

Razor Dirt Rocket SX500, Dirt Rocket MX500, Dirt Rocket MX650 Owner's Manual

OWNER’S MANUAL
Read and understand this entire manual before allowing
child to use this product!
NOTE: Manual illustrations are for demonstration purposes only.
Illustrations may not reflect exact appearance of actual product.
Specifications subject to change without notice.
Dirt Rocket™ SX500, MX500 and MX650


1
Safety Warnings ......................................................................................................... 1-2
Before You Begin ............................................................................................................3
Assembly and Set-Up ................................................................................................ 4-6
Charging the Battery ......................................................................................................7
Pre-Ride Checklist ...........................................................................................................7
Repair and Maintenance ......................................................................................... 8-11
Troubleshooting Guide ...........................................................................................11-12
Contact Information ......................................................................................................26
WARNING: Riding an electric motor bike does present potential risks
and caution is required. Like any riding product, an electric motor bike has inherent
hazards associated with its use (for example, falling off or riding it into a hazardous
situation). Like any riding product, electric motor bikes can and are intended to
move and it is therefore, of course, possible to lose control or other wise get into
dangerous situations. Both children, and adults responsible for supervising them,
must recognize that if such things occur, a rider can be seriously injured or die even
when using safety equipment and other precautions. USE EXTREME CAUTION.
WARNING: PARENTAL AND ADULT RESPONSIBILITY AND
SUPERVISION NECESSARY: This manual contains important safety
information. It is your responsibility to review this information and make sure that
all riders understand all warnings, cautions, instructions and safety topics, and
assure that young riders are able to safely and responsibly use these products.
Razor recommends that you periodically review and reinforce the information in
this manual with younger riders, and that you inspect and maintain your children’s
product to insure their safety.
WARNING: THE SX500/MX500 IS NOT FOR CHILDREN UNDER
AGE 14 OR HEAVIER THAN 175 LB (79 KG). THE MX650 IS NOT FOR
CHILDREN UNDER AGE 16 OR HEAVIER THAN 220 LB (100 KG).
Because products, like electric motor bikes, can and do present potential hazards
plainly associated with their use, it is well recognized THE NEED FOR EXERCISE
OF PARENTAL RESPONSIBILIT Y IN SELECTING RIDING PRODUCTS APPROPRIATE
TO THE AGE OF A CHILD, OR PARENTAL SUPERVISION IN SITUATIONS IN WHICH
CHILDREN OF VARIOUS AGES MAY HAVE ACCESS TO THE SAME RIDING
PRODUCTS, IS IMPORTANT. Not every product is appropriate for ever y age or
size of child, and different age recommendations are found within this category of
product which are intended to reflect the nature of the hazards and the expected
mental or physical ability, or both, of a rider to cope with the hazards.
Razor recommends that children under the age of 14 not be permitted to use the
SX500/MX500 and that children under the age of 16 not be permitted to use the
MX650. This recommendation is based not just on age or weight or height – it
reflects consideration of expected maturity and skills as well as physical size. The
recommended rider age of 14 years or older for SX500/MX500 and rider age of
16 years or older for MX650 are only estimates and can be affected by the rider’s
size, weight or skills – not every child 14 years old will be suited to the SX500/
MX500 and not every child 16 years old will be suite to the MX650. Certainly, any
rider unable to fit comfortably on the SX500/MX500/MX650 should not attempt
to ride it, but a parent’s decision to allow his or her child to ride these
products should be based on the child’s maturity, skill, and ability to
follow rules. Razor emphasizes that adults are strongly advised not
to disregard Razor’s recommendations or permit younger children to
ride the SX500/MX500/MX650.
DO NOT EXCEED THE WEIGHT LIMIT OF 175 lb (79 kg) for SX500/MX500 and
220 lb (100 kg) for MX650. Rider weight alone also does not necessarily mean
a person’s size is appropriate to fit or maintain control of the SX500/MX500/
MX650. Keep these products away from small children and remember that
these products are intended for use only by persons who are, at a minimum,
completely comfortable and competent while operating these products.
Persons with any mental or physical conditions that may make them
susceptible to injury, impair their physical dexterity or mental capabilities
to recognize, understand, and follow safety instructions and to be able to
understand the hazards inherent in a product’s use, should not use or be
permitted to use products inappropriate for their abilities. Persons with heart
conditions, head, back or neck ailments (or prior surgeries to these areas of the
body), or pregnant women, should be cautioned not to operate these products.
CHECK AND MAINTAIN MOTOR BIKE CONDITIONS
Before use, check to confirm that any and all chain guards or other covers and
guards are in place and in serviceable condition. Check that the brakes are
functioning properly, and that tires are inflated properly and have sufficient tread
remaining. The motor bike should be maintained and repaired in accordance
with the manufacturer’s specifications, using only the manufacturer’s authorized
replacement parts, and should not be modified from the manufacturer’s original
design and configuration.
ACCEPTABLE RIDING PRACTICES AND CONDITIONS
Always check and obey any local laws or regulations, which may
affect the locations where the electric motor bike may be used. Keep
safely away from cars and motor vehicle traffic at all times, and only
use where allowed and with caution.
Do not activate the speed control on the hand grip unless you are on the motor bike
and in a safe, outdoor environment suitable for riding.
The normal powered top speed of these motor bikes will be approximately 15
mph (24 km/h) for SX500/MX500 and 17 mph (27 km/h) for MX650, which can
be affected by conditions, such as rider weight, inclines, tire inflation and battery
charge level. Avoid excessive speeds that can be associated with downhill rides.
Maintain a hold on the handlebars at all times. Do not touch the brakes or motor
on your motor bike when in use or immediately after riding, as these parts can
become very hot.
Ride defensively. Watch out for potential obstacles that could catch your wheel
or force you to swerve suddenly or lose control. Be careful to avoid pedestrians,
skaters, skateboards, scooters, bikes, children or animals who may enter your path,
and respect the rights and property of others.
These electric motor bikes are intended for use on flat, dry surfaces, such as
pavement or level ground, without loose debris, such as sand, leaves, rocks or
gravel. Wet, slick, bumpy, uneven or rough surfaces may impair traction and
contribute to possible accidents. Do not ride your motor bike in mud, ice, puddles
or water. Watch out for potential obstacles that could catch your wheel or force
you to swerve suddenly or lose control. Avoid sharp bumps, drainage grates, and
sudden surface changes.
Do not attempt or do stunts or tricks on your electric motor bike. These motor bikes
are not made to withstand abuse from misuse, such as jumping, curb grinding or
any other type of stunts. Racing, stunt riding, or other maneuvers also enhance risk
of loss of control, or may cause uncontrolled rider actions or reactions.
Never allow more than one person at a time to ride the motor bike.
Do not ride at night or when visibility is limited.
Never use near steps or swimming pools.
Do not allow hands, feet, hair, body parts, clothing, or similar articles to
come in contact with moving parts, wheels, or drive train chain while the
motor is running.
SAFETY WARNINGS
CONTENTS

2
SAFETY WARNINGS
Never use headphones, a cell phone or text when riding.
Never hitch a ride with a vehicle.
Do not ride your motor bike in wet or icy weather and never immerse the motor
bike in water, as the electrical and drive components could be damaged by water
or create other possibly unsafe conditions. Never risk damaging surfaces, such as
carpet or flooring, by use of an electric motor bike indoors.
This product can only be used in private areas or enclosed venues. Do not use in
public roads, sidewalks or near traffic.
PROPER RIDING ATTIRE
Always wear proper protective equipment, such as an approved safety helmet (with
chin strap securely buckled), elbow pads and kneepads. A helmet may be legally
required by local law or regulation in your area. A long-sleeved shirt, long pants, and
gloves are recommended. Always wear athletic shoes (lace-up shoes with rubber
soles) and keep shoelaces tied and out of the way of the wheels, motor and drive
system. Never ride barefooted or in sandals.
USING THE CHARGER
The charger supplied with the electric motor bike should be regularly examined
for damage to the cord, plug, enclosure and other parts. In the event of such
damage, the motor bike must not be charged until the charger has been repaired
or replaced.
Use only with the recommended charger.
Use caution when charging.
The charger is not a toy. Charger should be operated by an adult.
Do not operate charger near flammable materials.
Unplug charger and disconnect from motor bike when not in use.
Always disconnect from the charger prior to wiping down and cleaning your motor
bike with damp cloth.
USE WITH EXTREME CAUTION.
3
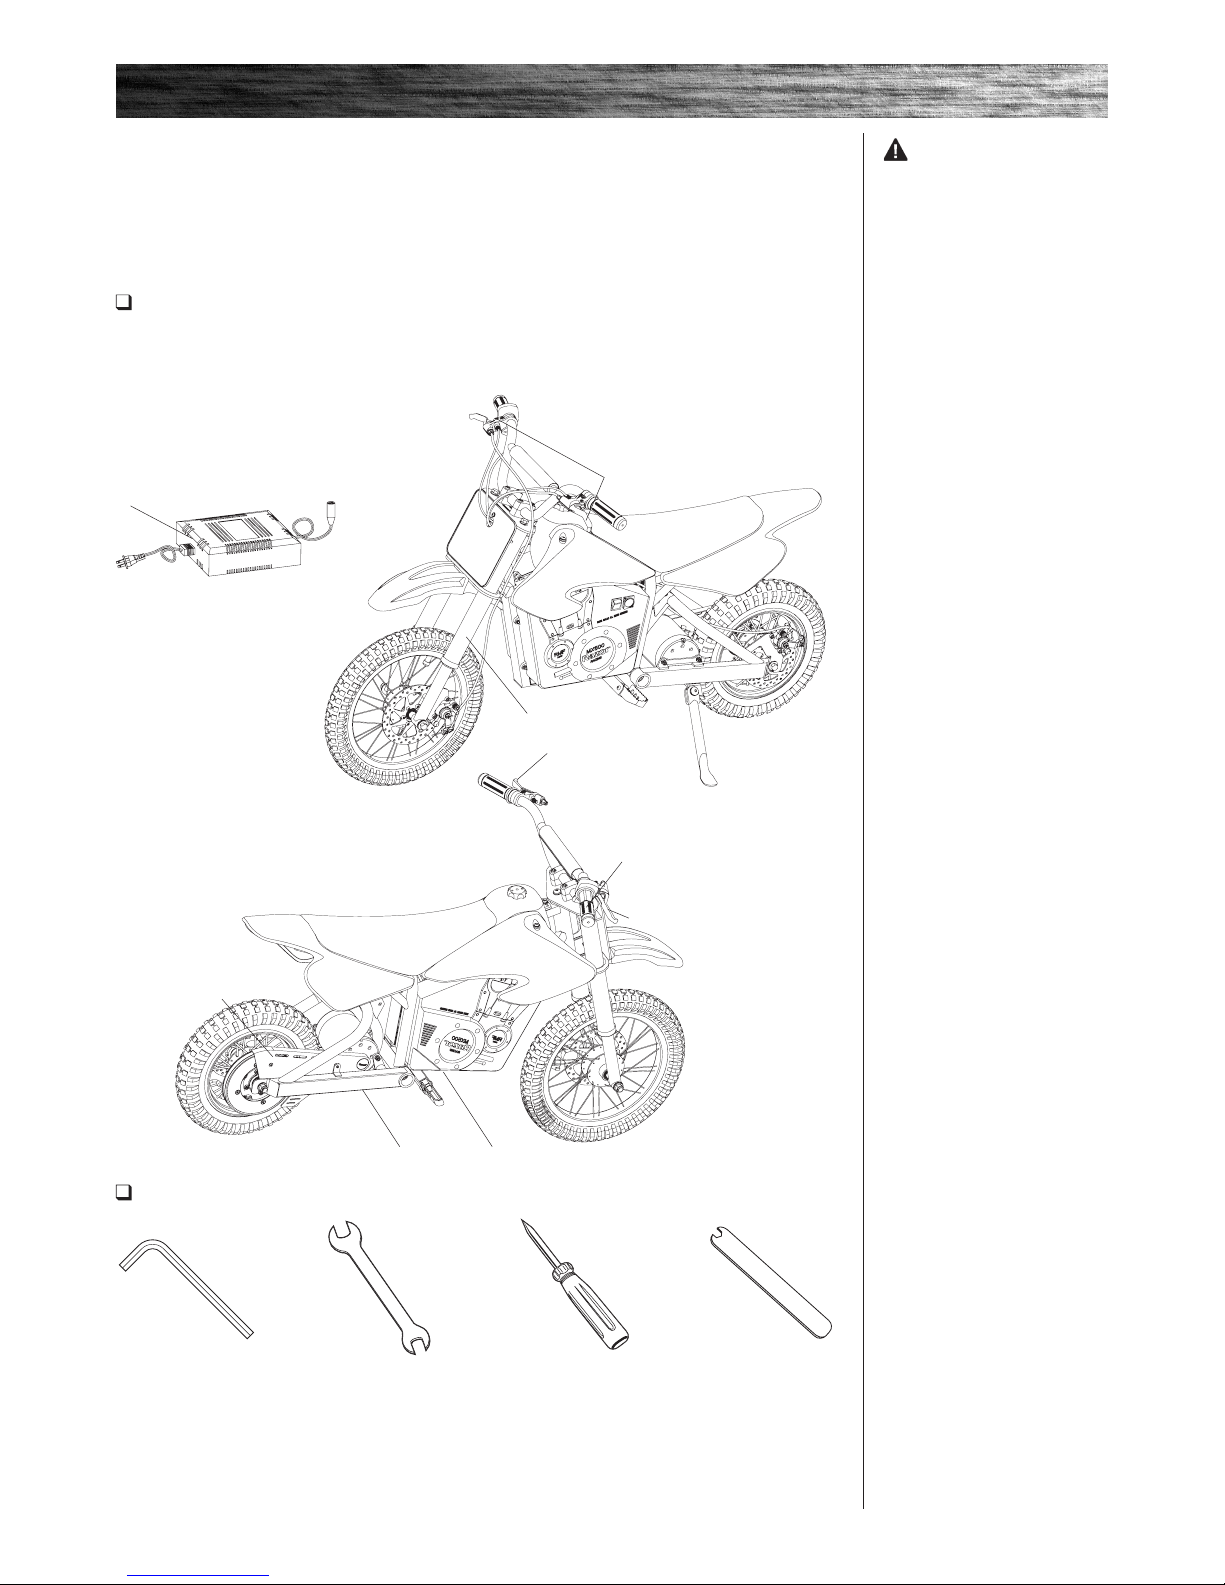
Speed Control
Drive
Chain
Front Fork
Brake Lever
Brake Lever
Brake Lever
Remove contents from box. Remove the separators that protect the components from damage during shipping. Inspect the
contents of the box for scratches in the paint, dents or kinked cables that may have occurred during shipping. Because the motor
bike was 95 percent assembled and packed at the factory, there should not be any problems, even if the box has a few scars or
dents.
MAKE SURE POWER SWITCH IS TURNED “OFF” BEFORE CONDUCTING ANY ASSEMBLY OR
MAINTENANCE PROCEDURES.
Estimated Assembly and Set-Up Time
Razor recommends assembly by an adult with experience in bicycle mechanics.
Allow up to 30 minutes for assembly, not including initial charge time.
Allow up to 12 hours for charge (see page 7 for charging information).
WARNING: DO NOT USE
NON-RAZOR PRODUCTS WITH
YOUR RAZOR ELECTRIC MOTOR
BIKE. The motor bike has been built
to certain Razor design specifications.
The original equipment supplied at
the time of sale was selected on the
basis of its compatibility with the
frame, fork and all other parts. Certain
aftermarket products may not be
compatible and will void the warranty.
Required Tools
5 mm and 6 mm
Allen wrenches
10 mm, 14 mm and 17 mm
wrenches
(MX500/MX650 Models)
10 mm, 17 mm and 19 mm
wrenches
(SX500 Model)
Phillips screwdriver Spoke tightener
Charger
(Note: Charger design may vary from
one shown)
Product ID Locations:
See locations to the left
1. Battery cover
2. Frame (underneath unit)
3. Charger
4. Box - side of UPC (not shown)
Plastic Bag Contents:
• Charger
• Handlebar Clamps
• Front Axle Bolt
• Tools
• Owner’s Manual
1.2.
3.
BEFORE YOU BEGIN
4
ASSEMBLY AND SET-UP
Bolt Tightening Torsion Value Reference Chart
Please refer to chart below to ensure the bolt you have tightened corresponds to below torsion value according to its relevant diameter.
Bolt Diameter Recommended Torsion Value
Normal Bolt Torsion Value(N-M)
5mm 5
6mm 10
8mm 21
10mm 34
12mm 53
5
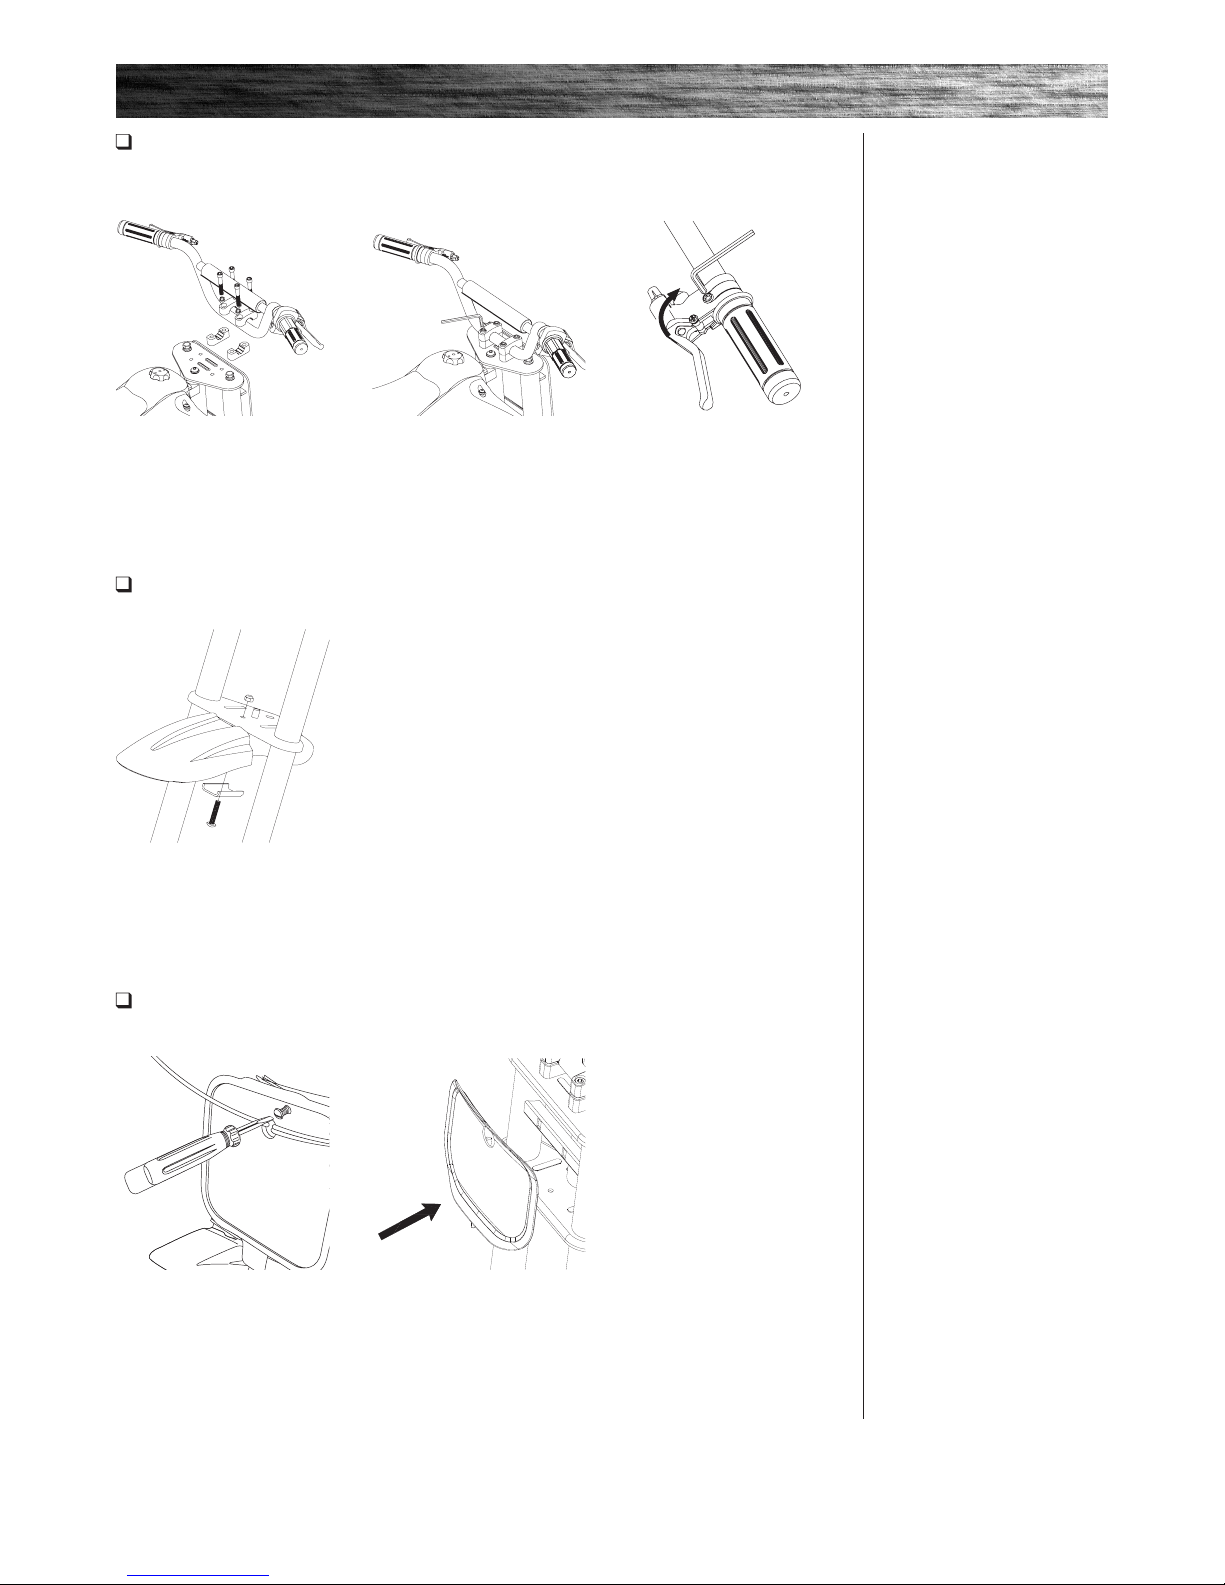
1 Place the handlebars in the
handlebar clamps with tools and
manual.
Note: Handlebar clamps are
located in the plastic bag.
2 Align parallel to the fork and
tighten the bolts using a 6 mm Allen
wrench. When properly tightened,
the handlebars should not move
forward or backward.
3 Adjust the brake lever adjuster to
the proper place and tighten it with
the 5 mm Allen wrench.
1 Align fender with the hole in
the fork and insert the bolt. Tighten
securely using a 10 mm wrench
and 5 mm Allen wrench.
MX500/MX650 Models
Remove screw from front fork. Align
the number plate with the hole in
the fork and tighten with a Phillips
screwdriver.
SX500 Model
Slip the cables through the slit on the
top of the number plate. Align the
number plate with the holes on the
fork and snap on the number plate.
Attaching the Handlebars
Tools required: 6 mm Allen wrench
Attaching the Front Fender
Tools required: 10 mm wrench and 5 mm Allen wrench
Attaching the Number Plate
Tools required: Phillips screwdriver
ASSEMBLY AND SET-UP
Note: Front fender design may vary.
SX500 Model
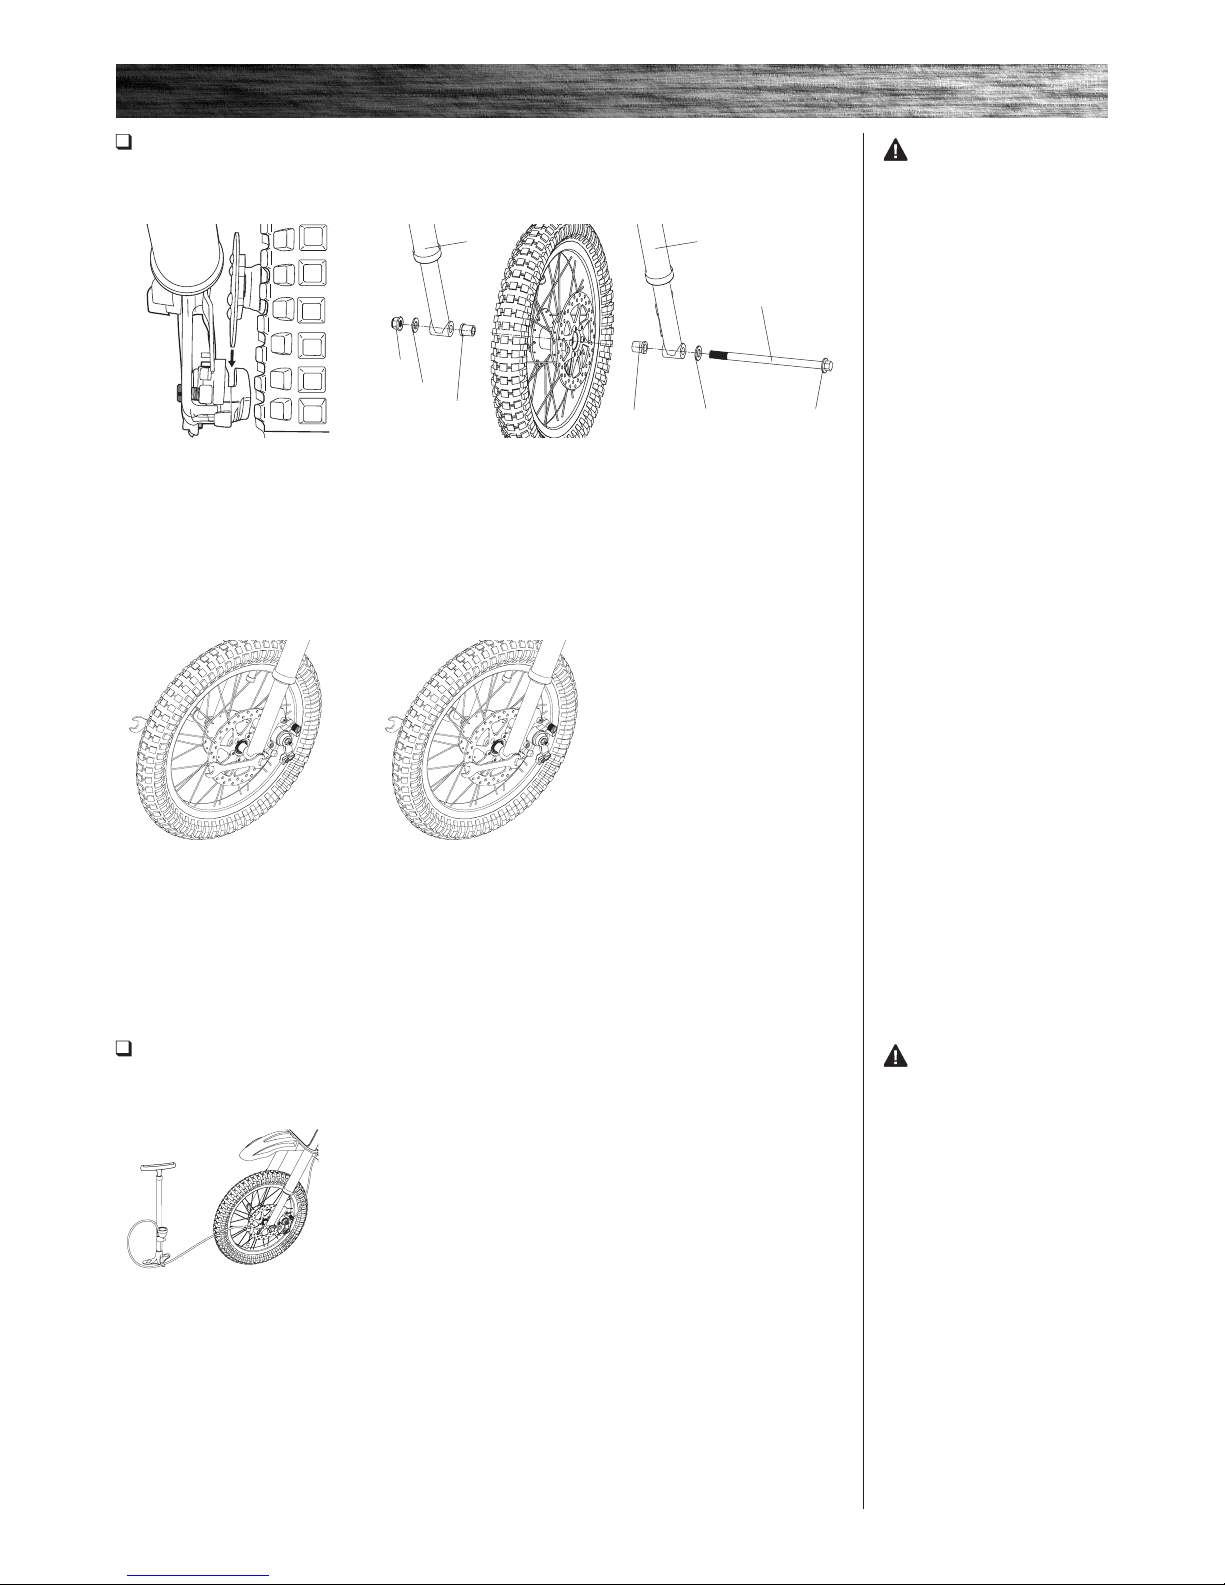
3 With a 17 mm and 19 mm
wrench, tighten the front wheel.
6
2 Slide axle through fork, spacer and wheel hub. When axle passes through the
other side of the wheel hub, add the other spacer, and slide though the fork. Secure
with washer and nut.
Note: Front axle is installed with the spacer between the fork and wheel for all Dirt
Rockets.
1 Position wheel in front fork and
slide disk brake into caliper.
MX500/MX650 Models
3 With a 14 mm and 17 mm
wrench, tighten the front wheel.
Installing the Front Wheel
Tools required: 14 mm wrench and 17 mm wrench (MX500/MX650 Models)
17 mm wrench and 19 mm wrench (SX500 Model)
Inflating the Tires
Tires are inflated when shipped, but they invariably lose some pressure between the point of manufacturing and your
purchase.
WARNING: Failing to
properly adjust and tighten the nuts
and bolts that affix the fork can cause
you to lose control and fall.
WARNING:
Do not over inflate, as this could
damage tire or wheel.
Note: The pressurized air supplies
found at gasoline stations are
designed to inflate high-volume
automobile tires. If you decide to use
such an air supply to inflate your motor
bike tires, first make sure the pressure
gauge is working, then use very
short bursts to inflate to the correct
PSI. If you inadvertently over-inflate
the tire, release the excess pressure
immediately.
1 Using a bicycle-style tire pump
equipped for a Schrader-type valve,
inflate the front tire to the correct PSI
indicated on the sidewall of the tire.
ASSEMBLY AND SET-UP
Axle Blot
Fork Fork
Spacer
Spacer
Washer
Washer Nut
Nut
7
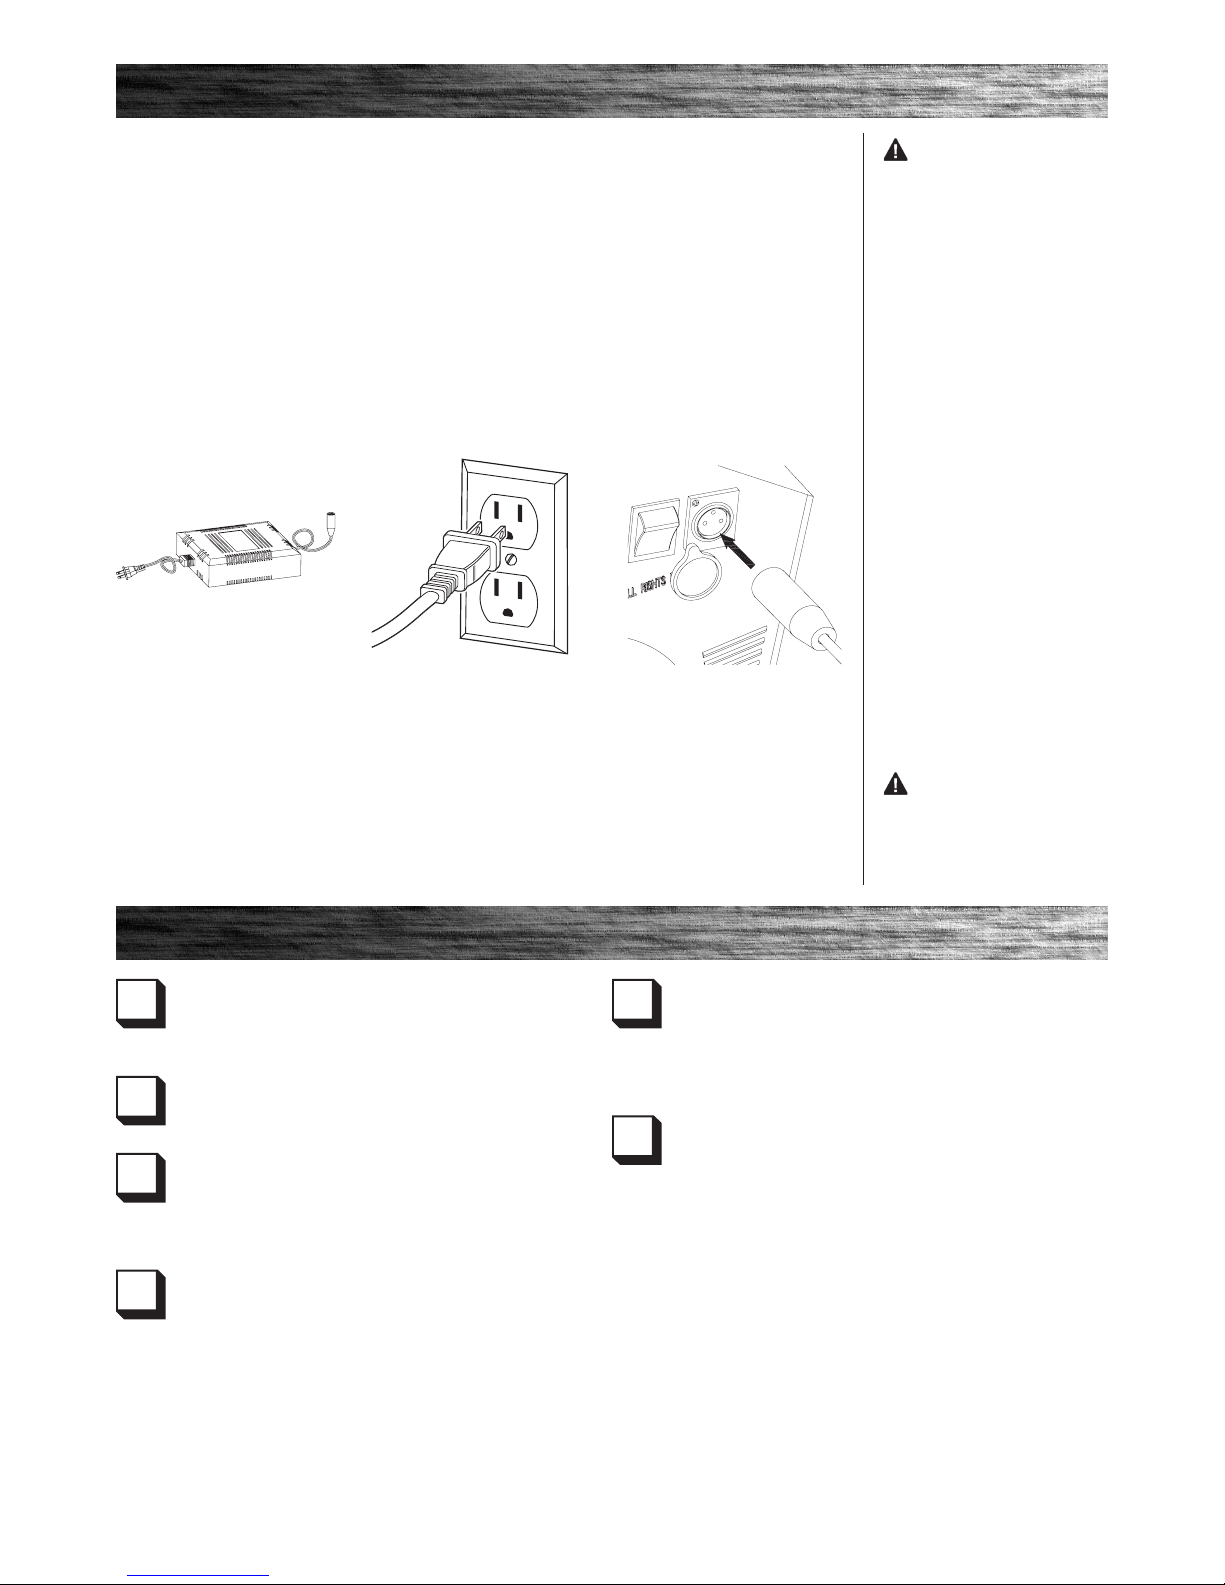
2 Maker sure power switch is in
the OFF position. Plug the charger
into the charger port. The light on
the charger should turn red during
charging then back to green when
charging is complete.
WARNING: Use ONLY
with the recommended charger.
Batteries are only to be charged
under adult supervision. The
charger is not a toy. Always
disconnect the charger before
wiping down and/or cleaning the
motor bike with a damp cloth.
The charger supplied with the motor
bike should be regularly examined for
damage to the cord, plug, enclosure
and other parts. In the event of such
damage, the electric motor bike
must not be charged until it has been
repaired or replaced.
Chargers have built-in overcharge
protection to prevent battery from
being overcharged.
Note: If the charger gets warm during
regular use, this is a normal response
and is no cause for concern. If your
charger does not get warm during use,
it does not mean that it is not working
properly.
Wall outlet - Green
Wall outlet and unit - Red (charging)
Wall outlet and unit - Green (charged)
Note: Continue charging unit even if
light turns green prior to 12 hours.
WARNING: Failure to
recharge the battery at least once a
month may result in a battery that will
no longer accept a charge.
1 Plug the charger into a wall
outlet. The light on the charger
should be green.
Note: If green light (LED) does not
light up, try a different outlet.
Your electric motor bike may not have a fully charged battery; therefore you must charge the battery prior to use.
• Initial charge time: 12 hours.
• Recharge time: up to 12 hours, even if the light
turns green. Recommended maximum charging time
is 24 hours.
• Always charge the battery immediately after riding.
• Fully charge battery before storing for extended periods
of time.
• Unplug charger from the wall outlet when not in use.
• Failure to recharge battery periodically may result in a
battery that will not accept a charge.
• Make sure the power switch is turned OFF when unit is
not in use. If the power switch is left on for an extended
period of time, the battery may reach a stage at which it
will no longer hold a charge.
• To ensure long battery life, never store the product in
freezing or below freezing temperatures! Freezing will
permanently damage the battery.
• Run time: Up to 40 minutes of continuous ride time.
Run time may vary depending on riding conditions, rider
weight, climate, and/or proper maintenance.
• Battery life can vary depending on proper maintenance
and usage of the unit.
Note: Make sure power is turned
OFF when unit is not in use. If
the power switch is left on for an
extended period of time, the battery
may reach a stage at which it will no
longer hold a charge.
PRE-RIDE CHECKLIST
Brake
Check the brakes for proper function. When you squeeze the lever,
the brake should provide positive braking action. Make sure that
brakes are not rubbing when the lever is released.
Tires
Periodically inspect the tires for excess wear and regularly check the
tire pressure. Reinflate as necessary.
Frame, Fork and Handlebars
Check for cracks or broken connections. Although broken frames are
rare, it is possible for an aggressive rider to run into a curb or object,
and wreck and bend or break a frame. Get in the habit of inspecting
your motor bike on a regular basis.
Hardware/Loose Parts
Before every ride, check all parts, such as nuts, bolts, cables,
fasteners, etc., to ensure they are secure and assembled
corre ctly. There should not be any unusual rattles or sounds
from loose parts or broken components. If the unit is damaged,
do not ride. Reference “Safety Warnings” on page 1 of
this manual.
Safety Gear
Always wear proper protective gear, such as an approved safety helmet.
Elbow pads and kneepads are recommended. Always wear athletic
shoes (lace-up shoes with rubber soles) and keep shoelaces tied and
out of the way of the wheels, motor and drive system. NEVER RIDE
BAREFOOTED OR IN SANDALS.
Laws and Regulations
Always check and obey any local laws or regulations.
CHARGING THE BATTERY
Charger
 Loading...