

Page 1

Experience true console gaming supremacy the way the pros do, with the Razer Wildcat
for Xbox One™ Gaming Controller.
Made for tournament use, and developed with feedback from the world’s best eSports
athletes, this ultimate gaming controller packs four additional Multi-Function Buttons
over the ordinary controller layout for unparalleled customizability, giving you the unfair
advantage over your foes.
Whether you want to create dedicated button layout profiles for each of your games or
tweak your audio settings on the fly, the Razer Sabertooth for Xbox One gives you
absolute control without any distractions.
1 | razer™
Page 2

TABLE OF CONTENTS
1. PACKAGE CONTENTS / SYSTEM REQUIREMENTS ........................................ 3
2. REGISTRATION / TECHNICAL SUPPORT ....................................................... 4
3. TECHNICAL SPECIFICATIONS ....................................................................... 5
4. DEVICE LAYOUT .......................................................................................... 6
5. SETTING UP YOUR RAZER WILDCAT ............................................................ 8
6. ADDITIONAL ACCESSORIES ....................................................................... 12
7. USING YOUR RAZER WILDCAT .................................................................. 13
8. SAFETY AND MAINTENANCE ..................................................................... 21
9. LEGALESE .................................................................................................. 22
2 | For gamers by gamers™
Page 3

1. PACKAGE CONTENTS / SYSTEM REQUIREMENTS
PACKAGE CONTENTS
Razer Wildcat Gaming Controller for Xbox One
Carrying case
Screwdriver
Detachable braided fiber cable
Breakaway cable
2 analog stick rubber grip caps
2 optional rubber palm grips
Important Product Information Guide
SYSTEM REQUIREMENTS
Xbox One™
OR
PC with a free USB 2.0 port
Windows® 10 / Windows® 8.1 / Windows® 8 / Windows® 7
3 | razer™
Page 4
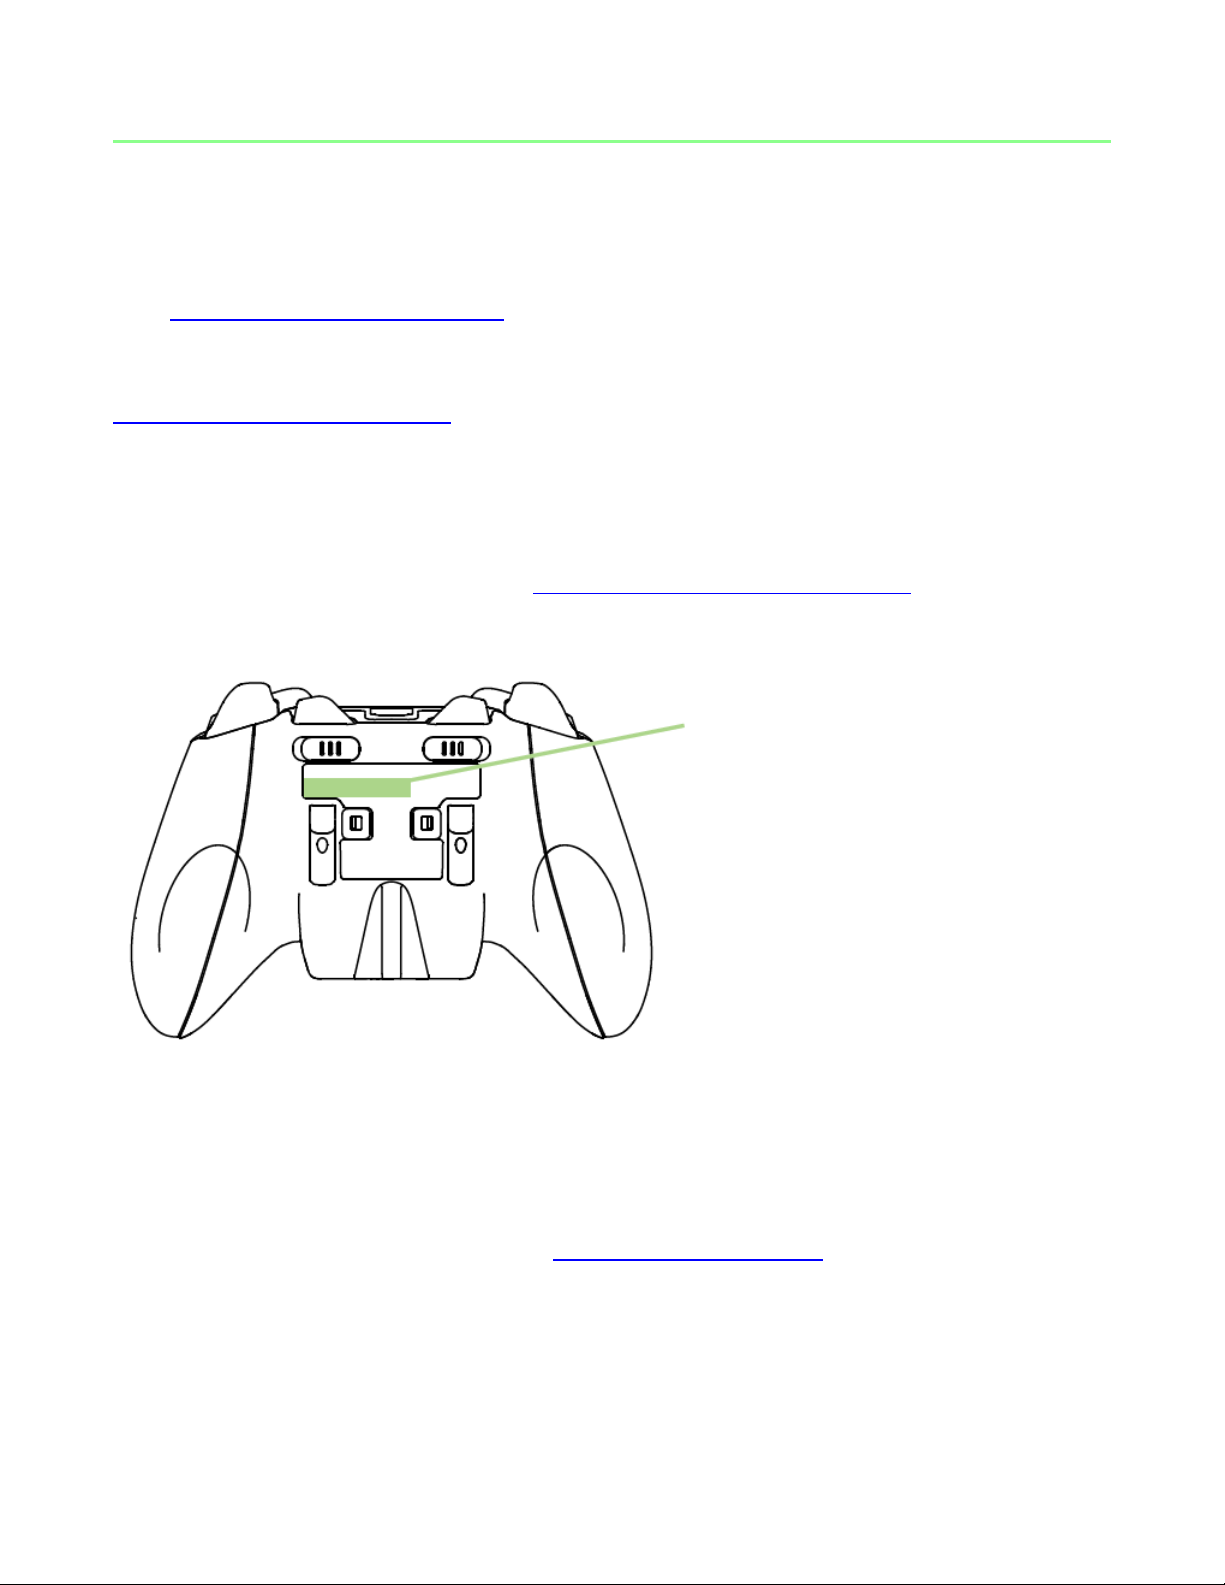
2. REGISTRATION / TECHNICAL SUPPORT
Your product’s serial number
can be found here.
REGISTRATION
Visit www.razerzone.com/razer-id to sign up for a Razer ID now to get a wide range of
Razer benefits. For example, get real-time information on your product’s warranty status
via Razer Synapse. To learn more about Razer Synapse and all its features, visit
www.razerzone.com/synapse.
If you already have a Razer ID, register your product by clicking on your email address
within the Razer Synapse application and select Warranty Status from the dropdown list.
To register your product online, visit www.razerzone.com/registration. Please note that
you will not be able to view your warranty status if you register via the website.
TECHNICAL SUPPORT
What you’ll get:
1 year limited manufacturer’s warranty.
Free online technical support at www.razersupport.com.
SAFETY STATEMENT
IMPORTANT! Before using the Xbox One with this product, read the Xbox One instruction manual for
safety, health, and other information regarding the use of the Xbox One.
4 | For gamers by gamers™
Page 5

3. TECHNICAL SPECIFICATIONS
TECHNICAL SPECIFICATIONS
2 shoulder Hyperesponse Multi-Function Bumpers
2 removable Hyperesponse Multi-Function Triggers
4 Hyperesponse ABXY action buttons
4 button Quick Control Panel
2 onboard profile quick-call buttons
Optional trigger stops for rapid-fire
Xbox LIVE Companion App for unlimited customization with cloud storage for
profile and settings
Hall sensor trigger mechanism
Left and right trigger haptic motors
Left and right rumble with distinct forces
Zero slow-turn analog joysticks
3.5 mm audio port for stereo audio output and microphone input
Optional rubber palm grips
Quick-release cable feature
Carrying case
3.5 mm audio port for stereo audio output and microphone input
Detachable 3 m / 10 ft lightweight braided fiber cable with Micro-USB connector
APPROXIMATE SIZE & WEIGHT:
Length 106 mm / 4.17”
Width 156 mm / 6.14”
Height 66 mm / 2.60”
Weight 260 g / 0.57 lbs
5 | razer™
Page 6

4. DEVICE LAYOUT
A. Xbox button
B. Power indicator
C. Profile indicators
D. Analog sticks
E. View button
F. Menu button
G. Action buttons
H. Directional pad
I. Remap button
J. Profile cycle button
K. Mic mute button
L. Audio control button
M. 3.5 mm headset port
6 | For gamers by gamers™
Page 7
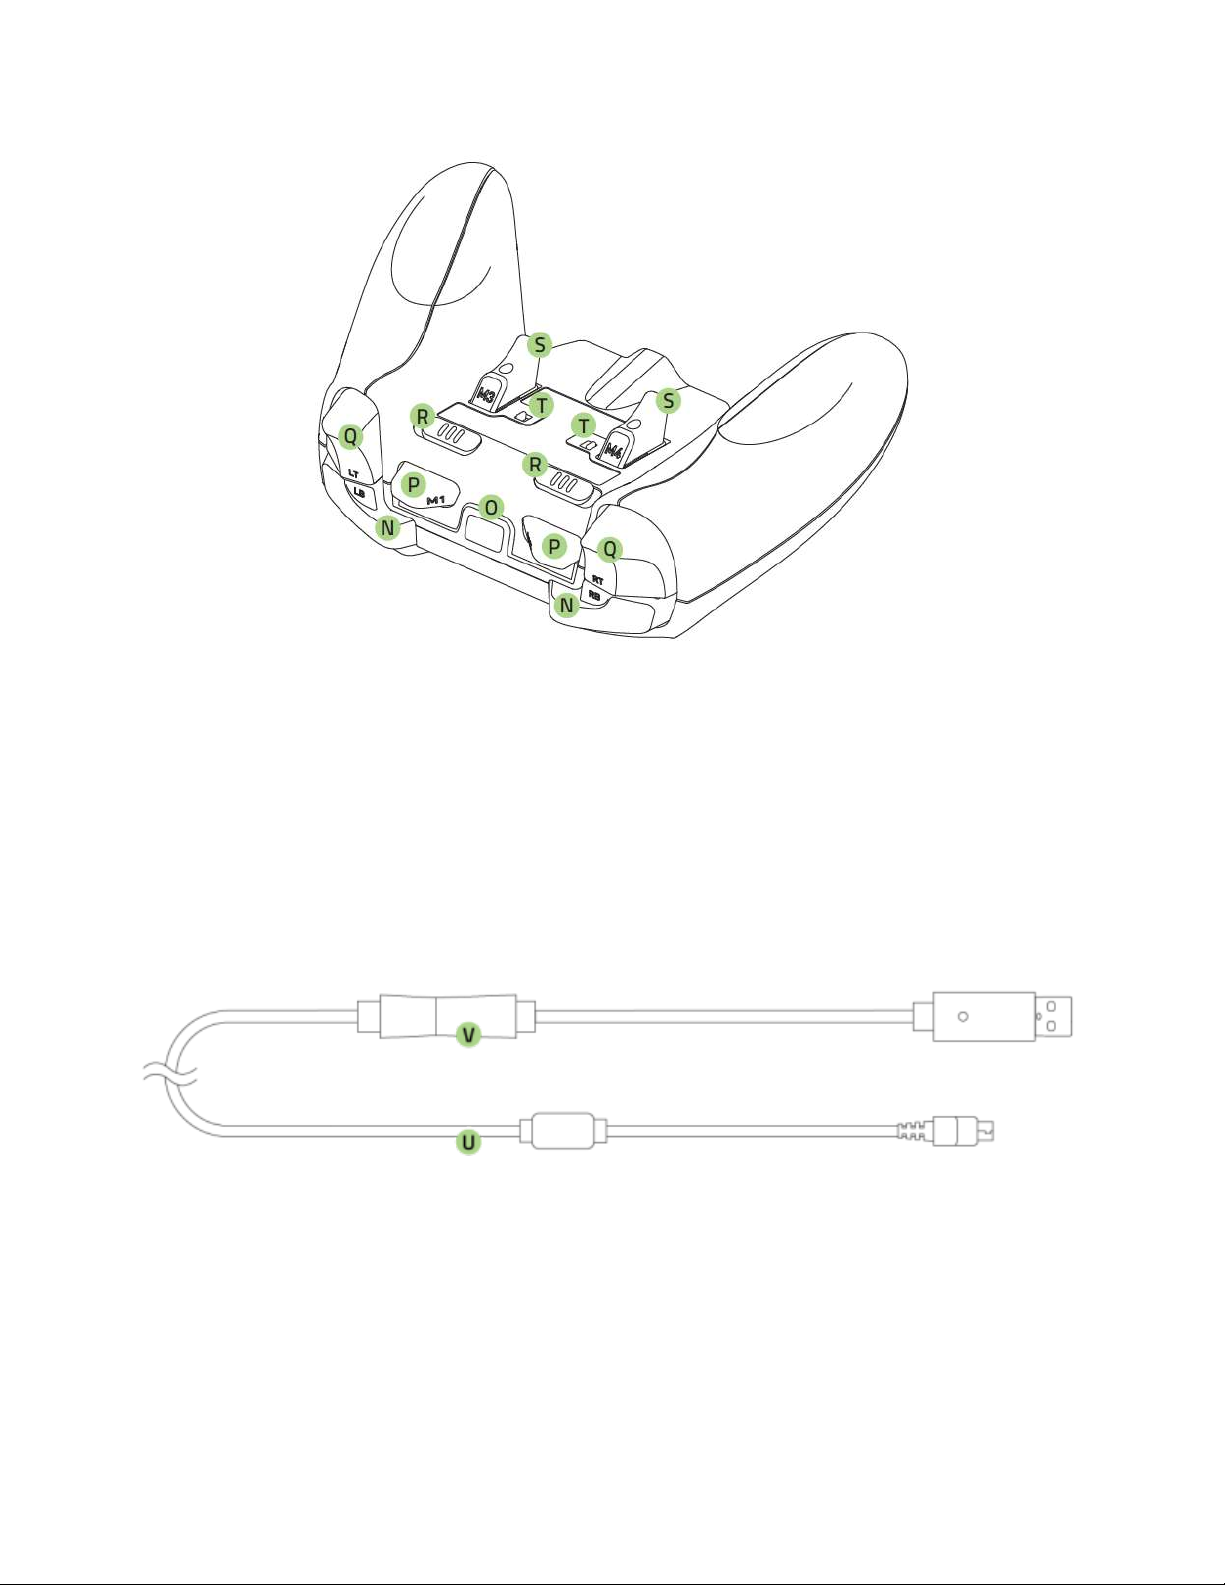
N. Bumpers (LB / RB)
O. Detachable cable port
P. Multi-Function Bumpers (M1 / M2)
Q. Triggers (LT / RT)
R. Trigger stop switches
S. Multi-Function Triggers (M3 / M4)
T. Cover release switches
U. Detachable braided fiber cable
V. Breakaway cable
7 | razer™
Page 8

5. SETTING UP YOUR RAZER WILDCAT
Plug the micro USB connector of the detachable braided fiber cable to your Razer
Wildcat.
CONNECTING TO YOUR XBOX ONE
Plug the USB connector of your Razer Wildcat into the USB port of your Xbox One gaming
console.
8 | For gamers by gamers™
Page 9

CONNECTING TO YOUR PC
1. Plug the USB connector of your Razer Wildcat into the USB port of your PC.
2. Wait until the Xbox One Controller drivers are automatically installed or manually
download the drivers at www.razersupport.com/gaming-controllers/razer-
wildcat.
REMOVING THE MULTI-FUNCTION TRIGGERS
1. Insert the tip of the screwdriver into the Multi-Function Trigger.
9 | razer™
Page 10

2. Turn the screwdriver counterclockwise until the screw is loose.
3. Remove the Multi-Function Trigger from the controller.
10 | For gamers by gamers™
Page 11

4. Close the trigger cover.
To open the trigger cover, simply pull aside the cover release switches.
11 | razer™
Page 12

6. ADDITIONAL ACCESSORIES
ANALOG STICK RUBBER GRIP CAPS
The additional texture on the rubber grip caps prevent your thumbs from slipping off the
analog sticks during intense gaming sessions.
OPTIONAL RUBBER PALM GRIPS
Add on these rubber palm grips to the controller for improved comfort and control.
Note: Once attached, the optional rubber palm grips can be difficult to remove and may not be
reattached.
12 | For gamers by gamers™
Page 13

7. USING YOUR RAZER WILDCAT
SELECTING A PROFILE
The Razer Wildcat has a default profile and 2 custom profiles which you can use to
customize the Multi-Function Bumpers and Triggers.
Pressing the Profile button will cycle the profiles to Profile 1 and Profile 2.
To return to default, press and hold the Profile button for at least 3 seconds until the
profile indicators are both unlit.
13 | razer™
Page 14

REMAPPING THE MULTI-FUNCTION TRIGGERS (MFT) AND BUMPERS (MFB)
To remap the Multi-Function Triggers and Multi-Function Bumpers, you will first need to
select either Profile 1 or Profile 2. After you have selected a profile, follow these
instructions:
1. Press and hold the Remap button until the active Profile Indicator blinks.
2. Press and hold the MFB or MFT you wish to configure.
3. Press the button you want to assign to the MFB or MFT.
14 | For gamers by gamers™
Page 15

4. Release your fingers once you feel the controller vibrate.
USING THE MIC MUTE BUTTON
The mic mute button allows you to disable the microphone that is connected to the
3.5mm headset port. The button will light up to indicate that the microphone is muted.
15 | razer™
Page 16

USING THE AUDIO CONTROL BUTTON
The Razer Wildcat has a multi-purpose audio control button which you can use to
increase or decrease the master volume as well as change the balance between the voice
chat and game volume.
To increase the master volume, simply press the audio control button.
To fine-tune the master volume, press and hold the audio control button then press the
directional pad’s up or down button to increase or decrease the volume respectively.
To increase the voice chat volume and decrease the game volume, press and hold the
audio control button then press the directional pad’s left button.
16 | For gamers by gamers™
Page 17

To increase the game volume and decrease the voice chat volume, press and hold the
audio control button then press the directional pad’s right button.
Note: The audio control button and 3.5 mm headset port are only applicable when used on the Xbox
One gaming console.
USING THE TRIGGER STOP SWITCHES
The Trigger Stops allows you to activate the Left and Right Triggers faster by shortening
their travel distance. To enable the Trigger Stops, simply slide the switches outwards;
and to disable the Trigger Stops, slide the switches inwards.
17 | razer™
Page 18

USING THE HAIR TRIGGER MODE
The Hair Trigger Mode is another alternative for activating the Left and Right Triggers
faster by reducing their response time.
To enable the Hair Trigger Mode:
1. Press and hold the Remap button until the active Profile Indicator blinks.
2. Press and hold the Trigger you wish to configure.
3. Press the “A” button to activate the Hair Trigger Mode.
18 | For gamers by gamers™
Page 19

4. Release your fingers once you feel the controller vibrate.
To disable the Hair Trigger Mode:
1. Press and hold the Remap button until the active Profile Indicator blinks.
2. Press and hold the Trigger you wish to configure.
19 | razer™
Page 20

3. Press the “B” button to deactivate the Hair Trigger Mode.
4. Release your fingers once you feel the controller vibrate.
Tip: Activate both the Trigger Stop switches and the Hair Trigger Mode at the same time for unparalleled
gaming performance.
Congratulations, you are now ready to use your Razer Wildcat.
Have fun!
20 | For gamers by gamers™
Page 21

8. SAFETY AND MAINTENANCE
SAFETY GUIDELINES
In order to achieve maximum safety while using your Razer Wildcat, we suggest that you
adopt the following guidelines:
1. Should you have trouble operating the device properly and troubleshooting does
not work, unplug the device and contact the Razer hotline or go to
www.razersupport.com for support. Do not attempt to service or fix the device
yourself at any time.
2. Do not take apart the device (doing so will void your warranty) and do not attempt
to operate it under abnormal current loads.
3. Keep the device away from liquid, humidity or moisture. Operate the device only
within the specific temperature range of 0°C (32°F) to 40°C (104°F). Should the
temperature exceed this range, unplug and switch off the device in order to let
the temperature stabilize to an optimal level.
MAINTENANCE AND USE
The Razer Wildcat requires minimum maintenance to keep it in optimum condition. Once
a month we recommend you unplug the device from the USB port and clean it using a
soft cloth or cotton swab with a bit of warm water to prevent dirt buildup. Do not use
soap or harsh cleaning agents.
21 | razer™
Page 22

9. LEGALESE
COPYRIGHT AND INTELLECTUAL PROPERTY INFORMATION
©2015 Razer Inc. Patent Pending. All Rights Reserved. Razer, the Razer Triple-Headed
Snake logo, the Razer distressed word logo and other trademarks contained herein are
trademarks or registered trademarks of Razer Inc. and/or its affiliated or associated
companies, registered in the United States and/or other countries.
This product is manufactured under license from Microsoft Corporation. Microsoft,
Kinect, Windows, Windows Vista, the Windows Logo, Xbox, Xbox LIVE, Xbox One, and
the Xbox logos are trademarks of the Microsoft group of companies.
Razer Inc. (“Razer”) may have copyright, trademarks, trade secrets, patents, patent
applications, or other intellectual property rights (whether registered or unregistered)
concerning the product in this guide. Furnishing of this guide does not give you license
to any such copyright, trademark, patent or other intellectual property right. The Razer
Wildcat (the “Product”) may differ from pictures whether on packaging or otherwise.
Razer assumes no responsibility for such differences or for any errors that may appear.
Information contained herein is subject to change without notice.
LIMITED PRODUCT WARRANTY
For the latest and current terms of the Limited Product Warranty, please visit
www.razerzone.com/warranty.
LIMITATION OF LIABILITY
Razer shall in no event be liable for any lost profits, loss of information or data, special,
incidental, indirect, punitive or consequential or incidental damages, arising in any way
out of distribution of, sale of, resale of, use of, or inability to use the Product. In no event
shall Razer’s liability exceed the retail purchase price of the Product.
22 | For gamers by gamers™
Page 23

COSTS OF PROCUREMENT
For the avoidance of doubt, in no event will Razer be liable for any costs of procurement
unless it has been advised of the possibility of such damages, and in no case shall Razer
be liable for any costs of procurement liability exceeding the retail purchase price of the
Product.
GENERAL
These terms shall be governed by and construed under the laws of the jurisdiction in
which the Product was purchased. If any term herein is held to be invalid or
unenforceable, then such term (in so far as it is invalid or unenforceable) shall be given
no effect and deemed to be excluded without invalidating any of the remaining terms.
Razer reserves the right to amend any term at any time without notice.
23 | razer™
 Loading...