

Page 1

DTD:21/12/2016
USER MANUAL
Page 2

1
PACKAGE CONTENTS / SYSTEM REQUIREMENTS
PACKAGE CONTENTS
Gaming mouse (Model: RC30-021203)
USB dongle (Model: DGRFG5)
USB dongle adapter
USB to Micro-USB cable
Important Product Information Guide
SYSTEM REQUIREMENTS
PRODUCT REQUIREMENTS
PC or Mac with a free USB port
RAZER SYNAPSE PRO REQUIREMENTS
Windows® 7 (or higher)
Internet connection
100 MB of free hard disk space
RAZER SYNAPSE REQUIREMENTS
Windows® 7 / OS X (10.9 or higher)*
Internet connection
100 MB of free hard disk space
*Features may vary between Operating Systems
F OR GA ME RS . BY GA ME RS .™
Page 3
REGISTRATION / TECHNICAL SUPPORT
Your prod uct’s seri al
REGISTRATION
Sign up now for a Razer Synapse account to get real-time information on your product’s warranty
status. To learn more about Razer Synapse and all its features, visit razerzone.com/synapse.
If you are already a Razer Synapse user, register your product by clicking on your email address at
the Razer Synapse application and select Warranty Status from the dropdown list.
To register your product online, visit razerzone.com/registration. Please note that you will not be
able to view your warranty status if you register via the website.
nu mber can be found here.
TECHNICAL SUPPORT
What you’ll get:
2 years limited manufacturer’s warranty.
Free online technical support at razersupport.com.
F OR GA ME RS . BY GA ME RS .™
2
Page 4
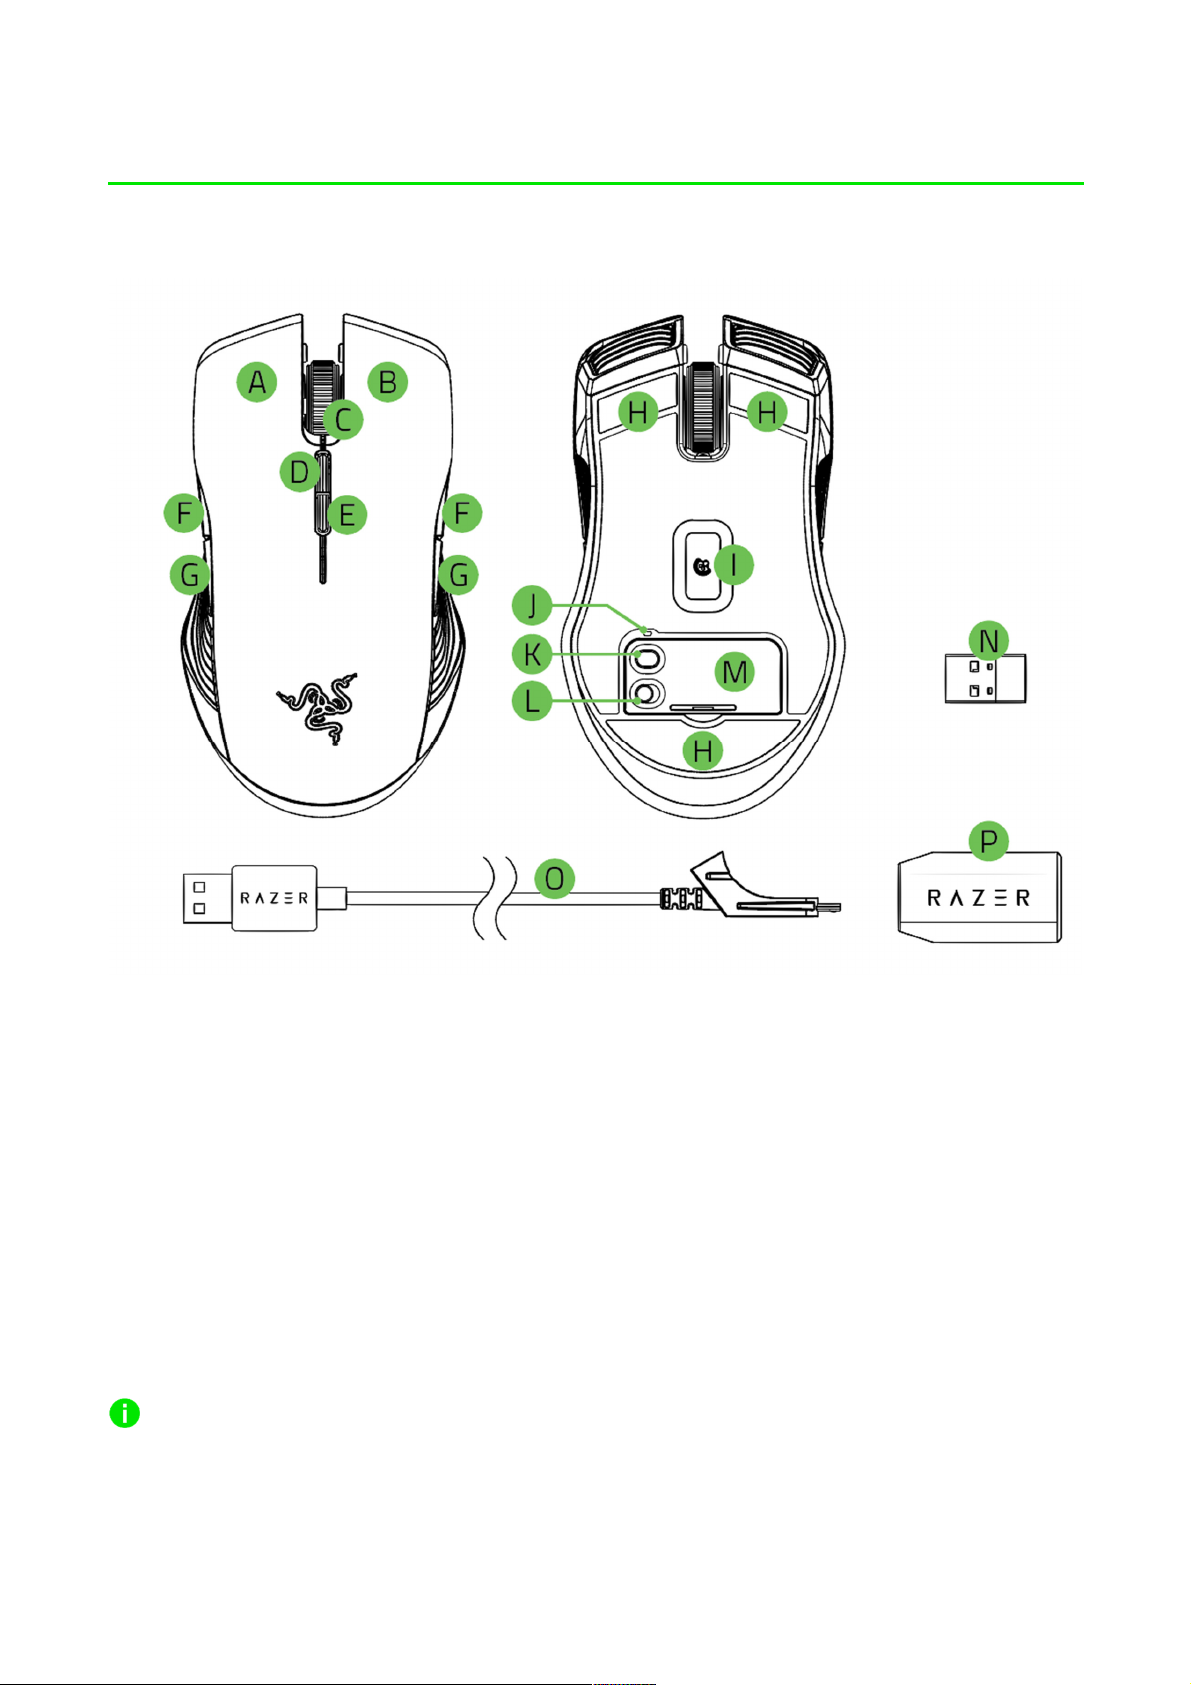
DEVICE LAYOUT
A. Left mouse button
B. Right mouse button
C. Scroll wheel
D. DPI stage up
E. DPI stage down
F. Mouse button 5
G. Mouse button 4
H. Ultraslick mouse feet
I. True 16,000 DPI 5G laser sensor
J. Profile indicator
K. Profile button
L. Power on/off button
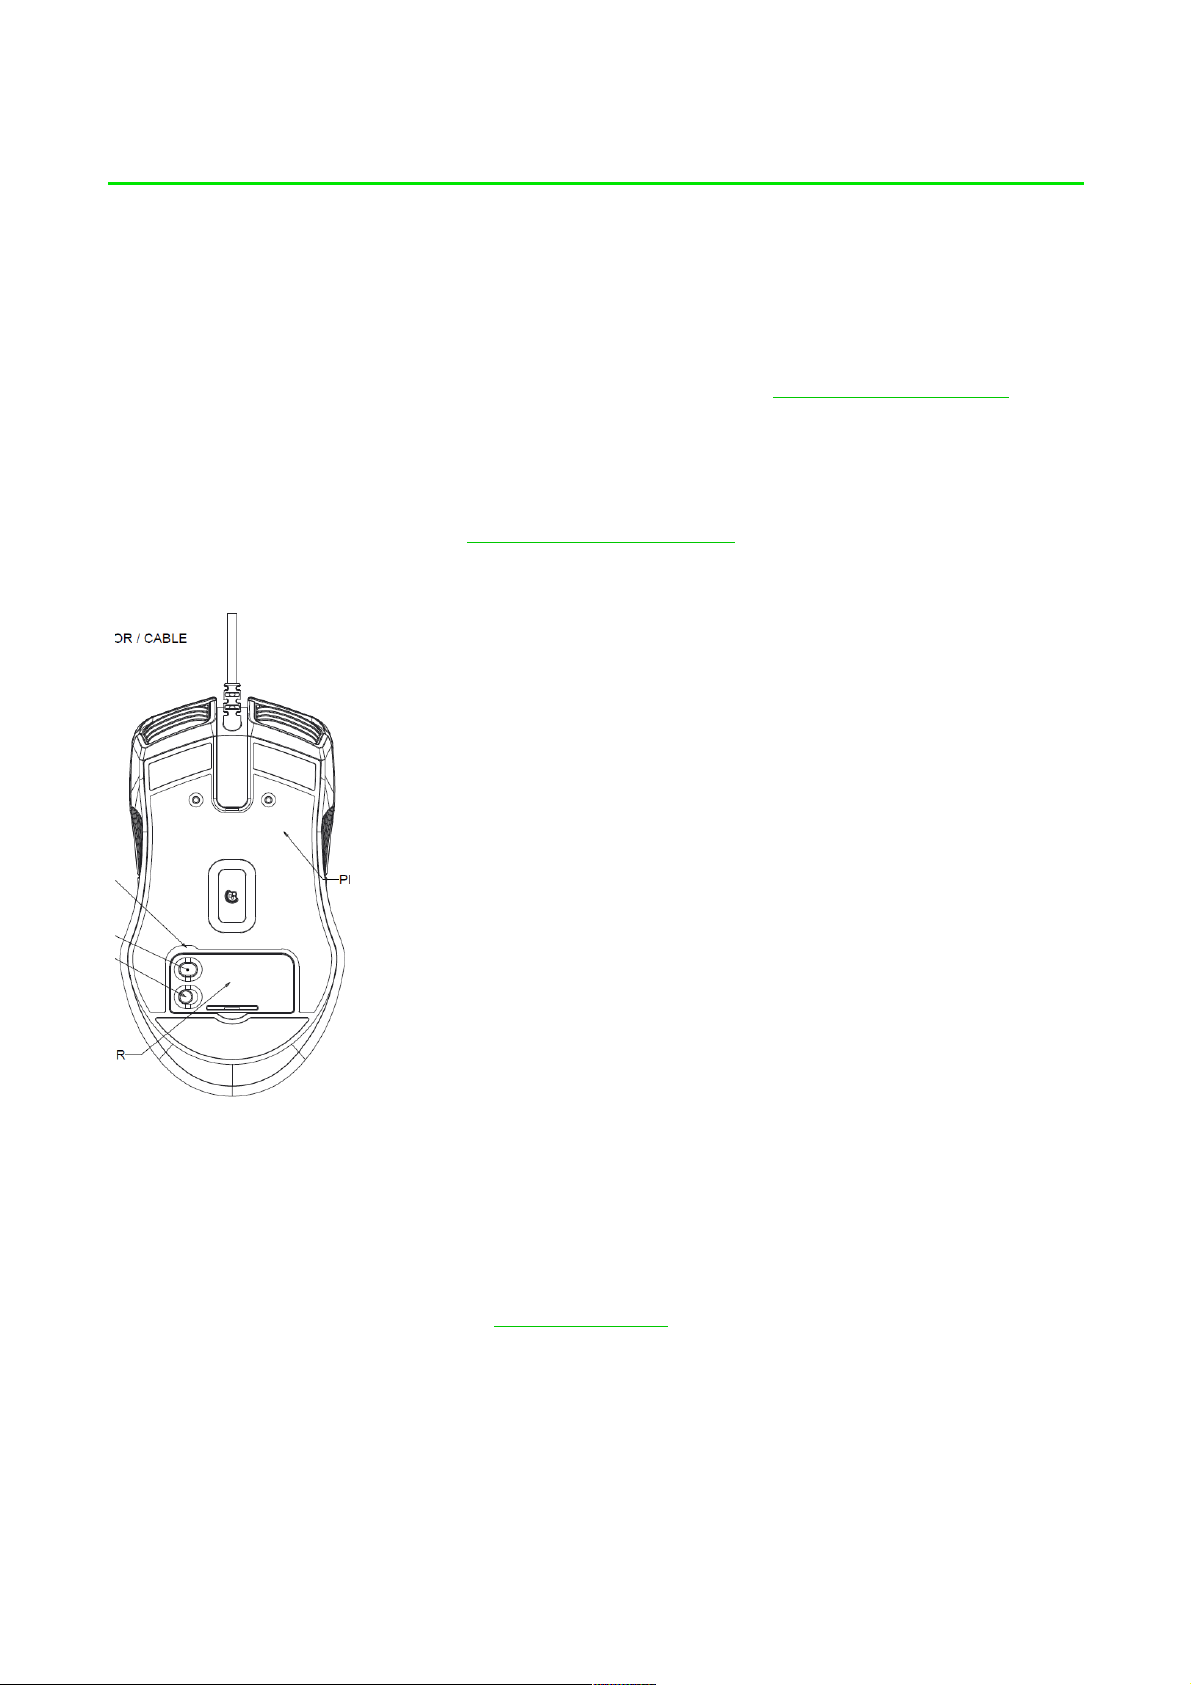
M. Bottom cover
N. USB dongle
O. USB to Micro-USB cable
P. USB dongle adapter
Default DPI stages are as follows: 800, 1800, 4500, 9000, and 16000. The DPI stages can be
customized using Razer Synapse.
F OR GA ME RS . BY GA ME RS .™
3
Page 5

1
SETTING UP YOUR RAZER LANCEHEAD
CHARGING YOUR RAZER LANCEHEAD
1. Plug the micro-USB connector of the USB to Micro-USB cable to the Razer Lancehead.
2. Plug the USB connector of the USB to Micro-USB cable to your computer.
This connection also acts as the wired mode for your Razer device.
F OR GA ME RS . BY GA ME RS .™
Page 6

For best results, please fully charge your Razer Lancehead before using it for the first time. A
depleted battery will be fully charged in approximately 4 hours. If the Razer Lancehead has not
been used for an extended period, you may need to recharge it before use.
The Razer Lancehead requires a USB connection that is able to supply sufficient power to charge
the battery. The battery charging process of the Razer Lancehead may be affected if connected to a
non-powered USB hub or non-powered USB ports found on certain keyboards and other
peripherals. When in doubt, it is preferable to connect the Razer Lancehead directly to the USB port
of your computer.
LOW POWER INDICATOR
The Razer Lancehead’s scroll wheel will blink red twice in repeated intervals to indicate that the
battery’s power is less than 15%. This lighting sequence will repeat until the battery is drained or
the mouse is connected to the PC via the USB to Micro-USB cable.
The indicator percentage can be customized on Razer Synapse.
F OR GA ME RS . BY GA ME RS .™
2
Page 7

USING THE USB DONGLE
1. Remove the bottom cover of the Razer Lancehead.
2. Remove the USB dongle from the compartment and plug it into your PC’s USB port.
F OR GA ME RS . BY GA ME RS .™
3
Page 8

3. Reattach the bottom cover onto the Razer Lancehead and make sure it is securely fastened.
4. Switch on the Razer Lancehead.
Your Razer Lancehead is now ready for use in wireless mode.
F OR GA ME RS . BY GA ME RS .™
4
Page 9

USING THE USB DONGLE ADAPTER
Use the USB dongle adapter to easily access and extend the reach of your USB dongle.
F OR GA ME RS . BY GA ME RS .™
5
Page 10

INSTALLING RAZER SYNAPSE FOR YOUR RAZER LANCEHEAD
Step 1: Make sure the USB dongle is connected to the USB port of your computer.
Step 2: Install Razer Synapse when prompted* or download the installer from
razerzone.com/synapse.
Step 3: Create your Razer ID or log into Razer Synapse with an existing account.
*Applicable for Windows 8 or later.
F OR GA ME RS . BY GA ME RS .™
6
Page 11

CONFIGURING YOUR RAZER LANCEHEAD VIA RAZER SYNAPSE
STORED PROFILES
Your Razer Lancehead is capable of storing up to 5 profiles from Razer Synapse Pro, which you can
use on systems that do not have Razer Synapse installed. Your Razer Lancehead can also store
your current profile temporarily until it is replaced with a new active profile. Pressing the Profile
button will cycle from the current profile to profiles 1 to 5. The profile indicator will change its color
to show which profile is presently selected.
Designated color
Active profile White
Profile 1 Red
Profile 2 Green
Profile 3 Blue
Profile 4 Cyan
Profile 5 Magenta
F OR GA ME RS . BY GA ME RS .™
7
Page 12

LIGHTING EFFECTS
Name
Description
How to set up
The Lighting Tab on Razer Synapse allows you to customize your Razer device by allowing you to
choose from different basic lighting effects or create your own using the Chroma Configurator. If
you have other Razer Chroma-enabled devices, you can synchronize their basic lighting effects by
clicking the button.
Note: Only devices that support the selected lighting effect will synchronize.
The lighting fades in and out of the
Breathing
selected color(s)
The LEDs will light up when you
Reactive
click any of the mouse buttons
Spectrum
cycling
The LEDs will cycle between 16.8
million colors indefinitely
Select up to 2 colors or
randomize
Select the color and the length
of time for the LED to remain lit
No further customization
required
Static
Select a color
selected color
The lighting will scroll in the
Select either front-to-back or
The LEDs will remain lit in the
Wave
direction selected with a default
back-to-front wave direction
spectrum of colors
Please refer to the Online Master Guide at razersupport.com for in-depth instructions on how to
configure and use your Razer Lancehead.
F OR GA ME RS . BY GA ME RS .™
8
Page 13

FCC Statement
This equipment has been tested and found to comply with the limits for a Class B digital device, pursuant to part 15 of the
FCC Rules. These limits are designed to provide reasonable protection against harmful interferen ce in a residential
installation. This equipment generates uses and can radiate radio frequency energy and, if not installed and used in
accordance with the instructions, may cause harmful interference to radio communications. However, there is no guarantee
that interference will not occur in a particular inst allation. If this equipment does cause harmful interf erence to radio or
television reception, which can be determined by t urning the equi pment off and on, the user i s encouraged to try to correct t he
interference by one or more of the following measures:
—Reorient or relocate the receiving antenna.
—Increase the separation between the equipment and receiver.
—Connect the equipment into an outlet on a circuit different from that to which the receiver is connected.
—Consult the dealer or an experienced radio/TV t echnician for help.
FCC Statement
This device complies with Part 15 of the FCC Rules. Oper ation is subject to the following two conditions: (1) this device may
not cause harmful interference, and (2) this device must accept any interference received, including interference that may
cause undesired operation.
Caution!
Any changes or modifications not expressly appr oved by the party responsible for compliance could void the user's authority
to operate the equipment.
Canada Statement
This device complies with Industry Canada’s licen ce-exempt RSSs. Operation is subject to the following t wo conditions:
(1) This device may not cause interference; and
(2) This device must accept any interference, including interference that may cause undesired operation of the device.
Le présent appareil est conforme aux CNR d’Indu st rie Canada applicables aux appareils radio exempts de li cence.
L’exploitation est autorisée aux deux conditions suivantes :
(1) l’appareil ne doit pas produire de brouillage;
(2) l’utilisateur de l’appareil doit accepter tout brouillage radioélectrique subi, même si le brouillage est susceptible d’en
compromettre le fonctionnement.
 Loading...