

Page 1
MASTER GUIDE
Page 2
paGe 2 paGe 3
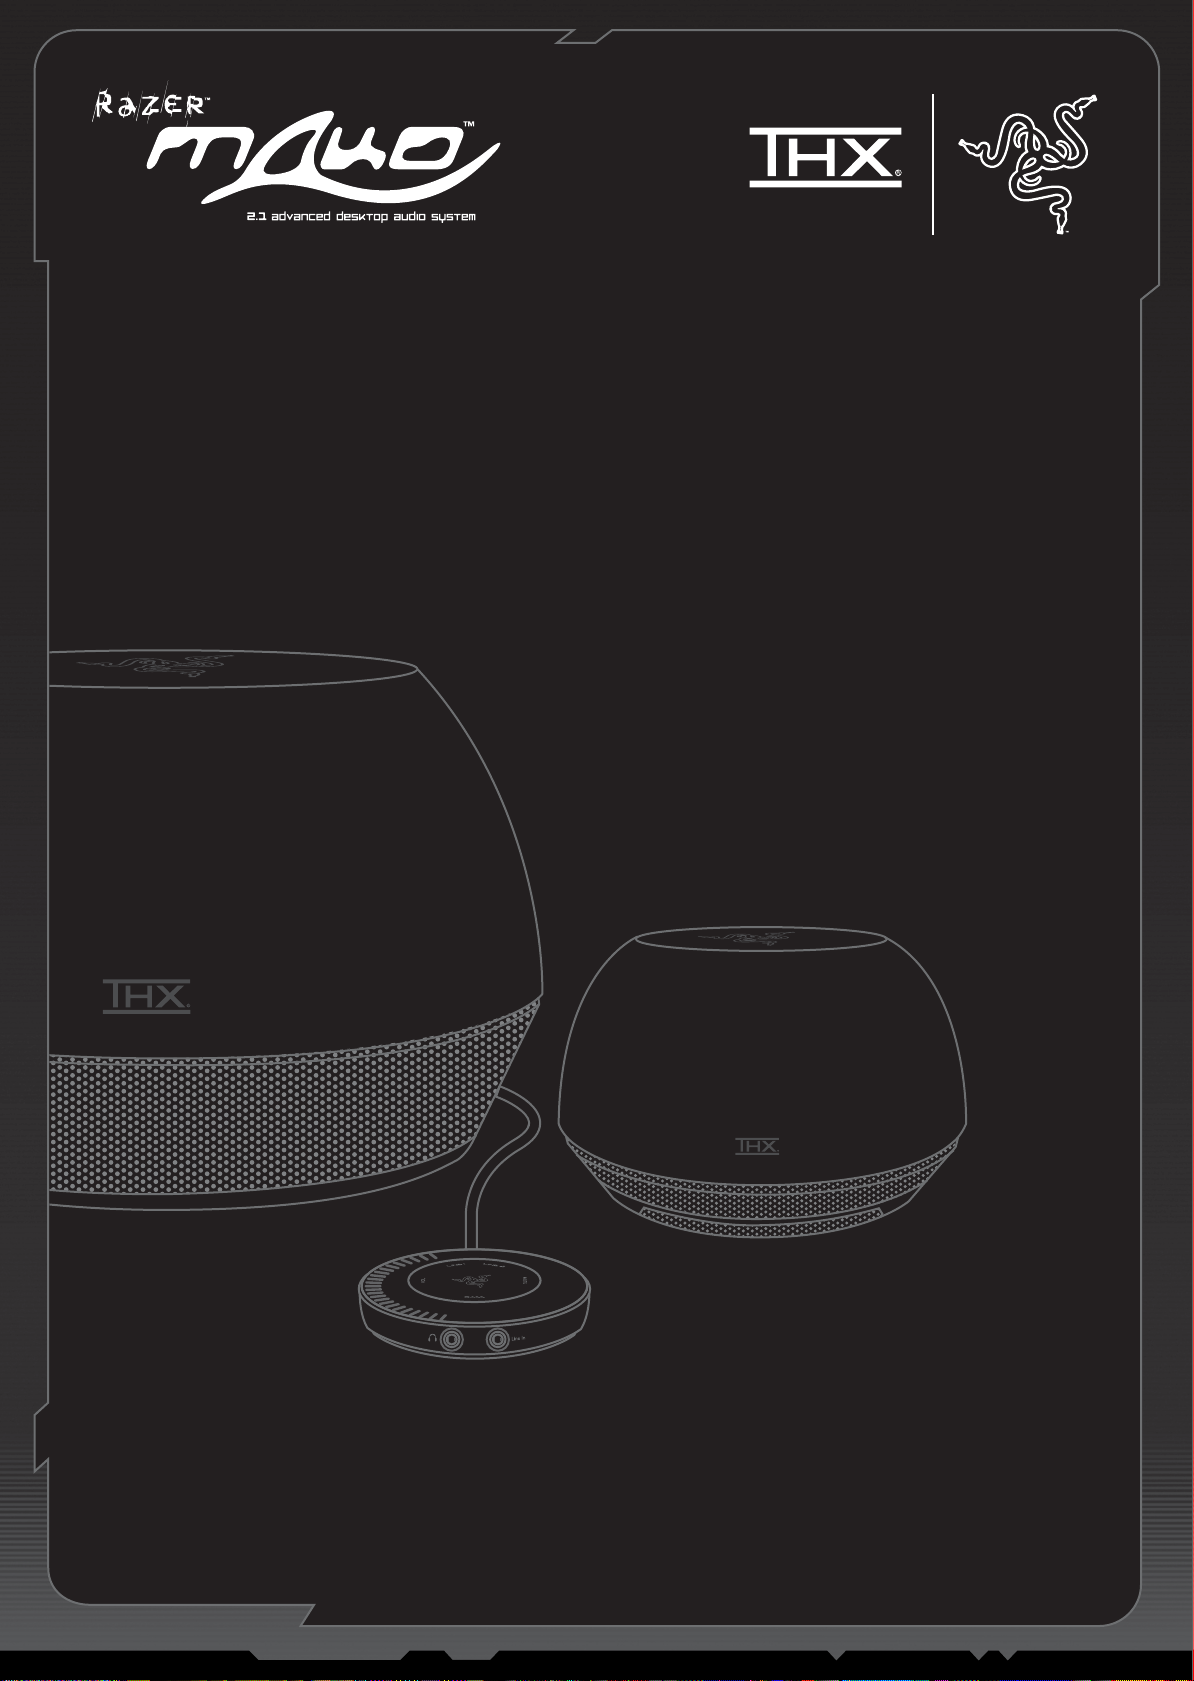
about razer mako™
The Razer Mako™ 2.1 Advanced Desktop Audio System is at the
cutting edge of audio sophistication.
The audio scientists from Razer™ and THX have revolutionized the
downward firing speaker design, incorporating THX Ground Plane™
and THX Slot Speaker™ technologies in the Razer Mako™,
immersing the listener in a rich, omnidirectional sound
environment never before achieved in desktop audio.
The best-in-class ClassHD® digital amplifier technology found in
the Razer Mako™ provides greater power efficiency, minimizing
distortion levels; and its bi-amplified satellites bring recording
studio sounds to your desktop.
Designed to meet the demanding standards in music for
audiophiles and the performance standards of hardcore gamers,
the Razer Mako™ redefines the standards for audio by enhancing
the experience for gaming, music, movies and more.
packaGe contents
Please carefully remove your Razer Mako™ from the packaging
and locate:
Subwoofer
Satellite Speakers x2
Control Pod
AC Power Cable
Satellite Cables x2
3.5 to 3.5mm Stereo Cable
Master Guide
Introductory Booklet
Sticker
< 75mm
(3”)
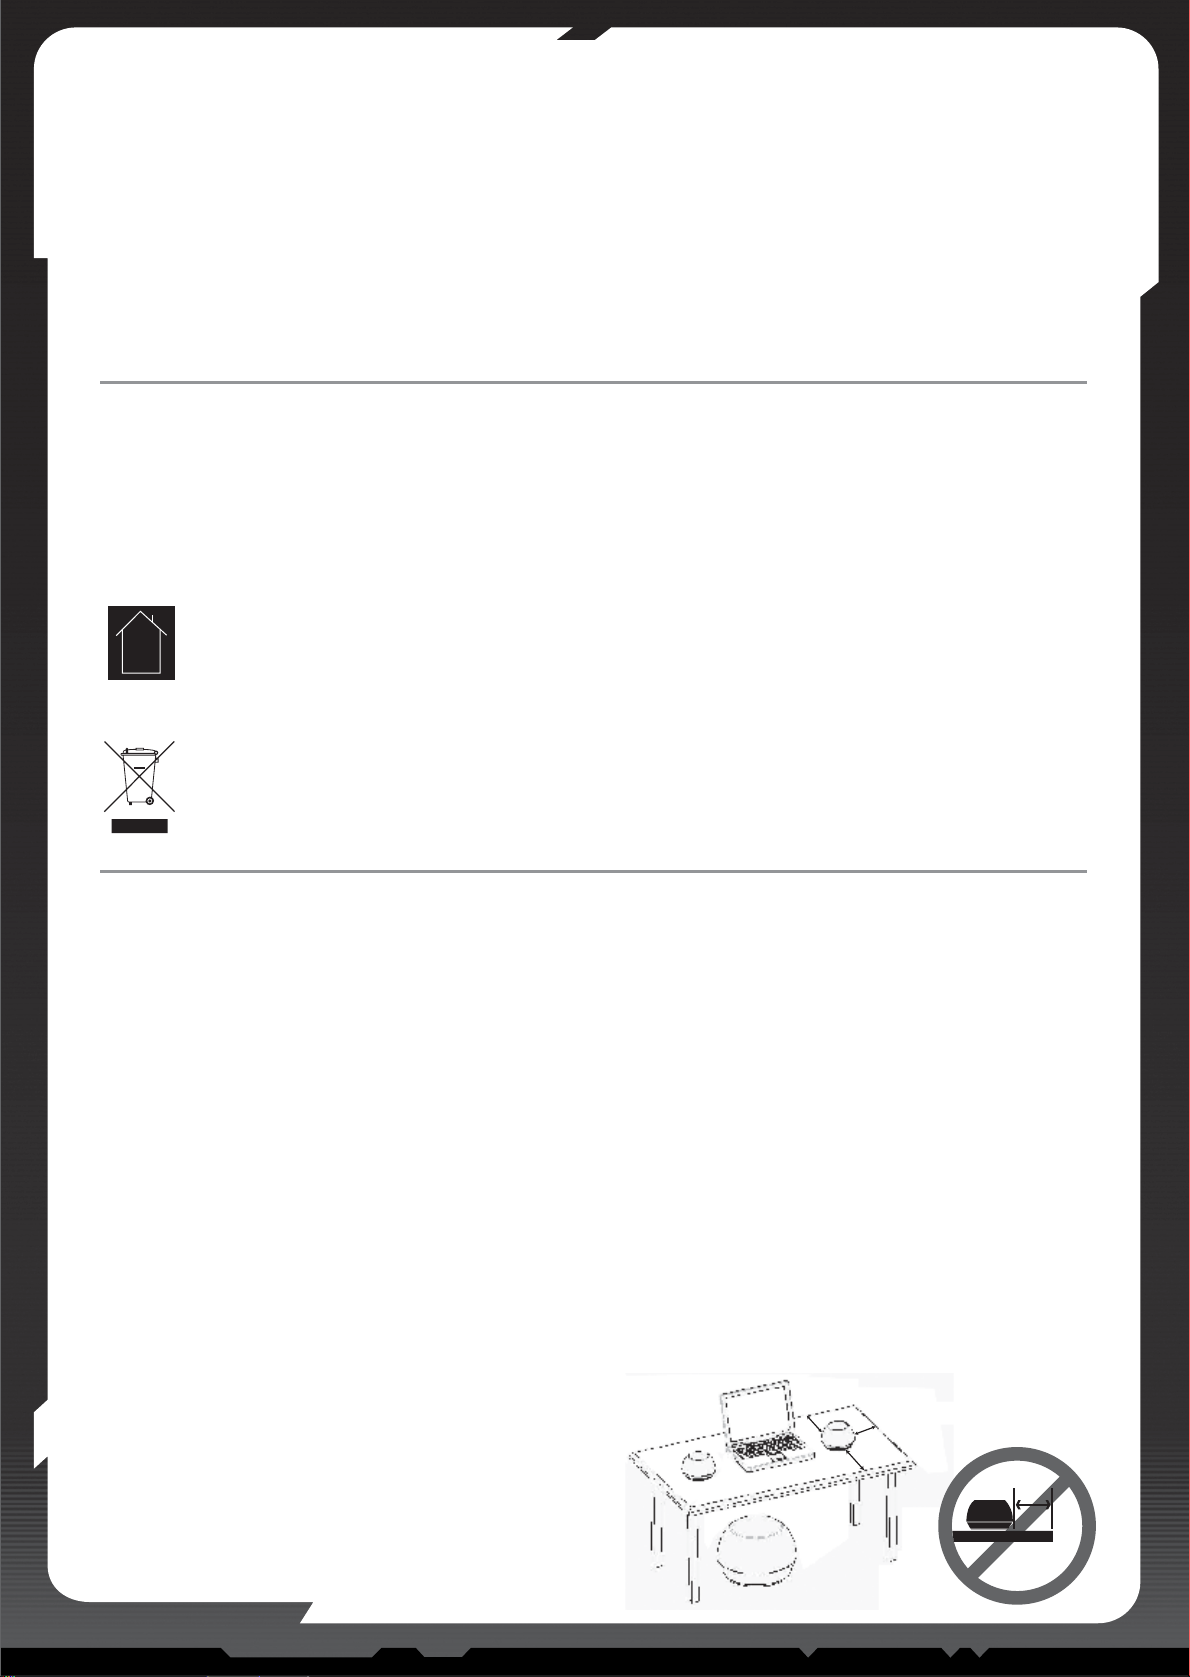
positioninG your razer mako™ speakers
To get the best audio performance from your Razer Mako speaker
system, position the speakers and subwoofer using the following
guide:
Satellites
The THX Ground Plane™ technology guarantees best performance
when the satellites are directly on the desk surface, with at least
150mm (6 in) of table surface around each satellite. Ideally, at least
75mm (3 in) of table surface is free of clutter and other objects, to
avoid sound absorption or buzzes. If shelf placement is required,
place the speakers at least 75mm (3 in) from the shelf edge.
While the system has a wide listening area, it is best that the
satellites are orientated such that you have clear line of sight to the
THX logo.
SubwooFer
Place the sub on the floor below the desk. Alternatively, place the
sub near the rear of the desk. Placement near a wall or floor (or
both) will give the best bass performance. It does not matter which
way the sub is pointing.
> 150mm (6”)
02 Product Safety / Recycling
About Razer Mako™ / Package Contents
Positioning your Razer Mako™ Speakers
03 Connecting the Razer Mako™ Components
04 Connecting the Sound Source
05 Powering the Razer Mako™
Control Pod Operation
06 Using the Control Pod
07 Troubleshooting
Care and Maintenance / Legal Information
Registration and Technical Support
08 Warranty Information
Limitation of Liability / Notice of FCC Compliance
WEEE
CONTENTS
product saFety
recyclinG
• Please make sure the apparatus has sufficient ventilation.
• The ventilation on the device should not be impaired by covering the ventilation openings with items, such as newspapers, table-cloths,
curtains, etc.
• No naked flame sources, such as lighted candles, should be placed on the apparatus.
• Make sure the apparatus shall not be exposed to dripping or splashing liquids and that objects filled liquid, such as vases, are not placed
on the apparatus.
• The appliance inlet of apparatus is used as disconnect device and shall remain readily operable.
Indoor use only.
Batteries and waste electrical products should not be disposed of with household waste. Please recycle where these facilities
exist. Check with your local authority or retailer for recycling advice.
Page 3

www.razerzone.com
connectinG the razer mako™ components
First locate the Razer Mako™ components and the location of the relevant connections as shown in Figure A.
A Satellite speaker ~ left
B Subwoofer/amplifier
C Control pod
D Satellite speaker ~ right
E
I J
K
HGF
A
B
C
D
(Figure A)
(Figure A)
E Satellite speaker input
F Control pod connector
G Line 1 (3.5mm mini-jack)
H Line 2 (RCA connectors)
I Satellite speaker output
J On/off switch
K Main power input*
*Please note that in the US, the
plug will be polarized and can
only be inserted one way.
Page 4

paGe 4 paGe 5
Connect your preferred sound source with the cables and jacks indicated in Figure C.
connectinG the sound source
When connecting the Control Pod, be sure to secure the plug with the two screw knobs.
Next, connect both the satellite speakers and the control pod as shown in Figure B.
Ensure that the left satellite is connected to the left jack and the right satellite to the right jack on the subwoofer.
NOTE: If either satellite cable is removed while the system is active, the Razer logo on the Control Pod will flash for up to 1 minute. If the problem
is not corrected within that time, the system will turn off automatically. No user adjustments will be possible while the light flashes due to a
disconnected satellite cable.
NOTE: If either cable is removed while attempting to turn on the system, the Razer logo will flash for 10 seconds. After 10 seconds, it will return
to the standby state.
DO NOT insert the speaker cables
into an ethernet LAN port.
DO NOT insert an ethernet cable
into the Razer Mako™
DO NOT
connect to a
monitor or PC
graphics port.
The Control Pod connector is not a VGA
monitor connector. Do not connect the
Control Pod to a video source. Likewise, do
not connect a monitor to the subwoofer. VGA
monitor extension cables cannot be used
with the Razer Mako™ system Control Pod
or subwoofer.
CD, DVD and digital music
player
Personal computer
Portable CD and digital
music players
Headphones
AV equipment such as
receivers, pre-amps, CD
players, DVD players and
consoles.
RCA-to-RCA
3.5mm mini-jack
(input socket)
3.5mm mini-jack
(input socket)
3.5mm mini-jack
(output socket)
RCA connectors
(red & white)
Mini-plug to RCA
Mini-plug to Mini-plug
Mini-plug to Mini-plug
Mini-plug
connector cable type audio source
If you’re connecting your computer as your sound source, we recommend setting the volume to about 75% of full volume using the computer or
sound card’s audio controls. Ensure that the volume is turned ON in your computer, soundcard, media player, or application settings.
(Figure B)
(Figure C)
Page 5

www.razerzone.com
powerinG the razer mako™
Use the provided AC power cord to connect the subwoofer to a suitable AC power source. Please read the “Important Safety Information”
section at the beginning of this guide carefully before plugging in the Razer Mako™.
For US*, Japan and Taiwan
- Voltage: 100-120V
* Please note that in the United States, a polarized plug is used.
It can only be inserted one way.
For France, Germany, Sweden, Switzerland and Korea
- Voltage: 220-240V
For UK, Singapore, India and Hong Kong
- Voltage: 220-240V
control pod operation
Control touch area
activation area
All functions on the Control Pod are activated by a single finger-touch.
To wake the Control Pod from dimmed mode, touch anywhere along the grey area. Functions that are
active will glow brightly, while functions that are not active, but can be activated, will be dim.
Power on/standby switch
Line 1 select (3.5mm mini-jack)
Line 2 select (RCA connector)
Turn muting on or off
Bass adjustment mode
Volume adjustment mode
Control Touch Area
Amplified headphone output
Line level input
The Control Touch Area allows users to adjust volume or bass level by using a single finger to touch or
drag along the arc.
Page 6

paGe 6 paGe 7
Touch the MUTE indicator on the Control Pod to silence the
system. Touch MUTE again to return the system to the original
volume level.
NOTE: When muted, no controls other than MUTE will work.
To adjust the subwoofer bass level, first touch the BASS indicator
on the Control Pod (A). When the BASS indicator is lit on the
Control Pod, use the Control Touch Area (B) to set the bass level.
NOTE: After several seconds of inactivity, the Control Pod Control
Touch Area returns to its normal state for volume adjustment.
To connect a headphone, insert the 3.5mm mini-plug into the
headphone mini-jack of the Control Pod.”
NOTE: When a headphone mini-plug is inserted into the Control
Pod, the subwoofer and satellites will be muted.
The Control Pod incorporates an intuitive touch sensing interface
in its laser-etched polycarbonate control surface, instead of
traditional mechanical buttons. Lightly touch the surface of the
Control Pod to operate your system.
Touch ( ) for 3 seconds for power or standby.
To operate, touch the desired function name (e.g. LINE 1 or MUTE).
Remove finger from surface once a visual or audible change has
occurred.
NOTE: Use only one finger to tap or slide on the Control Pod. More
than one finger on the surface may interfere with the operation of
the Control Pod. Also ensure that both finger and surface are dry,
as moisture may impair the performance of the touch sensor.
To adjust the volume and bass levels, slide one finger on the area
inside the level bar on the left side. Red color segments indicate
levels above 2/3 of full volume.
NOTE: You may select the AUX input directly by inserting a 3.5mm
connector from an MP3 player or other device into the AUX input on
the Control Pod. Doing so will automatically select the AUX input
as the source.
Touch the Line 1 or Line 2 inputs to select the audio source.
LINE 1
input
LINE 2
input
Adjust the volume by sliding a finger along the area directly to the
right of the level indicator lights.
Touch the activation area of the Control Pod to illuminate the
Control Pod display.
usinG the control pod
3 seconds
Page 7

www.razerzone.com
troubleshootinG
• If Control Pod lights are off; ensure that
- the Control Pod connector is securely attached to the
subwoofer.
Note that the control pod plug is similar to a VGA plug used
for a video monitor. Take care not to plug the Control Pod
into a video outlet.
Do not plug a video monitor into the subwoofer.
• If any of the plugs cannot be inserted, ensure that
- there are no objects obstructing any of the plug openings.
- in the case of the Control Pod connector, check that there
are no bent pins.
In the event any of the pins are bent in the connector, you
may try straightening them with small needle nose pliers.
If this does not work, contact Razer customer service.
• If there is no sound, ensure that
- power, input and satellite cables are securely attached.
Both satellite cables must be connected. In the event
that one cable is not connected, there will be no sound
from the system.
- the sound source is working. This is most easily checked
by unplugging the 3.5mm audio cable from the computer.
- the computer audio is not muted.
If you cannot confirm that the computer audio is functioning, try
a different source such as an MP3 player headphone output as a
source for the system.
• If the sound is muffled, ensure that
- objects are not obstructing the sound output slot of the
satellite speakers.
- the cable connection on each satellite is facing away from
the listening area.
- the stereo audio input cable is securely attached at both
ends.
Razer™ may have patents, patent applications, trademarks,
copyrights, trade secrets or other property rights, intellectual
and otherwise concerning the Product and subject matter in this
manual (both registered and unregistered). Except as is provided
in any written license agreement provided by Razer™, furnishing
of this manual does not give you a license to any such patents,
trademarks, copyrights or other intellectual property rights,
whether registered or otherwise.
reGister your razer™ product
Please visit www.razerzone.com for product online registration.
What you’ll get:
• 1 year’s limited manufacturer’s warranty
• Free online support
technical support
For technical support, please visit www.razersupport.com.
Care and maintenance
Use a clean damp cloth to wipe or dust fingerprints off the
speakers and Control Pod. Do not use any cleaning fluids or
solvents, as these may damage the system.
leGal inFormation
The Razer Mako is jointly-developed by Razer and THX Ltd,
designed and engineered in the USA by THX Ltd and
manufactured in an ISO9002 facility under license from THX Ltd.
Patents Pending.
intellectual property inFormation
©2007 Razer Audio Pte Ltd. All Rights Reserved. Razer™, the
Razer Triple-Headed Snake logo, the Razer distressed word
logo, MAKO and other trademarks contained herein are the
property of Razer Audio Pte Ltd and/or its affiliates, registered in
the United States or other countries.
THX and the THX logo are registered trademarks of THX Ltd.
ClassHD is a registered trademark of Audera.
iTunes is a trademark of Apple Inc., registered in the United
States and other countries.
All other trademarks are the property of their respective owners.
Razer™ assumes no responsibility for any errors that may
appear in this manual. Information contained herein is subject to
change without notice. Actual Product may differ from pictures.
- the equalizer controls on music software (such as iTunes)
are set to “flat” or “off”
• If the sound is too shrill (not enough bass), ensure that
- the stereo audio input cable is securely attached at both
ends.
- the bass level is adjusted for louder bass.
- the equalizer controls on music software (such as iTunes)
are set to “flat” or “off”
• If the sound has too much bass, ensure that
- the bass level is adjusted for lower bass.
- the equalizer controls on music software (such as iTunes)
are set to “flat” or “off.”
• If the sound is distorted, ensure that
- the volume controls on the computer are not set at too
high a level.
- the stereo audio input cable is securely attached at both
ends.
• If there is radio interference from a radio station or cell
phone, ensure that
- the system is not placed too near a source of interference.
Move the speakers to a different location to avoid the
interference.
In the case of mobile phone interference, try moving the
mobile phone.
For more detailed information and other troubleshooting tips,
please visit www.razerzone.com.
Page 8

limited one (1) year product warranty
Razer Audio Pte Ltd (hereinafter referred to as “Razer”) warrants
the Razer Mako (the “Product”) to be free from defects in
materials and workmanship (subject to the terms and conditions
set forth below) for a period of one (1) year from the date of retail
purchase, provided that the Product is used in accordance with
all safety and operational procedures and instructions
recommended herein and in the proper manner in which the
Product is meant to be used.
This warranty will not be valid if a claim on the warranty is due to
misuse, abuse, negligence, acts of God, floods, fires,
earthquakes or other external causes, accidents, unauthorized
commercial use, operation of the Product outside the
recommended parameters contained herein, modification of the
Product, failure to follow Product instructions or improper
operation, maintenance or installation. Any repairs or attempted
repairs other than by Razer or someone authorized by Razer
shall also invalidate this warranty. The warranty shall also be
invalidated if any serial number or date stamp has been altered
or removed from this Product. This warranty does not cover
cosmetic damages, including but not limited to scratches or
dents that would not otherwise effect the Product’s functionality
or materially impair your use of the same.
Notwithstanding, if a defect arises and a claim on the warranty is
received by Razer within the applicable warranty period, Razer
will (at its sole option) either (1) repair the Product or the
defective parts at no charge, using new or refurbished
replacement parts, (2) exchange the Product with a Product that
is new or which has been manufactured from new or serviceable
used parts and is at least functionally equivalent to the original
Product, or (3) refund the purchase price of the Product. Such
repairs, exchanges or refunds as provided herein are your
exclusive remedies for the Product. Proof of purchase in the
form of a bill, invoice, receipt or other similar document may be
required and will serve as prima facie evidence of the purchase
date and an indication of the applicable warranty period. When a
Product or part is exchanged or replaced, any replacement or
exchanged Product or part will become your property and what
was returned to Razer will become Razer’s property.
This warranty set forth herein replaces and/or supersedes all
other warranties and your remedies for breach of warranty are
expressly limited to those herein set forth. No Razer supplier,
dealer, agent, or employee is authorized to make any
modification, extension or alteration of the warranty or to
substitute products or services, lost profits, loss of information
or data, or any other special, indirect, consequential or incidental
damages arising in any way out of the distribution of, sale of,
resale of, use of, or inability to use any Product subject to
warranty herein set forth.
Before lodging a claim on the warranty, be sure to review the
online help resources at www.razersupport.com. If the Product
is still not functioning properly after making use of these
resources, please contact Razer through www.razersupport.com
or your authorized distributor or dealer. You may be required to
assist with the diagnosis process to verify and ascertain any
issues which you may be facing with the Product. Service
options, parts availability and response times may vary
depending on the country where in which a claim on the warranty
is lodged. You may be responsible for shipping and handling
charges as well as any applicable customs, duties or taxes if
shipment and handling of the Product is required and such
charges are incurred.
limitation oF liability
Razer expressly disclaims all other warranties to the fullest
extent allowed by law including, but not limited to, the implied
warranties of merchantability, fitness for a particular purpose,
non-infringement of third-party rights with respect to the
documentation and hardware. In no event will Razer™ be liable
for any special, incidental, indirect, punitive or consequential
damages, or for personal injury or death whatsoever, even if
Razer had been informed of the possibility of the same. In the
event that some jurisdictions do not allow the limitation or
exclusion of such warranties listed above, the above limitation or
exclusion may not apply. The above limitation or exclusion do not
exclude, limit or suspend or seek to exclude, limit or suspend any
liability made compulsory at law. The above limitation or
exclusion will also not apply in case of personal injury or death
where and only to the extent that applicable laws impose such
liability.
notice oF FCC Compliance
This device complies with part 15 of the FCC Rules. Operation is
subject to the following two conditions: (1) This device may not
cause harmful interference, and (2) this device must accept any
interference received, including interference that may cause
undesired operation.
Note: This equipment has been tested and found to comply with
the limits for a Class B digital device, pursuant to part 15 of the
FCC Rules. These limits are designed to provide reasonable
protection against harmful interference in a residential
installation. This equipment generates uses and can radiate
radio frequency energy and, if not installed and used in
accordance with the instructions, may cause harmful
interference to radio communications. However, there is no
guarantee that interference will not occur in a particular
installation. If this equipment does cause harmful interference to
radio or television reception, which can be determined by turning
the equipment off and on, the user is encouraged to try to correct
the interference by one or more of the following measures:
- Reorient or relocate the receiving antenna
- Increase the separation between the equipment and receiver
- Connect the equipment into an outlet on a circuit different from
that to which the receiver is connected
- Consult the dealer or an experienced radio/TV technician for
help
WEEE
Correct Disposal of This Product (Waste Electrical & Electronic Equipment)
(Applicable in the European Union and other European countries with separate collection systems)
This marking shown on the product or its literature, indicates that it should not be disposed with other household wastes at the end of its
working life. To prevent possible harm to the environment or human health from uncontrolled waste disposal, please separate this from
other types of wastes and recycle it responsibly to promote the sustainable reuse of material resources. Household users should contact
either the retailer where they purchased this product, or their local government office, for details of where and how they can take this item
for environmentally safe recycling. Business users should contact their supplier and check the terms and conditions of the purchase
contract. This product should not be mixed with other commercial wastes for disposal.
paGe 8 paGe 9
Page 9

www.razerzone.com www.razerzone.comFor GaMErs. bY Gamers.™ For GaMErs. bY Gamers.™ www.razerzone.com
 Loading...