


NETWORK SET UP GUIDE FOR
RVH1004/US411
RVH1008/US811
RVH1016/US611
1stG/2ndG/3rdG UGI H.264 DVR
SUPPORTING ROUTER
DLINK
LINKSYS
NETGEAR
Belkin
Network Setup
- p1

Introduction
Thank you for purchasing our RVH series DVR.
Welcome to this step by step network set up guide for our
ICatch/Rayvision DVRs, US411/RVH1004, US811/RVH1008, and
US611/RVH1016.
Following this guide you should be able to connect your
DVR to the Internet, and then you can view your DVR anytime
anywhere on any computer.
STEP-1 Activate DDNS Service.
All of our RVH series DVRs provide free Full DDNS service, allowing
you to connect your system to the Internet, even if you don’t have
Static IP address.
A. Every DVR comes with a software CD like the one shown
below.
You can also find the user manual to the DVR inside this CD quick
start guide and central management software.
On the CD there is a sticker with the username and password.
Each DVR is unique, so do not use the same username or password
you’ve already used before.
B. To start visit the following website to activate your Free DDNS
service using the provided user name and password on the CD
sticker :
http://i-dvr.net/logon.asp
Network Setup
- p2

Please enter
any name
by your choice at
Column, “host
.
domain
”
System will automatically show
the current computer IP.
“host.domain” is named by your choice.
server generates
If DVR IP has any changes, there are updates
At the website, key in the user name and password indicated on
the CD sleeve, and then click “Logon”.
C. After you are log in, go to the “Add New Record” section, and
enter a name of your choosing in the blank space under
“host.Domain”. The “IP” section displays your current
dynamic IP address. After you enter a name of your choosing,
click “insert” under “actions”.
For example, “hostname””””
Therefore, IE address will be “hostname.i-dvr.net”
If the DVR IP is known, you can type it in the column.
If not, you can press “insert” button.
After you click “insert”, your complete host domain will be
displayed in the “Host Manager” section. Your complete host
domain will be the name of your choosing plus .i-dvr.net.
“icatchddns.idvr.net” is what the main
Here at the same time. Press, “F5: Refresh”
And then IP column will update automatically
to it’s real IP Address.
Network Setup
- p3

reference.
Please note, remember to log in to this website once in a while and
click on the “update” bottom under “actions”. This will refresh your
dynamic IP address with the host to ensure your host domain is
kept updating with your dynamic IP.
STEP- 2 Set up your DVR
Now we need to set up the DVR so it will enable the DDNS service.
A. Enter DVR →Main Menu → Network Setup → DDNS. Activate
DDNS functions and input related information on the screen.
Click on “LAN” so it’s dark red and in the panel below, enter the
following information:
For DLINK and some NETGEAR Router user:
IP Address: 192.168.0.212
Subnet Mask: 255.255.255.0
Gateway: 192.168.0.1
For LINKSYS and NETGEAR Router user:
IP Address: 192.168.1.212
Subnet Mask: 255.255.255.0
Gateway: 192.168.1.1
You can change the last 3 digits to any other
numbers you want, not limited to 212. You just
have to remember this number for future
Network Setup
- p4

work
B. Enter DVR →Main Menu → Network Setup → “HTTP Setup” on
the left hand side; check the top box for “Enable HTTP Service”,
then change the “Port” to (8888) Click Ok to save.
Same thing
here, you can
change the
Port number to
any number
other than
8888, you just
have to
remember
them for future
reference.
C. Enter DVR →Main Menu → Network Setup → DDNS. Activate
DDNS functions and input related information on the screen.
Key in the information you obtained earlier on our host domain
website http://i-dvr.net/.
Check to Enable
DDNS without
Enabling DDNS
Service will not
STEP-3 Set up your Router
Network Setup
- p5

Router is the bridge between your DVR and the Internet. We have
already set up both the DVR and the Internet, now we need to
connect them with the router.
Due to the various brand and model of routers in the market, this
guide might not cover all the aspect of setting your router. If you
have any problem following the guide or need assistance, please
consult a Network specialist.
This guide is mainly going to cover DLINK, LINKSYS and NETGEAR
routers.
Before you set up your router, please make sure that your
computer and DVR are hardwired connected to the router (not
wirelessly).
A. DLINK Router
In the address bar, type in default gateway “Http://192.168.0.1”
and you will see the below image. Click “Log In” without any
password if you never change the password before.
In the “ADVANCED” tab on the top, click on the “VIRTUAL SERVER”
on the left, and you will be prompted with the below image.
In the name area, type in any name you want to give to your DVR,
in my example, I use “DVR”. Key in the “IP ADDRESS” we previously
set in the DVR, in my example, I use “192.168.0.212”.
Enter both the “Public Port” and “Private Port” the same port we
set in the DVR before, in my example,
Network Setup
- p6

I use “8888”. After you finish, check the box at the front and click
“Save Settings” on the top to exit.
B. LINKSYS Router
Network Setup
- p7

In the address bar, type in default gateway “Http://192.168.1.1”
Click “Log In” with blank Username and “admin” for Password if
you never change the password before.
In the “Applications & Gaming” tab on the top, choose “Port Range
Forward”.
Under “Application”, enter a name for your DVR.
In my case, I use “DVR”. Enter “8888” to “8888” under “Start – End
port”. In the IP Address section, enter “212” as we set in the DVR.
Check the “Enable” box then click “Save Settings”.
C. NETGEAR Router
Network Setup
- p8
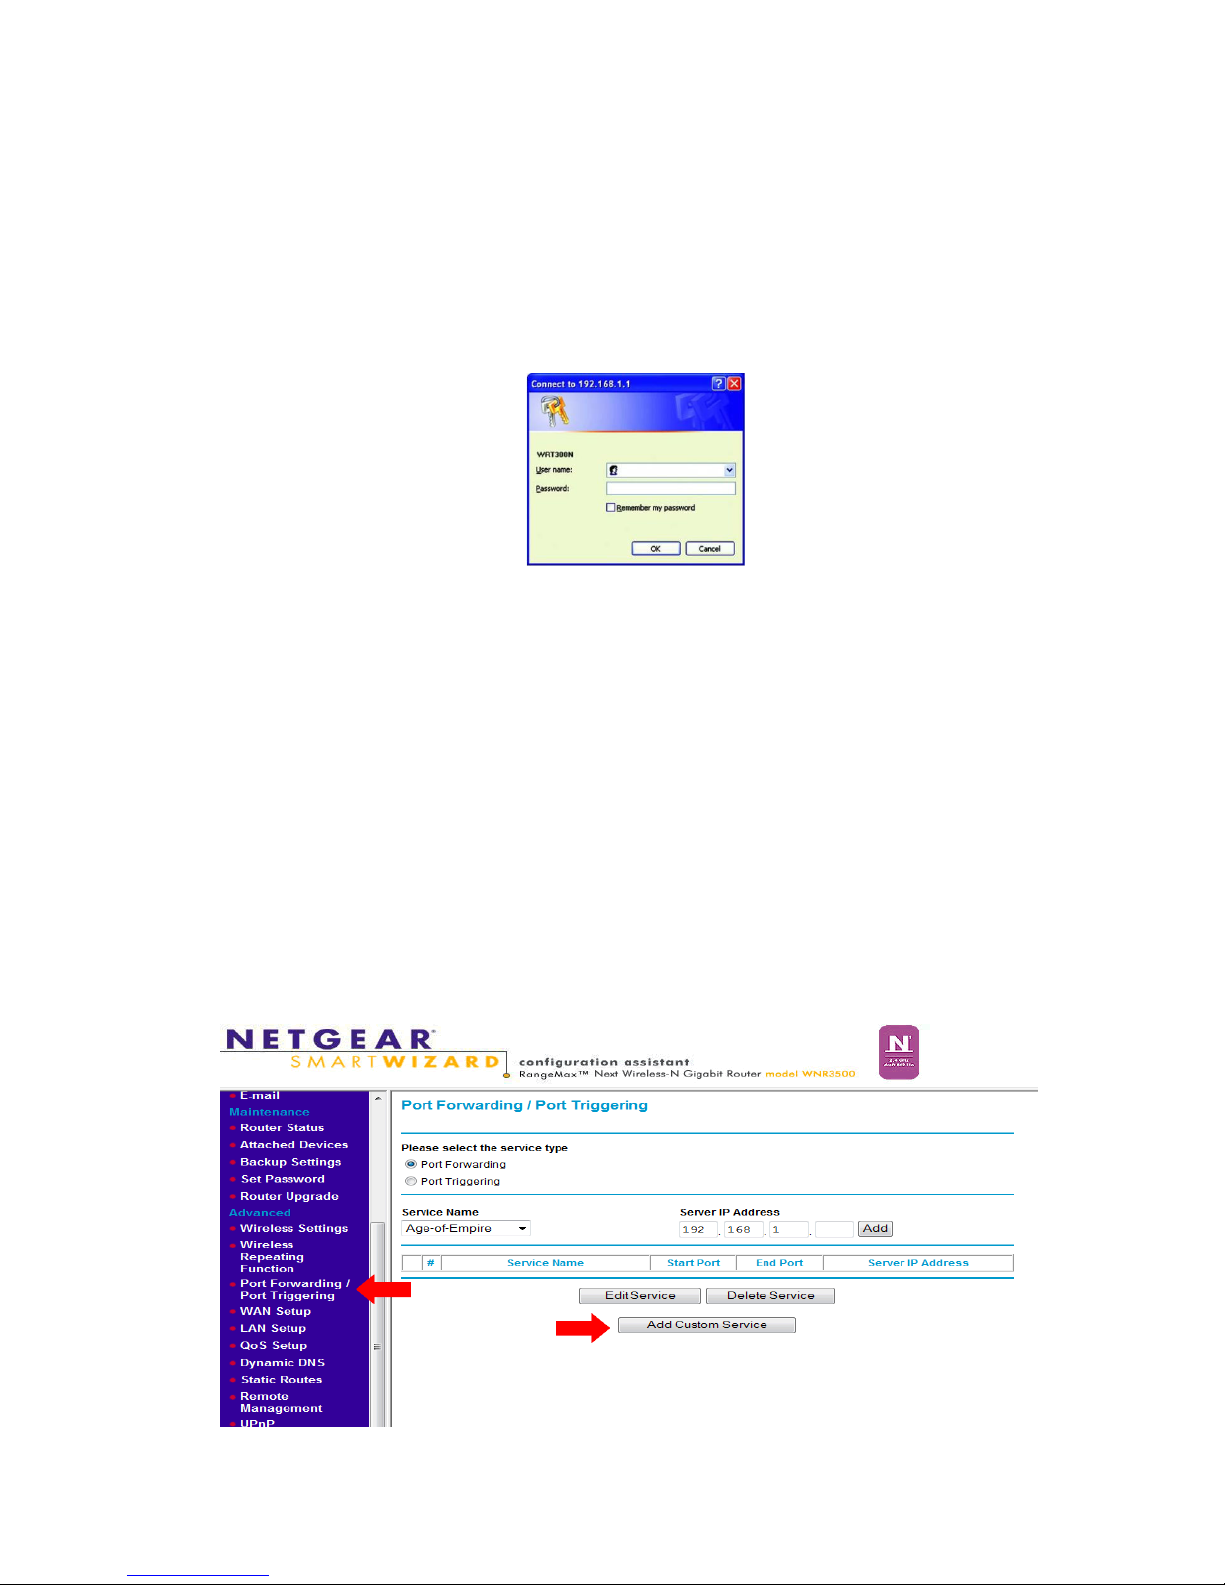
In the address bar, type in default gateway “Http://192.168.1.1”
and click “Log In” with “admin” for Username and “admin” for
Password if you never change the password before, then you will
see the below screen.
Scroll down to the “Advanced” heading at the lower-left corner of
the window. Click on the link labeled as “Port Forwarding”
underneath the “Advanced” heading.
Click on the “Service and Name” button. Choose the “HTTP” option
from the drop-down.
Click inside the “Server IP Address” text box and type in the IP
address that we set earlier in the DVR, in my case, I use
“192.168.1.212”. Click on the “Add” button.
Click on “Save” and then click on “Logout.” Make sure you set the
“Start Port” and “End Port” to “8888” as we set in the DVR.
Network Setup
- p9

D. Belkin Router
Open a Web Browser on your computer. Please type in
Http://192.168.2.1 In the address bar of the Web Browser, Click
Login in the upper right hand corner of the page. The router does
not ship with a password, so just click submit.
Click on Virtual Servers under Firewall in the menu on the left
Enter the following information
Click Enabled
Type “DVR” in description of the application, Type the “8888” for
both of the inbound port fields
Select “BOTH” for the Type, Private IP address: Enter “212”, Type
the “8888” both of the Private port fields.
Click the Apply Changes button.
Network Setup
- p10

STEP- 4 Connecting the DVR to the Internet
Now load up your Internet Explorer and in the address bar, type in
“http://host domain:port number”, in my example, it is
“http://Rayvision.i-dvr.net:8888” and press Enter key.
You should be prompted with “User Name and “Password”. Now
you need to type in the User Name and Password to the DVR, not
the information on the CD sleeve.
The default User Name is “admin” and the Password is “123456”,
and then hit the Enter key.
Then you will see the following page. Now you can either choose
the first option “Internet Explorer 6, 7, 8” or “Download DVR
Remote Desktop” for PC or MAC.
Network Setup
- p11

Choose “Internet Explorer 6, 7, 8” if you want view the DVR in
Internet Explorer.
This is suggested if you are using a public computer. Choose
“Download DVR Remote Desktop” if you want to save a copy of
the viewing software onto your computer, recommended if you are
using your personal computer.
Enter the “DVR Address” as the Host Domain; my example is
“Rayvision.i-dvr.net”. Enter “Port” as “8888”. Enter the default
Username as “admin” and “Password” as “123456” if you haven’t
changed it in the DVR setting. Click “Ok” to connect.
Congratulation, you have successfully connected your DVR to the
Internet.
You will be able to control the DVR anywhere and anytime as if you
are in front of the actual DVR.
Network Setup
- p12

STEP-5 Using Static IP Address
If you have Static IP address, please skip step one
Here is the DSL setup Quick check list without it your remote view
will not work;
1- Make sure your DSL Router/Modem is bridged, if your DSL
modem/router not bridged you have two routers back to back
and your remote view will not work.
2- Make sure the connection type setup in your Router is set to
PPOE if it is not & you have internet connection that mean
your DSL Modem/router is not bridged correctly and your
Network remote view will not work.
3- Make sure the Router port forwarding is set correctly and is
active with the same port number as the DVR ( under HTTP
setup) with the same IP address as the one you had assign to
your DVR if you are off by one number or one zero your
remote view will not work.
4- Make sure the DVR Network is set to LAN and the IP address
match the port forwarding IP in your Router and the Gateway
match he IP address to the Router itself.
5- Make sure HTTP server is enabled (under network) and the
port number matches the port number range in the port
forwarding in the router.
Skipping any of the listed steps will result in your DVR not been
viewable on line
If you still have any question regarding connecting your DVR to
the Internet and you cannot find the answer you need in this
guide, please consult a network specialist for assistance.
Network Setup
- p13
 Loading...