

Page 1

Noncontact Thermometer •
Berührungsloses Thermometer
• Thermomètre sans Contact • Termómetro sin Contacto
• Termômetro sem Contato
• •
Table of Contents
Unit diagram . . . . . . . . . . . .1
English . . . . . . . . . . . . . . . .2
German Translation . . . . . .15
French Translation . . . . . . .28
Spanish Translation . . . . . .41
Portuguese Translation . . . .54
Chinese Translation . . . . . .67
Japanese Translation . . . . .80
ST60 ProPlus
™ Standard
ST80 ProPlus
™ Enhanced
Raynger® ST
™
Worldwide Headquarters
Raytek Corporation
1201 Shaffer Road
P.O. Box 1820
Santa Cruz, CA 95061-1820
Phone 831 458 1110
Portable Products Division
Phone 800 866 5478
Fax 831 425 4561
European Headquarters
Raytek GmbH
Blankenburger Str. 135
D-13127 Berlin, Germany
Phone 49 30 4 78 00 80
Fax 49 30 4 71 02 51
South American Headquarters
Raytek do Brasil
Sorocaba, SP Brasil
Phone 55 15 233 6338
Fax 55 15 233 6826
World Wide Web
www.raytek.com
China
Raytek China Company
Beijing, China
Phone 86 10 6437 0284
Fax 86 10 6437 0285
France
Raytek France
Palaiseau, France
Phone 33 1 64 53 15 40
Fax 33 1 64 53 15 44
Japan
Raytek Japan, Inc.
Tokyo, Japan
Phone 81 3 5976 1531
Fax 81 3 5976 1530
Mexico
Raytek de Mexico
Mexico and Central America
Puebla, Mexico
Phone 52 22 30 4380
Fax 52 22 30-4438
United Kingdom
Raytek UK
Milton Keynes, UK
Phone 44 1 908 630800
Fax 44 1 908 630900
57502-1 Rev. C 6/00
Page 2
Specifications
Temperature range D : S*
ST60 ProPlus™ -32 to 600°C (-25 to 1100°F) 30 : 1
ST80 ProPlus™ -32 to 760°C (-25 to 1400°F) 50 : 1
Contact Probe -40 to 260°C (-40 to 500°F)
Display Resolution 0.1°C (0.1°F)
Accuracy For targets:
(infrared -- assumes Above 23°C (73°F): ± 1% of reading or ±1°C (±2°F),
ambient operating whichever is greater
temp. of 23-25°C[73-77°F]) -18 to 23°C (0 to 73°F): ± 2°C (± 3°F)
@ calibration geometry** -26 to -18°C (-15 to 0°F): ± 2.5°C (± 4°F)
-32 to -26°C (-25 to -15°F): ± 3°C (± 5°F)
Probe ≤ ± 1°C (± 2°F) or 1% of reading, whichever is greater
Repeatability ± 1°C (± 2°F), or ±0.5% of reading, whichever is greater
Response time 500 mSec
Spectral response 8–14 µm
Emissivity Digitally adjustable from 0.10 to 1.0
Ambient operating range 0 to 50°C (32 to 120°F)
Laser Max Laser turns off above 40°C (104°F) ambient temperature
Relative humidity 10–95% RH noncondensing, at < 30°C (86°F) ambient
Storage temperature -20 to 60°C (-13 to 158°F) without battery
Weight / Dimensions 320g (11oz); 200 x 160 x 55 mm (8 X 6 X 2 in)
Power 9V Alkaline or NiCd battery
Typical Battery life 20 hours with laser and backlight on 50%
(Alkaline) 40 hours laser and backlight off
Tripod Mount 1/4” 20 UNC threading
*90% encircled energy at the focal point. (Focal point = 914mm (36 inches)).
**Unit is calibrated at 279.4mm (11 in) away from 139.7mm (5.5 in) diameter, 0.95 emissivity blackbody.
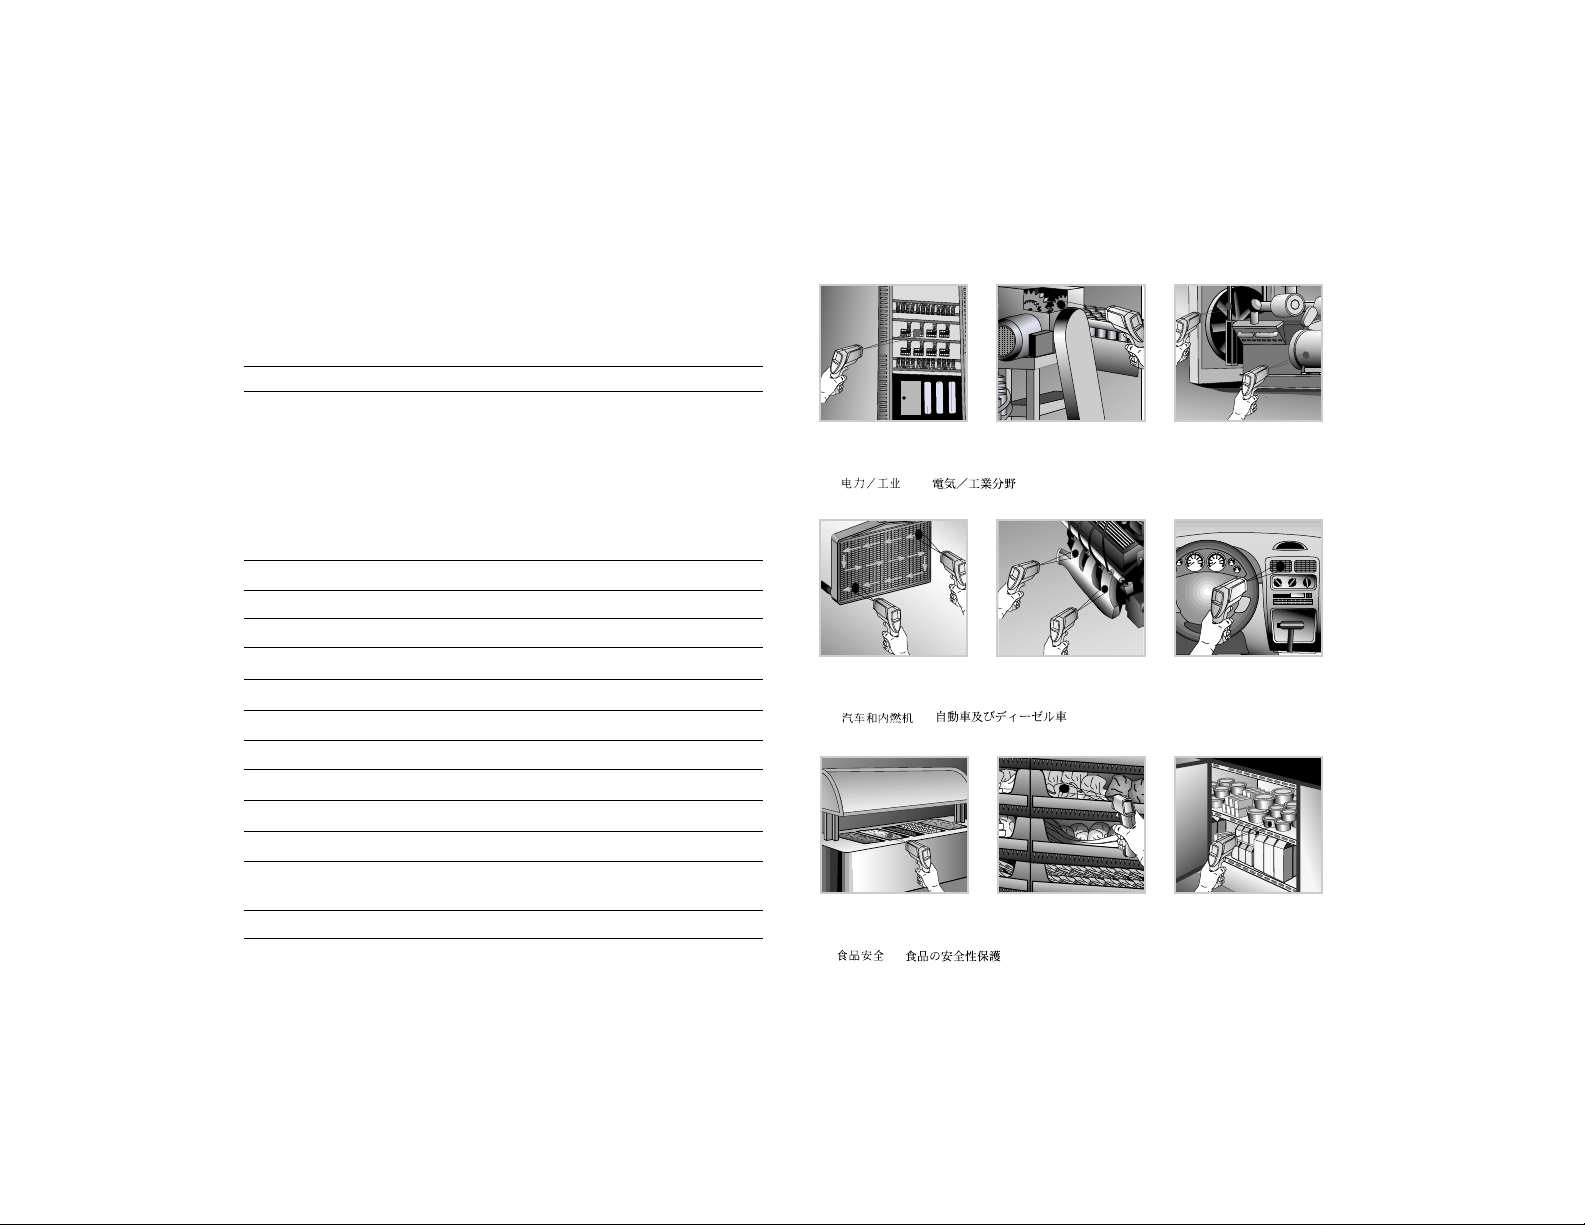
Some Noncontact Thermometer Uses
CREAM
MILK
MILK
CREAM
MILK
MILK
Electrical/Industrial •
Industrieanwendungen • Électricité-Méchanique
•Uso electromecánico Industrial • Manutenção Elétrica e Industrial
••
Automotive & Diesel •
KFZ-Instandesetzung und Wartung
• Vehicules (essence et diesel) • Automotriz y Diesel • Automotivo e Diesel
••
Food Safety •
Lebensmittelüberwachung• Hygiène alimentaire
• Seguridad en Alimentos • Segurança de Alimentos Pereciveis
••
Page 3
1
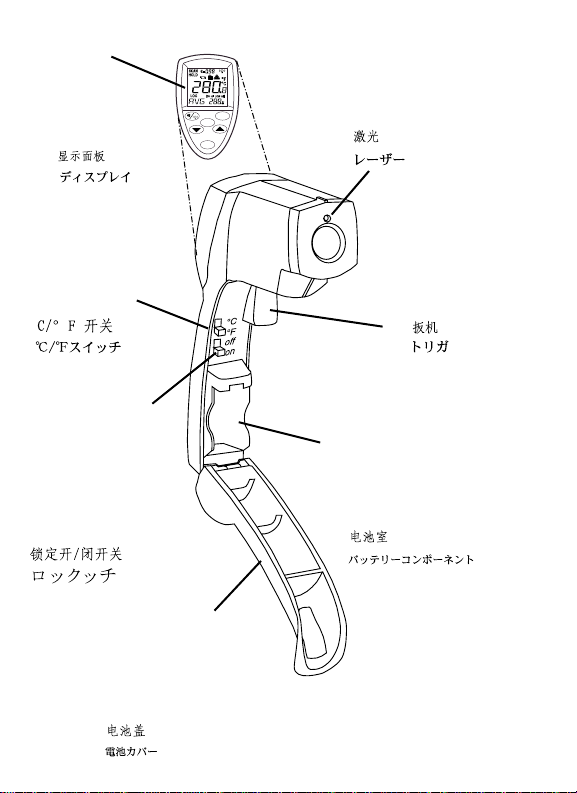
• Display
• Anzeige
• Affichage
• Pantalla
• Display
•
•
• Laser
• Laser
• Laser
• Láser
• Laser
•
•
• Trigger
• Meßtaste
• Gâchette
• Gatillo
• Gatilho
•
•
• Batter y Compartment
• Batteriefach
• Logement des Piles
• Compartimento
de las Pilas
• Compartimento
de Bateria
•
•
• Battery Cover
• Batterieabdeckung
• Couvercle du
Lcompartiment Pile
• Tapa de las Pilas
• Tampa da Bateria
•
•
• °C/°F Switch
• °C/°F-Schalter
• Commutateur °C/°F
• Interruptor de °C/°F
• Chave °C/°F
•
•
SET
MODE
LOG
• Lock ON/Off Switch
• Lock An/Aus Schalter
• Verrouillage du
Commutatuer
• Interruptor para trabar
o destrabar la unidad
• Travo do Gatilho
ON/OFF
•
•
Page 4
English
2
Warning
Do not point laser directly at eye or indirectly off
reflective surfaces.
Cautions
All models should be protected from the following:
▲ EMF (electro-magnetic fields) from arc welders,
induction heaters, etc
▲ Static electricity
▲ Thermal shock (caused by large or abrupt ambi-
ent temperature changes—allow 30 minutes for
unit to stabilize before use)
▲ Do not leave the unit on or near objects of high
temperature
AVOID EXPOSURE - LASER RADIATION
IS EMITTED FROM THIS APERTURE
CAUTION
LASER RADIATION – DO NOT STARE INTO BEAM
OUTPUT < 1mW WAVELENGTH 630 – 670 nm
CLASS II LASER PRODUCT
Page 5
English
3
Features
Your thermometer includes:
• Circular laser sighting
• Adjustable emissivity
• High and low alarm
• MAX, MIN, DIF, AVG temperature displays
• Data logging
• Trigger lock
• Backlit display
• Contact probe jack
• Hard case and wrist strap
Accessories
The optional accessories for your
thermometer are:
• Contact probe (RTD)
• Nylon Holster
• NIST/DKD certification
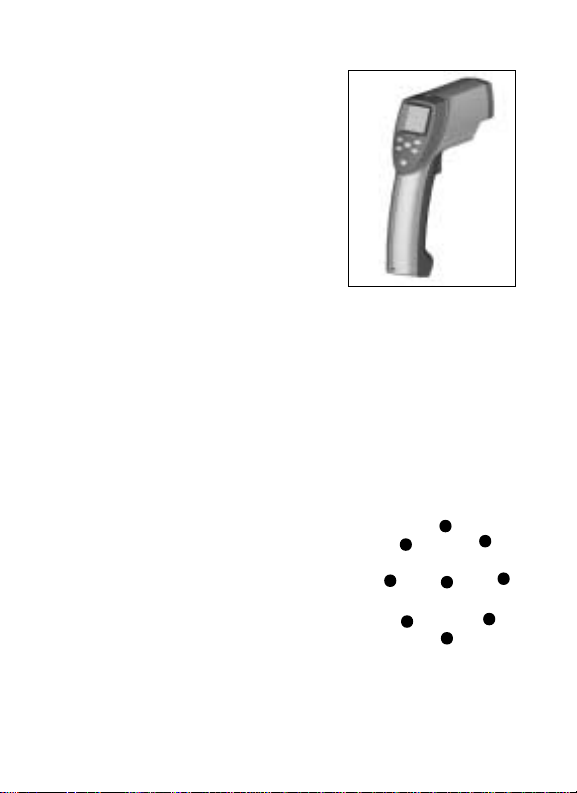
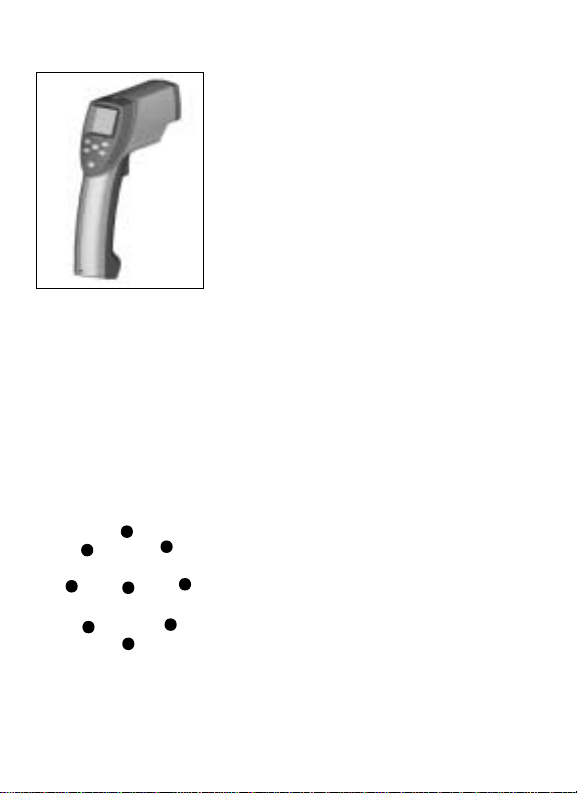
Circular Laser Sighting
The circular laser is made up of eight laser
spots that form a circle to show the
approximate area being measured; a
single laser spot shows the center of the
measurement area. In low-light conditions,
lighter spots surrounding the laser circle
may appear. These spots are not used for
aiming purposes. Use only the laser circle
to aim the unit.
Page 6
English
4
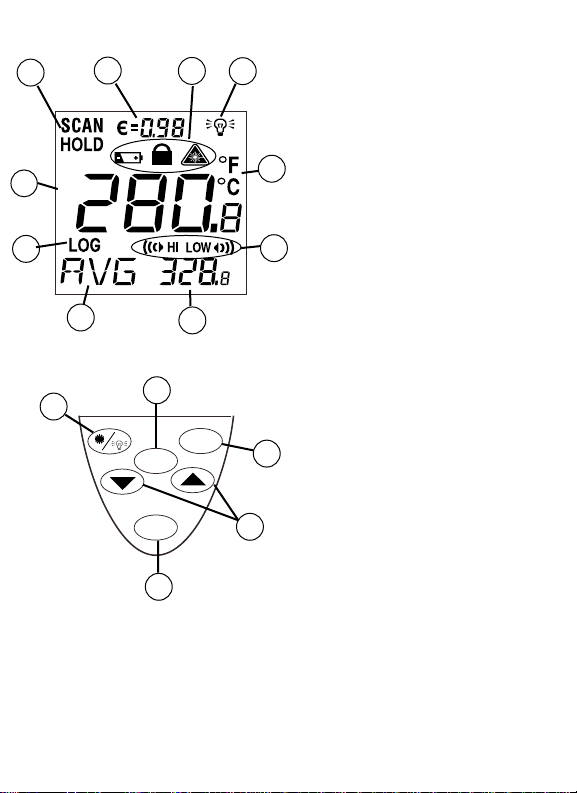
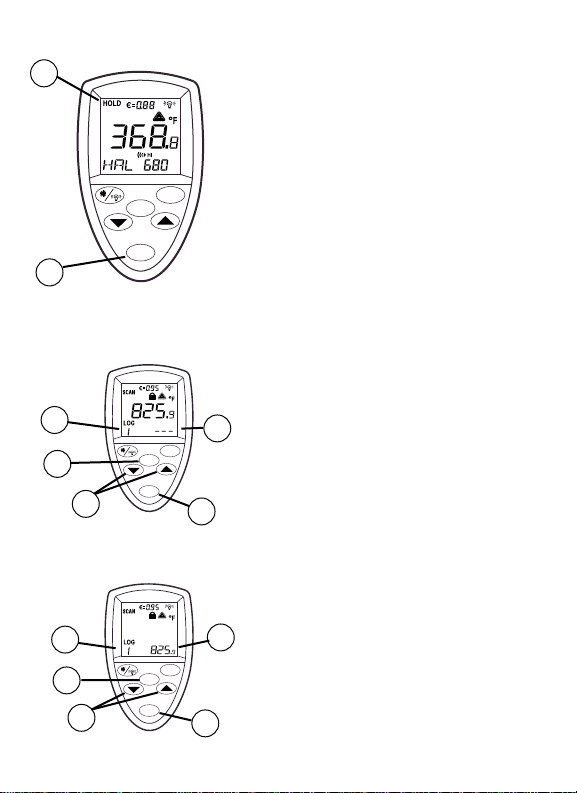
In SCAN mode, the LCD displays both the current temperature (G) and selected
Mode function (D, E) in Celsius or Fahrenheit (B). The unit will HOLD the last reading for 7 seconds after the trigger is released; the word HOLD appears (H). When
the battery is low, the battery icon is displayed, but the unit will continue to function;
when the battery is dead, the display will blank, and the unit will no longer function.
To activate the laser and backlight, pull the trigger. Press the laser/backlight button
(4) once to activate the backlight, twice to turn both laser and backlight on, and a
third time to turn them off.
Display
A) Backlight “On” symbol
B) °F/°C symbol
C) High Alarm and Low Alarm symbol
D) Temperature values for the MAX, MIN,
DIF, AVG, HAL (high alarm), LAL
(low alarm), and logged temperatures
E) Symbols for MAX, MIN, DIF, AVG,
HAL, LAL, PRB, and
F) LOG icon shows log Mode for data
storage
G) Current temperature value
H) SCAN or HOLD
I) Emissivity symbol and value
J) Low Battery, lock “On”, and laser
“On” symbols
1) SET button (for setting the high
alarm and low alarm)
2) Up and Down buttons
3) MODE button (for cycling through the
Mode loop)
4) Laser/Backlight on/off button (pull trig-
ger and press button to activate
laser/backlight)
5) LOG button (for storing data)
SET
MODE
LOG
A
B
C
D
E
F
G
H
I
J
4
5
2
1
3
Buttons
User Interface
Page 7
English
5
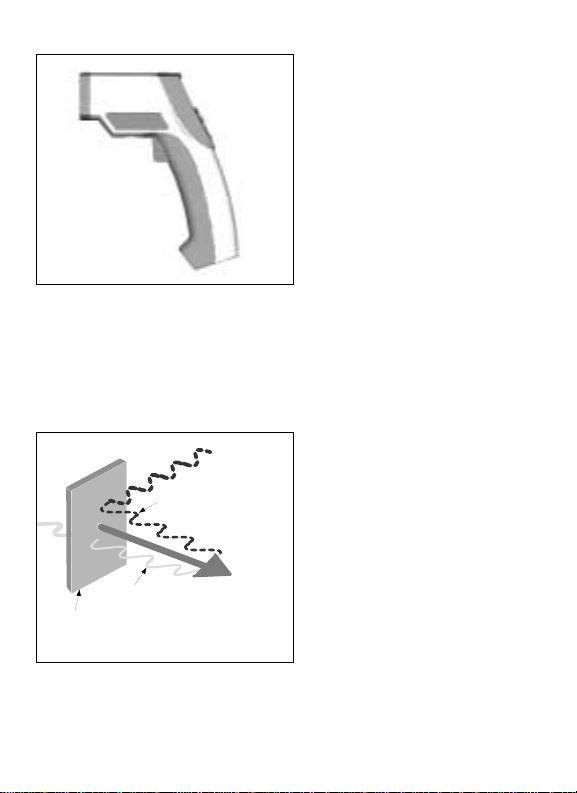
How it Works
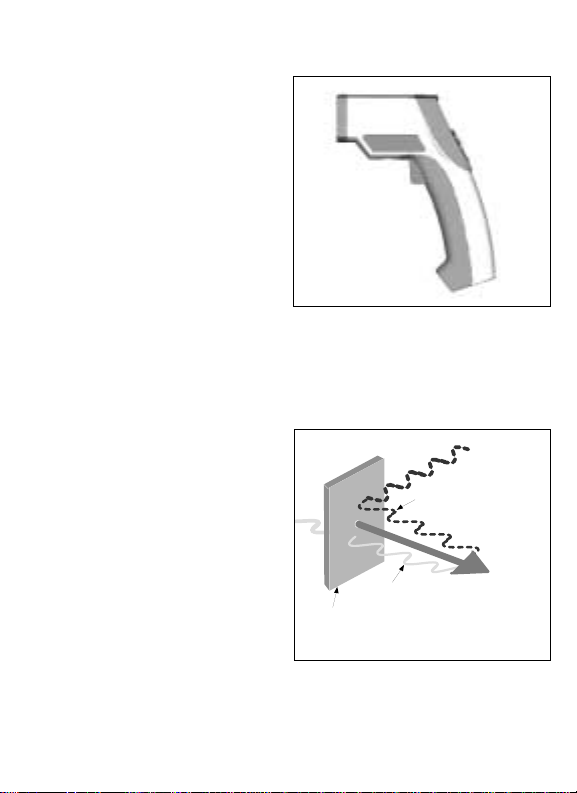
Infrared thermometers measure the surface temperature of an opaque object.
The unit’s optics sense emitted, reflected, and transmitted energy, which are
collected and focused onto a detector.
The unit’s electronics translate the
information into a temperature reading
which is displayed on the unit. The
laser is used for aiming purposes only.
Reflected energy
Emitted
Energy
Transmitted energy
Target
Introduction
We are confident you will find many
uses for your handheld noncontact
thermometer. Compact, rugged, and
easy to use—just aim, pull the trigger,
and read the temperature in less than a
second. You can safely measure surface
temperatures of hot, hazardous, moving, or hard-to-reach objects without
contact.
Page 8
English
6
How to Operate the Unit
Switching °C and °F; Locking the
Unit on; Changing the Battery
Measurement: Quick Start
To measure a temperature, point the unit at
an object, and pull the trigger. Be sure to
consider distance-to-spot size ratio and
field of view. The laser is used for aiming
only. For more detailed operating instructions, see “How to Accurately Measure
Temperatures.”
+
-
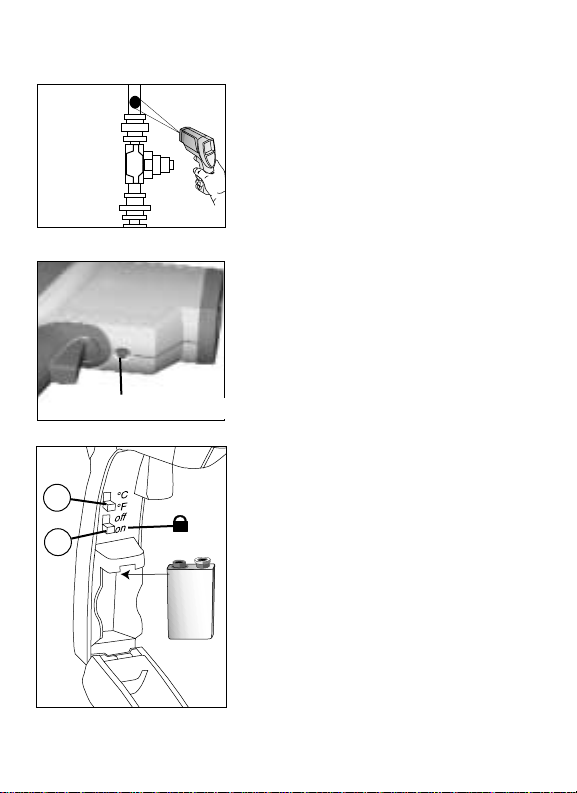
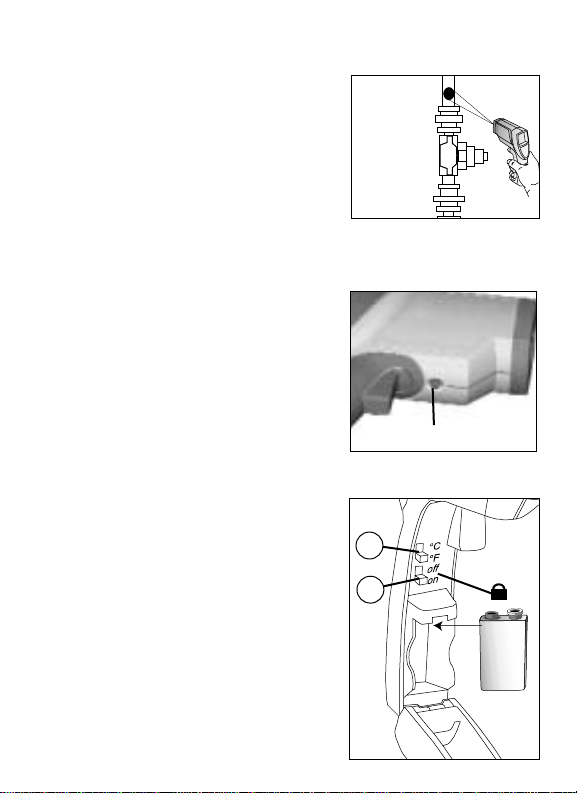
To open the unit’s handle, push the button
on the underside of the unit near the trigger,
and pull down and forward at the top of the
unit’s handle. To toggle between °C and °F,
slide the top switch (A) to the appropriate
position.
To lock the unit on for continuous measurement, slide the bottom switch (B)
down. If the trigger is pulled while the unit
is locked on, the laser and backlight will
turn on if they have been activated (see
“User Interface” for instructions on activating the laser and backlight). When the unit
is locked on, the laser will turn off when the
trigger is released; however, the backlight
will remain on unless it is turned off using
the Laser/Backlight button on the keypad.
To change the 9V battery, insert it with
the positive side toward the rear of the battery compartment.
A
B
Battery door release button
Page 9

English
7
English
How to Accurately Measure
Temperature
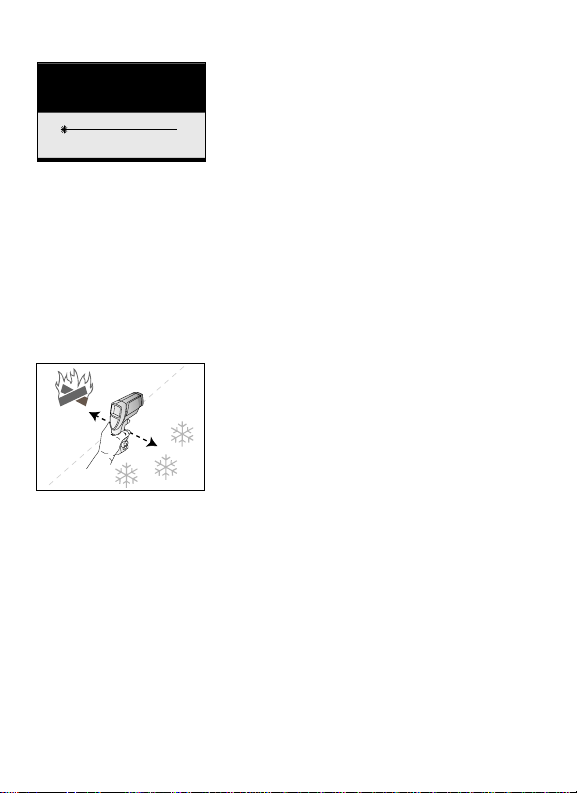
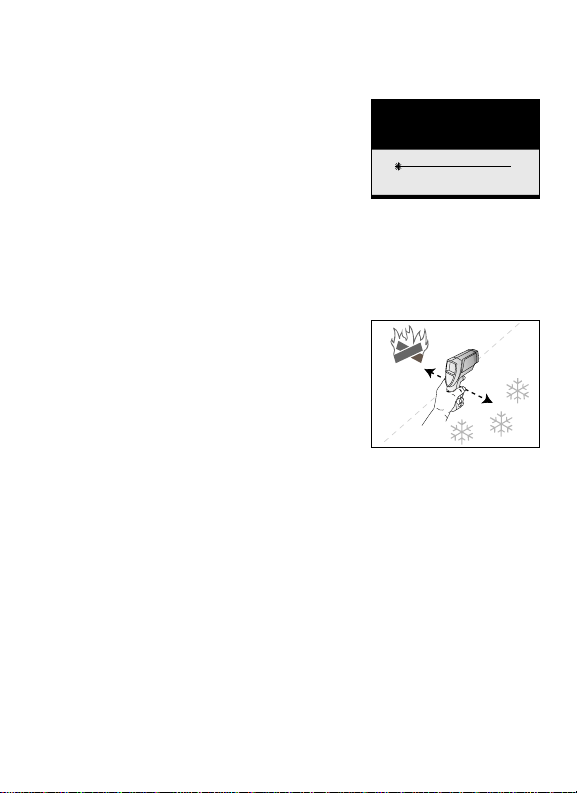
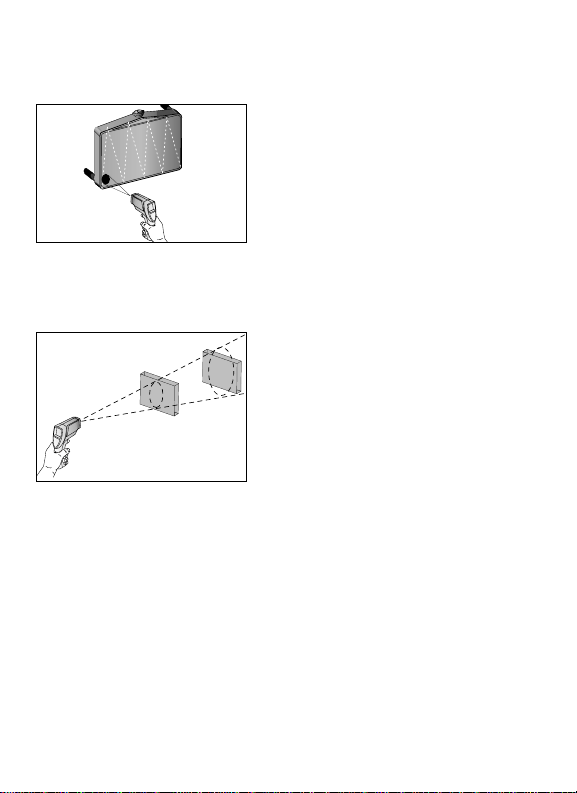
Locating a Hot or Cold Spot
To find a hot or cold spot, aim the thermometer outside the area of interest. Then slowly
scan across the area with an up and down
motion until you locate the hot or cold spot.
Field of View
Make sure that the target is larger than the
unit’s spot size. The smaller the target, the
closer you should be to it. (See the diagram
on the side of the unit.)
Yes
No
Emissivity
Emissivity is a term used to describe the
energy-emitting characteristics of materials.
Most organic materials and painted or oxidized surfaces have an emissivity of 0.95.
Inaccurate readings can result from measuring shiny or polished metal surfaces. To
compensate for this, adjust the unit’s emissivity reading (see “Setting the High Alarm,
Low Alarm, and Emissivity”), or cover the
surface to be measured with masking tape or
flat black paint (< 300°F/148°C). Allow time
for the tape or paint to reach the same temperature as the the material underneath it.
Measure the temperature of the tape or painted surface.
Page 10
English
8
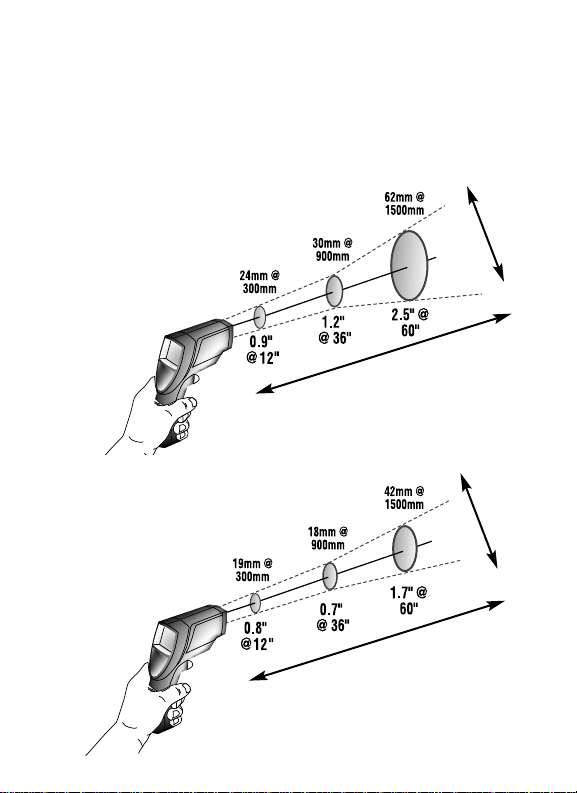
Distance & Spot Size
As the distance (D) from the object increases, the spot size
(S) of the area measured by the unit becomes larger. The relationship between distance and spot size for each unit is listed
below. The focal point for each unit is 914mm (36”). The spot
sizes indicate 90% encircled energy.
Enhanced Model
D:S = 50:1
Standard Model
D:S = 30:1
D
S
D
S
Page 11
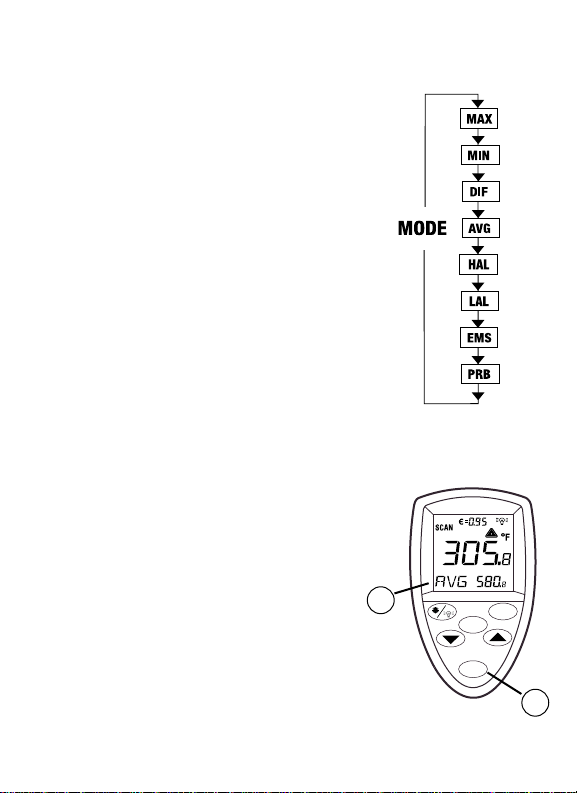
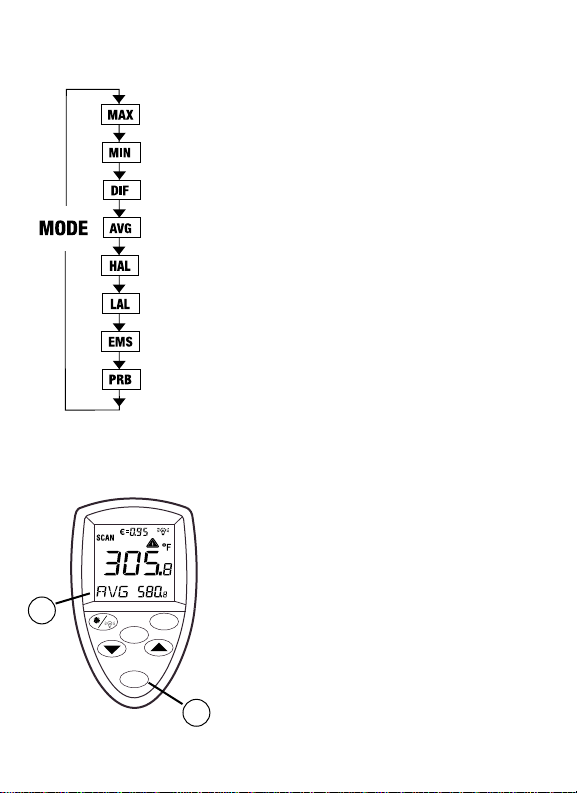
MODE button Functions
Your infrared thermometer measures Maximum
(MAX), Minimum (MIN), Differential (DIF)*, and
Average (AVG)** temperatures each time you take a
reading. This data is stored and can be recalled with
the MODE button (3) until a new measurement is
taken. (See “Hold and Recall” for information on
how to recall stored data.). When the trigger is
pulled again, the unit will begin measuring in the
last mode selected.
Pressing the MODE button also allows you to
access the High Alarm (HAL), Low Alarm (LAL),
Emissivity (EMS), Probe temperature (PRB – only
available when the probe is connected), and Data
logger (LOG). Each time you press MODE, you
advance through the mode cycle. The diagram
shows the sequence of functions in the Mode cycle.
Note: PRB (probe) is only available in the MODE
loop when the contact probe is connected to the
unit.
Selecting a Function
To Select the MAX, MIN, DIF, or AVG mode, pull the
trigger. While holding the trigger, press the MODE
button (3) until the appropriate code appears in the
lower left corner of the display (E). Each time you
press MODE, you advance through the MODE cycle.
The MODE cycle is shown above.
3
E
English
9
*DIF shows the difference between the maximum
and minimum temperatures measured
**AVG shows the average temperature reading for
each time the trigger is pulled or the unit is locked
on
LOG
MODE
SET
Page 12
English
10
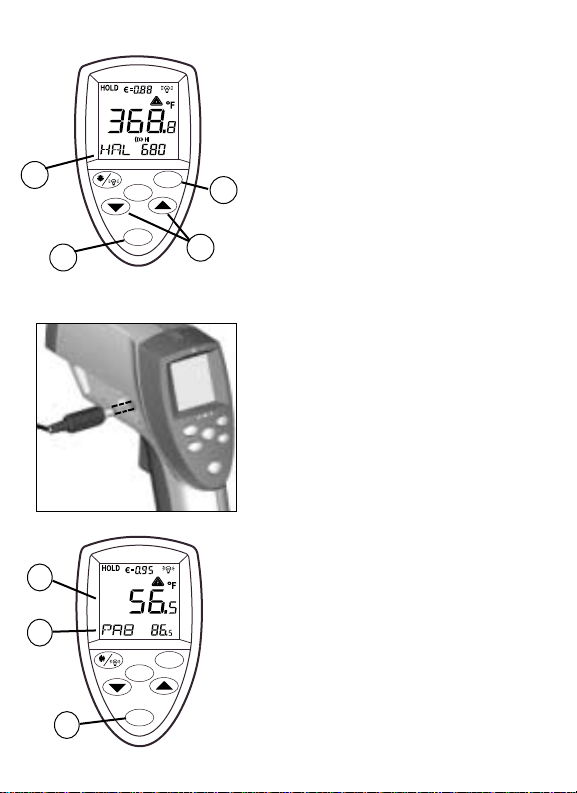
Setting the High Alarm, Low
Alarm, and Emissivity
To set values for the High Alarm (HAL), Low
Alarm (LAL), and emissivity, pull the trigger
or press the MODE button (3) to activate the
display. Press the MODE button until the
appropriate code appears in the lower left
corner of the display (E). Use the up and
down keys (2) to adjust the desired values.
To activate the alarms, press SET (1). To
deactivate the alarms, press SET again.
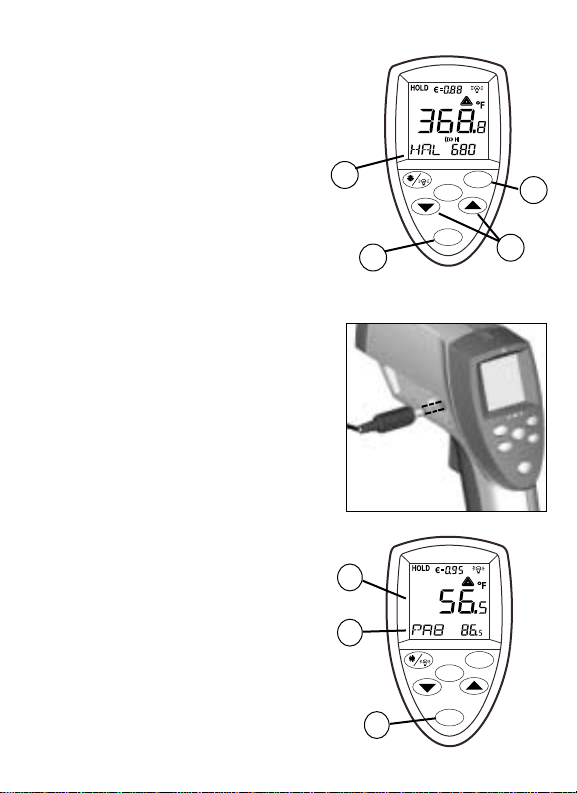
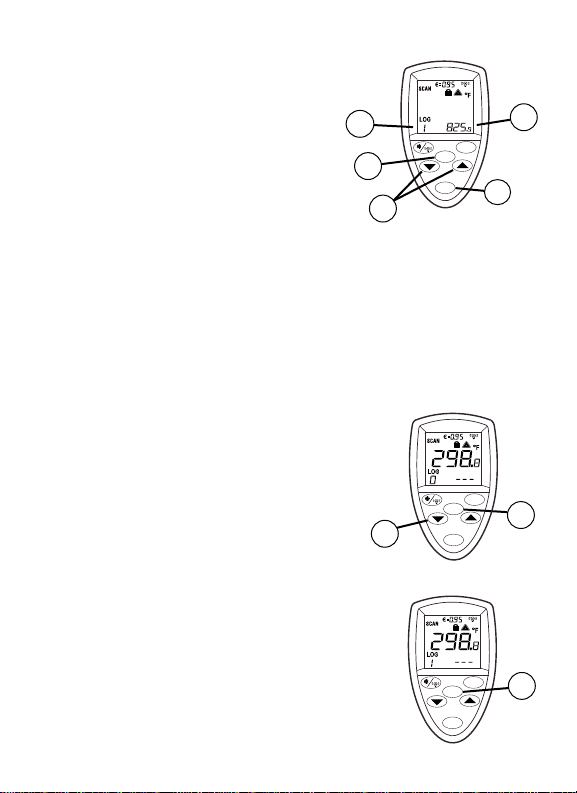
Using a Probe (PRB)
Connect the probe to the input on the side of
the unit (as shown). PRB automatically
appears in the lower left corner of the display
(E, below). The probe temperature is shown
in the lower right part of the display. The current infrared temperature continues to show
in the center of the display (F). While the
probe is connected, you may still cycle
through the mode functions by pressing
MODE (3).
Note: PRB is only available in the MODE
loop when a probe is connected to the unit;
the probe temperature will not activate the
high alarm or low alarm.
3
2
1
E
E
F
3
LOG
MODE
SET
SET
LOG
MODE
Page 13
English
11
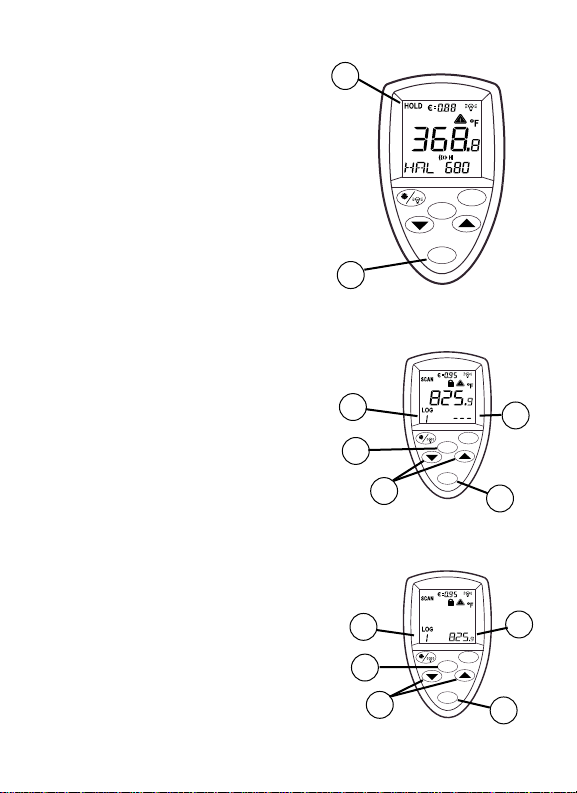
Storing Data
Your thermometer is capable of storing up to
12 data locations. The infrared temperature,
temperature scale (°C or °F), and emissivity
are also stored.
Infrared
To store data from an infrared reading, pull
the trigger. While holding the trigger, press
the MODE button (3) until LOG appears in
the lower left corner of the display (E); a log
location number will be shown below LOG. If
no temperature has been recorded in the
shown LOG location, 3 dashes will appear in
the lower right corner. Aim the unit at the target area you want to record, and press the
LOG button (5). You will hear a tone to confirm that the location temperature has been
recorded. The recorded temperature will
appear in the lower right corner (D). To select
another log location, press the up and down
keys (2).
Hold and Recall
The unit’s display will remain activated (HOLD)
for seven seconds after the trigger is released
(unless the unit is locked on); HOLD will
appear in the upper left corner of the display
(H). During HOLD, or after the unit shuts off,
you can recall stored values by pressing the
MODE button (3) without pulling the trigger.
Each time you press the MODE button, you
advance through the Mode Cycle. When the
trigger is pulled again, the unit will begin measuring in the last Mode selected.
H
3
E
5
2
3
D
E
5
2
3
D
SET
LOG
MODE
LOG
MODE
LOG
MODE
SET
SET
Page 14
English
12
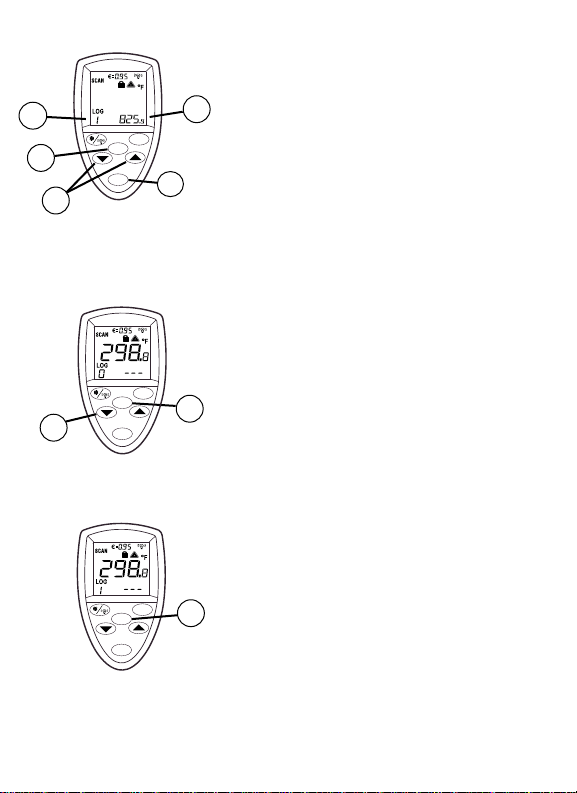
Recalling Data
To recall stored data after the unit shuts off, press
the MODE button (3) until LOG appears in the
lower left corner (E). A LOG location number will
be shown below LOG, and the stored temperature
for that location will be shown in the lower right
corner of the display (D). To move to another LOG
location, press the Up and Down keys (2).
E
5
2
3
D
SET
MODE
LOG
D
SET
MODE
LOG
D
2
Log Clear Function
The "LOG clear" function allows you to quickly
clear all logged data points. This function can
only be used when the unit is in LOG mode. It can
be used when the user has any number of log
locations stored.
CAUTION: You should only use the LOG clear
function if you want to clear all at once the Log
location data that is stored in the unit's memory.
The "LOG clear" function works as follows:
1) While in LOG mode, press the trigger, and then
press the "down" arrow button (2) until you reach
LOG location "0".
NOTE: This can only be done when the trigger is
pulled. LOG location "0" cannot be accessed, by
using the "up" arrow button.
2) When LOG location "0" shows in the lower lefthand corner of the display, press the LOG button
(D). Three tones will sound, and the LOG location
will automatically change to "1", signifying that all
data locations have been cleared.
SET
LOG
MODE
Page 15

English
13
Maintenance
Cleaning the lens: Blow off loose particles using clean compressed air. Gently
brush remaining debris away with a camel's hair brush. Carefully wipe the surface
with a moist cotton swab. The swab may be moistened with water. NOTE: DO NOT
use solvents to clean the glass lens.
Cleaning the housing: Use soap and water on a damp sponge or soft cloth. NOTE: DO
NOT submerge the unit in water.
Reminders
■ Not recommended for use in measuring shiny or polished metal surfaces
(stainless steel, aluminum, etc.). See “Emissivity” for measuring these surfaces.
■ The unit cannot measure through transparent surfaces such as glass or plastic.
It will measure the surface temperature of these materials instead.
■ Steam, dust, smoke, or other particles can prevent accurate measurement by
obstructing the unit’s optics.
Page 16
English
14
CE Certification
This instrument conforms to the following standards:
• EN50081-1:1992, Electromagnetic Emissions
• EN50082-1:1997, Electromagnetic Susceptibility
Tests were conducted using a frequency range of 80-1000 MHz with the instrument in
three orientations. The average error for the three orientations is ±1.4°C (±2.5°F) at 3
v/m throughout the spectrum. However, between 162 MHz and 792 MHz at 3 V/m, the
instrument may not meet its stated accuracy.
Troubleshooting
Code Problem Action
– – – (on display) Target temperature Select target within specifications
is over or under range
Battery icon
appears Low battery Check and/or replace battery
Blank display Possible dead battery Check and/or replace battery
Laser doesn’t work (1) Low or dead battery (1) Replace battery
(2) Ambient temperature (2) Use in area with lower ambient
above 40°C (104°F) temperature
ERR Possible damage Contact your distributor
by EMF
Page 17
15
Deutsch
Warnung
Richten Sie den Laser nicht direkt oder indirekt über
reflektierende Oberflächen auf die Augen.
Vorsichtsmaßnahmen
Alle Modelle müssen vor folgenden Zuständen
geschützt werden:
▲ EMF (elektromagnetische Felder) von
Elektroschweißgeräten, Induktionsheizgeräten
▲ statischer Elektrizität
▲ Thermischer Schock (verursacht durch große
oder plötzliche Temperaturänderungen – Gerät
vor Gebrauch 30 Minuten lang stabilisieren
lassen)
▲ Gerät nicht auf oder in der Nähe von heißen
Objekten aufbewahren.
AVOID EXPOSURE - LASER RADIATION
IS EMITTED FROM THIS APERTURE
CAUTION
LASER RADIATION – DO NOT STARE INTO BEAM
OUTPUT < 1mW WAVELENGTH 630 – 670 nm
CLASS II LASER PRODUCT
Page 18
16
Deutsch
Ausstattung
Ihr Thermometer besitzt:
• ein Laserkreisvisier
• Emissionsgradeinstellung
• Alarmierung bei Grenzwertüberschreitung
(Max/Min Alarm)
• Anzeige von MAX (Maximal), MIN(Minimal),
DIF(Differenz) und AVG (Mittelwert)
Temperaturen
• Datenspeicher
• Arrettierung der Messtaste für Dauerbetrieb
• beleuchtete Anzeige
• Messfühleranschluss
• Hartschalenkoffer und Trageschlaufe
Zubehör
Optional sind zusätzlich erhältlich:
• Messfühler (RTD)
• Gürteltasche
• DKD Zertifikat
Laservisiereinrichtung
Der Laserkreis wird durch acht kreisförmig angeordnete Punkte gebildet und dient zur Anzeige des
Messfeldes. In dunkler Umgebung können außerhalb des eigentlichen Laserkreises weitere
Markierungen erscheinen. Diese sind optisch
unvermeidbar und dienen nicht zum Markieren
des Messfeldes.
Page 19

17
SET
MODE
LOG
A
B
C
D
E
F
G
H
I
J
4
5
2
1
3
Deutsch
Im SCAN Modus werden sowohl die gemessene Temperatur (G), in Celsius oder
Fahrenheit (B), als auch die ausgewählten Funktionen (D, E) angezeigt. Der zuletzt
gemessene Wert verbleibt nach dem Loslassen der Messtaste für weitere 7 Sekunden im
Display, HOLD erscheint in der Anzeige (H). Bei schwacher Batterie erscheint das
Batterie-Symbol, das Gerät arbeitet weiter. Bei leerer Batterie bleibt die Anzeige leer. Um
Laser und Beleuchtung zu aktivieren, Messtaste drücken und dann die
Laser/Beleuchtungs-Taste (4) betätigen: - einmal zum Einschalten der Beleuchtung zweimal um den Laser hinzu zu schalten und dreimal, um beides auszuschalten.
Anzeige
A) Symbol: Anzeigenbeleuchtung “an”
B) °F/°C Symbol
C) Symbol für obere (HAL) und untere
(LAL) Temperaturgrenzwerte
D) Werte für MAX, MIN, DIF, AVG
(Mittelwert), HAL (oberer Grenzwert)
und LAL (unterer Grenzwert)
E) Symbole für MAX, MIN, DIF, AVG,
HAL, LAL, PRB (Messfühler)
F) Das LOG Symbol zeigt den
Datenspeichermodus an
G) aktueller Temperaturwert
H) SCAN oder HOLD (Messen oder
Haltemodus)
I) Emissionsgradsymbol und -wert
J) Anzeige des Batteriezustandes, der
Messtastenarrettierung und des
Laserbetriebszustandes
1) SET-Taste (zum Einstellen von oberem und
unterem Grenzwert)
2) Pfeiltasten
3) MODE-Taste (Bei Betätigung werden die
einzelnen Modi nacheinander aufgerufen)
4) Taste zum Ein- und Ausschalten des Lasers
oder der Anzeigenbeleuchtung (Funktioniert
nur bei gedrückter Messtaste)
5) Messwertspeichertaste
Page 20
18
Reflected energy
Emitted
Energy
Transmitted energy
Target
Deutsch
Einführung
Wir sind überzeugt, daß Sie für Ihr
handgehaltenes berührungsloses
Thermometer zahlreiche Anwendungen
finden werden. Kompakt, robust und einfach zu bedienen – einfach auf das Ziel
richten, den Knopf drücken, und in
weniger als einer Sekunde können Sie die
momentane Oberflächentemperatur ablesen. So lassen sich die
Oberflächentemperaturen von heißen,
gefährlichen oder schwer erreichbaren
Objekten gefahrlos und ohne Berührung
bestimmen.
Funktionsweise
Infrarot-Thermometer messen die
Oberflächentemperatur eines Objekts
(Target). Die Optik des Gerätes erfaßt die
emittierte, reflektierte und durchgelassene
Wärmestrahlung, die gebündelt und auf
einen Detektor fokussiert wird. Die
Geräteelektronik wandelt diese Information
in einen Temperaturwert um, der auf dem
Display angezeigt wird. Bei Geräten mit
einem Laser wird der Laser lediglich zum
Zielen verwendet.
Page 21
+
-
19
A
B
Taste
Deutsch
Zum Öffnen des Gerätehandgriffs drücken Sie den
Knopf auf der Geräteunterseite in der Nähe der
Messtaste. Ziehen Sie nun den oberen Teil des
Griffes nach vorn. Um zwischen °C und °F
umzuschalten, schieben Sie den Schalter (A) in die
gewünschte Position.
Die Messtastenarrettierung für kontinuierliche
Messungen: Schieben Sie den Schalter (B) nach
unten. Wenn Sie nun zusätzlich die Messtaste
betätigen, werden Laser und Beleuchtung
eingeschaltet, falls diese zuvor aktiviert wurden
(siehe Anschnitt “Bedienelemente” dieser
Anleitung). Bei arrettierter Messtaste schaltet sich
der Laser nach Loslassen der Messtaste aus. Die
Beleuchtung bleibt unabhängig hiervon eingeschaltet, es sei denn sie wurde deaktiviert.
Setzen sie eine neue 9V Batterie so ein, dass
die Polung korrekt ist.
Umschalten zwischen °C und °F;
Messtastenarrettierung; Batteriewechsel
Bedienung des Gerätes
Bedienung des Gerätes
Zur Temperaturbestimmung wird das Gerät
auf ein Objekt gerichtet und die Meßtaste
gedrückt. Denken Sie daran, das Verhältnis
von Entfernung zu Punktgröße sowie das
Sichtfeld zu berücksichtigen. Falls das Gerät
mit einem Laser ausgerüstet ist, benutzen Sie
den Laser bitte nur zum Zielen. Siehe
Abschnitt „Korrekte Temperaturbestimmung“.
Detaillierte Hinweise finden Sie im Abschnitt:
Wie messe ich Temperaturen exakt.
Page 22
20
Ja
Nein
Deutsch
Sokönnen Sie präzise die
Temperaturmessen
Feststellen von
Temperaturabweichungen
Um Temperaturabweichungen sicher
festzustellen, zielen Sie mit dem Gerät
außerhalb des interessanten Bereiches und
tasten dann zeilenweise über die
Messfläche, bis Sie die abweichende
Temperatur gefunden haben.
Sichtfeld
Achten Sie darauf, daß das Meßobjekt
größer ist als die Meßfleckgröße des
Gerätes. Je kleiner das Meßobjekt , desto
näher müssen Sie an das Objekt herangehen. (Siehe Abbildung an der Geräteseite)
Emissiongrad
Der Emissionsgrad beschreibt die Eigenschaften von Materialien in Hinblick auf
deren Energieabstrahlung. Die meisten organischen Materialien sowie lackierte
und oxidierte Oberflächen besitzen einen Emissionsgrad von 0,95. Die
Bestimmung der Temperaturen glänzender oder hochpolierter Metalloberflächen
ergibt ungenaue Meßwerte. Zur Kompensierung kann die zu messende Oberfläche
mit Klebeband abgedeckt oder mit mattschwarzer Farbe angestrichen werden (<
300°F/148°C). Warten Sie, bis das Klebeband dieselbe Temperatur wie das unterliegende Material aufweist. Bestimmen Sie dann die Temperatur des Klebebands
oder der angestrichenen Oberfläche.
Page 23

21
Entfernung & Meßfleckgröße
Mit größer werdender Entfernung (D) zum Objekt nimmt auch die
Meßfleckgröße (S) zu. Das Verhältnis zwischen Entfernung und Meßfleckgröße
ist jeweils für die Geräte unten angegeben. Der Scharfpunkt jedes Gerätes ist
in einer Entfernung von 914mm (36"). Innerhalb des Meßfleckkreises befinden
sich 90% der Gesamtenergie.
Enhanced Model
D:S = 50:1
Standard Model
D:S = 30:1
D
S
D
S
Deutsch
Page 24
22
3
E
Deutsch
Einstellungen mit Hilfe der MODE-Taste
Ihr Infrarot-Thermometer kann Maximum- (MAX),
Minimum- (MIN), Differenz- (DIF)* und Mittelwert(AVG)** Temperaturen bei jeder Messung anzeigen.
Diese Daten werden gespeichert und können so lange
wieder mittels der MODE-Taste (3) aufgerufen werden,
bis ein neuer Messvorgang durchgeführt wird. (Siehe
auch Punkt Halten und Speicher zeigen). Die neue
Messung geschieht im zuletzt ausgewählten Modus.
Mit Hilfe der MODE-Taste haben Sie auch Zugriff auf
die oberen (HAL) und unteren (LAL)
Temperaturgrenzwerte, den Emissionsgrad (EMS), die
Messfühlertemperatur (PRB – nur verfügbar wenn ein
Messfühler angeschlossen ist) und den Datenspeicher
(LOG). Mit jedem Drücken der MODE-Taste rufen Sie
nacheinander die verschiedenen Funktionen auf. In der
untenstehenden Abbildung sehen den gesamten
Zyklus.
Hinweis: PRB (Messfühler) erscheint nur dann im
MODE-Zyklus, wenn ein Messfühler angeschlossen
ist.
*DIF gibt den Differenzwert zwischen höchster und
niedrigster gemessener Temperatur an.
**AVG gibt den Mittelwert über den Zeitraum einer
Messung an, egal ob die Messung durch einfaches
Drücken der Messtaste oder über einen längeren
Zeitraum nach Arrettierung erfolgte.
Auswahl einer Funktion
Um zum MAX, MIN, DIF oder AVG Modus zu gelangen, betätigen Sie die Messtaste und halten Sie
diese fest. Dann drücken Sie die MODE-Taste (3) so
oft bis die gewünschte Funktion in der linken untere
Ecke der Anzeige erscheint (E). Mit jedem Drücken
der MODE-Taste gehen Sie vorwärts durch den
rechts abgebildeten Zyklus.
LOG
SET
MODE
Page 25
23
Einstellung von oberem (HAL) und
unterem (LAL) Grenzwert sowie des
Emissionsgrades (EMS)
Halten Sie die Messtaste gedrückt und
betätigen Sie die MODE-Taste (3) bis die
gewünschte Funktion in der linken unteren
Ecke der Anzeige erscheint (E). Mit den
Pfeiltasten (2) stellen Sie die gewünschten
Werte ein. Um die Alarmierung zu aktivieren,
drücken Sie SET (1). Drücken Sie die SETTaste erneut um High Alarm und Low Alarm
zu deaktivieren.
Einsatz eines Messfühlers (PRB)
Verbinden Sie den Messfühler über den
Anschluss an der Seite des Gerätes (siehe
Abb.). PRB erscheint automatisch in der
linken unteren Ecke der Anzeige (E, Abb.
unten). Die durch den Messfühler erfasste
Temperatur erscheint in der rechten unteren
Ecke der Anzeige. Gleichzeitig ist die InfrarotTemperatur im Zentrum der Anzeige (F) zu
sehen. Auch wenn ein Messfühler
angeschlossen ist, können Sie mit Hilfe der
MODE-Taste (3) die weiteren Funktionen
aufrufen.
Hinweis: PRB ist nur verfügbar, wenn ein
Messfühler an das Gerät angeschlossen ist.
Für die Messfühlertemperaturen können
keine oberen und unteren Grenzwerte
eingestellt werden.
3
2
1
E
E
F
3
Deutsch
LOG
MODE
SET
SET
LOG
MODE
Page 26
24
Datenspeicherung
Ihr Infrarot-Thermometer kann bis zu 12
Messungen abspeichern. Gespeichert werden der
IR-Temperaturwert, die Maßeinheit (°C oder °F)
und der Emissionsgrad.
Um die Messdaten abzuspeichern, betätigen Sie
die Messtaste. Bei gedrückter Messtaste betätigen
Sie den MODE-Knopf bis LOG in der unteren
linken Ecke der Anzeige (E) erscheint. Eine
Speicherplatznummer ist unterhalb von LOG zu
sehen. Falls in den angezeigten Speicherplatz
keine Temperatur eingelesen wurde, sehen Sie
drei Striche in der unteren rechten Ecke der
Anzeige. Richten Sie nun das Gerät auf das
Messziel und drücken Sie den LOG - Knopf (5).
Ein Quittierton zeigt die erfolgreiche
Abspeicherung an. Der eingelesene
Temperaturwert erscheint in der unteren rechten
Ecke (D). Um einen anderen Speicherplatz
auszuwählen, drücken Sie die Pfeiltasten (2).
Halten und Speicher zeigen
Die Anzeige bleibt für ca. 7 Sekunden nach
Loslassen der Messtaste eingeschaltet (HOLD), es
sei denn die Messtaste ist arrettiert; HOLD
erscheint in der oberen linken Ecke der Anzeige
(H). Während der Haltephase oder nachdem sich
das Gerät völlig ausgeschaltet hat, können die
zuletzt gespeicherten Messwerte zurückgerufen
werden. Drücken Sie hierzu die MODE-Taste (3)
ohne die Messtaste zu betätigen. Mit jedem Druck
auf die MODE-Taste durchlaufen Sie den MODEZyklus. Bei erneuter Betätigung der Messtaste
beginnt das Gerät mit einer neuen Messung im
zuletzt ausgewählten Modus.trigger is pulled
again, the unit will begin measuring in the last
mode selected.
H
3
Deutsch
E
5
2
3
D
E
5
2
3
D
LOG
SET
MODE
SET
LOG
MODE
SET
LOG
MODE
Page 27
25
Abrufen der gespeicherten
Messwerte
Datenrückruf
Um nach dem Ausschalten des Gerätes bereits abgespeicherte Daten anzuzeigen, drücken Sie den MODEKnopf (3) bis LOG in der unteren linken Ecke der
Anzeige erscheint. Die Speicherplatznummer steht
unterhalb von LOG (D) und der dazugehörige
Temperaturwert ist in der unteren rechten Ecke der
Anzeige (D) zu sehen. Der Aufruf anderer
Speicherplätze erfolgt mit den Pfeiltasten (2).
Deutsch
E
5
2
3
D
SET
MODE
LOG
D
SET
MODE
LOG
D
2
Speicherlöschfunktion
Mit Hilfe der Speicherlöschfunktion können Sie den
Inhalt des Datenspeichers des Gerätes in einem
Schritt komplett löschen. Diese Funktion steht nur zur
Verfügung, wenn sich das Gerät im LOG Modus
befindet und bereits eine Datenspeicherung stattgefunden hat.
ACHTUNG: Sie sollten die Speicherlöschfunktion nur
verwenden, wenn Sie wirklich alle im Gerätespeicher
befindlichen Daten mit einem Schritt löschen wollen.
Gehen Sie wie folgt vor:
1. Wenn sich das Gerät im LOG Modus befindet,
drücken Sie die Messtaste. Bei weiterhin gedrückter
Messtaste betätigen Sie die Abwärtstaste (2) um den
Speicherplatz (LOG) "0" zu erreichen.
HINWEIS: Das funktioniert nur bei gedrückter
Messtaste. Der Speicherplatz "0" kann nicht mit der
Aufwärtstaste erreicht werden.
2. Wenn der Speicherplatz "0" in der unteren linken
Ecke der Anzeige erscheint, drücken Sie die LOGTaste (D). Sie hören drei Signaltöne und die
Speicherplatzanzeige wechselt zu "1". Damit ist der
Löschvorgang abgeschlossen.
LOG
MODE
SET
Page 28

26
Deutsch
Wartung
Reinigung der Linse: Blasen Sie lose Teilchen mit reiner Preßluft weg.
Zurückbleibende Verunreinigungen werden dann vorsichtig mit einem weichen
Pinsel entfernt. Wischen Sie die Oberfläche vorsichtig mit einem feuchten
Wattebausch ab. Der Wattebausch kann mit Wasser befeuchtet werden. HINWEIS:
KEINE Lösungsmittel zur Reinigung der Linse verwenden.
Reinigung des Gehäuses: Mit Seifenlösung und Schwamm oder einem weichen
Tuch reinigen. HINWEIS: Das Gerät darf NICHT in Wasser eingetaucht werden..
Hinweise
■ Zur Messung von Temperaturen glänzender oder hochpolierter
Metalloberflächen (z.B. Edelstahl, Aluminium usw.) wird das Gerät nicht empfohlen. Siehe Abschnitt „Emissionsgrad“.
■ Es ist nicht möglich durch transparente Materialien, wie Glas oder Kunststoff
hindurchzumessen. Gemessen wird grundsätzlich die Oberflächentemperatur.
■ Dampf, Staub, Rauch usw. können die korrekte Temperaturbestimmung behin-
dern.
Page 29

27
Anzeige Problem Abhilfe
– – – Temperatur des Mess- Wählen Sie ein Messobjekt innerhalb
objektes außerhalb der Messwertgrenzen des Gerätes
Messwertgrenzen des
Gerätes
Batteriesymbol schwache Batterie Batterie prüfen und/oder ersetzen
keine Anzeige Wahrscheinlich leere Batterie Batterie prüfen und/oder ersetzen
Laser arbeitet nicht (1) Batterie ist zu schwach (1) Batterie ersetzen
(2) Umgebungstemperatur (2) Arbeiten Sie bei geringerer
ist oberhalb 40°C Umgebungstemperatur
ERR Wahrscheinlich wurde Rufen Sie Ihren Händler an
das Gerät durch zu hohe
elektromagnetische Felder
zerstört
Deutsch
CE=Zertifizierung
Dieses Gerät entspricht den folgenden Normen:
• EN50081-1:1992 (elektromagnetische Störstrahlung)
• EN50082-1:1997 (elektromagnetische Störstrahlung)
Das Gerät wurde Tests in einem Frequenzbereich von 80-1000 MHz in drei Ausrichtungen unter-
zogen. Der durchschnittliche Fehlerwert für die drei Ausrichtungen beträgt ± 1,4°C (±2,5°F) bei
3 V/m im Testspektrum. Im Bereich zwischen 162 MHz und 792 MHz bei 3 V/m kann es jedoch
sein, daß das Gerät der angegebenen Genauigkeit nicht entspricht.
Fehlersuche und -behebung
Page 30

28
Français
Avertissement
Ne pointez pas le rayon laser directement dans les
yeux ou indirectement sur des surfaces
réfléchissantes.
Précautions
Tous les modèles doivent être protégés contre :
• les champs électromagnétiques des postes de
soudure, les appareils de chauffage
par induction
• l’électricité statique
• les chocs thermiques (causés par d’importants
ou de brusques changements de température laissez le thermomètre se stabiliser pendant
30 minutes avant de l’utiliser)
• Ne laissez pas le thermomètre sur ou à proximité d’objets à température élevée.
AVOID EXPOSURE - LASER RADIATION
IS EMITTED FROM THIS APERTURE
CAUTION
LASER RADIATION – DO NOT STARE INTO BEAM
OUTPUT < 1mW WAVELENGTH 630 – 670 nm
CLASS II LASER PRODUCT
Page 31

29
Caractéristiques
Votre thermomètre comprend:
• Visée laser circulaire
• Emissivité réglable
• Alarme haute et basse
• Affichage des températures
MAX,MIN,DIF,AVG
• Acquisition de données
• Verrouillage de la gâchette
• Afficheur rétro-éclairé
• Connectique pour sonde de contact
Mallette et dragonne
Accessoires
Les accessoires optionnels pour votre
Thermomètres sont :
• Sonde de contact (RTD)
• Holste
• Etalonnage NIST/DKD
Visée circulaire laser
La surface mesurée est figurée par un cercle
constitué de 8 points laser Dans certaines conditions de luminosité, des halos laser circulaires peuvent apparaître. Ils n'ont aucune
fonction de visée. N'utiliser que le cercle de 8
points.
Français
Page 32

En mode SCAN, sont affichées la tem-
pérature courante (G)et la fonction sélectionnée (D,E) en Celsius ou Fahrenheit (B).L'appareil maintient la dernière mesure 7
secondes après avoir relâché la gâchette. Le mot HOLD apparaît(H). Quand la pile est
faible, l'icône correspondant s'affiche, mais l 'appareil continue à fonctionner. A la fin
de vie de la pile, l'afficheur s'éteint et l'appareil s'arrête. Pour activer le laser et le
rétro-éclairage appuyer sur la gâchette et sur le bouton (4) laser /rétro-éclairage une
première fois pour le rétro-éclairage, une deuxième fois pour activer le laser et une
troisième pour le désactiver.
30
Interface utilisateur
Affichage
A) Symbole de rétro-éclairage activé
B) Symbole °F/°C
C) Symbole alarme haute et alarme basse
D) Valeurs des températures MAX,MIN,
DIF,AVG,HAL (alarme haute) et LAL
(alarme basse)
E) Symboles pour
MAX,MIN,DIF,AVG,HAL,LAL,PRB
F) icône LOG montre le mode log pour
acquisition de données
G) Valeur de température en cours
H) SCAN ou HOLD
I) Symbole émissivité et valeur
J) Boutons symbole de pile faible,
verrouillage actif et laser allumé
Boutons
1) Bouton SET (réglage de l'alarme
haute et basse)
2) Boutons haut et bas
3) Bouton MODE (circulation dans la
boucle de paramétrage)
4) Bouton Laser/Rétro-éclairage actif /
désactivé (appuyer sur la gâchette et
sur le bouton pour activer le laser /
rétroéclairage)
5) Bouton LOG (pour acquisition de
données)
SET
MODE
LOG
A
B
C
D
E
F
G
H
I
J
4
5
2
1
3
Français
Page 33

31
Reflected energy
Emitted
Energy
Transmitted energy
Target
Français
Introduction
Nous sommes certains que vous trouverez
plusieurs utilisations pour le thermomètre
portable sans
contact . Compact, robuste et facile à
utiliser - il suffit de viser, d’appuyer sur la
gâchette pour lire la température courante
de surface en moins d’une seconde. Vous
pouvez ainsi mesurer en toute sécurité les
températures de surface d’objets les
toucher brulants, dangereux ou difficiles
d’accès, sans contact.
Principe de fonctionnement
Les thermomètres à infrarouge mesurent
la température de surface d’un objet.
L’optique de l’instrument capte l’énergie
émise, réfléchie et transmise ;celle-ci est
recueillie, puis dirigée sur un détecteur.
L’électronique du thermomètre traduit
cette information et affiche la température.
Le laser ne sert qu’à viser.
Page 34

+
-
32
Principe de fonctionnement
Utilisation du thermomètre
Pour mesurer une température, pointez l’instrument sur un objet et appuyez sur la
gâchette. Veillez tenir compte du champ de
visée et du rapport distance-dimension du
spot. L’usage du laser est réservé à la visée
de la cible. Pour des instructions plus détaillées , voir Comment mesurer précisément
des températures
Pour ouvrir la poignée de l'appareil, pousser
le bouton en face inférieure près de la
gâchette et tirer le haut de la poignée. Pour
commuter de °C à °F, positionner le commutateur (A) sur l'unité recherchée .
Pour verrouiller l'appareil en mesure continue, mettre le commutateur (B) en position
basse. Si la gâchette est activée pendant que
le verrouillage est enclenché, alors le laser et
le rétro-éclairage seront mis en marche( à la
condition qu'ils aient été activés préalablement au verrouillage / se reporter aux
instructions Interface utilisateur). Inversement
le relâchement de la gâchette provoquera une
extinction du laser, mais le rétro-éclairage
restera actif tant que le bouton Laser/Rétroéclairage n'aura pas été réutiliser . Ne pas
oublier de déverrouiller l'appareil pour pouvoir ne déclencher une mesure que par l'appui de la gâchette.
Pour changer de pile 9V, insérer le plus vers
le fond du compartiment.
Bouton
Français
Commutation °C et °F; verrouillage de
l'appareil; remplacement de la pile
A
B
Page 35

33
Comment mesurer précisément
la température
Localiser un point chaud ou froid
Pour trouver un point chaud ou froid, viser
en dehors de la zone à contrôler ; puis balayer de haut en bas la zone à contrôler jusqu’à
identification d’un point chaud ou froid.
Champ de visée
Assurez-vous que la cible est plus grande
que le spot mesuré par le thermomètre. Plus
la cible est petite, plus vous devrez vous en
rapprocher.
Oui
Non
Emissivité
L’émissivité caractérise la capacité d’émission
d’énergie de la surface d’un matériau. La plupart des matières organiques, ainsi que les
surfaces peintes ou oxydées ont une émissivité de 0,95. Des résultats inexacts peuvent
s’afficher en mesurant la température de surfaces métalliques brillantes ou polies. Pour
corriger cela, couvrez la surface à mesurer à
l’aide de ruban adhésif (résistant à la température mesurée) ou d’une peinture noire
mate (< 300°F/148°C). Laissez le ruban
adhésif atteindre la mÍme température que le
matériau recouvert. Mesurez la température
de la surface recouverte.
Français
Page 36

34
Distance et taille du spot mesuré
La taille du spot mesuré (S) s’accroît avec la distance (D) séparant le
thermomètre de la cible.
Au point focal est 0,914 m/36 inches.
Enhanced Model
D:S = 50:1
Standard Model
D:S = 30:1
D
S
D
S
Français
Page 37

35
Sélection d'une fonction
Pour sélectionner le mode MAX, MIN, DIF ou AVG
appuyez sur la gâchette, maintenez la en position et
appuyez sur le bouton MODE(3) jusqu'à l'apparition
du mode choisi dans le coin(E) inférieur gauche de
l'écran. Chaque appui sur MODE, permet d'avancer
dans le cycle. Ce dernier est présenté à droite.
3
E
Français
Fonctions du bouton MODE
Pour chaque séquence de mesure sont traitées
simultanément la valeur MAX, la valeur MIN, la différence DIF entre le MAX et le MIN, la valeur
moyenne AVG. Ces données sont stockées et peuvent être rappelées avec le bouton MODE (3), tant
qu'une nouvelle séquence de mesure n'a pas été initiée(voir Maintien et Rappel). Dès que la gâchette est
de nouveau activée une nouvelle séquence de
mesure est amorcée et l'affichage se fera dans le
dernier mode sélectionné.
L'appui sur le bouton MODE vous donne également
accès aux alarmes haute (HAL)et basse(LAL), à
l'émissivité (EMS), à la température de la sonde
(PRB-uniquement disponible si la sonde est connectée) et à l'acquisition de données (LOG). Chaque
fois que vous appuyez sur MODE, vous avancez
dans le cycle mode. L e diagramme présente la
séquence des fonctions liées à MODE.
Nota : PRB (sonde) n'apparaît dans le cycle mode
que si la sonde de contact est raccordée à l'appareil.
LOG
MODE
SET
Page 38

36
Réglage des alarmes haute, basse et de
l’émissivité
Pour régler les valeurs des alarmes haute,
basse et de l’émissivité (EMS), appuyez sur
la gâchette, maintenez la en position et
appuyez sur le bouton MODE(3) jusqu’à
l’apparition du mode choisi dans le coin(E)
inférieur gauche de l’écran. Utilisez les
touches « flèche haute », flèche basse »(2)
pour ajuster la valeur souhaitée. Pour activer les alarmes, appuyer sur SET(1).
Usage d'une sonde (PRB)
Raccordez la sonde à l'entrée latérale
(comme montré). PRB apparaît automatiquement dans le coin(E) inférieur gauche de
l'écran. La température de la sonde est
affichée dans la partie inférieure basse de
l'écran. La valeur courante mesurée par
infrarouge continue d'être affichée au centre
de l'écran (F). quand la sonde est raccordée
vous avez toujours accès au MODE(3)
Nota : PRB (sonde) n'apparaît dans le cycle
mode que si la sonde de contact est raccordée à l'appareil.
La température de la sonde ne peut pas
déclencher les alarmes haute et basse.
3
2
1
E
E
F
3
Français
LOG
MODE
LOG
SET
SET
MODE
Page 39

37
Mémorisation de données
Pour mémoriser une mesure à partir
d'une lecture, appuyer d'abord surla
gâchette.Pendant que la gâchette est maintenue, appuyer sur la touche MODE (3),
jusqu'à apparition de LOG dans le coin
inférieur gauche de l'afficheur (E);un numéro
de position mémoire s'inscrit sous LOG. Si
aucune température n'a déjà été mémorisée à
cette position, 3 tirets apparaissent dans le
coin inférieur droit. Viser alors la cible dont
vous souhaitez mémoriser la température,
puis appuyer sur la touche LOG (5).
L'émission d'un signal sonore confirmera le
bon enregistrement. La mesure mémorisée
apparaîtra dans le coin inférieur droit (D).
Pour passer à une autre position mémoire,
utiliser les flèches haute et basse (2).
Rappel et maintien
L'afficheur de l'appareil reste actif (fonction
HOLD) sept secondes après que a gâchette ait
été relâchée (à moins que l'appareil soit verouillé) ; HOLD apparaîtra dans le coin
supérieur gauche de l'écran (H). Pendant le
maintien (HOLD), ou après que l'appareil se
soit éteint, vous pouvez rappelez les valeurs
stockées avec le bouton MODE (3), sans
activer la gâchette. Chaque fois que vous
appuyez sur MODE, vous avancez dans le
cycle. Dès que la gâchette est de nouveau
activée une nouvelle séquence de mesure est
amorcée et l'affichage se fera dans le dernier
mode sélectionné.
H
3
Français
E
5
2
3
D
E
5
2
3
D
SET
LOG
MODE
LOG
MODE
LOG
MODE
SET
SET
Page 40

38
Rappel des données
Rappel de valeurs mémorisées
Pour rappeler des mesures stockées après que
l'appareil se soit éteint, appuyer sur la touche
MODE (3) jusqu'à l'apparition de LOG dans le
coin inférieur gauche. Un numéro de position
mémoire s'affiche sous LOG (D). La valeur de
température correspondante s'inscrit dans le
coin inférieur droit(D). Pour rechercher une
autre position mémoire, utiliser les flèches
haute et basse (2).
Français
E
5
2
3
D
SET
MODE
LOG
D
SET
MODE
LOG
D
2
La fonction "Log Clear"
(effacement des acquisitions)
La fonction "Log Clear" ( effacement des acquisitions) permet d'effacer très rapidement toutes
les mesures acquises (donc mémorisées). Cette
fonction ne peut être activée qu'avec l'appareil
en mode " Log " (acquisition), quelque soit le
nombre de points mémorisés.
ATTENTION: N'utiliser la fonction "Log Clear"
que si vous souhaitez effacer en une seule fois
toutes les mesures acquises et mémorisées.
Mode d'utilisation de la fonction "Log Clear"
1) L'appareil étant en mode "Log", activer la
gâchette, la maintenir, puis appuyer sur la flèche
basse (2) jusqu'à l'apparition de la position " 0
".
REMARQUE : La position " 0 " ne peut pas être
atteinte avec la flèche haute
2) Quand la position "0" apparaît, appuyer sur
la touche " Log " (D). Trois sons sont émis, et la
position " 1 " s'affiche. Cela signifie que tout a
été effacé.
SET
LOG
MODE
Page 41

39
Français
Rappels
• Il est déconseillé d’utiliser ce thermomètre pour mesurer la température de surfaces métalliques brillantes ou polies (acier inoxydable, aluminium, etc.). Voir
Emissivité.
• L’appareil ne peut mesurer au travers de matières transparentes telles que le verre
ou le plastique. Il mesurera par contre la surface de ces matériaux transparents .
• La précision des résultats peut être faussée par la présence de vapeur, de poussière, de fumée, etc.
Entretien
Nettoyage de l’optique : ôtez les particules libres en soufflant de l’air comprimé propre. Eliminez les débris restants en brossant délicatement à l’aide d’une brosse en
poils de chameau. Essuyez avec précaution la surface à l’aide d’un coton-tige
humide (que vous pouvez humidifier avec de l’eau). REMARQUE : N’utilisez PAS de
solvant pour nettoyer l’optique en plastique.
Nettoyage du boîtier : utilisez une éponge humide ou un linge doux imbibés d’eau
savonneuse. REMARQUE : N’immergez PAS le thermomètre dans l’eau.
Page 42

40
Français
Homologation CE
Cet instrument est conforme aux normes suivantes:
• EN50081-1:1992, Émissions électromagnétiques
• EN50082-1:1997, Susceptibilité électromagnétique
Des tests ont été effectués en utilisant une gamme de fréquences de 80-1000 MHz avec l’in-
strument dans trois orientations différentes. L’erreur moyenne pour les trois orientations est de
±1.4°C à 3 v/m pour tout le spectre de mesure. Cependant, entre 162 MHz et 792 MHz à 3 v/m,
il est possible que l’instrument ne soit pas conforme à cette précision nominale.
Code Problème Action
--- (sur afficheur) Température de cible Choisir une cible dans les
supérieureou inférieure specifications
apparition icône pile charge faible vérifier ou remplacer la pile
afficheur vide pile probablement vide vérifier ou remplacer la pile
pas de laser (1)pile faible ou vide changer la pile
(2)température ambiante se positionner en
supérieure à 40°C ambiance adaptée
ERR dommage probablement voir votre distributeur
lié àdes perturbations
électro-magnétiques
Dépannage
Page 43

41
Español
Advertencia
No apunte el láser directamente hacia los ojos o
indirectamente desde superficies reflejantes.
Precauciones
Todos los modelos deberán protegerse de lo
siguiente,
▲ Campos electromagnéticos de soldadoras de
arco, calentadores de inducción
▲ Electricidad estática
▲ Choque térmico (ocasionado por cambios
abruptos de temperatura ambiente—deje que la
unidad se estabilice por 30 minutos antes de usar)
▲ No deje la unidad sobre ni cerca de objetos de
alta temperatura
AVOID EXPOSURE - LASER RADIATION
IS EMITTED FROM THIS APERTURE
CAUTION
LASER RADIATION – DO NOT STARE INTO BEAM
OUTPUT < 1mW WAVELENGTH 630 – 670 nm
CLASS II LASER PRODUCT
Page 44

42
Español
Características
Su termómetro incluye:
• Mira láser circular
• Emisividad ajustable
• Alarmas Alta y Baja
• Temperaturas en pantalla MAX, MIN,
DIF y AVG
• Almacenamiento de Datos
• Gatillo trabable
• Pantalla iluminada
•Connector hembra para sonda de contacto
• Estuche rígido y correa para la muñeca
Accesorios
Los accesorios opcionales
para su termómetro son:
• Sonda de contacto (RTD)
• Estuche con presillas para cinturón
• Certificado de Calibración NIST/DKD
Mira Láser Circular
El láser circular consta de ocho puntos láser
que forman un círculo para mostrar el área que
se está midiendo. En condiciones de baja iluminación, pueden verse otros puntos láser de
menor intensidad alrededor del láser circular.
Estos puntos no deben utilizarse para apuntar.
Utilice únicamente el láser circular para éste fin.
Page 45

43
Pantalla
A) Símbolo de pantalla iluminada.
B) Símbolo °F/°C
C) Símbolo de Alarma Alta y Alarma Baja
D) Valores de temperatura MAX, MIN, DIF,
AVG (Promedio), HAL (Alarma Alta) y
LAL (Alarma Baja).
E) Símbolos para MAX, MIN, DIF, AVG,
HAL, LAL, PRB
F) El ícono LOG muestra el modo de
Almacenamiento de Datos.
G) Valor actual de la temperatura
H) Termómetro explorando (SCAN) o rete
niendo (HOLD) la lectura.
I) Símbolo y valor de la emisividad
J) Símbolos de Batería Baja, Gatillo
Trabado y Láser Encendido
Botones
1) Botón de ajustes (para Alarma Alta y
Alarma Baja
2) Botones Para Subir/ Bajar
3) Botón para selección de Modo
(para ciclar alrededor del bucle MODE)
4) Botón de Encender/ Apagar el Láser e
Iluminación de Pantalla. (jale el gatillo y
oprima el botón para activar el láser e
iluminación de pantalla)
5) Botón LOG (para almacenar datos)
Español
En el modo SCAN, la pantalla LCD muestra tanto la temperatura actual (G) y la función de
Modo seleccionada (D, E) ya sea en Celsius o Fahrenheit (B). La unidad retendrá la lectura
por 7 segundos después de soltar el gatillo; la palabra HOLD aparece (H). Cuando la batería
está baja, el icono de la batería aparece, pero la unidad seguirá funcionando; cuando la
batería está agotada, la pantalla se borrará completamente y la unidad dejará de funcionar.
Para activar el láser y la iluminación de la pantalla, jale el gatillo; oprima el botón láser/ iluminación de pantalla (4) una vez para encender la pantalla, dos veces para encender la pantalla y el láser y tres veces para apagar ambos nuevamente.
SET
MODE
LOG
A
B
C
D
E
F
G
H
I
J
4
5
2
1
3
Interfase de Usuario
Page 46

44
Español
Reflected energy
Emitted
Energy
Transmitted energy
Target
Introducción
Confiamos en que encontrará muchos
usos para su termómetro portátil sin
Contacto. Compacto, duradero y fácil de
usar—tan sólo hay que apuntar, oprimir
el gatillo y podrá leer las temperaturas
reales de superficie en menos de un
segundo. Puede medir sin peligro alguno
la temperatura de la superficie de objetos
calientes, peligrosos o de difícil acceso,
sin tener que tocarlos.
Cómo funciona
Los termómetros de rayos infrarrojos
miden la temperatura de la superficie de un
objeto. El sistema óptico de la unidad
detecta energía emitida, reflejada y transmitida, la cual es captada y enfocada hacia
un detector. El sistema electrónico de la
unidad convierte la información en una
lectura de temperatura, la cual se muestra
en la unidad. El láser es exclusivamente
para apuntar (como mira).
Page 47

45
Español
Cambiando de °C a °F; Trabando el
gatillo; Cambiando la batería.
Para abrir el mango de la unidad, oprima el
botón localizado en la parte inferior de la unidad
cerca del gatillo y jale hacia el frente la parte
superior del mango. Para cambiar de °C a °F y
viceversa, deslice el interruptor superior (A)
hacia la posición apropiada.
Para trabar el gatillo para medición continua,
deslice el interruptor inferior (B) hacia abajo. Si
el gatillo se jala mientras la unidad está trabada,
el láser y la iluminación de la pantalla se activan,
siempre y cuando hayan sido encendidas previamente (vea en "Interfase de Usuario" cómo se
encienden el láser y la pantalla). Cuando la
unidad está trabada, el láser se apagará cuando
el gatillo sea soltado, sin embargo, la pantalla
permanecerá encendida a menos que sea apagada usando el botón Láser/ Iluminación de
Pantalla del teclado.
Para cambiar la batería de 9V, insértela con el
lado positivo hacia la parte posterior del compartimiento de la batería.
A
B
Botón para soltar el mango
Como operar la Unidad
Funcionamiento de la unidad
Para medir una temperatura, apunte la unidad
hacia un objeto y oprima el gatillo. Asegúrese
de considerar la relación distancia-tamaño del
área a medir. Cuando utilice el láser, úselo únicamente para apuntar (mira). Para instrucciones
detalladas de operación, vea "Cómo Realizar
Mediciones de Temperatura con Precisión".
+
-
Page 48

46
Español
Si
No
Emisividad
La mayoría de los materiales orgánicos y las
superficies pintadas u oxidadas tienen una emisividad de 0,95. La medición de superficies
metálicas brillosas o pulidas resultará en
mediciones incorrectas. Para compensar,
adjuste la emisidad de la unidad (vea
“Adjustando la Alarma Alta, Alarma Baja y la
Emisividad.”) cubra la superficie que va a medir
con cinta aislante o con pintura mate negra
(< 300°F/148°C). Conceda tiempo suficiente
para que la cinta alcance la misma temperatura
que el material que está cubriendo. Mida la
temperatura de la cinta o de la
superficie pintada.
Como Medir Temperatura con
Precisión
Localizando un Punto
Caliente o Frío
Para localizar un punto caliente o frío, apunte el
termómetro fuera del área de interés. Entonces,
sin soltar el gatillo, realice un barrido a través
del área con movimientos de arriba abajo hasta
que localice el punto caliente o frío.
Campo Visual
Cerciórese de que el objeto a medir sea mayor
que el diámetro del área medida. Mientras más
pequeño el objeto, más cerca se debe hacer la
medición.
Page 49

47
Español
Enhanced Model
D:S = 50:1
Standard Model
D:S = 30:1
D
S
D
S
Distancia y Tamaño del área medida
A medida que aumenta la distancia (D) desde el objeto, el diámetro
del área medida (S) se vuelve más grande. La relación entra la distancia y el área medida se muesra abajo. El punto focal para cada
unidad es 914 mm (36 pulgadas). El diametro de las areas indica el
90% de la energía rodeada.
Page 50

48
Español
Funciones del botón MODE
Su termómetro infrarrojo mide las temperaturas
Máxima (MAX), Mínima (MIN), Diferencial (DIF)*, y
Promedio (AVG)** cada vez que toma una lectura.
Estos datos se almacenan y pueden ser recuperados
con el botón MODE (3) hasta que una nueva
medición se toma. (Vea las funciones Retener Lectura
(HOLD) y Recuperar (RECALL) más adelante).
Cuando el gatillo se jala nuevamente, la unidad
empezará la medición de acuerdo al último modo
seleccionado.
Oprimiendo el botón MODE también le permitirá tener
acceso a la Alarma Alta (HAL), Alarma Baja (LAL),
Emisividad (EMS), temperatura de la sonda de contacto (PRB - únicamente disponible cuando la sonda
está conectada) y al Almacenamiento de Datos (LOG).
Cada vez que se oprime el botón MODE, se avanza un
paso a través del menú de Modo. Al lado se muestra
un diagrama con la secuencia de las funciones en
este ciclo.
Note: PRB (probe, sonda de contacto) esta
disponible solamente em el cido MODE cuando la
sonda de contacto está conectado a la unidad.
Seleccionando una Función
Para poder seleccionar alguno de los modos MAX,
MIN, DIF o AVG, jale el gatillo. Sin dejar de jalar el
gatillo, oprima el botón MODE (3) varias veces hasta
que la leyenda apropiada aparezca en la esquina inferior
izquierda de la pantalla (E). Cada vez que se oprime el
botón, se avanza a través del ciclo MODE. El ciclo
MODE se muestra a la izquierda..
3
E
* DIF muestra la diferencia entre las temperaturas
Máxima y Mínimas medidas.
** AVG muestra el promedio de las temperaturas
tomadas durante el tiempo que el gatillo permaneció
jalado o la unidad trabada.
LOG
MODE
SET
Page 51

49
Español
Ajustando la Alarma Alta, Alarma
Baja y la Emisividad (EMS)
Para ajustar los valores para las Alarmas Alta
(HAL), Baja (LAL) y Emisividad (EMS), jale el
gatillo. Sin dejar de jalar el gatillo, oprima el
botón MODE (3) varias veces hasta que la
leyenda apropiada aparezca en la esquina
inferior izquierda de la pantalla (E). Utilizando
los botones Subir/ Bajar (p/q) (2) ajuste los
valores deseados. Para activar las alarmas,
oprima el botón SET (1). Oprima el botón
SET otra vez para desactivar la Alarma Alta y
Alarma Baja
Utilizando la Sonda de
Contacto (PRB)
Conecte la sonda en el conector localizado a
un lado de la unidad (vea la figura). La leyenda PRB aparece automáticamente en la
esquina inferior izquierda de la pantalla (E,
abajo). La temperatura de la sonda se muestra el la parte inferior derecha de la pantalla.
La temperatura infrarroja actual seguirá
mostrándose en el centro de la pantalla (F).
Mientras la sonda esté conectada, aún es
posible seleccionar las funciones deseadas
oprimiendo el botón MODE (3).
Nota: La función PRB es solamente
disponible con el botón MODE cuando la
sonda está conectada a la unidad; La sonda
de temperatura NO activa las Alarmas Baja o
Alta.
3
2
1
E
E
F
3
LOG
MODE
LOG
MODE
SET
SET
Page 52

50
Español
Almacenamiento de Datos
Su termómetro tiene hasta 12 posiciones de
memoria para almacenar datos. La temperatura
infrarroja, escala de temperatura (°C o °F) y
emisividad son también almacenados.
Para almacenar datos de una lectura infrarroja,
jale el gatillo. Mientras mantiene oprimido el
gatillo, presione el botón MODE (3), hasta que
LOG aparezca en la parte inferior izquierda de la
pantalla (E); un número posición de memoria será
mostrado debajo de LOG. Si ninguna temperatura
ha sido grabada en la ubicación LOG mostrada, 3
líneas aparecerán en la esquina inferior derecha.
Apunte la unidad al área de medición que quiere
grabar y presione el botón LOG (5). Usted
escuchará un tono para confirmar que la temperatura ha sido almacenada. La temperatura almacenada aparecerá en la esquina inferior derecha
(D). Para seleccionar otra posición de memoria,
presione los botones p o q (2).
Retener y Recuperar Lecturas
Las lecturas en la pantalla serán retenidas (HOLD)
por siete segundos después de que ha sido soltado
el gatillo (a menos que la unidad haya sido trabada); la leyenda HOLD aparecerá en la esquina superior izquierda de la pantalla (H). Durante la retención (HOLD en pantalla), o después que la unidad
se ha apagado, se pueden recuperar los valores
almacenados oprimiendo el botón MODE (3) sin
jalar el gatillo. Cada vez que oprima el botón
MODE, avanzará por el ciclo MODE. Cuando el
gatillo sea jalado nuevamente, la unidad empezará
una nueva medición de acuerdo al último modo
seleccionado.
H
3
E
5
2
3
D
E
5
2
3
D
LOG
SET
MODE
SET
LOG
MODE
SET
LOG
MODE
Page 53

51
Español
Recuperando los Datos Almacenados
Para revisar los datos almacenados después
de que la unidad se ha apagado, presione el
botón MODE (3) hasta que LOG aparezca en la
esquina inferior izquierda (E). Un número de
posición de memoria será mostrado debajo de
LOG (D) y la temperatura almacenada en esa
posición será mostrado en la esquina inferior
derecha de la pantalla (D). Para moverse a otra
posición de memoria, presione los botones p
o q (2).
E
5
2
3
D
SET
MODE
LOG
D
SET
MODE
LOG
D
2
Función "LOG Clear".
La función "LOG Clear" le permite borrar de una
manera rápida todos los datos almacenados en
memoria. Esta función puede ser utilizada únicamente cuando la unidad se encuentra en el modo
LOG. Puede ser utilizada teniendo cualquier número
de datos almacenados.
PRECAUCION: Solamente debe utilizar la función
"LOG Clear" cuando se desee borrar de una sola
vez toda la información almacenada en las memorias.
Descripción de la función "LOG Clear":
1)Estando en la función LOG, presione el gatillo y
luego presione el botón con la flecha (2) hasta llegar a la posición de memoria LOG "0".
NOTA: Esto solamente puede hacerse con el gatillo
presionado. La posición de memoria LOG "0" no
puede ser obtenida utilizando el botón
2) Cuando la posición de memoria LOG "0" sea
mostrada en la esquina inferior izquierda de la pantalla, oprima el botón LOG (D). Escuchará tres
tonos y la posición de memoria cambiará automáticamente a LOG "1", indicando que todas las posiciones de memoria han sido borradas.
LOG
MODE
SET
Page 54

52
Español
Mantenimiento
Limpieza de la lente: Elimine las partículas sueltas con aire comprimido limpio y
seco. Cepille suavemente cualquier partícula sobrante con un cepillo de pelo de
camello. Limpie cuidadosamente la superficie con un hisopo húmedo. Lo puede
humedecer con agua. NOTA: NO use solventes para limpiar el lente de plástico.
Limpieza del estuche: use agua y jabón en una esponja húmeda o paño suave.
NOTA: NO sumerja la unidad en agua.
Recordatorios
■ No se recomienda para uso en la medición de superficies metálicas brillosas o
pulidas (acero inoxidable, aluminio, etc.) Véase Emisividad.
■ La unidad no puede medir a través de materiales transparentes tales como
vidrio o plástico. La medición corresponderá a la temperatura de la superficie de
éstos materiales.
■ El vapor, polvo, humo, etc., pueden obstruir la medición, impidiendo una tem-
peratura exacta.
Page 55

53
Código Problema Corrección
- - - (en la pantalla) La temperatura del objetivo Seleccione un objetivo dentro
es mayor o menor que el rango. de las especificaciones.
El icono de batería
aparece. Batería descargada. Verifique y/o cambie la batería.
Pantalla "en blanco". Posiblemente batería agotada. Verifique y/o cambie la batería.
El láser no enciende. (1) Batería baja o agotada. (1) Cambie la batería.
(2) Temperatura ambiente arriba (2) Use la unidad en tempera-
de 40°C (104°F). turas ambiente más bajas.
E R R Posible daño por EMF Consulte a su Distribuidor.
Corrección de Problemas
Certificación CE
Este instrumento satisface las normas siguientes:
• EN50081-1:1992, Emisiones electromagnéticas
• EN50082-1:1997, Susceptibilidad electromagnética
Se han realizado pruebas usando un rango de frecuencia de 80-1000 MHz y con el
instrumento en tres direcciones diferentes. El error promedio para las tres direcciones es de ±1.4°C (±2.5°F) a 3 V/m en todo el espectro. Sin embargo, es posible
que el instrumento no tenga la misma precisión entre 162 MHz y 792 MHz a 3 V/m..
Español
Page 56

54
Português
Atenção ( modelos com mira laser )
Não aponte o laser para os olhos ou para superfícies reflectivas.
Cuidados
Todos os modelos devem ser protegidos de :
▲ EMF ( campos eletro-magnéticos ) gerados por
equipamentos que operam com indução
▲ Eletricidade estática
▲ Choque térmico ( causado por mudanças
bruscas na temperatura ambiente – aguarde 30
minutos para a estabilização da unidade antes
da utilização )
▲ Não deixe a unidade próxima a objetos com alta
temperatura.
AVOID EXPOSURE - LASER RADIATION
IS EMITTED FROM THIS APERTURE
CAUTION
LASER RADIATION – DO NOT STARE INTO BEAM
OUTPUT < 1mW WAVELENGTH 630 – 670 nm
CLASS II LASER PRODUCT
Page 57

55
Português
Características
Seu termômetro inclui :
• mira laser circular
• emissividade ajustável
• alarme alto e baixo
• temperatura MAX, MIN,DIF, AVG
• armazenamento de dados
• trava do gatilho
• display retroiluminado
• conector jack para sonda
• bolsa para transporte e gancho para fixação
ao cinto
Acessórios
Os acessórios opcionais do seu termômetro
são :
• Sonda de contato (RTD)
• Bolsa para cinto
• Certificado NIST (precisa ser
especificado na hora da compra)
Mira Laser Circular
A mira laser circular é composta de 8 pontos
de laser formando um círculo mostrando a área
a ser medida. Em condição de baixa luminosidade poderá aparecer pontos luminosos vizinhos ao laser circular. Estes pontos não são utilizados na medição e na mira. Utilize apenas a
mira laser circular da unidade.
Page 58

56
Português
No modo scan o display pode indicar a temperatura corrente (G) e selecionar ºC ou º
F (B) através da tecla MODE (D,E). A unidade irá sustentar a última leitura por 7
segundos após o gatilho ser liberado; a palavra HOLD aparecerá (H). Quando a bateria estiver baixa o ícone da bateria será mostrado, porém a unidade continuará funcionando. Quando a bateria terminar o display será apagado e a unidade não irá funcionar. Para ativar o laser e a retroiluminação aperte o gatilho, pressione o botão
laser/backlight (4) até que a retroiluminação seja ativada; aperte uma segunda vez
para ligar o laser e uma terceira vez para todos serem desligados.
Utilizando o Display
A) Símbolo de retroiluminação
B) ºF / ºC
C) Alarme de alta / Alarme de baixa
D) Valores de temperatura
MAX, MIN, DIF, AVG, HAL (alarme de
alta) e LAL (alarme de baixa)
E) Símbolos para MAX, MIN, DIF, AVG,
HAL, LAL, PRB
F) Ícone LOG para o modo de
armazenamento
G) Valor estantâneo da temperatura
H) "Scan" lendo ou "hold" fixo
I) Símbolo e Valores de emissividade
J) Bateria baixa, símbolos de trava e laser
"on"
Botões
1) Botão SET para ajuste do alarme
de alta e baixa
2) Botões de seta
3) Botão de modo "MODE"
4) Botão de liga/desliga - laser/
retroiluminação (puxe o gatilho e
pressione o botão para ativar o
laser/retroiluminação)
5) Botão LOG (para armazenar os dados)
SET
MODE
LOG
A
B
C
D
E
F
G
H
I
J
4
5
2
1
3
Page 59

57
Português
Reflected energy
Emitted
Energy
Transmitted energy
Target
Introdução
Temos segurança em que você encontrará
muitas aplicações para o seu termômetro
portátil sem contato. É compacto, robusto
e fácil de usar – apenas aponte, pressione o gatilho e leia a temperatura
superficial dos objetos em menos de um
segundo. Permite a medição segura da
temperatura de objetos quentes,
perigosos ou difíceis de alcançar sem a
necessidade de tocá-los.
Como funciona
Termômetros infravermelhos medem a
temperatura superficial dos objetos. O
sistema ótico do produto coleta as energias emitida, refletida, e transmitida, as
quais são concentradas sobre um detetor.
Esta energia é traduzida em uma indicação de temperatura a qual é indicada
no display. Nos modelos equipados com
mira laser a mesma apenas indica o
ponto central da área de medição. O laser
tem o propósito de mira somente.
Page 60

+
-
58
Português
Selecionando ºC ou ºF, Travando
a unidade , Trocando a bateria
Para abrir a unidade, aperte o botão embaixo
da unidade próximo ao gatilho e puxe a
manopla para frente até o topo. Para selecionar ºC ou ºF deslise a chave até o topo
(A). Para travar a unidade para medição contínua, deslise a chave inferior para baixo (B).
Se o gatilho estiver pressionado quando a
unidade for travada, o laser e a retroiluminação serão ligados. Se eles estiverem ativados veja "Utilizando a Interface" para
instruções de como ativar o laser e a retroiluminação. Quando a unidade estiver travada o
laser será desligado quando og atilho for liberado. Todavia se a retroiluminação permanecer ligaa ela poderá ser desligada utilizando o botão laser/backlight do teclado.
Para trocar a bateria de 9V insira com o
lado positivo em direção ao compartimento
traseiro da bateria.
A
B
botão
Como operar a unidade
Operando a unidade
Para medir temperatura de um objeto aponte o
termômetro e aperte o gatilho. Certifique-se de
levar em conta a distância e a área de medição
desejada, conforme diagram ótico. Se for um
modelo com mira laser utilize o laser somente
para mirar. Veja a seção Como Medir
Temperaturas Com Precisão.
Page 61

59
Português
Sim
Nâo
Como Medir Temperaturas Com
Precisão
Localizando pontos quentes e frios
Para achar pontos quentes ou frios, mire o
termômetro para a área de interesse. Então
movimente para cima e para baixo até
localizar o ponto quente ou frio.o.
Campo de Visão
Certifique-se que o objeto é maior do que a
Área de Medição do termômetro. Quanto
menor for o objeto, mais próximo o termômetro deverá estar.
Emissividade
Emissividade é um termo usado para descrever
a energia emitida pelo material. A grande
maioria dos materiais orgânicos, ou materiais
metálicos pintados ou com superfície oxidada
possuem fator de emissividade de 0.95.
Leituras imprecisas podem ocorrem quando
medindo superfícies polidas ou brilhantes.Para
compensar, cubra a superfície a ser medida
com fita ou tinta preta (< 300°F/148°C).
Espere a temperatura da fita / tinta atingir a
temperatura da superfície abaixo e meça a temperatura na porção coberta com a fita / tinta.
Page 62

60
Português
Distância e Área de Medição
A medida que a distância (D) do termômetro ao objeto aumenta, a área de medição (S) aumenta proporcionalmente.
Enhanced Model
D:S = 50:1
Standard Model
D:S = 30:1
D
S
D
S
Page 63

61
Português
Funções do botão MODE
Sua medição infravermelha de temperatura apresenta máxima (MAX), mínima (MIN), Diferença (DIF) *
e média (AVG) ** cada vez que uma temperatura for
lida. Este dado é guardado e pode ser recuperado
com o botão MODE (3) até que uma nova medição
seja executada. Veja "HOLD" e "RECALL" para informação de como recuperar o dado armazenado.
Quando o gatilho é pressionado novamente, a
unidade iniciará uma medição no último modo selecionado.
Pressionando o botão "MODE" permitirá que você
acesse o alarme de alta (HAL), alarme de baixa
(LAL), emissividade (EMS) , temperatura da sonda
(PRB), (apenas se a sonda estiver conectada) e
dados armazenados (LOG) . Cada vez que você
pressionar o botão "MODE" você avançará através
do ciclo "MODE". O diagrama mostra a sequência
do funcionamento "MODE".
Nota : PRB (sonda) estará disponível no loop
"MODE"quando a sonda estiver conectada a
unidade.
* DIF mostra a diferença de temperatura lida entre a
máxima e a mínima
** AVG mostra a média da temperatura lida cada
vez que o gatilho é pressionado ou quando a trava
da unidade é ligada.
Selecionando a Função
Para selecionar o modo MAX, MIN, DIF ou AVG
pressione o gatilho. Enquanto o gatilho estiver
pressionado, aperte o botão "MODE" (3) até o código apropriado aparecer no canto inferior esquerdo
do display (E). Cada vez que você pressionar
"MODE", você avançará através do ciclo "MODE". O
ciclo "MODE"é mostrado a direita.
3
E
LOG
MODE
SET
Page 64

62
Português
Selecionando Alarme de Alta,
Baixa e Emissividade
Para selecionar valores de alta, baixa e
emissividade (EMS) aperte o gatilho.
Enquanto o gatilho estiver pressionado,
aperte o botão "MODE" (3) até o código
apropriado aparecer no canto inferior
esquerdo do display (E). Utilize as teclas de
seta (2) para ajustar o valor desejado. Para
ativar os alarmes pressione SET (1).
Pressione SET para desativar o alarme de
alta e baixa.
Utilizando uma sonda (PRB).
Conecte a sonda ao lado da unidade (P)
(como exibido). PRB automaticamente
aparecerá no lado esquerdo inferior do display (E, abaixo). A temperatura da sonda é
mostrada na parte inferior direita. A temperatura infravermelha corrente continuará
sendo mostrada no display (F). Enquanto a
sonda estiver conectada ele fará parte do
ciclo da função "MODE" (3) .
Nota: PRB estará apenas disponível no loop
MODE quando uma sonda estiver conectada na unidade. A temperatura da sonda
não ativa os alarmes de alta e baixa.
3
2
1
E
E
F
3
LOG
MODE
SET
SET
LOG
MODE
Page 65

63
Armazenando Dados
Seu termômetro infravermelho é capaz de
armazenar 12 dados. Serão armazenadas a temperatura infravermelha, a unidade ºC ou ºF e a
emissividade.
Para armazenar dados da leitura infravermelha,
puxe o gatilho. Enquanto segura o gatilho aperte
o botão MODE (3) até LOG aparecer no canto
esquerdo inferior do display (E); um número de
LOG irá ser mostrado abaixo da posição LOG. Se
a temperatura não tiver sido gravada na localização de LOG, 3 traços aparecerão no canto inferior direito. Aponte a unidade para o alvo que você
quer gravar e pressione o botão LOG (5). Você
irá escutar um bip confirmando que a temperatura foi gravada. A temperatura gravada irá aparecer no canto inferior direito (D). Para selecionar
outra localização de LOG, pressione as setas
para cima ou para baixo (2).
Português
Sustentação e Recuperação
O display da unidade permanecerá ativado por 7
segundos após o gatilho ser liberado (não
estando a unidade travada); (HOLD) aparecerá
no canto superior esquerdo do display (H)
durante a sustentação (HOLD) ou após a unidade
ser desligada você poderá recuperar o valor
armazenado pressionando a tecla mode (3) sem
apertar o gatilho. Cada vez que você presssionar
"MODE" você avançará através do ciclo "MODE".
Quando o gatilho é pressionado novamente a
unidade irá iniciar a medição no último modo
selecionado.
H
3
E
5
2
3
D
E
5
2
3
D
SET
LOG
MODE
LOG
MODE
LOG
MODE
SET
SET
Page 66

64
Português
Chamando os dados
Para recuperar os dados depois da
unidade desligada, pressione o botão MODE
(3) até LOG aparecer no canto esquerdo inferior (E). Um número de LOG irá ser mostrado
abaixo de LOG (D), e a temperatura armazenada para aquela localização irá ser mostrada no
canto direito inferior do display (D). Para
mover localização LOG, movimente as setas
para cima e para baixo.
E
5
2
3
D
SET
MODE
LOG
D
SET
MODE
LOG
D
2
Função : Limpar "Log"
A função limpar "LOG" permite limpar rapidamente
todos os dados armazenados . Esta função estará
disponível somente quando a unidade estiver no
modo "LOG". Ela pode ser utilizada para qualquer
quantidade de dados "Log" armazenados.
PERIGO: Você poderá usar a função limpar
"LOG" somente para limpar todos os dados de
"Log" uma vez que eles estejam na memória da
unidade.
A função limpar "LOG" funciona da seguinte
maneira :
1. No modo "LOG", aperte o gatilho e então desça
com a seta para baixo (2) até a posição 0 "LOG" 0
Nota: Isto só poderá ser feito com o gatilho apertado. "LOG" 0 não poderá ser acessado usando a
seta para cima.
Quando a posição 0 for mostrada "LOG 0" no lado
inferior esquerda do display, aperte o botão LOG
(D). Você escutará o som de um bip três vezes e o
"LOG" será automaticamente trocado para 1. Isto
informa que todos os dados foram limpos.
SET
LOG
MODE
Page 67

65
Português
Lembretes
■ Não recomendado para medir superfíces metálicas brilhantes ou polidas ( aço
inoxidável, alumínio etc. ). Veja Emissividade.
■ O termômetro não mede através de superfíces transparentes tais como
vidro.Medirá a temperatura superficial do vidro.
■ Vapor, pó, fumaça etc. podem prejudicar a precisão das medições, obstruindo o
campo de visão do instrumento.
Manutenção
Limpeza das lentes : sopre as partículas aderidas à lene com ar comprimido limpo.
Escove com suavidade as partículas remanescentes com uma escova macia. Utilize
um cotonete umedecido em água para finalizar. NOTA : NÃO utilize solventes ou
álcool para limpar as lentes.
Limpando a unidade : utilize um pano macio umedecido em água com sabão.
NOTA : NÃO mergulhe o produto na água.
Page 68

66
Portugués
CERTIFICADO CE
Este instrumento está em conformidade com os seguintes padrões:
• EN50081-1:1992, Emissões eletromagnéticas
• EN50082-1:1997, Suscetibilidade eletromagnética
Foram conduzidos testes utilizando a escala de freqüência de 80-1000 Mhz, com o instrumen-
to em três orientações. O erro médio nas três orientações é de ±1.4˚C (±2.5°F) a 3 v/m em todo
o espectro. Entretanto, o instrumento poderá não ter a mesma precisão entre 162 MHz e 792
MHz a 3 v/m.
Código Problema Ação
– – – (display) alvo com temperatura selecionar o alvo dentro das
acima ou abaixo do range especificações
Quando o ícone da bateria fraca Checar e / ou trocar a bateria
bateria
aparecer
Display zerado Possibilidade de bateria Checar e / ou trocar a bateria
Se o laser não (1) bateria fraca ou (1)trocar a bateria
funcionar descarregada
(2) Ambient temperature (2) Use em área de baixa
above 40°C (104°F) temperatura
ERR possível dano causado contacte seu distribuido
por campo magnético
Identificação de problemas
Page 69

67
Chinese
AVOID EXPOSURE - LASER RADIATION
IS EMITTED FROM THIS APERTURE
CAUTION
LASER RADIATION – DO NOT STARE INTO BEAM
OUTPUT < 1mW WAVELENGTH 630 – 670 nm
CLASS II LASER PRODUCT
Page 70

68
Chinese
.
Page 71

69
Chinese
SET
MODE
LOG
A
B
C
D
E
F
G
H
I
J
4
5
2
1
3
Page 72

70
Chinese
Reflected energy
Emitted
Energy
Transmitted energy
Target
Page 73

+
-
71
Chinese
A
B
Page 74

72
Chinese
Yes
No
How to Accurately Measure
Temperature
Page 75

73
Chinese
Enhanced Model
D:S = 50:1
Standard Model
D:S = 30:1
D
S
D
S
Page 76

74
Chinese
3
E
LOG
MODE
SET
Page 77

75
Chinese
3
2
1
E
E
F
3
LOG
MODE
SET
SET
LOG
MODE
Page 78

76
Chinese
H
3
E
5
2
3
D
E
5
2
3
D
LOG
MODE
SET
LOG
MODE
LOG
MODE
SET
SET
Page 79

77
Chinese
E
5
2
3
D
SET
MODE
LOG
D
SET
MODE
LOG
D
2
LOG
MODE
SET
Page 80

78
Chinese
Page 81

79
Chinese
Page 82

80
Japanese
AVOID EXPOSURE - LASER RADIATION
IS EMITTED FROM THIS APERTURE
CAUTION
LASER RADIATION – DO NOT STARE INTO BEAM
OUTPUT < 1mW WAVELENGTH 630 – 670 nm
CLASS II LASER PRODUCT
•
•
•
•
Page 83

81
Japanese
Page 84

82
Japanese
SET
MODE
LOG
A
B
C
D
E
F
G
H
I
J
4
5
2
1
3
Page 85

83
Japanese
Reflected energy
Emitted
Energy
Transmitted energy
Target
Page 86

+
-
84
Japanese
A
B
Page 87

85
Japanese
Yes
No
Page 88

86
Japanese
Advanced Model
D:S = 50:1
Standard Model
D:S = 30:1
D
S
D
S
Page 89

87
Japanese
3
E
LOG
MODE
SET
Page 90

88
Japanese
3
2
1
E
E
F
3
LOG
MODE
SET
SET
LOG
MODE
Page 91

89
Japanese
H
3
E
5
2
3
D
E
5
2
3
D
SET
LOG
MODE
LOG
MODE
LOG
MODE
SET
SET
Page 92

90
Japanese
E
5
2
3
D
SET
MODE
LOG
D
SET
MODE
LOG
D
2
LOG
MODE
SET
Page 93

91
Japanese
Page 94

92
Japanese
Page 95

English
93
 Loading...