

Page 1

Noncontact Temperature Measurement
Manual
57560-1 Rev A West 11/02
■
Infrared Thermometer for Automotive Diagnostics
■
Infrarot-Thermometer für die Fahrzeugdiagnose
■
Termômetro Infravermelho para Diagnósticos Automotivos
■
Termómetro Infrarrojo para Diagnóstico Automotriz
■
Thermomètre infrarouge pour le diagnostique automobile
Page 2

Worldwide
Headquarters
Raytek Corporation
1201 Shaffer Rd. PO Box 1820
Santa Cruz, CA 95061-1820 USA
Tel: 1 800 866 5478
1 831 458 1110
Fax: 1 831 425 4561
solutions@raytek.com
Raytek China Company
Beijing, China
Tel: 86 10 6439 2255
Fax: 86 10 6437 0285
info@raytek.com.cn
Raytek Japan, Inc.
Osaka, Japan
Tel: 81 6 4390 5015
Fax: 81 6 4390 5016
info@raytekjapan.co.jp
South American Headquarters
Raytek do Brasil
Sorocaba, SP Brasil
Tel: 55 15 32176046
Fax: 55 15 32175694
info@raytek.com.br
European Headquarters
Raytek GmbH
Berlin, Germany
Tel: 49 30 4 78 00 80
Fax: 49 30 4 71 02 51
raytek@raytek.de
Raytek UK Ltd.
Milton Keynes, United Kingdom
Tel: 44 1908 630800
Fax: 44 1908 630900
ukinfo@raytek.com
Raytek France
Palaiseau, France
Tel: 33 1 64 53 15 40
Fax: 33 1 64 53 15 44
info@raytek.fr
Worldwide Service
Raytek offers services including
emergency repairs and calibration.
For more information, contact
your local office or e-mail:
support@raytek.com
www.raytek.com
for up-to-the-minute features
Page 3

500 mSec (95% of reading)
8-14µm
Pre-set at 0.95
0 to 50ºC (32 to 120ºF)
10-90% RH noncondensing,
at 30 to 50ºC (86 to 122ºF)
-20 to 60ºC (-13 to 158ºF) without battery
360g (12oz) 205 x 160 x 55mm (8x6x2 in)
9V Alkaline or NiCd Battery
4 hrs w/laser, flashlight & backlight on
20 hrs w/laser, flashlight & backlight off
Response Time
Spectral Response
Emissivity
Ambient Operating Temp.
Relative Humidity
Storage Temperature
Weight/Dimensions
Power
Typical Battery Life
(Alkaline)
Specifications
Te mperature Range -32 to 535°C (-25 to 999°F)
Accuracy for target
temperatures
(assumes ambient
temperature of
23°C (73°F))
Repeatability
±0.5% or ≤ ±1ºC (±2ºF),
whichever is greater
Laser (Class II)
Typical Distance to Target
MAX Temp. Display
Display Hold (7 seconds)
LCD Backlit
Tripod Mounting
Removable base magnet
Work area illumination
Additional
Options/Accessories
SmartSight™ dual laser sighting system
Laser turns off above 40º C (104ºF)
ambient temperature
200 mm-600 mm (8 inches to 2 feet)
✓
✓
✓
0.25” 20 UNC threading
✓
Bright white LED (7100 millicandela)
Nylon Holster
NIST Calibration Certificate
–32 to –26°C (-25 to -15°F): ±3ºC (±5ºF)
-26 to -18°C(-15 to 0°F): ±2.5ºC (±4ºF)
-18 to 23°C (0 to 73°F): ±2ºC (±3ºF)
23° to 510ºC (73º to 950ºF):
±1% of reading or ±1ºC (±2ºF),
whichever is greater
Above 510ºC (950ºF): ±1.5% of reading
Distance to Spot (D:S)
0.2ºC (0.5ºF)
Display Resolution
Optimized for use at 8 inches
Approximately 16:1 at focus point
Te mperature Display ºC or ºF selectable
Page 4
Page 5
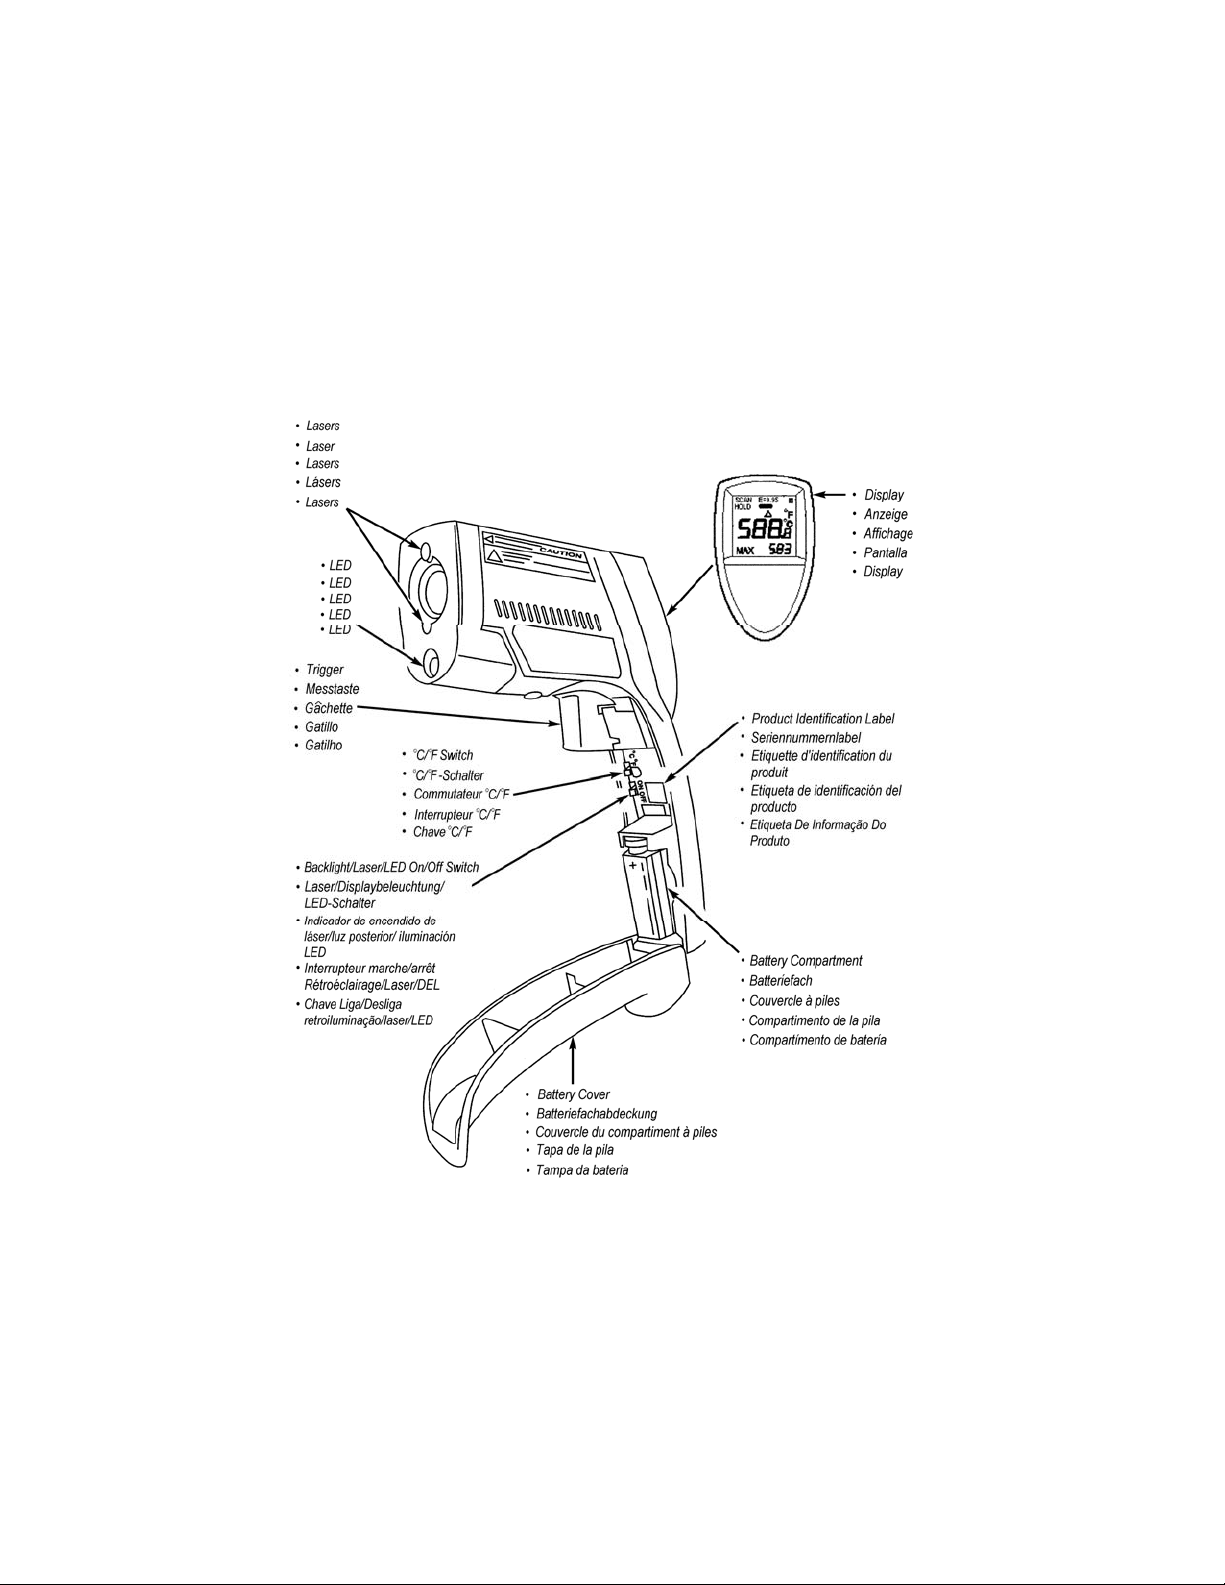
INTRODUCTION
Product Identification Label
Features
Your thermometer includes:
Dual laser sighting
LED Flashlight
Wide temperature range
MAX temperature display
Back-lit graphic display
Tripod mount
Removable magnetic Base
Durable, ergonomic construction
Options/Accessories
Nylon Holster
N.I.S.T./DKD Certification
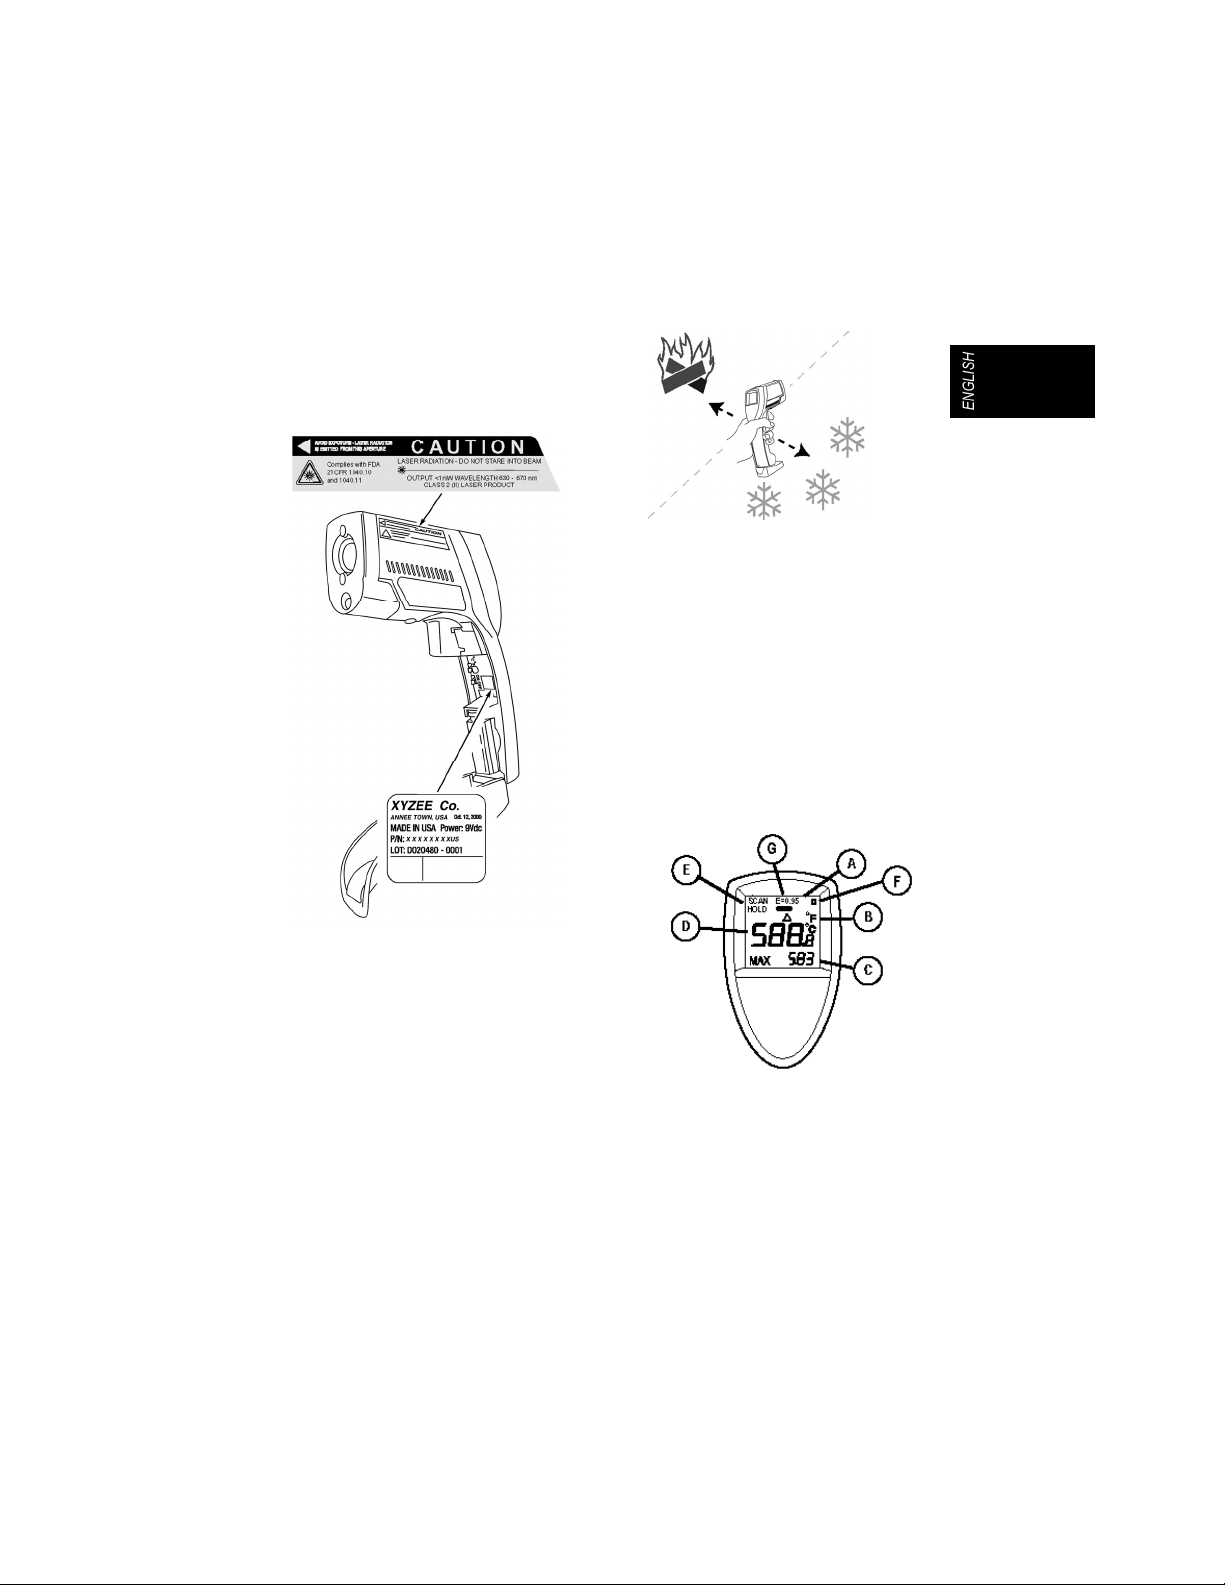
Warning:
Do not point lasers directly at eye or indirectly off
reflective surfaces.
Cautions:
All models should be protected from the
following:
EMF (Electro-Magnetic Fields) from engine
components closer than 125 mm (5
inches).
Static electricity
Thermal shock (caused by large or abrupt
ambient temperature changes—allow 30
minutes for unit to stabilize before use)
Do not leave the unit on or near objects of
high temperature
Display
A) Low battery indicator (comes on when
battery is low)
B) °C/°F symbol
C) Maximum temperature value (continuously
updated while the unit is on)
D) Temperature display
E) Scan/Hold indicator
1
Page 6
F) Laser/Backlight/LED on indicator
G) Emissivity indicator
In the scan mode, the backlit LCD displays both
the current temperature (D) and maximum
temperature (C) in Celsius or Fahrenheit (B). The
unit will hold the last reading for 7 seconds after
the trigger is released; the word HOLD appears
(E). The presence of the battery icon (A)
indicates a low battery. The presence of a light
bulb (F) will indicate backlight and LED flashlight
are on. When trigger is pulled triangular icon will
be present indicating laser is on.
Introduction
We are confident you will find many uses for your
handheld non-contact thermometer. Compact,
rugged, and easy to use—just aim, pull the
trigger, and read the temperature in less than a
second. You can safely measure surface
temperatures of hot, hazardous, or hard-to-reach
objects without contact.
How to Operate the Unit
Measurement: Quick Start
To measure an object, point the unit at an object,
and pull the trigger. Try to merge the 2 laser dots
on your target into one dot. When using the
lasers, use them only for aiming. When sighting
an object, merge the 2 lasers into one for
optimum temperature reading. For more detailed
operating instructions, see “How to Accurately
Measure Temperature.”
How it Works
Infrared thermometers measure the surface
temperature of an object. The unit’s optics sense
emitted, reflected, and transmitted energy, which
are collected and focused onto a detector. The
unit’s electronics translate the information into a
temperature reading displayed on the unit. The
lasers are used for aiming purposes only.
2
Switching °C and °F; Changing the
Battery; Laser/Backlight/LED On/Off
Before opening the unit’s handle to access the
battery and controls, use a Phillips head
screwdriver to remove the base magnet. To open
the unit’s handle, push the button near the trigger
on the underside of the unit, and pull the handle
down and forward.
To select °C or °F, slide the top switch (A) up for
Celsius and down for Fahrenheit. To activate the
lasers, backlight and LED flashlight, slide the
lower switch (B) down. Dual lasers and LED
flashlight will turn on when the trigger is pulled.
The lasers and LED flashlight will turn off when
the trigger is released. The backlight will remain
on for 7 seconds after the trigger is released.
Page 7
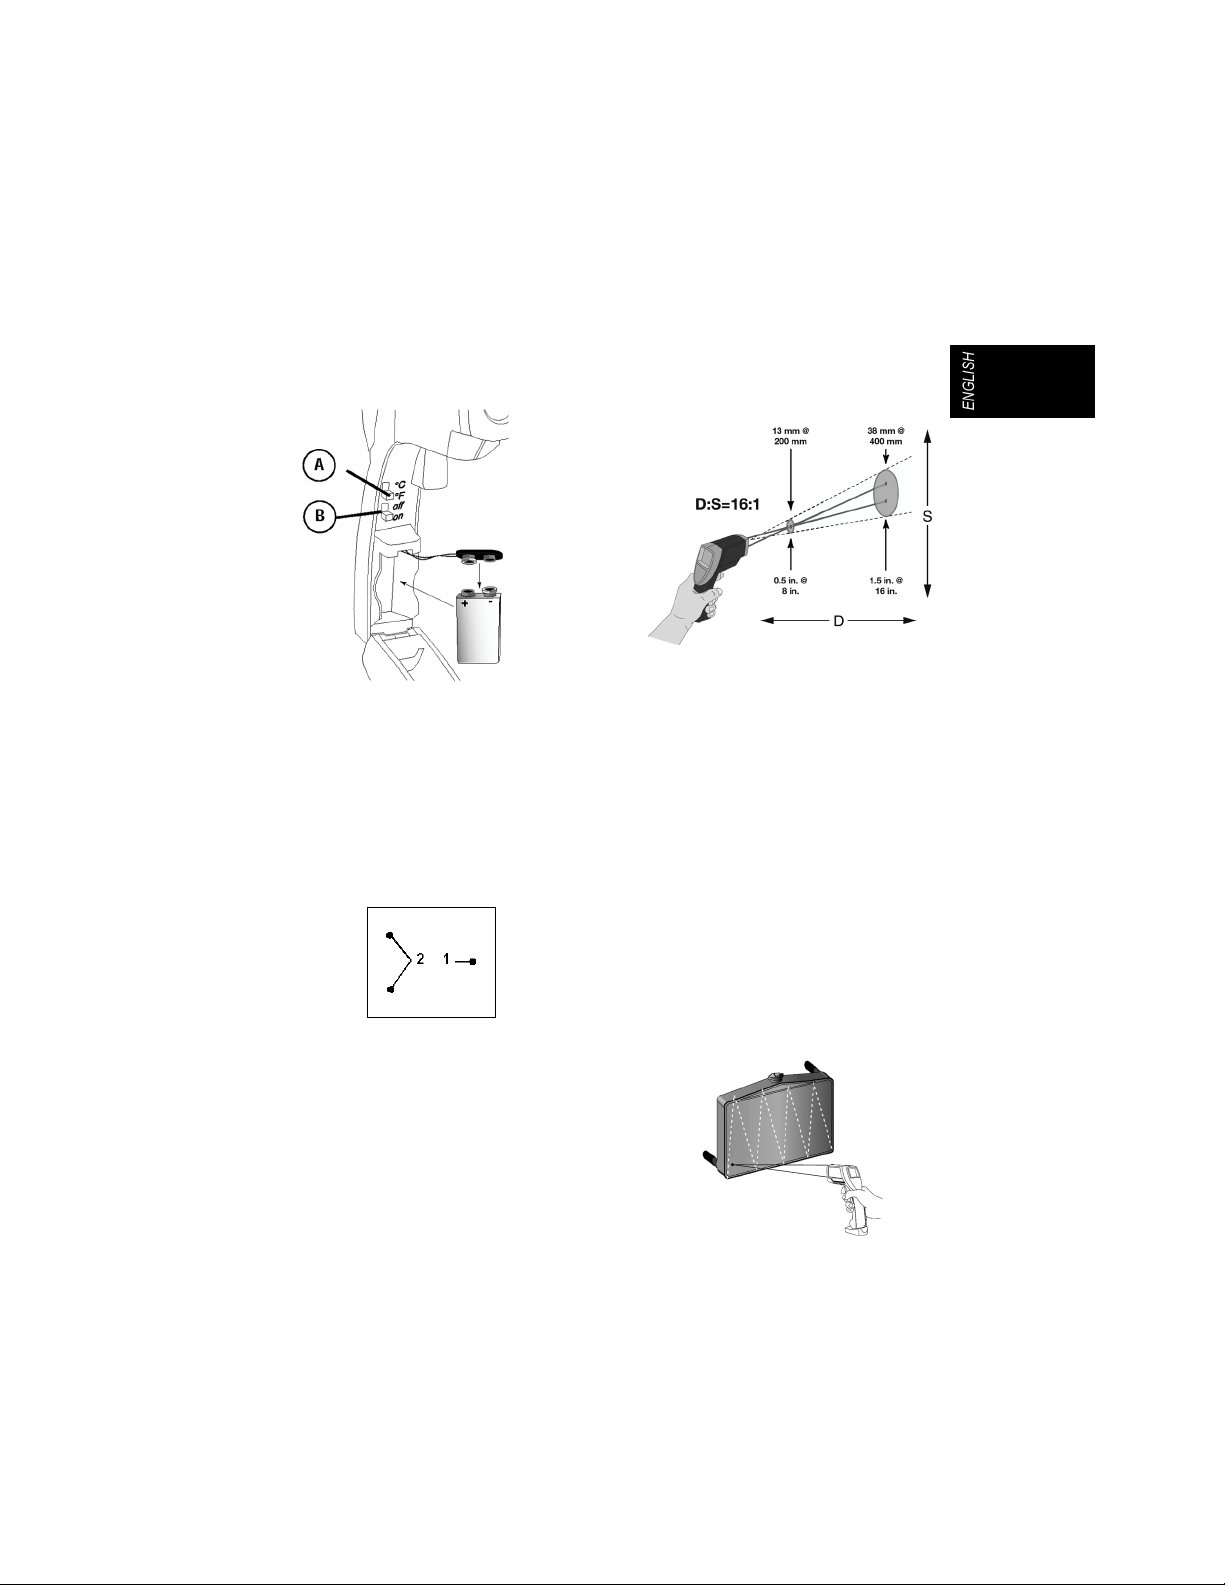
To change the 9V battery, attach the battery to
the battery snaps with the positive side toward
the rear of the battery compartment.
How to Accurately Measure
Temperature
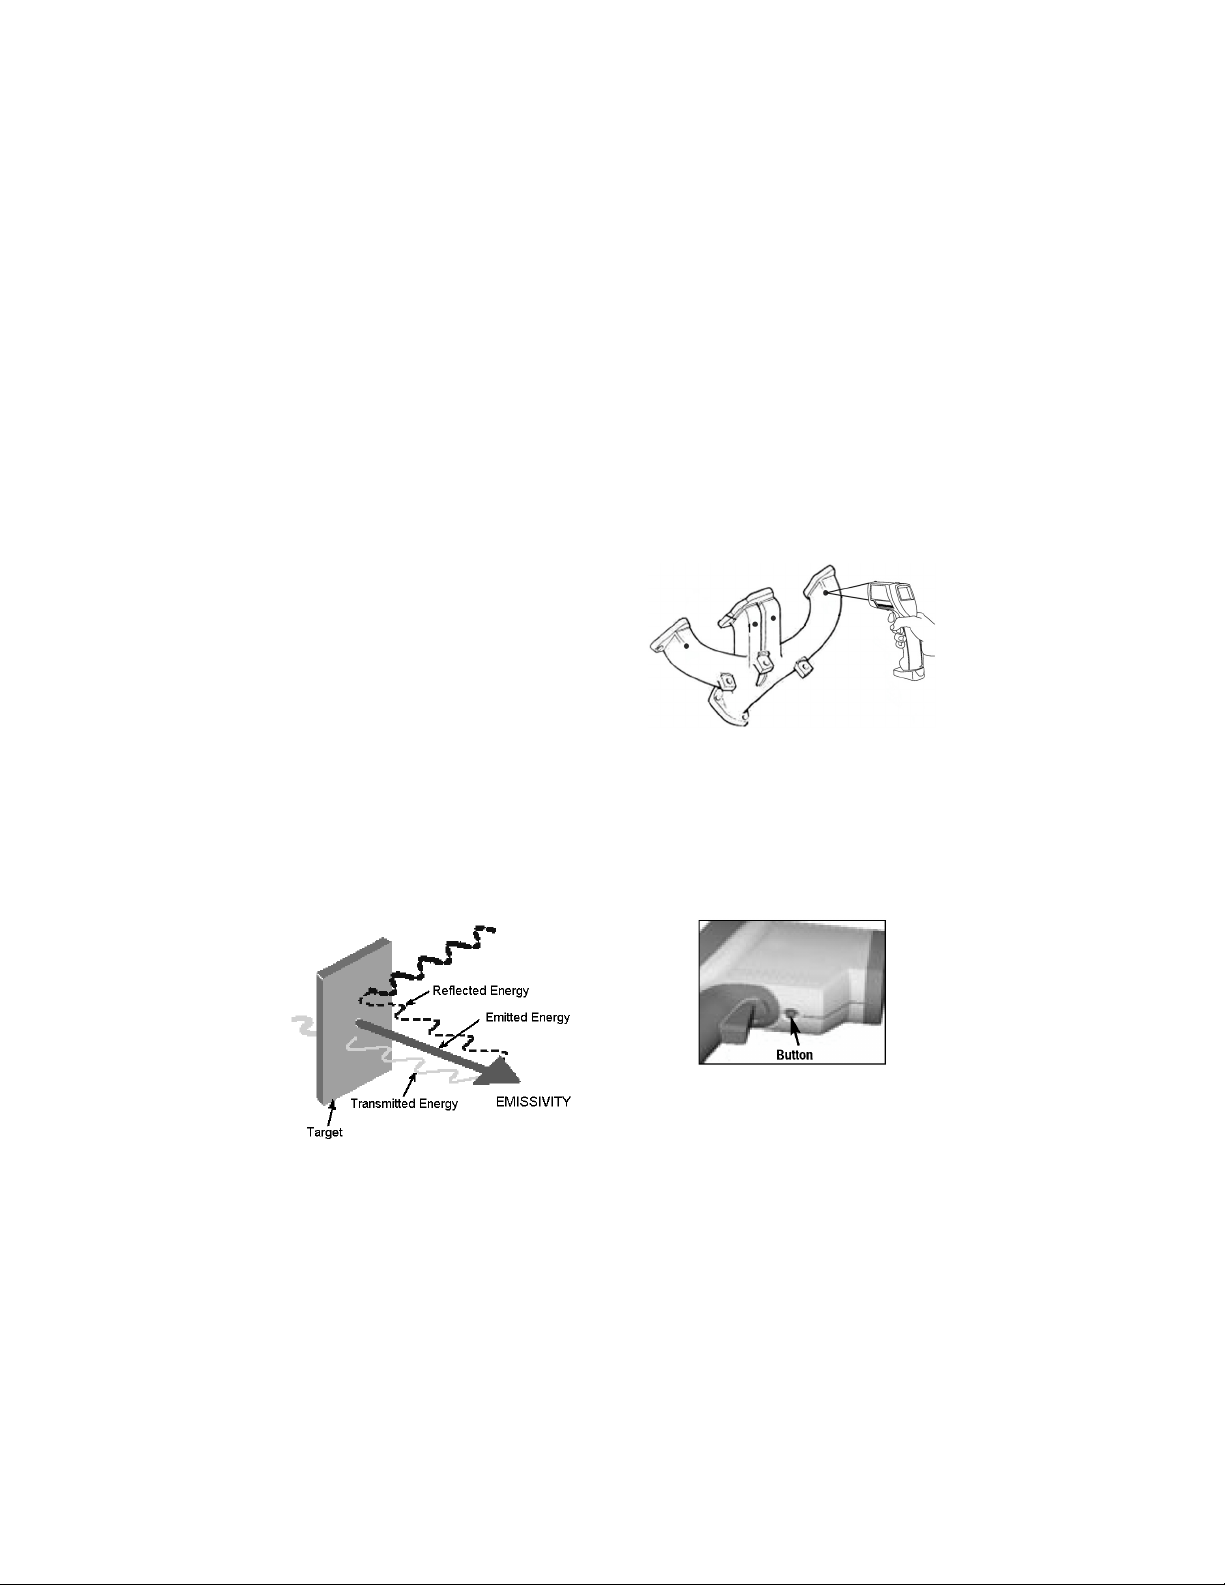
Laser Sighting
Laser sighting consists of 2 lasers. These lasers
are aimed at different angles. The point at which
the two laser points intersect (thermometer
focused) is 8 inches (200 mm). This is also the
optimum measuring distance.
inches: 0.5 inch). As the distance (D) from the
object decreases or increases, the spot size (S)
of the area measured by the unit becomes larger.
The spot sizes indicate 90%-encircled energy.
Emissivity
Emissivity is a term used to describe the energyemitting characteristics of materials. Most organic
materials and painted or oxidized surfaces have
an emissivity of 0.95 (pre-set in the unit).
Inaccurate readings can result from measuring
shiny or polished metal surfaces. To
compensate, cover the surface to be measured
with masking tape or flat black paint. Allow time
for the tape or paint to reach the same
temperature as the material underneath it.
Measure the temperature of the tape or painted
surface.
To sight object being measured, press trigger to
turn on laser sight. Only one laser point should
be seen when at optimum measuring distance
(1). If two laser points are visible (2), adjust
distance of unit from object being measured. If it
is not possible to adjust the distance, see
Distance & Spot Size information.
Distance & Spot Size
The relationship between distance and spot size
is 16:1 at the focus point (200mm: 13mm or 8
Locating a Hot or Cold Spot
To find a hot or cold spot, aim the thermometer
outside the area of interest. Then scan across
the area with an up and down motion until you
locate the hot or cold spot.
3
Page 8

LED Illumination
An LED is located on the front of the unit. When
the trigger is pulled, notice a bright LED
illuminates the area including and around the
area being measured for convenience unless
switched off.
Magnetic Base
A removable magnetic base is attached to the
bottom of unit, below the handle. The magnetic
base allows the unit to be attached to any ferrous
metal surface. The magnet’s surface has been
engineered not to scratch finishes by recessing
the actual magnets. However, metal shavings
and debris can be inadvertently picked up by the
magnetic, and if not removed and cleaned, can
damage the finish of a surface. The magnetic
base is attached to the unit using a Phillips head
screw and can easily be removed using a
screwdriver.
Reminders
Not recommended for use when measuring
shiny or polished metal surfaces (stainless
steel, aluminum, etc.). See “Emissivity” for
measuring these surfaces.
The unit cannot measure through
transparent surfaces such as glass or
plastic. It will measure the surface
temperature of these materials instead.
Steam, dust, smoke, or other particles can
prevent accurate measurement by
obstructing the unit’s optics.
The thermometer can be pointed using the
sighting guides on top of the unit whenever
it is difficult to see the laser sighting
system.
Maintenance
Lens Cleaning: Blow off loose particles using
clean compressed air. Gently brush remaining
debris away with a soft brush. Carefully wipe the
surface with a moist cotton swab. The swab may
be moistened with water.
Note: Do not use solvents to clean the plastic
lens.
Cleaning the housing: Use soap and water on a
damp sponge or soft cloth.
Note: Do not submerge the unit in water.
CE Certification
This instrument conforms to the following
standards:
EN61326-1 EMC
EN61010-1
EN60825-1 Safety
Tests were conducted using a frequency range of
80–1000 MHz with the instrument in three
orientations.
Note: Between 165 MHz and 880 MHz at
3V/m, the instrument may not meet its stated
accuracy.
4
Page 9

Troubleshooting
Code Problem Action
– – – (on display) Target temperature is over or
under range
Select target within specifications
Battery icon
Blank display Possible dead battery Check and/or replace battery
Laser doesn’t work (1) Low or dead battery
ERR Possible damage by EMF Contact your distributor
Low battery Check and/or replace battery
(2) Laser turned off
(3) Ambient temperature above
40°C (104°F)
(1) Replace battery
(2) Turn laser on
(3) Use in area with lower ambient
temperature
5
Page 10

Page 11

APPLICATIONS
TABLE OF CONTENTS
A/C-HEATER SYSTEM ...................................... 7
BEARINGS, BUSHINGS, CV JOINTS &
UNIVERSAL JOINTS.......................................... 8
BRAKES.............................................................. 9
COOLING SYSTEM.......................................... 11
ENGINE PERFORMANCE ...............................13
HEATED SEATS............................................... 15
REAR WINDOW DEFROSTER........................ 16
TIRE PRESSURES & WHEEL ALIGNMENT ... 16
A/C-Heater System
A/C System – Cooling
NOTE: Before and after performing repairs
on the A/C refrigerant system,
discharge/charge refrigerant using approved
refrigerant recovery/recycling equipment.
When A/C is on and set at maximum cooling, air
temperature from instrument panel ducts should
be a minimum of 15°C (25°F) cooler than
ambient temperature. To verify A/C outlet
temperature, start vehicle and set A/C to coldest
setting using dash vents. Set A/C controls to
MAX-A/C or re-circulate position. Test-drive
vehicle if possible. If test is to be performed in
service bay, place a large fan in front of the
vehicle to ensure A/C condenser has sufficient
airflow for an accurate temperature reading. If
vehicle is stationary, raise idle and allow A/C
system to stabilize before measuring outlet
temperature. Ensure windows are rolled up and
doors are closed.
CAUTION: To avoid thermal-shock of IR
thermometer, DO NOT hold unit directly in the
flow of the A/C outlet when measuring A/C
duct surface temperature or measuring other
components near A/C ducts. Hold unit off to
one side when measuring to avoid direct
contact with cold airflow.
Using the IR thermometer, measure A/C outlet
temperature. If outlet temperature is at 15°C
(25°F) cooler than ambient temperature, A/C
system is cooling sufficiently. If outlet
temperature is less than 15°C (25°F) cooler than
ambient temperature, check for the following:
Restricted liquid line to evaporator (check
for ice on liquid line to evaporator).
Restricted expansion valve or orifice tube
(check for ice on expansion valve or orifice
tube).
Measure temperature of condenser to check for
cold spots. If cold spots are found, this will
indicate a restriction in the condenser. Parallel
flow condensers will normally have an even
temperature drop from one side to the other while
serpentine condensers will show a drop in
temperature from top to bottom.
If A/C compressor is cycling on and off with less
“on” time than normal, check for low refrigerant
charge. If A/C compressor is not operating at all,
diagnose and repair A/C system using
appropriate service information.
Automatic A/C System
On many vehicles with automatic A/C systems,
sensors are used to determine ambient (outside)
and cabin (in-car) temperatures to control
functions of the A/C-Heater system. Often, along
with these sensors, the A/C system may have the
ability to display current ambient and in-car
temperature provided by these sensors, on the
A/C controls. Most ambient temperature sensors
are mounted outside the passenger
7
Page 12

A/C-Heater System (Cont.)
compartment, near the front of the vehicle. Most
in-car temperature sensors are mounted on the
instrument panel. See manufacturer’s information
to identify exact location of sensors, if equipped.
To verify correct operation of sensors, use the IR
thermometer to measure ambient temperature
near the ambient temperature sensor and in-car
temperature near the in-car temperature sensor.
Compare readings to A/C control. If the
measured and displayed temperatures are not
approximately the same, a problem with the
sensor or A/C system may exist.
Heater System
WARNING: Engine coolant can reach
temperatures exceeding 125°C (260°F). Allow
engine to cool before performing repairs on
heater system or serious injury may occur.
Heater systems on most vehicles are connected
directly to the engine cooling system using the
engine water pump and coolant system pressure
to provide coolant to the heater core. On other
vehicles a separate water pump is used to
circulate water for the heater system. A heater
control valve, controlled by the A/C system, is
used in some applications to stop flow of coolant
into heater core to prolong heater core life and to
aid in cooling the passenger compartment when
A/C is in use. When trouble shooting heater
cores, ensure A/C system is off and heater
control valve is open as to not stop flow of
coolant to heater core. Inspect coolant level and
top off as necessary to ensure air will not be
trapped in heater core during testing.
Ensure vehicle is at operating temperature,
approximately 85-105°C (190-220°F). Verify
operating temperature has been reached by
measuring temperature at upper radiator hose
near the thermostat housing. If vehicle does not
reach operating temperature, trouble shoot the
cooling system first.
Using the IR thermometer, measure inlet and
outlet hose temperature near firewall. The
temperature reading of the inlet hose should be
approximately 10°C (20°F) hotter than the outlet
hose. If the outlet hose is not hot or the
temperature differential between the inlet and the
outlet hose is greater than 10°C (20°F), coolant
is not flowing through the heater core. Check for
the following:
Plugged/Restricted heater core.
Heater control valve not opening.
Bearings, Bushings, CV Joints
& Universal Joints
Bearings, bushings, CV joints and universal joints
all have friction surfaces that require proper
clearance and lubrication to operate properly.
Some of these components are sealed and do
not require service while some are equipped with
fittings to allow regular maintenance. Following
manufacturers recommended maintenance
intervals is key to ensuring proper operation of all
friction surfaces.
Bearings & Bushings – Including
Trailers
Most bearing and bushing problems can be
related with a growl noise or metal-on-metal
contact. Once a noise is heard, damage has
occurred. A bearing or bushing that has
deteriorated this far can possibly damage the
component it has been designed to protect. To
prevent this type of damage, whenever possible,
perform a through visual inspection to check for
damaged or leaking seals. On wheel bearings,
check for uneven wear of brake pads or
excessive axial movement of wheels.
Bearings and bushings can be checked before
damage occurs. To check for deteriorating wheel
bearings, test-drive vehicle a short distance. Stop
vehicle, place in Park (auto trans) or neutral
(manual trans) and set parking brake.
Using the IR thermometer, measure
temperatures at all wheel bearings and/or hubs.
The bearing or hub with a higher temperature as
compared to other bearings/hubs will indicate
potential bearing failure. Verify that a brake drag
is not causing the difference in temperature.
Inspect components and repair as necessary.
8
Page 13

Bearings, Bushings, CV Joints
& Universal Joints (Cont.)
NOTE: It is advised to check all wheel
bearings/hubs at the same time to ensure all
are in good working order.
On other items such as alternator bearings,
differential pinion bearings or distributor bushings
that do not have a like component to compare
temperature readings measure temperature of
component away from bearing/bushing area.
Then measure bearing/bushing area. When
operating properly, temperature should not
change significantly between the component and
the bearing/bushing area. If temperature
increases at the bearing/bushing area, inspect
the bearing/bushing and repair as necessary. On
components such as alternators, check for brown
residue expelling from bearings indicating
bearing deterioration.
CV Joints & Universal Joints
CV joints and universal joints operate typically
the same as bearings. Lubrication and clearance
are key to proper operation. On a CV joint, a
noise or symptom is usually not heard until
damage is done. On a universal joint, often a
squeak or a vibration will indicate a marginal
component. To prevent this type of damage,
whenever possible, perform a thorough visual
inspection to check for damaged/torn boots or
leaking seals.
To trouble shoot CV joints and universal joints,
test-drive vehicle a short distance. Stop vehicle,
place in Park (auto trans) or neutral (manual
trans) and set parking brake.
Using the IR thermometer, measure
temperatures at all CV joints or universal joints.
The CV joint or universal joint with excessive
temperature as compared to other
joints will indicate potential bearing failure.
Remove, inspect and repair as necessary.
CV/universal
Brakes
Familiarity with the different types of braking
systems can aid in choosing the correct path of
diagnosis. High temperature at one brake does
not mean that is the brake with the problem. If
another brake is not operating properly, then the
brake that is hotter may be having to work harder
to stop the vehicle. See appropriate service for
information to verify type of braking system for
vehicle.
NOTE: Before trouble shooting brakes,
ensure all tires are properly inflated to
manufacturer’s specification. Ensure tire size
on vehicle is the same across the front or rear
and that bias-ply and radial tires are not
mixed.
CAUTION: Both front or rear brakes should
be serviced at the same time to ensure brakes
are at optimum operating condition.
Front/Rear Split Brake Systems
On vehicles equipped with front/rear split brake
systems, each circuit of the master cylinder
operates either the front or rear brakes.
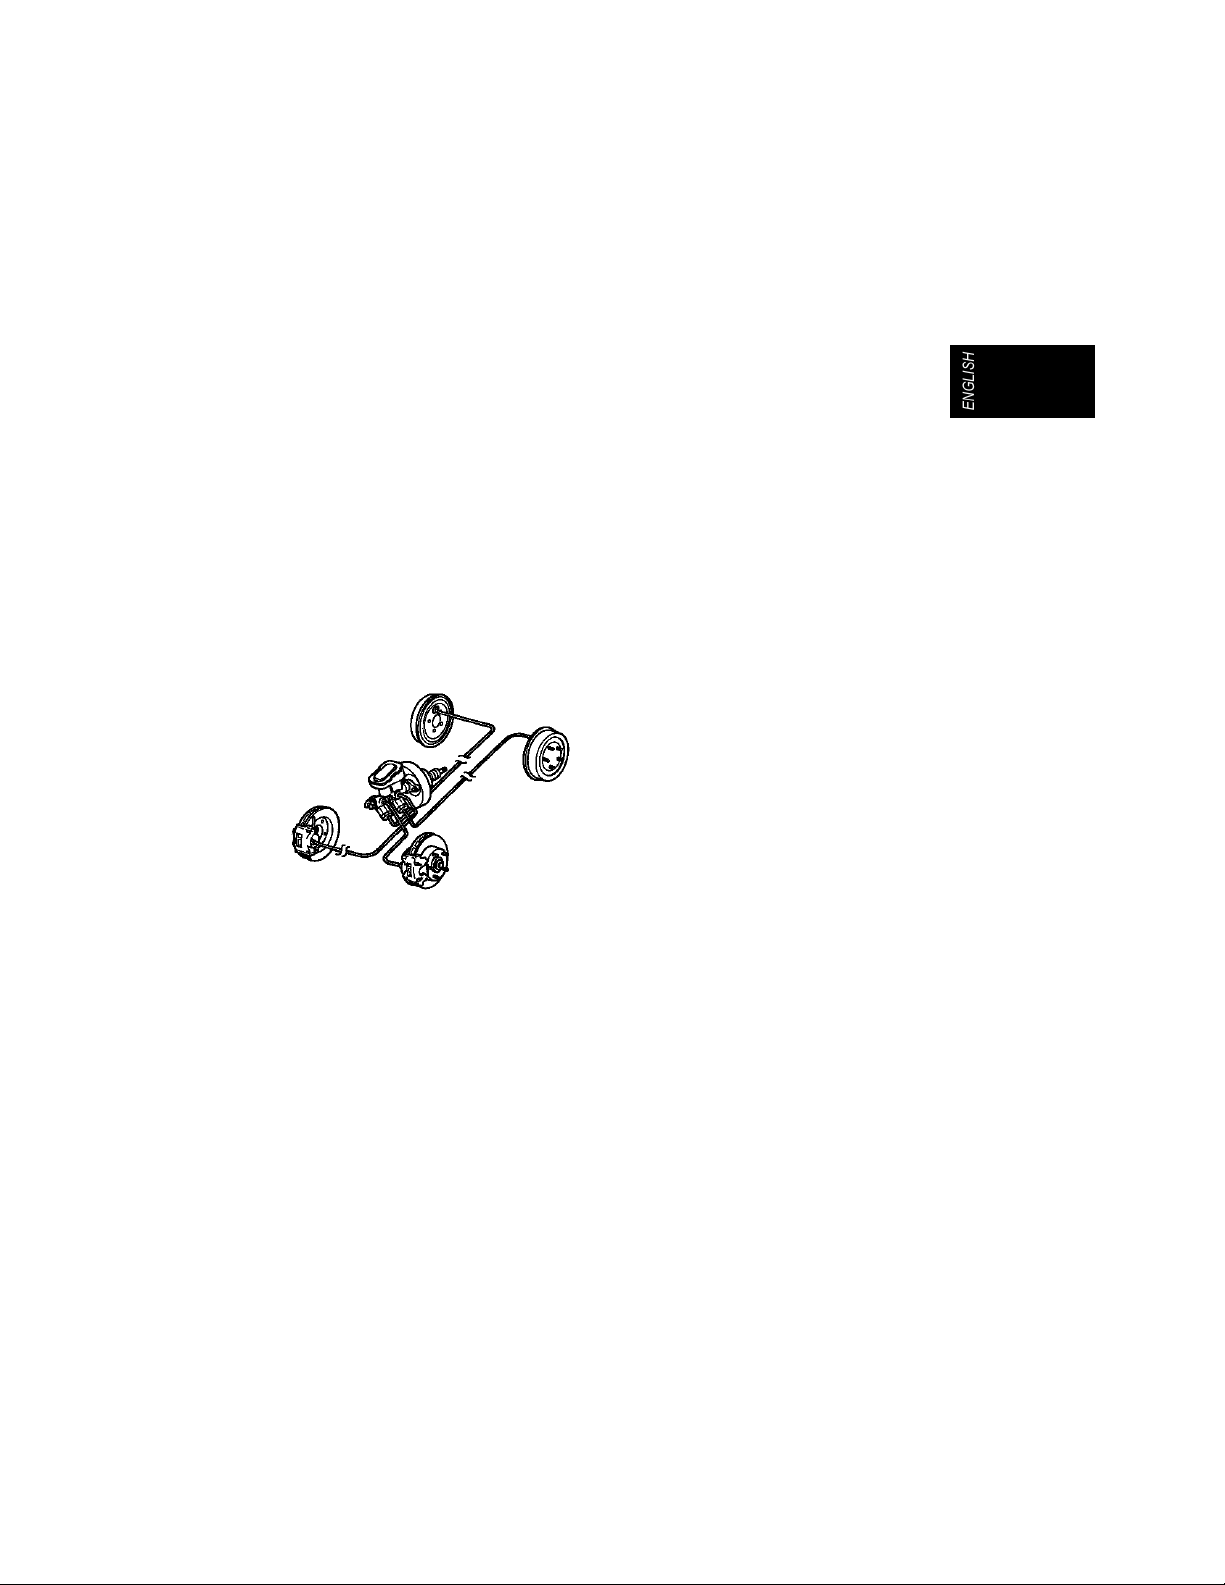
See Fig 1.
Fig. 1: Front/Rear Split Brake System
The front brakes will normally have higher
temperatures than rear brakes when working
properly. Normal temperature differential
between front and rear brakes is 30°C (50°F).
This procedure checks operation of front and rear
brakes on these systems and applies to vehicles
with disc/disc, drum/drum or disc/drum brake
configuration.
9
Page 14
Brakes (Cont.)
To obtain an accurate temperature reading, test
drive vehicle in a low-traffic area, preferably on a
straight, level section of roadway. Operate
vehicle to 50 KM/H (30 MPH) and bring to a
complete stop 5 times. Stop vehicle, place in
Park (auto trans) or neutral (manual trans) and
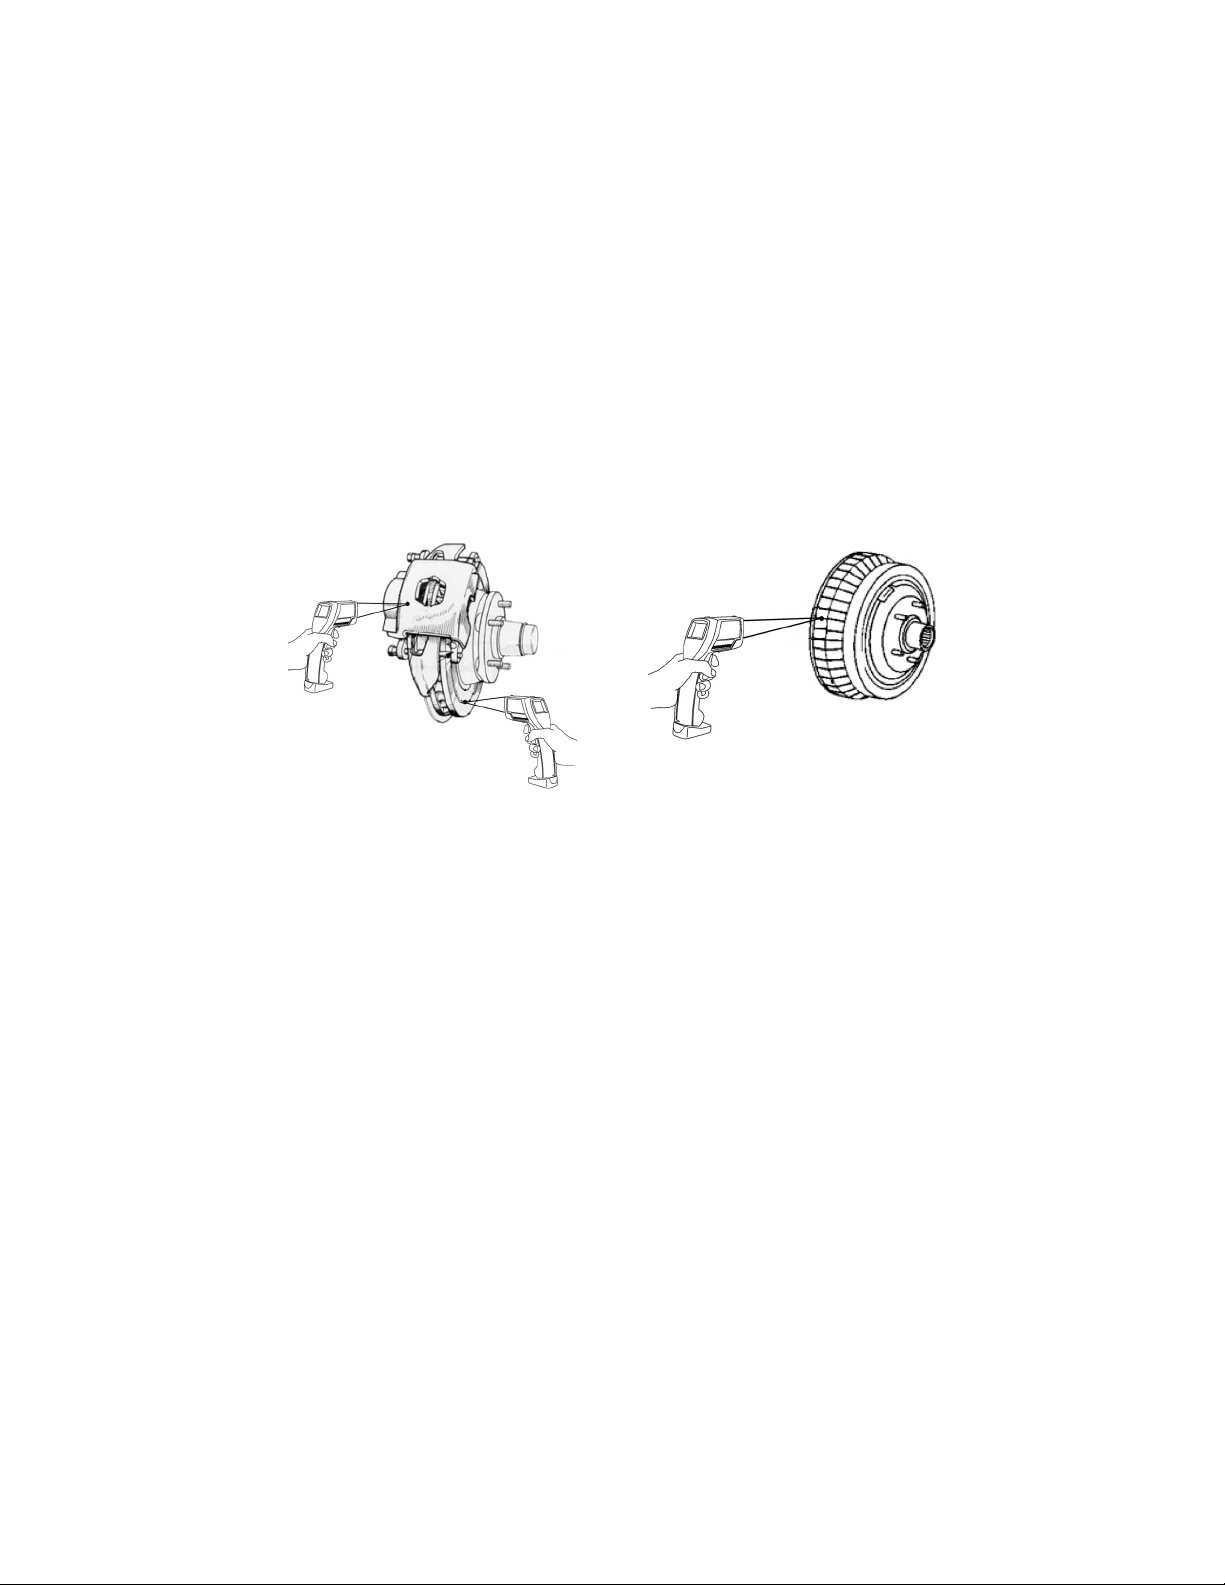
set parking brake. Using the IR thermometer,
measure temperature of front and rear brakes.
See Figs. 2 & 3.
Rear brake adjustment too tight (drum
brakes - rear).
Emergency brake adjustment too tight.
Combination valve malfunction.
Master cylinder malfunction.
Leaking calipers or wheel cylinders.
Brake line or hose restriction.
Some vehicles also have a load-sensing valve
near the rear brakes. Check this valve for proper
operation where applicable.
Fig. 3: Measuring Drum Brake Temperatures
Fig. 2: Measuring Disc Brake Temperatures
If temperature differential between front and rear
brakes is greater than 30°C (50°F), rear brakes
may not be working effectively. Check the
following:
Front brake adjustment too tight (drum
brakes - front).
Rear brake adjustment too loose (drum
brakes - rear).
Emergency brake adjustment.
Combination valve malfunction.
Master cylinder malfunction (check for loss
of brake fluid without a visible fluid leak).
Leaking calipers or wheel cylinders.
Master cylinder overfilled.
Brake line or hose restriction.
If temperature differential is less than 30°C
(50°F), or rear brake temperature is hotter than
front brakes, front brakes may not be working
effectively. Check the following:
Front brake adjustment too loose (drum
brakes - front).
10
Diagonal Split Brake Systems
Diagonal split brake systems differ from front/rear
split systems in that each circuit of the master
cylinder operates one front brake and the
diagonally opposite rear brake. See Fig. 4.
As in front/rear split brake systems; diagonal split
brake systems front brakes will normally have
higher temperatures than rear brakes when
working properly. Normal temperature differential
between front and rear brakes is 30°C (50°F).
Diagonal split brake system symptoms are often
related with a brake pull. This is when the vehicle
pulls to left or right when the brakes are applied.
This procedure trouble shoots operation of the
diagonal split brake system and applies to
vehicles with disc/disc or disc/drum brake
configuration.
To obtain an accurate temperature reading, test
drive vehicle in a low-traffic area, preferably on a
straight, level section of roadway. Operate
Page 15
Brakes (Cont.)
vehicle to 50 KM/H (30 MPH) and bring to a
complete stop 5 times. Stop vehicle, place in
Park (auto trans) or neutral (manual trans) and
set parking brake. Using the IR thermometer,
measure temperature of each front and each rear
brake. See Figs. 2 & 3. If the temperature
reading of one brake on the front of the vehicle is
3°C (5°F) greater than the other front brake and
the diagonally opposite brake on the rear is also
3°C (5°F) greater than the other rear brake,
check for the following:
Master cylinder malfunction (check for loss
of brake fluid without a visible fluid leak).
Master cylinder overfilled.
Leaking calipers or wheel cylinders.
Brake line restriction.
Combination valve malfunction.
Fig. 4: Diagonal Split Brake System
Some vehicles also have a load-sensing valve
near the rear brakes. Check this valve for proper
operation where applicable. If temperature
differential is greater than 3°C (5°F) only
between the two front brakes or the two rear
brakes, check for conditions associated with
brake drag at one or more brakes.
Brake Drag/Pull (Left/Right)
Vehicle may pull to one side when brakes are
applied. One wheel may lock up under braking.
Uneven brake pad/shoe wear or glazed surface
may accompany condition. Heat damage to
rotor/drum may also exist. This procedure applies
to vehicles with disc/disc, drum/drum or
disc/drum brake configuration and also to
front/rear and diagonal split brake systems.
To obtain an accurate temperature reading, testdrive vehicle in a low-traffic area, preferably on a
straight, level section of roadway. Operate
vehicle to 50 KM/H (30 MPH) and bring to a
complete stop 5 times. Make sure brake
symptom is duplicated. Stop vehicle, place in
Park (auto trans) or neutral (manual trans) and
set parking brake. Using the IR thermometer,
measure temperature of all brake rotors/drums.
See Figs. 2 & 3. If temperature differential of one
brake is greater than 3°C (5°F) compared to the
other brake on the same axle, check for the
following at all brakes:
Binding caliper hardware (disc brakes).
Frozen caliper (disc brakes).
Leaking calipers or wheel cylinders.
Broken, loose or missing brake hardware.
Brake adjustment (drum brakes).
Worn or damaged backing plates (drum
brakes).
Wheel bearing adjustment.
Leaking bearing or axle seals
(contaminated pads/shoes).
Brake hose restriction.
On drum brakes, check that automatic brake
adjusters operate properly. If temperature
differential between brakes is small or nonexistent, worn suspension components or
alignment of vehicle may be causing pull.
Cooling System
WARNING: Engine coolant can reach
temperatures exceeding 125°C (260°F). Allow
engine to cool before performing repairs on
cooling system or serious injury may occur.
Each vehicle has its own optimum operating
temperature and a threshold beyond that to allow
vehicle operation without causing damage to
engine components. A cooling system may be
operating fine and have no visible signs of
trouble, yet for some reason the vehicle may be
running hot, have a fluctuating temperature or
possibly overheating. The task is to be able to
trouble shoot and repair the cooling system
11
Page 16

Cooling System (Cont.)
before the vehicle overheats and to prevent
damage to engine.
Note: Before trouble shooting cooling
system, ensure coolant leaks DO NOT exist
and cooling fans operate properly.
Radiator Trouble Shooting
Radiators are hard to trouble shoot visually. The
radiator will either leak or not leak. You may be
able to pull the radiator cap off and look inside at
the ends of the passages. The cap may look new
and the seal good. Unless there is excessive
damage or corrosion, the radiator may not be
considered suspect.
Internally there are many passages that can be
blocked or restricted, causing cool spots that
decrease the radiators flow and effectiveness at
lowering the temperature of the coolant to the
engine.
CAUTION: On vehicles with mechanical
fans, use care not to place tools or hands into
moving blades to prevent injury. On vehicles
with electric fans, be cautious when working
near because the fan may turn on at any time.
To trouble shoot for radiator blockage, start
engine and run until normal operating
temperature of 85-105°C (190-220°F) is reached
and temperature stabilizes. For vehicles
equipped with electric cooling fans, ensure fans
cycle on and off three times prior to checking
temperatures.
Using the IR thermometer, measure radiator
surface temperature. On vehicles equipped with
a cross flow radiator, measure temperature from
inlet side (hose from thermostat) to outlet side
(hose from water pump inlet). Temperature
should decrease evenly from inlet side to outlet
side. On vehicles equipped with a down flow
radiator, measure temperature from top to
bottom. Temperature should decrease evenly
from top to bottom. Also measure temperature at
various points across radiator fins. If there is a
drop in temperature at one section, this indicates
a blockage or restricted flow. Also check for bent
fins restricting airflow.
Thermostat Opening Temperature
As an engine reaches normal operating
temperature, approximately 85-105°C (190220°F) on most vehicles, the thermostat should
open and allow coolant to flow through the
radiator. Using the IR thermometer, measure the
temperature of the upper radiator hose near the
thermostat housing as engine reaches operating
temperature. When the thermostat opens at the
specified temperature, the temperature of the
upper radiator hose should quickly increase. If
temperature at upper radiator hose near the
thermostat housing does not increase, check for
the following:
Stuck closed thermostat causing coolant
not to flow (engine temperature will be
high).
Stuck open thermostat, causing coolant to
flow constantly and not increase in
temperature.
Air in cooling system (possibly from not
being properly bled).
If temperature remains low and does not reach
normal operating temperature, check for the
following:
Stuck open thermostat, causing coolant to
flow constantly and not increase in
temperature.
Missing thermostat.
Thermostat with opening temperature too
low for vehicle.
If temperature of upper radiator hose fluctuates
up and down, check for the following:
Weak thermostat spring.
Air in cooling system (possibly from not
being properly bled).
A fluctuating temperature gauge may accompany
fluctuating temperature at upper radiator hose.
12
Page 17

Engine Performance
Engine Misfire Trouble Shooting –
Gasoline
A gasoline engine may idle rough or have an
intermittent misfire. Lack of fuel, lack of spark or
lack of cylinder pressure (compression) can
cause misfires. In a gasoline engine, any of these
three problems means no combustion in that
cylinder. No heat coming from the exhaust port
will indicate lack of combustion. A lean fuel
condition will cause a higher combustion
temperature. Individual exhaust temperature will
be easier to obtain on vehicles equipped with
separate exhaust pipes for each port. On exhaust
manifolds, heat transfer will occur and make it
difficult to identify changes in temperature
between ports. The best results on a manifold will
be observed when the vehicle is first started and
the engine is cold. On newer vehicles, if a
cylinder is not operating effectively, the check
engine light may turn on and a Diagnostic
Trouble Code (DTC) will be set.
To locate a misfiring cylinder using the IR
thermometer, start engine and allow the idle to
stabilize. Measure temperature at each exhaust
port, noting changes in temperature. See Fig. 5.
If any cylinders show a significantly lower
temperature than other cylinders, check that
cylinder for the following:
Malfunctioning ignition supply to affected
cylinder.
Malfunctioning fuel supply to affected
cylinder (rich condition).
Excessively low cylinder pressure
(compression).
If any cylinders show a significantly higher
temperature than other cylinders, check for a fuel
restriction to affected cylinder causing a lean
misfire. Most likely cause is a dirty fuel injector or
vacuum leak.
If any cylinders indicate a noticeable, but not
significantly lower or higher temperature than
other cylinders, this could be an indication of
poor cylinder performance. This check may warn
of other mechanical problems. Check for the
following:
Worn spark plugs or wires.
Malfunctioning fuel supply to affected
cylinder (rich/lean condition).
Low cylinder pressure (compression).
Carbon buildup.
Fig. 5: Measuring Exhaust Port Temperatures
Engine Misfire Trouble Shooting –
Diesel
A diesel engine may be hard to start, lack power
or idle rough in all climates and at all operating
temperatures. The engine may have a cylinder
that is misfiring.
To locate a misfiring cylinder using the IR
thermometer, start engine and run until engine
reaches normal operating temperature. Run
engine at a fast idle and measure temperature at
each exhaust port, noting changes in
temperature. See Fig. 5. A weak cylinder can be
identified as having a temperature less than
surrounding cylinders of 55°C (100°F) or more. If
a weak cylinder is found, check that cylinder for
the following:
Malfunctioning fuel injectors or fuel injector
pump.
Excessively low cylinder pressure
(compression).
Engine Temperature Sensors
Emission controls on most computer-controlled
vehicles rely on many sensor inputs, allowing
proper control of spark and fuel supply in all
climate and driving conditions. Engine Coolant
Temperature (ECT) sensor and Intake Air
Temperature (IAT) sensor (if equipped) inputs
can be verified using the IR thermometer. To
13
Page 18

Engine Performance (Cont.)
verify ECT and IAT sensor inputs, a scan tool or
other data device with proper software installed
will need to be connected to the vehicle to enable
viewing of the actual ECT and IAT sensor
temperature readings.
Start engine and run until normal operating
temperature of 85-105°C (190-220°F) is reached
and temperature stabilizes. For vehicles
equipped with electric cooling fans, ensure fans
cycle on and off three times prior to checking
temperatures.
To verify ECT sensor temperature, monitor ECT
sensor temperature reading on scan tool. On
most vehicles the ECT sensor is threaded into
the cooling system, near the thermostat.
Measure temperature where ECT sensor threads
into engine. Compare temperature readings. If
temperature readings are not approximately the
same, check for the following before diagnosing:
Damaged ECT sensor, connector or wiring.
Air in cooling system (possibly from not
being properly bled).
To verify IAT sensor temperature, turn engine off
and ignition on. Monitor IAT sensor temperature
reading on scan tool. On some vehicles the IAT
sensor may be threaded into the intake air
ducting before the throttle body. On other
vehicles it may be threaded directly into the
intake manifold after the throttle body. After
engine reaches operating temperature, it may be
difficult to verify IAT sensor temperature when
threaded into the intake manifold. On vehicles
where the IAT is threaded into the intake air
ducting, remove ducting to access IAT sensor
without disconnecting IAT sensor. Measure air
temperature around IAT sensor. Compare
temperature readings. If temperature readings
are not approximately the same, check for the
following before diagnosing:
Contaminated or damaged IAT sensor,
connector or wiring.
Damaged intake air ducting.
Catalytic Converter - Efficiency
An engine may run fine yet fail an emissions test.
The catalytic converter efficiency can be
checked. Start engine and test drive vehicle until
14
normal operating temperature of 85-105°C (190220°F) is reached and temperature stabilizes. On
some vehicles the catalytic converter
temperatures will lower and become insufficient
for testing purposes if the vehicle is left idling for
a prolonged period of time. For vehicles
equipped with electric cooling fans, ensure fans
cycle on and off three times prior to testing
catalytic converter. During test, hold throttle to
keep engine running at 1000 RPM.
Fig. 6: Measuring Converter Inlet & Outlet
Temperatures
Using the IR thermometer, measure the inlet and
outlet temperatures of the converter. See Fig. 6.
Compare inlet temperature to outlet temperature.
On vehicles equipped with 2-way catalytic
converters, temperature differential will be 55°C
(100°F) or more. On vehicles equipped with 3way catalytic converters, temperature differential
will be 20°C (30°F) or more. The outlet
temperature will be hotter when the converter is
operating properly. If temperature differential
between converter inlet and outlet are less than
specified or the application, then the converter
needs to be inspected further. Before replacing
the catalytic converter, determine cause of
failure. Catalytic converters are designed to last
the life of the vehicle. If vehicle has high mileage
of over 240,000 kilometers (150,000 miles) it is
probably just expired. If the vehicle has low
mileage of less 240,000 kilometers (150,000
miles) then check for the following:
Ignition system malfunction (misfire).
Fuel system malfunction (over-lean or
over- rich condition).
Emission system operation (O
injection, etc).
2
, air
Page 19

Engine Performance (Cont.)
Engine coolant in combustion chamber
(leaking/blown head gasket).
Excessive oil getting past rings or valve
guides.
be removed, inspected and repaired as
necessary.
Before replacing the catalytic converter,
determine cause of failure as to not damage new
converter.
Trouble shoot and repair problem and retest
before replacing catalytic converter.
Catalytic Converter – Plugged
CAUTION:
plugged catalytic converter for any length of
time, possible engine damage may result.
If a catalytic converter is exposed to a rough
running or improperly maintained engine for
extended periods of time, the end result could be
a plugged converter or exhaust system.
Symptoms of a plugged catalytic converter will be
lack of power, engine temperature increasing as
vehicle is driven, and if the converter has been
plugged for a while, the exhaust manifold gaskets
will blow out.
To check for a plugged converter, start engine
and test drive until normal operating temperature
of 85-105°C (190-220°F) is reached and
temperature stabilizes. On some vehicles the
catalytic converter temperatures will lower and
become insufficient for testing purposes if the
vehicle is left idling for a prolonged period of
time. For vehicles equipped with electric cooling
fans, ensure fans cycle on and off three times
prior to testing catalytic converter. During test,
hold throttle to keep engine running at 1000
RPM.
Using the IR thermometer, measure the inlet and
outlet temperatures of the converter. Compare
inlet temperature to outlet temperature. When a
converter is plugged, the converter outlet
temperature will be cooler than the inlet
temperature. In some cases, the catalyst inside
of the converter will break apart and end up
plugging the exhaust in the muffler. In this case,
the inlet and outlet temperatures of the converter
will be close as with an expired converter. If this
is the case, the converter and muffler will need to
If a vehicle is operated with a
Heated Seats
Some vehicles are equipped with heated seats
as an option. Some heated seats have 2-position
LOW/HIGH heating capabilities. Vehicle may
also be equipped with rear heated seats.
On most vehicles, seat temperature will reach
35°C (98°F) when in LOW position and
approximately 45°C (110°F), when in HIGH
position. Internal temperature sensors will ensure
heated seats will operate at these temperatures
as closely as possible. Seat temperature may
vary by manufacturer. See appropriate service
information for exact operating temperatures for
vehicle being serviced.
Before checking heated seat temperatures, verify
if vehicle is equipped with heated seat cushions,
heated seat backs or both heated seat cushions
and seat backs. If possible, park vehicle out of
sunlight and allow cabin (in-car) temperature to
stabilize.
Using the IR thermometer, measure heated seat
cushion and/or seat back surface with all heated
seats off. Measure other seats to get a general
temperature reading of seat surfaces.
Temperature should be close between all seats.
If surface temperature is noticeably hotter,
heated seat may be stuck on. Next, turn ignition
on and set heated seat switch to LOW position
and allow 5 minutes for seat temperature to
stabilize. Measure heated seat cushion and/or
seat back surface again. Verify that LOW
temperature reading is close to 35°C (98°F).
Next, set heated seat switch to HIGH position
and allow 5 minutes for seat temperature to
stabilize. Measure heated seat cushion and/or
seat back surface again. Verify that HIGH
temperature reading is close 45°C (110°F). If
temperature readings are hotter or cooler,
diagnose heated seat system using appropriate
service information.
15
Page 20

Rear Window Defroster
Locating Broken Grid Lines
Rear window defroster uses heat through voltage
to defrost the rear window using metal strips
attached to the inside of the rear window. To
visually locate broken grid lines is difficult. To
trouble shoot defroster system grid lines turn
ignition on and activate rear window defroster.
Using the IR thermometer, measure temperature
across each defroster grid line from left to right
from inside of window. Temperature should
increase from left to right on grid line as
temperature is measured. If temperature remains
constant across grid line, check for a loose
ground for defroster grid. Temperature drops will
indicate location of broken grid lines. See Fig. 7.
If defroster does not turn on or temperature does
not increase, problem may be in voltage supply
circuit, relay or defroster switch. See appropriate
service information to diagnose and repair.
Fig. 7: Locating Broken Grid Lines
Tire Pressures & Wheel
Alignment
Tire temperatures can tell you how well the tire is
using the tread surface and the road surface to
maintain control. The objective is to get the tire to
work effectively across the entire face of the tire.
This can be maximized for most vehicles by
adjusting tire pressures and alignment.
Tire Temperatures/Pressures
CAUTION: Some vehicles are equipped with
tire pressure monitoring systems. If air
pressure is adjusted, system may set a
warning light. Check manufacturer’s
information before adjusting air pressure
beyond factory specifications.
Optimum tire temperature should be little to no
temperature differential across the tire tread. On
a vehicle such as a taxi or a truck, this procedure
may not be suitable because of the varying loads
impressed upon the tires.
Tire manufacturers recommend tire temperature
differential for passenger car tires across the
tread should be less than 10°C (20°F).
Before test drive, ensure tires are properly
inflated to manufacturer’s specifications.
To obtain an accurate temperature reading, test
drive vehicle in a low-traffic area, preferably on a
straight, level section of roadway. Operate
vehicle at a safe speed and bring to a complete
stop. Try to avoid any sharp turns or movements
during test drive. Stop vehicle, place in Park
(auto trans) or neutral (manual trans) and set
parking brake. Using the IR thermometer,
measure temperature at inside, center and
outside of tire tread surface. See Fig. 8.
NOTE: Before trouble shooting tire
pressures or alignment, ensure all tires are
properly inflated to manufacturer’s
specification. Ensure tire size on vehicle is
the same across the front or rear and that
bias-ply and radial tires are not mixed.
16
Fig. 8: Measuring Tire Temperatures
Page 21

Tire Pressures & Wheel
Alignment (Cont.)
If the center temperature is higher than the inside
and outside temperatures, the tire is probably
over inflated. Try reducing pressure in 2-psi (14
kPa) increments and recheck. If the middle
temperature is lower than the inside and outside
temperatures, the tire is probably under inflated.
Try increasing pressure in 2-psi (14 kPa)
increments and recheck.
Wheel Alignment
Temperatures can be used to determine
condition of alignment before tread wear is
evident. Before attempting to trouble shoot wheel
alignment using tire temperature readings,
ensure tires are properly inflated to
manufacturer’s specifications. On many vehicles,
front and rear suspension alignment can be
adjusted. See appropriate service information to
verify if vehicle is equipped with front and rear
alignment adjustments.
Positive Camber - This is when the top of
the tire leans away from the vehicle (2).
See Fig. 10.
Caster – Caster will not cause tire tread
wear or increase tire temperatures. Caster
can cause a pull.
To obtain an accurate temperature reading, test
drive vehicle in a low-traffic area, preferably on a
straight, level section of roadway. Operate
vehicle at a safe speed and bring to a complete
stop. Try to avoid any sharp turns or movements
during test drive. Stop vehicle, place in Park
(auto trans) or neutral (manual trans) and set
parking brake.
Using the IR thermometer, measure temperature
at inside, center and outside of tire tread surface
on all tires. See Fig. 8.
Fig. 9: Identifying Toe
The following are alignment conditions that can
be diagnosed using tire temperatures.
Toe-In - This is when the distance between
the front (1) centerline of the tires is shorter
than the distance between the rear (2)
centerline of the tires. See Fig. 9.
Toe-Out - This is when the distance
between the rear (2) centerline of the tires
is shorter than the distance between the
front (1) centerline of the tires. See Fig. 9.
Negative Camber - This is when the top of
the tire leans in toward the vehicle (1). See
Fig. 10.
Fig. 10: Identifying Camber (Positive Camber
Shown)
If tire temperatures are higher on the inside of
both tires, check for the following:
Excessive toe-out condition.
Excessive negative camber at both wheels.
Ride height too low (causing excessive
negative camber).
Excessive play in steering or suspension
components (tie-rod ends, ball joints,
bushings, etc.).
17
Page 22

Tire Pressures & Wheel
Alignment (Cont.)
Bent steering or suspension components.
Collapsed springs.
Bent axle or axle housing (solid front/rear
axle vehicles).
If tire temperatures are hotter on the outside of
both tires, check for the following:
Excessive toe-in condition.
Excessive positive camber at both wheels.
Ride height too high (causing excessive
positive camber).
Bent steering or suspension components.
Bent axle or axle housing (solid front/rear
axle vehicles).
If tire temperature on one tire is hotter on the
inside only, check for the following:
Excessive amount of negative camber at
that wheel.
Excessive play in steering or suspension
components (tie-rod ends, ball joints,
bushings, etc.).
Bent or damaged steering or suspension
components.
Collapsed spring.
Bent axle or axle housing (solid front/rear
axle vehicles).
If tire temperature on one tire is hotter on the
outside only, check for the following:
Excessive amount of positive camber at
that wheel.
Excessive play in steering or suspension
components (tie-rod ends, ball joints,
bushings, etc.).
Bent or damaged steering or suspension
components.
Bent axle or axle housing (solid front/rear
axle vehicles).
18
 Loading...