

Page 1
Power in
Made in UK
P-cell
adjust
-
+
Power
adjust
-
+
MAX 50 PoE LUX 50 PoE
and
High Power PoE illuminators installation guide
This installation guide provides instructions for installing the RAYMAX 50 & RAYLUX 50
High Power PoE series illuminators.
Overview
Installation Steps
1. Mount Illuminator
2. Feed cable into connector
3. Connect cable to
waterproof connector
4. Connect to high power
PoE switch or hub
Set Up Steps
1. Optional night set-up for optimum
image performance
2. Adjust vertical angle
3. Tighten all fixings
Package Contents
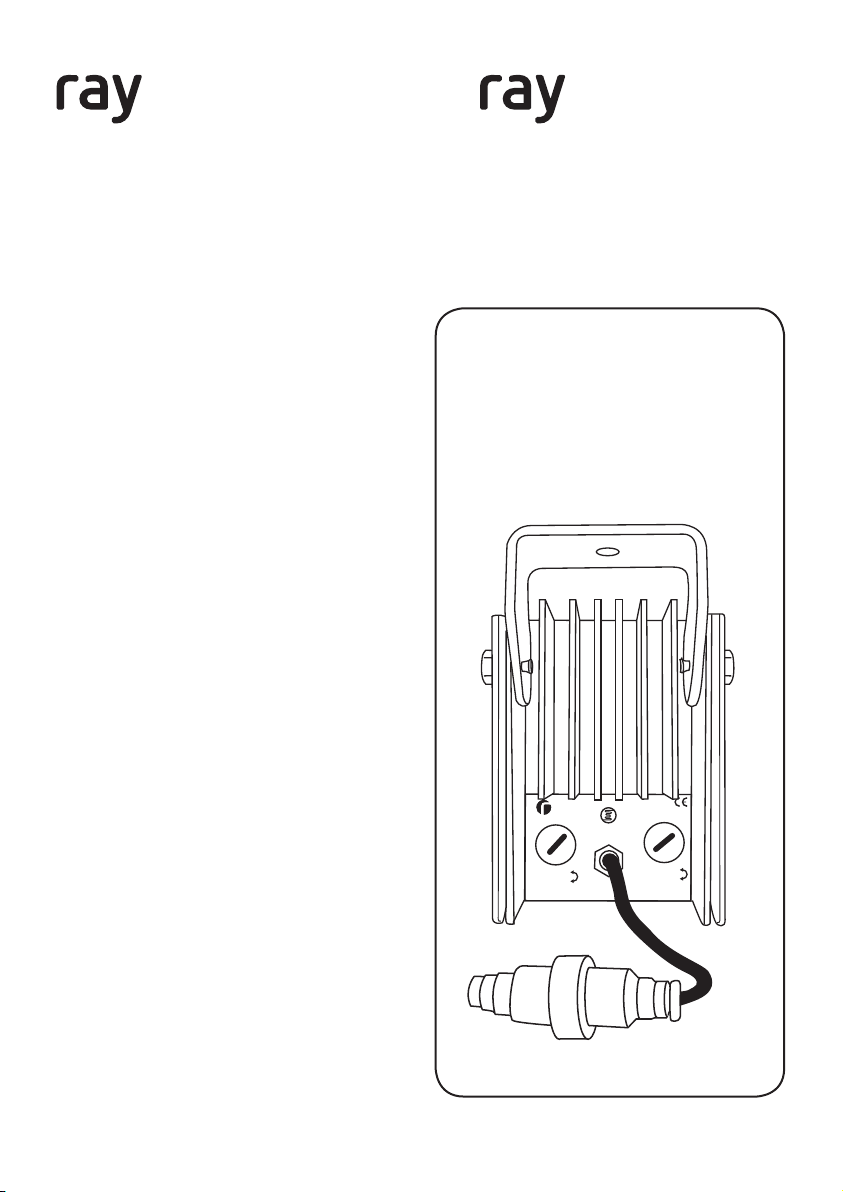
1. High power PoE illuminator including
waterproof connector
RAYMAX 50 / RAYLUX 50
HP PoE illuminator
(back of illuminator)
Version 4.0
Page 2
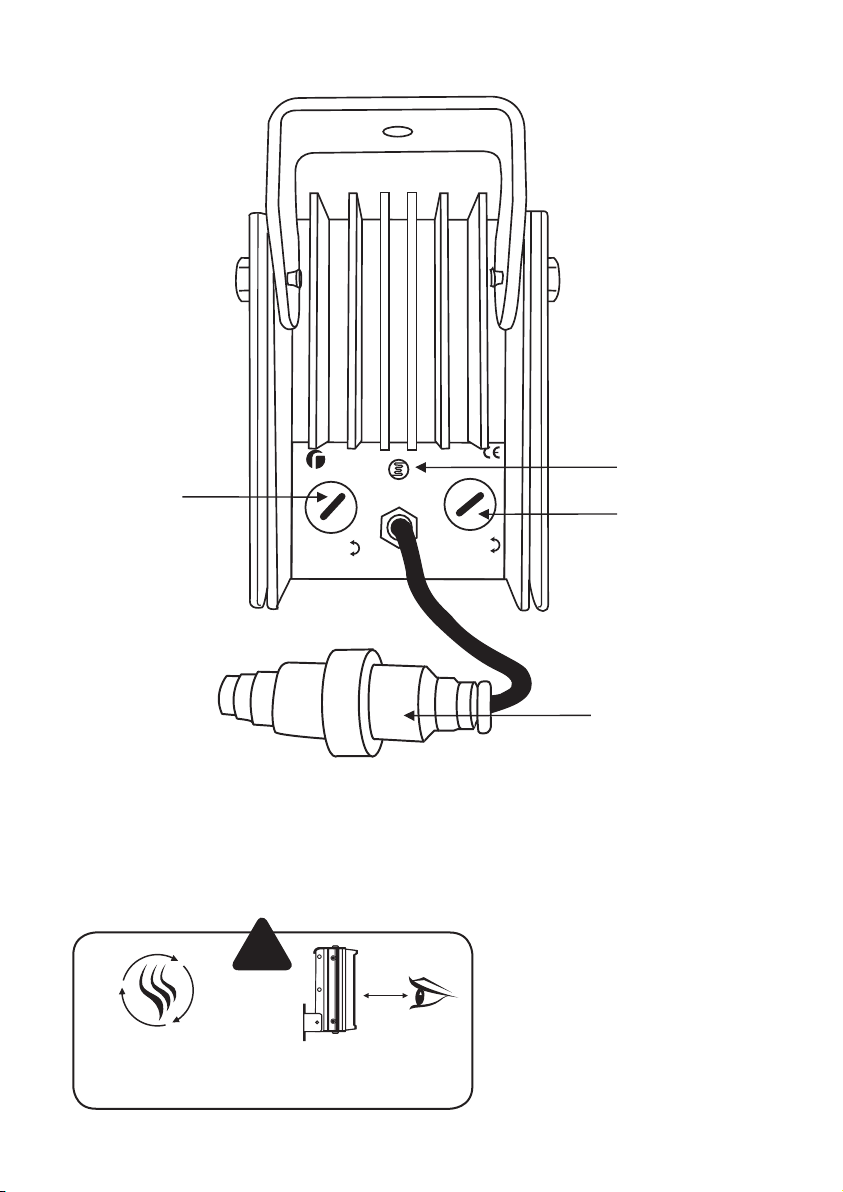
Power
Adjust
Power
adjust
-
+
Power in
P-cell
adjust
Made in UK
Photocell
Photocell
-
+
Adjust
Waterproof RJ45
connection
Install in a well
ventilated area
!
1.5 m
Do not continually
stare at lamp
The Raymax and Raylux 50 PoE illuminators
use the IEEE802.3af standard detection
method and require and injector that can
deliver up to 25W.
Specifications subject to change without
notice. Installation to be carried out by
suitable trained and qualified personnel.
2
Page 3

Installation
Set Up
INTERNAL AND EXTERNAL
Mount illuminator
1
2
Feed CAT5 cable into waterproof connector
1
3
3
Unscrew waterproof connector. Feed
cable through connector and select the
2
appropriate rubber bung for the outside
cable diameter. Terminate cable with an
RJ45 connector and fit into the RJ45
socket. Fit the two waterproof connector
ends together and tighten. Finally tighten
the two end gland nuts to ensure that it is
waterproof
4
Connect to a 802-3AF protocol standard
high power PoE injector switch or hub.
TARGET
1
Optional night set-up
for optimum image
performance
Use wall bracket if you require horizontal adjustment.
2
Adjust vertical angle
Tighten all fixings
3
Match illumination to camera field of view
Camera
Camera
Reduces performance May cause hot spots Best performance
x
Light
Light
Camera
x
Light
3
Page 4

Technical Drawings (Not to scale)
Standard Bracketry
8.5mm
48mm
(1.9”)
72mm
(2.8”)
36mm
(1.4”)
(0.3”)
25mm
(1”)
RM 50/RL 50 PoE
Specifications
INFRA-RED AND WHITE-LIGHT Series
Input Output PoE Photocell
PoE
up to
25W
Uses IEEE802.3af
standard detection
method.
CAT5 Cable
Integrated
(adjustable
sensitivity)
Optional Bracketry
Wall Mount
Adjustable
Power
10% - 100%
Weight
1kg
(2.2lbs)
Dimensions
L x W x D
135 x 100 x 63mm
5.25” x 4” x 2.5”
approx
Command and Control
Integrated Power Supply Features
• Adjustable photocell
• Adjustable power
4
Page 5

Trouble Shooting
Step 1: Basics
• Ensure power adjust is turned to the maximum level for troubleshooting.
• Ensure Photocell operates as required and turns lamp on and off when
covered, if necessary adjust the photocell sensitivity.
• When the light is on, a dull red glow should be visible from your
Infra-Red illuminator, and a bright white beam should be visible from
your White-Light illuminator.
• Confirm that the PoE injector, hub or switch unit is fully functioning and
is suitably rated to provide required power and suitably rated to
protocol standard 802-3af to provide power.
NB: Refer to manufacturer’s guide
• Ensure you have wired RJ45 connectors correctly at both ends.
• Check that the RJ45 waterproof connection is sound and fully weather
protected.
• Check that the cable is fully intact, and not broken or split.
Step 2: Set-up Camera, lens and illumination
Check alignment of lamp
Check camera lens – fully open at night & set correctly.
Check model number to Raytec performance specification to ensure
required distance is achievable.
Step 3: Call Raytec for further assistance
Note down:
• Model and serial number of illuminator
• Camera make and model
• Lens make and model
If the Raytec lamp is still not delivering the required performance, please
contact us for further assistance: tel +44 (0) 1670 520055.
5
Page 6

PoE/13/6.1
UK / Europe
T: +44 (0) 1670 520055
F: +44 (0) 1670 819760
sales@rayteccctv.com
Americas (Toll Free)
T: +1 888 505 8335
ussales@rayteccctv.com
www.rayteccctv.com
 Loading...