

Page 1
INSTALLATION
AND OPERATING
INSTRUCTIONS
RP2100
SWIMMING POOL
and
SPA HEATER
Atmospheric Models
P-R185B to P-R405B
C-R185B to C-R405B
CATALOG NO. 6000.52-AK
Effective: 05-01-04
Replaces: 03-15-04
Low NOx Models
P-R185BL to P-R405BL
C-R185BL to C-R405BL
WARNING: If the information in these instructions is not followed exactly, a fire or
explosion may result causing property damage, personal injury or death.
— Do not store or use gasoline or other flammable vapors and liquids in the vicinity of
this or any other appliance.
— WHAT TO DO IF YOU SMELL GAS
• Do not try to light any appliance.
• Do not touch any electrical switch; do not use any phone in your building.
• Immediately call your gas supplier from a neighbor's phone. Follow the gas
supplier's instructions.
• If you cannot reach your gas supplier, call the fire department.
— Installation and service must be performed by a qualified installer, service agency or
the gas supplier.
Fig.# 9478
This manual should be maintained in legible condition and kept adjacent to the
heater or kept in a safe place for future reference.
Part No. 240612
Page 2

Page 3

CONTENTS
4 PART ONE
OWNER'S OPERATING INSTRUCTIONS
4 SECTION 1
START-UP PROCEDURES
4 Before Start-Up
5 Lighting Instructions & Shut-Off Procedures-
Manually Lighted Pilots MV
6 Operating Instruction & Shut-Off Procedures-
Automatically Lighted Pilots IID
7 After Start-Up
7 SECTION 2
CAUTION
7 SECTION 3
MAINTENANCE & CARE PROCEDURES
8 Pool & Spa Water Chemistry
8 Cold Weather Operation
9 Winterizing the Pool & Spa Heater
10 PART TWO
INSTALLATION & SERVICE INSTRUCTIONS
10 SECTION 1
RECEIVING EQUIPMENT
10 SECTION 2
GENERAL SPECIFICATIONS
29 SECTION 4
SERVICING INSTRUCTIONS
29 General Location of Controls
29 Millivolt Controls
30 Digital Thermostat Controls
31 Digital Diagnostics and Codes
32 Remote Control and Operation Installation
34 Pressure Switch
34 Flame Roll-Out Safety Switch
34 High Limit
34 Pilot Safety
35 Burner Drawer Removal
35 Gas Valve Removal
35 Main Burner and Orifice Removal
35 Pilot Removal and Cleaning
35 Heat Exchanger Removal
36 Tube Cleaning Procedure
36 Desooting Procedure
36 Combustion Chamber Removal
36 Immersion Well Replacement
36 Unitherm Governor (U.G.) Replacement
37 Low NOx Pool Heaters
39 SECTION 5
TROUBLE SHOOTING GUIDE
39 Mechanical
40 Electrical MV Units
41 Electrical IID Units
42 Digital Control Logic
11 SECTION 3
INSTALLATION INSTRUCTIONS
11 Code Requirements
11 Clearances
12 Outdoor Heater Installation
12 Indoor Heater Installation
16 Specifications and Dimensions
16 Combustion Air
17 Vent Piping
17 Gas Supply Connections
19 Plumbing For Water Connections
23 Heat Exchanger Reversal Procedure
24 Electrical Wiring
25 Transformer Wiring
26 Wiring Diagram-Millivolt (Mechanical Therm.)
27 Wiring Diagram-IID (Atmospheric)
28 Wiring Diagram-IID (Low NOx)
43 SECTION 6
REPLACEMENT PARTS
44 Illustrated Parts List
46 Part Numbers
3
Page 4
PART ONE
OWNER'S OPERATING INSTRUCTIONS
FOR YOUR SAFETY - READ BEFORE OPERATING
WARNING: IF YOU DO NOT FOLLOW THESE INSTRUCTIONS EXACTLY, A FIRE OR EXPLOSION MAY
RESULT, CAUSING PROPERTY DAMAGE, PERSONAL INJURY OR LOSS OF LIFE.
SECTION 1 - START-UP PROCEDURES
Your Raypak Pool/Spa heater has been designed for years of safe and reliable pool/spa water heating. It is available
in millivolt or electronic control options. ASME certified units, typical used in commercial applications, are also
available. This manual provides operation, installation, maintenance, and service information for these heaters.
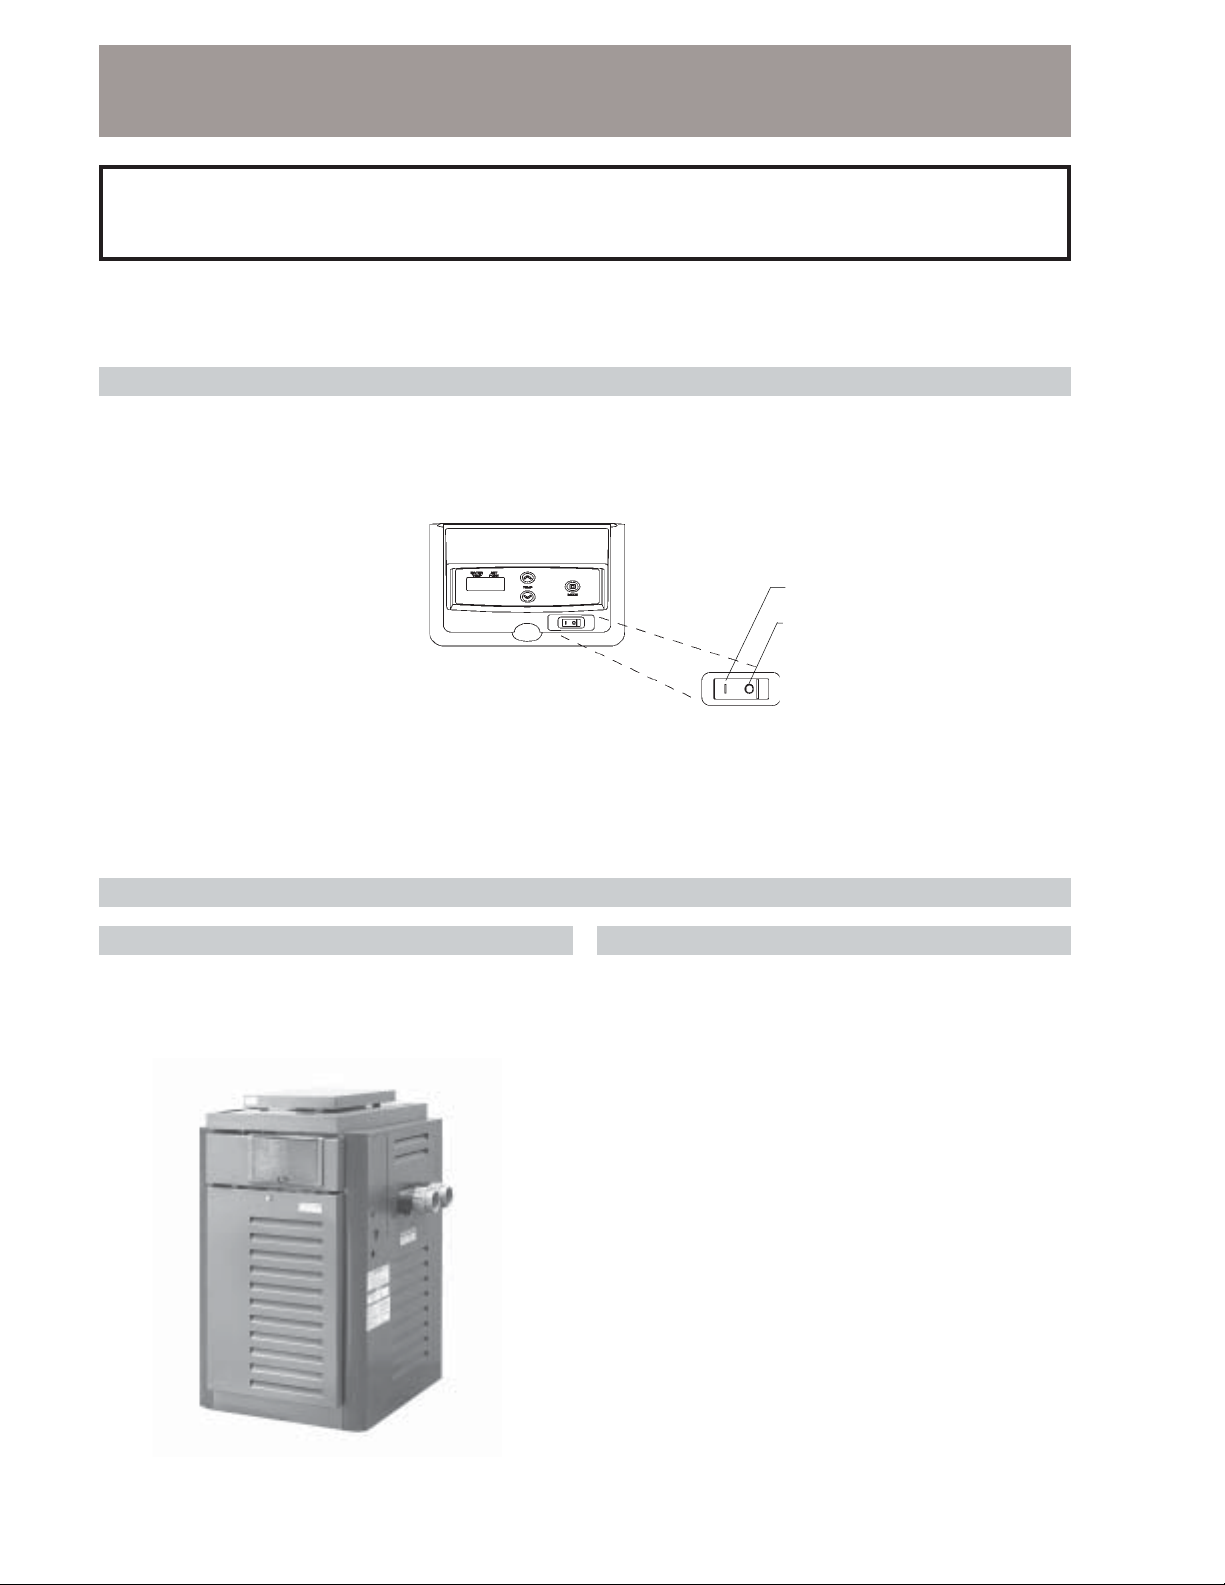
ON
OFF
Fig.# 9472
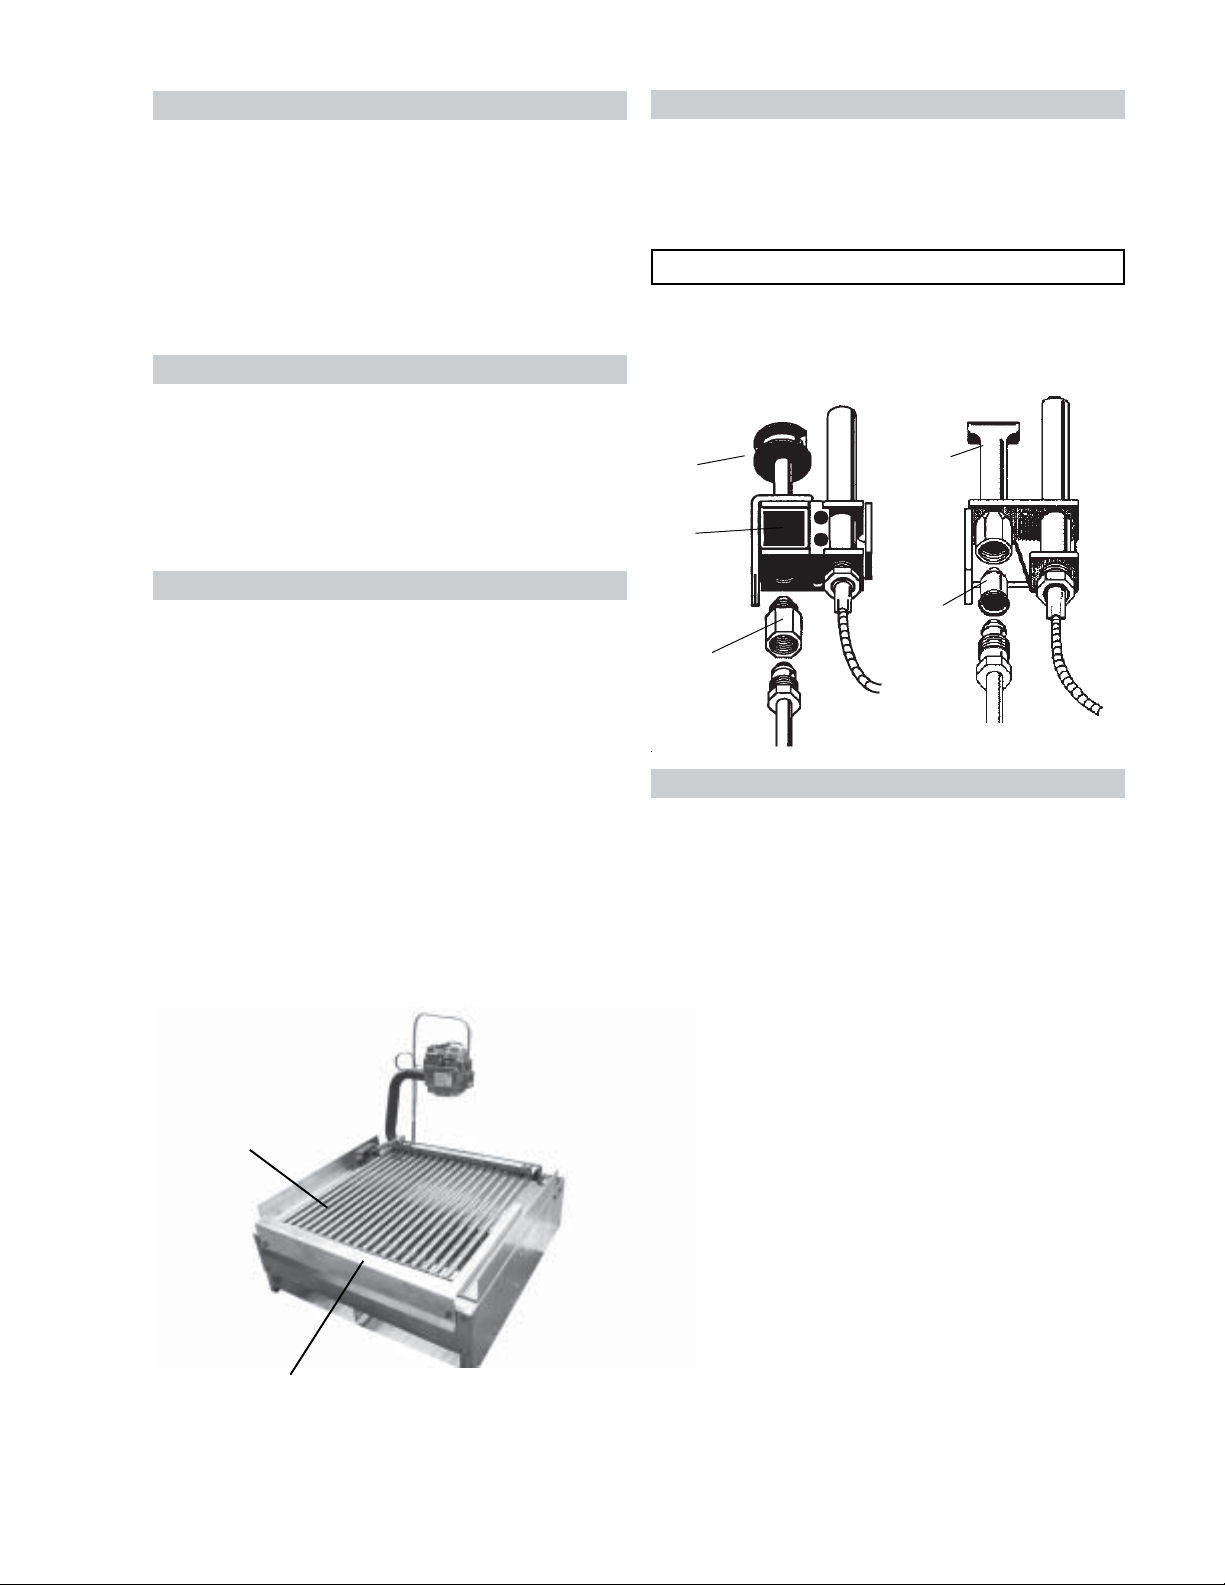
If your heater has been installed correctly, operating the heater is an easy task. The upper front panel of the heater
contains the control center that allows you to turn the heater on or off and adjust the temperature settings for the pool
or spa. The temperature range is factory set from 65°F (18°C) to 104°F (40°C). The heater is also equipped with a
toggle switch to turn the heater on and off, see fig. # 9472 above for location. Section 4 of this manual contains more
details about the use of the controls in the Controls Adjustments subsection (page 29).
BEFORE START-UP
BURNERS
Clean main burners, combustion fan and air louvers of
dust, lint and debris. Keep heater area clear and free from
combustibles, flammable liquids and chemicals. Do not
obstruct the flow of combustion and ventilating air.
WATER
Water must be flowing through the heater during operation. Insure that system is filled with water and have pump
operating.
RP2100 DIGITAL IID POLYMER
Fig.# 9478
4
Page 5

CAUTION: Propane gas is heavier than air and will settle on the ground. Since propane can accumulate in
confined areas, extra care should be exercised when lighting propane heaters.
LIGHTING INSTRUCTIONS AND SHUT-OFF PROCEDURES
MANUALLY LIGHTED PILOTS
MILLIVOLT SYSTEM
A. This appliance has a pilot that must be lit by
hand. When lighting the pilot, follow these
*If you cannot reach your gas supplier, call
the fire department.
instructions exactly.
C. Use only your hand to push in or turn the gas
B. BEFORE LIGHTING smell all around the
appliance area for gas. Be sure to smell next
to the floor because some gas is heavier than
air and will settle on the floor.
control knob. Never use tools. If the knob will
not push in or turn by hand, do not try to repair
it. Call a qualified service technician. Force or
attempted repair may result in a fire or explosion.
WHAT TO DO IF YOU SMELL GAS:
*Do not try to light any appliance.
*Do not touch any electric switch; do not use
any phone in your building.
*Immediately call your gas supplier from a
neighbor's phone. Follow the gas supplier's
D. Do not use this appliance if any part has been
under water. Immediately call a qualified service technician to inspect the appliance and to
replace any part of the control system and any
gas control which has been under water.
instructions.
LIGHTING INSTRUCTIONS
1. STOP! Read the safety information above.
2. Set the thermostat on the lowest setting.
3. Turn On/Off switch to the "Off" position.
4. Remove heater door panel.
5. Push in gas control knob slightly and turn
clockwise to "Off".
NOTE: Knob cannot be turned from "Pilot" to Off"
unless knob is pushed in slightly. Do not
force.
6. Wait 5 minutes to clear out any gas. If you then
smell gas, STOP! Follow "B" in the safety
information above. If you don't smell gas, go
to the next step.
7. Locate pilot mounted on the right side panel of
the burner drawer. For burner drawer location,
see location of control section, page 20.
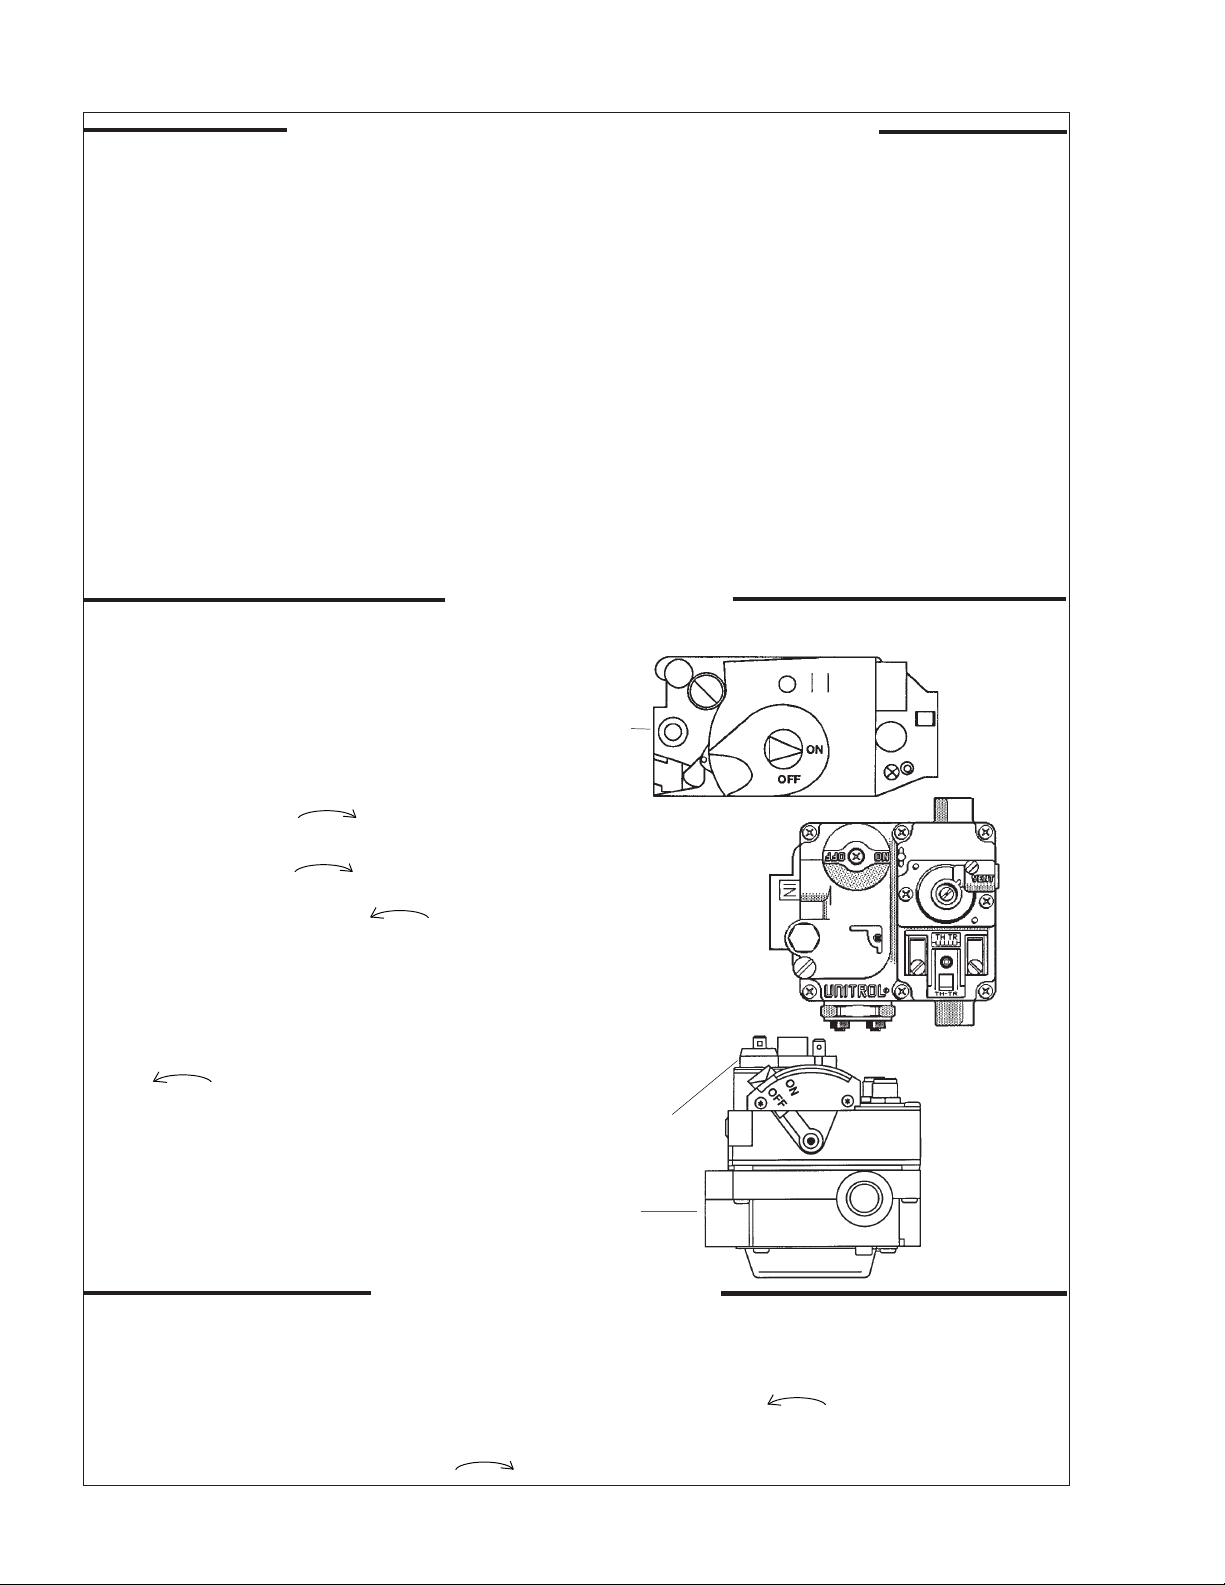
GAS CONTROL KNOB SHOWN IN OFF POSITION
HONEYWELL PILOT
Fig. # 8083.0 Fig. # 8084.1
ROBERTSHAW PILOT
8. Turn knob on gas control counter-clockwise
to "Pilot"
9. Place flame to end of pilot tube. Push in
control knob all the way and hold to light pilot.
Continue to hold control knob in for about one
minute after the pilot is lighted, release knob
and it will pop back up. Pilot should remain
HONEYWELL
GAS VALVE
MILLIVOLT
lighted. If it goes out, repeat steps 5 through 9.
*If knob does not pop up when released, stop
and immediately call your service technician
or gas supplier.
10. Stand to the side of the heater and turn the gas
control knob counter clockwise to "On".
11. Replace heater door panel.
12. Turn On/Off switch to the "On" position.
Fig. # 8081.0
ROBERTSHAW
GAS VALVE
MILLIVOLT
Fig. # 8079.0
13. Set thermostat to the desired setting.
TO TURN OFF GAS TO APPLIANCE
1. Set the thermostat to the lowest setting.
2. Turn On/Off switch to the "Off" position.
3. Remove heater door panel.
4. Push the gas control knob slightly and turn
clockwise to "Off". Do not force.
5. Replace heater door panel.
5
Page 6
CAUTION: Propane gas is heavier than air and will settle on the ground. Since propane can accumulate in
confined areas, extra care should be exercised when lighting propane heaters.
OPERATING INSTRUCTIONS AND SHUT-OFF PROCEDURES
AUTOMATICALLY LIGHTED PILOTS
ELECTRONIC IGNITIONS SYSTEMS
A. This appliance is equipped with an ignition
device which automatically lights the pilot. Do
not try to light the pilot by hand.
B. BEFORE OPERATING, smell all around the
appliance area for gas. Be sure to smell next
to the floor because some gas is heavier than
air and will settle on the floor.
WHAT TO DO IF YOU SMELL GAS:
*Do not try to light any appliance.
*Do not touch any electric switch; do not use
any phone in your building
*Immediately call your gas supplier from a
neighbor's phone. Follow the gas supplier's
instructions.
OPERATING INSTRUCTIONS
1. STOP! Read the safety information above.
2. Set the thermostat to the lowest setting.
3. Turn off all electric power to the appliance.
4. This appliance is equipped with an ignition
device which automatically lights the pilot.
Do not try to light the pilot by hand.
5. Remove heater door panel.
6. For Honeywell Valve: Turn gas control
knob clockwise to "Off".
For Robertshaw valve: Turn gas control
knob clockwise to "Off".(Models
265-405) Push in and move gas control
lever counter-clockwise to "Off"
position. (Model 185)
7. Wait 5 minutes to clear out any gas. If you
then smell gas STOP! Follow "B" in the
safety information previously stated. If you
don't smell gas, go to the next step.
8. Turn gas control knob counter-clockwise
to "On". (Honeywell VR 8300 and
Robertshaw 7000)
9. Replace heater door panel.
10. Turn on all electric power to the appliance.
11. Set thermostat to desired setting.
12. If the appliance will not operate, follow the
instructions "To Turn Off Gas To Appliance"
and call your service technician or gas
supplier.
TO TURN OFF GAS TO APPLIANCE
1. Set the thermostat at the lowest setting.
2. Turn off all the electric power to the appliance
if service is to be performed.
3. Remove heater door panel.
4. For Honeywell VR 8300 and Robertshaw
7000 gas valve.
Turn gas control knob clockwise
*If you cannot reach your gas supplier, call the fire
department.
C. Use only your hand to push in or turn the gas
control knob. Never use tools. If the knob will
not push in or turn by hand, don't try to repair
it; call a qualified service technician. Force or
attempted repair may result in fire or explosion.
D. Do not use this appliance if any part has been
underwater. Immediately call a qualified service technician to inspect the appliance and to
replace any part of the control system and any
gas control which has been underwater.
GAS CONTROL KNOB SHOWN IN "ON" POSITION
GAS
INLET
ROBERTSHAW 7000
GAS VALVE IID
MODEL 265-405
GAS CONTROL
LEVER SHOWN
IN "OFF"
POSITION
GAS
INLET
HONEYWELL
VR 8300 GAS
VALVE IID
ROBERTSHAW
7200 GAS VALVE
IID MODEL 185
to "Off". Make sure knob rest against stop.
For Robertshaw 7200 gas valve.
Push in and move gas control lever counterclockwise to "Off" position.
5. Replace heater door panel.
Fig. # 8080.0
Fig. # 8934.1
6
Page 7
AFTER START-UP
SECTION 2 - CAUTION
Feel the inlet and outlet pipes. Outlet pipe should be only
slightly warmer than the inlet. It should not be hot.
WARNING: Should overheating occur or the gas
supply fail to shut off, turn off the manual gas control
to the appliance.
VISUAL INSPECTION
With the heater on, remove the door and make a visual
check of the pilot and burner. The flame should be blue
with a well-defined pattern.
4" MAX
Fig. # 8205.2
MAIN BURNER FLAME
Elevated water temperature can be hazardous, and the
U. S. Consumer Product Safety Commission recommends the following guidelines:
1. Spa or hot tub water temperatures should never
exceed 104°F (40°C). A temperature of 100°F (38°C)
is considered safe for a healthy adult. Special
caution is suggested for young children.
2. Drinking of alcoholic beverages before or during spa
or hot tub use can cause drowsiness which could
lead to unconsciousness and subsequently result in
drowning.
3. Pregnant Women Beware! Soaking in water over
102°F (39°C) can cause fetal damage during the first
three months of pregnancy resulting in the birth of a
brain-damaged or deformed child. Pregnant women
should stick to the 100°F (38°C) maximum rule.
4. Before entering the spa or hot tub, users should
check the water temperature with an accurate thermometer; spa or hot tub thermostats may err in
regulating water temperatures by as much as 4°F
(2.2°C).
Fig. # 8964.1
PILOT BURNER FLAME
A yellow or "floating" flame indicates restricted air openings or incorrect orifice size. Should this occur, shut the
heater off and contact your installer or gas supplier.
WATER PRESSURE SWITCH
A water pressure switch is provided in the heater to shut
off the burners in the event that water supply to the heater
is interrupted. It is very important to verify that the switch
electrically opens and shuts off the gas valve when water
flow to the heater is interrupted. Otherwise, rapid and
severe damage will likely occur to the heater. (The water
pressure switch should be checked and adjusted for
proper operation by a qualified service person at the time
of installation and periodically checked thereafter. Refer
to Pressure Switch Adjustment on pg. 34 of this manual).
WARNING: Operation of the heater without water
circulation will cause rapid and severe damage to the
heater.
5. Persons with a medical history of heart disease,
circulatory problems, diabetes, or blood pressure
problems should obtain a physician's advice before
using pools or hot tubs.
6. Persons taking medications which induce drowsiness, such as tranquilizers, antihistamines, or anticoagulant, should not use spas or hot tubs.
SECTION 3 - MAINTENANCE AND
CARE PROCEDURES
To be followed one month after start-up and then semiannually.
1. Inspect top of heater and drafthood for soot, a sticky
black substance around finned tubes and "V"
baffles), and open flue gas passage ways. Any visible
soot should be cleaned for proper operation.
CAUTION: Soot may be combustible. Wet sooted
surfaces completely prior to cleaning. Do not use steel
wire brush.
2. Clean main burners and pilot burner of dust and lint.
3. Inspect and operate all controls, gas valve and
pressure relief valve.
7
Page 8
4. Make visual check of the burner and pilot flame.
Flame pattern on the main burner and pilot is indicated in the previous illustration. Yellow flame
means restriction of the air openings. Lifting or
blowing flame indicates high gas pressure. Low
flame means low gas pressure. Should the latter
occur, shut the heater off and contact your gas
supplier or qualified service agency.
AUTOMATIC CHLORINATORS AND
CHEMICAL FEEDERS
All chemicals must be introduced and completely diluted
into the pool or spa water before being circulated through
the heater. Do not place chlorine tablets or bromine
sticks in the skimmer. High chemical concentrations will
result when the pump is not running (e.g. overnight).
5. On indoor heaters, clean room intake openings to
assure adequate flow of combustion and ventilation
air.
CAUTION: Combustion air must not be contaminated
by corrosive chemical fumes which can damage the
heater and void the warranty.
6. Keep area around heater clear and free from combustible materials, gasoline and other flammable and
corrosive vapors and liquids.
BASIC TIPS IF HEATER WILL NOT FIRE:
If you have no electrical power; it may be your "circuit
breaker" has tripped. Try re-setting it.
If you have electrical power but the heater will not fire
check the following:
1. The time clock must be moved to the "ON" position.
2. Your pump strainer basket may be full. If so remove
debris.
3. Your filter may be dirty. If so, backwash or clean
filter. (To tell if your filter is dirty, look to see if the
filter pressure will be higher than usual).
4. The pump may have lost it's prime. It may be running dry, check the pressure on the filter. If there is
no pressure; then you are not moving water (or your
gauge is broken). Try to get the pump to run at it's
normal flow rate.
POOL & SPA WATER CHEMISTRY
Chlorinators must feed downstream of the heater and
have an anti-siphoning device to prevent chemical backup into the heater when the pump is shut off.
NOTE: High chemical concentrates from feeders and
chlorinators that are out of adjustment will cause very
rapid corrosion to the heat exchanger. Such damage is
not covered under the warranty.
COLD WEATHER OPERATION
IMPORTANT FREEZE INFORMATION
MODERATE CLIMATE: Heater operation can con-
tinue during short term cold spells. When temperatures are below freezing, flow (continuous pump operation) must be maintained.
CAUTION: Do not use the heater to maintain water
temperatures just above freezing or for freeze protection. When heater is used during freezing weather,
care must be taken to avoid freeze ups. Continuous
pump operation is a must. Additional protection may
be required. The heater is not warranted against freeze
ups.
COLD CLIMATE: Prolonged operation with water temperatures below 50°F is not recommended. When
starting the heater with pool temperatures below 50°F
operate the heater continuously until higher temperatures are reached. Operating the heater for prolonged
periods with pool water below 50°F can seriously
damage the heater, and is not covered by the warranty.
For cold climate areas, please follow the winterizing
procedures listed.
Chemical imbalance can cause severe damage to your
heater and associated equipment. Maintain your water
pH between 7.4 and 7.8 and total alkalinity between 100
and 150 p.p.m. If the mineral content and dissolved solids
in the water become too high, scale forms inside the heat
exchanger tubes, reducing heater efficiency and also
damaging the heater. If the pH drops below 7.2, the
heater will be severely damaged. This will result in
corrosion of the heat exchanger. Heat exchanger
damage resulting from chemical imbalance is not
covered by the warranty.
8
Page 9
WINTERIZING THE POOL & SPA HEATER
Heaters installed outdoors in freezing climate areas are
subject to be shut down for the winter. Observe the
following procedure for winterizing the heater:
1. Turn off gas valve, manual gas valve, and electrical
supply to the heater.
2. Open drain plug located on the inlet/outlet header,
(under water pipes). Remove the heat exchanger
inspection panel on the side opposite water piping to
gain access to the drain plug on the return header.
Open drain plug on return header.
Return Header
Drain Plug
3. For ASME Heaters only:
Disconnect compression
fittings from the pressure switch and return header
that connects to the 1/4" copper tube and allow the
tube to drain. For ASME Heaters only.
9
Page 10

PART TWO
INSTALLATION AND SERVICE INSTRUCTIONS
SECTION 1 - RECEIVING EQUIPMENT
On receipt of your equipment it is suggested that you visually check for external damage to the carton. If the carton
is damaged, a note should be made on the Bill of Lading when signing for equipment. Remove the heater from the
carton and if it is damaged, report the damage to the carrier immediately. Save the carton.
These items are shipped loose inside the carton with the heater:
STANDARD UNIT (POLYMER HEADERS) ASME UNIT (CAST IRON HEADERS)
1. "Pagoda" Top 1. "Pagoda" Top
2. 2" CPVC Union with "O" rings (2) 2. In/Out Flanges (2)
3. Plastic pipe finish flange for gas line 3. 1-1/2" Flange Gaskets (2)
4. Bonding lug with mounting screw 4. 2" Flange Gaskets (2)
(IID units only) 5. Flange Bolts (4)
6. Pressure Relief Valve
7. 2" CPVC Adapters (2)
8. Plastic pipe finish flange for gas line.
9. Bonding lug with mounting screw. (IID units only).
Be sure that you receive the number of packages indicated on the Bill of Lading.
When ordering parts, you must specify model and serial number of heater. When ordering under warranty conditions,
you must also specify date of installation. (Raypak recommends that this manual be reviewed thoroughly before
installing your Raypak pool/spa heater. If there are any questions that this manual does not answer, please contact
the factory or your local Raypak representative.)
SECTION 2 - GENERAL SPECIFICATIONS
These heaters are design certified and tested under the requirements of ANSI Z21.56 / CSA 4.7 American National
Standard / CSA Standard for Gas-Fired Pool Heaters. All heaters can be used either indoor or outdoors. The
appropriate top designated for that type of use is required. If desired, the top can be changed at a later date to change
from outdoor to indoor or vice versa. Millivolt heater contains a self-generating electrical system operating between
.25 and .75 volts.
Ambient Temperature Rating of Heater Components
Millivolt Heater with Honeywell Gas Valve +32°F to +175°F
Millivolt Heater with Robertshaw Gas Valve 0°F to +175°F
Electronic Ignition Heaters* -32°F to + 175°F
*Requires 120V or 240V Power Supply
Atmospheric heaters:
Rated inputs suitable for up to 2000 feet elevation. For elevations above 2000 feet, reduce input 4% for each 1000
feet above sea level, as high elevation reduces combustion performance.
Low NOx heaters:
Rated inputs suitable for up to 5000 feet elevation. For elevations above 5000 feet, consult the factory.
10
Page 11
m
M
SECTION 3 - INSTALLATION INSTRUCTIONS
CALIFORNIA PROPOSITION 65 WARNING: This product contains chemicals known to the State of California
to cause cancer, birth defects or other reproductive harm.
IMPORTANT NOTICE
These instructions are intended for the use of qualified
personnel only, specifically trained and experienced in
the installation of this type of heating equipment and
related system components. Installation and service
personnel may be required by some states to be licensed. If your state is such, be sure your contractor
bears the appropriate license. Persons not qualified shall
not attempt to fix this equipment nor attempt repairs
according to these instructions.
WARNING:
Improper installation, adjustment, alteration, service or
maintenance may damage the equipment, create a
hazard resulting in asphyxiation, explosion or fire, and
will void the warranty.
CODE REQUIREMENTS
NOTE: The heater should not be located in an area
where possible water leakage will result in damage to
the area adjacent to the appliance or to the structure.
When such locations cannot be avoided, it is recommended that a suitable drain pan, adequately drained,
be installed under the appliance. The pan must not
restrict combustion air flow.
Installation must be in accordance with local codes, or,
in the absence of local codes, with the latest edition of the
National Fuel Gas Code, ANSI Z223.1 and National
Electrical Code, ANSI/NFPA 70, and for Canada, the
latest edition of CAN/CGA-B149.1 and B149.2, and
Canadian Electrical Code, CSA C22.1 Part 1 and Part
2.
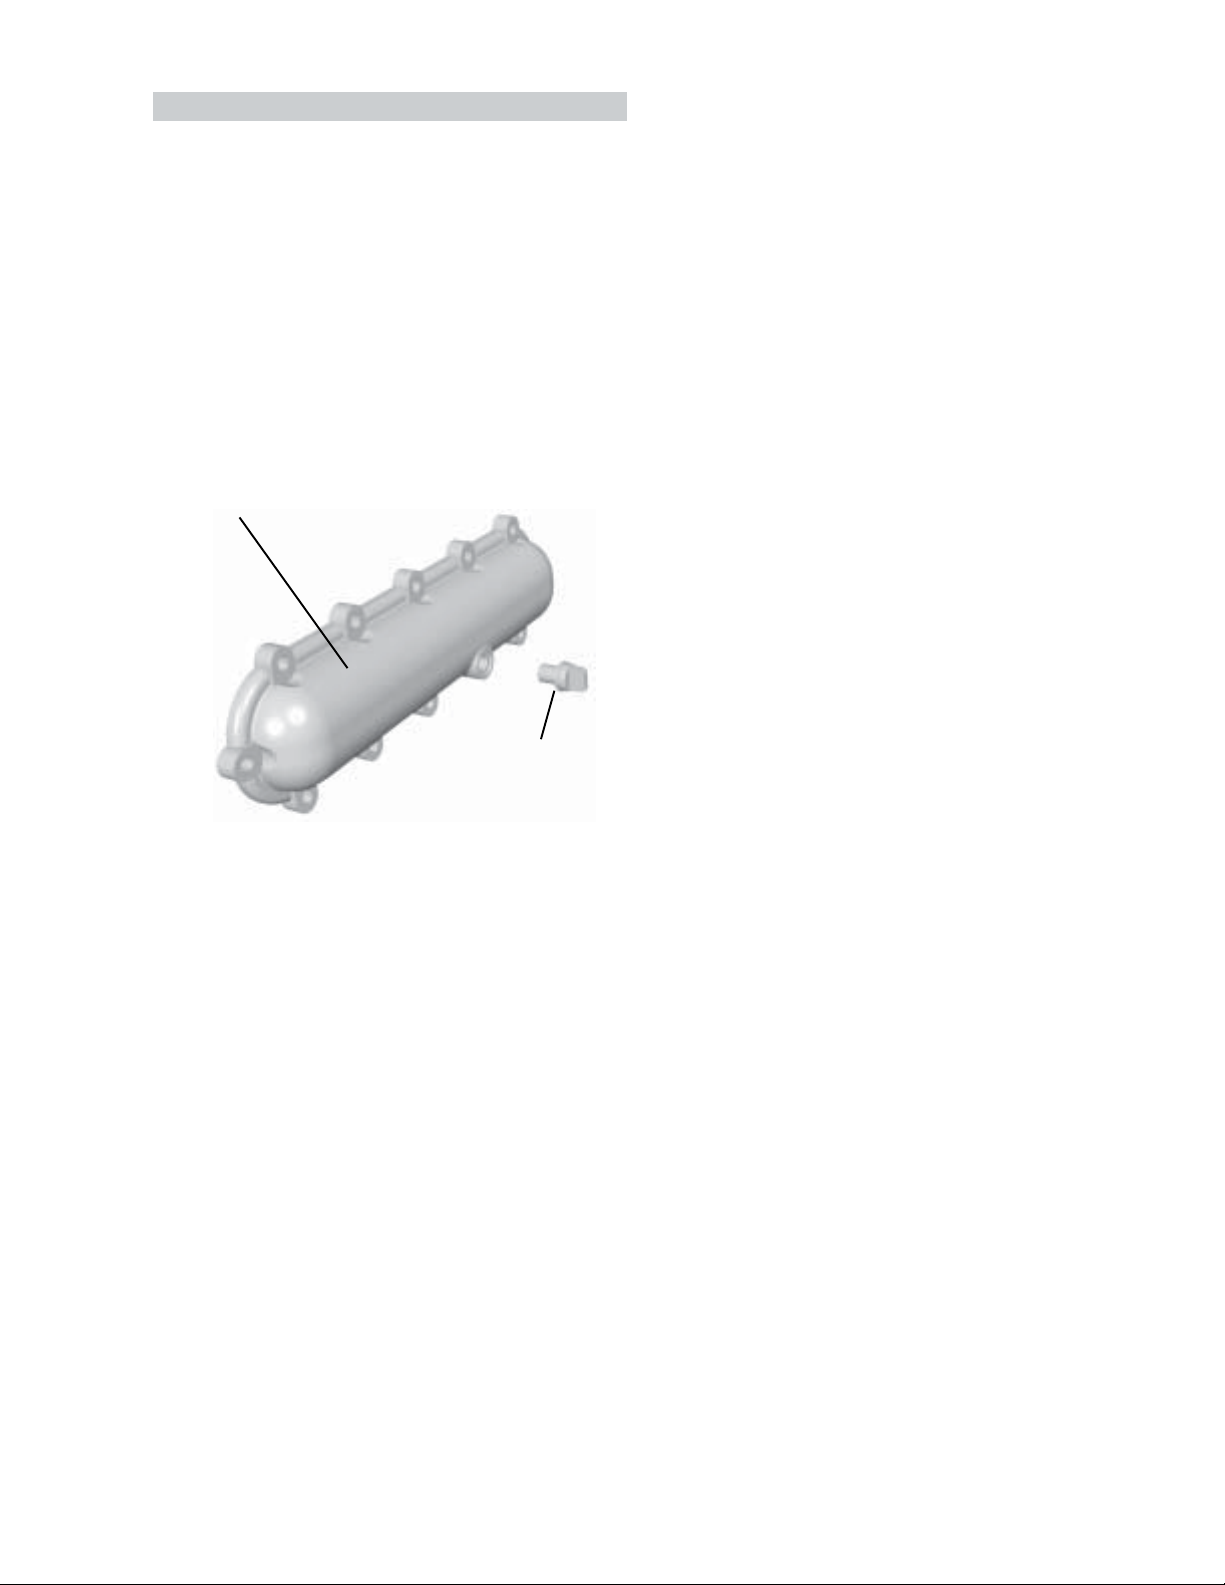
BASE INSTALLATION
Heater must be mounted on a level base, such as cement
slab, cement blocks or other non-combustible surface.
An optional non-combustible base is available for all
models.
An alternative method for providing a base for combustible
floors is illustrated below. Heaters must
not be installed
on carpeting.
12"
12"
inimum
4"
Minimum
HEATER
Sheet Metal
24 Gauge
Minimu
Fig. # 8148.1
Utilize hollow concrete cinder blocks, align holes and
leave ends open.
CLEARANCES
ALL HEATERS
For clearances from combustible surfaces, see the chart
below.
CLEARANCE FROM
COMBUSTIBLE CONSTRUCTION
INDOOR INSTALLATIONS:
Top*- 30"(Drafthood) Back - 6"
Front - Alcove Right Side - 12" (Water Side)
Vent - 6" Left Side - 6"
(Opposite Water side)
OUTDOOR INSTALLATION:
Top* - Unobstructed (Stackless top or outdoor stack)
Back - 6"
Side - 6"
*Clearance from top of vent terminal
When installed according to the listed minimum clearances from combustible construction materials, the
Raypak pool heaters can still be serviced without removing permanent structural construction around the heater.
However for ease of servicing, we recommend a clearance of at least 24" in the front, and at least 18" on the
water connection side. This will enable the heater to be
serviced in its installed location, that is, without movement or removal of the heater.
Clearances less than these (6" minimum), may require
removal of the heater to service either the heat exchanger
or the burner tray. In either case, the heater must be
installed in a manner that will enable the heater to be
serviced without removing any structure around the
heater.
11
Page 12
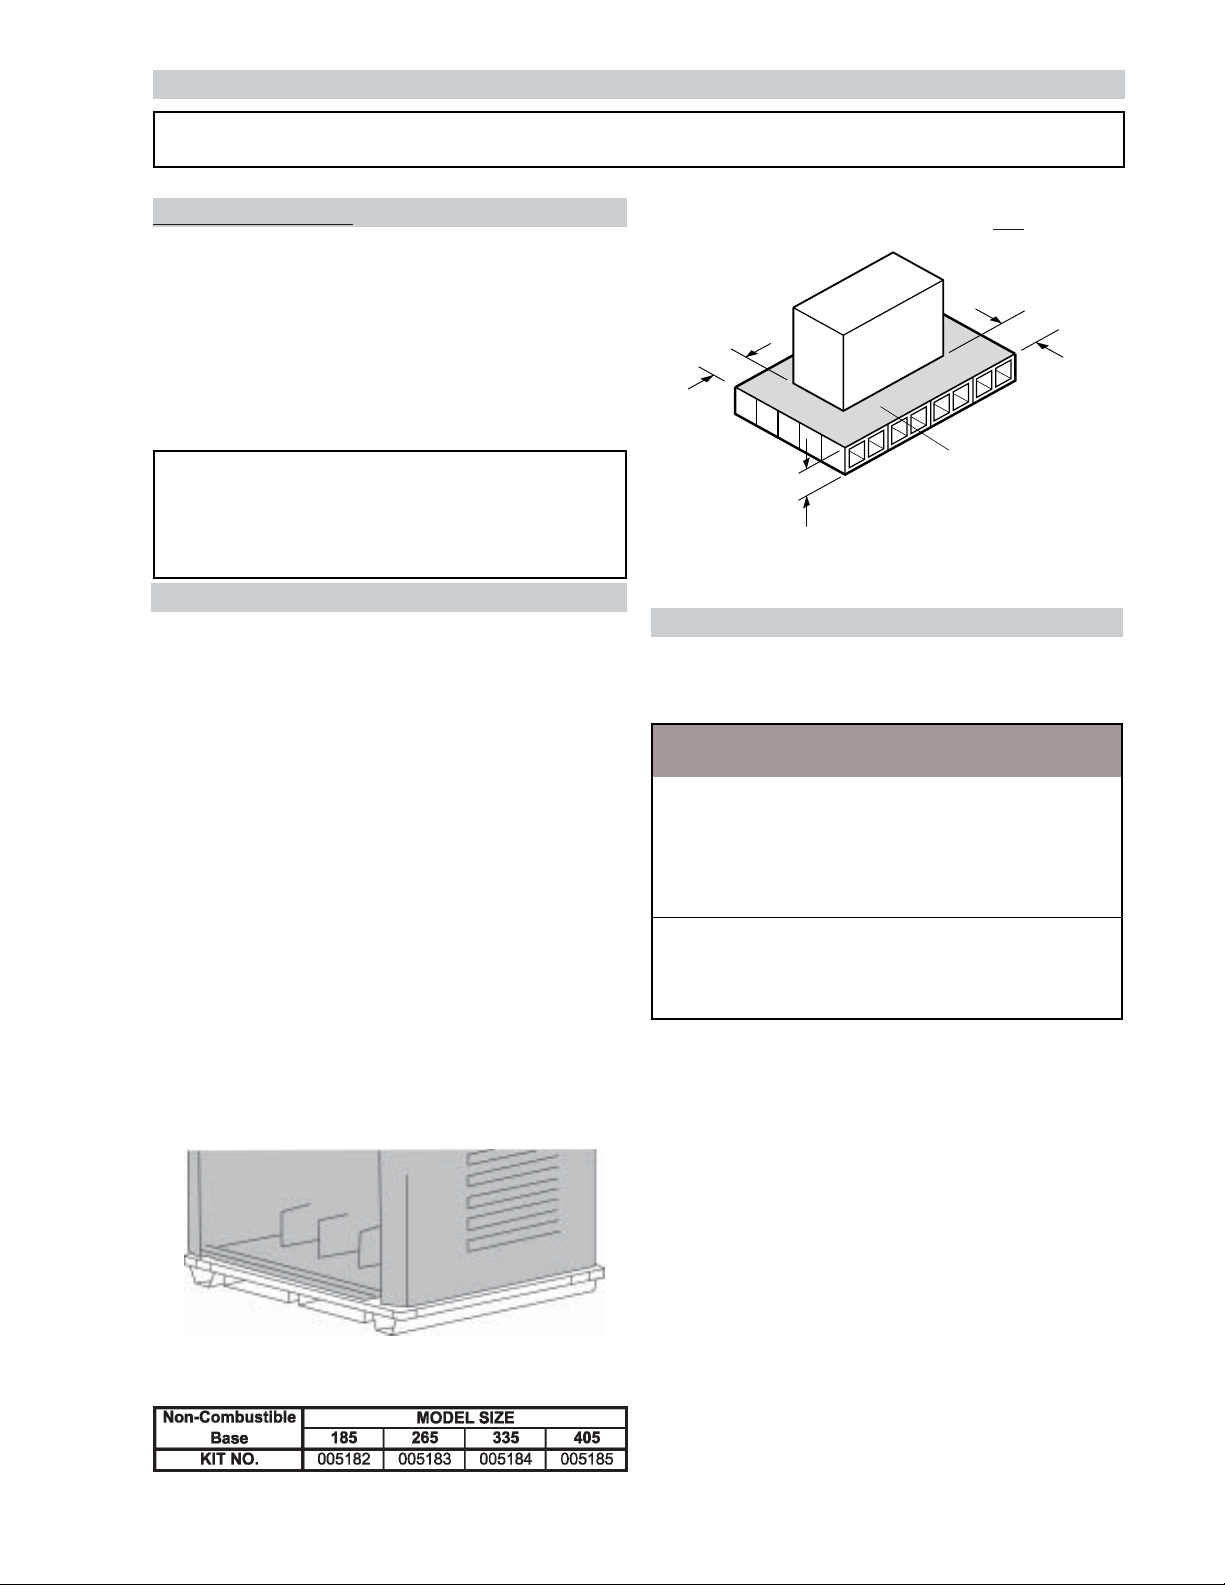
OUTDOOR HEATER INSTALLATION
These heaters are design certified for outdoor installation, when equipped with the approved tops designated for
outdoor use.
WARNING: The heater shall not be located in an area where water sprinklers, or other devices, may cause water
to spray through the cabinet louvers and into the heater. This could cause internal rusting or damage some electrical
components, and this would void the warranty.
WARNING: Do not install within 3 feet of a heat pump or an outdoor condensing unit. Strong air intake from these
equipment can disturb the combustion process and cause damage or personal injury.
HEATER WITH OUTDOOR STACKLESS TOP
VENT TERMINAL (Outdoor) Stackless Top Installation
1. Insert tabs into keyhole (4 places).
Pagoda Top
(Shipped
Loose with
Heater)
2. Snap tabs into keyholes so as not to pull out.
Fig. # 8278.2
Fig. #RP8280.1
Heaters must not be installed under an overhang of less than three (3) feet from the top of the heater. Three (3) sides
must be open in the area under the overhang. Roof water drainage must be diverted away from the heaters installed
under overhangs with the use of gutters.
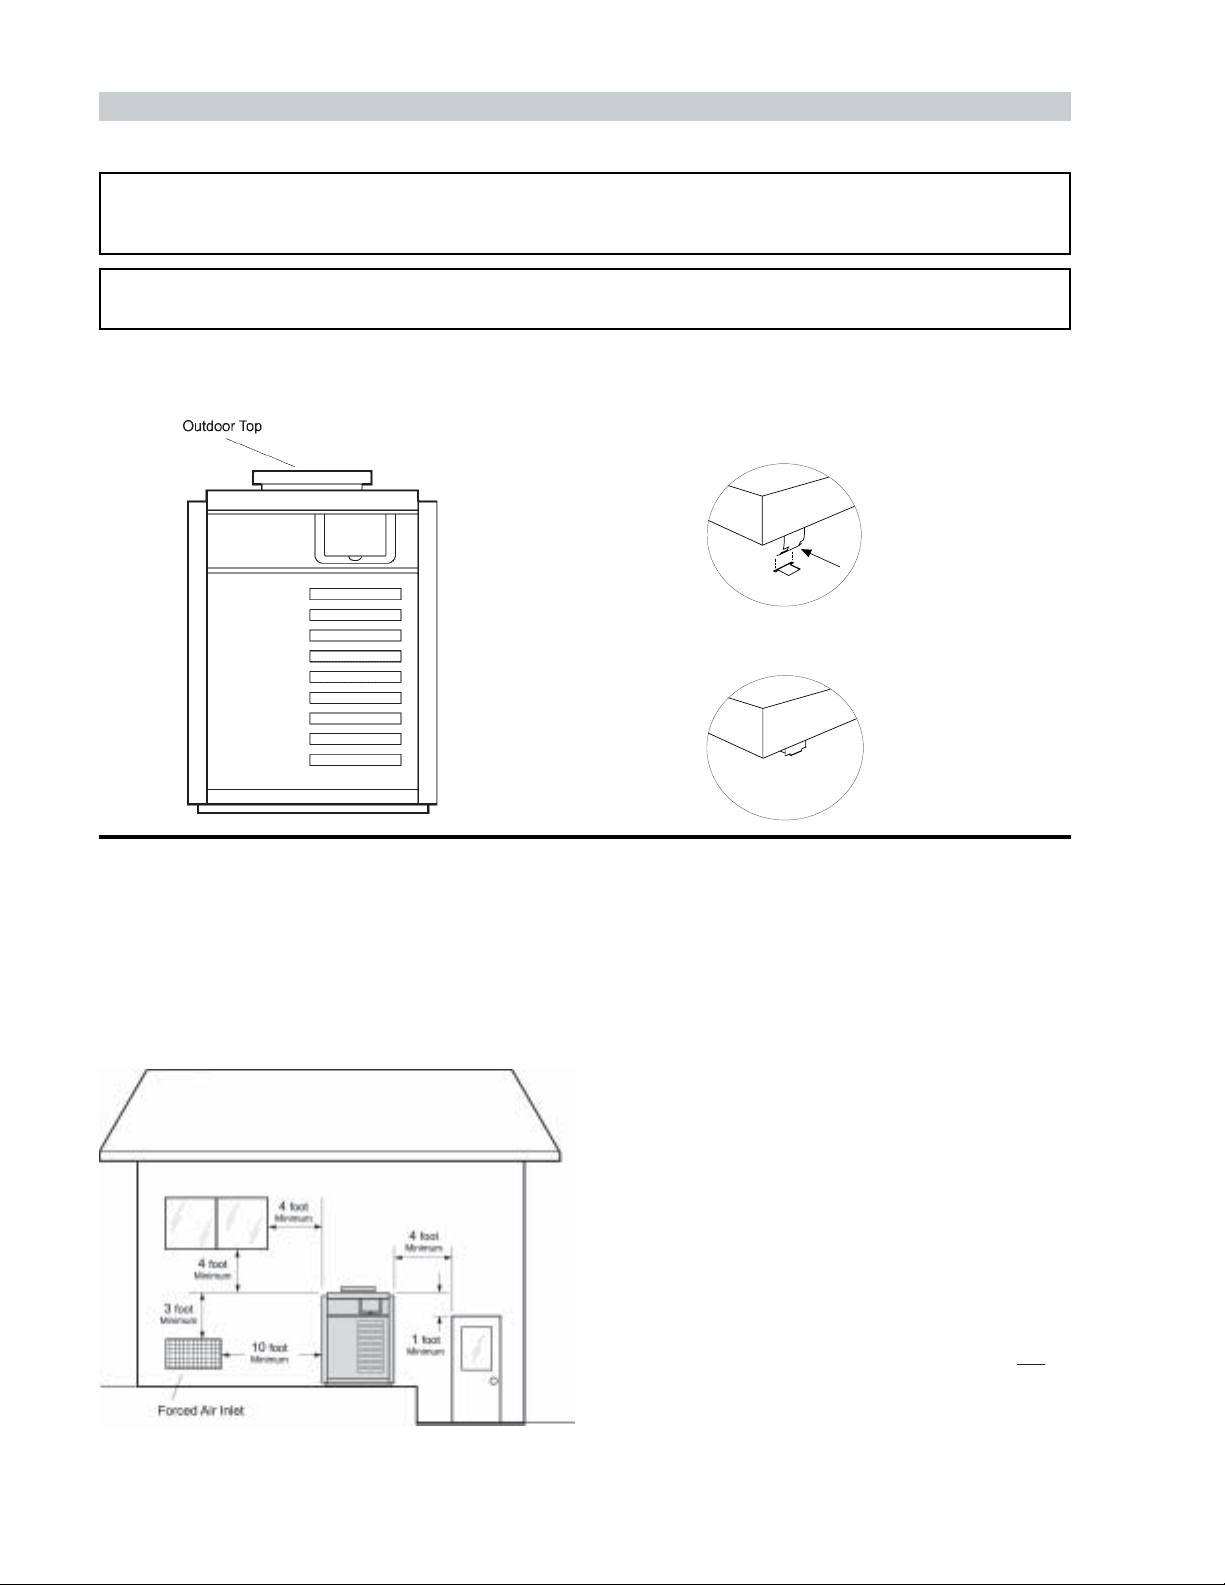
For U.S. installations,the point from where the flue products exit the heater must be a minimum of four (4) feet below,
four (4) feet horizontally from, or one (1) foot above any door, window or gravity inlet into any building. The top surface
of the heater shall be at least three (3) feet above any forced air inlet, or intake ducts located within ten (10) feet
horizontally.
For installations in Canada, pool heaters shall not be
installed with the top of the vent assembly within 10 feet
below, or to either side, of any opening into the building.
Refer to the latest revisions of CAN/CGA-B149.1 and
U.S. Installations only
Fig# 8245.1
B149.2.
12
Page 13
INDOOR HEATER INSTALLATION
The design is also certified for indoor installation when equipped with the approved draft hood.
For Canada, indoor installation is restricted to an enclosure that is not occupied and does not directly communicate
with occupied area. Refer to the latest edition of CAN/CGA-B149.1 and B149.2 for specific requirements.
Locate heater as close as practical to a chimney or gas vent. Heater must always be vented to the outside. See
Vent Piping section (pg. 17) for venting details. Minimum allowable space is shown on the nameplate.
WARNING: Indoor boilers require a drafthood that must be connected to a vent pipe and properly vented to the
outside. Failure to follow this procedure can cause fire or fatal carbon monoxide poisoning.
OUTDOOR STACK / INDOOR STACK INSTALLATION
NOTE: The outdoor and indoor stack are optional equipment and do not come standard with the heater.
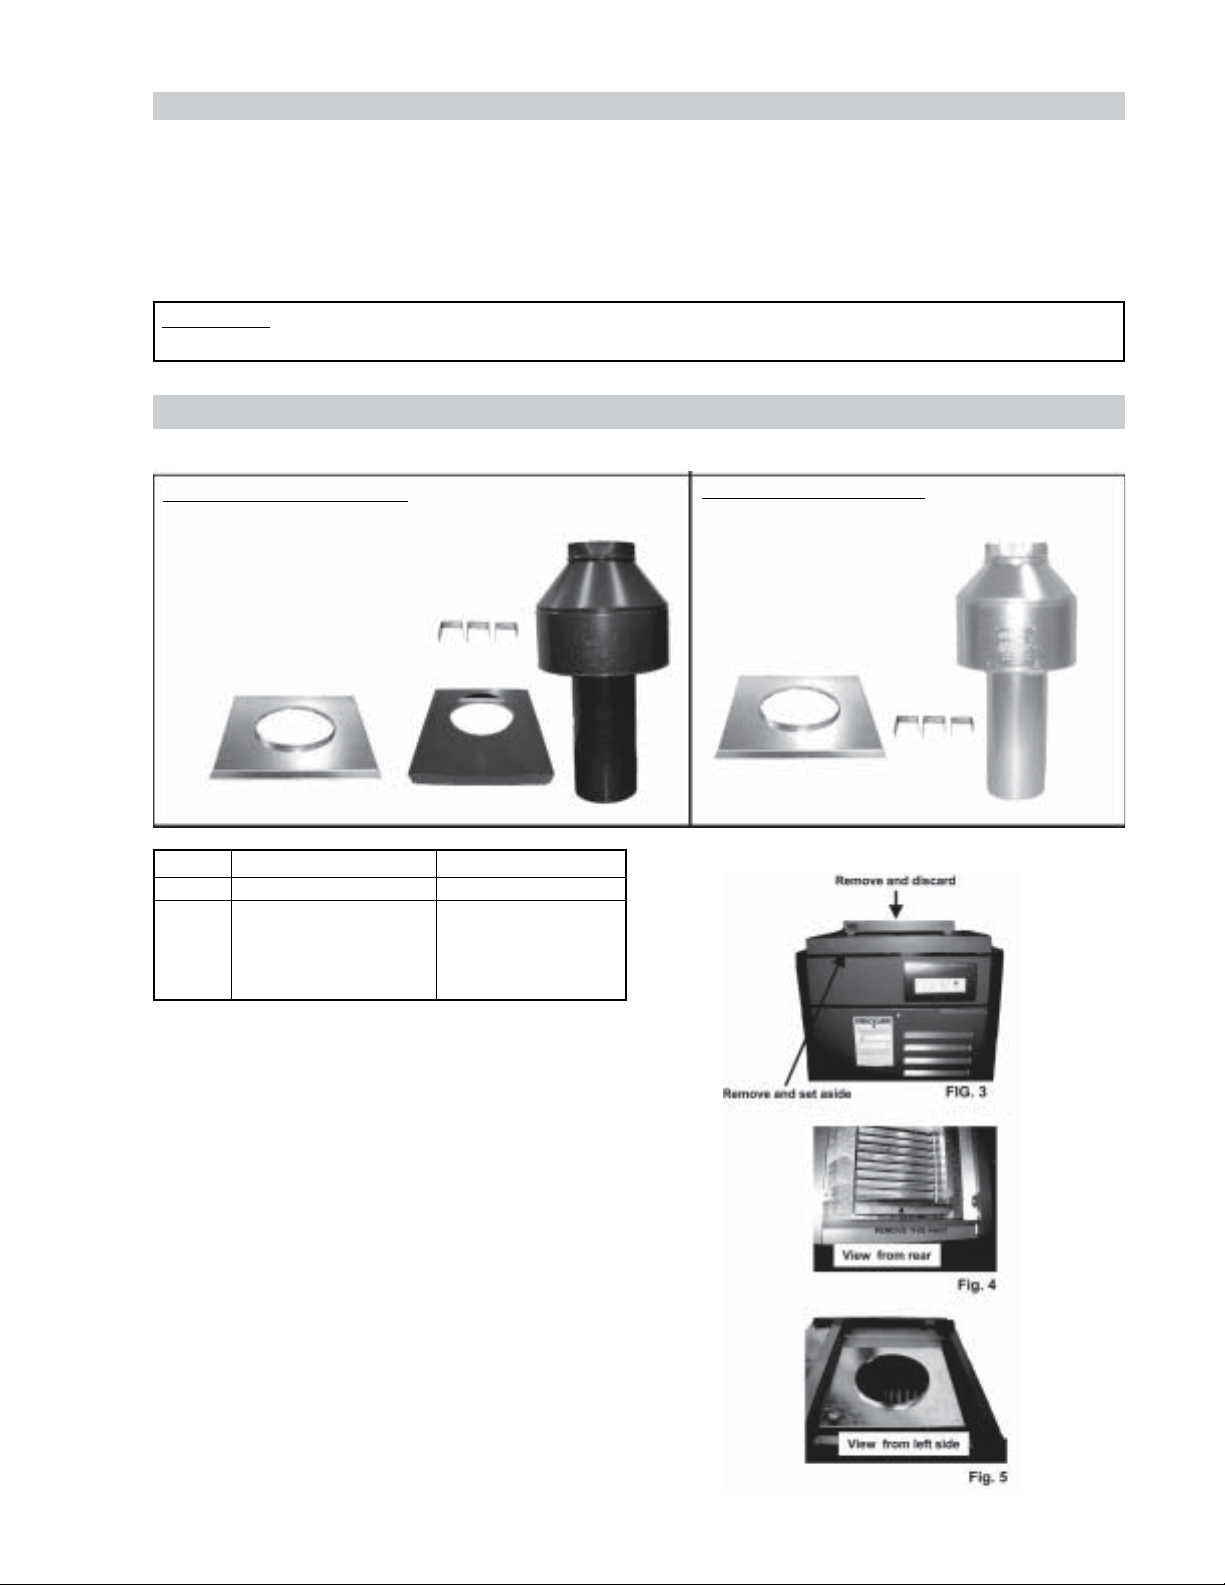
OUTDOOR KIT INCLUDES:
1- Draft hood, painted
1- Adapter plate
3- Mounting brackets (clips)
1- Top panel cover
2- 1 foot sections of metal tape
3- Screws
1- Instructions
OUTDOOR STACK INDOOR STACK
Model Part No. Part No.
185 006751 006696
265 006752 006697
335 006753 006698
405 006754 006699
Clips
ASSEMBLY PROCEDURE
INDOOR KIT INCLUDES:
1- Draft hood, unpainted
1- Adapter plate
3- Mounting brackets (clips)
3- Screws
1- Instructions
Clips
1. Make sure that the gas and electricity to the unit has
been turned off.
2. Remove the "pagoda" top from the louvered top and
discard. See Fig. 3.
3. Remove the louvered top and set aside, saving the
four phillips screws for reassembly. See Fig. 3.
4. Remove and discard the rain shield. See Fig. 4.
5 Install adapter plate on top of heater flue collector.
See Fig. 5.
6. Reinstall louvered top on heater and fasten with
Phillips screws set aside in step 3.
13
Page 14
SECURING THE TOP PANEL COVER
INDOOR KIT ONLY
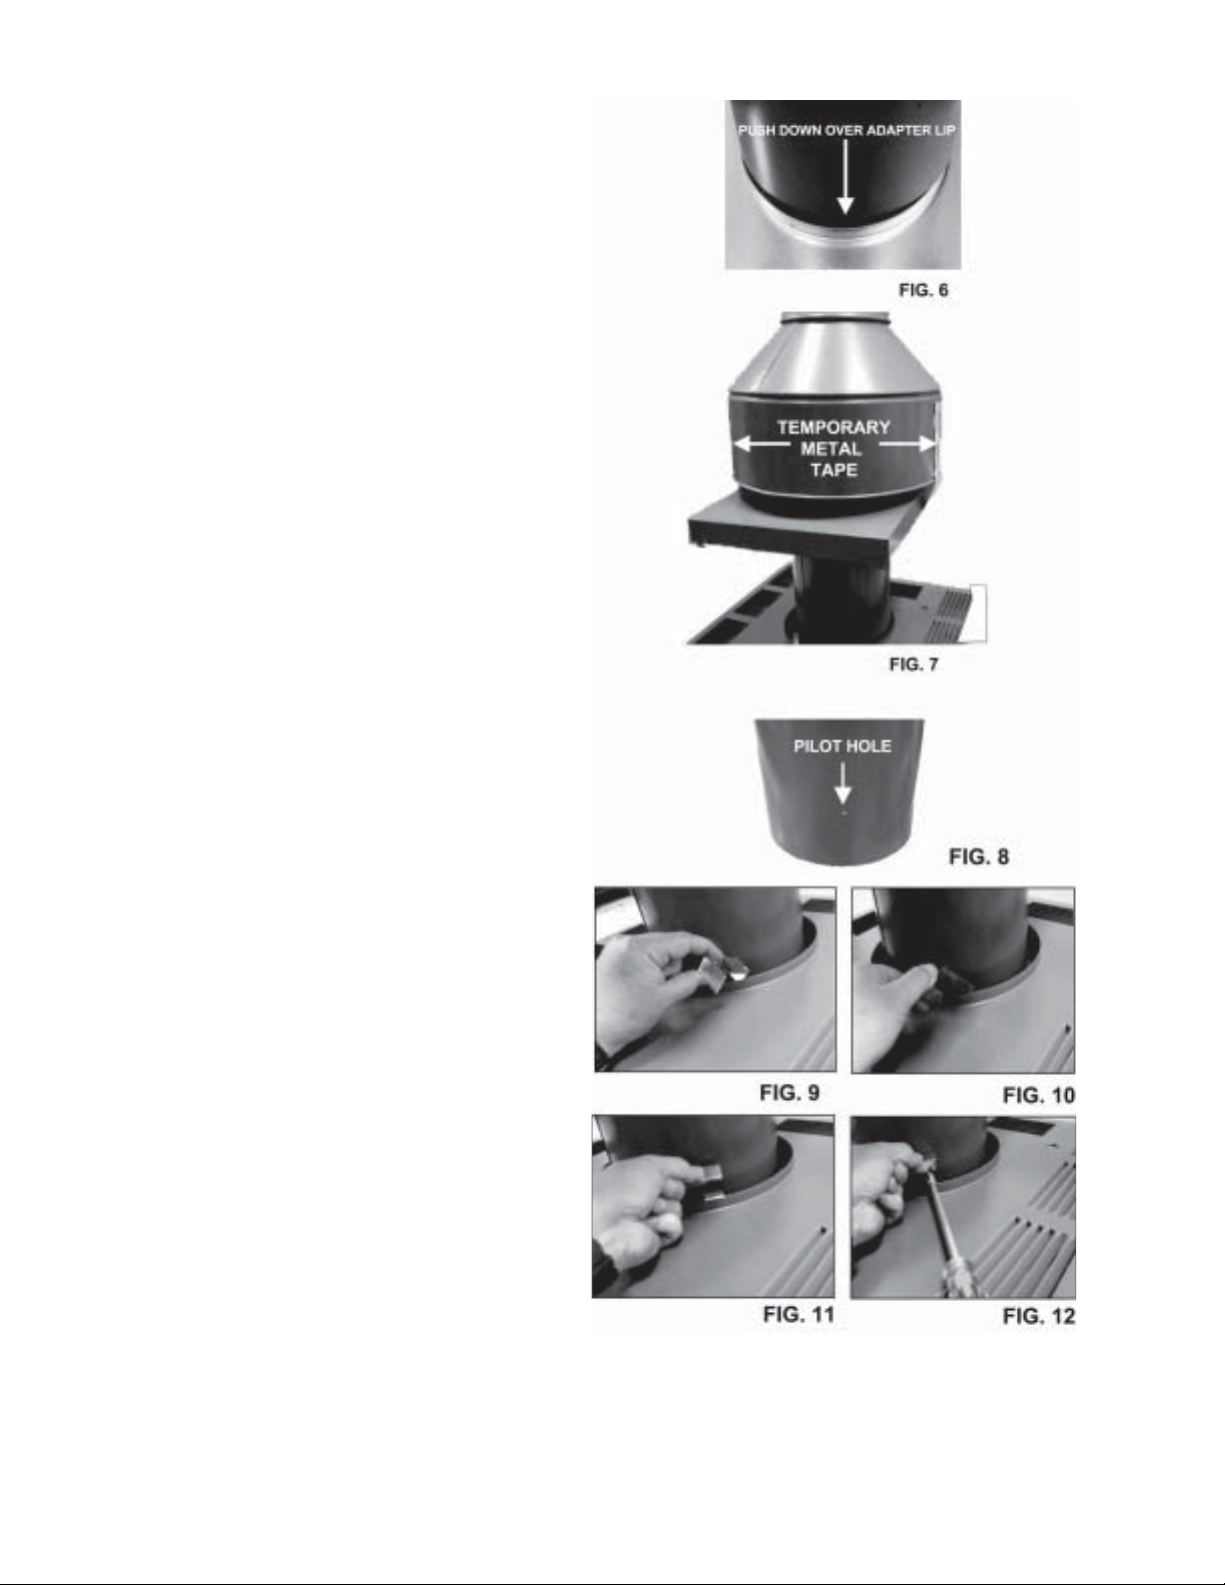
7. Reinstall the louvered top.
8. Mount the draft hood onto the adapter plate lip inside
the heater. See Fig. 6.
9. Proceed to installing the clips, step 14.
SECURING THE TOP PANEL COVER
OUTDOOR KIT ONLY
10. After removing the drafthood from the box, slide the
top panel cover over the draft hood.
11. Holding both pieces together, mount the draft hood
on the adapter plate lip inside the heater. See Fig. 6.
12. Take the two pieces of tape and attach to each side
of the drafthood leaving 6" hanging down.
13. Slide the top panel cover up and attach the tape to the
underneath side. This is to temporarily keep the top
panel cover out of the way while you are attaching the
clips as shown in the next steps. See Fig. 7.
INSTALLING THE CLIPS
INDOOR & OUTDOOR KITS
14. Notice that there are three pilot holes above the base
of the drafthood as shown in Fig.8. These are the
locations where the three clips are to be attached.
15. Insert the long edge of one clip between the top panel
cover and the drafthood, see Fig. 9.
16. With a twisting motion, rotate the clip up, see Fig. 10.
17. Pull up on clip, see Fig. 11.
18. Hold the clip up and align the clip hole to the pilot
hole, see Fig. 12.
19. Insert screw into hole and secure using a 5/16" nut
driver.
20. Repeat steps 15-19 using remaining two clips.
21. This completes the indoor drafthood installation. If
installing an outdoor drafthood, proceed to step 22.
14
Page 15

INSTALLING THE TOP COVER
OUTDOOR KIT ONLY
22. Remove the two pieces of metal tape holding the top
panel cover up and discard.
23. Insert the rear two tabs into the slots on the heater top
and slide the top panel cover backwards. See Fig.13.
24. Lower the top panel cover and using your thumbs,
push tabs in and insert the two front tabs into the
slots on the top of the heater. See Fig.14.
25. Lower the top panel cover flush to the top and release
the tabs. They will spring into place as shown in
Fig.15.
26. Turn the gas and electricity to the heater on.
15
Page 16
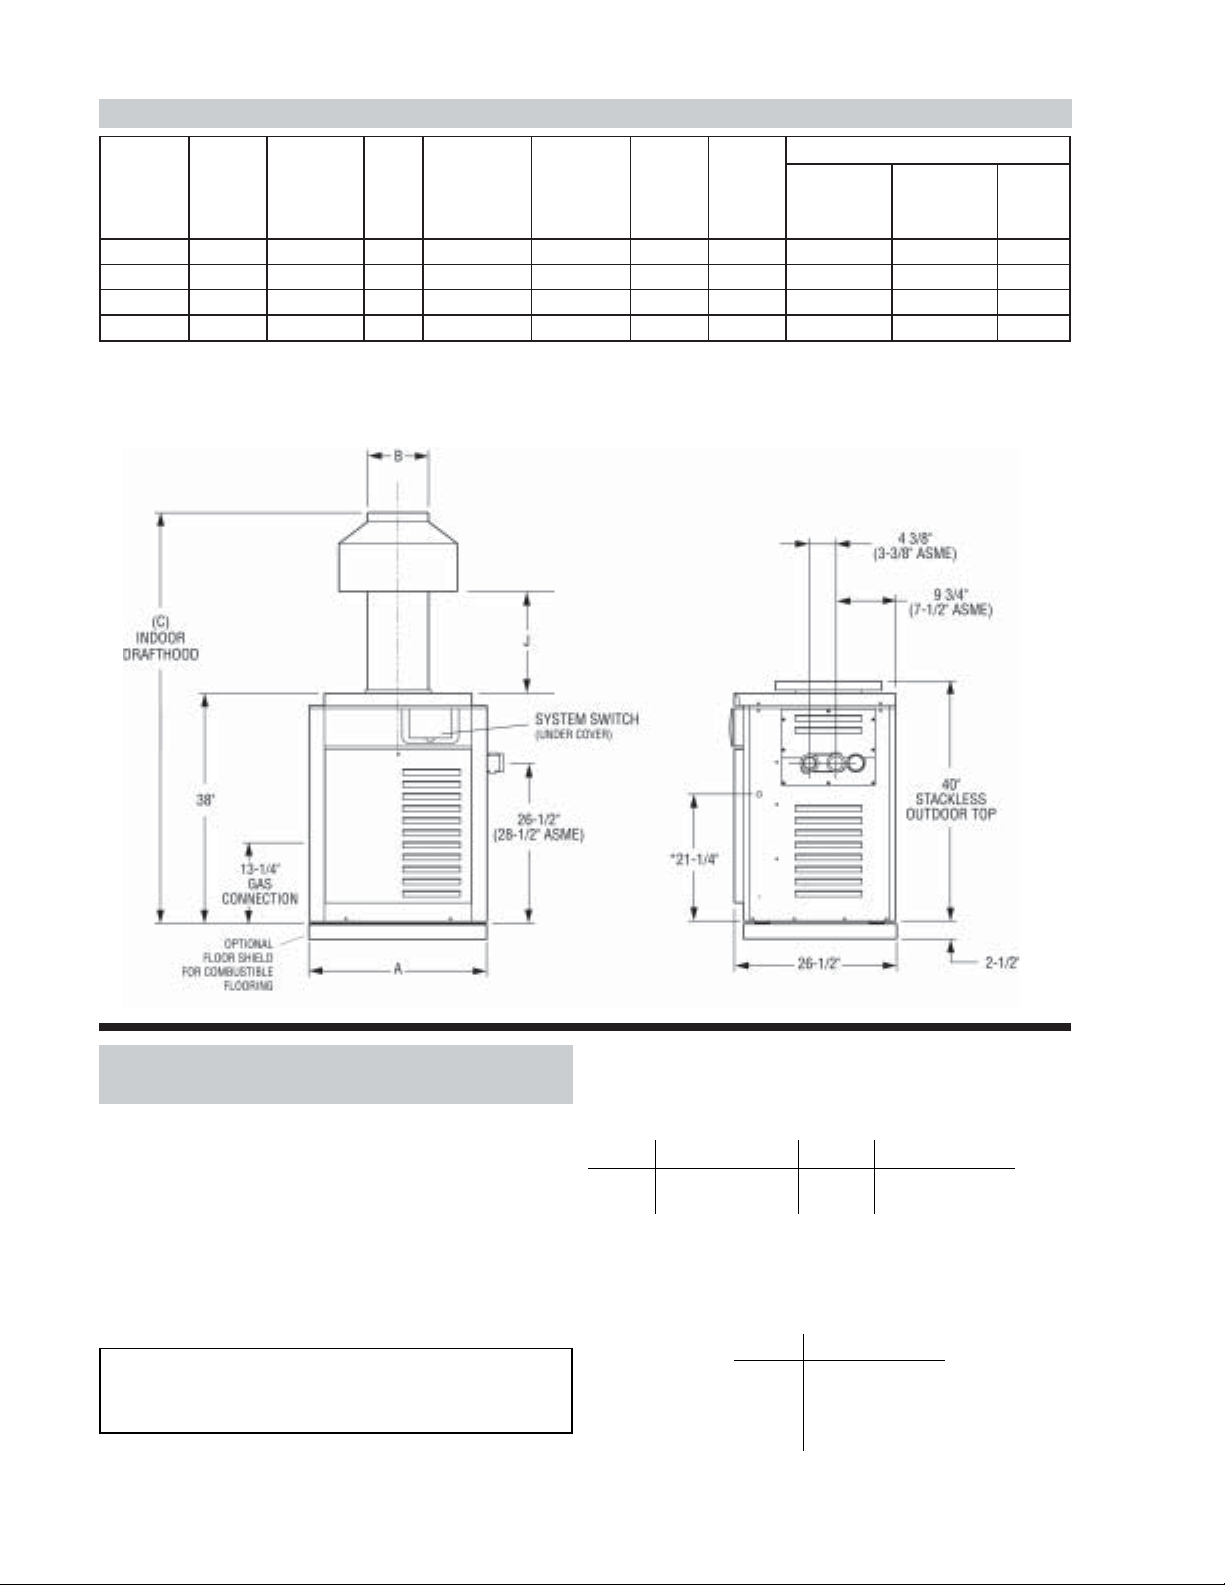
SPECIFICATIONS AND DIMENSIONS
)sbl(sthgieWgnippihS
HUTB
retaeH
ledoM
tupnI
)000(
)A(
htdiW
)B(
tenibaC
eulF
.aiD
)C(
roodnI
doohtfarD
)J(
saG
.nnoC
retaW
.nnoC
norItsaC
retaeH
sselkcatS/w
poT
B581R181"4/1-81"6"8/5-26"61/1-21"4/3"219127121
B562R462"8/3-22"7"8/7-26"8/1-11"4/3"241259151
B533R433"4/3-52"8"4/3-36"4/3-01"4/3"243251271
B504R993"4/1-92"9"8/3-56"2/1-21"4/3"235243202
*Designation for Propane is "EP", Natural gas is "EN". Prefix "C" is for Cast Iron (ASME) Headers; "P" is for Plastic (Polymer)
Headers. Atmospheric heaters: reduce input 4% for each 1000 ft. above sea level when installed above 2000 ft. elevation.
Low NOx heaters: for elevations above 5,000 feet consult factory. For Canada, no de-rating is required for elevations up to
4500 feet. Manufactured under Patent No. 3,623,458. Note: Plastic (Polymer) headers cannot be used for ASME installations.
norpaC
retaeH
Iroodn
sselkcatS/w
poT
-tfarD
dooh
COMBUSTION AND VENTILATION AIR
(Indoor Units Only)
The heater must have both combustion and ventilation air.
Minimum requirements for net free air supply openings,
one opening that is 12 inches from the ceiling for
ventilation and one opening that is 12 inches from the floor
for combustion air as outlined in the latest edition of the
National Fuel Gas Code, ANSI Z2231(Canada-CAN/
CGA-B149.1 and B149.2) and any local codes that may
have jurisdiction.
CAUTION: Combustion air must not be contaminated
by corrosive chemical fumes which can damage the
heater and void the warranty.
Fig # 9037.2
*Electrical Connection On Left Side is 19-1/8".
a. All Air From Inside The Building:
Each opening shall have a minimum net free square
inches as noted:
Model Square Inches Model Square Inches
185 181 335 333
265 264 405 399
b. All Air From Outdoors:
When air is supplied directly from outside of building,
each opening shall have a minimum net free square
inches as noted:
Model Square Inches
185 46
265 66
335 84
405 100
16
Page 17
VENT PIPING
WARNING: Indoor boilers require a drafthood that
must be connected to a vent pipe and properly vented
to the outside. Failure to follow this procedure can
cause fire or fatal carbon monoxide poisoning.
Vent piping the same size as the draft hood outlet is
recommended, however, when the total vent height is at
least ten (10) feet (draft hood relief opening to vent
terminal), the vent pipe size may be reduced as specified in Chapter 10 of the National Fuel Gas Code, ANSI
Z 223.1 (Canada-CAN/CGA-B149.1 and B149.2). As
much as possible avoid long horizontal runs of vent pipe
and too many elbows. If installation requires horizontal
non-vertical runs, the vent pipe must have a minimum of
1/4 inch per foot rise and should be supported at not more
than five foot intervals. Plumbers tape, criss-crossed, will
serve to space both horizontal and vertical piping. Gas
vents supported only by the flashing and extending above
the roof more than five feet should be securely guyed or
braced to withstand snow and wind loads. We recommend use of insulated vent pipe spacer through the roofs
and walls. Another option for installation that requires
horizontal runs is using the D-2 power vent kit option.
Power Vent Kit
Model Part No.
185 008086
265 008086
335 008087
405 008087
Fig. # 9469
Optional Raypak D-2
Power Vent
For more detailed D-2 installation information consult the
D-2 Power Vent manual 6000.57.
The power vent assembly is a fan-assisted combustion
system designed for application to Raypak Pool Heater
Models 185-405. The unit, when installed as directed, is
capable of operating in applications such as through-thewall venting and reduced horizontal and vertical vent pipe
sizes in new and current installations. It is certified for
Category III venting up to 40 feet equivalent 4" diameter
venting. The unit is factory wired for 240V, with capability
of rewiring for 120V.
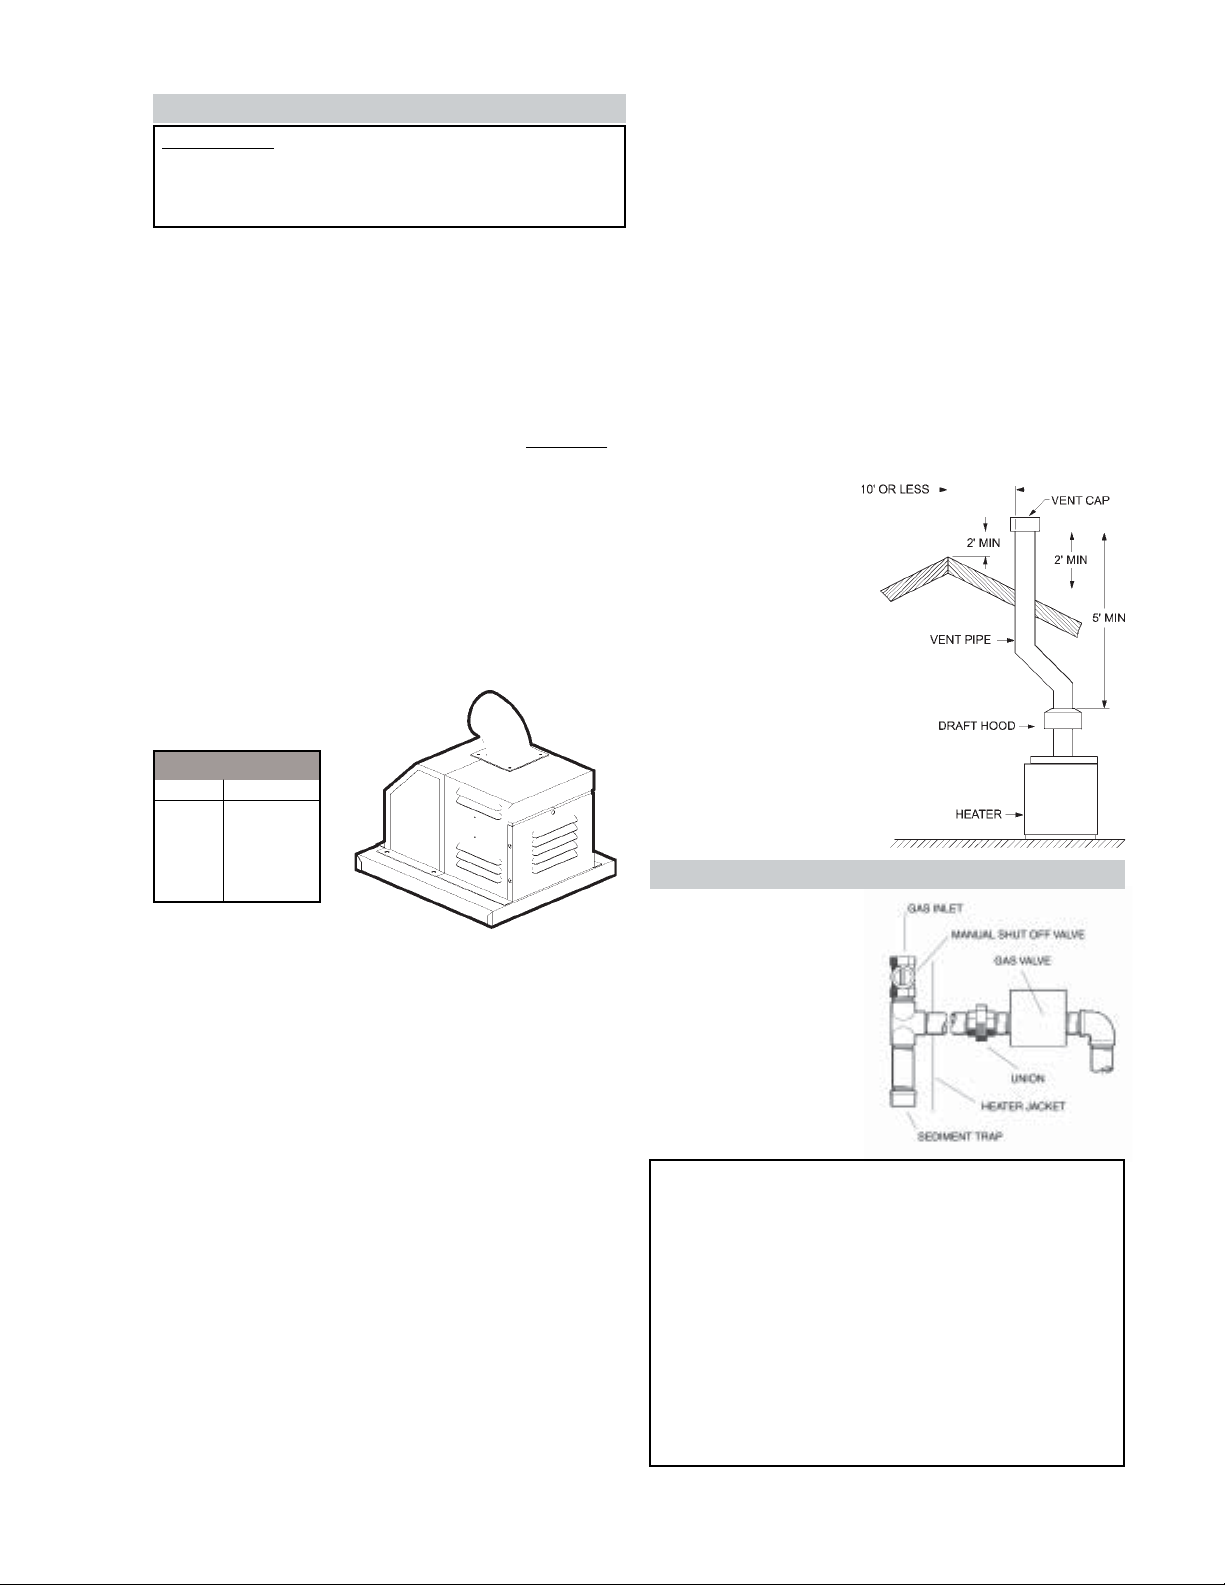
For protection against rain or blockage by snow, the vent
pipe must terminate with a vent cap which complies with
the local codes or, in the absence of such codes, to
the latest edition of the National Fuel Gas Code, ANSI
Z223.1 (Canada-CAN/CGA-B149.1 and B149.2).
The discharge opening must be a minimum of two feet
vertically from the roof surface and at least 2 feet higher
than any part of the building within 10 feet. Vent stack
shall be at least five feet in vertical height above the
drafthood outlet. The vent cap location shall have a
minimum clearance of 4 feet horizontally from, and in no
case below, unless a 4-foot horizontal distance is maintained, from electric meters, gas meters regulators and
relief equipment.
The weight of the vent stack or chimney must not rest on
heater draft hood. Support must be provided in compliance with applicable codes. The heater top and draft
hood must be readily removable for maintenance and
inspection. Vent pipe should be adequately supported to
maintain proper clearances from combustible construction.
Type "B" double wall
or equivalent vent pipe
is recommended.
However single wall
metal vent pipe may
be used as specified
in the latest edition of
the National Flue Gas
Code ANSI Z 223.1
(Canada-CAN/CGAB149.1 and B149.2).
Fig. #RP 8119.2
GAS SUPPLY CONNECTIONS
Gas piping must have a
sediment trap ahead of
the heater gas controls,
and a manual shut-off
valve located outside the
heater jacket. All gas
piping should be tested
after installation in accordance with local
codes.
Fig. #RP 8090.0
CAUTION: The heater and its manual shut off valve
must be disconnected from the gas supply during any
pressure testing of that system at test pressures in
excess of 1/2 psig (3.45 KPA). Dissipate test pressure
in the gas supply line before reconnecting the heater
and its manual shut off valve to gas supply line.
FAILURE TO FOLLOW THIS PROCEDURE MAY
DAMAGE THE GAS VALVE. OVER PRESSURED
GAS VALVES ARE NOT COVERED BY
WARRANTY. The heater and its gas connections shall
be leak tested before placing the appliance in
operation. Use soapy water for leak test. DO NOT use
open flame.
17
Page 18

NOTE: Do not use Teflon tape on gas line pipe thread.
A flexible sealant is recommended.
A minimum of 7" W.C. and a maximum of 14" W.C.
upstream pressure under load, and no load conditions
must be provided for natural gas or a minimum of 12"
W.C. and a maximum of 14" for propane gas.
GAS PRESSURE REGULATOR
The gas pressure regulator is preset at 4" W. C. for natural
gas, and 11" W. C. for propane gas. The pressure at the
gas valve, taken with a manometer, should be about 3.7"
W. C. natural gas (3.9" W.C. for Low NOx) and 10.5" W.
C. propane gas. If an adjustment is needed, remove seal
and turn adjustment screw clockwise to increase
pressure or counter-clockwise_____to decrease pressure.
ELECTRONIC IGNITION GAS VALVES-CONTINUED
Fig # 9328
Robertshaw 7200
Model 185
Fig # 9327
Gas
Pressure
Adjustment
Robertshaw 7000 BDER
Model 265-335
Fig # 9329
Gas
Pressure
Adjustment
Robertshaw 7000 DERHC
Model 405
Fig. # 8149
Fig. # 9365
ATMOSPHERIC LOW NOx
GAS PRESSURE ADJUSTMENT LOCATIONS
MILLIVOLT GAS VALVES
Gas
Pressure
Adjustment
Fig # 9263
Robertshaw 7000
Models 185 thru 405
ELECTRONIC IGNITION GAS VALVES
Gas
Pressure
Adjustment
PIPE SIZING FOR GAS CONNECTIONS
Low NOx units are not available in propane.
Honeywell VR8304
Models 185 thru 405
Fig # 9264
18
Page 19
PLUMBING FOR WATER CONNECTIONS
HEATER LOCATION (Relative to the pump and filter)
The RP 2100 heater requires water flow and positive
pressure to fire and operate properly. It must therefore be
installed downstream of the discharge side of the filter
pump. A typical installation is plumbed as follows:
1. The inlet side of the filter is plumbed directly to the
discharge side of the filter pump;
2. The outlet side of the filter is then plumbed to the inlet
of the heater; and
3. The outlet of the heater is plumbed to the return line
to the pool or spa. The pump, filter and heater are
thus plumbed in series.
Plumbing from the heater back to the pool must not have
any valves or restriction that could prevent flow when the
pump is operating.
CAUTION: An additional source of heated water, e.g.
a solar system, must be connected to the main line
ahead of the heater inlet pipe in order for it to act as the
primary heat source. If the primary system provides
adequate heat to maintain set-point, the RP2100
heater will not fire. Be advised that the RP2100 control
panel will then display sensed water temperatures
downstream of the primary heating system, rather than
the temperature of the water exiting the pool.
Heater must be located so that any water leaks will not
damage the structure of adjacent area. PVC pipe may
be glued directly into header unions.
POLYMER HEADERS
POLYMER HEADERS (STANDARD MODELS)
Before attaching the 2-inch unions to the inlet/outlet
header, make sure the o-rings are properly seated in the
grooves. Use AquaLube or equivalent non-petroleum
based lubricant on the o-ring. Hand tighten the unions.
Glue PVC piping directly to the unions.
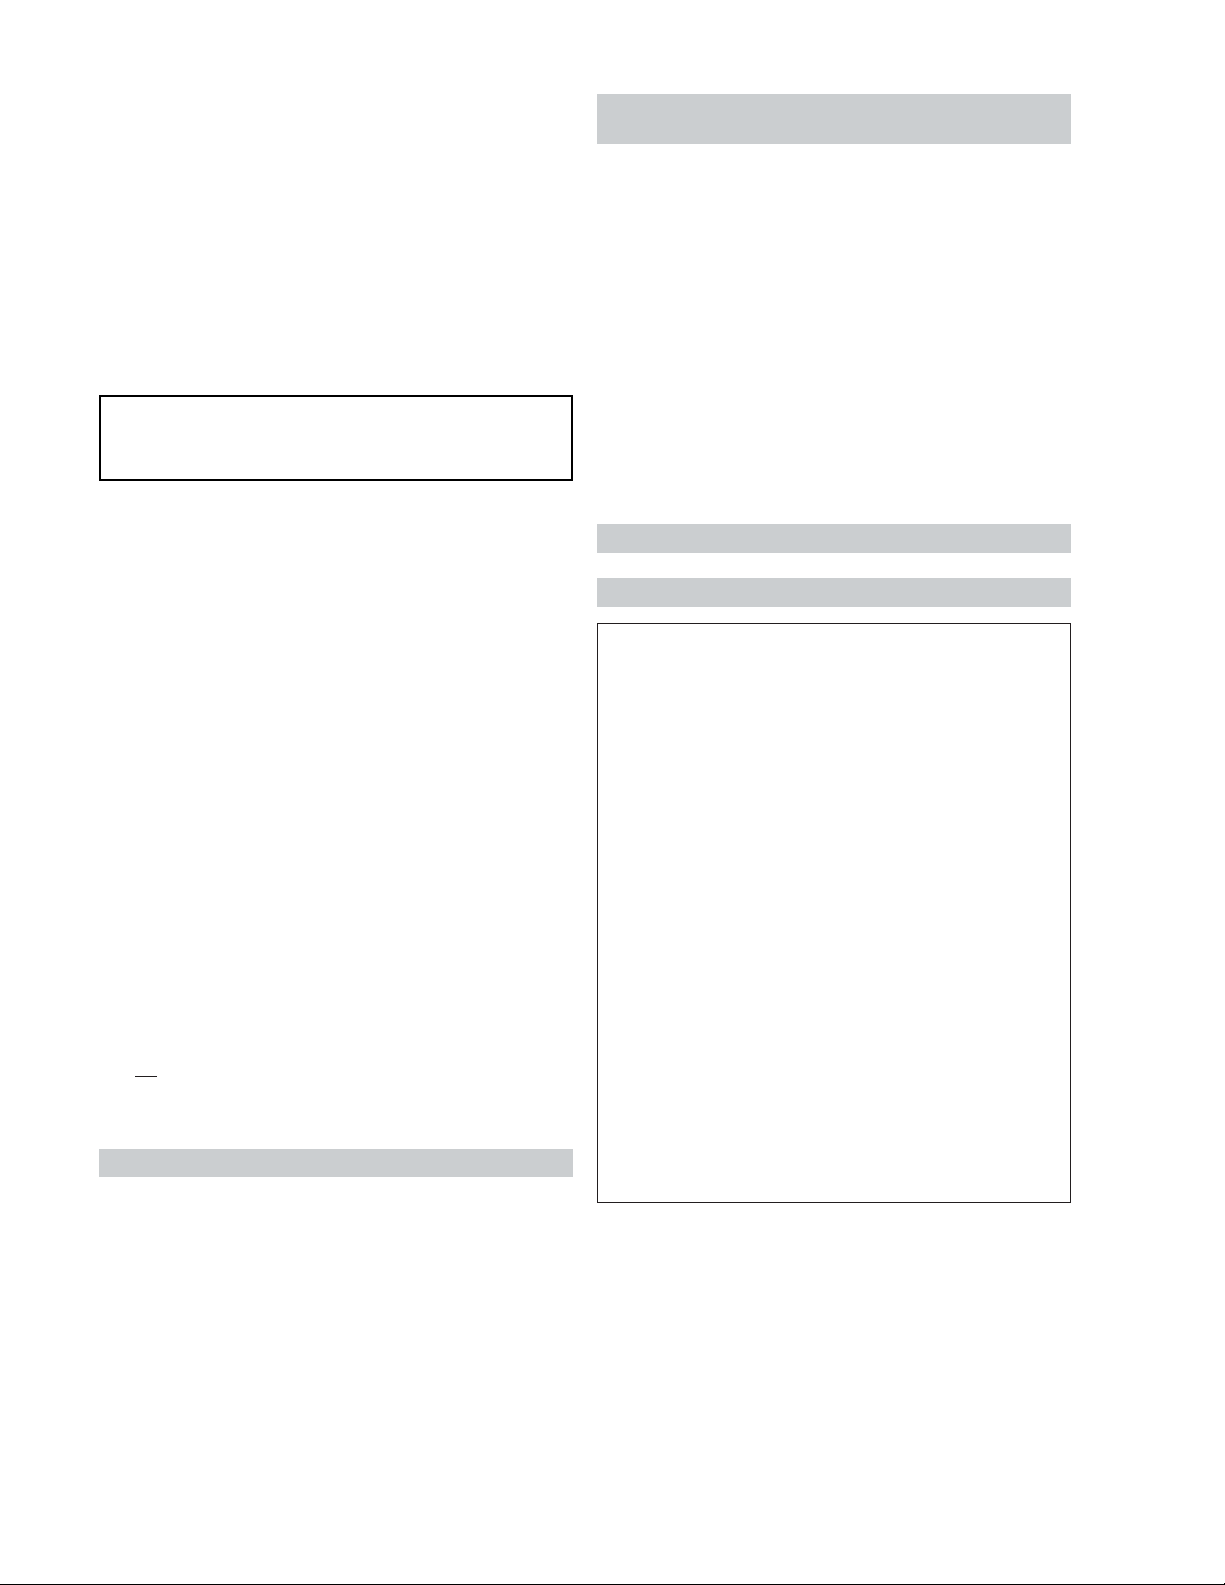
INLET/OUTLET HEADER (Polymer)
Flange Gasket
Header Flange
(CPVC)
FLOW RATES
MODEL PIPE SIZE MIN.GPM *MAX.GPM
185 1-1/4"-1-1/2" - 2 20 125
265 1-1/4"-1-1/2" - 2 25 125
335 1-1/4"-1-1/2" - 2 35 125
405 1-1/4"-1-1/2" - 2 40 125
*When flow rates exceed maximum GPM an external
auxiliary bypass valve is required. See external bypass
valve section for details.
ASME-Cast Iron
Header Flange Nut
(CPVC)
Inlet
Fig. #2002.1
High temperature CPVC Header Flanges and header
Flange Nuts are provided. If there is any possibility of
back- siphoning when the pump stops, it is suggested
that a check valve (or valves) also be installed in the
system.
19
Page 20
CAST IRON HEADRERS (ASME MODELS)
INLET/OUTLET HEADER - ASME
Heater must be located so that any water leaks will not
damage the structure of adjacent area. High temperature
2" plastic pipe (CPVC) may be threaded directly into the
header flanges. This is not the same as the Schedule 80
PVC pipe which is also colored gray. PVC may be used
immediately after the CPVC adapters.
2" CPVC Adapters
ASME
Inlet/Outlet Header
PVC Pipe
CAUTION: NEVER install PVC directly into header
flanges. Use the 2" CPVC adapter supplied loose with
the heater.
DO NOT use petroleum base assembly fluids (such as
Petroleum Jelly or lubricating oil). If assembly lube is
required, use a silicon base such as Amoral etc.
There are two sets of flange gaskets supplied with your
heater. Use the appropriate gaskets for all your heater
connections. Discard unused set.
Flange Gasket
Fig. # 8093.1
Header Flange
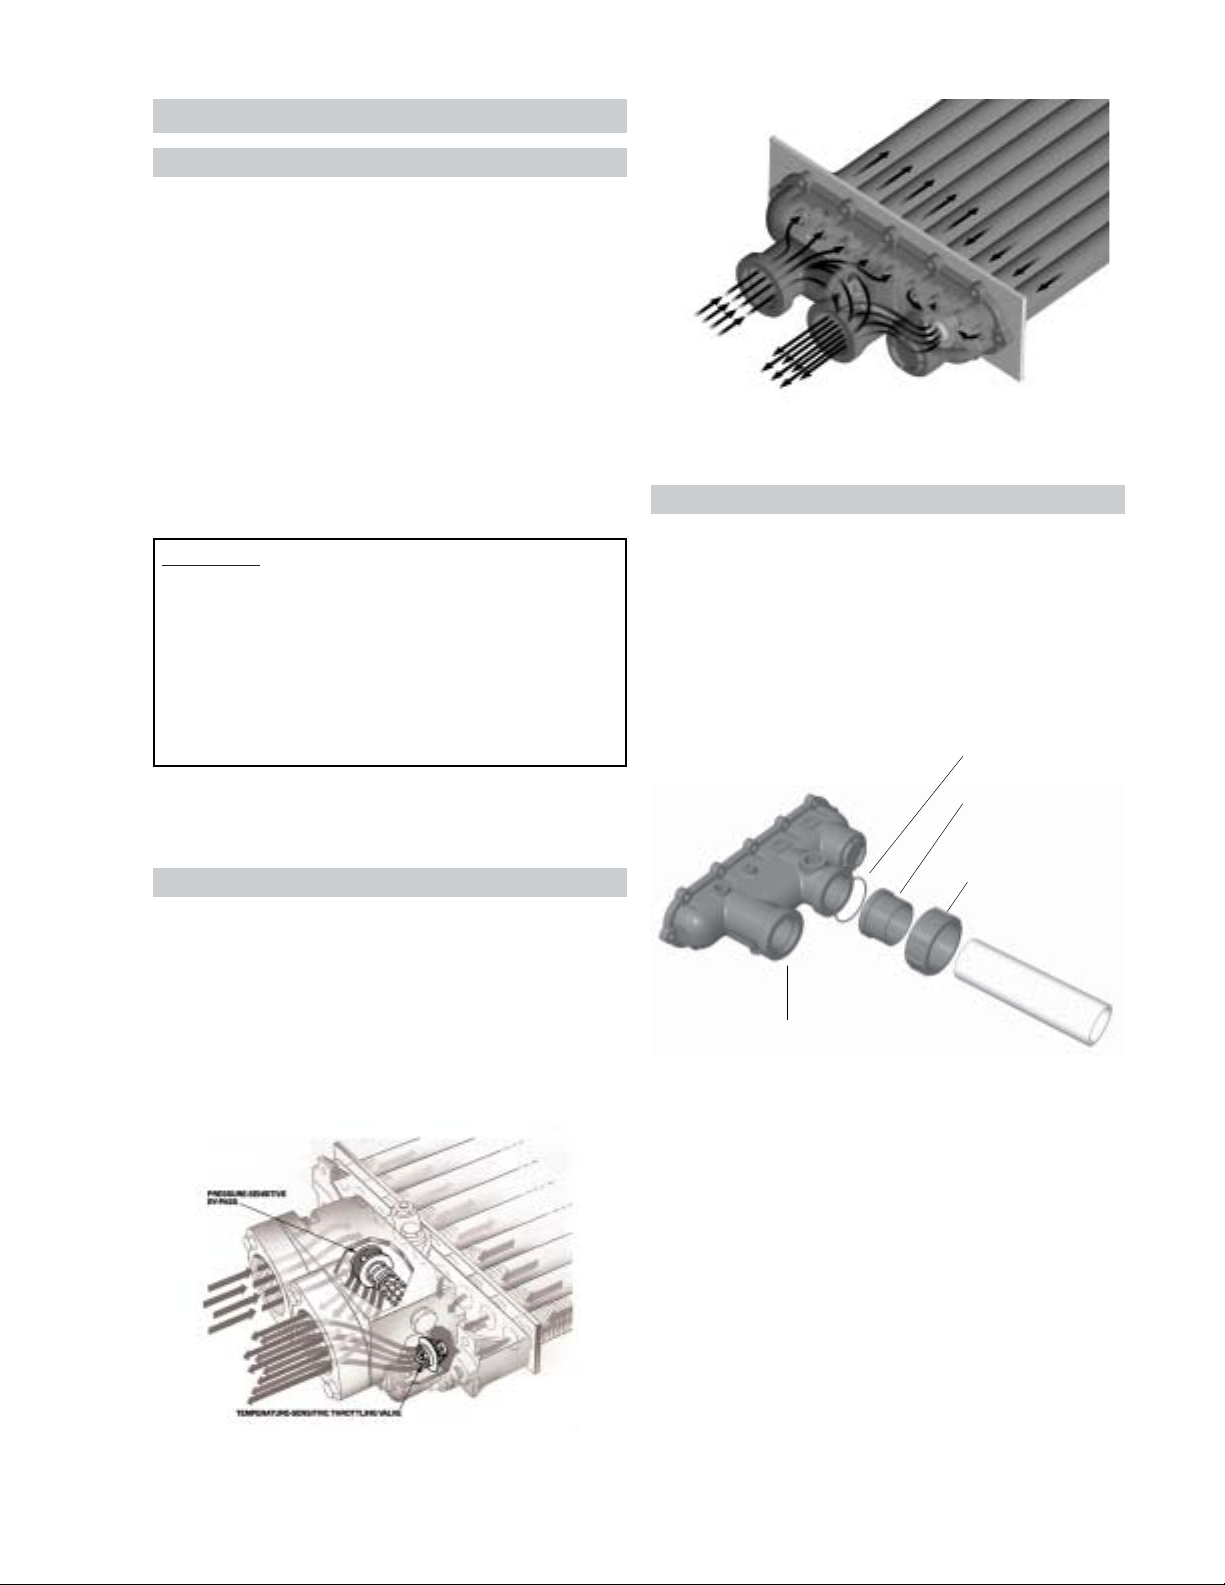
UNITHERM GOVERNOR OPERATION
CAUTION:
The patented Unitherm Governor is a thermostatic
mixing valve specifically designed to maintain constant
heater internal temperature between 105° to 115°F
despite continually changing flow rates from the filter
and changing pool temperatures. This narrow range is
needed to prevent damaging condensation on the
burners which will occur if the heater runs for any length
of time below 100°F. It is also needed to inhibit scale
formation in the tubes by maintaining temperatures
well below accelerated scaling temperatures.
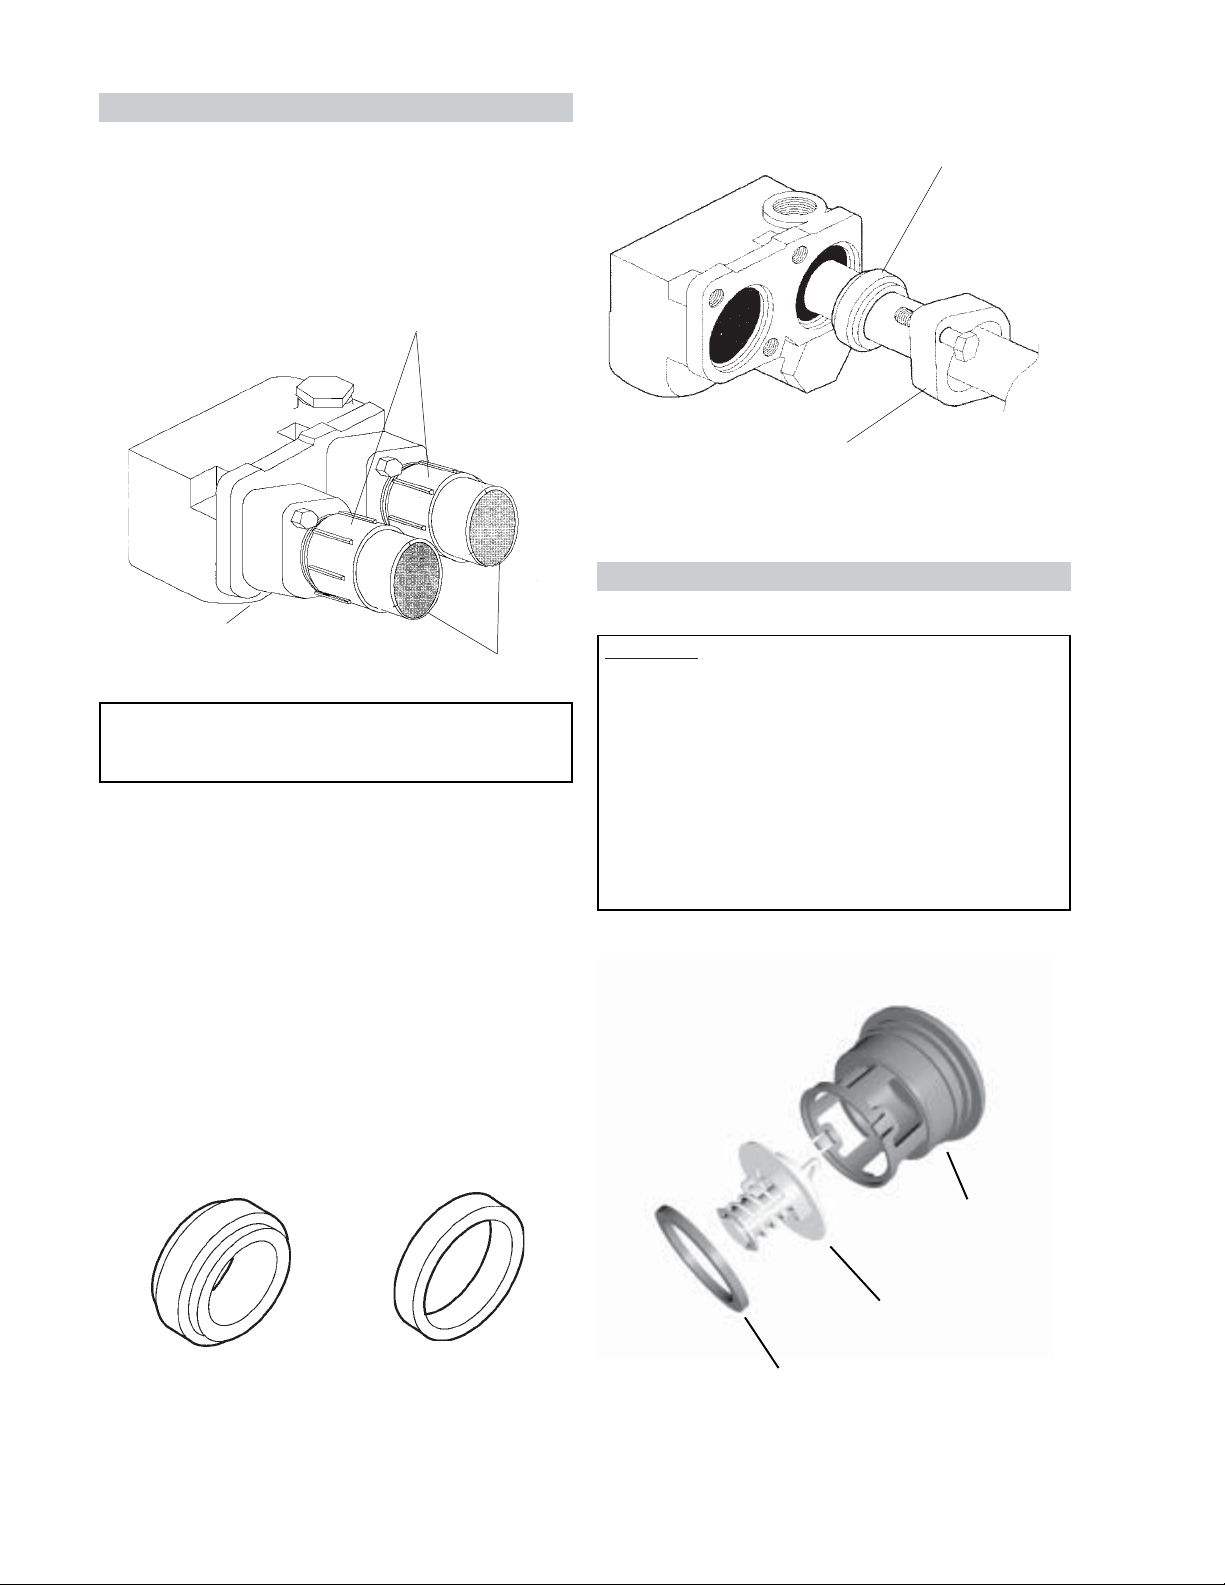
GASKET DESIGN #1: Accepts 1-1/2" copper tube or
1-1/4" galvanized pipe as a slip connection.
GASKET DESIGN #2: Accepts 2" copper tube as a slip
connection. The flange is threaded for 2" screw in pipe
connections. Also used with the 2" CPVC adapters.
#1 #2
Fig. # 8095.1 Fig. # 8097.1
U.G. PLUG
(Polymer)
UNITHERM
GOVERNOR
GASKET
20
Page 21

INTERNAL AUTOMATIC BY-PASS VALVE
PRESSURE RELIEF VALVE INSTALLATION
In addition to the Unitherm Governor, a built-in automatic
by-pass valve is provided in the in/out header. While the
Unitherm Governor responds to the changes in water
temperature in the heater, the internal by-pass valve
automatically responds to changes in water pressure in
the piping system. Proper amount of water flow is
maintained through the heater under varying pressures
dictated by the conditions of the pump and filter.
BYPASS DISC
SPRING
BYPASS
BODY
EXTERNAL AUXILIARY BYPASS VALVE
(Where Required)
An auxiliary bypass valve should be used when flow rates
exceed 125 GPM (usually a high performance pump size
larger than two horsepower will exceed this flow rate).
This valve is required to complement the function of the
automatic bypass valve, particularly when starting the
heater in winter or early spring when the spa or pool
temperature is down below 50°F. It also serves to
eliminate needless pressure drop through the heater and
accompanying reduction in the flow rate to the spa jets,
etc.
To conform to local building codes, it may be necessary
to install a pressure relief valve. A 3/4" pressure relief
valve having a capacity equal to BTU/HR output of the
model to be installed is recommended for this heater. The
maximum acceptable pressure relief valve setting is 125
psi.
A 3/4" NPT connection is provided in the plastic header
for installation of a pressure relief valve. The valve shall be
installed in a vertical position. Do not over tighten. Install
pressure relief valve hand tight plus 1/2 turn.
POLYMER HEADER
Pressure Relief Valve
PRV Discharge
Connection
Inlet/Outlet Header
Fig. #2004
A 3/4" NPT connection is provided in the header for
installation of a pressure relief valve. The valve shall be
installed in a vertical position.
ASME HEADER
(Cast Iron)
Pressure Relief
Valve
From Heater To Heater
To Pool From Pool
AUXILIARY BYPASS VALVE
(DO NOT USE GATE VALVE)
Fig.#2003
Fig. # 8150.0ss
AUXILIARY BYPASS VALVE ADJUSTMENT
To set bypass: With clean filter, adjustment is made by
feeling the inlet and outlet pipes at the heater. Outlet
pipes should be slightly warmer than inlet and comfortable to the touch. If pipe is hot, close bypass; if cold, open
bypass.
PRV Discharge
Connection
Inlet/Outlet Header
Fig. # 8095.0
NOTE: To avoid water damage or scalding due to valve
operation, drain pipe must be connected to valve outlet
and run to a safe place of discharge. Drain pipe must be
the same size as the valve discharge connection
throughout its entire length and must pitch downward
from the valve. No shutoff valve shall be installed
between the relief valve and the drain line. Valve lever
should be tripped at least once a year to ensure that
waterways are clear.
21
Page 22
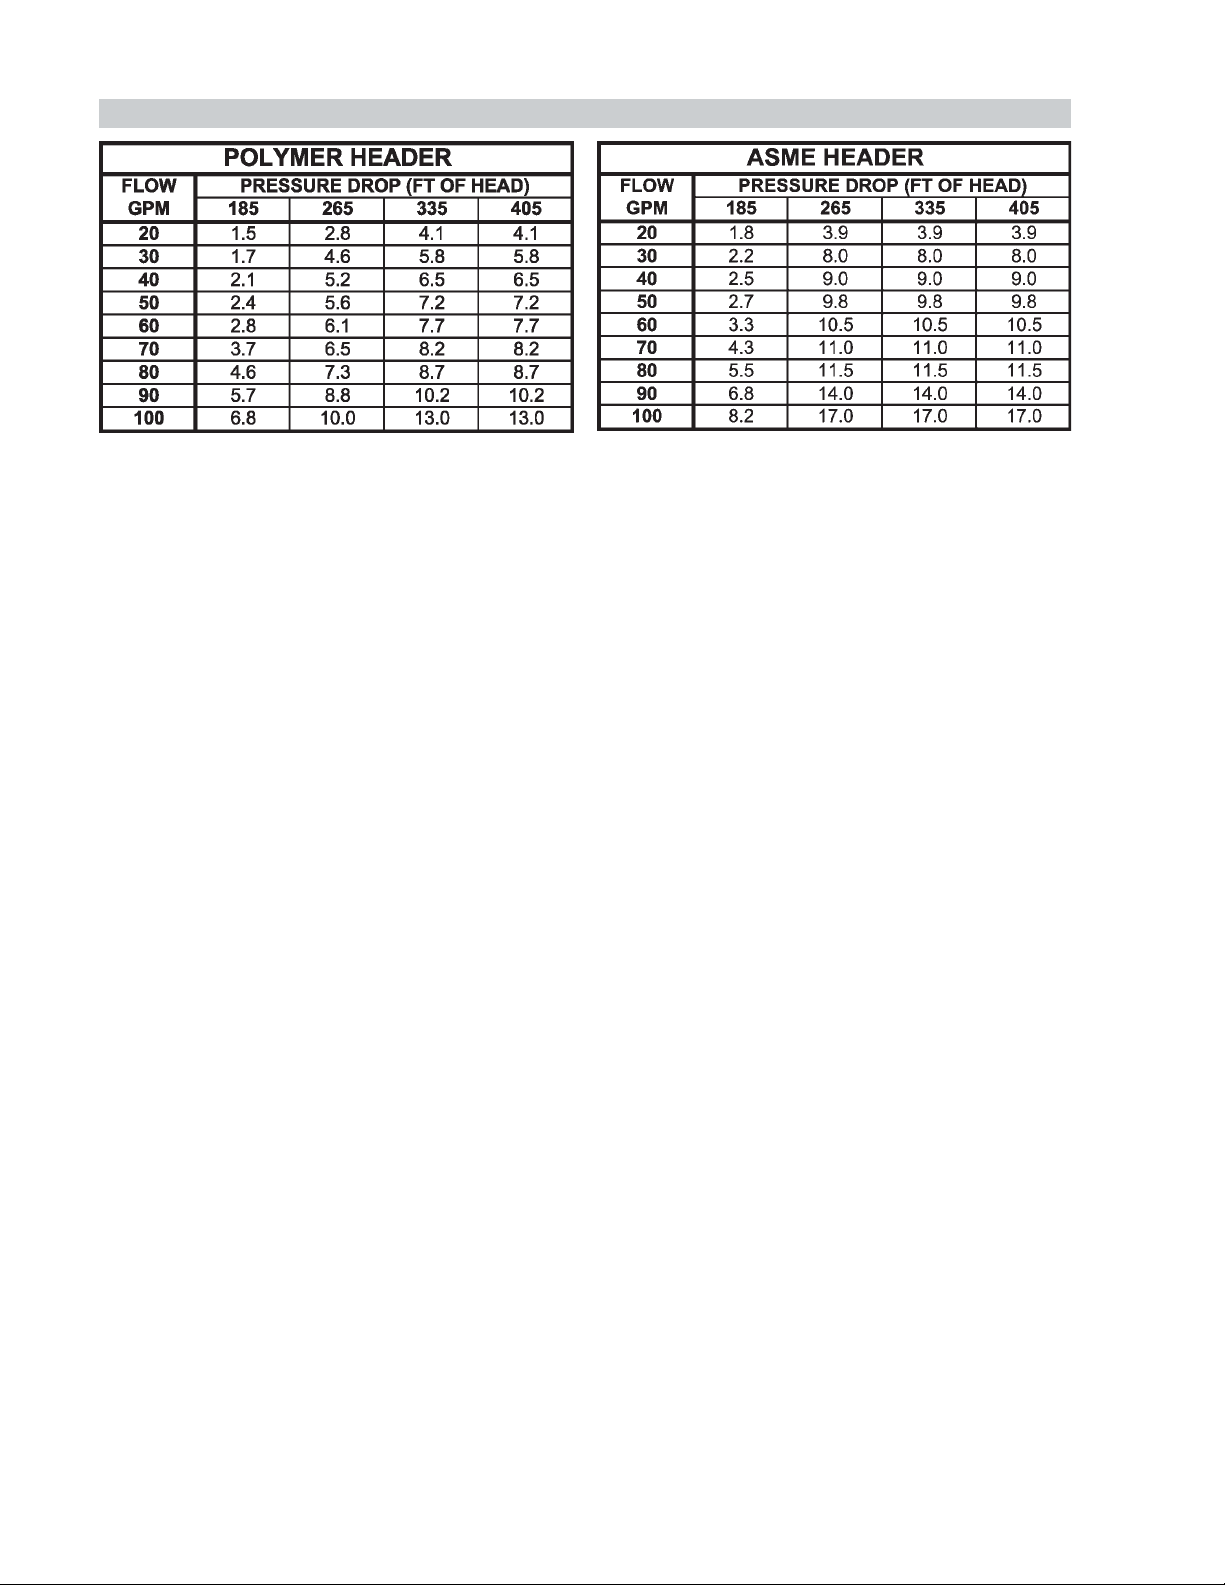
HEAT EXCHANGER PRESSURE DROP TABLES
22
Page 23
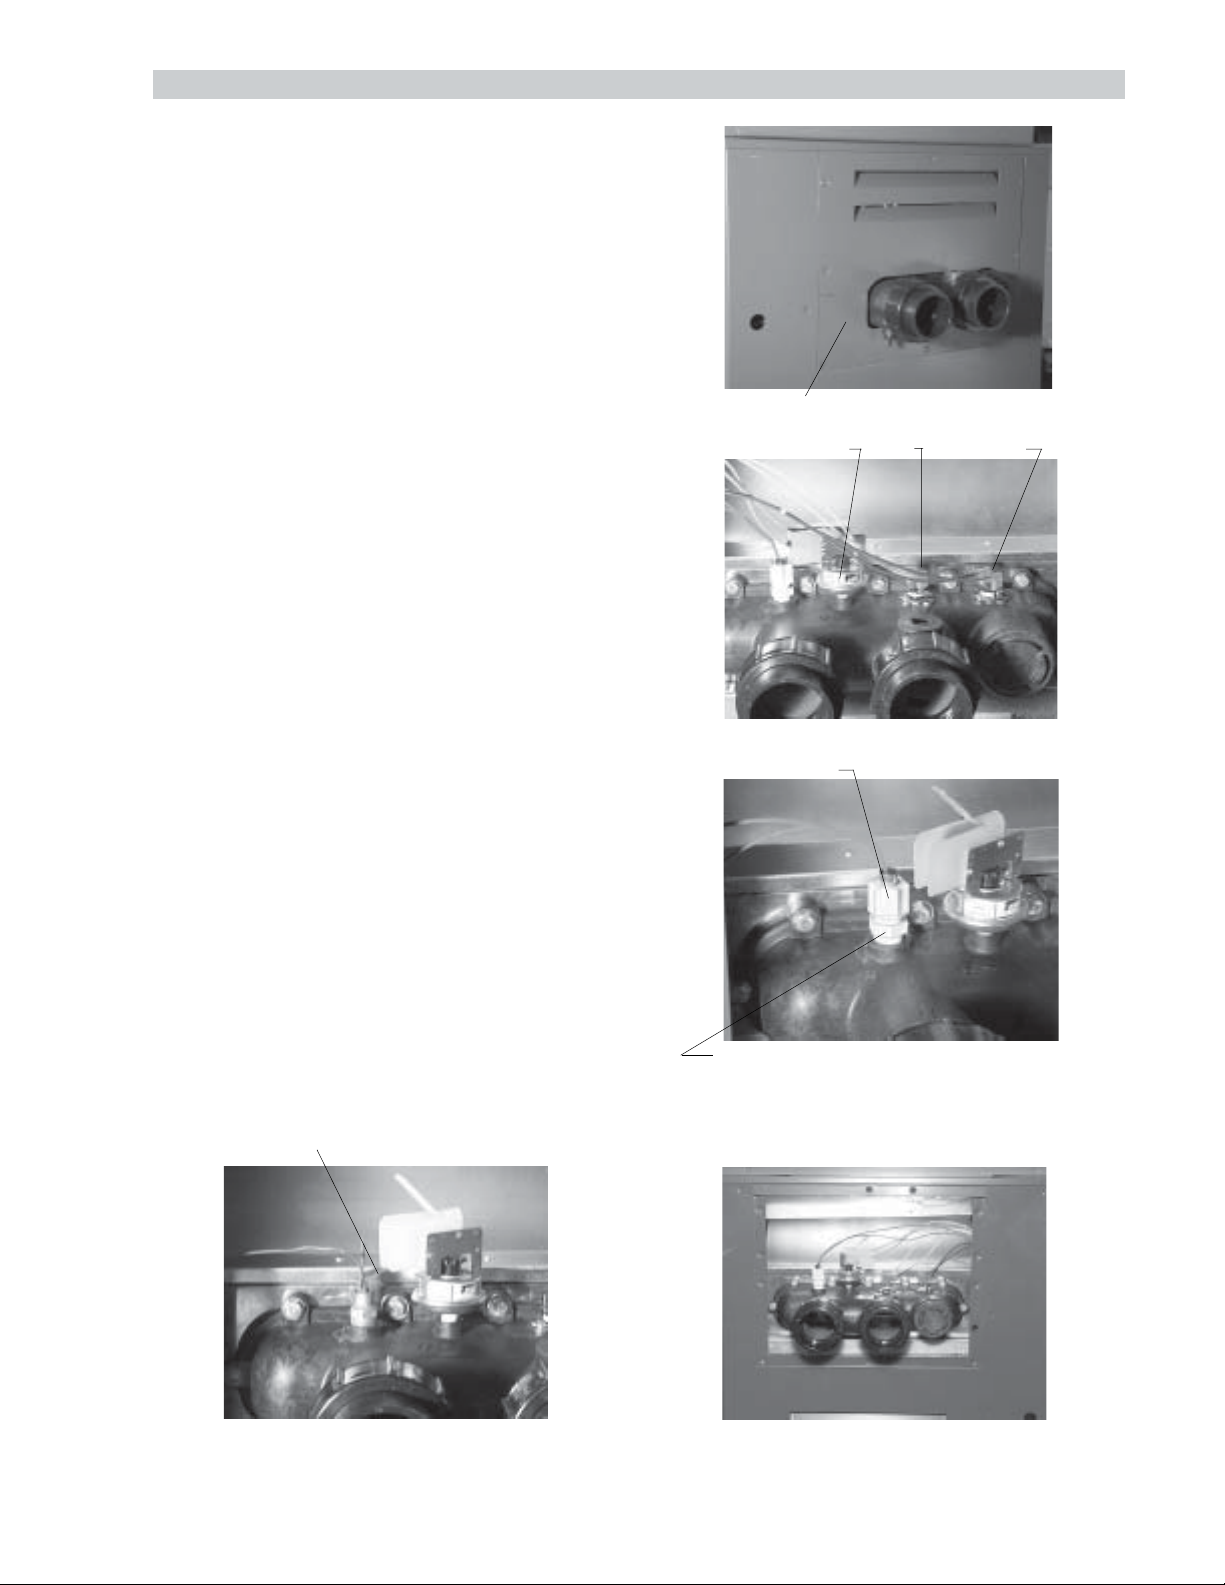
HEAT EXCHANGER REVERSAL PROCEDURE (POLYMER HEADER MODELS)
1. Remove right and left side access panels (Figure 1).
2. Disconnect wires at high limit, AGS (automatic gas
shutoff), and pressure switch on the inlet/outlet
header (Figure 2).
3. Electronic Ignition Heaters: Remove the thermo-
stat temperature sensor by loosening the compression fitting nut (Figure 3). Reroute the sensor to the
left side of the heater.
4. Millivolt Heaters: Remove the temperature sensor
bulb and retainer clip from the sensor well (Figure 4).
Reroute the sensor bulb to the left side of the heater.
5. Remove (12) bolts holding the inlet/outlet and return
headers to the tube sheets. Clean off tube sheet area
ACCESS PANEL
where the gasket seats. Also clean off the header
and the gasket. Apply a non-petroleum based lubri-
PRESS SWITCH AGS HI-LIMIT
cant to the gasket such as Aqua Lube. Reattach the
headers to the opposite sides, making sure they are
installed in an upright position (Figure 5). Do not
over tighten. Torque should not exceed 7 ft/lbs.
6. Reconnect high limit, AGS, and pressure switch
wires.
7. Electronic Ignition Heaters: Insert the temperature
sensor in the compression fitting and tighten 1/2 turn
past hand tight.
8. Millivolt Heaters: Insert sensor bulb and retainer
clip into sensor well.
9. Allow for water flow through the heater and check for
leaks.
JACO FITTING
10. Reattach access panels to the opposite sides.
Fig. #1
Fig. #2
For ASME Models call your factory representative.
BULB & CLIP
NOTE:Tighten almost flush
(1/32" to 1/8") to the header to avoid leaks.
REINSTALLED IN/OUT HEADER ON OPPOSITE SIDE.
Fig. #3
Fig. #4
Fig. #5
23
Page 24

ELECTRICAL WIRING
NOTE: If it is necessary to replace any of the original
wiring, it must be replaced with 105° C wire or its
equivalent, and/or 150° C wire or its equivalent as
originally built.
MILLIVOLT SYSTEM
The Millivolt System residential heater is equipped with a
self-generating electrical system in which the electric
current is provided by means of a pilot generator. No
external electrical connections are required.
Option Location For Left
Side Field Wiring
(Factory Mounted Location)
Control Box
When installing a remote switch, do not exceed 10 feet
of wiring from the heater. Use 18 gage stranded wire.
ELECTRONIC
INTERMITTENT IGNITION DEVICE SYSTEM (IID)
NOTE:
Heaters are factory wired for 240V power supply.
The standard field wiring connection is on the right side
of the heater.
To wire the heater from the left side, follow the steps
below:
1. Remove the two (2) screws that hold down the
junction box to the sway brace. Untie excess yellow
wires located behind the junction box.
2. Move the junction box to the left side of unit and
attach the box to the sway brace.
3. Secure 24V yellow wires to sway brace panel with
existing wire retainers.
4. Connect the wires inside the junction box, either
120V or 240V depending on the field wiring.
NOTE: 7/8" Dia. holes not utilized on jacket and control
box can be used for fireman switch or auxiliary control
interface wiring.
NOTE: Heater must be electrically grounded and
bonded. Bonding lug is provided loose with the unit.
Install bonding lug on lower right or left side of jacket as
necessary for bonding the unit. Mounting hole is provided
on the jacket.
Bonding Lug
(Optional Location)
Fig. # 9470
ATMOSPHERIC
Wiring locations
LOW NOx
Wiring locations
Sway
Brace
Bonding Lug
(Standard Location)
Fig.# 9366.1
The Electronic Intermittent Ignition Device automatically
lights the pilot and main burners upon a call for the heat.
The heater is supplied with a dual voltage transformer for
120V or 240V input power hookup.
24
Page 25
TRANSFORMER WIRING
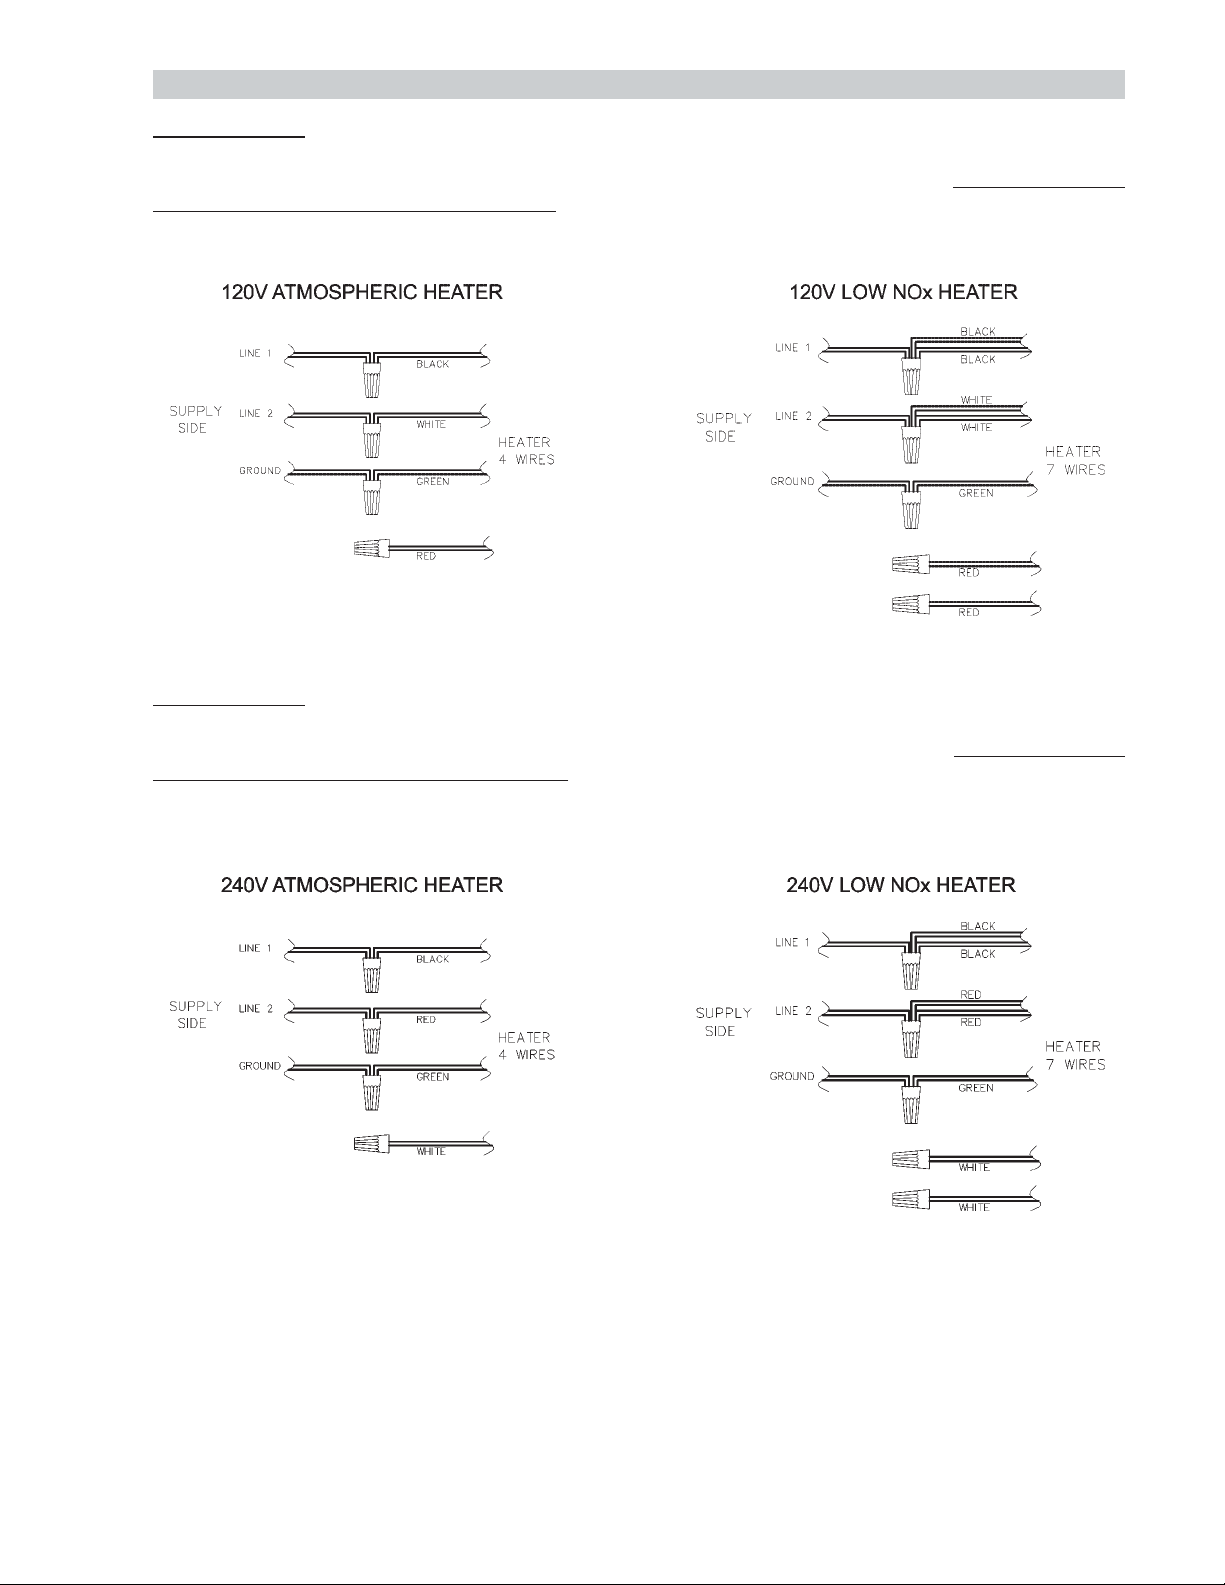
120V WIRING
For 120 V input power to the unit, connect the black wire to the “L1” or hot leg of the power supply. Connect the
white wire to the “L2” or neutral leg of the power supply. Attach the wire nut to the red wire. There should be no
connection to the red wire for 120V operation. For Low NOx pool heaters wire nut each red wire
independently.
Fig. #9471
240V WIRING
For 240 V input power to the unit, connect the black wire to the “L1” or hot leg of the power supply. Connect the red
wire to the “L2” or second hot leg of the power supply. Attach the wire nut to the white wire. There should be no
connection to the white wire for 240V operation. For Low NOx pool heaters wire nut each white wire
independently.
Fig. # 9471.1
Heater must be electrically grounded and bonded in accordance with local codes, or, in the absence of local codes,
with the latest edition of the National Electrical code, ANSI/NFPA 70. (Canada- Canadian Electrical Code, CSA
C22.1, Part 1 and Part 2.)
NOTE: Input power to the heater (120/240V) can be supplied from the load (pump) side of time clock or directly from
the switch/GFCI power source. It is preferred to make connection to the load/pump side of the time clock. When
using the switched GFCI power source the heater could display false service indicators on the delay panel if the pump
is turned off.
25
Page 26

WIRING DIAGRAM - MILLIVOLT (MECHANICAL THERMOSTAT)
26
Page 27

WIRING DIAGRAM - IID (Atmospheric)
27
Page 28

WIRING DIAGRAM - IID (Low NOx)
28
Page 29

SECTION 4 - SERVICING INSTRUCTIONS
GENERAL LOCATION OF CONTROLS
Bypass
Hi Limit on
Drain Plug
(Located in
Return
Header)
Digital
Thermostat
Circuit Board
Roll-Out
Switch
Gas Valve
Pilot
I/O header
(ASME on
Return
Header)
AGS HiLimit
(Located
on Inlet/
Outlet
Header)
Unitherm
Governor
Drain Plug
Transformer
Fig #2005
CONTROL PANEL REMOVAL
1. Remove (4) screws from sides of control panel.
2. Rotate control panel down until panel stops. Do not
force.
NOTE: Caution must be taken not to damage controls or
wiring.
CONTROL ADJUSTMENTS
Temperature
Adjust Buttons
Mode Button
ON
OFF
LCD Display
Fig.# 9472
MILLIVOLT CONTROLS
The pool or spa water temperature is controlled by the
pool heater thermostat on the upper front panel of the
heater. The control center contains an On/Off switch and
one or two thermostats.
Thermostats are fitted with a means of limiting the upper
temperature limit below the maximum level. The knob
stop adjustment ring illustrated below is adjustable by
loosening the set screw, rotating the knobstop ring to the
desired location and retightening the set screw.
SPA TEMPERATURE
RANGE
POOL TEMPERATURE
RANGE
Control Panel
Mounting Screws (4)
Fig. #RP 8267
KNOB STOP RING
29
TEMPERATURE
SET SCREW
Fig. #9473
KNOB STOP SHOWN ABOVE IS
IN THE SPA TEMPERATURE RANGE
STAND-BY
Page 30

DIGITAL THERMOSTAT CONTROLS
Notice to owner- Thermostat operation
Your heater is equipped with a microprocessor controlled thermostat that controls the pool or spa temperature
by measuring the temperature of the water coming back through the heater. It will then monitor the water
temperature and turn the heater back on when it senses that the water temperature is falling below the set point.
It is normal to experience small fluctuations in the return water temperature during the operation of the heater.
The thermostat is calibrated with a very close tolerance to ensure accuracy of the set temperature. Thus, slight
fluctuations in water temperature may cause your heater to cycle on and off frequently. This
phenomenon is not a problem. It will not harm the heater nor interfere with its function to precisely control the
temperature of the pool or spa.
Fig #9480
LCD DISPLAY TEMP
BUTTONS
MODE
BUTTON
THERMOSTAT CONTROL OPERATION
The pool heater thermostat on the upper front panel of
the heater controls the pool/spa water temperature. This
control center contains a mode button, up and down
temperature adjustment buttons, and a LCD display.
Mode Button
The MODE button functions as a means to turn the
heater off or on in either the pool or spa temperature
setting. The LCD display indicates the mode the heater
is in and the actual water temperature.
Temp Buttons
If the mode is in POOL or SPA, the desired pool or spa
temperature will also be displayed and may be changed
using the UP or DOWN buttons. A manual toggle switch
is also provided right below the MODE button to allow
the heater to be turned off.
Operation
In the POOL or SPA modes, the actual water temperature
is displayed along with the desired pool or spa
temperature. If the heater is firing, a flame icon will be
visible.
PROGRAM MODE BUTTON
Fig #9481
Set Points
The electronic thermostat cannot be set above selected
maximum set points. The maximum default set points
are factory set at 104°F for both pool and spa. These
can be changed to a higher or lower value to suit your
needs, but can never be set above 107°F.
Program Mode Button
To adjust the set point, press the Mode button until the
display reads OFF. Remove the four screws holding the
control cover on. Swing control panel down so the back
side of the board is visible (see page 27). Locate the
Program Mode button as show in figure 9481.
Hold this button and use the Mode button to select “Set”
on the digital display. You can release the button once
“Set” appears. Using the “Up” and “Down” buttons will
change the Maximum Temperature Setting. The control
can be set for a maximum of 107°F. A separate value
can be set for either Pool or Spa by using the Mode
button to select Pool or Spa and using the “Up” and
“Down” arrows to select the desired Max temp for each.
Once this is done reassemble the control panel.
To adjust the desired pool or spa temperature setting,
make sure the control is in the appropriate mode (POOL
or SPA) and push the UP or DOWN buttons to get the
desired set point temperature.
MODE
DISPLAY
call for heat
TEMPERATURE
WATER
Fig# 9484
TEMPERATURE
POOL or SPA
FLAME ICON
SET POINT
Fahrenheit vs Centigrade
The digital display is capable of displaying Centigrade
as well as Fahrenheit temperatures. To change the
display follow the instruction above to access the
Program Mode Button. Hold this button and use the
Mode button to select “F/C” on the digital display. The
“Up” and “Down” buttons will select “F” or “C” on the
temperature display. Once this is done reassemble the
control panel.
30
Page 31

NOTE: The digital temperature display may not coincide with the temperature reading of your pool or spa
thermometer. The RP2100 reads the water temperature at the inlet of the heater. Due to the circulation
characteristics of any pool or spa, the water temperature at the inlet to the heater may differ from that observed
at a given location in the pool or spa.
DIAGNOSTICS
The RP2100 Digital heater is equipped with on-board
diagnostic controls. If there is a safety fault, a fault code
will be displayed along with a service indication.
If the PRS fault code is displayed, it indicates that
there is insufficient flow through the heater. Make sure
the pool filter and pump strainer are clean before calling
a service representative.
Fig# 9482
STATUS CODES
Display Definition
CFH Call for heat
CLK Time clock
LOW Caution - low water temperature
OFF Off mode
REM Remote control activated
SPK Spark
SPR Spare fault code indicator
READING A FAULT
The word “SERVICE” will flash on and off if the PC board
detects a known fault. The fault will be displayed in
three big letters on the lower left of the display.
SERVICE WILL FLASH
Fig# 9485
3 LETTER FAULT CODE
See table for fault definition
FAULT CODES
Display Definition
BD1 Board failure
FFL Flame sensing when pilot and gas
valves are closed
HL1 Hi limit switch #1 open
HL2 Hi limit switch #2 open
IGN Ignition control failure
ILO Ignition lock out
PLT Pilot failure
PRS Pressure switch open
ROL Heat roll-out safety switch open
SNS Sensor failure
VNT Vent switch open
PROGRAM MODES
Display Definition
CCC Celsius setting
F/C Change from Fahrenheit to Celsius
FFF Fahrenheit setting
RES Reset defaults
SET Set point max adjustment
31
Page 32
REMOTE CONTROL INSTALLATION AND OPERATION
CAUTION: Before installing remote controls to the RP2100 Digital Heater, read the following:
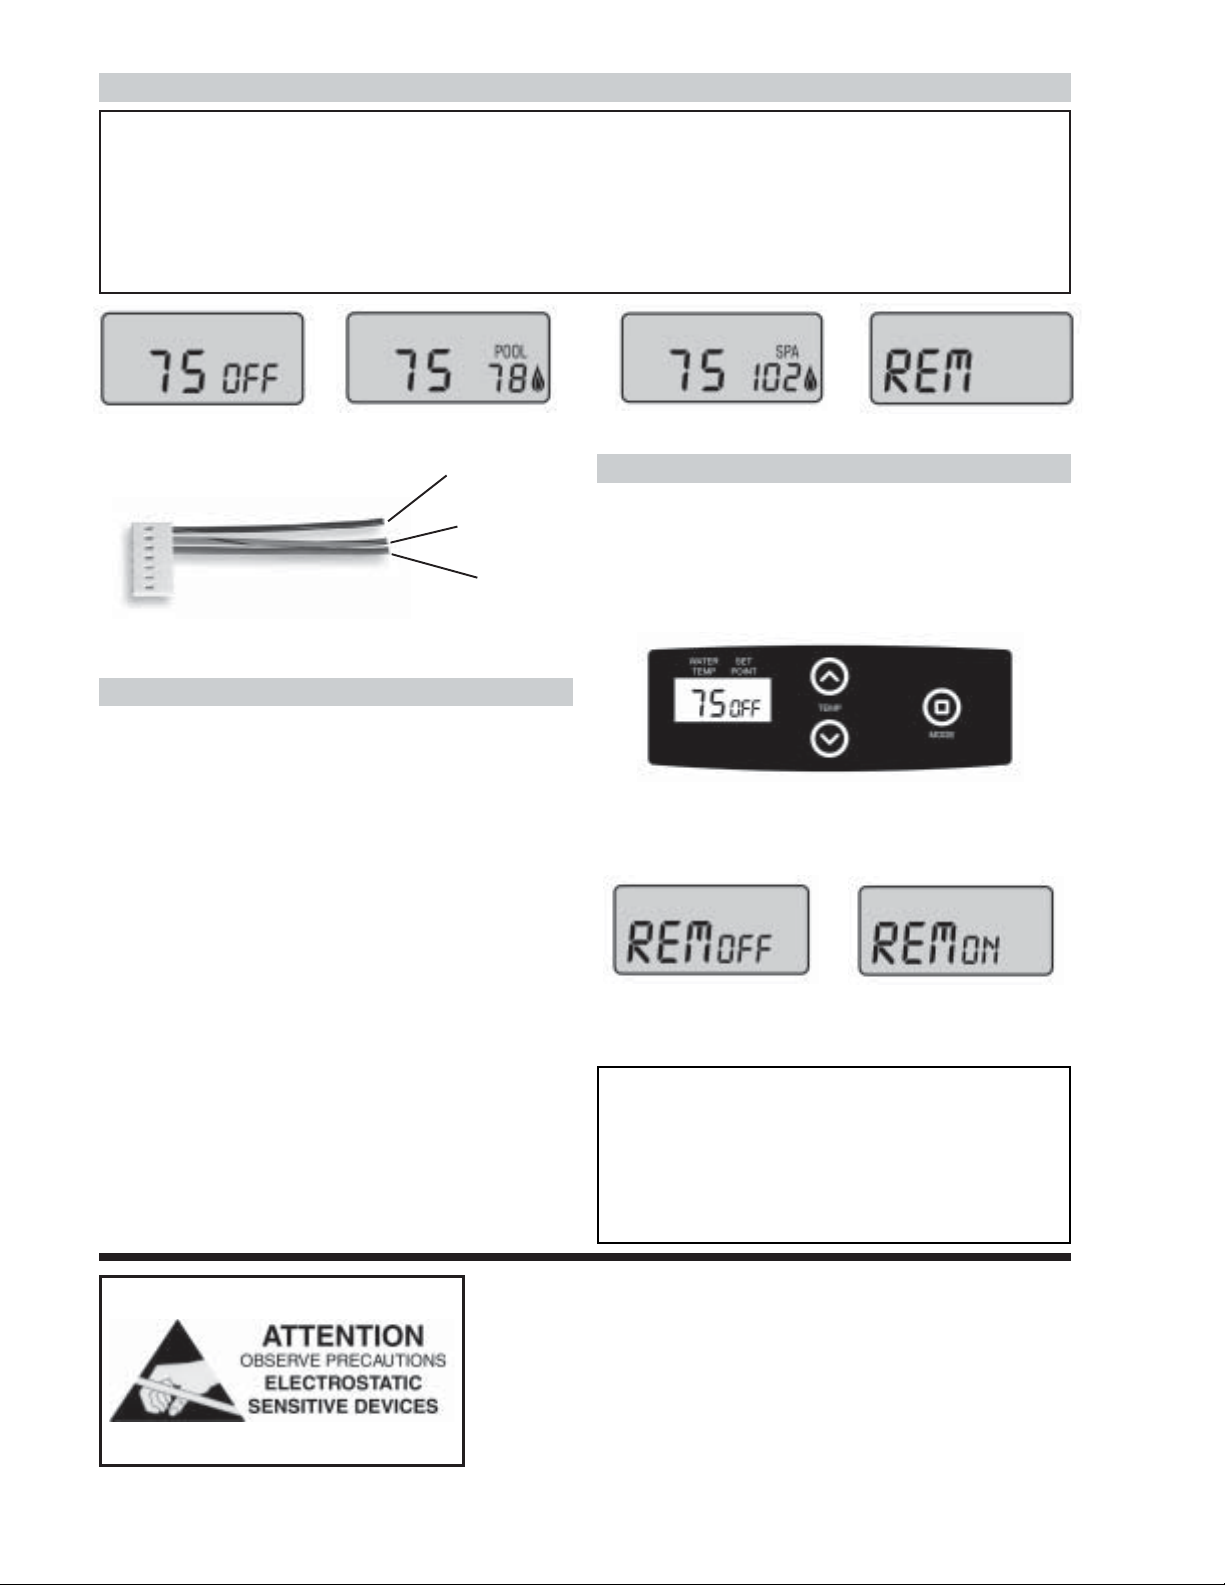
The Raypak RP 2100 Digital Heater is remote ready in most cases. The digital liquid crystal display (LCD)
shows the actual pool temperature, operating status, and service codes (See examples below). The touch pad
on the control panel allows you to select the desired pool or spa temperature. It also indicates when a remote
system is controlling the heater by displaying REM in the display. When connecting the RP2100 Digital to a
remote system, identify whether it is a two- or three-wire remote system. Select the appropriate instruction
listed below to properly install the remote to the heater.
Fig# 9487
OFF Mode Heating in the POOL Mode Heating in the SPA Mode Remote Mode
POOL COMMON
(BLK/ORG)
SPA COMMON
(ORG/BLK)
24VAC HOT
Fig# 9494
7-PIN REMOTE
WIRING CONNECTOR
PART NUMBER 071494
(BLU)
REMOTE OPERATION
The RP2100 Digital heater is equipped with the ability
to work with external remote controls. The Raypak
supplied 7-pin remote wiring connector supplies power
out to either a toggle switch or the switch contacts of a
third party remote. The remote works by either making
or breaking the circuit created by the remote wiring.
Typically, a remote does not supply power to the heater,
it only provides a switching function to turn the heater
on or off. If your remote is suppling its own voltage to
the heater, it will not work with the RP2100 and may
damage the digital circuit board.
Fig# 9484
Fig# 9486
ACTIVATING THE REMOTE
The RP2100 digital has the ability to disconnect from
the remote it is wired to. To activate or deactivate the
remote follow these steps:
Press and hold all three buttons for 5 to 7 seconds.
Fig# 9480
The digital display format will change and indicate
REMoff or REMon.
Fig# 9489
External remote control
disabled
External remote control
active
Fig# 9488
Fig# 9490
Press either temperature button to switch remote modes.
IMPORTANT - Please Read
When the heater is to be controlled by a remote you
must choose REMon and the heater thermostat display must be in the OFF mode. If the heater thermostat
is left in a heat mode the heater will operate to this
setting and the remote shut-off feature will not be
functional.
Note: Electrostatic Discharge (ESD) damage can be caused by direct
or indirect contact with the wiring or circuit board. When one walks to
the heater area, an electrostatic charge accumulates on the body.
Contact of a finger allows the body to discharge, possibly causing
device damage. This damage can be limited if the service person
discharges himself by removing that charge by adhering to ESD
preventative/removal practices and reducing that charge by holding on
to the heater enclosure for 5 seconds before proceeding.
32
Page 33
REMOTE CONTROL WIRING
Important Installation Notes for Remote or External Wiring Configuration
• Remote wiring must be run in separate conduit.
• Remote wiring must not be run parallel to high voltage lines.
• For runs of under 30 feet, remote wiring should have stranded conductors with a minimum of 22 AWG, 600V,
cable twisting 1.5 to 2.5 and jacketed.
• For runs over 30 feet, the conductors should be a minimum of 20 AWG, 600V, cable twisting 1.5 to 2.5 inch lay
that is shielded and jacketed.
• Maximum cable length is 200 feet.
• For both two- and three- wire remote systems, the provided 7-pin wiring connector must be utilized. Please refer
to the wiring instructions.
Note: The remote wires must be connected to the
7-pin connector before it is connected to the board.
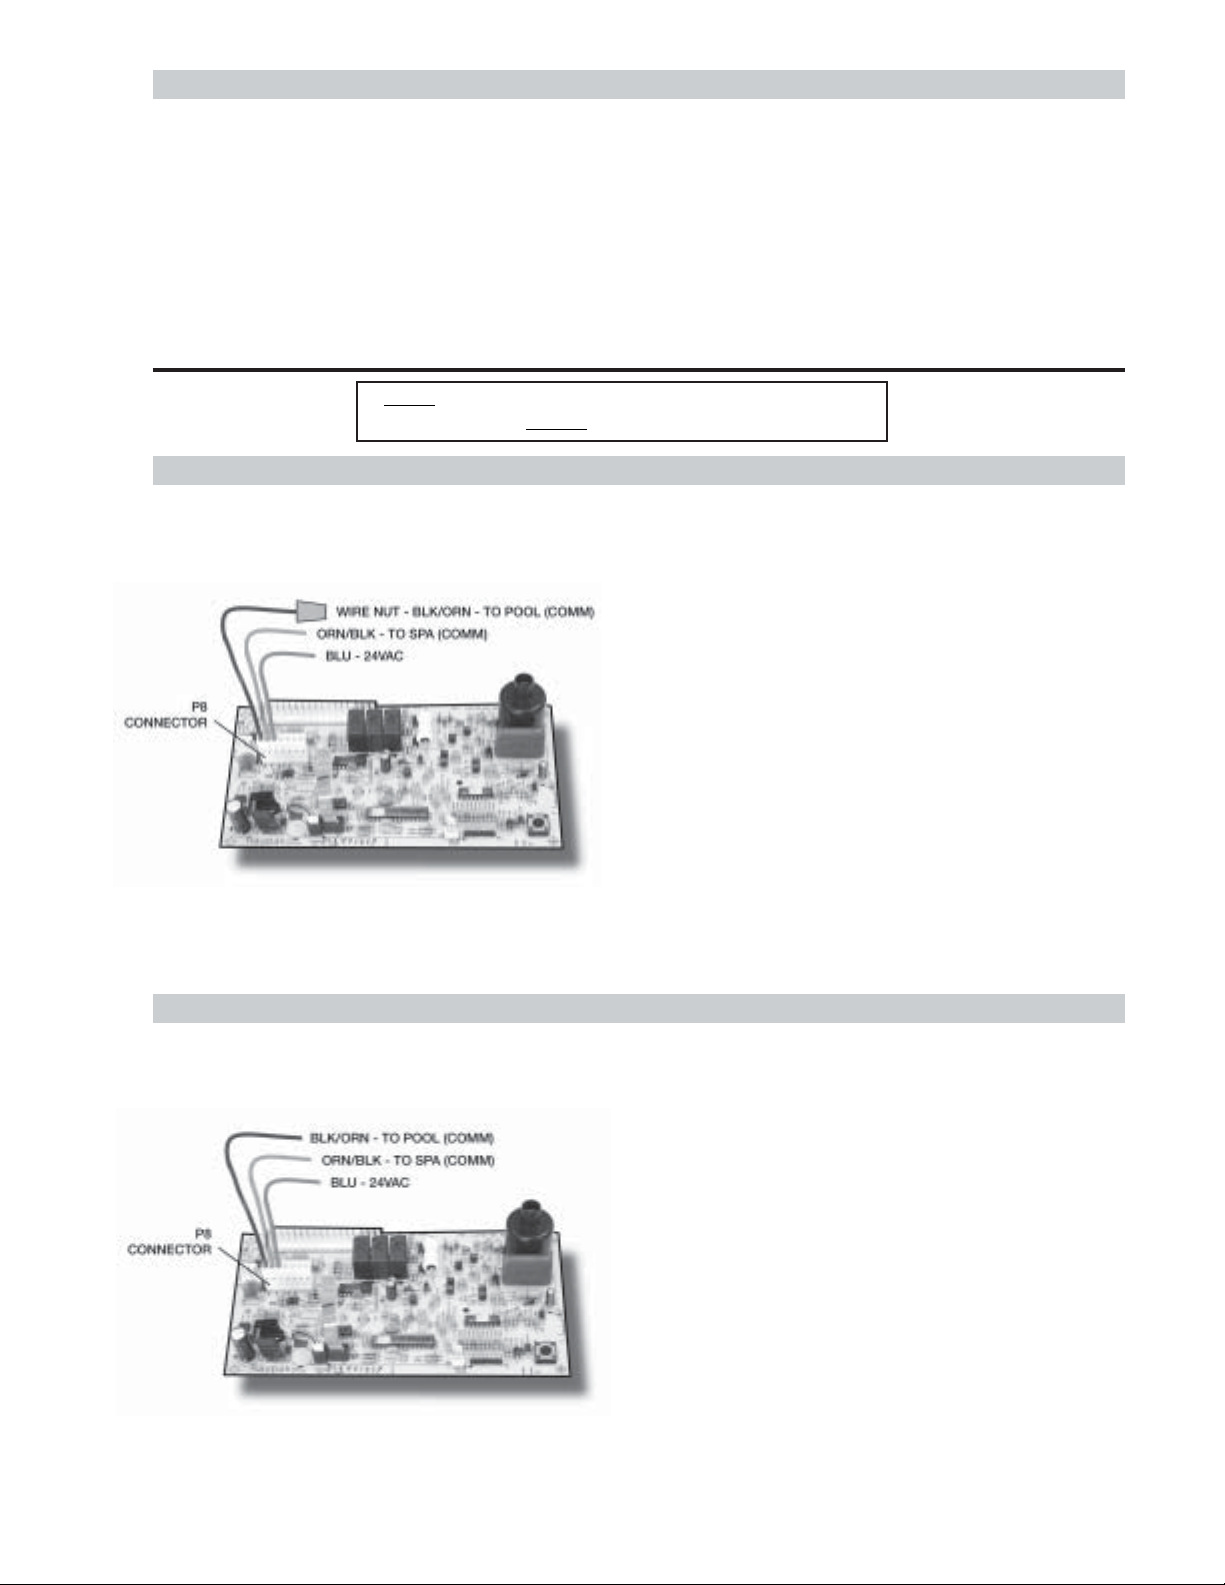
2-Wire Remote Control (On-Off)
This application assumes that only one heating function is required.
1. Turn on power to the heater.
2. Push the mode button to the "POOL" or "SPA" mode and
set the desired temperature for each. (eg. 102°F)
3. Turn the mode button to "OFF" and remove power from the
heater.
4. On the "Remote Interface Harness" connect the BLUE
wire to one side of the "REMOTE" switch and connect the
other side to either the ORANGE/BLACK wire for "SPA"
operation or the BLACK/ORANGE wire for "POOL" operation.
5. Place wire nut on unused wire on the "Remote Interface
Harness."
6. Install the "7-Pin Remote Interface Harness" to the P8
connector and turn on power to the heater.
Fig# 9492
See instructions on previous page to activate the
remote control.
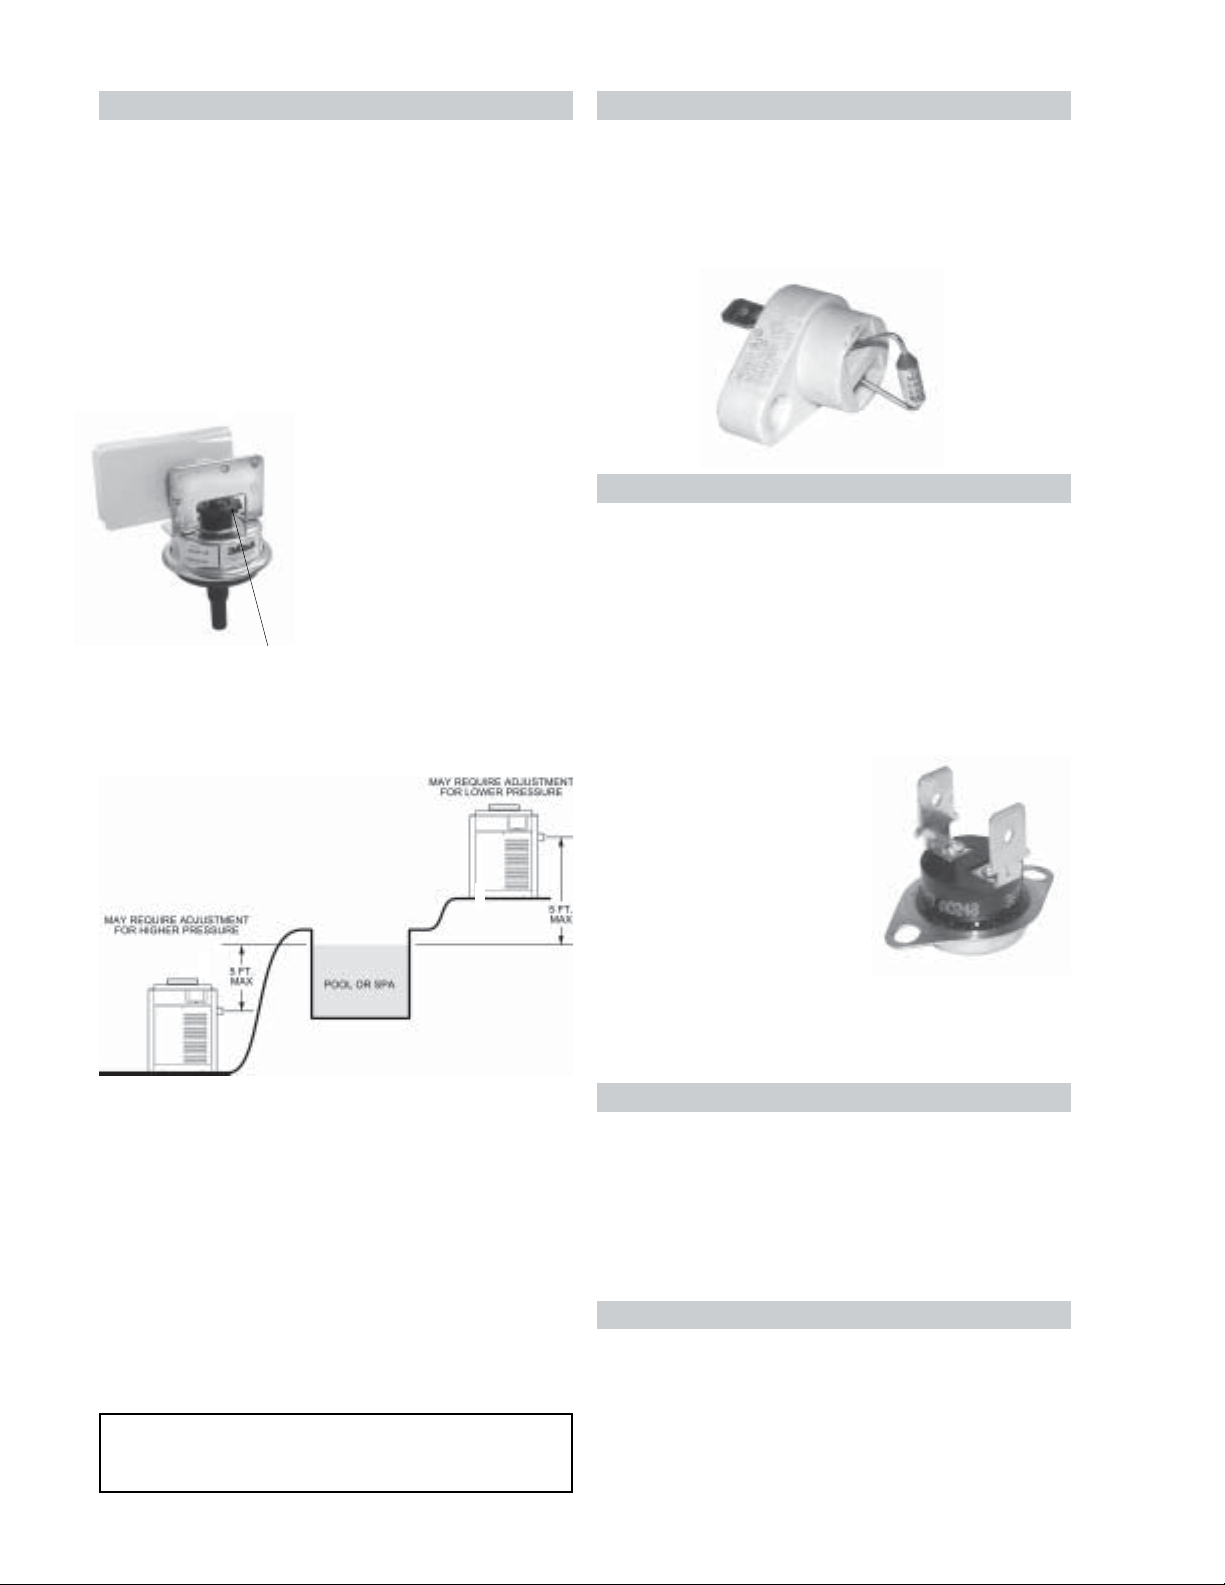
3-Wire Remote Control Using Three-Position Switch (Pool-Off-Spa, or Low-Off-High)
This application assumes that multiple heating functions are required.
1. Turn on power to the heater.
2. Push the mode button to the "POOL" or "SPA" modes
and set the desired temperature for each.
(eg. 80° for Pool and 102°F for Spa)
3. Turn the mode button to "OFF" and remove power from the
heater.
4. On the "Remote Interface Harness" connect the BLUE
wire to one side of the "REMOTE" switch and connect the
ORANGE/BLACK wire for "SPA" operation and the
BLACK/ORANGE wire for the "POOL" operation.
5. Install the "Remote Interface Harness" to the P8 connector and turn power "ON" to the heater.
Fig# 9493
See instructions on previous page to activate the
remote control.
33
Page 34
PRESSURE SWITCH
The pressure switch, or heater actuator, insures that the
heater operates only when the filter pump is in operation.
It is located on the inlet/outlet header. It is factory set at
1.75 PSI for deck level installations. When the heater is
located below the level of the spa or pool, it may be
necessary to reset the pressure switch to compensate
for the no-flow static head. If it is necessary to reset the
pressure switch, utilize the following procedure:
PRESSURE SWITCH ADJUSTMENT
FLAME ROLL-OUT SAFETY SWITCH
Atmospheric heaters are equipped with a thermal cutoff
device to prevent flame roll-out in the event the heat
exchanger becomes blocked. This is a "single-use" type
fusible link or thermal fuse, that must be replaced when
disabled by an over temperature condition, caused by
excessive restriction in the heat exchanger flue passage.
Fig. #9438
Adjustment
Knob
PRESSURE SWITCH
ADJUSTMENT RANGE
1. With pump and heater on,
turn adjustment knob clockwise until a click is heard
from the gas valve.
2. Turn adjustment knob
counter clockwise 1/4
turn.
3. Turn pump off and on several
times. Heater should shut
off immediately. If it does
not, repeat steps above until
proper adjustments made.
Fig. #9440
HIGH LIMITS
The heater is equipped with two automatic high limits.
Both are located in the inlet/outlet header. Both are set
to open at 135°F.
NOTE: An erratic high limit is often characteristic of
internal heat exchanger problem, e.g. scale buildup,
defective bypass. Refer to troubleshooting sections (pg.
39).
HIGH LIMIT REMOVAL
1. Shut off main electrical
power switch to heater.
2. Remove inlet/outlet inspection panel.
3. Remove defective high
limit and replace with a
new high limit.
4. Replace inspection
panel.
Fig. # 9439
Fig. # 8152.2
NOTE: If heater is installed outside of the limits shown,
a higher pressure rated (11 psi) switch may be used or a
flow switch mounted and wired adjacent to the heater may
be used in place of the factory mounted pressure switch.
See Parts List (pg. 47) for 11 psi pressure switch.
TWO-SPEED PUMPS
In some cases, the flow on the low-speed is insufficient
to operate the heater. This is apparent when the pressure
switch cannot be further adjusted or if the heater makes
banging noises or goes off on high limit. In these cases,
the pump must be run at high speed when heating the
water.
CAUTION: Do not operate the heater without the
function of a properly adjusted pressure switch or flow
switch.
PILOT SAFETY- Millivolt
The heaters equipped with the standing pilot (millivolt
system), have pilot generators which act as a safety
device to shut off the flow of gas to the main burners and
the pilot burner in case the pilot flame is extinguished.
The pilot burner must be manually relighted to place the
heater in operation again. Refer to the lighting instructions provided on the heater label.
PILOT SAFETY- Electronic
The heater employs a pilot safety which closes the main
gas valve within 8/10ths of a second whenever the pilot
flame is interrupted. Pilot flame is automatically lit when
the device is powered. Unit performs its own safety check
and opens the main valve only after the pilot is proven to
be lit.
34
Page 35
BURNER DRAWER REMOVAL
1. Shut off main electrical power switch to heater.
2. Shut off gas upstream of heater.
3. Remove front door.
4. Disconnect gas line from gas valve.
5. Remove (2) screws that mount burner tray to unit,
and (2) screws that secure gas valve to jacket.
6. Disconnect wires that terminate at gas valve.
7. Slide out burner tray.
8. Reverse above procedure to reinstall.
GAS VALVE REMOVAL
1. Shut off gas supply to the heater. Remove gas piping
to gas valve inlet.
2. Disconnect wires, pilot tubing and bleed line, if
required.
3. Turn vertical gas pipe from manifold slightly and
unscrew gas valve.
4. Reverse above procedure to reinstall.
MAIN BURNER AND ORIFICE REMOVAL
1. Remove burner drawer, following procedure above.
2. Remove screws and burner hold-down bracket.
NOTE: If the heat exchanger is sooted badly, the
burner hold-down bracket and spacer can become distorted from direct flame impingement and this usually
necessitates replacement of these parts.
3. Lift burners from slotted spacers and slide from
orifices. Clean with a wire brush.
4. Orifices usually do not need to be replaced. To clean,
run either copper wire or wood toothpick through
orifice. Do not enlarge hole. To remove orifice, use
a socket wrench and remove from manifold. DO NOT
overtighten when reinstalling.
Burners
PILOT REMOVAL AND CLEANING
1. Disconnect pilot tubing and wires from gas valve.
2. Remove pilot assembly from burner tray.
3. Remove pilot from bracket.
4. Remove pilot orifice and air opening (Honeywell MV
unit only), and clean with wire or small brush.
CAUTION! Do not enlarge hole in pilot orifice.
5. Reverse above procedure to reinstall.
HONEYWELL PILOT ROBERTSHAW PILOT
Pilot Pilot
Air
Opening
Orifice
Orifice
Fig. # 8045.1 Fig. # 8102.0
HEAT EXCHANGER REMOVAL
1. Shut water, gas and electricity off, close valves and
relieve pressure and remove relief valve. Remove side
inspection panels.
2. Remove top holding screws.
3. Remove draft diverter, lift and remove top and flue
collector. Remove inspection panels.
4. Disconnect wires from high limits and pressure
switch. Remove temperature sensor.
5. Disconnect flange nuts on inlet-outlet header, loosen
union(s) at gas pipe and slide boiler away from piping.
6. Lift heat exchanger straight up using caution not to
damage refractory.
7. Reverse above procedure to reinstall. Make sure the
insulation strips are properly replaced on top of the
refractory retainer.
Burner Hold-Down Bracket
Fig. # 9479
35
Page 36
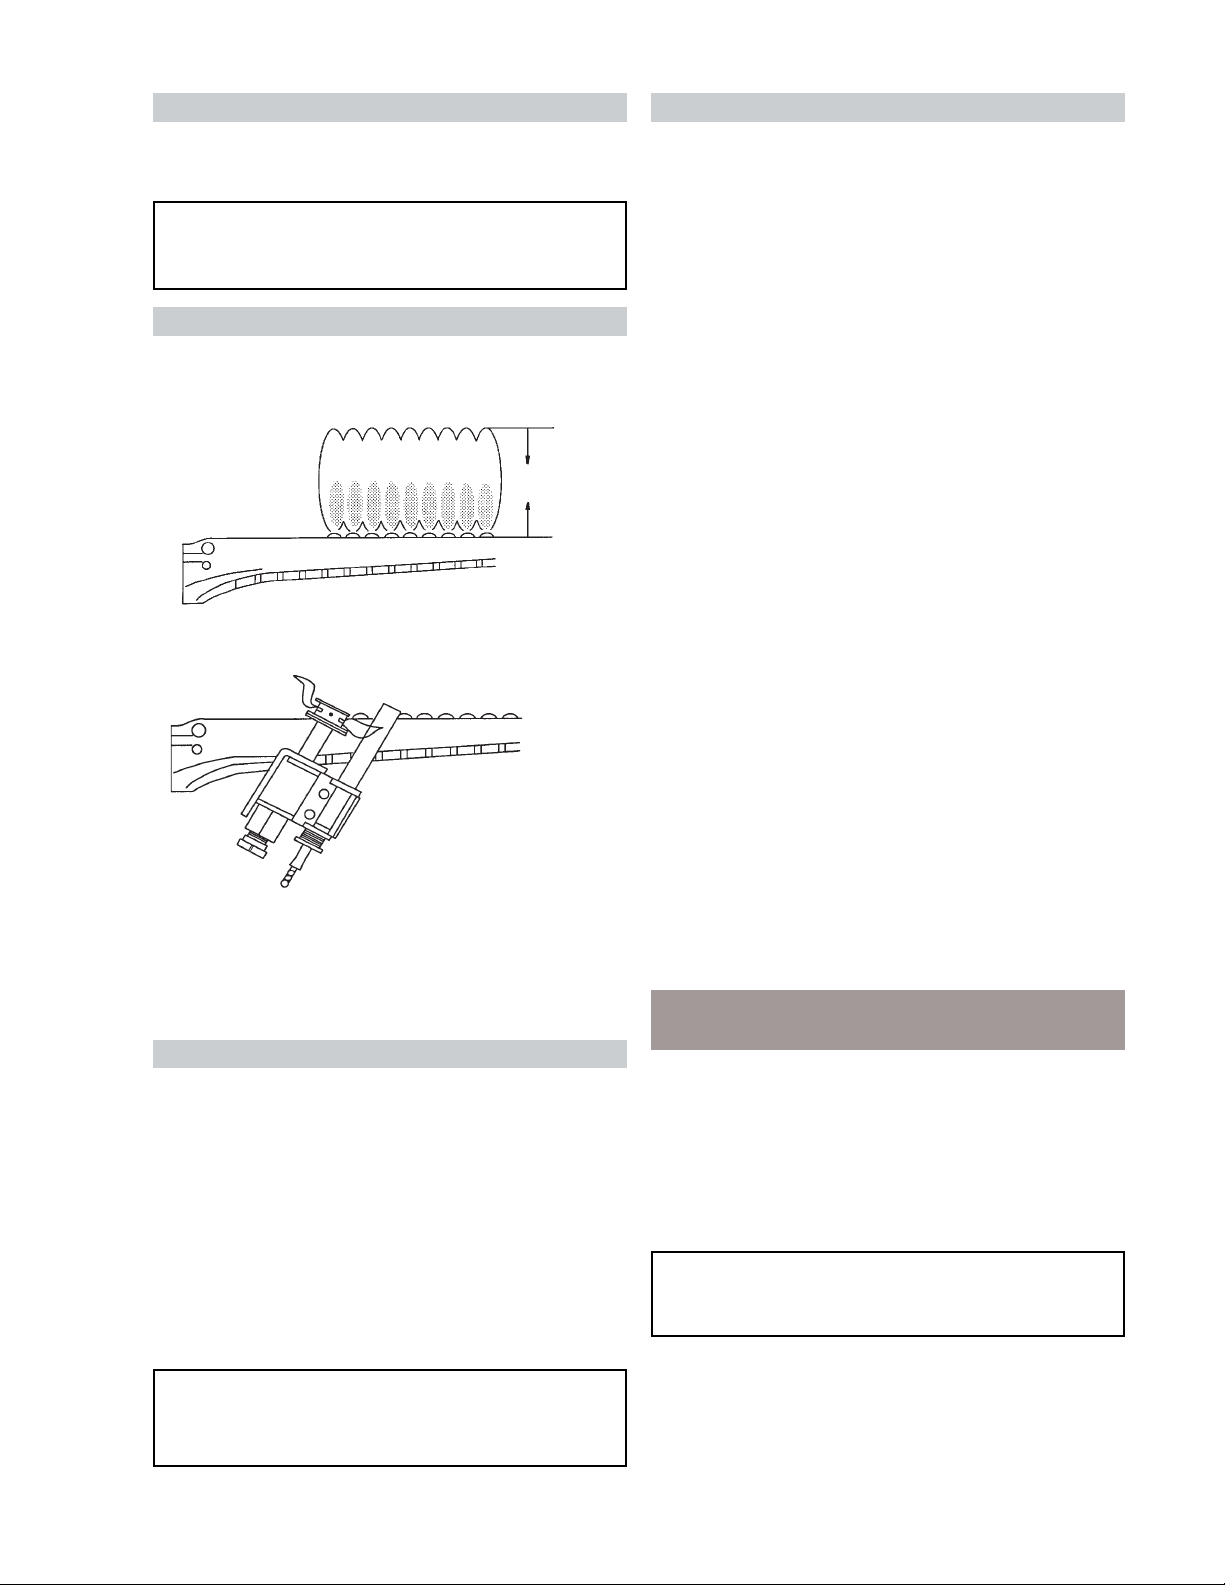
Extension Pieces (2) Auger with Carbide Tip Wire Brush
Fig. # 8154.0
TUBE CLEANING PROCEDURE
Establish a regular inspection schedule, frequency depending on local water condition and severity of service.
Do not let the tubes clog up solidly. Clean out deposits
over 1/16" in thickness.
The heater may be cleaned from the return header side,
without breaking pipe connections. It is preferable,
however, to remove both headers for better visibility
through the tubes and to be sure the ground-up lime dust
does not get into the system.
Note that you do not remove the top panel or the heater
exchanger, generally.
After reaming, mount the wire brush in place of the auger
and clean out debris remaining in the tubes.
Another method is to remove the heat exchanger, ream
tubes and immerse heat exchanger in non-inhibited descale solvent for severe scale buildup.
DESOOTING PROCEDURE
CAUTION: SOOT IS COMBUSTIBLE. EXERCISE
EXTREME CARE:
Soot will clog areas between fins and cause eventual tube
failure. Any sign of soot at the base of the burners or
around the outer jacket indicates a need for cleaning.
1. Remove top and flue collector from cabinet.
2. Remove "V" baffles from heat exchanger.
3. Remove burner drawer. (See pg. 35).
4. Remove heat exchanger from the heater and wash
with a garden hose, making sure soot is removed
from spaces between fins.
5. Reverse above procedure to reinstall.
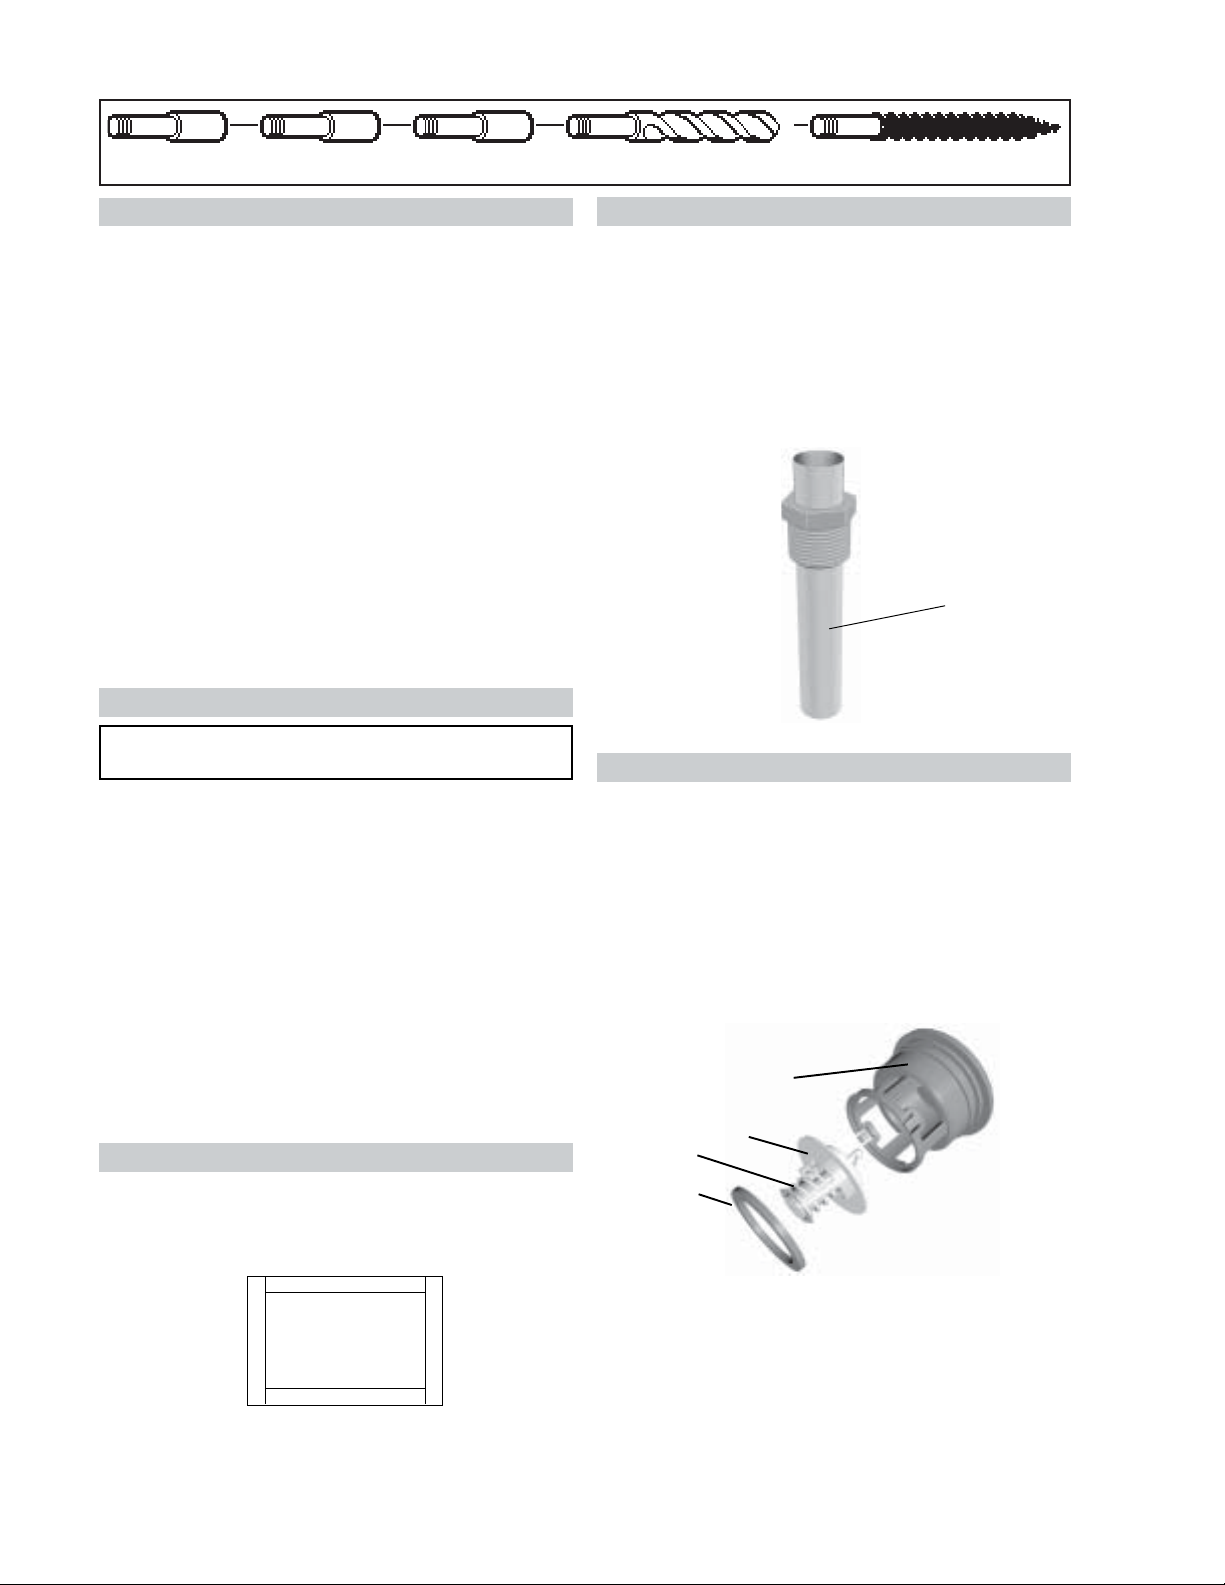
IMMERSION WELL REPLACEMENT
(Millivolt and ASME)
1. Shut water off to heater and drain heat exchanger.
2. Remove access panel on water connection side of
heater.
3. Remove old immersion well with bushing and sleeve.
4. Install in header.
NOTE: Installation in plastic should be hand tight plus
1/2 turn.
Well Assembly
Fig. #2010
UNITHERM GOVERNOR (U.G.) REPLACEMENT
1. Shut water, gas and electricity off, close valves and
relieve pressure.
2. Drain heat exchanger.
3. Remove retainer plug located next to the outlet pipe
connection.
4. Unsnap old U.G. to remove from retainer plug. Snap
in new U.G.
5. Reinstall retainer plug, taking care to lubricate gasket with a non-petroleum based grease such as
AquaLube.
NOTE: In extreme cases it may be necessary to do
steam cleaning at the local car wash. DO NOT WIRE
BRUSH.
COMBUSTION CHAMBER REMOVAL
To remove combustion chamber, you must first have
removed the heat exchanger. Unbolt metal combustion
chamber retainer from top and remove combustion chamber panels individually.
Fig. #RP 8155.0
REFRACTORY PANELS-TOP VIEW
Retainer Plug
U.G.
Spring
Gasket
Fig. #2011
To test the operation of the Unitherm Governor, place in
hot water (over 100°F) and watch for movement against
spring. If there is no movement, replace unit.
36
Page 37
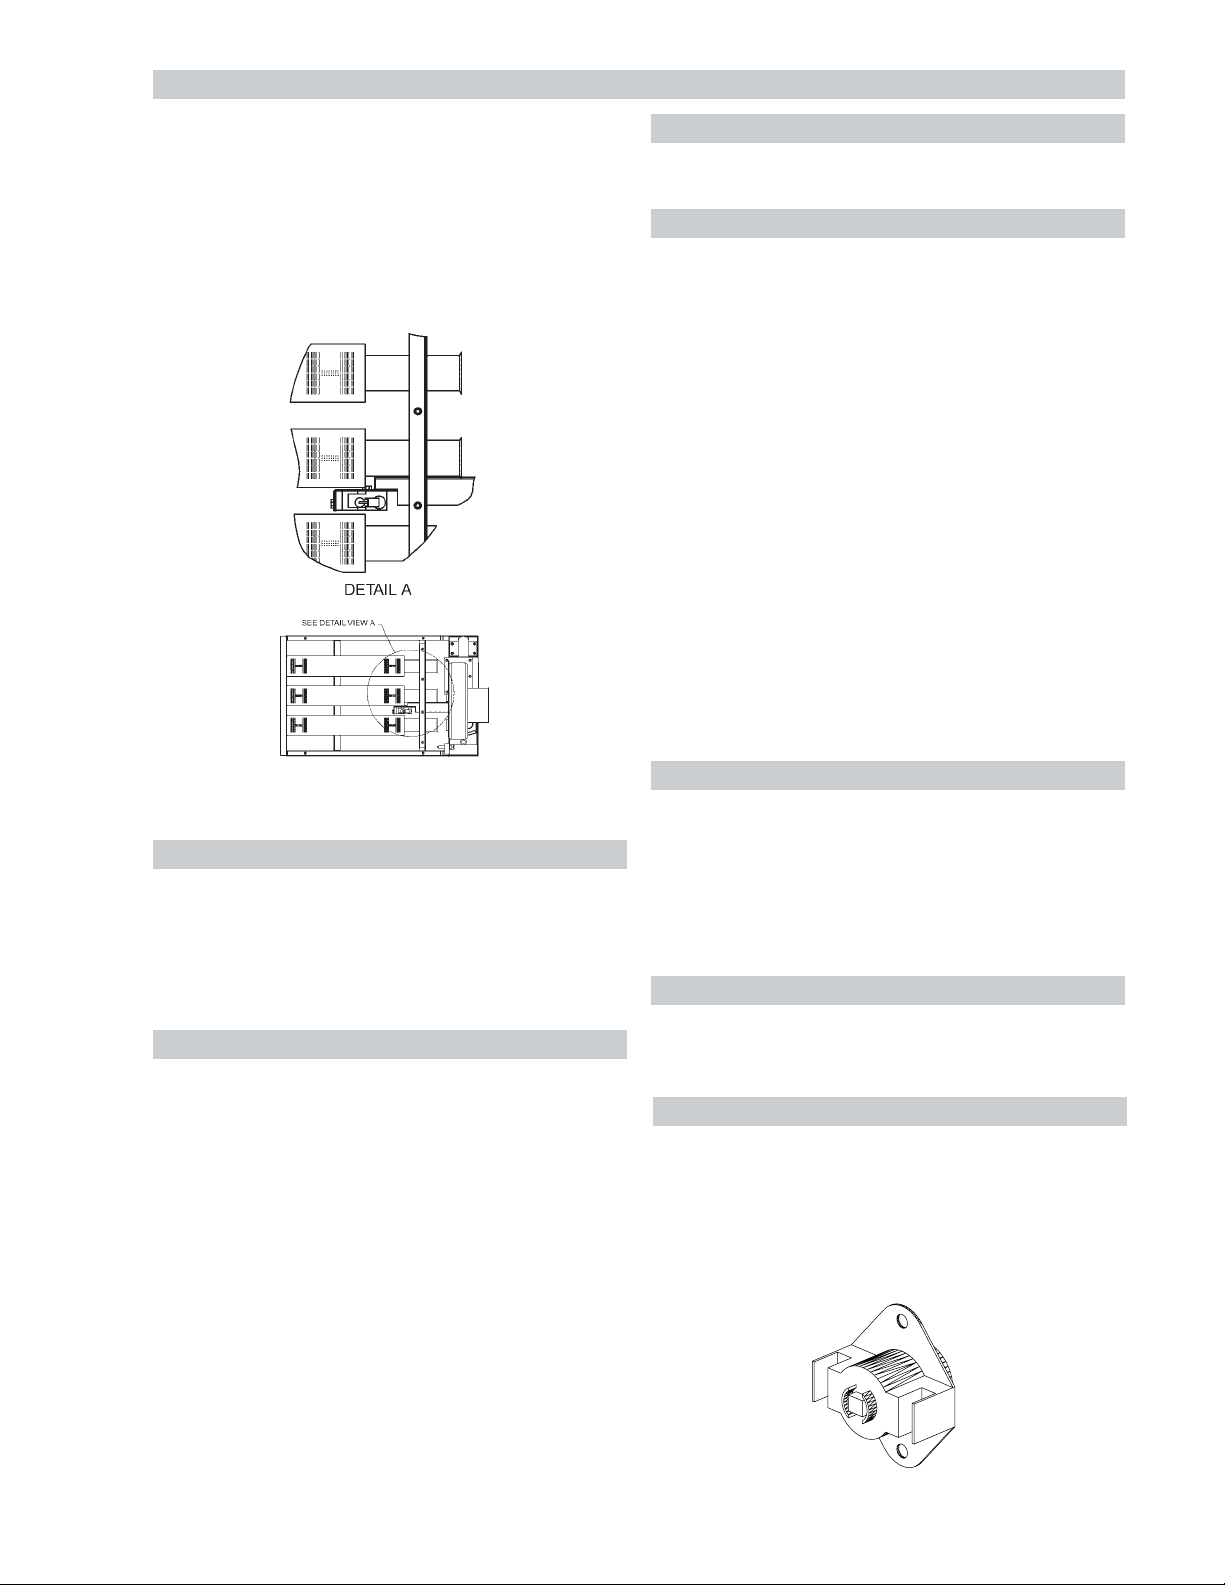
LOW NOx POOL HEATERS
The Raypak Low NOx Pool Heaters are certified and
tested under the ANSI Z21.56.CSA 4.7 standards for
gas-fired pool heaters.
The heater should be installed to meet all local codes, the
latest editions of the National Fuel Gas Code Z223.1 and
the National Electrical Code, ANSI/NFPA 70.
Fig # 9361
OPERATION
On call for heat, the ignition system, consisting of an
electronic spark module, gas valve and pilot system, is
energized. Providing the pilot is proven blower will start
running, the main gas valve will open and the heater will
operate. When the operating control is satisfied the
heater will shut down.
START-UP PROCEDURES
1. Turn on power to the heater with gas supply off.
2. Check ignition as follows:
a. Set the thermostat or controller to call for heat.
b. Watch for continuous spark at the pilot burner.
c. Check the ignition spark operation. Time must
be within the lockout timing period (15 or 90
seconds).
d. Turn control down to end call for heat and wait 60
seconds on lockout models before beginning step
3.
3. Turn on gas supply.
4. Set controller to call for heat.
5. System should start as follows:
a. Spark will turn on, pilot gas valve will open, and
the blower will begin running.
b. Heater will operate until call for heat is satisfied.
BURNER ADJUSTMENT
This burner assembly does not require any primary air
adjustments.
BLOWER ADJUSTMENT
The Raypak RP2100 Low NOx pool heater is equipped
with a combustion air baffle mounted at the air intake to
the combustion air blower. The baffle has a slot that is
utilized to align with a square window cutout on the
shutter assembly.
The factory setting will be adequate for most field conditions and adjustment will not normally be required.
However in some cases, field conditions including unusual gas characteristics may create a need for adjustment to achieve optimum performance. When the combustion air setting is proper, there will be some lifting of
the flames on some areas of the burner deck under coldstart conditions. After about five minutes of operation, the
flames should settle down and blue tips should become
visible. Lifting of flames beyond the five minutes would
indicate too much combustion air. Loosening the knurled
screw and opening the air baffle (move to the left)
increases the amount of combustion air; closing it (move
to the right) decreases the amount of combustion air.
After a steady blue flame is attained, the knurled screw
must be re-tightened.
VISUAL INSPECTION
Flame can be observed through the slot opening above
the plenum. Flame color is blue and evenly spread on the
top surface of the burner. At least every three months a
visual inspection should be made of the burners. In case
flame lifting is observed on the burner, check gas pressure in manifold. Gas pressure in manifold should be 3.9"
W.C.
ELECTRICAL
Be sure that electrical service to the boiler has proper
overload fuse or circuit breaker protection, wire size and
connections which comply with all applicable codes.
FLAME ROLL-OUT SAFETY SWITCH
Low NOx heaters are equipped with a cutoff device to
prevent flame roll-out in the event the heat exchanger
becomes blocked. This is a "manual reset" type roll-out
switch that must be reset by a service technician after
any over temperature conditions have been fixed. Excessive restriction in the heat exchanger flue passage may
cause the switch to disable the heater.
37
Page 38

LOW NOx HEATERS (CONTINUED)
Fig # 9362
7. Reverse above procedure to reinstall.
IID PILOT
Fig # 9477
LOW NOx BURNER TRAY ASSEMBLY
BURNER DRAWER REMOVAL
1. Shut off main electrical power switch to heater.
2. Shut off gas upstream of heater.
3. Remove front door.
4. Disconnect gas line from gas valve.
5. Remove (2) screws that mount burner tray to the
base of the unit, and (2) screws that secure gas
valve to jacket.
6. Disconnect wires that terminate at gas valve.
7. Unscrew (4) screws that secure the control box.
8. Disconnect pilot wire from the ignition module.
9. Disconnect wire harness from the combustion blower.
10. Carefully slide out the burner tray assembly.
11. Reverse above procedure to reinstall.
GAS VALVE REMOVAL
1. Remove burner drawer, following above procedure.
2. Disconnect, pilot tubing from gas valve.
3. Turn vertical gas pipe from manifold slightly and unscrew gas valve.
4. Reverse above procedure to reinstall.
PILOT REMOVAL
1. Disconnect pilot tubing from gas valve.
2. Remove (4) screws from control box. Open the control box.
3. Remove the pilot wire from the ignition wire.
4. Remove (2) screws that mount the pilot bracket to
the air manifold assembly.
5. Pull the pilot bracket slightly, then drop and pull
downwards and outwards.
6. Reverse above procedure to reinstall. Make sure
the pilot bracket is all the way up on the pilot side,
see drawing below.
MAIN BURNER AND ORIFICE REMOVAL
1. Remove burner drawer, following above procedure.
2. Remove pilot. See pilot removal procedure.
3. Remove (8) total screws from the hold down brackets, front and rear of tray.
4. Remove (8) total screws from the left and right sides
of the manifold assembly. Detach the manifold assembly from the burner tray assembly.
5. Remove burners by raising the bracket on the back
end of the burners up and out of their slots.
6. Use a long 9/16” socket wrench to remove orifices
from the gas manifold.
Fig# 9368
COMBUSTION FAN REMOVAL
1. Remove burner drawer. See Burner Drawer
Removal procedure on this page.
2. Remove (4) screws that mount the combustion
blower to the manifold assembly.
3. Reverse above procedure to reinstall.
38
Page 39
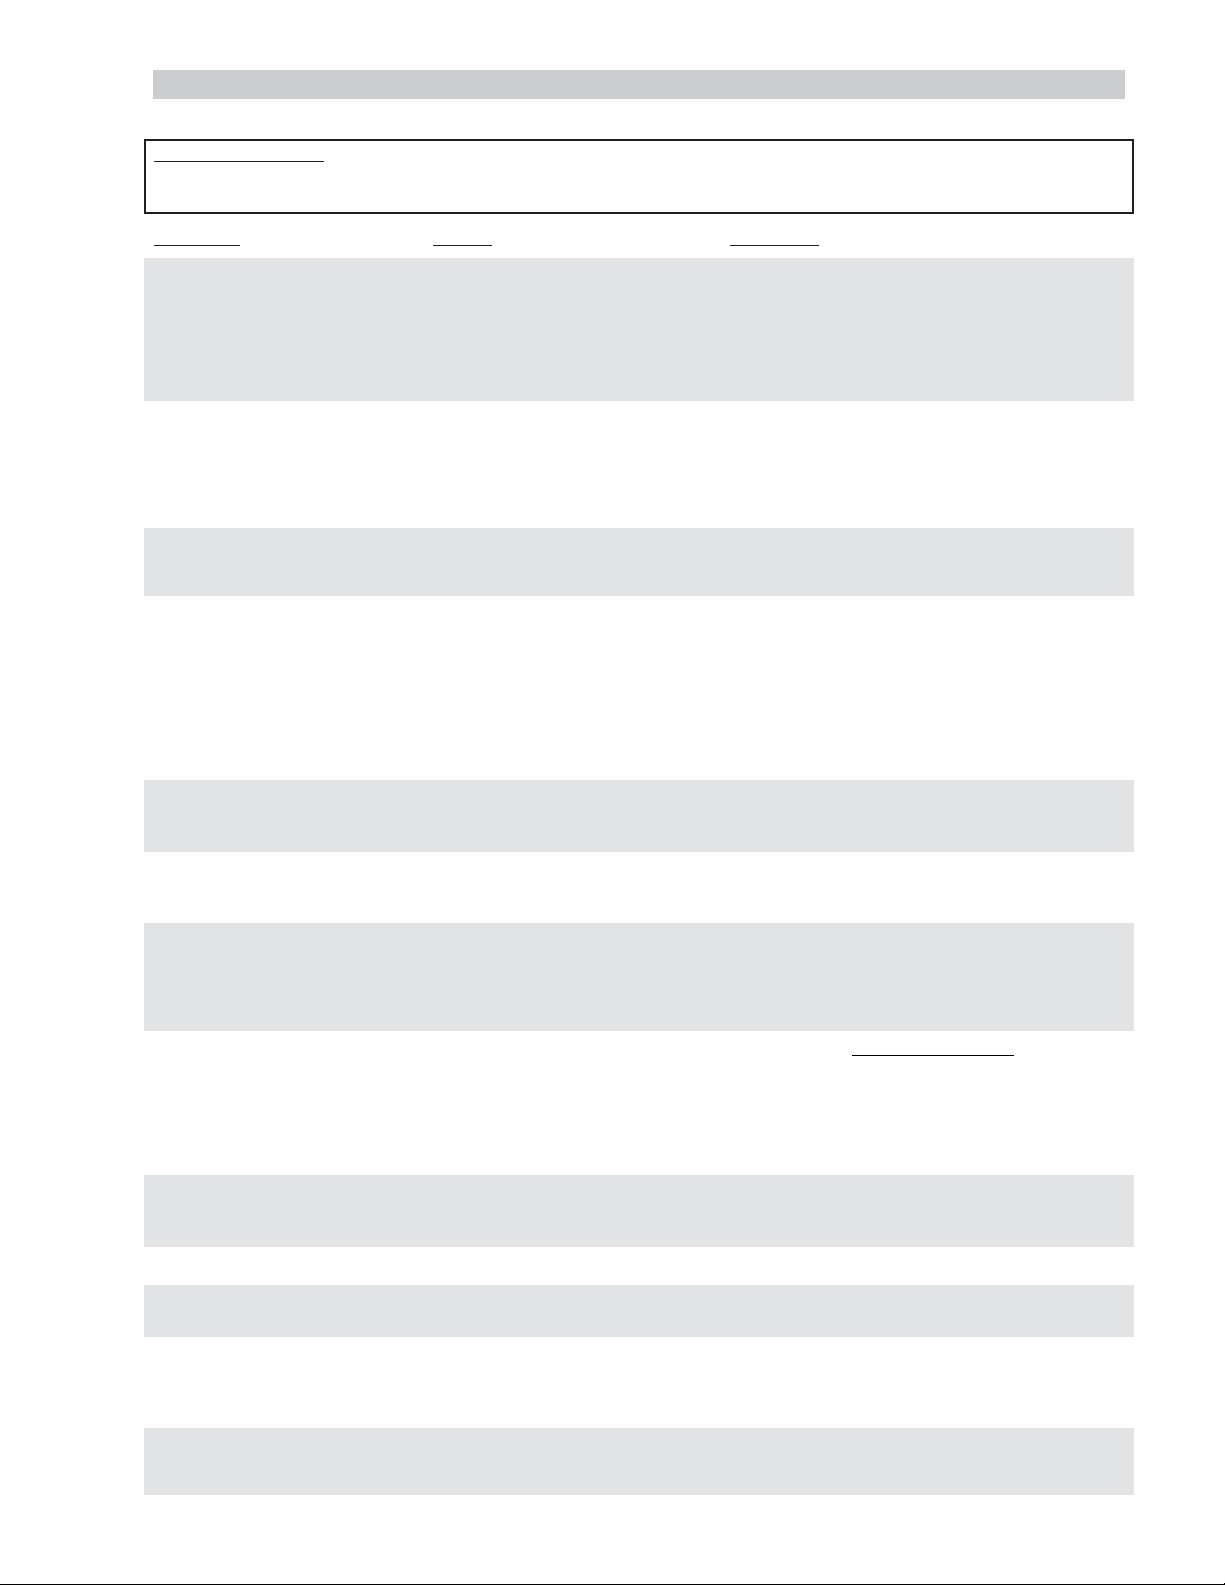
SECTION 5 - TROUBLESHOOTING GUIDE
MECHANICAL (FOR QUALIFIED SERVICE PERSONNEL ONLY)
IMPORTANT NOTICE These instructions are primarily intended for the use of qualified personnel specifically trained and experienced in
the installation of this type of heating equipment and related system components. Installation and service personnel may be required by
some states to be licensed. Persons not qualified shall not attempt to install this equipment nor attempt repairs according to these instructions.
PROBLEM CAUSE SOLUTION
Harmonics, or whining noise U.G. inoperative.................................... Check movement by putting in hot water (110°F or
*Debris or restriction in system............ Locate the restriction and remove. Flush system
*Debris in gas line................................. Remove debris or blow out gas line.
Low flow.............................................. Scale forming in heat exchanger - clean heat
Heater going on and off Dirty filter.............................................. Backwash filter.
continuously Low water level in pool........................ Raise water level.
External bypass setting out of
adjustment............................................ Adjust bypass
*Pressure switch out of
adjustment............................................. Adjust pressure switch
Liming or scale forming on Pool water............................................. Recommended pH should be between 7.4 and 7.8
heat exchanger Total alkalinity 100-150 PPM maximum.
Sooting High flow rates..................................... Reduce by adding manual bypass valve. Adjust
U.G. Inoperative.................................... Check movement by putting in hot water (110°F
*Air starvation....................................... Refer to installation instructions.
*Improper venting.................................. Follow recommended installation instructions.
*Insects or debris clogging
burner intake ports............................... Clean burners.
Pilot outage Low gas pressure................................ Adjust gas pressure.
Restricted pilot...................................... Clean pilot.
Weak pilot generator............................. Replace pilot.
higher). If no movement, replace.
and clean.
exchanger and check pool pH and total alkalinity.
Hardness 150-400 PPM maximum.
manual bypass valve until heater outlet water
temperature is between 105° and 110°F.
or higher). If no movement, replace.
Yellow lazy flame Low gas pressure................................ Adjust gas pressure.
Outer jacket very hot *Broken refractory caused by
(paint blistered) shipping damage or improper
Takes long time to heat Calculate temperature in °/hr................ Heat rise (°/hr.)= Htr. output
pool or spa. Pool gallonage x 8.33
Liming Bypassing too much water................... Inspect bypass for movement, if no movement,
Leaking at well. Overacid............................................... Replace well and maintain water chemistry properly.
Leaking at heat exchanger. Overacid............................................... Replace heat exchanger and maintain chemistry
Gasket brittle and leaking - Heater running after pump
(overheated). shuts off............................................... See pressure switch adjustment.
Combustion fan not running Fan relay............................................... Replace fan relay
*Insects or debris clogging
burner intake ports............................... Clean burners.
combustion.......................................... Replace refractory panels.
Excessive sooting of heat
exchanger........................................... Determine cause of sooting & correct.
or refer to heater sizing chart. This does not take into
account heat loss due to weather.
Filter not running long enough............... Reset time clock.
Dirty filter............................................... Clean filter.
Gas line or meter undersized................ Refer to installation instructions.
replace.
U.G. not functioning.............................. Replace if no movement when heated.
properly.
Refractory damage............................... Replace refractory.
Sooted heater....................................... Determine cause of sooting and correct.
Fan........................................................ Loose connection or failed motor
Burned motor ....................................... Incorrect wiring, replace blower
* Indicates symptom which usually occurs on initial start-up.
39
Page 40
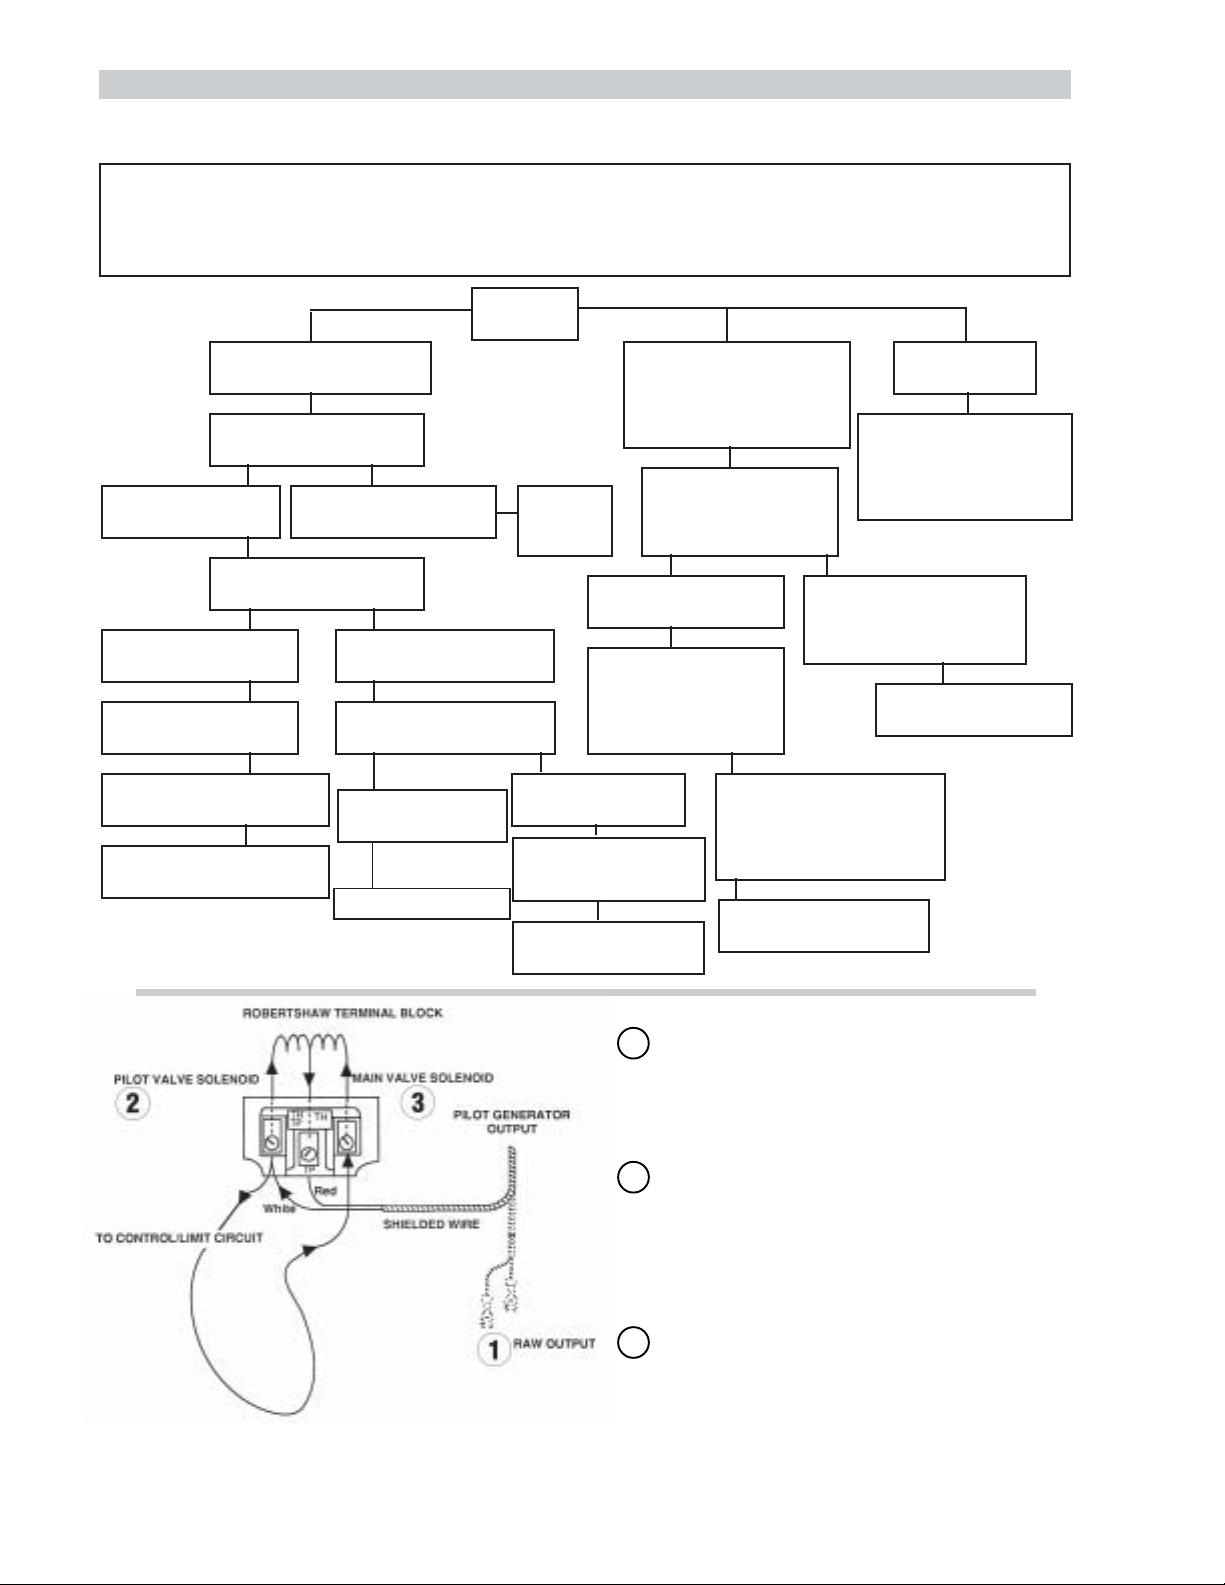
ELECTRICAL (STANDING PILOT MILLIVOLT)
RAYPAK POOL OR SPA HEATER
ELECTRICAL CHECK WITH MV GAS VALVE
CAUTION: For qualified service personnel only.
1. Filter must be on with adequate water flow through heater.
2. Gas valve must be "ON" position. Thermostat set higher than pool water temperature.
3. Jumpers are for temporary check only. If left in place, they could cause the heater to burn up.
Light pilot
If pilot burner remains lit.
Jump across both "TH"
wires on gas valves
If main burner fires,
remove jumper
Jump across pressure
If main burner fires,
remove jumper
Clean filter
Check for adequate water
flow from filter
Replace pressure switch
If main burner does not
switch terminals
fire, remove jumper
If main burner does not
fire, remove jumper
Jump across thermostat
If main burner fires,
remove jumper
Replace thermostat
If pilot burner goes out
when main burner lights
or when gas valve knob
Replace
gas
valve
If pilot burner stays on
Problem is a wire or
If main burner does
NOT fire...
Jump across each
high limit and remove
jumper
Replace high limit that
caused heater to fire
Remove both "TH"
wires from gas valve.
component short to
cabinet or low gas
pressure
is released
Relight pilot
If burner does not remain
lit, attach millivolt meter
and read pilot output.
If below 500mV, check
gas pressure. Also check
for insects or debris in
the pilot burner
If output is still low,
replace pilot generator.
If pilot burner
does not light
Check gas supply, gas
line size, gas pressure.
Also check for insects
or debris in pilot output.
If above 500mV,
replace gas valve
40
Raw Output (700mV± 100)
1
Pilot generator disconnected from valve (knob must
be held down to keep pilot on).
White – Negative
Red + Positive
Pilot Load (500mV± 100)
2
Pilot generator connected to valve-Power applied to
pilot solenoid.
TP(Thermopile-Robertshaw)
PP(Power Pile-Honeywell)
TH TP – Common
TH PP – Common
Main Valve Load (200mV± 100)
3
Control/Limit circuit closed (All switches "ON")
TP(Thermopile-Robertshaw)
PP(Power Pile-Honeywell)
TH TP – Common
TH PP – Common
Page 41
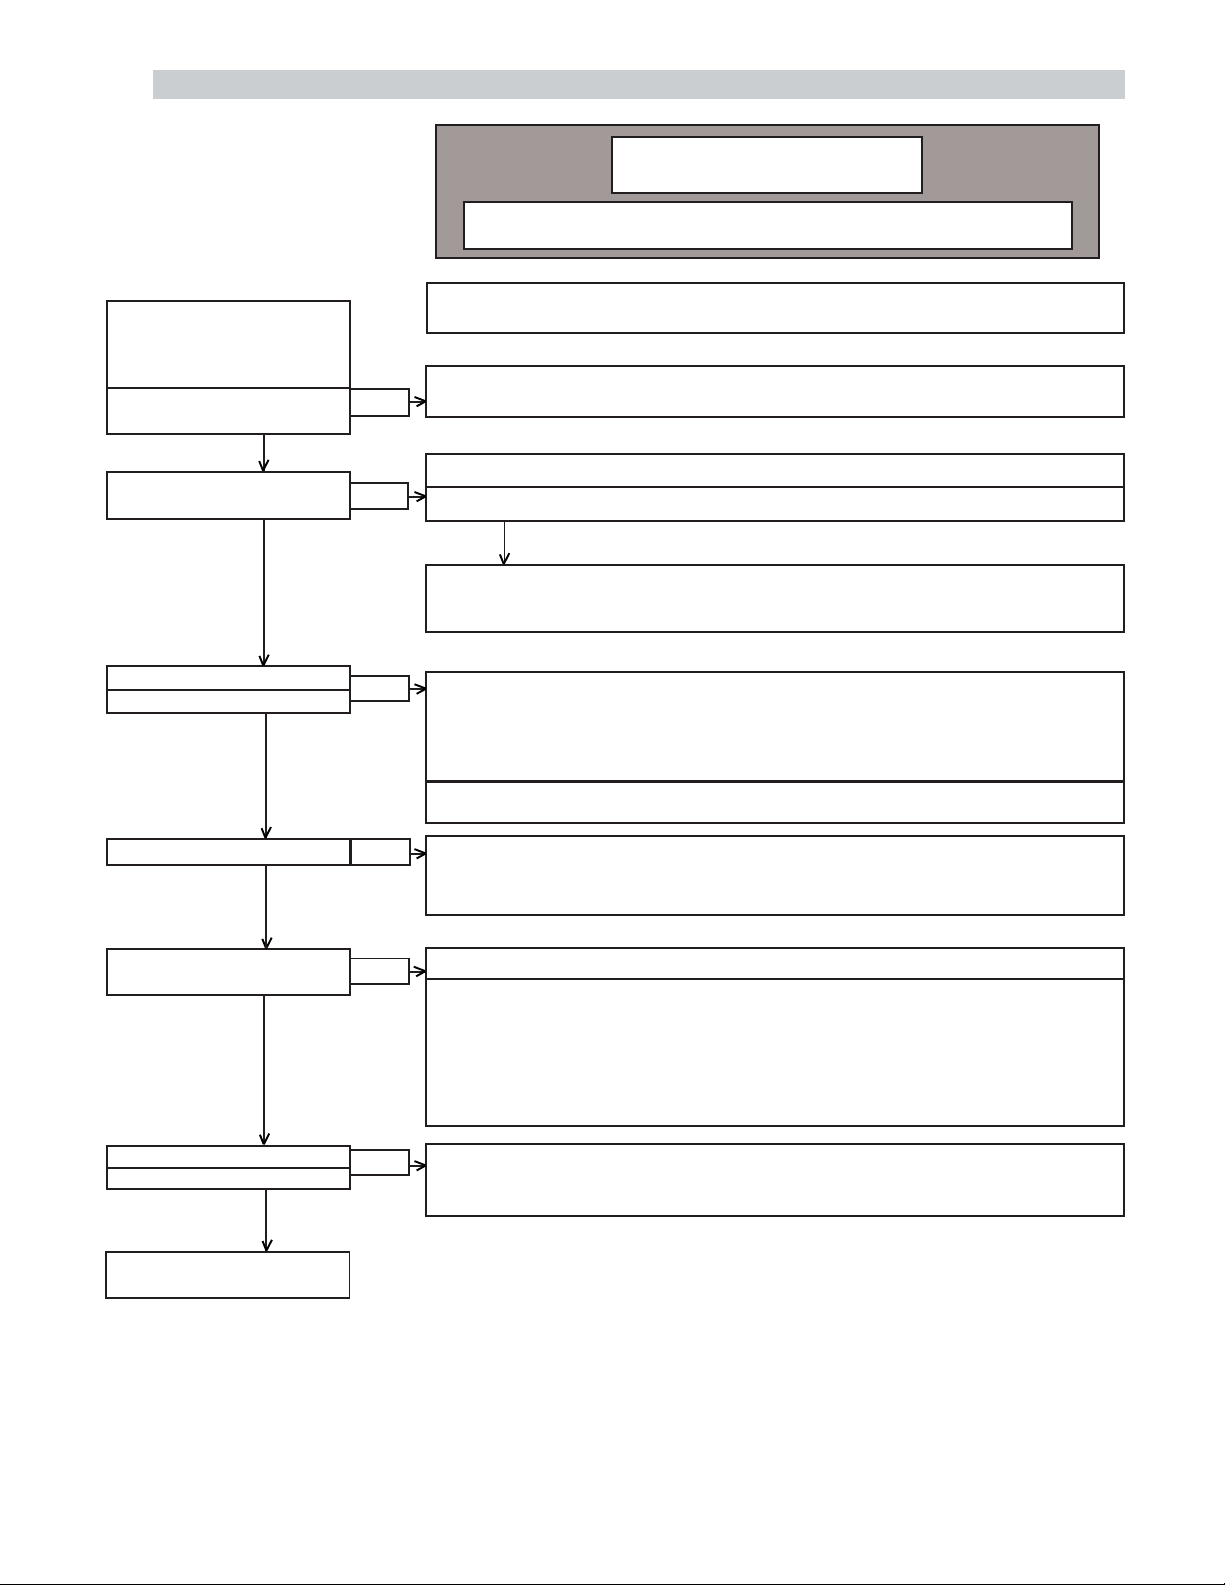
ELECTRICAL (ELECTRONIC IGNITION IID) TROUBLESHOOTING
WARNING HIGH VOLTAGE
For qualified technicians ONLY
NOTE: Some heaters may be equipped with an ignition module that shuts off pilot gas
if pilot fails to light. To reset, interrupt power to heater.
START
TURN GAS SUPPLY OFF.
TURN THERMOSTAT
(CONTROLLER) TO CALL
FOR HEAT
POWER TO PC BOARD?
(24 V NOMINAL)
YES
SPARK ACROSS
IGNITER/SENSOR GAP?
YES
TURN GAS SUPPLY ON
PILOT BURNER LIGHTS?
YES
MAIN BURNER LIGHTS?
YES
NO
NO
NO
NO
NOTE: Before troubleshooting, familiarize yourself with the start-up and checkout
procedure.
Check line voltage power, low voltage transformer, limit controller, thermostat
(controller) and wiring.
Pull ignition lead and check spark at PC board.
Spark Okay?
YES
• Check ignition cable, ground wiring, ceramic insulator and gap, and correct.
• Check boot of the ignition cable for signs of melting or buckling. Take protective
action to shield cable and boot from excessive temperatures.
• Check that all manual gas valves are open, supply tubing and pressures are good,
and pilot burner orifice is not blocked.
• Check electrical connections between PC board and pilot operator on gas control.
• Check for 24 Vac across PV-MV/PV terminals on PC board. If voltage is okay,
replace gas control; if not, replace PC board.
NOTE: If PC board goes into lockout, reset system. Lockout is used on L.P.G.
models.
• Check for 24 Vac across MV-MV/PV terminals. If no voltage, replace module.
• Check electrical connections between PC board and gas control. If okay, replace
gas valve or gas control operator, i.e. pilot gas valve, flow switch etc.
SYSTEM RUNS UNTIL
CALL FOR HEAT ENDS?
YES
CALL FOR HEAT ENDS
SYSTEM SHUTS OFF?
YES
TROUBLESHOOTING
ENDS
NO
NO
Repeat procedure until trouble free operation is obtained.
NOTE: IF PC board goes into lockout, reset system.
• Check continuity of ignition cable and ground wire.
NOTE: If ground is poor or erratic, shutdowns may occur occasionally even though
operation is normal at the time of checkout.
• Check that pilot flame covers flame rod and is steady and blue.
• If checks are okay, replace PC board.
• Check for proper thermostat (controller) operation.
• Remove MV lead at module; if valve closes, recheck temperature controller and
wiring; if not, replace gas valve.
41
Page 42

DIGITAL CONTROL LOGIC - FLOW CHART
42
Page 43

SECTION 6 - REPLACEMENT PARTS
NOTE: To supply you with the correct part it is impor-
tant that you supply the model number, serial number
and type of gas when applicable.
Any part returned for replacement under standard company warranties must be properly tagged with a Raypak
return parts tag, completely filled in with the heater serial
number, model number, etc., and shipped to the Company freight prepaid.
If determined defective by the Company and within
warranty, a like part or equal substitution will be returned,
freight collect. Credit will not be issued.
RAYPAK, INC.
2151 Eastman Avenue
Oxnard, CA 93030
For Canada:
RAYPAK CANADA LTD.
2805 SLOUGH STREET
MISSISSAUGA, ONTARIO
L4T 1G2
43
Page 44

ILLUSTRATED PARTS LIST
44
Page 45

LOW NOx BURNER TRAY
PILOT ASSEMBLIES
7-P
10-P
Honeywell IID Atmospheric units
for units produced prior to 06/01/2000
8-P
6-P
1-P
4-P
9-P
2-P
Fig. #8124
5-P
2-P
4-P
7-P
10-P
9-P
Honeywell IID Low NOx and Atmospheric units
for units produced after to 06/01/2000
Use KIT Number 008155F for Low NOx units
Use KIT Number 002003F for Atmospheric units
Fig. #9369
3-P
9-P
Honeywell MV Fig. #8107
45
Page 46

464748
Page 47

Page 48
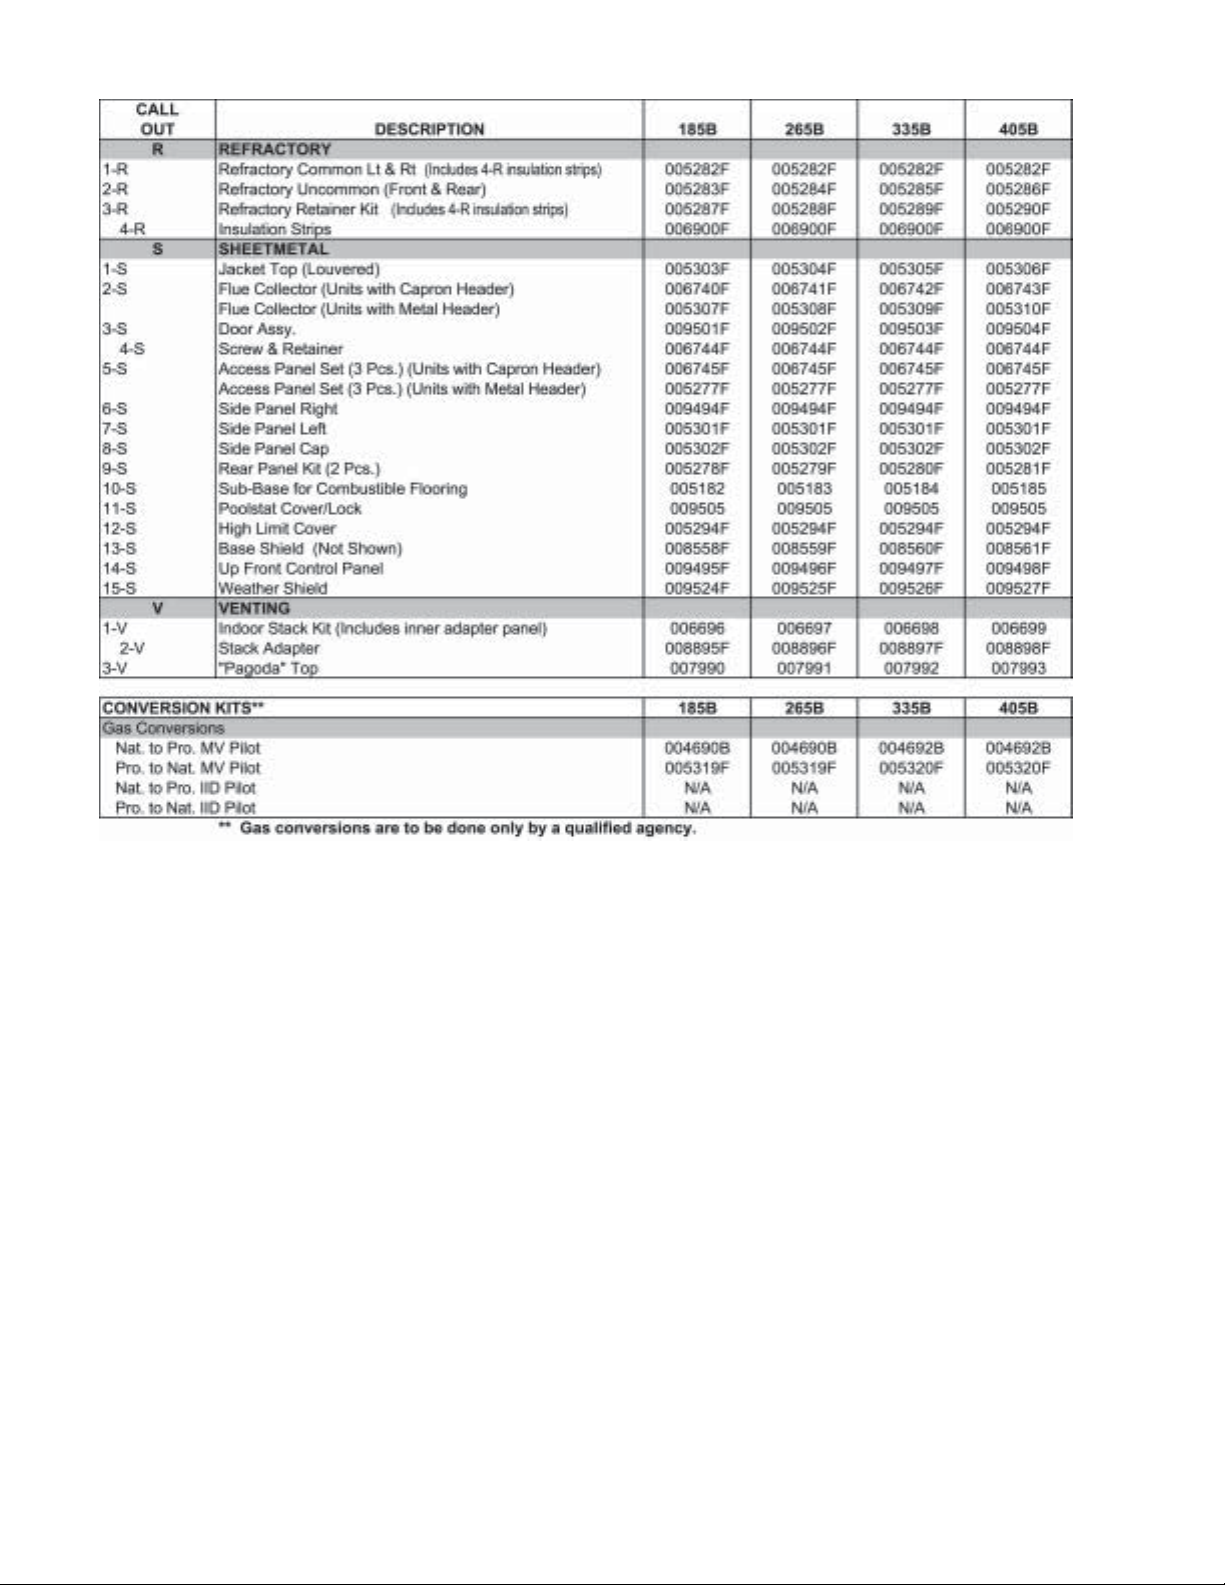
Page 49

Page 50

Page 51

51
Page 52

www.raypak.com
Raypak, Inc., 2151 Eastman Avenue, Oxnard, CA 93030 (805) 278-5300 Fax (800) 872-9725
Raypak Canada LTD, 2805 Slough Street, Mississauga, Ontario, Canada L4T 1G2 (905) 677-7999 Fax (905) 677-8036
Litho in U.S.A.
 Loading...