

Page 1
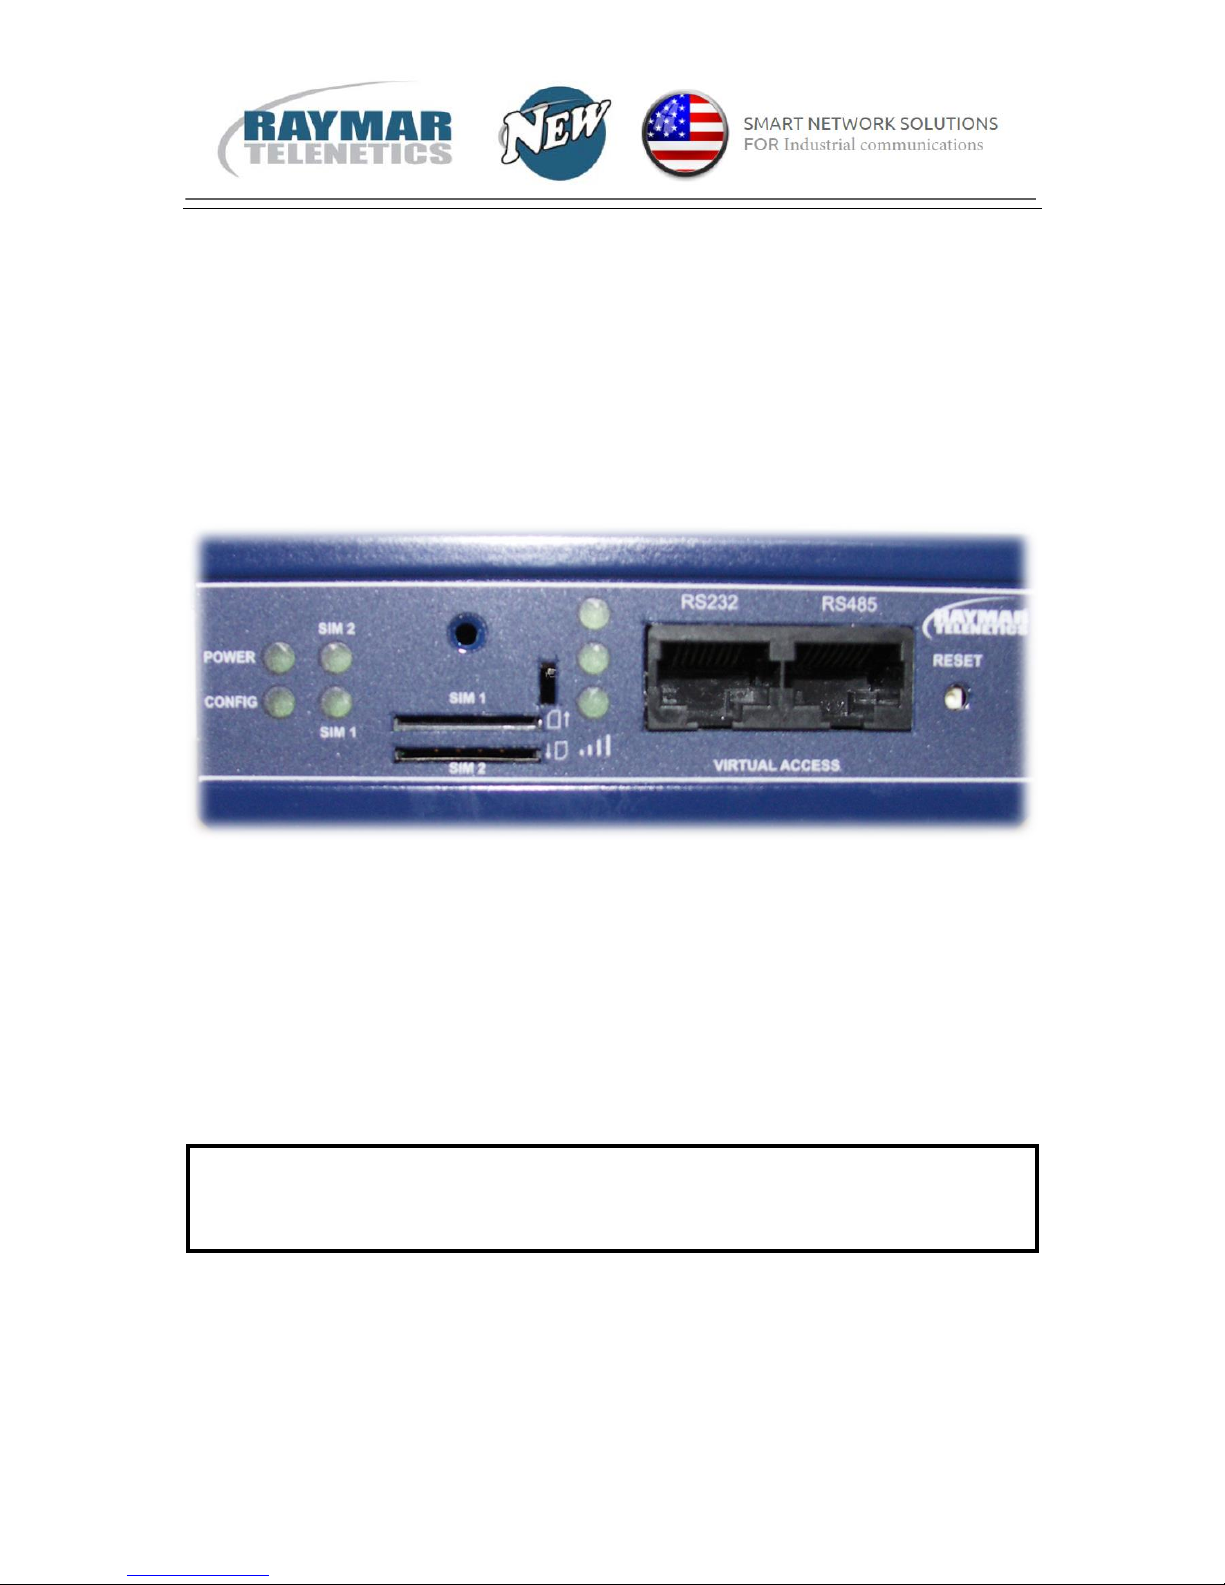
Raymar RT20xx Series
Quick Start Guide
Page 2

Table of Contents
Raymar RT20xx Series Quick Start Guide
Issue: 1.2 Page 2 of
15
1 Preface .................................................................................................... 3
1.1 Safety instructions ................................................................................. 3
1.2 Electrical safety ...................................................................................... 3
1.3 Wireless safety ....................................................................................... 3
1.4 Product disposal ..................................................................................... 4
2 Introduction ............................................................................................ 5
2.1 4G LTE .................................................................................................... 5
2.2 GPRS ...................................................................................................... 5
2.3 HSPA+ .................................................................................................... 5
2.4 HSDPA .................................................................................................... 5
2.5 HSUPA .................................................................................................... 5
2.6 UMTS ...................................................................................................... 5
2.7 EDGE ...................................................................................................... 5
2.8 CSD in EGSM900/GSM1800 MHz ............................................................. 6
3 Getting started ........................................................................................ 7
3.1 Serial number ......................................................................................... 7
3.2 Inserting the SIM card ........................................................................... 7
3.3 Connecting the antenna ......................................................................... 7
3.3.1 Antenna diversity ................................................................................... 8
3.4 Connecting the power supply ................................................................. 8
4 LED behaviour ......................................................................................... 9
4.1 Main LED behaviour ................................................................................ 9
4.2 Ethernet port LED behaviour ................................................................ 10
5 Configuring the RT20xx for 3G/4G access ............................................. 11
6 Firmware updates information .............................................................. 14
7 Troubleshooting .................................................................................... 15
Page 3

Table of Contents
Raymar RT20xx Series Quick Start Guide
Issue: 1.2 Page 3 of
15
1 Preface
1.1 Safety instructions
The router is complicated electronic equipment that may be repaired only by authorised
and qualified personnel.
Do not try to open or repair the router yourself.
Do not place the router in a damp or humid place.
Do not stack the router.
The router should be used in a sheltered area, within a temperature range of 0oC
to 40oC.
Do not expose the router to direct sunlight.
HIGH VOLTAGES
Under no circumstances is the router to be operated with the cover removed.
DANGEROUS SUBSTANCES
Semiconductor devices contain dangerous substances, such as beryllium and arsenic.
Electronic devices must not be opened. If they become damaged, they must only be
handled using protective gloves. If the substances inside the electronic devices come into
contact with broken skin or wounds, hospital care must be sought immediately.
Electronic components must be disposed of as hazardous toxic waste and must not be
incinerated.
1.2 Electrical safety
The RT20xx Series router is a class I/II apparatus.
We recommend that an AC surge arrestor is installed in the AC outlet to which this
equipment is connected.
Plug in the power supply into a socket outlet that is installed near the equipment and is
easily accessible.
1.3 Wireless safety
Wireless routers incorporate a wireless radio module. Ensure the antenna is positioned at
least one metre away from you and other people in normal operation.
If in a hospital or health care facility, do not use the router in areas where guidelines to
switch off mobiles phones are posted. Medical equipment may be sensitive to RF energy.
The operation of cardiac pacemakers, other implanted medical equipment and hearing
aids can be affected by interference from wireless routers when placed close to the
device. People with pacemakers are advised to keep the wireless router away from the
pacemaker while it is on.
Do not operate your wireless router in the presence of flammable gases, fumes or
potentially explosive atmospheres. Wireless routers should not be used anywhere that
blasting operations are taking place.
Page 4
Table of Contents
Raymar RT20xx Series Quick Start Guide
Issue: 1.2 Page 4 of
15
Wireless routers operate using radio signals and cellular networks cannot be guaranteed
to connect in all possible conditions. Therefore, you should not rely solely on any wireless
device for life-critical communications.
1.4 Product disposal
The United Kingdom and Republic of Ireland are under an obligation to minimise the
disposal of Waste Electrical and Electronic Equipment (WEEE) in domestic waste and
encourage recycling, recovery and environmentally sound disposal. Raymar is committed
to promoting the reuse, recycling and recovery of WEEE by contributing to the
appropriate compliance schemes.
Our product packaging is marked with the crossed out wheeled bin symbol to indicate
that the product must not be disposed of in domestic waste but disposed of through an
approved WEEE take back scheme. For details of your local collection facilities, please
contact your local authority.
Raymar WEEE registration number: WEE/CA2530XZ.
Page 5

2: Introduction
Raymar RT20xx Series Quick Start Guide
Issue: 1.2 Page 5 of
15
2 Introduction
This configuration guide explains how to set up and configure a 3G connection on a
Raymar RT20xx Series router.
3G is the third generation of mobile phone standards and technology. It is based on the
International Telecommunication Union (ITU) family of standards under the International
Mobile Telecommunications programme, IMT-2000.
3G and 4G technologies enable network operators to offer users a wider range of more
advanced services while achieving greater network capacity through improved spectral
efficiency. Services include wide-area wireless voice telephony, video calls, and
broadband wireless data, all in a mobile environment.
The RT20xx Series can contain either a 3G or 4G wireless modem. The modem together
with a SIM card establishes a WAN connection to the Internet or private network.
Data bearers are frame protocols that transport data streams. The GSM (3G) modem
supports GPRS, Edge, HSDPA, HSUPA, UMTS and CSD. The 4G modem supports 4G
frequencies and fails over to 3G, GPRS and EDGE technologies.
2.1 4G LTE
4G LTE is the fourth generation of mobile communication technology standards. It is a
successor to 3G and provides greater bandwidth.
2.2 GPRS
GPRS (General Packet Radio Service) uses packet-switched technology to transmit small
bursts of data. The 3G or 4G modem on the RT20xx Series supports multi-slot class 6,
which allows a maximum data rate of 384Kbps class 3. The maximum data rate available
to the 3G or 4G modem depends on provisioning by the network operator.
2.3 HSPA+
High-Speed Packet Access + is an improvement on UMTS with achievable download
speeds of 21Mbps
2.4 HSDPA
HSDPA (High-Speed Downlink Packet Access) uses circuit-switched technology to
transmit data at speeds of up to 7.2Mbps.
2.5 HSUPA
HSUPA (High-Speed Uplink Packet Access) is a 3G mobile protocol with uplink speeds of
5.76Mbps
2.6 UMTS
UMTS (Universal Mobile Telecommunications System) is a third generation technology
providing higher transfer rates.
2.7 EDGE
EDGE uses the same frequencies as GPRS but offers better speeds. It is used when the
signal strength for 3G or 4G is not sufficient.
Page 6

2: Introduction
Raymar RT20xx Series Quick Start Guide
Issue: 1.2 Page 6 of
15
2.8 CSD in EGSM900/GSM1800 MHz
CSD (Circuit-Switched Data) mode enables the 3G modem to transmit data over the
EGSM (Extended Global System for Mobile communications) frequency or the GSM
frequency. The modem behaves as a dual-band mobile phone behaves
Page 7
3: Getting started
Raymar RT20xx Series Quick Start Guide
Issue: 1.2 Page 7 of
15
3 Getting started
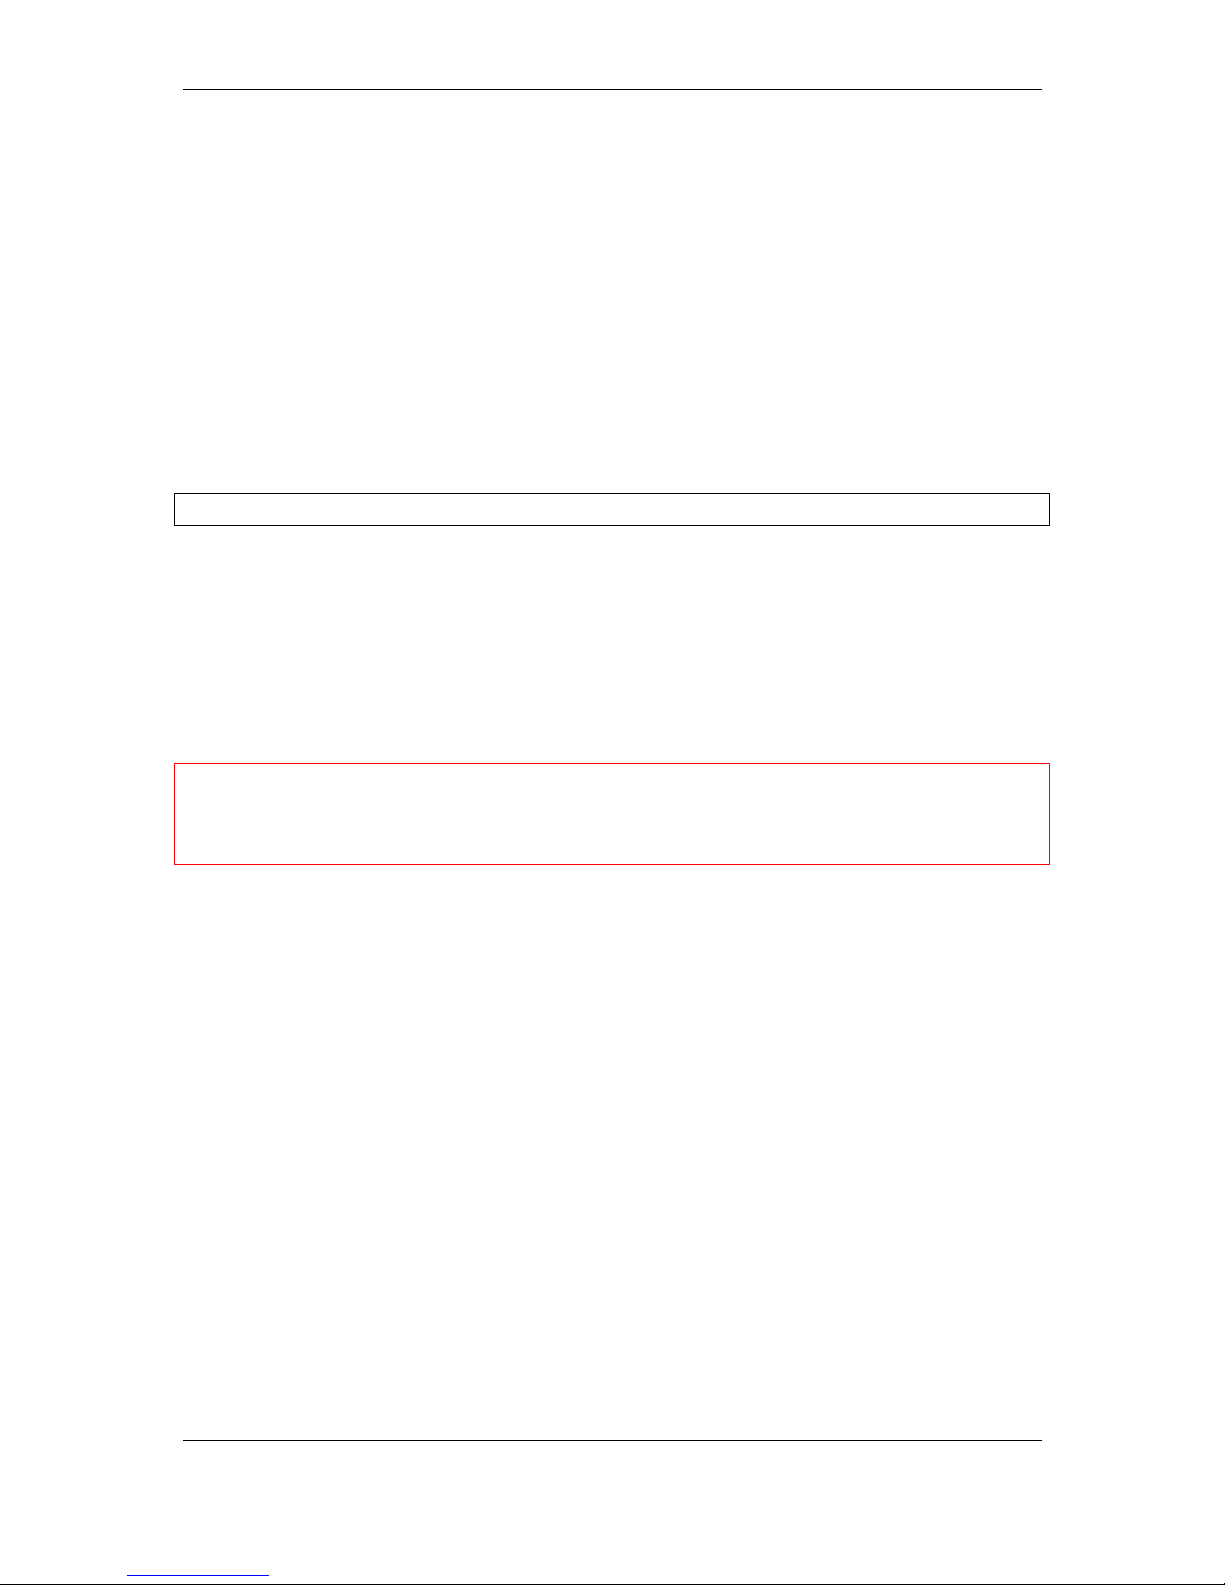
Note: images in this document show the RT2021 model. LEDS on other models may
vary.
3.1 Serial number
When you receive your RT20xx Series router package retain the outer packaging. The
label containing the model number, serial number (S/N) and part number (P/N) is located
on the side of the packaging box.
Each RT20xx Series router is assigned a unique serial number. Record your device serial
number on your warranty card or somewhere you can easily access it. You must
reference your unique serial number (S/N) when you contact Raymar support for
installation and configuration confirmation or should you request service on the device.
Unpack the contents. There is a matching label located on the bottom of the router.
3.2 Inserting the SIM card
1. Ensure the unit is powered off.
2. Hold the SIM card with the chip side facing down and the cut corner top left.
3. Gently push the SIM card into SIM slot 1 until it clicks in.
4. To remove the SIM card, gently push the SIM card. The card will click out.
WARNING
The SIM card MUST be inserted into the router before the unit is powered on.
Do not insert or remove the SIM card after the unit has been powered on.
3.3 Connecting the antenna
The RT20xx Series router is shipped with one antenna suitable for the model you
ordered. If you require antenna diversity, contact your reseller.
Screw the antenna into the back MAIN SMA connector.
Page 8

3: Getting started
Raymar RT20xx Series Quick Start Guide
Issue: 1.2 Page 8 of
15
3.3.1 Antenna diversity
The RT20xx Series router has an AUX connector for connection of a second antenna to
allow for antenna diversity. Antenna diversity helps improve the quality and reliability of
a wireless link by mitigating problems associated with multipath distortion.
Multipath distortion is a form of RF interference that occurs when a radio signal has more
than one path between the receiver and the transmitter. It commonly occurs when there
is no clear line of sight between the transmitter and receiver and instead the signal is
reflected off hard surfaces such as shelves, ceilings and walls.
3.4 Connecting the power supply
1. Plug the power cable into an electrical socket suitable for a DC12V/1A power
supply.
2. The router initialises. The Power LED lights green, the CONFIG LED flashes, and
all the LEDs temporarily light in sequence. Then the router activates.
Page 9
4: LED behaviour
Raymar RT20xx Series Quick Start Guide
Issue: 1.2 Page 9 of
15
4 LED behaviour
4.1 Main LED behaviour
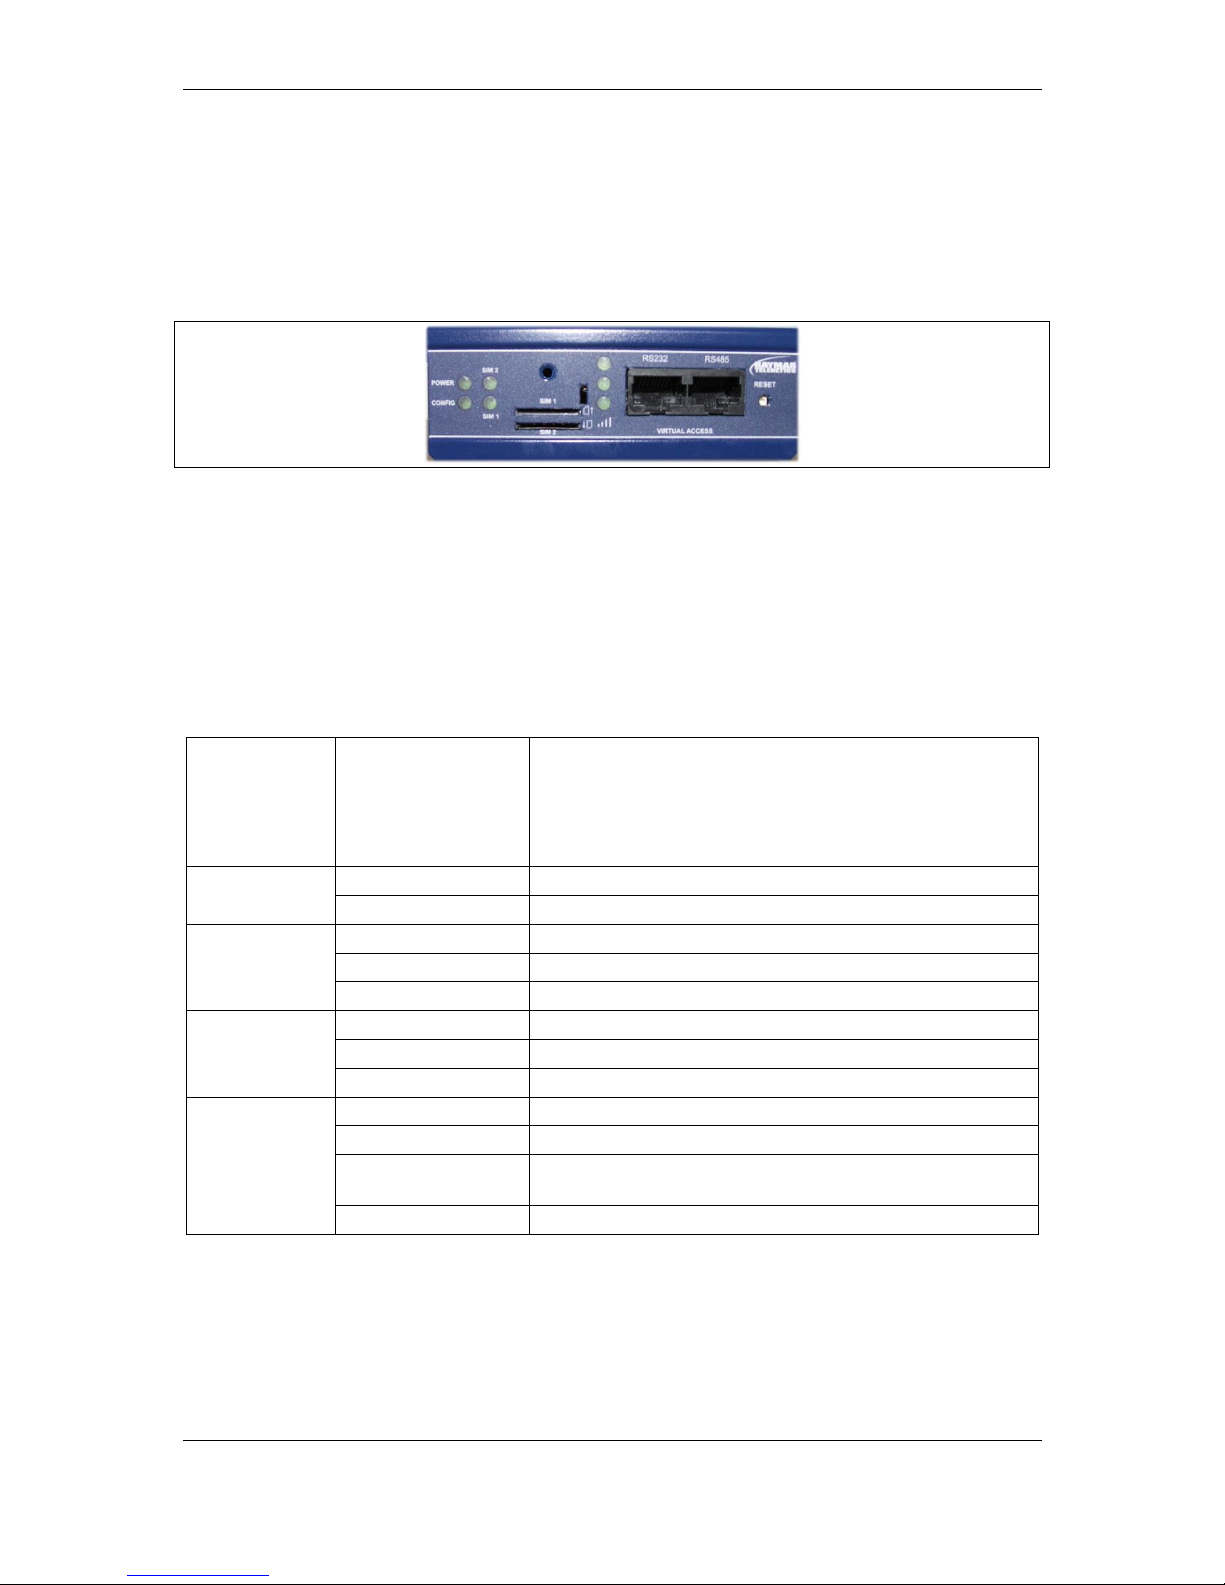
The RT20xx Series router has single colour LEDs for power, config and signal strength.
When the router is powered on, the LED is green.
Figure 1: Power and config LED activity on a RT20xx model: power and config are on
The possible LED states are:
Off
Flashing slowing
Flashing quickly
On
The following table describes the possible LED behaviour and meaning.
Booting
The RT20xx router takes approximately 2 minutes to
boot up. During this time, the power LED is SOLID.
Other LEDs display different diagnostic patterns.
When start up is complete all LED activity will stabilise,
indicating the unit is ready.
Power LED
On
Power
Off
No power/boot loader does not exist
Config LED
On
Unit running a valid configuration file
Flashing slowly
Unit running in recovery mode (5 Hz)
Flashing quickly
Unit running in factory configuration (2.5 Hz)
SIM LEDs
On
SIM selected and registered on the network
Off
Not selected or SIM not inserted
Flashing
SIM selected and not registered on the network
Signal LEDs
None
PPP not connected or signal strength <= -113dBm
1
PPP connected and signal strength <= -89dBm
2
PPP connected and signal strength between -89dBm and
-69dBm
3
PPP connected and signal strength >-69dBm
Table 1: LED behaviour and descriptions
Note: When PPP is not connected, none of the signal LEDs will light regardless of signal
strength.
Page 10
4: LED behaviour
Raymar RT20xx Series Quick Start Guide
Issue: 1.2 Page 10 of
15
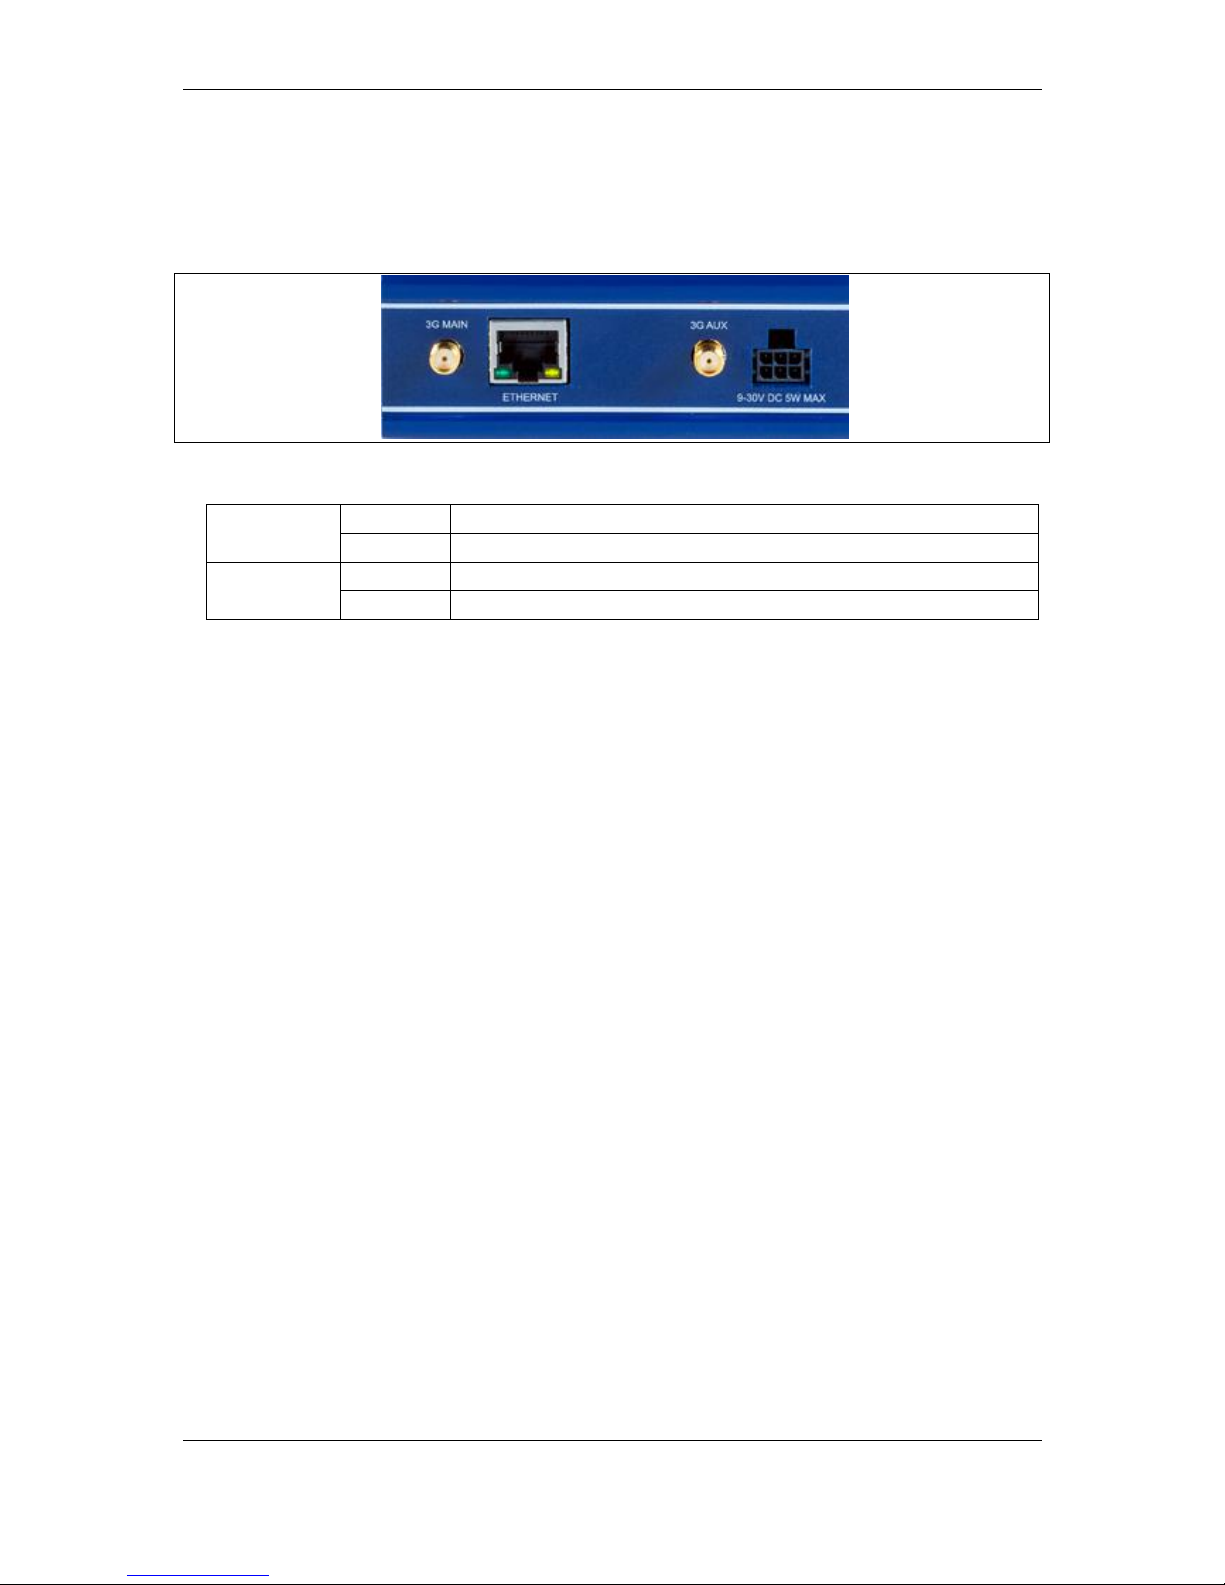
4.2 Ethernet port LED behaviour
The Ethernet port has two LEDs: a LINK LED (green) and an ACT LED (amber). When
looking at the port, the LED on the left hand side is the LINK LED, and the ACT LED is on
the right hand side.
Figure 2: Ethernet LED activity on the rear of a RT2021 router
Link LED
(green)
Off
No physical Ethernet link detected
On
Physical Ethernet link detected
ACT LED
(amber)
Off
No data is being transmitted/received over the link
Flashing
Data is being transmitted/ received over the link
Page 11
5: Configuring the RT20xx for 3G/4G access
© Raymar 2013
Raymar Raymar RT20xx Series Quick Start Guide
Issue 1.2 Page 11 of 15
5 Configuring the RT20xx for 3G/4G access
1. Ensure the SIM is inserted into SIM 1 slot and that the power is connected to the
router.
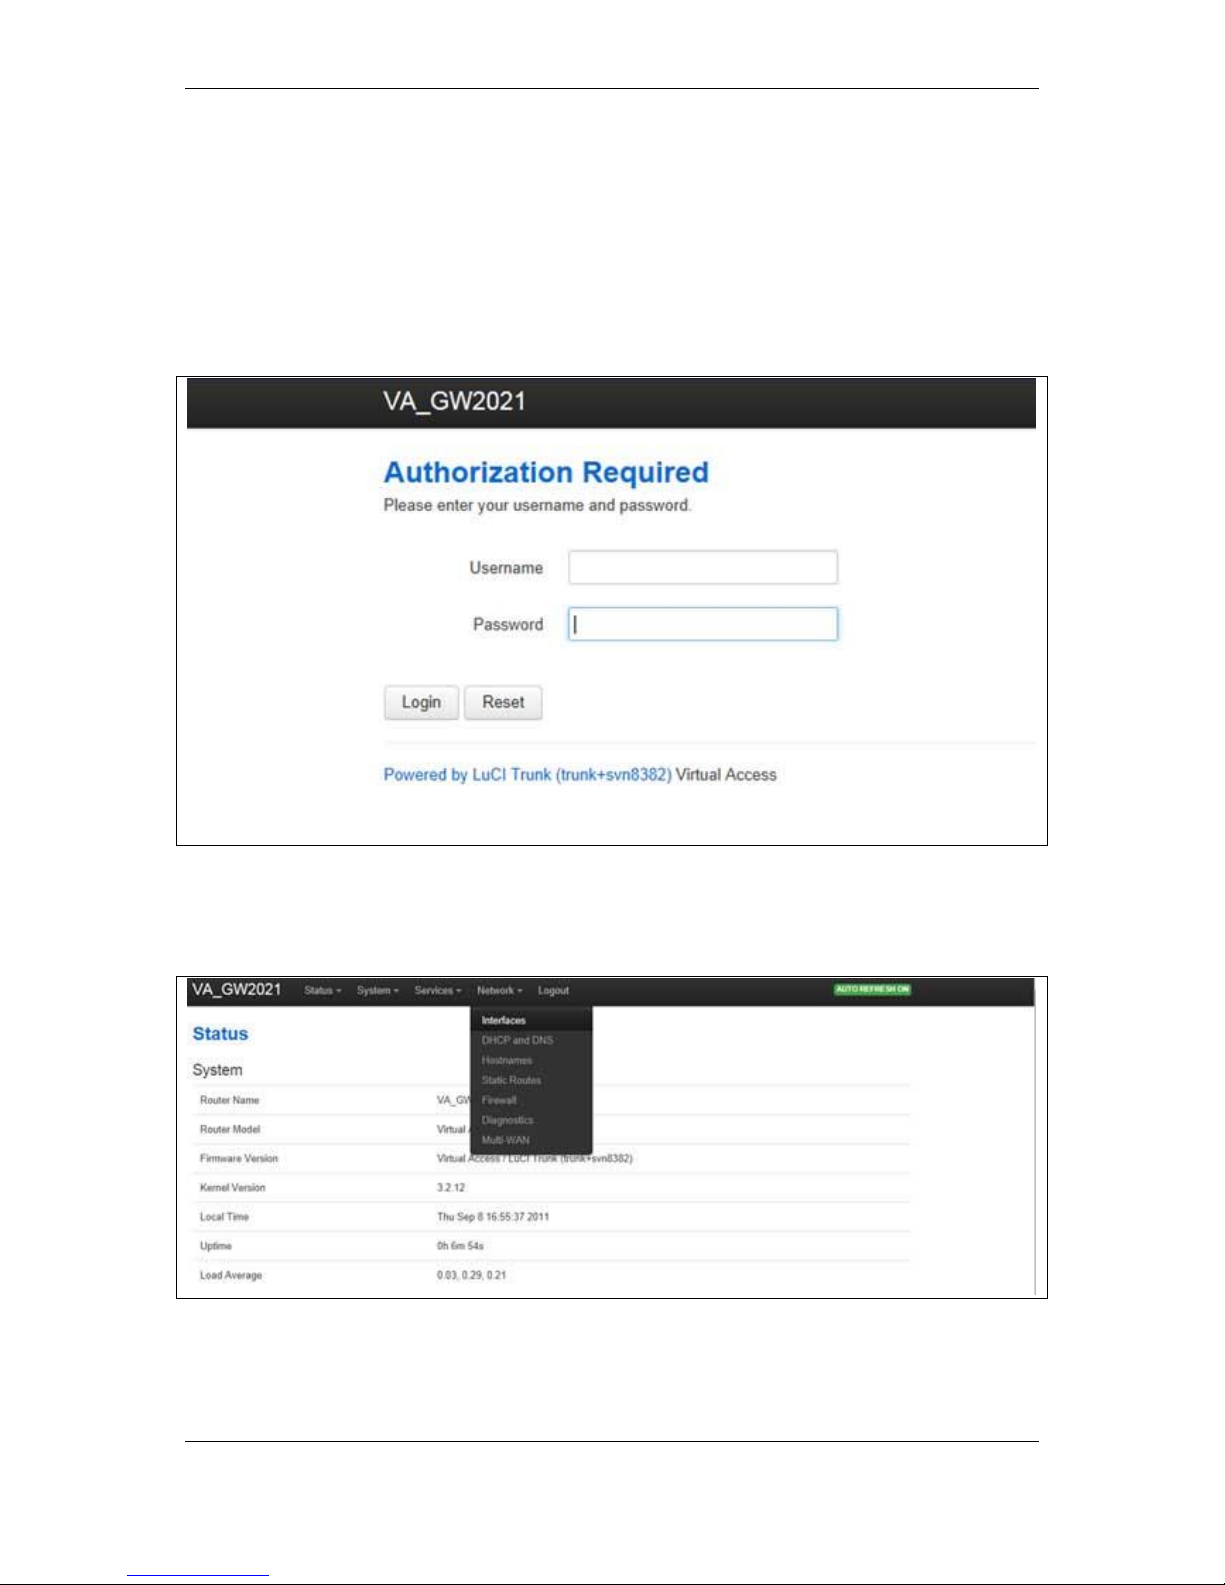
2. When the router has booted up, browse to 192.168.100.1 and enter the default
user name and password.
User name: root
Password: admin
Figure 3: The RT20xx login page
3. Click Login.
4. In the top menu, select Network -> Interfaces.
Figure 4: The RT20xx interfaces menu
5. Click Edit on WAN or LAN to make your changes.
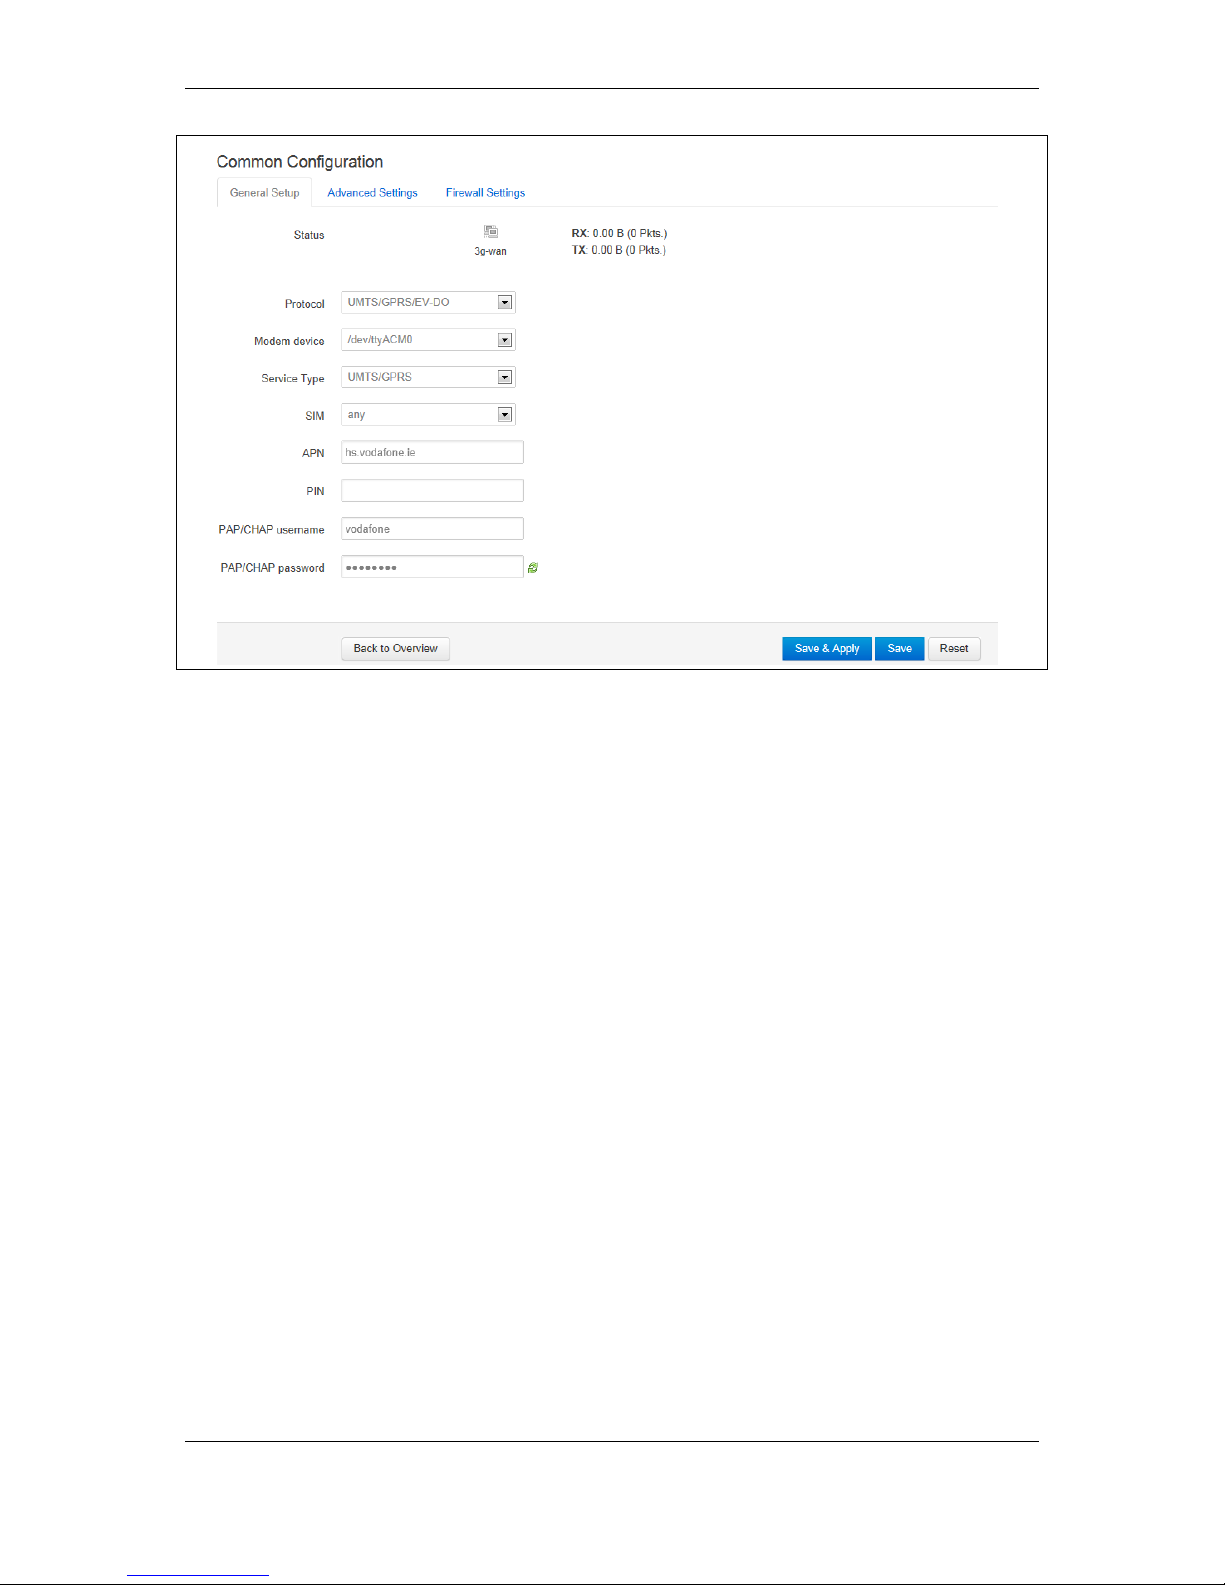
For WAN connectivity, the Common Configuration page appears.
Page 12
5: Configuring the RT20xx for 3G/4G access
© Raymar 2013
Raymar Raymar RT20xx Series Quick Start Guide
Issue 1.2 Page 12 of 15
Figure 5: The common connectivity page
6. Ensure the General Setup tab is selected.
7. For single SIM implementation, in the SIM drop down menu, select SIM 1.
8. Enter the APN information and the PAP/CHAP username and password.
9. Click Save & Apply.
10. To enable 3G/4G connection to connect on boot up, select the Advanced Settings
tab.
11. Select Bring up on boot.
12. Click Save & Apply.
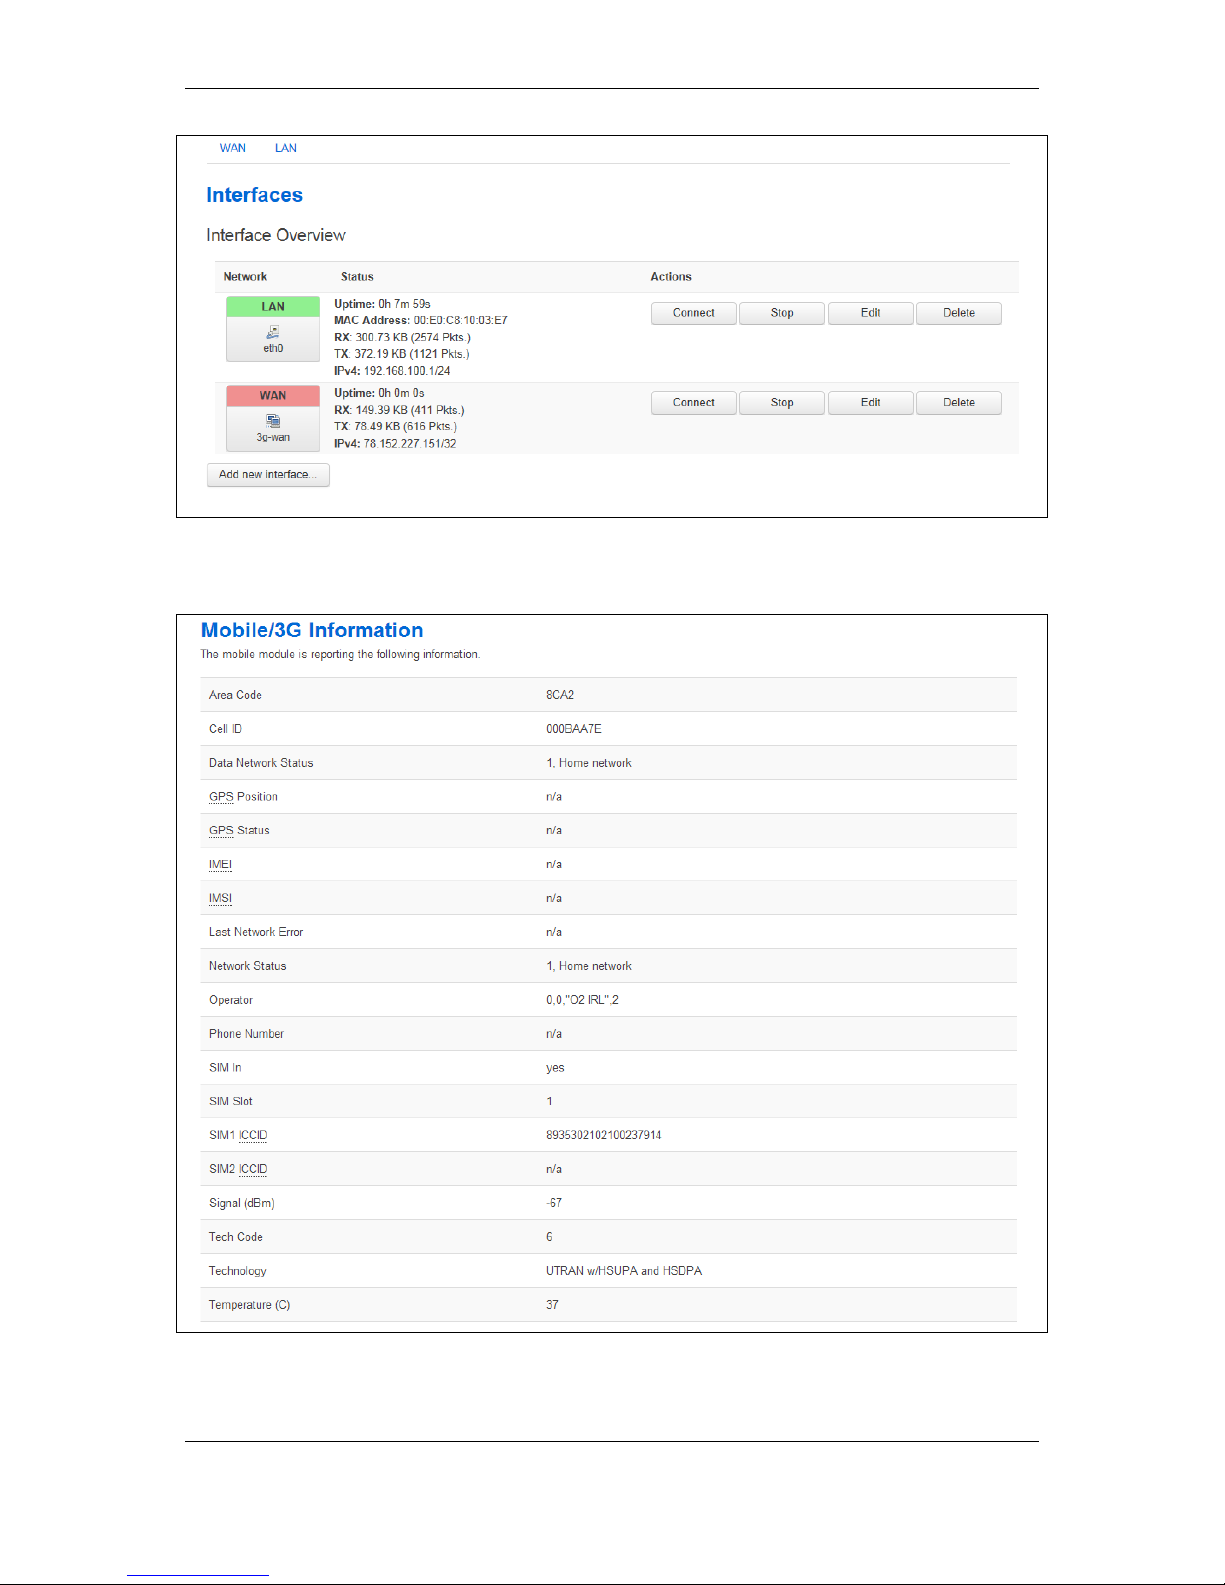
13. To check for connectivity, return to the top menu, and under Network ->
Interfaces, the WAN interface will show receive and transmit packets and an IP
address.
Page 13
5: Configuring the RT20xx for 3G/4G access
© Raymar 2013
Raymar Raymar RT20xx Series Quick Start Guide
Issue 1.2 Page 13 of 15
Figure 6: The interfaces overview page
14. To view 3G/4G connectivity information, browse to Status -> Mobile Stats.
Figure 7: The 3G/4G information page
Page 14

6: Firmware updates information
© Raymar 2013
Raymar Raymar RT20xx Series Quick Start Guide
Issue 1.2 Page 14 of 15
6 Firmware updates information
To obtain firmware updates for your RT20xx Series router, contact your reseller.
Page 15

7: Troubleshooting
© Raymar 2013
Raymar Raymar RT20xx Series Quick Start Guide
Issue 1.2 Page 15 of 15
7 Troubleshooting
Problem
Possible causes
Solution
I cannot access the RT20xx
The configured IP address or
subnet, or both on your PC is
incorrect.
Change the IP on your PC to
contact the RT20xx on
192.168.100.1/24
The RT20xx is not running its
factory configuration.
Check the config LED status.
Flashing indicates its running
its factory configuration. If it
is solid, hold in the reset
button for between 3 and 15
seconds and then release.
I cannot access the WAN
network after manual
configuration
The SIM is not inserted.
Power off the RT20xx, insert
the SIM card and then power
on the RT20xx.
The APN is incorrect.
Check the correct APN has
been configured.
SIM username or password, or
both are incorrect.
Check the correct SIM
username and password
settings.
There is a connection failure.
Check the status of
Connection Monitor by, from
the Start page, browsing to
>Advanced > Connection
monitor.
The router performance is
slow.
There is poor 3G signal
strength.
Check the signal strength by,
from the Start page, browsing
to Status > 3G Info. Move
the RT20xx to a better
location and recheck signal
strength
 Loading...