


Main technical contents:
U-LILY Size:
L: 28.5cm × W: 28.5cm × H:6.7cm(with protecon cover)
U-LILY weight: 150 gram
Flying distance: 50-80 meters
Charging me: About 120 minutes
Flying me: 9-11 minutes
Baery:
Quadcopter Baery(Built-in): 3.7V/1000 mAh Li-po baery inside
Transmier Baery: 4*AA baery (Not including)
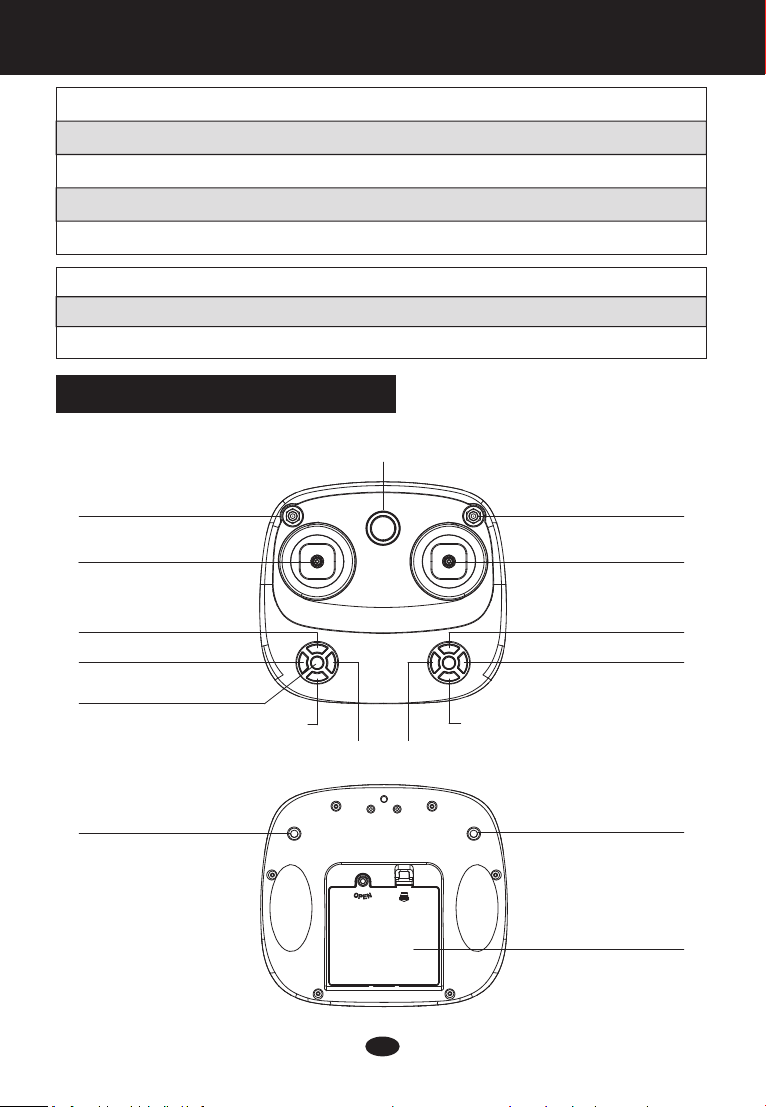
2.4G transmier instrucon:
On/off switch
Headless mode
Throle/Rudder
Light control
Turn le trim
(Forward/Backwar/Right/Le)
One key return
Elevator/Aileron
Forward trim
Right side fly trim
One key unlock/Landing
Fast/slow speed
Take video/photo
Short press:take photo
Long press: take video
(VGA/480P wifi camera
without this funcon)
Backward trim
Turn right trim Le side fly trim
2
Front/Back/Le/Right Flip
Required 4*AA baery
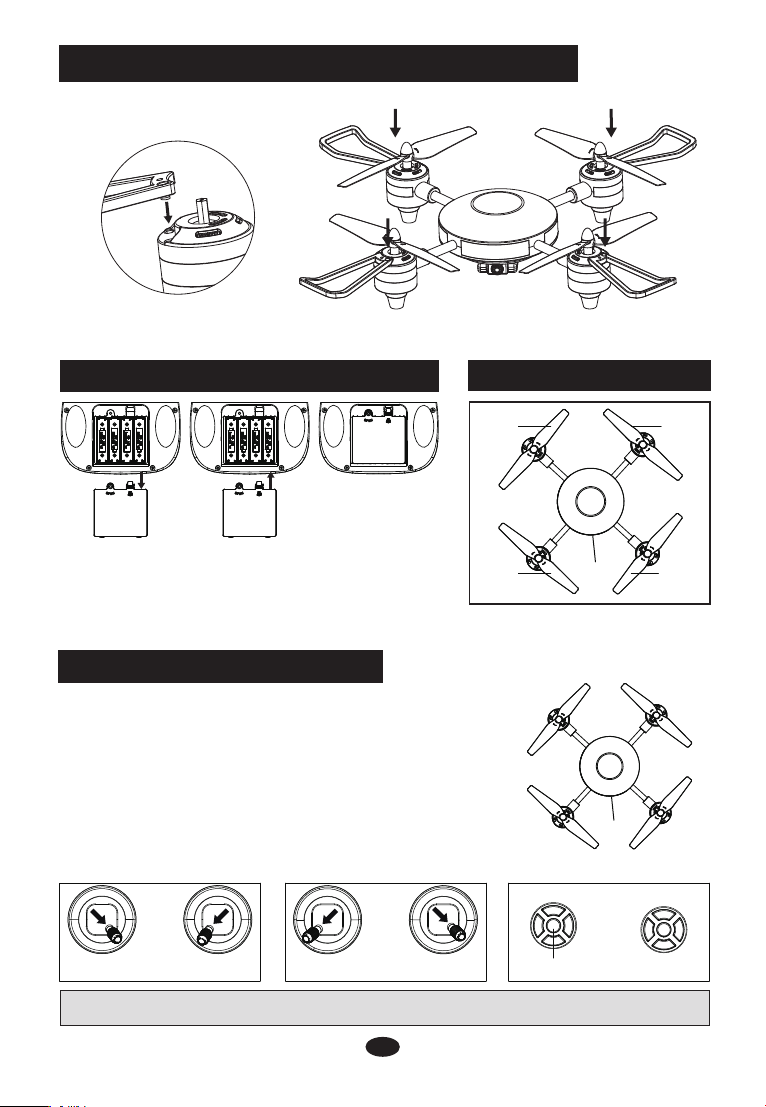
Protecon cover installaon instrucons:
Base on figure to install protection cover, and use screw to fix it.
Remote control installation instructions:
25.400 25.400
(figure 1) (figure 2) (figure 3)
1. Use screwdriver to open the battery cover(figure 1)
2. Base on the instruction in the battery slot to
Blade installaction location:
bladeA
bladeB
Front
back
Power
switch
bladeB
bladeA
put battery(figure 2)
3. Tighten the screws in battery cover(figure 3)
Frequency connect/Unlock:
1. “Front”“Back”as the right figure, Place quadcopter on
level ground, put quadcopter’s head in front. Back aim
at transmitter.
2. Turn on the botton prower switch, quadcopter’s light flash.
3. Open the transmitter switch, push the throttle stick,
then pull down the throttle stick, the transmitter’s indicator
light will be stable, the quadcopter’s light also stable,
it means frequency connect sucessfully.
4. Following figures shows three ways unlock. Four paddles
will be rotate slowly when quadcopter unlock, it means unlock sucessfully.
back
Front
Power
switch
Throle/Rudder
(turn)
Noted: After unlock, if do not do any operation, about 10 seconds, motor will be stop
automatically. If need to quick stop after start, just re-do unlock operation.
Front/back/Le /
right side fly rudder
Throle/Rudder
(turn)
right side fly rudder
One key unlock/landingFront/back/Le /
3

Flying operaon introducon:
Hover up and down Forward and backward
Front
Push the throttle up or down, the
quadcopter flies upward or downward.
Turn le and right
Pull the throttle left or right, the
quadcopter nose turns to left or right.
Fine-tuning operaon:
Forward/Backward fine-tuning
Front
Up
Down
Sideward fly fine-tuning
Left Right
Push the elevator/aileron up or down,
the quadcopter flies forward or backward.
Le side fly and right side fly
Pull the elevator/aileron left or right,
the quadcopter flies to left side or right
side.
When the quadcopter keeps flying forward/
backward, you can correct it by pressing
fine-tunning button down/up.
When the quadcopter keeps flying sideward,
you can correct it by pressing fine-tuning
button left/right.
Turn le/right fine-tuning
Anti-Clockwise Clockwise
Left Right
When the quadcopter keeps rolling/head
move left/right, fix it by pressing fine-tuning
button left to right/right to left.
4
4

Environment for flight:
Please have good practice before go to flight.
Distance of 3M
Distance of 3M
Distance of 2.5M
Distance of 2M
Distance of 3M
Baery charging using instrucon:
1. Battery installation: 1. Clockwise rotate to open battery door.
2. Battery's plug insert to quadcopter's plug.
3. Put battery into battery socket,then make well line and plug.
4. Battery door " " mark aim to the bottom of the drone
" "mark(figure1), counterclockwise to cover battery door.
2. Battery charging: remove the battery from drone, battery plug aim to USB adopter
to charge(Figure2). Remark: It will has LED red light on adopter when charge, after 120
minutes it will be off when charge completely. (Noted: For safe, pls charge within sight.)
3. During the normal flight, if drone light flash rapidly, it means need to replace
the battery/re-charge the battery.
Warning on Li-poly baery:
When charging, please put the drone on a dry area and keep it far away from
heat source or explosive divices.
After flying, please do not charge the battery if the surface temperature is still not
cool. Otherwise it may cause a swollen battery or even a fire hazard.
Please make sure that you use the original adopter provided with the drone and
When the battery has been used for a long time, or appears to be swollen, please
replace them.
If not in use for a long time will lose its charge automatically charging or
discharging too often may reduce its life.
open
Battery
1 2
Battery
3 4
door
close
Battery
door
3.7V1000mAh
Li-po baery
USB charger Charger
(Excluded)
(Figure2)(Figure1)
Headless mode operaon instrucon:
1. Headless mode function instruction:
The functioning of headless mode is pretty simple.
Only pre-requisite is that before taking off,
you’re required to position the drone in such a
way that its front is your front. Since yaw (the
left stick) anyway doesn’t have anything to do
with orientation(left is left and right is right all
the time, regardless of where your drone is pointing
at), it is how the drone reacts to rudder(the right
stick)that changes. In other words, even when
you turn your drone 90 degrees to the left.
2. How to set headless mode:
Base on”Reset operation introduction”third steps to reset headless mode firstly.
Push down the headless mode button before/after quadcopter fly to open
headless mode.
5
Front Front
Turn Turn
Front
Front

Reset opertaion introducon:
1.Transmitter reset: When transmitter cannot control quadcopter normally, pls turn
off transmitter, then re-turn on transmitter, transmitter will reset automatically.
2.Quadcopter reset: When quadcopter cannot fly normally,
also the transmitter already reset, at this time, you can try
to reset the quadcopter. Reset way: Place the quadcopter
on the level ground, turn on, after frequency connect, pull
down transmitter rudder to left, keep 2-3 seconds, wait
quadcopter light turn flash to stable(Figure 1).
3.Headless mode adjust: If need to turn on headless mode
Throle/Rudder(tun)
Front/back/Le /
right side fly Rudder
(Figure 1)
during play before quadcopter fly up, must adjust
headless mode first(Must adjust headless mode for every
time flight). Adjust way: Place quadcopter on the level
ground, head in front, back aim to controller before turn
on quadcopter, frequency connect, then pull down
transmitter rudder to right, keep 2-3 seconds, wait
quadcopter light turn flash to stable(Figure 2).
Throle/Rudder(tun)
Front/back/Le/
right side fly Rudder
(Figure 2)
Main spare parts:
up
down
A B
Part-01
Motor Cover up and down
3.7V/1000 mAh Li-po battery
Part-04
Part-07
Motor upper cover Motor down cover
Part-10 Part-12
Main Motor(Red/Blue Wire) Main Motor(Black/White Wire)
Part-13
Cellphone Holder
Part-02
Protection Guard
Part-05
Battery Cover Transmitter
Part-08
Part-11
6
Part-03
Blade A/B
Part-06
Part-09
RCB
Blade Cover


 Loading...