

Page 1
Mobile Accessibility for the Visually Impaired
RAY VISION User Guide
Version 4.0
Page 2

RAY User Guide About This User Guide
Important Notice
Important Notice
Important NoticeImportant Notice
Copyright © 2014-2016 by Project RAY Ltd. All rights reserved.
All intellectual property rights in this publication are owned by Project RAY Ltd. and
protected by applicable copyright laws and international treaty provisions. Project
RAY Ltd. retains all rights not expressly granted. No part of this publication may be
reproduced in any form whatsoever or used to make any derivative work without
prior written approval by Project RAY Ltd.
Project RAY Ltd. reserves the right to revise this publication, and/or make
improvements or changes in the product(s) and/or the program(s) described in
this documentation at any time without prior notice. The information in this
document is provided in good faith. However, it is provided without any warranty
that it is accurate or complete and on the express understanding that Project RAY
Ltd. shall have no liability whatsoever to other parties in any way arising from or
relating to the information or its use.
Any product described in this publication is furnished under a license agreement.
Android is a trademark of Google Inc. Use of this trademark is subject to Google
Permissions. All other trademarks or registered trademarks are the property of
their respective owners.
Support and Contacting Information
Support and Contacting Information
Support and Contacting InformationSupport and Contacting Information
For technical support of our products, please contact us at:
Email: [email protected]
2
Page 3

RAY User Guide About This User Guide
About This User Guide
Thank you for choosing RAY as your mobility tool. RAY is a Smartphone especially
designed for blind and visually impaired users.
This user guide contains the following chapters:
•
Chapter 1, Introducing RAY, page 7, introduces RAY’s functionality, the
services that it provides and the Android Smartphone platform on which it
runs.
•
Chapter 2, Getting Started with RAY, page 12, describes how to get
started using RAY, make your first call and turn RAY off. This chapter also
describes how to access the RAY Wizard which provides various lessons and
practice sessions describing how to use RAY.
•
Chapter 3, RAY Interface Basics, page 25, introduces the basic concepts,
finger gestures and screen types of RAY’s user interface.
•
Chapter 4, Using RAY, page 41, describes each of the services available
from the Home Menu in detail.
•
Chapter 5, Remote Control and Configuration, page 67, describes how
your family and friends can help you control and configure RAY from your
personal RAY web page on the Internet.
3
Page 4

RAY User Guide Table of Contents
Table of Contents
Important Notice ....................................................................................... 1
Support and Contacting Information ........................................................... 2
About This User Guide.................................................................... 3
Table of Contents ........................................................................... 4
Introducing RAY ............................................................................ 7
What is RAY? ......................................................................................... 7
The RAY Device ...................................................................................... 9
Remote RAY Support ........................................................................... 10
Getting Started with RAY ............................................................. 12
Preparing to Use RAY .......................................................................... 12
Charging RAY .......................................................................................... 12
Connecting RAY ...................................................................................... 13
Device Activation ..................................................................................... 14
Powering On RAY .................................................................................... 14
Making a Call ....................................................................................... 15
Entering a Number .................................................................................. 20
Turning RAY Off ................................................................................... 22
Sleep Mode ............................................................................................. 22
Powering Off RAY .................................................................................... 22
Power Menu ............................................................................................ 23
How Do You Know Whether RAY is on? .................................................... 24
RAY Interface Basics .................................................................... 25
Introducing the RAY Interface ............................................................ 25
Basic Interface Concepts .......................................................................... 25
Basic Finger Gestures .............................................................................. 27
KEYPAD and Tactile keys alternative ......................................................... 27
RAY Screen Types ................................................................................ 28
RAY Menu Screens .................................................................................. 28
RAY List Screens ..................................................................................... 31
RAY Management Screens ....................................................................... 34
RAY Keyboard Screen .............................................................................. 37
4
Page 5

RAY User Guide Table of Contents
Text Entry Using Speech Recognition ........................................................ 38
Configurable Menu Options ................................................................. 40
Using RAY .................................................................................... 41
Speed Dialing ....................................................................................... 42
Telephone ............................................................................................ 44
Dialing a Number .................................................................................... 45
Answering/Rejecting a Phone Call ............................................................ 46
Calling a Contact ..................................................................................... 46
Calling Using Speech Recognition ............................................................. 47
Entering a New Contact ........................................................................... 49
Favorites ................................................................................................. 50
Messages ............................................................................................. 51
Sending a Message .................................................................................. 52
Listening to a Message ............................................................................ 52
Library.................................................................................................. 54
My Library .............................................................................................. 55
Magazine Catalog .................................................................................... 56
Books Catalog ......................................................................................... 58
Calendar ............................................................................................... 59
Location ............................................................................................... 61
Events .................................................................................................. 63
More ..................................................................................................... 64
Remote Control and Configuration .............................................. 68
Introduction......................................................................................... 68
Accessing Your RAY Web Page ............................................................ 69
RAY Web Page Options ........................................................................ 70
Change Password .................................................................................... 70
Update Personal Details ........................................................................... 70
Upload Music .......................................................................................... 70
Device Management ................................................................................ 71
Library Periodicals/ Library Books ............................................................. 71
Contacts ................................................................................................. 71
Calendar ................................................................................................. 71
RAY Remote Visual Assistance ............................................................ 71
5
Page 6

RAY User Guide Table of Contents
Blank page for double-sided printing
6
Page 7
RAY User Guide Introducing RAY
1
Introducing RAY
This chapter introduces RAY’s functionality, the services that it provides and the
Android Smartphone platform on which it runs.
What is RAY?
RAY is an integrated portable system designed to assist the community of visually
impaired people and their families in their daily life. RAY leverages the latest
mobility technologies to increase independence, enrich social life and improve
accessibility of essential services for the visually impaired.
The RAY mobile system provides a unique user interface on an Android platform
that is especially designed for the visually impaired. Its special design and
functionality enable non-sighted users to interact with it by touching its screen,
use a built-in or attached keypad, feeling vibrations and listening to sounds.
RAY is available as a standalone application you can download and install on any
Android device (OS version 4.2 and above). It is also available on a number of
different smartphones models, pre-configured for out-of-a-box experience.
To download and install RAY VISION application, go to Google Play Store and look
for ‘RAY app for the visually impaired”
(https://play.google.com/store/apps/details?id=com.ray.manager ).
The RAY devices are available to buy over the Internet at Project Ray web site,
Amazon and eBay; or from local distributers as listed on Project Ray website.
For simplicity purpose, all device related examples and descriptions are related to
the RAY N5 device which is based on Google Nexus 5. Application capabilities and
screen images are similar across all models and devices.
7
Page 8

RAY User Guide Introducing RAY
RAY puts the following rich variety of services and applications at your fingertips:
•
Book/Magazine Subscription and Reading Services
Connecting directly to online library services
Downloading online audio content
Reading audio content with speed control
•
Telephony Services
Dialing numbers in your Contacts List
Reading out the name or number of incoming calls (caller ID)
Managing contacts directly on RAY or from a website at home
•
Messages: Receiving, reading and answering out text messages related to
SMS messaging, Email, WhatsApp and other social networks.
•
GPS and Location Finder: Reading out your current location using GPS
•
Device Status: Reading out the device status, battery usage and network
information
•
Remote Support: Managing and controlling RAY remotely from a PC through
the Internet and getting real-time help from a remote mobile application
•
Various Services: RAY provides access to many helpful applications, such as
printed page scanning with read aloud (OCR), Banknotes Reader, Color
Detector, Calendar, Scheduler, recording service, tag readers and so on.
For additional and up-to-date information, check out our website
at www.project-ray.com.
8
Page 9
RAY User Guide Introducing RAY
Speaker
Volume
Control
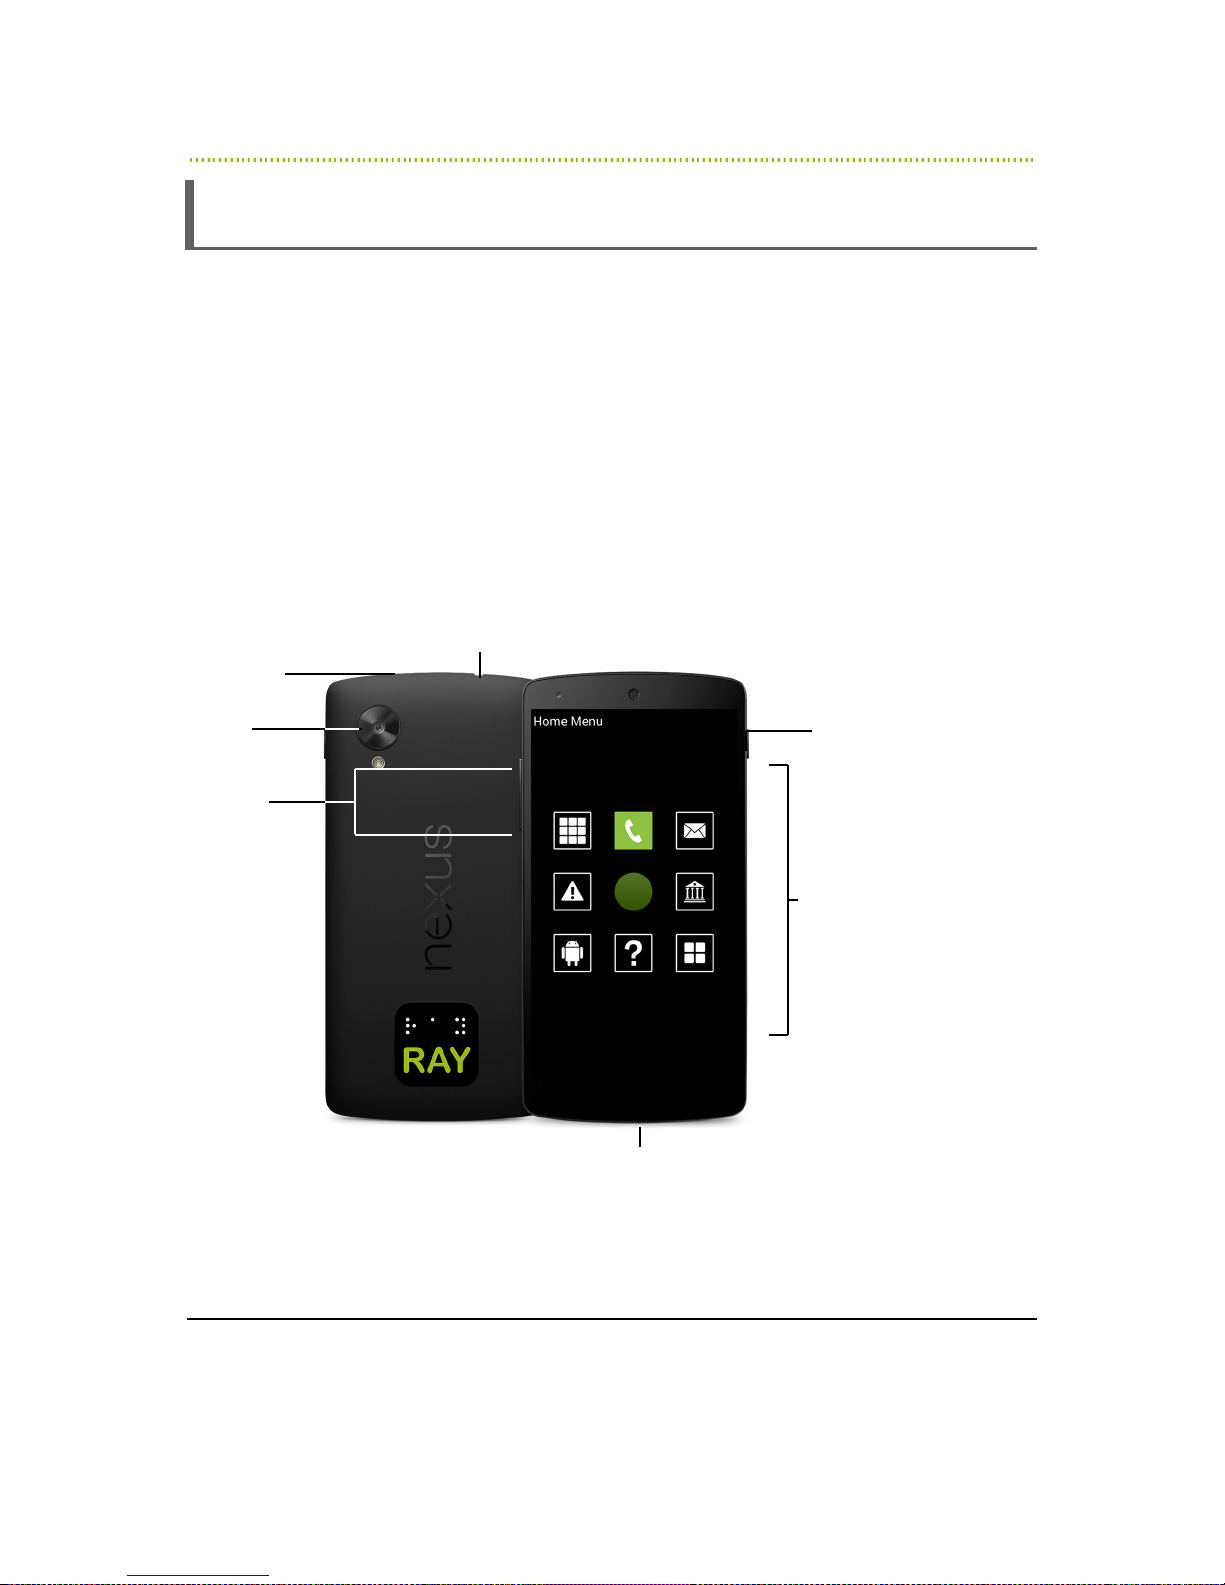
The RAY Device
A typical RAY phone includes ON/OFF button, Volume Control, Touch screen, Earphone port,
Charging port, Speakers and Camera lenses. In addition, several RAY models like the RAY E5
and the RAY L5 includes physical keypads for alphanumeric data entry and navigation keys.
The position of those keys on each device is different.
On the RAY N5 (based on Nexus 5) device -
The Power key is located on the top right side.
The Volume key is located on the top left side.
The Earphone port is on the top side.
The Charging port is at the bottom side of the device.
Hold the phone in the palm of either hand so that the tip of your index finger is
touching the top of the device. The camera lenses hole should be facing your hand
on the back of the phone.
Earphone Input Port
Camera
Charger Input Port
Figure 1: RAY Physical Description of a typical RAY device.
ON/OFF Button
Touch Screen
9
Page 10

RAY User Guide Introducing RAY
•
ON/OFF Button: The On/Off button is a small physical key located on the
top, right or left side of your device. A short press starts or ends power saving
(sleep) mode. A long press displays the Power menu from which you can turn
the device off, return to the Home menu, dial an emergency number and
more. You may refer to the
information.
•
Touch Screen: The glass surface on the front of RAY reacts to your touch,
finger movements and finger gestures, as described in the
RAY Interface
•
Volume Control: The Volume control is a large physical key with Volume up
and Volume down directions, located on the top, right or left side of your
device. Press the top of this control to increase volume, or the bottom of this
control to decrease volume.
•
Earphone Input Port: This is on the top, center of the phone.
•
Charger Input Port: This mini USB connector is standard with all Android
based devices and can be connected to a PC or electric outlet. It is found on
the side of the device towards the bottom.
•
Speaker
section on page 25.
Power Menu
section on page 23 for more
Introducing the
Remote RAY Support
RAY connects to both cellular and Wi-Fi networks just like any other standard
Smartphones. RAY must be connected to the Internet in order to provide remote
services, including:
•
Your Personal RAY Management Page: RAY automatically creates a
personalized web page for managing the RAY device through the Internet from
any computer. You, or any person that you authorize, can then use a user
name and password to remotely perform a variety of functions on the RAY
device, including the following:
Managing your Contacts List
Managing your Scheduler
Initiating a beeping sound on RAY
Displaying the geographic location of RAY
Uploading Music Periodicals and Books
And more
10
Page 11

RAY User Guide Introducing RAY
Your personal RAY management page can be accessed from the RAY web
page at www.project-ray.com by selecting the Login option (located in the top
right corner of the Home page). To enter, you will need unique user name
assigned to the device and password which is set by default to be “12345678”.
The user-id of your device, and your life-long identity in the RAY network, is
visible to a sighted person as a string in the form of an email address
displayed at the bottom of the HOME MENU. It is also available as a voice
announcement in the ‘Setting & Information’ menu item.
After opening the RAY system for the first time, you will receive a welcome
message, including credentials and access links to your email address.
•
Remote Visual Assistance – “Eye-Assist”: RAY also provides a remote
visual assistance service that enables family members and designated sighted
people to remotely control the device, locate its position on a map, and view
the video stream and camera images for a full remote assistance. To provide
the support, a sighted person should download the matching application
available in Google Play Store when searching for “RAY Eye Assist”
(https://play.google.com/store/apps/details?id=com.ray.remoteassistance ).
•
Automatic Backup and Restore: RAY is registered with your unique user
name and password. The system automatically backs up and stores the
current state of your RAY device through the Internet every few seconds. This
includes all your data, appointments, contacts and settings on your RAY. If
something happens to your RAY, you can restore a new RAY device with all
your latest information by simply logging in to a new RAY device with your
user name and password.
11
Page 12
RAY User Guide Getting Started with RAY
2
Getting Started with RAY
This chapter describes how to get started using RAY, make your first call and turn
RAY off. This chapter also describes how to access the RAY Wizard which provides
various lessons and practice sessions describing how to use RAY.
Preparing to Use RAY
Charging
Charging RAY
Charging Charging
►
To charge
To charge RAY
To charge To charge
1 Plug the provided AC power adapter into the charger input port on the bottom
of RAY, as shown in
2 Plug the AC power charger into a standard power outlet (mains socket).
Charging starts immediately.
3 If this is the first time that you are using RAY, then let it charge for a few
hours.
Note
When RAY’s battery level is low, it says Low Battery. You may refer to
page 65 for a description of how to check the battery charge level.
RAY
RAYRAY
RAY’s
’s internal battery
RAYRAY
internal battery::::
’s ’s
internal batteryinternal battery
Error! Reference source not found.
.
12
Page 13
RAY User Guide Getting Started with RAY
Connecting
Connecting RAY
Connecting Connecting
RAY can connect to a cellular and/or a Wi-Fi network.
In order to enable the remote control of the RAY device and the automatic backup
and storage of your RAY data, the RAY requires a connection to a cellular network.
This connection is available by simply subscribing to Internet access with your local
cell phone provider.
Note
Downloading music, periodicals and books from the library may require
significant amounts of bandwidth, which may use up your data package.
Therefore, RAY requires a Wi-Fi network in order to download books and
music. Other on-line connected tools like remote assistance can use Wi-Fi or
3G connections.
Wi-Fi can be set up using the Settings option in the More Menu, as
described in the
web page, as described on page 71.
►
To
To connect RAY to a
connect RAY to a cellular network
To To
connect RAY to aconnect RAY to a
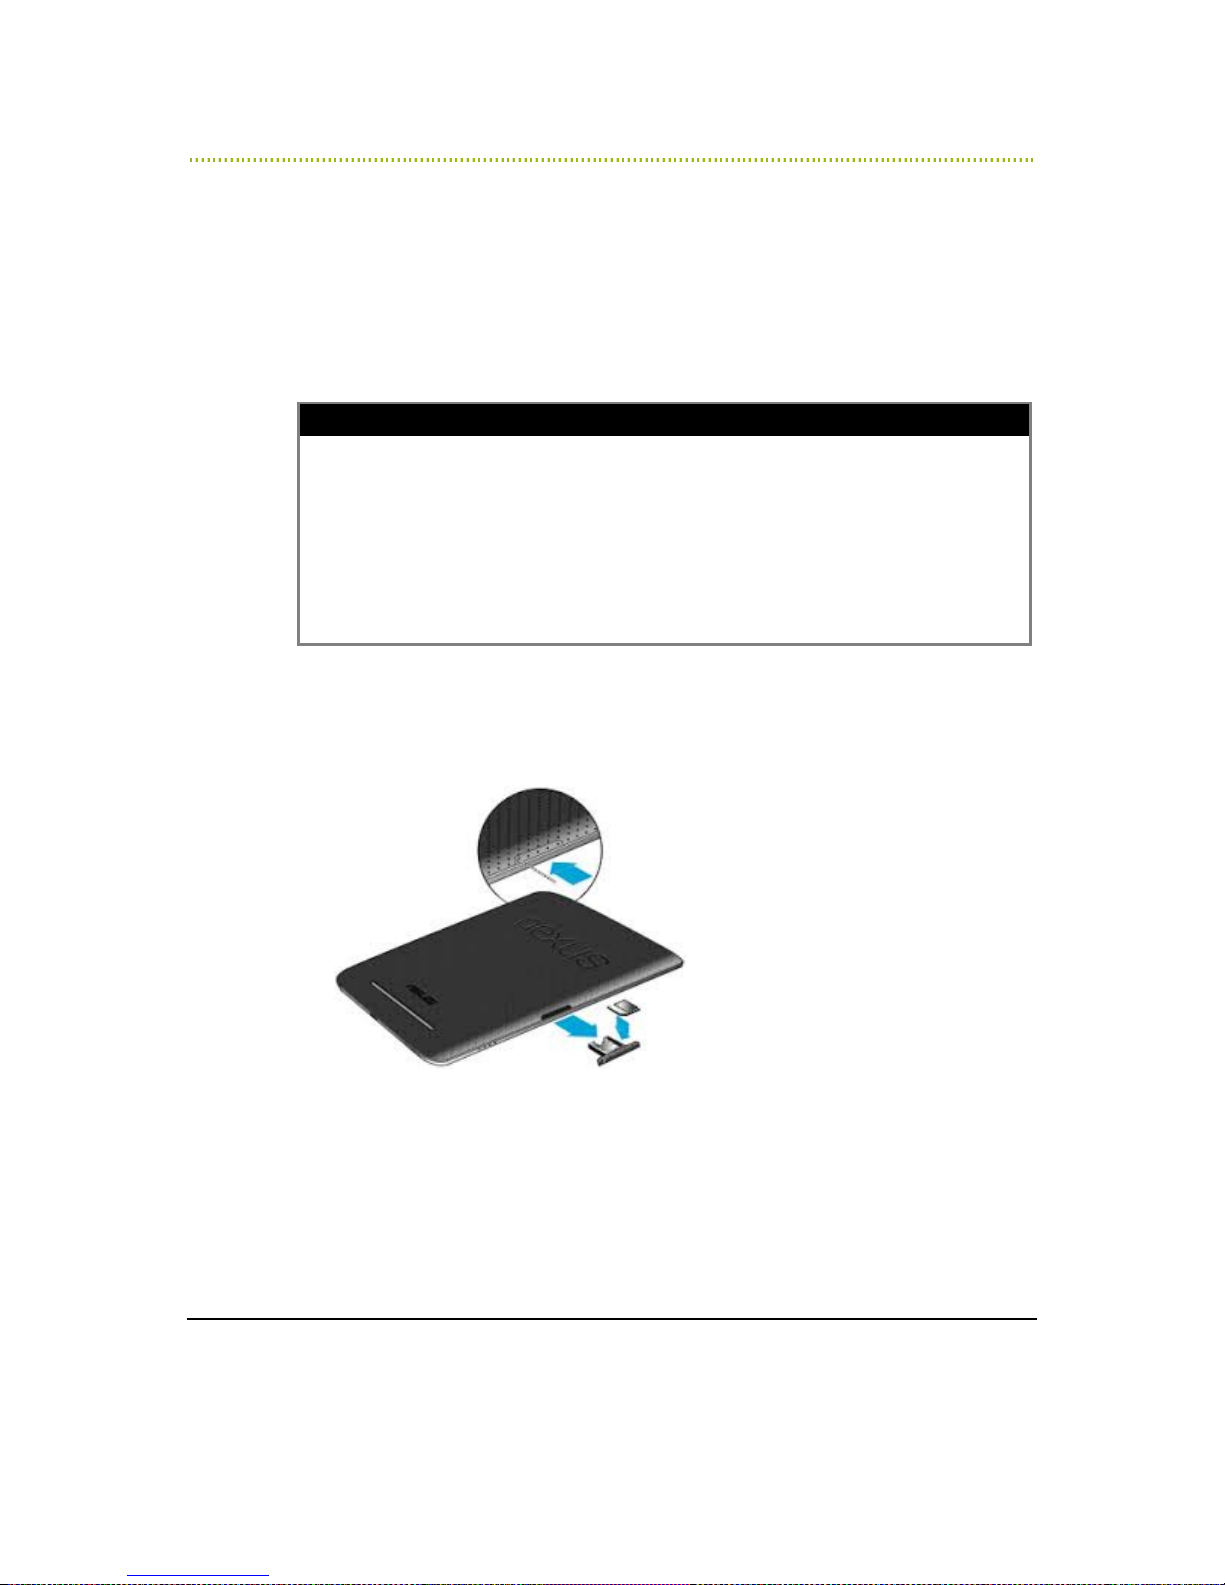
1 Insert a valid Micro-SIM card into RAY. The SIM card for RAY N5 (as an
example) should be inserted under the Power key on the left side of the
device, as shown below:
RAY
RAYRAY
More
section on page 66 or remotely from your personal
cellular network::::
cellular networkcellular network
Figure 2: Inserting a SIM Card
2 Subscribe to a cellular plan that includes voice calls, SMS services and a data
plan. A 3 GB per month data package is recommend and sufficient for regular
usage.
13
Page 14
RAY User Guide Getting Started with RAY
Device
Device Activation
Device Device
RAY must be activated within 30 days of the initial use with basic personal
information including name, email address and phone number. This will enable ongoing remote support and software updates for your RAY device.
The registration is done on the web through your personal web portal. After
activation is completed, you will receive a welcoming email containing your
personal User ID and password.
Powering
Powering On
Powering Powering
►
To power
To power on
To powerTo power
1 Long press the ON/OFF button on the top of RAY (shown in
Error! Reference source not found.) and wait a few
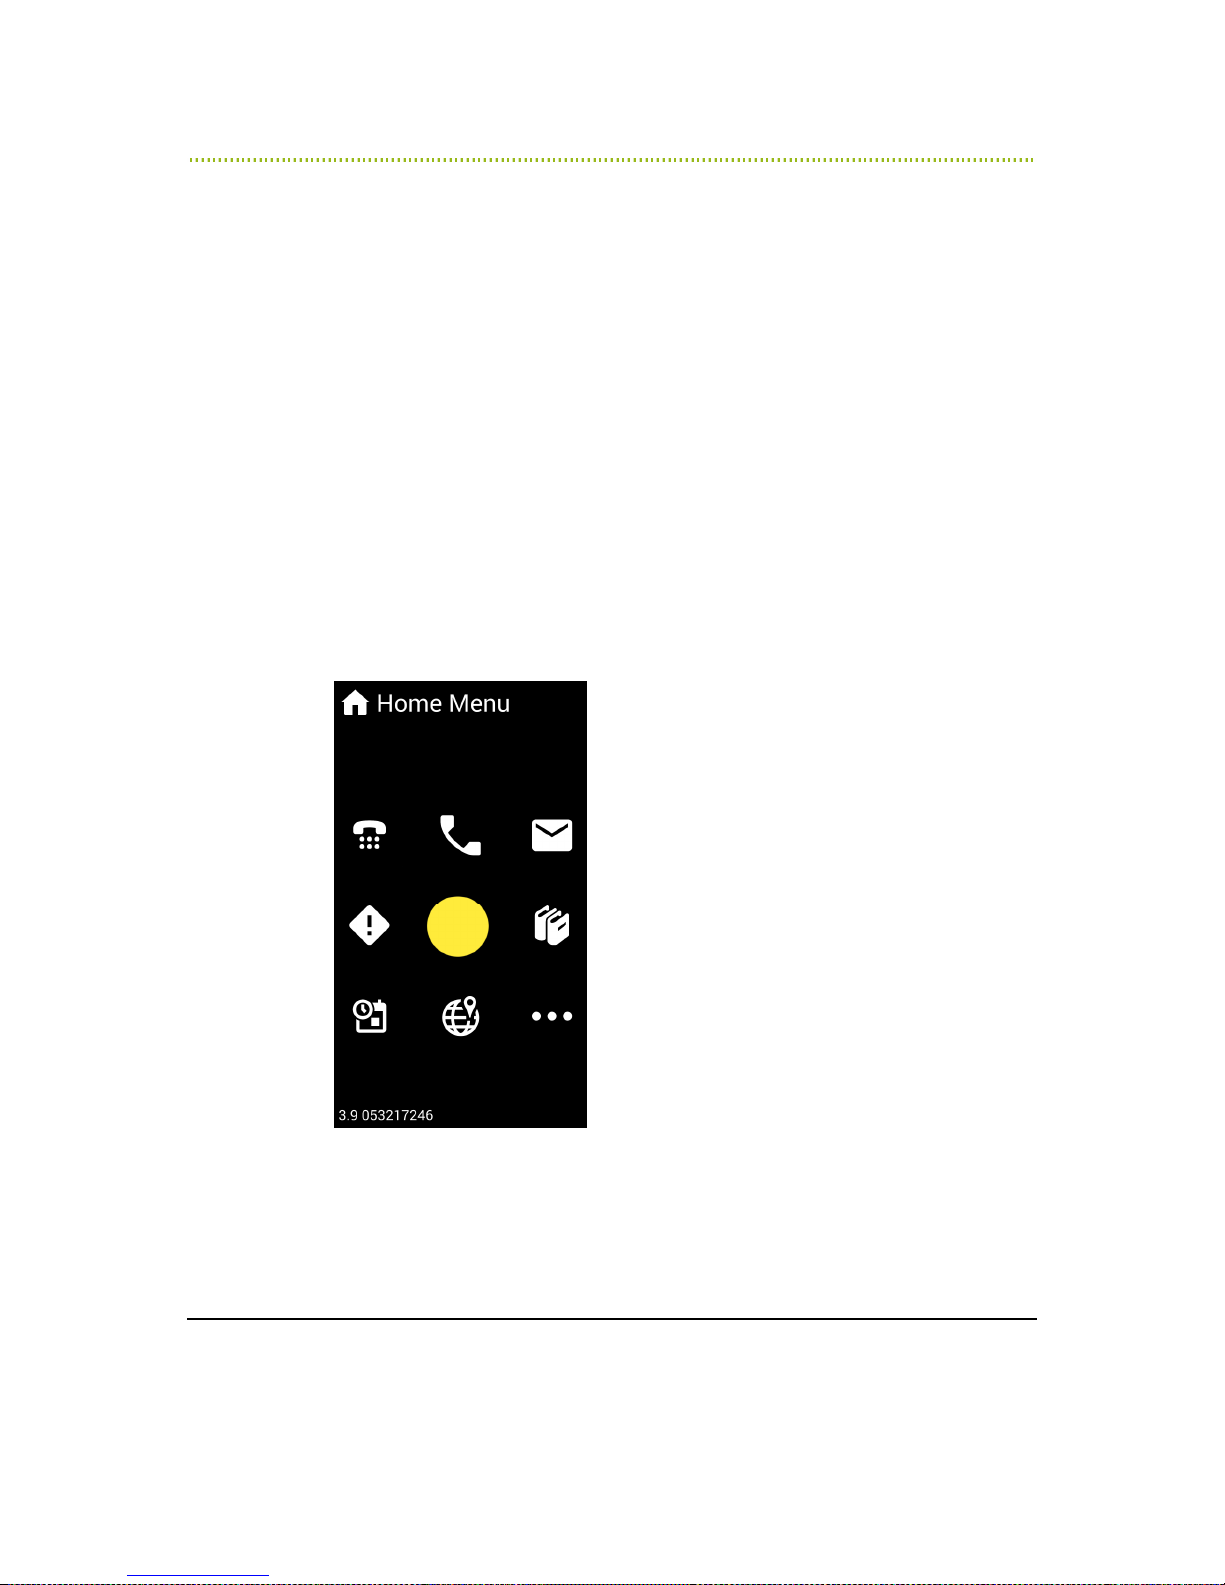
seconds. RAY plays the opening sound and the Home Menu
appears, as shown below:
2
Activation
ActivationActivation
On RAY
RAY
On On
RAYRAY
on RAY:
RAY:
on on
RAY:RAY:
Figure 3: Home Menu
You may refer to
options available in the Home Menu.
Chapter 4, Using RAY
14
on page 40 for a description of the
Page 15
RAY User Guide Getting Started with RAY
RAY is especially designed for non-sighted users and therefore its interface
works differently than a regular Touch-Screen Based, Smartphone device.
The most important thing to learn about RAY is that basic operation is done by
putting your finger somewhere in the center of the screen, then slide your
finger on the screen in the direction of the option that you want to select.
RAY then says the name of an option. After hearing the desired option, lift
your finger to select and execute that option.
You do not select things by tapping an icon.
Making a Call
In order to familiarize you with RAY’s special interface, the following guides you
through making your first phone call to someone in your Contacts List. For this
purpose, RAY is provided with a single contact person already defined in the
Contacts List. For example, the phone number of a directory service or the Library
for the Blind.
Note
To answer an incoming call, short press the ON/OFF button.
Note
RAY also provides a speed dial option, which is described in the
Dialing
create Contacts.
►
To mak
To make
To makTo mak
1 Go to the Home Menu. You can tell whether you are already on the Home
Menu by touching the screen and holding your finger on it for three seconds
until RAY says Home Menu.
section on page 41. You will be able to use this option after you
e a phone call from the Contacts L
a phone call from the Contacts List:
e e
a phone call from the Contacts La phone call from the Contacts L
ist:
ist:ist:
Speed
Tip
If you are not sure where you are on the RAY device, then simply press and
hold your finger on its screen (somewhere near the center) for three
seconds. The Ray device then says the name of the screen you are in.
Tip
A quick way back to the Home Menu is to:
1 On RAY N5 device, long press the ON/OFF button. RAY says Power
Menu. The HOME screen option is located at key number 4 on the left.
2 On L5 and E5 devices, this function is available in the standard HOME
15
Page 16
RAY User Guide Getting Started with RAY
key of the device.
2 From the Home Menu, place your finger somewhere in the middle of the
screen. Wherever you put your finger becomes the number 5 on a regular
numeric keypad.
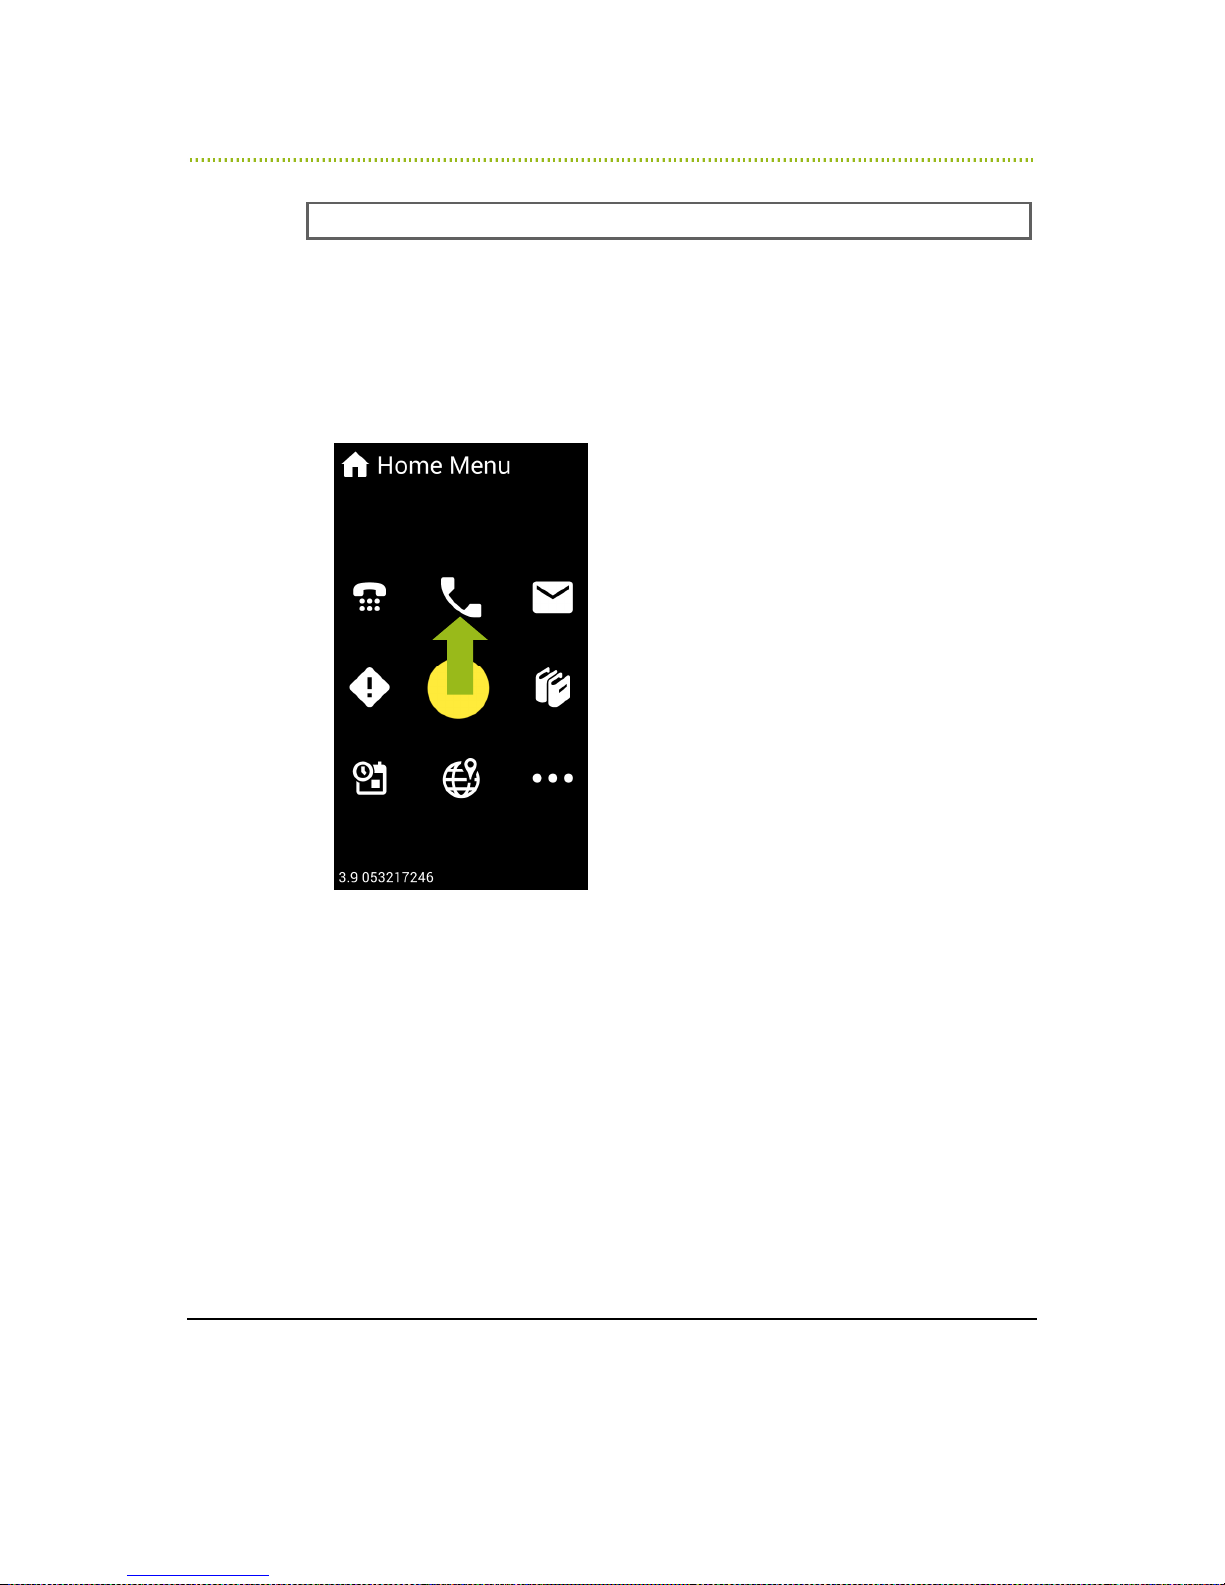
3 Slide your finger on the screen (without lifting it) upwards towards the number
2 position on this imaginary keypad. When RAY says the word Telephone, lift
your finger off the screen:
Figure 4: Selecting the Telephone Service
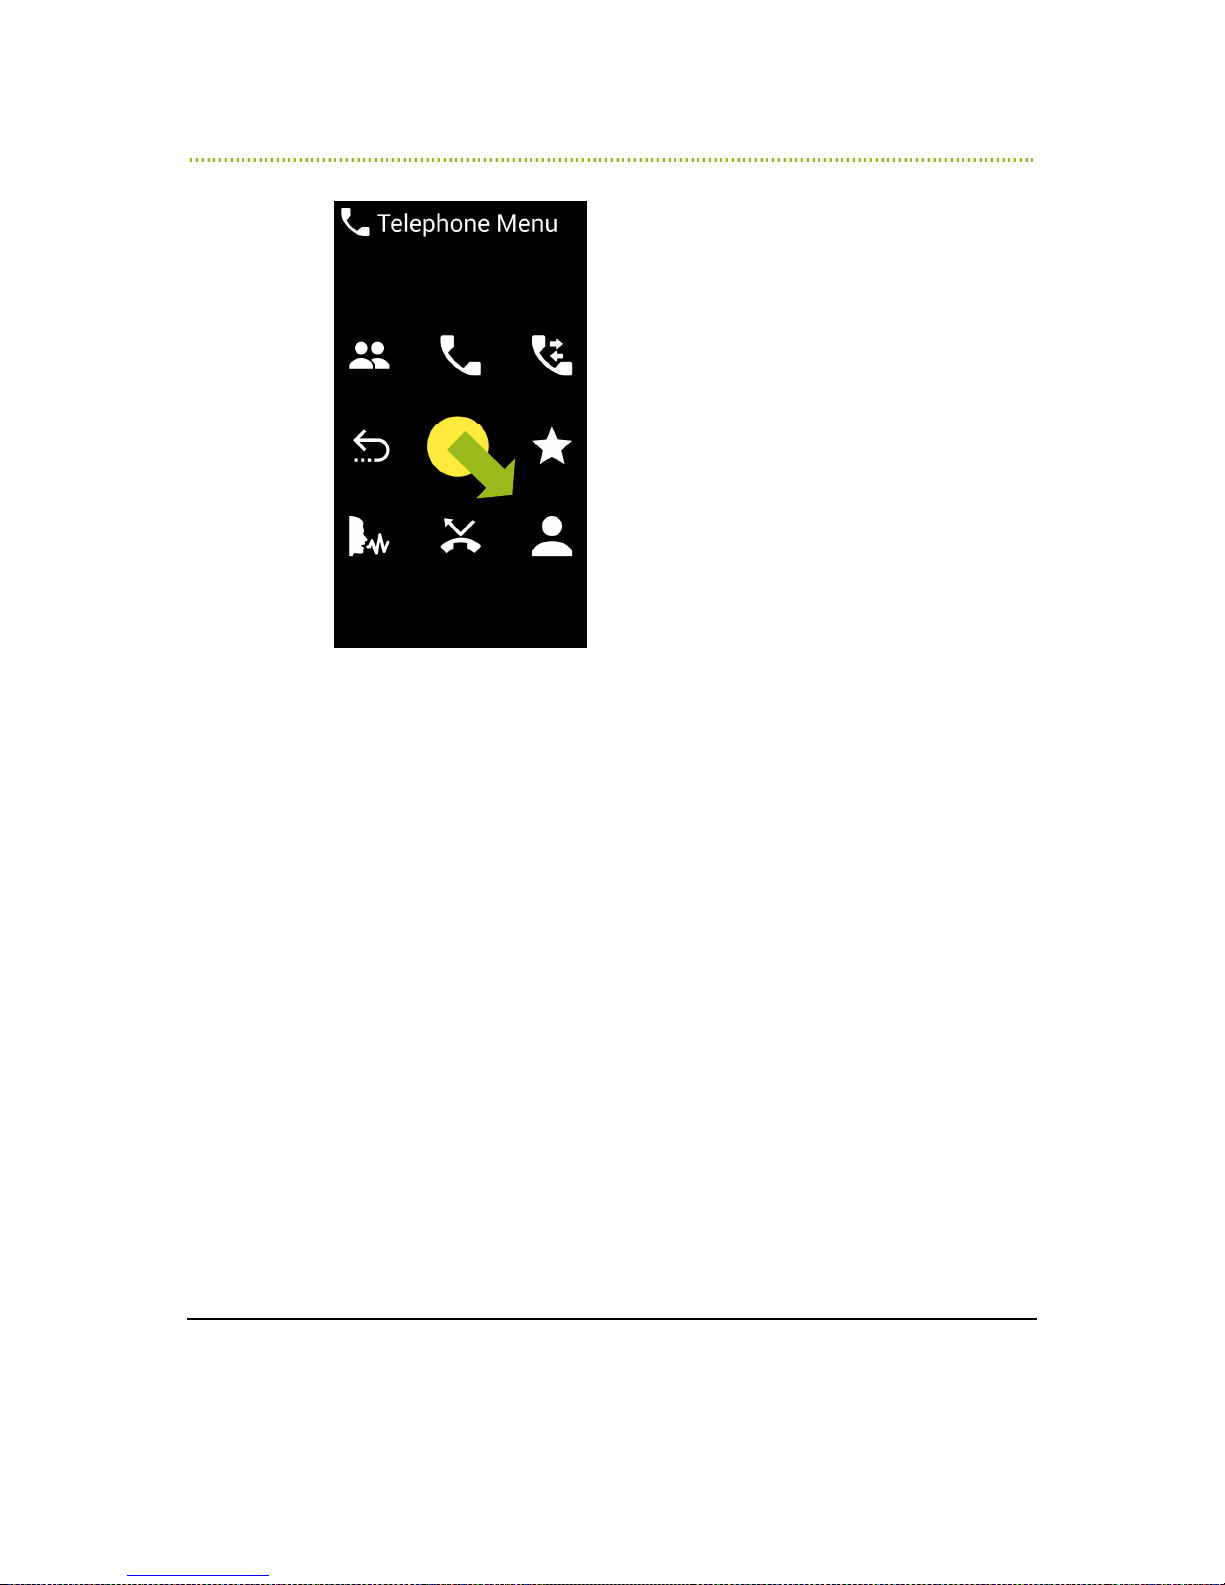
4 RAY says Telephone Menu to indicate that you are now in the menu that
provides various telephone services.
16
Page 17
RAY User Guide Getting Started with RAY
Figure 5: Telephone Menu – Selecting the Contact List
Place your finger in the middle of the screen again on the imaginary number 5,
and slide it in the direction of the number 9 (diagonally downwards and to the
right). When RAY says “Call Contacts”, lift your finger off the screen:
17
Page 18
RAY User Guide Getting Started with RAY
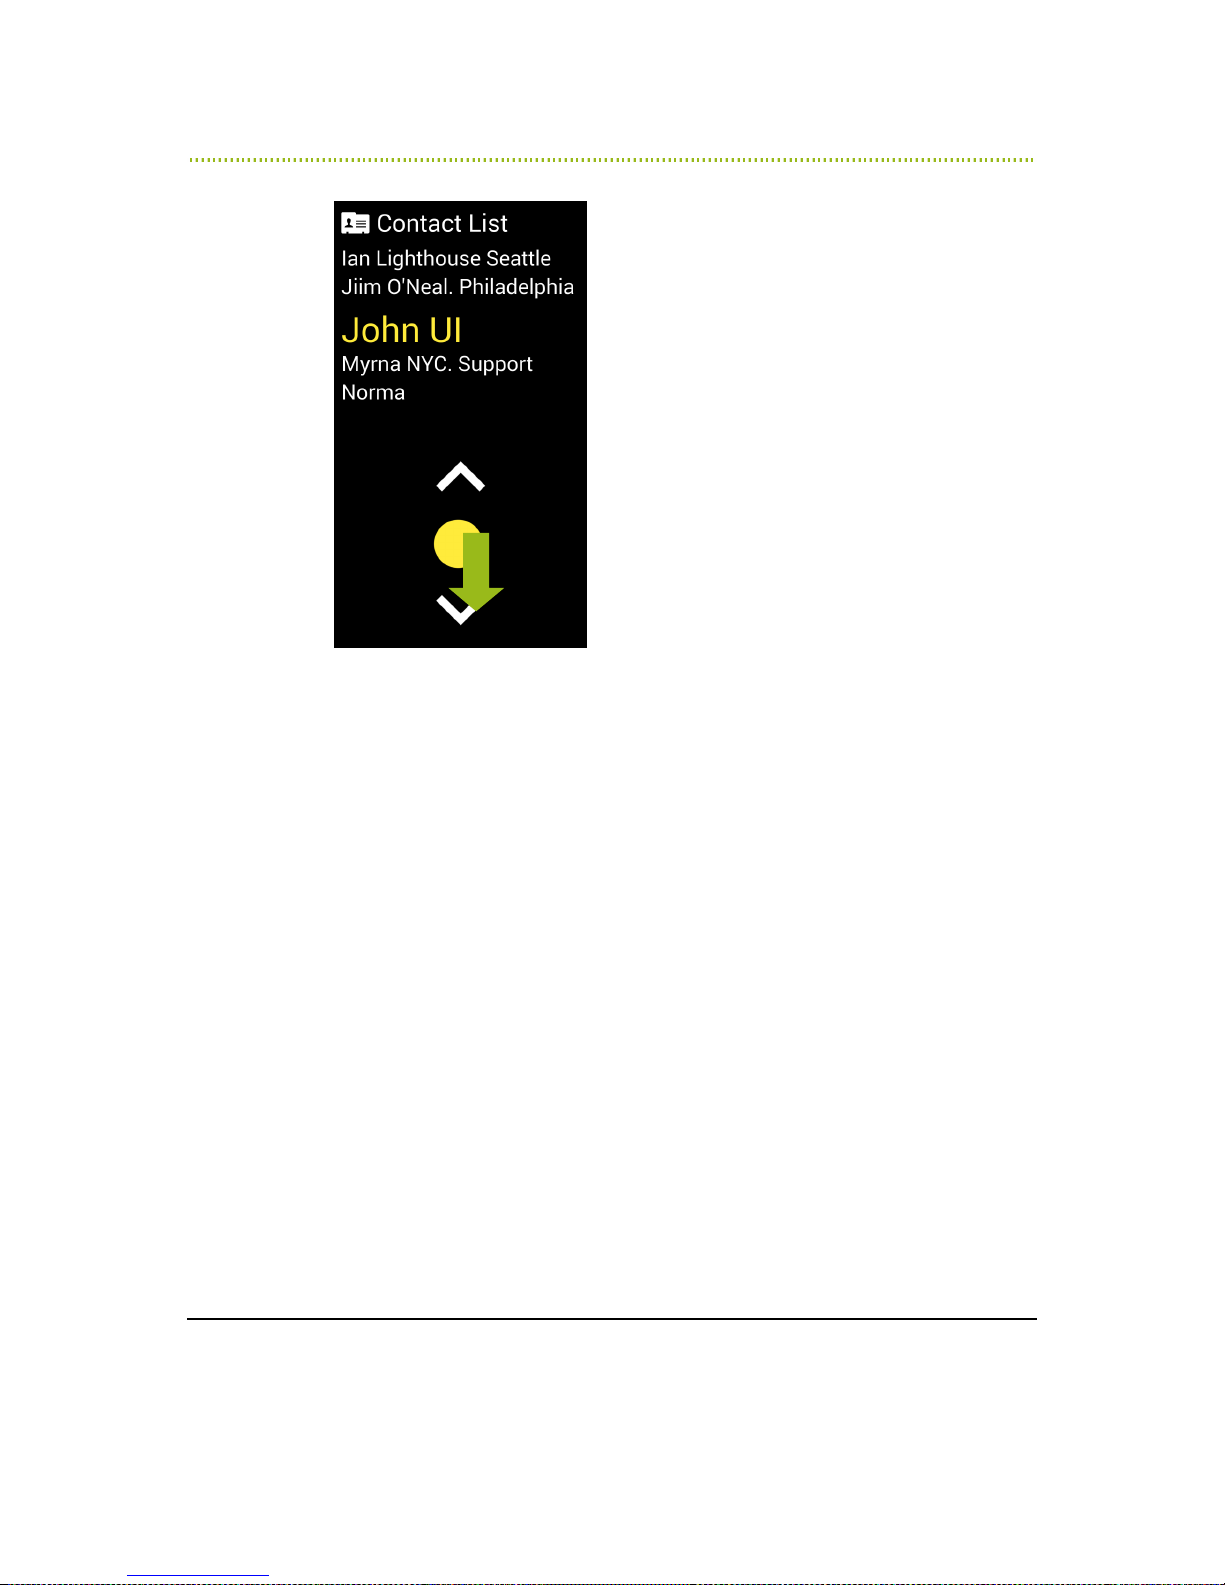
Figure 6: Selecting a Contact
RAY says Contacts List and says how many items are in the list.
5 Place you finger on the imaginary number 5. RAY then reads out the name of
the selected Contact.
You can also slide your finger slightly downwards towards the number 8 until
you hear a bell sound. Then, stop moving your finger and leave it on the
screen.
Listen while RAY reads out the names in the Contacts List one after another.
On a new device, the Contacts List only has a single Contact.
Items in a list are arranged in a circular manner. Therefore, for example, after
the last option is read out, the first option is read out, then the second option
and so on.
18
Page 19
RAY User Guide Getting Started with RAY
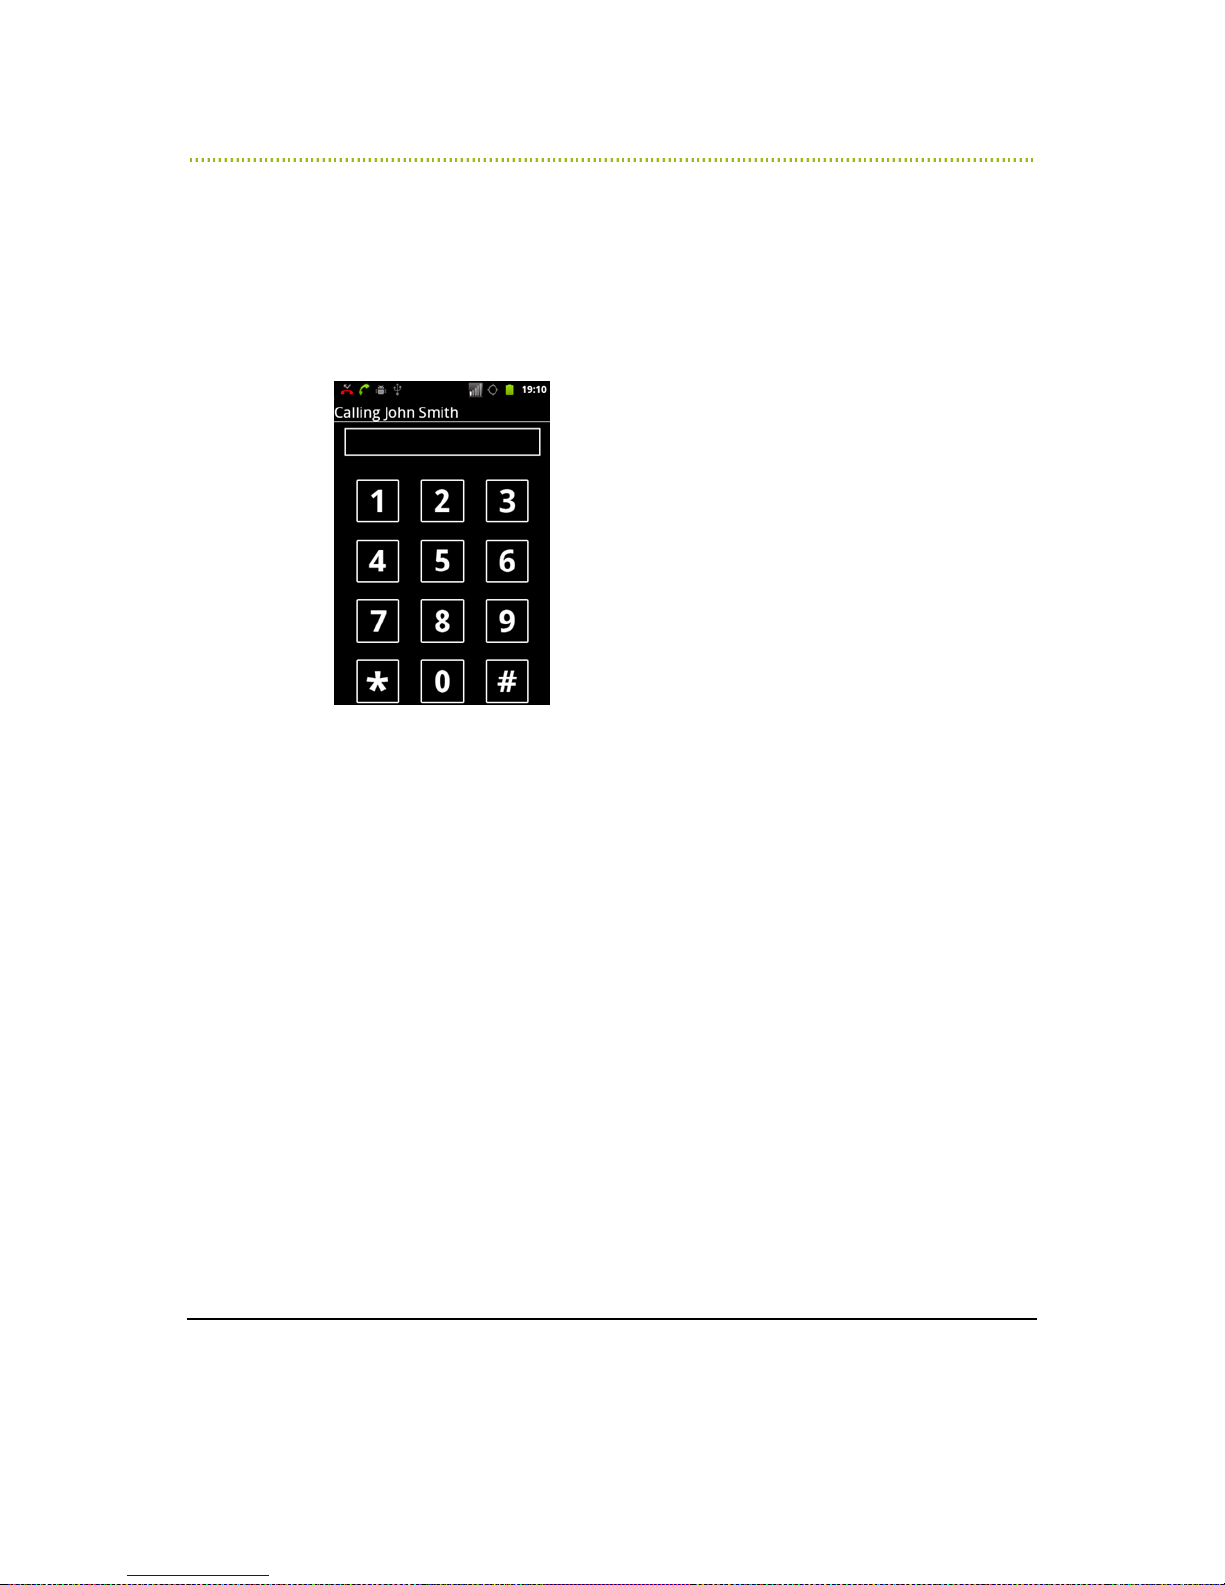
6 When RAY says the preferred Contact name, lift your finger off the screen to
select it. RAY will then initiate a telephone call to the selected person and says
the name of the person that you are calling.
If the call is answered, a standard 12-key numeric keypad appears, as shown
below. This keypad stays open during the entire call.
Figure 7 RAY Numeric Keypad
During the call, you can use the keypad to enter DTMF digits, if needed, as
described in the
7 During a call, you can perform the following:
To terminate the call, short press the ON/OFF button.
To toggle the speakerphone on and off, swipe your finger from the middle
of the screen downwards.
Entering a Number
19
section below.
Page 20
RAY User Guide Getting Started with RAY
Entering a Number
Entering a Number
Entering a NumberEntering a Number
The following describes how to enter a number for any reason. For example, to
dial a phone number or as a DTMF (meaning to enter numbers in the middle of a
call if requested to do so by the callee).
Note
Many of the numbers in the Dialer have additional functionality besides
enabling you to type a number, as described on page 21.
To enter a number:
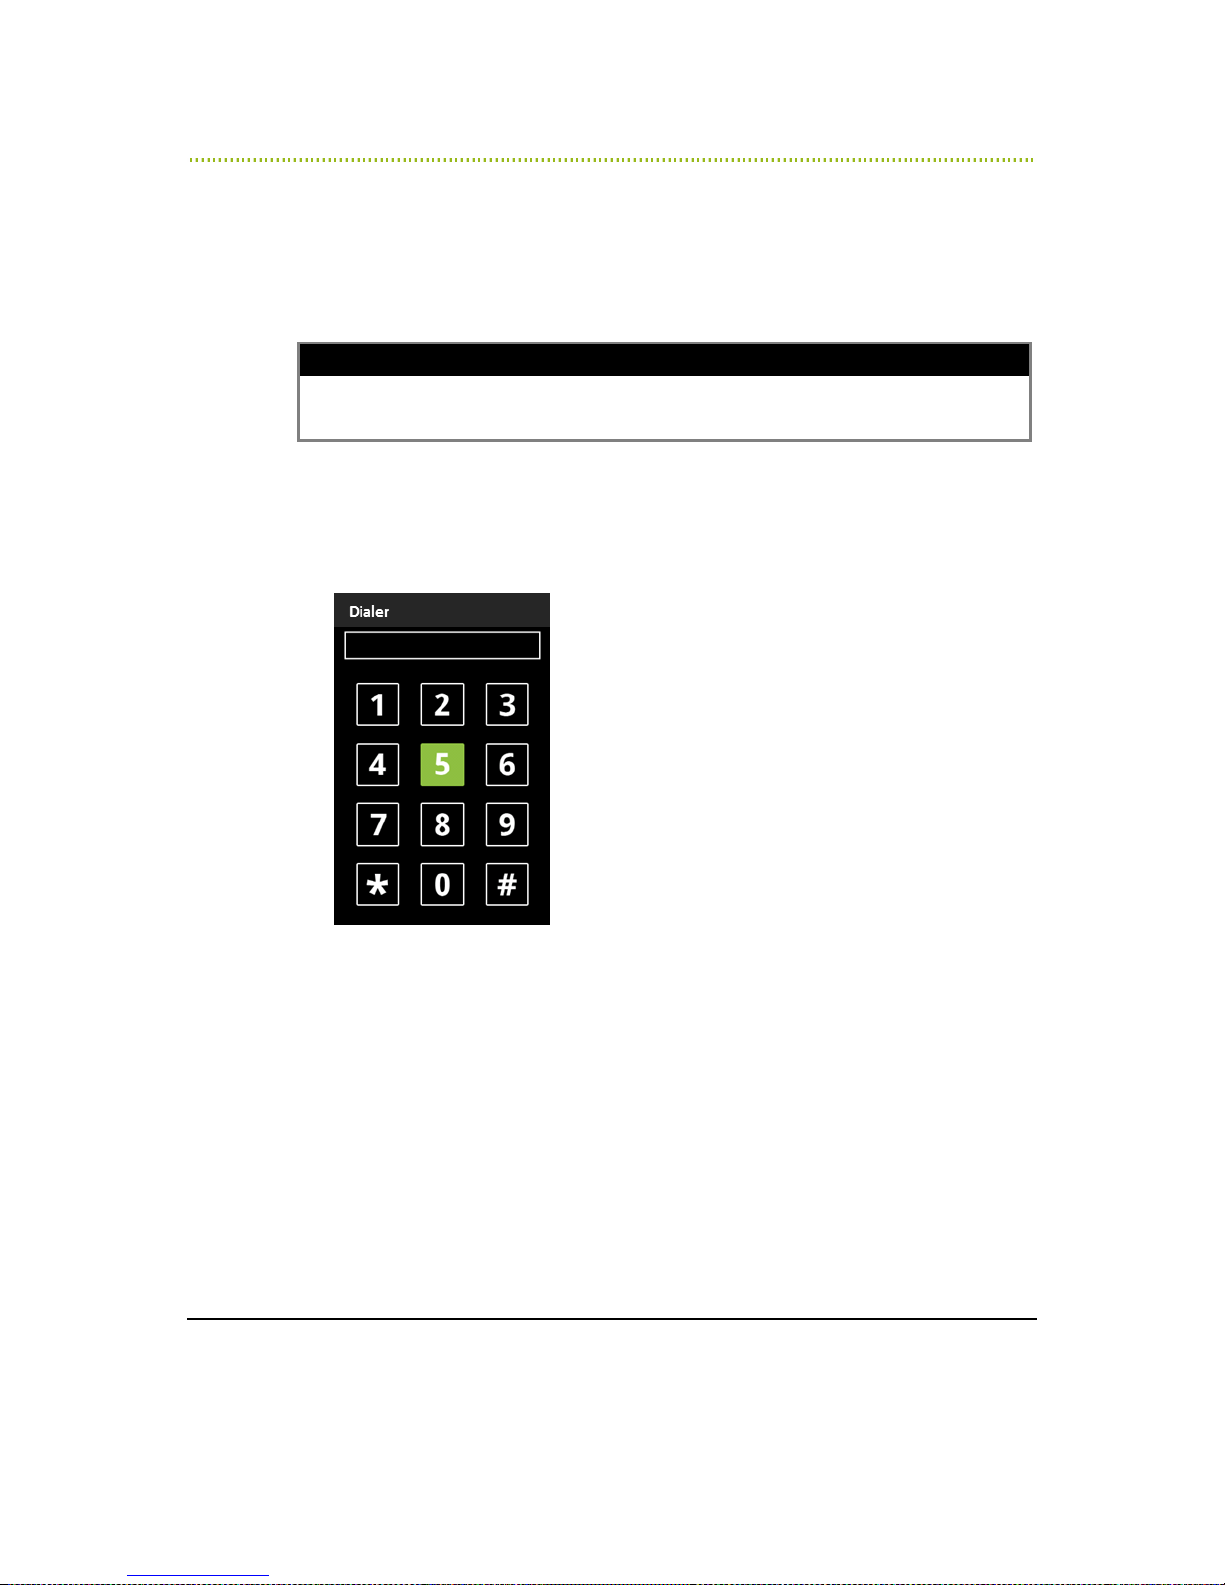
1 When a numeric keypad is open (for example, as described on the previous
page), place your finger somewhere near the center of the screen. Wherever
you place your finger becomes the center of the 12-key numeric keypad,
meaning the number 5.
Figure 8: Entering a Number
2 RAY then says 5. To select the number 5, simply lift your finger off the screen.
To select a different digit, slide your finger, without lifting it, in the direction of
that number until RAY says the intended number.
3 When RAY says the intended number, lift your finger to select it.
For example:
To select the number 2, place your finger on the screen and then slide it
slightly upwards.
To select the number 6, place your finger on the screen and then slide it
to the right.
20
Page 21

RAY User Guide Getting Started with RAY
To select the number 3, place your finger on the screen and then slide it
diagonally upwards to the top, right of the screen and so on.
To select an *, 0 or #, slide your finger downwards. On the way, you should
hear RAY read out 7, 8 or 9 accordingly.
4 To dial the telephone number, slide your finger from the center of the screen
towards the number 6. When your finger reaches 6, RAY says 6. Hold your
finger in that place on the screen and after a moment RAY says the word Dial.
Then, lift your finger off the screen and RAY dials the number.
5 To terminate a call in progress short press the ON/OFF key.
Other Dialer Options
Other Dialer Options
Other Dialer OptionsOther Dialer Options
Many of the numbers in the Dialer have additional functionality besides enabling
you to type a number.
To access the additional functionality of a number key:
1 Place your finger near the center of the screen, this becomes the number 5.
2 Slide your finger from the center of the screen towards a number. RAY reads
out the number of that key and then (after a moment) reads out the function
of that number key.
For example, to erase the last digit of the number that you have entered,
slide your finger from the center of the screen towards the number 8. When
your finger reaches 8, RAY says 8. Hold your finger in that place on the screen
and after a moment RAY says the word Delete. Then, lift your finger off the
screen and RAY deletes the last digit that you entered.
The following are the additional functions provided by each number on the Dialer
keypad:
•
4 – Previous: Returns to the previous screen and leaves the Dialer.
•
2 – Read: Reads out the entire number that you entered.
•
6 – Dial: Dials the number that you entered.
•
7 – Delete Number: Clears the entire number that you entered.
•
8 – Delete Last Digit: Erases the last digit of the number that you entered.
Note
You can also use RAY’s speech recognition options to make a call, as
described in the
Calling Using Speech Recognition
21
section on page 47.
Page 22

RAY User Guide Getting Started with RAY
Turning RAY Off
RAY can be powered down completely or it can be in Sleep mode. Sleep mode
saves battery while retaining RAY’s connection to the cellular and/or Wi-Fi
network.
When RAY is completely powered down, it takes a few seconds longer to power
back on than when it is in Sleep mode.
Sleep Mode
Sleep Mode
Sleep ModeSleep Mode
RAY automatically goes to sleep mode after it is not used for a while. The following
also puts RAY in Sleep mode.
►
To go to Sleep mode:
To go to Sleep mode:
To go to Sleep mode:To go to Sleep mode:
1 Short press the ON/OFF button shown in Error! Reference source not
found.. RAY plays a special sound.
2 You can power RAY back up by pressing the ON/OFF button. RAY then opens
the previously displayed screen.
PPPPowering Off RAY
owering Off RAY
owering Off RAYowering Off RAY
►
To power off RAY:
To power off RAY:
To power off RAY:To power off RAY:
1 Long press the ON/OFF button shown in Error! Reference source not
found.. RAY says Power Menu.
2 Place your finger somewhere in the middle of the screen and slide it towards
the number 2. When RAY say Power Down, lift your finger off the screen.
3 You can power RAY back up with a long press of the ON/OFF button. Hold the
ON/OFF button until you feel RAY vibrate. RAY says Home Menu when it is
ready for you to start using it.
22
Page 23
RAY User Guide Getting Started with RAY
Power Menu
Power Menu
Power MenuPower Menu
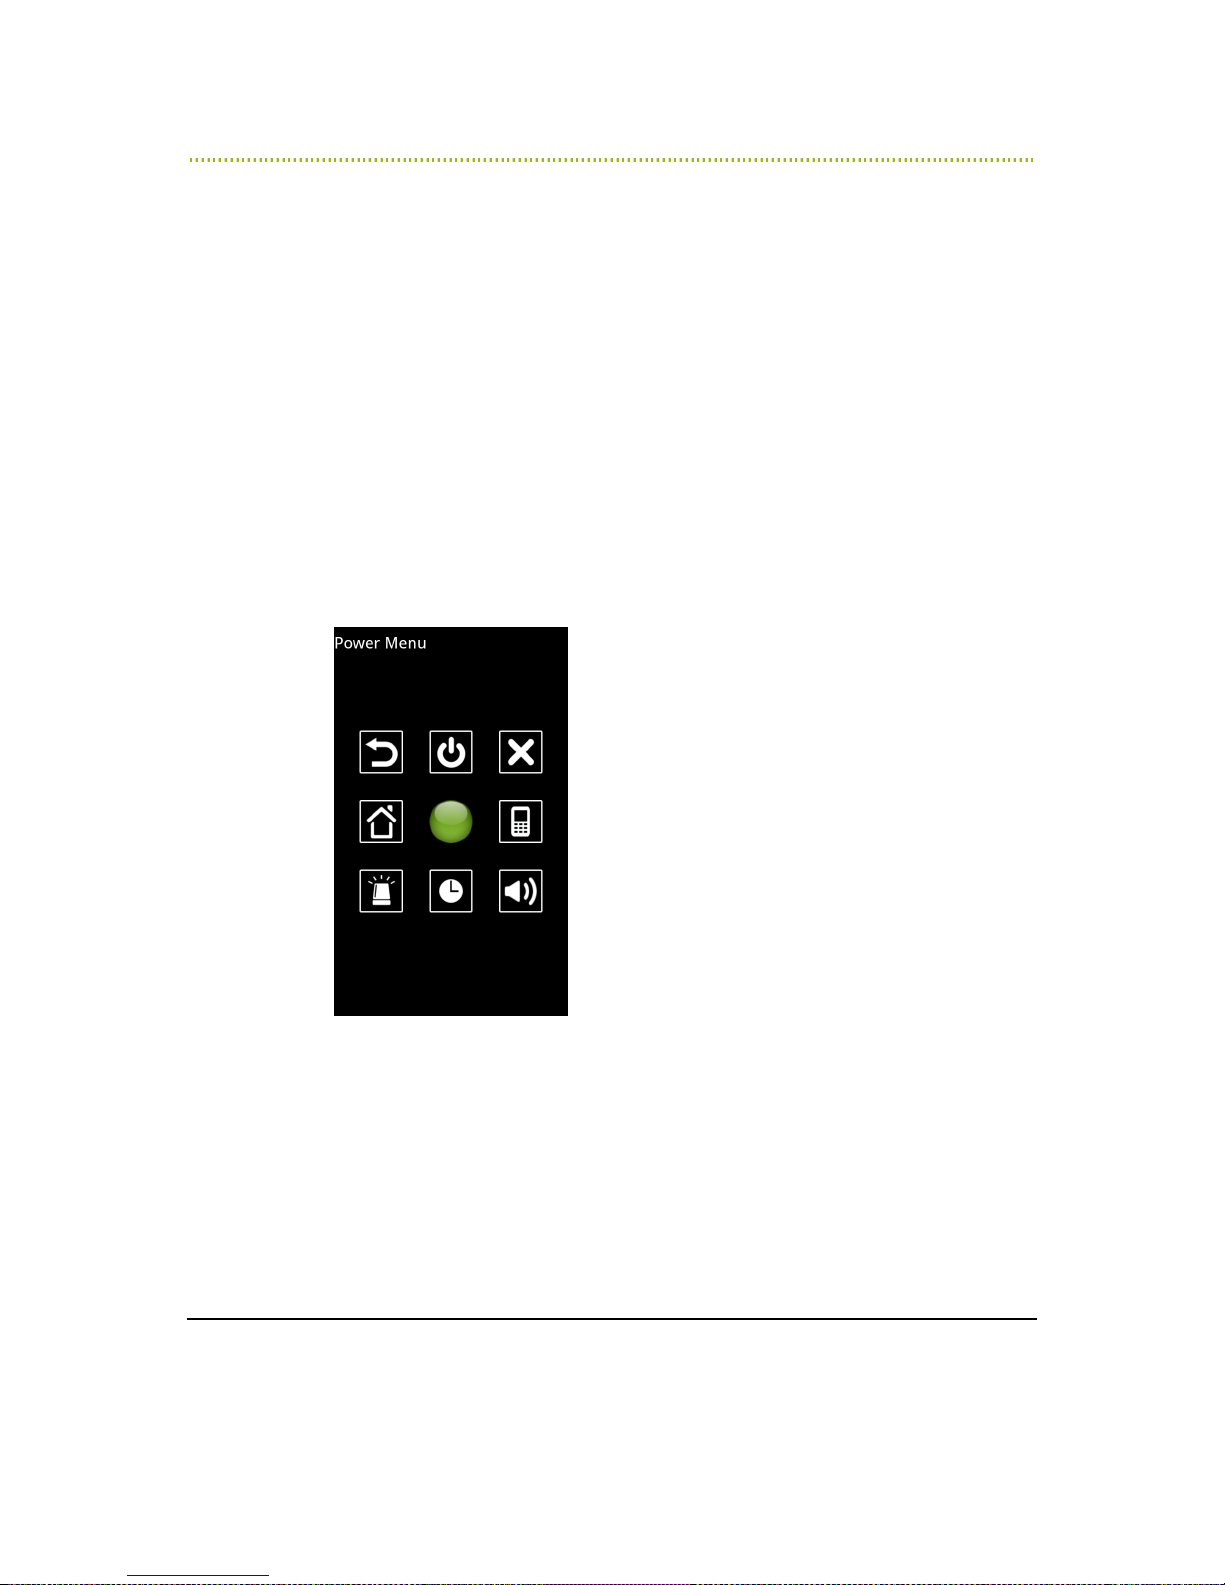
On a few RAY devices, one may get a quick access to the Power Menu, which
provides eight options, described below, for quick and always available access.
The Power menu is available in the RAY N5 device by a long press on the device
power key. It is also available for setting on devices that supports NFC reading
(see page 22) and the purchase of special NFC tags.
The Power menu is arranged like a standard Menu type screen (see page 22)
where each option is positioned in one of eight directions around the touch point.
The following describes the options in the Power Menu.
►
To
To access the RAY Power Menu
access the RAY Power Menu::::
To To
access the RAY Power Menuaccess the RAY Power Menu
1 Use the specific invocation method relevant to your own device. RAY says
Power Menu.
Figure 9: Power Menu
2 Place your finger somewhere in the middle of the screen and slide it in one of
the eight directions and then lift your finger when RAY says the desired option.
The following options are arranged in a clockwise direction starting with the
number 1 on the top left:
1 – Previous Screen: Returns to the previous screen (meaning the one
before the one you were in when you opened the Power Menu). You can
use this option to go back to the previous screen from anywhere.
23
Page 24

RAY User Guide Getting Started with RAY
2 – Power Down: Powers down the RAY device.
3 – Cancel: Returns back to the screen that you were in when you
opened the Power Menu.
6 – Information: Displays a menu of information options, such as
battery level, storage space, network connection and more, as described
on page 73.
9 – Vibrate: Sets the phone to only vibrate or not when there is an
incoming call (not to ring). This is a toggle option.
8 – Clock: Says the current day, date and time. This is a configurable
option, as described on page 36.
7 – Emergency: Dials an emergency number. The emergency number
can be set in the Information Emergency service (as described on
page 73) or from your own personal RAY web page on the Internet
available at the RAY website, as described in
and Configuration
4 – Back to HOME Menu: Displays the Home Menu, as described in the
on page 25. You can use this option to go back to the HOME Menu from
anywhere.
on page 68.
Chapter 5, Remote Control
How Do You Know Whether
How Do You Know Whether RAY is
How Do You Know Whether How Do You Know Whether
Tap the screen. When RAY is on, it plays a tone and vibrates slightly.
If RAY does not vibrate, then it is off.
To turn it on, press the ON/OFF button. A short press may be enough, or you may
have to press a bit longer if the device is powered down.
24
RAY is on
RAY is RAY is
on????
onon
Page 25
RAY User Guide RAY Interface Basics
3
RAY Interface Basics
This chapter introduces the basic concepts, finger gestures and screen types of
RAY’s user interface.
Introducing the RAY Interface
Basic
Basic Interface Concept
Basic Basic
Interface Conceptssss
Interface ConceptInterface Concept
RAY is an advanced computing device that is based on Smartphone technologies.
Most of its operation is using finger movements.
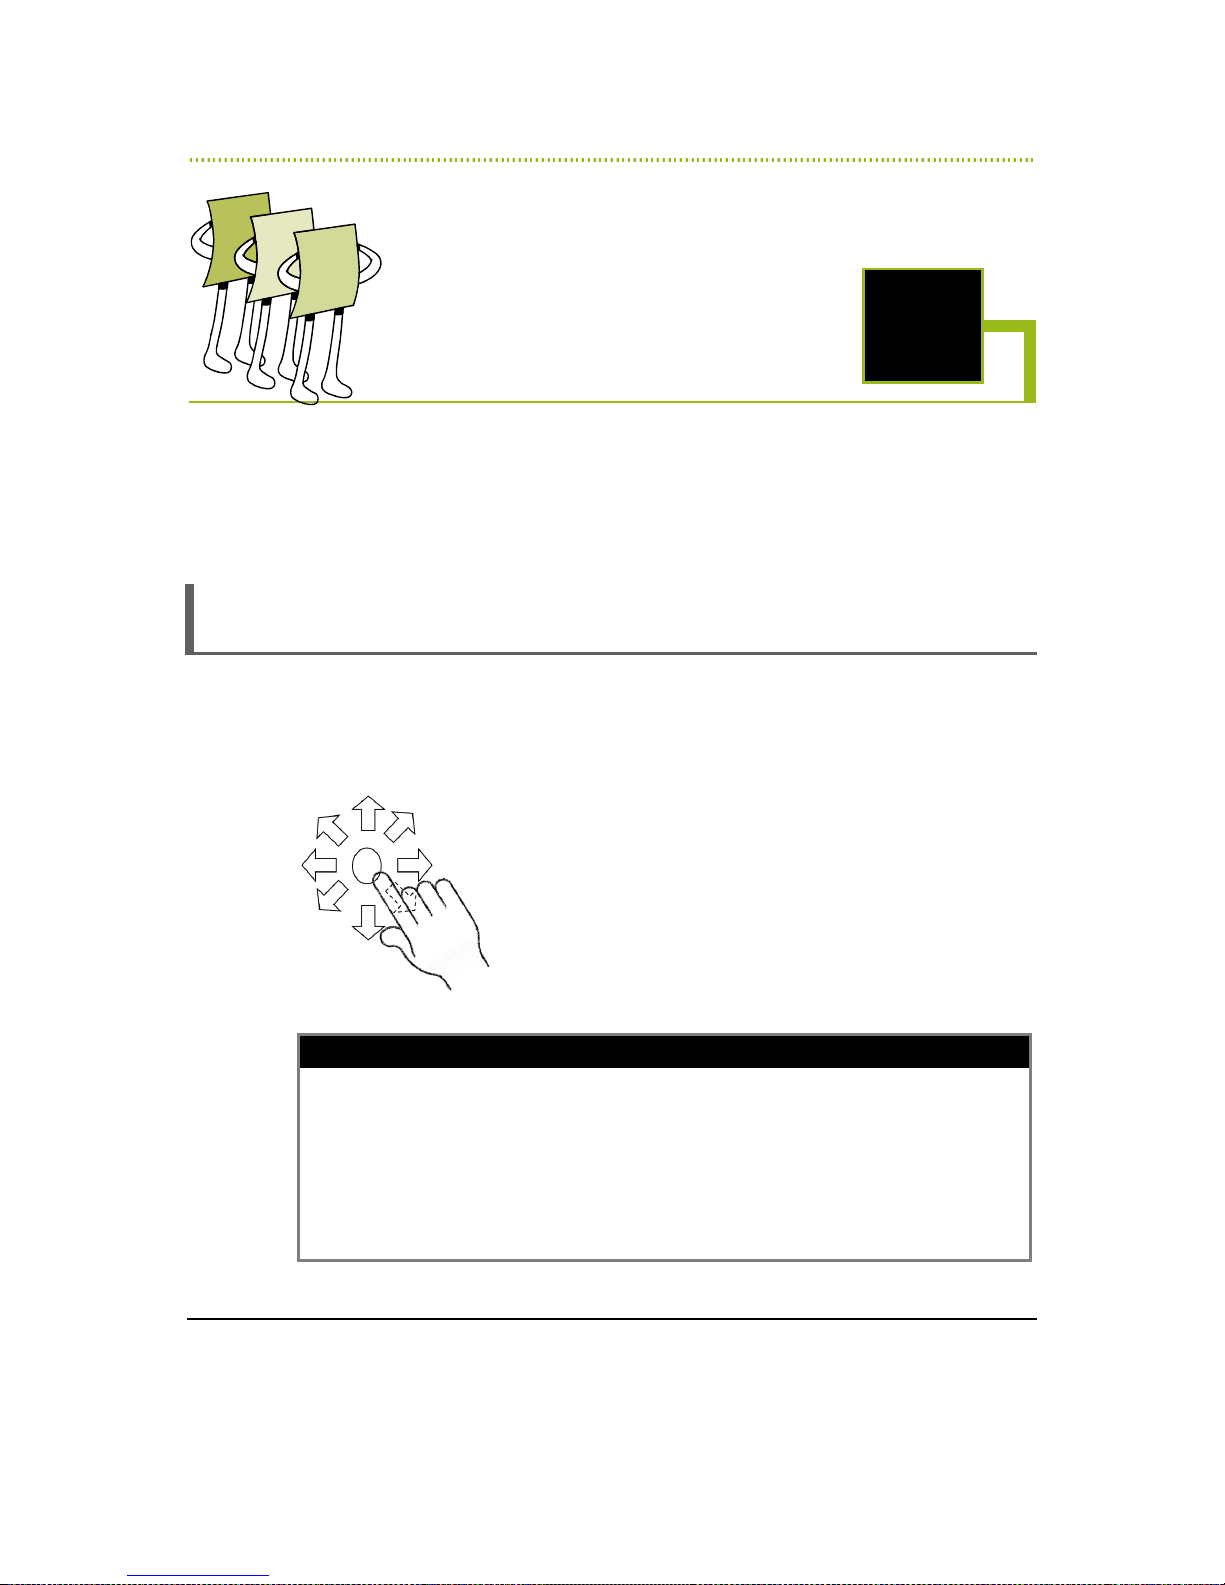
Figure 10: Selecting an Option on RAY’s Touch Screen
Note
RAY is especially designed for non-sighted users and therefore its interface
works differently than a regular Smartphone device.
The most important thing to learn about RAY is that you put your finger
somewhere in the middle of the screen, slide your finger on the screen in the
direction of the option that you want to select. When RAY says the name of
the option that you want to select, lift your finger to select that option. You
do not select things by tapping an icon.
25
Page 26

RAY User Guide RAY Interface Basics
►
To select
To select options
To select To select
1 Touch anywhere on its screen with your finger. A special tone is sounded for
2 Slide your finger a little in a specific direction until you hear Ray say the name
3 To select the option that RAY reads out, simply lift your finger off the screen.
options on RAY’s touch screen
options options
each screen open on the device. RAY also has a distinct vibration for each
screen.
If you are touching too far away from the center of the screen, then a special
cancellation tone is sounded and your touch is ignored. In this case, simply lift
your finger, and place it near the middle of the screen.
of the option that you want to select. Then, stop without lifting your finger off
the screen.
You should move your finger far enough to hear the name of the desired
option, but not too far as to exit the screen.
RAY then tells you the next step.
on RAY’s touch screen::::
on RAY’s touch screenon RAY’s touch screen
Tip
If you do not want to select the option that you hear, then just keep sliding
your finger until it is off the screen. When the device detects that your finger
moved off the screen, it sounds a special cancellation tone to indicate that
your touch on the screen will be ignored.
Tip
After you place and hold your finger anywhere on the screen for three
seconds, RAY enters special help mode.
It will first read the basic information about the screen you are on.
You than must lift up your finger and touch it again to choose one of the
three options available upon sliding your finger to the right – get basic
system information including battery status and such; getting extended help
information and using guidance; and getting back to the last screen.
26
Page 27

RAY User Guide RAY Interface Basics
Basic Finger Gestures
Basic Finger Gestures
Basic Finger GesturesBasic Finger Gestures
The following are the basic finger gestures for operating RAY:
•
TOUCH: RAY is operated by using your fingertip(s) to touch its screen. For
best results, try to position your finger approximately in the center of the
screen. When you touch the screen, RAY vibrates slightly. If you are touching
outside of the touch screen surface (meaning too far away from the center of
the screen), then a special cancellation tone is sounded and your touch is
ignored. If RAY does not vibrate or beep, then RAY is powered off (in this
case, press the ON/OFF button to power it back on).
•
SLIDE: Sliding means to move your finger a little in any direction and then
stop, without lifting your finger off the screen. The slide only needs to be long
enough for RAY to recognize the movement, but not too long to go out of the
screen area. After you slide your finger far enough, RAY says the name of an
option. If you slide your finger too far out of the touch screen area, then you
hear a cancellation sound and no selection is made.
•
SELECT: An item is selected in RAY when you lift your finger off the screen
after RAY says the name of the option that you want to select.
KEYPAD and Tactile keys alternative
KEYPAD and Tactile keys alternative
KEYPAD and Tactile keys alternativeKEYPAD and Tactile keys alternative
RAY also supports users interface that is based on physical keys alternative to
finger movement on the touch screen. Such alternatives are available as
complimentary capabilities on special RAY devices like the L5 and the E5 or by
setting an external keyboard device set to work on your Android smartphone.
When working with physical keypads, RAY is using for keys to designate up, down,
back and enter functions as follows:
•
UP - enables moving up in a list of items, the system will read aloud the
name of the item or the function in the up position.
•
DOWN - enables moving down in a list of items, the system will read aloud
the name of the item or the function in the down position.
•
BACK – enables getting back to the previous screen
•
ENTER – Enables invocation and activation of the item current in focus
27
Page 28

RAY User Guide RAY Interface Basics
RAY Screen Types
RAY’s has four screen types especially designed for non-sighted users. All RAY
usage is performed in one of these screen types.
•
RAY Menu Screens,
•
RAY List Screens,
•
RAY Management Screens,
•
RAY Keyboard Screen,
RAY
RAY MMMMenu
RAY RAY
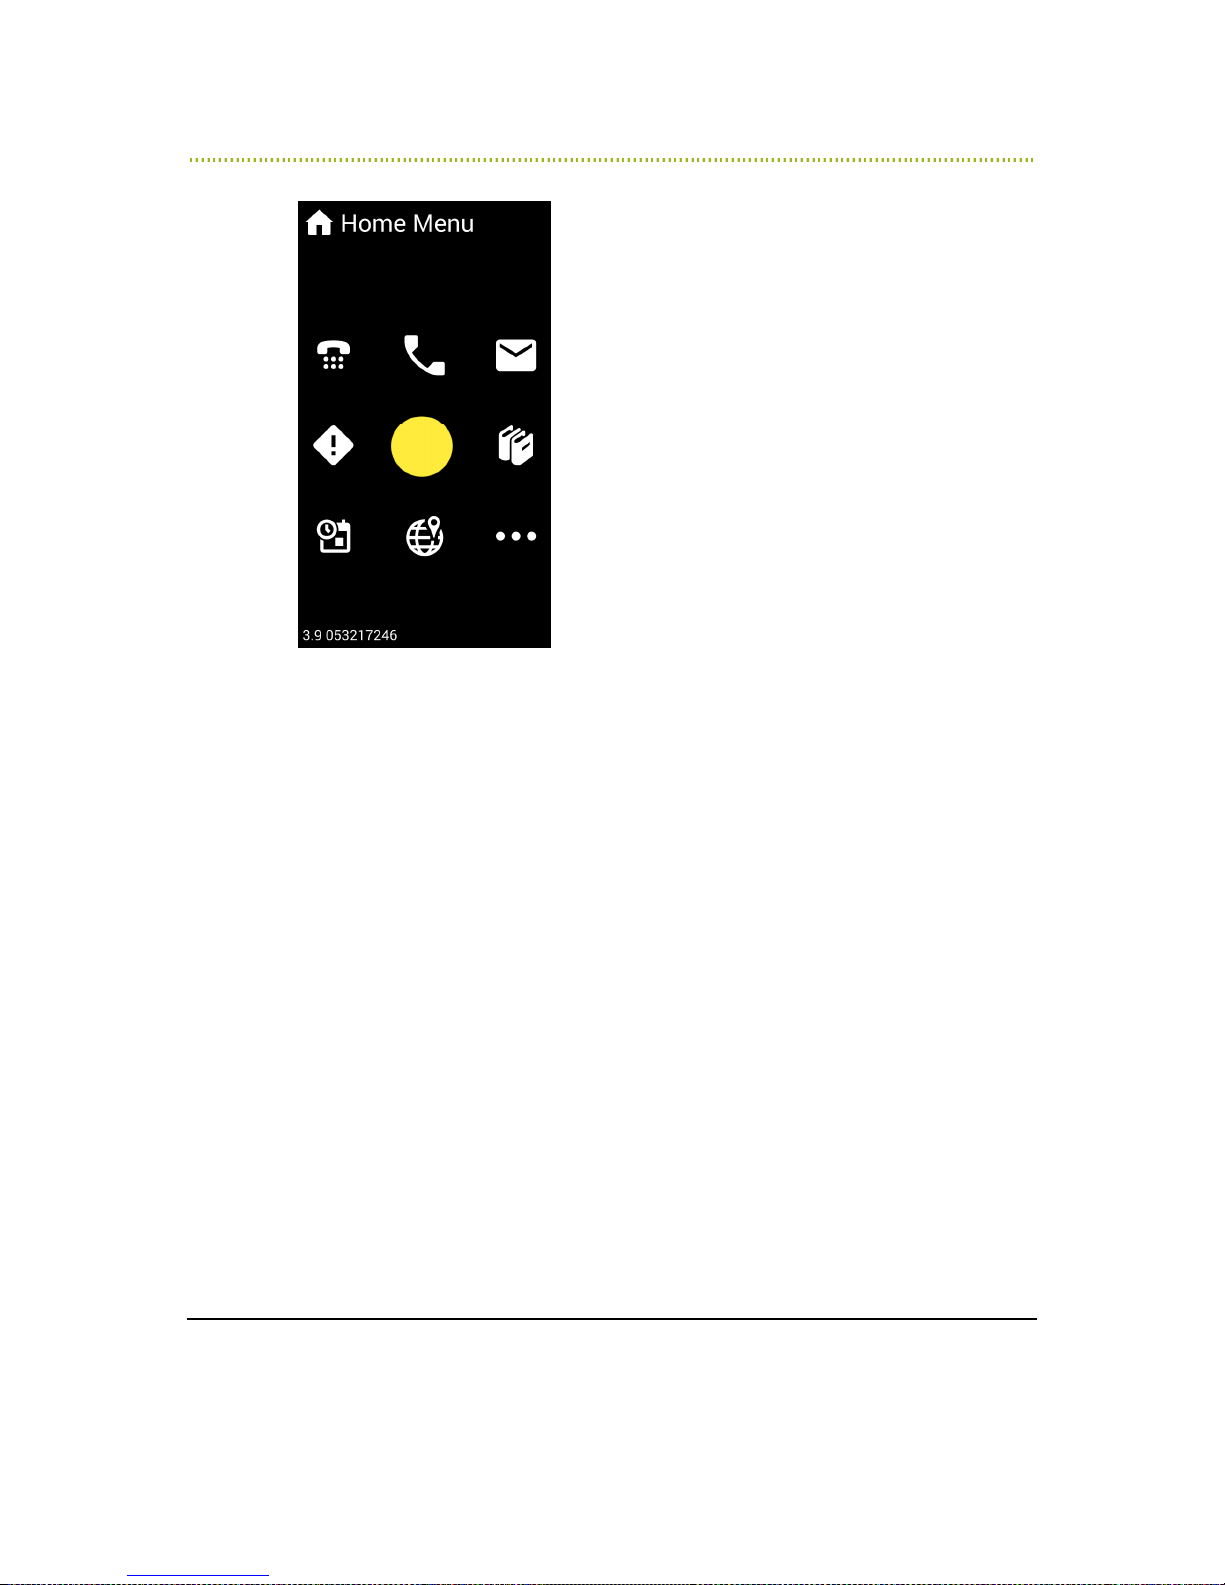
RAY Menus enables you to select a specific application out of eight different
options. The eight different options are arranged around the point of touching the
screen, which becomes the number five key on a 12-key numeric keypad. The first
application is available in the number 1 position (which is in the upper left
direction), the second option is available in the number 2 direction (which is the
upwards direction) and so on.
enu Screens
enuenu
Screens
ScreensScreens
On devices in which we have a physical keypad, the 8 different options are
arranged in a circular list where the order of the items when going in DOWN
direction is: key in position 2, 8, 4, 6, 1, 3, 9, 7.
RAY has a few menus, such as the Home Menu, shown in Error! Reference
source not found.. Each operates in the same manner as described below.
28
Page 29
RAY User Guide RAY Interface Basics
Figure 11: RAY Menu
►
TTTTo use a
o use a RAY
o use a o use a
1 Touch anywhere on the screen. You will feel RAY vibrate slightly and a tone
RAY Menu
Menu::::
RAY RAY
MenuMenu
sounds.
Wherever you touch the screen becomes the middle of the Menu for selection
purposes.
You do not have to touch the screen precisely in the middle.
Somewhere near the middle is good enough! Anyway, touching too close
to the sides of the screen is ignored.
2 Imagine the place you touched the screen is the number 5 on a regular 12-
digit numeric keyboard. Clockwise round the area where you placed your
finger (which becomes the number 5), there are 8 numbers starting from 1 on
the upper left corner, 2 in the upwards direction, 3, 6, 9, 8, 7 and 4.
3 Slide your finger a little on the screen in any of the 8 directions. Each direction
represents a RAY function. RAY reads out the name of the service according to
the direction of your finger movement.
4 To select the function that RAY reads out, simply lift your finger. RAY then tells
you the name of the function that is open so that you know what to do next.
If you slide your finger too much and go off the screen, you will hear a
cancellation sound and the current operation is cancelled.
29
Page 30

RAY User Guide RAY Interface Basics
Tip
Remember lifting your finger makes a selection. Therefore, if you are not sure
what to do, then keep moving your finger until it is off the screen in order to
cancel the current operation.
Tip
You can go back to the previous screen from any menu (except the Home
Menu) by sliding your finger from the center of the screen to the number 4.
Tip
All Menus have eight different options arranged around your touch point.
Note
This user guide describes the various options that are provided by sliding your
fingers in each direction. Directions are described in this user guide as if your
finger starts from the center of a numeric keyboard on the number 5. For
example, in order to select the number 2, slide your finger upwards, in order
to select the number 3, slide your finger diagonally to the upper right corner
and so on.
Note
After you place and hold your finger anywhere on the screen for three
seconds, RAY reads out help information, including the name of the screen and
positioning information.
30
Page 31
RAY User Guide RAY Interface Basics
RAY
RAY LLLList
RAY RAY
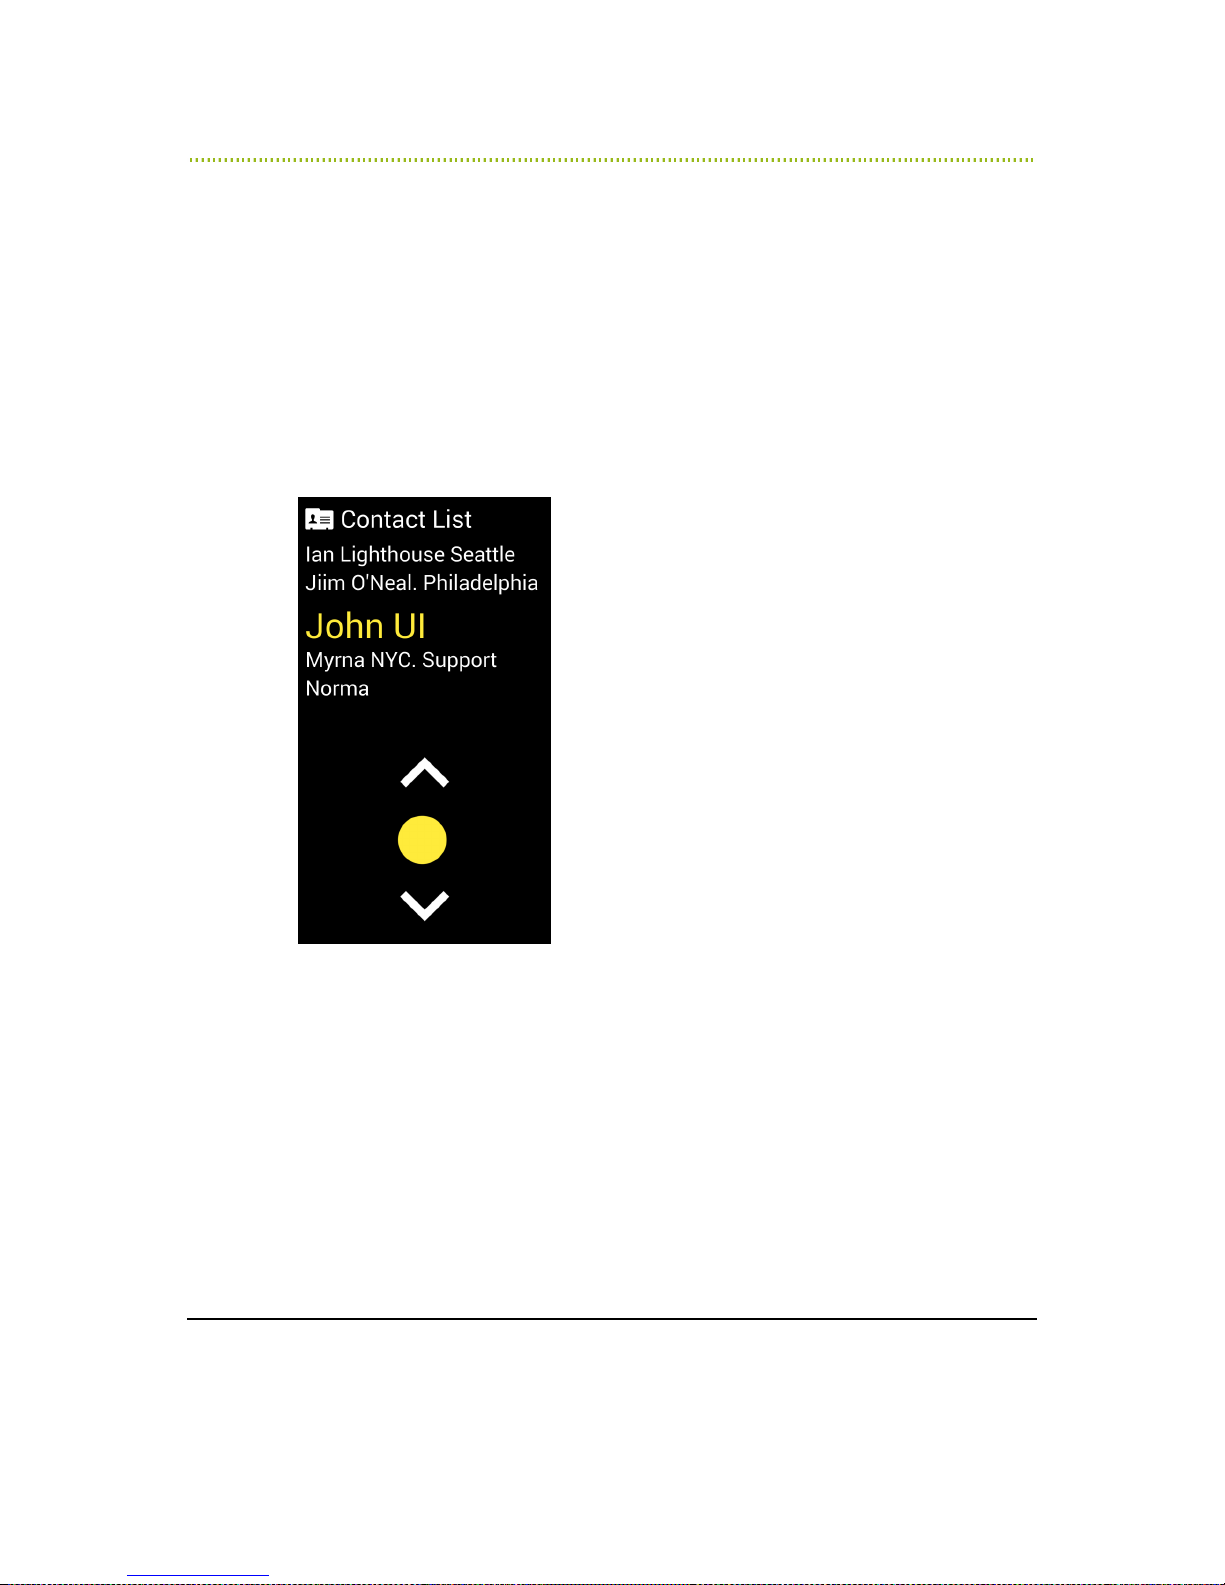
RAY provides a variety of services that use a RAY List screen. Each List screen
operates in the same manner as described below.
A RAY List screen enables you to select one item from a list of items of the same
type. For example, to select a Contact from your Contact List, to select a book
from a Book list and so on.
When a List screen is first opened, RAY reads out its name (for example Contact
List or Book List) and tells you how many items are in the List screen.
ist Screens
Screens
istist
ScreensScreens
Figure 12: RAY List Screens
31
Page 32

RAY User Guide RAY Interface Basics
►
To
To select an item from a
select an item from a List screen
To To
select an item from a select an item from a
1 Place your finger on the screen. RAY then reads out the name of the first item
in the List screen.
2 If this is the item that you want to select, then go to step 3 below. Otherwise,
without lifting your finger, slide it either up towards the number 2 or down
towards the number 8. RAY then reads out the names of the items in the List
screen one after another.
You only need slide your finger a little and then stop in order to indicate the
direction in which to scroll the List screen (up or down).
RAY reads out each item in the List screen in a cyclical fashion, meaning that
RAY always scrolls through all the items until it reaches the item that you
want.
3 When RAY says the required item name, lift your finger up to select it. When
you place your finger on a List screen, you hear RAY’s special List screen
sound and feel the special List screen vibration.
List screen::::
List screenList screen
Tip
All Lists are organized as follows:
• The first item in the List is the first item in the downwards direction.
• The first item in the upwards direction is the last item in the List.
Tip
Two options are provided for browsing more quickly through lists:
• Tap to Skip: You can stop RAY from reading the full name of an item in
a List screen in order to skip to the next item more quickly. When RAY
starts reading the name of an item (while one finger is still on the
screen), tap the screen with another finger. RAY will immediately skip to
reading the next item on the list. You can do this repeatedly to go
through the list quickly.
• Two Fingers for Alphabetical Browsing: In a long list of more than
25 items, you can browse quickly through the List screen by doing the
same thing as described above (Step 2 on the previous page), but with
keeping two fingers on the screen (not tapping). As long as you keep
both fingers are on the screen, RAY reads out the letters of the alphabet.
When RAY reaches the preferred letter, lift up one finger to continue
browsing through all the items that start with that letter.
• Special note when Android is configured with TalkBack on: If
your basic Android environment is configured with Accessibility on
(talkback is enabled), in order to enable fast move within long list, you
must make the first touch on the screen with two fingers. As an
32
Page 33
RAY User Guide RAY Interface Basics
alternative, you may quickly disable the TalkBack on to off by using the
quick-key setting of the specific device.
Tip
You can go back to the previous screen from any list by sliding your finger
from the center of the screen to the number 4 until RAY says Previous
Screen.
Note
After you hold your finger on a List screen for three seconds, RAY reads out
the name of the list.
33
Page 34
RAY User Guide RAY Interface Basics
RAY
RAY MMMManagement
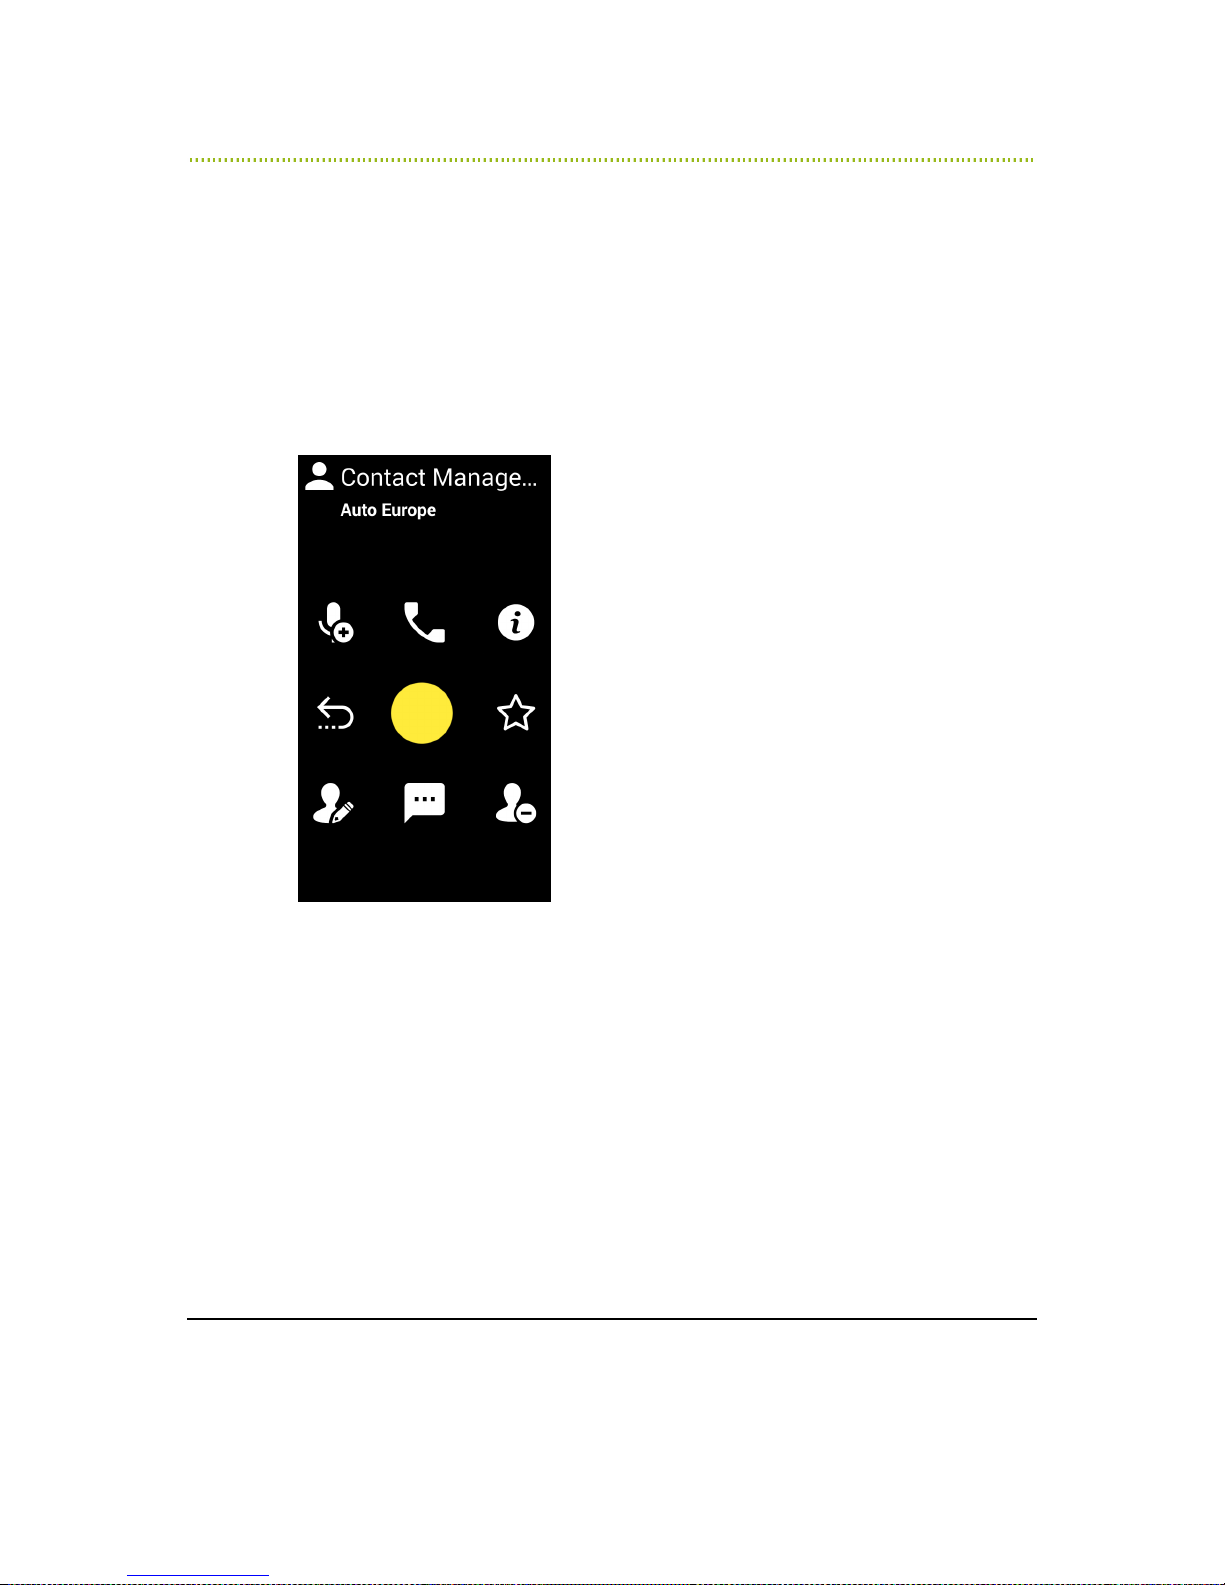
RAY RAY
RAY Management screens provide between three and eight different actions that
you can choose to perform on the selected item. RAY provides a variety of services
that use Management screens. Each operates in the same manner as described
below. In RAY, a Management screen enables you to select an operation to
perform on the item that you chose. For example, to start reading the selected
book.
anagement Screen
anagementanagement
Screenssss
ScreenScreen
Figure 13: RAY Management Screen
►
Management screen layout:
Management screen layout:
Management screen layout:Management screen layout:
The basic layout of a management screen is similar to the one described in MENU
screen – meaning eight options arranged around your touch point.
►
To select
To select an
To select To select
1 Touch anywhere on the screen. You will feel RAY vibrate slightly and a tone
an operation
operation::::
an an
operationoperation
sounds. Wherever you touch the screen becomes the middle of the Menu for
selection purposes.
You do not have to touch the screen precisely in the middle.
Somewhere near the middle is good enough! Anyway, touching too close
to the sides of the screen is ignored.
34
Page 35

RAY User Guide RAY Interface Basics
2 Imagine the place you touched the screen is the number 5 on a regular 12-
digit numeric keyboard. Clockwise round the area where you placed your
finger (which becomes the number 5), there are 8 numbers starting from 1 on
the upper left corner, 2 in the upwards direction, 3, 6, 9, 8, 7 and 4.
3 Slide your finger a little on the screen in any of the 8 directions. Each direction
represents a RAY activity. RAY reads out the name of the activity according to
the direction of your finger movement. For example, the operations available
for a contact management includes the following:
4 – Previous Screen: Returns
1 – Record a note: Record the name of the person or a note instead of
getting a vocal reading of the name itself.
2 – Call the contact:
3 – Information: get full information about the contact including name,
numbers and recording attached to it.
6 – Favorite: Add or remove the contact from the list of favorite contacts
7 – Edit:
8 – Send SMS to contact:
9 – Delete the contact:
4 To select the activity that RAY reads out, simply lift your finger. RAY then tells
you the name of the activity that is open so that you know what to do next.
If you slide your finger too much and go off the screen, you will hear a
cancellation sound and the current operation is cancelled.
Tip
You can go back to the previous screen from a management screen by
sliding your finger from the center of the screen to the number 4.
Tip
After you hold your finger on a Management screen for three seconds, RAY
reads out the name of the screen.
Tip
After you put your finger on a Management screen, RAY reads out the name
of the currently selected option in the Management screen. Lift your finger to
select it.
35
Page 36

RAY User Guide RAY Interface Basics
On devices in which we have a physical keypad, the 8 different options are
arranged in a circular list where the order of the items when going in DOWN
direction is: key in position 2, 8, 4, 6, 1, 3, 9, 7.
If a function is left empty, RAY will skip it and move directly to the next item in the
list.
36
Page 37

RAY User Guide RAY Interface Basics
RAY Keyboard
RAY Keyboard Screen
RAY KeyboardRAY Keyboard
RAY provides special screens for the entry of textual information or numbers.
The RAY keyboard is based on a 12-key alphanumeric screen, typically found in
simple mobile phones or home telephony devices. Each key represents a number
or three or more letters and symbols like a regular telephone device.
When used for numeric functions the keyboard includes only numbers and
telephony symbols. When used for Alpha Numeric text entry, the different letters
and numbers arranged under a single key in similar fashion to the structure of the
regular phone dialers.
RAY keyboard Screen can be used with finger gestures OR speech recognition
mode. When the screen appears, it is automatically set to recognize speech inputs.
Upon the first touch on the screen, the speech recognition mode is turned off.
Using gesture mode, the finger touch point on the screen always relates to the
number 5 on the 12 keys dialpad. By sliding your finger from the touch point to
the relative direction of the other keys, you will choose the related number or
letter. Lifting your finger when you hear the desired number or letter will make a
selection.
Some of the numbers in the Dialer have additional functionality besides enabling
you to type a number.
To access the additional functionality of a number key:
1 Place your finger near the center of the screen, this becomes the number 5.
2 Slide your finger from the center of the screen towards a number. RAY reads
out the number of that key and then (after a moment) reads out the function
of that number key.
For example, to erase the last digit of the number that you have entered,
slide your finger from the center of the screen towards the number 8. When
your finger reaches 8, RAY says 8. Hold your finger in that place on the screen
and after a moment RAY says the word Delete. Then, lift your finger off the
screen and RAY deletes the last digit that you entered.
The following are the additional functions provided by each number on the Dialer
keypad:
Screen
ScreenScreen
•
4 – Previous: Returns to the previous screen and leaves the Dialer.
•
2 – Read: Reads out the entire number that you entered.
37
Page 38
RAY User Guide RAY Interface Basics
•
6 – Dial: Dials the number that you entered.
•
7 – Delete Number: Clears the entire number that you entered.
•
8 – Delete Last Digit: Erases the last digit of the number that you entered.
Text Entry
Text Entry Using Speech Recognition
Text EntryText Entry
You can use RAY’s speech recognition option, as follows:
When the alphanumeric screen is first displayed, RAY is in speech
recognition listening mode until you touch the screen with your fingers.
You can now say the letters or words (even complete sentences and
complete number). Following one second of silence, RAY will translate the
vocal impression into textual information and will reads it out.
Please note that speech recognition requires on-line connectivity to the
internet server for accurate translation.
To make a phone call using speech recognition:
To make a phone call using speech recognition:
To make a phone call using speech recognition:To make a phone call using speech recognition:
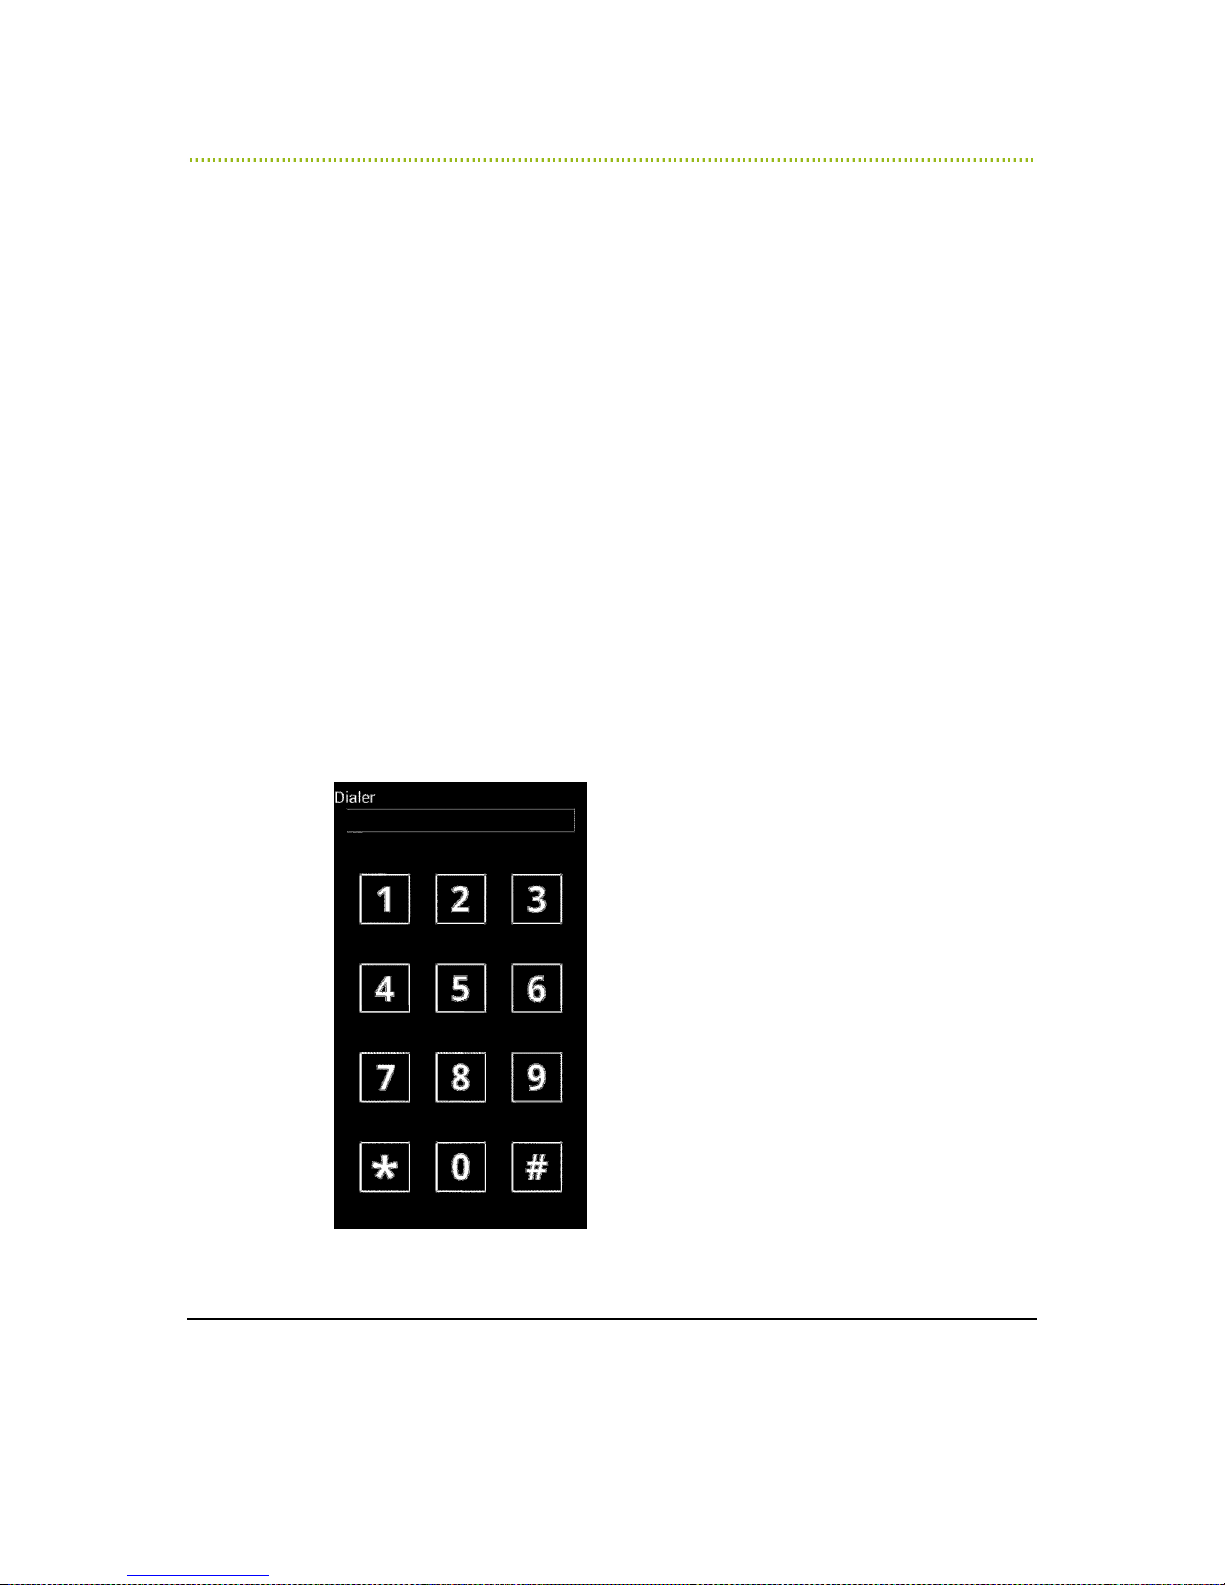
1 Open the dialer or keyboard screen
Using Speech Recognition
Using Speech Recognition Using Speech Recognition
RAY says Dialer or Keyboard and a 12-key dialing keypad appears, as
shown below:
Figure 14: Dialer
38
Page 39

RAY User Guide RAY Interface Basics
2 RAY is now in speech recognition listening mode until you touch the screen
with your fingers.
You can now say the digits or the entire number. After a one second of
silence, RAY will translate the speech impression into a textual string of
numbers and will read it aloud.
3 To call for an action, while you are in a numeric keypad mode (and there is no
recognition of words and letters), you can simply say “RAY” to dial the call.
Note, when you are in a text entry mode, you can speak a complete sentence and
get it registered in the input buffer.
Note
While in speech recognition mode, you can activate the underlying functions
available in the system by saying the following commands:
To enter action mode while speaking a sentence use one of the following
words: RAY, Action, Actions, Done typing, Finish typing, End typing.
You don’t need to enter action mode if you are in the dialer screen which
recognize only numbers.
• Back, Previous screen: Returns to the previous screen and leaves the
Dialer. This is under the digit 4.
• Read: Reads out the entire number that you entered. This is under the
digit 2.
• Dial, Finish, Finish typing, Send: Dials the number or send the
sentence that you entered. This is under the digit 6.
• Delete Number, Delete Word: Clears the entire number that you
entered. This is under the digit 7.
• Delete: Erases the last digit of the number or the last letter in a word
that you entered. This is under the digit 8.
For example, say “RAY Delete Number” to clear the entire number that
you entered.
Note
If you opened the Dialer and then accidently ended speech recognition mode
by touching the keypad, you can reactivate speech recognition mode by
moving your finger to the number 0 and holding it there for a moment.
39
Page 40

RAY User Guide RAY Interface Basics
Configurable Menu Options
RAY lets you configure the functionality of some of the options in its Menu screens,
meaning that you can define what a key does instead of its default functionality.
The icon shown on the screen is replaced and the action performed by the number
key changes according to your definition, as described below.
The following number keys can be configured:
In the Home Menu: Items in location 7 & 8
In the Additional More Menu: All items
For example, you might prefer to change the Calendar key to the Banknotes
function or to the Remote Assistance function (for example) in order to enable
easy access to these functions.
►
To
To reconfigure a menu key to perform a different function
reconfigure a menu key to perform a different function::::
To To
reconfigure a menu key to perform a different functionreconfigure a menu key to perform a different function
1 Open the desired Menu screen in which you would like to replace the
function.
2 Place your finger somewhere in the middle of the screen and slide it to one of
the number keys listed above in order to configure it.
3 Hold your finger on that number until RAY says Select Application, and then
lift your finger. RAY says Application List and opens a list of up to more than
20 applications from which you can select, such as Banknotes, Colors, Email
and so on.
4 Select an option from this RAY List screen.
40
Page 41
RAY User Guide Using RAY
4
Using RAY
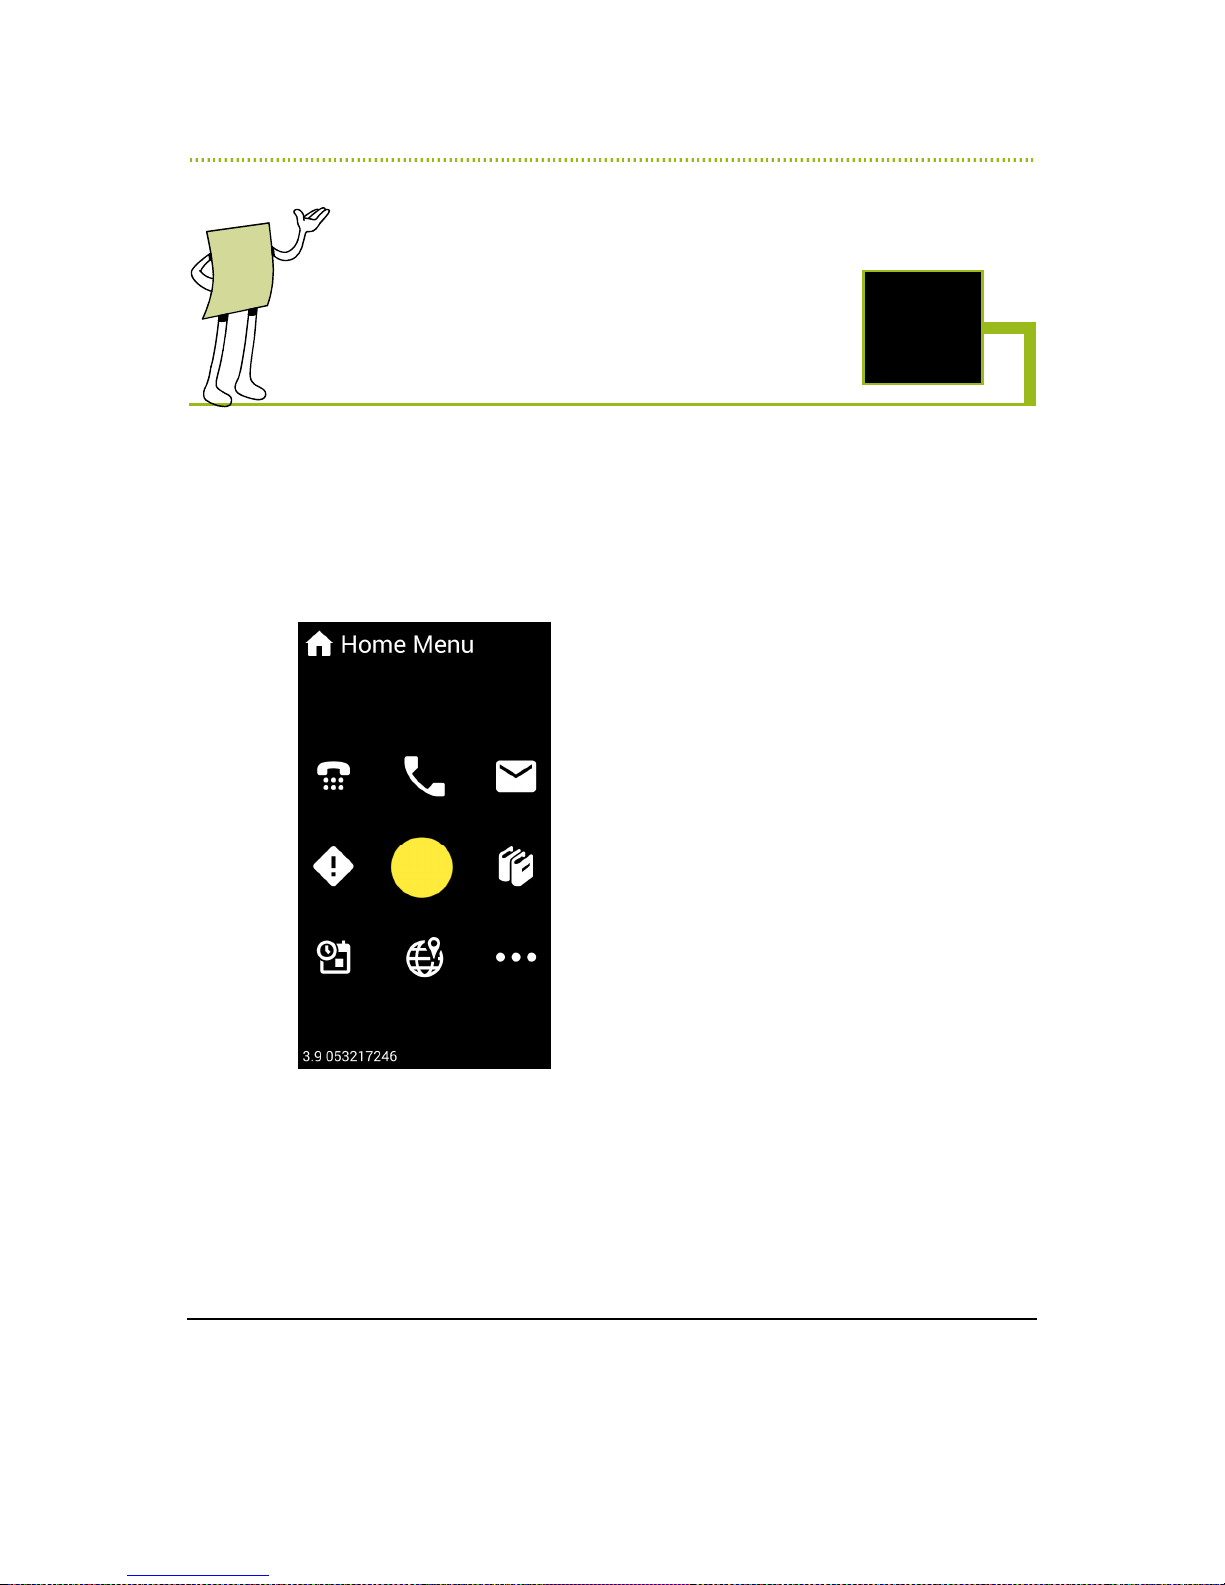
This chapter describes each of the services available from the Home Menu in
detail.
Figure 15: Home Menu
The following Home Menu options are provided:
•
Number 1 – Speed Dial, page 42, enables you to define and dial up to seven
preset numbers.
•
Number 2 – Telephone, page 44, provides a variety of telephone services.
•
Number 3 – Messages, page 50, provides a variety of message services.
41
Page 42
RAY User Guide Using RAY
•
Number 6 – Library, page 54, provides a variety of library services.
•
Number 9 – More, page 59, provides a variety of additional services.
•
Number 8 – Location, page Error! Bookmark not defined., provides
various lessons and practice sessions describing how to use RAY.
•
Number 7 – Calendar, page 59, provides various scheduling options.
•
Number 4 – Events, page 61, provides a list of notifications of various
system and application events.
Speed Dialing
Home Menu Number 1
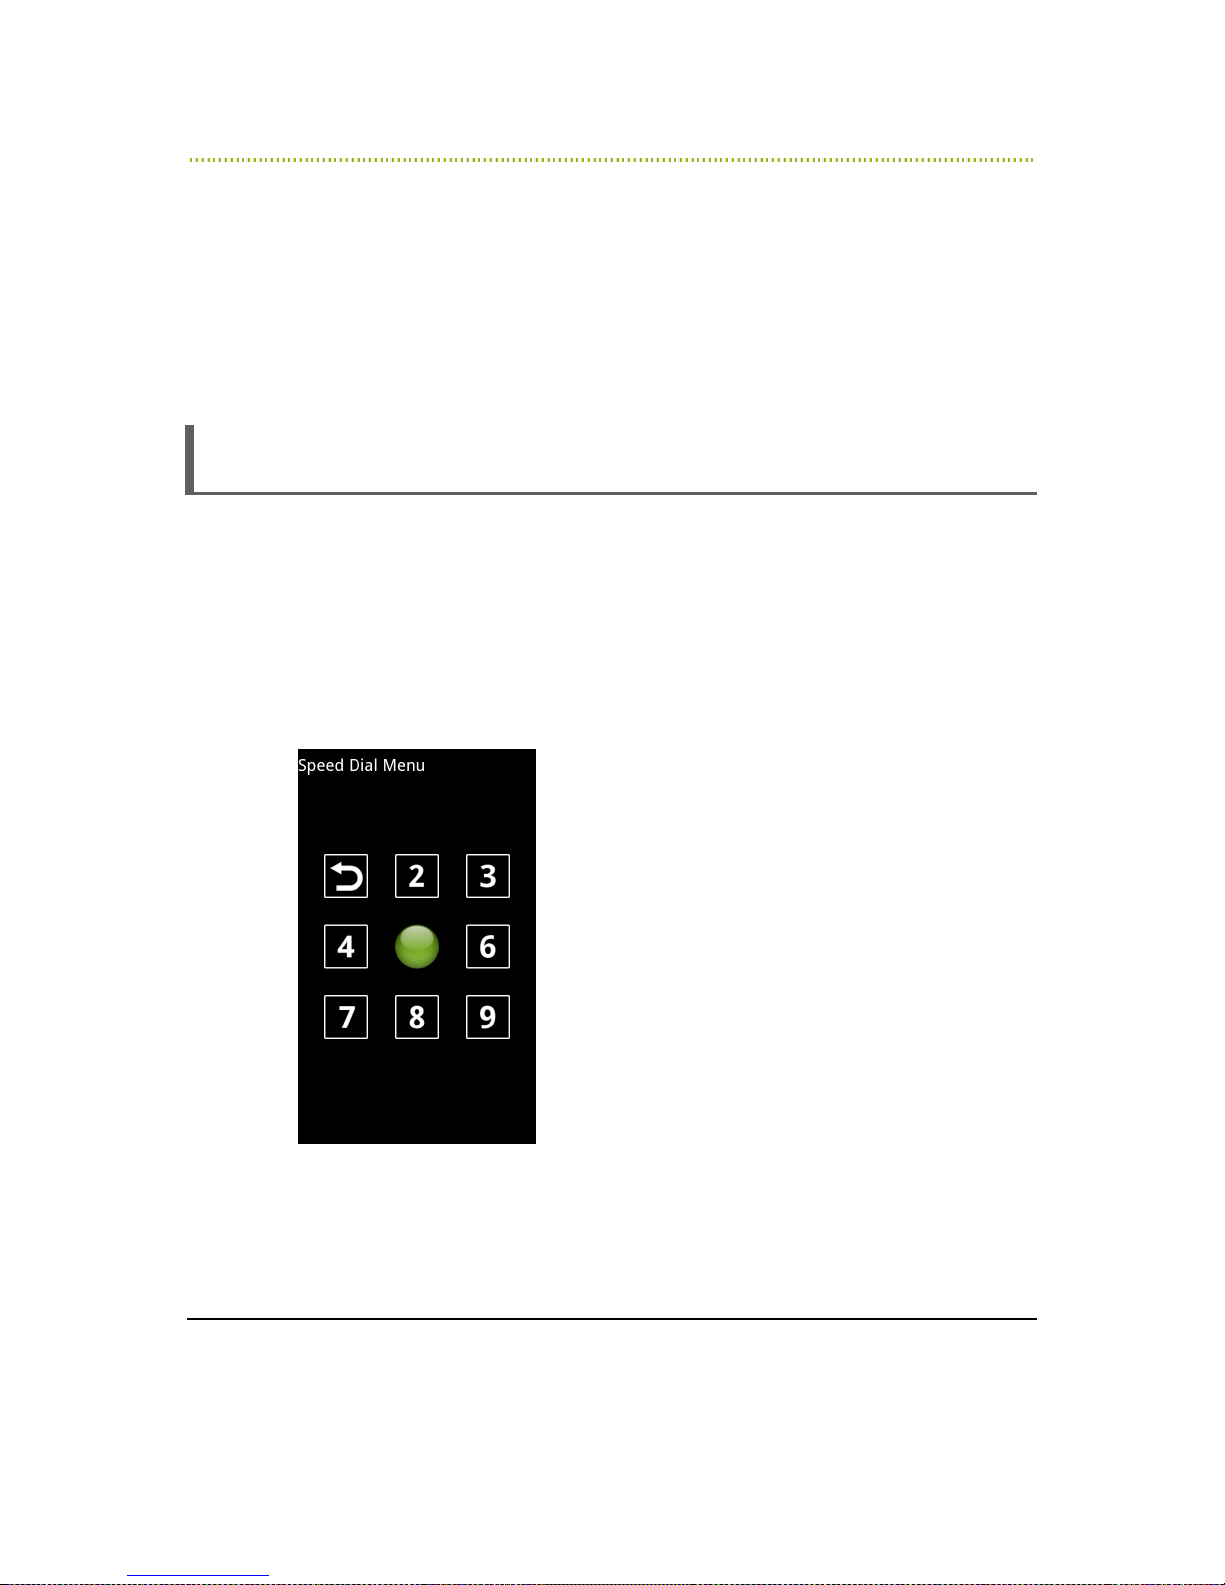
RAY enables you to define and dial up to seven preset numbers for quick dialing in
the number key positions 1, 2, 3, 6, 7, 8 and 9.
The Previous Screen option is in the number 4 position. This is standard for all
Menus.
The same Speed Dial Menu is used to define Speed Dial presets and to speed
dial, as described below:
Figure 16: Speed Dial Menu
You can only define speed dial presets after you have added Contacts to your
Contact List, as described in the
Entering a New Contact
section on page 49.
42
Page 43

RAY User Guide Using RAY
►
To define a speed dial preset:
To define a speed dial preset:
To define a speed dial preset:To define a speed dial preset:
1 Open the Home Menu.
2 Place your finger somewhere in the middle of the screen and slide it towards
the number 1 until RAY says Speed Dial. The Speed Dial Menu opens and
RAY says Speed Dial Menu.
3 Place your finger somewhere in the middle of the screen and slide it towards
one of the Speed Dial preset keys in positions 1, 2, 3, 6, 7, 8 or 9.
4 If no Contact was assigned to this preset key, then RAY says Select Contact
and opens the Contacts List.
If a Contact was already assigned to this preset key, then RAY reads out the
name of the Contact assigned to this preset key. To change this Contact, hold
your finger on this key until RAY says Select Contact. The Contact List is
open.
5 Select a Contact by placing your finger in the center of the screen. RAY then
reads out the name of the selected Contact. You can also slide your finger
downwards so that RAY reads out the names in the Contacts List. Lift your
finger to assign the Contact that you hear to this Speed Dial preset key.
►
To speed dial:
To speed dial:
To speed dial:To speed dial:
1 Open the Home Menu.
2 Place your finger somewhere in the middle of the screen and slide it towards
the number 1 until RAY says Speed Dial. The Speed Dial Menu opens and
RAY says Speed Dial Menu.
3 Place your finger somewhere in the middle of the screen and slide it towards
one of the Speed Dial preset keys in positions 1, 2, 3, 6, 7, 8 or 9.
4 RAY reads out the name of the Contact assigned to this preset key. Lift your
finger to dial this Contact.
43
Page 44
RAY User Guide Using RAY
Telephone
Home Menu Number 2
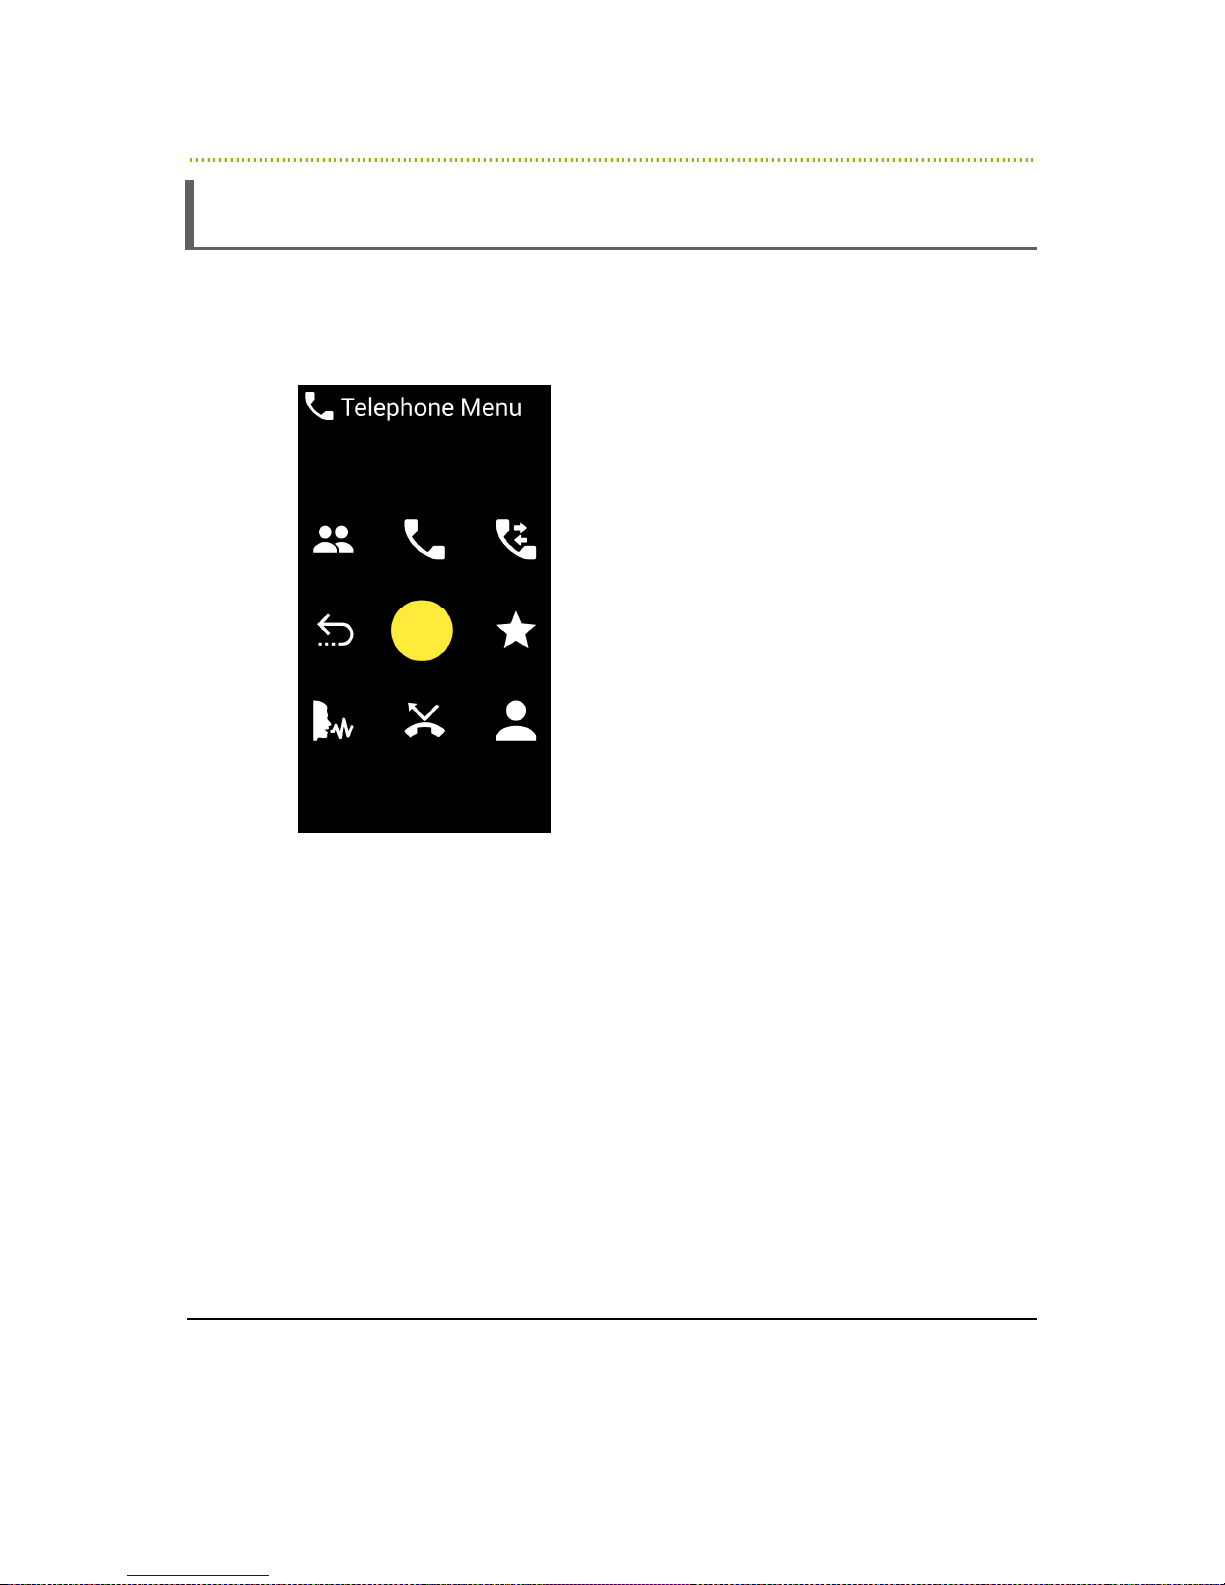
The following Telephone services are available from the Home Menu in the
number 2 position:
Figure 17: Telephone Menu
•
Number 4 – Previous Screen
•
Number 1 – Manage Contacts: Enables you to fully manage your contact
list including add delete and change. Note that you can also manage your
contact list from the web (see remote assistance chapter).
•
Number 2 – Dialer: See below, enables you to make a call by dialing a
telephone number.
•
Number 3 – Call Log: Tracks all of the calls on this RAY and initiate followup actions including convert a number to a contact person, call back to the
person/number, send a message and such.
•
Number 6 – Call Favorite contact: See below, enables you to easily call
your favorite Contacts.
•
Number 9 – Call Contact: See below, enables you to call a Contact.
44
Page 45
RAY User Guide Using RAY
•
Number 7 – Voice Dialing: Enables you to call a person by saying his/her
name after the beep sound. This capability is enabled by automatic speech
recognition and is subject to errors due to background noises, accent and
unclear prompting. To perfect this function, you may have to practice a bit and
adjust your pronunciation.
•
Number 8 – Missed Calls: Provides a history of missed calls.
Dialing a Number
Dialing a Number
Dialing a NumberDialing a Number
Home Menu Telephone Menu Number 2
►
To make a phone call
To make a phone call by dialing a number:
To make a phone call To make a phone call
1 From the Home Menu, go to the Telephone Menu by placing your finger
somewhere in the middle of the screen and sliding it upwards towards the
number 2.
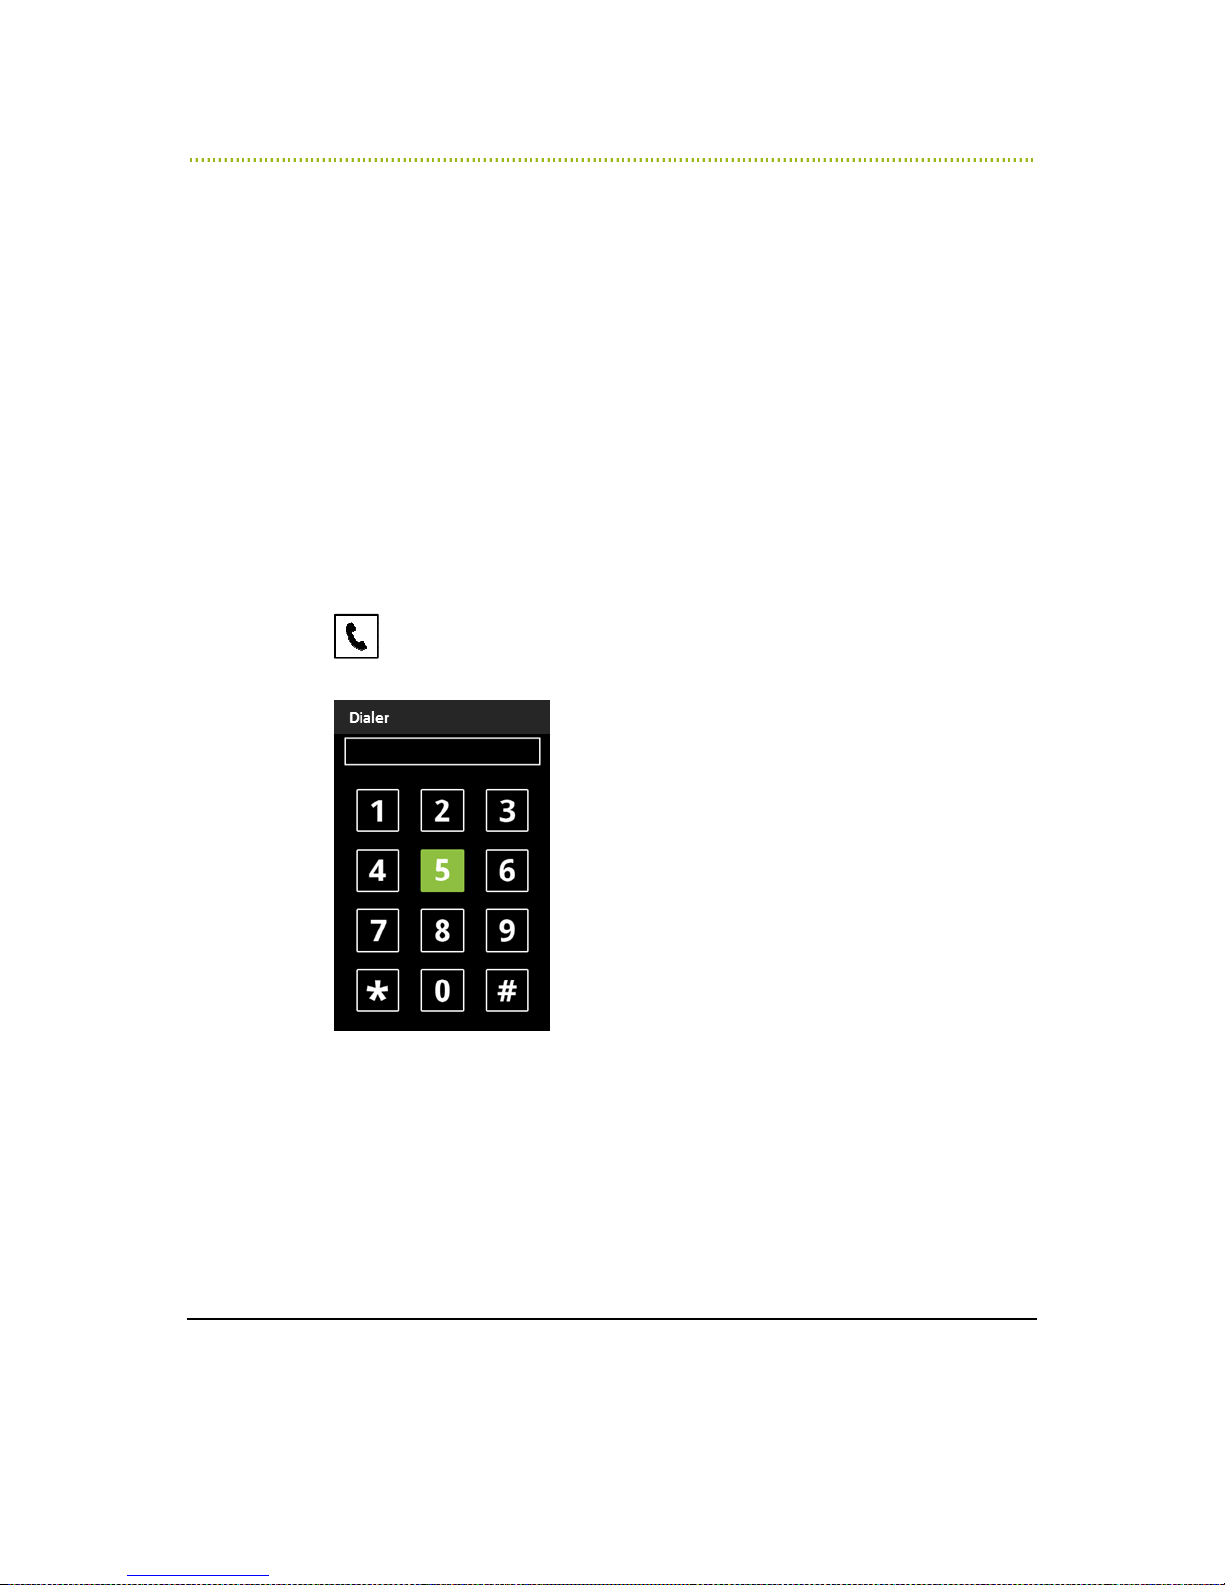
RAY says Dialer and a 12-key dialing keypad appears, as shown below:
by dialing a number:
by dialing a number:by dialing a number:
Figure 18: Dialer
2 Enter the phone number to dial, as described in the
on page 20.
3 To dial the number that was entered, slide your finger to the number 6 and
leave it there until RAY says Dial and then lift your finger to dial.
Entering a Number
45
section
Page 46

RAY User Guide Using RAY
4 In the same way as you can dial the phone number that you entered (as
described above in Step 4) some of the number keys in the Dialer have
additional functionality. You can activate this functionality by sliding your
finger to that number, leaving your finger on that number until RAY says the
name of the function and then lifting your finger to activate it. The following
options are available:
Number 2 – Read: To have RAY read the number out to you, slide your
finger towards the number 2 and leave it there until RAY says Read.
Number 8 – Delete Number: To erase the last digit that you entered,
slide your finger towards the number 8 and leave it there until RAY says
Delete Number.
Number 7 – Delete: To erase the entire number, slide your finger
towards the number 7 and leave it there until RAY says Delete.
Number 1 – Previous Screen: To return to the previous screen and
leave the Dialer, slide your finger towards the number 1 and leave it there
until RAY says Previous Screen.
5 During a call, you can perform the following:
To terminate the call, short press the ON/OFF button.
To toggle the speakerphone on and off, swipe your finger from the middle
of the screen downwards.
Answer
Answering/Rejecting
AnswerAnswer
Upon receiving an incoming phone call, RAY reads out the name or number of the
caller. RAY can only read out the name of the caller if his/her number is in the
Contacts List.
►
To answer the call:
To answer the call:
To answer the call:To answer the call:
•
Short press the ON/OFF button.
►
To
To reject
reject the call:
To To
rejectreject
•
Press the Volume Down key.
Calling a Contact
Calling a Contact
Calling a ContactCalling a Contact
►
To make a phone call using the Contacts List screen:
To make a phone call using the Contacts List screen:
To make a phone call using the Contacts List screen:To make a phone call using the Contacts List screen:
Refer to the
ing/Rejecting a
ing/Rejectinging/Rejecting
the call:
the call:the call:
Making a Call
section on page 15 for a full description.
46
a Phone Call
Phone Call
a a
Phone CallPhone Call
Page 47
RAY User Guide Using RAY
Calling
Calling UUUUsing Speech Recognition
Calling Calling
Home Menu Telephone Menu Number 2
►
To make a phone call using speech recognition:
To make a phone call using speech recognition:
To make a phone call using speech recognition:To make a phone call using speech recognition:
1 From the Home Menu, go to the Telephone Menu by placing your finger
somewhere in the middle of the screen and sliding it upwards towards the
number 2.
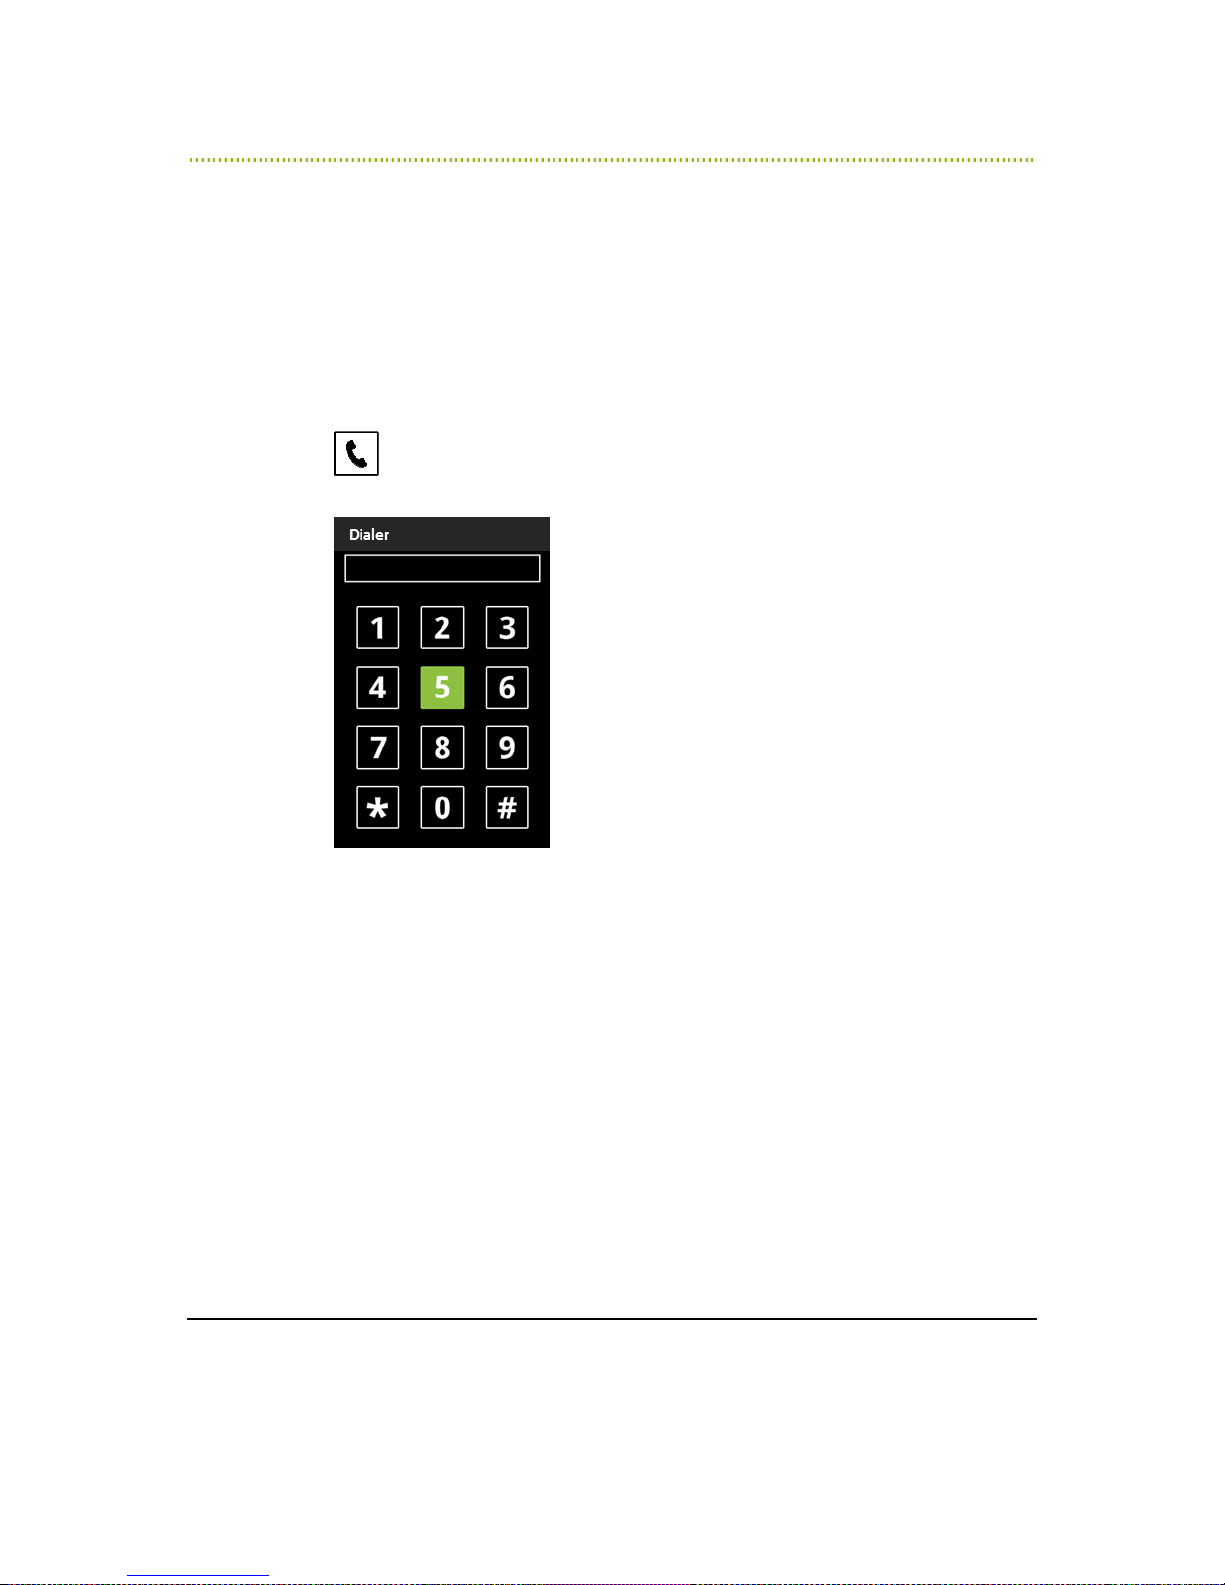
RAY says Dialer and a 12-key dialing keypad appears, as shown below:
sing Speech Recognition
sing Speech Recognition sing Speech Recognition
Figure 19: Dialer
2 RAY is now in speech recognition listening mode until you touch the screen
with your fingers.
You can now say the digits to dial. After a one second silence, RAY reads out
the number.
3 Say the words “RAY Dial” to dial the call.
47
Page 48

RAY User Guide Using RAY
Note
You can activate the underlying function of each digit on the dialer by saying
the words “RAY <command>”. The following are the additional functions
provided on the Dialer keypad:
• Previous: Returns to the previous screen and leaves the Dialer. This is
under the digit 1.
• Read: Reads out the entire number that you entered. This is under the
digit 2.
• Dial: Dials the number that you entered. This is under the digit 6.
• Delete Number: Clears the entire number that you entered. This is
under the digit 7.
• Delete Last Digit: Erases the last digit of the number that you entered.
This is under the digit 8.
For example, say “RAY Delete Number” to clear the entire number that
you entered.
Note
If you opened the Dialer and then accidently ended speech recognition mode
by touching the keypad, you can reactivate speech recognition mode by
moving your finger to the number 0 and holding it there for a moment.
48
Page 49
RAY User Guide Using RAY
Entering a New Contact
Entering a New Contact
Entering a New ContactEntering a New Contact
After you receive a call or make a call, you can add that number to the Contacts
list from the Call Log, Miss Calls, Incoming Calls list or Missed Calls list.
►
To creat
To create a new Contact:
To creatTo creat
1 Select the call whose number you want to add to the Contacts list.
2 This number is added as the phone number of the new Contact.
e a new Contact:
e a new Contact: e a new Contact:
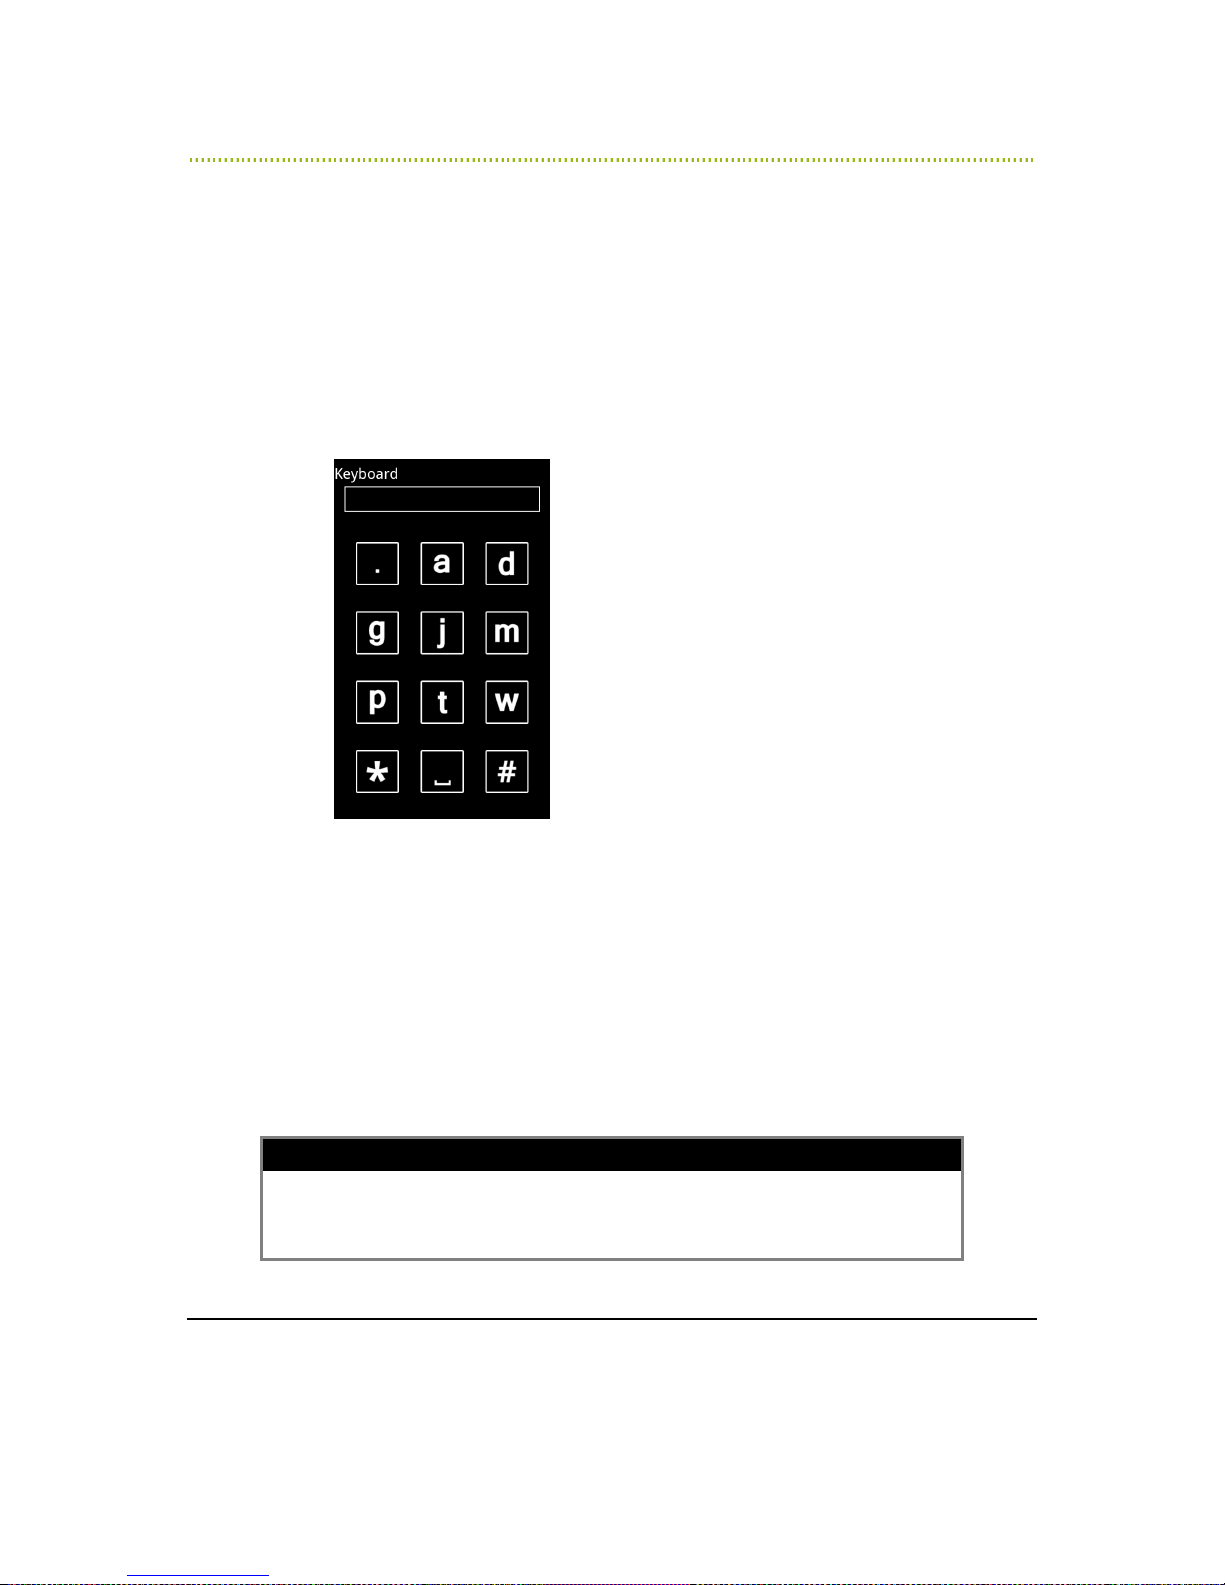
A keyboard screen appears in which you can enter the name of the Contact.
Figure 20: Alphanumeric Screen – Enter a Contact Name
This RAY keyboard is based on a 12-key alphanumeric screen. Each key
represents three or more letters and symbols like a regular telephone device.
3 Select a letter/symbol by moving your finger to the selected key and leaving it
there until RAY says the desired letter. Lift your finger to select that letter.
Alternatively, you can use RAY’s speech recognition option, as follows:
When the alphanumeric screen is first displayed, RAY is in speech
recognition listening mode until you touch the screen with your fingers.
You can now say the letters or words (even complete sentences). After a
one second silence, RAY reads it out.
Note
Contacts can also be added to your Contact list from your personal RAY
web page on the Internet available at the RAY website, as described in
Chapter 5, Remote Control and Configuration
49
on page 68.
Page 50

RAY User Guide Using RAY
Favorites
Favorites
FavoritesFavorites
Home Menu Number 2 (Telephone Menu) Number 6
The Favorites service is available in the direction of the number 6 in the
Telephone Menu screen.
The Favorites service provides a List screen of your preferred Contacts in order to
enable easy access. For each Contact in the List screen, the following operations
are provided:
•
Calling that Contact
•
Recording a verbal note for that Contact
•
Listening to a full description of the Contact, including the name, phone
number and recorded note
•
Deleting a verbal note for that Contact (if one was recorded)
You can also manage your Favorites screen, as described in
Control and Configuration
on page 68.
Chapter 5, Remote
50
Page 51
RAY User Guide Using RAY
Messages
Home Menu Number 3
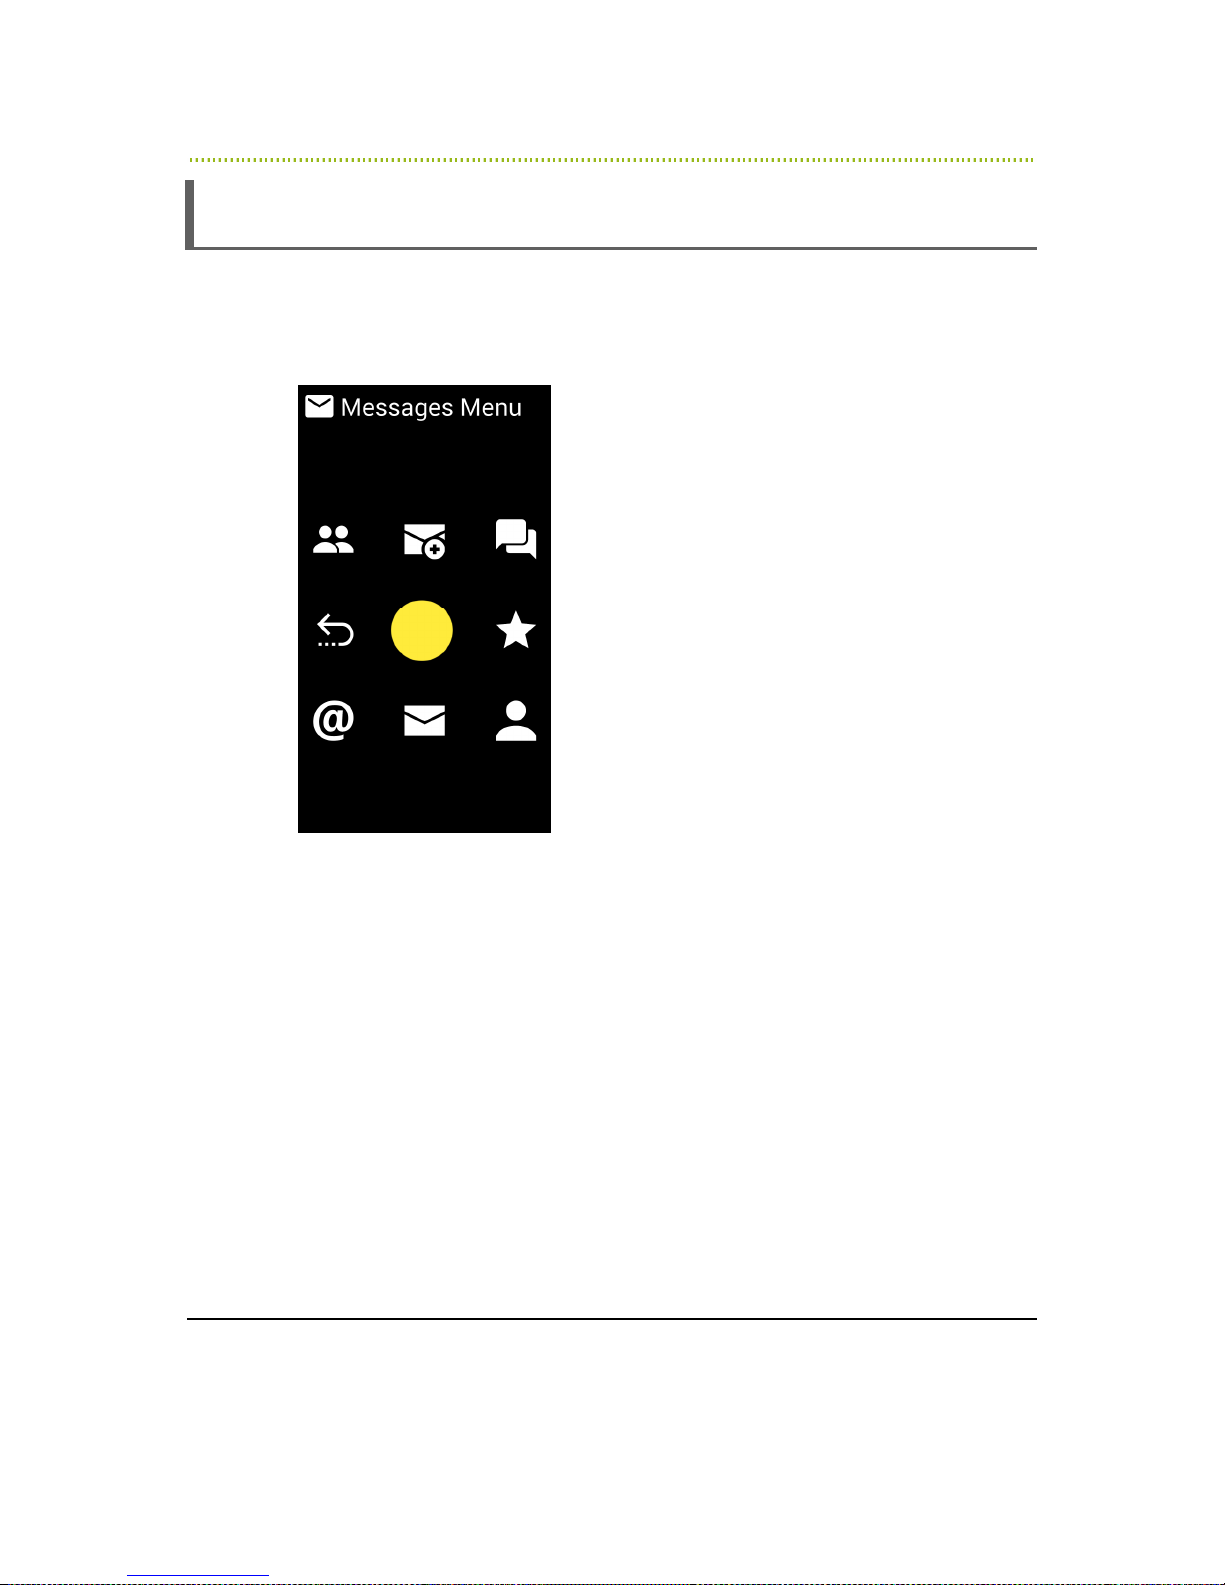
The following Messages services are available from the Home Menu in the
number 3 position:
Figure 21: Messages Menu
•
Number 4 – Previous Screen
•
Number 1 – Manage Contacts: Enables you to fully manage your contact
list including add delete and change. Note that you can also manage your
contact list from the web (see remote assistance chapter).
•
Number 2 – New Message: Enables you to write and send a new message,
as described in the
•
Number 3 – Messages Log: Enables you to listen to your incoming and
outgoing messages.
•
Number 6 – Send message to Favorite: Enables you to easily send a
message to your favorite Contact.
•
Number 9 – Send message to Contact: Enables you to select a Contact to
whom to send a message and then to type in that message.
Sending a Message
51
section on page 52.
Page 52

RAY User Guide Using RAY
•
Number 8 – Unread Messages List: Enables you to listen to new unread
messages.
•
Number 7 – Email: Enables you to read and write your emails. RAY only
supports Email accounts that are part of the GMAIL network by Google.
Sending a Message
Sending a Message
Sending a MessageSending a Message
Sending a Message to a Contact
Sending a Message to a Contact
Sending a Message to a ContactSending a Message to a Contact
Home Menu 3 (Messages Menu) Number 9
►
To send a message
To send a message to a Contact
To send a message To send a message
1 From the Home Menu, select number 2 to the Messages Menu.
2 Select number 9 to open the Contacts List.
3 Select a Contact in the Contact List. An alphanumeric screen opens.
4 Type in the message in the alphanumeric screen, as described on page 49.
5 Slide you finger to the letter M in the number 6 position and hold it there until
RAY says Finished Typing. The Dialer opens up.
6 Slide you finger to the number 6 position and hold it there until RAY says
Finished Typing. The message is then sent.
to a Contact::::
to a Contactto a Contact
Sending a Message by Dialing a Number
Sending a Message by Dialing a Number
Sending a Message by Dialing a NumberSending a Message by Dialing a Number
Home Menu 3 (Messages Menu) Number 2
►
To
To send a message
send a message by dialing a number:
To To
send a message send a message
1 From the Home Menu, select number 2 to the Messages Menu.
2 Select number 2 to create a new message. An alphanumeric screen opens.
3 Type in the message in the alphanumeric screen, as described on page 49.
4 Slide you finger to the letter M in the number 6 position and hold it there until
RAY says Finished Typing. The Dialer opens up.
5 Slide you finger to the number 6 position and hold it there until RAY says
Finished Typing. The message is then sent.
Listen
Listening
ListenListen
Home Menu 3 (Messages Menu) 3 (Messages List)
ing to a Message
inging
by dialing a number:
by dialing a number:by dialing a number:
to a Message
to a Messageto a Message
52
Page 53

RAY User Guide Using RAY
►
To listen to a message:
To listen to a message:
To listen to a message:To listen to a message:
1 In the Messages Menu, slide your finger towards the number 3. The
Messages List appears. RAY reads out the number or name of the person who
sent the message. The name of the person is only read out if that person was
defined in the Contacts List.
2 Scroll the list and lift your finger to choose the desired message. At this point
RAY a Management screen appears in which you can select the following
operations:
To listen to an incoming SMS message
To listen to information about the message
To delete the message
53
Page 54
RAY User Guide Using RAY
Library
Home Menu Number 6 (Library Menu)
Library services are available in the direction of the number 6 in the Home Menu.
RAY enables you to subscribe to magazines, which are then automatically loaded
onto RAY as each is published. RAY then notifies you that a new magazine is ready
for you, as described in the
The Library service also enables you to download audio books from your audio
library source.
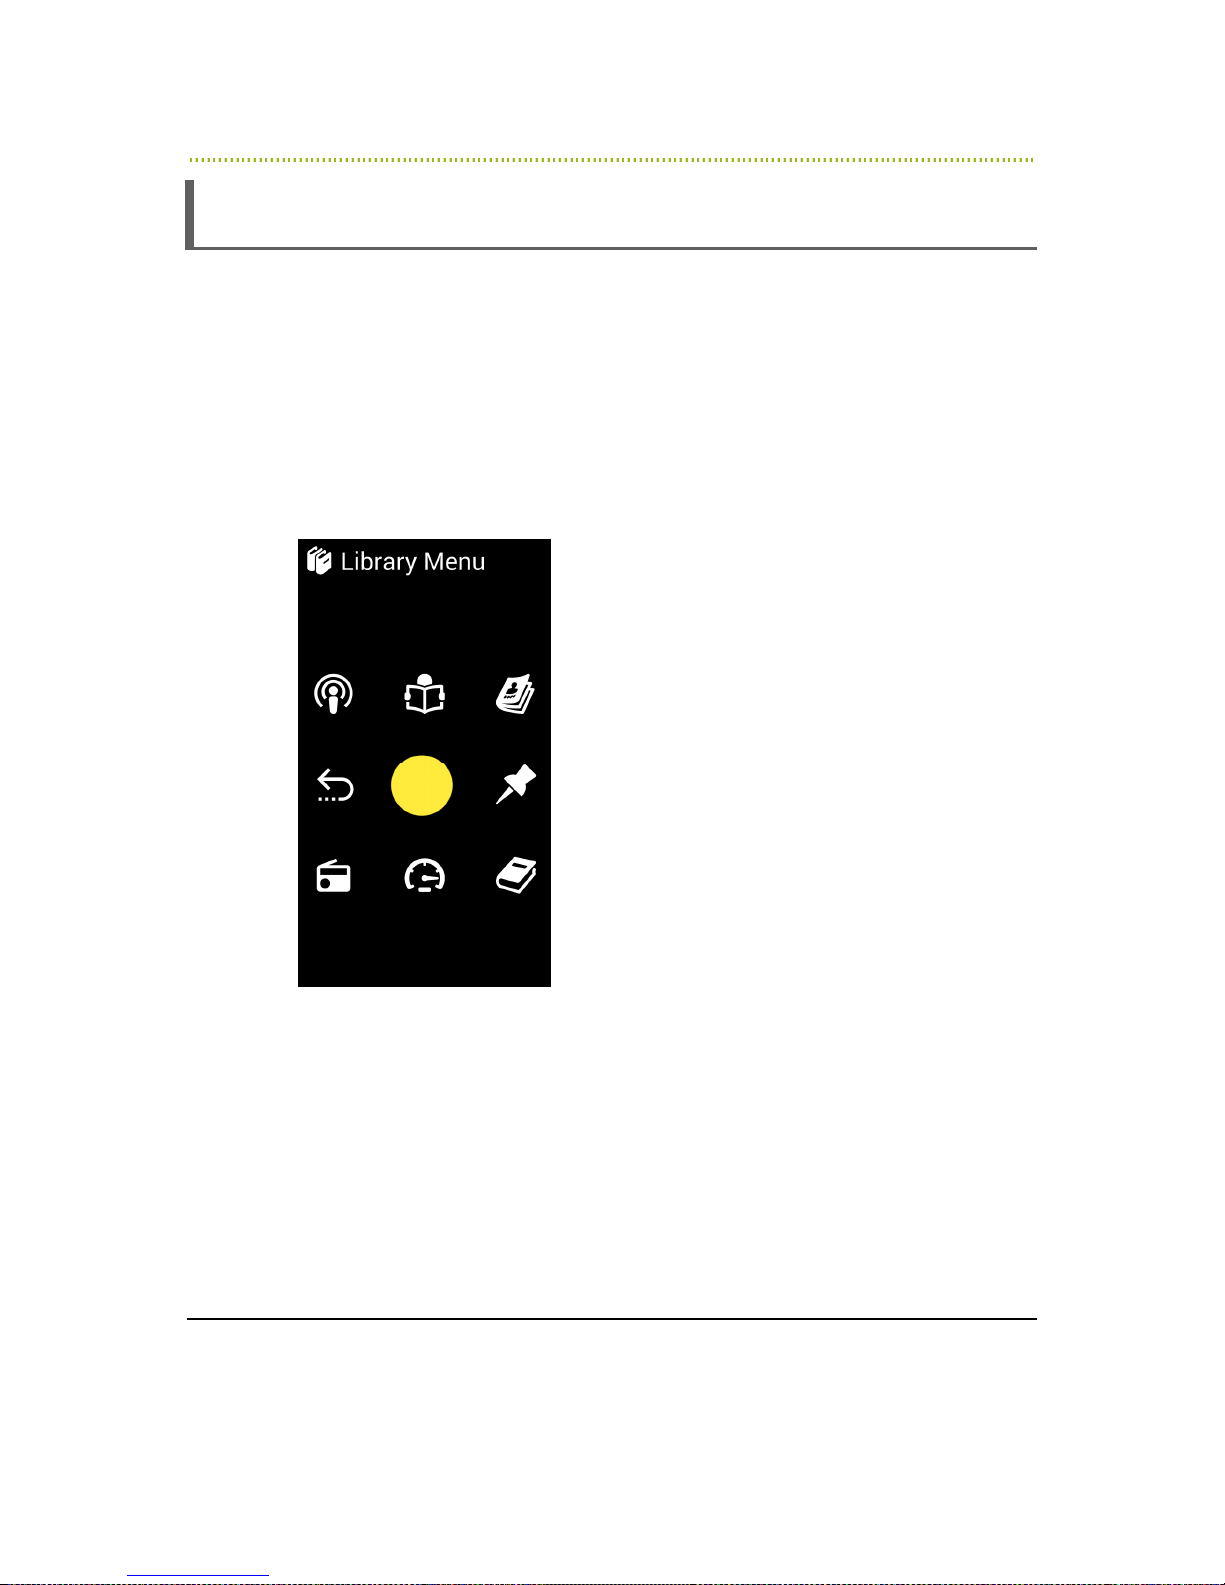
The Library Menu opens, as shown below:
Events
section on page 61.
Figure 22: Library Menu
The following services are available from the Library Menu:
•
Number 4 – Previous Screen
Number 1 – Podcast: Enables you to listen to online podcasts. You can set
the list of podcasts available on your personal web page as described in
remote assistance chapter.
Number 7 - Internet Radio: Enables you to listen to Internet radio. You can
set the list of Internet Radio Station on your personal web page as described
in remote assistance chapter.
54
Page 55
RAY User Guide Using RAY
•
Number 2 – My Library: Enables you to access the list of magazines and
books that are already saved on your RAY device.
•
Number 3 – Magazine Catalog: Enables you to access an online catalog of
magazines that you can download to RAY in order to listen to them.
•
Number 6 – Last: Opens the last book that you read to the same page.
•
Number 9 – Books Catalog: page 58, Enables you to access a menu of
options for listening to books.
•
Number 8 – Speed: Enables you to set the reading speed. Select a speed
percentage relative to normal reading speed, as follows: 50%, 75%, 100%,
125%, 150%, 175% and 200%. 50% is the slowest and 200% is the fastest.
My
My Library
My My
Home Menu 6 Library Menu Number 2
The My Library Management screen is available in the direction of the number 2
in the Library Menu.
This service provides access to the list of magazines and books that are saved on
your RAY device. After you choose the magazine or book to which you want to
listen, a Management screen opens that includes the following options:
Library
LibraryLibrary
Read: Starts reading.
Information: Reads out information about the current article or chapter,
including its name and length.
Articles/Chapters: Reads out a list of articles/chapters in the current
magazine or book and enables you to go to any item in the List screen. By
default, RAY keeps your last reading position of each magazine stored on
the device.
Previous Screen
Pause: Pauses reading.
Next: Goes to the next article/chapter in the magazine/book.
55
Page 56
RAY User Guide Using RAY
Previous: Goes to the previous article/chapter in the magazine/book.
Speed: Enables you to set the reading speed. Select a speed percentage
relative to normal reading speed, as follows: 50%, 75%, 100%, 125%,
150%, 175% and 200%. 50% is the slowest and 200% is the fastest.
Tip
RAY keeps track of your last place in each book and magazine, and
automatically opens to that place each time you come back to continue
reading.
MMMMagazine
agazine Catalog
agazine agazine
Home Menu 6 Library Menu Number 3
The Magazine Catalog service is available in the direction of the number 3 in the
Library Menu.
Catalog
CatalogCatalog
This service provides access to an online catalog of magazines that you can
download to RAY in order to listen to them.
Tip
Instead of performing the procedure below, you can subscribe to a magazine
on RAY’s website, as described in
Configuration
issue as soon as it is published. After the download is completed, RAY
automatically alerts you with an Event notification. You can then select that
Event to listen to the magazine, as described on page 61.
►
To download a
To download a magazine
To download a To download a
1 Select a magazine/book from the RAY List screen. A RAY List opens listing the
issues of the selected magazine.
2 Select the preferred magazine issue from the List screen.
RAY then says the words Download started and starts downloading the
selected magazine issue or book. You can continue to use RAY for other things
while it is downloading.
When the download is completed, RAY alerts you with an Event notification.
You can select that event to listen to the magazine/book.
on page 68. RAY then automatically downloads each magazine
magazine issue/book
magazinemagazine
issue/book::::
issue/bookissue/book
Chapter 5, Remote Control and
56
Page 57

RAY User Guide Using RAY
Events are described on page 61. The following options are provided from this
Event:
Last: Continue reading the last magazine/book that was read.
Magazine, as described in this section.
My Magazines, as described on page 55.
Speed: Enables you to set the reading speed from the RAY List screen
that applies to the entire device. Select the percentage of the speed
relative to normal reading speed, as follows: 50%, 75%, 100%, 125%,
150%, 175% and 200%. 50% is the slowest and 200% is the fastest.
Manage: Enables you to delete a magazine issue/book that is stored on
RAY.
Note
If RAY’s memory card is getting full, then RAY automatically deletes old
magazine issues when it needs to make space for new issues. The oldest are
deleted first.
57
Page 58
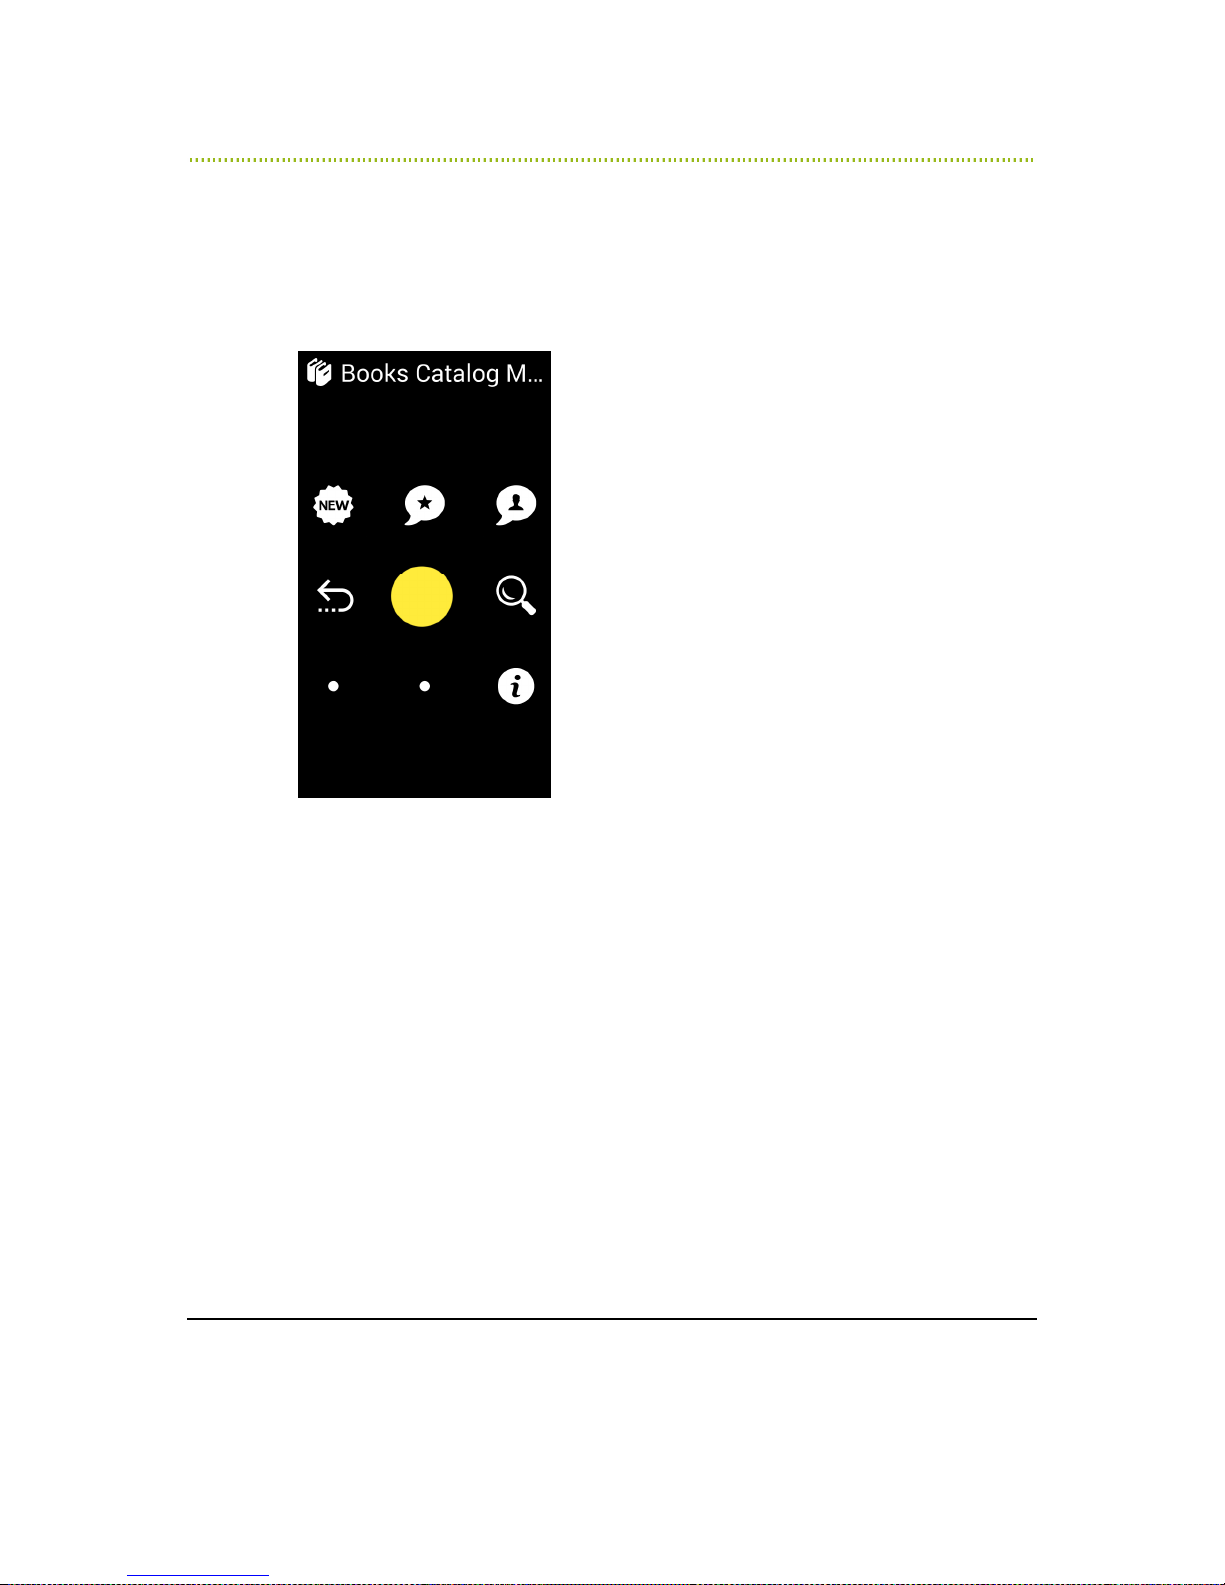
RAY User Guide Using RAY
BBBBook
ookssss CCCCatalog
ookook
Home Menu 6 Library Menu Number 9
The Books Catalog Menu provides various options for downloading books, as
described below:
atalog
atalogatalog
Figure 23: Books Catalog Menu
•
Number 4 – Previous Screen
•
Number 1 – New Books: Enables you to browse through a list of new books
in the library that you can download.
•
Number 2 – Recommended Books: Enables to browse through a list of
books selected by RAY librarian.
•
Number 3 – most popular Books: Enables to browse through a list of
books selected by other readers.
•
Number 6 – Search: Enables you to type in a term in order to search for
books.
•
Number 9 – Books in download: Enables you to get a list of books who are
in download or waiting to be downloaded to the device. There are cases in
which the books found in the library are not yet available on-line for direct
download.
•
Number 7 & 8 options are empty.
58
Page 59
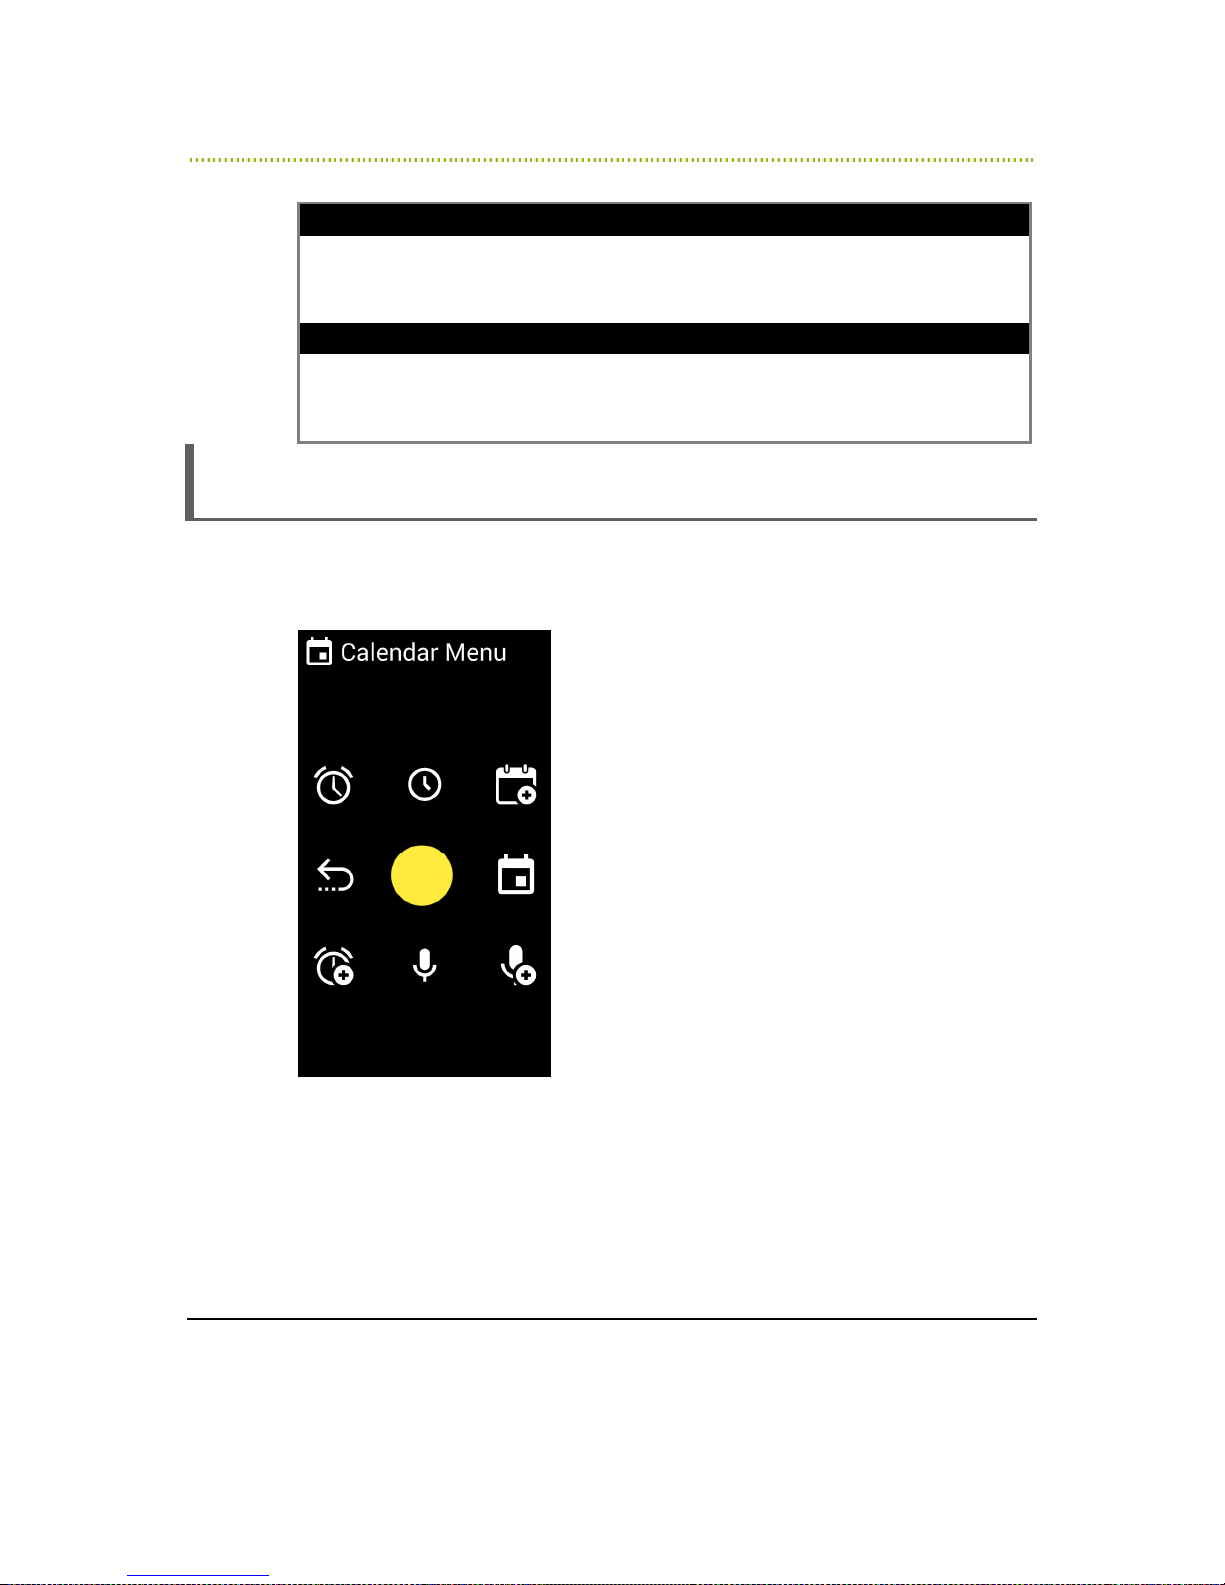
RAY User Guide Using RAY
Note
You may also download books from your own personal RAY web page on the
Internet available at the RAY website, as described in
Control and Configuration
on page 68.
Chapter 5, Remote
Note
To exit third-party applications, such as IDEAL Group Reader, use the Power
Menu, as described on page 23.
Calendar
Home Menu Number 7
The Calendar Menu provides various scheduling options.
Figure 24: Calendar Menu
•
Number 4 – Previous Screen
•
Number 1 – Alarm List: Readers out your alarm list.
•
Number 7 – Add Alarm: Enables you to add an clock alarm.
59
Page 60

RAY User Guide Using RAY
•
Number 2 – Clock: Readers out the current time.
•
Number 3 – Add Appointment: Enables you to add an appointment.
•
Number 6 – Appointments: Opens your appointments list.
•
Number 9 – Add Recording: Enables you to make a recording.
•
Number 8 – Recordings List: Enables you to access the list of recordings
that you have made.
•
Tip
You can easily set appointments in your Calendar by sending a Calendar
invitation to your RAY email address.
Note
You may also manage your schedule from your own personal RAY web page
on the Internet available at the RAY website, as described in
Remote Control and Configuration
on page 68.
Chapter 5,
60
Page 61
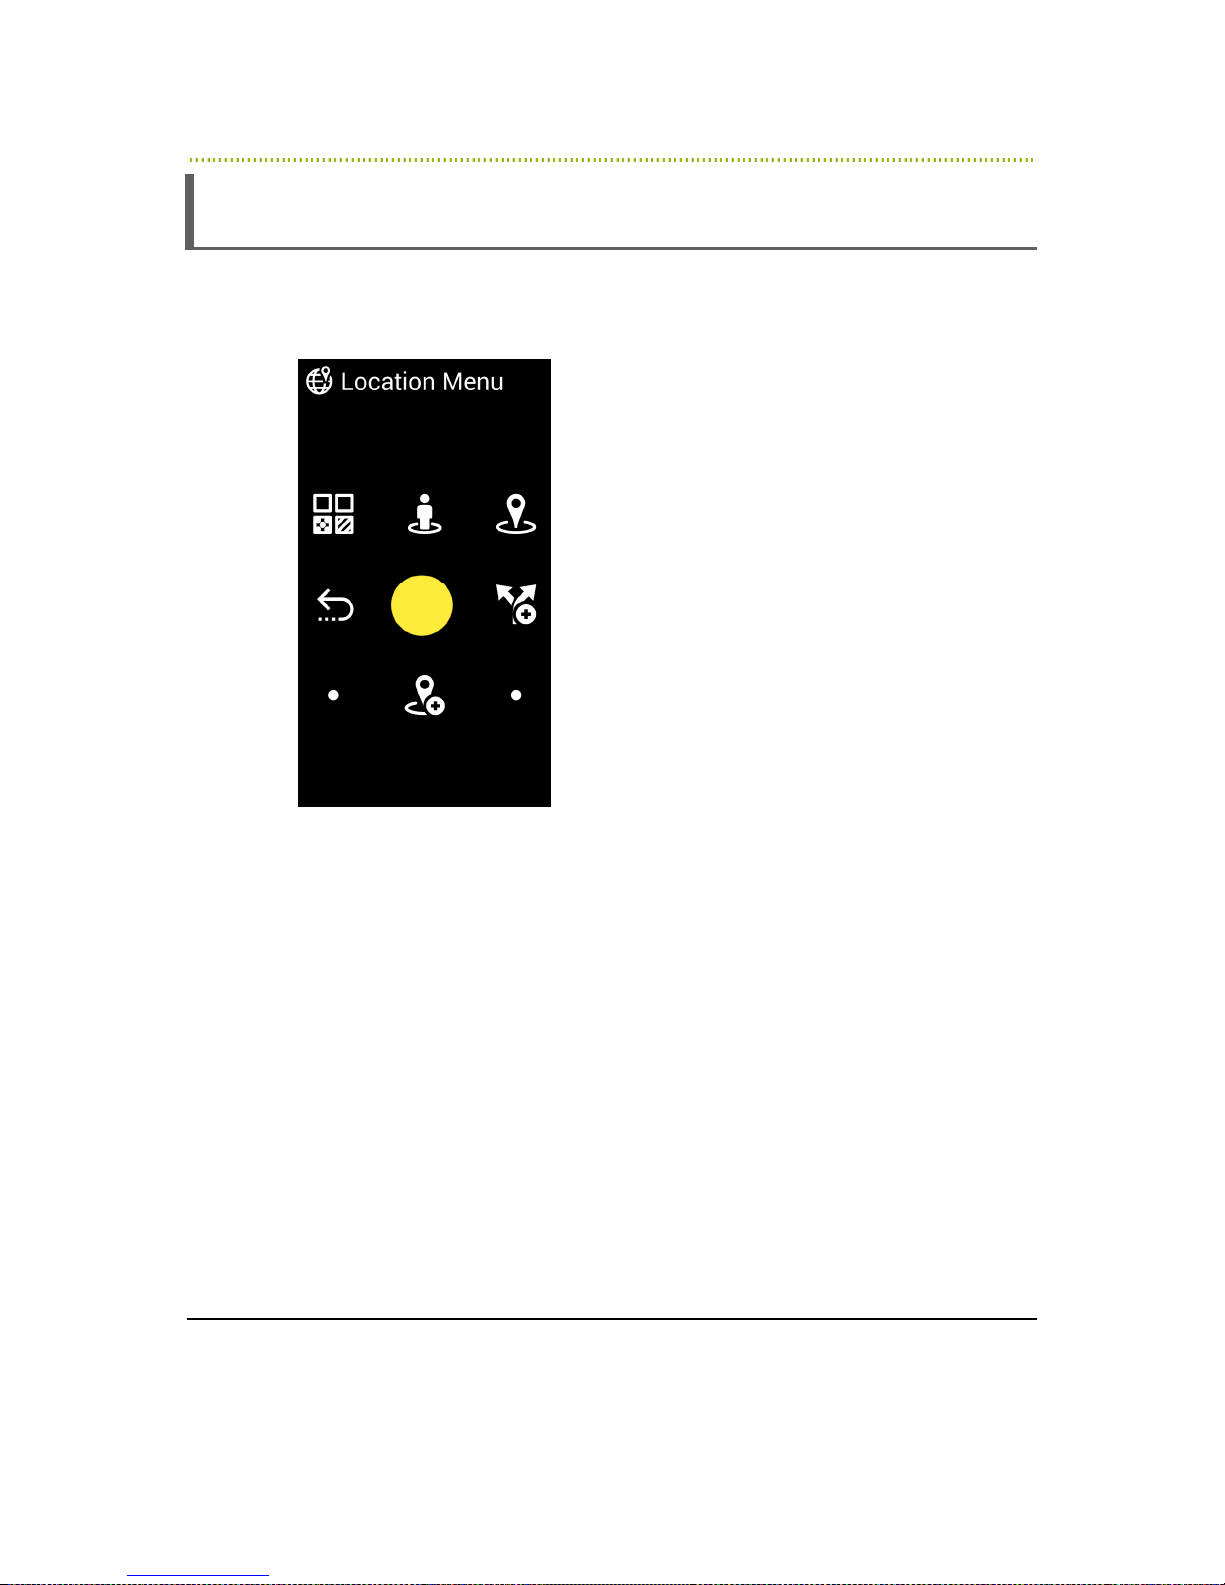
RAY User Guide Using RAY
Location
Home Menu Number 8
The Location Menu provides various scheduling options.
Figure 25: Calendar Menu
•
Number 4 – Previous Screen
•
Number 1 – Search by Category: Search for business type around your
current location
•
Number 2 – My Location: Reads out your current geographic location. The
system is based on a GPS component inside the device. Its accuracy level is
determined by the information received by the device. This option requires a
connection to the Internet from RAY at the moment this option is used.
•
Number 3 – Around Me: Search for businesses around your current location
•
Number 6 – New Trip: Enables getting direction information using public
transportation (available in selected countries only)
61
Page 62

RAY User Guide Using RAY
•
Number 8 – My Places: Setting of a list of favorite places used for
navigation features.
•
Number 7 & 9 are left empty.
62
Page 63

RAY User Guide Using RAY
Events
Home Menu Number 4
The Events service provides a List screen of notifications of various system and
application events. These types of events are mostly generated from other
applications than RAY. The Events service is available in the direction of the
number 4 in the Home Menu.
Events include notifications of:
•
A new incoming SMS.
•
A missed call.
•
A new book or magazine that was loaded to RAY and is ready to read.
•
Low battery.
•
Under 2GB left in the storage space.
Selecting an Event opens the relevant Management screen.
Tip
If RAY is in Sleep mode, then a tone sounds when a new notification arrives.
You may want to check the Events List screen from time to time if you have
been using Ray continuously.
Tip
RAY keeps track of your last place in each book and magazine, and
automatically opens to that place each time you come back to continue
reading.
63
Page 64
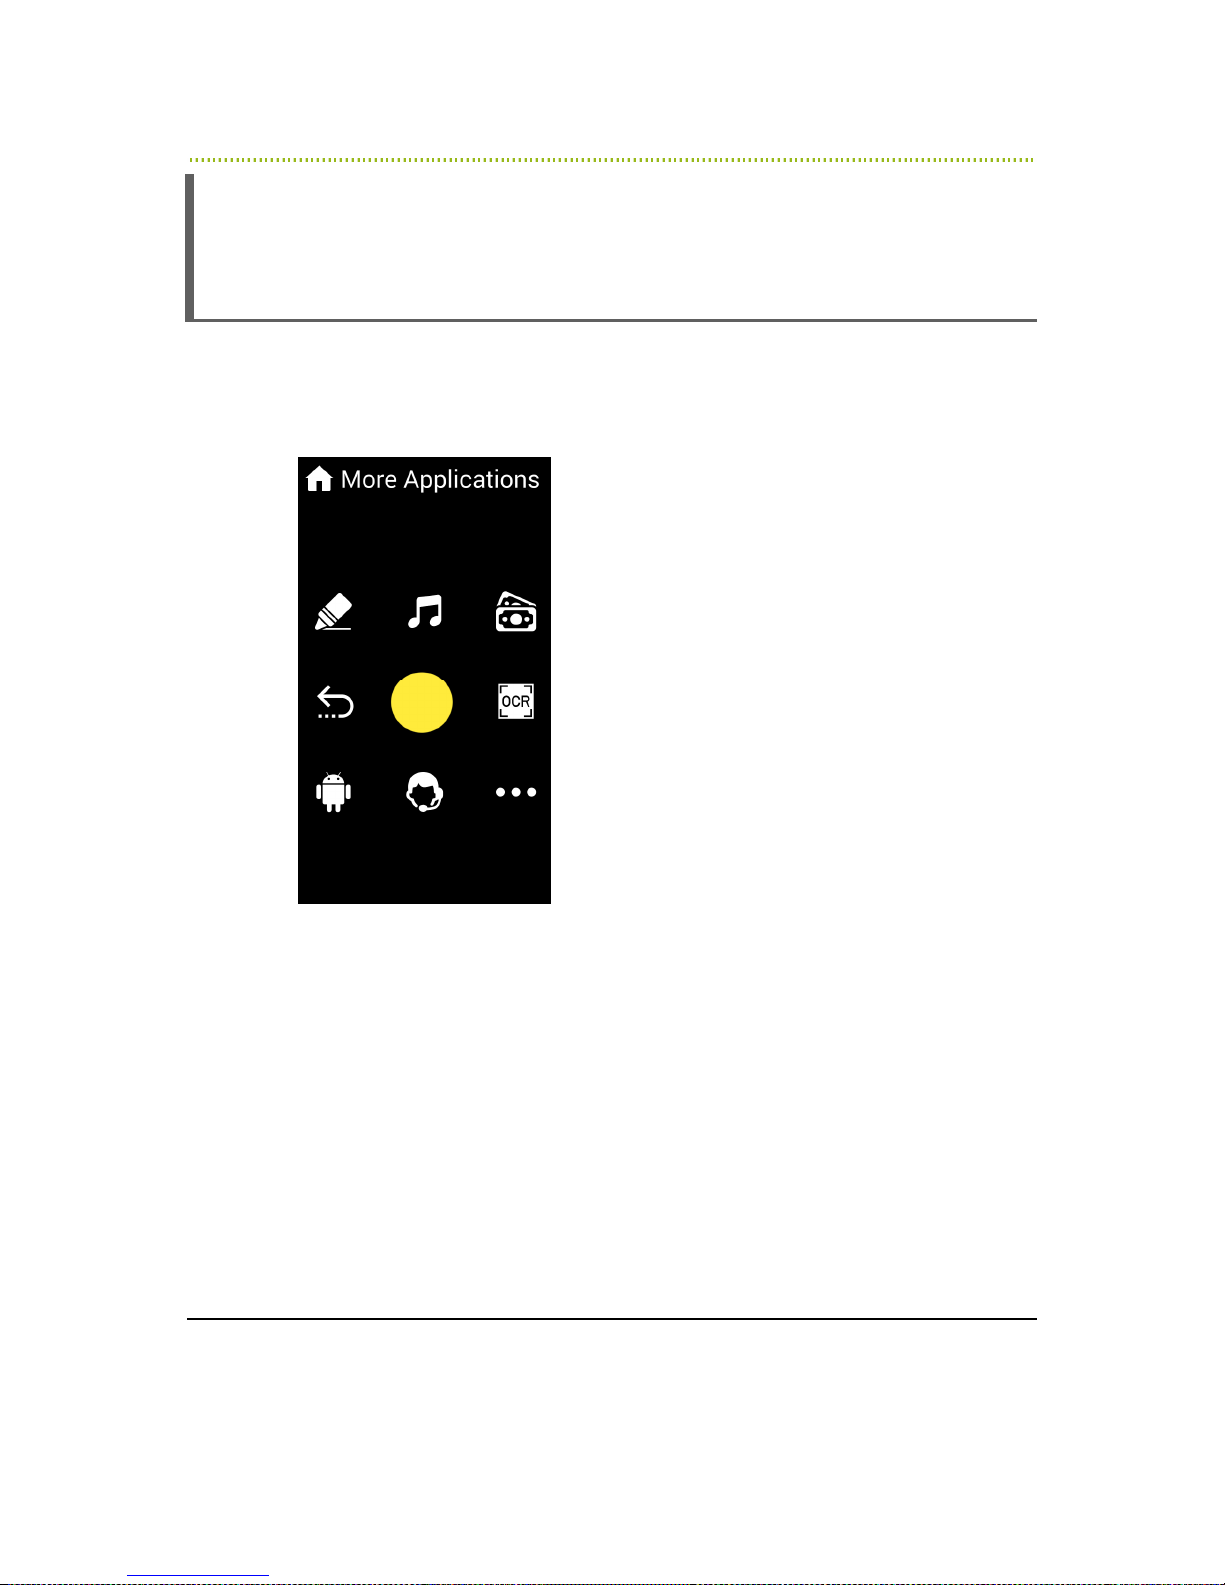
RAY User Guide Using RAY
More
Home Menu Number 9
The More option opens a Menu of additional application services. It is available in
the direction of the number 9 in the Home Menu.
Figure 26: More Menu
The following options are provided in the More Menu:
•
Number 4 – Previous Screen
•
Number 1 – Colors: Enables you to use RAY to identify a color. Point RAY at
the object and then tap the screen. RAY reads out the color.
•
Number 2 – Music: Opens a list of music that you have on the device or
loaded from your personal RAY web page on the Internet available at the RAY
website, as described in
68.
•
Number 3 – Banknotes: Enables you to use RAY to identify the value of bill.
Point RAY at the bill and then tap the screen. RAY then reads out the bill
value.
Chapter 5, Remote Control and Configuration
64
on page
Page 65
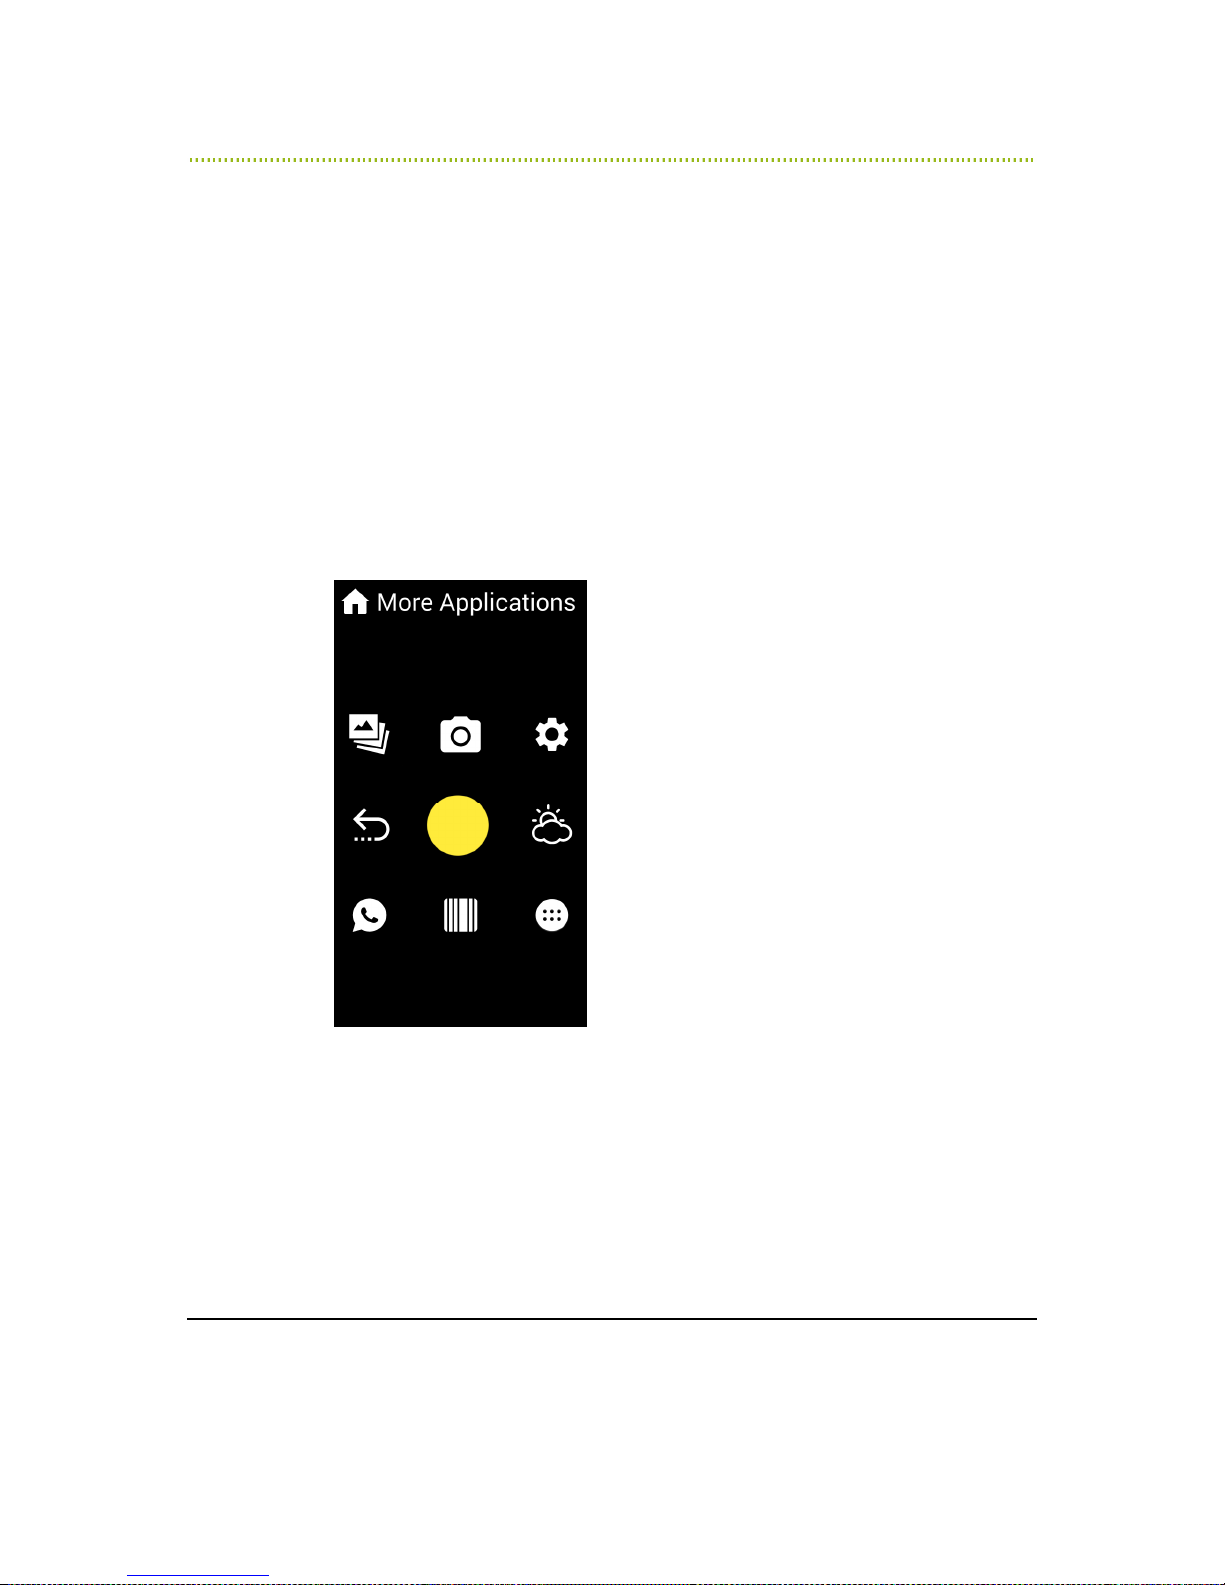
RAY User Guide Using RAY
•
Number 6 – OCR: Enables you to read aloud a printed page. You must hold
your device above the printed page with the camera pointing to it and press
on the screen to initate the process. There are special device holders you can
buy seperatly to enable a stable and accurate image taking.
•
Number 7 – Exit to Android: Enables you to exit to the Android
environment. You can set Android to operate with TalkBack on or off in the
Setting menu.
•
Number 8 – Remote Assistance: Enables the invocation of a set of remote
assistance capabilities described later in the manual.
•
Number 9 –2nd More: Opens another menu of additional applications such as
bill identifier, color identifier and more. This application is interfaced differently
than the other parts of the system and requires separate learning and training.
Figure 27: Additional More Menu
Number 4 – Previous Screen
Number 1 – Gallery: Open native Android application to see the gallery
of pictures stored in the device. This application is not accessible to people
with no vision. To get back from it use the standard Android BACK key of
the device.
65
Page 66

RAY User Guide Using RAY
Number 2 – Camera: Open the native Android Camera application that
enables taking pictures in the device. This application is not fully accessible
to people with no vision. To get back from it use the standard Android
BACK key of the device.
•
Number 3 – Information and setting: Opens a list of status related
options that enables you to perform the following
Battery Level: Reads out information about the battery level. We
recommend downloading files and recordings to RAY at night time
while it is not being used. Beforehand, you should either plug in RAY
to charge or at least check that RAY has enough battery to operate
while downloading.
Network Connectivity: Reads out information about the type of
data connection currently active in the system only a Cellular
connection or Wi-Fi can be connected at once.
Storage Space: Reads out information about the remaining storage
space on RAY. If the remaining storage space goes under 2GB, a
warning is sounded and you will be asked to manually delete old
recordings.
Version: Reads out information about RAY’s device type and software
version.
Guide: Opens a recording of the RAY user guide (the one you are
reading now).
Settings: Opens a list of settings that can be changed in the device
such as Emergency number (Panic), System Language, Keyboard
Language, Wi-Fi Configuration, Airplane Mode and Accessibility Mode.
The Wi-Fi Configuration option enables/disables connection to a Wi-Fi
network. This option requires the help of a sighted person in order to
type in the necessary password.
Most options can be configured from your personal RAY web page on
the Internet available at the RAY website, as described in
Remote Control and Configuration
You may contact the RAY support if you need help defining any of
these settings.
Number 6 – Weather: provides local weather information. You may set
the metrics used in the readout (Celsius or Fahrenheit) in the information
and setting screen.
66
on page 68.
Chapter 5,
Page 67

RAY User Guide Using RAY
Number 7 – WhatsApp messaging: Invoke WhatsApp messenger
application. You can set this menu option to invoke the standard
WhatsApp version and operate it fully with TalkBack set to on. You can
also set it up to open a special RAY version of the app that enables users
control over it using the standard RAY interface concept (related to the
capabilities of each device, not all of the options available in the standard
WhatsApp app are available in RAY version of it.)
Number 8 – Tag Reader: This function is available in devices that
support NFC communication. It enables the setting of special NFC tags
(available for purchase separately) to identify special objects (medicine for
example) by reading a recorded message associated with it; or invoke
special system functions like invoking frequently used apps or menus.
Number 9 – Application List: Lists more than 20 applications that you
can select and run.
67
Page 68
RAY User Guide Remote Control and Configuration
5
Remote Control and
Configuration
This chapter describes how your family and friends can help you control and
configure RAY from your personal RAY web page on the Internet.
Introduction
RAY provides you with a personalized web page in which you, or a designated
sighted user, can manage your RAY device through the Internet from any
computer or web browser application.
You, or any person that you authorize, can then use your personal user name and
password to remotely perform a variety of functions on the RAY device, including
the following:
•
Managing your Contacts List
•
Managing your Schedule
•
Initiating a beeping sound on RAY to help you find it, if you misplaced it
•
Displaying the geographic location of the RAY device
•
Uploading Music Periodicals and Books
•
Sharing the device screen on the remote browser. If RAY VISION is running on
a RAY device, one can also get a full remote access and control on the device
over the WEB.
68
Page 69
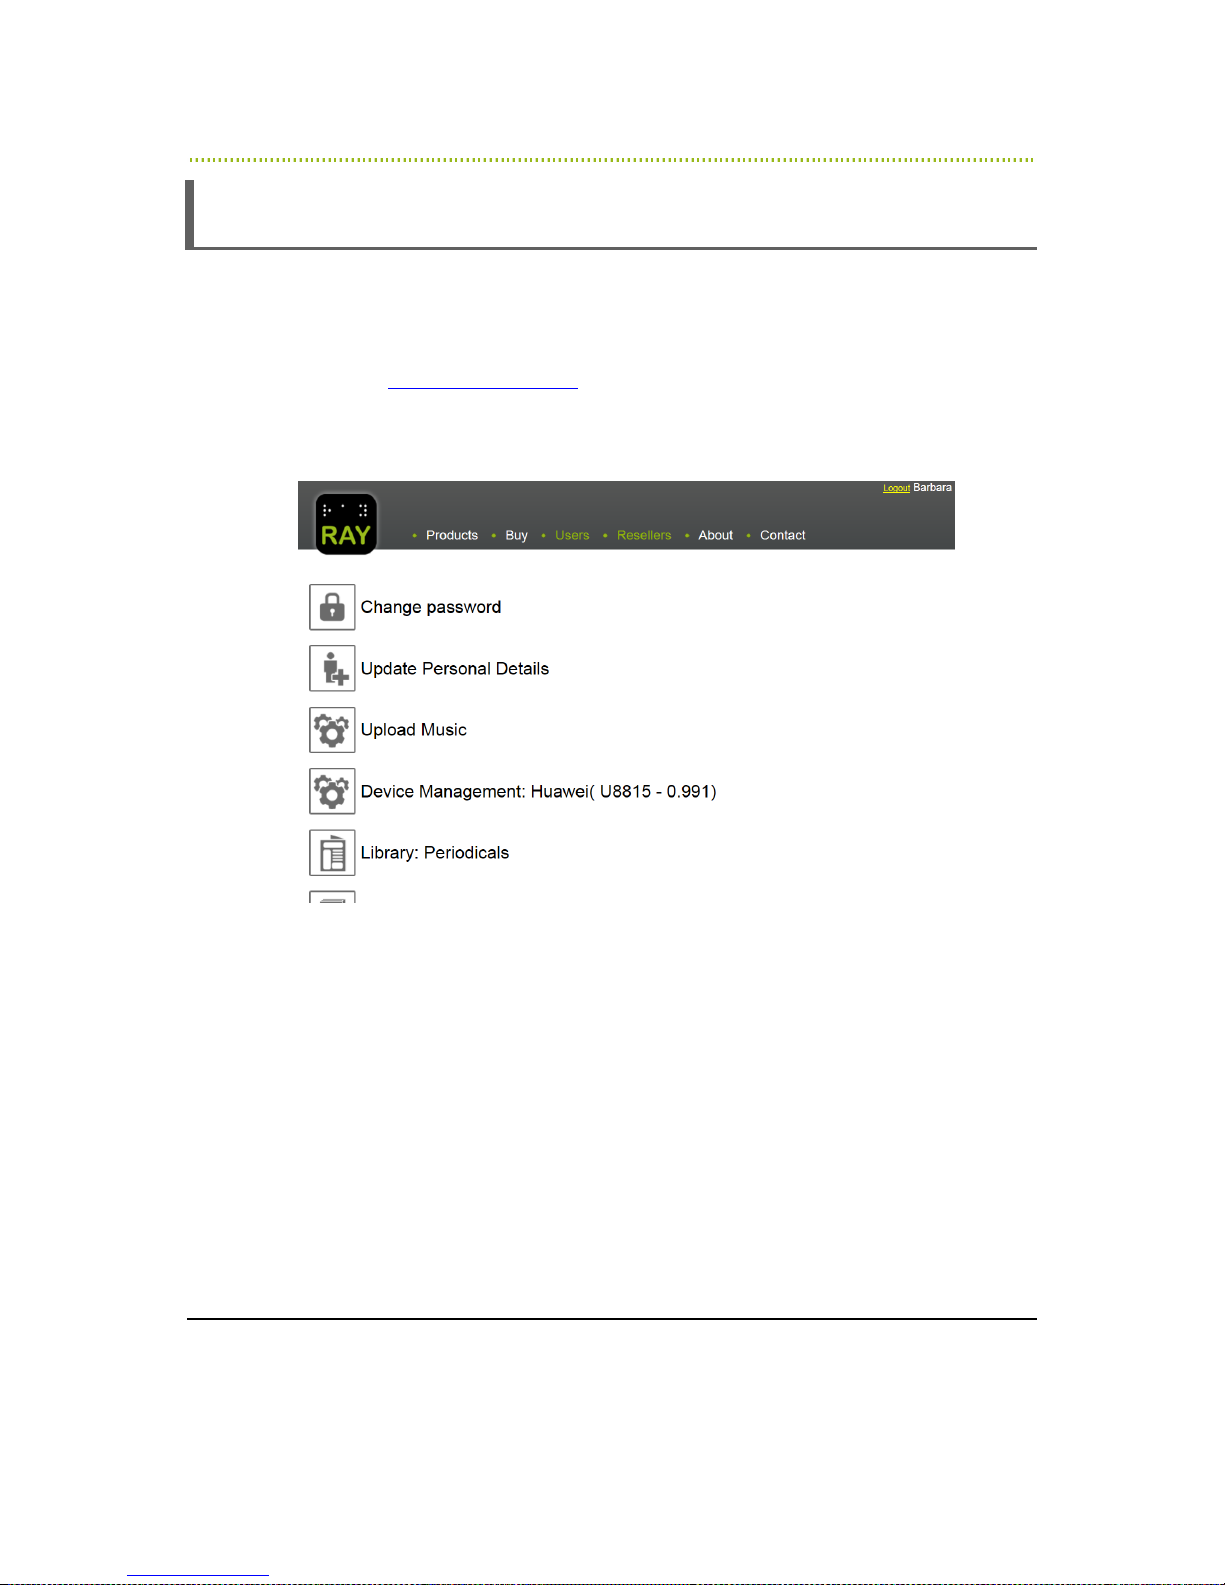
RAY User Guide Remote Control and Configuration
Accessing Your RAY Web Page
Your personal RAY management page is designed for sighted people to help you
from a remote location.
►
To access your RAY web page:
To access your RAY web page:
To access your RAY web page:To access your RAY web page:
1 Go to www.project-ray.com and select the Users Login option in the top right
corner of the page.
2 Enter the user name and password you received by e-mail during the sign-up
process.
69
Page 70

RAY User Guide Remote Control and Configuration
RAY Web Page Options
The following options are available from your personal RAY web page. The
information displayed in these pages reflects the information in your RAY device
and the configuration that you set in these web pages is automatically updated in
your RAY device.
Some settings are automatically and immediately implemented on the RAY device.
However, it may take a short while for some changes to appear on the RAY. For
example, music downloaded to the RAY website may take a short while to
download to the device. After the download is completed, an event notification
appears in the RAY Event List, as described on page 61.
Note
There is no need to reset the RAY device after you update settings on the
web page.
Change Password
Change Password
Change PasswordChange Password
This option enables you to change the password for accessing the remote control
configuration web page described in this chapter. This password is also used to
load all your latest RAY setting to a new RAY device (for example, to replace a lost
RAY device).
Update Personal Details
Update Personal Details
Update Personal DetailsUpdate Personal Details
This option enables you to enter/modify your personal details and your password
for accessing various magazine/book libraries.
Upload Music
Upload Music
Upload MusicUpload Music
This option enables you to load music to RAY. You can listen to this music using
the Music option that is available in the 2nd More Menu. This option is described on
page 73.
RAY then notifies you that new music is ready for you, as described in the
section on page 61.
Events
70
Page 71

RAY User Guide Remote Control and Configuration
Device Management
Device Management
Device Management Device Management
This option enables you to perform the following actions:
•
Make phone ring
•
Show phone location
•
Edit Wi-Fi Settings
•
Remote Control enables you to remotely control the Ray device through the
web page. For example, you can see all the information on the RAY device,
add a contact to it or dial a phone number from it.
Library Periodicals/ Library Books
Library Periodicals/ Library Books
Library Periodicals/ Library Books Library Periodicals/ Library Books
This option enables you to subscribe to, download (to RAY) and browse through
various periodicals / books.
RAY then notifies you that a new periodical/book is ready for you, as described in
the
Events
section on page 61.
Contacts
Contacts
ContactsContacts
This option enables you to add, edit and delete Contacts on RAY.
Calendar
Calendar
CalendarCalendar
This option enables you to manage your schedule on RAY.
RAY Remote Visual Assistance
RAY also provide a special mobile application for sighted people from which they
can remotely control and help a visually impaired person.
To download the remote assistance application, go to Google Play Store and
search for “RAY Eye Assist”
(https://play.google.com/store/apps/details?id=com.ray.remoteassistance) .
71
Page 72

RAY User Guide Remote Control and Configuration
For initial setup, you should fill the phone number of the remote assisting device in
Eye-Assist application.
You should do the same in the Remote Assistance application on the RAY device.
And set the phone number of the designated assisting device from RAY’s contact
list.
To initiate a remote assistance session, the visually impaired person should initiate
a phone call to the supporting person. Upon receiving this phone call, Eye-Assist
app pops-up on the sighted person device and enable a remote visual control of
the RAY device including:
1. See the geographic location of the RAY device on a map.
2. Take snapshot pictures from RAY device and transfer it for view in Eye-Assist.
3. Grab a one-way video stream from RAY and see it in Eye-Assist.
4. The above options are in parallel to the phone call between the two devices
that enables a complete interactive session between the visually impaired
person and the support person.
72
Page 73

RAY User Guide Remote Control and Configuration
Blank page for double-sided printing
•
Number 3 – Clock: Reads out the current day, date and time.
•
Number 7 – Clock: Reads out the current day, date and time.
•
Number 4 – Calendar: Provides various calendar options, as described on page
59.
•
•
Number 2 – Emergency: Dials an emergency number. The emergency
number can be set in the Information Emergency service (as described
on page 66) or from your personal RAY web page on the Internet available at
the RAY website, as described in
on page 68.
Chapter 5, Remote Control and Configuration
73
Page 74

 Loading...