

Ravpower RP-SH008 User Manual
RP-SH008
www.ravpower.com
NORTH AMERICA
E-mail : support@ravpower.com(US)
support.ca@ravpower.com(CA)
Tel : 1-888-456-8468 (Monday-Friday: 9:00-17:00 PST)
Address : 46724 Lakeview Blvd, Fremont, CA 94538
EUROPE
E-mail:
support.uk@ravpower.com(UK)
support.de@ravpower.com(DE)
support.fr@ravpower.com(FR)
support.es@ravpower.com(ES)
support.it@ravpower.com(IT)
EU Importer : ZBT International Trading GmbH,Halstenbeker Weg
98C, 25462 Rellingen, Deutschland
ASIA PACIFIC
E-mail : support.jp@ravpower.com(JP)
JP Importer: 株式会社SUNVALLEYJAPAN
〒104-0032東京都中央区八丁堀3丁目18-6PMO京橋東9F
Manufacturer
Shenzhen NearbyExpress Technology Development Co., Ltd.
Address
333 Bulong Road, Shenzhen, China, 518129
Learn more about the EU Declaration of Conformity:
https://www.ravpower.com/downloads-RP-SH008-CE-Cert.html
MADE IN CHINA
www.ravpower.com
WIRELESS CHARGER CAR MOUNT
User Guide
CONTENTS
English
Deutsch
Français
Español
Italiano
日本語
01/05
06/10
11/15
16/20
21/25
26/30
FR
①
②
⑤
⑥
⑦
③
④
⑧
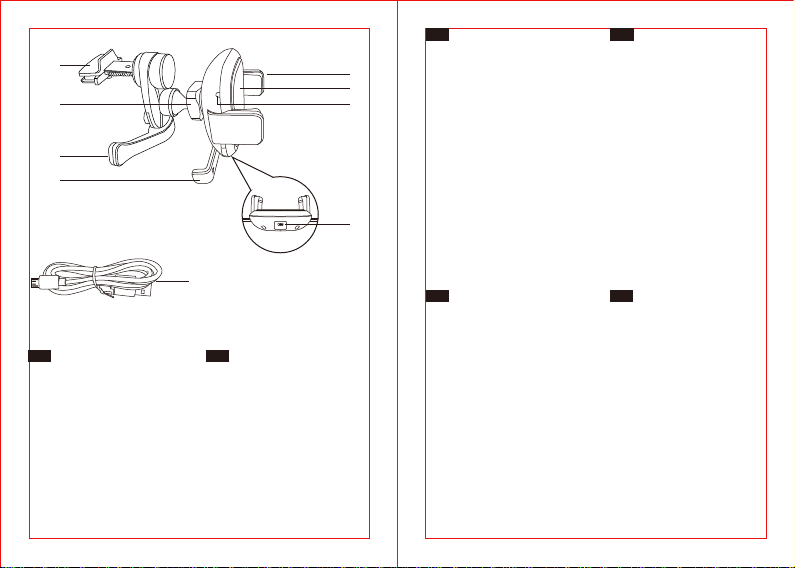
Schéma produit
1. Pince à ressort
2. Boule pivot & Anneau de
serrage
3. Bras de support
4. Pinces de libération du
support
5. Bras de serrage latéraux
6. Bouton de Serrage Rapide
/ Chargeur sans l
7. Témoins de charge
8. Port de recharge micro USB
9. Câble micro USB
ES
Producto Diagrama
1. Gancho de Palanca de Resorte
2. Articulación Esférica y Tuerca
Estabilizadora
3. Pie de Soporte
4. Barra de Liberación del Soporte
5. Bloqueo de los Brazos Laterales
6. Botón de Sujeción Rápida /
Cargador Inalámbrico
7. Indicadores de Carga
8. Puerto de Carga micro USB
9. Cable Micro USB
EN
Product Diagram
1. Spring Loaded Lever Hook
2. Ball Joint & Stabilizing Nut
3. Support Foot
4. Cradle Release Bars
5. Locking Side Arms
6. Fast Clamping Button /
Wireless Charger
7. Charging Indicators
8. Micro USB Charging Port
9. Micro USB Cable
⑨
DE
Produktabbildung
1. Federgespannter Befestigungsriegel
2. Kugelgelenk & Feststellmutter
3. Stützfuß
4. Greiferfreigabeknöpfe
5. Seitliche Greifarme
6. Schnell-Klemmknopf /
Induktives Ladegerät
7. Ladeanzeigen
8. Micro-USB-Ladeanschluss
9. Micro-USB-Kabel
IT
Schema del Prodotto
1. Gancio a Leva a Molla
2. Giunto Sferico e Dado
Stabilizzatore
3. Piedino di Supporto
4. Barre di Rilascio della Sede
5. Bracci Laterali di Bloccaggio
6. pulsante di bloccaggio rapido
/ Caricabatterie Wireless
7. Indicatori di Ricarica
8. Porta di Ricarica Micro USB
9. Cavo Micro USB
JP
製品図
1.スプリングレバーフック
2.ボール接続部&固定ネジ
3.サポート台
4.クラドル解除バー
5. ロックサイドアーム
6.高速クランプボタン/ワイヤレ
ス充電器
7.充電表示
8.マイクロUSB充電ポート
9.マイクロUSBケーブル
EN
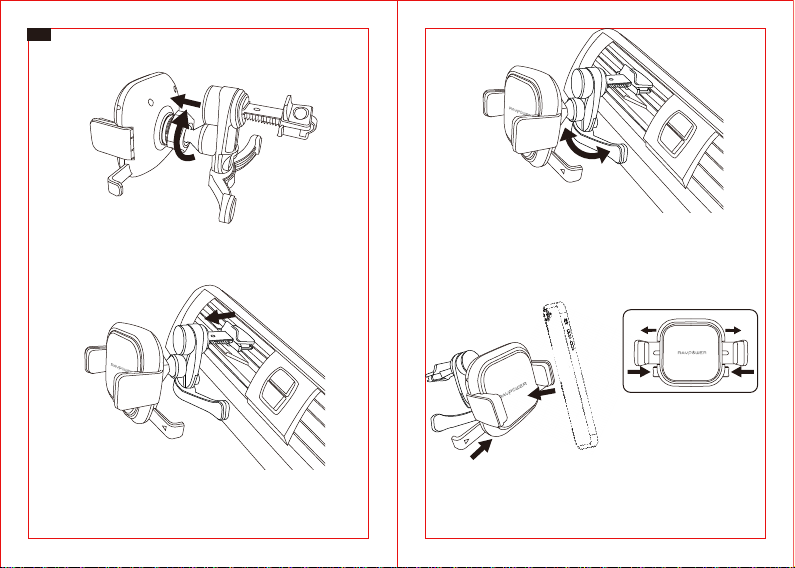
Mounting & Using the Phone Holder
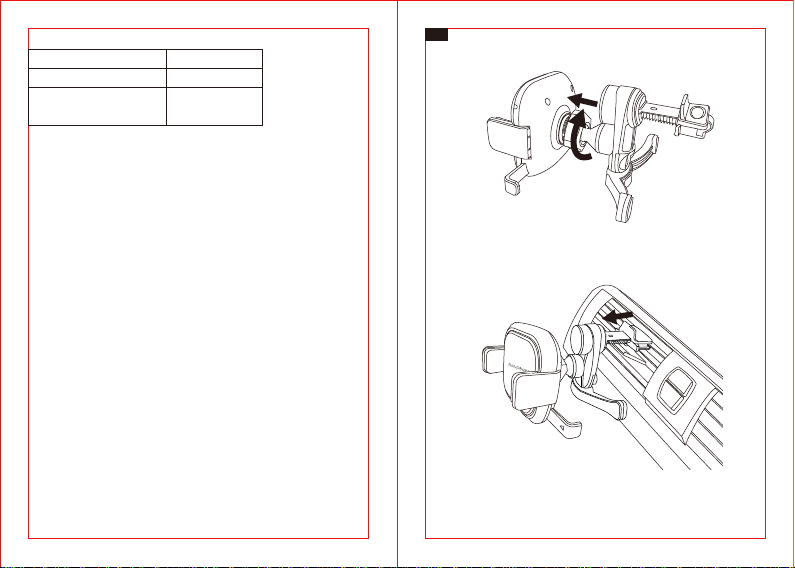
Click the ball into the connecting joint, screw the stabilizing nut to lock in place
Push back the spring lever, clamp the hook onto your air vent blade, and release
the spring to lock in place
Note: The spring lever hook clamps onto your air vent blade stably, either
horizontal or vertical.
Revolve and adjust the support foot to stabilize the holder
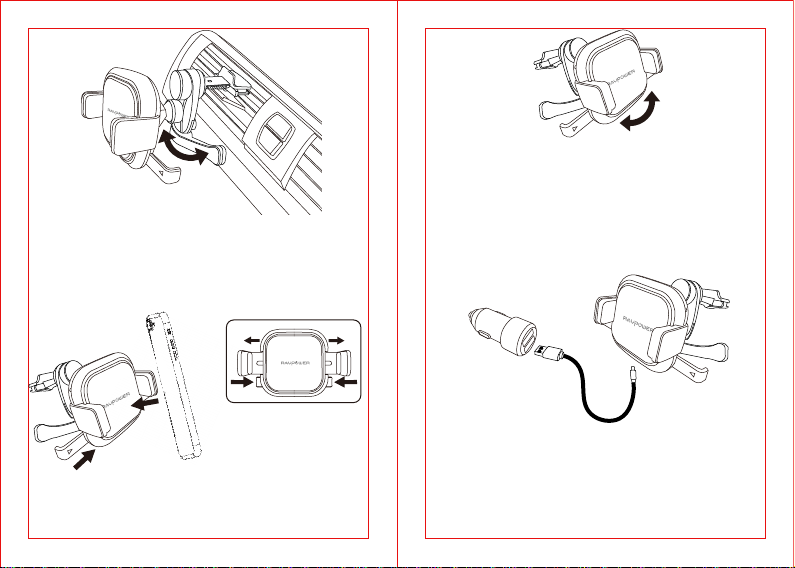
Squeeze the cradle release bars to open the locking side arms. Place your phone
against the Fast Clamping Button to close the arms against your device.
01/02
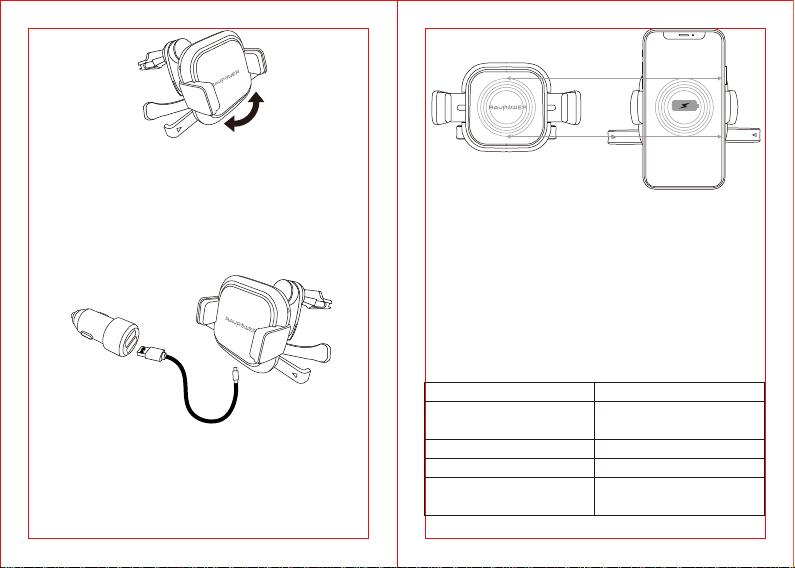
Rotate the ball joint to obtain your best viewing angle
58.6 - 88.6mm / 2.3 - 3.5 inch
Powering the Wireless Charger
1. Connect the micro USB cable into the charging port.
2. Insert the USB connector into a car charger.
Note: The car charger is not included in the RP-SH008.
Position your phone so that back-center aligns with Fast Clamping Button.
The arms will automatically close against your device upon a slight
push against the trigger.
Note:
· Line up the center of phone with the charging coils to achieve ecient charging.
· Phones with cases more than 0.2 inch / 0.5 cm thick will not be detected.
Remove before charging.
Charging will start automatically with a right connection and the charging
indicators will light up accordingly.
Charging Indicators
Turns blue for 10 seconds,
then turns o
Turns on solid blue
Blue indicator turns o
Flashes red
Working Status
Standby
Charging a compatible device
Device fully charged
FOD (Foreign Object Damage)
alarm
03/04
Powering the Wireless Charger
Model
Input (Wireless Charger)
Output (Wireless Charger)
Caution
· The charging process may give o heat so your device will become warm. Use
only in cool environments.
· If the product gets wet, please stop the charging process immediately and
remove all plugs. Do not use it before it’s completely dry.
· Do not drop, knock, or squeeze the product.
· Do not dismantle or throw the product in re or water, to avoid causing short
circuit leakage.
· Do not use the wireless charger in severely hot, humid, or corrosive environments
to avoid circuit damage and leakage.
· Do not use the charger if it has excessive dents, punctures, damages, or
deformities.
· Do not place close to magnetic stripe or chip card (ID card, bank cards, etc.) to
avoid magnetic failure.
· Make sure the back of your phone or phone case is even without foreign metal
objects.
· Keep at least 20 cm / 7.9 in away from implantable medical devices (pacemakers,
implantable cochlear, etc.) to avoid potential magnetic interference.
· Keep away from children.
Customer Service
RAVPower products are covered by an 18-month limited warranty from the date
of its original purchase. If any problems occur, please contact our support team.
We can only provide after sales service for products that are sold by RAVPower or
RAVPower authorized retailers and distributors. If you have purchased your unit
from a dierent place, please contact your seller for return and warranty issues.
RP-SH008
5V / 2A
5W Max
DE
Montage & Verwendung der Handyhalterung
Lassen Sie das Kugelgelenk in die Gelenkverbindung einrasten und schrauben Sie
die Feststellmutter zum Fixieren fest
Drücken Sie den Federriegel nach hinten, klemmen Sie den Haken an eine Lamelle
Ihres Gebläses und lassen Sie die Feder zum Fixieren los Anmerkung:
Der Federriegel lässt sich sowohl horizontal als auch vertikal stabil an die
Gebläselamellen klemmen.
05/06
Drehen Sie das Kugelgelenk für einen optimalen Blickwinkel
Drehen und justieren Sie den Stützfuß, um die Halterung zu stabilisieren
Drücken Sie die Greiferfreigabeknöpfe, um die seitlichen Greifarme zu önen.
Legen Sie Ihr Handy auf den Schnell-Klemmknopf, damit sich die Greifarme um Ihr
Gerät schließen.
Stromversorgung des kabellosen Ladegeräts
1. Schließen Sie das Micro-USB-Kabel am Ladeanschluss an.
2. Stecken Sie den USB-Stecker in ein Autoladegerät.
Anmerkung: Im Lieferumfang von RP-SH008 ist das Autoladegerät nicht enthalten.
07/08
 Loading...