

Ravpower RP-PC118 User Manual
www.ravpower.com
ASIA PACIFIC
E-mail : support.jp@ravpower.com(JP)
Tel:03-5542-0238(10~18時/土日祝を除く)
JP Importer: 株式会社SUNVALLEY JAPAN
Address: 〒104-0032 東京都中央区八丁堀3丁目18-6 PMO
京橋東9F
EUROPE
E-mail:
support.uk@ravpower.com(UK)
support.de@ravpower.com(DE)
support.fr@ravpower.com(FR)
support.es@ravpower.com(ES)
support.it@ravpower.com(IT)
EU Importer : ZBT International Trading GmbH
Address: Halstenbeker Weg 98C, 25462 Rellingen,
Deutschland
NORTH AMERICA
E-mail : support@ravpower.com(US)
support.ca@ravpower.com(CA)
Tel : 1-888-456-8468 (Monday-Friday: 9:00-17:00 PST)
US Distributor: SUNVALLEYTEK INTERNATIONAL INC.
Address : 46724 Lakeview Blvd, Fremont, CA 94538
MANUFACTURER
Manufacturer: Shenzhen NearbyExpress Technology
Development Co., Ltd.
Address: 333 Bulong Road, Shenzhen, China, 518129
RP-PC118_V1.0
Model: RP-PC118
RAVPOWER PRIME 21W 2-PORT
SOLAR CHARGER
User Guide

CONTENTS
English
Deutsch
Français
Español
Italiano
日本語
01-08
09-16
17-24
25-32
33-40
41-48
IT
JP
EN
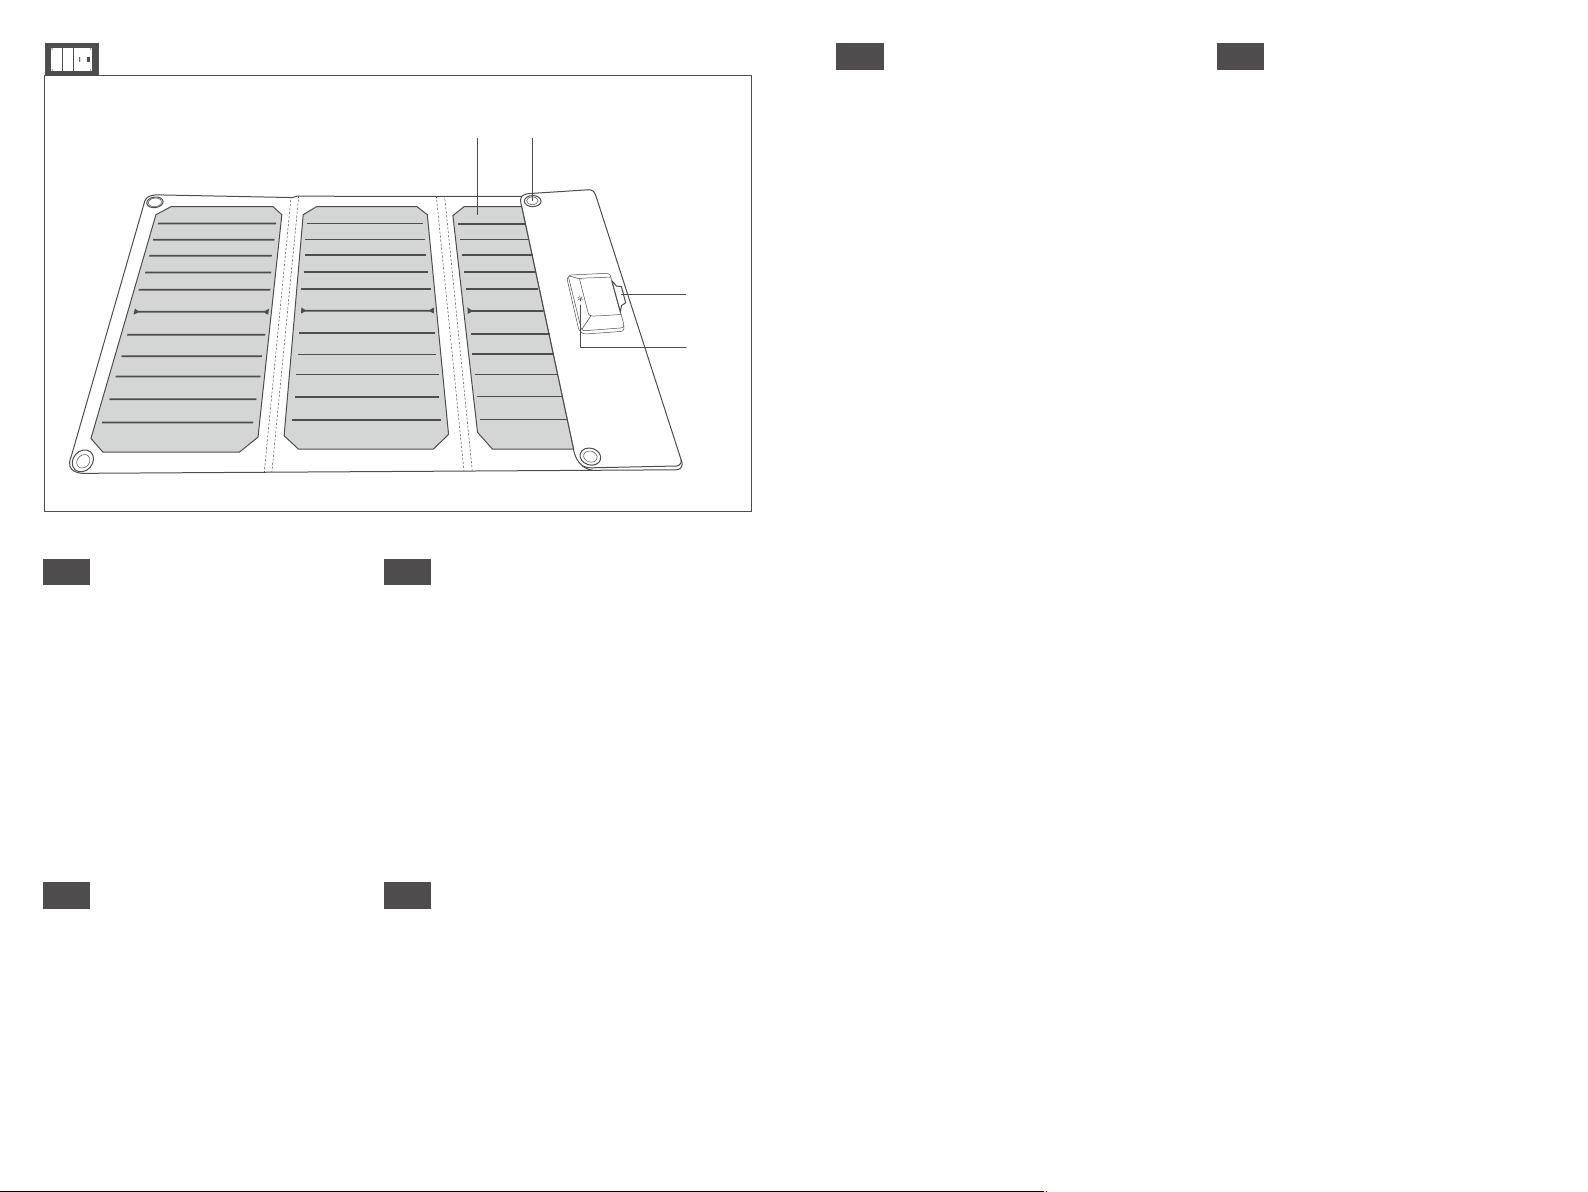
Product Diagram
v
Charging Panel
w
Hook hole
x
USB-A Port with Flap
y
LED indicator
v w
x
y
DE
Produktabbildung
v
Solarmodul
w
Hakenösen
x
USB-A-Anschluss mit Klappe
y
LED-Anzeige
Schema del Prodotto
v
Pannello di Ricarica
w
Foro per gancio
x
Porta USB-A con Linguetta
y
Indicatore LED
製品図
v
充電パネル
w
フック用ホール
x
カバー付きUSB-Aポート
y
LEDインジケーター
FR
Description du
Produit
v
Panneau de Charge
w
Trou pour crochet
x
Port USB-A avec Cache
y
Indicateur LED
ES
Diagrama del Producto
v
Panel de Carga
w
Agujero del Gancho
x
Puerto USB-A Con Tapa
y
Indicador LED

EN
Using Your Solar Charger
Thanks for purchasing RAVPower products. Please read this
User Manual thoroughly before use of the product and retain
it for future reference.
Package Contents
1 x RAVPower 21W Solar Charger (Model: RP-PC118)
4 x Stainless Steel Hooks
1 x Micro USB Cable (60 cm / 24 in)
1 x Micro USB Cable (30 cm / 12 in)
1 x User Manual
1 x Thank You Card
Specifications
Model
RP-PC118
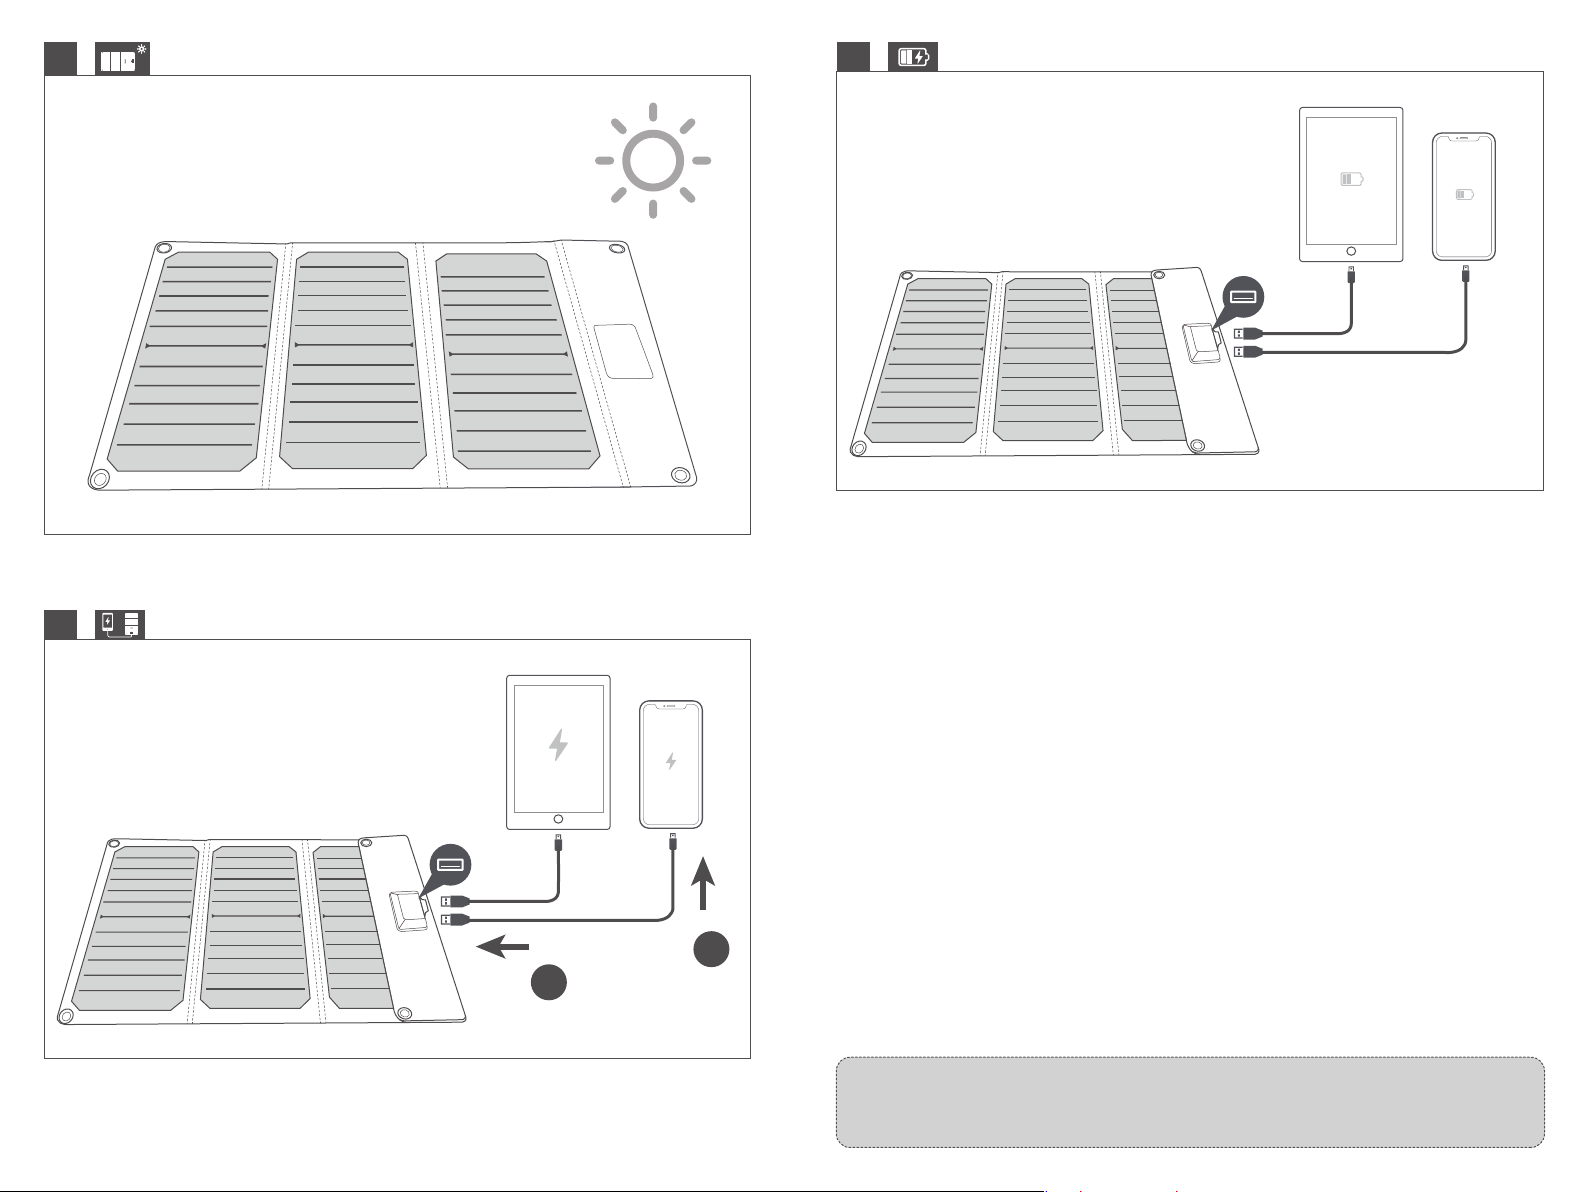
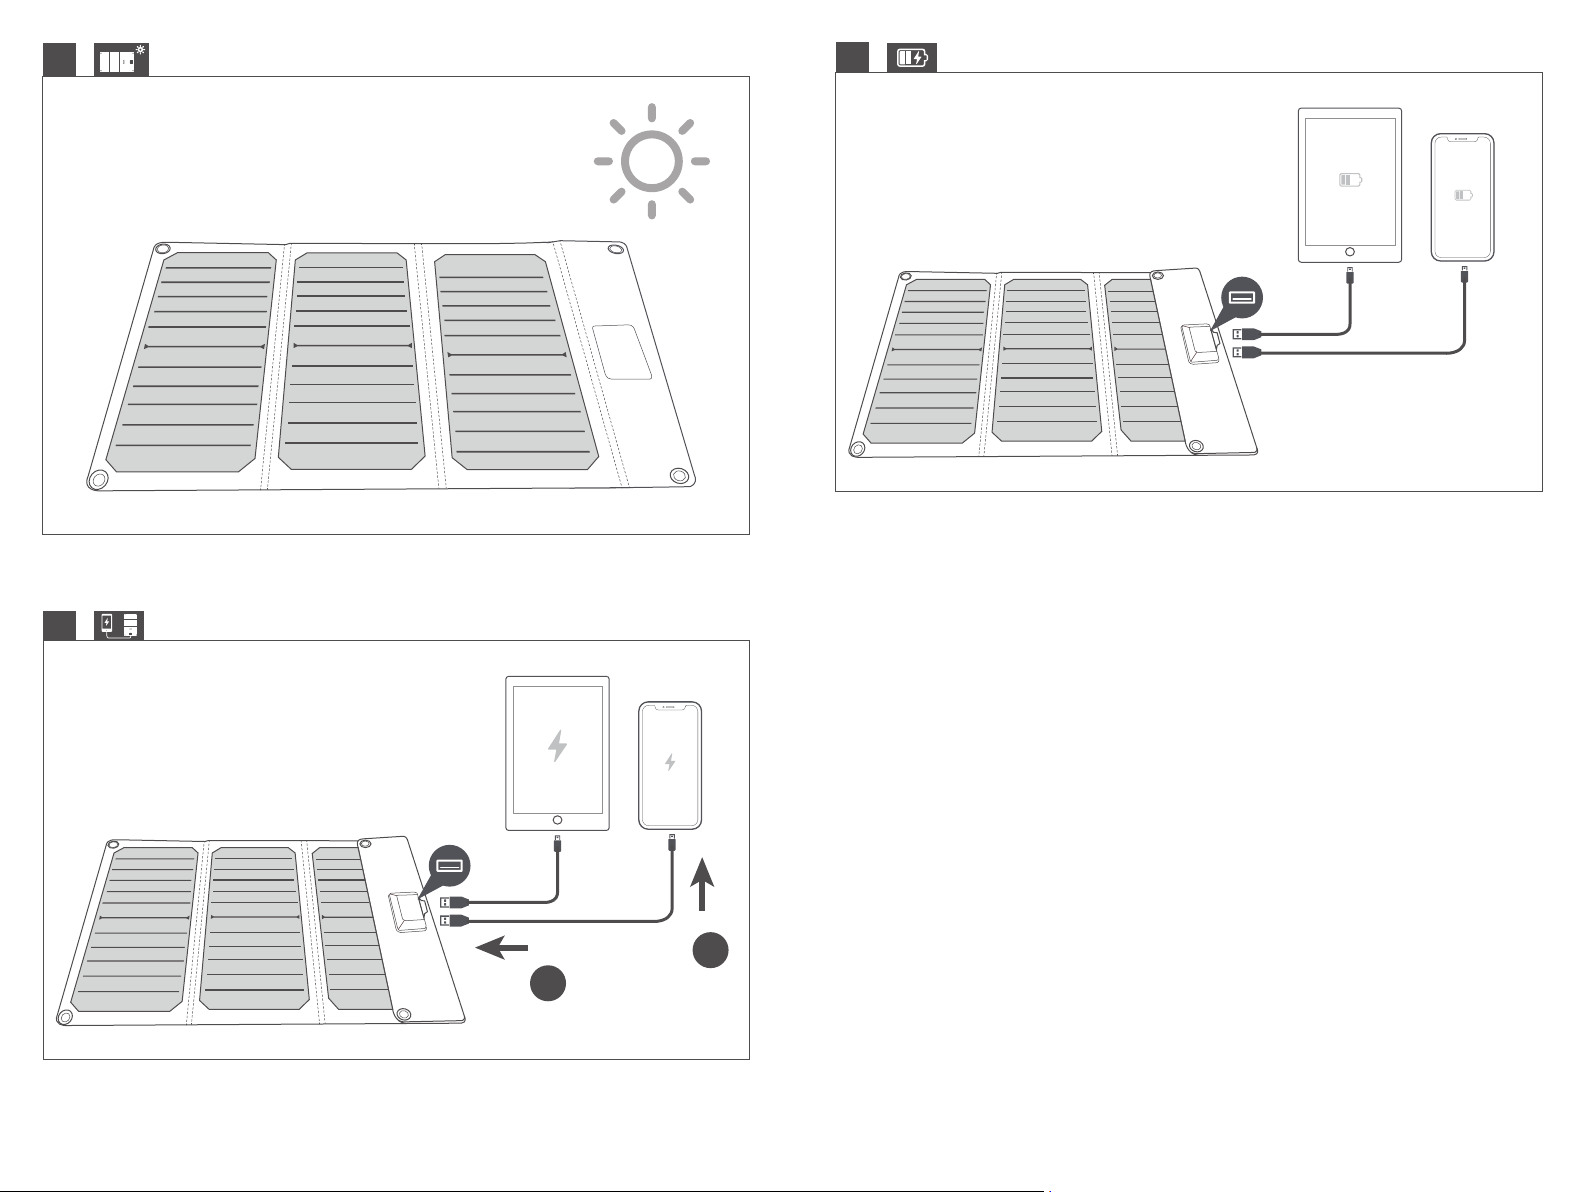
Charge Your Device
1. Unfold the charging panels and make sure to place them
under direct sunlight.
Tip: Make sure to expose the panels to as much sunlight as
possible for faster charging.
2. Plug your charging cable into the USB-A port then connect
your device to the solar charger.
3. Charging will start automatically with the LED indicator
staying solid red.
Note:
· The solar charger does not come with power storage
functionality. Only when exposed to direct sunlight can
it charge your device.
· It is not recommended to use your device during charge
for faster charging.
· The LED indicator will flash red when overcurrent or
short circuit occurs.
iSmart Output
Total Output
Dimensions
Net Weight
5V 2.4A, each 12W Max
5V 4.2A, 21W Max
Folded: 150 x 295 mm / 5.9 x 11.6 in
Unfold: 525 x 295 mm / 20.7 x 11.6 in
500g / 17.6oz
· The optimum charging time may vary with local
environment.
· Place your device beneath the solar charger or in a
well-ventilated place during charging to avoid
overheating.
0201
1
3
2
2
1
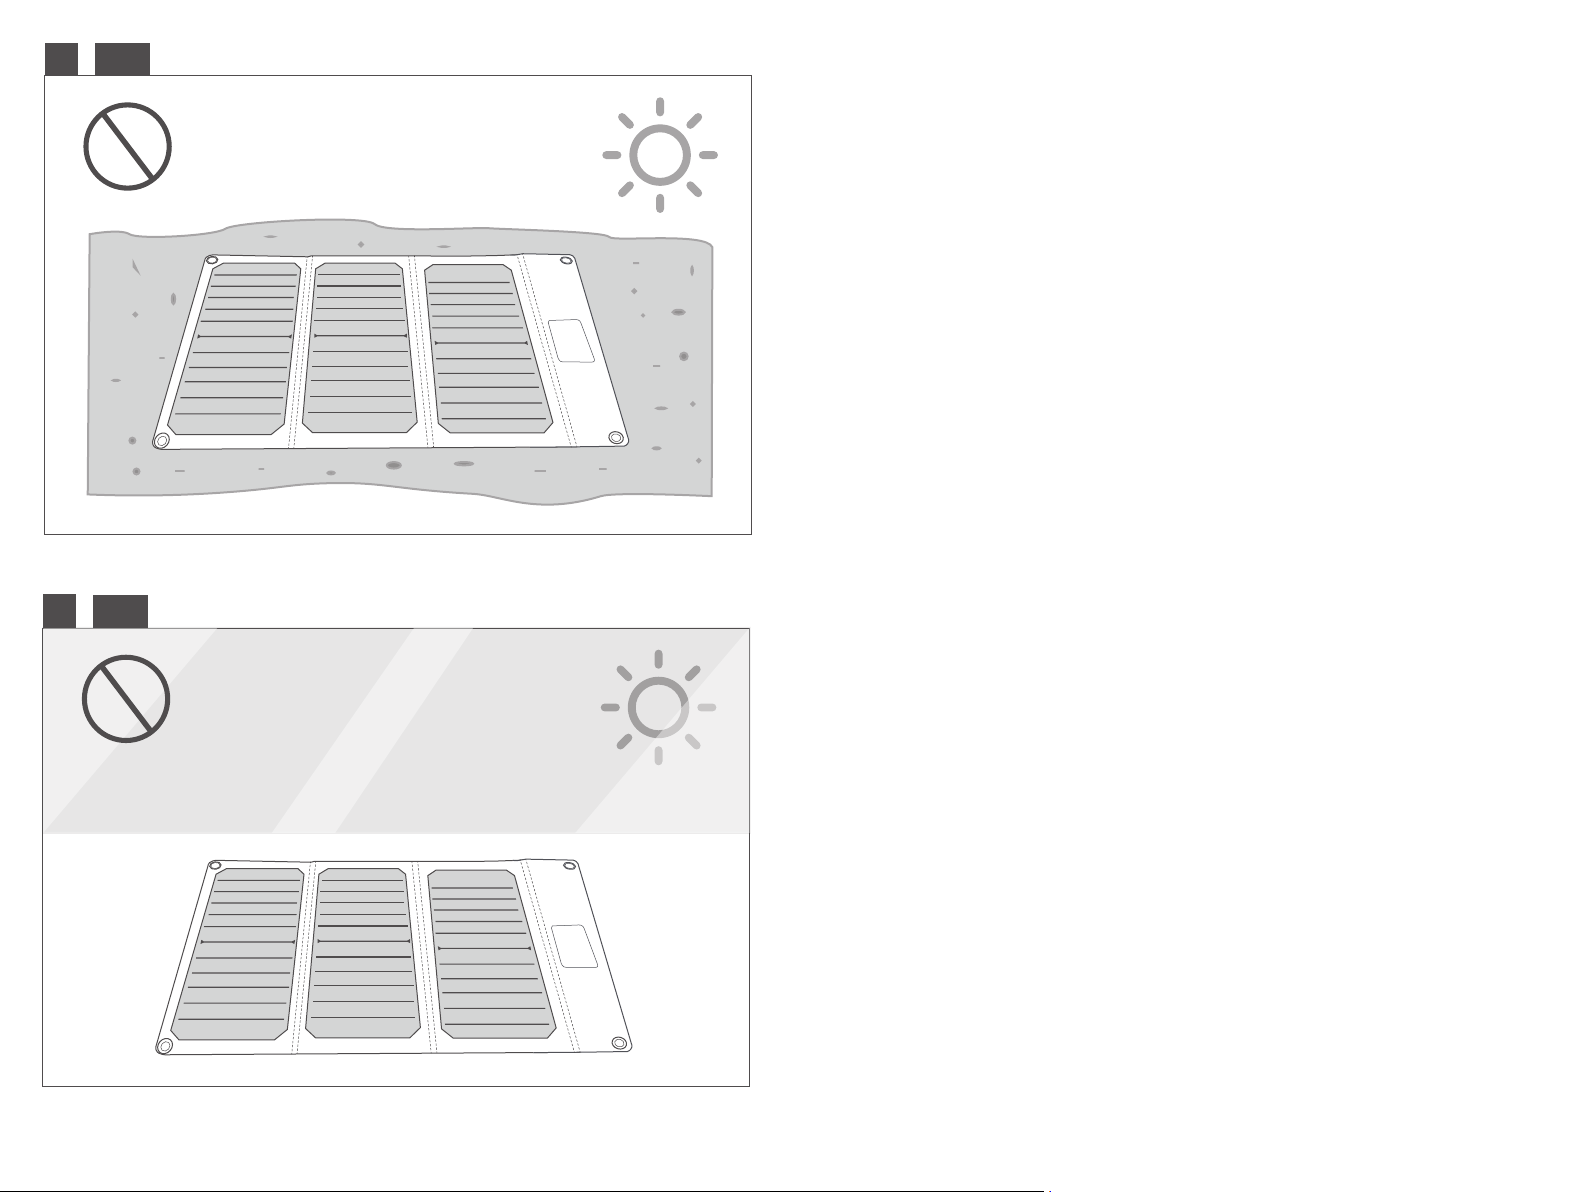
Using Environment
1. Optimum working temperature: -10-60°C / 14-140°F.
2. Do not place the panels in high temperature places like
sand, cement, rock for a long time (fig. 1).
3. For faster charging, place the panels under direct sunlight.
Do not use the unit behind the windshield / glasses or
indoor (fig. 2).
4. Inadequate sunlight may slow down or pause the charging
process. Device not supported prompt may pop out if you
are charging iPhone or iPad. It is recommended to unplug
your device and charge again when there is enough
sunlight.
Note: It is not recommended to charge two devices at the
same time when sunlight is inadequate.
0403
2
!
1
Caution
· Keep away from liquids.
· Keep away from extreme temperatures.
· Keep away from flammables.
· Never try to dismantle, repair or refit this unit by yourself.
· Avoid dropping.
· Do not place this unit outdoor in rainy days.
· Do not scratch surface of this charger with sharp objects.
· Do not squeeze this charger.
· Device being charged in direct sunlight will become hot,
pay attention to overheating.
· Keep the charger clean. Wipe it with soft cloth. Never use
corrosive liquids on this unit to avoid damages.
· Keep out of reach of children.
· Dispose this product as per local law and regulations.
!
0605

Frequently Asked Questions
Q: Failed to charge my devices with the solar charger.
A:
· Inadequate sunlight leads to charging failure.
· Indirect exposure to sunlight (e.g. cloud or shadows from
other objects) may lead to current output fluctuation.
· The solar charger can not charge your device in cloudy
weather.
Please place the solar charger under direct sunlight or wait
Q: Will charging resume automatically if there is enough
sunlight?
A: Yes. But we recommend you to unplug the charging cable
and plug it back into place again to avoid delayed
charging, low charging speed, or charging pause.
Warranty
until the sky is clear of cloud.
Q: What’s the optimum charging angle?
A: Fully unfold the charging panels and place them under
direct sunlight.
Q: Charging speed is low.
A:
· Charging speed varies with the sunlight intensity.
· Temperature too high. The energy transformation rate will
slow down when operating temperature is over 60°C /
140°F and charging will stop if temperature reaches
80°C / 176°F.
· Please make sure the charging cable connection is secure.
· Device is overheating or you are using your device during
charging.
· 18 Month Warranty.
· Life-time Support.
Note: This warranty is void if the defect is caused by
· Damage caused by force majeure.
· Accidental damage, misuse, abuse, neglect.
· Improper repair or alteration by unauthorized persons.
· Expired warranty period.
Q: Do I have to fully unfold the charging panels?
A: You can charge your device via 1 or 2 pieces of charging
panels in direct sunlight. But the charging speed would be
lower.
0807

DE
So verwenden Sie Ihr Solarladegerät
Vielen Dank, dass Sie sich für ein RAVPower Produkt entschieden haben. Bitte lesen Sie sich diese Bedienungsanleitung
sorgfältig durch, bevor Sie das Produkt benutzen, und bewahren Sie sie zur künftigen Bezugnahme gut auf.
Im Lieferumfang enthalten
1 x RAVPower 21W Solarladegerät (Modell: RP-PC118)
4 x Edelstahlhaken
1 x Micro-USB-Kabel (60 cm / 24 in)
1 x Micro-USB-Kabel (30 cm / 12 in)
1 x Bedienungsanleitung
1 x Dankeschön-Karte
Laden Ihres Geräts
1. Klappen Sie die Solarmodule aus und platzieren Sie sie in
direktem Sonnenlicht.
Tipp: Je mehr Sonnenlicht auf das Ladegerät fällt, desto
schneller lädt es sich auf.
2. Stecken Sie Ihr Ladekabel in den USB-A-Anschluss und
schließen Sie dann Ihr Gerät am Solarladegerät an.
3. Der Ladevorgang beginnt automatisch und die
LED-Anzeige leuchtet konstant rot.
Anmerkung:
· Das Solarladegerät verfügt über keine
Energiespeicherfunktion. Es kann Ihr Gerät nur laden,
wenn es direkt von der Sonne beschienen wird.
· Sie sollten Ihr Gerät während des Ladevorgangs nicht
benutzen, da dies die Ladedauer verlängert.
Spezifikationen
Modell
iSmart-Ausgang
Gesamtausgangsleistung
Maße
Nettogewicht
RP-PC118
5V 2.4A, je 12W max.
5V 4.2A, 21W max.
Gefaltet: 150 x 295 mm / 5.9 x 11.6 in
Ausgeklappt: 525 x 295 mm / 20.7 x 11.6 in
500g / 17.6oz
· Die LED-Anzeige blinkt bei Überstrom- und
Kurzschlussfehlern rot.
· Die optimale Ladezeit kann je nach
Umgebungsbedingungen variieren.
· Legen Sie Ihr Gerät beim Laden unter das
Solarladegerät oder an einen gut belüfteten Ort, um
Überhitzen vorzubeugen.
1009
1
3
2
Betriebsumgebung
1. Optimale Betriebstemperatur: -10-60°C / 14-140°F.
2. Legen Sie die Module nicht über längere Zeit auf heißen
Untergrund wie Sand, Zement oder Stein (Bild 1).
3. Legen Sie die Module zum schnelleren Laden in direktes
Sonnenlicht. Verwenden Sie das Gerät nicht hinter einer
Windschutzscheibe / einem Fenster oder in Innenräumen
(Bild 2).
2
1
4. Zu wenig Sonnenlicht kann den Ladevorgang verlang
samen oder pausieren. Wenn Sie ein iPhone oder iPad
laden, kann die Meldung 'Gerät nicht
unterstützt' erscheinen. Sie sollten Ihr Gerät abstecken und
weiter laden, wenn die Sonne wieder ausreichend scheint.
1211
 Loading...