

Page 1

Power 7 Technology Corporation – Wi-Fi SD/USB Users Manuals v1.0
1
PRODUCT OVERVIEW
The portable Wi-Fi SD/USB (code name: Combi) device allows you to convert any SD memory cards and
USB external storage devices into a Wi-Fi accessible media.
Simply insert your SD memory card into the SD slot or connect your USB external storage into the built-in
USB port. Switch the unit on and you can now wirelessly access your videos, music, photos, data and
stream it to your iPad®, iPhone®, tablets, smartphones, and notebooks. There is no need to worry about
running out of space on your mobile devices
For maximum portability, the Wi-Fi SD/USB device has a built-in rechargeable battery. Simply plug it into
any available USB port on your computer to charge. As simple as 1-2-3, you are ready to enjoy your
device and no waiting needed. With the SD or External USB connected, the portable Wi-Fi SD/USB can
be accessed while the battery is charging.
Product Features
Supports SDXC, SDHC and SD memory cards. SD adapter is needed for MicroSD and MiniSD.
Supports USB 1.1, 2.0 and 3.0 External Storage devices
Stream media over WiFi enabled devices up to 5 users simultaneously
Access and stream your music, videos, photos and data from the SD memory cards or from USB
external storage using the free custom mobile app supporting iOS and Android operating systems
Built-in micro USB port for charging and data sync function
Up to 7 Hours of continuous battery life*
Search function to locate and access your file much faster
Internet access capability via wireless, supporting 802.11 b/g/n speeds
Supports LAN data-shares and cross-platforms including Windows, Mac, Linux, iOS and Android.
Support multiple NSA, including samba/webdav
Page 2
Power 7 Technology Corporation – Wi-Fi SD/USB Users Manuals v1.0
2
Support multiple platform client tools, including Windows/Mac/Linux/iPad/iPhone/Android
*Battery life subject to normal usage conditions and configurations.
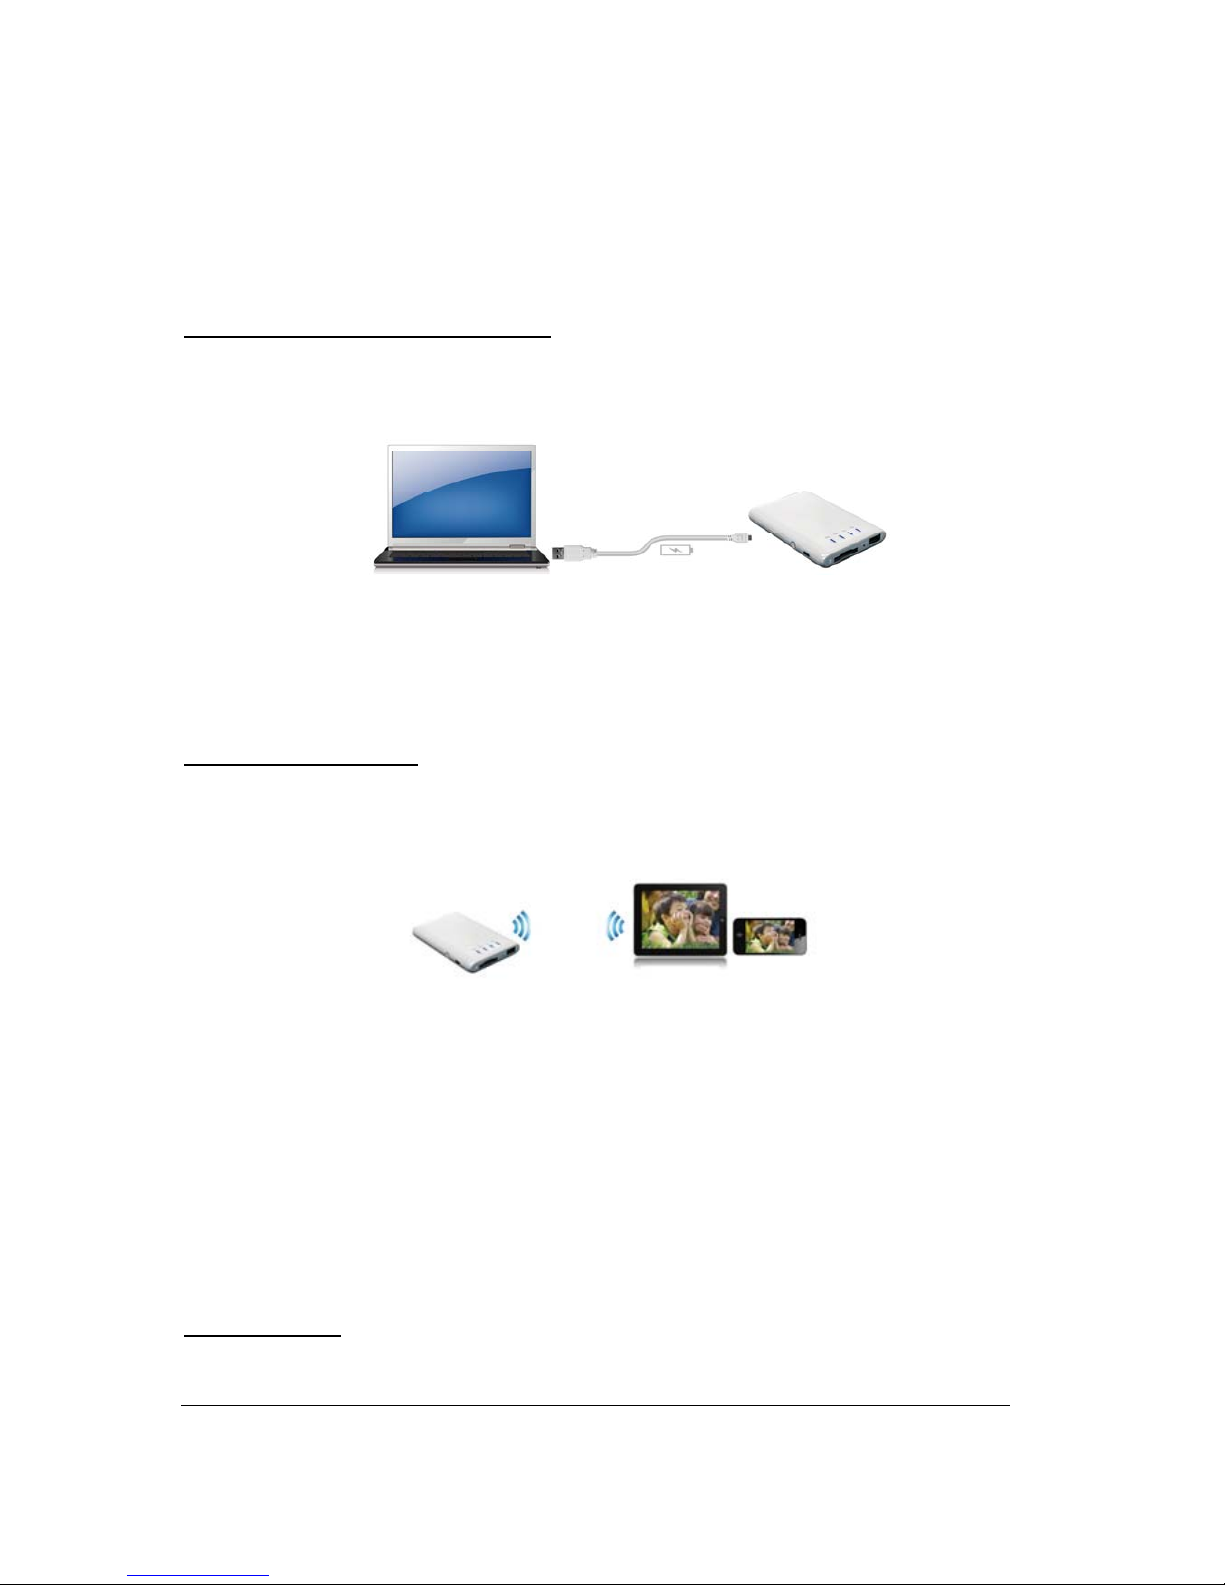
A. To function as SD memory card reader.
Simply connect the device into the computer’s available
USB port. The device will automatically mount on your desktop or inside the “My Computer”.
The Wi-Fi SD/USB works as SD memory card reader and charges the internal battery.
B. To function as a Bridge.
Press power switch button on, it works solely as a Wi-Fi SD/USB external
HDD/Flash.
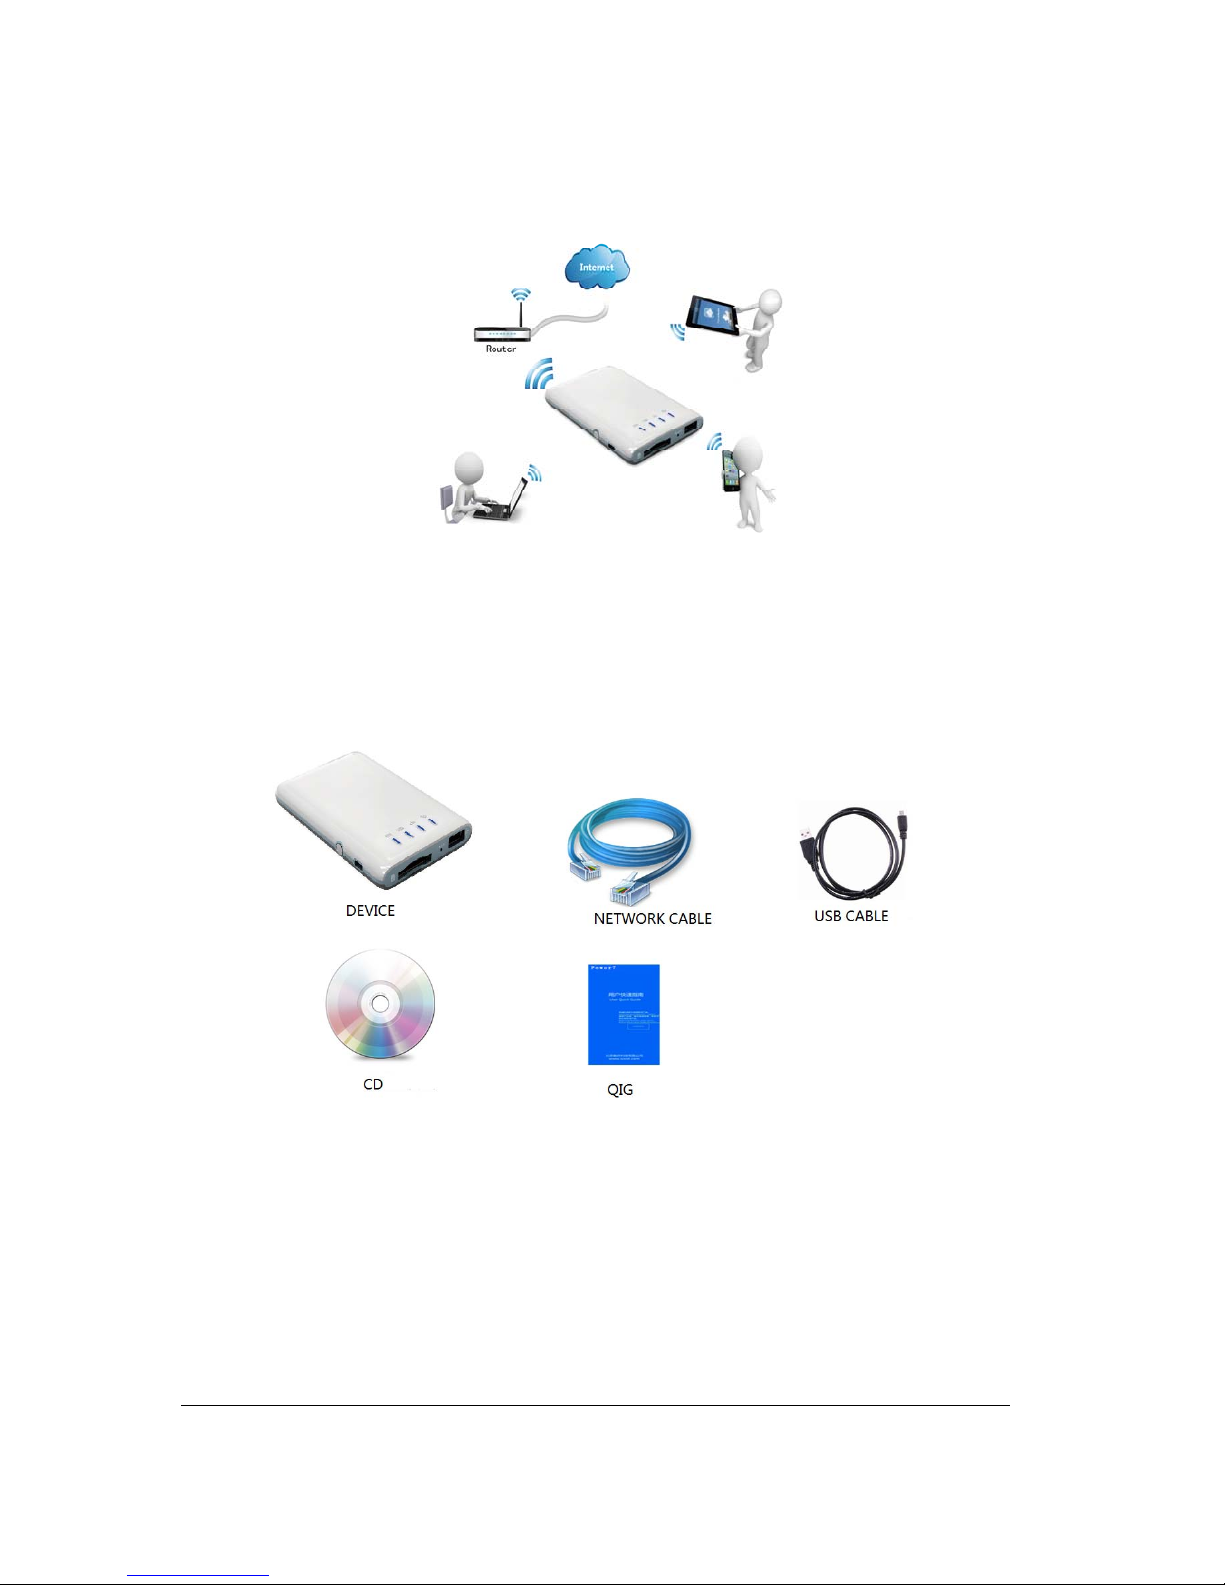
C. Wireless mode
, Wirelessly connect the device to your existing wireless router to have internet
access as illustrated below.
Page 3
Power 7 Technology Corporation – Wi-Fi SD/USB Users Manuals v1.0
3
1. Hardware and Accessories
The Power 7 Wi-Fi SD/USB Storage kit includes the following:
2 Product Parameters
2.1 Product Dimensions
Dimension:118mm (L) X 79mm (W) X 14mm (H)
2.2. Product Specification
CPU:
Page 4

Power 7 Technology Corporation – Wi-Fi SD/USB Users Manuals v1.0
4
Model: Ralink RT5350
Frequency: MIPS24KEc 360MHZ
Wi-Fi:
Standard: 802.11 b/g/n,
Frequency: 2.4 GHZ
Speed: 72Mbps at 20MHz
150Mbps at 40MHz
USB Interface:Micro USB 2.0 for data transfer and charging
Battery:
Capacity:3000mAh
Charging current: supports 500mA, 800mA and 1.5A
Power consumption:
A) SD Card Read/Write*:2W
B) Stand-by (HDD Sleep Mode): 1.5W
Emission (EMI) Safety and Other Certifications: FCC (Class B) and CE
*Varies on SD card type.
2.3. Operating Temperature
The normal operating temperature of the device is between 5°C to 35°C. Non-operating temperature is
between 0° to 60°C.
The operating humidity (non-condensing) is between 5% to 90% and non-operating humidity is 5% ~ 90 %
(non-condensing).
3. Minimum Hardware Requirements
Internet Connection
PC Operating System Requirements
o Windows: XP/Vista/Windows 7
o Mac: OS X 10.5.0 and later
o Others: Fedora 12 (Linux) and late
PC Web Browser
o Windows: Supports Internet Explorer 7.0 and higher version
o Mac: Supports Safari 3.0 and higher version
o Others: Firefox 3.5 and higher version
Router or Switch
Page 5
Power 7 Technology Corporation – Wi-Fi SD/USB Users Manuals v1.0
5
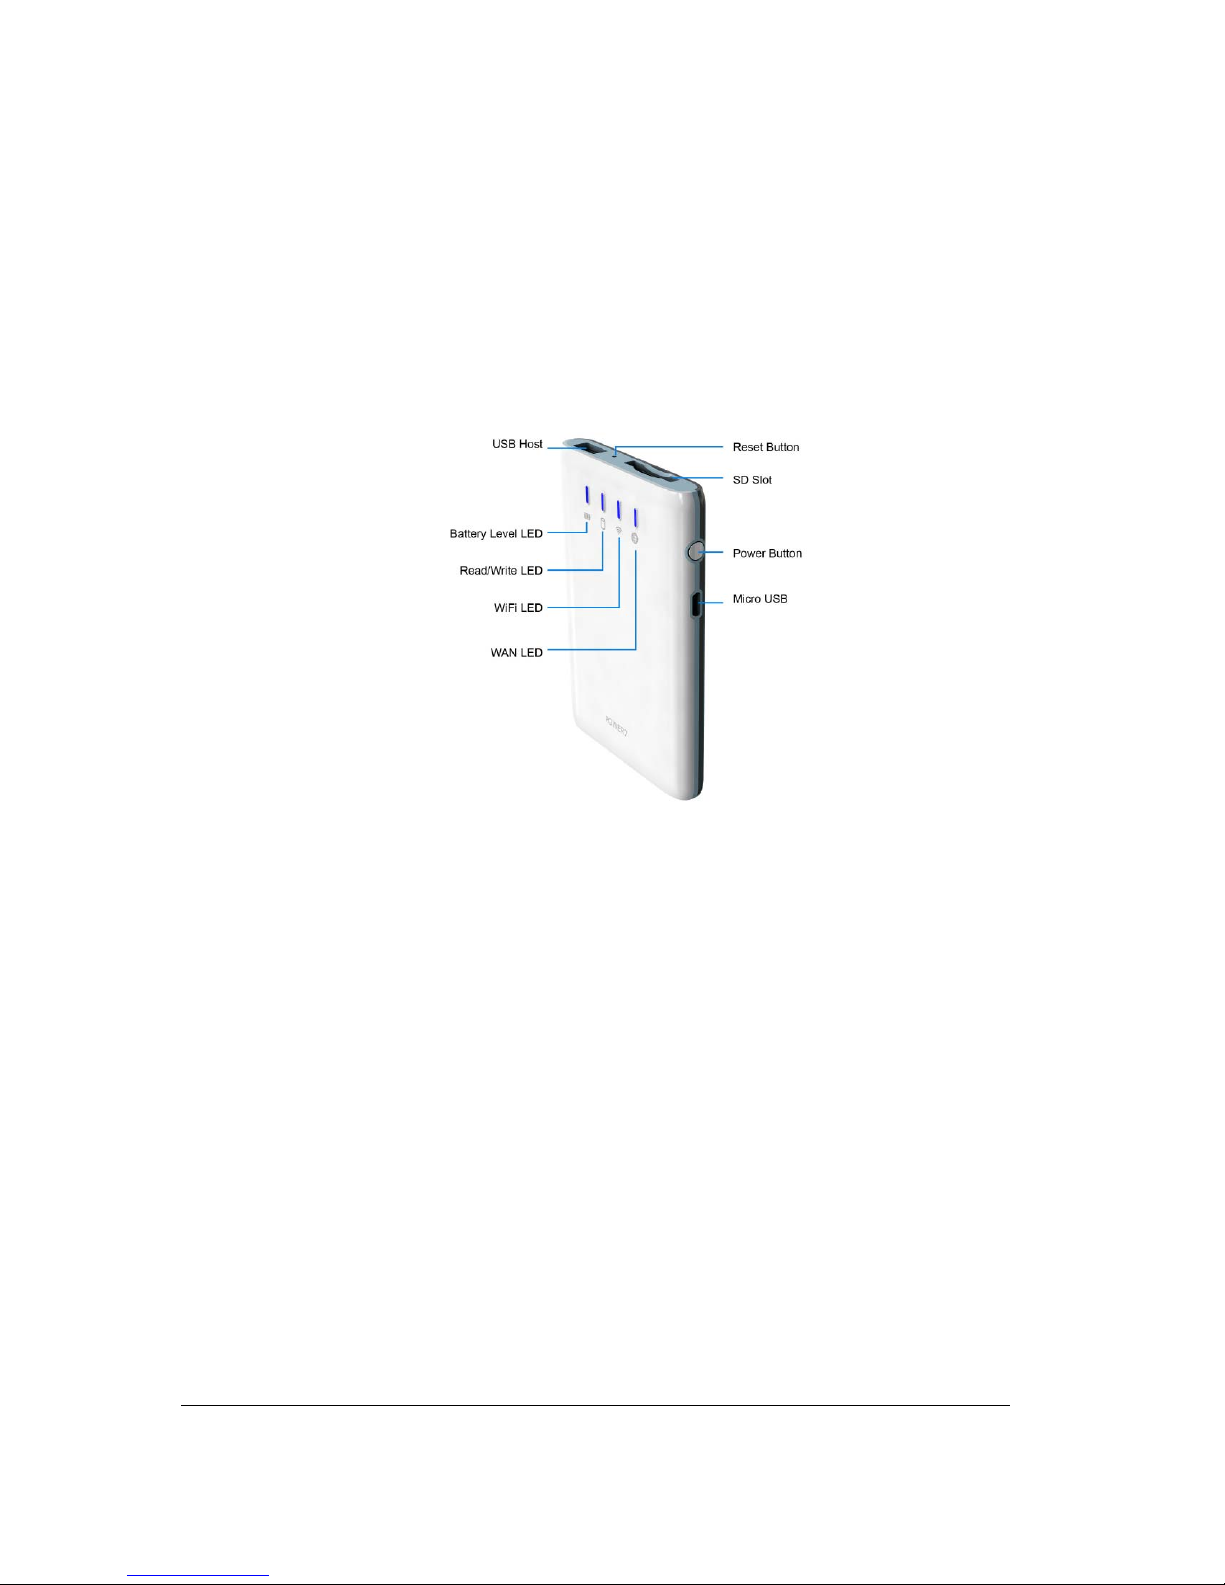
4. Product View
5. Interface
5.1USB Interface:Micro USB 2.0 Interface can connect to the computer to transmit data and charge
the device.
5.2 USB host interface: connect USB memory for WIFI accessing, or connect smartphone for
charging.
5.3 SD slot: insert SD card for WIFI accessing.
5.4 Power BUTTON: Turns the device on/off.
5.5 Reset Button: set the device to Default Factory configuration.
5.6 LED Panel
Battery Level LED:
Page 6

Power 7 Technology Corporation – Wi-Fi SD/USB Users Manuals v1.0
6
1. Green Steady Light: The battery power is >30%.
2. Red Steady Light: The battery power is <30% and >10%.
3. Red Fast Flash: The battery power is depleting and will soon shut down.
4. Green Slow Flash (every 2 seconds): The battery is charging.
5. Green Slow Flash (every 1.5 seconds): The device is shutting down.
6. LED off: The device is powered off.
WiFi LED
1. Blue LED shows the system initiation state. It starts flashing in the process of initiation, and it
stops flashing when the system initiation completes.
2. Blue Steady Light: WiFi is ready.
3. The LED light is off for the following situations:
A. Device is on, but the WiFi signal is unsteady.
B. Device is off.
C. Device is in Mobile HDD Mode and the WiFi is off.
Internet LED
A. Green Steady Light: WiFi signal is good. .
B. No Light: Not connected to the Internet.
R/W LED
1. On WiFi disk mode
A. Blue Steady Light: Memory connection is successful.
B. Blue Flashing Light: Memory is reading or writing.
2. Card reader mode
A. Blue Steady Light: Connec ted to USB2.0
B. Blue Flashing Light: Connected to USB2.0 and is reading or writing.
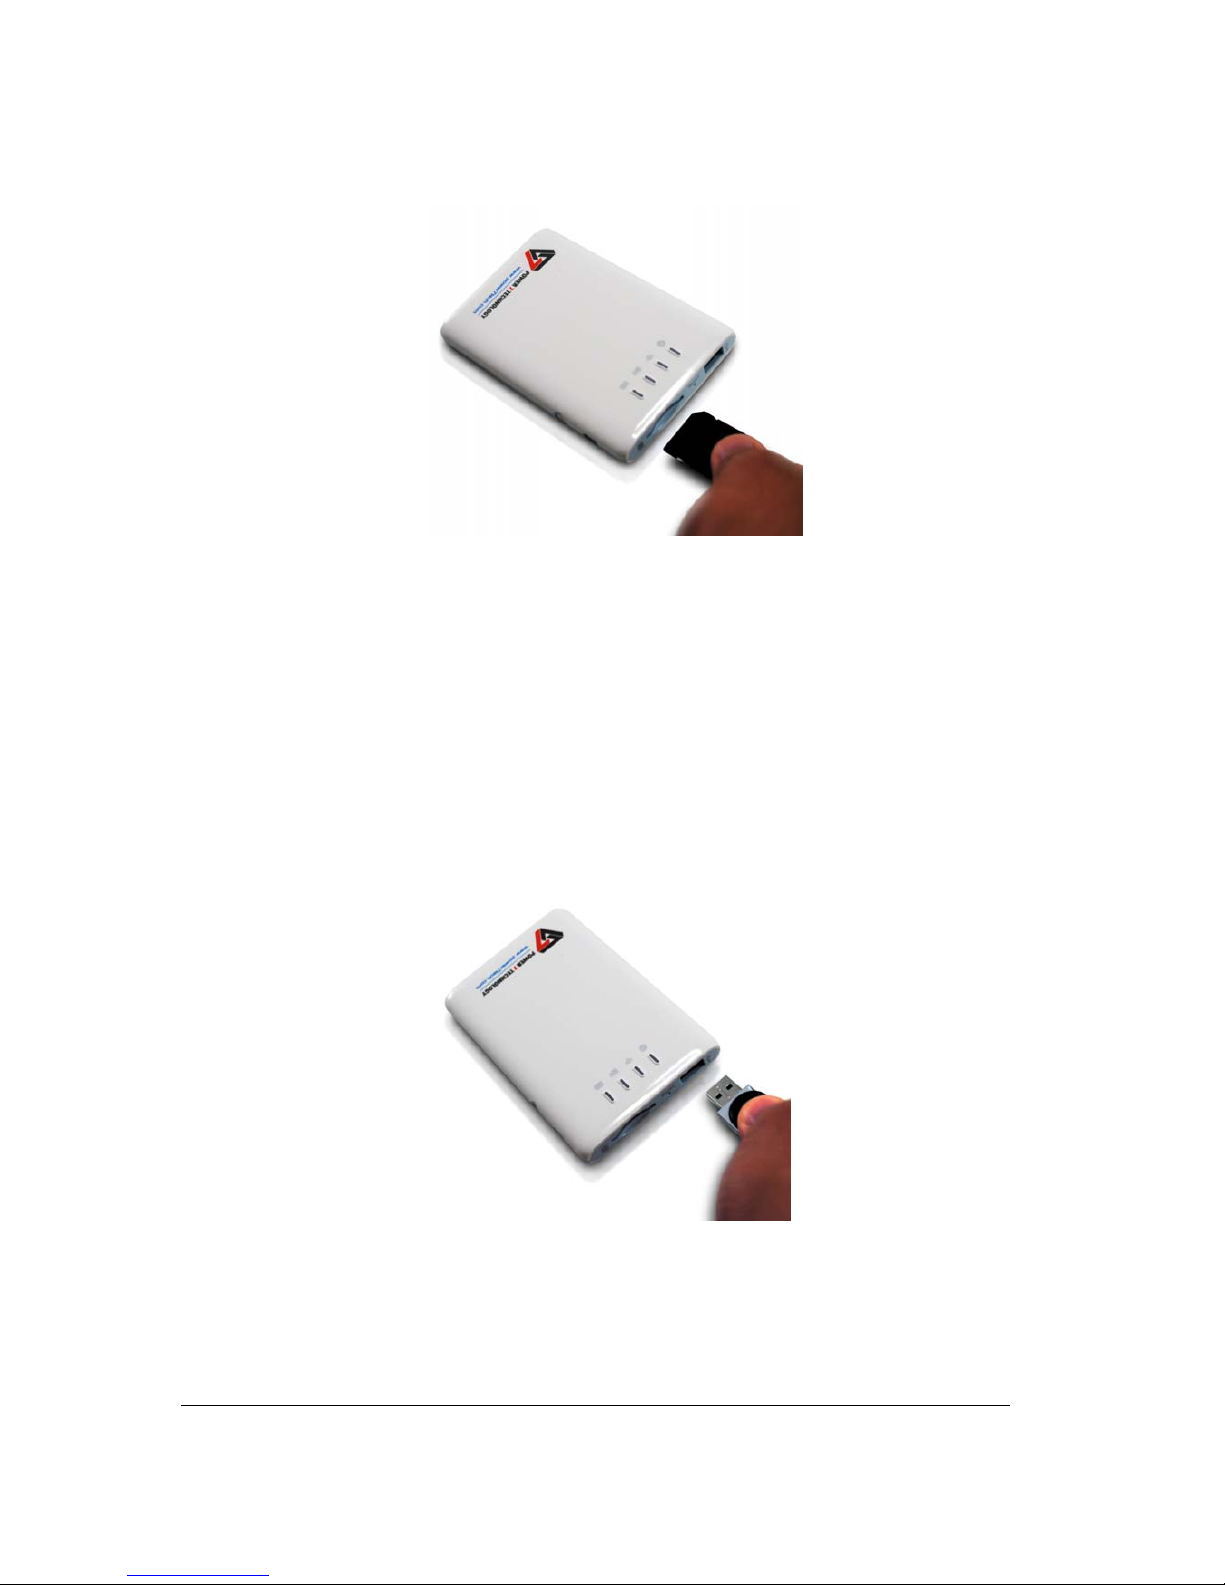
6. Storage Installation
6.1 SD Memory Card
Note: Do not touch the exposed connectors on your SD memory card. Prior to installing the SD memory
card, make use the Wi-Fi SD/USB device is switched off and no USB external storage is connected.
Installing the SD memory card is very simple. Locate the SD memory card slot. Simply insert the
memory card as seen on the image below. Gently push the memory card all the way in until it locks into
its place.
Page 7
Power 7 Technology Corporation – Wi-Fi SD/USB Users Manuals v1.0
7
Press the power button to switch on the device. Wait for few seconds to complete the initialization
process and your SD memory card is ready to use.
6.2 USB External Storage
Note: Prior to installing your external USB Storage, make use the Wi-Fi SD/USB device is switched off
and no SD memory card installed.
Locate the USB port on the device. Simply insert the USB connector into the USB port of the device as
seen the image below.
Press the power button to switch on the device. Wait for few seconds to complete the initialization
process and your USB external storage is ready to use.
7. PC Client Software Installation
Page 8

Power 7 Technology Corporation – Wi-Fi SD/USB Users Manuals v1.0
8
Our included Client Utility software is the only software that y ou will need to install on your computer. This
software utility allows you to easily search and look for your Wi-Fi SD/USB that is connected from your
home network.
1. To install the software, simply double-click on the “NAS Client Login Utility v2.2 Setup” executable
file and follow the on-screen instructions.
2. Once the installation is complete, double-click on the “NAS Client Login Utility V2.2” icon on
your desktop to launch the software utility.
8. Using Personal Computer
8.1. Connecting Wirelessly to PC
Switch-on the Wi-Fi SD/USB by pressing the power button at the front panel. Wait for few minutes until
the Wireless LED has remained lit. Enable the Wi-Fi feature on your PC and open the Wireless Network
Connection. Select the WiFiDisk wireless connection (default wireless SSID: WiFiDisk and with no
password). Once you have successfully co nnected to your Wi-Fi SD/USB, you may no w run the “NAS
Client Log In Utility V2.2” to search for your device and complete the configuration process.
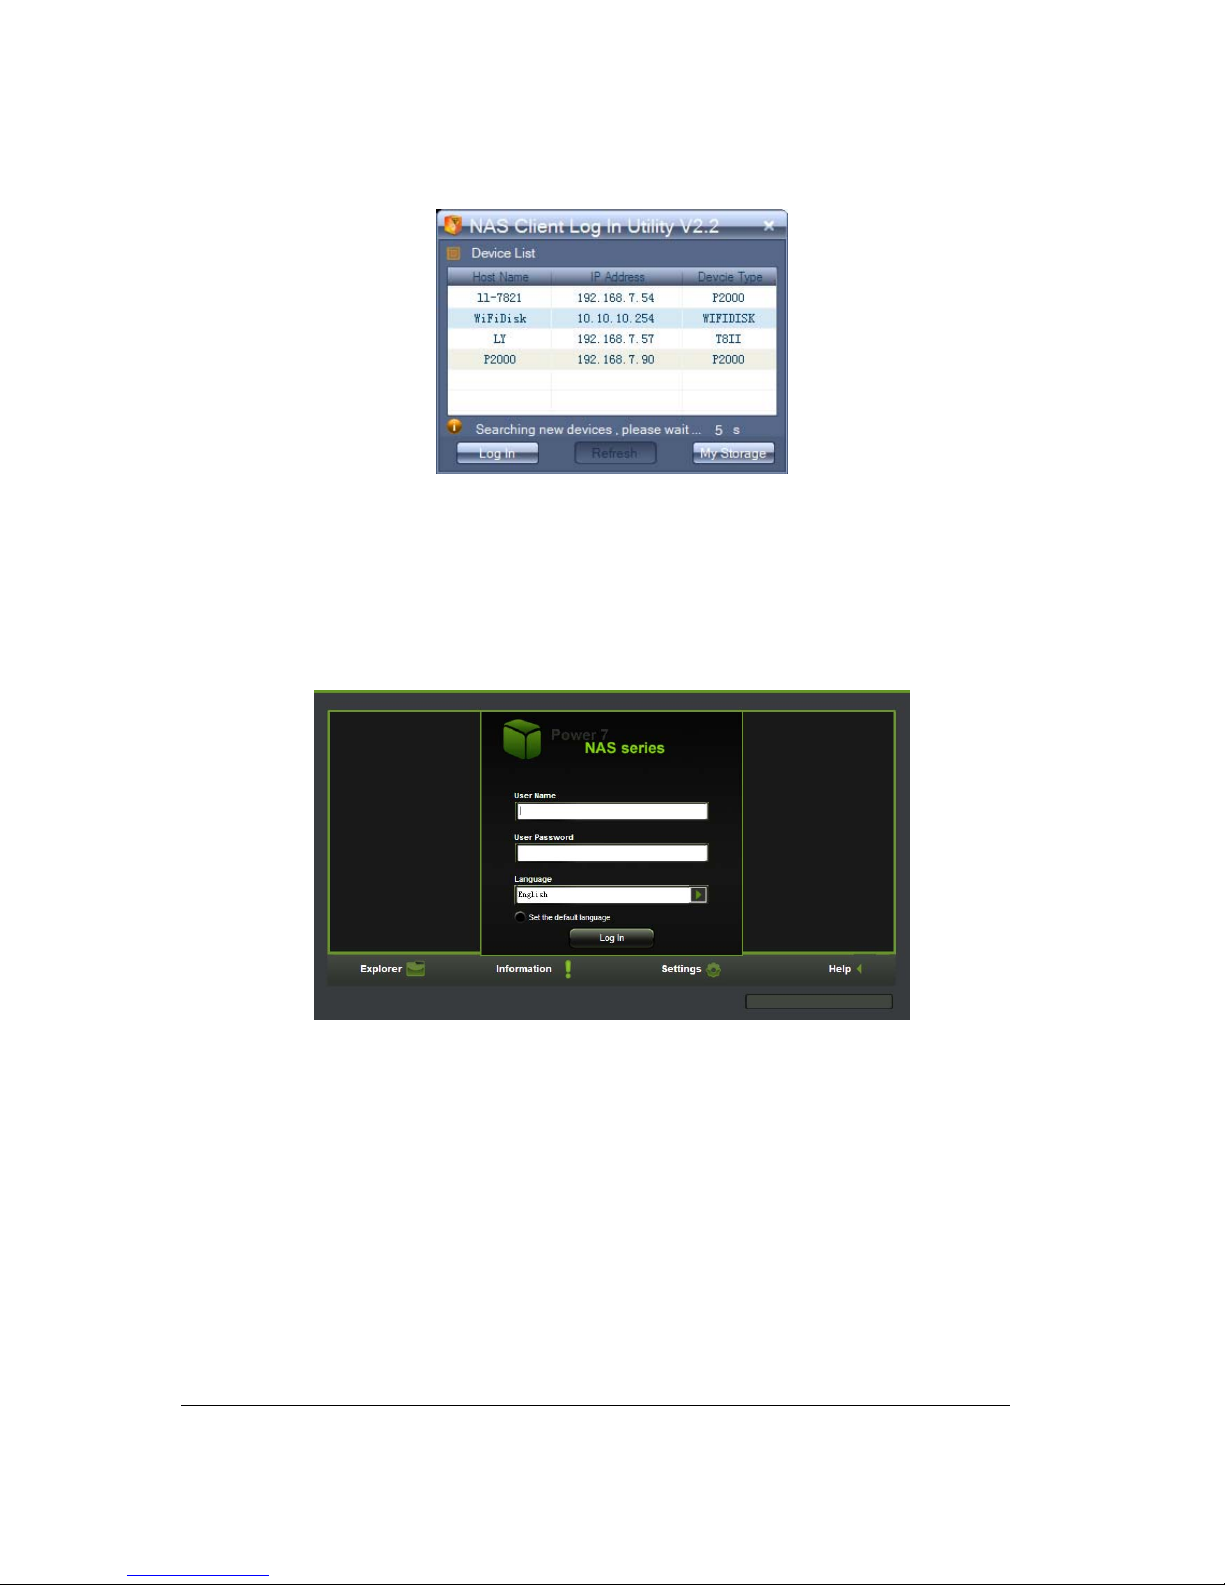
8.2. PC Client Login Utility
Double-click the “Client Log In Utility V 2.2” icon on your desktop. The software utility will search all the
connected devices in your network as seen on the screensh ot below.
Page 9
Power 7 Technology Corporation – Wi-Fi SD/USB Users Manuals v1.0
9
If you do not find the WiFiDisk on the list of devices connected in your network, click on the “Refresh”
button to refresh the device list.
Select the WiFiDisk on the list, then click on the “Log In ” butto n to e nt er the we b int erfa ce as se en on the
image below.
Type the default User Name as admin and leave the User Password as blank. Click on the “Log In”
button to access the Web Management Interface.
If you choose to click on the “My Storage” button, enter the admin login name and password to gain access
to the Wi-Fi SD/USB. Once successfully logged-in, it automatically mount the storage area of the Wi-Fi
SD/USB onto your desktop
8.3. Wi-Fi SD/USB Configuration using PC
Once your Wi-Fi enabled-PC is successfully connect to the Wi-Fi SD/USB, using the “NAS Client Login
Utility V2.2” will allow you to access our built-in Web Management Int erface and configure your device.
Page 10
Power 7 Technology Corporation – Wi-Fi SD/USB Users Manuals v1.0
10
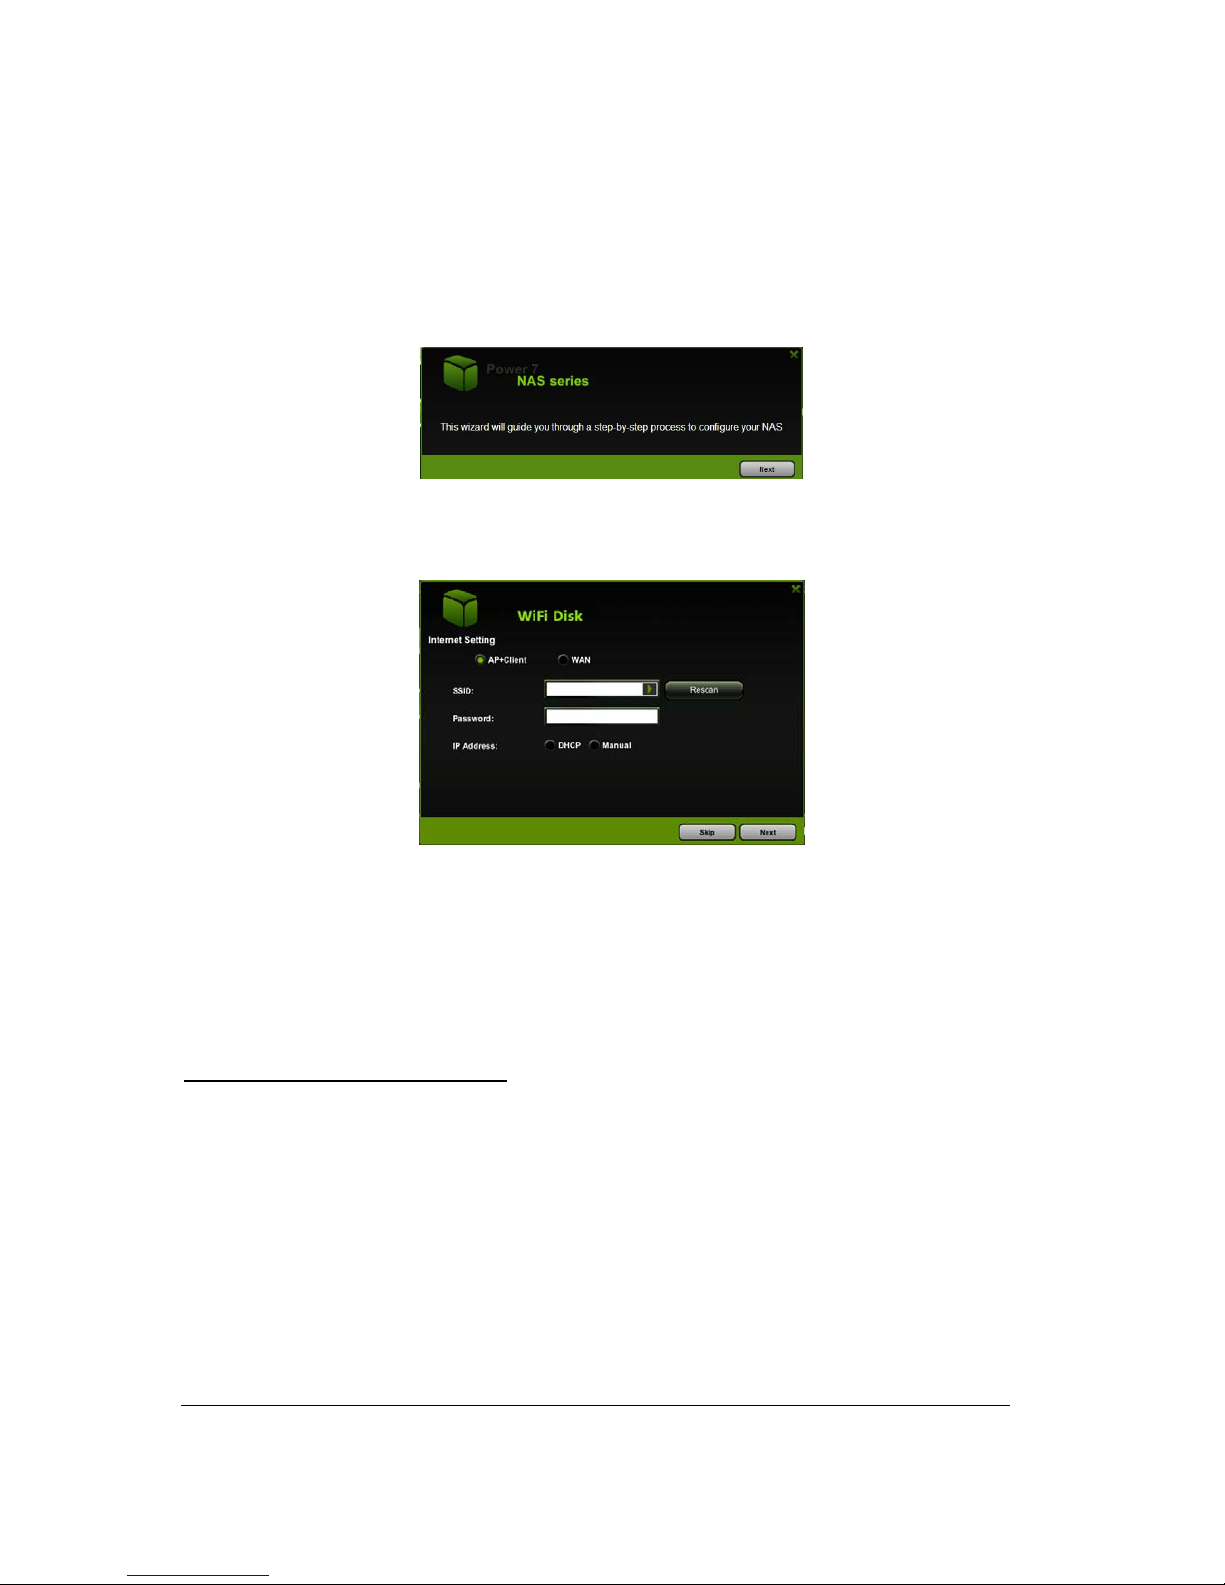
1. During the initial setup, our Wizard will automatically run and will guide you through the
step-by-step process on configuring the Wi-Fi SD/USB as seen on the screenshot below. You
may cancel this process by clicking on the “X” at the top right corner of the window. If you
cancel the Wizard, it will keep the factory default settings of your Wi-Fi SD/USB.
2. Click on the “Next” button. By default, the Access Point (AP)+Client is selected.
There are two available Internet Access options –
A. Access Point (AP) + Client. Connecting the Wi-Fi SD/USB to another wireless device to
have the internet access.
B. WAN. Directly connecting the Wi-Fi SD/USB to the available port on the back the router.
Selecting the AP+Client Option
- SSID. Type-in the SSID name or click on the “Rescan” button to automatically search for the
available wireless network connections.
- Password. Type-in the correct password to join the wireless network connection selected.
- IP Address. Select either DHCP or Manually assign an IP address
o By selecting DHCP, the host will provide an automatic IP address to connect to the
internet
o By selecting Manual, you have to manually assign an IP address to connect to the
internet
Page 11
Power 7 Technology Corporation – Wi-Fi SD/USB Users Manuals v1.0
11
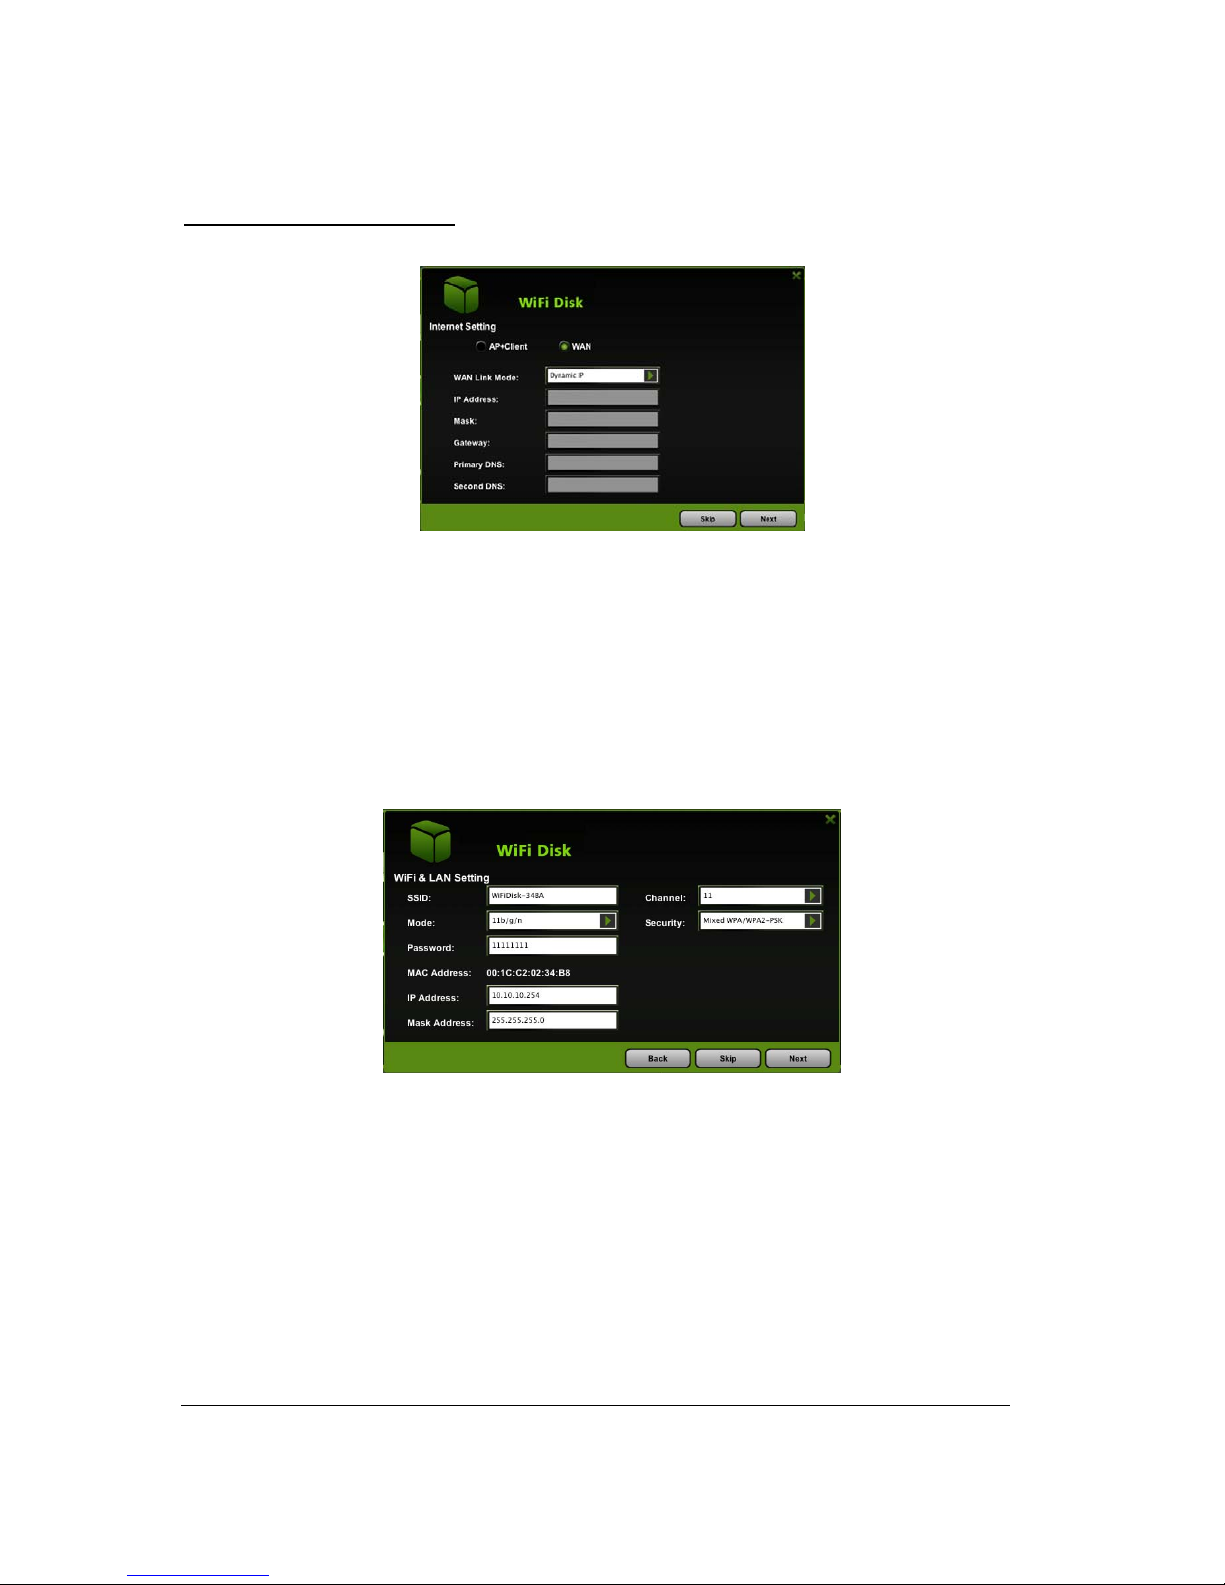
Selecting the WAN Option
By selecting the WAN option, the Dy namic IP is selected as the default setting. You can
manually assign your own IP address by clicking on the green arrow and select the Static IP
option.
Click on the “X” button if you wish to cancel and exit this window.
3. Click on the “Next” button. The next step is to configure the Wi-Fi Disk.
SSID: Type-in the combination of letters and numbers only . 32 characters is the
maximum allowable SSID length
Channel: The default setting is set to Auto. There are 14 available channels to
choose from.
Modes: The default setting is 11b/g/n. You can also manu ally set the modes to
1 1Mbps (802.11b), 54MBPS (802.11G), and 150Mbps (802.11n).
Security: The default is set to NONE. The WPA-PSK, WPA2-PSK , Mixed
WPA/WPA2-PSK are available.
Password: WPA-PSK , WPA2-PSK , Mixed WPA-PSK/WPA2-PSK: Minimum 8
Page 12
Power 7 Technology Corporation – Wi-Fi SD/USB Users Manuals v1.0
12
(Maximum 63) characters.
IP Address: The default IP address is set to 10.10.10.254 with subnet mask of
255.255.255.0. The IP address can be changed.
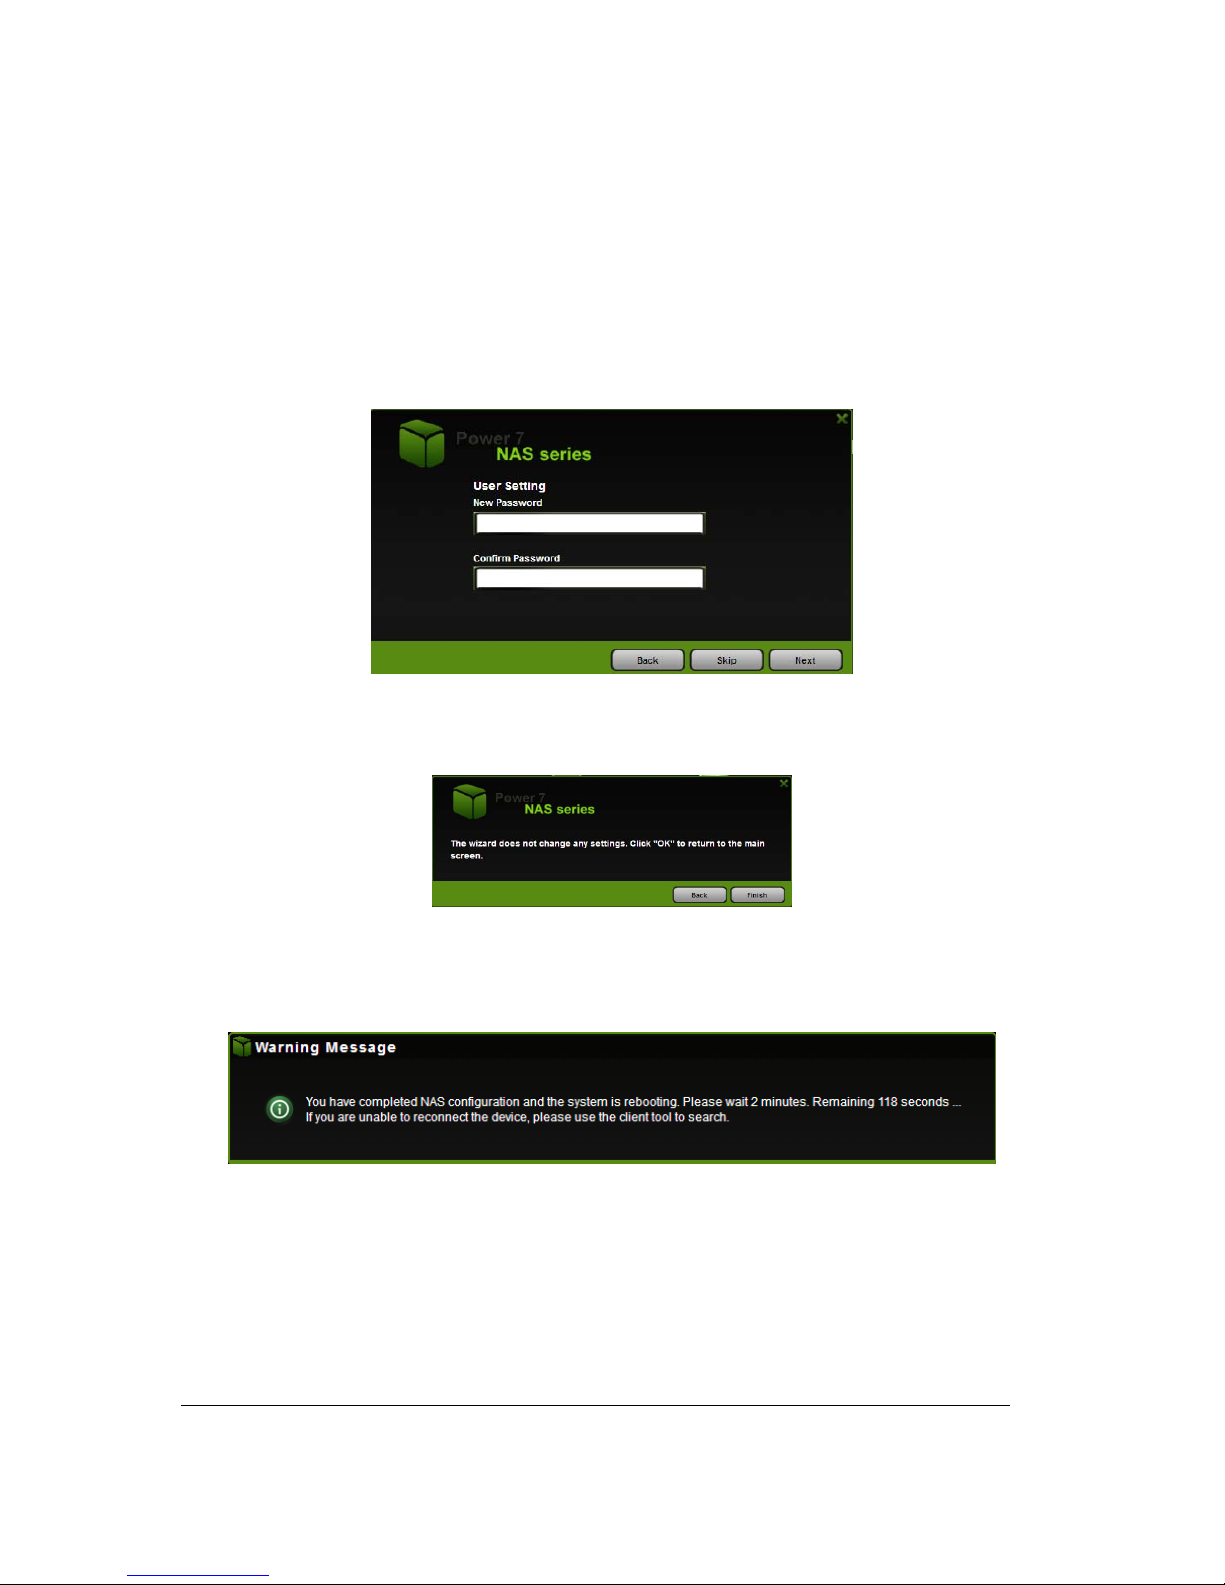
4. Click on the “Next” button. The next step is to change the admin default password. Click on the
“Next” button once the password has been modified. You may click on the “Skip” button to keep the
default password.
5. Click on the “Finish” button to complete and save the changes made.
The system will start rebooting. This process will take approximately 5 minutes as seen on the
image below.
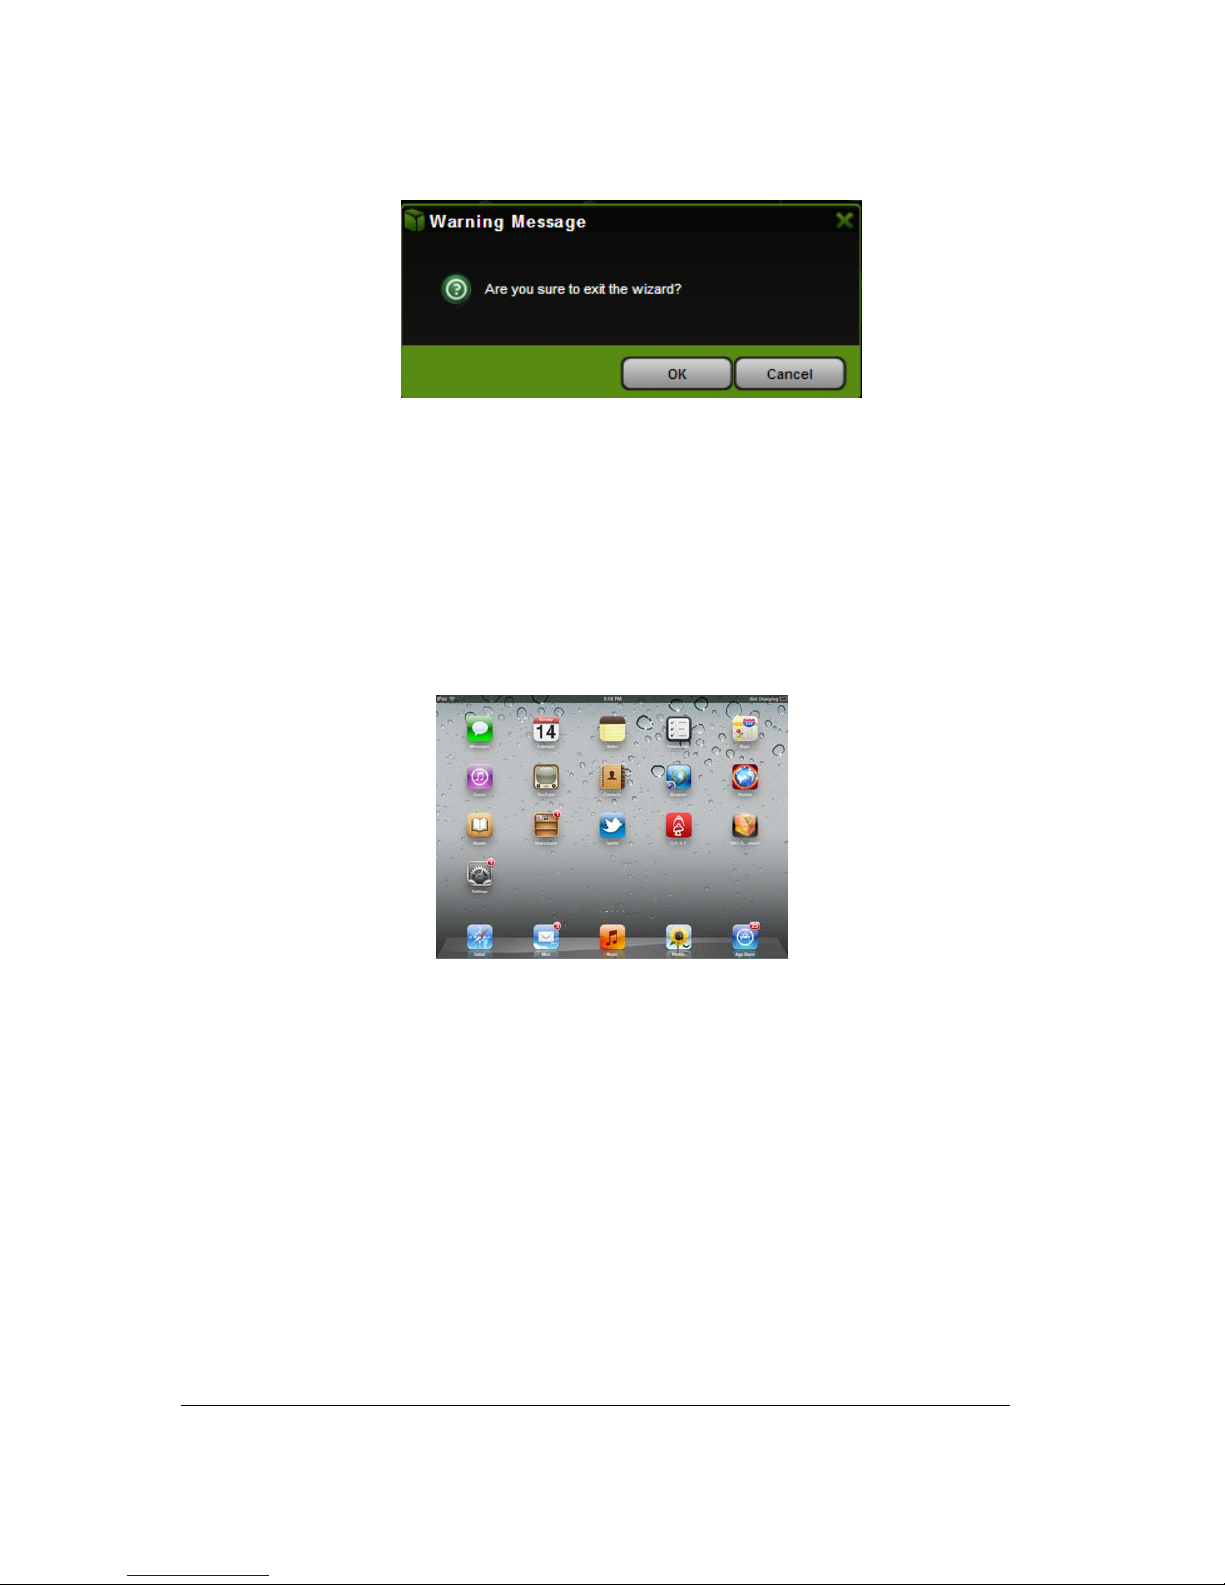
The step-by-step wizard can be canceled at anytime. Click on the “X” located at the top right of
the window as seen on the image below. Click on the “OK” button to exit or “Cancel”.
Page 13
Power 7 Technology Corporation – Wi-Fi SD/USB Users Manuals v1.0
13
9. Using Mobile Devices
9.1. iOS Client App Installation
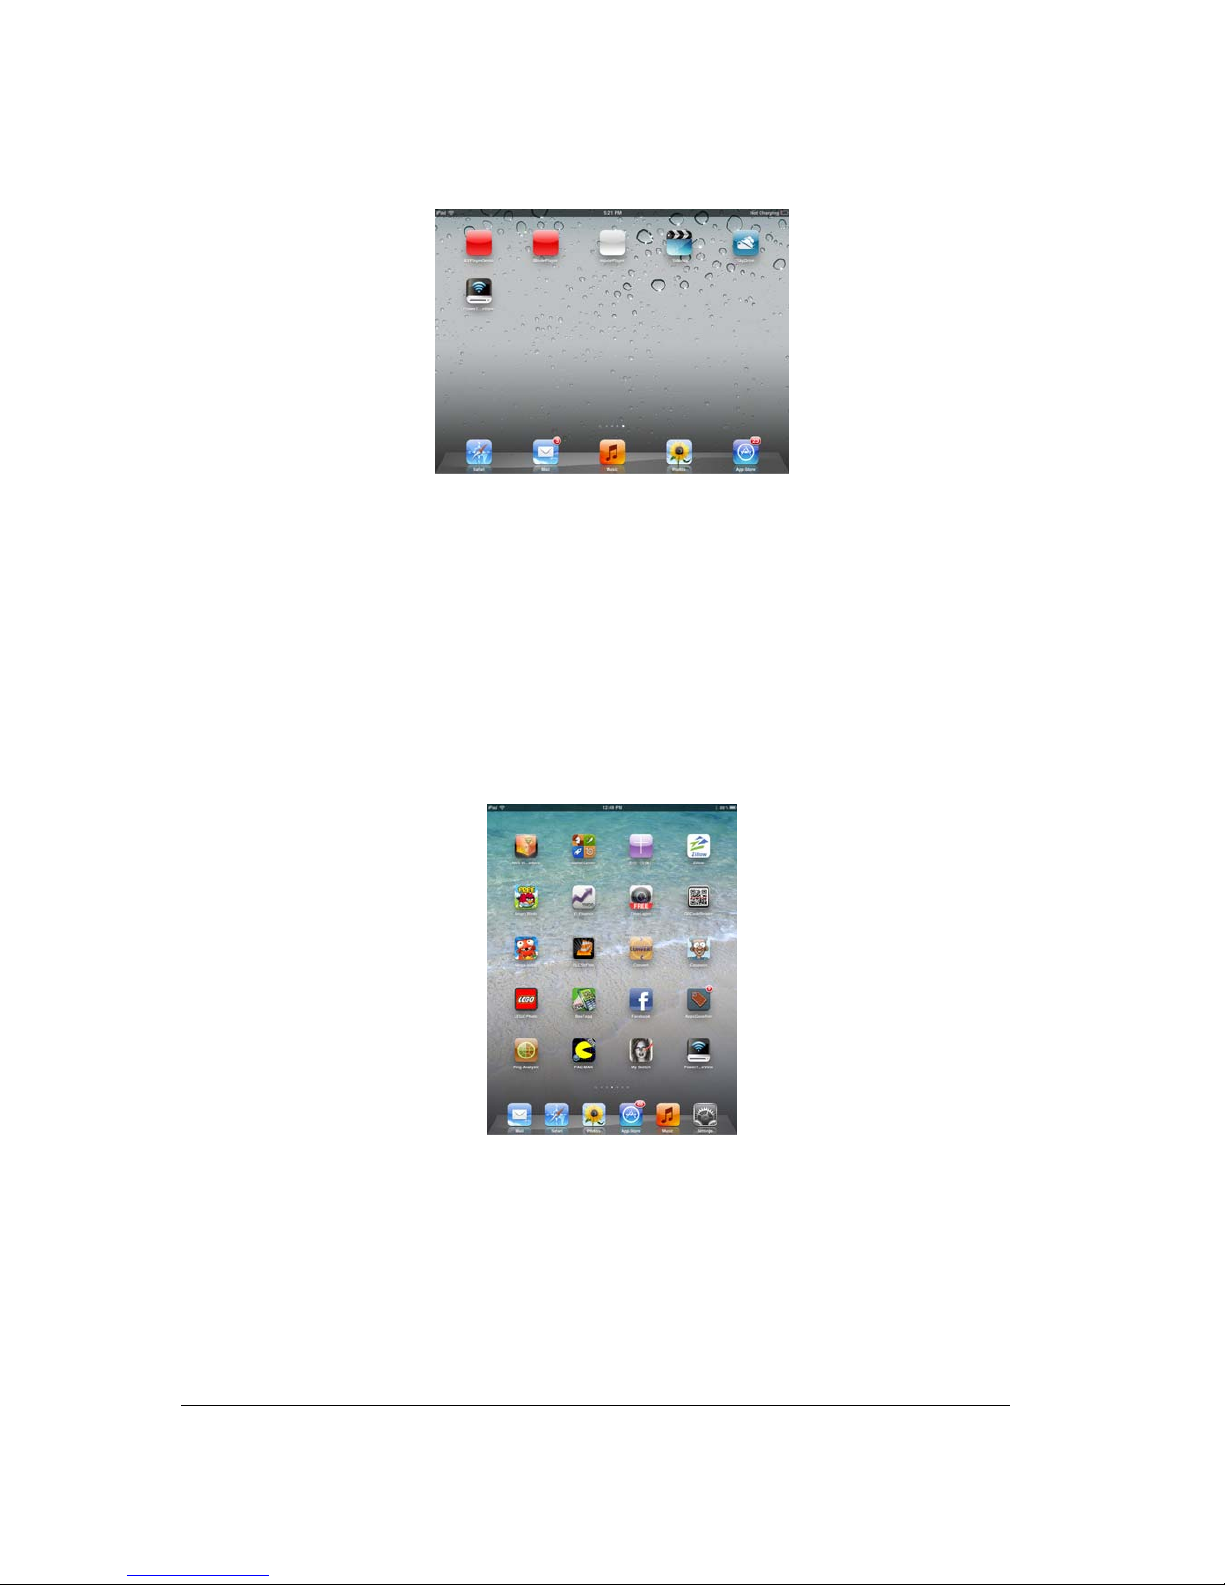
1. Click on the “App Store” icon on the desktop as seen on the image below. Search and locate the
free “Power 7 MobileView” app and follow the on-screen installation instructions.
2. Once the installation process has been completed, the “Power 7 MobileView” app can be found on
the desktop as seen on the image below.
Page 14
Power 7 Technology Corporation – Wi-Fi SD/USB Users Manuals v1.0
14
9.2. Wirelessly connecting your iPhone/iPad
1. Turn-on the Wi-Fi SD/USB. Wait for few minutes to complete the initialization process. The
blue Wi-Fi LED on the device should remain solid indicating that the initialization process has
been completed.
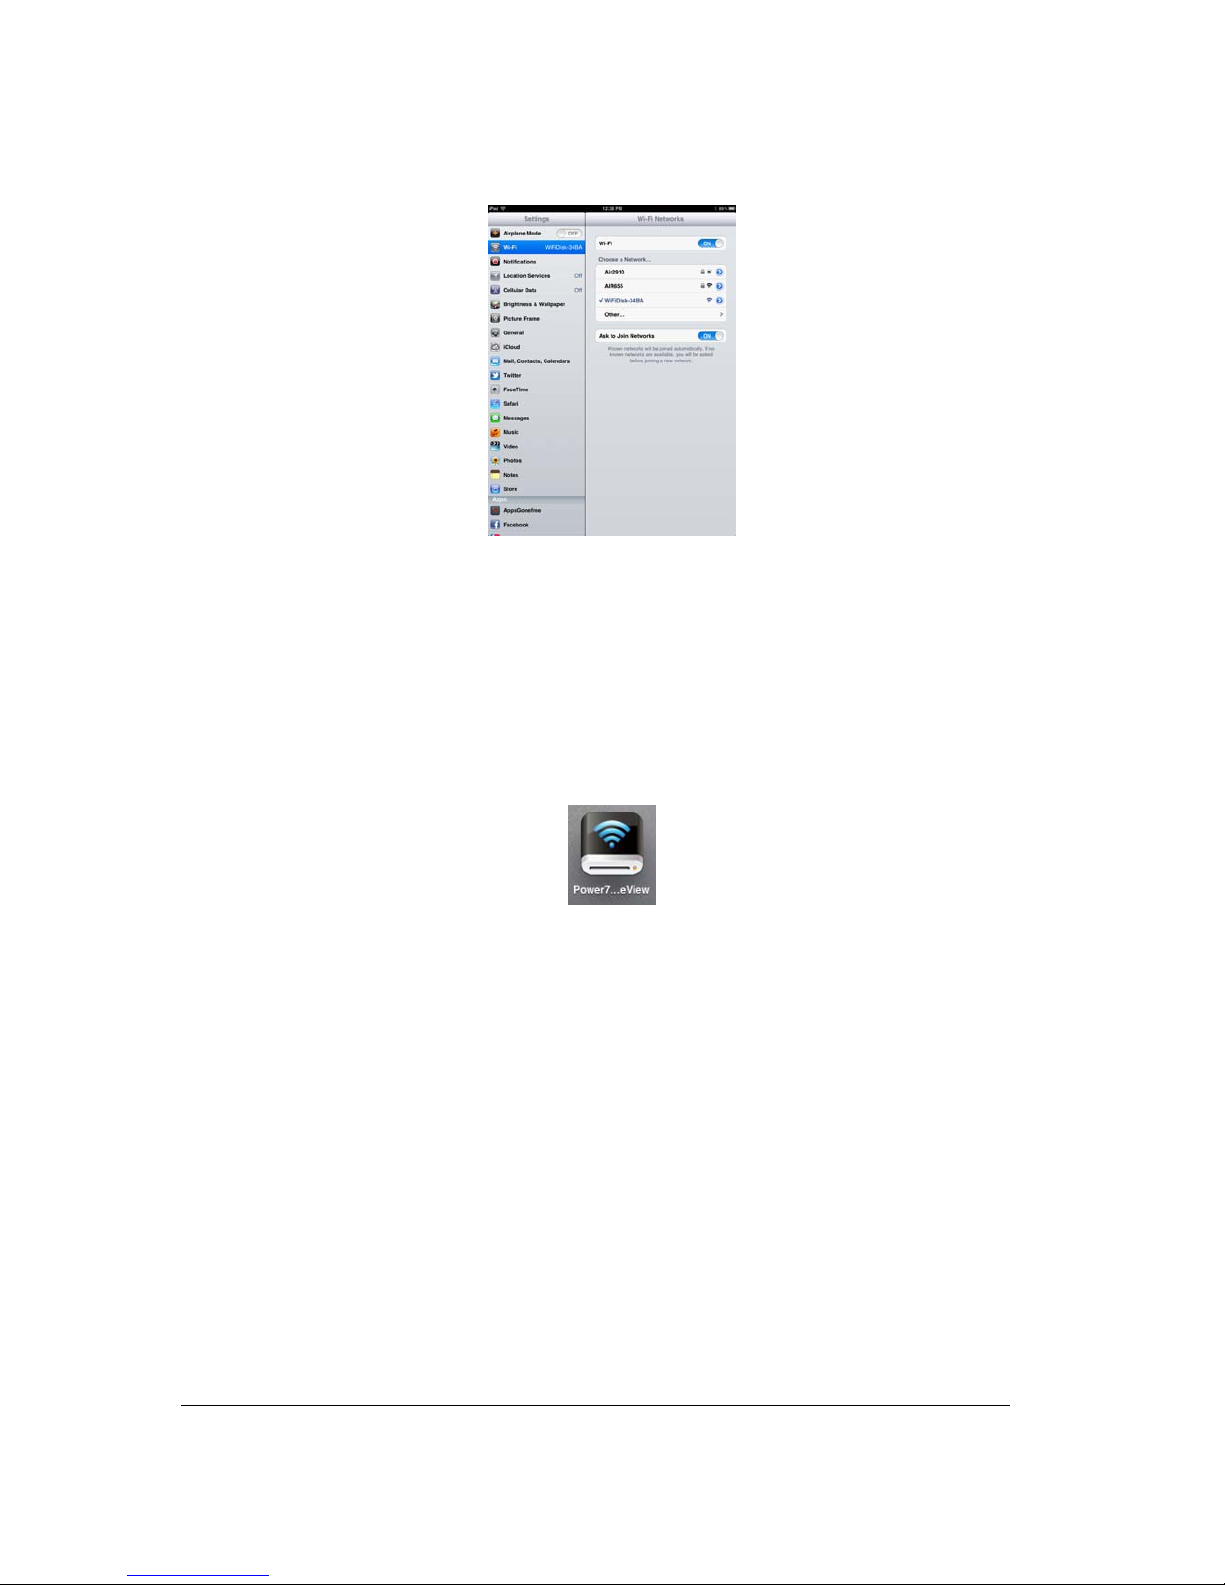
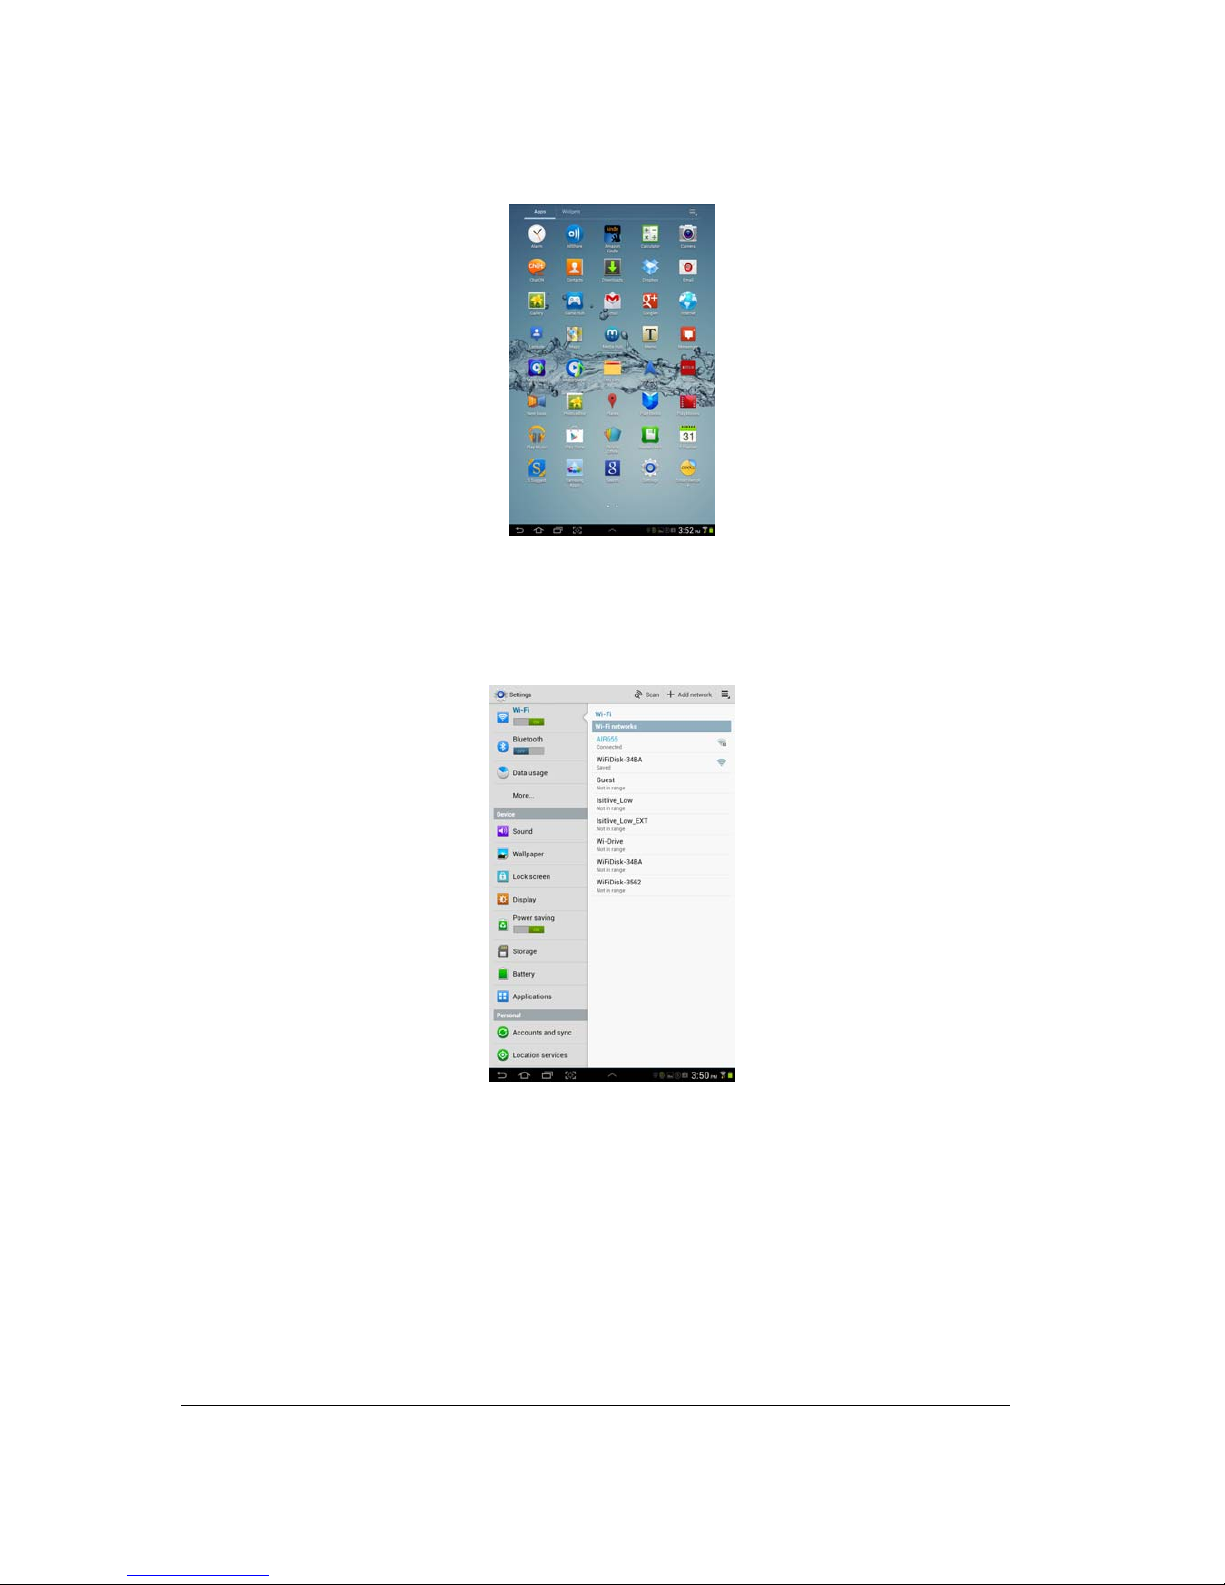
2. Click on the “Settings” icon on the desktop as seen on the screenshot below.
3. Click on the “Wi-Fi”. Inside the Wi-Fi Networks, the “WifiDisk-XXXX” should appear on the list.
Click on the “WifiDisk-34BA” as seen on the image below. The “34BA” part of the SSID is the
last 4 digits of the device MAC Address.
Page 15
Power 7 Technology Corporation – Wi-Fi SD/USB Users Manuals v1.0
15
Once the “Wifidisk-XXXX” is selected, a check mark will appear before the SSID and the Wi-Fi
logo will appear after the device name on the top left of the display.
9.3. iOS User Login
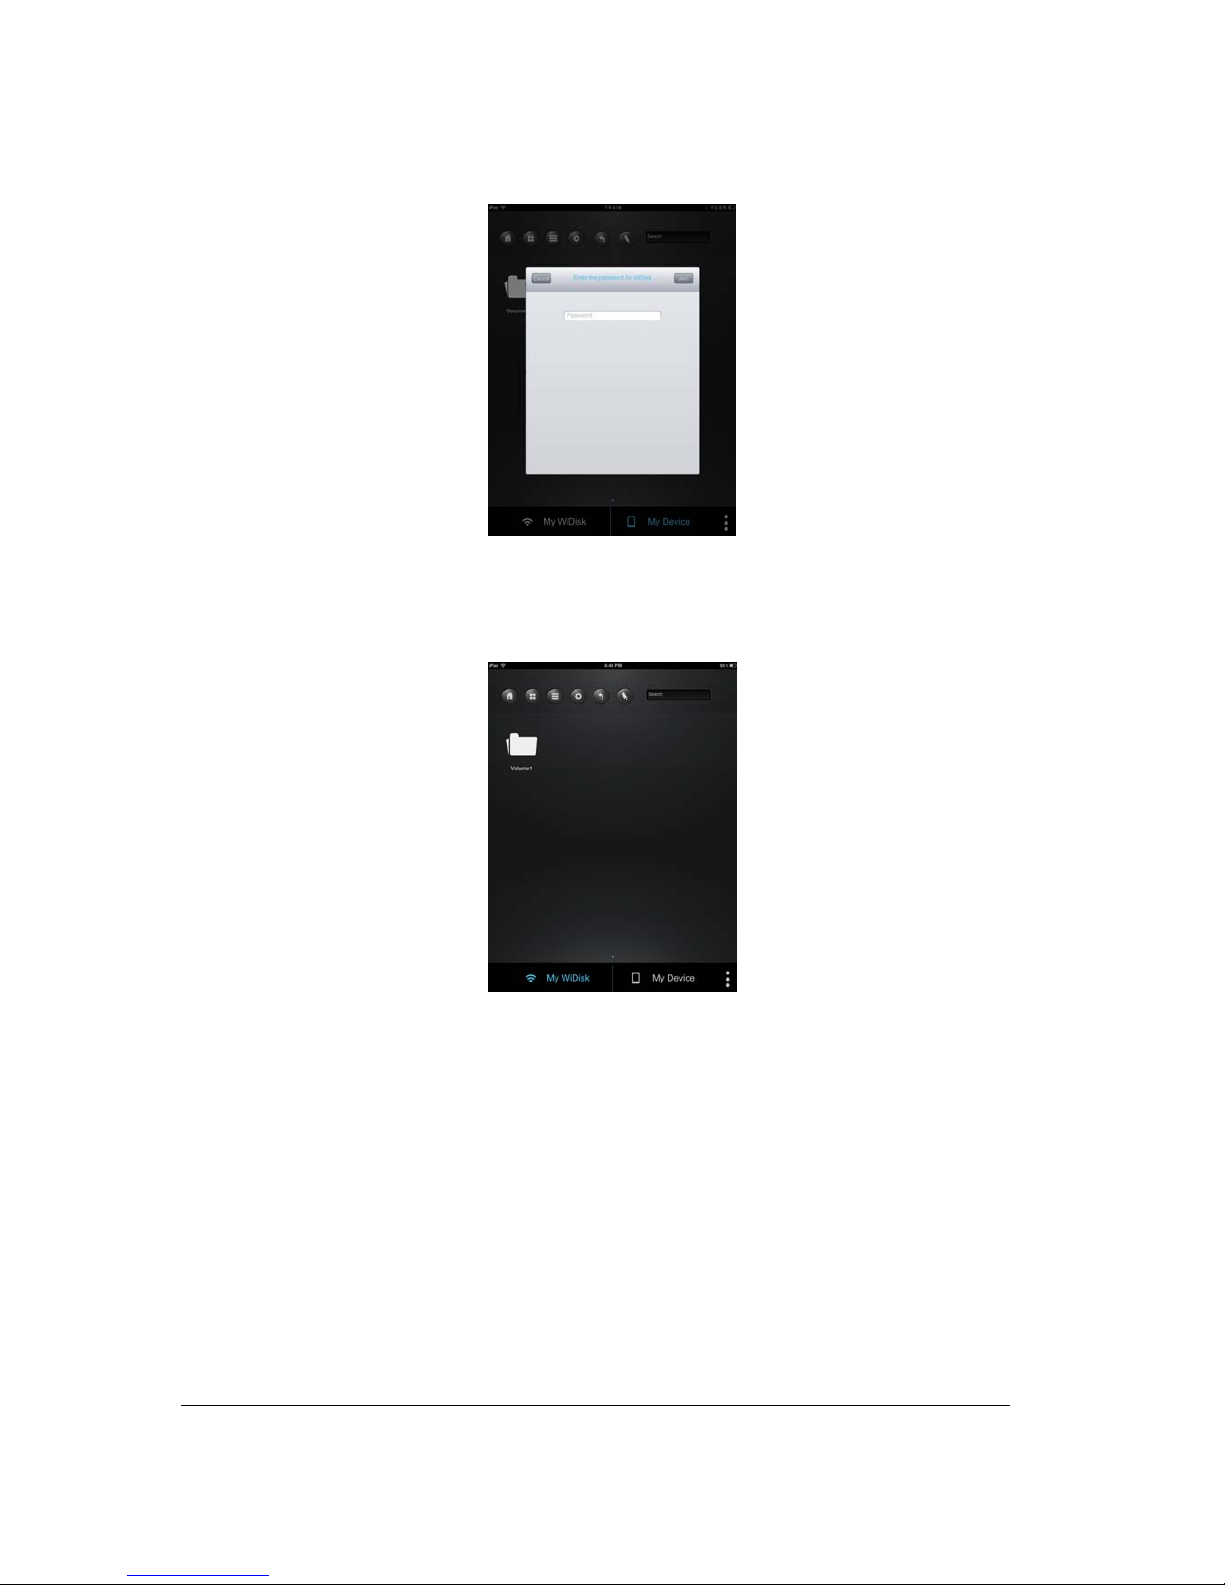
1. Click on the “Power 7 MobileView” icon to launch the app as seen on the image below.
2. Enter the Admin password that you assigned during the configuration process. The
password is only required during the first login. The device remembers the pass word and there is
no need to enter it again the second time you login.
Page 16
Power 7 Technology Corporation – Wi-Fi SD/USB Users Manuals v1.0
16
3. Once the password has been entered correctly, you will be automatically connected into the
“My WiDisk”. The “My WiDisk” is the Wi-Fi SD/USB Storage.
9.4. Android Client App Installation
1. Download the Client App called “WDisk” from the official website as seen on the screenshot below.
Page 17

Power 7 Technology Corporation – Wi-Fi SD/USB Users Manuals v1.0
17
2. Click on the “Install” button and follow the on-screen instructions.
3. Once the Client App is successfully installed, the “ WDisk” icon can be found on your desktop as
seen on the image below.
9.5. Wirelessly connecting your Android devices
1. Turn-on the Wi-Fi SD/USB. Wait for few minutes to complete the initialization process. The
blue Wi-Fi LED on the device should remain solid indicating that the initializat ion process has
been completed.
2. Click on the “Settings” icon on your desktop as seen on the screenshot below.
Page 18
Power 7 Technology Corporation – Wi-Fi SD/USB Users Manuals v1.0
18
3. Switch the Wi-Fi to ON position. Inside the Wi-Fi networks, the “WifiDisk-XXXX” should
appear on the list. Click on the “WifiDisk-34BA” as seen on the image below. The “34BA” part
of the SSID is the last 4 digits of the device MAC Address.
4. The word “Connected” will appear under the SSID name of which is an indication that the
Android Device is connected to the Wi-Fi SD/USB.
9.6. Android User Login
1. Click on the “Power7 WDisk” icon to launch the app as seen on the image below.
Page 19

Power 7 Technology Corporation – Wi-Fi SD/USB Users Manuals v1.0
19
2. Enter the Admin password that you assigned during the configuration process. The
password is only required during the first login. The device remembers the p ass word and there is
no need to enter it again the second time you login.
3. Once the password has been entered correctly, you will be automatically connected into the
“My WiDisk”. The “My WiDisk” is the Wi-Fi SD/USB Storage.
10. Basic Functionality
10.1. iOS Device Client
Once you have successfully connected to the Wi-Fi SD/USB, by default, you will be inside the “My WiDisk”.
The “My WiDisk” is the Wi-Fi SD/USB and the “My Device” is the device that you are using to access the
Page 20

Power 7 Technology Corporation – Wi-Fi SD/USB Users Manuals v1.0
20
Wi-Fi SD/USB. Few buttons that can be found inside the Main Screen as listed below.
My Device Main Screen View
– By default, the Documents folder, Music folder, Photos Folder, V ideos
folders and iPad (or iPhone) folder are available to easily organize your files inside the My Device.
My WiDisk Main Screen View –
Home Button – back to the main screen.
View Button - change to List or Thumbnail view.
Setting Button – change the Wi-Fi SD/USB configuration.
Page 21

Power 7 Technology Corporation – Wi-Fi SD/USB Users Manuals v1.0
21
Back Button – back to previous screen
Share Button – to share, copy, delete, and upload files functions
Search Box – to search for specific file name and/or extension.
My WiDisk – the Wi-Fi SD/USB or the Remote Storage.
My Device – the device that you are using to access the Wi-Fi SD/USB or the Local
Storage
Status Button – to view the download/upload status list.
10.2. Android Device Client
Once you have successfully connected to the Wi-Fi SD/USB, by default, you will be inside the “My WiFi
Disk”. The “My WiFi Disk” is the Wi-Fi SD/USB and the “My Device” is the device that you are using to
access the Wi-Fi SD/USB. Few buttons that can be found inside the Main Screen as listed below.
My Device Main Screen View
– By default, the Documents folder, Music folder, Photos Folder, V ideos
folders and SDCard folder are available to easily organize your files inside the My Device.
Page 22

Power 7 Technology Corporation – Wi-Fi SD/USB Users Manuals v1.0
22
My WiFi Disk Main Screen View –
Home Button – back to the main screen.
View Button - change to List or Thumbnail view.
Setting Button – change the Wi-Fi SD/USB configuration. This feature only appears when
switched to the “My WiFi Device”.
Back Button – back to previous screen
Share Button – to share, copy, delete, and upload files functions
Search Box – to search for specific file name and/or extension.
My WiFi Disk – the Wi-Fi SD/USB or the Remote Storage
Page 23

Power 7 Technology Corporation – Wi-Fi SD/USB Users Manuals v1.0
23
My Device – the device that you are using to access the Wi-Fi SD/USB or the Local
Storage
Status Button – to view the upload/downalod status, current song/video playing and to exit the app.
10.3. Playing Music/Audio (iOS and Android)
Tip: It is highly recommend ed to cre ate a fol der o r folders whe re to co py all y our movi e files into th e
Wi-Fi SD/USB for ease of use and file organization.
The Music or Audio files can be played r egardless if you are in side the “My WiDisk” (or “My Wifi Disk for
Android) or “My Device.
Simply locate the music or audio file that you would like to play. Click on the file and your music will
automatically play.
Note: Please consult your device manual to check whether it will support the music/audio files that
you would like to play.
- When clicked, the current music that is playing will restart at 0.00. Clicked twice, it will play the
previous music.
- When clicked, it will play the next music
- When clicked, it will start playing the music or audio file. Click again, the will pause/stop
playing the m usic.
Page 24

Power 7 Technology Corporation – Wi-Fi SD/USB Users Manuals v1.0
24
- When clicked, it will exit the music player interface.
Five play-modes:
a.
- Play current song: the current music that is playing will be stopped, and play ing
progress will back to 0.00.
b.
- Repeat current song: the player will always play the current song, and it will only
stop playing when the
button is clicked.
c.
- Shuffle all songs: the music or the audio files will be played randomly.
d.
- Play current list: the music or the audio files will be played sequentially.
e. e.
- Repeat All songs: the music or the audio files will be played in sequence, and it
will only stop playing when the
button is clicked.
Tip: You can click and hold, then slide the music progress button to fast-forward or rewind the music.
Tip: You can exit the Music Player Interface at any time and will continue to play the music or audio
file in the bac kground.
10.4. Playing movie/video (iOS only)
Tip: It is highly recomm ended to cr eate a fol der o r folders whe re to co py all your movie files into th e
Wi-Fi SD/USB for ease of use and file organization.
The movie or video files can be played regardless if you are inside the “My WiDisk” (or “My Wifi Disk for
Android) or “My Device.
Simply locate the movie or video file that you would like to play. Click on the file and your movie will
automatically play as seen on the screenshot below.
Page 25

Power 7 Technology Corporation – Wi-Fi SD/USB Users Manuals v1.0
25
Note: Please consult your device manual to check whether it will support the movie or video files
that you would like to play.
By default, the video playback is in the landscape mode. See the button functionalities b elow.
1.
- When clicked, the movie that is currently playing will stop and will exit the Movie Player
Interface.
2.
- When clicked, this will scale your movie according to the screen size.
3.
- Click, hold and slide the progress button to fast-forward or rewind the movie.
4.
- Click, hold and slide the volume control to increase or lower the volume.
Page 26

Power 7 Technology Corporation – Wi-Fi SD/USB Users Manuals v1.0
26
5. Press and hold to fast-rewind the movie while playing.
6.
Press and hold to fast-forward the movie while playing.
7.
When clicked, it will start playing or resume playing the movie.
8.
When clicked, it will pause the movie from playing.
10.5 Playing movie/video (Android only)
Tip: It is highly recommend ed to cre ate a fol der o r folders whe re to co py all y our movi e files into th e
Wi-Fi SD/USB for ease of use and file organization.
The movie or video files can be played regardless if you are inside the “My WiDisk” (or “My Wifi Disk for
Android) or “My Device.
Simply locate the movie or video file that you would like to play. Click on the file and the list of movie
player will appear as seen on the screenshot below.
Note: The control panel will vary depending on the movie player installed on your Android devices.
Please consult the movie player’s user guide on how to control the movie.
10.6. Viewing/playing photos (iOS only)
Tip: It is highly recommended to create a folder or folders where to copy all your pictures into the
Wi-Fi SD/USB for ease of use and file organization.
Note: The Wi-Fi SD/USB currently supports .jpg, tiff, gif and .bmp images.
Page 27

Power 7 Technology Corporation – Wi-Fi SD/USB Users Manuals v1.0
27
The supported images can be viewed as thumbnails or as a list as seen on the screenshot below.
Any images that are not supported can be viewed as a generic thumbnail or icon.
Click on any pictures or images and it will automatically play as a slide show as seen on the screen
shot below.
There are few functions are available to control the slideshow. You can swipe your finger acr oss the
screen to manually view the pictures or images or click the
button, to automatically play the
slideshow.
Click the
button to pause the slideshow from playing and press again to continue
playing.
Click the
button to restart or to replay the slideshow.
Page 28

Power 7 Technology Corporation – Wi-Fi SD/USB Users Manuals v1.0
28
Click the button to play the slideshow once and it will stop at the last image or photo.
Click the
button to return from the previous screen.
Background music can be added while playing the slideshow. Click the
button as seen on the
screenshot below.
Stop/Continue playing button - to stop or continue playing the background music.
Select button - search and locate the file or files that you would like to play as the background
music. Click on the
to return to the slideshow as seen on the screenshot below.
Repeat button – the background music will continue playing the same music when it is
switched-on. By default, this option is switched-off.
10.7. Viewing/playing photos (Android only)
Page 29

Power 7 Technology Corporation – Wi-Fi SD/USB Users Manuals v1.0
29
Tip: It is highly recommended to create a folder or folders where to copy all your pictures into the
Wi-Fi SD/USB for ease of use and file organization.
Note: The Wi-Fi SD/USB currently supports .jpg, tiff, gif and .bmp images.
The supported images can be viewed as thumbnails or as a list as seen on the screenshot below.
Any images that are not supported can be viewed as a generic thumbnail or icon.
Click on any pictures or images and it will automatically play as a slideshow as seen on the screen
shot below.
There are few functions that are available to control the slideshow. You can swipe your index finger
across the screen to manually view the pictures or images or click the
button, to automatically
play the slideshow .
Page 30

Power 7 Technology Corporation – Wi-Fi SD/USB Users Manuals v1.0
30
Click the button to pause the slideshow from playing and press again to continue
playing.
Click the
button to restart or to replay the slideshow.
Click the
button to play the slideshow once and it will stop at the last image or photo.
Click the
button to return from the previous screen.
10.8. Sharing photos/images (iOS only)
There are few options to share photos/image to your friends and family; by email, saving to the device
Photo Album and upload to Facebook.
Note: Internet connection is required to share photos/images via email or accessing any social media
network.
Click on the
button located at the top right of the screen to show the three options
available to share your photos/images. Click the
button to return from the previous
screen.
1)E-Mail button – when clicked, the default email app will automatically launch and the selected
photo/image as an attachment.
Page 31

Power 7 Technology Corporation – Wi-Fi SD/USB Users Manuals v1.0
31
2)Add to photo – when clicked, the selected photo/image will be saved into the Photo Album of the
device.
3)Upload to Facebook – when clicked, you will be directed to the Facebook login screen. The
Facebook app must be installed on your device. Facebook login and password is required.
10.9. Sharing photos/images (Android only)
Sharing photos/images using your Android device will vary depending on the apps installed on your
device.
Note: Internet connection is required to share photos/images via email or accessing any social media
networks.
Click the
button to return from the previous screen or to exit. Click the button located at
the top right of the screen to show the three options available to share your photos/images.
Page 32

Power 7 Technology Corporation – Wi-Fi SD/USB Users Manuals v1.0
32
1) Share button – when clicked the, a list of app installed on your Android will appear as seen on
the screenshot below. You may select from the list which app to launch.
2) Save Photo button - when clicked, the selected photo/image will be saved into the device
Photo Gallery.
10.10. Opening/viewing documents (iOS only)
The device client app supports keynote, numbers, page, Excel, Word, .pdf, .txt and ppt files.
To open or view any documents, simply click on the file. This will automatically open the supported
file. Click the
button to return from the previous screen or click the bu tton to send the
file via email as seen on the screenshot below.
Page 33

Power 7 Technology Corporation – Wi-Fi SD/USB Users Manuals v1.0
33
Note: Internet connection is required to send emails.
Click the “E-Mail” button, the default email app will launch automatically and the selected document
will be sent as an attachment.
.
Once the email is sent, there will be a message “Mail Sent” located at the lower-left corner of the
screen. This is an indication that the email was sent successfully.
Page 34

Power 7 Technology Corporation – Wi-Fi SD/USB Users Manuals v1.0
34
“Mail Canceled” message will appear at the lower-left corner of the screen when the email is
canceled. See the screen shot below.
10.11. Opening/viewing documents (Android only)
To open/view a document using your Android device, simply click on the file that you wish to
open/view. This will automatically open the file using the default viewer or the installed app on your
Android device as seen on the screenshot below.
Page 35

Power 7 Technology Corporation – Wi-Fi SD/USB Users Manuals v1.0
35
Note: Internet connection is required to send emails.
To send the document as an attachment, click on the
button at the top right of the screen. Click
on the “File”, then “Send”. Once the “Send” button is clicked, a list of installed app will appear on
your screen. You may select from the list of app that you wish to use to send or share the selected
document. See the screenshot below.
Page 36

Power 7 Technology Corporation – Wi-Fi SD/USB Users Manuals v1.0
36
10.12. Copy, Delete, Download, Upload functions (iOS and Android)
You may click on the at anytime to share, copy, delete, download, and upload files. As seen on
the screenshots below, the
will appear at the top as part of the menu once the is clicked.
At the bottom of the screen, there are new icons. See below for their functions.
- Click once, all the files will be selected. The icon will turn into blue color and a check mark
will appear on every file.
- Click once again, all the files will be unselected. The check marks will no longer
visible.
Tip: You may select a single or multiple files by clicking on the thumbnail. As well, you may click and
hold on the thumbnail for few seconds and drag it to
icon to download, or icon to
upload or to
icon to delete a file or files.
Page 37

Power 7 Technology Corporation – Wi-Fi SD/USB Users Manuals v1.0
37
- From the My WiDisk (or My WiFi Disk), the file or files may be downloaded to the local drive
or to My Device. The down arrow indicates that you are currently in the My WiDisk (My WiFi Disk).
- From the My Device, when clicked, the file or files may be uploaded to the remote storage or
to My WiDisk (or My WiFi Disk). The up arrow indicates that you are currently in the My Device.
- When clicked, the list of files that are in queue for uploads/downloads will appear as well as
the list of files that were copied/transferred successfully.
- When clicked, any selected files will be deleted.
10.13. Copying/transferring file to My Device (iOS and Android)
Once you get connected into the Wi-Fi SD/USB, you can only copy/transfer a single or multiple files
into the local storage (My Device).
1. Click on the
.
2. Use your index finger to select a single or multiple files or you may use the to select
all files to be copied/transferred.
Page 38

Power 7 Technology Corporation – Wi-Fi SD/USB Users Manuals v1.0
38
3. Click on the
.
4. Select and click the folder where you want the file or files to be copied or transferred.
A new folder may be created to copy/transfer the selected file or files. To create a new folder,
simply click on the “New Folder” button. Enter the new folder name inside the box and click
the “Create” button as seen on the screenshot below. The folder name can be minimum 2
characters in length and maximum of 26 characters. Click the “Cancel” button to exit.
Page 39

Power 7 Technology Corporation – Wi-Fi SD/USB Users Manuals v1.0
39
5. Click on the “Select” button to start copying/transferring files as seen on the screenshot
below.
Note: Successfully copied/transferred file or files will be listed below inside the “Recent” window
as seen on the screenshot above. Click on the “Clear” button to remove or clear the list.
6. Click anywhere on the screen and you will return to the previous screen. Once done, click
on the
to exit.
10.14. Copying/transferring file to My WiDisk (iOS and Android)
Make sure you are in the “My Device”.
Page 40

Power 7 Technology Corporation – Wi-Fi SD/USB Users Manuals v1.0
40
1. Click on the .
2. Use your index finger to select a single or multiple files or you may use the to select all
files to be copied/transferred.
3. Click on the
.
4. Select and click the folder where you want the file or files to be copied or transferred.
A new folder may be created to copy/transfer the selected file or files. To create a new folder,
simply click on the “New Folder” button. Enter the new folder name inside the box and click
the “Create” button as seen on the screenshot below. The folder name can be minimum 2
characters in length and maximum of 26 characters. Click the “Cancel” button to exit.
Page 41

Power 7 Technology Corporation – Wi-Fi SD/USB Users Manuals v1.0
41
5. Click on the “Select” button to start copying/transferring files as seen on the screenshot below
into the “My WiDisk”.
6. Click anywhere on the screen and you will return to the previous screen. Once done, click
on the
to exit.
10.15. Deleting/erasing a single or multiple files (iOS and Android)
A single or multiple files can be easily deleted/erased whether you are in “My Device” or in “My
WiDisk”
1. To delete file or files, click on the
.
Page 42

Power 7 Technology Corporation – Wi-Fi SD/USB Users Manuals v1.0
42
2. Use your index finger to select a single or multiple files. You may click on the to Select
All files to delete/erase.
3. Click on the
to delete or erase the selected file or files. A warning message will
appear on the screen to confirm file deletion as seen on the screenshot below. Click OK to
continue deleting files.
10.17. Upload/download history and status
If you have uploaded or download multiple files from/to the Wi-Fi- HDD to your local storage (My
Device), simply click the
to check the files on the queue or files that were successfully
copied/transferred. You may also click on the
on the main screen to check on the status.
10.18. Exiting Power 7 Mobileview App (iOS)
To exit from using the Power 7 Mobileview on iPhone/ iP ad devices, simply press the Home key on
your Apple Device.
To reset the app, click on the Home key twice and the list of app will appear at the bottom of your
device. Click and hold the application icon until the minus “-“ sign appears at the top corner of the
app icon. Click on the minus “-“ sign to remove the app as seen on the screenshot below.
Page 43

Power 7 Technology Corporation – Wi-Fi SD/USB Users Manuals v1.0
43
10.19. Exiting Power 7 Mobileview App (Android)
To exit from using the Power 7 Mobileview Android mobile devices, simply click on the and select
the “Exit” button. A warning “Are you sure you w ant to exit this applet?” message w ill appear. Click “OK”
to continue existing or click “Cancel”.
10.20. Uninstall Power 7 Mobileview App (iOS)
To uninstall the app from your Apple Mobile Devices, click and hold the Power 7 Mobileview app for
few seconds. An “X” mark will appear on all the icons on your mobile device as seen on the
screenshot below. Simple click on the “X” located at the top-left corner of the Power 7 Mobileview
icon and this will remove the app from your Apple device.
Page 44

Power 7 Technology Corporation – Wi-Fi SD/USB Users Manuals v1.0
44
10.21. Uninstall Power 7 Mobileview App (Android)
To uninstall the Power 7 Mobileview app from your Android mobile devices, see the instructions
below.
Note: Uninstalling app on the Android devices will vary. Please consult your mobile device manual
prior to removing any application.
1. Click on the Settings icon from your desktop.
2. Go into the application manager.
3. Locate and select the Power 7 Mobileview app.
4. Click on the “Uninstall” button.
Page 45

Power 7 Technology Corporation – Wi-Fi SD/USB Users Manuals v1.0
45
5. A warning “WiFi Disk. This application will be uninstalled.” Click the “OK” button to continue
uninstalling the app or click on the “Canc el” button.
11. WEB Management Functions
Our built-in Web Management software is a unique web-based utility stored inside our Wi-Fi SD/USB
product. No software is needed to install on your Personal Computer to use this utility. Simply launch
our “Client Login Utility V2.2” or open your web browser and enter the 10.10.10.254 IP address.
Allows the user to make changes on the admin password.
Provides information of the Internal hard disk drive.
Page 46

Power 7 Technology Corporation – Wi-Fi SD/USB Users Manuals v1.0
46
Networking Settings allow the user to make modifications and change s to Host Name, Wi-Fi
and LAN, DHCP Server, Internet and DDNS.
Allows the users to enable and disable the Win File and Ext Net Services.
Allows the user to make changes on the Power Off/Reset option.
Allows the user to make modifications and changes to the Time Settings, Create System
Backup, Firmware Upgrade and Resetting to the factory default setup.
This will guide the user through a step-by-step process to configure the device.
11.1. Explorer Function
Our user-friendly web based utility allows the user to upload files to the device, create folders, copy,
cut, delete and rename folders and file names. We provide similar functionalities as the windows
explorer of which makes our interface much easier to use.
Refresh button - to refresh the display
Page 47

Power 7 Technology Corporation – Wi-Fi SD/USB Users Manuals v1.0
47
Upload button - to upload file or files into a specific folder.
Create Folder - to create a new folder. Maximum folder name is 26 characters in length.
Copy button - to copy file or files and paste them into another folder.
Move button - to move a file or files from one location to another
Download button - to download a file or files into a specific location. If the software installed
on your computer supports a specific file type, this file will automatically open otherwise, it w ill ask you
to download the file into a specific location. Downloading a folder or folders is currently not supported.
Delete button - to delete a file or files.
Renaming button - to make name modification or changing the file name.
11.2. Context Menu
1. On the file level, you can right-click using your mouse and a pop-menu will appear. You
may Copy, Cut, Delete, Rename or Download as seen on the screenshot below.
2. On the folder level, you can right-click using your mouse and a pop- up menu will appea r. You
may Open, Copy, Cut, Delete or Rename the folder as seen on the screenshot below.
Page 48

Power 7 Technology Corporation – Wi-Fi SD/USB Users Manuals v1.0
48
3. Selecting multiple files and right-click on the mouse will allow the user to either Copy, Cut or
Delete the files as seen on the screenshot below.
4. Right-clicking at the bottom of the window as seen below will allow the user to either Paste,
Create or Upload file or files.
◆
Open Command – Select a folder and right-click. Inside the pop-up menu, select “Open” to
view the cont en ts or open the folder.
◆
Copy Command - Select a folder or a file and then right-click. Inside the pop-up menu, select
“Copy” to make a copy of the entire folder or a file and paste into another location or folder.
◆
Cut Command- Select multiple files or folders and then right-click. Inside the pop-up menu,
select “Cut” and then paste the files or folders into another folder.
◆
Paste Command – After using the Cut or Copy command, right-click to launch the pop-up
menu and then select “Paste” to place the file or folder into another location.
Page 49

Power 7 Technology Corporation – Wi-Fi SD/USB Users Manuals v1.0
49
◆
Delete Command – Right-click and then select “Delete” to erase a single, multiple files or
folders.
◆
Create Command - Right-click on the blank area inside the window and a pop-up menu will
appear. Select “Create”. Enter the folder name inside the Create Folder window and click on
Save.
◆
Rename Command – Right-click on the folder or the file name and select “Rename”. This
allows the user to make changes on the folder or file name. Click on the “Save” after the name
has been chan g e d.
◆
Upload Command - Right-click the empty area inside the window. Select “Upload” inside the
pop-up menu and browse for the file to be uploaded inside the current location.
◆
Download Command – Select and right-click on the file to be downloaded. From the pop-up
menu, select “Download”. The file will automatically open if any of the software installed on the
computer supports this file type otherwise, it will ask you to download the file into a specific
location. Downloading a folder or folders is currently not supported.
11.3. Keyboard Shortcuts
Our built-in Web Management Interface supports keyboard commands and shortcuts such as the
following:
Tab Key, Enter Key, Home Key, PGUP, PGDN,, End Key, Up Arrow, Down Arrow, Left, Arrow Right Arrow,
and Delete Key
Windows – Ctrl+C = Copy; Ctrl+V = Paste
Mac – CMD+C = Copy; CMD+V = Past
11.4. Drag and Drop
A single file drag and drop is supported by our built-in Web Management Interface, simply click and hold on
the file inside the main window and drag it to any folders available inside the Folders tree.
11.5. Information
Provides detail information regarding the hardware condition, network status and storage information.
Page 50

Power 7 Technology Corporation – Wi-Fi SD/USB Users Manuals v1.0
50
11.5.1. Device Information
Provides information such as the Host Name, Device Serial Number, Manufacturer Name, Model Number
and CPU utilization as seen on the screenshot below.
11.5.2. Storage Information
Provides information regarding the internal storage such as the total capacity, hard drive
manufacturer and available storage as seen on the screenshot below.
11.5.3. Network Information
Provides detailed information regarding the current network settings such as the connection to access the
internet, WiFi SSID and IP Address as seen on the screenshot below.
11.6. Settings
Page 51

Power 7 Technology Corporation – Wi-Fi SD/USB Users Manuals v1.0
51
11.6.1. Admin User
Click on the “User” thumbnail This window will allow you to modify the admin password as seen on the
screenshot below. The password should be at minimum of 5 characters to maximum 32 characters in
length. Click on the “Save” button the password has been changed.
The default User Name is admin and no password is assigned. Click on the “X” to cancel and exit.
11.6.2. Disk
Click on the “Disk” thumbnail. This window provides information regarding the internal hard drive as seen
on the screenshot below. It provides detailed information including firmware version, serial number, disk
total capacity, temperature, and more.
As seen on the screenshot below, the Volume screen provides information regarding the File System used
to format the internal hard disk drive, total and available capacity.
,
Click on the “X” to exit.
Page 52

Power 7 Technology Corporation – Wi-Fi SD/USB Users Manuals v1.0
52
11.7. Network Settings
1 1.7.1 Hostname
The Hostname is a name that is assigned to a device connected to a computer network. The Hostname
can be modified to whatever name that will fit your needs. It must begin with a letter and followed by a
combination of letters and numbers. Required minimum 2 characters to maximum 8 characters in length.
Click on the “Save” button after making any changes. Click on the “X” to exit and cancel.
11.7.2. Wi-Fi & LAN
The settings inside the WiFi & LAN can be modified based on your needs. See the screenshot below for
the available options.
SSID: Type-in the combination of letters and numbers only. 32 characters is the
maximum allowable SSID length
Channel: The default setting is set to Auto. There are 14 available channels to
choose from.
Modes: The default setting is 11b/g/n. You can also manually set the modes to
1 1Mbps (802.11b), 54MBPS (802.11G), and 150Mbps (802.11n).
Security: The default is set to NONE. The WPA-PSK, WPA2-PSK, Mixed
WPA/WPA2-PSK are available.
Password: WPA-PSK , WPA2-PSK , Mixed WPA-PSK/WPA2-PSK: Minimum 8
(Maximum 63) characters.
Page 53

Power 7 Technology Corporation – Wi-Fi SD/USB Users Manuals v1.0
53
IP Address: The default IP address is set to 10.10.10.254 with subnet mask of
255.255.255.0. The IP address can be changed.
Click on the “Save” button after making any changes. Click on the “X” to exit and cancel.
11.7.3. DHCP Server
The DHCP or Dynamic Host Configuration Protocol is a network protocol that enables a server to
automatically assign an IP address to a computer connected into a network. By default, the DHCP Server
option is enabled. This option can be disabled if needed and the IP address can be manually assigned.
Click on the “Save” button after making any changes. Click on the “X” to exit and cancel.
Click on the “DHCP List” button and it will provide a list of all the computers and devices connected to your
Wi-Fi SD/USB Device. Please see the screenshot below.
11.7.4. Internet Settings
There are two available Internet Access options –
A. Access Point (AP) + Client. Connecting the Wi-Fi SD/USB to another wireless device to have the
internet access.
B. WAN. Directly connecting the Wi-Fi SD/USB to the available port on the back the router.
Page 54

Power 7 Technology Corporation – Wi-Fi SD/USB Users Manuals v1.0
54
Selecting the AP+Client Option
- SSID. Type-in the SSID name or click on the “Rescan” button to automatically search for the
available wireless network connections.
- Password. Type-in the correct password to join the wireless network connection selected.
- IP Address. Select either DHCP or Manually assign an IP address
o By selecting DHCP, the host will provide an automatic IP address to connect to the
internet
o By selecting Manual, you have to manually assign an IP address to connect to the
internet
Selecting the WAN Option
By selecting the WAN option, the Dynamic IP is selected as the default setting. You can manually
assign your own IP address by clicking on the green arrow and select the Static IP option.
11.8 Network Services
Windows sharing and network services are available to access the Wi-Fi SD/USB
1 1 .8.1. Windows Sharing Services
Data sharing and accessing the Wi-Fi HD product makes it simple by enabling the Windows File Services.
By default, this feature is already enabled as seen on the screenshot below.
Page 55

Power 7 Technology Corporation – Wi-Fi SD/USB Users Manuals v1.0
55
11.8.2. Power Setting
This is another way to reboot/restart the Wi-Fi SD/USB product. Simply click on the radio button and click
on the “Save” button to proceed.
Click on the “OK” button to continue on rebooting the device.
11.9. System Settings
1 1 .9.1 Time Settings
The time settings can be changed based on the region on earth you are located. You can choose to
synchronize time with the Internet or the time on your PC.
Click on the drop-down list and select the region you are located and switch-on the “Automatically
synchronize with an Internet Time Server”. This will automatically update the time when the Wi-Fi
SD/USB is connected to the internet.
Page 56

Power 7 Technology Corporation – Wi-Fi SD/USB Users Manuals v1.0
56
The “Time Sync Frequency” can be set to everyday, every 2 days, every 3 days, up to every 7 days.
The automatic time synchronization can be switched-off and apply the PC time instead. Applying
the PC time will automatically adjust the time and date based on the PC time. See the image below.
Click on the “X” button to exit and cancel the Time Settings.
11.9.2. Backup Settings
Creating a backup as seen on the screenshot below can save the Wi-Fi SD/USB system
configuration. Please note that this process will not create a backup of the Wi-Fi SD/USB contents.
Simply click on the “Save” button create the backup. This process will create a .bin.gz or .bin file of
which can be used to restore the current settings of the Wi-Fi SD/USB.
Click the “Save” button to save the backup file on your computer as seen on the screenshot below.
Page 57

Power 7 Technology Corporation – Wi-Fi SD/USB Users Manuals v1.0
57
To resto re the backup, cl ick the folder icon . Locate and select the .bin or .bin.gz file. The backup
file will appear below the folder as seen on the screenshot below. Click on the “Save” button to
restore.
A warning mes s age will appear as seen on the screenshot below.
The device will reboot automatically once the restore process has been completed and will return to
login screen.
11.9.3. Firmware Upgrade
The device firmware can be upgraded by following the simple s teps below.
Page 58

Power 7 Technology Corporation – Wi-Fi SD/USB Users Manuals v1.0
58
1. Download and save the latest firmware version on your computer.
2. Click on the folder icon, search and locate the firmware file on your computer and then click on the
“Open” button as seen on the screenshot below.
3. The latest firmware update file will appear at the bottom of the folder . Click on the “Save” button
to continue updating the firmware.
4. Once the firmware has been installed, the warning message as seen on the screenshot bel ow will
appear and the device will automatically reboot and will go back into the login screen.
Page 59

Power 7 Technology Corporation – Wi-Fi SD/USB Users Manuals v1.0
59
11.9.4. Resetting to factory defaults
Resetting to factory defaults will reset all your customized settings or whatever changes you made
back to its original settings.
Simply click on the radio button after the “Restore to Factory Default Settings:” Click on the “Save”
button to continue.
The Warning Message window will appear. The Wi-Fi SD/USB will automatically reboot once the
restoring to the factory default settings have been completed. See the screenshot below.
Note: This process will reset the Wi-Fi SSID, and the password including the admin password.
1 1.9.5. About Settings
The About screen provides information such as the HostName, Device Serial Number and Model
Number, MAC add ress, CPU and Memory utilization as seen on the screenshot below.
Page 60

Power 7 Technology Corporation – Wi-Fi SD/USB Users Manuals v1.0
60
12. Help
The Help icon provide information and basic instructions on how to setup and configure the Wi-Fi
SD/USB production.
 Loading...