

Page 1

FILEHUB
User Guide
RP-WD007
EUROPE
E-mail:
support.uk@ravpower.com(UK)
support.de@ravpower.com(DE)
support.fr@ravpower.com(FR)
support.es@ravpower.com(ES)
support.it@ravpower.com(IT)
EU Importer: ZBT International Trading GmbH,
Halstenbeker Weg 98C, 25462 Rellingen, Deutschland
NORTH AMERICA
E-mail :
support@ravpower.com(US)
support.ca@ravpower.com(CA)
Tel : 1-888-456-8468 (Monday-Friday: 9:00 – 17:00 PST)
Address: 46724 Lakeview Blvd, Fremont, CA 94538
www.ravpower.com
ASIA PACIFIC
E-mail : support.jp@ravpower.com(JP)
Manufacturer
Shenzhen NearbyExpress Technology Development Co., Ltd.
Address: 333 Bulong Road, Shenzhen, China, 518129
Learn more about the EU Declaration of Conformity:
https://www.ravpower.com/downloads-RP-WD007-CE-Cert.html
Page 2

CONTENTS
English
Deutsch
Francais
Espanol
Italiano
01/06
07/12
13/18
19/24
25/30
Page 3
EN
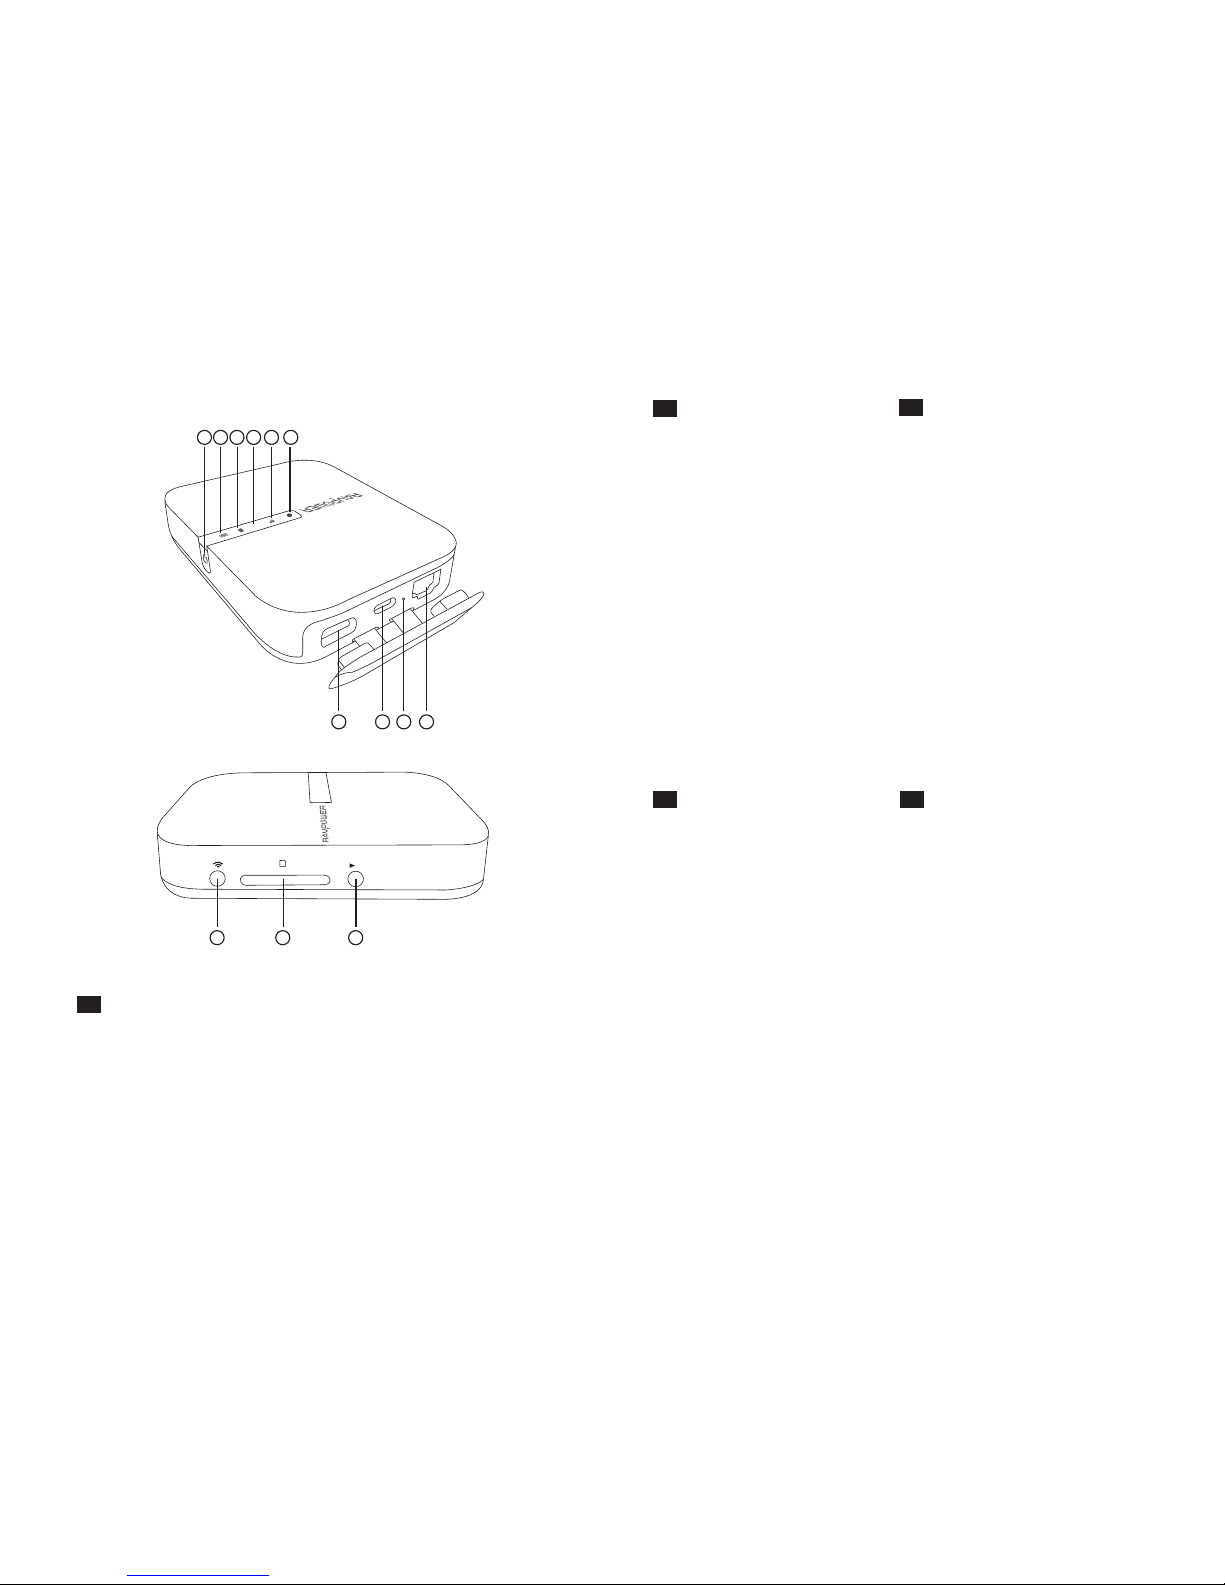
Product Diagram
1. Internet Indicator
2. WiFi Indicator
3. 5G Indicator
4. SD Card Indicator
5. Battery Indicator
6. Power Button
7. USB A Port
8. USB C Input Port
9. Reset Button
10. RJ45 Ethernet Port
11. WiFi Button
12. SD Card Slot
13. SD to USB Backup Button
DE
Product Diagram
1. Internet-Anzeige
2. WiFi-Anzeige
3. 5G-Anzeige
4. SD-Karte-Anzeige
5. Akku-Anzeige
6. Einschaltknopf
7. USB A-Anschluss
8. USB C-Anschluss
9. Resetknopf
10. RJ45 Ethernet-Anschluss
11. WiFi-Taste
12. Steckplatz für die SD-Karte
13. SD auf USB-Backup-Taste
ES
Diagrama del Producto
1. Indicador de Internet
2. Indicador Wi-Fi
3. Indicador 5G
4. Indicador de Tarjeta SD
5. Indicador de Batería
6. Botón de Encendido
7. Puerto USB A
8. Puerto de Entrada USB C
9. Botón de Reinicio
10. Puerto Ethernet RJ45
11. Botón de Wi-Fi
12. Ranura para Tarjetas SD
13. Botón de Copia de Seguridad
a SD o USB
IT
Diagrama del Prodotto
1. Indicatore Internet
2. Indicatore WiFi
3. Indicatore 5G
4. Indicatore Scheda SD
5. Indicatore Batteria
6. Pulsante di Accensione
7. Porta USB A
8. Porta in ingresso USB C
9. Pulsante Reset
10. Porta Ethernet RJ45
11. Pulsante WiFi
12. Slot per Scheda SD
13. Pulsante per Backup da
Scheda SD a USB
FR
Schéma produit
1. Témoin Internet
2. Témoin WiFi
3. Témoin 5G
4. Témoin carte SD
5. Témoin de batterie
6. Bouton d’allumage
7. Port USB A
8. Port d’entrée USB C
9. Bouton réinitialisation
10. Port Ethernet RJ45
11. Bouton WiFi
12. Emplacement carte SD
13. Bouton sauvegarde SD vers USB
123456
7 8 9
10
5G
SD
11
SD
SD USB
12 13
Page 4
EN
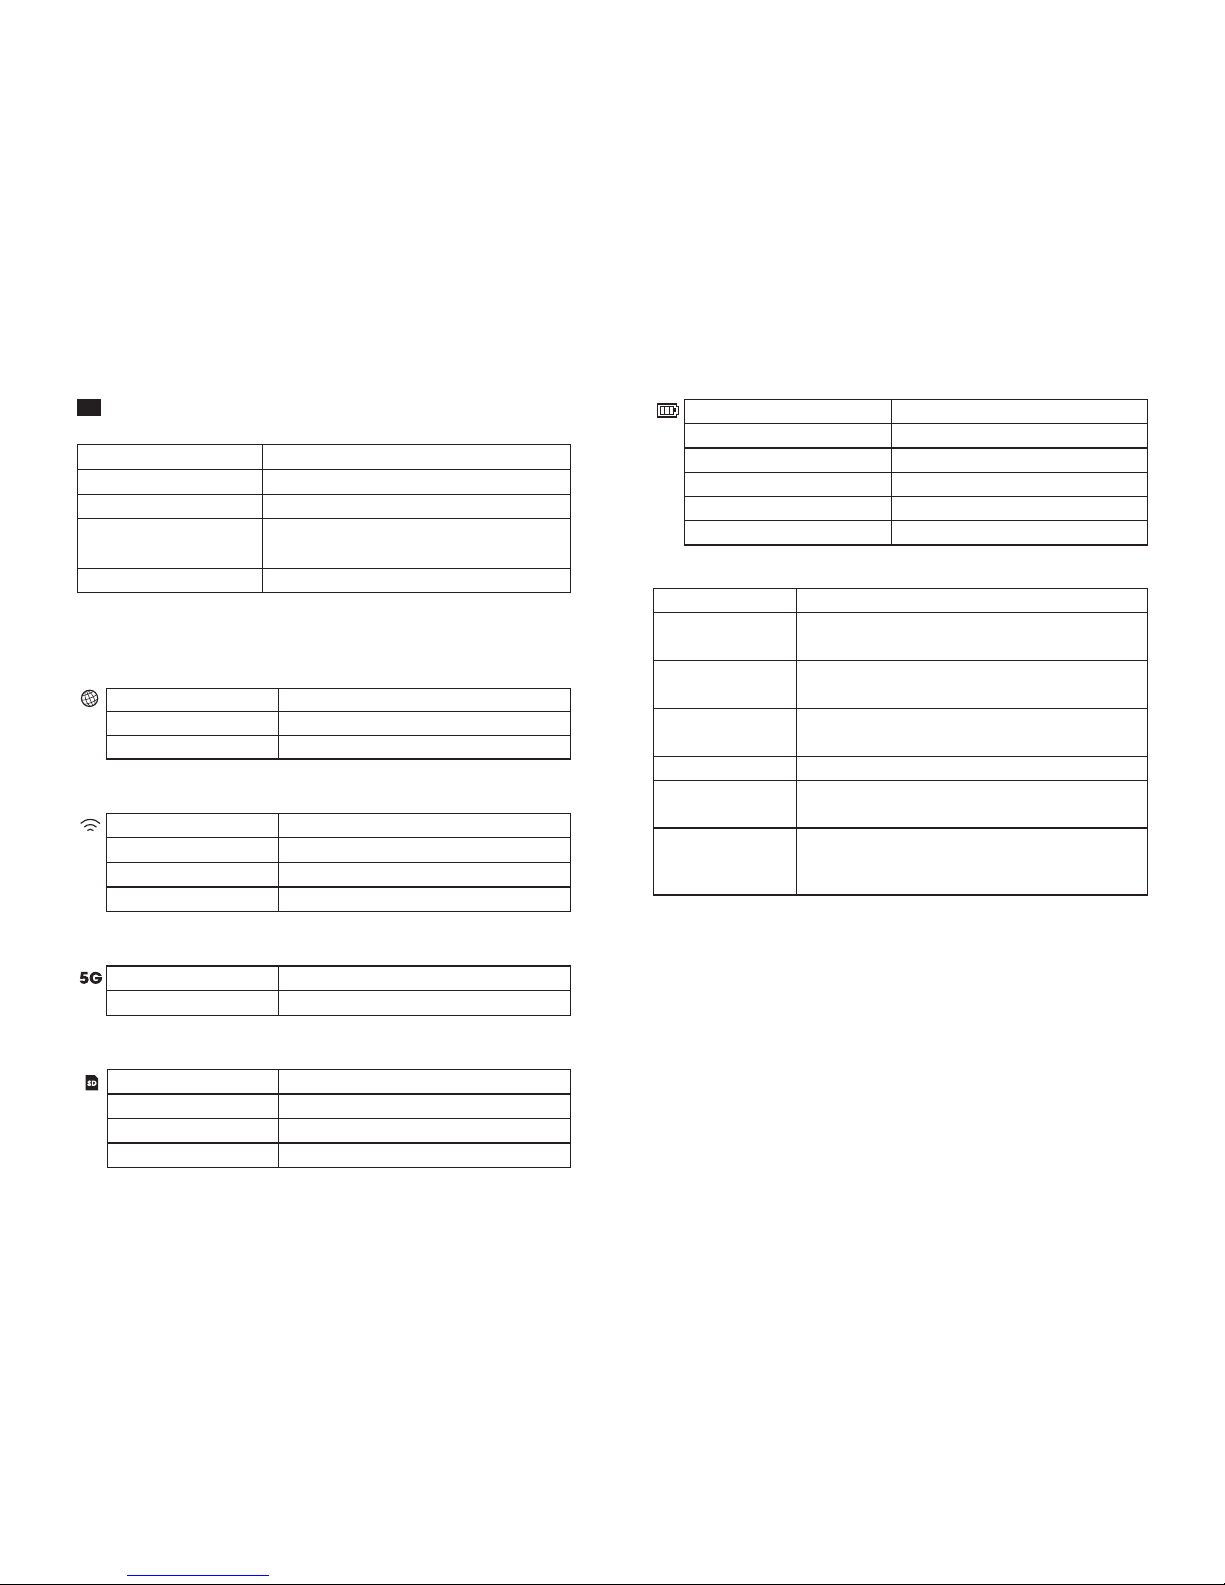
Specif ications
Instructions
LED Indicators
Button Controls
Accessing Network Attached Storage (NAS)
1. Download “RAV FileHub” app from Apple App Store or Google
Play. Access our website www.ravpower.com to download if you
are using a Windows or macOS computer.
2. Insert the USB ash drive, external HDD, or any USB storage
devices into the USB port, or the SD card into the SD slot,
to create a NAS.
3. Press and hold the Power Button for 3 seconds to turn on the FileHub.
4. Turn on the wireless connection and search for available network
on your host device. Find ”FileHubPlus-XXXX” in the Wi-Fi list.
5. Connect to the “FileHubPlus-XXXX” network using default
password 11111111 (8 x 1s).
6. Run the RAV FileHub App to access the storage wirelessly.
CPU
Operating System
Battery Capacity
Play Time
Operating Temperature
5200 mAh Li-ion
5°C – 35°C / 41°F – 95 °F
2.4G: 8.4 hours
5G: 6 hours
MTK MT7628AN+MT7610E
iOS, Android, Windows, macOS
Internet Indicator
Turns on white
Turns o
Connected to interent
Disconnected from internet
Work Status
WiFi Indicator
Flashes
Stops ashing
Turns solid
SD card reading or writing
Work Status
SD card inserted
Unable to back up or error
SD Card Indicator
Turns on white
Flashes white
Turns red
5G Indicator
Turns on
Work Status
Initiating
Connecting
Connected to WiFi
5G WiFi connected
Work Status
Work Status
≥ 30%
< 30%
< 10%
Charging
Shutting down
Battary Indicator
Turns on white
Turns on red
Fast ashes red
Blinks every 2 seconds
Blinks every 0.5 second
Power Button Press to turn on / o the FileHub
Support up to 2TB SDXC
Support USB ash and HDD drive data transfer
(FAT32, exFAT, NTFS)
Provide 1A output current to compatible devices
Charge the FileHub
Data transfer with USB C devices
Press the Backup Button to start copying and
backing up data from the SD card to USB HDD
Press and hold for 3 seconds to cycle throgh
2.4GHz / 5GHz / 5GHz & 2.4GHz WiFi modes
Press and hold for 5 seconds to resume factory
setting
Reset Button
WiFi Mode Button
Backup Button
SD Card Slot
USB C Port
USB A Port
01/02
Page 5
03/04
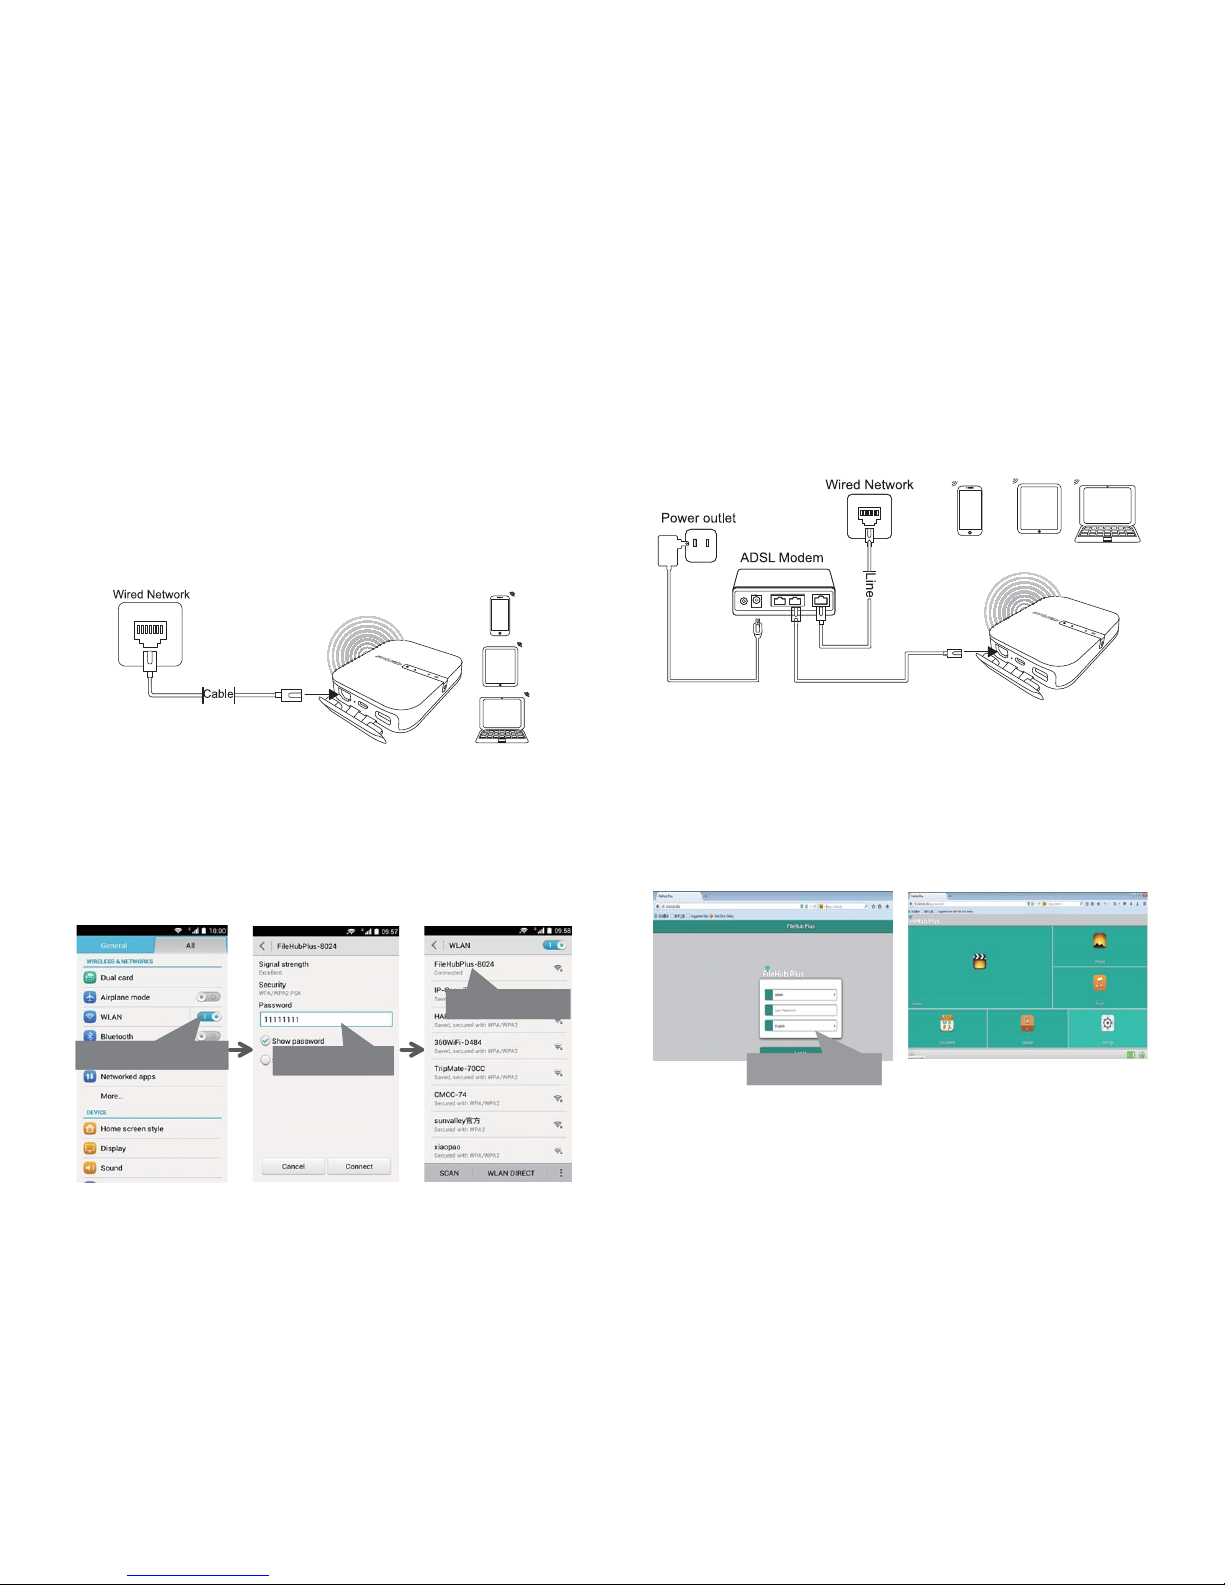
Note: The FileHub does not support smartphone, tablet, or camera
used as USB storage.
In this mode, the FileHub is connected to digital subscriber line
(DSL) modem or cable modem and works as a regular router.
1. Connect the FileHub to DSL Modem and turn on the FileHub.
2. Ensure your device (PC/ Smartphone / Tablet) is connected to
FileHub Wi-Fi already (follow the previous instructions).
3. Access: 10.10.10.254 via your web browser
(IE, Firefox, Safari, or an alternative browser).
4. Login with user name: “admin” (all lower case) and no password
(leave the password eld blank).
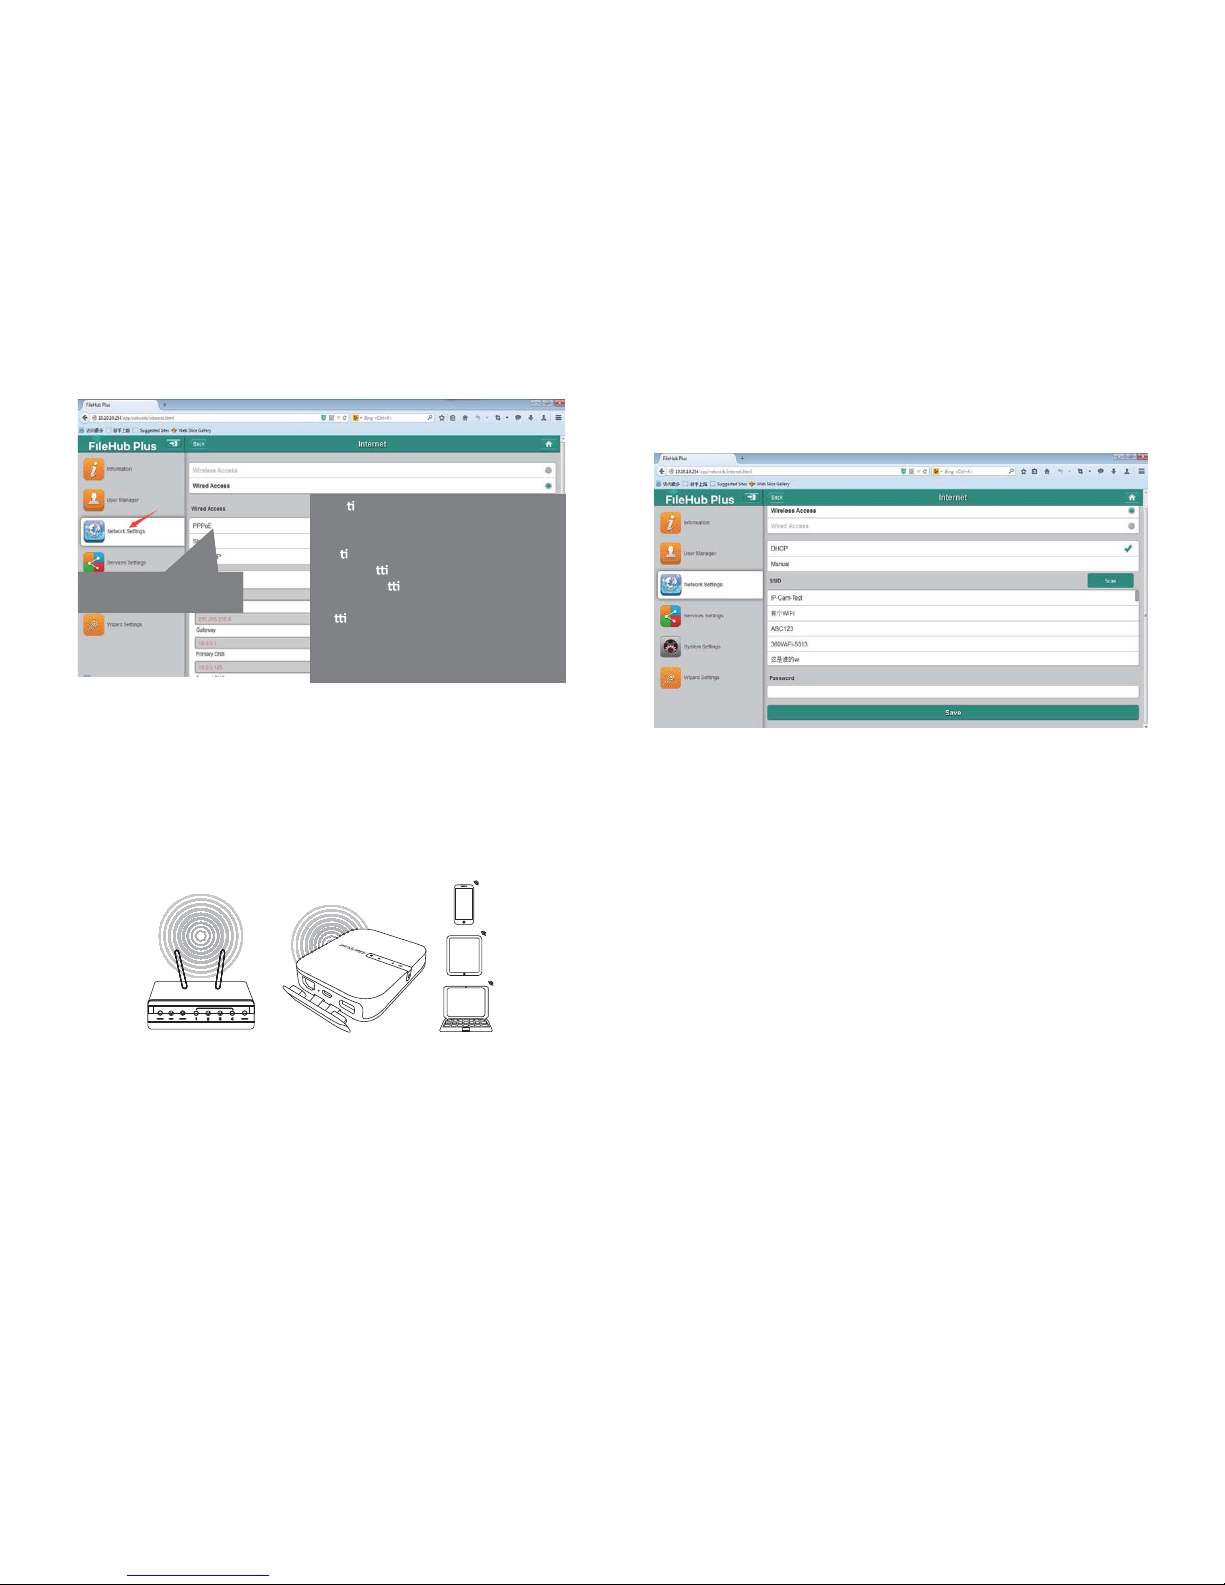
5. Click “Network Settings” > “Internet” > “Wired Access”, where it
will show Dynamic IP, Static IP, PPPoE for router setup.
Please consult your network administrator or refer to the user
documentation of your network to check which one to select.
Conguring your FileHub (AP / Router / Bridge)
Router Mode
Conf iguration
Access Point (AP) Mode
Conf iguration
1. Turn on the FileHub.
2. Connect the FileHub to router or existing wired network.
3. Wait for the Wi-Fi LED to turn white.
4. Now the FileHub has become an AP and a new connection named
“FileHubPlus-XXXX” will show in the list of Wi-Fi networks.
Connect your devices to it (default password 11111111).
In AP mode, the FileHub is connected to a wired network and other
device can connect to the FileHub (and access the wired network)
via its Wi-Fi connection.
Turn on the Wi-Fi of your device
assword 11111111
Connected already
5G
SD
5G
SD
Username: admin
Password: leave it blank
Page 6
*Sta c IP/ Dynamic IP/ PPPoE?
When you use your DSL or cable modem
without the router, how does it work?
Sta
c IP: It requires you to go into the
TCP/IP se
ng and specify the IP address
and DNS se
ng.
Dynamic IP: No IP address or DNS
se
ngs are required to assign.
PPPoE: It requires you to specify the
username and password assigned by
your ISP.
Choose the way to congure
the
router mode
05/06
Bridge Mode
Conf iguration
NOTE: Setting your FileHub to Bridge Mode will disable all its router
capabilities and turn it into an access point. It will cease to act
as a DHCP server.
In bridge mode, FileHub can create a secured Wi-Fi with a new SSID
based on an existing wireless network.
Use FileHub as a power bank to charge your mobile device by simply
connecting it to your devices via USB charging cable.
Check the remaining battery level by pressing the Power Button.
1. Open the FileHub Login and Admin Page
(Refer to Steps 1-5 from Previous section “Router mode”)
2. Go to “Network Settings” > “Internet” > “Wireless Access” to create
the connection between your FileHub and your existing wireless
Internet.
Use FileHub as a Power Bank
3. FileHub shall then broadcast the connection into a dierent SSID
called FileHubPlus-xxxx.
5G
SD
Page 7

07/08
DE
Spezif ikationen
Anleitungen
LED-Anzeigen
Bedientasten
Network Attached Storage (NAS) nutzen
1. Laden Sie die „RAV FileHub“ aus dem Apple App Store oder von
Google Play herunter. Besuchen Sie unsere Website,
www.ravpower.com, wenn Sie einen Windows oder MacOS
Computer benutzen, um Software herunterzuladen.
2. Stecken Sie den USB-Stick, die externe HDD-Festplatte oder
andere USB-Speichergeräte in den USB-Anschluss oder die Stecken
Sie SD-Karte in den SD-Steckplatz, um ein NAS einzurichten.
3. Halten Sie den Einschaltknopf für 3 Sekunden gedrückt, um den
FileHub einzuschalten.
4. Schalten Sie die Wireless-Verbindung ein und suchen Sie nach
verfügbaren Netzwerken auf Ihrem Host-Gerät.
Sie sollten “FileHubPlus-XXXX“ in der Wi-Fi-Liste nden.
CPU
Betriebssystem
Akkukapazität
Betriebszeit
Betriebstemperatur
5200 mAh Li-ion
5°C – 35°C / 41°F – 95 °F
2,4 G: 8,4 Stunden
5 G: 6 Stunden
MTK MT7628AN+MT7610E
iOS, Android, Windows, MacOS
Internet-Anzeige
Leuchtet weiß
Leuchtet nicht
mit Internet verbunden
nicht mit Internet verbunden
Status
Status
Starten
Verbinden
Mit WiFi verbunden
WiFi-Anzeige
Blinkt
Blinken aufhaltet
konstant leuchtet
SD-Karte eingesteckt
Status
SD-Karte wird gelesen oder beschrieben
Kann nicht speichern oder es Fehler gibt
SD-Karten-Anzeige
Leuchtet weiß
Blinkt weiß
Wird rot
5G-Anzeige
Leuchtet 5G WiFi verbunden
Status
Status
≥ 30%
< 30%
< 10%
Wird aufgeladen
Wird heruntergefahren
Akku-Anzeige
Leuchtet weiß
Leuchtet rot
Blinkt schnell rot
Blinkt alle 2 Sekunden
Blinkt alle 0,5 Sekunden
Einschaltknopf Drücken, um den FileHub ein-/auszuschalten
Unterstützt bis zu 2 TB SDXC
Unterstützt USB-Sticks und HDD-Festplatten
Datentransfer (FAT32, exFAT, NTFS)
Bietet 1A Ausgangsstrom für kompatible Geräte
Zum Auaden des FileHubs
Datentransfer mit USB C-Geräten
Backup-Taste drücken, um Daten von der SDKarte auf USB HDD zu kopieren und zu sichern
3 Sekunden gedrückt halten, um 2,4 GHz / 5
GHz / 5 GHz & 2,4 GHz WiFi Modus auszuwählen
5 Sekunden gedrückt halten, um
Standardeinstellungen wiederherzustellen
Resetknopf
WiFi Modustaste
Backup-Taste
SD-Karte-Slot
USB C-Anschluss
USB A-Anschluss
Page 8

09/10
5. Verbinden Sie Ihr Gerät mit “FileHubPlus-XXXX“ mit dem defaulten
Passwort 11111111 (8 x 1).
6. Starten Sie die RAV FileHub, um auf den Speicher kabellos zuzugreifen.
Achtung: Der FileHub unterstützt keine Smartphones, Tablets oder
Kameras, die als USB-Speicher benutzt werden.
Ihren FileHub kongurieren (AP / Router / Bridge)
Access Point (AP) Modus
Konguration
1. Schalten Sie den FileHub ein
2. Verbinden Sie den FileHub mit dem Router oder einem
bestehenden Netzwerk
3. Warten Sie, bis die Wi-Fi LED-Anzeige weiß wird
4. Jetzt ist der FileHub zum AP geworden und eine neue Verbindung
mit dem Namen „FileHubPlus-XXXX” wird in der Liste der Wi-Fi
Netzwerke aufgeführt. Verbinden Sie Ihre Geräte mit diesem
Netzwerk (voreingestelltes Passwort: 11111111).
Im AP-Modus ist der FileHub mit einem Netzwerk per Kabel
verbunden und andere Geräte können auf den FileHub über die
Wi-Fi-Verbindung zugreifen (und das verkabelte Netzwerk mitnutzen).
In diesem Modus ist der FileHub mit einem digitalen Subscriber
Line-Modem (DSL) oder einem Kabelmodem verbunden und
funktioniert wie ein normaler Router.
1. Verbinden Sie den FileHub mit einem DSL Modem und schalten
Sie den FileHub an.
2. Stellen Sie sicher, dass Ihr Gerät (PC/ Smartphone / Tablet) bereits
mit dem FileHub per Wi-Fi verbunden ist
(entsprechend der obigen Anleitung).
Router Modus
Konf iguration
Turn on the Wi-Fi of your device
assword 11111111
Connected alrea dy
5G
SD
5G
SD
Page 9

11/12
5. Klicken Sie auf „Network Settings“ > „Internet” > „Wired Access”.
Dort sehen Sie Dynamic IP, Static IP, PPPoE für die Router
Einstellungen. Bitte fragen Sie Ihren Netzwerkadmin oder schauen
Sie in der Dokumentation Ihres Netzwerks nach, welches für Sie
am besten ist.
Bridge Modus
Konf iguration
FileHub als externe Batterie nutzen
ACHTUNG: Wenn Sie bei Ihrem FileHub den Bridge-Modus aktivieren,
werden alle Routerfunktionen ausgesetzt und es wird zu
einem Access Point. Der Hub funktioniert dann nicht
mehr als DHCP Server.
Im Bridge-Modus kann der FileHub ein sicheres Wi-Fi mit einer neuen
SSID auf Basis eines bestehenden Wireless-Netzwerkes erstellen.
1. Önen Sie die FileHub Anmeldungs- und Admin-Seite (siehen Sie
die Schritte 1-5 aus der Sektion „Router Modus”)
2. Gehen Sie zu „Network Settings” > „Internet” > „Wireless Access”,
um eine Verbindung zwischen Ihrem FileHub und Ihrem
bestehenden wireless Internet herzustellen.
3. FileHub wird die Verbindung dann an ein anderes SSID namens
FileHubPlus-xxxx senden.
Nutzen Sie FileHub als externe Batterie, indem Sie einfach Ihre Geräte
über USB-Ladekabel mit dem Gerät verbinden. Überprüfen Sie den
verbleibenden Akkustand, indem Sie auf den Einschaltknopf drücken.
3. Zugang: 10.10.10.254 über Ihren Webbrowser
(IE, Firefox, Safari oder ein anderer Browser)
4. Melden Sie sich mit dem Benutzernamen: “admin“ (alles
kleingeschrieben) und ohne Passwort (lassen Sie das Passwortfeld
leer) an.
Username: admin
Password: leave it blank
*Sta c IP/ Dynamic IP/ PPPoE?
When you use your DSL or cable modem
without the router, how does it work?
Sta
c IP: It requires you to go into the
TCP/IP se
ng and specify the IP address
and DNS se
ng.
Dynamic IP: No IP address or DNS
se
ngs are required to assign.
PPPoE: It requires you to specify the
username and password assigned by
your ISP.
Choose the way to congure
the
router mode
5G
SD
Page 10

13/14
FR
Spécif ications
Instructions
Témoins LED
CPU
Système d’exploitation
Capacité de batterie
Temps de lecture
Température de fonctionnement
5200 mAh Li-ion
5°C – 35°C / 41°F – 95 °F
2.4G: 8.4 heures
5G: 6 heures
MTK MT7628AN+MT7610E
iOS, Android, Windows, macOS
Témoin Internet
S’allume en blanc Connecté à internet
Déconnecté d’internetS’éteint
Statut
Témoin WiFi Statut
Clignote Initialisation
Connexion
Connecté au WiFi
Ne clignote plus
S’allume f ixe
Témoin carte SD Statut
S’allume en blanc Carte SD insérée
Lecture ou écriture de la carte SD
Impossible de sauvegarder ou erreur
Clignote en blanc
S’allume en rouge
Témoin 5G
S’allume WiFi 5G connecté
Statut
Boutons de commande
Accès au stockage en ligne (NAS)
1. Téléchargez “RAV FileHub App” de l’App Store Apple ou Google
Play. Rendez-vous sur notre site www.ravpower.com pour
télécharger si vous utilisez un ordinateur Windows ou macOS.
2. Insérez un disque ash USB, disque dur externe ou tout stockage
USB, ou une carte SD dans l’emplacement SD, pour créer un NAS.
3. Appuyez et maintenez le bouton d’allumage pendant 3 secondes
pour allumer le FileHub.
4. Activez la connexion sans f il et recherchez les réseaux sur votre
appareil. Trouvez ”FileHubPlus-XXXX” dans la liste des réseaux WiFi.
Témoin de batterie Statut
S’allume en blanc ≥ 30%
< 30%
< 10%
En charge
Extinction
S’allume en rouge
Clignotement rapide rouge
Clignote toutes les 2 secondes
Clignote toutes les 0,5 secondes
Bouton d’allumage Appuyez pour allumer / éteindre le hub
Supporte les cartes SDXC jusqu’à 2TB
Supporte les disques USB ash et disques durs
HDD pour les transferts (FAT32, exFAT, NTFS)
Fournit un courant 1A de sortie aux appareils
compatibles
Charger le hub
Transfert de données avec appareils USB C
Appuyez sur le bouton sauvegarde pour
commencer à copier et sauvegarder vos
données de la carte SD au disque USB
Appuyez et maintenez pendant 3 secondes pour
basculer entre les modes WiFi 2.4GHz / 5GHz /
5GHz & 2.4GHz
Appuyez et maintenez 5 secondes pour
retourner aux réglages d’usine
Bouton de
réinitialisation
Bouton de mode
WiFi
Bouton de
sauvegarde
Emplacement carte SD
Port USB C
Port USB A
Page 11

15/16
Conf igurer votre FileHub (AP / Routeur / Bridge)
Mode Point d’accès (AP)
Conf iguration
1. Allumez le FileHub
2. Connectez le FileHub au routeur ou au réseau laire existant
3. Attendez que la LED Wi-Fi devienne blanche
4. Le FileHub est maintenant un Point d’accès et la nouvelle
connexion nommée “FileHubPlus-XXXX” s’achera dans la liste
des réseaux Wi-Fi. Connectez-y vos appareils
(mot de passe par défaut 11111111).
En mode AP, le Hub est connecté au réseau laire et d’autres
appareils peuvent s’y connecter (et accéder au réseau laire) via sa
connexion Wi-Fi.
Dans ce mode, le FileHub est connecté à un modem DSL ou un
modem câble et fonctionne comme un routeur classique.
1. Connectez le FileHub au modem DSL et allumez-le.
2. Assurez-vous que votre appareil (PC/Smartphone/Tablette) est
connecté au Wi-Fi du Filehub (consignes précédentes).
3. Accédez à: 10.10.10.254 dans votre navigateur
(IE, Firefox, Safari, ou autre)
4. Connectez-vous avec le nom d’utilisation: “admin” (minuscules)
et sans mot de passe (laisser le champ vide)
Mode Routeur
Conf iguration:
5. Connectez-vous au réseau “FileHubPlus-XXXX” avec le mot de
passe par défaut 11111111 (8 x 1).
6. Lancez l’application FileHub pour accéder au stockage à distance.
Note: Le hub ne permet pas d’utiliser un smartphone, une tablette
ou un appareil photo comme stockage USB.
Turn on the Wi-Fi of your device
assword 11111111
Connected alrea dy
5G
SD
5G
SD
Page 12

17/18
5. Cliquez sur “Réglages réseau” > “Internet” > “Accès laire”, où vous
trouverez IP Dynamique, IP Statique, PPPoE pour la conguration
du routeur. Veuillez consulter votre administrateur réseau ou vous
référer à la documentation de votre réseau pour savoir quels
paramètres sélectionner.
Mode Bridge
NOTE: Régler votre FileHub en mode Bridge désactivera toutes ses
capacités en tant que routeur et le transformera en point
d’accès. Il arrêtera d’agir comme un serveur DHCP.
En mode bridge, le FileHub peut créer une connexion Wi-Fi sécurisée
avec un nouveau SSID basée sur un réseau sans l existant.
Conf iguration:
Utiliser le FileHub comme un Power Bank
1. Ouvrez la page de connexion et d’administration du FileHub
(Voir étapes 1-5 de la section “Mode Routeur” précédente)
2. Allez dans “Réglages réseau” > “Internet” > “Accès sans l” pour
créer une connexion entre votre FileHub et votre réseau sans f il
Internet existant.
3. Le FileHub diusera alors la connexion sur un SSID diérent
appelé FileHubPlus-xxxx.
Vous pouvez vous servir du FileHub comme une batterie externe en
branchant votre appareil mobile à votre hub via son câble USB de
charge. Consultez le niveau de batterie restante en appuyant sur le
bouton d’allumage.
Username: admin
Password: leave it blank
*Sta c IP/ Dynamic IP/ PPPoE?
When you use your DSL or cable modem
without the router, how does it work?
Sta
c IP: It requires you to go into the
TCP/IP se
ng and specify the IP address
and DNS se
ng.
Dynamic IP: No IP address or DNS
se
ngs are required to assign.
PPPoE: It requires you to specify the
username and password assigned by
your ISP.
Choose the way to congure
the
router mode
5G
SD
Page 13

19/20
ES
Especif icaciones
Instrucciones
Indicadores LED
CPU
Sistema Operativo
Capacidad de la Batería
Tiempo de Reproducción
Temperatura de Operación
5200 mAh Li-ion
5°C - 35°C / 41°F - 95°F
2.4G: 8.4 horas
5G: 6 horas
MTK MT7628AN+MT7610E
iOS, Android, Windows, Mac OS
Indicador de Internet
Se ilumina blanco Conectado al internet
Desconectado del internetSe apaga
Estado de Trabajo
Indicador de Wi-Fi Estado de Trabajo
Parpadea Iniciando
Conectando
Conectado a Wi-Fi
Para de parpadear
Se queda iluminado
Indicador de Tarjeta SD Estado de Trabajo
Se ilumina blanco Tarjeta SD insertada
Lectura o grabado de tarjeta SD
No se pudo hacer una copia de
seguridad o error
Parpadea blanco
Se ilumina rojo
Indicador 5G
Se enciende Wi-Fi 5G conectado
Estado de Trabajo
Controles de los Botones
Acceso al Almacenamiento Conectado a la Red (NAS)
1. Descargue la "Aplicación RAV FileHub " del Apple App Store o del
Google Play Store. Acceda a nuestro sitio web www.ravpower.com
para descargarla si está usando una computadora Windows o Mac OS .
2. Inserte una unidad ash USB, disco duro externo o cualquier
dispositivo de almacenamiento USB en el puerto USB, o una tarjeta
SD en la ranura SD, para crear un NAS.
3. Mantenga presionado el Botón de Encendido por 3 segundos para
encender el concentrador (FileHub).
4. Encienda la conexión inalámbrica y busque la red disponible en su
dispositivo central. Encuentre "FileHubPlus-XXXX" en la lista
de conexiones Wi-Fi.
Estado de Trabajo
≥ 30%
< 30%
< 10%
Cargando
Apagando
Indicador de la Batería
Se ilumina en blanco
Se ilumina en rojo
Rápidamente parpadea en rojo
Parpadea cada 2 segundos
Parpadea cada 0.5 segundos
Botón de Encendido Presiona para encender/apagar el FileHub
Soporta hasta 2TB SDXC
Soporta transferencia de datos a una Memoria
ash USB o a un disco duro ( FAT32 , exFAT, NTFS )
Proporciona una corriente de salida de 1A a
los dispositivos compatibles
Cargue el FileHub
Transferencia de datos con dispositivos USB C
Presione el botón de copia de seguridad para
crear un respaldo de los datos a una tarjeta SD
o a una USB HDD
Manténgalo presionado durante 3 segundos
para circular entre los modos de Wi-Fi de
2.4GHz / 5GHz / 5 GHz y 2.4 GHz
Manténgalo presionado durante 5 segundos
para reanudar la conf iguración de fábrica
Botón de Reinicio
Botón de Modo
Wi-Fi
Botón de Copia
de Seguridad
Ranura para Tarjetas SD
Puerto USB C
Puerto USB A
Page 14

21/22
Conf igurando su Concentrador (FileHub) (AP/ Router /
Puente de Red)
Modo de Punto de Acceso (AP)
Conf iguración:
1. Encienda el FileHub.
2. Conecte el FileHub al router o a la red cableada existente.
3. Espere a que el LED se ilumine blanco.
4. Ahora el FileHub se ha convertido en un AP y una nueva conexión
llamada " FileHubPlus-XXXX " aparecerá en la lista de redes Wi-Fi.
Conecte sus dispositivos a ella (contraseña de fabrica 11111111).
En modo AP, el FileHub está conectado a una red cableada y otro
dispositivo puede conectarse al FileHub (y acceder a la red cableada)
a través de su conexión Wi-Fi.
En este modo, el concentrador está conectado al módem de línea de
abonado digital (DSL) o cable módem y funciona como un enrutador
normal.
1. Conecte el FileHub al DSL Modern y enciéndalo.
2. Asegúrese de que su dispositivo (PC / Smartphone / Tablet) ya esté
conectado al Wi-FI del FileHub (siga las instrucciones anteriores) .
3. Entre a: 10.10.10.254 a través de su navegador web
(IE, Firefox, Safari, o un navegador alternativo)
4. Inicie sesión con el nombre de usuario: "admin" (en minúsculas) y
sin contraseña (deja el campo de contraseña en blanco)
Modo Enrutador
Conf iguración
5. Conéctese a la red "FileHubPlus-XXXX" utilizando la contraseña de
fabrica 11111111 (8 unos).
6. Ejecute la aplicación RAV FileHub para acceder al almacenamiento
de forma inalámbrica.
Nota: El concentrador (FileHub) no es compatible con Smartphone,
tabletas o cámaras utilizadas como almacenamiento USB.
Turn on the Wi-Fi of your device
assword 11111111
Connected already
5G
SD
5G
SD
Page 15

23/24
5. Haga clic en " Conguración de Red " > " Internet " > " Acceso
Alámbrico " , donde se mostrará IP dinámica, IP estática, PPPoE
para la conguración del enrutador. Por favor consulte a su
administrador de red o consulte la documentación de usuario de
su red para vericar cuál seleccionar.
Modo Puente
NOTA: Congurando su FileHub al Modo Puente deshabilitará todas
las capacidades como enrutador y lo convertirá en un punto
de acceso. Dejará de actuar como un servidor DHCP.
En modo puente, el concentrador (FileHub) puede crear una red de
Wi-Fi segura con un nuevo SSID basado en una red inalámbrica
existente.
Conf iguración
Use el Concentrador (FileHub) como un Banco de Energía
1. Abra la página FileHub de Iniciar Sesión y Admin
(consulte los pasos 1-5 de la sección anterior " Modo enrutador " )
2. Vaya a " Conguración de Red " > " Internet " > " Acceso
Inalámbrico " para crear la conexión entre su FileHub y su Internet
inalámbrico existente .
3. El concentrador (FileHub) luego transmitirá la conexión a un
diferente SSID llamado FileHubPlus-xxxx.
Use FileHub como un banco de energía para cargar su dispositivo
móvil simplemente conectándolo a sus dispositivos a través de un
cable de carga USB. Revise el nivel de batería restante presionando
el Botón de Encendido.
Username: admin
Password: leave it blank
*Sta c IP/ Dynamic IP/ PPPoE?
When you use your DSL or cable modem
without the router, how does it work?
Sta
c IP: It requires you to go into the
TCP/IP se
ng and specify the IP address
and DNS se
ng.
Dynamic IP: No IP address or DNS
se
ngs are required to assign.
PPPoE: It requires you to specify the
username and password assigned by
your ISP.
Choose the way to congure
the
router mode
5G
SD
Page 16

Connesso ad interent
Disconnesso da internet
Condizione
Condizione
Inizializzazione
Connessione
Connesso al WiFi
Condizione
Scheda SD inserita
Lettura o scrittura scheda SD
Impossibile eettuare il
backup o errore
Connesso al WiFi 5G
Condizione
25/26
IT
Specif iche
Istruzioni
Indicatori LED
Pulsanti di Controllo
Accesso ad unità NAS (Network Attached Storage)
1. Scaricare “"RAV FileHub App” dall’Apple App Store o da Google
Play. Accedere al nostro sito web www.ravpower.com per
scaricare se si sta usando un computer Windows o macOS.
2. Inserire l’unità ash USB, l’HDD esterno o qualsiasi altro
dispositivo external HDD nella porta USB port, o la scheda SD
nello slot SD slot per creare un’unità NAS.
3. Premere e tenere premuto il Pulsante Accensione per 3 secondi
per accendere FileHub.
CPU
Sistemi Operativi
Capacità della Batteria
Tempo di Riproduzione
Temperatura di Esercizio
5200 mAh agli Ioni di Litio
5°C – 35°C / 41°F – 95 °F
2.4G: 8,4 ore
5G: 6 ore
MTK MT7628AN+MT7610E
iOS, Android, Windows, macOS
Spento
Indicatore WiFi
Indicatore Internet
Bianco
Lampeggiante
Smette di lampeggiare
Luce ssa
Indicatore Scheda SD
Bianco f isso
Bianco lampeggiante
Rosso
Indicatore 5G
Acceso
Condizione
≥ 30%
< 30%
< 10%
In carica
Spegnimento in corso
Indicatore Batteria
Bianco
Rosso
Rosso Lampeggiante (veloce)
Lampeggia ogni 2 secondi
Lampeggia ogni 0,5 secondi
Pulsante di Accensione Premere per accendere / spegnere FileHub
Supporta SDXC no a 2TB
Supporta unità ash USB e trasferimento dati
per dischi HDD (FAT32, exFAT, NTFS)
Fornisce una corrente in uscita di 1A ai
dispositivi compatibili
Ricarica FileHub
Trasferimento dati con dispositivi USB C
Premere il Pulsante Backup per iniziare a copiare
e a fare il backup dei dati dalla scheda SD
all’HDD USB
Premere e tenere premuto per 3 secondi per
passare tra le modalità WiFi 2.4GHz / 5GHz /
5GHz e 2.4GHz
Premere e tenere premuto per 5 secondi per
riportare alle impostazioni di fabbrica
Pulsante Reset
Pulsante Modalità
WiFi
Pulsante Backup
Slot per scheda SD
Porta USB C
Porta USB A
Page 17

27/28
4. Accendere la connessione wireless e cercare le reti disponibili sul
proprio dispositivo host. Trovare “FileHubPlus-XXXX” nella lista
delle WiFi disponibili.
5. Collegarsi alla rete “FileHubPlus-XXXX” utilizzando la password di
default 11111111 (8 volte 1).
6. Far partire l’App RAV FileHub per accedere all’unità in modalità
wireless.
Nota: FileHub non supporta smartphone, tablet o fotocamere
utilizzate come unità di memorizzazione USB.
Congurazione di FileHub (AP / Router / Bridge)
Modalità Access Point (AP)
Conf igurazione
1. Accendere FileHub
2. Collegare FileHub al router o ad una rete cablata esistente
3. Attendere che il LED del WiFi diventi bianco
4. Ora FileHub è diventato un AP. Sarà presente una nuova
connessione chiamata “FileHubPlus-XXXX” nella lista delle reti WiFi,
ai quali potranno essere connessi i propri dispositivi
(con la password di default 11111111).
In modalità AP, FileHub è connesso ad una rete cablata e l’altro
dispositivo può connettersi a FileHub
(ed accedere alla rete cablata) attraverso la sua connessione WiFi.
In questa modalità, FileHub è connesso ad una linea DSL (Digital
Subscriber Line) con modem o modem cablato e funzionerà come
un normale router.
1. Collegare FileHub ad un modem DSL e accendere FileHub.
2. Assicurarsi che il proprio dispositivo (PC / Smartphone / Tablet) sia
già collegato al Wi-Fi di FileHub (seguire le istruzioni precedenti).
3. Accedere all’indirizzo 10.10.10.254 attraverso il proprio web
browser (IE, Firefox, Safari o un browser alternativo)
4. Eettuare il login con il nome utente “admin” (tutto minuscolo) e
senza password (lasciare bianco il campo password)
Modalità Router
Conf igurazione
Turn on the Wi-Fi of your device
assword 11111111
Connected already
5G
SD
5G
SD
Page 18

29/30
5. Cliccare “Impostazioni di Rete” > “Internet” > “Accesso Cablato”,
dove verranno mostrati IP Dinamico, IP Statico e PPPoE per il setup
del router. Si prega di consultare il proprio amministratore di rete
o di fare riferimento alla documentazione utente della propria
rete per controllare quale selezionare.
Modalità Bridge
NOTA: Impostando FileHub in modalità Bridge, verranno disabilitate
tutte le caratteristiche di router e il dispositivo verrà
trasformato in un access point. Smetterà di funzionare come
server DHCP.
In modalità Bridge, FileHub può creare una rete sicura WiFi con un
nuovo SSID basato su un rete wireless esistente.
Conf igurazione:
Utilizzo di FileHub come Power Bank
1. Aprire la pagina di Login e di Amministrazione di FileHub (fare
riferimento ai punti 1-5 della precedente sezione “Modalità Router”)
2. Andare su “Impostazioni di Rete” > “Internet” > “Accesso Wireless”
per creare la connessione tra FileHub e la propria connessione
internet wireless.
3. FileHub potrà quindi trasmettere la connessione su un SSID
diverso chiamato FileHubPlus-xxxx.
E’ possibile utilizzare FileHub com power bank per ricaricare il
proprio dispositivo mobile semplicemente connettendolo al proprio
dispositivo con il cavo di ricarica USB. E’ possibile controllare il livello
rimanente della batteria premendo il Pulsante di Accensione.
Username: admin
Password: leave it blank
*Sta c IP/ Dynamic IP/ PPPoE?
When you use your DSL or cable modem
without the router, how does it work?
Sta
c IP: It requires you to go into the
TCP/IP se
ng and specify the IP address
and DNS se
ng.
Dynamic IP: No IP address or DNS
se
ngs are required to assign.
PPPoE: It requires you to specify the
username and password assigned by
your ISP.
Choose the way to congure
the
router mode
5G
SD
Page 19

FCC Notice
This device complies with Part 15 of the FCC Rules. Operation is
subject to the following two conditions:
(1) This device may not cause harmful interference, and (2) this device must accept any
interference received, including interference that may cause undesired operation.
NOTE 1: This equipment has been tested and found to comply with the limits for a Class B digital
device, pursuant to part 15 of the FCC Rules. These limits are designed to provide reasonable
protection against harmful interference in a residential installation. This equipment generates, uses
and can radiate radio frequency energy and, if not installed and used in accordance with the
instructions, may cause harmful interference to radio communications. However, there is no
guarantee that interference will not occur in a particular installation. If this equipment does cause
harmful interference to radio or television reception, which can be determined by turning the
equipment off and on, the user is encouraged to try to correct the interference by one or more of
the following measures:
- Reorient or relocate the receiving antenna.
- Increase the separation between the equipment and receiver.
-Connect the equipment into an outlet on a circuit different from that to which the receiver is
connected.
-Consult the dealer or an experienced radio/TV technician for help.
NOTE 2: Any changes or modifications to this unit not expressly approved by the party
responsible for compliance could void the user's authority to operate the equipment.
FCC Radiation Exposure Statement:
This device meets the government's requirements for exposure to radio waves. The guidelines are
based on standards that were developed by independent scientific organizations through periodic
and thorough evaluation of scientific studies. The standards include a substantial safety margin
designed to assure the safety of all persons regardless of age or health. The SAR limit of USA (FCC)
is 1.6 W/kg averaged over one gram of tissue for body. Device types: FileHub (FCC ID:2AFDGRP-WD007)
has also been tested against this SAR limit. SAR information on this and other pad can be viewed on-line
at http://www.fcc.gov/oet/ea/fccid/. Please use the device FCC ID number for search. This device was
tested simulation typical 10mm to body. To maintain compliance with FCC RFexposure requirements, use
accessories should maintain a separation distance between the user's bodies mentioned above, the use of
belt clips, holsters and similar accessories should not contain metallic components in itsits assembly, the use
of accessories that do not satisfy these requirements may not comply with FCC RF exposure requirements,
and should be avoided.
Page 20

POWER YOUR LIFE
www.ravpower.com
 Loading...