

Page 1
USB Port SmartMedia
Reader/Writer
SMA03U
User Guide
May 1999
Rev. 1.1
Page 2

SMA03U User Guide
1-1. Features ...................................................................................................................2
1-2. About the SMA03U User Guide ............................................................................3
1-3. Trademarks .............................................................................................................3
1-4. The name of the parts of SMA03 ...........................................................................4
1-5. System requirements ..............................................................................................5
1-6. SmartMedia compatibility...................................................................................... 5
1-7. Restrictions .............................................................................................................. 5
2-1. Cautions ...................................................................................................................6
2-2. Unpacking this pakage ...........................................................................................6
2-3. How to register ........................................................................................................7
2-4. Program update and support ................................................................................. 7
Page 3

3-1. Connect the SMA03U to the PC .......................................................................... 10
3-2. Installation of the driver for Windows98 ........................................................... 12
4-1. Power Supply LED and Access LED ................................................................. 24
4-2. Removal of SMA03U ........................................................................................... 25
4-3. Inserting the SmartMedia ................................................................................... 26
4-4. Removing the SmartMedia ................................................................................. 28
5-1. Read/Write files in SmartMedia ......................................................................... 30
5-2. About Write-Protect of SmartMedia .................................................................. 31
5-3. Format SmartMedia ............................................................................................ 31
6. Troubleshooting ....................................................................................................... 32
7. Set USB Port Enable ............................................................................................... 34
8. Set SMA03U Enable ................................................................................................ 40
9-1. Installation of the driver for Macintosh ............................................................. 48
9-2. Connect the SMA03U to the Mac........................................................................ 51
10-1. Power Supply LED and Access LED ............................................................... 52
10-2. Removal of SMA03U ......................................................................................... 53
10-3. Inserting the SmartMedia ................................................................................. 54
10-4. Removing the SmartMedia ............................................................................... 56
11-1. About Write-Protect of SmartMedia ................................................................ 58
11-2. Format SmartMedia .......................................................................................... 58
12. Troubleshooting ..................................................................................................... 60
Page 4

FCC Statement
This equipment has been tested and found to comply with the limits for a
Class B digital device, pursuant to Part 15 of the FCC Rules. These limits are
designed to provide reasonable protection against harmful interference in a
residential installation. This equipment generates, uses and can radiate radio
frequency energy and, if not installed and used in accordance with the
instructions, may cause harmful interference to radio communications.
However, there is no guarantee that interference will not occur in a particular
installation. If this equipment does cause harmful interference to radio or
television reception, which can be determined by turning the equipment off
and on, the user is encouraged to try to correct the interference by one or more
of the following measures:
(1)Reorient or relocate the receiving antenna.
(2)Increase the separation between the equipment and receiver.
(3)Connect the equipment into an outlet on a circuit different from that to
which the receiver is connected.
(4)Consult the dealer or an experienced radio/TV technician for help.
Changes or modifications not expressly approved by the party responsible for
compliance may result in this unit not complying with FCC Rules Part 15.
4
Page 5

1.Introduction
Thank you for purchasing the SMA03U kit. This kit contains the SMA03 USB
SmartMedia Reader/Writer, software for Windows 98, software for MacOS
8.5.1 or later and this document. This guide contains the most complete
information for installation and operation of the SMA03 USB SmartMedia
Reader/Writer at press time. Be sure to read this guide before using the
SmartMedia Reader/Writer for the first time. The README file included on
the supplied floppy disk may contain more recent information which may not
be included in this guide. Be sure to read the README file as well.
1-1. Features
-Allows the direct and fast transfer of data between SmartMedia and your system
-Supports up to 128MB SmartMedia
-Supports both 3.3V and 5V
-Flexible data exchange
-True plug and play;Just plug connectors to the USB port without opening your PC
-Requires no external power supply
-Hot swappable
-Includes LEDs of power ,and read/write operation for convenient visual status
5
Page 6

1-2. About the SMA03U User Guide
-Information in this document is subject to change without notice.
-If you have any questions or find errors in this guide,
do not hesitate to let us know.
1-3. Trademarks
-Windows is a registered trademark of Microsoft Corporation.
-Macintosh, MacOS and PowerBook are registered trademarks of Apple
Computer,Inc.
-SmartMediaTM is a registered trademark of TOSHIBA Corporation.
-Other names of companies and products appearing in this guide are trademarks
or registered trademarks respectively of those companies.
6
Page 7
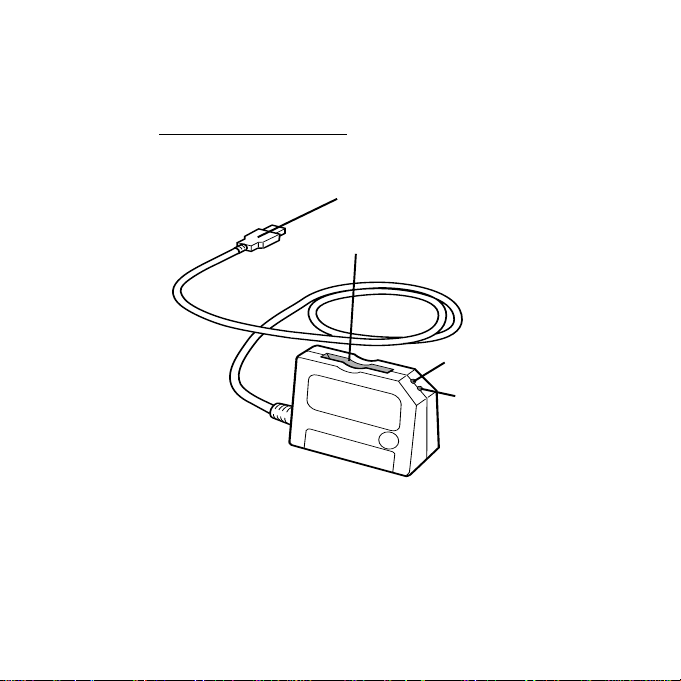
1-4. The name of the parts of SMA03
USB Connector
Insertion Point
Power Supply LED
(GREEN)
Access LED
(ORANGE)
7
Page 8

1-5. System requirements
-USB port
-Windows 98, MacOS8.5.1 or later
1-6. SmartMedia compatibility
Supports both 3.3V and 5V SmartMedia (up to 128Mb)
-5V :2MB, 4MB
-3.3V :2MB, 4MB,8MB,16MB,32MB,64MB,128MB
NOTENOTE
NOTE:As for 64MB and 128MB,SMA03U is made on the specifications of
NOTENOTE
64MB and 128MB ,although 64MB and 128MB is not on the market as of
May/1999.
1-7. Restrictions
-If you format SmartMedia from OS,there are some possibility that you can’t
use the. SmartMedia anymore with digital cameras.
So,we recommend you format SmartMedia with your digital camera.
-It is necessary for USB port to be suppleid more than 76mA current.
USB Hubs below don’t have enough current under some conditions.
i)Bus Power Type Hub (This kind of Hub doesn’t use AC adapter )
ii)Hub which is cascaded (There are more than 2 Hubs with cascade
connection)
We recommend you use SelfPowered Hub
(This kind of Hub uses AC adapter)
8
Page 9

2.Before using SMA03U
2-1. Cautions
-Do not bend,drop or strike the adapter and cable,or put them under heavy pressure.
-Never attempt to disassemble the adapter and cable.
2-2. Unpacking this pakage
-SMA03U USB SmartMedia Reader/Writer
-Setup floppy disk for Windows98
-Setup CD-ROM for Macintosh
-User Guide(This document)
NOTE:
-If any of these items are missing from this package,contact your store or RATOC
Systems immediately.
9
Page 10
2-3. How to register
1.On the Internet,access our site.(http:www.rexpccard.co.jp)
2.Follow window menu guide to register
3.Fill out and submit the registration form.
2-4. Program update and support
We recognize the need to keep users up-to-date with the latest software
releases.Software updates can be downloaded from our web site.
(http:www.rexpccard.co.jp)
Technical support is handled by RATOC Systems,Inc. at the following:
RATOC Systems,Inc.
1-6-14 Shikitsu-higashi,Naniwa-ku,Osaka,JAPAN 556-0012
FAX:+81-6-6633-3553 E-mail:int-support@rexpccard.co.jp
10
Page 11

NOTE:
-Please include the following information to help us to assist you in the event
of a problem:
-Model type, serial number and product description
-Host computer name, System BIOS name and version
-Software driver product type and version number
NOTE:What is SmartMedia/SSFDC all about?
Short for "Solid State Floppy Disk Card", SSFDC is a next-generation, NANDtype small flash memory card developed and proposed as a standard by Toshiba.
This memory card is a removable storage medium best suited for use in digital
still cameras and portable information-related equipment. It is nicknamed the
" SmartMedia ".
11
Page 12
For Windows98
12
Page 13
3.Setup
Here is how to get started SMA03U:
1.Connect the SMA03U to the PC.
2.Installation of the driver for Windows98.
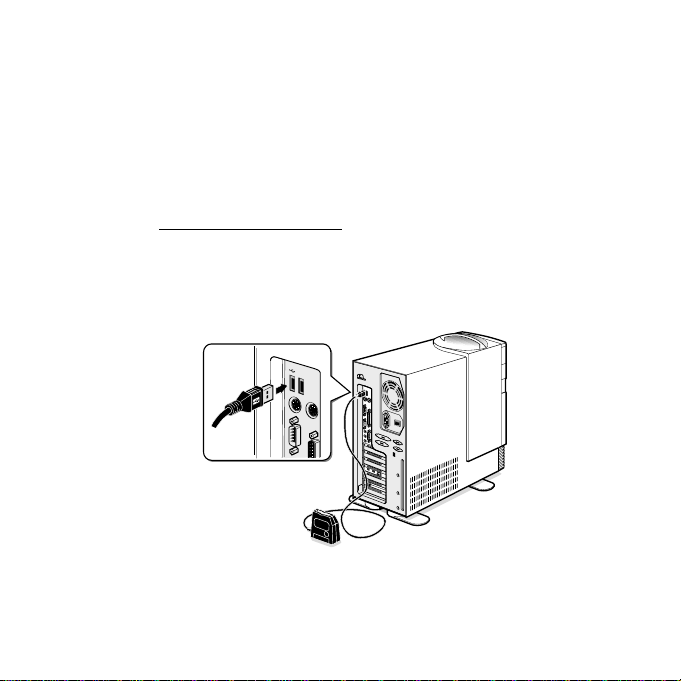
3-1. Connect the SMA03U to the PC
1.Turn on the PC.
2.Connect the USB cabel of SMA03U to the USB port at back of the PC,
as shown below.
13
Page 14
When you insert USB cable to the PC for the first time,
Add New Hardware Wizard screen will appear.
In such a case,refer to 3-2.Installation of the driver for Windows98.
IfAdd New Hardware Wizard will not appear,there are some probability
that USB port of the PC is set disabled.
First,remove the USB cable from the PC and set USB port enable,reffering
Troubleshooting.
14
Page 15
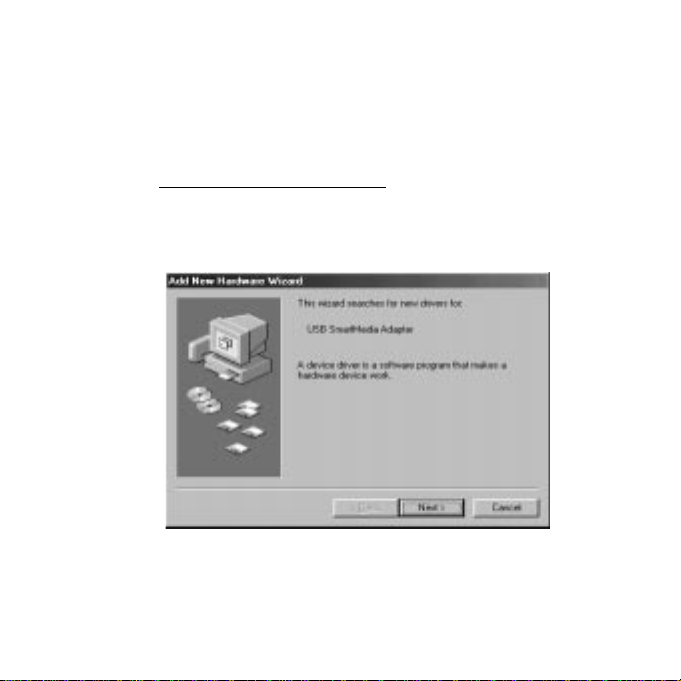
3-2. Installation of the driver for Windows98
Here is an explanation of how to install the driver for Windows98.
1. You will see a screen below.Click Next button.
15
Page 16
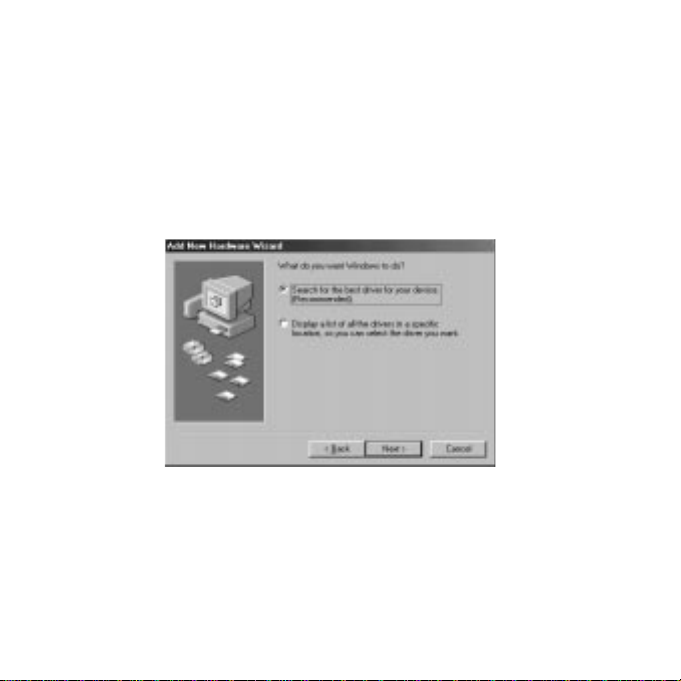
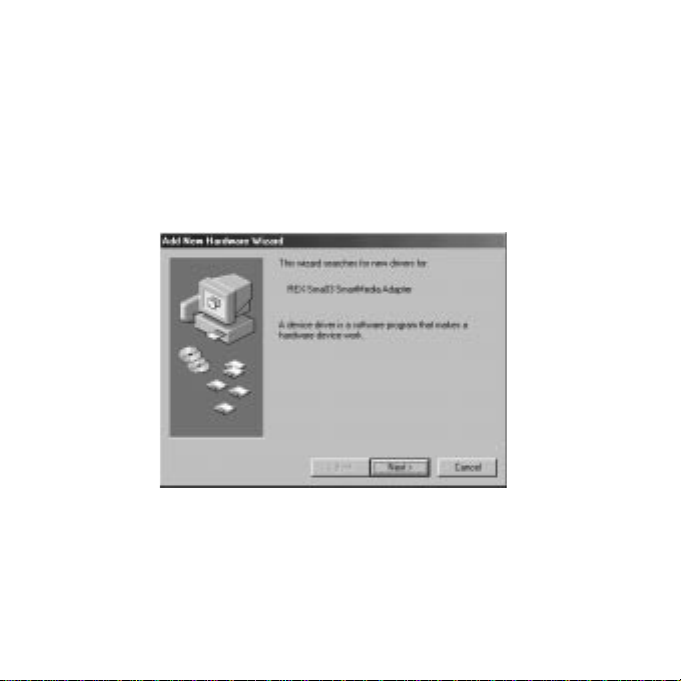
2. When the following window appears,select Search for the best driver for your
device(Recommended). Then click Next button.
16
Page 17

3.When the following window appears,check the Floppy disk drives box.Then
insert the setup floppy disk into the floppy disk drive and click on
the Next button.
17
Page 18
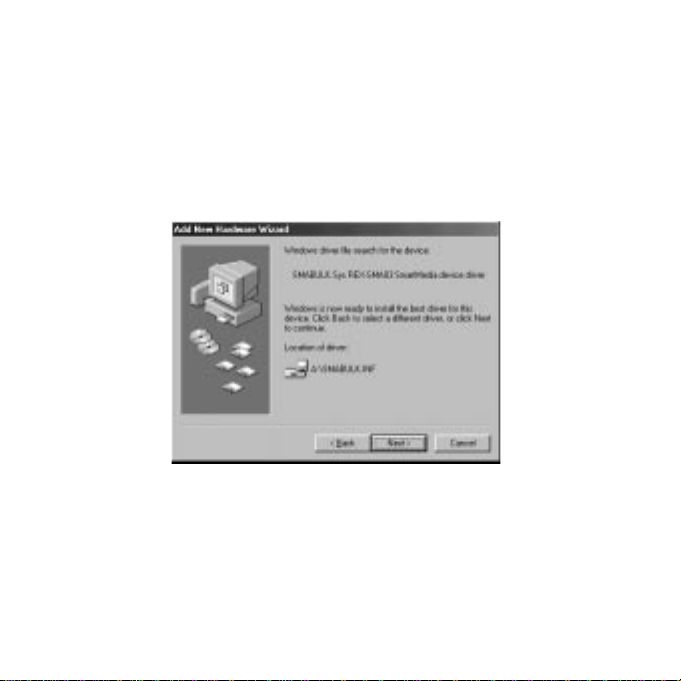
4.When the following window appears,click on the Next button.
18
Page 19
5.When the following window appears,click on the Finsish button.
19
Page 20
6.When the following window appears,click on the Next button.
20
Page 21

7.When the following window appears,select Search for the best driver for
your device(Recommended).Then click Next button.
21
Page 22

8.When the following window appears,check the Floppy disk drives box.Then
insert the support software floppy disk into the floppy disk drive and
click on the Next button.
22
Page 23

9.When the following window appears,and click on the Next button.
23
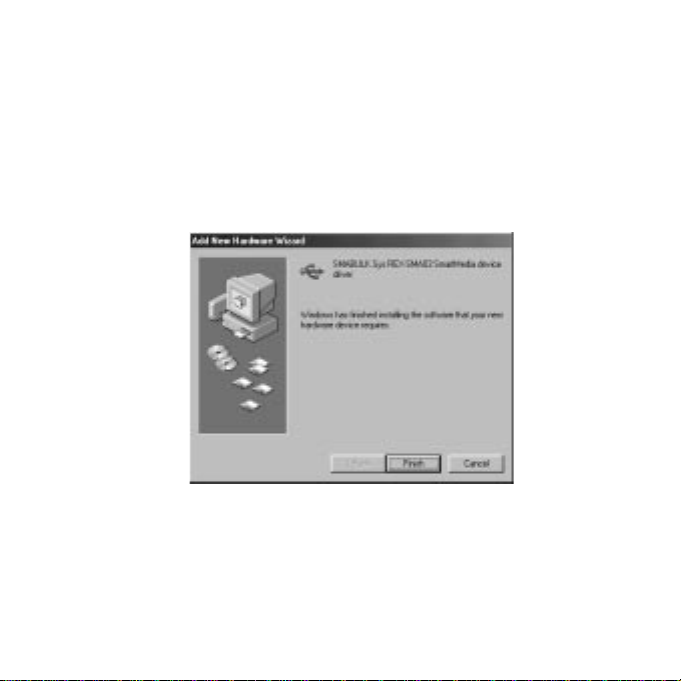
Page 24

10.When the following window appears,and click on the Finish button.
24
Page 25

11.Now you finish installing the driver of SMA03U for Windows98.
In the My Computer,check there is Removable Disk icon.
Take a screen below for example,drive letter is E:.But this drive letter
depend on your PC.
*If you change USB port,you may have to install the driver from scratch.
25
Page 26

When Windows98 urges you to insert Windows98 CD-ROM
during installation.
1.When such a screen appears,just click OK button.
2.Insert the floppy disk in this kit into the floppy disk drive.
3.Copy the file requested by Windows98 from the floppy disk.
26
Page 27

4.Using SMA03U
4-1. Power Supply LED and Access LED
Power Supply LED
While the PC is on, SMA03U is supplied power and Power Supply LED turns
green.
If the Power Supply LED doesn’t turn green, SMA03U might not be connected
to the PC correctly. Make sure that the connector is connected correctly.
Access LED
Indicates the current state of access to the slot. Access LED turns orange when
SMA03U reads or writes data from/to the SmartMedia.
Cautions
Do not remove the SMA03U or SmartMedia
while the Access LED is on.
If you ignore this cautions,the date in SmartMedia may get broken
or get erased.
27
Page 28

4-2. Removal of SMA03U
Before removing SMA03U,check Access LED is not ON.
After checking this point,pull the USB cable out of USB port of the PC.
You can insert or remove even if the PC is powered.
You do not have to go all the way to shut down Windows98,restart the PC,
or get the PC in sleep mode at all.
28
Page 29

4-3. Inserting the SmartMedia
1.Insert the SmartMedia into the slot as shown in the illustration.
3.3V SmartMedia 5V SmartMedia
The location of cut of 5V SmartMedia
is different from that of 3V SmartMedia.
However you insert SmartMedia into
Turn the gold surface
in front as shown above.
the slot,SmartMedia is inserted into the
slot deeply,but unless you insert it
correctly as shown above,SmartMedia
is not recongized at all.
29
Page 30

2.Push the SmartMedia until it is firmly seated.
30
Page 31

4-4. Removing the SmartMedia
Cautions
Do not remove the SMA03U or SmartMedia
while the Access LED is on.
If you ignore this cautions,the date in SmartMedia may get broken
or get erased.
1.Push the top of the SmartMedia in the slot as shown below.
31
Page 32

2.Pull the SmartMedia out of the slot as shown below.
32
Page 33

5.Handling files in SmartMedia
5-1. Read/Write files in SmartMedia
If you insert SmartMedia into the slot of SMA03U, Removable Disk will appear in the My Computer.
The files in this Removable Disk can be handled the same as you handle files
in Hard Drives or Floppy Drive.
You can access the files in SmartMedia with a variety of application software.
But it is necessary that application software can handle the file format in
SmartMedia.
33
Page 34

5-2. About Write-Protect of SmartMedia
To prevent unintended writing date to,erasing data from,formatting of
SmartMedia,stick a Write-Protect label on the SmartMedia.
Refer to the manual that accompanied your SmartMedia for instructions.
5-3. Format SmartMedia
Before you format SmartMedia,make sure the things below.
If you format SmartMedia,the date in SmartMedia will get erased completely.
When you use SmartMedia with digital camera,follow instructions below.
There are some possibility that you can not use SmartMedia
with digital camera if you format SmartMedia from OS.
We recommend you format SmartMedia with digital camera
when you use SmartMedia with digital camera.
If you want to format SmartMedia from OS,select Removable Disk
in My Computer and click the right buton and select Format in the menu.
34
Page 35

6.Troubleshooting
Problem Cause Solution Page
-Power Supply LED You don’ t connect USB Connect USB cable 10
doesn’t turn green cable correctly. firmly.
enough current can supply enough
USB port doesn’t have Use USB Hub which 5
to supply current.
-Smart Media can’tYou don’t insert You have to follow 26
be recognized. SmartMedia correctly. the instructions.
-When double
clicking,
Removable Disk
icon, warning
message appears.
-You can’ write data You stick a WriteProtect Rip off the WriteProtect
to SmartMedia label on SmartMedia. label on SmartMedia.
35
Page 36

Problem Cause Solution Page
-You can’t see You failed to install Install the driver again. 12
Removable Disk the driver.
icon in
My Computer You set SMA03 Enable SMA03
40
-There is [!]or [×] disable on Windows98. in Device Manager.
in Device Manager Y ou set USB port Enable USB port 34
disable on Windows98. in Device Manager.
You set USB portSet USB port enable
disable on BIOS. on BIOS.
Refer to the PC manual.
36
Page 37

7.Set USB Port Enable
When you use SMA03U,you have to set USB port enable.
Make sure that USB port is set enable ,following the instructions below.
1.Click Start button and select [Control Panel] in the [Settings] menu.
2. Double-click the [System] icon.
37
Page 38

3.Click on the Device Manager tab.
4.You will see a screen below and check there is no [!] or [ × ] mark in the
Universal serial bus controller.
38
Page 39

If there is [!] or [×] mark in the Universal serial bus controller, double-click
the item and follow the next instructions.
5.You will see a screen below . Click Enable Device button on the General tag
screen. In this case,there is a [!] or [×] mark on USB Host Controller.
39
Page 40

6.Make sure that Disable in this hardware profile is not ckecked anymore
and click OK button.
40
Page 41

7.You will see a screen below . Click Enable Device button on the General tag
screen. In this case,there is a [!] or [×] mark on USB Root Hub.
41
Page 42

8.Make sure that Disable in this hardware profile is not ckecked anymore
and click OK button.
42
Page 43

8.Set SMA03U Enable
1.Click Start button and select [Control Panel] in the [Settings] menu.
2. Double-click the [System] icon.
43
Page 44

3.Click on the Device Manager tab.
44
Page 45

4.You will see a screen below and check there is no [!] or [ × ] marks on
SMA03U as shown below.
45
Page 46

If there is [!] or [×] mark on SMA03U, double-click the REX-Sma03 Smart
Media Adapter and follow the next instructions.
46
Page 47

5.You will see a screen below . Click Enable Device button on the General tag
screen. In this case,there is a [!] or [×] mark on REX-Sma03 SmartMedia
Adapter.
47
Page 48

6.Make sure that Disable in this hardware profile is not ckecked anymore
and click OK button.
48
Page 49

For Macintosh
49
Page 50

9.Setup for Macintosh
Before you setup SMA03U,make sure that there is File Exchange in Control
Panels.
Here is how to get started with SMA03U:
1.Installation of the driver for Macintosh.
2.Restart Mac.
3.Connect the SMA03U to the Mac.
50
Page 51

9-1. Installation of the driver for Macintosh
1.Start your Mac and insert Setup CD-ROM for Macintosh into CD-ROM drive.
Finish all the other applications before you install the driver for Macintosh.
2.Open the mounted CD-ROM.You will see a screen below.
3.Double-click the Installer icon.
51
Page 52

4.You will see a screen below.Make sure Easy Install is selected and click [Install].
52
Page 53

5.You will see a screen below. Click [Restart].
53
Page 54

9-2. Connect the SMA03U to the Mac
1.After restarting your Mac,connect USB cable of SMA03U to the Mac.
2.Now you can use SMA03U.
-It is necessary for USB port to be suppleid more than 76mA current.
USB Hubs below don’t have enough current under some conditions.
i) Bus Power Type (This kind of Hub doesn’t use AC adapter )
ii)Hub which is cascaded
(There are more than 2 Hubs with cascade connection)
We recommend you use SelfPowered Hub
(This kind of Hub uses AC adapter )
54
Page 55

10.Using SMA03U
10-1. Power Supply LED and Access LED
Power Supply LED
While the Mac is on, SMA03U is supplied power and Power Supply LED
turns green.
If the Power Supply LED doesn’t turn green, SMA03U might not be connected
to the Mac correctly. Make sure that the connector is connected correctly.
Access LED
Indicates the current state of access to the slot. Access LED turns orange when
SMA03U reads or writes data from/to the SmartMedia.
Cautions
Do not remove the SMA03U or SmartMedia
while the Access LED is on.
If you ignore this cautions,the date in SmartMedia may get broken
or get erased.
55
Page 56

10-2. Removal of SMA03U
Before removing SMA03U,check Access LED is not ON and Trash SmartMedia
.After checking these points,pull the USB cable out of USB port of the PC.
You can insert or remove even if the Mac is powered.
You do not have to go all the way to shut down Mac OS,restart the Mac,
get the Mac in sleep mode at all.
56
Page 57

10-3. Inserting the SmartMedia
1.Insert the SmartMedia into the slot as shown in the illustration.
3.3V SmartMedia 5V SmartMedia
The location of cut of 5V SmartMedia
is different from that of 3V SmartMedia.
However you insert SmartMedia into
the slot,SmartMedia is inserted into
the slot deeply,but unless you insert it
Turn the gold surface
in front as shown above.
correctly as shown above,SmartMedia
is not recongized at all.
57
Page 58

2.Push the SmartMedia until it is firmly seated.
3. The icon below will be mounted.
It will take longer time to recognize larger SmartMedia like 32MB
than smaller one.
4.If you double-click the mounted icon above, the files in this Removable
Disk can be handled the same as you handle files in Hard Drives or Floppy
Drive.
58
Page 59

10-4. Removing the SmartMedia
Cautions
Do not remove the SMA03U or SmartMedia
while the Access LED is on.
If you ignore this cautions,the date in SmartMedia may get broken
or get erased.
1.Before removing SmartMedia,check Access LED is not ON and Trash
SmartMedia .
2. Push the top of the SmartMedia in the slot as shown below.
59
Page 60

3. Pull the SmartMedia out of the slot as shown below.
60
Page 61

11.Handling SmartMedia
11-1. About Write-Protect of SmartMedia
To prevent unintended writing date to,erasing data from,formatting of
SmartMedia,stick a Write-Protect label on the SmartMedia.
Refer to the manual that accompanied your SmartMedia for instructions.
11-2. Format SmartMedia
Before you format SmartMedia,make sure the things below.
If you format SmartMedia,the date in SmartMedia will get erased completely.
When you use SmartMedia with digital camera,follow instructions below.
There are some possibility that you can not use SmartMedia with digital
camera if you format SmartMedia from OS.
We recommend you format SmartMedia with digital camera
when you use SmartMedia with digital camera.
61
Page 62

1.Select the mounted icon below.
2.Select Erase Disk of the Special pull down menu on the task bar.
3.When you click Erase button,formatting SmartMedia will start.
62
Page 63

Problem Cause Solution Page
-Power Supply LED You don’t connect USB Connect USB cable 51
doesn’t turn green cable correctly. firmly.
USB port doesn’t have Use USB Hub which 51
enough current to supply can supply enough
current.
-SmartMedia can’t Sometimes SmartMedia Connect SMA03U
be recognized. can’t be recognize when to the embeded USB
you start Mac under port of Mac directly.
conditions that Or,when you start Mac,
SMA03U is connected pull out USB cable
to SelfPowered and after finishing
type USB Hub. booting up,
reconnect USB cable.
63
Page 64

Problem Cause Solution Page
-Dialog box saying We are investigating Just OK button and
Type-110 error this point for Apple. remove SMA03U
appears from your Mac and
-You can’ write data You stick a WriteProtect Rip of f WriterProtect 58
to SmartMedia label on SmartMedia. label on SmartMedia.
-Even if you insert You failed to install Install the driver again. 48
Smart Media, the driver.
the icon won’t appear
You don’t insert You have to follow 54
SmartMedia correctly. the instructions.
reconnect SMA03U
to your Mac.
64
Page 65

13.Specifications
Product name SMA03U
Model name USB SmartMedia Reader/Writer
Interface USB(Universal Serial Bus)
Size 77mm(W) ×70mm(H)×18mm-40mm(D)
Length of USB cable 47.2in(120cm)
Weight 125g
Required V oltage +5V
Cunsumption current 76mA(MAX)
Operating temperature 32F-131F(0℃-55℃)
Relative humidity 20-80%(non-condensing)
Max number of insertion 10,000cycles(SmartMedia)
Max connect unit 4 unit
65
 Loading...