

Page 1
www.allitebooks.com
Page 2

Raspberry Pi®
User Guide
Eben Upton and Gareth Halfacree
A John Wiley and Sons, Ltd., Publication
www.allitebooks.com
Page 3

Raspberry Pi®
User Guide
www.allitebooks.com
Page 4

is edition rst published 2012
© 2012 Eben Upton and Gareth Halfacree
Registered oce
John Wiley & Sons Ltd., e Atrium, Southern Gate, Chichester, West Sussex, PO19 8SQ, United Kingdom
For details of our global editorial oces, for customer services and for information about how to apply for permission to
reuse the copyright material in this book please see our website at www.wiley.com.
e right of the authors to be identied as the authors of this work has been asserted in accordance with the Copyright,
Designs and Patents Act 1988.
All rights reserved. No part of this publication may be reproduced, stored in a retrieval system, or transmitted, in any form
or by any means, electronic, mechanical, photocopying, recording or otherwise, except as permitted by the UK Copyright,
Designs and Patents Act 1988, without the prior permission of the publisher.
Wiley also publishes its books in a variety of electronic formats. Some content that appears in print may not be available in
electronic books.
Designations used by companies to distinguish their products are often claimed as trademarks. All brand names and product names used in this book are trade names, service marks, trademarks or registered trademarks of their respective owners. e publisher is not associated with any product or vendor mentioned in this book. is publication is designed to
provide accurate and authoritative information in regard to the subject matter covered. It is sold on the understanding that
the publisher is not engaged in rendering professional services. If professional advice or other expert assistance is required,
the services of a competent professional should be sought.
Trademarks: Wiley and the Wiley logo are trademarks or registered trademarks of John Wiley and Sons, Ltd. and/or its
aliates in the United States and/or other countries, and may not be used without written permission. Raspberry Pi and
the Raspberry Pi logo are registered trademarks of the Raspberry Pi Foundation. All other trademarks are the property of
their respective owners. John Wiley & Sons, Ltd. is not associated with any product or vendor mentioned in the book.
Google Drive™ is a registered trademark of Google™.
A catalogue record for this book is available from the British Library.
ISBN 978-1-118-46446-5 (pbk); ISBN 978-1-118-46448-9 (ebk); ISBN 978-1-118-46447-2 (ebk); ISBN 978-1-118-46449-6 (ebk)
Set in 10 pt. Chaparral Pro by Indianapolis Composition Services
Printed simultaneously in Great Britain and the United States
www.allitebooks.com
Page 5

Publisher’s Acknowledgements
Some of the people who helped bring this book to market include the following:
Editorial and Production
VP Consumer and Technology Publishing
Director
Michelle Leete
Associate Director–Book Content
Management
Martin Tribe
Associate Publisher
Chris Webb
Executive Commissioning Editor
Craig Smith
Assistant Editor
Ellie Scott
Project Editor
Kathryn Duggan
Copy Editor
Kathryn Duggan
Marketing
Associate Marketing Director
Louise Breinholt
Marketing Manager
Lorna Mein
Senior Marketing Executive
Kate Parrett
Composition Services
Compositor
Erin Zeltner
Proofreader
Wordsmith Editorial
Indexer
BIM Indexing & Proofreading Services
Technical Editor
Omer Kilic
Editorial Manager
Jodi Jensen
Senior Project Editor
Sara Shlaer
Editorial Assistant
Leslie Saxman
www.allitebooks.com
Page 6

www.allitebooks.com
Page 7

About the Authors
Eben Upton is a founder and trustee of the Raspberry Pi Foundation, and serves as its
Executive Director. He is responsible for the overall software and hardware architecture of
the Raspberry Pi, and for the Foundation's relationships with its key suppliers and customers.
In an earlier life, he founded two successful mobile games and middleware companies,
Ideaworks 3d Ltd. and Podfun Ltd., and held the post of Director of Studies for Computer
Science at St John's College, Cambridge. He holds a BA, a PhD and an MBA from the
University of Cambridge.
In his day job, Eben works for Broadcom as an ASIC architect and general troublemaker.
Gareth Halfacree is a freelance technology journalist and the co-author of the Raspberry Pi
User Guide alongside project co-founder Eben Upton. Formerly a system administrator
working in the education sector, Gareth’s passion for open source projects has followed him
from one career to another, and he can often be seen reviewing, documenting or even
contributing to projects including GNU/Linux, LibreOce, Fritzing and Arduino. He is also
the creator of the Sleepduino and Burnduino open hardware projects, which extend the
capabilities of the Arduino electronics prototyping system. A summary of his current work
can be found at http://freelance.halfacree.co.uk.
www.allitebooks.com
Page 8

For Liz, who made it all possible.
—Eben
For my father, the enthusiastic past,
and my daughter, the exciting future.
—Gareth
www.allitebooks.com
Page 9

Table of Contents
Introduction ......................................... 1
Programming is fun! ..........................................................1
A bit of history ...............................................................3
So what can you do with the Raspberry Pi? ......................................8
Part I: Connecting the Board
CHAPTER 1
Meet the Raspberry Pi ................................. 11
ARM vs. x86 ................................................................12
Windows vs. Linux ..........................................................13
Getting Started with the Raspberry Pi ..........................................14
Connecting a Display .....................................................14
Composite Video ......................................................14
HDMI Video ..........................................................15
DSI Video .............................................................16
Connecting Audio ........................................................16
Connecting a Keyboard and Mouse .........................................17
Flashing the SD Card ......................................................19
Flashing from Linux ....................................................20
Flashing from OS X ....................................................21
Flashing from Windows ................................................21
Connecting External Storage ...............................................22
Connecting the Network ..................................................23
Wired Networking .....................................................24
Wireless Networking ...................................................25
Connecting Power ........................................................26
CHAPTER 2
Linux System Administration ............................ 27
Linux: An Overview .........................................................28
Linux Basics ................................................................30
Introducing Debian ..........................................................30
Using External Storage Devices ...............................................34
Creating a New User Account .................................................36
File System Layout ..........................................................37
Logical Layout ...........................................................37
Physical Layout ..........................................................39
Installing and Uninstalling Software ...........................................40
Finding Software .........................................................41
Installing Software ........................................................42
Uninstalling Software .....................................................43
Upgrading Software .......................................................44
www.allitebooks.com
Page 10

xii
RASPBERRY PI USER GUIDE
CHAPTER 3
Troubleshooting..................................... 45
Keyboard and Mouse Diagnostics .............................................46
Power Diagnostics ...........................................................47
Display Diagnostics .........................................................49
Boot Diagnostics ............................................................50
Network Diagnostics ........................................................50
e Emergency Kernel .......................................................53
CHAPTER 4
Network Conguration ................................. 55
Wired Networking ..........................................................56
Wireless Networking ........................................................59
No Encryption ........................................................68
WEP Encryption .......................................................68
WPA/WPA2 Encryption ................................................69
Connecting to the Wireless Network .....................................69
CHAPTER 5
Partition Management................................. 71
Creating a New Partition .....................................................72
Resizing Existing Partitions ...................................................76
Automatic Resizing .......................................................76
Manual Resizing. . . . . . . . . . . . . . . . . . . . . . . . . . . . . . . . . . . . . . . . . . . . . . . . . . . . . . . . . . 77
Moving to a Bigger SD Card ..................................................81
Imaging from Linux .......................................................82
Imaging from OS X .......................................................83
Imaging from Windows ...................................................83
CHAPTER 6
Conguring the Raspberry Pi............................ 85
Hardware Settings—cong.txt ................................................86
Modifying the Display .....................................................87
Boot Options ............................................................90
Overclocking the Raspberry Pi ..............................................91
Overclocking Settings ..................................................92
Overvoltage Settings ...................................................93
Disabling L2 Cache .......................................................94
Enabling Test Mode ......................................................95
Memory Partitioning—start.elf ...............................................96
Software Settings—cmdline.txt ...............................................97
www.allitebooks.com
Page 11

TABLE OF CONTENTS
Part II: Using the Pi as a Media Centre,
Productivity Machine and Web Server
CHAPTER 7
The Pi as a Home Theatre PC ........................... 103
Playing Music at the Console ................................................104
Dedicated HTPC with Rasbmc ...............................................106
Streaming Internet Media ................................................108
Streaming Local Network Media ...........................................109
Conguring Rasbmc .....................................................111
CHAPTER 8
The Pi as a Productivity Machine ........................ 113
Using Cloud-Based Apps ....................................................114
Using OpenOce.org .......................................................117
Image Editing with e Gimp ................................................119
CHAPTER 9
The Pi as a Web Server............................... 123
Installing a LAMP Stack .....................................................124
Installing WordPress .......................................................128
xiii
Part III: Programming and Hacking
CHAPTER 10
An Introduction to Scratch ............................. 135
Introducing Scratch ........................................................136
Example 1: Hello World .....................................................137
Example 2: Animation and Sound ............................................140
Example 3: A Simple Game ..................................................143
Robotics and Sensors .......................................................149
Sensing with the PicoBoard ...............................................149
Robotics with LEGO .....................................................150
Further Reading ...........................................................150
CHAPTER 11
An Introduction to Python............................. 151
Introducing Python ........................................................152
Example 1: Hello World .....................................................152
Example 2: Comments, Inputs, Variables and Loops ............................158
Page 12

xiv
RASPBERRY PI USER GUIDE
Example 3: Gaming with pygame .............................................162
Example 4: Python and Networking ..........................................171
Further Reading ...........................................................178
CHAPTER 12
Hardware Hacking .................................. 179
Electronic Equipment .......................................................180
Reading Resistor Colour Codes ...............................................182
Sourcing Components ......................................................184
Online Sources ..........................................................184
Oine Sources ..........................................................185
Hobby Specialists ........................................................186
e GPIO Port .............................................................186
UART Serial Bus .........................................................188
I²C Bus .................................................................189
SPI Bus ................................................................189
Using the GPIO Port in Python ..............................................189
Installing the GPIO Python Library ........................................190
GPIO Output: Flashing an LED ............................................192
GPIO Input: Reading a Button .............................................196
Moving Up From the Breadboard .............................................200
A Brief Guide to Soldering ...................................................203
CHAPTER 13
Add-on Boards..................................... 209
Ciseco Slice of Pi ...........................................................210
Adafruit Prototyping Pi Plate ................................................214
Fen Logic Gertboard ........................................................217
Part IV: Appendixes
APPENDIX A
Python Recipes ..................................... 225
Raspberry Snake (Chapter 11, Example 3) .....................................226
IRC User List (Chapter 11, Example 4) ........................................228
GPIO Input and Output (Chapter 12) .........................................230
APPENDIX B
HDMI Display Modes ................................. 231
Index............................................ 237
Page 13

Introduction
“CHILDREN TODAY ARE digital natives”, said a man I got talking to at a reworks
party last year. “I don’t understand why you’re making this thing. My kids know more
about setting up our PC than I do.”
I asked him if they could program, to which he replied: “Why would they want to? e
computers do all the stu they need for them already, don’t they? Isn’t that the point?”
As it happens, plenty of kids today aren’t digital natives. We have yet to meet any of
these imagined wild digital children, swinging from ropes of twisted-pair cable and
chanting war songs in nicely parsed Python. In the Raspberry Pi Foundation’s educational outreach work, we do meet a lot of kids whose entire interaction with technology
is limited to closed platforms with graphical user interfaces (GUIs) that they use to play
movies, do a spot of word-processed homework and play games. ey can browse the
web, upload pictures and video, and even design web pages. (ey’re often better at setting the satellite TV box than Mum or Dad, too.) It’s a useful toolset, but it’s shockingly
incomplete, and in a country where 20% of households still don’t have a computer in the
home, even this toolset is not available to all children.
Despite the most fervent wishes of my new acquaintance at the reworks party, computers don’t program themselves. We need an industry full of skilled engineers to keep
technology moving forward, and we need young people to be taking those jobs to ll
the pipeline as older engineers retire and leave the industry. But there’s much more to
teaching a skill like programmatic thinking than breeding a new generation of coders
and hardware hackers. Being able to structure your creative thoughts and tasks in
complex, non-linear ways is a learned talent, and one that has huge benets for everyone who acquires it, from historians to designers, lawyers and chemists.
Programming is fun!
It’s enormous, rewarding, creative fun. You can create gorgeous intricacies, as well as
(much more gorgeous, in my opinion) clever, devastatingly quick and deceptively simplelooking routes through, under and over obstacles. You can make stu that’ll have other
Page 14

2
RASPBERRY PI USER GUIDE
people looking on jealously, and that’ll make you feel wonderfully smug all afternoon. In my
day job, where I design the sort of silicon chips that we use in the Raspberry Pi as a processor
and work on the low-level software that runs on them, I basically get paid to sit around all day
playing. What could be better than equipping people to be able to spend a lifetime doing that?
It’s not even as if we’re coming from a position where children don’t want to get involved in
the computer industry. A big kick up the backside came a few years ago, when we were moving quite slowly on the Raspberry Pi project. All the development work on Raspberry Pi was
done in the spare evenings and weekends of the Foundation’s trustees and volunteers—
we’re a charity, so the trustees aren’t paid by the Foundation, and we all have full-time jobs
to pay the bills. is meant that occasionally, motivation was hard to come by when all I
wanted to do in the evening was slump in front of the Arrested Development boxed set with a
glass of wine. One evening, when not slumping, I was talking to a neighbour’s nephew about
the subjects he was taking for his General Certicate of Secondary Education (GCSE, the
British system of public examinations taken in various subjects from the age of about 16),
and I asked him what he wanted to do for a living later on.
“I want to write computer games”, he said.
“Awesome. What sort of computer do you have at home? I’ve got some programming books
you might be interested in.”
“A Wii and an Xbox.”
On talking with him a bit more, it became clear that this perfectly smart kid had never done
any real programming at all; that there wasn’t any machine that he could program in the
house; and that his information and communication technology (ICT) classes—where he
shared a computer and was taught about web page design, using spreadsheets and word processing—hadn’t really equipped him to use a computer even in the barest sense. But computer games were a passion for him (and there’s nothing peculiar about wanting to work on
something you’re passionate about). So that was what he was hoping the GCSE subjects he’d
chosen would enable him to do. He certainly had the artistic skills that the games industry
looks for, and his maths and science marks weren’t bad. But his schooling had skirted around
any programming—there were no Computing options on his syllabus, just more of the same
ICT classes, with its emphasis on end users rather than programming. And his home interactions with computing meant that he stood a vanishingly small chance of acquiring the skills
he needed in order to do what he really wanted to do with his life.
is is the sort of situation I want to see the back of, where potential and enthusiasm is
squandered to no purpose. Now, obviously, I’m not monomaniacal enough to imagine that simply making the Raspberry Pi is enough to eect all the changes that are needed. But I do believe
that it can act as a catalyst. We’re already seeing big changes in the UK schools’ curriculum,
Page 15

INTRODUCTION
where Computing is arriving on the syllabus and ICT is being reshaped, and we’ve seen a massive
change in awareness of a gap in our educational and cultural provision for kids just in the short
time since the Raspberry Pi was launched.
Too many of the computing devices a child will interact with daily are so locked down that they
can’t be used creatively as a tool—even though computing is a creative subject. Try using your
iPhone to act as the brains of a robot, or getting your PS3 to play a game you’ve written. Sure,
you can program the home PC, but there are signicant barriers in doing that which a lot of
children don’t overcome: the need to download special software, and having the sort of parents
who aren’t worried about you breaking something that they don’t know how to x. And plenty
of kids aren’t even aware that doing such a thing as programming the home PC is possible. ey
think of the PC as a machine with nice clicky icons that give you an easy way to do the things
you need to do so you don’t need to think much. It comes in a sealed box, which Mum and Dad
use to do the banking and which will cost lots of money to replace if something goes wrong!
e Raspberry Pi is cheap enough to buy with a few weeks’ pocket money, and you probably
have all the equipment you need to make it work: a TV, an SD card that can come from an old
camera, a mobile phone charger, a keyboard and a mouse. It’s not shared with the family; it
belongs to the kid; and it’s small enough to put in a pocket and take to a friend’s house. If
something goes wrong, it’s no big deal—you just swap out a new SD card and your Raspberry
Pi is factory-new again. And all the tools, environments and learning materials that you need
to get started on the long, smooth curve to learning how to program your Raspberry Pi are
right there, waiting for you as soon as you turn it on.
3
A bit of history
I started work on a tiny, aordable, bare-bones computer about six years ago, when I was a
Director of Studies in Computer Science at Cambridge University. I’d received a degree at the
University Computer Lab as well as studying for a PhD while teaching there, and over that
period, I’d noticed a distinct decline in the skillset of the young people who were applying to
read Computer Science at the Lab. From a position in the mid-1990s, when 17-year-olds
wanting to read Computer Science had come to the University with a grounding in several
computer languages, knew a bit about hardware hacking, and often even worked in assembly
language, we gradually found ourselves in a position where, by 2005, those kids were arriving
having done some HTML—with a bit of PHP and Cascading Style Sheets if you were lucky.
ey were still fearsomely clever kids with lots of potential, but their experience with computers was entirely dierent from what we’d been seeing before.
e Computer Science course at Cambridge includes about 60 weeks of lecture and seminar
time over three years. If you’re using the whole rst year to bring students up to speed, it’s
harder to get them to a position where they can start a PhD or go into industry over the next
Page 16

4
RASPBERRY PI USER GUIDE
two years. e best undergraduates—the ones who performed the best at the end of their
three-year course—were the ones who weren’t just programming when they’d been told to
for their weekly assignment or for a class project. ey were the ones who were programming
in their spare time. So the initial idea behind the Raspberry Pi was a very parochial one with
a very tight (and pretty unambitious) focus: I wanted to make a tool to get the small number
of applicants to this small university course a kick start. My colleagues and I imagined we’d
hand out these devices to schoolkids at open days, and if they came to Cambridge for an
interview a few months later, we’d ask what they’d done with the free computer we’d given
them. ose who had done something interesting would be the ones that we’d be interested
in having in the program. We thought maybe we’d make a few hundred of these devices, or
best case, a lifetime production run of a few thousand.
Of course, once work was seriously underway on the project, it became obvious that there was
a lot more we could address with a cheap little computer like this. What we started with is a
long way indeed from the Raspberry Pi you see today. I began by soldering up the longest piece
of breadboard you can buy at Maplin with an Atmel chip at our kitchen table, and the rst
crude prototypes used cheap microcontroller chips to drive a standard-denition TV set
directly. With only 512 K of RAM, and a few MIPS of processing power, these prototypes were
very similar in performance to the original 8-bit microcomputers. It was hard to imagine these
machines capturing the imaginations of kids used to modern games consoles and iPads.
ere had been discussions at the University Computer Lab about the general state of computer education, and when I left the Lab for a non-academic job in the industry, I noticed
that I was seeing the same issues in young job applicants as I’d been seeing at the University.
So I got together with my colleagues Dr Rob Mullins and Professor Alan Mycroft (two colleagues from the Computer Lab), Jack Lang (who lectures in entrepreneurship at the
University), Pete Lomas (a hardware guru) and David Braben (a Cambridge games industry
leading light with an invaluable address book), and over beers (and, in Jack’s case, cheese and
wine), we set up the Raspberry Pi Foundation—a little charity with big ideas.
Why “Raspberry Pi”?
We get asked a lot where the name “Raspberry Pi” came from. Bits of the name came from
different trustees. It’s one of the very few successful bits of design by committee I’ve seen,
and to be honest, I hated it at first. (I have since come to love the name, because it works really
well—but it took a bit of getting used to since I’d been calling the project the “ABC Micro” in
my head for years.) It’s “Raspberry” because there’s a long tradition of fruit names in computer
companies (besides the obvious, there are the old Tangerine and Apricot computers—and we
like to think of the Acorn as a fruit as well). “Pi” is a mangling of “Python”, which we thought
early on in development would be the only programming language available on a much less
powerful platform than the Raspberry Pi we ended up with. As it happens, we still recommend
Python as our favourite language for learning and development, but there is a world of other
language options you can explore on the Raspberry Pi too.
Page 17

INTRODUCTION
In my new role as a chip architect at Broadcom, a big semiconductor company, I had access to
inexpensive but high-performing hardware produced by the company with the intention of
being used in very high-end mobile phones—the sort with the HD video and the 14-megapixel
cameras. I was amazed by the dierence between the chips you could buy for $10 as a small
developer, and what you could buy as a cell-phone manufacturer for roughly the same amount
of money: general purpose processing, 3D graphics, video and memory bundled into a single
BGA package the size of a ngernail. ese microchips consume very little power, and have big
capabilities. ey are especially good at multimedia, and were already being used by set-top box
companies to play high-denition video. A chip like this seemed the obvious next step for the
shape the Raspberry Pi was taking, so I worked on taping out a low-cost variant that had an
ARM microprocessor on board and could handle the processing grunt we needed.
We felt it was important to have a way to get kids enthusiastic about using a Raspberry Pi
even if they didn’t feel very enthusiastic about programming. In the 1980s, if you wanted to
play a computer game, you had to boot up a box that went “bing” and fed you a command
prompt. It required typing a little bit of code just to get started, and most users didn’t ever go
beyond that—but some did, and got beguiled into learning how to program by that little bit
of interaction. We realised that the Raspberry Pi could work as a very capable, very tiny, very
cheap modern media centre, so we emphasised that capability to suck in the unwary—with
the hope that they’d pick up some programming while they’re at it.
5
After about ve years’ hard grind, we had created a very cute prototype board, about the size of
a thumb drive. We included a permanent camera module on top of the board to demonstrate
the sort of peripherals that can easily be added, and brought it along to a number of meetings
with the BBC’s R&D department. ose of us who grew up in the UK in the 1980s had learned
a lot about 8-bit computing from the BBC Microcomputer and the ecosystem that had grown
up around it—with BBC-produced books, magazines and TV programmes—so I’d hoped that
they might be interested in developing the Raspberry Pi further. But as it turned out, something has changed since we were kids: various competition laws in the UK and the EU meant
that “the Beeb” couldn’t become involved in the way we’d hoped. In a last-ditch attempt to get
something organised with them, we ditched the R&D department idea and David (he of the
giant address book) organised a meeting with Rory Cellan-Jones, a senior tech journalist, in
May 2011. Rory didn’t hold out much hope for partnership with the BBC, but he did ask if he
could take a video of the little prototype board with his phone, to put on his blog.
e next morning, Rory’s video had gone viral, and I realised that we had accidentally promised the world that we’d make everybody a $25 computer.
While Rory went o to write another blog post on exactly what it is that makes a video go
viral, we went o to put our thinking caps on. at original, thumb-drive-sized prototype
didn’t t the bill: with the camera included as standard, it was way too expensive to meet the
Page 18

6
RASPBERRY PI USER GUIDE
cost model we’d suggested (the $25 gure came from my statement to the BBC that the
Raspberry Pi should cost around the same as a text book, and is a splendid demonstration of
the fact that I had no idea how much text books cost these days), and the tiny prototype
model didn’t have enough room around its periphery for all the ports we needed to make it
as useable as we wanted it to be. So we spent a year working on engineering the board to
lower cost as much as possible while retaining all the features we wanted (engineering cost
down is a harder job than you might think), and to get the Raspberry Pi as useable as possible
for people who might not be able to aord much in the way of peripherals.
We knew we wanted the Raspberry Pi to be used with TVs at home, just like the ZX Spectrum in
the 1980s, saving the user the cost of a monitor. But not everybody has access to an HDMI television, so we added a composite port to make the Raspberry Pi work with an old cathode-ray television instead since SD cards are cheap and easy to nd. We decided against microSD as the storage
medium, because the little ngernail-sized cards are so imsy in the hands of children and so easy
to lose. And we went through several iterations of power supply, ending up with a micro USB
cable. Recently, micro USB became the standard charger cable for mobile telephones across the
EU (and it’s becoming the standard everywhere), which means the cables are becoming more and
more ubiquitous, and in many cases, people already have them at home.
By the end of 2011, with a projected February release date, it was becoming obvious to us that
things were moving faster, and demand was higher, than we were ever going to be able to cope
with. e initial launch was always aimed at developers, with the educational launch planned
for later in 2012. We have a small number of very dedicated volunteers, but we need the wider
Linux community to help us prepare a software stack and iron out any early-life niggles with
the board before releasing into the educational market. We had enough capital in the
Foundation to buy the parts for and build 10,000 Raspberry Pis over a period of a month or so,
and we thought that the people in the community who would be interested in an early board
would come to around that number. Fortunately and unfortunately, we’d been really successful
in building a big online community around the device, and interest wasn’t limited to the UK, or
to the educational market. Ten thousand was looking less and less realistic.
Our Community
The Raspberry Pi community is one of the things we’re proudest of. We started with a
very bare-bones blog at www.raspberrypi.org just after Rory’s May 2011 video, and put
up a forum on the same website shortly after that. That forum now has more than 20,000
members—between them they’ve contributed more than 100,000 posts of wit and wisdom
about the Raspberry Pi. If there’s any question, no matter how abstruse, that you want to ask
about the Raspberry Pi or about programming in general, someone there will have the answer
(if it’s not in this book, you’ll find it in the forums).
Page 19

INTRODUCTION
Part of my job at Raspberry Pi involves giving talks to hacker groups, computing conferences,
teachers, programming collectives and the like, and there’s always someone in the audience
who has talked to me or to my wife Liz (who runs the community) on the Raspberry Pi
website—and some of these people have become good friends of ours. The Raspberry Pi
website gets around one request every single second of the day.
There are now hundreds of fan sites out there. There’s also a fan magazine called The MagPi (a
free download from www.themagpi.com), which is produced monthly by community members,
with type-in listings, lots of articles, project guides, tutorials and more. Type-in games in magazines
and books provided an easy route into programming for me—my earliest programming experience
with the BBC Micro was of modifying a type-in helicopter game to add enemies and pick-ups.
We blog something interesting about the device at www.raspberrypi.org at least once
every day. Come and join in the conversation!
ere were 100,000 people on our mailing list wanting a Raspberry Pi—and they all put an
order in on day one! Not surprisingly, this brought up a few issues.
First o, there are the inevitable paper cuts you’re going to get boxing up 100,000 little computers
and mailing them out—and the fact was that we had absolutely no money to hire people to do
this for us. We didn’t have a warehouse—we had Jack’s garage. ere was no way we could raise
the money to build 100,000 units at once—we’d envisaged making them in batches of 2,000
every couple of weeks, which, with this level of interest, was going to take so long that the thing
would be obsolete before we managed to full all the orders. Clearly, manufacturing and distribution were something we were going to have to give up on and hand over to somebody else who
already had the infrastructure and capital to do that, so we got in touch with element14 and RS
Components, both UK microelectronics suppliers with worldwide businesses, and contracted
with them to do the actual manufacture and distribution side of things worldwide so we could
concentrate on development and the Raspberry Pi Foundation’s charitable goals.
7
Demand on the rst day was still so large that RS and element14’s websites both crashed for
most of the day—at one point in the day, element14 were getting seven orders a second, and
for a couple of hours on February 29, Google showed more searches were made worldwide
for “Raspberry Pi” than were made for “Lady Gaga”. I’m writing this in early June 2012, and
orders in the three months since we opened for business have topped half a million units,
even though we’re still at a point when neither company will sell you more than one
Raspberry Pi (they’re trying to get rid of their order backlogs before they turn on the ability
to multiorder). At this point, if we’d gone with our original plans, we’d have made 100 or so
of these devices for University open days, and that would have been it.
ere is nothing that aects the blood pressure quite like accidentally ending up running a
large computer company!
Page 20

8
RASPBERRY PI USER GUIDE
So what can you do with the Raspberry Pi?
is book explores a number of things you can do with your Raspberry Pi, from controlling
hardware with Python, to using it as a media centre, or building games in Scratch. e beauty of
the Raspberry Pi is that it’s just a very tiny general-purpose computer (which may be a little
slower than you’re used to for some desktop applications, but much better at some other stu
than a regular PC), so you can do anything you could do on a regular computer with it. In addition, the Raspberry Pi has powerful multimedia and 3D graphics capabilities, so it has the
potential to be used as a games platform, and we very much hope to see people starting to write
games for it.
We think physical computing—building systems using sensors, motors, lights and microcontrollers—is something that gets overlooked in favour of pure software projects in a lot of
instances, and it’s a shame, because physical computing is massive fun. To the extent that there’s
any children’s computing movement at the moment, it’s a physical computing movement. e
LOGO turtles that represented physical computing when we were kids are now ghting robots,
quadcopters or parent-sensing bedroom doors, and we love it. However, the lack of General
Purpose Input/Output (GPIO) on home PCs is a real handicap for many people getting started
with robotics projects. e Raspberry Pi exposes GPIO so you can get to work straight away.
I keep being surprised by ideas the community comes up with which wouldn’t have crossed
my mind in a thousand years: the Australian school meteor-tracking project; the Boreatton
Scouts in the UK and their robot, which is controlled via an electroencephalography headset
(the world’s rst robot controlled by Scouting brain waves); the family who are building a
robot vacuum cleaner. And I’m a real space cadet, so reading about the people sending
Raspberry Pis into near-earth orbit on rockets and balloons gives me goosebumps.
Success for us would be another 1,000 people every year taking up Computer Science at the
university level in the UK. at would not only be benecial for the country, the software
and hardware industries, and the economy; but it would be even more benecial for every
one of those 1,000 people, who, I hope, discover that there’s a whole world of possibilities
and a great deal of fun to be had out there. Building a robot when you’re a kid can take you to
places you never imagined—I know because it happened to me!
—Eben Upton
Page 21

Part I
Connecting
the Board
Chapter 1 Meet the Raspberry Pi
Chapter 2 Linux System Administration
Chapter 3 Troubleshooting
Chapter 4 Network Conguration
Chapter 5 Partition Management
Chapter 6 Conguring the Raspberry Pi
Page 22

Page 23

Chapter 1
Meet the Raspberry Pi
Page 24
12
RASPBERRY PI USER GUIDE
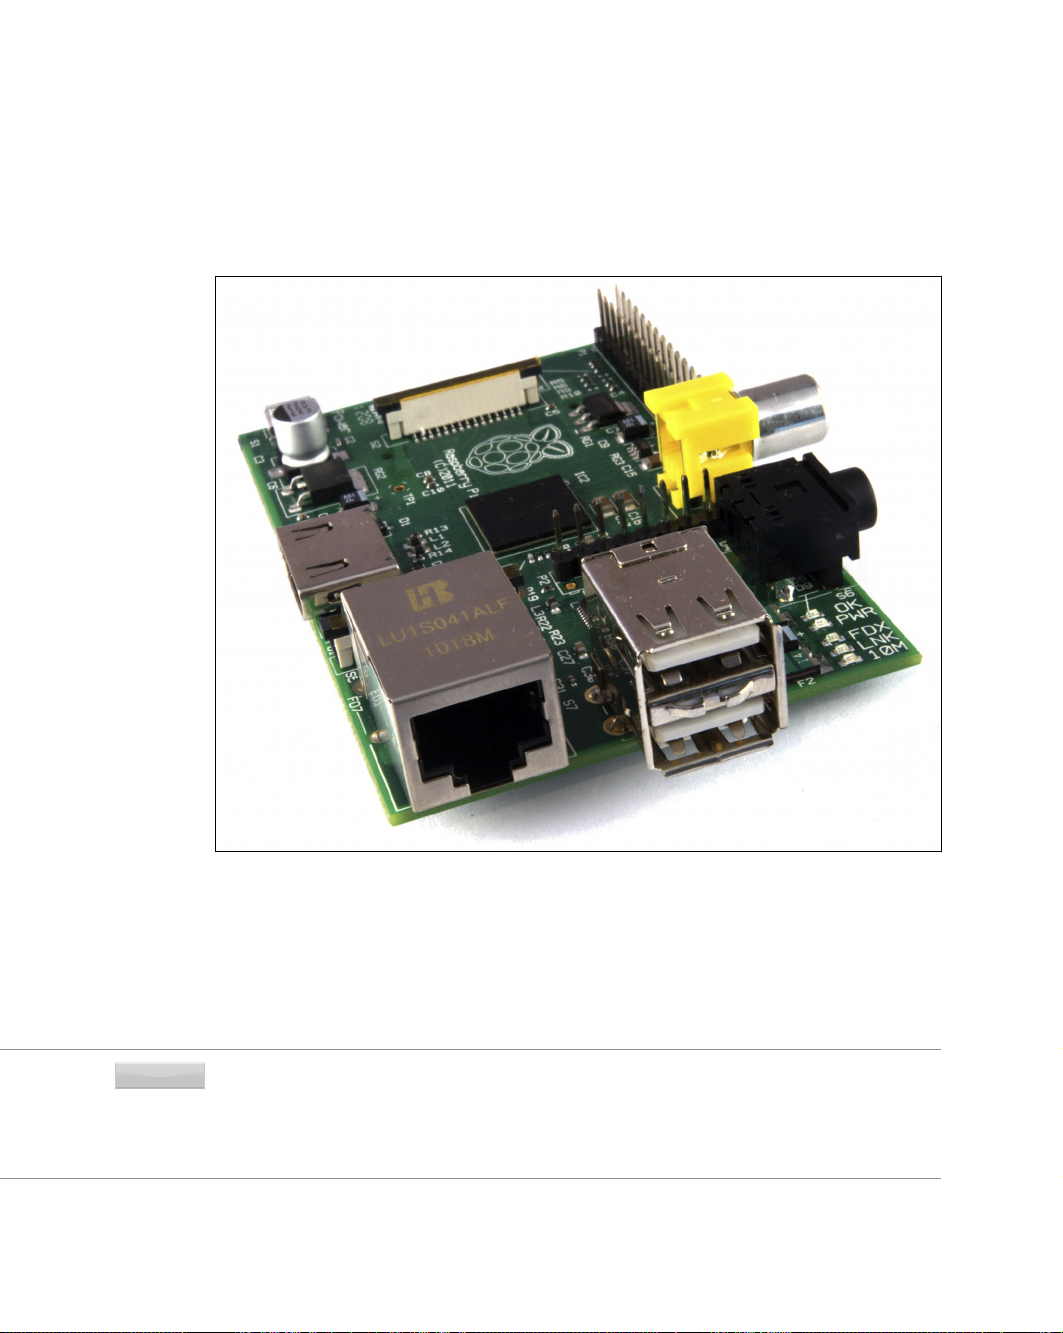
YOUR RASPBERRY PI board is a miniature marvel, packing considerable computing power
into a footprint no larger than a credit card. It’s capable of some amazing things, but there are
a few things you’re going to need to know before you plunge head-rst into the bramble patch.
TIP
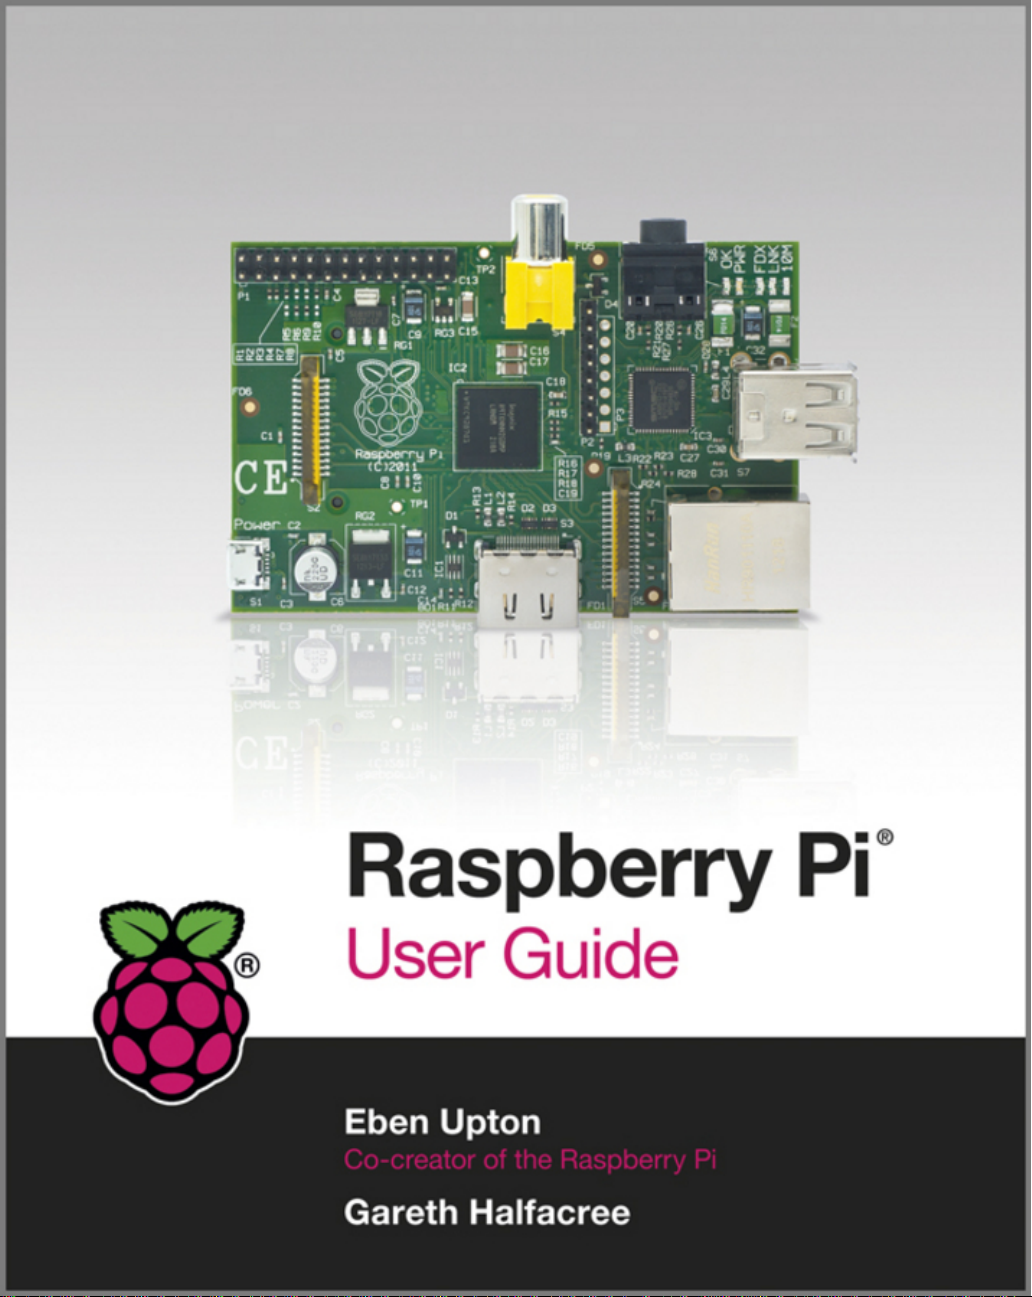
F -:
e BCM2835
SoC, located
beneath a Hynix
memory chip
If you’re eager to get started, skip ahead a couple of pages to find out how to connect your
Raspberry Pi to a display, keyboard and mouse.
ARM vs. x86
e processor at the heart of the Raspberry Pi system is a Broadcom BCM2835 system-onchip (SoC) multimedia processor. is means that the vast majority of the system’s components, including its central and graphics processing units along with the audio and
communications hardware, are built onto that single component hidden beneath the 256
MB memory chip at the centre of the board (see Figure 1-1).
It’s not just this SoC design that makes the BCM2835 dierent to the processor found in
your desktop or laptop, however. It also uses a dierent instruction set architecture (ISA),
known as ARM.
Page 25

CHAPTER 1 MEET THE RASPBERRY PI
Developed by Acorn Computers back in the late 1980s, the ARM architecture is a relatively
uncommon sight in the desktop world. Where it excels, however, is in mobile devices: the
phone in your pocket almost certainly has at least one ARM-based processing core hidden
away inside. Its combination of a simple reduced instruction set (RISC) architecture and low
power draw make it the perfect choice over desktop chips with high power demands and
complex instruction set (CISC) architectures.
e ARM-based BCM2835 is the secret of how the Raspberry Pi is able to operate on just the
5V 1A power supply provided by the onboard micro-USB port. It’s also the reason why you
won’t nd any heat-sinks on the device: the chip’s low power draw directly translates into
very little waste heat, even during complicated processing tasks.
It does, however, mean that the Raspberry Pi isn’t compatible with traditional PC software.
e majority of software for desktops and laptops is built with the x86 instruction set architecture in mind, as found in processors from the likes of AMD, Intel and VIA. As a result, it
won’t run on the ARM-based Raspberry Pi.
e BCM2835 uses a generation of ARM’s processor design known as ARM11, which in turn is
designed around a version of the instruction set architecture known as ARMv6. is is worth
remembering: ARMv6 is a lightweight and powerful architecture, but has a rival in the more
advanced ARMv7 architecture used by the ARM Cortex family of processors. Software developed for ARMv7, like software developed for x86, is sadly not compatible with the Raspberry
Pi’s BCM2835—although developers can usually convert the software to make it suitable.
13
at’s not to say you’re going to be restricted in your choices. As you’ll discover later in the
book, there is plenty of software available for the ARMv6 instruction set, and as the Raspberry
Pi’s popularity continues to grow, that will only increase. In this book, you’ll also learn how to
create your own software for the Pi even if you have no experience with programming.
Windows vs. Linux
Another important dierence between the Raspberry Pi and your desktop or laptop, other than
the size and price, is the operating system—the software that allows you to control the computer.
e majority of desktop and laptop computers available today run one of two operating systems: Microsoft Windows or Apple OS X. Both platforms are closed source, created in a secretive environment using proprietary techniques.
ese operating systems are known as closed source for the nature of their source code, the
computer-language recipe that tells the system what to do. In closed-source software, this
recipe is kept a closely-guarded secret. Users are able to obtain the nished software, but
never to see how it’s made.
Page 26

14
RASPBERRY PI USER GUIDE
e Raspberry Pi, by contrast, is designed to run an operating system called GNU/Linux—
hereafter referred to simply as Linux. Unlike Windows or OS X, Linux is open source: it’s
possible to download the source code for the entire operating system and make whatever
changes you desire. Nothing is hidden, and all changes are made in full view of the public.
is open source development ethos has allowed Linux to be quickly altered to run on the
Raspberry Pi, a process known as porting. At the time of this writing, several versions of
Linux—known as distributions—have been ported to the Raspberry Pi’s BCM2835 chip,
including Debian, Fedora Remix and Arch Linux.
e dierent distributions cater to dierent needs, but they all have something in common:
they’re all open source. ey’re also all, by and large, compatible with each other: software
written on a Debian system will operate perfectly well on Arch Linux and vice versa.
Linux isn’t exclusive to the Raspberry Pi. Hundreds of dierent distributions are available for
desktops, laptops and even mobile devices; and Google’s popular Android platform is developed on top of a Linux core. If you nd that you enjoy the experience of using Linux on the
Raspberry Pi, you could consider adding it to other computing devices you use as well. It will
happily coexist with your current operating system, allowing you to enjoy the benets of
both while giving you a familiar environment when your Pi is unavailable.
As with the dierence between ARM and x86, there’s a key point to make about the practical
dierence between Windows, OS X and Linux: software written for Windows or OS X won’t
run on Linux. ankfully, there are plenty of compatible alternatives for the overwhelming
majority of common software products—better still, the majority are free to use and as open
source as the operating system itself.
Getting Started with the Raspberry Pi
Now that you have a basic understanding of how the Pi diers from other computing devices,
it’s time to get started. If you’ve just received your Pi, take it out of its protective anti-static
bag and place it on a at, non-conductive surface before continuing with this chapter.
Connecting a Display
Before you can start using your Raspberry Pi, you’re going to need to connect a display. e
Pi supports three dierent video outputs: composite video, HDMI video and DSI video.
Composite video and HDMI video are readily accessible to the end user, as described in this
section, while DSI video requires some specialised hardware.
Composite Video
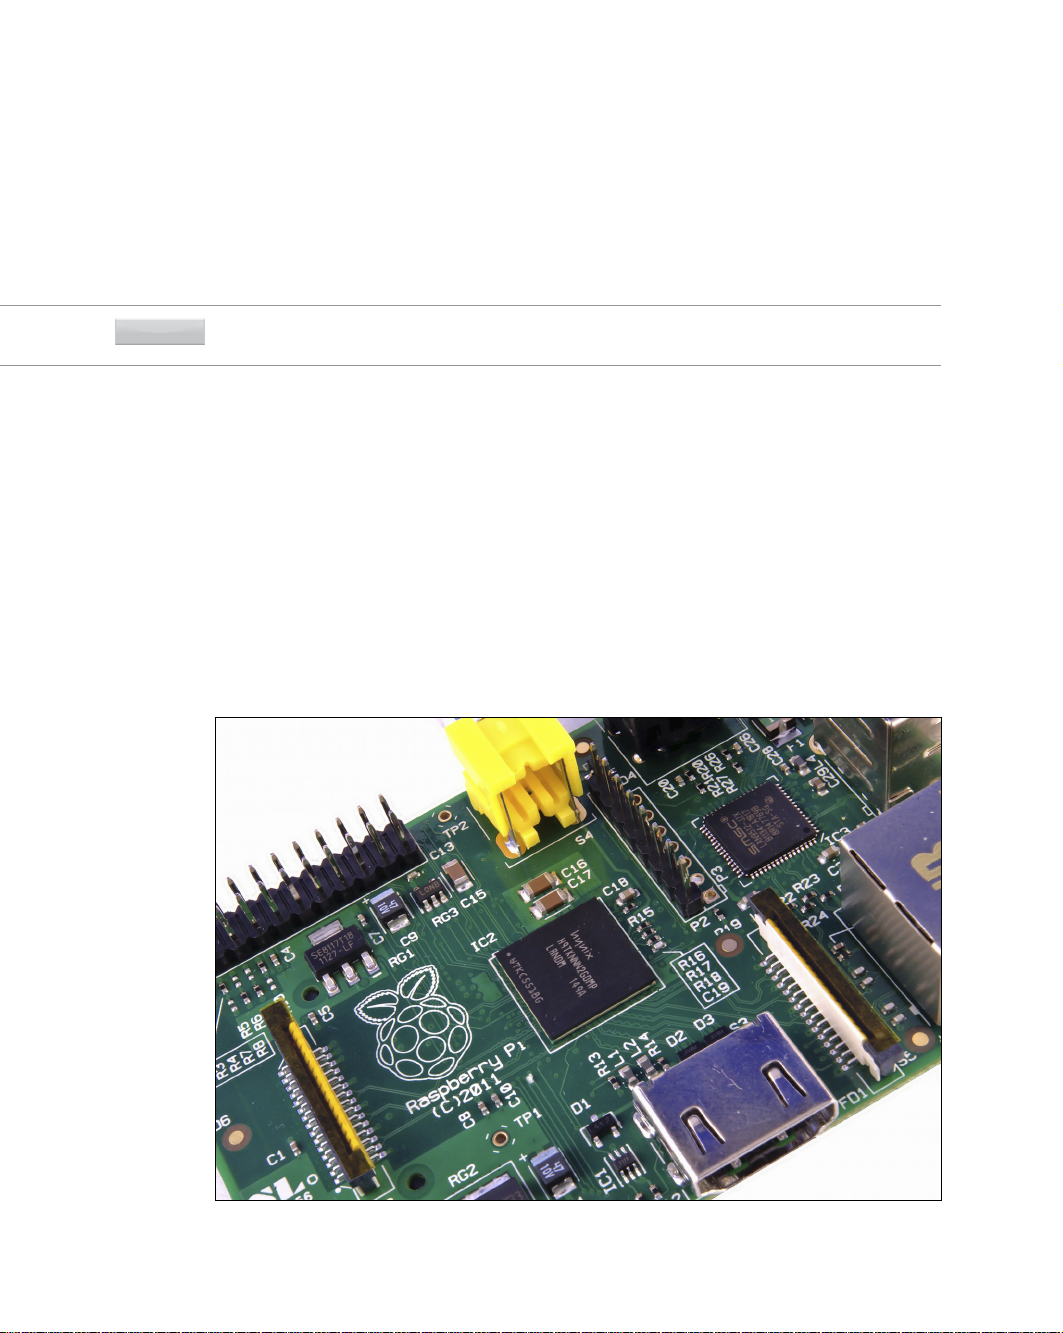
Composite video, available via the yellow-and-silver port at the top of the Pi known as an
RCA phono connector (see Figure 1-2), is designed for connecting the Raspberry Pi to older
display devices. As the name suggests, the connector creates a composite of the colours
Page 27
CHAPTER 1 MEET THE RASPBERRY PI
found within an image—red, green and blue—and sends it down a single wire to the display
device, typically an old cathode-ray tube (CRT) TV.
15
F -:
e yellow
RCA phono
connector, for
composite video
output
When no other display device is available, a composite video connection will get you started
with the Pi. e quality, however, isn’t great. Composite video connections are signicantly
more prone to interference, lack clarity and run at a limited resolution, meaning that you can
t fewer icons and lines of text on the screen at once.
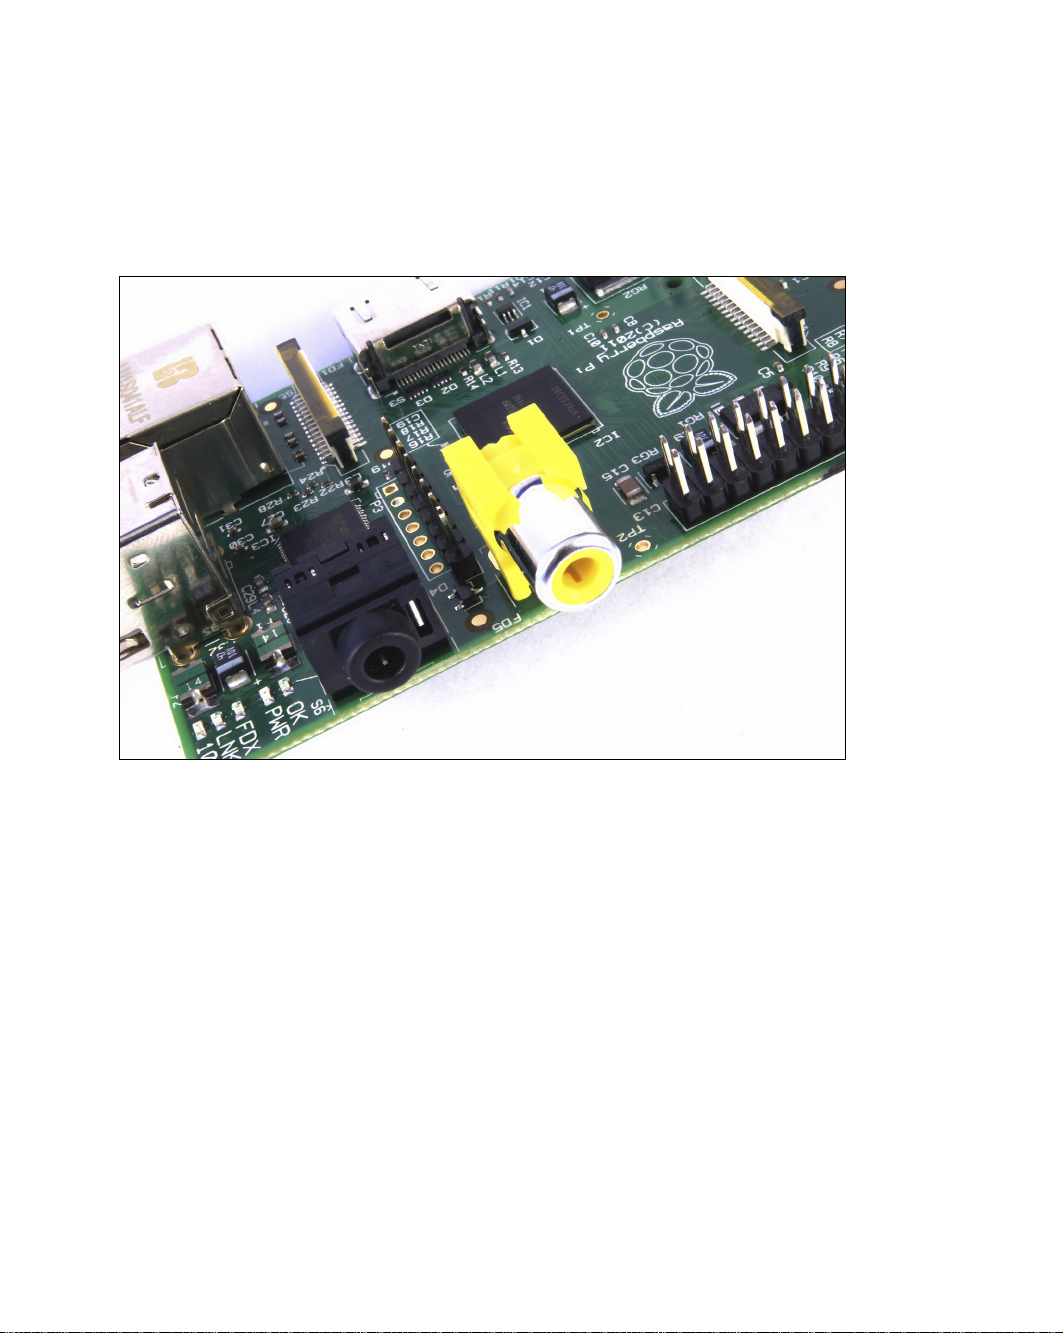
HDMI Video
A better-quality picture can be obtained using the HDMI (High Definition Multimedia Interface)
connector, the only port found on the bottom of the Pi (see Figure 1-3). Unlike the analogue
composite connection, the HDMI port provides a high-speed digital connection for pixelperfect pictures on both computer monitors and high-denition TV sets. Using the HDMI
port, a Pi can display images at the Full HD 1920x1080 resolution of most modern HDTV
sets. At this resolution, signicantly more detail is available on the screen.
If you’re hoping to use the Pi with an existing computer monitor, you may nd that your display doesn’t have an HDMI input. at’s not a disaster: the digital signals present on the HDMI
cable map to a common computer monitor standard called DVI (Digital Video Interconnect). By
purchasing an HDMI-to-DVI cable, you’ll be able to connect the Pi’s HDMI port to a monitor
with DVI-D connectivity.
Page 28
16
RASPBERRY PI USER GUIDE
F -:
e silver HDMI
connector, for
high-denition
video output
If your monitor has a VGA input—a D-shaped connector with 15 pins, typically coloured silver
and blue—the Raspberry Pi can’t connect to it. Adapters are available that will take in a digital
DVI signal and convert it to an analogue VGA signal, but these are expensive and bulky. e
best option here is simply to buy a more-modern monitor with a DVI or HDMI input.
DSI Video
e nal video output on the Pi can be found above the SD card slot on the top of the printed
circuit board—it’s a small ribbon connector protected by a layer of plastic. is is for a video
standard known as Display Serial Interface (DSI), which is used in the at-panel displays of
tablets and smartphones. Displays with a DSI connector are rarely available for retail purchase, and are typically reserved for engineers looking to create a compact, self-contained
system. A DSI display can be connected by inserting a ribbon cable into the matched connector on the Pi, but for beginners, the use of a composite or HDMI display is recommended.
Connecting Audio
If you’re using the Raspberry Pi’s HDMI port, audio is simple: when properly congured, the
HDMI port carries both the video signal and a digital audio signal. is means that you can
connect a single cable to your display device to enjoy both sound and pictures.
Page 29
CHAPTER 1 MEET THE RASPBERRY PI
Assuming you’re connecting the Pi to a standard HDMI display, there’s very little to do at
this point. For now, it’s enough to simply connect the cable.
If you’re using the Pi with a DVI-D monitor via an adapter or cable, audio will not be included.
is highlights the main dierence between HDMI and DVI: while HDMI can carry audio
signals, DVI cannot.
For those with DVI-D monitors, or those using the composite video output, a black 3.5 mm
audio jack located on the top edge of the Pi next to the yellow phono connector provides analogue audio (see Figure 1-2). is is the same connector used for headphones and microphones on consumer audio equipment, and it’s wired in exactly the same way. If you want,
you can simply connect a pair of headphones to this port for quick access to audio.
17
While headphones can be connected directly to the Raspberry Pi, you may find the volume a
little lacking. If possible, connect a pair of powered speakers instead. The amplifier inside will
help boost the signal to a more audible level.
If you’re looking for something more permanent, you can either use standard PC speakers
that have a 3.5 mm connector or you can buy some adapter cables. For composite video
users, a 3.5 mm to RCA phono cable is useful. is provides the two white-and-red RCA
phono connections that sit alongside the video connection, each carrying a channel of the
stereo audio signal to the TV.
For those connecting the Pi to an amplier or stereo system, you’ll either need a 3.5 mm to
RCA phono cable or a 3.5 mm to 3.5 mm cable, depending on what spare connections you
have on your system. Both cable types are readily and cheaply available at consumer electronics shops, or can be purchased even cheaper at online retailers such as Amazon.
Connecting a Keyboard and Mouse
Now that you’ve got your Raspberry Pi’s output devices sorted, it’s time to think about input.
As a bare minimum, you’re going to need a keyboard, and for the majority of users, a mouse
or trackball is a necessity too.
First, some bad news: if you’ve got a keyboard and mouse with a PS/2 connector—a round
plug with a horseshoe-shaped array of pins—then you’re going to have to go out and buy a
replacement. e old PS/2 connection has been superseded, and the Pi expects your peripherals to be connected over the Universal Serial Bus (USB) port.
TIP
Depending on whether you purchased the Model A or Model B, you’ll have either one or two
USB ports available on the right side of the Pi (see Figure 1-4). If you’re using Model B, you
Page 30
18
RASPBERRY PI USER GUIDE
can connect the keyboard and mouse directly to these ports. If you’re using Model A, you’ll
need to purchase a USB hub in order to connect two USB devices simultaneously.
F -:
Model B’s two
USB ports
TIP
A USB hub is a good investment for any Pi user: even if you’ve got a Model B, you’ll use up
both your available ports just connecting your keyboard and mouse, leaving nothing free for
additional devices such as an external optical drive, storage device or joystick. Make sure you
buy a powered USB hub: passive models are cheaper and smaller, but lack the ability to run
current-hungry devices like CD drives and external hard drives.
If you want to reduce the number of power sockets in use, connect the Raspberry Pi’s USB
power lead to your powered USB hub. This way, the Pi can draw its power directly from the
hub, rather than needing its own dedicated power socket and mains adapter. This will only
work on hubs with a power supply capable of providing 700mA to the Pi’s USB port, along with
whatever power is required by other peripherals.
Connecting the keyboard and mouse is as simple as plugging them in to the USB ports, either
directly in the case of a Model B or via a USB hub in the case of a Model A.
www.allitebooks.com
Page 31

CHAPTER 1 MEET THE RASPBERRY PI
A Note on Storage
As you’ve probably noticed, the Raspberry Pi doesn’t have a traditional hard drive. Instead it uses
a Secure Digital (SD) memory card, a solid-state storage system typically used in digital cameras.
Almost any SD card will work with the Raspberry Pi, but because it holds the entire operating
system, it is necessary for the card to be at least 2 GB in capacity to store all the required files.
SD cards with the operating system preloaded are available from the official Raspberry Pi
Store along with numerous other sites on the Internet. If you’ve purchased one of these, or
received it in a bundle with your Pi, you can simply plug it in to the SD card slot on the bottom side of the left-hand edge. If not, you’ll need to install an operating system—known as
flashing—onto the card before it’s ready to go.
Some SD cards work better than others, with some models refusing to work at all with the
Raspberry Pi. For an up-to-date list of SD card models known to work with the Pi, visit the
eLinux Wiki page: http://www.elinux.org/RPi_VerifiedPeripherals#SD_cards
19
Flashing the SD Card
To prepare a blank SD card for use with the Raspberry Pi, you’ll need to flash an operating
system onto the card. While this is slightly more complicated than simply dragging and dropping les onto the card, it shouldn’t take more than a few minutes to complete.
Firstly, you’ll need to decide which Linux distribution you would like to use with your
Raspberry Pi. Each has its advantages and disadvantages. Don’t worry if you change your
mind later and want to try a dierent version of Linux: an SD card can be ashed again with
a new operating system at any point.
e most up-to-date list of Linux releases compatible with the Pi is available from the
Raspberry Pi website at http://www.raspberrypi.org/downloads.
e Foundation provides BitTorrent links for each distribution. ese are small les that can
be used with BitTorrent software to download the les from other users. Using these links is
an ecient and fast way to distribute large les, and keeps the Foundation’s download servers from becoming overloaded.
To use a BitTorrent link, you’ll need to have a compatible client installed. If you don’t already
have a BitTorrent client installed, download one and install it before trying to download the
Raspberry Pi Linux distribution. One client for Windows, OS X and Linux is µTorrent, available from http://www.utorrent.com/downloads.
Page 32

20
RASPBERRY PI USER GUIDE
Which distribution you choose to download is up to you. Instructions in the rest of the book
will be based on the Debian Raspberry Pi distribution, a good choice for beginners. Where
possible, we’ll give you instructions for other distributions as well.
Linux distributions for the Raspberry Pi are provided as a single image file, compressed to make
it faster to download. Once you’ve downloaded the Zip archive (a compressed le, which takes
less time to download than the uncompressed les would) for your chosen distribution, you’ll
need to decompress it somewhere on your system. In most operating systems, you can simply
double-click the le to open it, and then choose Extract or Unzip to retrieve the contents.
After you’ve decompressed the archive, you’ll end up with two separate les. e le ending in
sha1 is a hash, which can be used to verify that the download hasn’t been corrupted in transit.
e le ending in img contains an exact copy of an SD card set up by the distribution’s creators in
a way that the Raspberry Pi understands. is is the le that needs to be ashed to the SD card.
WARNING
During the following, you’ll be using a software utility called dd. Used incorrectly dd will
happily write the image to your main hard drive, erasing your operating system and all your
stored data. Make sure you read the instructions in each section thoroughly and note the
device address of your SD card carefully. Read twice, write once!
Flashing from Linux
If your current PC is running a variant of Linux already, you can use the dd command to write the
contents of the image le out to the SD card. is is a text-interface program operated from the
command prompt, known as a terminal in Linux parlance. Follow these steps to ash the SD card:
1. Open a terminal from your distribution’s applications menu.
2. Plug your blank SD card into a card reader connected to the PC.
3. Type sudo fdisk -l to see a list of disks. Find the SD card by its size, and note the device
address (/dev/sdX, where X is a letter identifying the storage device. Some systems with
integrated SD card readers may use the alternative format /dev/mmcblkX—if this is the
case, remember to change the target in the following instructions accordingly).
4. Use cd to change to the directory with the .img le you extracted from the Zip archive.
5. Type sudo dd if=imagefilename.img of=/dev/sdX bs=2M to write the le
imagefilename.img to the SD card connected to the device address from step 3.
Replace imagefilename.img with the actual name of the le extracted from the Zip
archive. is step takes a while, so be patient! During ashing, nothing will be shown
on the screen until the process is fully complete (see Figure 1-5).
Page 33

CHAPTER 1 MEET THE RASPBERRY PI
21
F -:
Flashing the SD
card using the
dd command
in Linux
Flashing from OS X
If your current PC is a Mac running Apple OS X, you’ll be pleased to hear that things are as
simple as with Linux. anks to a similar ancestry, OS X and Linux both contain the dd utility, which you can use to ash the system image to your blank SD card as follows:
1. Select Utilities from the Application menu, and then click on the Terminal application.
2. Plug your blank SD card into a card reader connected to the Mac.
3. Type diskutil list to see a list of disks. Find the SD card by its size, and note the
device address (/dev/diskX, where X is a letter identifying the storage device).
4. If the SD card has been automatically mounted and is displayed on the desktop, type
diskutil unmountdisk /dev/diskX to unmount it before proceeding.
5. Use cd to change to the directory with the .img le you extracted from the Zip archive.
6. Type dd if=imagefilename.img of=/dev/diskX bs=2M to write the le
imagefilename.img to the SD card connected to the device address from step 3.
Replace imagefilename.img with the actual name of the le extracted from the Zip
archive. is step takes a while, so be patient!
Flashing from Windows
If your current PC is running Windows, things are slightly trickier than with Linux or OS X.
Windows does not have a utility like dd, so some third-party software is required to get the
Page 34

22
RASPBERRY PI USER GUIDE
image le ashed onto the SD card. Although it’s possible to install a Windows-compatible
version of dd, there is an easier way: the Image Writer for Windows. Designed specically for
creating USB or SD card images of Linux distributions, it features a simple graphical user
interface that makes the creation of a Raspberry Pi SD card straightforward.
e latest version of Image Writer for Windows can be found at the ocial website:
https://launchpad.net/win32-image-writer. Follow these steps to download,
install and use the Image Writer for Windows software to prepare the SD card for the Pi:
1. Download the binary (not source) Image Writer for Windows Zip le, and extract it to a
folder on your computer.
2. Plug your blank SD card into a card reader connected to the PC.
3. Double-click the Win32DiskImager.exe le to open the program, and click the blue
folder icon to open a le browse dialogue box.
4. Browse to the imagefilename.img le you extracted from the distribution archive,
replacing imagefilename.img with the actual name of the le extracted from the
Zip archive, and then click the Open button.
WARNING
5. Select the drive letter corresponding to the SD card from the Device drop-down dia-
logue box. If you’re unsure which drive letter to choose, open My Computer or
Windows Explorer to check.
6. Click the Write button to ash the image le to the SD card. is process takes a while,
so be patient!
No matter which operating system you’re writing from, it’s important to ensure you leave the
SD card connected until the image has been completely written. If you don’t, you may find
that Pi doesn’t boot when the SD card is connected. If this happens, start the process again.
When the image has been flashed onto the SD card, remove it from the computer and insert it into
the Raspberry Pi’s SD card slot, located underneath the circuit board. The SD card should be inserted
with the label facing away from the board and pushed fully home to ensure a good connection.
Connecting External Storage
While the Raspberry Pi uses an SD card for its main storage device—known as a boot device—
you may nd that you run into space limitations quite quickly. Although large SD cards holding 32 GB, 64 GB or more are available, they are often prohibitively expensive.
ankfully, there are devices that provide an additional hard drive to any computer when connected via a USB cable. Known as USB Mass Storage (UMS) devices, these can be physical hard
drives, solid-state drives (SSDs) or even portable pocket-sized ash drives (see Figure 1-6).
Page 35

CHAPTER 1 MEET THE RASPBERRY PI
e majority of USB Mass Storage devices can be read by the Pi, whether or not they have
existing content. In order for the Pi to be able to access these devices, their drives must be
mounted—a process you will learn in Chapter 2, “Linux System Administration”. For now, it’s
enough to connect the drives to the Pi in readiness.
23
F -:
Two USB Mass
Storage devices:
a pen drive and
an external hard
drive
Connecting the Network
While the majority of these setup instructions are equally applicable to both the Raspberry Pi
Model A and the Model B, networking is a special exception. To keep the component count—
and therefore the cost—as low as possible, the Model A doesn’t feature any onboard networking. ankfully, that doesn’t mean you can’t network the Model A; only that you’ll need
some additional equipment to do so.
Networking the Model A
To give the Model A the same networking capabilities as its more expensive Model B counterpart, you’ll need a USB-connected Ethernet adapter. This connects to a free USB port on
the Raspberry Pi or a connected hub and provides a wired Ethernet connection with an
RJ45 connector, the same as is available on the Model B.
A 10/100 USB Ethernet adapter—with the numbers referring to its two-speed mode, 10 Mb/s
and 100 Mb/s—can be purchased from online retailers for very little money. When buying an
Ethernet adapter, be sure to check that Linux is listed as a supported operating system. A few
models only work with Microsoft Windows, and are incompatible with the Raspberry Pi.
Don’t be tempted to go for a gigabit-class adapter, which will be referred to as a 10/100/1000
USB Ethernet adapter. Standard USB ports, as used on the Raspberry Pi, can’t cope with the
speed of a gigabit Ethernet connection, and you’ll see no benefit to the more expensive adapter.
Page 36

24
RASPBERRY PI USER GUIDE
Wired Networking
To get your Raspberry Pi on the network, you’ll need to connect an RJ45 Ethernet patch cable
between the Pi and a switch, router or hub. If you don’t have a router or hub, you can get your
desktop or laptop talking to the Pi by connecting the two directly together with a patch cable.
Usually, connecting two network clients together in this way requires a special cable, known
as a crossover cable. In a crossover cable, the receive and transmit pairs are swapped so that
the two devices are prevented from talking over each other—a task usually handled by a
network switch or hub.
e Raspberry Pi is cleverer than that, however. e RJ45 port on the side of the Pi (see
Figure 1-7) includes a feature known as auto-MDI, which allows it to recongure itself automatically. As a result, you can use any RJ45 cable—crossover or not—to connect the Pi to
the network, and it will adjust its conguration accordingly.
F -:
e Raspberry Pi
Model B’s
Ethernet port
If you do connect the Pi directly to a PC or laptop, you won’t be able to connect out onto the
Internet by default. To do so, you’ll need to congure your PC to bridge the wired Ethernet
Page 37

CHAPTER 1 MEET THE RASPBERRY PI
port and another (typically wireless) connection. Doing so is outside the scope of this book,
but if you are completely unable to connect the Pi to the Internet in any other way, you can
try searching your operating system’s help le for “bridge network” to nd more guidance.
With a cable connected, the Pi will automatically receive the details it needs to access the
Internet when it loads its operating system through the Dynamic Host Configuration Protocol
(DHCP). is assigns the Pi an Internet Protocol (IP) address on your network, and tells it the
gateway it needs to use to access the Internet (typically the IP address of your router or modem).
For some networks, there is no DHCP server to provide the Pi with an IP address. When connected to such a network, the Pi will need manual conguration. You’ll learn more about this
in Chapter 4, “Network Conguration”.
Wireless Networking
Current Raspberry Pi models don’t feature any form of wireless network capability onboard,
but—as with adding wired Ethernet to the Model A—it’s possible to add Wi-Fi support to
any Pi using a USB wireless adapter (see Figure 1-8).
25
Using such a device, the Pi can connect to a wide range of wireless networks, including those
running on the latest 802.11n high-speed standard. Before purchasing a USB wireless
adapter, check the following:
F -:
Two USB
wireless
adapters,
suitable for use
with the
Raspberry Pi
Page 38

26
RASPBERRY PI USER GUIDE
❍ Ensure that Linux is listed as a supported operating system. Some wireless adapters are
provided with drivers for Windows and OS X only, making them incompatible with the
Raspberry Pi. A list of Wi-Fi adapters known to work with the Raspberry Pi can be found
on the following website: http://elinux.org/RPi_VerifiedPeripherals#USB_
WiFi_Adapters
❍ Ensure that your Wi-Fi network type is supported by the USB wireless adapter. e
network type will be listed in the specications as a number followed by a letter. If your
network type is 802.11a, for example, an 802.11g wireless adapter won’t work.
❍ Check the frequencies supported by the card. Some wireless network standards, like
802.11a, support more than one frequency. If a USB wireless adapter is designed to
work on a 2.4GHz network, it won’t connect to a 5GHz network.
❍ Check the encryption type used by your wireless network. Most modern USB wireless
adapters support all forms of encryption, but if you’re buying a second-hand or older
model, you may nd it won’t connect to your network. Common encryption types
include the outdated WEP and more modern WPA and WPA2.
Conguration of the wireless connection is done within Linux, so for now it’s enough to
simply connect the adapter to the Pi (ideally through a powered USB hub.) You’ll learn how
to congure the connection in Chapter 4, “Network Conguration”.
Connecting Power
e Raspberry Pi is powered by the small micro-USB connector found on the lower left side of
the circuit board. is connector is the same as found on the majority of smartphones and
some tablet devices.
Many chargers designed for smartphones will work with the Raspberry Pi, but not all. e Pi
is more power-hungry than most micro-USB devices, and requires up to 700mA in order to
operate. Some chargers can only supply up to 500mA, causing intermittent problems in the
Pi’s operation (see Chapter 3, “Troubleshooting”).
Connecting the Pi to the USB port on a desktop or laptop computer is possible, but not recommended. As with smaller chargers, the USB ports on a computer can’t provide the power
required for the Pi to work properly.
Only connect the micro-USB power supply when you are ready to start using the Pi. With no
power button on the device, it will start working the instant power is connected and can only
be turned o again by physically removing the power cable.
Page 39

Chapter 2
Linux System Administration
Page 40

28
RASPBERRY PI USER GUIDE
THE MAJORITY OF modern Linux distributions are user-friendly, with a graphical user
interface (GUI) that provides an easy way to perform common tasks. It is, however, quite dif-
ferent to both Windows and OS X, so if you’re going to get the most out of your Raspberry Pi,
you’ll need a quick primer in using the operating system.
Linux: An Overview
As briey explained in Chapter 1, “Meet the Raspberry Pi”, Linux is an open-source project which
was originally founded to produce a kernel that would be free for anyone to use. e kernel is the
heart of an operating system, and handles the communication between the user and the hardware.
Although only the kernel itself is rightly called Linux, the term is often used to refer to a collection of dierent open-source projects from a variety of companies. ese collections come
together to form dierent flavours of Linux, known as distributions.
e original version of Linux was combined with a collection of tools created by a group called
GNU. e resulting system, known as GNU/Linux, was basic but powerful. Unlike other operating
systems of the era, it oered facilities like multiple user accounts where several users can share a
single computer. at’s something rival closed-source operating systems have taken on board,
with both Windows and OS X now supporting multiple user accounts on the same system. It’s
also still present in Linux, and provides security and protection for the operating system.
In Linux, you’ll spend most of your time running a restricted user account. is doesn’t mean
you’re being limited in what you can do. Instead, it prevents you from accidentally doing something that will break the software on your Raspberry Pi. It also prevents viruses and other mal-
ware from infecting the system by locking down access to critical system les and directories.
Before you can get started, it’s worth becoming familiar with some of the terms and concepts
used in the world of Linux, as dened in Table 2-1. Even if you’re experienced with other operating systems, it’s a good idea to review this table before booting up your Pi for the rst time.
The Terminal and the GUI
As in OS X and Windows, there are typically two main ways to achieve a given goal in Linux:
through the graphical user interface (GUI) and through the command line (known in Linux
parlance as the console or the terminal).
The appearance of various Linux distributions can be quite different, depending on the desktop environment in use. In this book, the recommended Debian distribution is used, but
most of the commands you will be learning are entered at the terminal and are typically the
same across all distributions.
Where other distributions differ, you will be given alternative methods of achieving the same goals.
Page 41

CHAPTER 2 LINUX SYSTEM ADMINISTRATION
Table 2.1 The Quick Linux Glossary
Term/Concept Denition
Bash e most popular shell choice, used in the majority of Linux distributions.
Bootloader Software responsible for loading the Linux kernel. e most common is GRUB.
Console A version of the terminal which is always available, and the rst thing you see
on the Pi.
Desktop
environment
Directory e Linux term for what Windows calls folders, where les are stored.
Distribution A particular version of Linux. Fedora Remix, Arch and Debian are distributions.
Executable A le that can be run as a program. Linux les must be marked executable in
EXT2/3/4 e EXTended le system, the most common format used in Linux.
File system e way a hard drive or other storage device is formatted so it’s ready for le
GNOME One of the most common Linux desktop environments around.
GNU A free software project, which provides many of the tools used in Linux
GRUB e GRand Unied Bootloader, created by GNU and used to load the Linux
GUI A graphical user interface, in which the user operates the computer via a mouse
KDE Another extremely popular Linux desktop environment.
Linux Properly, the kernel used by GNU/Linux. Popularly, an open-source operating
Live CD A Linux distribution provided as a CD or DVD, which doesn’t require installation.
Package A collection of les required to run an application, typically handled by the
Package manager A tool for keeping track of, and installing new, software.
Partition A section of a hard drive which is ready to have a le system applied to it for
Root e main user account in Linux, equivalent to the Windows administrator
Shell A text-based command prompt, loaded in a terminal.
sudo A program that allows restricted users to run a command as the root user.
Superuser See Root.
Terminal A text-based command prompt in which the user interacts with a shell program.
X11 e X Window system, a package that provides a graphical user interface (GUI).
Software to make the GUI look pretty. GNOME and KDE are popular desktop
environments.
order to run.
storage.
distributions.
kernel.
or touch.
system.
package manager.
storage.
account.
29
Page 42

30
RASPBERRY PI USER GUIDE
Linux Basics
Although there are hundreds of dierent Linux distributions available, they all share a common set of tools. ese tools, which are operated via the terminal, are analogous to similar
tools on Windows and OS X. To get started, you’ll need to learn the following commands:
❍ ls—Short for listing, ls provides a list of the contents of the current directory.
Alternatively, it can be called with an argument of the directory to be listed. As an
example, typing ls /home will provide a list of the contents of /home, regardless of
your current directory. e Windows equivalent is dir.
❍ cd—An initialism of change directory, cd allows you to navigate your way through the le
system. Typing cd on its own puts you back in your home directory. Typing the command
along with the name of the directory you wish to move to, by contrast, switches to that
directory. Note that directories can be absolute or relative: cd boot will move you to
the directory called boot under your current directory, but cd /boot will move you
straight to the /boot directory wherever you are.
❍ mv—e move command has two purposes in Linux: it allows a le to be moved from
one directory to another, and it also allows les to be renamed. at latter feature may
seem out of place, but in Linux terms, the le is being moved from one name to
another. e command is called as mv oldfile newfile.
❍ rm—Short for remove, rm deletes les. Any le—or list of les—provided after the
command name will be deleted. e Windows equivalent is del, and the two share a
common requirement that care should be taken to ensure the right le is deleted.
❍ rmdir—By itself, rm cannot usually remove directories. As a result, rmdir is provided
to delete directories once they have been emptied of les by rm.
❍ mkdir—e opposite of rmdir, the mkdir command creates new directories. For
example, typing mkdir myfolder at the terminal will create a new directory called
myfolder under the current working directory. As with cd, directories provided to
the command can be relative or absolute.
Introducing Debian
Debian is one of the oldest Linux distributions around, and a great choice for the Raspberry Pi
thanks to its lightweight nature. is is why the Raspberry Pi Foundation has chosen it to be
the recommended software for newcomers, and the one used for the examples in this book.
To keep the download size to a minimum, the Raspberry Pi image for Debian includes only a
subset of the software you’d nd on a regular desktop version. ese include tools for browsing the web, programming in Python, and using the Pi with a GUI. Additional software can
be quickly installed though the use of the distribution’s package manager apt.
Page 43

CHAPTER 2 LINUX SYSTEM ADMINISTRATION
e Raspberry Pi build of Debian includes a desktop environment known as the Lightweight
X11 Desktop Environment (LXDE). Designed to oer an attractive user interface using the X
Window System software, LXDE provides a familiar point-and-click interface which will be
immediately accessible to anyone who has used Windows, OS X or other GUI-based operating systems in the past.
31
The GUI doesn’t load by default in most Raspberry Pi distributions. To quickly load it and leave
the text-based console behind, log in, type startx and then press the Enter key.
If you’re using the recommended Debian distribution, you’ll nd that you have plenty of
preinstalled software to get started. While hardly an exhaustive example of the software
available for the Pi, which numbers in the thousands of packages, it’s a good introduction to
precisely what the system can do.
e software provided with the Debian distribution is split into themed categories. To view
these categories, you can left-click the menu icon, located on the bottom-left of the screen in
LXDE (see Figure 2-1).
TIP
F -:
e LXDE
desktop, as
loaded on the
Debian
Raspberry Pi
distribution
e following lists describe the software packages, grouped by category.
Page 44

32
RASPBERRY PI USER GUIDE
Accessories
❍ Debian Reference—A built-in reference guide, this provides a detailed explanation of
the Debian Linux distribution and how programmers can contribute to its development.
❍ File Manager—e PCManFM le manager provides a graphical browser for les
stored on the Pi or any connected storage device.
❍ Image Viewer—e GPicView lets you view images, such as those from a digital cam-
era or on a connected storage device.
❍ Leafpad—is is a simple text editor, which is useful for making quick notes or writ-
ing simple programs.
❍ LXTerminal—is LXDE terminal package allows you to use the Linux command line
in a window without leaving the graphical user interface.
❍ Root Terminal—Similar to LXTerminal, the Root Terminal automatically logs you in
as the root super-user account in order to carry out system maintenance tasks unavailable to a regular user account.
❍ Xarchiver—If you need to create or extract compressed les, such as ZIP archives,
this is the tool for the job.
Education
❍ Scratch—A graphical programming language aimed at young children. You’ll learn
more about Scratch and its capabilities in Chapter 10, “An Introduction to Scratch”.
❍ Squeak—e platform on which Scratch runs. You will rarely need to use this menu
entry, and should instead use the Scratch entry above.
Internet
❍ Midori—A fast yet lightweight web browser, Midori is equivalent to Internet Explorer
in Windows or to Safari on OS X.
❍ Midori Private Browsing—Clicking on this menu entry loads the Midori web browser
in private mode, meaning that sites you visit aren’t saved into the browser’s history.
❍ NetSurf Web Browser—An alternative to Midori, NetSurf can perform better on cer-
tain types of web page. Trying both will allow you to experiment and nd the one
which works best for you.
Programming
❍ IDLE—An integrated development environment (IDE) written specically for Python.
You’ll learn more about using IDLE to write your own Python programs in Chapter 11,
“An Introduction to Python”.
Page 45

CHAPTER 2 LINUX SYSTEM ADMINISTRATION
❍ IDLE 3—Clicking this entry loads IDLE congured to use the newer Python 3 pro-
gramming language, rather than the default Python 2.7 language. Both are largely
compatible with each other, but some programs may require features of Python 3.
❍ Scratch—is shortcut opens the Scratch educational language, and is the same as the
Scratch entry found in the Education category. Either can be used to start the program.
❍ Squeak—As with Scratch, this is a duplicate of the shortcut found in the Education cate-
gory. You will rarely want to click this directly, and should instead use the Scratch shortcut.
Sound & Video
❍ Music Player—LXMusic is a simple and lightweight interface to the XMMS2 music
playback software, allowing you to listen to music les while you work on the Pi.
System Tools
❍ Task Manager—A tool for checking the amount of free memory available on the Pi,
the current workload of the processor, and for closing programs which have crashed or
are otherwise unresponsive.
33
Preferences
❍ Customise Look and Feel—A toolkit for adjusting the appearance of the GUI, includ-
ing the style and colour of windows.
❍ Desktop Session Settings—A tool for changing how the system works when the user
is logged in, including what programs are automatically loaded and which window
manager—the software that draws the borders and title bars of windows—is used.
❍ Keyboard and Mouse—A tool for adjusting input devices. If your keyboard is typing
the wrong characters for certain keys, or your mouse is too sensitive, the settings can
be altered here.
❍ Monitor Settings—e resolution that the monitor or TV connected to the Pi runs at
can be altered here, although advanced changes require modication of conguration
les. You’ll learn about this in Chapter 6, “Conguring the Raspberry Pi”.
❍ Openbox Conguration Manager—e LXDE GUI uses a desktop environment
called Openbox, which can be adjusted here. Using thist tool, you can apply new themes
to change the GUI’s appearance, or alter how certain aspects of the interface operate.
❍ Preferred Applications—A tool for changing which applications are opened for par-
ticular le types. If you choose to use an alternative web browser, the system default
can be changed here.
Page 46

34
RASPBERRY PI USER GUIDE
Finding Help
Linux is designed to be as user-friendly as possible to new users, even at the terminal command prompt. Although you’ll learn the most common ways to use each command in this
chapter, not every option will be covered—to do so would require a much larger book.
If you find yourself stuck, or if you want to learn more about any of the tools that are discussed in the following pages, there’s a command you should learn: man.
Each Linux application comes with a help file, known as a man page—short for “manual
page”. It provides background on the software as well as details on what its options do and
how to use them.
To access the man page for a given tool, just type man followed by the command name. To
see the man page for ls, a tool for listing the contents of directories, just type man ls.
Using External Storage Devices
e Pi’s SD card, which stores all the various Pi les and directories, isn’t very big. e largest
available SD card at the time of writing is 64 GB, which is tiny compared to the 3,000 GB (3
TB) available from the largest full-size desktop hard drives.
If you’re using your Pi to play back video les (see Chapter 7, “e Pi as a Home eatre PC”)
you’ll likely need more storage than you can get from an SD card. As you learned in Chapter
1, “Meet the Raspberry Pi”, it’s possible to connect USB Mass Storage (UMS) devices to the Pi
in order to gain access to more storage space.
Before these external devices are accessible, however, the operating system needs to know
about them. In Linux, this process is known as mounting. If you’re running a version of Linux
with a desktop environment loaded—like the recommended Debian distribution’s LXDE,
loaded from the console with the startx command—this process is automatic. Simply connect the device to a free USB port on the Pi or a USB hub, and the device and its contents will
be immediately accessible (see Figure 2-2).
Page 47

CHAPTER 2 LINUX SYSTEM ADMINISTRATION
35
F -:
LXDE
automatically
mounting a USB
mass storage
device
From the console, things are only slightly more dicult. To make a device accessible to Linux
when the desktop environment isn’t loaded, follow these steps:
1. Connect the USB storage device to the Pi, either directly or through a connected USB hub.
2. Type sudo fdisk -l to get a list of drives connected to the Pi, and nd the USB stor-
age device by size. Note the device name: /dev/sdXN, where X is the drive letter and N is
the partition number. If it is the only device connected to the Pi, this will be /dev/sda1.
3. Before the USB storage device is accessible, Linux needs a mount point for it. Create
this by typing sudo mkdir /media/externaldrive.
4. Currently, the device is only accessible to the root user. To make it accessible to all
users, type the following as a single line:
sudo chgrp -R users /media/externaldrive && Æ
sudo chmod -R g+w /media/externaldrive
5. Mount the USB storage device with sudo mount /dev/sdXN /media/externaldrive
-o=rw to gain access to the device and its contents.
Page 48

36
RASPBERRY PI USER GUIDE
Creating a New User Account
Unlike Windows and OS X, which are largely designed for use by a single individual, Linux is
at heart a social operating system designed to accommodate numerous users. By default,
Debian is congured with two user accounts: pi, which is the normal user account, and root,
which is a superuser account with additional permissions.
TIP
Don’t be tempted to log in as root all the time. Using a nonprivileged user account, you’re
protected against accidentally wrecking your operating system and from the ravages of viruses
and other malware downloaded from the Internet.
While it’s certainly possible for you to use the pi account, it’s better if you create your own
dedicated user account. Further accounts can also be created, for any friends or family members who might want to use the Pi.
Creating a new account on the Pi is straightforward, and the same on all distributions, except
for the username and password used to log on to the Pi initially. Just follow these steps:
1. Log in to the Pi using the existing user account (user name pi and password rasp-
berry if you’re using the recommended Debian distribution).
2. Type the following as a single line:
sudo useradd -m -G adm,dialout,cdrom,audio,plugdev,users, Æ
lpadmin,sambashare,vchiq,powerdev username
is creates a new, blank user account. Note that the command should be typed as a
single line, with no spaces after the commas.
3. To set a password on the new account, type sudo passwd username followed by
the new password when prompted.
To explain what just happened: the command sudo tells the operating system that the command
you’re typing should be run as if you were logged in as the root account. e useradd command
says you want to create a new user account. e -m section—known as a flag or an option—tells
the useradd program to create a home directory where the new user can store his or her les.
e big list following the -G ag is the list of groups of which the user should be a member.
Page 49

CHAPTER 2 LINUX SYSTEM ADMINISTRATION
Users and Groups
In Linux, each user has three main attributes: their User ID (UID), their Group ID (GID) and a
list of supplementary group memberships. A user can be a member of as many groups as
he or she pleases, although only one of these can be the user’s primary group. This is usually a self-named group matching the user name.
Group membership is important. While users can be granted direct access to files and
devices on the system, it’s more common for a user to receive access to these via group
membership. The group audio, for example, grants all members the ability to access the
Pi’s sound playback hardware. Without that membership, the user won’t be listening to any
music.
To see a user’s group memberships, type groups username at the terminal. If you use
this on the default user pi, you’ll see the list of groups any new member should join to make
use of the Pi. This is where the information used in step 2 of the preceding procedure was
found.
37
File System Layout
e content of the SD card is known as its file system, and is split into multiple sections each
with a particular purpose. Although it’s not necessary for you to understand what each section does in order to use the Raspberry Pi, it can be helpful background knowledge should
anything go wrong.
Logical Layout
e way Linux deals with drives, les, folders and devices is somewhat dierent to other
operating systems. Instead of having multiple drives labelled with a letter, everything appears
as a branch beneath what is known as the root file system.
If you log in to the Pi and type ls / you’ll see various directories displayed (see Figure 2-3).
Some of these are areas of the SD card for storing les, while others are virtual directories for
accessing dierent portions of the operating system or hardware.
Page 50

38
RASPBERRY PI USER GUIDE
F -:
A directory
listing for the
Pi’s root le
system
e directories visible on the default Debian distribution are as follows:
❍ boot—is contains the Linux kernel and other packages needed to start the Pi.
❍ bin—Operating system-related binary les, like those required to run the GUI, are
stored here.
❍ dev—is is a virtual directory, which doesn’t actually exist on the SD card. All the
devices connected to the system—including storage devices, the sound card and the
HDMI port—can be accessed from here.
❍ etc—is stores miscellaneous conguration les, including the list of users and their
encrypted passwords.
❍ home—Each user gets a subdirectory beneath this directory to store all their personal
les.
❍ lib—is is a storage space for libraries, which are shared bits of code required by
numerous dierent applications.
❍ lost+found—is is a special directory where file fragments are stored if the system
crashes.
www.allitebooks.com
Page 51

CHAPTER 2 LINUX SYSTEM ADMINISTRATION
❍ media—is is a special directory for removable storage devices, like USB memory
sticks or external CD drives.
❍ mnt—is folder is used to manually mount storage devices, such as external hard
drives.
❍ opt—is stores optional software that is not part of the operating system itself. If
you install new software to your Pi, it will usually go here.
❍ proc—is is another virtual directory, containing information about running pro-
grams which are known in Linux as processes.
❍ selinux—Files related to Security Enhanced Linux, a suite of security utilities originally
developed by the US National Security Agency.
❍ sbin—is stores special binary les, primarily used by the root (superuser) account
for system maintenance.
❍ sys—is directory is where special operating system les are stored.
❍ tmp—Temporary les are stored here automatically.
39
❍ usr—is directory provides storage for user-accessible programs.
❍ var—is is a virtual directory that programs use to store changing values or variables.
Physical Layout
Although the preceding list is how the le system appears to the Linux operating system, it’s
not how it’s laid out on the SD card itself. For the default Debian distribution, the SD card is
organised into two main sections, known as partitions because they split the device into different areas in much the same way as the chapters of this book help to organise its contents.
e rst partition on the disk is a small (75 MB) partition formatted as VFAT, the same partition format used by Microsoft Windows for removable drives. is is mounted, or made
accessible, by Linux in the /boot directory and contains all the les required to congure
the Raspberry Pi and to load Linux itself.
e second partition is far larger and formatted as EXT4, a native Linux le system designed
for high-speed access and data safety. is partition contains the main chunk of the distribution. All the programs, the desktop, the users’ les and any software that you install yourself
are stored here. is takes up the bulk of the SD card.
Page 52

40
RASPBERRY PI USER GUIDE
Installing and Uninstalling Software
e default software installed with the Debian distribution is enough to get you started, but
chances are you’re going to want to customise your Pi according to your own requirements.
Installing new software onto the Pi is simple. e Debian distribution includes a tool called
apt, which is a powerful package manager. Packages are what Linux calls a piece of software,
or a collection of dierent pieces of software designed to work together.
Although apt is designed to be operated from the command line, it’s very user-friendly and
easy to learn. ere are GUIs for apt, such as the popular Synaptic Package Manager, but
they often struggle to run on the Pi due to the lack of memory. As a result, we recommend
that software be installed at the terminal.
Other Distributions
Debian, and distributions based on Debian, typically use apt as the package manager. It’s
not the only tool out there, and other distributions make different choices. Fedora Remix,
for example, uses the pacman tool.
TIP
Pacman is no more difficult to use than apt, but its syntax (the way it expects you to phrase
instructions to install new software or remove existing software) is different. For instructions
on how to use pacman instead of apt, type man pacman at the Fedora Remix terminal.
Other distributions may use the yum package manager. If you’re trying a distribution that
uses yum, simply type man yum at the terminal for instructions.
A package manager’s job is to keep track of all the software installed on the system. It doesn’t
just install new software—it also keeps tabs on what is currently installed, allows old software to be removed and installs updates as they become available.
Package management is one of the areas where Linux diers greatly from operating systems
like Windows or OS X. Although it’s possible to manually download new software to install,
it’s far more common to use the built-in package management tools instead.
Before trying to install new software or upgrade existing software, you need to make sure
the apt cache is up to date. To do this, simply type the command sudo apt-get update.
Page 53

CHAPTER 2 LINUX SYSTEM ADMINISTRATION
Finding Software
e rst step to installing a new piece of software is to nd out what it’s called. e easiest
way to do this is to search the cache of available software packages. is cache is a list of all
the software available to install via apt, stored on Internet servers known as repositories.
e apt software includes a utility for managing this cache, called apt-cache. Using this
software, it’s possible to run a search on all the available software packages for a particular
word or phrase.
For example, to nd a game to play, you can type the following command:
apt-cache search game
at tells apt-cache to search its list of available software for anything which has the word
“game” in its title or description. For common search terms, you can end up with quite a list
(see Figure 2-4), so try to be as specic as you can.
41
F -:
e last few
results for an
apt-cache
“game” search
Page 54

42
RASPBERRY PI USER GUIDE
TIP
If your search term brings up too many different packages to see on a single screen display, you can
tell Linux that you want it to pause on each screenfull by piping the output of apt-cache through
a tool called less. Simply change the command to apt-cache search game | less and use
the cursor keys to scroll through the list. Press the letter Q on the keyboard to exit.
Installing Software
Once you know the name of the package you want to install, switch to the apt-get command in order to install it. Installing software is a privilege aorded only to the root user, as
it aects all users of the Pi. As a result, the commands will need to be prefaced with sudo to
tell the operating system that it should be run as the root user.
For example, to install the package thrust (a Linux version of a popular Commodore 64
game from days gone by), you would simply use the install command with apt-get as
follows:
sudo apt-get install thrust
Some packages rely on other packages in order to operate. A programming language may
depend on a compiler, a game engine on graphics les, or an audio player on codecs for playing back dierent formats. ese are known in Linux terms as dependencies.
Dependencies are one of the biggest reasons for using a package manager like apt rather
than installing software manually. If a package depends on other packages, apt will automatically nd them (see Figure 2-5) and prepare them for installation. If this happens, you’ll
be shown a prompt asking whether you want to continue. If you do, type the letter Y and
press the Enter key.
Page 55

CHAPTER 2 LINUX SYSTEM ADMINISTRATION
43
F -:
Apt listing the
dependencies
for the
OpenOce.org
package
Uninstalling Software
If you decide you no longer want a piece of software, apt-get also includes a remove command that cleanly uninstalls the package along with any dependencies which are no longer
required. When you’re using a smaller SD card with the Pi, the ability to try out software and
quickly remove it is extremely useful.
To remove thrust, simply open the terminal and type the following command:
sudo apt-get remove thrust
e remove command has a more powerful brother in the form of the purge command. Like
remove, the purge command gets rid of software you no longer require. Where remove
leaves the software’s conguration les intact, however, purge removes everything. If you’ve
got yourself into a mess customising a particular package and it no longer works, purge is the
command to use. For example, to purge thrust, you would just type this:
sudo apt-get purge thrust
Page 56

44
RASPBERRY PI USER GUIDE
Upgrading Software
In addition to installing and uninstalling packages, apt can be used to keep them up to date.
Upgrading a package through apt ensures that you’ve received the latest updates, bug xes
and security patches.
Before trying to upgrade a package, make sure the apt cache is as fresh as possible by running an update:
sudo apt-get update
When upgrading software, you have two choices: you can upgrade everything on the system
at once or upgrade individual programs. If you just want to keep your distribution updated,
the former is achieved by typing the following:
sudo apt-get upgrade
To upgrade an individual package, simply tell apt to install it again. For example, to install a
thrust upgrade, you would type this:
TIP
sudo apt-get install thrust
If the package is already installed, apt will treat it as an in-place upgrade. If you’re already
running the latest version available, apt will simply tell you it cannot upgrade the software
and exit.
For more information on package management with apt—in particular, how certain packages
can be “kept back” and excluded from upgrades—type man apt at the terminal.
Page 57

Chapter 3
Troubleshooting
Page 58

46
RASPBERRY PI USER GUIDE
SOMETIMES, THINGS DON’T go entirely smoothly. e more complex the device, the
more complex the problems that can occur—and the Pi is an extremely complex device
indeed.
ankfully, many of the most common problems are straightforward to diagnose and x. In
this chapter, we’ll look at some of the most common reasons for the Pi to misbehave and
how to x them.
Keyboard and Mouse Diagnostics
Perhaps the most common problem that users experience with the Raspberry Pi is when the
keyboard repeats certain characters. For example, if the command startx appears onscreen
as sttttttttttartxxxxxxxxxxxx, it will, understandably, fail to work when the Enter
key is pressed.
ere are typically two reasons why a USB keyboard fails to operate correctly when connected to the Raspberry Pi: it’s drawing too much power, or its internal chipset is conicting
with the USB circuitry on the Pi.
Check the documentation for your keyboard, or the label on its underside, to see if it has a
power rating given in milliamps (mA). is is how much power the keyboard attempts to draw
from the USB port when it’s in use.
e Pi’s USB ports have a component called a polyfuse connected to them, which protects the
Pi in the event that a device attempts to draw too much power. When this polyfuse is tripped,
it causes the USB port to shut o, at around 150 mA. If your keyboard draws anywhere
around that much power, it may operate strangely—or not at all. is can be a problem for
keyboards that have built-in LED lighting, which require far more power to operate than a
standard keyboard.
If you nd that your USB keyboard may be drawing too much power, try connecting it to a
powered USB hub instead of directly to the Pi. is will allow the keyboard to draw its power
from the hub’s power supply unit, instead of from the Pi itself. Alternatively, swap the keyboard out for a model with lower power demands. e repeating-letter problem may also be
traced to an inadequate power supply for the Pi itself, which is addressed in the next section,
“Power Diagnostics”.
e issue of compatibility, sadly, is harder to diagnose. While the overwhelming majority of
keyboards work just ne with the Pi, a small number exhibit strange symptoms. ese range
from intermittent response, the repeating-letter syndrome or even crashes that prevent the
Page 59

CHAPTER 3 TROUBLESHOOTING
Pi from operating. Sometimes, these issues don’t appear until other USB devices are connected to the Pi. If your keyboard was working ne until another USB device, in particular a
USB wireless adapter, was connected, you may have an issue of incompatibility.
If possible, try swapping the keyboard out for another model. If the new keyboard works,
your old one may be incompatible with the Pi. For a list of known-incompatible keyboards,
visit the eLinux wiki: http://elinux.org/RPi_VerifiedPeripherals#Problem_
USB_Keyboards
e same advice on checking compatibility in advance applies to problems with the mouse: the
majority of USB mice and trackballs work ne, but some exhibit incompatibility with the Pi’s
own USB circuitry. is usually results in symptoms like a jerky or unresponsive mouse pointer,
but it can sometimes lead to the Pi failing to load or crashing at random intervals. If you’re
looking to buy a new mouse, an up-to-date list of models known to work with the Pi is available
at the eLinux wiki site: http://elinux.org/RPi_VerifiedPeripherals#Working_
USB_Mouse_Devices
47
Power Diagnostics
Many problems with the Raspberry Pi can be traced to an inadequate power supply. e
Model A requires a 5 V supply capable of providing a 500 mA current, while the Model B’s
extra components bump up the current requirement to 700 mA. Not all USB power adapters
are designed to oer this much power, even if their labelling claims otherwise.
The formal USB standard states that devices should draw no more than 500 mA, with even
that level of power only available to the device following a process called negotiation. Because
the Pi doesn’t negotiate for power, it’s unlikely that it will work if you connect it to the USB
ports on a desktop or laptop computer.
If you’re having intermittent problems with your Pi—particularly if it works until you connect something to a USB port or start a processor-intensive operation like playing video—
the chances are that the power supply in use is inadequate. e Pi provides a relatively easy
way to check if this is the case in the form of two voltage test points.
To use the voltage test points, you’ll need a voltmeter or multimeter with direct current (DC)
voltage measuring capabilities. If your meter has multiple inputs for dierent voltages, use
an appropriate setting.
TIP
Page 60

48
RASPBERRY PI USER GUIDE
WARNING
F -:
e two voltage
test points,
labelled TP1
and TP2
Avoid touching the test probes to anything not labelled as a test point. It’s possible to bridge
the 5 V supply that comes in to the Pi to the internal 3.3 V supply, creating a short circuit which
can damage the device. Be especially careful around exposed header pins.
e two test points are small, copper-clad holes known as vias, which are connected to the
Pi’s 5 V and ground circuits. Put the positive (red) meter probe on TP1, located to the left of
the board just above a small black component called a regulator labelled RG2. Connect the
black (negative) meter probe to TP2, located between the copper GPIO pins and the yellowand-silver RCA phono connector at the top-left of the board (see Figure 3-1).
Page 61

CHAPTER 3 TROUBLESHOOTING
e reading on the voltmeter should be somewhere between 4.8 V and 5 V. If it’s lower than
4.8 V, this indicates that the Pi is not being provided with enough power. Try swapping the
USB adapter for a dierent model, and check that the label says it can supply 700 mA or
more. A model rated at 1A is recommended, but beware of cheap models—they sometimes
have inaccurate labelling, and fail to supply the promised current. Genuine branded mobile
phone chargers rarely have this problem, but cheap unbranded devices—often sold as
compatible adapters—should be avoided
If your voltmeter reads a negative number, don’t worry: this just means you’ve got the positive and negative probes in the wrong place. Either swap them around or just ignore the
negative sign when noting your reading.
Display Diagnostics
Although the Pi is designed to work with almost any HDMI, DVI or composite video display
device, it simply may not work as expected when you plug it in. For example, you may nd
that your picture is shifted to the side or not fully displayed, or is only visible as a postagestamp-sized cut-out in the middle of the screen or in black-and-white—or even missing
entirely.
49
First, check the type of device to which the Pi is connected. is is especially important when
you’re using the composite RCA connection to plug the Pi into a TV. Dierent countries use
dierent standards for TV video, meaning that a Pi congured for one country may not work
in another. is is the usual explanation for a Pi showing black-and-white video. You’ll learn
how to adjust this setting in Chapter 6, “Conguring the Raspberry Pi”.
When you use the HDMI output, the display type is usually automatically detected. If you’re
using an HDMI to DVI adapter to plug the Pi into a computer monitor, however, this occasionally goes awry. Common symptoms include snow-like static, missing picture portions or
no display at all. To x this, note the resolution and refresh rate of your connected display,
and then jump to Chapter 6 to nd out how to set these manually.
Another issue is a too-large or too-small image, either missing portions at the edge of the
screen or sitting in the middle of a large black border. is is caused by a setting known as
overscan, which is used when the Pi is connected to TVs to avoid printing to portions of the
display which may be hidden under a bezel. As with other display-related settings, you will
learn how to adjust—or even completely disable—overscan in Chapter 6.
Page 62

50
RASPBERRY PI USER GUIDE
Boot Diagnostics
e most common cause for a Pi to fail to boot is a problem with the SD card. Unlike a desktop or laptop computer, the Pi relies on les stored on the SD card for everything. If Pi can’t
talk to the card, it won’t display anything on the screen or show any signs of life at all.
If your Pi’s power light glows when you connect the micro-USB power supply, but nothing
else happens and the OK light remains dark, you have an SD card problem. First, ensure that
the card works when you connect it to a PC, and that it shows the partitions and les
expected of a well-ashed card. (For more details, see Chapter 2, “Linux System
Administration”, particularly the section titled “File System Layout” in that chapter.)
If the card works on a PC but not in the Pi, it may be a compatibility problem. Some SD
cards—especially high-speed cards marked as Class 10 on their labelling—don’t operate correctly when connected to the Pi’s onboard SD card reader. A list of cards known to cause
compatibility problems with the Pi can be found on the eLinux wiki: http://elinux.
org/RPi_VerifiedPeripherals#Problem_SD_Cards
Sadly, if you have one of the cards on the list, you may need to replace it with a dierent card
in order for the Pi to work. As the Pi’s software base is developed, however, work is being carried out to ensure that a wider range of cards operate correctly with the Pi. Before giving up
on a high-speed card completely, check to see if an updated version of your chosen Linux
distribution is available. (See Chapter 1, “Meet the Raspberry Pi”, for more information
about distributions.)
Network Diagnostics
e most useful tool for diagnosing network problems is ifconfig. If you’re using a wireless network connection, jump to Chapter 4, “Network Conguration”, for information on a
similar tool for those devices. Otherwise, read on.
Designed to provide information on connected network ports, ifconfig is a powerful tool
for controlling and conguring the Pi’s network ports. For its most basic usage, simply type
the tool’s name in the terminal:
ifconfig
Called in this manner, ifconfig provides information on all the network ports it can nd
(see Figure 3-2). For the standard Raspberry Pi Model B, there are two ports: the physical
Ethernet port on the right side of the board, and a virtual loopback interface that allows programs on the Pi to talk to each other.
Page 63

CHAPTER 3 TROUBLESHOOTING
51
F -:
e output of
ifconfig
on a Raspberry
Pi Model B
e output of ifconfig is split into the following sections:
❍ Link encap—e type of encapsulation used by the network, which on the Model B will
either read Ethernet for the physical network port or Local Loopback for the virtual loopback adaptor.
❍ Hwaddr—e Media Access Control (MAC) address of the network interface, written in
hexadecimal. is is unique for every device on the network, and each Pi has its own
MAC address, which is set at the factory.
❍ inet addr—e internet protocol (IP) address of the network interface. is is how you
nd the Pi on the network if you’re using it to run a network-accessible service, such as
a web server or le server.
❍ Bcast—e broadcast address for the network to which the Pi is connected. Any trac
sent to this address will be received by every device on the network.
❍ Mask—e network mask, which controls the maximum size of the network to which
the Pi is connected. For most home users, this will read 255.255.255.0.
❍ MTU—e maximum transmission unit size, which is how big a single packet of data
can be before the system needs to split it into multiple packets.
Page 64

52
RASPBERRY PI USER GUIDE
❍ RX—is section provides feedback on the received network trac, including the
number of errors and dropped packets recorded. If you start to see errors appearing in
this section, there’s something wrong with the network.
❍ TX—is provides the same information as the RX section, but for transmitted pack-
ets. Again, any errors recorded here indicate a problem with the network.
❍ collisions—If two systems on the network try to talk at the same time, you get a colli-
sion which requires them to retransmit their packets. Small numbers of collisions
aren’t a problem, but a large number here indicates a network issue.
❍ txqueuelen—e length of the transmission queue, which will usually be set to 1000
and rarely needs changing.
❍ RX bytes, TX bytes—A summary of the amount of trac the network interface has
passed.
If you’re having problems with the network on the Pi, you should rst try to disable and then
re-enable the network interface. e easiest way to do this is with two tools called ifup and
ifdown.
If the network is up, but not working correctly—for example, if ifconfig doesn’t list anything in the inet addr section—start by disabling the network port. From the terminal,
type the following command:
sudo ifdown eth0
Once the network is disabled, make sure that the cable is inserted tightly at both ends, and
that whatever network device the Pi is connected to (hub, switch or router) is powered on
and working. en bring the interface back up again with the following command:
sudo ifup eth0
You can test the networking by using the ping command, which sends data to a remote
computer and waits for a response. If everything’s working, you should see the same response
as shown in Figure 3-3. If not, you may need to manually congure your network settings,
which you’ll learn how to do in Chapter 4, “Network Conguration”.
Page 65

CHAPTER 3 TROUBLESHOOTING
53
F -:
e result of a
successful test
of the network,
using the ping
command
The Emergency Kernel
e Linux kernel is the heart of the operating system that drives the Pi. It’s responsible for
everything from making sure that you can access your les to allowing programs to talk to
other programs.
When switched on, your Pi will load the normal, default kernel. ere’s also a second kernel
included in most distributions, which sits unused. is is the emergency kernel, and as the
name suggests, it is typically used only when the normal kernel isn’t working.
It’s highly unlikely that you’ll ever need to boot a Pi using the emergency kernel, but it’s
worth learning how to do so just in case. is is especially important if you’re upgrading your
kernel or are using a new and potentially poorly tested distribution. Sometimes, newlyreleased software can have bugs which aren’t spotted before its release. When encountering
strange errors after upgrading, the emergency kernel can be used to narrow down the problem to the new kernel version.
Page 66

54
RASPBERRY PI USER GUIDE
e Linux kernel is a single le located in the /boot directory called kernel.img. When
the Pi is rst switched on and begins to load the operating system, it looks for this le, and if
the le is missing, the Pi won’t work. e emergency kernel is a second le, again in the /
boot directory, called kernel_emergency.img.
e emergency kernel is, in most cases, almost identical to the standard kernel. When
changes are made to the standard kernel, to boost performance or add new features for
example, the emergency kernel is left unaltered. is way, if the changes to the standard
kernel cause stability problems, a user can simply tell the Pi to load the emergency kernel
instead.
ere are two ways to boot into the emergency kernel, and both require the use of a PC and
an SD card reader if the Pi can’t boot. Otherwise, the following can be carried out on the Pi
itself.
e easiest way to boot the emergency kernel is to rename the existing kernel.img le to
kernel.img.bak, and then rename the kernel_emergency.img le to kernel.img.
When the Pi loads, it will now load the emergency kernel by default. To go back to the standard kernel, simply reverse the process: rename kernel.img to kernel_emergency.img
and kernel.img.bak to kernel.img.
An alternative method to load the emergency kernel is to edit the cmdline.xt le (located
in the /boot directory) by adding the following entry at the end of the existing command
line:
kernel=kernel_emergency.img
is tells the Pi that it should load the kernel named kernel_emergency.img instead of
the usual kernel.img. Reversing the process is as simple as opening cmdline.txt again
and removing the entry.
You’ll learn more about cmdline.txt and how it aects the operation of the Raspberry Pi
in Chapter 6, “Conguring the Raspberry Pi”.
Page 67

Chapter 4
Network Configuration
Page 68

56
RASPBERRY PI USER GUIDE
FOR MOST USERS, conguring the Pi’s network is as easy as plugging a cable into the
Model B’s Ethernet port—or a USB Ethernet adapter in the case of the Model A. For others,
however, the network requires manual conguration.
If you know that your network doesn’t have a Dynamic Host Configuration Protocol (DHCP)
server—a system that tells the Pi and other devices on the network how they should connect—or if you want to use a USB wireless adapter with the Pi, read on.
Wired Networking
If the network still doesn’t work, you may need to congure it manually. Normally, the network in a home, school or oce has a DHCP server that tells the Pi and other devices on the
network how they should connect. Some networks, however, don’t have a DHCP server and
need to be set up manually.
e list of network interfaces, along with information about how they should be congured,
is stored in a le called interfaces located in the folder /etc/network. is is a le only
the root user can edit, because removing a network interface from this list will cause it to stop
working.
From the terminal, you can edit this le using a variety of dierent text editors. For simplicity, the nano text editor should be used for this process. Open the le for editing with the
following command:
sudo nano /etc/network/interfaces
Nano is a powerful yet lightweight text editor, with a simple user interface (see Figure 4-1).
You can move your cursor around the document with the arrow keys, save by holding down
the CTRL key and pressing O, and quit by holding down the CTRL key and pressing X.
e line you need to edit for manual conguration starts with iface eth0 inet. Delete
dhcp from the end of this line and replace it with static, press Enter to start a new line, and
then ll in the remaining details in the following format with a tab at the start of each line:
[Tab] address xxx.xxx.xxx.xxx
[Tab] netmask xxx.xxx.xxx.xxx
[Tab] gateway xxx.xxx.xxx.xxx
Make sure that you press the Tab key at the start of each line, and don’t actually type [Tab].
e x characters in the conguration lines represent network addresses you’ll need to enter.
For address, you should enter the static IP address that you want to assign to the Pi. For
Page 69

CHAPTER 4 NETWORK CONFIGURATION
netmask, you should enter the network mask—which controls the size of the connected
network—in what is known as dotted-quad format. If you’re using a home network, this is
typically 255.255.255.0. For gateway, you should enter the IP address of your router or
cable modem.
As an example, the settings for a common home network would look like this:
iface eth0 inet static
[Tab] address 192.168.0.10
[Tab] netmask 255.255.255.0
[Tab] gateway 192.168.0.254
57
F -:
Editing /etc/
network/
interfaces
with nano
When you’ve nished editing the le, press CTRL + O to save it, and then press CTRL + X to
leave nano and return to the terminal. To use your new network settings, restart the net-
working service by typing the following:
sudo /etc/init.d/networking restart
Page 70

58
RASPBERRY PI USER GUIDE
If you need to return to automatic settings via DHCP, you need to edit the interfaces le
again and delete the address, netmask and gateway settings. Replace static with dhcp
at the end of the iface line, and then restart the networking service again.
Setting a manual IP address isn’t quite enough to get your Pi connected to the outside world.
Computers on modern networks have both a numerical address identier known as an IP
address and a hostname or domain name. It’s this latter, friendly name which means you can
simply type www.raspberrypi.org into your browser, instead of trying to remember
93.93.128.176.
A system called a Domain Name Service (DNS) server is responsible for looking up the friendly
names you supply and converting them into the numbers required to access the system. It
operates much like an automated telephone directory. Before you’ll be able to access Internetconnected systems via their domain names, you’ll need to tell the Pi which DNS servers to use.
e list of DNS servers, known as nameservers in Linux parlance, is stored in /etc/resolv.
conf. When the system gets its details through DHCP, this le is automatically lled in.
When you set an address manually, you need to provide the addresses of the nameservers on
your network. Normally, this would be the address of your router as found in the gateway
line from the interfaces le (described earlier in this chapter).
To set the nameservers, open the le with nano by typing the following command at the
terminal:
sudo nano /etc/resolv.conf
Add each nameserver on a separate line, prefaced with nameserver and a space. As an
example, the resolv.conf conguration for a network which uses Google’s publicly-accessible
nameservers to resolve domain names would appear like this:
nameserver 8.8.8.8
nameserver 8.8.4.4
You’ll notice that the nameserver addresses need to be supplied as IP addresses, rather than
domain names. If you provided domain names instead, the Pi would enter an innite loop of
trying to nd a nameserver to ask how it can nd the nameservers.
Save the le by pressing CTRL + O, and then quit nano by pressing CTRL + X. Restart the
networking interface by typing the following:
sudo /etc/init.d/networking restart
Page 71

CHAPTER 4 NETWORK CONFIGURATION
en test the settings by either opening a web browser or using the following ping command (see Figure 4-2):
ping -c 1 www.raspberrypi.org
59
F -:
A successful test
of networking
on the
Raspberry Pi
Model B
Wireless Networking
Although no current models of the Raspberry Pi include Wi-Fi networking hardware onboard,
it’s possible to add wireless connectivity with a simple USB Wi-Fi adapter. However, you will
need to congure the adapter before you can use it to get your Pi online.
USB Wi-Fi adapters are very power-hungry. If you connect one directly to the Pi’s USB port,
the chances are it simply won’t work. Instead, connect a powered USB hub to the Pi, and then
insert the Wi-Fi adapter into that.
TIP
Page 72

60
RASPBERRY PI USER GUIDE
Before you start to set up the wireless interface, you’ll need to know the Service Set Identifier
(SSID)—also known as the network name—of the wireless router to which you want to con-
nect, along with the type of encryption in use and the password required. You’ll also need to
know what type of wireless network it is. A USB adapter designed for 802.11a Wi-Fi may not
connect to an 802.11g network, and vice versa.
In order for the USB wireless adapter to be addressed by the system, a software bundle
known as a firmware is required. While some distributions include a selection of the most
common Wi-Fi rmware installed by default, others do not. At present, to save space, most
distributions designed for the Raspberry Pi need the rmware les for a wireless card installing manually.
is, unfortunately, can lead to a Catch-22 situation: in order to download the rmware les,
the Pi must be connected to the Internet. If you can spare a wired port on your router or
gateway for a few minutes, that’s not a problem. However, if wireless is your only way of getting online, you’ll need to manually download the rmware installation package on a dierent computer, and then transfer it across to the Pi by either copying it to the Pi’s SD card or
connecting an external storage device such as a USB ash drive.
To nd the correct rmware le to download, you’ll need to know what type of wireless
adapter you have. Although various companies sell branded USB wireless adapters, the number of companies that actually manufacture the components is a lot smaller. Several dierent manufacturers may use the same type of chip inside their USB wireless adapters, making
them all compatible with the same rmware. As a result, the labelling on a device or its packaging is not enough to know which rmware you should install. Instead, you’ll need to connect the device to the Pi and check the kernel ring buffer for error messages. If you’ve already
connected the wireless adapter as instructed in Chapter 1, “Meet the Raspberry Pi”, you can
continue. If not, connect the adapter now.
e kernel ring buer is a special portion of memory used by the Linux kernel to store its
human-readable output. It’s an important part of the Linux operating system: the text
ashes by too quickly to read while the Pi boots, so it’s critical that users are able to view the
messages at a later date to read errors and diagnose problems.
With the adapter connected but no wireless rmware packages installed, the kernel will print
a series of error messages to the ring buer. To read these messages, you can use the dmesg
command to print the contents of the buer to the screen. At the terminal, or at the console
if you haven’t loaded the desktop environment, simply type the following command to view
the buer:
dmesg
Page 73

CHAPTER 4 NETWORK CONFIGURATION
is will print out the entire kernel ring buer, which will contain all messages output by the
kernel since the Pi was switched on. If the Pi has been running a while, that can be a lot of
text. To locate error message particular to the wireless adapter, it can help to send the output
of dmesg through a tool called grep. Using grep, you can search through the buer for text
relating to missing rmware. By piping the output of dmesg through grep with a search
term, things become signicantly clearer. Type the following at the terminal:
dmesg | grep ^usb
e | symbol is known as a pipe, and tells Linux to send the output of one program—which
would normally go to a le or the screen—to the input of another. Multiple programs can be
chained this way. In this example, grep is being told to search through the output of
dmesg—the screens full of text from the earlier command—for any use of the term usb at
the start of the line (denoted by the ^ character).
e exact output of that search will depend on the manufacturer of your USB wireless
adapter. In Figure 4-3, the output is shown with a Zyxel NWD2015 Wireless USB Adapter
connected to the Pi.
61
F -:
Searching the
kernel ring
buer for usb
with a Zyxel
wireless adapter
connected
Page 74

62
RASPBERRY PI USER GUIDE
e important part of this output is the line that reads Manufacturer. In the case of the
example Zyxel NWD2105, this reads Ralink, which is the company that makes the actual
chip found inside Zyxel USB wireless adapter. It’s this company’s rmware that must be
installed for the wireless adapter to work.
TIP
If you couldn’t find anything using usb as a search term, you can try the same command using
the search term firmware, wlan or wireless. If you still can’t see anything useful, type
lsusb for a list of all USB devices connected to the system.
Using the manufacturer name from dmesg, search for the rmware les using the apt-cache
search tool introduced earlier in this chapter. For the example Zyxel NWD2015 adapter, the
apt-cache command would be
apt-cache search ralink
If apt-cache fails to nd the rmware, you may need to make a guess based on the rmware packages in the following list. Don’t worry if you install the wrong one—any rmware
can be quickly uninstalled using apt-get remove, and having multiple rmware packages
does no harm. e following wireless rmware packages are available in the recommended
Debian distribution on the Raspberry Pi:
❍ atmel-rmware—For devices based on the Atmel AT76C50X chipset
❍ rmware-atheros—For devices based on Atheros chipsets
❍ rmware-brcm80211—For devices based on Broadcom chipsets
❍ rmware-intelwimax—For devices based on Intel’s WiMAX chipsets
❍ rmware-ipw2x00—For Intel Pro Wireless adapters (including 2100, 2200 and
2915)
❍ rmware-iwlwi—For other Intel wireless adapters (including 3945, 4965 and the
5000 series)
❍ rmware-ralink—For devices based on Ralink chipsets
❍ rmware-realtek—For devices based on Realtek chipsets
❍ zd1211-rmware—For devices based on the ZyDAS 1211 chipset
e rmware for the example Zyxel wireless adapter is provided by the firmware-ralink
package in this list. is package can be installed using apt-get, but only while the Pi is
Page 75

CHAPTER 4 NETWORK CONFIGURATION
connected to the Internet through its wired Ethernet port or a USB Ethernet adapter.
When connected, install the rmware by typing the following:
sudo apt-get install firmwarepackage
Replace firmwarepackage in this command with the name of the package that you found
by using apt-cache. For the example Zyxel NWD2105, the full command would be sudo
apt-get install firmware-ralink.
Installing Wireless Firmware Ofine
If you can’t connect the Pi to the Internet using any method other than a wireless connection, you’ll need to download the firmware on a different computer. In a web browser, load
a search engine and type the name of the firmware package followed by the name of the
distribution you’re using and its version.
If you’re using the recommend Debian distribution, the firmware for the Ralink RT2x00 chipset from the example can be found by searching for firmware-ralink debian wheezy.
The search will lead you to a package file to download. In the case of Debian, this is a .deb
file. For Fedora Remix, the same firmware is provided as a .rpm file.
63
Download this file, and then copy it to the Pi’s SD card in the /home/pi directory, or onto
a USB flash drive or other external storage device. Load the Pi, and then when it comes
time to install the firmware, replace the package name with the name of the file you downloaded. For the example Zyxel NWD2105 card, the command would be the following:
sudo apt-get install firmware-ralink_0.35_all.deb
With the rmware installed, disconnect the USB wireless adapter and reconnect it to the Pi.
is will restart the kernel’s search for the rmware les, which it will now be able to nd.
ese les will remain in place, and load automatically when the USB wireless adapter is connected. You will only have to perform the installation process once.
With the rmware installed, setting the wireless connection up should be straightforward.
First, check that the USB wireless adapter is working as it should by using the iwlist command to scan for nearby wireless access points. is list will probably be larger than a single
screen, so pipe the command’s output through less to pause after each screenful, like this:
sudo iwlist scan | less
Page 76

64
RASPBERRY PI USER GUIDE
is command will return a list of all the wireless networks reachable from the Pi and their
details (see Figure 4-4). If you receive an error message at this point—in particular, one that
claims the network or interface is down—check that you have installed the correct rmware,
and that the USB wireless adapter is connected to a powered USB hub.
F -:
Scanning
for wireless
networks with
iwlist
You can check the current status of the network using the iwconfig command. Like
ifconfig, the iwconfig command allows you to check the status of a network interface
and issue conguration commands. Unlike ifconfig, however, iwconfig is specically
designed for wireless networks and includes specic features for this. Type the command
name at the terminal as follows:
iwconfig
e output of iwconfig, as shown in Figure 4-5, is split into the following sections:
❍ Interface Name—Each device has its own interface name, as with wired networks. If
the interface is a wireless connection, additional details will be shown. e default
name for a Pi’s wireless connection is wlan0.
Page 77

CHAPTER 4 NETWORK CONFIGURATION
❍ Standard—e IEEE 802.11 wireless standards have a variety of dierent types, dis-
tinguished by a letter sux. is section lists the standards supported by the USB
wireless adapter. For the example adapter, this reads IEEE 802.11bgn for the network types it can address.
❍ ESSID—e SSID of the network to which the adapter is connected. If the adapter is
not currently connected to a network, this will read off/any.
❍ Mode—e mode that the adapter is currently operating in, which will be one of the
following:
Managed—A standard wireless network, with clients connecting to access
•
points. is is the mode used for almost all home and business networks.
Ad-Hoc—A device-to-device wireless network, with no access points.
•
Monitor—A special mode in which the card listens out for all trac whether or
•
not it is the addressee. is mode is typically used in network troubleshooting for
capturing wireless network trac.
Repeater—A special mode that forces a wireless card to forward trac on to
•
other network clients, to boost signal strength.
65
Secondary—A subset of the Repeater mode, which forces the wireless card to act
•
as a backup repeater.
❍ Access Point—e address of the access point to which the wireless adapter is cur-
rently connected. If the adapter isn’t connected to a wireless access point, this will read
Not-Associated.
❍ Tx-Power—e transmission power of the wireless adapter. e number displayed
here indicates the strength of the signal that the adapter is sending: the higher the
number, the stronger the signal.
❍ Retry—e current setting for the wireless adapter’s transmission retry, used on con-
gested networks. is does not normally need changing, and some cards won’t allow it
to be changed.
❍ RTS—e adapter’s current setting for Ready To Send and Clear To Send (RTS/CTS)
handshaking, used on busy networks to prevent collisions. is is normally set by the
access point on connection.
❍ Fragment—e maximum fragment size, used on busy networks to split packets up
into multiple fragments. is is normally set by the access point on connection.
❍ Power Management—e current status of the adapter’s power management function-
ality, which reduces the device’s power demands when the wireless network is idle. is has
little eect on the Pi, but is typically enabled for battery-powered devices like a laptop.
Page 78

66
RASPBERRY PI USER GUIDE
F -:
e output of
iwconfig
when not
connected to a
wireless network
To connect the Pi to a wireless network, you will need to add some lines into the /etc/net-
work/interfaces le. (For full details on how this le is laid out, see the “Wired
Networking” section earlier in this chapter.) First, open the le in the nano text editor:
sudo nano /etc/network/interfaces
At the bottom of the le, create a new entry for the USB wireless adapter that reads as follows (see Figure 4-6):
auto wlan0
iface wlan0 inet dhcp
wpa-conf /etc/wpa.conf
Page 79

CHAPTER 4 NETWORK CONFIGURATION
67
F -:
Editing the
interfaces
le for wireless
network access
Once the entry is in place, save the le by pressing CTRL + O and then quit nano with CTRL + X.
The device ID of wlan0 is correct if this is the first wireless device you’ve set up on your Pi. If
it isn’t, the number at the end will be different. Type iwconfig to see a current list of wireless
devices, and change the lines in the preceding code example accordingly.
e last line of the interfaces le makes reference to a conguration le, wpa.conf,
which does not yet exist. is le is used by a tool known as wpasupplicant, designed to
provide Linux with an easy way to connect to networks secured with Wireless Protected Access
(WPA) encryption.
Using wpasupplicant, you can connect the Pi to almost any wireless network—regardless
of whether it’s protected by WPA or its newer replacement WPA2—in both Advanced
Encryption Standard (AES) and Temporal Key Integrity Protocol (TKIP) modes. Despite its
name, wpasupplicant also allows connection to wireless networks using the older Wired
Equivalent Privacy (WEP) encryption standard.
TIP
Page 80

68
RASPBERRY PI USER GUIDE
e wpasupplicant program stores its conguration in a le called wpa.conf, located in
the /etc directory. To begin conguring the Pi for wireless access, rst open a new blank le
for editing by typing the following:
sudo nano /etc/wpa.conf
Enter the following two lines, which again, are the same for any wireless network type.
Replace Your_SSID with the SSID for the wireless network to which you want to connect,
and then nish the le with the lines that match your network’s encryption type.
network={
[Tab] ssid=”Your_SSID”
At this point in the conguration le, the details required dier depending on the type of
wireless network you are conguring. e following subsections provide instructions for
completing the conguration for unencrypted, WEP and WPA networks.
TIP
No Encryption
If your wireless network has no encryption in place, nish the wpa.conf le as follows:
[Tab] key_mgmt=NONE
}
Save the le with CTRL + O, and then exit nano with CTRL + X.
WEP Encryption
If your wireless network uses WEP encryption, nish the wpa.conf le as follows:
[Tab] key_mgmt=NONE
[Tab] wep_key0=”Your_WEP_Key”
}
Replace Your_WEP_Key with the ASCII key for your wireless network’s WEP encryption.
Save the le with CTRL + O, and then exit nano with CTRL + X.
WEP encryption is extremely insecure. Readily-available software can break the encryption on
a WEP-protected network in just a few minutes, allowing a third party to use your network. If
you’re still running WEP, consider switching to WPA or WPA2 for better security.
Page 81

CHAPTER 4 NETWORK CONFIGURATION
WPA/WPA2 Encryption
If your wireless network uses WPA or WPA2 encryption, nish the wpa.conf le as follows:
[Tab] key_mgmt=WPA-PSK
[Tab] psk=”Your_WPA_Key”
}
Replace Your_WPA_Key with the pass phrase for your wireless network’s encryption. Figure
4-7 shows an example conguration for a wireless network with the SSID “Private_
Router” and the WPA pass phrase “Private Wireless Network”. Save the le with
CTRL + O, and then exit nano with CTRL + X.
69
F -:
Editing the
wpa.conf
le for a WPAprotected
network
Connecting to the Wireless Network
e Pi’s wireless networking is now congured, and will begin the next time the Pi is
restarted. To start the wireless network without rebooting, type the following:
sudo ifup wlan0
Page 82

70
RASPBERRY PI USER GUIDE
To make sure that the network is operational, unplug the Pi’s Ethernet cable (if attached)
and type the following:
ping -c 1 www.raspberrypi.org
TIP
If you start having problems with your Pi following the installation of a USB wireless adapter, it
could be due to a conflict with other USB devices. Some adapter models are known to cause
problems with certain USB keyboards. For an up-to-date list of adapters that are known to be
good, as well as those that are known to cause conflicts, visit http://www.element14.
com/community/docs/DOC-44703/l/raspberry-pi-wifi-adapter-testing or the
eLinux wiki at http://elinux.org/RPi_VerifiedPeripherals#Working_USB_Wifi_
Adapters.
Page 83

Chapter 5
Partition Management
Page 84

72
RASPBERRY PI USER GUIDE
HAVING THE RASPBERRY PI’S operating system provided as an image of somebody
else’s SD card is convenient, but a little inexible. Most distribution images available for
download assume a 2 GB or 4 GB SD card, meaning that people with 8 GB or larger cards nd
much of their space wasted.
Creating a New Partition
One way to make the most of a large SD on the Raspberry Pi is to create a new partition in
the empty space at the end of the card. is partition can be used to store any large les that
you want your Pi to be able to access without having to use an external storage device.
All the tasks required for this can be carried out directly on the Pi, without having to remove
the SD card and connect it to a PC. All you need is an SD card ashed with one of the
Raspberry Pi Linux images (as described in Chapter 1, “Meet the Raspberry Pi”) and some
free space.
WARNING
When using tools that can modify the partitions on a disk, it’s important not to delete any
existing partitions. In particular, be careful not to delete the /boot or root file system partitions,
or the Pi will be unable to load.
Follow these steps to create a new partition on an SD card:
1. Open a terminal window, and type sudo fdisk -l to list the storage devices con-
nected to the Pi and their current partitions. e SD card will appear as /dev/
mmcblk0 with a series of partitions numbered p0, p1 and so on.
2. Load the cfdisk menu-based partition management tool by typing sudo cfdisk /
dev/mmcblk0. is will use the SD card as the target device. If you’re trying to create
a partition on a USB Mass Storage device, replace mmcblk0 with the device identier
for the storage device (for example, sda).
3. Using the cursor keys, move the partition selection highlight—which prints the cur-
rently selected partition in inverse video, typically black on white—down the partition
list to the section labelled Free Space at the bottom.
4. Again using the cursor keys, move the option selection highlight, located at the bottom
of the screen and displayed in inverse video, right to the New option and press Enter
(see Figure 5-1).
Page 85

CHAPTER 5 PARTITION MANAGEMENT
73
F -:
Creating a new
partition using
cfdisk
5. You will be prompted to create a Primary or Logical partition. e default is to create a
Primary partition, so just press Enter to accept this.
6. e next prompt will ask you how big the partition should be, in megabytes (MB). e
default is to create a partition that lls the entire available free space on the device, so
again, just press Enter.
7. Next, the new details—known as a partition table—need to be written to the disk. Use
the cursor keys to move the option selection highlight to Write and press Enter.
8. You will be prompted to make sure that the changes are correct. Double-check that
you’ve created the partition as instructed, and then type yes and press Enter.
9. Exit cfdisk by moving the option selection highlight at the bottom of the screen to
Quit with the cursor keys and then pressing Enter.
Although the partition table has now been updated with the freshly created partition, it
won’t be visible to the operating system until it has been reloaded. e easiest way to achieve
that is to restart the Pi by typing the following:
sudo reboot
Page 86

74
RASPBERRY PI USER GUIDE
When the Pi has restarted and you’ve logged back in, you can use fdisk to verify that the
new partition is ready for use with the following command:
sudo fdisk -l
Before you can store les on the new partition, however, you need to put a le system in
place by formatting the drive using the mkfs tool as follows.
1. Type fdisk -l to list the storage devices connected to the Pi and their current parti-
tions. Note the new partition, which will appear as /dev/mmcblk0pN where N is the
partition number. If you’re doing this on the recommended Debian distribution, the
partition will be /dev/mmcblk0p3.
2. Create a new EXT4 le system in the partition by typing sudo mkfs.ext4 /dev/
mmcblk0pN, replacing N with the new partition’s number. Make sure that you’ve
picked the right partition: the mkfs (make file system) command will wipe any data on
the partition it is told to format.
3. Before the new le system can be used, it must be mounted. Create a mount point (an
empty directory) by typing sudo mkdir /storage at the terminal.
WARNING
4. Use the mount command to make the new partition accessible on the mount point
you just created by typing sudo mount /dev/mmcblk0pN /storage, where N is
the new partition number.
When using mkfs to create a new, blank file system on a partition, always double-check the
partition details before continuing. If you give mkfs the wrong partition, it will erase any files
you have stored there. If it’s the /boot or root file system that has been wiped, the Pi will no
longer load until you flash the SD card again.
While this gives you a storage device that the root superuser can access, the pi standard user
and any user accounts you’ve created yourself don’t currently have permission to store les
there. at can be changed with a trio of commands: chown, chgrp and chmod.
e rst command, chown, is short for change ownership and allows les created by one user to
be passed across to another; chgrp changes the group to which a le belongs so all the members of that group can access it; and chmod modies the permissions on a le or directory.
To allow all users to access your new partition, change the group membership from root to
users with the chgrp command, using the -R (recursive) ag to aect the directory’s entire
contents as follows:
sudo chgrp -R users /storage
Page 87

CHAPTER 5 PARTITION MANAGEMENT
You’ll also need to allow all members of the group to write to the directory. To do this, you
use the chmod command with the option g+w, which tells chmod to allow write access from
the group:
sudo chmod -R g+w /storage
e new partition is now ready for use, but there’s still one more task to carry out. At present, the partition needs to be manually mounted (using the mount command combined with
the sudo command for running as the root user) each time the Pi reboots. To save time, you
can tell the Pi to automatically mount the new partition instead by editing the fstab le.
Short for file system table, the fstab le—located in the /etc directory—tells Linux what
le systems should be mounted on which mount points. is table may look complicated at
rst glance, but its layout follows a logical tabular pattern.
From left to right, the columns tell Linux the location of the device to be mounted, the directory where the device should be accessible (the mount point), the le system type, any
options required, and nally, two numbers that control whether the le system should be
dumped in the event of a system problem and whether it should be checked by the fsck (le
system check) tool.
75
To make the system mount the new partition automatically, rst open the fstab le in
nano:
sudo nano /etc/fstab
Add a new line at the bottom of the le, dening the various options required by the new
partition, with tabs between each eld:
/dev/mmcblk0pN [Tab]/storage[Tab] ext4[Tab] defaults[Tab] 0[Tab] 2
Remember to change N for the partition number of the new partition (see Figure 5-2). If
you’re using fstab to mount external storage devices, use the device name /dev/sdXN
where X is the device letter and N is the partition number. Save the le with CTRL + W, and
then exit nano with CTRL + X. When you’re back at the terminal, reboot your system and
check if /storage is mounted automatically by typing mount. If not, double-check your
new fstab entry. Remember that you need to press the Tab key each time you come to the
end of a eld.
Page 88

76
RASPBERRY PI USER GUIDE
F -:
Editing fstab
to automatically
mount the new
partition
WARNING
Resizing Existing Partitions
Creating a new partition is one way to make use of a larger SD card, but it’s not the most exible. A better method is to resize existing partitions to make use of the free space. To do this
reliably, you’ll need to unplug the Pi, remove the SD card and insert it into a desktop or laptop through a card reader.
Automatic Resizing
e Debian Linux distribution for the Raspberry Pi comes with a tool called raspi-config,
which loads when the system is booted for the rst time. It can also be loaded manually at
any time by typing sudo raspi-config at the console or in a terminal window. is tool
provides an interface for many common conguration tasks, including the ability to resize
the root le system to make full use of the available space on an SD card automatically.
Using the raspi-config tool to resize the root file system can, in rare cases, result in data
corruption. If you have data stored on the Pi which you can’t afford to lose, back it up first or
consider following the more reliable manual resizing instructions found later in this chapter.
Page 89

CHAPTER 5 PARTITION MANAGEMENT
To resize the root le system using the raspi-config tool, follow these instructions:
1. If this is the rst time you have loaded Debian on the Raspberry Pi, raspi-config
will load automatically. If it does not, type sudo raspi-config at the console or
terminal to load the tool manually.
2. In the raspi-config menu (see Figure 5-3), press the down arrow on the keyboard
to highlight the expand_rootfs option and then press Enter.
77
F -:
e raspiconfig tool’s
menu screen
3. e resizing operation takes just a few seconds, and is followed by a message telling
you that the process will complete when the Pi is next restarted. Press Enter to dismiss
this message.
4. Press the Tab key twice to highlight Exit, and then press Enter to quit raspi-config.
5. Type sudo reboot to restart the Pi. e reboot process will take longer than usual,
because the le system will need to be resized. is process happens only once per
resize—the next time the Pi is rebooted, it will take no longer than usual.
When the Pi has fully rebooted, the root le system will now be as large as the SD card allows.
To verify this, type df -h at the terminal to list the free space on all connected storage devices.
Manual Resizing
e most reliable way to resize Linux partitions on a desktop or laptop computer is to use a tool
called Parted Magic, a free bootable CD that is designed specically for adjusting le systems.
Page 90

78
RASPBERRY PI USER GUIDE
e disc works on both PCs and Macs, and operates entirely from memory. As a result, it won’t
try to replace your existing operating system. It’s also compatible with any distribution for the
Raspberry Pi, unlike the Debian-specic raspi-config tool.
TIP
F -:
e Parted
Magic desktop
If you’re a Linux user, you can install gparted—the graphical partitioning tool used in Parted
Magic—instead of having to boot from the CD. For Debian-based distributions, you just type
sudo apt-get install gparted followed by sudo gparted to load the program.
Download the Parted Magic ISO image le from http://partedmagic.com and write it
to a CD or DVD using the CD writing program provided on your PC. With the disc still in the
drive, reboot your computer and it will load into the Parted Magic menu system. From here,
choose Standard Settings to load the software itself.
Parted Magic is a customised Linux operating system that includes tools specically designed
for managing storage devices. Connect the Raspberry Pi’s SD card to your computer and load
Partition Editor from the desktop by double-clicking the icon (see Figure 5-4).
Page 91

CHAPTER 5 PARTITION MANAGEMENT
By default, the partition editor will look at the rst drive it nds in your system, which is usually your PC’s hard drive. You don’t want to make changes to that, so make sure to click on
the device selector in the top-right corner and choose the device corresponding to the SD
card. On a single-drive system, this will usually be /dev/sdb (see Figure 5-5).
79
F -:
Parted Magic’s
Partition Editor
tool, before
resizing the
partition
Resizing and moving partitions is a risky process. If the SD card is removed while the resize is
in progress, or the PC loses power, it will corrupt the contents of the card. Always make sure
you’ve backed up any irreplaceable personal files from the card before editing the partitions.
e exact partitions that need to be resized and moved will dier according to the distribution chosen. In the case of Debian, you will need to resize the second partition, which will
usually be sdb2. With the partition editor loaded, do the following:
1. Some Linux distributions include a swap partition at the end of the image. is appears
as a small partition of type linux-swap in the partition editor. If this is present, continue with these instructions; if not, skip straight to step 5.
2. Click on the swap partition, which will be the last partition in the list, and choose
Resize/Move from the toolbar.
3. In the dialogue box that appears, click and drag the box at the top left over to the top
right (see Figure 5-6). Once complete, the Free Space Following box should read 0.
WARNING
Page 92

80
RASPBERRY PI USER GUIDE
F -:
Moving the
swap partition
in the partition
editor
4. Click the Resize/Move button to conrm the change. Moving the partition will trigger a
warning about the potential for the new partition table to lead to booting problems. at
doesn’t apply to this change, because you’re not moving the boot partition, so just click OK.
5. Click on the largest partition in the list, which is typically labelled sdb2, and click
Resize/Move on the toolbar again.
F -:
Resizing the
root le system
in the partition
editor
6. is time, click and hold the right arrow on the coloured box and drag it to the right
edge of the grey box (see Figure 5-7). is will make the partition larger, rather than
just moving it.
7. Click the Resize/Move button to conrm your change, and again click OK on the warn-
ing box that appears.
8. Click Apply on the toolbar, and again on the dialogue box that appears. Depending on
the speed of your SD card, the resizing process may take a few minutes to complete.
9. When the resize has completed, you can turn o your PC and put the SD card back into
your Pi.
Page 93

CHAPTER 5 PARTITION MANAGEMENT
anks to the changes made in the partition editor (see Figure 5-8), the main partition on
the SD card is now as big as the card will allow it to be. As this is where most Linux distributions store both their own les and the users’ les, the Pi should now have plenty of space
available to use.
81
F -:
Parted Magic’s
Partition Editor
tool, after
resizing the
partition
Moving to a Bigger SD Card
If you’ve been using the Pi for a while, you may nd that the 4 GB SD card you thought would
be large enough for your needs has become full. Buying a new SD card with 8 GB, 16 GB or
even more storage is cheap enough, but you don’t want to lose your les.
ankfully, it’s pretty straightforward to move the contents of your existing SD card across
to a bigger card. e latter half of the process is no dierent to how you ashed the SD card
back in Chapter 1, “Meet the Raspberry Pi”. Where it diers, however, is that you will be
using the existing SD card as the source rather than a downloaded image le.
The process of cloning an SD card is nondestructive, and will result in both cards having the
same data on them. If you have personal files on the old SD card, make sure to wipe it clean
before passing it on to a third party.vIn addition to your original SD card and the newer, larger
card, you’ll need access to a PC or Mac, an SD card reader and—if you’re a Windows user—
the Parted Magic disc used to resize the partitions earlier in this chapter.
WARNING
Page 94

82
RASPBERRY PI USER GUIDE
e rst step to moving to a larger SD card is to create an image of the existing card. If you
have access to two SD card readers, you can skip this step and, in the later instructions,
replace the name of the image le with the device address of the SD card reader with the Pi’s
original card inserted.
Imaging from Linux
Creating an image of the SD card under Linux is no more dicult than ashing the card was
in Chapter 1. Before starting, make sure you have enough disk space on your computer to
hold a le the size of the SD card. en follow these steps:
1. Open a terminal from your distribution’s applications menu.
2. Plug your Pi’s smaller SD card into a card reader connected to the PC.
3. Type sudo fdisk -l to see a list of disks. Find the SD card by its size, and note the
device address (/dev/sdX, where X is a letter corresponding to the device. For some
computers with in-built SD card readers, this may appear as /dev/mmcblkX where X is
a letter corresponding to the device. If so, use that address in the following instructions.).
F -:
Creating an
image of an
existing SD card
using dd
4. Type sudo dd of=temporaryimage.img if=/dev/sdX bs=2M to read the contents of the
SD card and write it to a le called temporaryimage.img (see Figure 5-9).
Page 95

CHAPTER 5 PARTITION MANAGEMENT
Imaging from OS X
Imaging the Pi’s SD card on OS X is almost exactly the same as ashing the SD card was back
in Chapter 1. Again, make sure you have enough hard disk space to hold a le the size of the
SD card. en follow these steps:
1. Select Utilities from the Application menu, and then click on the Terminal application.
2. Plug your Pi’s smaller SD card into a card reader connected to the PC.
3. Type diskutil list to see a list of storage devices. Find the SD card by its size, and
note the device address (/dev/diskX, where X is a letter corresponding to the device).
4. If the SD card has been automatically mounted and appears on the desktop, type
diskutil unmountdisk /dev/diskX to unmount it before proceeding.
5. Type dd of=temporaryimage.img if=/dev/diskX bs=2M to read the contents
of the SD card and write it to a le called temporaryimage.img.
Imaging from Windows
e Windows Image Writer tool that you used to ash the SD card in Chapter 1, “Meet the
Raspberry Pi”, doesn’t support the creation of images. Instead, you’ll need to use the Parted
Magic disc to gain access to the Linux dd utility, as follows:
83
1. Insert the Parted Magic CD into your PC, reboot and choose Standard Settings.
2. Open a terminal window using the third icon from the left on the bottom tool bar,
which looks like a computer monitor (see Figure 5-10).
3. Type fdisk -l to get a list of drives on your PC, and nd your main hard drive by
size. Note the device name: /dev/sdXN, where X is the drive letter and N the partition
number. For some computers with in-built SD card readers, this may appear as /dev/
mmcblkX where X is a letter corresponding to the device. If so, use that address in the
following instructions.
4. Create a mount point for your PC’s hard drive by typing mkdir /media/harddrive,
and then mount the drive with mount /dev/sdXN /media/harddrive -o=rw to
gain access.
5. Insert your SD card reader with the Pi’s smaller SD card into the PC, and then use
fdisk -l to nd its device node (/dev/sdY where Y is the drive letter).
6. Type dd of=/media/harddrive/temporaryimage.img if=/dev/sdY bs=2M
to read the contents of the SD card and write it to a le called temporaryimage.img
on your hard drive.
Page 96

84
RASPBERRY PI USER GUIDE
F -:
e terminal
icon in Parted
Magic
Now that you have your disk image, use the instructions on ashing an SD card from Chapter
1, “Meet the Raspberry Pi”, to write it to the new card. Remember that writing an image takes
time, so be patient and let it nish fully.
When the image writing has nished, you’ll have two SD cards containing the exact same
data, including the same partition table. is means that while the new card might be 16 GB
or 32 GB, the Pi will only be able to access the same 2 GB or 4 GB of the original card.
To ensure the Pi can make use of the space on the new card, follow the instructions in
“Resizing Existing Partitions” earlier in this chapter.
Page 97

Chapter 6
Configuring the Raspberry Pi
Page 98

86
RASPBERRY PI USER GUIDE
BECAUSE OF ITS origins in embedded computing, the BCM2835 chip at the heart of the
Raspberry Pi doesn’t have anything like a PC’s BIOS menu where various low-level system
settings can be congured. Instead, it relies on text les containing conguration strings that
are loaded by the chip when the power is switched on.
Before taking a look at the various options available in these les—config.txt, cmdline.
txt and start.elf—a word of warning: changing some of these settings away from their
defaults can result in a Pi that, best case, doesn’t boot until the les are reverted and, worst
case, can physically damage the system. ese potentially dangerous settings will be highlighted with warnings in this chapter.
Hardware Settings—cong.txt
e Pi’s hardware is controlled by settings contained in a le called config.txt, which is
located in the /boot directory (see Figure 6-1). is le tells the Pi how to set up its various
inputs and outputs, and at what speed the BCM2835 chip and its connected memory module should run.
F -:
e contents of
the /boot
directory, with
config.txt
highlighted
Page 99

CHAPTER 6 CONFIGURING THE RASPBERRY PI
If you’re having problems with graphics output, such as the image not lling the screen or
spilling over the edge, config.txt is where you’ll be able to x it. Normally, the le is
empty or—on some distributions—simply not present; this just means that the Pi will operate using its preset defaults. If you want to make changes and the le isn’t there, just create
a new text le called config.txt and ll in the settings you want to change.
e config.txt le can control almost all aspects of the Pi’s hardware, with the exception
of the way the central processing unit (CPU) and graphics processing unit (GPU) sections of
the BCM2835 apportion the memory. You’ll learn how to alter that split in the “Memory
Partitioning—start.elf” section, later in this chapter.
e config.txt le is only read when the system rst starts up. Any changes made while
the Pi is running won’t take eect until the system is restarted, or switched o and back on
again. In the event that the changes are unwanted, simply deleting the le from the /boot
directory should be enough to restore the defaults once more. If the Pi won’t boot with your
new settings, just remove the SD card and delete config.txt from the boot partition on
another PC, and then reinsert it into the Pi and try again.
87
Modifying the Display
Usually, the Raspberry Pi will detect the type of display that’s connected and alter its settings
accordingly. Sometimes, however, this automatic detection doesn’t work. is is often the case
when a Raspberry Pi from one country is connected to an older TV from another country. If you
connect your Pi to your TV and there’s nothing to see, you may need to override these defaults.
Various settings in the config.txt le can be used to improve or alter the video output.
ese settings, and their possible values, are described in the following list.
Manually adjusting the HDMI or composite video output settings can leave your Pi unable to
communicate with your monitor. It’s usually best to use the automatically-detected settings,
unless you’re unable to see a picture in the first place.
❍ overscan_left—is moves the picture inwards a set number of pixels to compensate
for a TV’s overscan. If the text on the Pi is disappearing o the edge of the screen, adjusting the overscan will x it. Values should be given as the number of pixels to skip.
❍ overscan_right—is does the same job as overscan_left, but on the right side of
the screen.
❍ overscan_top—Again, this ignores a certain number of pixels, but this time on the
top of the screen.
WARNING
Page 100

88
RASPBERRY PI USER GUIDE
❍ overscan_bottom—is can be used to skip a number of pixels from the bottom of
the display. Typically, the values for all the overscan_ settings would be the same,
creating a regular border around the display.
❍ disable_overscan—If you use a monitor or TV via HDMI, you may nd that your
image has a black border around it. To get rid of this border, any default overscan settings can be disabled by setting this value to 1.
❍ framebuer_width—is value is measured in pixels, and adjusting it will change
the width of the console. If text appears too small on your screen, try changing this to
a lower value than the default width of the connected display.
❍ framebuer_height—is aects the size of the console in the same way as frame-
buffer_width, but vertically rather than horizontally.
❍ framebuer_depth—Controls the colour depth of the console in bits per pixel. e
default is 16 bits per pixel, which gives 65,536 colours. Other values, including 8 bits
per pixel (256 colours), 24 bits per pixel (around 16.7 million colours) and 32 bits per
pixel (around 1 billion colours) are valid, but may cause graphical corruption.
❍ framebuer_ignore_alpha—Set to 1, this value disables the alpha channel, which
controls transparency in the console. Disabling the alpha channel is not normally
required, but may correct graphical corruption caused when setting framebuffer_
depth to 32 bits per pixel.
❍ sdtv_mode—is value aects the analogue composite video output of the Pi, adjust-
ing it to operate in various countries. By default, the Pi uses the North American version of the NTSC video standard; users in other countries may need to change this
value to get a picture on an analogue TV. Possible values are:
0—NTSC, the North American video standard
•
1—NTSC-J, the Japanese video standard
•
2—PAL, the video standard for the UK and other countries
•
3—PAL-M, the Brazilian video standard
•
❍ sdtv_aspect—Controls the aspect ratio of the analogue composite output. If the pic-
ture looks stretched or squished, alter this to correspond to your TV’s aspect ratio.
Possible values are:
1—4:3 aspect ratio, common on older sets
•
2—14:9 aspect ratio, common for smaller widescreen TVs
•
3—16:9 aspect ratio, common for modern widescreen TVs
•
www.allitebooks.com
 Loading...