

Raritan Engineering 1700 User Manual
ELECTRIC WATER HEATERS
With or Without Optional Heat Exchanger
INSTALLATION and MAINTENANCE INSTRUCTIONS
1700 Series Models
WARNING: Raritan Engineering Company, Inc. recommends that a qualified person or electrician install
this product. Equipment damage, injury to personnel or death could result from improper
installation. Raritan Engineering Company, Inc. accepts no responsibility or liability for
damage to equipment, injury to personnel or death that may result from improper installation
or operation of this product.
WARNING: Hazard of Shock or Fire - Always use recommended fuse/circuit breaker and wire size. Always
make sure that unit is properly grounded to AC grounding conductor (green).
Hazard of Scalding - Water temperature over 125°F (52°C) can cause severe burns instantly.
WARNING: Hydrogen gas can be produced in a hot water system served by this heater that has not been used
for a long period of time (generally 2 weeks or more). Hydrogen gas is extremely flammable.
To reduce the risk of injury under these conditions, it is recommended that a hot water faucet be
opened for several minutes before using any electrical appliance connected to the hot water
system. If hydrogen is present, there will probably be an unusual sound such as air escaping
through the pipe as the water begins to flow. There should be no smoking or open flame near
the faucet when it is initially opened.
IMPORTANT SAFETY INSTRUCTIONS
1. Read all instructions thoroughly.
2. Ground water heater properly. Connect water
heater to grounded AC system.
3. Install or locate water heater only in accordance
with the provided installation instructions.
4. Use water heater only for its intended use as
described in this manual.
5. Do not use an extension cord. Contact a qualified
electrician to have wiring properly installed.
6. Supervise children when using hot water.
Temperature limiting valves are recommended
at the point of use (such as shower or sink) to
limit the water temperature. For more
information, see your qualified technician.
7. Do not operate if wiring is damaged, or if the
heater has been damaged or dropped.
DESCRIPTION
Raritan Water Heaters are constructed with high
quality components: a glass lined tank, high density
non-CFC foam insulation, noncorrosive polymer
jacket and an adjustable Thermostat. Models with an
internal Heat Exchanger heat water from an external
source. Dockside hot water recovery rate is 13
gallons (49.2 liters) per hour. (18 gallons [68.1 liters]
per hour for model #17120203 or 17200203 with
4500 watt/ 240V heating element). Ground terminal
and replaceable Anode are built-in. Temperature and
Pressure Valve rated at 75 psi (517kPa) 210°F (99°C)
is included for on-board nominal working system
pressure of 50 psi (345kPa) maximum. The water
heater is ignition protected.
MAINTENANCE
WARNING: If temperature and pressure relief
valve is leaking it must be replaced.
8. Only qualified service personnel should service
this water heater. Contact Raritan Technical
Support for repairs.
Inspection of Anode and proper winterization is
required of the Raritan Water Heater. Periodic visual
inspection is recommended to be sure connections
are tight, wires are not frayed and the unit is properly
grounded. Do not use solvents to clean heater jacket.
Incorporate this inspection into commissioning
procedure in spring and winterizing procedure in fall.
8. Screw ring terminals of white and black wires on
lower side of thermostat to studs of the element.
A removable magnesium Anode is integral with the
hot water discharge fitting. The Anode should be
checked at least once a year by removing it from the
water heater. If the Anode diameter is less than 3/8"
(9.5mm), it should be replaced. If discoloration,
unusual smell or taste develop in the water, inspect or
replace Anode. The Anode is replaceable as a unit
and may be ordered from Raritan dealers or from the
factory. Please specify 6, 12, or 20 gallon model.
Replacing the thermostat:
WARNING: Danger of shock. Be sure to turn
power off.
Use ONLY Raritan replacement thermostat
(#WH16 - ignition protected).
1. Remove access panel to thermostat and element.
2. Remove personnel protector.
3. Unscrew the neutral and hot wires from the
element with a Phillips screw driver.
4. Cut the incoming wires. Using fingers pull tabs
of thermostat mounting bracket forward and lift
thermostat out.
5. Install new thermostat.
6. Strip incoming wires, exposing 5/16"(8mm) of
wire.
7. Crimp neutral wire supply to white wire and hot
wire supply to black wire (series connector
provided with new thermostat).
9. Reinstall personal protector panel.
NOTE: Check for leaks before proceeding.
10. Replace access panel.
11. Turn on AC power.
Replacing The Heating Element:
WARNING: Danger of shock. Be sure to turn
power off.
1. Turn off water pressure pump and open all hot
water faucets. When water has stopped flowing,
pressure in water heater has been relieved.
2. Drain heater the rest of the way either through the
drain valve, if installed, or by removing the cold
water supply hose at the bottom of the tank.
3. Remove electrical access cover, personnel
protector and two wires connected to heating
element. Do not remove ground wire. Unscrew
and remove Heating Element using 1½" socket
wrench, discarding gasket. Never reuse an old
gasket.
4. Install new gasket and Heating Element.
5. Reconnect black and white wires to the new
Heating Element and install personnel protector
and electrical access cover.
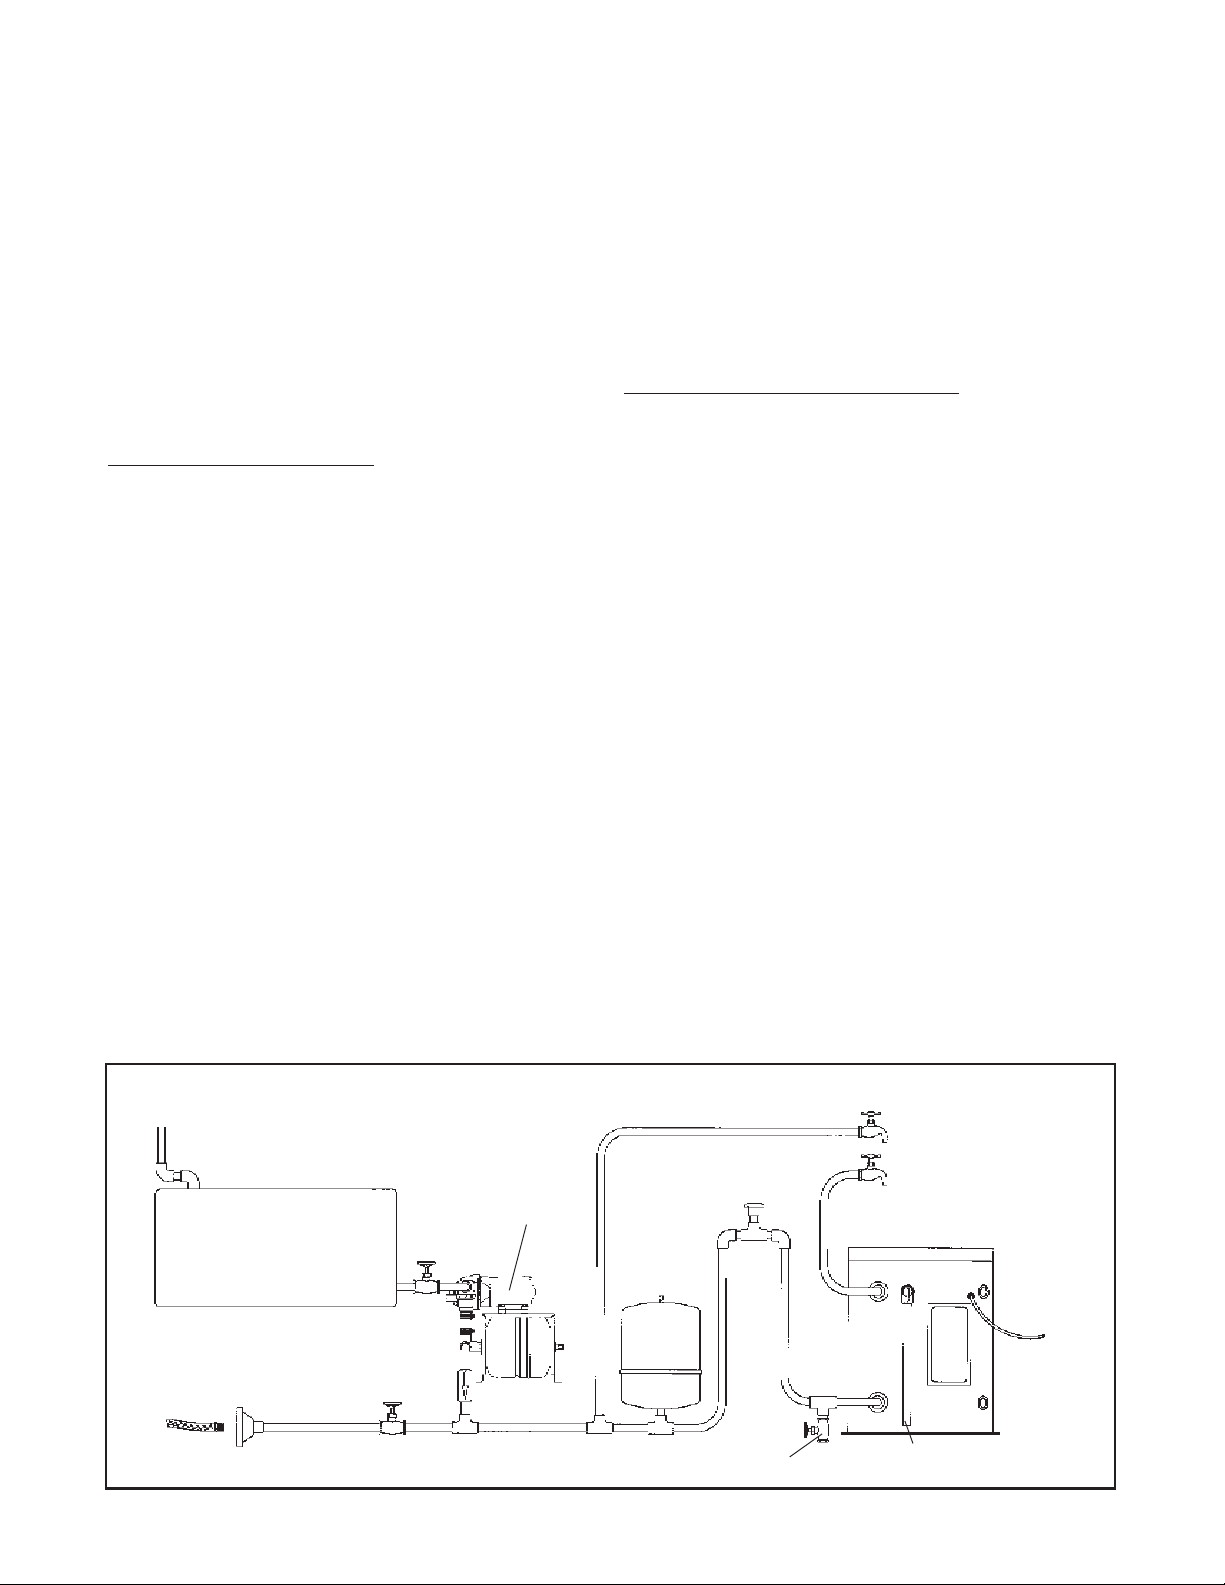
Fig. #1 Typical Hookup, Raritan Water Pressure System and Water Heater
Fill Fitting
on Deck
Freshwater Tank
Connector Fitting with
Built-in Regulator
Dockside
Water Hose
Shutoff
Shutoff
Valve
Valve
Check
Valve
Water Pressure
Pump
VacuumBreak
(Backflow Preventor)
Expansion
Tank
Drain Valve
2
2
or Drain
Plug
Cold Water Faucet
Hot Water Faucet
Water Heater
Hot
Cold
Drain for Temperature
and Pressure Valve
Engine
Coolant
IN
To Shore
Power
(AC Service)
Engine
Coolant
OUT

6. Close drain valve or reconnect plumbing to cold
water supply for the water heater.
7. See "Start Up" procedure before turning on
power.
WINTERIZING
Before beginning winterizing, be sure the power is
turned off to the water heater. Open all hot water taps
on the boat to relieve the pressure and allow cold
water to cool the water in the system. Remove both
lines from the heater and allow it to drain. After it
has drained, blow it out with air pressure, if available.
Pour a quart of nontoxic antifreeze (propylene glycol)
into the hot water fitting of the tank using a funnel
and short length of hose. Be sure power remains
off until spring.
When recommissioning in the spring, run water long
enough to insure that all antifreeze has been flushed
out and tank is filled BEFORE TURNING ON
POWER. Heat exchangers are winterized in
conjunction with the boat’s engine cooling system.
INSTALLATION
Materials Required for Installation (not included
with water heater):
Plumbing: 3/4" NPT "Tee", check valve, expansion
tank, drain valve, PTFE tape, vacuum relief valve
and shut-off valve. For hot water connections use
hose or plastic tubing rated for hot water use. If
system will be used with dockside water supply, a
pressure regulator valve, set to match boat pressure
system is also required. See Fig. #1 for typical
installation.
Electrical: #12-3 stranded cable; circuit breaker (15
amp 120V, 10 amp 240V), wire crimp terminals for
#12 wire, and wire supports/straps. For model
#17120203 and 17200203 electrical requirements
are: #10-3 stranded cable; circuit breaker (both legs
simultaneous 20 amp 240V), wire crimp terminals
for #10 wire and wire supports/straps.
Hardware: Four 5/16" (8mm) stainless steel bolts
or lag bolts, flat washers and hose clamps. For 12
and 20 gallon models: stainless steel straps and
fasteners.
Tools needed: Pipe wrench, screw driver, nut driver
and wrench(es) for mounting bolts or lag bolts.
MOUNTING THE HEATER
1. Select an area where the heater will not be subjected
to water spray (especially salt water).
NOTE: Access or hatch must be large enough for
future servicing and/or replacement.
2. Position heater so that electrical cover plates,
plumbing nipples and heat exchanger fittings are
easily accessible.
3. Using the four mounting holes provided, securely
mount heater to deck or other sturdy flat area.
Stainless steel 5/16"(8mm) bolts or lag bolts with
flat washers should be used to properly support
the strain of a full unit while the boat is rocking.
Raritan 12 and 20 gallon water heaters require
auxiliary bracing, when the boat is in heavy seas.
This is also recommended for the 6 gallon models if
excessive heeling and pitching is expected. See Fig.
#3a for optional bracing.
PLUMBING
CAUTION: To reduce the risk of excessive
pressure and temperature in this water heater,
temperature and pressure sensitive protective
equipment must be installed that meet the
requirement of local codes. A device MUST NOT
be installed unless it is certified by a nationally
recognized testing laboratory and meets the
requirements for Relief Valves and Automatic
Shut-off Devices for Hot Water Supply Systems,
ANSI Z21.11-1979. The relief valve must not be
blocked or restricted under any circumstances.
For hot water connections use only pipping, hoses,
tubing, fixtures and connectors rated for hot
water use.
Avoid sharp bends and 90° ells in the plumbing
wherever possible, as they reduce the water flow.
Should copper fittings be desired, DO NOT apply
direct heat to the 3/4'' nipples protruding from
the heater. They contain a nonmetallic lining
which will be destroyed by heat. Solder fittings
first, then attach to water heater.
1. Install Temperature and Pressure Relief Valve in
area marked "OPENING FOR TEMPERATURE
AND PRESSURE RELIEF DEVICE." Valve is
included in box separate from the heater. Use
PTFE tape on the threads.
3
3
 Loading...