

Page 1
consult the User Manual found on the enclosed CD-ROM.
For more detailed installation and operating instructions, please
I. Prepare Servers and Network for Remote Operation
Congratulations on your purchase of IP-Reach, the industry-leading solution for multi-platform, high-performance, remote,
network-based KVM console access. IP-Reach enables highly-secure, multi-user, bandwidth-efficient, and software-independent
access to your servers’ KVM consoles via a web browser.
Before installing IP-Reach, first configure each server which you intend to access remotely with the following parameters. This
important installation procedure ensures optimal video / mouse performance and responsiveness.
IP-Reach
Quick Installation and Setup Guide
Quick Installation and Setup Guide
IP-Reach M Series
®
All Servers
A. For optimal bandwidth efficiency and
video performance, set the desktop background to a predominantly solid, plain, lightcolored graphic.
B. Ensure that the server’s video resolution
and refresh rate are supported by IP-Reach,
and the signal is non-interlaced:
Text Mode 1024x768 @ 60Hz
640x480 @ 60Hz 1024x768 @ 70Hz
640x480 @ 72Hz 1024x768 @ 75Hz
640x480 @ 75Hz 1024x768 @ 85Hz
640x480 @ 85Hz 1152x864 @ 60Hz
800x600 @ 60Hz 1152x864 @ 75Hz
800x600 @ 72Hz 1280x1024 @ 60Hz
800x600 @ 75Hz
800x600 @ 85Hz
II. Attach Local Console for Initial Configuration
Network / Firewall
In order to enable IP-Reach, your network
and firewall must allow communication on
TCP Port 5000. Alternatively, IP-Reach can
be configured to use a different TCP port of
your own designation (in step II-6 below).
Windows XP
Disable “Enhanced Pointer Precision”, and set
the mouse motion speed exactly to the
middle speed setting; these options are located in Control Panel > Mouse > Mouse Pointers.
Windows 2000 / ME
Set mouse pointer acceleration to “none”,
and the mouse motion speed exactly to the
middle speed setting.
Windows 95 / 98 / NT
Set mouse motion speed to the slowest
setting in Control Panel > Mouse > Motion.
Linux
Set mouse acceleration to exactly 1, and
threshold to exactly 1.
Sun Solaris
Set mouse acceleration to exactly 1.0. Also
be sure that your video card is set to a
supported resolution, and is outputting VGA
(H-and-V Sync, not composite sync). This
non-default configuration can be set in the
bootprom mode by issuing the command
“setenv output-device screen:r1024x768x70”,
followed by “boot” to reboot.
Macintosh
While no specific mouse setting is required,
when using IP-Reach to access and control
a Macintosh system, you must set the IPReach client to “single cursor” mode. See
IP-Reach User Manual for more details.
Raritan Computer Inc.
400 Cottontail Lane
Somerset, NJ 08873
USA
Tel. 1-732-764-8886
Fax. 1-732-764-8887
E-mail: sales@raritan.com
http://www.raritan.com
Raritan Computer Europe, B.V.
P.O. Box 566
2900 AN Capelle aan den IJssel
The Netherlands
Tel. 31-10-284-4040
Fax. 31-10-284-4049
E-mail: sales.europe@raritan.com
http://www.raritan.com
Raritan Computer Japan, Inc.
Kuga Building 7F
11-6, Kuramae 4-chome
Taitoo-ku, Tokyo 111-0051, Japan
Tel. 81-3-5833-6360
Fax. 81-3-5833-6336
E-mail: sales.japan@raritan.com
http://www.raritan.co.jp
Raritan Computer Taiwan,Inc.
5F, 121, Lane 235,
Pao-Chiao Rd., Hsin Tien
Taipei Hsien, Taiwan, ROC
Tel. 886-2-8919-1333
Fax. 886-2-8919-1338
E-mail: sales.asia@raritan.com
http://www.raritan.com.tw
255-80-3102 Rev0A
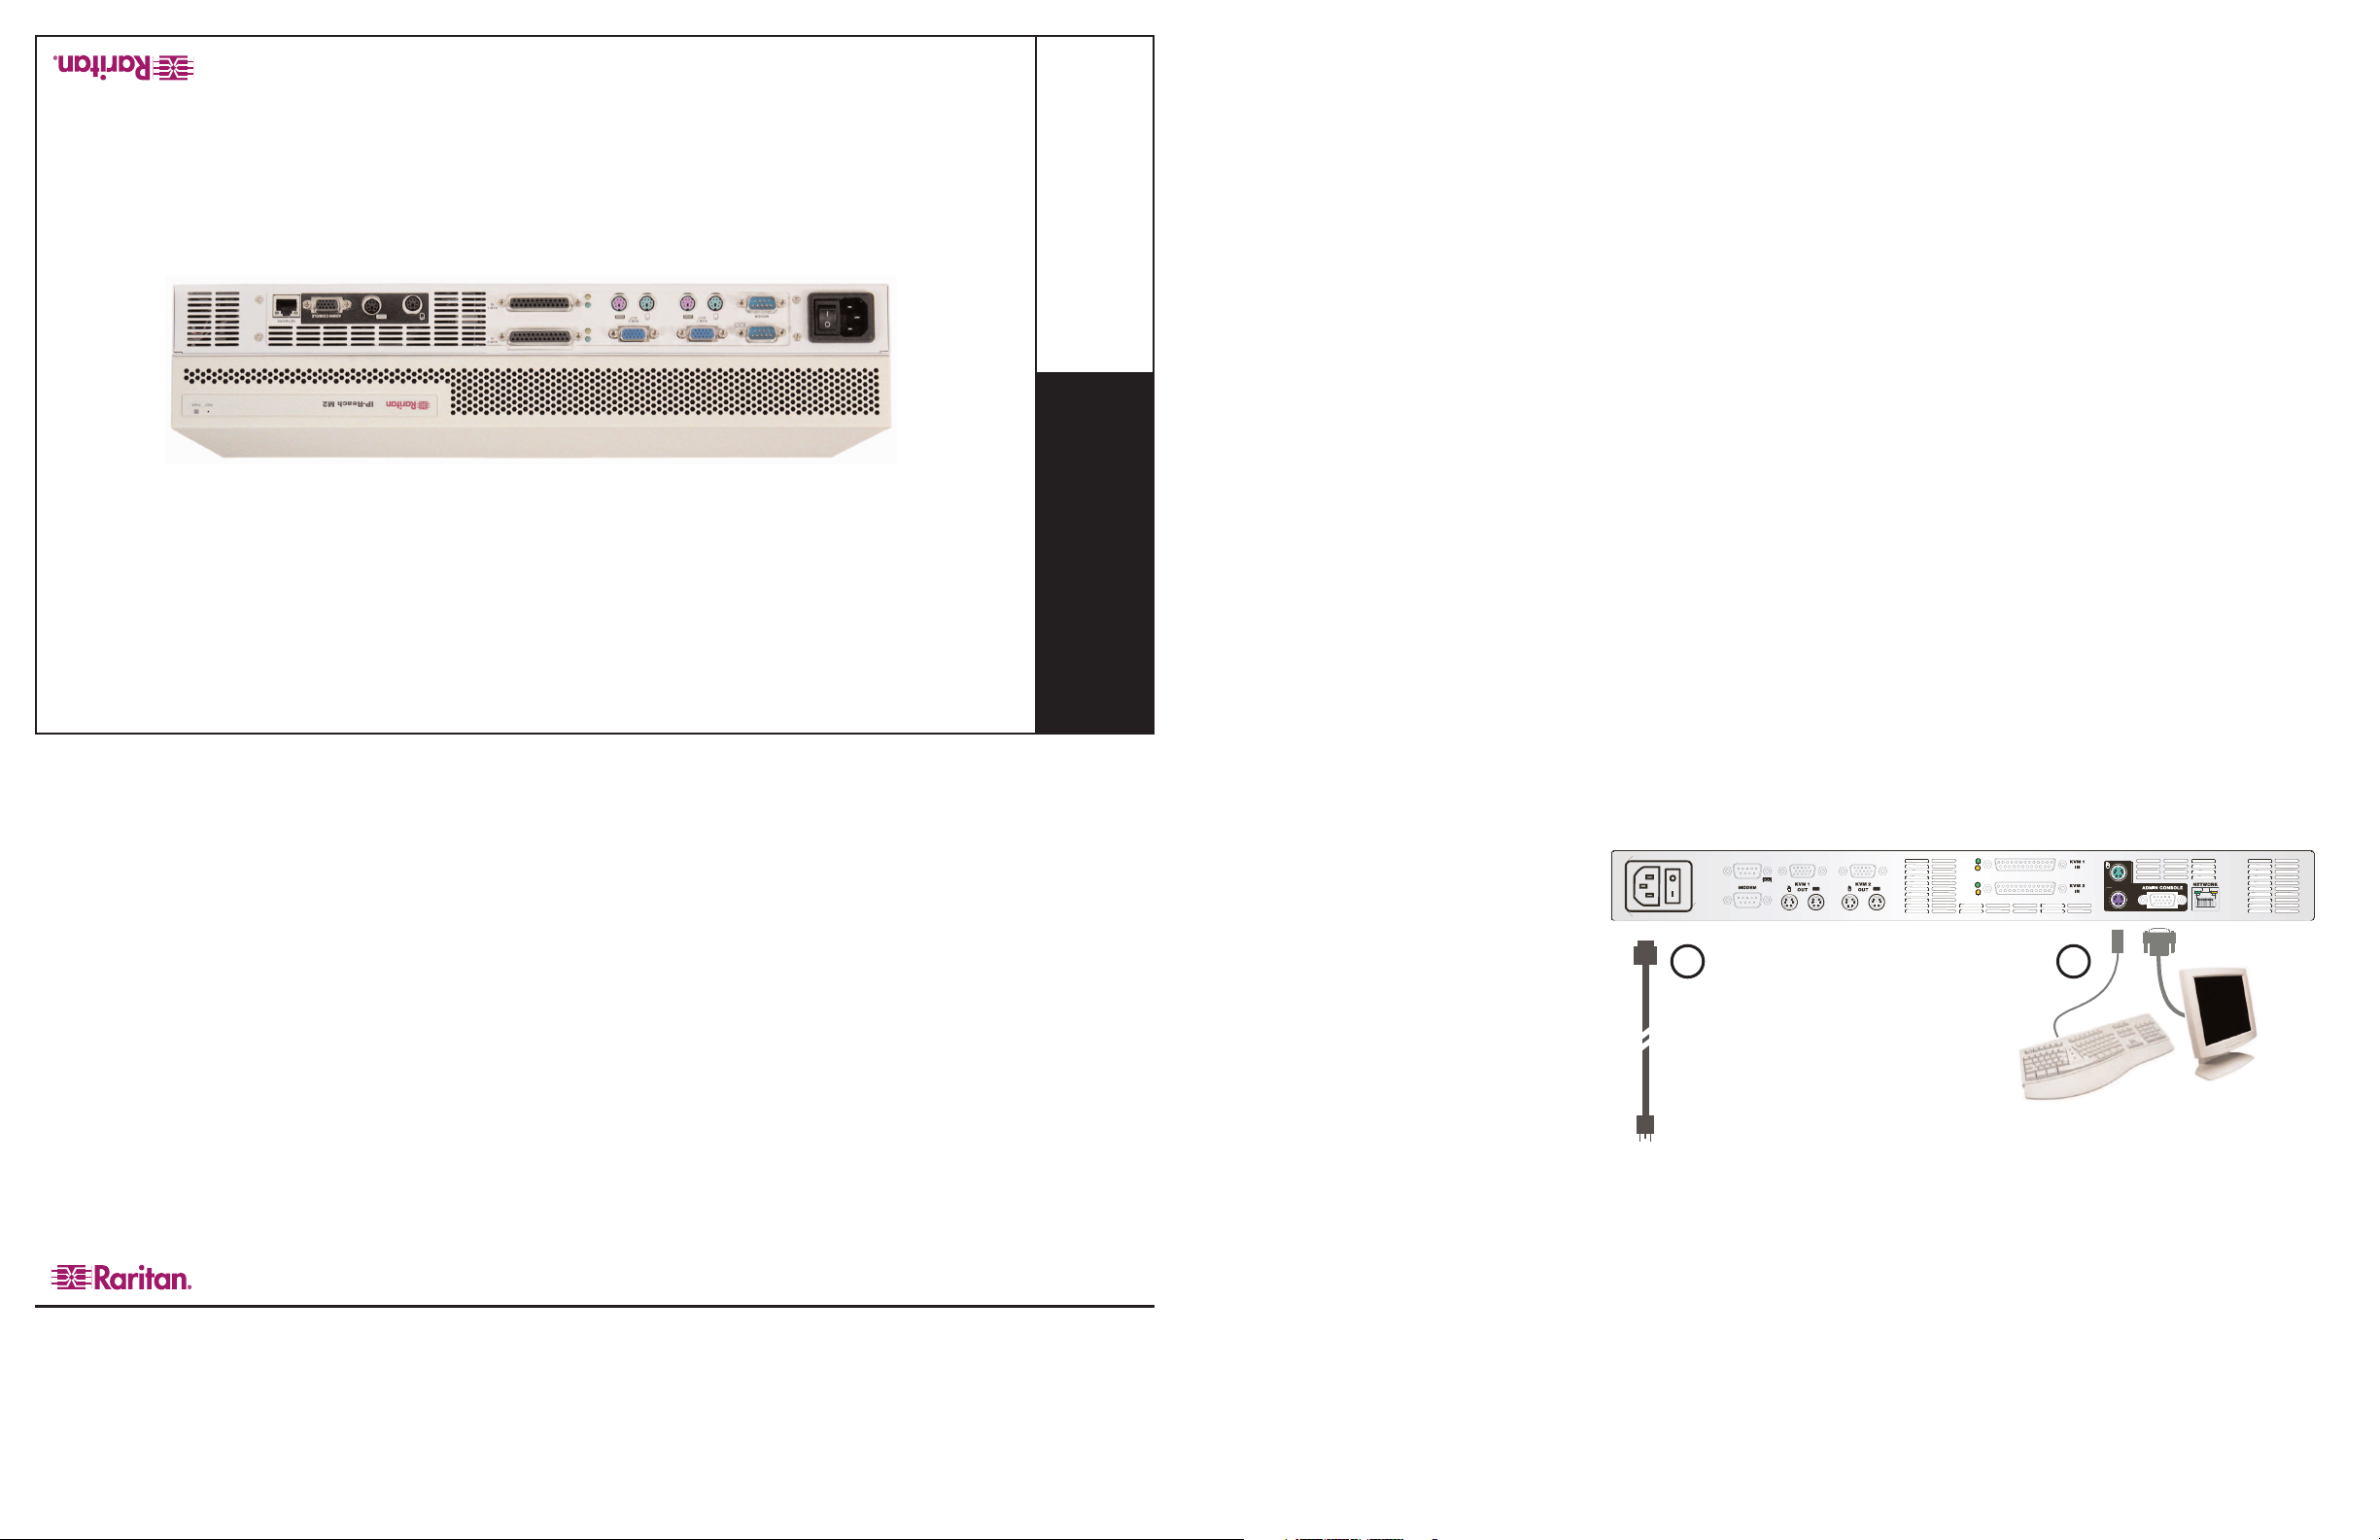
1. Attach the included AC power cord to
IP-Reach, and into an AC power outlet.
2. Attach a PS/2 keyboard and multisync
monitor to the corresponding ports in the
back of IP-Reach marked “Admin Console.”
3. Power ON IP-Reach.
4. After booting, IP-Reach will display the
Setup Wizard on the Admin Console screen.
Press ‘B’ on the Admin Console keyboard to
begin configuring IP-Reach.
5. On the Key Configuration Screen, enter
the 16-digit user license key located on the
software certificate included with your IPReach unit. Press <Ctrl+S> to save.
6. On the Network Configuration Screen,
assign a unique name (e.g. “Server_Room”)
and IP Address parameters for IP-Reach.
7. The Main Menu appears. Browse
through the Admin Console options to
configure IP-Reach as appropriate to your
environment. Refer to the User Manual
found on the enclosed CD-ROM for detailed
descriptions of administrative parameters.
8. When satisfied with your IP-Reach configuration, return to the main menu of the
IP-Reach M1 / M2
1
To AC Power Outlet
Admin Console, and press ‘R’ to “Restart or
shutdown IP-Reach”. Press ‘S’ to shutdown,
and power OFF IP-Reach.
9. At this time, you may detach the PS/2
keyboard and multisync monitor from the
Admin Console ports, or leave them
attached for future monitoring or further
configuration.
ALTERNATIVE: As an alternative method
of performing initial configuration, you may
connect to IP-Reach via a web browser on a
Windows computer, instead of directly via a
keyboard and monitor as described above.
2
Local Admin Console
KEYBOARD AND MONITOR USED TO
PERFORM INITIAL CONFIGURATION
To do so, simply attach a crossover
Ethernet cable between the network ports of
IP-Reach and your computer; enter IPReach’s default IP address into Internet
Explorer (192.168.0.192); and login with the
default username / password (“admin” /
“raritan”).
After authenticating, you will be directly
connected to your IP-Reach unit. On the lefthand side of the window, double-click on
the “Admin Console” port to commence
remote administration of your IP-Reach unit.
Page 2
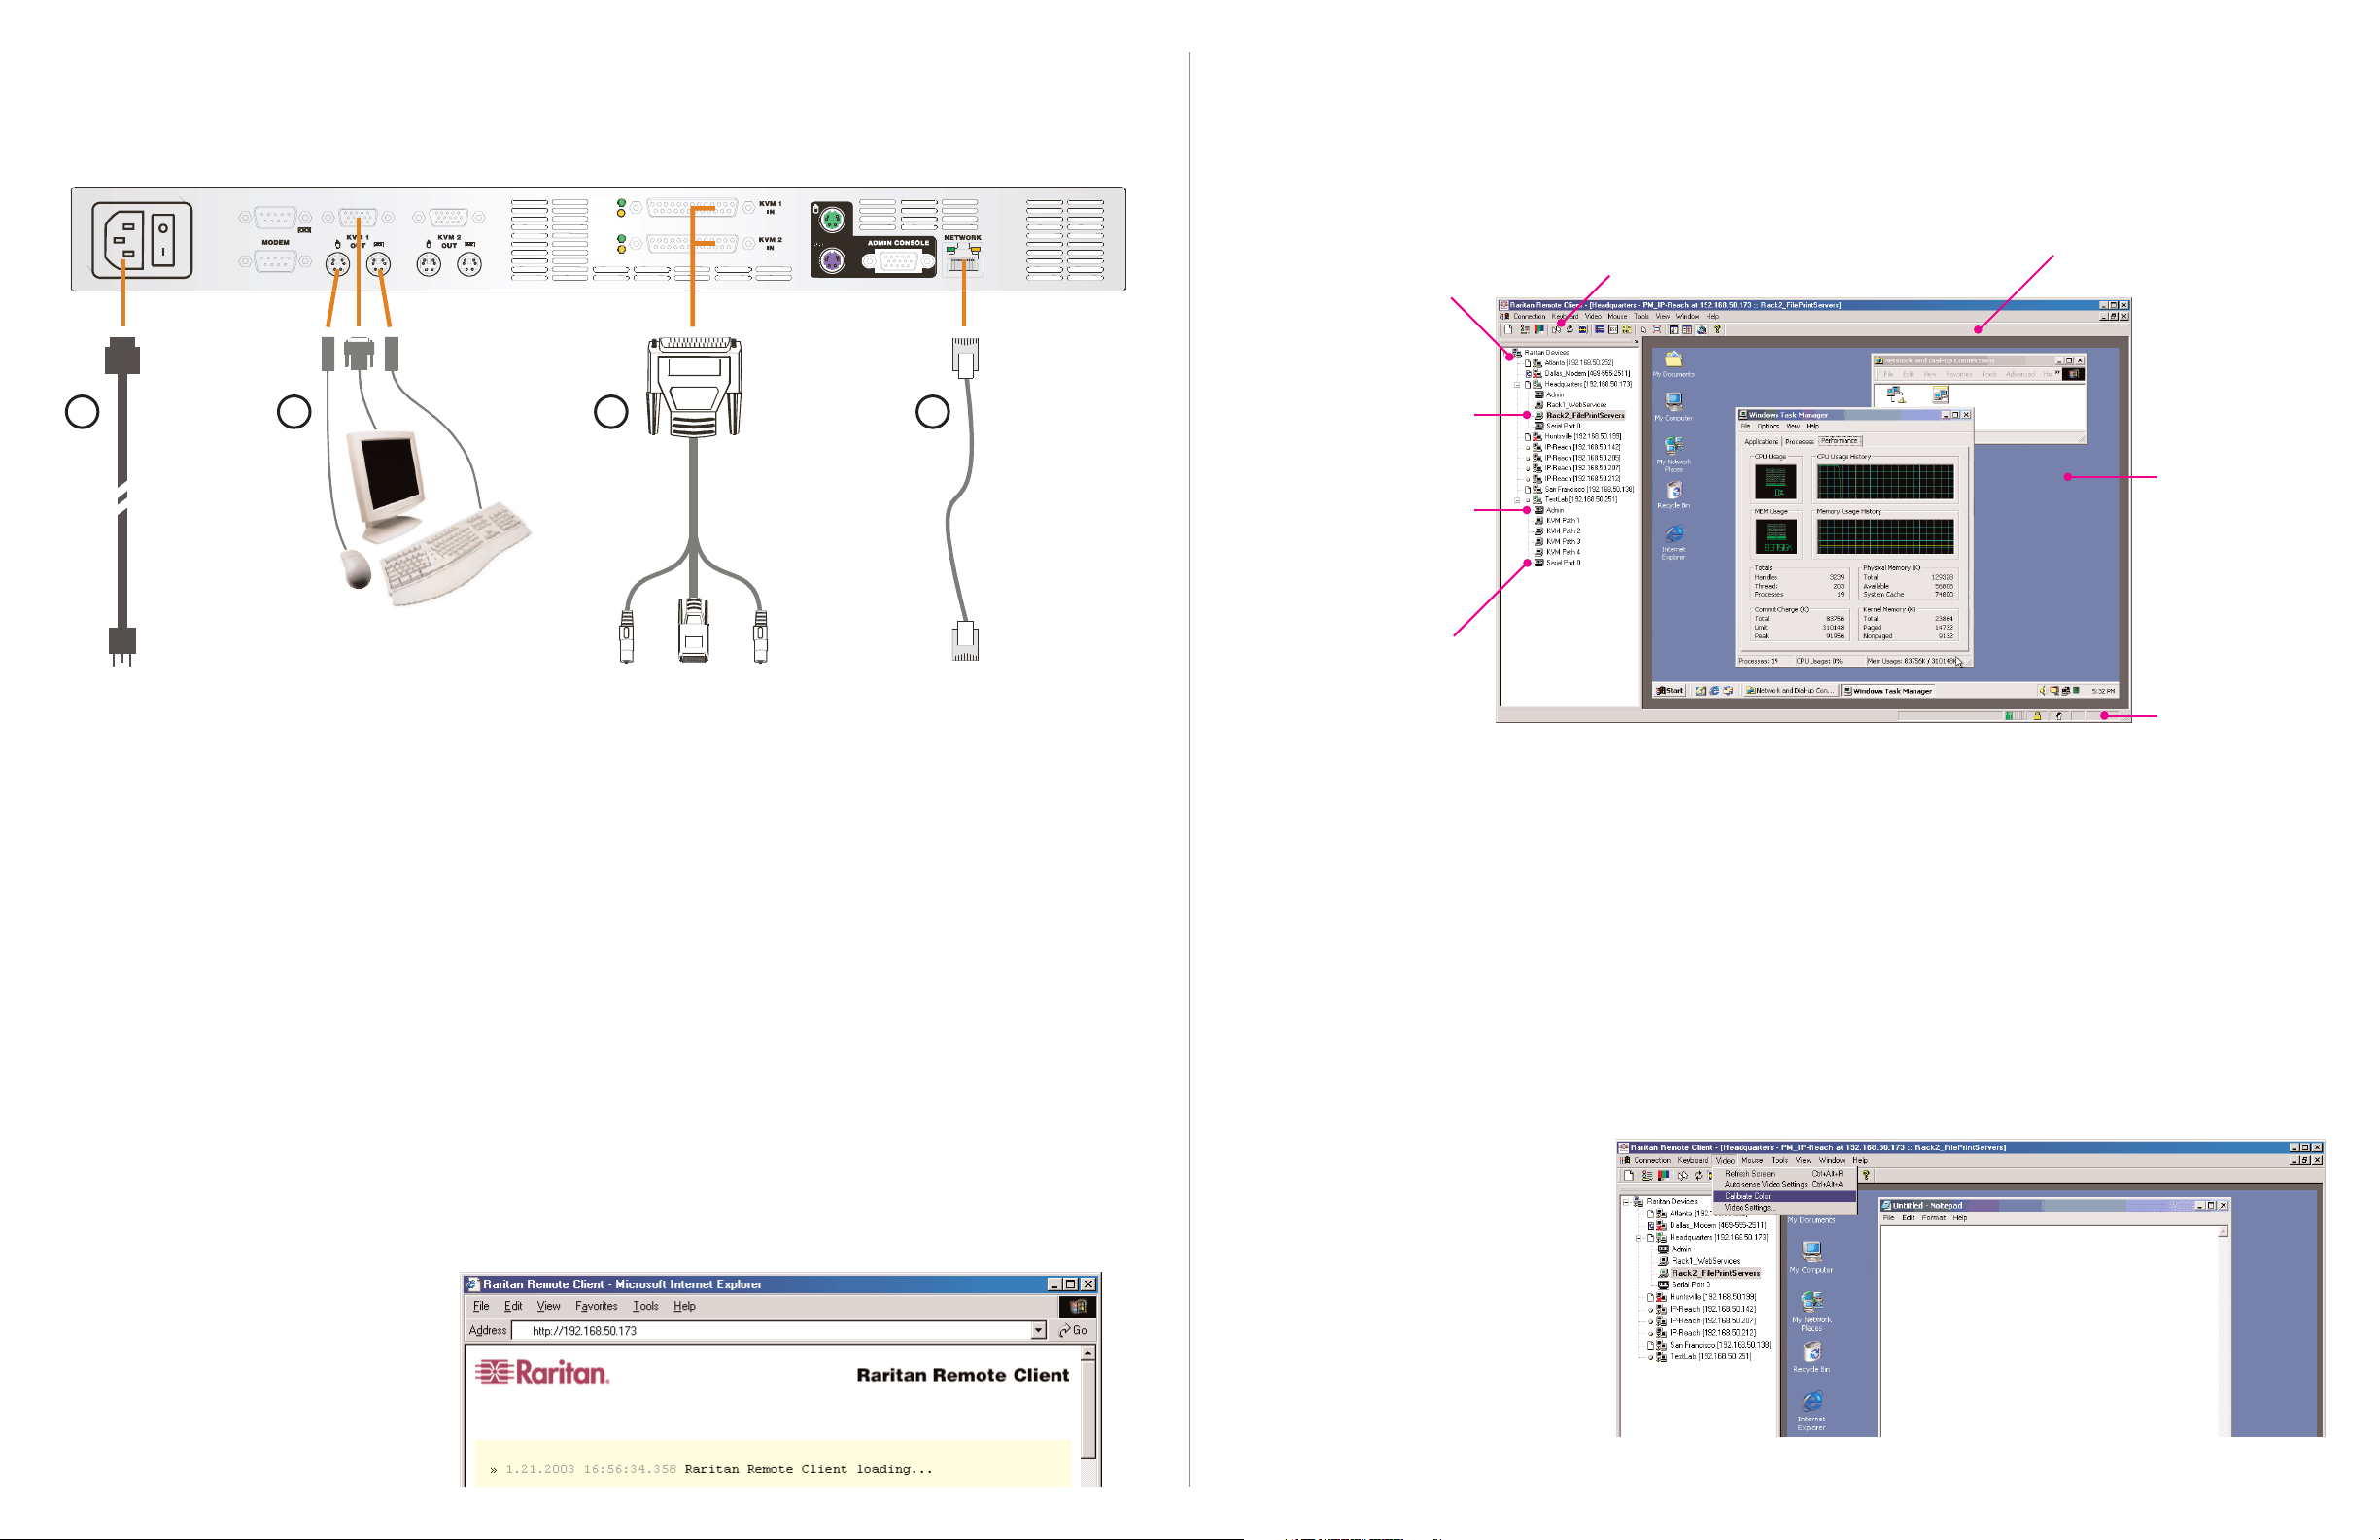
III. Connect to Network; Attach Servers to be Remotely Accessed
V. Establish a Connection
In this step, connect IP-Reach to the network; and attach the server(s) or KVM switch(es) which you wish to access remotely.
1 2 3 4
Included Cable
(p/n CCP20)
Local User Console [Optional]
To AC
Power Outlet
“KVM OUT” PORT(S) ALLOW DIRECT ANALOG
ACCESS TO SERVER OR KVM SWITCH ATTACHED
TO CORRESPONDING “KVM IN” PORT(S)
To Server / KVM Switch
CONNECT THE INCLUDED CCP20 CABLE FROM
“KVM IN” PORT(S) TO THEKVM CONSOLE OF SERVER
OR KVM SWITCH TO BE ACCESSED REMOTELY
Standard
Straight-Thru
Ethernet Cable
To LAN / WAN
Immediately upon launching the Raritan Remote Client (RRC), IP-Reach will request your user credentials. (See your IP-Reach
User Manual for user account administration). Login with the default username and password (“admin”/“raritan”). You will
immediately be connected to your IP-Reach unit. Use the RRC Navigator, found on the left-hand side of the RRC window, to
select and connect to a port.
The RRC Navigator displays
any known Raritan networked
appliances in a single view.
Double-click on a port to
establish control over the
server or KVM switch
attached to that port.
Users with Administrator
privileges may modify IPReach configuration settings
remotely.
Remotely access VT100
serial consoles connected to
the “Serial IN” port of
IP-Reach.
Click on “Synchronize Mouse” to converge
the mouse pointers displayed.
The RRC Toolbar provides single-click
access to RRC’s most frequently
utilized features.
Once connected to
a port, keystrokes
and video signals
are transmitted in
real-time — exactly
as if you were situated locally.
The RRC Status Bar
provides real-time
information on connection parameters.
1. Attach the included AC power cord to
IP-Reach, and into an AC power outlet.
2. [Optional] The KVM Out port(s) provide
transparent, pass-thru output of the KVM
console(s) connected to IP-Reach.
Connect a PS/2 keyboard, mouse, and
multisync monitor to the KVM Out port(s) if
you wish to have local, direct analog access
to the server(s) or KVM switch(es) to be
connected to IP-Reach.
3. Connect the DB25 end of an included
CCP20 cable, to the KVM In Port(s) found
on the back panel IP-Reach.
Connect the other end of the CCP
cable, to corresponding PS/2 keyboard,
mouse, and VGA video ports of the KVM
switch(es) or server(s) to which you wish to
provide remote, network access.
4. Connect a standard Ethernet cable from
the IP-Reach network port, to your networked switch / hub / router.
5. After checking to ensure all connections
are secure, power IP-Reach ON; bootup
requires approximately 30-45 seconds.
NOTE: You may also attach a serial
modem to the IP-Reach dedicated modem
port, for network-independent telephone
access.
IV. Launch Raritan Remote Client (RRC)
IP-Reach provides secure web-browser access to connected KVM switch(es) or server(s) from any Windows-based
computer. This enables convenient remote access to your server(s) without the burden of having software on-hand.
1. Log into any Windows-based computer
with network access to IP-Reach.
2. If you are using Windows NT, 2000,
or XP, ensure that you are not a “restricted”
user.
3. Launch Microsoft Internet Explorer.
Ensure that your Internet Explorer security
settings allow the download and execution
of ActiveX controls.
NOTE: The Windows default security
setting, “Medium”, will suffice.
4. In the text field found on the Internet Explorer “Address” bar, type in the IP address you
assigned to IP-Reach in Step II-6. Press [ENTER] to load and launch the web access client.
VI. Maximize IP-Reach Performance
IP-Reach’s dynamic video compression algorithms maintain usability under varying bandwidth constraints. Unlike competitive
solutions, IP-Reach optimizes its output for not just LAN utilization, but also via the WAN and dial-up. By adjusting color depth
and limiting video output, IP-Reach offers the optimal balance between video quality and system responsiveness in any
bandwidth constraint. Familiarize yourself with the following configurable parameters to adjust performance options even further.
Video Smoothing
Setting the video smoothing level too high
could cause IP-Reach to refrain from correctly transmitting color gradations.
On the menu bar, select “Connection” >
“Properties” to adjust the Smoothing level to
an appropriate setting for your environment.
Noise Filter
All video graphics cards generate electrical
noise that cannot be seen by the naked eye
when displayed on a monitor. IP-Reach
reduces the bandwidth it consumes by
intelligently ignoring extraneous signal
noise.
Setting the noise filter too high can
cause IP-Reach to refrain from correctly
transmitting screen changes.
On the menu bar, select “Video” >
“Video Settings” to adjust the Noise Filter
level to an appropriate setting for your
environment.
Color Calibration
Some video cards output non-standard signal levels. Therefore, to optimize transmitted
color for accuracy, perform a color calibration upon inital setup:
1. On the remote server desktop that you are controlling with IP-Reach, ensure that a solid
white color covers approximately 15% or more of the screen. One simple way to accomplish
this is to open the Notepad application and maximize its window size:
2. On the RRC menu bar, select “Video” > “Calibrate Color” to perform the color calibration.
 Loading...