

Page 1

Paragon Manager™
User Guide
Release 2.0.3
Copyright © 2009 Raritan, Inc.
PMG-0I-v2.0.3-E
May 2009
255-30-6100-00
Page 2

Page 3

This document contains proprietary information that is protected by copyright. All rights reserved.
No part of this document may be photocopied, reproduced, or translated into another language
without express prior written consent of Raritan, Inc.
© Copyright 2009 Raritan, Inc., Paragon®, Paragon Manager, CommandCenter®, Dominion®,
and the Raritan company logo are trademarks or registered trademarks of Rari tan, Inc. All rights
reserved. Java® is a registered trademark of Sun Microsystems, Inc. Internet Explorer® is a
registered trademark of Microsoft Corporation. Netscape® and Netscape Navigator® are
registered trademarks of Netscape Communication Corporation. All other trademarks or
registered trademarks are the property of their respective holders.
System Requirements
Your system must meet these minimum requirements in order to run Paragon Manager:
• Memory: 256MB
• CPU: 750 MHz Pentium III processor
• Minimum available disk space: 100 MB
Page 4

Page 5

CONTENTS i
Contents
Chapter 1: Introduction .................................................................. 1
Paragon Manager Overview......................................................................................................1
Installing Paragon Manager.......................................................................................................1
Chapter 2: Operation ...................................................................... 3
Connection and Login................................................................................................................3
Establishing a Connection...................................................................................................3
Paragon Manager Window Components...................................................................................5
Toolbar.................................................................................................................................7
Device Panel..............................................................................................................................8
Device View.................................................................................................................... .....9
Ghosting ............................................................................................................................11
System Setting.........................................................................................................................12
User Panel ...............................................................................................................................14
Creating a User .................................................................................................................14
Deleting a User..................................................................................................................16
Viewing User Properties....................................................................................................16
Saving User Profiles..........................................................................................................17
Loading a User Profile.......................................................................................................18
Log Panel.................................................................................................................................19
Editing Event Log Settings ................................................................................................19
Power Strip View Panel............................................................................................................20
Editing Power Strip Data ...................................................................................................20
Power Strip Outlet Associations........................................................................................21
Channel Information Editor................................................................................................21
Multi Function View (MFV) Panel......................................................................................23
Setting Up Multiple Video Function..........................................................................................24
Adding an Association Group............................................................................................24
Editing an Association Group............................................................................................25
Deleting an Association Group..........................................................................................25
Video Redirection (Forced Video)............................................................................................26
Refreshing IBM Blade Channel Status ....................................................................................26
Setting Up NV5128 Router Association...................................................................................27
Overview of the Router Menu............................................................................................27
Configure Routers .............................................................................................................27
Configure Servers..............................................................................................................29
Configure User Stations ....................................................................................................31
Exporting Router Configuration.........................................................................................33
Importing Router Configuration .........................................................................................33
Checking Audio/Video Routing Results.............................................................................33
Saving the Paragon Switch’s Database...................................................................................34
Updating Firmware...................................................................................................................34
Reorganizing the Update List............................................................................................37
Disconnection...........................................................................................................................37
Closing Paragon Manager .......................................................................................................38
Synchronizing Database..........................................................................................................38
Paragon Manager Help............................................................................................................38
Appendix A: Client Software for Paragon II System Controller... 39
Some Differences in the Shared Commands ..........................................................................40
Connect (Session Menu)...................................................................................................40
Create and Property (Users Menu) ...................................................................................41
Exclusive Features in P2SC ....................................................................................................41
RFT_Update (Setup Menu)...............................................................................................41
Base UMT’s (Setup Menu)................................................................................................41
About Paragon II System Controller Admin.......................................................................42
Page 6

ii FIGURES
Figures
Figure 1 Session Menu - Connect...............................................................................................................3
Figure 2 Paragon Manager Login Dialog - Connect.....................................................................................3
Figure 3 UMT Profile Dialog.........................................................................................................................4
Figure 4 Update Progress............................................................................................................................4
Figure 5 Paragon Manager Window ............................................................................................................5
Figure 6 Paragon Manager Window ............................................................................................................6
Figure 7 Device Tree by Channel ................................................................................................................ 9
Figure 8 Tiered Switch Example (Z-CIM).....................................................................................................9
Figure 9 Device Tree by Type....................................................................................................................10
Figure 10 Ghosted Channels Option in the View Menu.............................................................................11
Figure 11 System Settings Dialog............................................................................................................. 12
Figure 12 Add User Dialog......................................................................................................................... 14
Figure 13 Change Password Dialog ..........................................................................................................15
Figure 14 User Information Dialog.............................................................................................................16
Figure 15 Admin User Information Screen.................................................................................................17
Figure 16 Select Destination Path Dialog ..................................................................................................17
Figure 17 Confirm Load User Profile Dialog...............................................................................................18
Figure 18 Edit Log Settings Dialog.............................................................................................................19
Figure 19 Power Strip View Panel ............................................................................................................. 20
Figure 20 Outlet Information Dialog ...........................................................................................................20
Figure 21 Channel Information Editor Dialog.............................................................................................21
Figure 22 MFV with Channel Data.............................................................................................................23
Figure 23 MFV with Power Strip View Panel..............................................................................................23
Figure 24 Add Multiple Port Association Dialog – Initial Screen.................................................................24
Figure 25 Add Multiple Port Association Dialog – Edit Data ......................................................................25
Figure 26 Force Video Dialog .................................................................................................................... 26
Figure 27 Router Menu..............................................................................................................................27
Figure 28 Configure Routers Dialog........................................................................................................... 28
Figure 29 Router Settings..........................................................................................................................28
Figure 30 Configure Servers Dialog...........................................................................................................29
Figure 31 Source Association Table ..........................................................................................................30
Figure 32 Configure User Stations Dialog.................................................................................................. 31
Figure 33 Destination Association Table.................................................................................................... 32
Figure 34 Paragon Update Dialog..............................................................................................................35
Figure 35 Paragon Update – Check All......................................................................................................36
Figure 36 Paragon Device and File Version Information Window..............................................................36
Figure 37 Wrong Firmware Warning Message...........................................................................................37
Figure 38 Paragon Update Progress Bar...................................................................................................37
Figure 39 Paragon Update Successful Message.......................................................................................37
Figure 40 Session Menu - Disconnect.......................................................................................................38
Figure 41 Setup Menu – Synchronize Database........................................................................................38
Figure 42 P2SC - System Controller Admin Login Dialog..........................................................................40
Figure 43 P2SC – Add User Dialog ...........................................................................................................41
Figure 44 P2SC – Paragon System Configuration Dialog (No Data).........................................................42
Figure 45 P2SC – Paragon System Configuration Dialog (with Data) .......................................................42
Page 7

CHAPTER 1: INTRODUCTION 1
Chapter 1: Introduction
Paragon Manager Overview
Paragon Manager is Raritan’s appliance management and configuration application, offering one
coordinated graphical user interface that displays Device, User, Log, and Outlet information for
your Paragon system. Paragon Manager allows you to add, modify, and delete Devices, Users, or
Groups, and to specify log events to keep an audit trail of events that is updated in real time. In
addition, you can also perform video redirection (called Forced Video), refresh IBM Blade
server’s channel status, or associate channels for setting up concurrent multiple-video-output
function (called Multiple Video or Port-Following Switch) in Paragon Manager. Paragon
Manager can be downloaded from Raritan’s website.
If working with a Paragon II configuration, first read the Paragon II User Guide for initial
installation and configuration of your Paragon II devices. This document can be downloaded from
the Firmware and Documentation section of Raritan website at:
http://www.raritan.com/support/firmware-and-documentation/
For users who use Paragon II System Controller, see Appendix A: Client Software for Paragon
II System Controller for the difference between P2SC Admin client software and Paragon
Manager.
.
Installing Paragon Manager
Follow the steps below to download Paragon Manager.
1. Use your browser to visit Raritan's Firmware and Documentation webpage
(http://www.raritan.com/support/firmware-and-documentation/
2. Click Paragon II on the left pane to open its list of support documents and files.
3. Locate the Other Support Files section on the right pane.
4. Click the latest version of “Paragon Manager Admin Tool” to download Paragon Manager.
5. (Optional) If this is your first time to download the program or firmware from the Raritan
website, fill in the Firmware Request from, and click Submit.
6. When you see the hyperlink on the right pane, click it.
7. Specify the location where you want to save the file, and click Save. Wait until the download
completes.
8. Extract the file if it is a ZIP file.
9. Double click the ParagonManager-setup.exe file to install Paragon Manager. Accept the
default settings.
When installation is complete, a shortcut to the application has been added to your Start menu
).
Page 8

2 PARAGON MANAGER USER GUIDE
Page 9

CHAPTER 2: OPERATION 3
Chapter 2: Operation
Connection and Login
Only three types of users have permissions to log in to Paragon Manager:
• Administrators (the “Admin” account)
• Users with administrator privileges
• Users with Forced Video privileges
Administrators and users with administrator privileges can manage or even modify the user or
channel data in Paragon Manager, but users with Forced Video privileges do not have
permissions to do this. The only thing they can do is to perform the Forced Video function.
Establishing a Connection
Follow the steps below to establish the connection to any Paragon II switch after Paragon
Manager is launched:
1. Choose Start > Programs > Paragon Manager. The Paragon Manager window appears.
2. Choose Session > Connect.
Figure 1 Session Menu - Connect
The Paragon Manager Login dialog appears.
Figure 2 Paragon Manager Login Dialog - Connect
3. Type your user name in the User Name field.
4. Type your password in the Password field.
5. Decide your next action based on the Paragon switch displayed in the Select UMT field:
• If the desired Paragon switch is already displayed, go to step 6.
• If the desired Paragon switch is NOT displayed, click the arrow beside the field and
select the desired Paragon switch from the drop-down list.
• If the desired Paragon switch is neither displayed nor available from the drop-down list,
do the following to add it:
a) Click the
button. The UMT Profile dialog appears.
Page 10
4 PARAGON MANAGER USER GUIDE
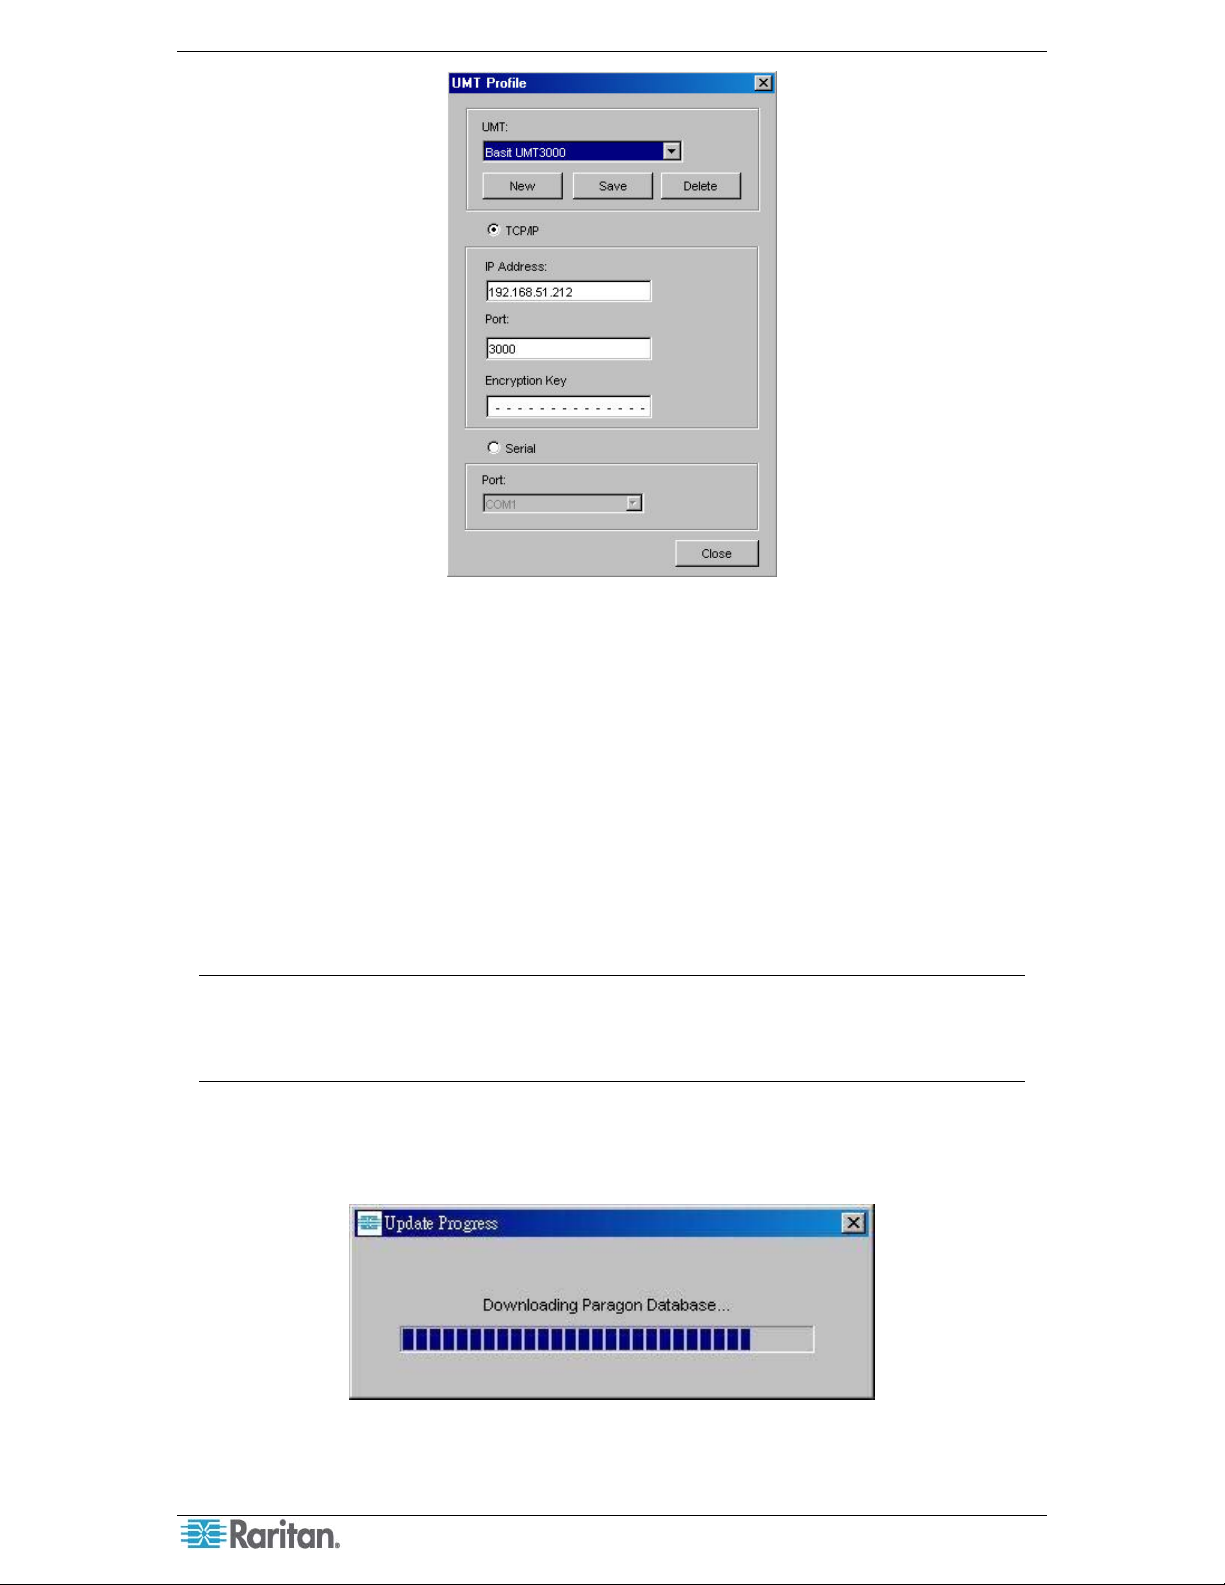
Figure 3 UMT Profile Dialog
b) Click New.
c) Type the name of the device in the UMT field.
d) Select the TCP/IP option.
• Type the IP address of the Paragon switch in the IP Address field.
• Type the Port number of the Paragon switch in the Port field.
• Type the appropriate encryption key of the Paragon switch in the Encryption
Key field, if applicable.
e) Click Save to save this new device.
f) Click Close to return to the login window.
Note: To delete a Paragon switch in the UMT Profile dialog:
(1) Click the drop-down arrow in the UMT field and select the device you wish to delete.
(2) Click Delete to delete it.
(3) Click Close to return to the login dialog.
6. Click Login to log in to the Paragon switch. The Update Progress indicator displays your
connection status. It may take 30 seconds or longer to connect, depending on your Paragon
configuration.
Figure 4 Update Progress
Page 11

CHAPTER 2: OPERATION 5
7. When connected, the Paragon Manager window appears.
Figure 5 Paragon Manager Window
Note: See Disconnection for information on disconnecting the existing connection session,
or see Closing Paragon Manager for information on closing the application.
Paragon Manager Window Components
The Paragon Manager window contains the Paragon Manager menu bar and toolbar, the Device
panel, User panel, Log panel, and Power Strip View panel.
• The Device panel displays all connected devices in a single Paragon system.
• The User panel displays all users in your Paragon system.
• The Log panel displays the current activity of Paragon Manager.
• The Power Strip View panel displays any power strips connected to your Paragon
system.
When you connect to your Paragon switch via Paragon Manager, it downloads the device’s
database and populates the Device, User, and Power Strip View panels automatically. Initial
download may last several minutes, depending on the sizes of the client system and the Paragon
system. Once a connection session is initiated, updates to the database happen in real time and
changes to the Paragon database from other users are immediately reflected in your Paragon
Manager screen.
Page 12
6 PARAGON MANAGER USER GUIDE
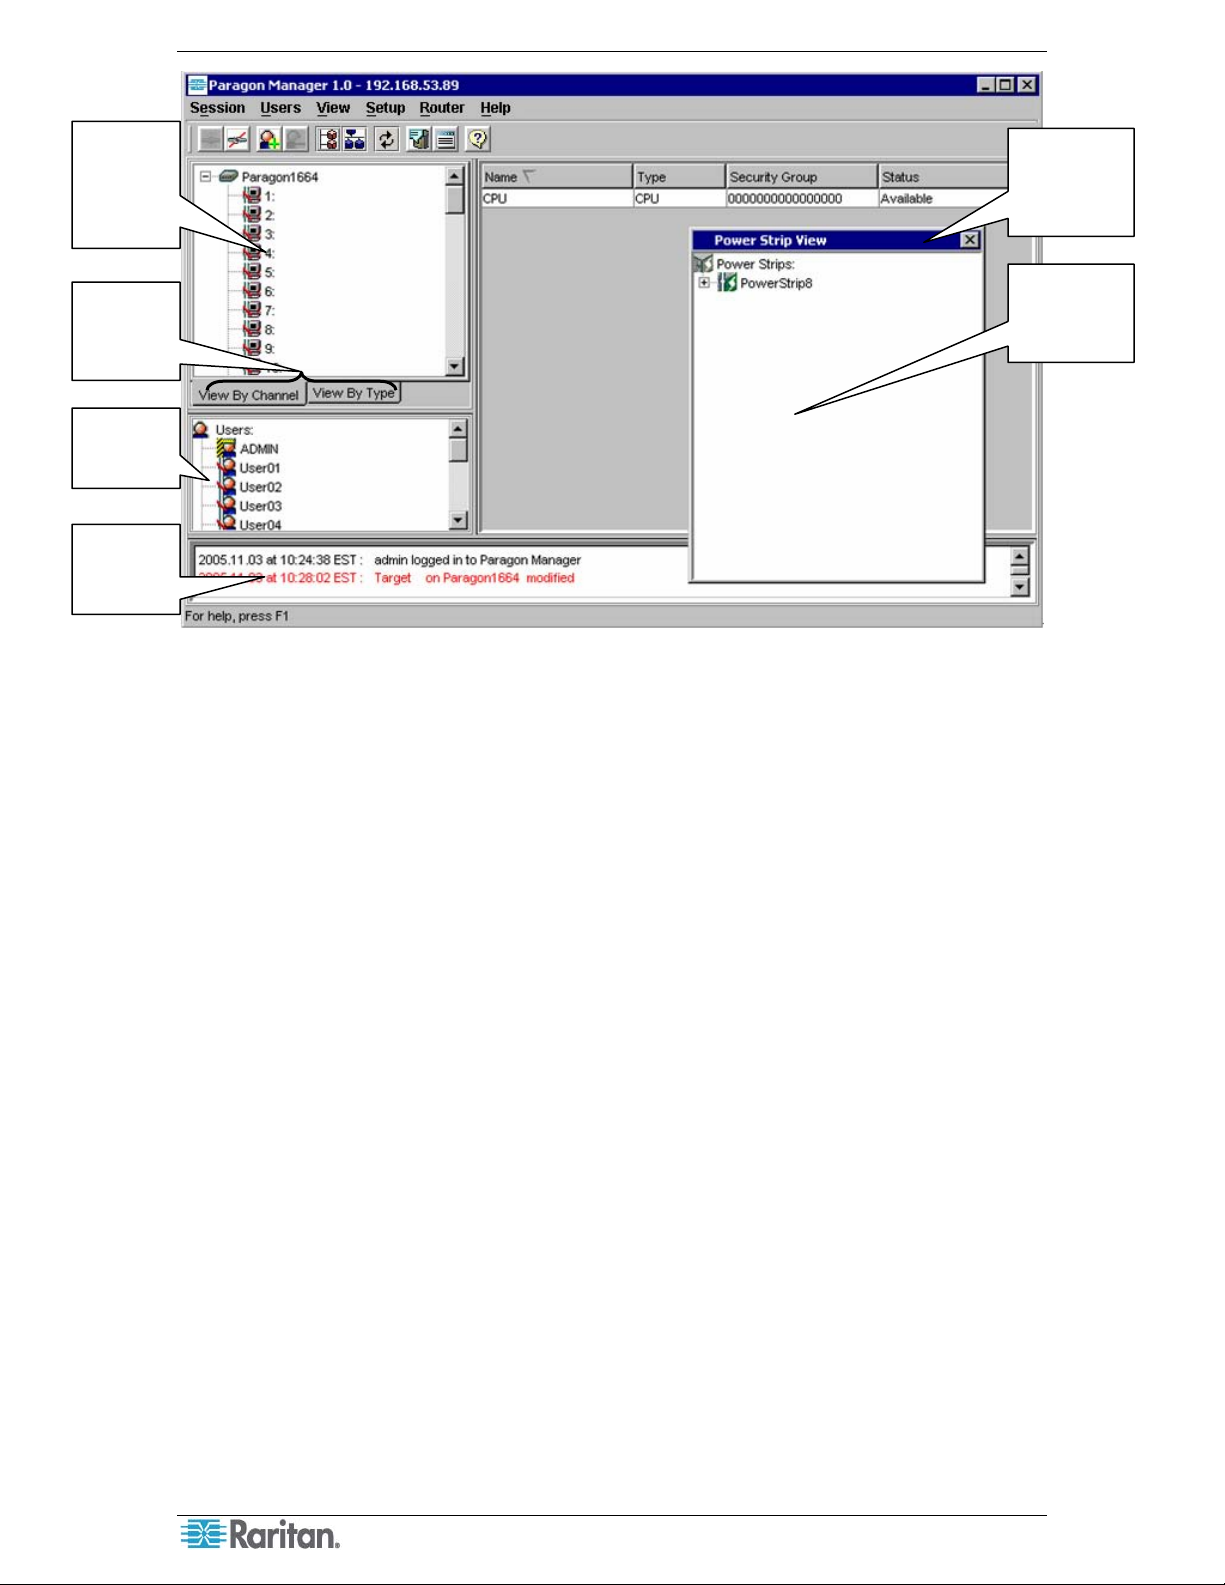
Device panel displays all
connected
devices in the
Paragon II
system
Device View
Tabs – view
devices by
Channel or by
Type
User panel –
displays users
and groups in
the system
Log panel –
displays tracked
events by date
and time
Figure 6 Paragon Manager Window
Multi-Function
View (MFV)
panel – displays
device and/or user
information
Power Strip View
panel – displays
power strips and
connected ports
Page 13

CHAPTER 2: OPERATION 7
Customize your view by resizing panels or by displaying or hiding any of these components,
except for the Device panel. Select options on the View menu; click the desired panels in the
menu to display or to hide them. A check mark before the menu item indicates that it is displayed.
Only the Device panel cannot be hidden.
Resize the window panels by resting your mouse cursor on the border of two panels until a
double-headed arrow appears. Click and drag the arrow to size the panel up/down or left/right.
Toolbar
The toolbar displays shortcut buttons for the most commonly-used commands. These are
explained in the table below.
Note: Some of these shortcuts, as well as some menu commands, are also available by rightclicking on a User, Device, or Channel icon to activate a shortcut menu.
Toolbar Shortcut Icons
BUTTON ACTION
Connect: Establishes a connection to the selected Paragon switch.
Disconnect: Disconnects the existing connection session.
Add User: Adds a new user account in Paragon Manager and the connected
Paragon system.
Delete Selected User: Deletes the user selected in the User View panel from
Paragon Manager and the connected Paragon system.
View by Channel: Displays devices by Channel.
View by Type: Displays devices by Type.
Synchronize Database: Activate the download process again to refresh
Paragon Manager’s database.
System Setting: Displays the connected Paragon’s system configuration.
Log File: Launches the Edit Log Setting dialog for Administrators to
configure event filters, event severity, and locations of saved log files.
Help: Launches the Paragon Manager online help.
Page 14
8 PARAGON MANAGER USER GUIDE
Device Panel
The Device panel displays all devices connected to the Paragon switch to which you are
connected. To make control easier, view devices either by Channel or by Type using the two tabs
at the base of the Device panel (please see next section for additional information on Device
views).
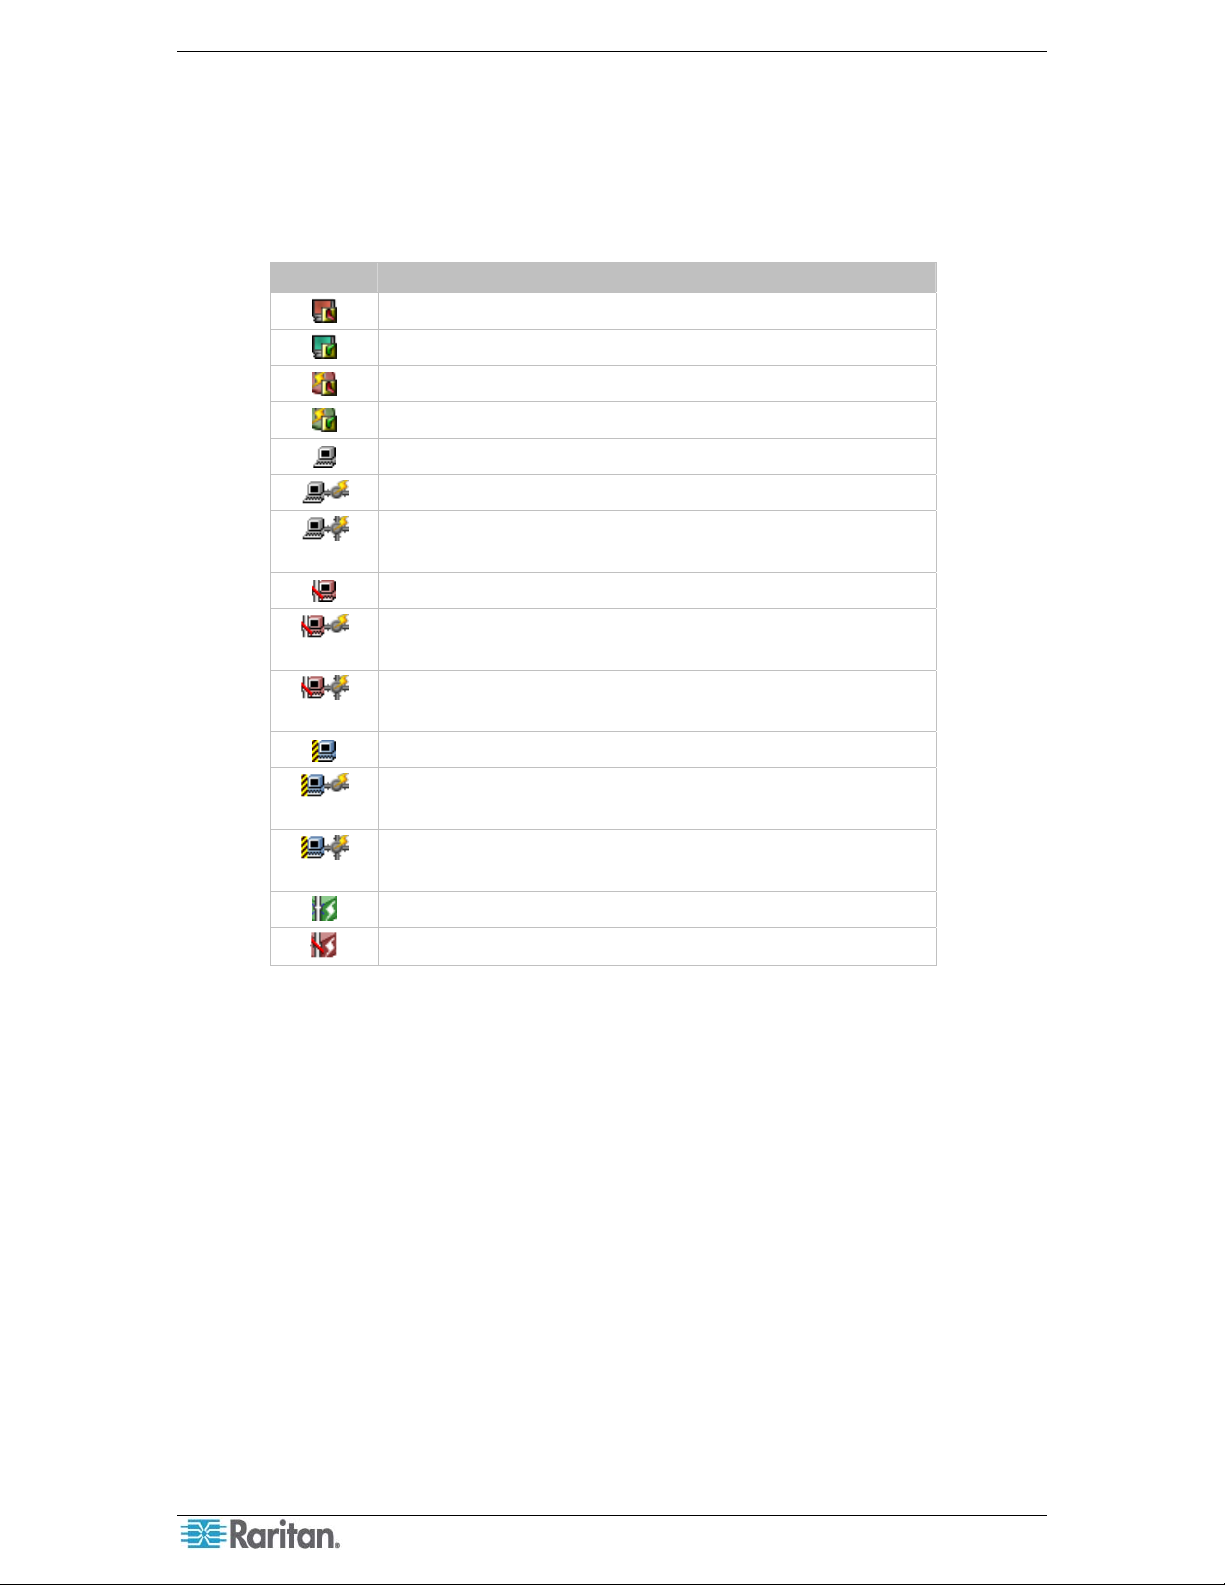
ICON INDICATES:
Power Strip outlet – power off (server)
Power Strip outlet – power on (server)
Power Strip outlet – power off (PWR)
Power Strip outlet – power on (PWR)
Channel Available
Channel Available with one power strip outlet association
Channel Available with multiple power strip outlet
associations
Channel Disconnected
Channel Disconnected with one power strip outlet
association
Channel Disconnected with multiple power strip outlet
associations
Channel Occupied by a user
Channel Occupied by a user, with one power strip outlet
association
Channel Occupied by a user, with multiple power strip
outlet associations
Power Strip Connected
Power Strip Disconnected
Page 15

CHAPTER 2: OPERATION 9
Device View
View by Channel
Click the View By Channel tab to display devices in a hierarchical tree by channel number. The
icon at the top of the tree is the connected Paragon switch.
Click the + symbol next to the Paragon switch to expand the tree and display all devices
connected directly to it, listed in port number order. Target servers appear as computer icons.
Figure 7 Device Tree by Channel
Tiered switches (such as Z-CIM) appear as icons with the + symbol before them, and can also be
expanded.
Figure 8 Tiered Switch Example (Z-CIM)
Grey computer icons represent a target server that is available for connection, while blue
computer icons indicate that a user is accessing the target server. Red computer icons represent a
target server that is unavailable. See the Device Panel table on the previous page for more
information.
Page 16

10 PARAGON MANAGER USER GUIDE
View by Type
Click the View By Type tab to display devices in a hierarchical tree by device type. Target
Systems, Switches, and Power Strips are represented in this view.
• Switches are represented by a grey node.
• Target Systems are represented by a grey computer
• Power Strips are represented by a grey lightning bolt.
Click the + symbol before any icon to expand the tree to display all devices of that type in the
configuration, displayed by type in alphabetical order.
Figure 9 Device Tree by Type
Page 17

CHAPTER 2: OPERATION 11
Ghosting
In a Paragon system, when a CIM or tier device is removed from the system or powered off
(manually or accidentally), a record of the CIM or CIMs connected to that tier device is reserved
in the Paragon system. The target (or port) name will continue to appear in black text on the OnScreen Display (OSUI) of local user stations, and will also appear, with inactive status, in clients
such as Raritan MPC (Multi-Platform Client), RRC (Raritan Remote Client), Paragon Manager,
P2SC (Paragon II System Controller) Admin, and CC (CommandCenter).
In versions of PCCI 1.2 and later (and with standalone Paragon 4.1 and later), the default
Ghosting mode on the Paragon OSUI is set to Enable. When an active CIM is removed from one
channel and connected to another channel (‘hot-swapped’), you will see two identical CIM entries
on the OSUI of the Paragon Clients: one in green text (indicating that it is active) and another in
black text (indicating that it is inactive). The inactive CIM is known as the ‘ghost’ CIM. To stop
displaying records of the inactive CIMs after they are hot-swapped into a different port, you must
set the Ghosting mode in Paragon to Disable.
Even if Ghosting mode in your Paragon device is set to Disable, Paragon Manager allows the
capability to override the ghost setting on the local machine. Choose View > Ghosted Channels
to display any ghosted channels even though they are invisible throughout the rest of the Paragon
system. This feature allows you to override the Ghosting preferences without changing settings of
the entire system. It should be used for administration and for troubleshooting. Please see the next
section for specifying Ghosting preferences for the system.
Figure 10 Ghosted Channels Option in the View Menu
Page 18

12 PARAGON MANAGER USER GUIDE
System Setting
Users of Paragon Manager for standalone Paragon product must set up their Paragon system
configuration. Use the System Setting shortcut on the toolbar, or click System Setting on the
Setup menu.
1. Choose Setup > System Setting. The System Setting dialog appears.
Figure 11 System Settings Dialog
2. Type a name for your Paragon II switch in the System Name field (up to 12 alphanumeric
characters). It is important for Paragon switches to have distinctive names if they are part of a
cascaded system with multiple Base Units.
3. Click the Operation Mode drop-down menu and select a mode. Operation Mode indicates
the way your Paragon system handles requests from multiple users for access to the same
channel port. Choose:
− Private: A server or other device on a specific channel port can be accessed exclusively
by only one user at a time. No other users can control that device until its controlling user
selects a different channel port.
− Public View (P-View): While one user is accessing a server or other device on a specific
channel port, other users can select the same channel port and view the video output from
that device, but only the first user will have keyboard and mouse control. When the first
user selects a different channel port, the waiting user who is first to type or move the
mouse is given keyboard and mouse control. Status messages showing users’ identities
appear on video-sharing users’ monitors when Public View mode is in effect.
− PC Share: A server or other device on a specific channel port can be selected and
accessed by more than one user, but only one user has keyboard and mouse control at any
given time. If the PC share timeout is enabled and the user in control is idle (no keyboard
or mouse activity) for the duration of the timeout, the waiting user who is first to type or
move the mouse is given keyboard and mouse control of the PC.
4. Click the Hide Admin From Users drop-down arrow and choose Yes or No. When
Operation Mode is set to “Public View” (P-View), the user in control of a server is normally
notified when other users start and stop viewing the channel port’s video. However, when
Hide Admin From Users is set to “Yes,” administrators can view other users’ video without
activating this viewing-notification message. The default setting is No.
Page 19

CHAPTER 2: OPERATION 13
5. Click the Login Sleep drop-down arrow and choose OFF, Saver or Green. If you choose
Saver or Green, specify the amount of time in minutes that the local user station can remain
inactive at the Login Menu before the monitor enters the power-saving mode (press any of
the keys on the keyboard to restore normal video). Using leading zeroes if necessary, type in
a two-digit number of minutes from 01 to 99 in the Interval (Min.) field which is next to the
Login Sleep field. The default setting is 05. The difference between Green and Saver is the
Saver option makes the monitor go blank with a floater displayed on the screen, but without a
floater for the Green option. If the Login Sleep is set to “Off,” the number in this field will
have no effect.
6. Click the Default Login Name Blank drop-down arrow and choose Yes or No. This
determines whether the User Name field in the Login Menu will be blank when the menu
appears, or if the field will contain the default user name (the first available “userxy” name,
where “xy” is a two-digit number with leading zeroes—“user01,” “user02,” and so on). Use
the Ç and È keys to toggle between “Yes” (the field is blank – the default value) and “No”
(field contains the user name).
7. Click the Logoff Timeout drop-down arrow and choose On or Off. If enabled, the amount of
time in minutes that the local user station can remain inactive before the logged-in user at that
station is logged out of the Paragon II system.
− If Logoff Timeout field, above, is set to “On,” the number in the Interval (Min.) field
(the one near the Logoff Timeout field) is the number of minutes of inactivity before the
timeout is triggered and the user is logged out. Using leading zeroes if necessary, type in
a two-digit number of minutes from 01 to 99. The default setting is 05. If Logoff Timeout
is set to “Off,” the number in this field will have no effect.
8. Type the timeout (in seconds) in the PCShare Timeout (Sec) field. If Operation Mode is set
to “PC Share” and more than one user has selected a server, the first user to type or use
his/her mouse will have control of the server. However, another user can gain control of the
server if the first user’s keyboard and mouse remain idle for the length of this timeout. Using
leading zeroes if necessary, type in a two-digit number of seconds from 01 to 99. The default
setting is 01.
9. Click the Require Password drop-down arrow and choose Yes or No. Determine whether a
user can specify a blank password, that is, delete any existing password and have no
password at all. Use the Ç and È keys to toggle between “No” (users may delete their
existing passwords) and “Yes” (the default setting; starting with the first time they change
their password, users must always have a non-blank password). Newly created users always
start with no password, and must assign one to themselves during initial setup.
10. Click the Ghost Mode drop-down arrow and choose Enable or Disable. If you enable
ghosting, you will be able to view hot-plugged CIM connections, former and current. If you
disable ghosting, you will see only current CIM connections. The default setting is Enable.
11. When finished, click Ok to accept all system settings, or click Cancel to close this screen
without saving changes.
Page 20
14 PARAGON MANAGER USER GUIDE
User Panel
The User panel displays users stored on the connected Paragon system and displays each user’s
profile.
Double-click a user to display the User Information dialog. As an Administrator, you can change
account properties for users selected in this dialog.
ICON INDICATES:
Admin logged in and Connected
Admin logged in and Disconnected
Admin logged out and Disconnected
User logged in and Connected
User logged in and Disconnected
User logged out and Disconnected
Creating a User
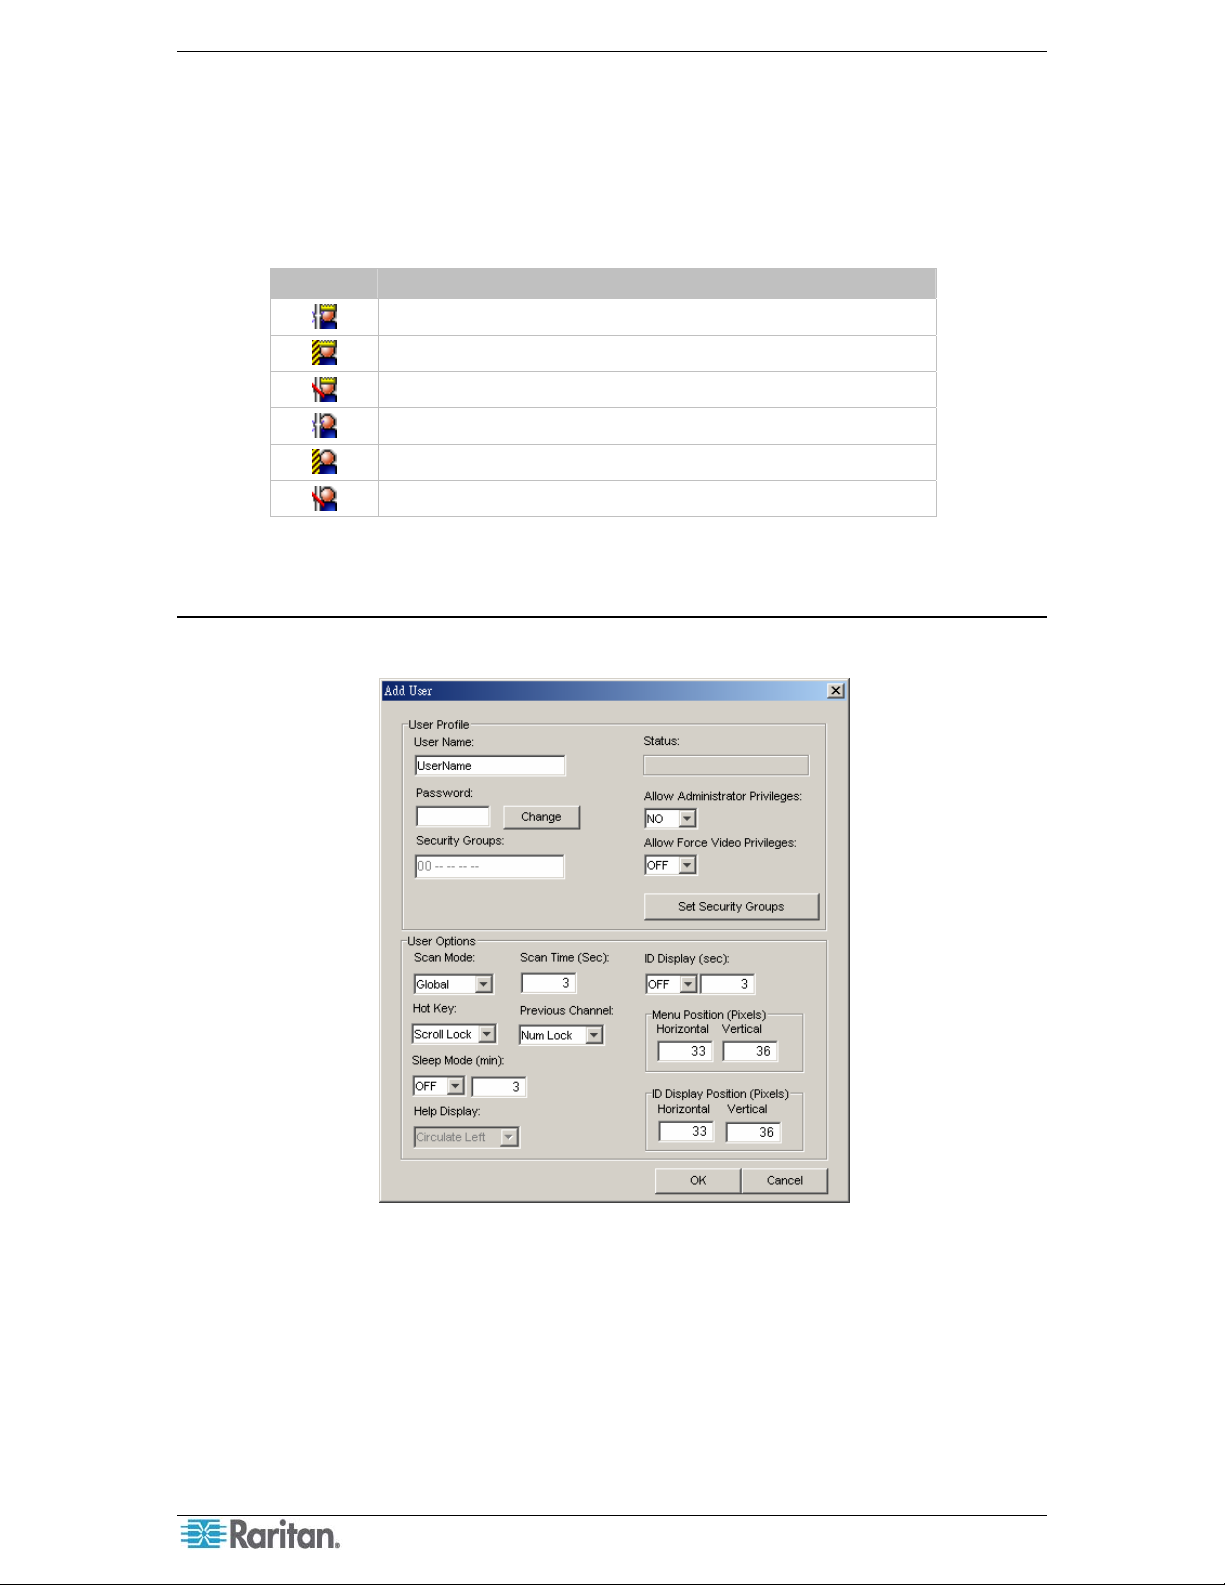
1. Choose Users > Create. The Add User dialog appears.
Figure 12 Add User Dialog
2. Type the new user’s name in the User Name field.
Page 21

CHAPTER 2: OPERATION 15
3. Click Change and the Change Password dialog appears. Type a new pass word in the Enter
New Password field, and re-type the password in the Repeat Password field. Click OK
when finished.
Figure 13 Change Password Dialog
4. The Security Groups field is automatically populated, based on the defaults of the Paragon
switch to which you are connected. To change the assigned Security Groups, click Set
Security Group and change the default groups (please consult your Paragon User Guide for
more information on Security Groups).
5. Click the Allow Administrator Privileges drop-down arrow and select an option from the
list.
6. In the User Options panel, click the Scan Mode drop-down arrow and select the scan mode
for this user. Global scan mode, the default, scans each channel for the same amount of time
(default time = three seconds), and Individual scan mode scans each channel for a specific
time the Administrator has specified on the OSUI. To change the number of seconds for the
Global scan, type the new duration of seconds in the Scan Time (Sec) field.
7. Click the Hot Key drop-down arrow and select a key from the list. When you press this key
twice rapidly on any user station in your Paragon configuration, the Paragon OSUI will
appear. Note that this option is set in Paragon Manager, but used only at local user stations in
the Paragon system.
8. Click the Previous Channel drop-down arrow and select a key from the list. When you press
this key on any user station in your Paragon configuration, the channel previously viewed
will re-appear. Choose None to override this capability. Note that this option is set in Paragon
Manager, but used only at local user stations in the Paragon system.
9. Click the Sleep Mode (min) drop-down arrow and turn the power-saving mode off or on
(that is, Saver or Green). If you select Saver or Green, type in the number of minutes after
which, if there is no keyboard or mouse activity, the user station monitor goes blank with a
floater displayed (Saver) or without a floater displayed (Green) on the screen.
10. The Help Display determines how the Paragon help screen is activated from any user station
in your Paragon configuration.
11. Click the ID Display (sec) drop-down arrow to turn the ID display Off or On. If you select
On, the ID Display will remain on the user station monitor for the number of seconds you
type into the next field.
12. In the Menu Position and ID Display Position panels, enter the Horizontal and Vertical
placement of the menu on any of the user station monitors in your Paragon configuration.
13. Allow Force Video Privileges field: An administrator or user with administrator privileges is
by default capable of performing the Forced Video function (video redirection). However, to
allow a user without administrator privileges to be able to execute this function, you need to
specify the privileges for that user. Please note if you have more than one Paragon switch in
your Paragon system, you may need to connect to diverse Paragon switches to configure the
Force Video privileges for the same user since each Paragon switch stores their user data
respectively. Choose ON to authorize the privileges to the user or OFF to disable the
privileges.
14. Click OK when finished, or click Cancel to exit without adding a new user.
Page 22
16 PARAGON MANAGER USER GUIDE
Deleting a User
Deleting a user in the Paragon Manager window deletes the user account from both the Paragon
Manager screen and also from the currently connected Paragon system.
1. In the User panel, click the user you want to delete.
2. Choose Users > Delete. The Confirm User Delete dialog appears.
3. Click Yes to delete the user or click No to close the dialog without deleting.
Note: The Administrator (Admin) cannot be deleted.
Viewing User Properties
Administrators can modify user properties in Paragon Manager.
1. In the User panel, click the user whose properties you want to modify, or simply double click
it.
2. Choose Users > Property, or right-click that user and choose Property from the pop-up
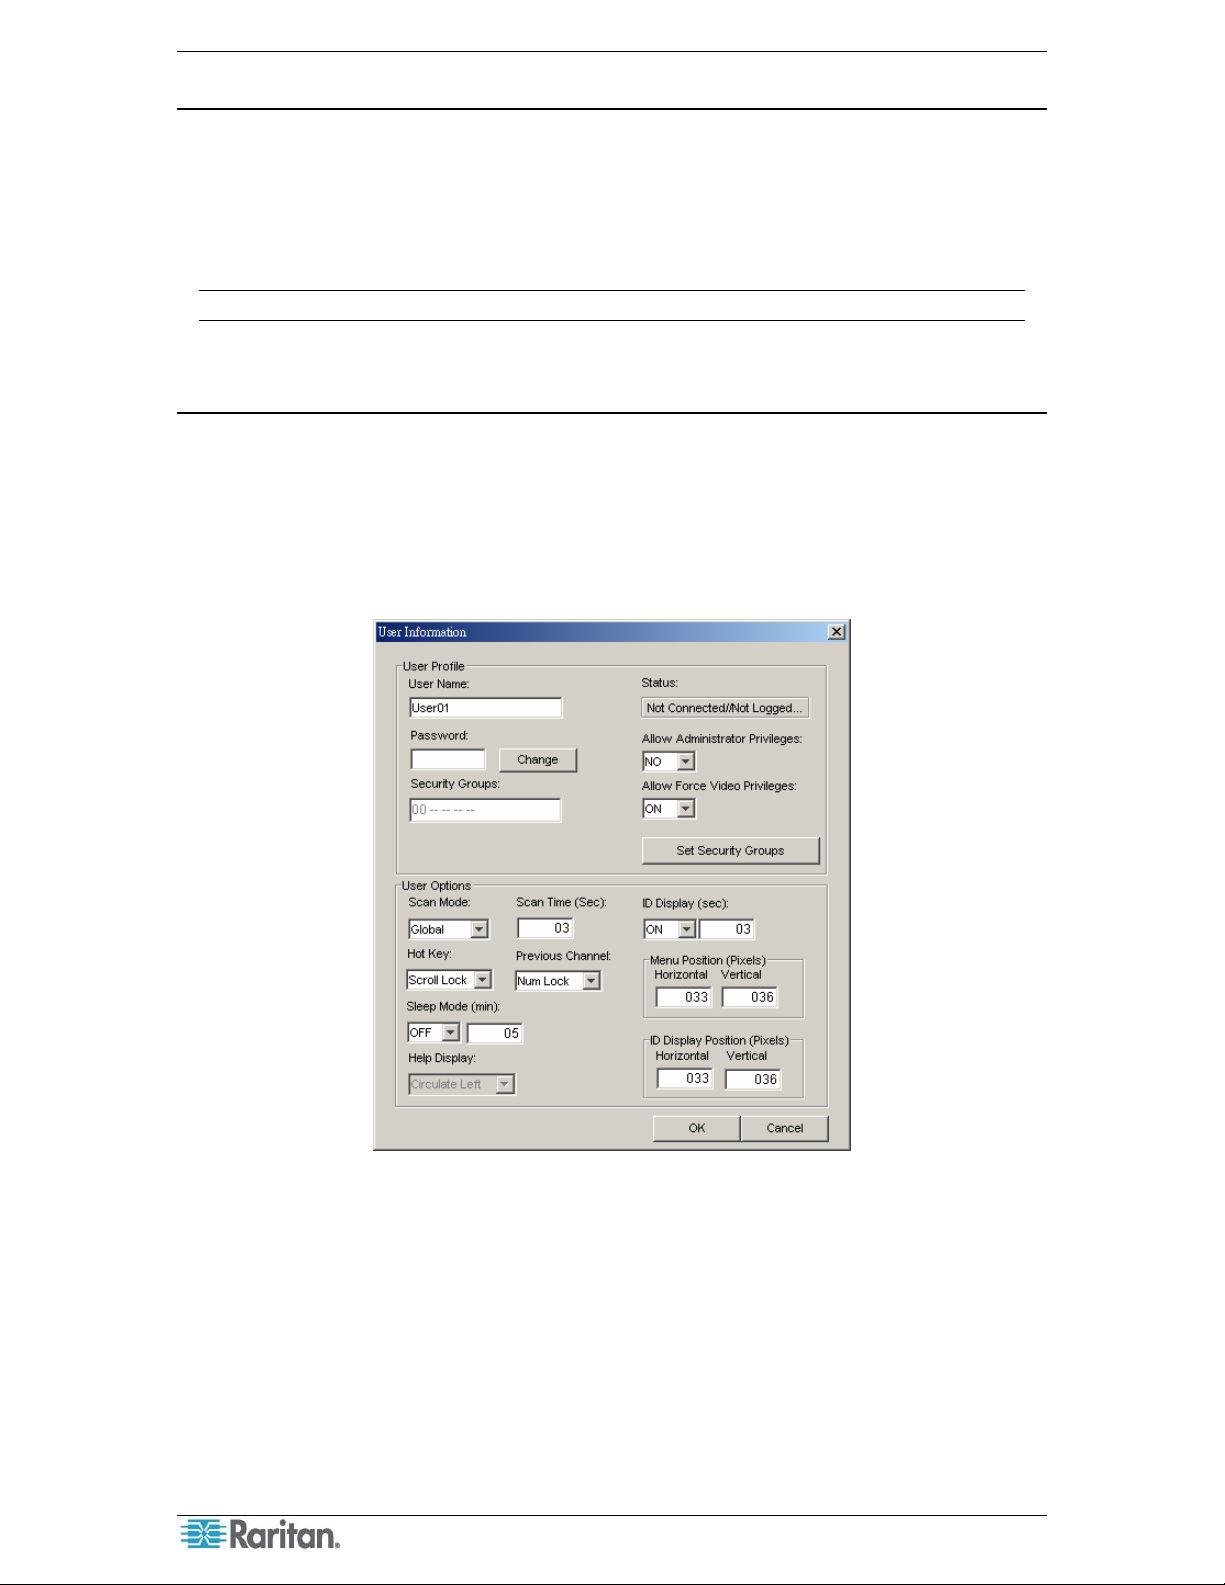
menu. The User Information dialog appears.
Figure 14 User Information Dialog
3. Change any of the user’s properties, according to the guidelines just outlined in the section
Creating a User.
4. When finished, click OK to change the user properties or click Cancel to close the dialog
without saving any changes.
Page 23

CHAPTER 2: OPERATION 17
Not all of the Administrator User’s (Admin) properties can be changed. If you select the Admin
icon in the User panel and activate the Admin’s User information dialog, those properties are
grayed out, as illustrated below. Properties that cannot be changed include User Name, Allow
Administrator Privileges, Allow Force Video Privileges, Set Security Groups, and Help
Display.
Figure 15 Admin User Information Screen
Saving User Profiles
As an Administrator, you can back up the User Database of the connected Paragon system to your
local computer using the Save Profile command.
1. Choose Users > Save Profile. The Select destination path dialog appears.
Figure 16 Select Destination Path Dialog
2. Browse through the local system until you find the location where you want to save the
Profile. Type the name of the file in the File Name field and click Save. A confirm message
box will display the path to the folder and file you just chose. Click OK to close the message
box.
Page 24

18 PARAGON MANAGER USER GUIDE
Loading a User Profile
Use the Load Profiles command to restore previously backed-up Paragon Manager files.
1. Choose Users > Load Profiles. The Confirm Load User Profile dialog appears.
Figure 17 Confirm Load User Profile Dialog
2. Click Yes to load existing user profiles, or click No to exit the dialog.
Note: If you load a user profile for a user currently in Paragon Manager, the older profile
will replace the new profile.
Important: The Load Profiles command can be used to restore previously saved
Paragon Manager system database files (*.mxd files) from an older Paragon HW3
configuration.
Page 25
CHAPTER 2: OPERATION 19
Log Panel
Editing Event Log Settings
The Log panel located at the base of the Paragon Manager window displays events that occur in
your Paragon system(s). As the Administrator, you can record and configure standard events and
message filters, and set severity levels for events, color-coding them for easier identification.
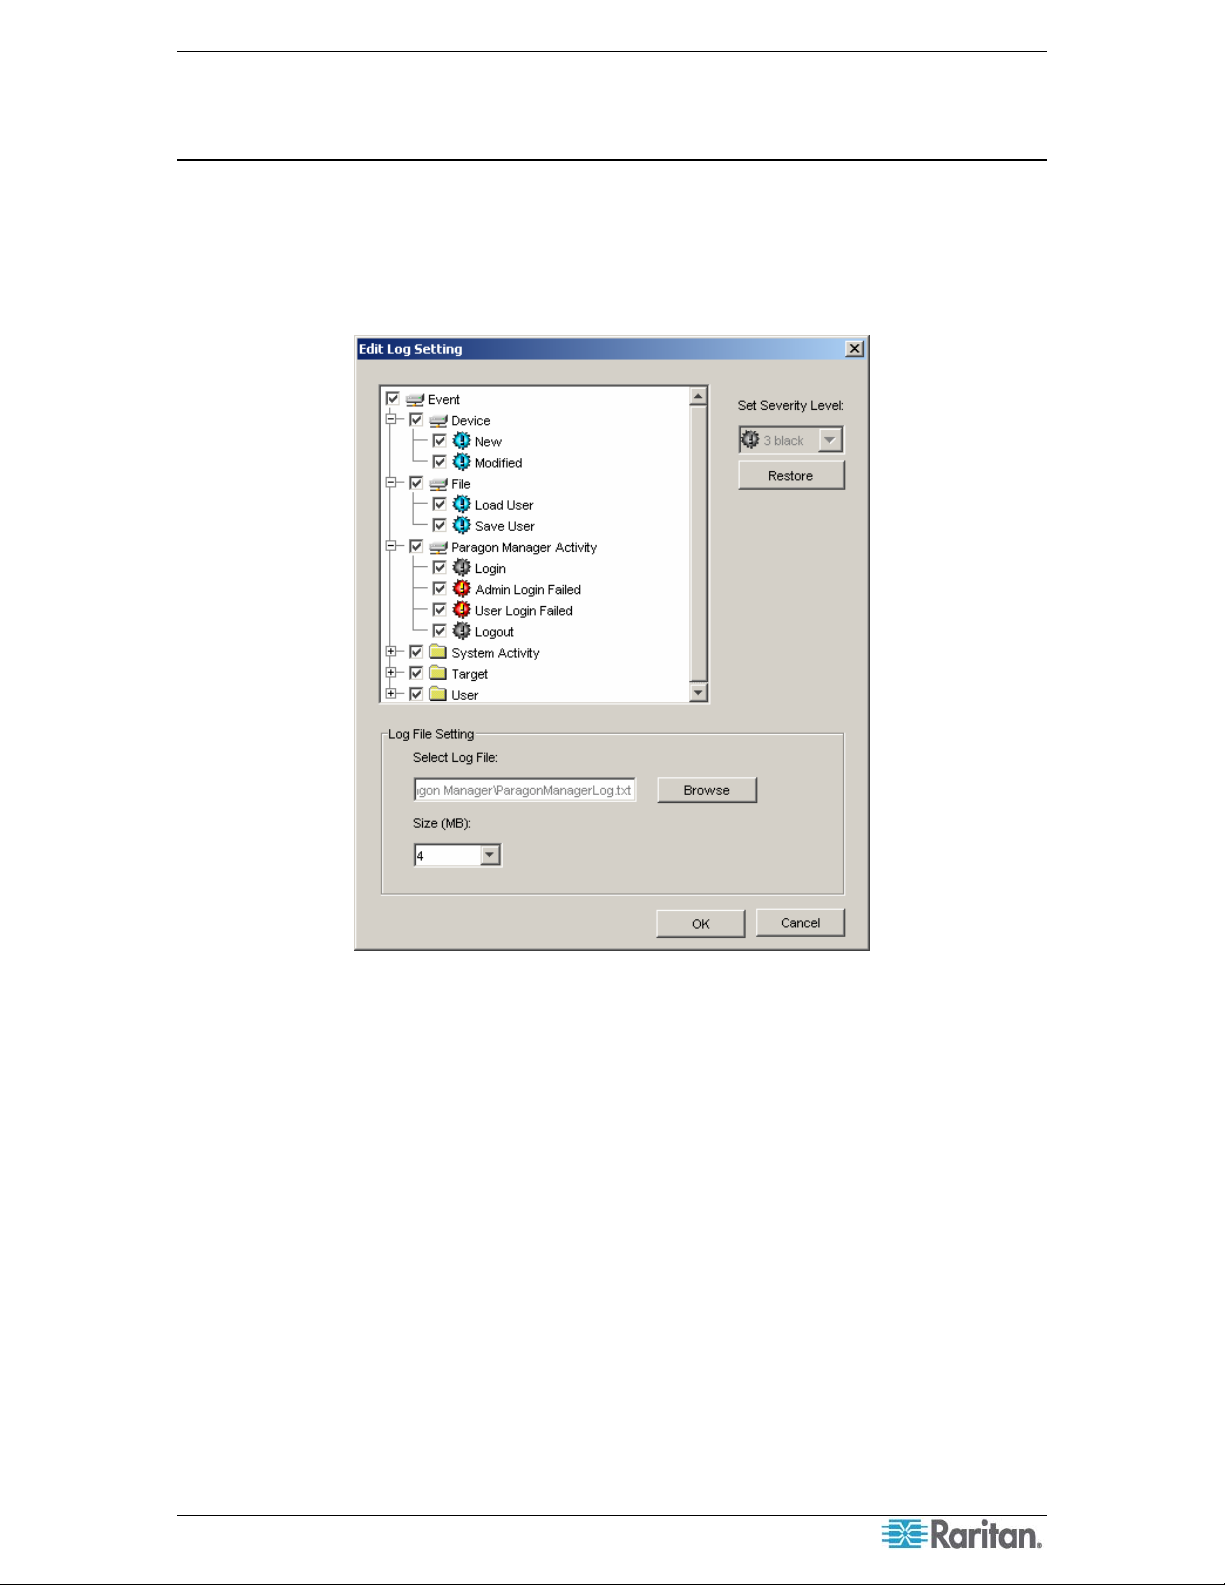
1. Choose Setup > Log Setting. The Edit Log Setting dialog appears.
Figure 18 Edit Log Settings Dialog
2. Click the + and – signs to expand and collapse the event tree in this window. Entries in the
event tree are pre-determined events programmed into Paragon Manager.
3. Click the checkbox before a device to select and specify events for recording in the log
panel. Select an event for the device.
4. On the right side of the window, click the Set Severity Level drop-down arrow and select a
severity level – levels are color-coordinated: high severity is represented by a red icon,
medium severity is blue, and lowest severity is black. To restore the default levels for the
events, click Restore.
5. In the Log File Setting panel, the location for saved log files appears in the Select Log File
field. The default location is C:/Documents and Settings (username). To change this default
location, click Browse and locate the folder in which you want to store log files.
6. Click the Size (MB) drop-down arrow to select the file size limit (default limit is 4MB).
Once the log file hits the size limit set in this field, Paragon Manager automatically creates a
new log file and continues to store events.
7. Click OK to save the log settings, or click Cancel to close the dialog without saving any
changes.
Page 26

20 PARAGON MANAGER USER GUIDE
Power Strip View Panel
The Power Strip View panel is a mobile display of Raritan Remote Power Control Strips
connected to your Paragon switch. Each node in the Power Strip tree represents a power strip, and
you can click the + and – signs to expand and collapse the view of devices plugged into each of
the serially-controlled Power Strip outlets. If the Power Strip View panel is not visible, choose
View > Power Strip.
Figure 19 Power Strip View Panel
Paragon Manager automatically detects Raritan Power Strips connected to your Paragon system.
Click any Power Strip in the tree to view its outlets. Click the + and – signs to expand and
collapse the view. Right-click any Power Strip outlet to view its properties.
Editing Power Strip Data
To organize the Power Strips in your Paragon configuration and to keep track of the machines to
which they are connected, you may want to name the Power Strips and outlets.
1. Double-click any Power Strip icon to view its properties. The Outlet Information dialog
appears.
Figure 20 Outlet Information Dialog
2. The default name of the strip appears in the Power Strip Name field. Type a new name if
needed.
3. The Outlet # field is automatically populated and cannot be changed.
4. Click the Outlet Type drop-down arrow to select either a Power (PWR) or CPU type outlet.
5. Type the name of the outlet in the Outlet Name field.
Page 27

CHAPTER 2: OPERATION 21
6. Type the Security Group in the Security Group field.
7. Click OK to save the changes, or click Cancel to close the window without saving any
changes.
Note: Because the Power Strip cannot detect what device type is associated with a specific
outlet through the power cables, outlet associations must be created manually before an
outlet can indicate to what type of device it supplies power.
Power Strip Outlet Associations
You can assign specific devices to unassigned Power Strip Outlets from the Paragon Manager
interface.
1. Expand the Power Strip tree so you can see the outlet to which you plan to assign the selected
device.
2. Click a device in the Device panel and drag the Device icon to the desired outlet icon.
3. When you release the device, a confirm message box appears. Click Yes to associate Device
to this outlet or click No to cancel this action. You can now control the Device from the
Paragon OSUI.
Note 1: For devices with redundant power supplies, one device can be associated with up to
four outlets.
Note 2: Paragon Manager only allows you to configure the power strip association setting.
You cannot use it to control the associated power strip. To control the power strip, you must
use the Paragon OSUI. For more information, see Paragon II User Guide, which can be
downloaded from the Firmware and Documentation section of Raritan’s website:
http://www.raritan.com/support/firmware-and-documentation/
.
Channel Information Editor
To view the properties or change the name of channel:
1. Select the target channel in the Device View panel.
2. Right click the highlighted channel and select Property. The Channel Information Editor
dialog appears.
Figure 21 Channel Information Editor Dialog
- Name: Give the device on this channel a name.
- Type: Select what type of device this is, CPU for target servers or any of the Raritan
PowerStrips or non-Paragon switches available in the list.
Depending on the Type selected, further information may be available in the dialog.
- Status: Displays the current status of a target device on this channel.
Page 28

22 PARAGON MANAGER USER GUIDE
- Security Group: The security groups the target device belongs to (This only affects
local Paragon access from outside of CommandCenter).
- Associated Outlets: Lists any power outlets associated with this target device. Select
an outlet and click Remove to break an association.
- Serial Number: Displays the serial number of a non-CPU type device.
3. Click OK to save your changes when done, or Cancel to exit without saving.
4. After saving the channel information, this device can be recognized by the given name in
both the System Controller Admin and the CommandCenter Configure Ports screen.
Page 29

CHAPTER 2: OPERATION 23
Multi Function View (MFV) Panel
The Multi Function View (MFV) panel of the screen displays detailed information of items you
select in the Device panel, User panel, or Power Strip panel and allows Administrators to edit
item properties from this list.
If you select a device in the Device tree, the MFV displays target-related information: name,
device type, security group, and device status. If you select a user in the User tree, the MFV
displays user-related information: user name, Admin status, security group, scan rate, and
connection information. If you select a power strip outlet, the MFV displays outlet name and
connected device type.
Administrators can double-click an entry in the MFV to activate the properties dialog for that
entry, and modify data for devices, users, or outlets, as described in the respective sections of this
chapter.
Figure 22 MFV with Channel Data
Figure 23 MFV with Power Strip View Panel
Page 30

24 PARAGON MANAGER USER GUIDE
Setting Up Multiple Video Function
Multiple Video allows users to leverage a server’s numerous video ports, providing enhanced
flexibility in video access and port operations.
Multiple Video, also known as “Port Following Switch,” enables multiple user stations (2 or 4) to
simultaneously view the video output of a single server that has more than one video port.
Multiple Video may also be used to send video from separate servers to sequential user stations.
This function is executed through the Paragon OSUI, but must be configured in Paragon Manager
first. Always remember that only channels on the same Paragon switch
group. Up to 256 association groups can be set per Paragon system.
Note: Anyone can perform the Multiple Video function on the Paragon OSUI, but only the
Administrator or users with administrator privileges can set up the channel association in
Paragon Manager.
Adding an Association Group
In order to perform Multiple Video, you must set up the channel association. One association
group consists of 2 or 4 channels, but each channel is associated in one group only.
1. Choose Setup > Multiple Video. The Add Multiple Port Association dialog appears.
can be associated as one
Figure 24 Add Multiple Port Association Dialog – Initial Screen
2. Click New to start creating an association setting.
3. Type a name in the Association Name field to identify this association group. Up to 20
characters can be entered.
4. Click the UMT drop-down arrow and select the Paragon switch whose channels you are
going to associate. By default, each Paragon switch’s name is followed by its serial number.
5. Click the Viewing Mode drop-down arrow, and select the desired option, as explained below.
− Dual Screens associates two channels.
− Quad Screens associates four channels.
Page 31

CHAPTER 2: OPERATION 25
6. Click the First Channel drop-down arrow and select the channel number that will be able to
activate video outputs of other channels when it is accessed.
7. Click the Second Channel drop-down arrow and select the channel number whose video
output will be activated when the first channel is accessed.
8. Repeat step 7 for Third and Fourth Channel if you choose “Quad Screens” in Step 5.
9. Choose the desired action(s) from the following:
• Click OK to save changes and exit the dialog.
• Click Apply to save changes without exiting the dialog.
• To exit the dialog without saving any changes, click Close.
• If you want to create more association groups, repeat steps 2 to 9 to complete each
association setting.
Editing an Association Group
You can modify any existing association group to meet your needs instead of creating a new
association group from scratch.
1. Choose Setup > Multiple Video. The Add Multiple Port Association dialog appears.
2. Click the association group that you want to edit from the list on the lower part of the dialog.
Figure 25 Add Multiple Port Association Dialog – Edit Data
3. (Optional) If you want to change the total number of channels, click the Viewing Mode drop-
down arrow and select the appropriate option.
4. Change the channel configuration.
5. Click Apply to save the changes, or Close to exit the dialog without saving any changes.
Deleting an Association Group
You can remove any unnecessary or obsolete association group from the list.
1. Choose Setup > Multiple Video. The Add Multiple Port Association dialog appears.
Page 32
26 PARAGON MANAGER USER GUIDE
2. Click the association group that you want to delete from the list on the lower part of the
dialog.
3. Click Delete.
4. Click Y to delete the group, or N to abort the deletion.
Video Redirection (Forced Video)
You can direct a channel output its video/keyboard/mouse signals to a specific user station and
thus display the video image on that user station’s monitor. Please note that the signals can only
be directed to a user station connected to the same Paragon switch. By default, only an
administrator user can perform the function. To allow a non-administrator user to execute it, see
the description of Force Video setting in Creating a User for related information.
1. First connect to the Paragon switch on which you want to perform Forced Video. See
Connection and Login for more information.
2. Perform Forced Video through one of the following methods:
• Click the channel of the target server in the Channel panel, and then choose Setup >
Force Video.
• Right-click the channel of the target server in the Channel panel, and select Force Video
from the pop-up menu.
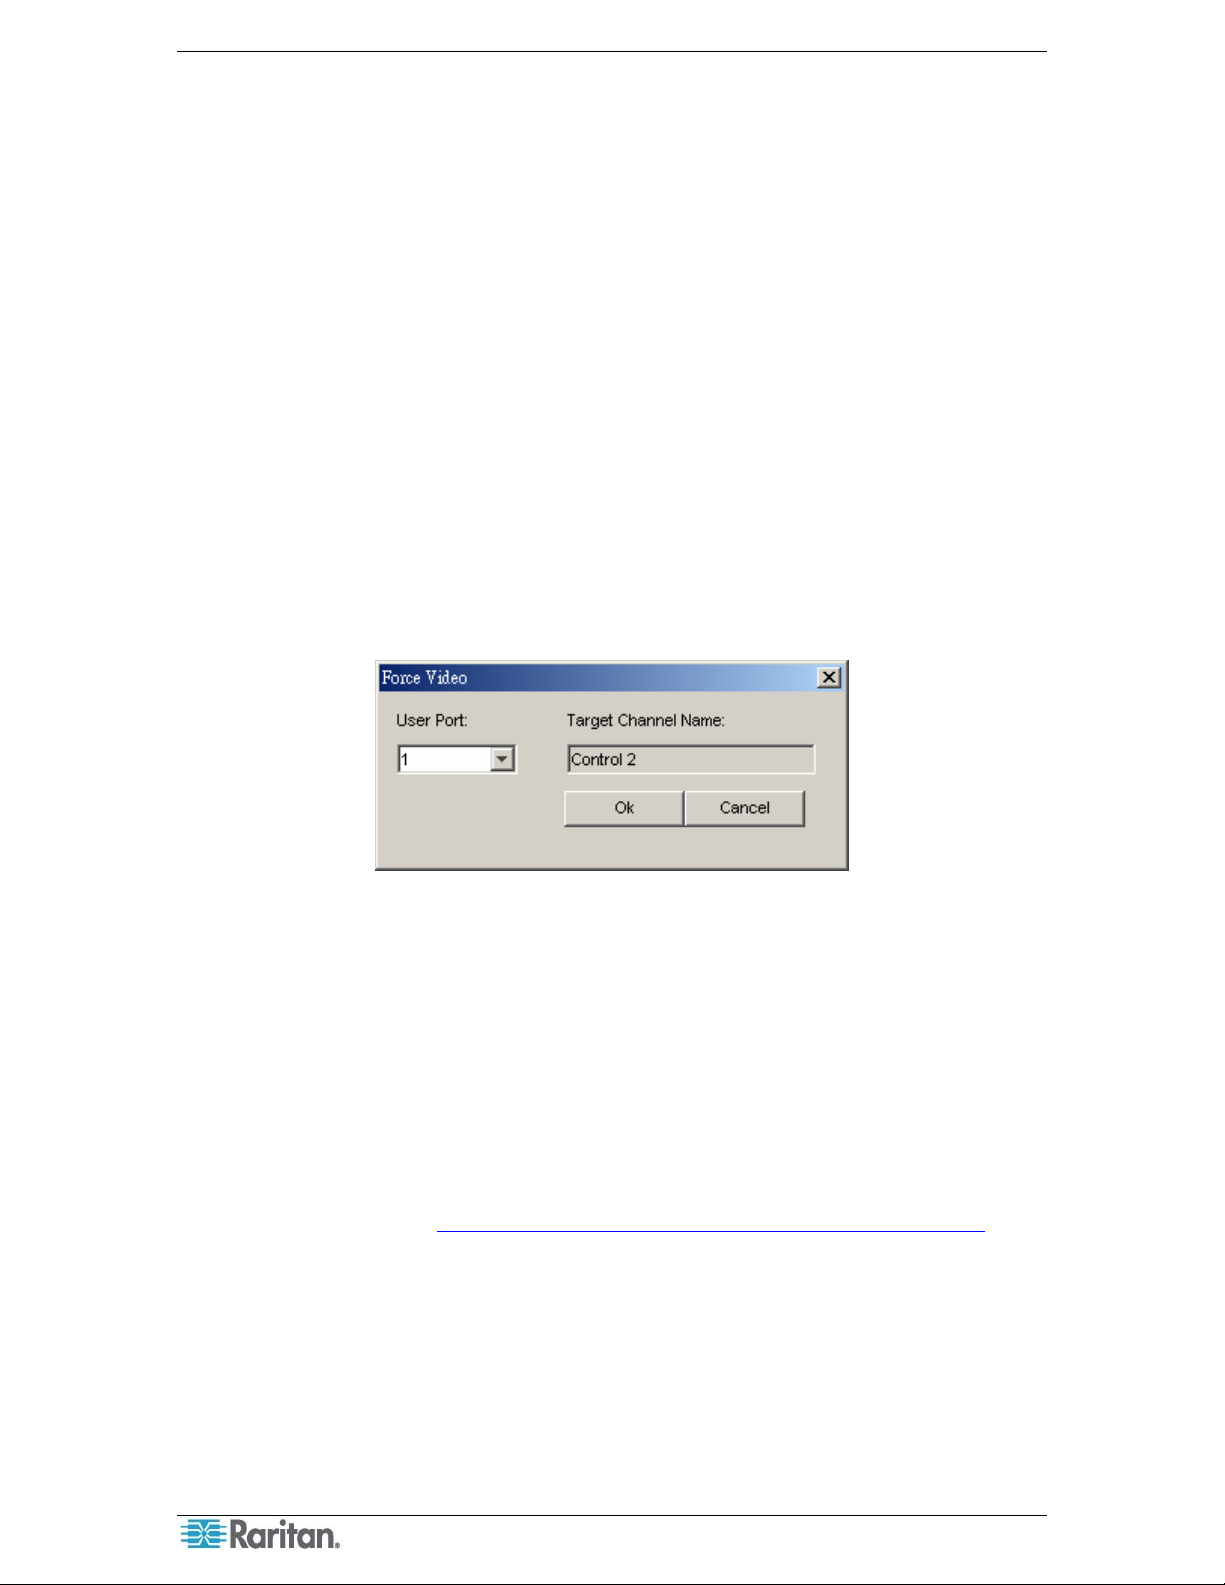
The Force Video dialog appears.
Figure 26 Force Video Dialog
3. Click the User Port drop-down arrow and select the user port to which the desired user
station is connected.
4. Click OK.
Refreshing IBM Blade Channel Status
The Paragon switch does not automatically detect and reflect the real-time IBM Blade server
status. To update the channel status, you can perform the “RefreshBLD-I” command on the OSUI
or in Paragon Manager. For information on using OSUI to refresh the IBM Blade channel status,
see Paragon II User Guide, which can be downloaded from the Firmware and Documentation
section of Raritan’s website: http://www.raritan.com/support/firmware-and-documentation/
1. Verify whether the Device View panel sorts channels by channel numbers. If not, click the
View By Channel tab.
2. Locate the IBM BladeCenter chassis channel, which is preceded with a plus sign.
3. Right-click the channel and select Property. The Channel Information Editor dialog
appears.
4. Type RefreshBLD-I in the Name field. Note the command is case-sensitive.
5. Click OK and the Paragon system updates IBM Blade channel status for 2 to 4 minutes.
Paragon Manager does not save “RefreshBLD-I” as a channel name so the IBM BladeCenter
chassis channel will restore its original name.
.
Page 33
CHAPTER 2: OPERATION 27
Setting Up NV5128 Router Association
Paragon version 4.6 or later supports audio/video routing when working with the NVISION®
NV5128 multi-format router and Paragon Manager 2.0.3 or later.
To activate this function, the router association data is required. With the router association data,
Paragon Manager can command the NV5128 router to direct audio/video signals from specified
audio/video sources to specified audio/video destinations when any access to Paragon channels
occurs.
Important: The audio/video routing function is applicable to a “one-tier” configuration
only, which comprises a single Paragon Main Unit or a combination of a Paragon Main
Unit and Stacking Unit(s). You can associate the router with a maximum of 16 user
ports and 128 channel ports in the Paragon system.
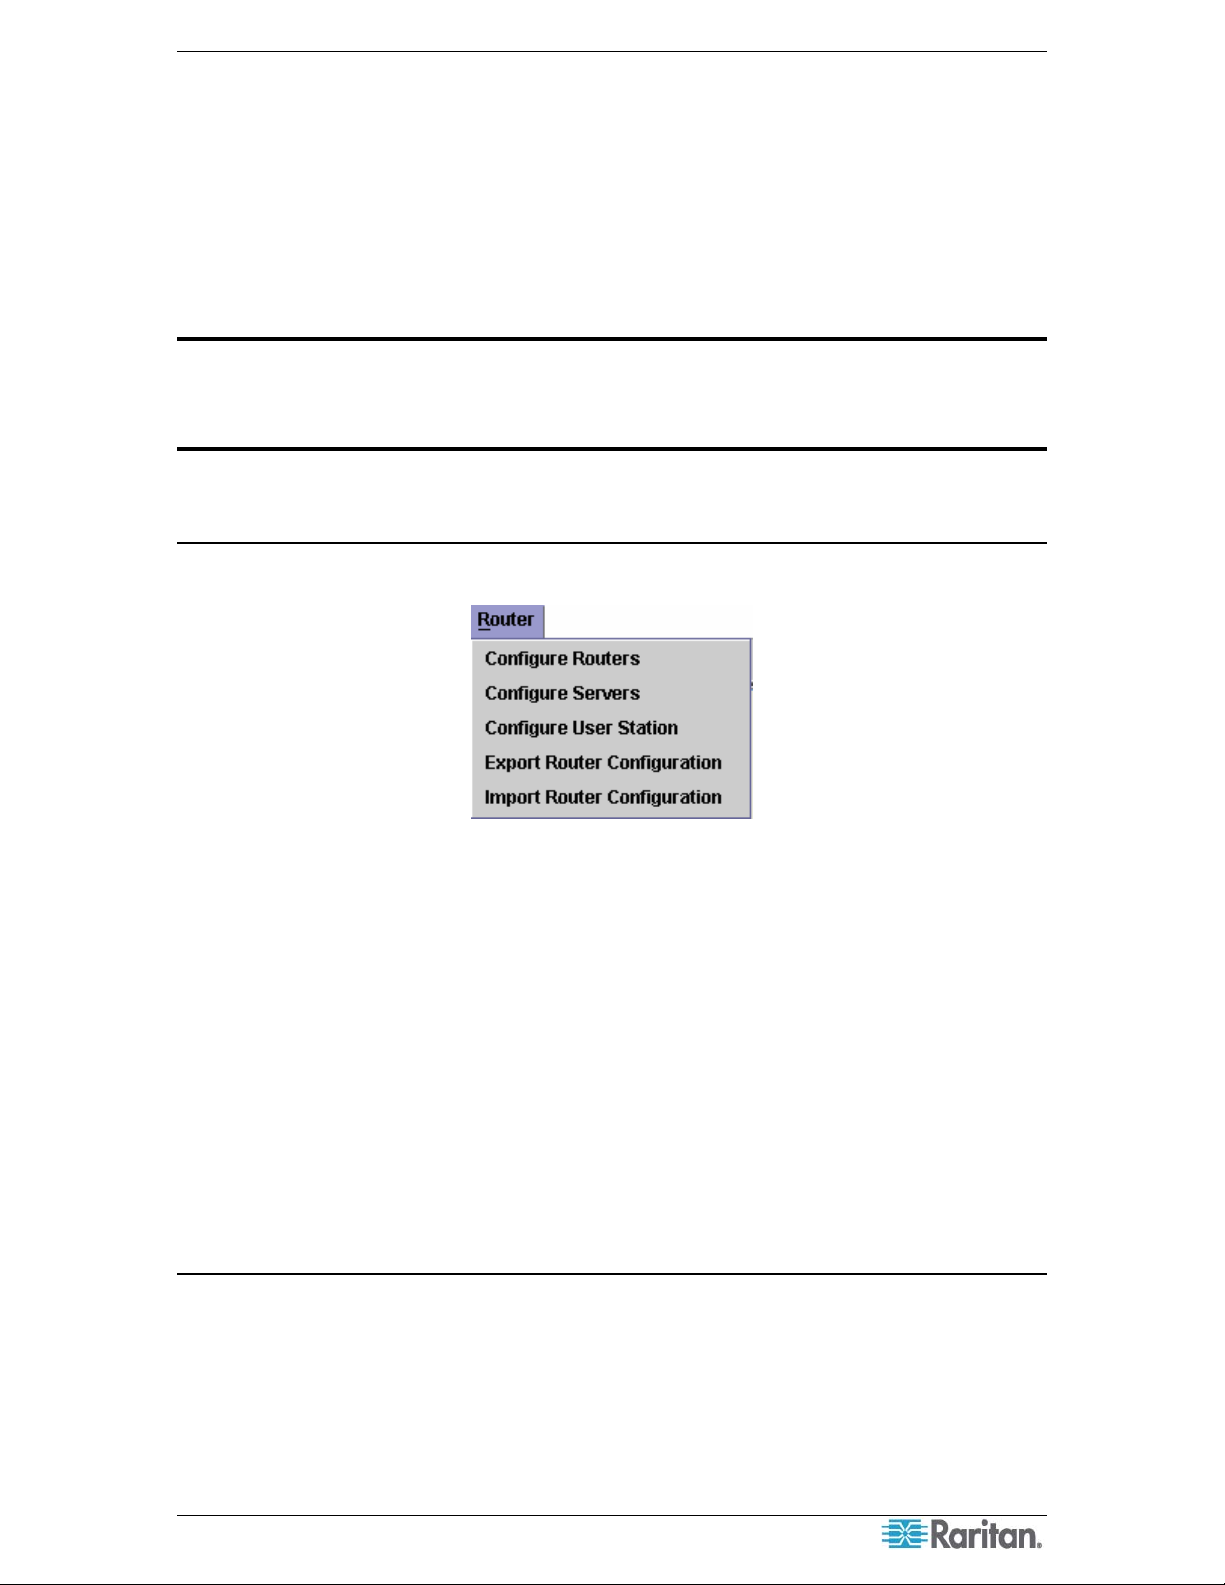
Overview of the Router Menu
The Router menu provides all commands necessary to deal with the router association.
Figure 27 Router Menu
To create the router association data from scratch, three commands are necessary:
• Configure Routers
• Configure Servers
• Configure User Stations
To save new router association data or the changes made to existing data, use this command:
• Export Router Configuration
To import any existing router association data into Paragon Manager, use this command:
• Import Router Configuration
Configure Routers
Specify one or more NV5128 routers that you want the Paragon switch to associate with in
Paragon Manager.
Adding NV5128 Routers
1. Choose Router > Configure Routers. The Configure Routers dialog appears.
Page 34

28 PARAGON MANAGER USER GUIDE
Figure 28 Configure Routers Dialog
2. Click New to start adding a router.
3. Type the NV5128 router’s IP address in the IP Address field.
4. Ensure the TCP Port Number field displays 5194.
Important: Do
control the NV5128 router.
not
change the TCP port number, or Paragon Manager cannot
5. Type a name in the Router Name field for identifying the router.
6. (Optional) Type any descriptive text in the Description field.
7. Do one of these:
• Click Apply to save the changes and the router setting is displayed in the table to the
right. Repeat Steps 1 to 7 if you want to add more NV5128 routers.
• Click OK to save the changes and quit the dialog.
• Click Close to quit the dialog without saving the changes.
Editing NV5128 Router Settings
You can change existing router settings if IP address of any NV5128 router has been changed or
is incorrect.
1. Choose Router > Configure Routers. The Configure Routers dialog appears.
2. Click the row containing the router settings that you want to change in the table. The
highlighted router’s settings are all displayed in the fields to the left.
Figure 29 Router Settings
3. Change any field you want except for the Router Name field.
4. Do one of these:
• Click Apply to save the changes, and then the changes are reflected in the table. Repeat
Steps 1 to 4 if you want to edit more NV5128 router settings.
• Click OK to save the changes and quit the dialog.
• Click Close to quit the dialog without saving the changes.
Page 35

CHAPTER 2: OPERATION 29
Removing NV5128 Routers
You can delete any existing NV5128 routers from Paragon Manager so that Paragon Manager can
no longer control it. When you delete the router, all association data relevant with the router is
removed, either.
1. Choose Router > Configure Routers. The Configure Routers dialog appears.
2. Click the row containing the router that you want to remove from the table.
3. Click Delete.
4. A confirmation message appears. Click Yes to remove the router or No to abort the removal.
5. Repeat Steps 1 to 4 if you want to remove more routers.
6. Click Close to quit the dialog.
Configure Servers
Channels ports on a Paragon switch usually connect to servers, and source ports (input connectors)
on a NV5128 router connect to audio/video output devices. To determine which audio/video
output devices the router should output audio/video signals when you access any Paragon channel
port, you must associate channel ports with the source ports. A channel port can be associated
with a maximum of 8 source ports, and each source port can be associated with one channel port
only.
Adding Source Association Data
1. Choose Router > Configure Servers. The Configure Servers dialog appears.
Figure 30 Configure Servers Dialog
2. Click New to start adding source association data.
3. Click the UMT Name drop-down arrow and select the Paragon Base Unit to which the
Paragon Manager is connecting.
4. In the Server field, select the channel port on the Paragon switch that you want to associate
with the router’s source port(s). Click the left drop-down arrow to select the channel number
and the right drop-down combo box will show the channel name if any.
5. Click the Router Name drop-down arrow and select the NV5128 router whose source ports
you want to associate with.
6. This step varies depending on your physical hardware configuration:
• To associate all ports based on identical port numbers:
a. Click Reset to Defaults.
b. A confirmation message appears. Click Yes to reset. Then each channel port is
associated with a source port if they share the same port numbers. Note that the port
type of all source association data is set to Audio by default.
• To associate the ports at a random sequence:
Page 36

30 PARAGON MANAGER USER GUIDE
a. Click the Source Port drop-down arrow and select the source port to associate with.
b. Click Audio if the selected source port is an audio connector, or Video if it is a video
connector. The default is Audio.
7. If you associate the ports at a random sequence in Step 6, do one of these:
• Click Apply to save the changes and the new association data is displayed in the table to
the right. Repeat Steps 1 to 7 if you want to add more source association data.
• Click OK to save the changes and quit the dialog.
• Click Close to abort the changes and quit the dialog.
Editing Source Association Data
You can change existing source association data when any setting is incorrect or if you have
made changes to the physical hardware configuration. For example, you may have moved the
audio/video output devices from one source port to another source port or to a different NV5128
router.
1. Choose Router > Configure Servers. The Configure Servers dialog appears.
2. Click the row containing the source association settings that you want to change in the table.
The highlighted data’s settings are all displayed in the fields to the left.
Figure 31 Source Association Table
3. Change any field you want except for the UMT Name and Server fields, or click Reset to
Defaults to reset all source association settings based on identical port numbers.
4. Do one of these:
• Click Apply to save the changes, and then the changes are reflected in the table. Repeat
Steps 1 to 3 if you want to edit more source association settings.
• Click OK to save the changes and quit the dialog.
• Click Close to quit the dialog without saving the changes.
Removing Source Association Data
You can remove any invalid source association settings from the table.
1. Choose Router > Configure Servers. The Configure Servers dialog appears.
2. Click the row containing the source association settings that you want to remove from the
table.
3. Click Delete.
4. A confirmation message appears. Click Yes to remove the source association data or No to
abort the removal.
5. Repeat Steps 1 to 3 if you want to remove more source association data.
Page 37
CHAPTER 2: OPERATION 31
6. Click Close to quit the dialog.
Note about “Reset to Defaults”
You can click Reset to Defaults to save time configuring the source association data when the
Paragon channel ports and the router’s source ports are associated with each other based on the
same port numbers. The command has these characteristics:
• All existing source association data is cleared and replaced by new data.
• All channel ports will be associated with source ports based on identical port numbers. That
is, channel port 1 is associated with source port 1, channel port 2 with source port 2, channel
port 3 with source port 3, and so on.
• The number of associated ports is determined according to the number of channel ports.
• Port type is set to audio by default.
Configure User Stations
User ports on a Paragon switch connect to user stations, and destination ports (output connectors)
on a NV5128 router connect to audio/video input devices. To determine which audio/video input
devices should receive the audio/video signals transmitted by the router, you must associate user
ports with destination ports. Usually your association settings should be able to direct the
audio/video signals to the audio/video input devices located near a user station. A user port can be
associated with a maximum of 8 destination ports, and each destination port can be associated
with one user port only.
Adding Destination Association Data
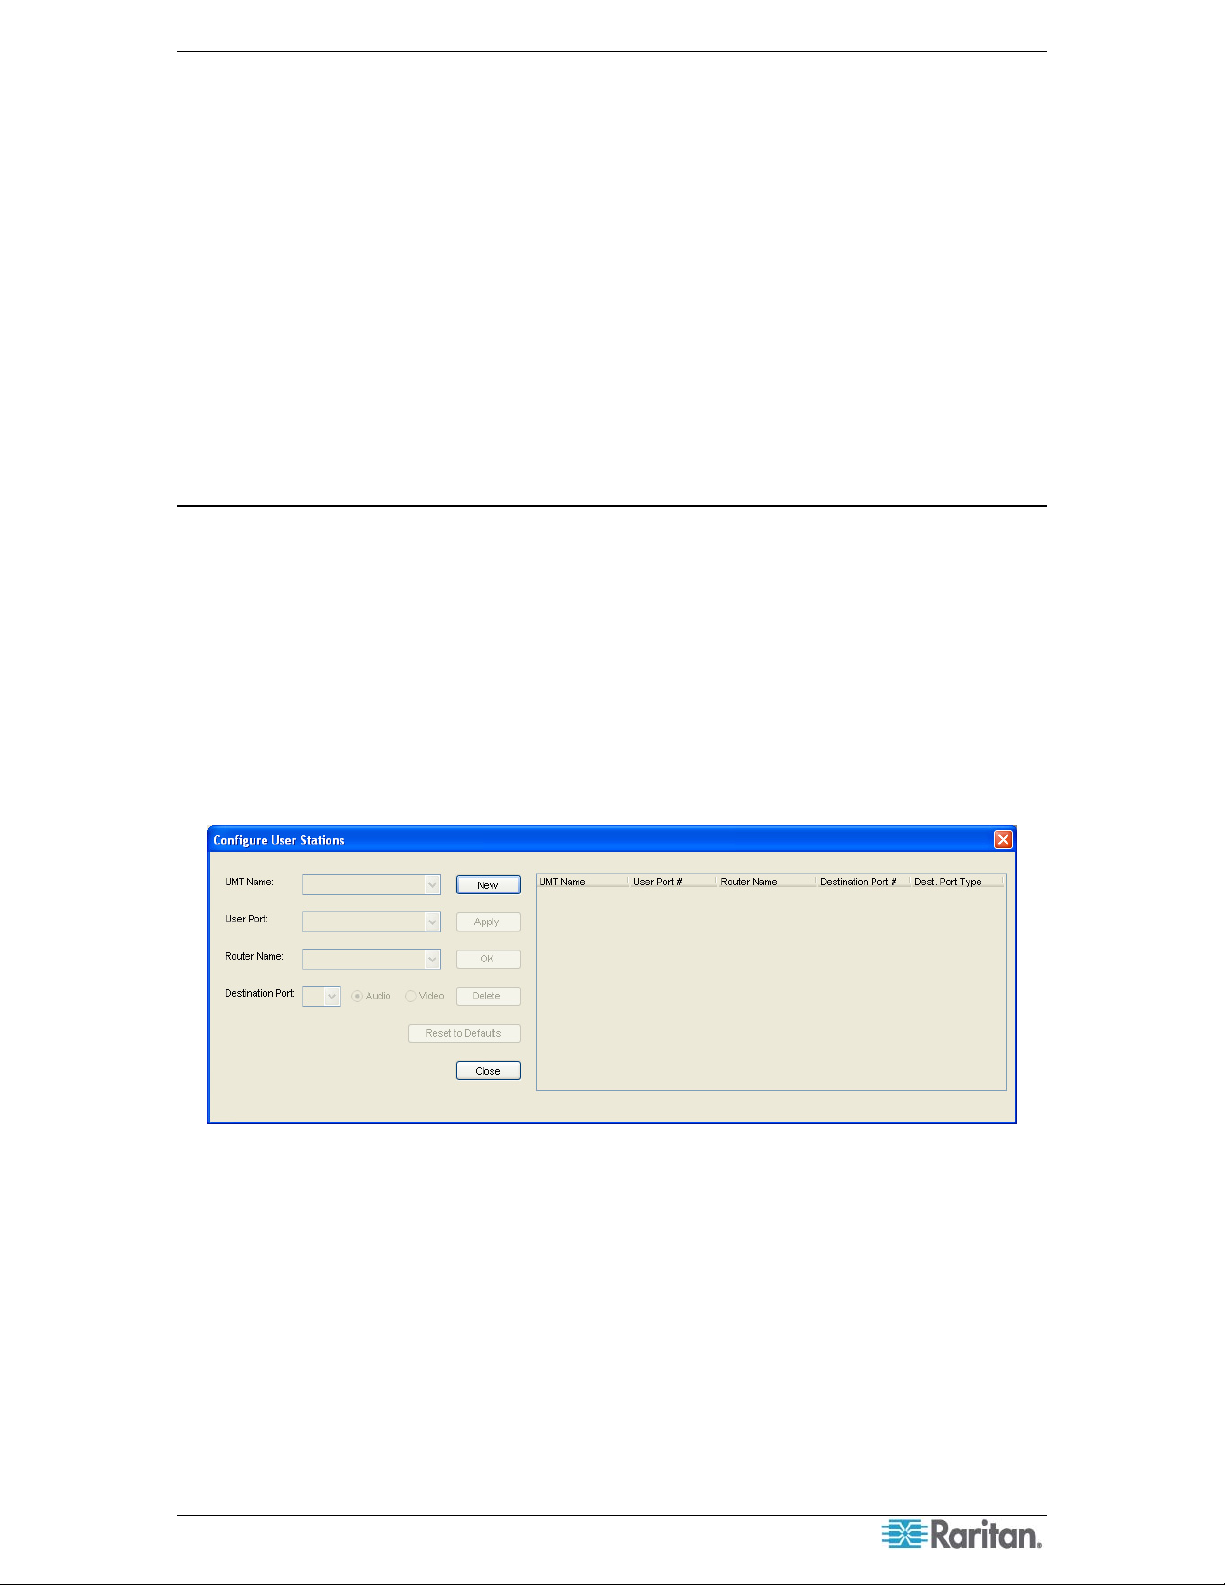
1. Choose Router > Configure User Stations. The Configure User Stations dialog appears.
Figure 32 Configure User Stations Dialog
2. Click New to start adding destination association data.
3. Click the UMT Name drop-down arrow and select the Paragon Base Unit to which the
Paragon Manager is connecting.
4. Click the User Port drop-down arrow, and select the user port on the Paragon switch that you
want to associate with the router’s destination port(s).
5. Click the Router Name drop-down arrow and select the NV5128 router whose destination
ports you want to associate. The router must be the same one that you selected in the
Configure Servers dialog.
6. This step varies depending on your physical hardware configuration:
• To associate all ports based on identical port numbers:
a. Click Reset to Defaults.
Page 38

32 PARAGON MANAGER USER GUIDE
b. A confirmation message appears. Click Yes to reset. Then each user port is associated
with a destination port if they share the same port numbers. Note that port type of all
destination association data is set to Audio by default.
• To associate the ports at a random sequence:
a. Click the Destination Port drop-down arrow and select the destination port to
associate with.
b. Click Audio if the selected destination port is an audio connector, or Video if it is a
video connector. The default is Audio.
7. If you associate the ports at a random sequence in Step 6, do one of these:
• Click Apply to save the changes and the new association data is displayed in the table to
the right. Repeat Steps 1 to 7 if you want to add more destination association data.
• Click OK to save the changes and quit the dialog.
• Click Close to abort the changes and quit the dialog.
Editing Destination Association Data
You can change existing destination association data when any setting is incorrect or if you have
made changes to the physical hardware configuration. For example, you may have moved the
audio/video input devices from one user station to another user station or reconnected them to a
different NV5128 router.
1. Choose Router > Configure User Stations. The Configure User Stations dialog appears.
2. Click the row containing the destination association settings that you want to change in the
table. The highlighted data’s settings are all displayed in the fields to the left.
Figure 33 Destination Association Table
3. Change any field you want except for the UMT Name and User Port fields, or click Reset to
Defaults to reset all destination association settings based on identical port numbers.
4. Do one of these:
• Click Apply to save the changes, and then the changes are reflected in the table. Repeat
Steps 1 to 3 if you want to edit more destination association settings.
• Click OK to save the changes and quit the dialog.
• Click Close to quit the dialog without saving the changes.
Removing Destination Association Data
You can remove any invalid destination association settings from the table.
1. Choose Router > Configure User Stations. The Configure User Stations dialog appears.
2. Click the row containing the destination association settings that you want to remove from
the table.
3. Click Delete.
4. A confirmation message appears. Click Yes to remove the destination association data or No
to abort the removal.
5. Repeat Steps 1 to 3 if you want to remove more destination association data.
6. Click Close to quit the dialog.
Page 39

CHAPTER 2: OPERATION 33
Note about “Reset to Defaults”
You can click Reset to Defaults to save time configuring the destination association data when
the Paragon user ports and the router’s destination ports are associated with each other based on
the same port numbers. The command has these characteristics:
• All existing destination association data is cleared and replaced by new data.
• All user ports will be associated with destination ports based on identical port numbers. That
is, user port 1 is associated with destination port 1, user port 2 with destination port 2, user
port 3 with destination port 3, and so on.
• The number of associated ports is determined according to the number of user ports.
• Port type is set to audio by default.
Exporting Router Configuration
After creating or changing the router association data, involving source and destination
associations, you should save the data by exporting it for future use, or all association settings or
changes you made will be lost when you exit from Paragon Manager or disconnect the Paragon
system.
1. Choose Router > Export Router Configuration. The Select destination path dialog appears.
2. Ensure the file type shows XML Files.
3. Navigate to appropriate location, specify the filename and click Save. It is recommended to
name the file based on the Paragon switch’s name for easy identification of the file when
importing the data in the future.
Note: All characters that are present in the File name filed are regarded as the filename so
you should remove unnecessary characters, including the extension, from this field when
necessary.
Importing Router Configuration
Paragon Manager does not automatically import any previously-saved router association data so
you must either create the router association data from the scratch or import existing router
association data. This section explains how to import existing data.
1. Choose Router > Import Router Configuration. The Select File to Import dialog appears.
2. A confirmation message appears. Click Yes to import the selected data or No to cancel.
3. Ensure the file type selects XML Files.
4. Navigate to where the router association data specific to the Paragon switch is stored, select
the appropriate file and click Open.
Note: The router association data is Paragon switch-specific. If you import any router
association data that is not for the connected Paragon switch, an error message appears,
indicating that the UMT ID is different.
Checking Audio/Video Routing Results
Paragon Manager has a log panel at the bottom to display Paragon Manager activity. When
Paragon Manager makes the router route audio/video signals based on the association data, the
log panel records the activity and outcome.
Page 40
34 PARAGON MANAGER USER GUIDE
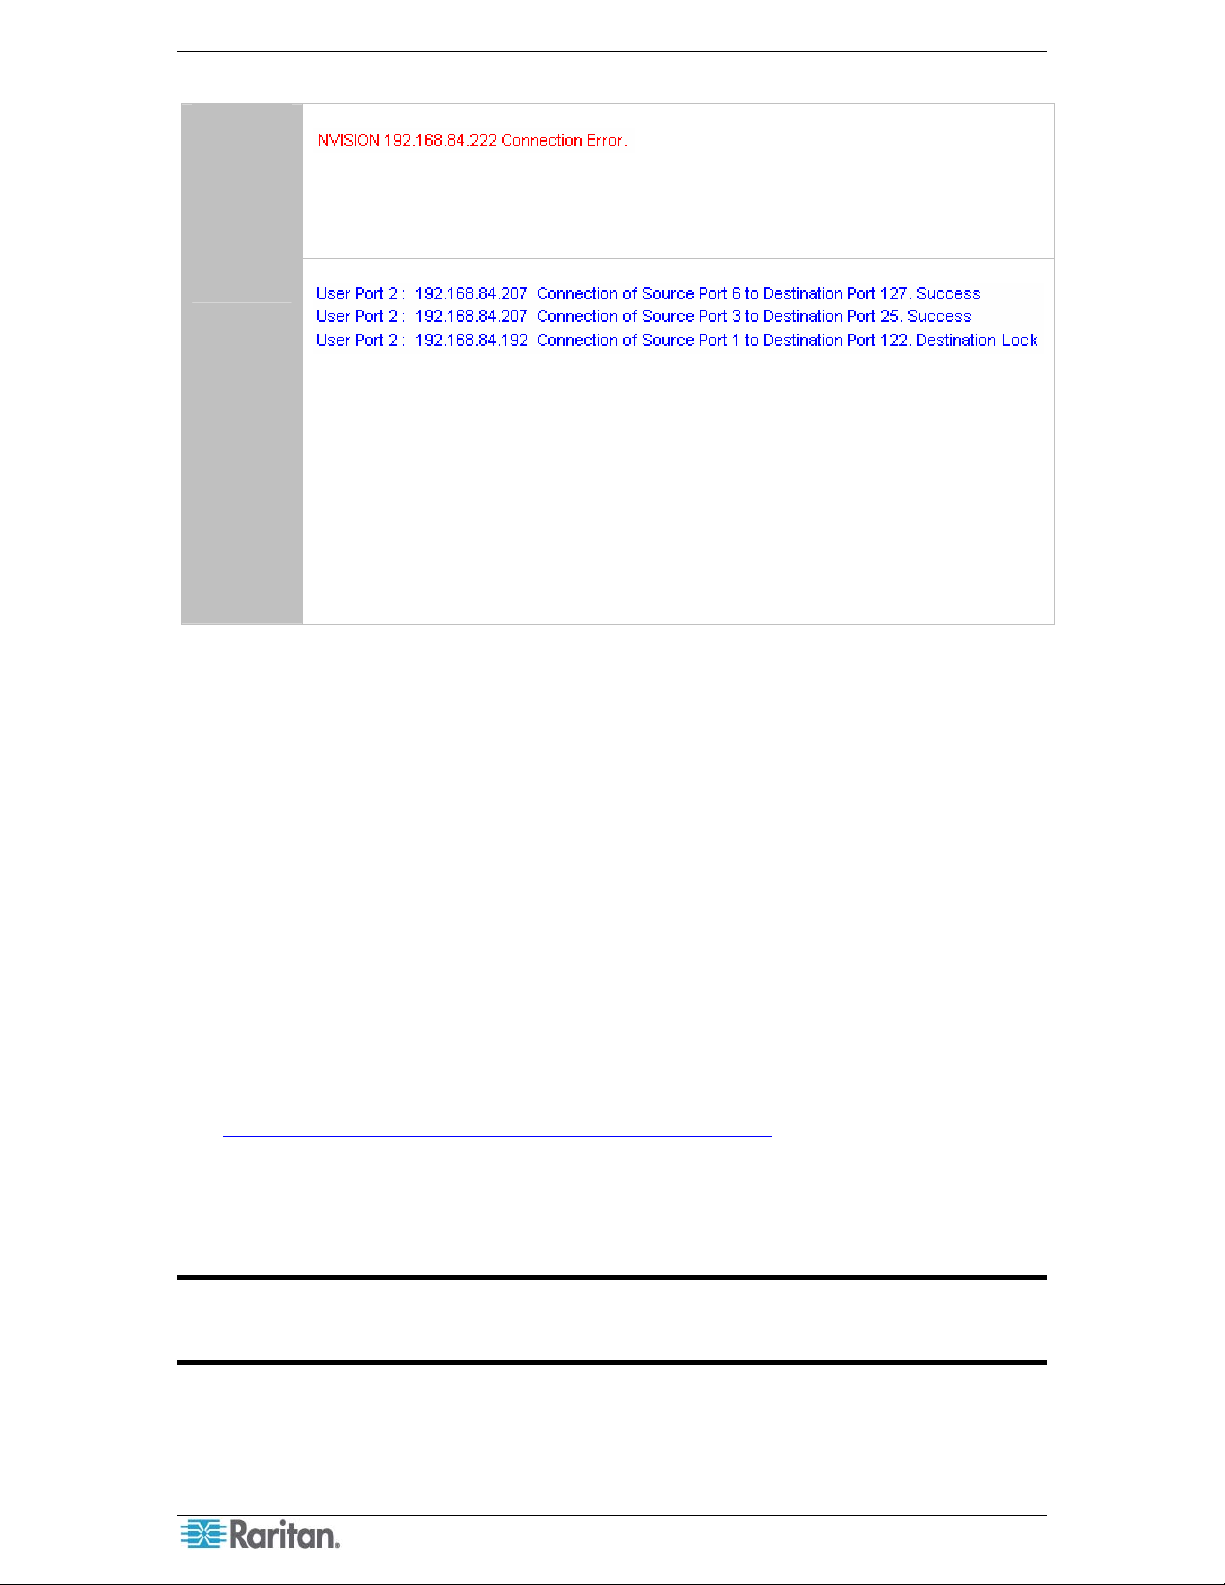
There are two types of routing records as explained in the table.
Type 1
This message indicates that Paragon Manager fails to connect to the NV5128
router with the IP address 192.168.84.222. Check the router network settings and
cabling when the connection error occurs.
Type 2
These messages indicate that Paragon Manager successfully connects to the
NV5128 router with the IP address 192.168.84.207 and the other router with the
IP address 192.168.84.192, and whether the routing for each audio/video source is
successfully carried out.
The information from left to right includes:
• User port number, indicating the user station you are operating
• Router’s IP address
• Source and destination port numbers, indicating the routing path
• Routing result (success, destination lock, and so on)
Saving the Paragon Switch’s Database
You can save the database of the connected Paragon switch, including system settings and
channel configuration, as an XML-formatted file for your own backup or review purpose.
1. Choose Help > Save XML Configuration. The Select destination path dialog appears.
2. Navigate to the location where you want to save the file and specify the file name.
3. Click Save.
Updating Firmware
In Paragon Manager, you can activate the firmware update utility—Paragon Update, in order to
update your Paragon switch or even the user station’s firmware version. To update the firmware,
first download the latest firmware file from Raritan’s website.
To locate the firmware file:
1. Use your browser to visit the Firmware and Documentation section
(http://www.raritan.com/support/firmware-and-documentation/
2. Scroll down the page and click Paragon II to open a list of support documents and files.
3. Click the latest version to locate the latest firmware file for your device.
After downloading the file, unzip it, and then do the following:
Important: If the device you are going to upgrade is a Paragon switch, it is strongly
recommended to back up the user profile prior to the upgrade. Otherwise, you may
need to reconfigure specific user data, such as user passwords, after the upgrade.
).
To update the firmware file:
1. Choose Setup > Firmware Update.
2. The Confirm Disconnect message box appears. Click Yes to disconnect the existing
connection session.
Page 41
CHAPTER 2: OPERATION 35
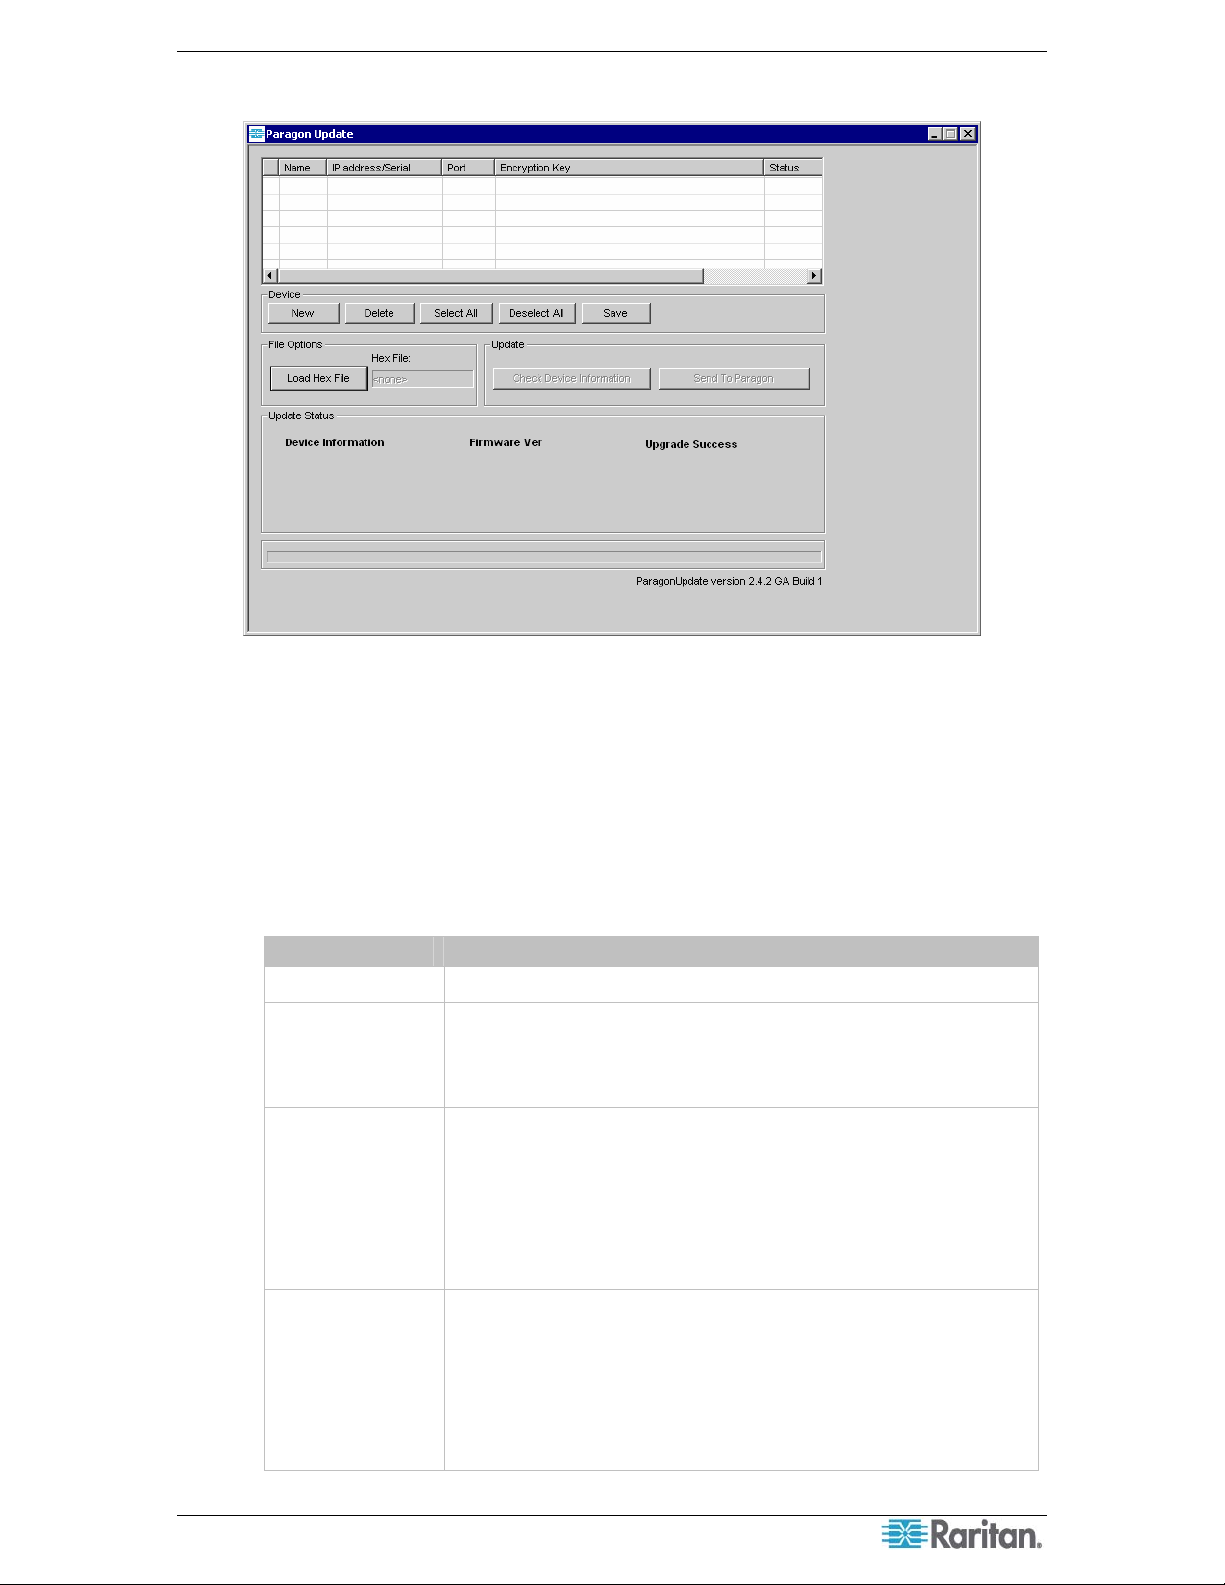
3. The Paragon Update dialog appears.
Figure 34 Paragon Update Dialog
4. If the device(s) intended to upgrade are listed in the dialog, go to Step 5. If not, click New to
add the device(s) and click each field to enter or select the appropriate data, which is
explained below:
Depending on the manner in which the computer running Paragon Manager is connect to the
desired devices, you may update the firmware through the network or the RS-232 connection.
For example, updating a Paragon I switch requires the RS-232 connection, and updating a
Paragon II switch requires the network connection.
FIELD DATA TO ENTER OR CHOOSE
Name Type the name of the desired KVM switch or user station.
• Network connection: Type the IP address of the Paragon
IP Address/Serial
switch.
• RS-232 connection: Choose <Default Serial> from the
drop-down list.
• Network connection: Type the number of the appropriate
network port. This setting must be the same as the port
setting on the OSUI of the Paragon switch. The factory
Port
default port is 3000.
• RS-232 connection: Type the number of the serial port
(COM port) that is connected to the desired KVM switch or
user station.
• Network connection: If you have assigned encryption keys
for the Paragon switch in the OSUI’s network setting, you
must type the same encryption keys here. Otherwise, both of
Encryption Key
the connection and firmware upgrade will fail. If there are
no encryption keys, choose <Default No Encryption>.
• RS-232 connection: Always choose <Default No
Encryption>.
Page 42

36 PARAGON MANAGER USER GUIDE
Click Save to store the current list of devices so next time when you execute the Paragon
Update utility, the same list appears and saves your time re-entering the same information.
3
Note: The devices checked (
) on the list must all belong to the same type. For example,
either all of them are Paragon switches or all are user stations.
5. Select the checkboxes of the devices whose firmware you want to upgrade. OR click Select
All to check all checkboxes.
Figure 35 Paragon Update – Check All
6. Click Load Hex File. The Open dialog appears.
7. Navigate to where the desired firmware file (*.hex) is located, select it and click Open.
8. (Optional) Click Check Device Information and then Yes to verify whether the firmware
version is designed for the Paragon model you are going to upgrade. The Paragon Device
and File Version Information window appears; click OK to exit. If the firmware file is
suitable for updating your device, you will be returned to Paragon Update dialog. Otherwise,
a warning message is displayed.
Figure 36 Paragon Device and File Version Information Window
Page 43

CHAPTER 2: OPERATION 37
Figure 37 Wrong Firmware Warning Message
9. Click Send To Paragon to perform the upgrade. A progress indicator is displayed on the
bottom of the dialog to indicate the upgrade status. This may last for several minutes
depending on your network speed.
Figure 38 Paragon Update Progress Bar
Paragon Update utility will update the selected devices one by one, but if one device encounters
problems during updating, the utility will prompt you with a message, and you must click OK to
let the utility continue to update the next devices.
When the device is updated successfully, the “Device Update Successful” message box appears.
Click OK to close the message.
Figure 39 Paragon Update Successful Message
Reorganizing the Update List
You can remove unnecessary Paragon switches or user stations from the list in the Paragon
Update dialog.
1. Select the checkboxes of those Paragon switches or user stations that you want to remove.
2. Click Delete.
3. Click Save to save the changes.
Disconnection
Do this if you want to disconnect the existing connection session without closing Paragon
Manager.
1. Choose Session > Disconnect. Or click the Disconnect shortcut button on the toolbar.
Page 44

38 PARAGON MANAGER USER GUIDE
Figure 40 Session Menu - Disconnect
2. Click Yes when a message asks you to confirm the disconnection.
Closing Paragon Manager
Choose Session > Exit to close Paragon Manager. The existing connection session is also
disconnected at the same time.
Synchronizing Database
Paragon Manager is able to synchronize its database with the connected Paragon switch all the
time after establishing the connection. Therefore, usually you don’t need to issue the
“Synchronize Database” command manually. However, if the Paragon switch is disconnected
abnormally by accident, and the database is not synchronized after the connection is restored, you
may have to execute “Synchronize Database” to have Paragon Manager download the latest
database from the Paragon system. The command can be executed either by choosing Setup >
Synchronize Database or clicking the Synchronize Database icon on the toolbar.
Figure 41 Setup Menu – Synchronize Database
Paragon Manager Help
• Choose Help > Index to view this user manual online.
• Choose Help > About Paragon Manager to view product name and version information.
This will assist you in the event you must call Raritan Technical Support for assistance.
Page 45

APPENDIX A: CLIENT SOFTWARE FOR PARAGON II SYSTEM CONTROLLER 39
Appendix A: Client Software for Paragon II System Controller
This appendix is only for Administrators who use Paragon II System Controller (P2SC).
The client software for Paragon II System Controller (P2SC), which is called Paragon II System
Controller Admin (P2SC Admin), looks similar to Paragon Manager. Both software utilities
share basic features and similar user interface. In this section, we will point out the common
commands and differences. For other configuration information about Paragon II System
Controller, see Paragon II System Controller (P2SC) User Guide, which can be downloaded
from Raritan’s website (http://www.raritan.com
Comparison of Menu Commands
between Paragon Manager and P2SC Admin
).
Legend
Shared commands
Commands available in Paragon
Manager only
Commands available in P2SC Admin
only
Page 46

40 PARAGON MANAGER USER GUIDE
For most of the shared commands, the operation and functions are the same as those in Paragon
Manager and you can refer to previous chapters for these functions.
As for the commands specific to P2SC Admin, they described in the following sections. For more
information, see Paragon II System Controller (P2SC) User Guide.
Some Differences in the Shared Commands
Although most of the shared commands provide the same features and options as those in
Paragon Manager, still a few differences exist in several shared commands.
Connect (Session Menu)
In P2SC, this command is for logging in to a Paragon II System Controller (P2SC). Simply type
the Administrator’s user name (default: Admin) and password (default: raritan), and then click
Login. Note the password is case-sensitive.
Figure 42 P2SC - System Controller Admin Login Dialog
Page 47

APPENDIX A: CLIENT SOFTWARE FOR PARAGON II SYSTEM CONTROLLER 41
Create and Property (Users Menu)
The functions of the “Create” and “Property” commands are similar to those of Paragon Manager.
Only two points are different:
• P2SC does not support the Forced Video function so the configuration of “Allow Forced
Video Privileges” is not available.
• “Green Mode” performs power-saving function as the “Sleep Mode” in Paragon Manager,
but in P2SC it offers only two options: ON and OFF, instead of three options as Paragon
Manager.
− ON will activate the power-saving mode when the mouse/keyboard activity is idle for the
time (minutes) specified under “Green Mode.”
− Choosing OFF will never activate the power-saving mode.
Figure 43 P2SC – Add User Dialog
Exclusive Features in P2SC
Those features specific to P2SC Admin are described below.
RFT_Update (Setup Menu)
The “RFT_Update” command updates the P2SC firmware. Before updating the firmware, you
must download the latest P2SC firmware from the Firmware and Documentation webpage on
Raritan’s website at: http://www.raritan.com/support/firmware-and-documentation/
following:
1. Choose RFT_Update from the Setup drop-down menu.
2. A message box appears, asking you to confirm the RFT update action. Click Yes.
3. The Select RFP File dialog appears. Choose the appropriate file and click Open.
Base UMT’s (Setup Menu)
This command is to determine which and how many Paragon switches are managed by P2SC. A
P2SC can control up to 8 Paragon II Base Units.
. Then do the
Page 48
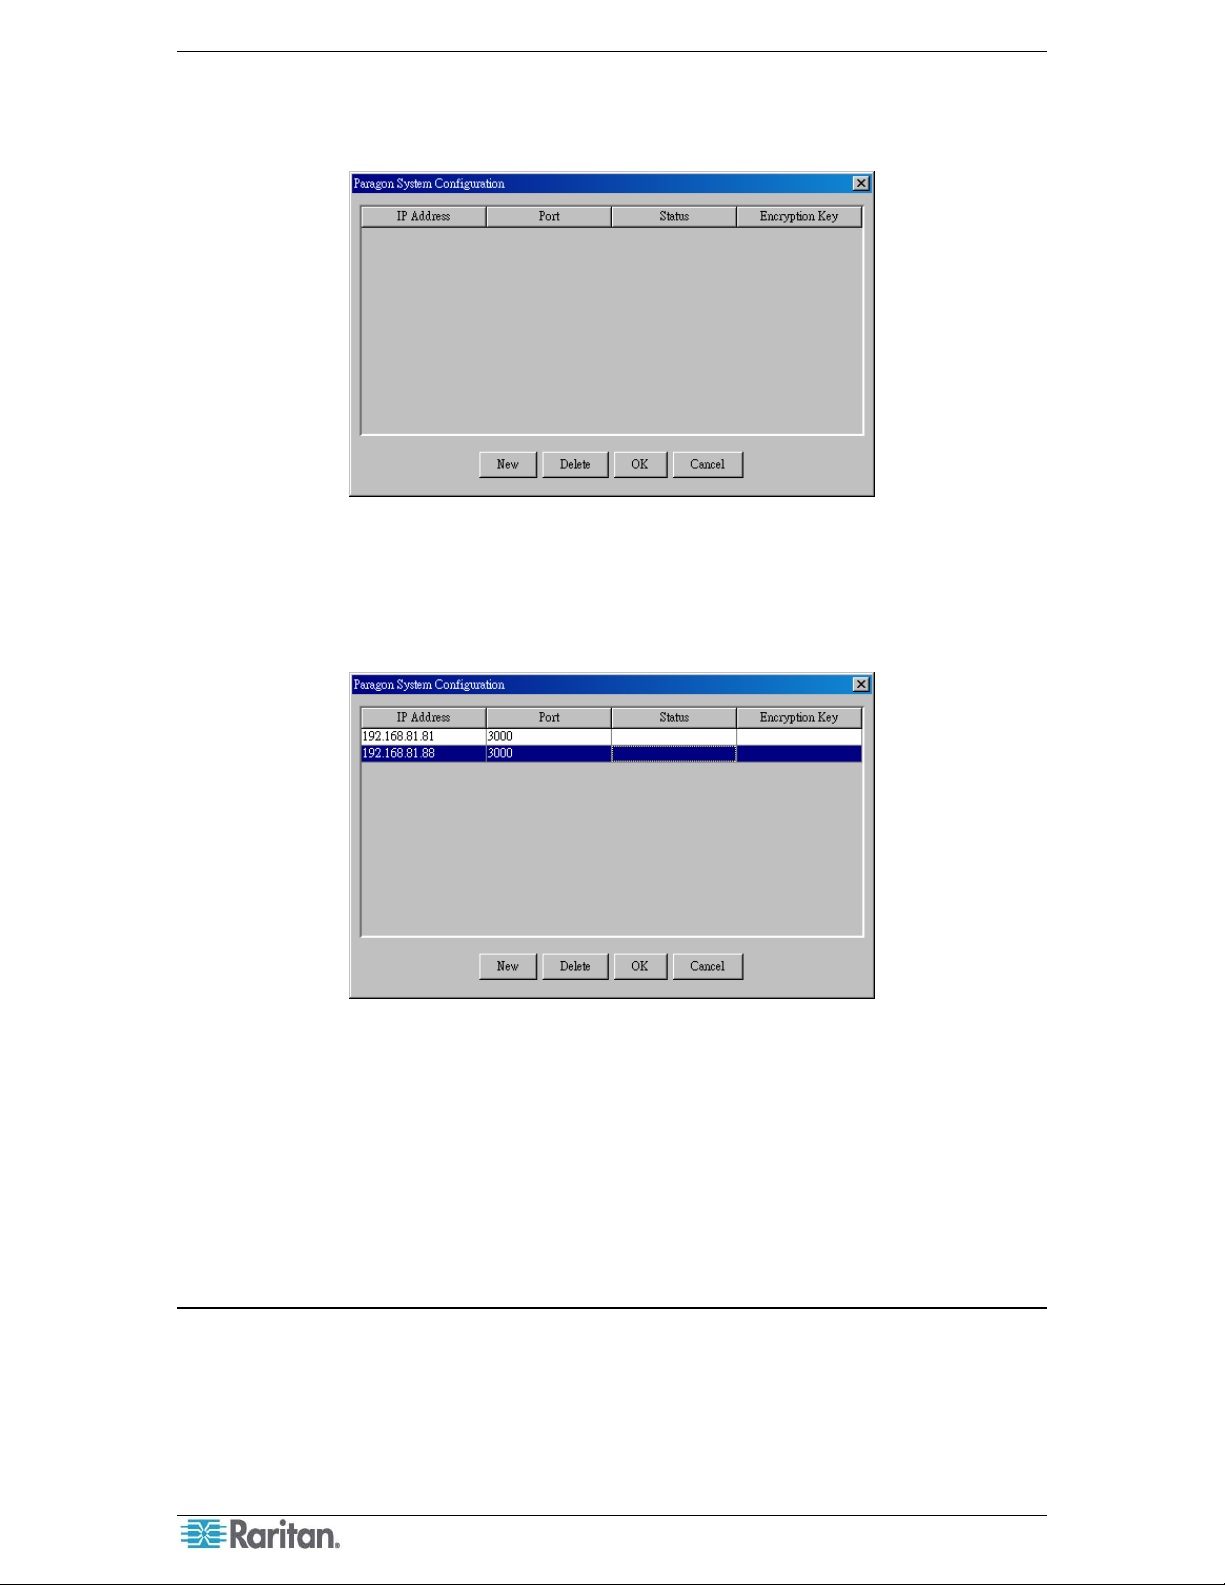
42 PARAGON MANAGER USER GUIDE
Adding Paragon Switches in P2SC
1. Select Base UMT’s from the Setup drop-down menu. The Paragon System Configuration
dialog appears.
Figure 44 P2SC – Paragon System Configuration Dialog (No Data)
2. Click New to add new Paragon switches’ data.
3. Click each field and type the appropriate data for Paragon switch intended to connect. Make
sure the IP address and Port number for each Paragon switch are entered, and their data is the
same as each Paragon switch’s network setting on the OSUI.
Figure 45 P2SC – Paragon System Configuration Dialog (with Data)
4. Click OK to put the Paragon switches under the control of P2SC, or Cancel to abort it.
Removing Paragon Switches from P2SC
1. Select Base UMT’s from the Setup drop-down menu. The Paragon System Configuration
dialog appears.
2. Click the Paragon switch which you want to remove and click Delete.
About Paragon II System Controller Admin
This command simply displays the current versions of the P2SC device and P2SC Admin
software.
Page 49

APPENDIX A: CLIENT SOFTWARE FOR PARAGON II SYSTEM CONTROLLER 43
Page 50

Page 51

U.S./Canada/Latin America
Monday - Friday
8 a.m. - 8 p.m. ET
Phone: 800-724-8090 or 732-764-8886
For CommandCenter NOC: Press 6, then Press 1
For CommandCenter Secure Gateway: Press 6, then Press 2
Fax: 732-764-8887
Email for CommandCenter NOC: tech-ccnoc@raritan.com
Email for all other products: tech@raritan.com
China
Beijing
Monday - Friday
9 a.m. - 6 p.m. local time
Phone: +86-10-88091890
Shanghai
Monday - Friday
9 a.m. - 6 p.m. local time
Phone: +86-21-5425-2499
GuangZhou
Monday - Friday
9 a.m. - 6 p.m. local time
Phone: +86-20-8755-5561
Europe
Europe
Monday - Friday
8:30 a.m. - 5 p.m. GMT+1 CET
Phone: +31-10-2844040
Email: tech.europe@raritan.com
United Kingdom
Monday - Friday
8:30 a.m. to 5 p.m. GMT
Phone +44(0)20-7090-1390
France
Monday - Friday
8:30 a.m. - 5 p.m. GMT+1 CET
Phone: +33-1-47-56-20-39
Germany
Monday - Friday
8:30 a.m. - 5 p.m. GMT+1 CET
Phone: +49-20-17-47-98-0
Korea
Monday - Friday
9 a.m. - 6 p.m. local time
Phone: +82-2-5578730
India
Monday - Friday
9 a.m. - 6 p.m. local time
Phone: +91-124-410-7881
Melbourne, Australia
Monday - Friday
9:00 a.m. - 6 p.m. local time
Phone: +61-3-9866-6887
Japan
Monday - Friday
9:30 a.m. - 5:30 p.m. local time
Phone: +81-3-3523-5994
Email: support.japan@raritan.com
Tai wan
Monday - Friday
9 a.m. - 6 p.m. GMT -5 Standard -4 Daylight
Phone: +886-2-8919-1333
Email: support.apac@raritan.com
 Loading...