

Page 1
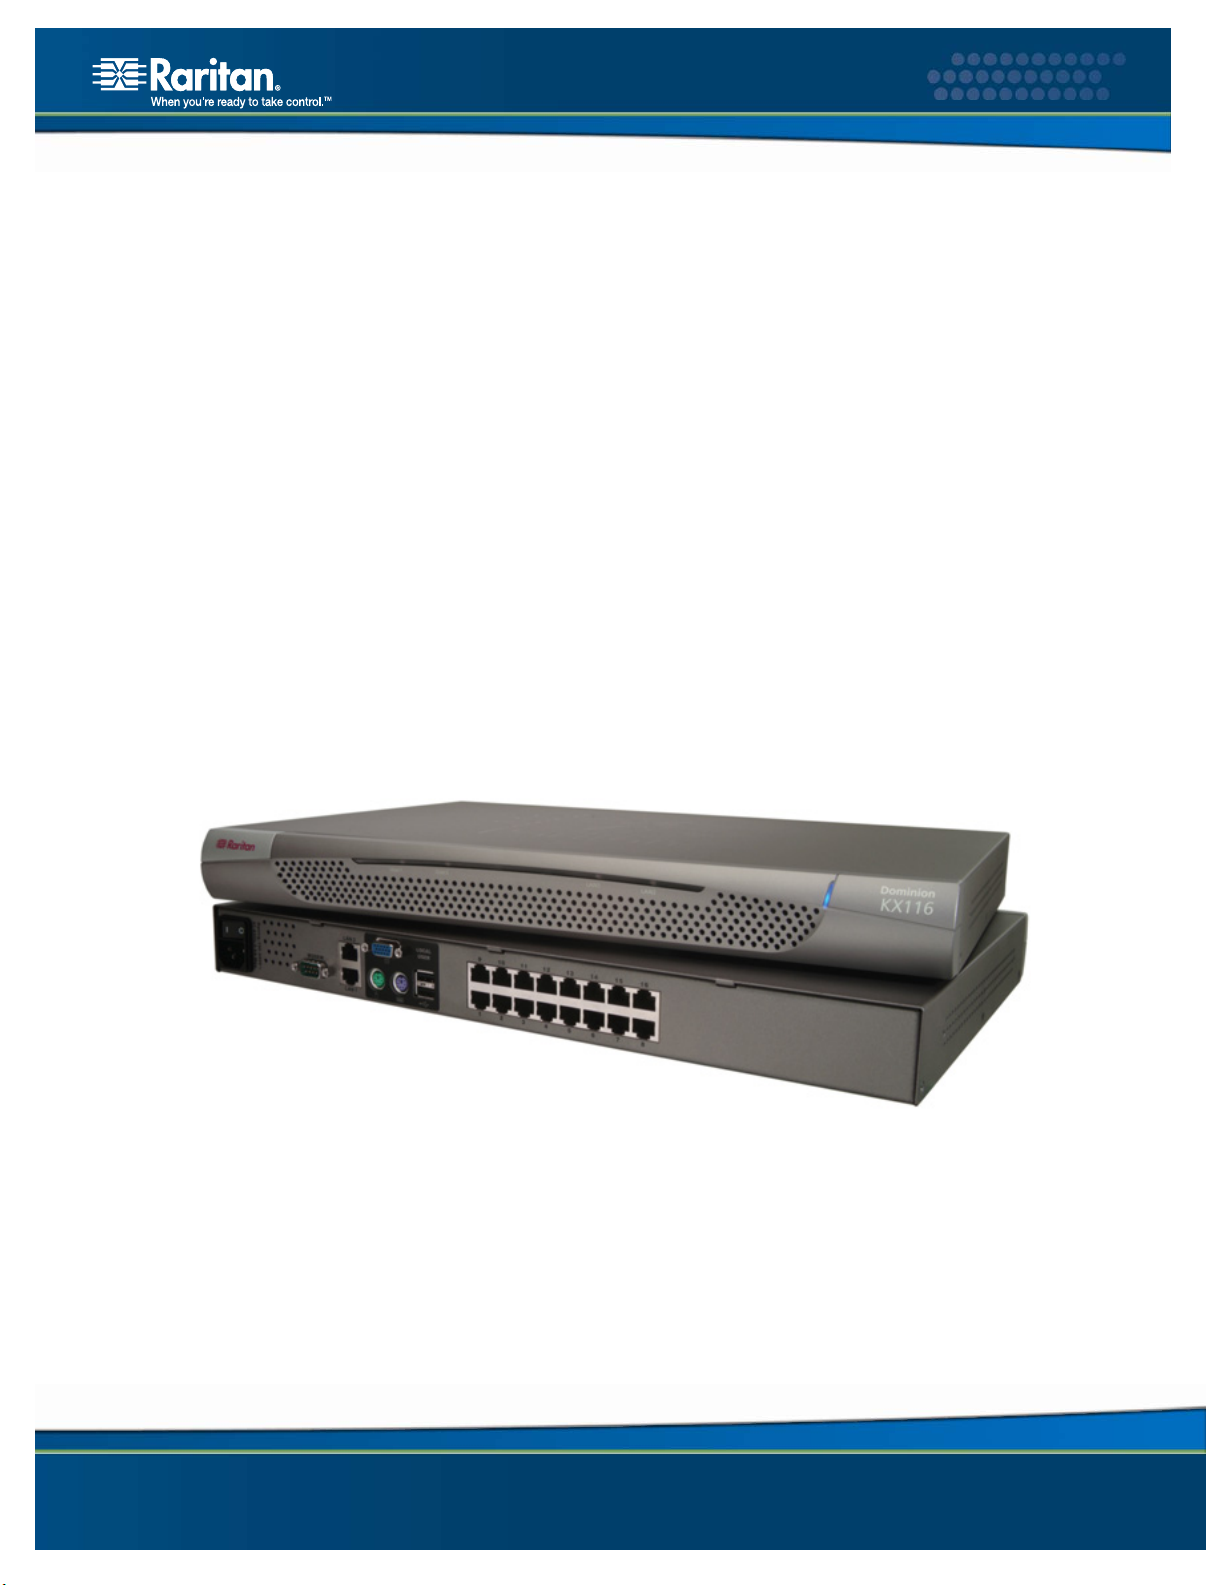
Dominion® KX
DKX116
DKX132
Release 1.4.5
Copyright © 2006 Raritan Computer, Inc.
DKX216
DKX232
User Guide
DKX-0H-E
May 2007
255-80-6040
DKX416
DKX432
DKX464
Page 2

This page intentionally left blank.
Page 3

Copyright and Trademark Information
This document contains proprietary information that is protected by copyright. All rights reserved.
No part of this document may be photocopied, reproduced, or translated into another language
without express prior written consent of Raritan Computer, Inc.
© Copyright 2006 Raritan Computer, Inc., CommandCenter, RaritanConsole, Dominion, and the
Raritan company logo are trademarks or registered trademarks of Raritan Computer, Inc. All
rights reserved. Java is a registered trademark of Sun Microsystems, Inc. Internet Explorer and
Active Directory are registered trademark of Microsoft Corporation. Netscape and Netscape
Navigator are registered trademarks of Netscape Communication Corporation. All other marks
are the property of their respective owners.
FCC Information
This equipment has been tested and found to comply with the limits for a Class A digital device,
pursuant to Part 15 of the FCC Rules. These limits are designed to provide reasonable protection
against harmful interference in a commercial installation. This equipment generates, uses, and can
radiate radio frequency energy and if not installed and used in accordance with the instructions,
may cause harmful interference to radio communications. Operation of this equipment in a
residential environment may cause harmful interference.
Japanese Approvals
Raritan is not responsible for damage to this product resulting from accident, disaster, misuse,
abuse, non-Raritan modification of the product, or other events outside of Raritan’s reasonable
control or not arising under normal operating conditions.
U
C
LI STED
For assistance in the North or South America, please contact the Raritan Technical Support Team
by telephone (732) 764-8886, by fax (732) 764-8887, or by e-mail
Ask for Technical Support – Monday through Friday, 8:00am to 8:00pm, Eastern.
1F61
US
L
I.T.E.
tech@raritan.com
For assistance around the world, please see the last page of this guide for
regional Raritan office contact information.
Page 4

Safety Guidelines
To avoid potentially fatal shock hazard and possible damage to Raritan equipment:
• Do not use a 2-wire power cord in any product configuration.
• Test AC outlets at your computer and monitor for proper polarity and grounding.
• Use only with grounded outlets at both the computer and monitor. When using a backup UPS,
power the computer, monitor and appliance off the supply.
Rack Mount Safety Guidelines
In Raritan products which require Rack Mounting, please follow these precautions:
• Operation temperature in a closed rack environment may be greater than room temperature.
Do not exceed the rated maximum ambient temperature of the appliances (please see
Appendix A: Specifications for additional information).
• Ensure sufficient airflow through the rack environment.
• Mount equipment in the rack carefully to avoid uneven mechanical loading.
• Connect equipment to the supply circuit carefully to avoid overloading circuits.
• Ground all equipment properly, especially supply connections, such as power strips (other
than direct connections), to the branch circuit.
Page 5
Important Information
Login
• The default Dominion KX login user name is admin and the password is raritan. This user
has administrative privileges.
• Passwords are case sensitive and must be entered in the exact case combination in which they
were created.
• The default password raritan must be entered entirely in lowercase letters.
• To ensure security, change the default password as soon as possible.
• For backup and business continuity purposes, Raritan suggests that customers create a backup
administrator login and keep the password in a secure location.
Default IP Address
• Dominion KX ships with the default IP address of 192.168.0.192.
Service Pack
• Dominion KX users with Microsoft Internet Explorer version 5.01 or Windows 2000 must
upgrade to Service Pack 4 (SP4) or higher.
Version 1.4.5 Scope
• This User Manual applies to Dominion KX firmware version 1.4.5, which operates on all
Dominion models: DKX116, DKX1342, DKX216, DKX232, DKX416, DKX432, and
DKX64. To determine the firmware upgrade version on an existing KX device to upgrade
from the Raritan website (
System Information command on the setup menu in KX Manager (or press the F8 key from
the OSD) to display the current firmware version.
FIRMWARE VERSION KX FIRMWARE UPGRADE
0A28 Version 1.0
0A34 Version 1.0.3
0A47 Version 1.1
0B12 Version 1.2
0B1B Version 1.3
0B2O Version 1.4
• Please check the Release Notes included with this product for important information on each
firmware upgrade.
www.raritan.com) in the Firmware Upgrades section, click the
VERSION
Supported Browsers
Dominion KX supports the following browsers:
• Internet Explorer 6
• Netscape 7.2
• Firefox 1.0 or later
• Mozilla 1.7
Page 6
Note: Netscape 8 has an option (radio button) to change the rendering engine. When Internet
Explorer is selected as the rendering engine from Netscape, the RRC is displayed. When Firefox
is selected as the rendering engine from Netscape, the MPC is displayed.
Supported Paragon CIMs
Dominion KX version 1.4 and higher support the following CIMs:
DCIM-PS2 for PS/2 KB/MS P2CIM-PS2
DCIM-SUN for SUN KB/MS P2CIM-SUN
DCIM-USB for USB KB/MS (not Sun) P2CIM-USB
DCIM-SUSB for SUN USB KB/MS P2CIM-SUSB
P2CIM-PWR for power strip control UKVMPD
UUSBPD USKVMPD
Local Port ─ Supported Keyboard and Mouse Devices
The Dominion KX supports on the local port:
• USB/USB keyboard and mouse (two distinct connectors).
• PS2/PS2 keyboard and mouse (two distinct connectors).
The Dominion KX does not support on the local port:
• Combination keyboard/mouse devices through a single USB cable
• AUSB mouse and a PS/2 keyboard
• A PS/2 mouse and USB keyboard
• Keyboards that allow additional USB devices to be plugged into the keyboard itself
(functioning as a hub)
Page 7

CONTENTS i
Contents
Chapter 1: Introduction................................................................. 1
Dominion KX Overview..............................................................................................................1
Product Photos...........................................................................................................................2
Product Features........................................................................................................................3
Terminology ...............................................................................................................................4
Package Contents......................................................................................................................4
Chapter 2: Installation .................................................................. 5
Configuring Target Servers........................................................................................................5
Server Video Resolution....................................................................................................................5
Desktop Background .........................................................................................................................5
Mouse Settings..................................................................................................................................5
Windows XP / Windows 2003 Settings..............................................................................................6
Windows 2000 / ME Settings.............................................................................................................6
Windows 95 / 98 / NT Settings ..........................................................................................................6
Linux Settings....................................................................................................................................7
Sun Solaris Settings ..........................................................................................................................7
Apple Macintosh Settings ..................................................................................................................8
IBM AIX Settings................................................................................................................................9
Configurable Hotkey..........................................................................................................................9
Configuring Network Firewall Settings.......................................................................................9
Physical Connections...............................................................................................................10
Initial Configuration ..................................................................................................................12
Assigning an IP Address..................................................................................................................12
Connecting and Naming Target Servers..........................................................................................12
Changing Default Password............................................................................................................13
Note to CC-SG Users......................................................................................................................14
Upgrading Device Firmware.....................................................................................................14
Updating User Password.................................................................................................................14
Connecting to Dominion KX Remotely Using Raritan Multi-Platform Client and Raritan
Remote Client ..........................................................................................................................
MPC Requirements .........................................................................................................................15
Supported Browsers........................................................................................................................15
Installing and Launching MPC.........................................................................................................17
Installing and Launching RRC .........................................................................................................17
Establishing a Connection...............................................................................................................19
15
Chapter 3: Administrative Functions ...........................................23
Launching Dominion KX Manager...........................................................................................23
KX Manager Interface..............................................................................................................25
Network Configuration..............................................................................................................26
Security Settings......................................................................................................................29
Time and Date..........................................................................................................................31
Users, Groups, and Access Permissions.................................................................................32
Overview..........................................................................................................................................32
Relationship between Users and Group Entries..............................................................................32
Creating or Editing User Groups and Access Permissions..............................................................33
Moving Users Between Groups.......................................................................................................36
Deleting User Groups......................................................................................................................36
Creating or Editing Users.................................................................................................................37
Deleting Users.................................................................................................................................37
Remote Authentication.............................................................................................................38
Introduction......................................................................................................................................38
Remote Authentication Implementation...........................................................................................38
General Settings for Remote Authentication....................................................................................40
Forced User Logoff ..................................................................................................................48
Viewing KX Unit Event Log (Status) ........................................................................................48
Rebooting the Device...............................................................................................................49
Device Diagnostic Console......................................................................................................49
Device System Information......................................................................................................50
Configuration Backup and Restore..........................................................................................51
Performance Settings...............................................................................................................51
Page 8

ii CONTENTS
PC Properties...........................................................................................................................52
Power Control (Dominion KX only)..........................................................................................53
Power Strip Management ........................................................................................................54
Power Supply Management (Dominion KX only).....................................................................55
CC UnManager........................................................................................................................56
Activating CC UnManager...............................................................................................................57
Event Management..................................................................................................................58
SNMP Agent Configuration......................................................................................................59
Chapter 4: Local Console Port Access.........................................61
Local Port Functionality............................................................................................................61
Local Factory and Password Reset.........................................................................................62
Selecting Servers.....................................................................................................................62
Local Port Administration.........................................................................................................64
Local User Security Settings....................................................................................................68
Appendix A: Specifications ..........................................................69
Remote Connection .................................................................................................................69
Raritan Remote Client (RRC) Applet.......................................................................................70
Dominion KX Manager (Remote Administration Applet)..........................................................70
TCP Ports Used.......................................................................................................................70
Target Server Connection Distance and Video Resolution .....................................................71
Supported Video Resolutions ..................................................................................................71
Certified Modems.....................................................................................................................72
Appendix B: Novell eDirectory .....................................................73
Appendix C: FAQs.........................................................................81
General Questions...................................................................................................................81
Remote Access........................................................................................................................82
Ethernet and IP Networking.....................................................................................................84
Servers.....................................................................................................................................86
Installation................................................................................................................................87
Local Port.................................................................................................................................89
Power Control ..........................................................................................................................90
Scalability.................................................................................................................................91
Computer Interface Modules (CIMs)........................................................................................92
Security ....................................................................................................................................92
Manageability...........................................................................................................................93
Miscellaneous ..........................................................................................................................94
Page 9

FIGURES iii
Figures
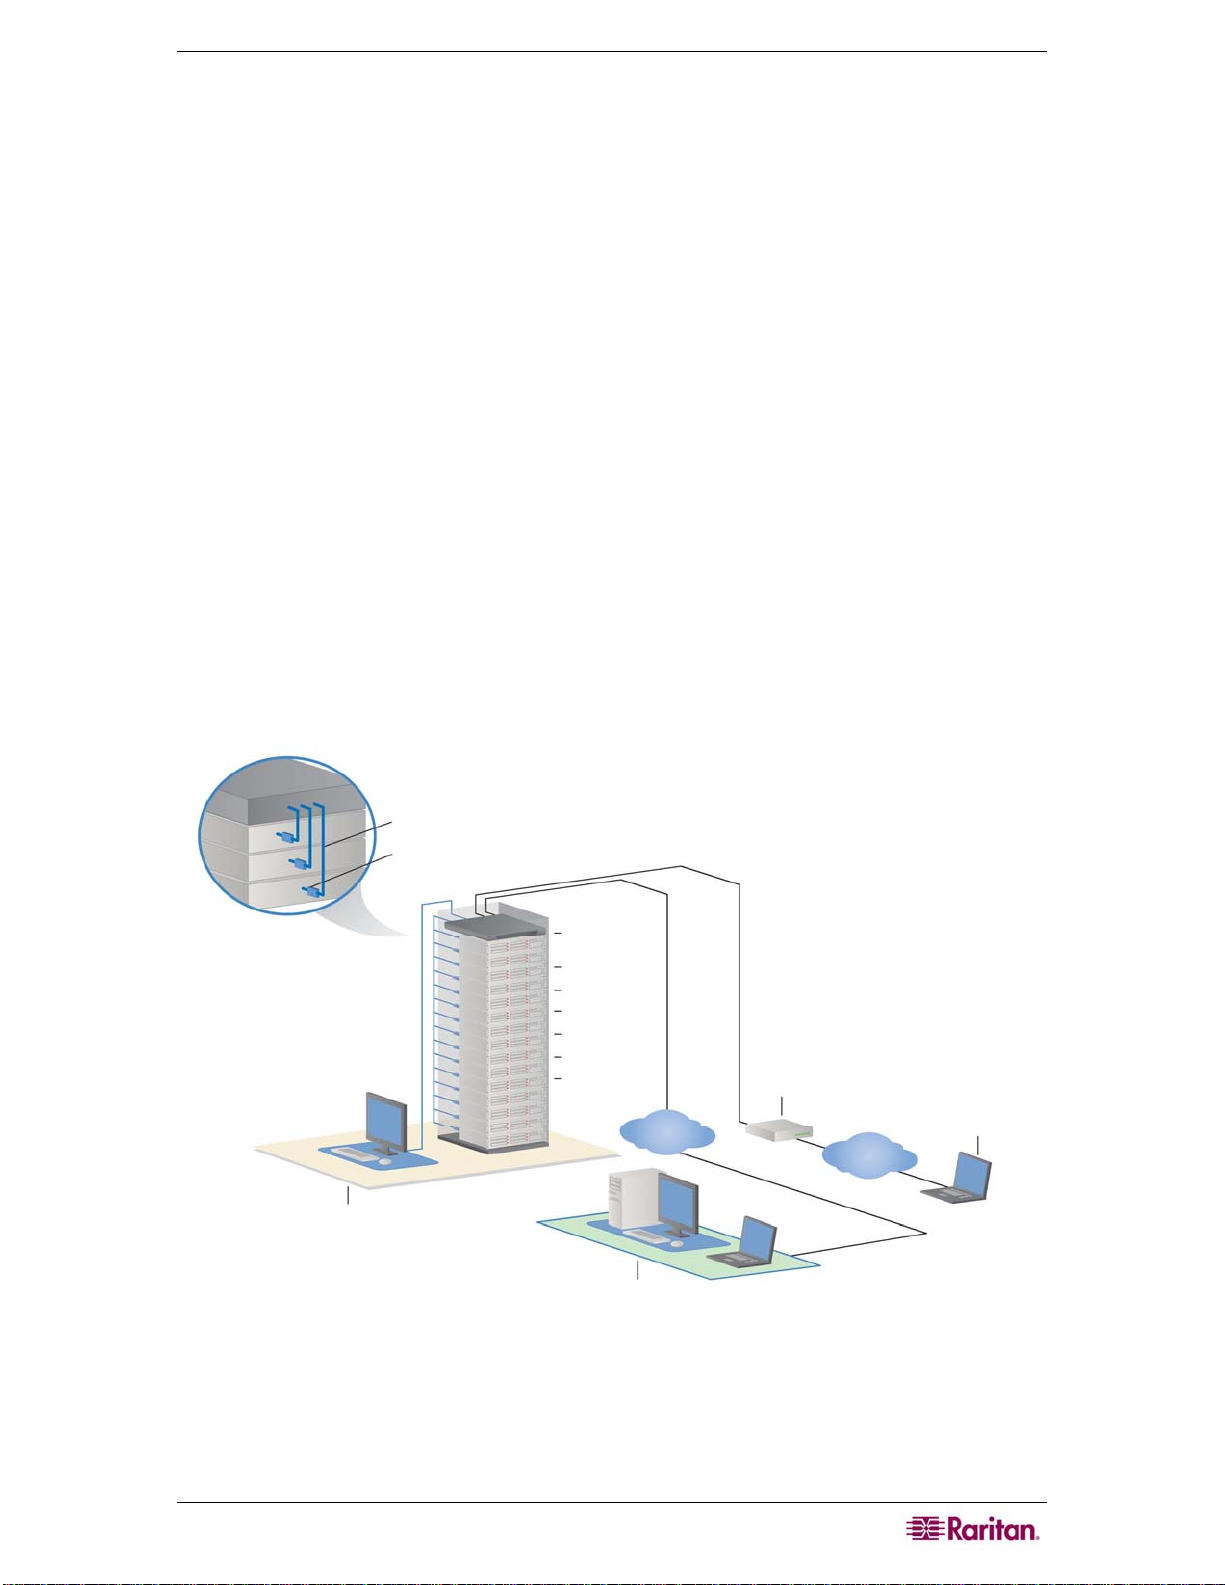
Figure 1 Dominion KX Configuration............................................................................................................1
Figure 2 Dominion KX132............................................................................................................................2
Figure 3 Dominion KX464 with Dual Power Supply .....................................................................................2
Figure 4 Dominion KX Computer Interface Module (DCIM).........................................................................2
Figure 5 Terminology and Topology ............................................................................................................4
Figure 6 Solaris Mouse Configuration Window............................................................................................7
Figure 7 Back Panel of Dominion KX.........................................................................................................10
Figure 8 Rear Panel of Dominion KX 464 with Dual Power Ports..............................................................10
Figure 9 Change Password Window..........................................................................................................15
Figure 10 RRC Connection Window..........................................................................................................17
Figure 11 MPC Window Layout ................................................................................................................. 19
Figure 12 RRC Screen...............................................................................................................................20
Figure 13 Dominion KX Manager Login Screen......................................................................................... 24
Figure 14 KX Manager Main Screen..........................................................................................................25
Figure 15 Network Configuration Window.................................................................................................. 26
Figure 16 Access Control List Window ......................................................................................................27
Figure 17 Security Configuration Window..................................................................................................29
Figure 18 Time and Date Settings .............................................................................................................31
Figure 19 Add Group Window.................................................................................................................... 33
Figure 20 Edit Group Window....................................................................................................................34
Figure 21 Select Ports Window..................................................................................................................35
Figure 22 Set Access Control List for Group Window................................................................................ 36
Figure 23 Add User Window......................................................................................................................37
Figure 24 Edit User Window ...................................................................................................................... 37
Figure 25 Authorization Flow Diagram.......................................................................................................39
Figure 26 Remote Authentication Window.................................................................................................40
Figure 27 Create New Attribute Window....................................................................................................42
Figure 28 Adding the Attributes to the Class.............................................................................................. 43
Figure 29 ADSI Edit Window......................................................................................................................44
Figure 30 User Properties Screen..............................................................................................................45
Figure 31 Edit Attribute - adding user to KX group.....................................................................................45
Figure 32 Logoff User Menu Option...........................................................................................................48
Figure 33 Dominion KX Status Window..................................................................................................... 48
Figure 34 Device Diagnostic Window ........................................................................................................49
Figure 35 System Information Window (for Dominion KX).........................................................................50
Figure 36 System Information Window (for KX101)................................................................................... 50
Figure 37 Performance Settings Window................................................................................................... 51
Figure 38 PC Properties Screen (shown on a Dominion KX with a Power Strip association)....................52
Figure 39 Associating a Target with a Power Outlet..................................................................................53
Figure 40 Power Strip Properties Window .................................................................................................54
Figure 41 Power Strip View Window..........................................................................................................54
Figure 42 Active and Inactive Power Supplies in the Device Tree............................................................. 55
Figure 43 Power Supply Properties Window..............................................................................................55
Figure 44 KX Manager Warning if KX is Under CC-SG Management .......................................................56
Figure 45 KX Manager Removing KX from CC-SG Management..............................................................56
Figure 46 KX Manager Change Warning...................................................................................................56
Figure 47 CC UnManager Command ........................................................................................................57
Figure 48 Event Notification Activation Tab ............................................................................................... 58
Figure 49 SNMP Configuration Tab........................................................................................................... 59
Figure 50 Local User Panel on Dominion KX............................................................................................. 61
Figure 51 Local Server Display..................................................................................................................63
Page 10

iv FIGURES
Figure 52 Administrative Menu ..................................................................................................................64
Figure 53 Channel Configuration Menu ..................................................................................................... 64
Figure 54 Power Management Screen ......................................................................................................65
Figure 55 Network Settings Menu..............................................................................................................65
Figure 56 Administrative Menu ..................................................................................................................66
Figure 57 User Station Profile Screen........................................................................................................66
Figure 58 Help Menu .................................................................................................................................67
Figure 59 System Information Window......................................................................................................67
Figure 60 User Security Menu ...................................................................................................................68
.
Page 11
CHAPTER 1: INTRODUCTION 1
g
Chapter 1: Introduction
Dominion KX Overview
Dominion KX is an enterprise-class, secure, digital KVM switch that provides BIOS-level access
and control of 64 servers from anywhere in the world via Web browser. At the rack, Dominion
KX provides BIOS-level control of up to 64 servers and other IT devices from a single keyboard,
monitor, and mouse. Dominion KX’s integrated remote access capabilities provide the same
BIOS-level control of your servers, from anywhere in the world, via Web browser.
Dominion KX is easily installed using standard UTP (Cat 5/5e/6) cabling. Its advanced features
include 128-bit encryption, remote power control, dual Ethernet, LDAP, RADIUS, Active
Directory, and syslog integration, and Web management. These features enable you to deliver
higher uptime, better productivity, and bulletproof security – at any time from anywhere.
For larger data centers and enterprises, multiple Dominion KX units (along with Dominion SX
units for remote serial console access and Dominion KSX for remote/branch office management)
can be integrated into a single logical solution via Raritan’s CommandCenter Secure Gateway
(CC-SG) management appliance.
With release 1.4, Raritan introduces two new KX models: KX132 and KX464. The new
Dominion KX132 offers an economical alternative with the same KX reliability, and the KX464
is the market’s first 64-port digital KVM switch. It also offers a dual power option for added
reliability. In addition, release 1.4 offers users intelligent mouse synchronization and SNMP
management.
UTP (Cat5/5e/6) Server Cablin
Computer Interface Module
Dominion KX
WinXP
Win2000
Linux/UNIX
Novell
Sun Solaris
Etc.
LAN
Local Rack
Access
Remote Network
Access
External Modem
(optional)
Modem
Access
PSTN
Figure 1 Dominion KX Configuration
Page 12
2 DOMINION KX USER GUIDE
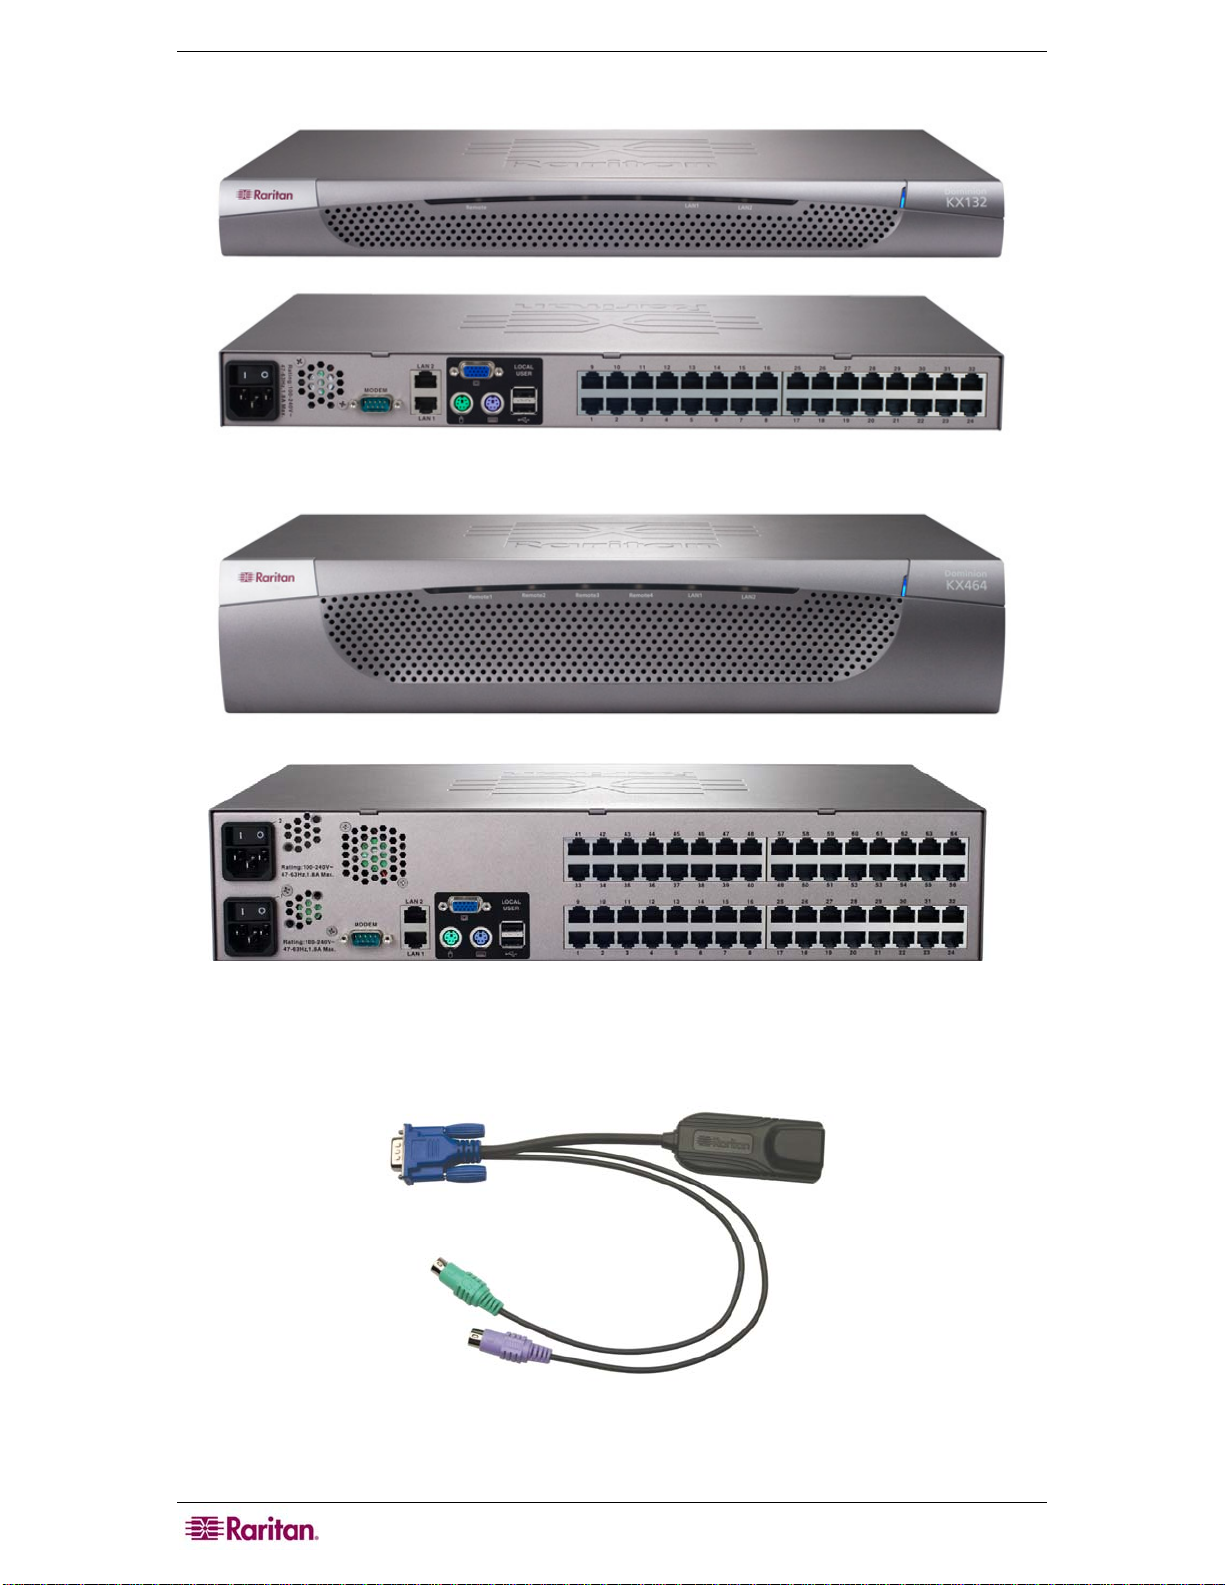
Product Photos
Figure 2 Dominion KX132
Figure 3 Dominion KX464 with Dual Power Supply
Figure 4 Dominion KX Computer Interface Module (DCIM)
Page 13

CHAPTER 1: INTRODUCTION 3
Product Features
Hardware
• 1U or 2U rack-mountable (brackets included)
• Dual Power with Failover (with KX464)
• Dual-failover Ethernet Ports
• 16, 32, or 64 (on KX464) server ports
• Multiple User Capacity
• UTP (Cat5/5e/6) Server Cabling
• Dual failover 10/100 LAN
• Modem-ready via external Modem Port
• FLASH upgradeable
• Auto-switching power supply
• Local User Port for Rack Access
− PS/2 and USB keyboard/mouse ports
− Fully concurrent with remote users
− On-Screen display
• Centralized access security
• Integrated Power Control
• LED indicators for power, network activity, and remote user status
• Integrated KVM Over IP Remote Access
• Cross-platform server support
Software
• Plug and Play Appliance
• Web based access and management
• Intuitive Graphical User Interface
• Integration with Raritan’s CommandCenter Secure Gateway (CC-SG) management appliance
• High-color (15-bit+) palette support
• 128-bit encryption of complete KVM signal, including video
• LDAP, RADIUS, or Active Directory – or Internal Authentication
• DHCP or fixed IP addressing
• SNMP Management
• Intelligent Mouse Synchronization
• CC UnManage (via Dominion KX Manager)
Page 14
4 DOMINION KX USER GUIDE
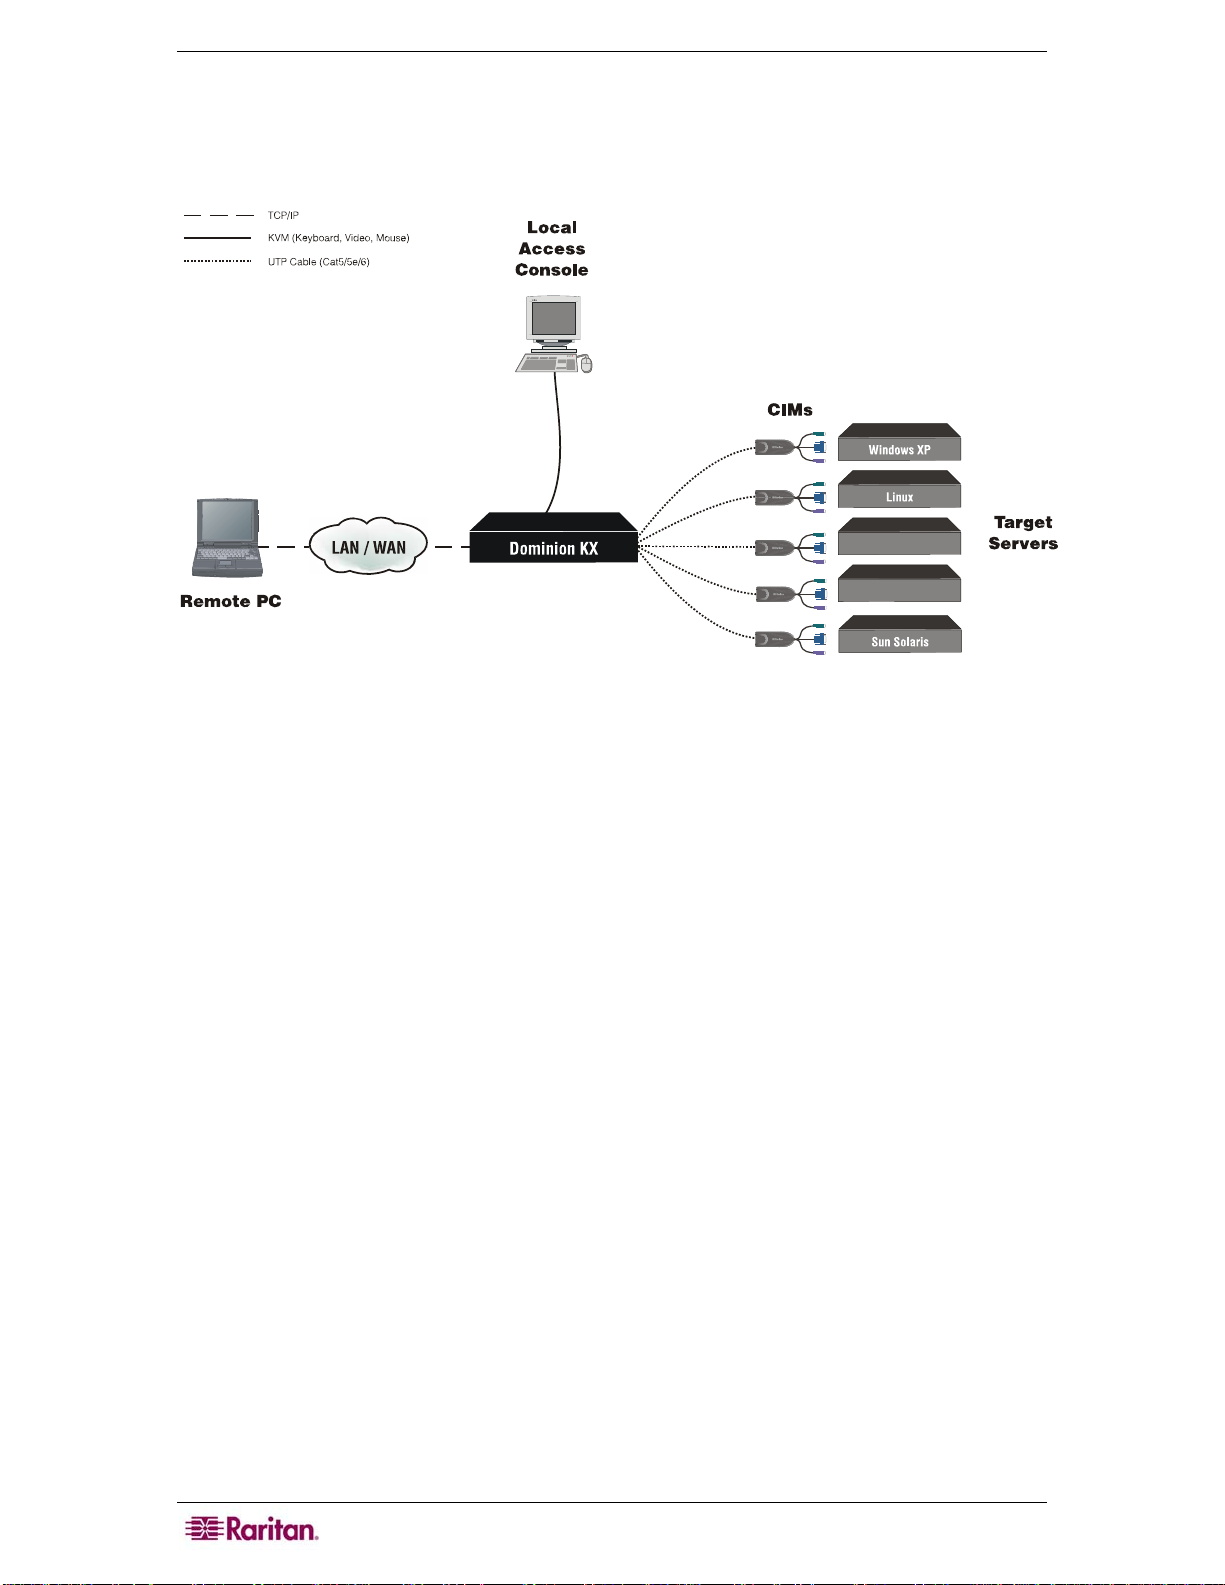
Terminology
This manual uses the following terms for components of a typical Dominion KX configuration.
Please refer to the diagram below for clarification, if needed.
Windows 2000
Unix
Figure 5 Terminology and Topology
Target Servers
Servers with graphical video cards and user interfaces (e.g.,
Windows, Linux, Solaris, etc.) to be accessed remotely via
Dominion KX.
Remote PC
A networked computer used to access and control target devices
connected to Dominion KX.
Local Access Console
An optional user console, consisting of a keyboard, mouse, and
multi-sync VGA monitor, directly attached to Dominion KX to
control target servers locally (directly at the rack, not through the
network).
CIM
(Computer Interface
Modules)
Server dongles (Raritan P/N DCIM-xxxx) that connect to each
target server. Available for PS/2, Sun, USB, and Sun USB
keyboard and mouse ports.
Package Contents
Dominion KX ships as a fully configured stand-alone product in a standard 1U 19" rackmount
chassis. Each Dominion KX unit ships with the following contents:
(1) Dominion KX unit
(1) Dominion KX printed Quick Setup Guide
(1) Raritan User Manuals CD-ROM
(1) Rackmount Kit
(1) AC Power Cord
(1) Cat5 Network cable
(1) Cat5 Network crossover cable
(1) Set of 4 rubber feet (for desktop use)
Page 15

CHAPTER 2: INSTALLATION 5
Chapter 2: Installation
Configuring Target Servers
Before installing Dominion KX, you must configure any target servers to be accessed via
Dominion KX, to ensure optimum performance. Note that the following configuration
requirements apply only to target servers, not to the client workstations (Remote PCs) that you
use to access Dominion KX remotely (please see
additional information).
Server Video Resolution
Ensure that each target server’s video resolution and refresh rate is supported by Dominion KX
and that the signal is non-interlaced. Dominion KX supports the following video resolutions:
Text Modes
640x480 @ 60Hz 1024x768 @ 60Hz
640x480 @ 72Hz 1024x768 @ 70Hz
640x480 @ 75Hz 1024x768 @ 75Hz
640x480 @ 85Hz 1024x768 @ 85Hz
720x400 @ 70Hz 1152x864 @ 60Hz
720x400 @ 85Hz 1152x864 @ 70Hz
800x600 @ 56Hz 1152x864 @ 75Hz
800x600 @ 60Hz 1280x960 @ 60Hz
800x600 @ 72Hz 1280x1024 @ 60Hz
800x600 @ 75Hz
800x600 @ 85Hz
Chapter 1: Introduction, Terminology for
Desktop Background
For optimal bandwidth efficiency and video performance, target servers running graphical user
interfaces such as Windows, Linux, X-Windows, Solaris, and KDE should be configured with
desktop backgrounds set to a predominantly solid, plain, light-colored graphic. The desktop
background need not be completely solid; but desktop backgrounds featuring photos or complex
gradients should be avoided.
Mouse Settings
Dominion KX operates in Standard mouse mode (by default), which requires that acceleration be
disabled. However, depending on your OS, you can choose to work in Intelligent Mouse mode. In
either mode, mouse parameters must be set to specific values, which are described later in this
chapter. Although Absolute mouse mode appears on the Mouse menu, it is disabled at this time.
Please see the Raritan Multi-Platform Client and Raritan Remote Client User Guide, available on
Raritan’s Website
Manuals & Quick Setup Guides CD ROM included with your Dominion KX shipment for
additional information on Intelligent Mouse mode. Please note that mouse configurations will
vary on different target operations system; consult your OS guidelines for further details.
http://www.raritan.com/support/sup_prdmanuals.aspx, or on the Raritan User
Page 16

6 DOMINION KX USER GUIDE
Windows XP / Windows 2003 Settings
On target servers running Microsoft Windows XP, disable the Enhanced Pointer Precision
option, and set the mouse motion speed exactly to the middle speed setting. These parameters are
found in Control Panel → Mouse → Pointer Options.
Disable transition effects in Control Panel → Display → Appearance → Effects.
Note: For target servers running Windows NT, 2000, or XP, you may wish to create a user name
that will be used only for remote connections through Dominion KX. This will enable you to keep
the target server’s slow mouse pointer motion/acceleration settings exclusive to the Dominion
KX connection only.
Windows XP and 2000 login screens revert to pre-set mouse parameters that differ from those
suggested for optimal Dominion KX performance. As a result, mouse sync may not be optimal at
these screens. If you are comfortable adjusting the registry on Windows target servers, you can
obtain better Dominion KX mouse synchronization at login screens by using the Windows
registry editor to change the following settings: Default user mouse motion speed = 0; mouse
threshold 1= 0; mouse threshold 2 = 0.
Important: Only the default, Standard mouse mode, works in these Operating
Systems.
Windows 2000 / ME Settings
On target servers running Microsoft Windows 2000/ME, set the mouse pointer acceleration to
None and the mouse motion speed exactly to the middle speed setting. These parameters are
found in Control Panel → Mouse.
Disable transition effects in Control Panel → Display → Effects.
Windows 95 / 98 / NT Settings
On target servers running Microsoft Windows 95/98/NT, set the mouse motion speed to the
slowest setting in Control Panel → Mouse → Motion.
Disable window, menu, and list animation in Control Panel → Display → Effects.
Page 17
CHAPTER 2: INSTALLATION 7
Linux Settings
On target servers running Linux graphical interfaces, set the mouse acceleration to exactly 1 and
set threshold to exactly 1. Enter this command: xset mouse 1 1.
Ensure that each target server running Linux is using a resolution supported by Dominion KX at a
standard VESA resolution and refresh rate. Each Linux target server should also be set so the
blanking times are within +/- 40% of VESA standard values.
To check for these parameters:
• Go to the Xfree86 Configuration file XF86Config
• Using a text editor, disable all non-Dominion KX supported resolutions
• Disable the virtual desktop feature, which is not supported by Dominion KX
• Check blanking times (+/- 40% of VESA standard).
• Restart computer
Note: In many Linux graphical environments, the command <CTRL+ALT+ + (plus key)> will
change the video resolution, scrolling through all available resolutions that remain enabled in
the XF86Config file.
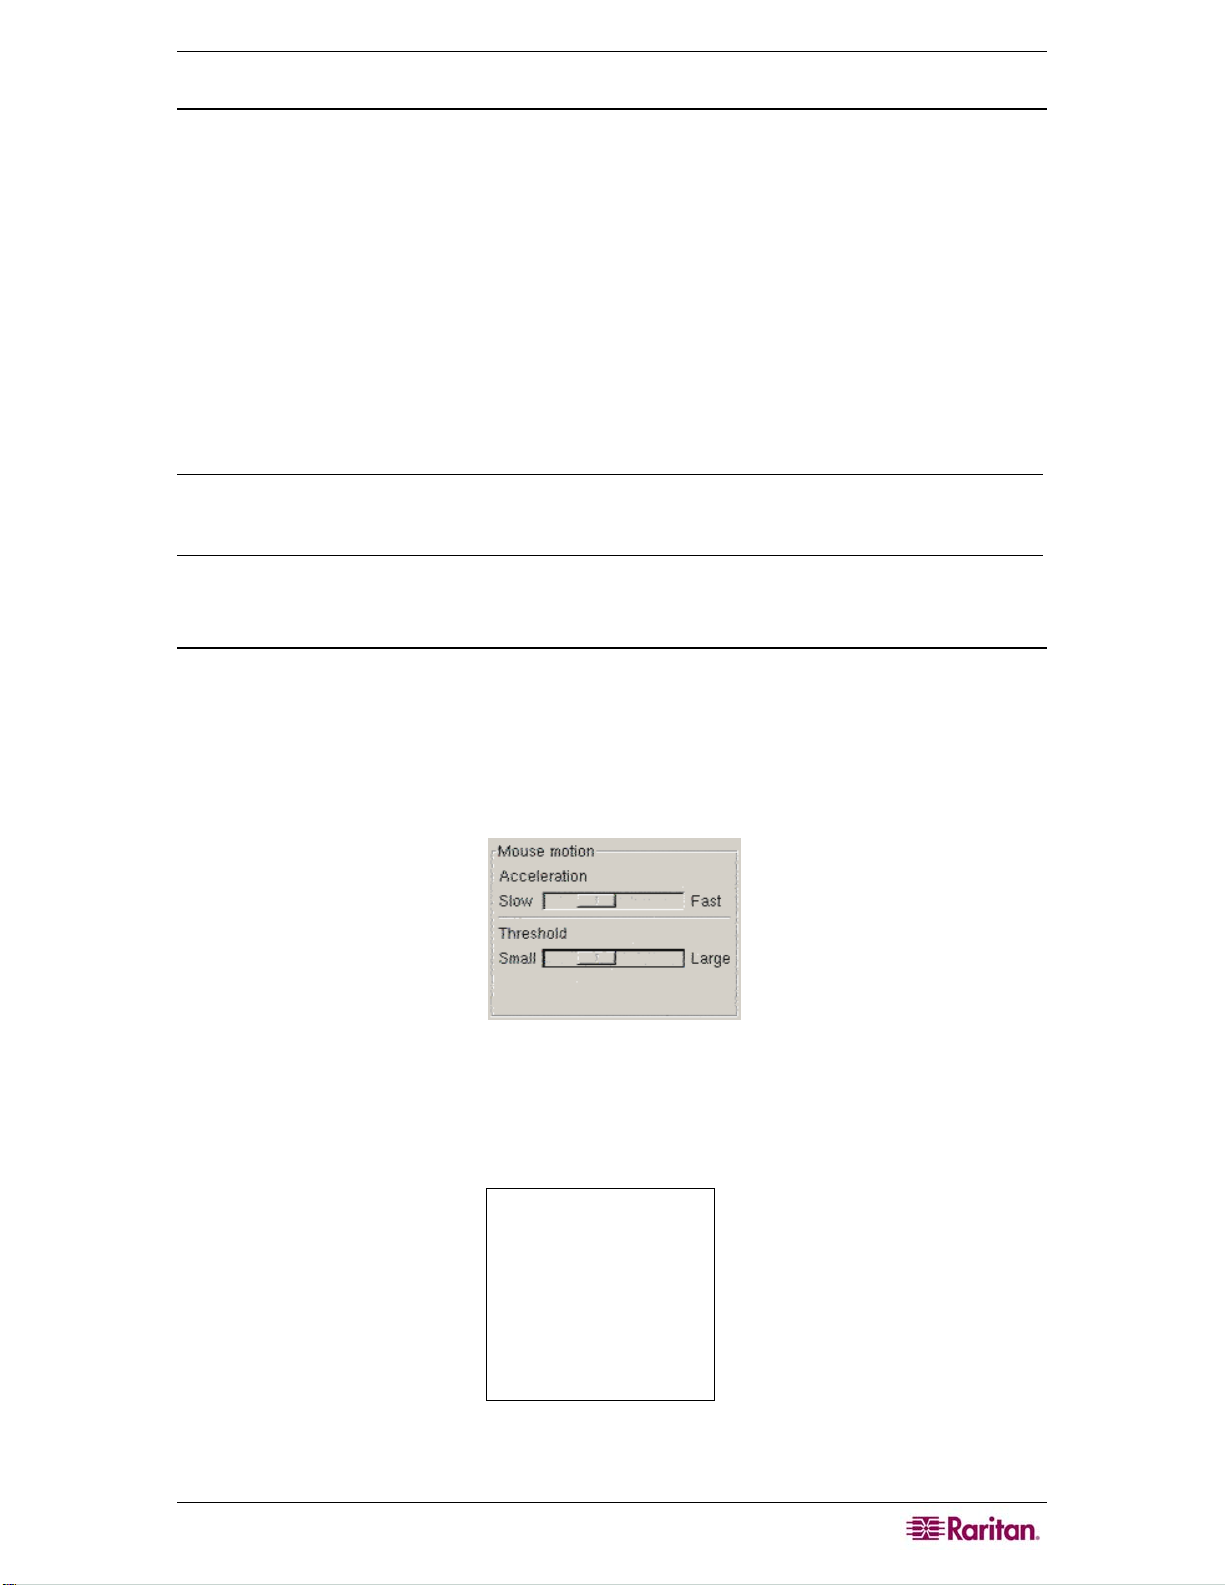
Sun Solaris Settings
On target servers running the Solaris operating system, set the mouse acceleration value to
exactly 1 and threshold to exactly 1.
This can be performed from the graphical user interface, or with the command line:
xset mouse a t
where “a” is the acceleration and “t” is the threshold.
Figure 6 Solaris Mouse Configuration Window
All target servers must be configured to one of the display resolutions supported by Dominion
KX, as listed in the beginning of this chapter. The most popular supported resolutions for Sun
machines are:
1024 x 768 @ 60 Hz
1024 x 768 @ 70 Hz
1024 x 768 @ 75 Hz
1024 x 768 @ 85 Hz
1152 x 900 @ 66 Hz
1152 x 900 @ 76 Hz
1280 x 1024 @ 60 Hz
Target servers running the Solaris operating system must output VGA video (H-and-V sync, not
composite sync). To change your Sun video card output from composite sync to the non-default
Page 18
8 DOMINION KX USER GUIDE
VGA output, first issue the Stop+A command to drop to bootprom mode. Then, issue the
command:
setenv output-device screen:r1024x768x70
to change the output resolution. Issue the “boot” command to reboot the server.
You may also contact your Raritan representative to purchase a video output adapter. 13W3 Suns
with composite sync output require APSSUN II Guardian converter for use with Dominion KX.
HD15 Suns with composite sync output require the 1396C converter to convert from HD15 to
13W3 and an APSSUN II Guardian converter to support composite sync. HD15 Suns with
separate sync output require an APKMSUN Guardian converter for use with Dominion KX.
Note: Some of the standard SUN background screens may not center precisely on certain SUN
servers, that is, those with dark borders. Use another background or place a light colored icon in
the upper left hand corner.
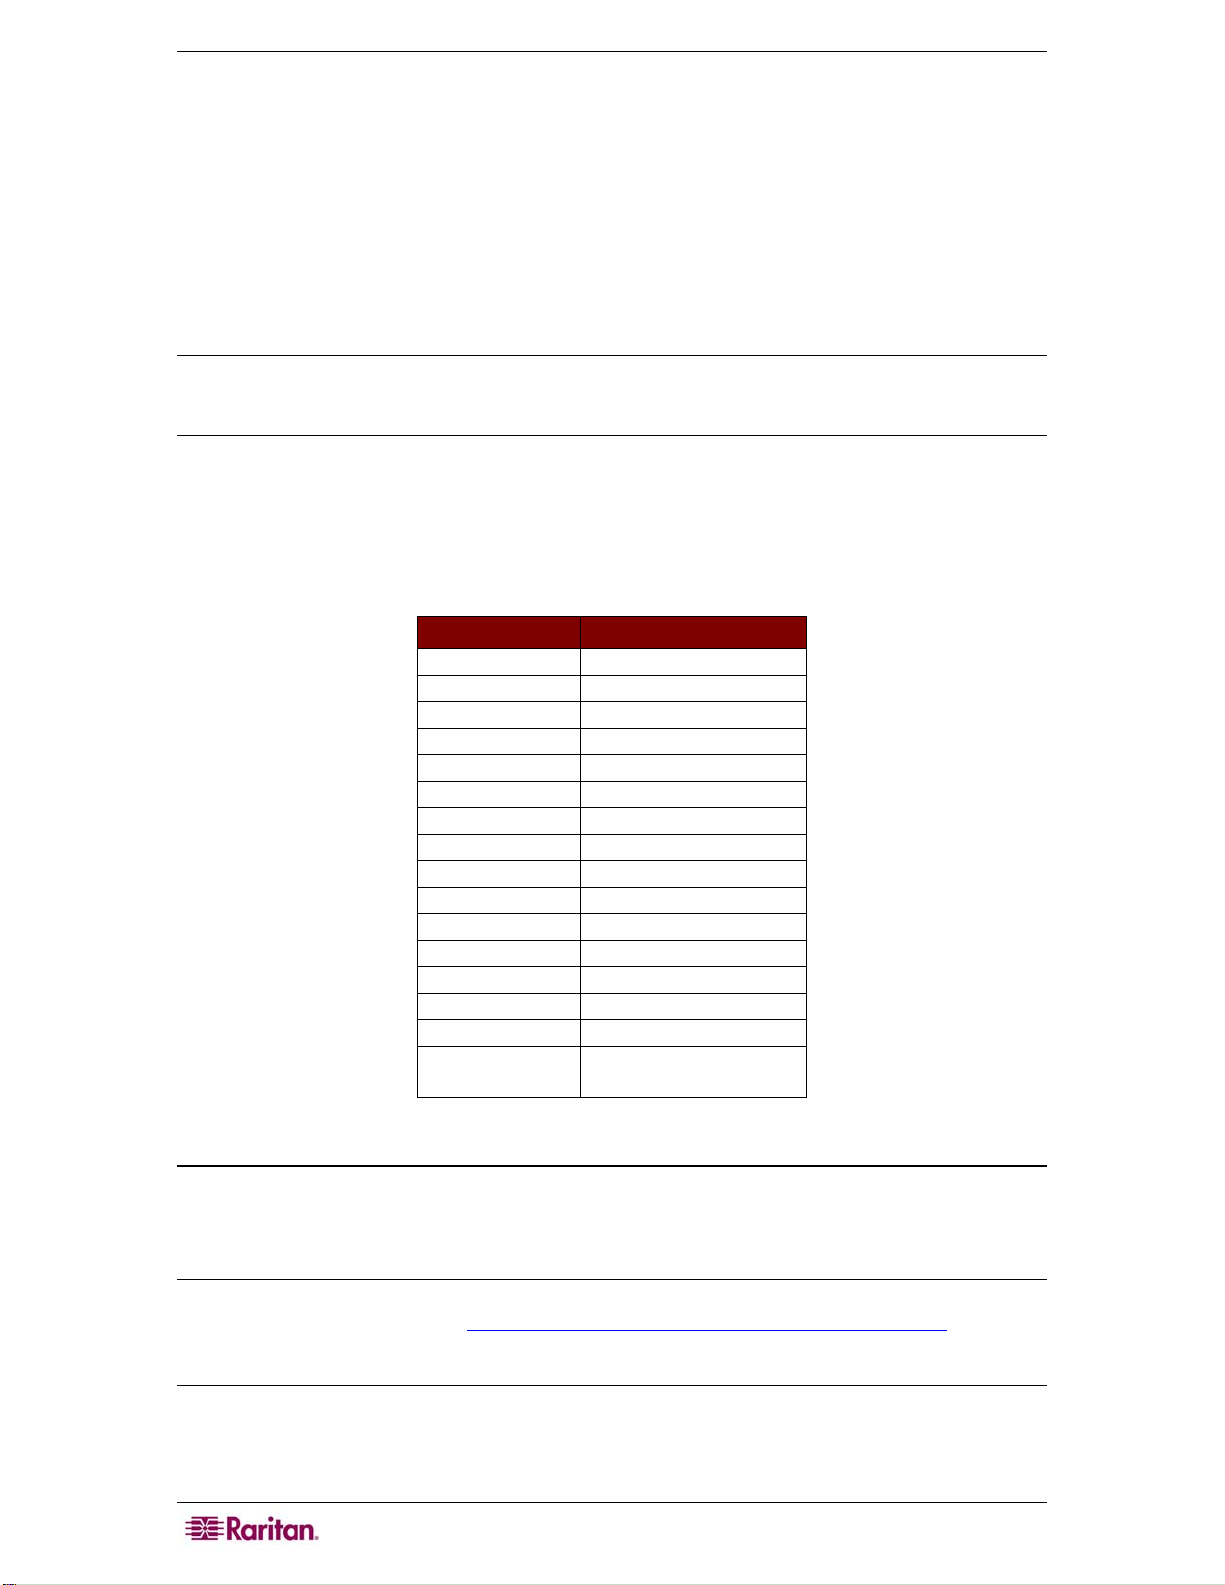
Raritan Remote Client Key Combination Equivalents
The following keys are commands specific to the special keys on the Sun keyboard. Please use
the RRC key combinations in their place.
SUN KEY RRC
Again
Props
Undo
Front
Copy
Open
Paste
Find
Cut
Help
Mute
Compose
VOL+
VOLStop
CTRL+ALT+F2
CTRL+ALT+F3
CTRL+ALT+F4
CTRL+ALT+F5
CTRL+ALT+F6
CTRL+ALT+F7
CTRL+ALT+F8
CTRL+ALT+F9
CTRL+ALT+F10
CTRL+ALT+F11
CTRL+ALT+F12
CTRL+ALT+Kpd
CTRL+ALT+ +
CTRL+ALT+ Pause/Break
Special
Stop+A
Pause/Break,A
Apple Macintosh Settings
For target servers running an Apple Macintosh operating system, no specific mouse setting is
required. However, when using Dominion KX to access and control your target server, you must
set Raritan Multi-Platform Client (MPC) to “single cursor” mode.
Note: Please see the Raritan Multi-Platform Client and Raritan Remote Client User Guide,
available on Raritan’s Website http://www.raritan.com/support/sup_prdmanuals.aspx, or on the
Raritan User Manuals & Quick Setup Guides CD ROM included with your Dominion KX
shipment for details on installing and operating MPC and RRC.
Dual cursor mode is not supported for Macintosh target servers; the two mouse pointers will not
appear in sync if you attempt to control a Macintosh server via Dominion KX in dual cursor
mode.
Page 19
CHAPTER 2: INSTALLATION 9
IBM AIX Settings
For target servers running the IBM AIX operating system, go to the Style Manager, click on
Mouse Settings and set Mouse acceleration to 1.0 and Threshold to 3.0.
Configurable Hotkey
The Control+Alt+m key sequence displays the RRC/MPC Shortcut menu. This sequence can be
configured to a key other than the “m” key.
Please note, however, that some key sequences are pre-defined by certain operating systems. For
UK keyboards, the “a” and “i” keys should not be used. Press Control+Alt to see the current
hotkey sequence.
This hotkey sequence can be reconfigured from the Tools/Options panel.
Configuring Network Firewall Settings
If you wish to access Dominion KX through a network firewall, your firewall must allow
communication on TCP Port 5000. Dominion KX can also be configured to use a different TCP
port of your designation (please see
Configuration for additional information).
Optional: To take advantage of Dominion KX’s web-access capabilities, the firewall must also
allow inbound communication on TCP Port 443 – the standard TCP port for HTTPS
communication. To take advantage of Dominion KX’s automatic redirection of HTTP requests to
HTTPS (i.e., so users may type the more common, “http://xxx.xxx.xxxx” instead of
“https://xxx.xxx.xxxx”), then the firewall must also allow inbound communication on TCP Port
80 – the standard TCP port for HTTP communication.
Chapter 3: Administrative Functions, Network
Note: Depending on hardware status, firewall ports may require different settings. Please refer to
the table below:
PORT OLD DEVICE NEW DEVICE
5000 UDP Can be used for discovery Will be used for discovery
5002 UDP Can be used for discovery Not supported
5000 TCP Can be used for connecting to the
device
5001 TCP Can be used for connecting to the
device
Will be used for connecting to the
device
Not supported
Page 20
10 DOMINION KX USER GUIDE
3 4 5
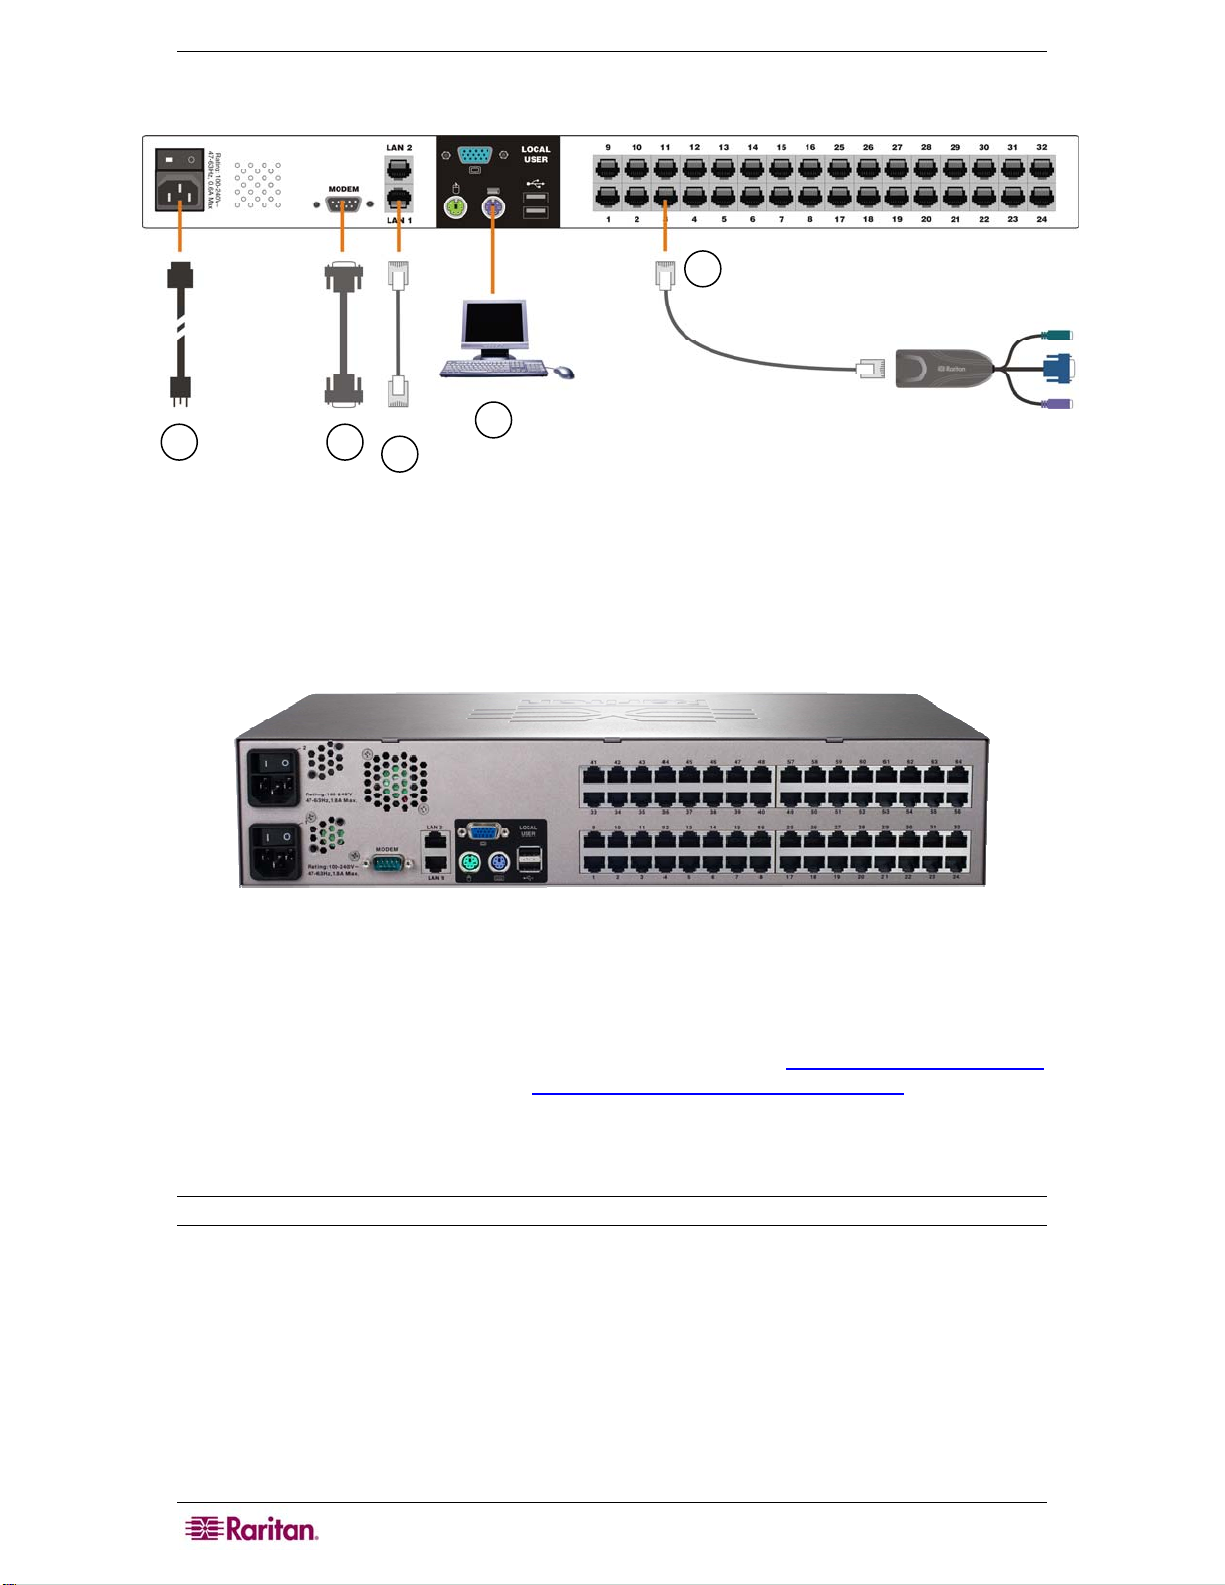
Physical Connections
1
2
Figure 7 Back Panel of Dominion KX
1. AC Power Line
Attach the included AC power cord to Dominion KX and plug into an AC Power Outlet.
If you are installing a KX464 and want dual power failover protection, attach the second included
AC power cord and plug it into a different power source than the first power cord.
Figure 8 Rear Panel of Dominion KX 464 with Dual Power Ports
2. Modem Port (optional)
Dominion KX features a dedicated modem port for remote access even when the LAN/WAN is
unavailable. Using a straight-through serial (RS-232) cable, connect an external serial modem to
the port labeled MODEM on the back of Dominion KX (please see
for a list of certified modems and
Chapter 3: Administrative Functions for additional
Appendix A: Specifications
information on modem functions). Use both network ports only if you want to use one as a
failover port; using both ports is not mandatory. As with failover power supply, plug the second
serial cable into a different switch than the first cable.
Note: Raritan recommends configuring the modem by enabling the CD (carrier detect) setting.
3. Network Ports
Dominion KX provides two Ethernet ports for failover purposes (not for load-balancing). By
default, only LAN1 is active and automatic failover is disabled. In the case that the Dominion KX
internal network interface or the network switch to which it is connected becomes unavailable,
the port labeled LAN2 will become enabled, using the same IP address.
Connect a standard Ethernet cable (included) from the network port labeled LAN1 to an Ethernet
switch, hub, or router. To make use of Dominion KX’s Ethernet failover capabilities, you must
also connect a standard Ethernet cable from the network port labeled LAN2 to an Ethernet switch,
Page 21
CHAPTER 2: INSTALLATION 11
hub, or router and then Enable Automatic Failover on the Network Configuration screen in KX
Manager.
4. Local Access Console Ports (optional)
For convenient access to target servers while at the rack, use Dominion KX’s Local Access
Console ports. Attach a multisync VGA monitor, mouse, and keyboard to the ports labeled Local
User using either a PS/2 keyboard and mouse or a USB keyboard and mouse.
The USB keyboard and mouse ports are to be used only for keyboard and mouse access – other
USB devices such as external drives, scanners, etc. should not be connected to these ports.
5. Server Ports
Dominion KX uses standard UTP cabling (Cat5/5e/6) to connect to each target server. Please see
Appendix A: Specifications for additional information. To connect a target server to Dominion
KX, use the appropriate Computer Interface Module (CIM):
DCIM-PS2 PS/2 keyboard/mouse
DCIM-SUN Sun keyboard/mouse
DCIM-USB USB keyboard/mouse
DCIM-SUSB USB keyboard/mouse for Sun Microsystems servers
Attach the HD15 video connector of your CIM to the video card of your target server. Ensure that
your target server’s video has already been configured to a supported resolution and refresh rate.
For Sun servers, also ensure that your target server’s video card has been set to output standard
VGA (H-and-V sync) and not composite sync.
Attach the keyboard/mouse connector of your CIM to the corresponding ports of your target
server. Then, using a standard straight-through UTP (Cat5/5e/6) cable, connect the CIM to an
empty server port on the back of your Dominion KX unit.
Note: Other CIMs supported by DKX version 1.3 and higher include: P2CIM-PS2, P2CIM-SUN,
P2CIM-USB, P2CIM-SUSB, UKVMPD, USKVMPD, UUSBPD, and P2CIM-PWR (for power
strip control).
When using a DCIM-SUSB, please follow the steps below to change keyboard layout code:
1. Open a Text Editor window on the Sun workstation.
2. Ensure that the NUM LOCK key is active and press the left CTRL key and the DEL key on
your Keypad. The Caps Lock LED starts to blink, which indicates that the CIM is in Layout
Code Change mode.
3. The text window displays the following: Raritan Computer, Inc. Current keyboard layout
code = 22h (US5 Unix).
4. Type the layout code desired (for example, 31 for Japanese keyboard).
5. Press ENTER.
6. Shut down the unit and power ON once again so that the DCIM-SUSB performs a reset
(power cycle).
7. Use MPC or C/MPC to switch in again and press keys to verify all character is correct.
Page 22

12 DOMINION KX USER GUIDE
Initial Configuration
IMPORTANT: In some environments, the default 10/100 Mb Auto-negotiation
does not properly set the network parameters, leading to network issues. For
an example, please visit
these cases, setting the Dominion KX to 100 Mbps/Full Duplex (or whatever is
appropriate to your network) addresses the issue. To set, in the Network
Settings screen, select Autonegotiate and set the values appropriate to your
network.
Assigning an IP Address
1. Power ON Dominion KX via the power switch on the back of the unit. Wait approximately
45 seconds as Dominion KX boots.
2. After the KX unit boots, the on-screen display (OSD) appears on the monitor attached to
Dominion KX’s Local Access Console. Log on with the default username/password of
admin/raritan and press Enter.
3. Press the F5 key on your keyboard to activate the Administrative Menu.
4. Select Option 3, Network Settings, and press ENTER.
5. Specify TCP/IP parameters for your Dominion KX unit: IP address, subnet mask, and default
gateway. When finished, press the S key to save the settings. The Dominion KX unit will
automatically reboot.
6. Connect one end of a straight-through Ethernet cable (included) to the port labeled LAN1 on
the rear panel of Dominion KX, and the other end to a network switch or router.
Your Dominion KX unit is now network accessible.
http://www.cisco.com/warp/public/473/3.html. In
Note: If two Dominion KX units are assigned the same IP address, an IP conflict results. A
Raritan Remote Console attempting to connect to one of the units may get a “Bad Parameter”
message. This is because the RRC discovers devices and maintains a list of discovered devices
using the IP address of the device as the key. The device ID is also stored with the key. If another
KX is discovered with the same IP address, the RRC will not know there an IP conflict. When the
RRC starts communicating with the second device, it uses the device ID from the first device. As a
result, the second device issues the Bad Parameter message.
Connecting and Naming Target Servers
1. Connect one end of a standard, straight-through UTP cable (Cat5/5e/6) to an unoccupied
server port; connect the other end to the RJ45 port on a Dominion KX Computer Interface
Module (CIM): DCIM-PS2 (PS/2 ports); DCIM-USB (USB ports); DCIM-SUSB (USB ports
for Sun servers); or DCIM-SUN (Sun ports with HD15 video).
2. Connect the remaining ports on the CIM to the corresponding KVM ports of the server that
you wish to manage using Dominion KX.
3. Repeat steps 1 and 2 to connect all servers that you wish to manage using Dominion KX.
4. On the Local Access Console, log on with the default username/password of admin/raritan.
5. Press the F5 key to activate the Administrative Menu, and select Option 5, Channel
Configuration.
6. Select a server port to rename, and press the ENTER key. When the cursor changes to a
green color, assign a name (up to 20 characters, alphanumeric, no symbols allowed) to
identify the server connected to that port. Press ENTER to complete the change.
7. Press ESC to exit the menu.
Page 23

CHAPTER 2: INSTALLATION 13
Changing Default Password
1. Find and log on to any workstation with (a) network connectivity to your Dominion KX unit,
and (b) Java Runtime Environment v1.4.2_2 or higher installed (Java Runtime Environment
is available at
2. Launch a Web browser such as Internet Explorer or Mozilla.
3. If you are using Internet Explorer (IE) type the following URL:
where IP-ADDRESS is the IP address that you assigned to your Dominion KX unit.
4. The Dominion KX remote management tool, Dominion KX Manager, will launch. Log on
with the default username and password (admin/raritan).
5. In the User Navigation tree in the left panel of the screen, select the Admin user icon.
6. Right-click on the Admin user icon and select Edit User from the shortcut menu.
http://java.sun.com/).
http://IP-ADDRESS/admin,
Page 24

14 DOMINION KX USER GUIDE
7. Type a new password in the Password field. Retype the password in the Confirm Password
field. Passwords consist of twenty (20) English alphanumeric characters and the following
symbols: !"#$%&'()*+,-./:;<=>?@[\]^_`{|}~.
8. Click OK to save User properties or click Cancel to close the window without saving.
The Default Password can also be changed from Raritan Multi-Platform Client and Raritan
Remote Client (MPC and RRC).
1. Log on to the device at RRC with default user name admin and default password raritan.
2. Click once on the device in the Navigator panel and then right-click on it.
3. Click Update and the click User Password. The Change Password screen appears.
4. Type your old password in the Old Password field.
5. Type your new password in the New Password field.
6. Retype your new password in the Retype Password field.
7. Click OK to save new password.
Note to CC-SG Users
If you are using Dominion KX in a CC-SG configuration, perform the installation steps as
outlined above, and when finished, consult the CommandCenter Secure Gateway User Guide,
Administrator Guide, or Deployment Guide to proceed (all found on Raritan’s Website under
Support:
applies primarily to users deploying their Dominion KX unit(s) without the integration
functionality of CC-SG.
http://www.raritan.com/support/sup_prdmanuals.aspx#com). The rest of this user guide
Upgrading Device Firmware
To update a device’s firmware, first connect to the device. Highlight the device’s icon in the MPC
Navigator, and click on the Tools menu, click Update and then click Update Device to perform
firmware upgrades.
MPC / RRC will prompt you to locate a Raritan firmware distribution file (*.RFP format), found
on the Raritan Website Firmware Upgrades page when available:
http://www.raritan.com/support/sup_upgrades.aspx. Copy the RFP file to a local drive, not a
network drive, and ensure that you read all instructions included in firmware ZIP files carefully
before upgrading your Dominion KX.
Note: When a user upgrades a device, the device goes into a "Maintenance Mode." All sessions
are disconnected and the device can execute only certain required software components. This
allows the system to be in a clean, well understood state so that firmware update operations can
occur reliably.
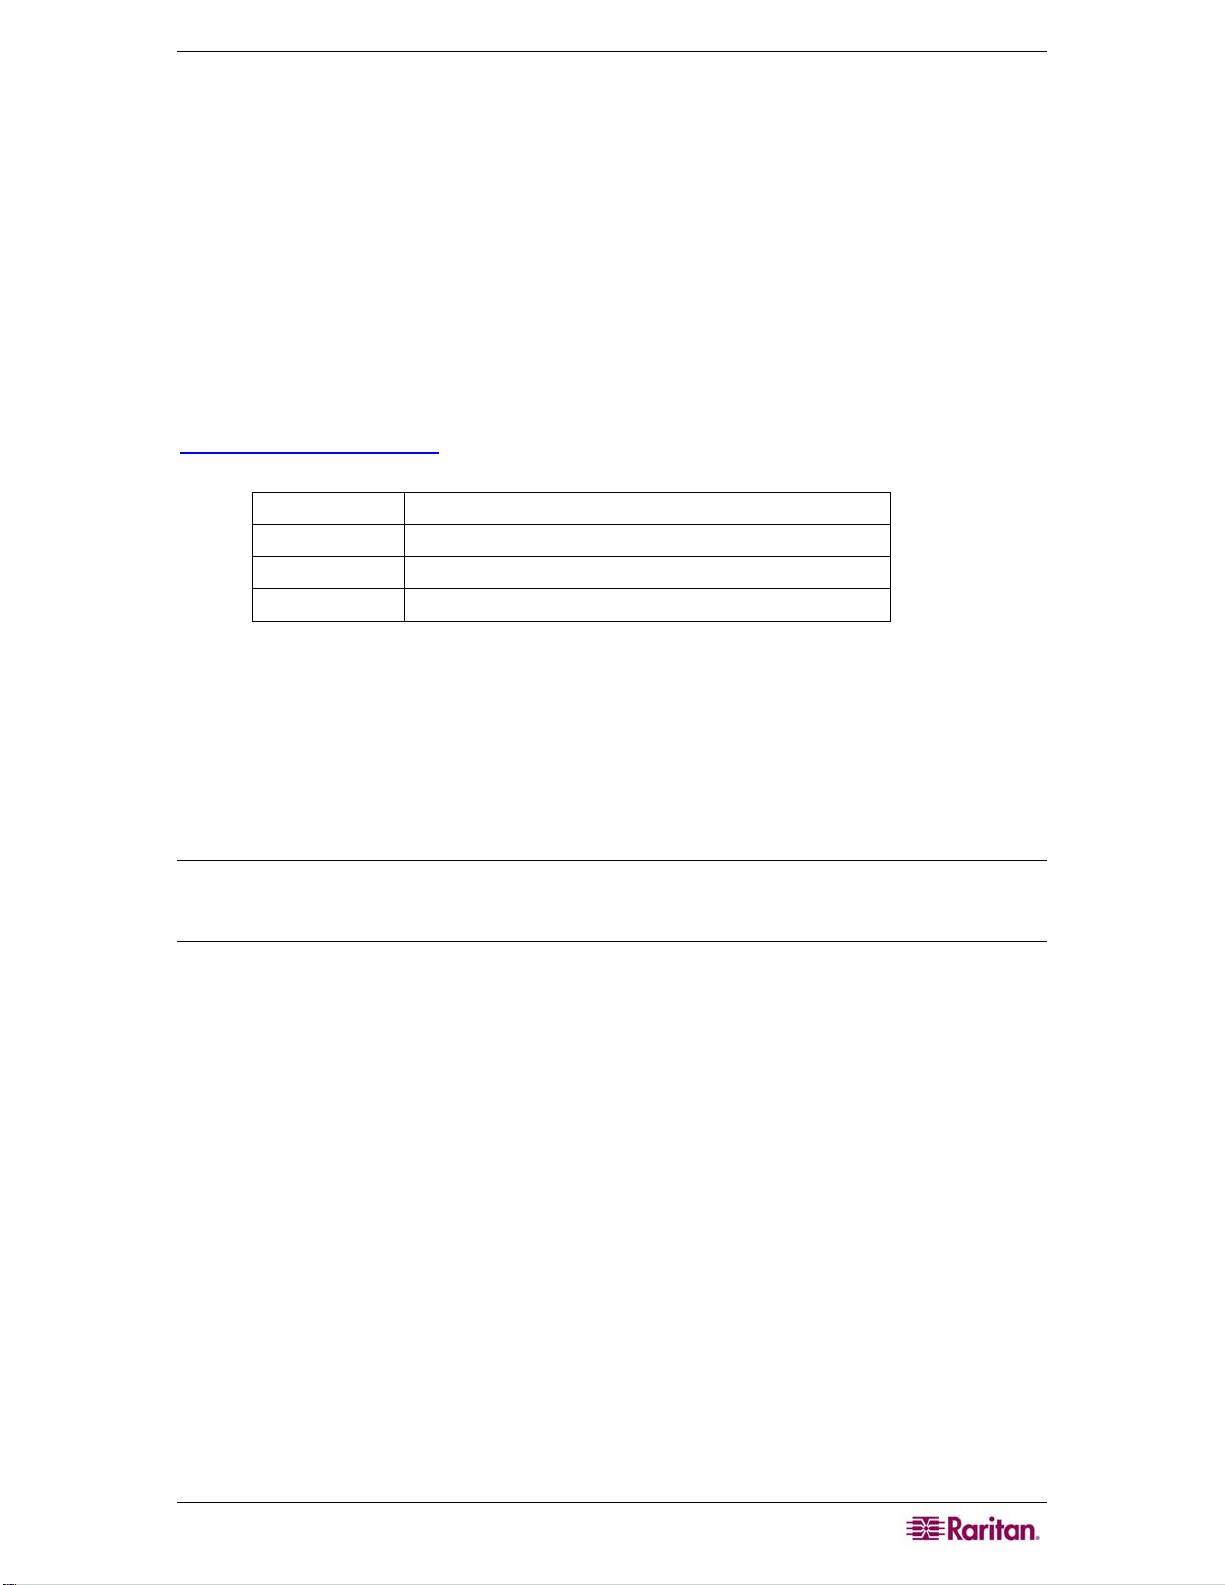
Updating User Password
After upgrading your firmware, the Change Password window automatically appears. Fill in new
password information. To manually change your password at any time, connect to the target using
its icon in the Navigator, and on the Tools menu, click Update and then click User Password.
The Change Password window appears.
Page 25
CHAPTER 2: INSTALLATION 15
Figure 9 Change Password Window
1. Type your current password in the Old Password field.
2. Type the new password in the New Password field.
3. Retype the password in the Confirm New Password field.
4. When finished, click OK.
Connecting to Dominion KX Remotely Using Raritan Multi-Platform Client and Raritan Remote Client
Raritan Multi-Platform Client (MPC) and Raritan Remote Client (RRC) are graphical interfaces
that allow you to remotely access the target devices connected to Raritan’s Dominion and IPReach units. Both can be installed to use stand-alone or accessed remotely.
After installing the Dominion device, either download a standalone version of Raritan MPC or
RRC and establish an initial network connection, or launch either application using the directions
that follow.
Non-Windows users must use MPC, and Windows users running Internet Explorer default to
RRC.
Note: Please see the Raritan Multi-Platform Client and Raritan Remote Client User Guide,
available on Raritan’s Website http://www.raritan.com/support/sup_prdmanuals.aspx, or on the
Raritan User Manuals & Quick Setup Guides CD ROM included with your Dominion shipment
for additional information on installing and operating MPC and RRC.
MPC Requirements
To run the Raritan Multi-Platform Client and Raritan Remote Client, your computer must meet
the following minimum requirements:
• CPU speed of 1.0 GHz
• 512 Mbytes of RAM
All installations of MPC require Sun Microsystems’ Java Runtime Environment (JRE) version
JRE 1.4.2_05
or greater. You may need some configuration depending on your OS and browser;
configuration instructions are provided with the JRE download. Please note that modem use is not
supported with Raritan’s Dominion KX101.
Determine your version of the JRE on the Java webpage:
http://www.java.com/en/download/help/testvm.xml
Note: Raritan does not support JRE version 1.5.0_02 for use with MPC.
Supported Browsers
MPC supports the following browsers:
• Internet Explorer 6 or later
Page 26

16 DOMINION KX USER GUIDE
• Netscape 7.2 or later
• Safari 1.2 or later
• Firefox 1.0 or later
• Mozilla 1.7 or later
Page 27
CHAPTER 2: INSTALLATION 17
Installing and Launching MPC
1. To launch MPC from a machine running any browser except Internet Explorer, type
http://<IP address> into the address line, where <IP address> is the IP address of your
Raritan device. Please note that the MPC applet will launch in a new window that does not
contain a Menu bar, Tool bar, Scroll bar, or Address bar. Work in this window and toggle to
other open windows using the command ALT+TAB.
2. When MPC launches, a device tree of all automatically detected Raritan devices found on
your subnet is displayed on the left side of the screen. If you do not find your Dominion unit
listed by name, create an icon manually by selecting Connection Æ New Profile. The Add
Profile window appears.
3. Type a device Description, specify a Connection Type, and add the Dominion unit’s IP
Address, and click OK. These specifications can be edited later, as described in the
MPC/RRC User Guide (
4. In the Navigator panel on the left of the screen, double-click on the icon that corresponds to
your Dominion unit.
To install MPC as a standalone applet, please see Appendix A in the
Client and Raritan Remote Client User Guide.
Important: Regardless of the browser you use, you must allow pop-ups from
the Dominion device’s IP address in order to launch MPC.
http://www.raritan.com/support/sup_prdmanuals.aspx).
Raritan Multi-Platform
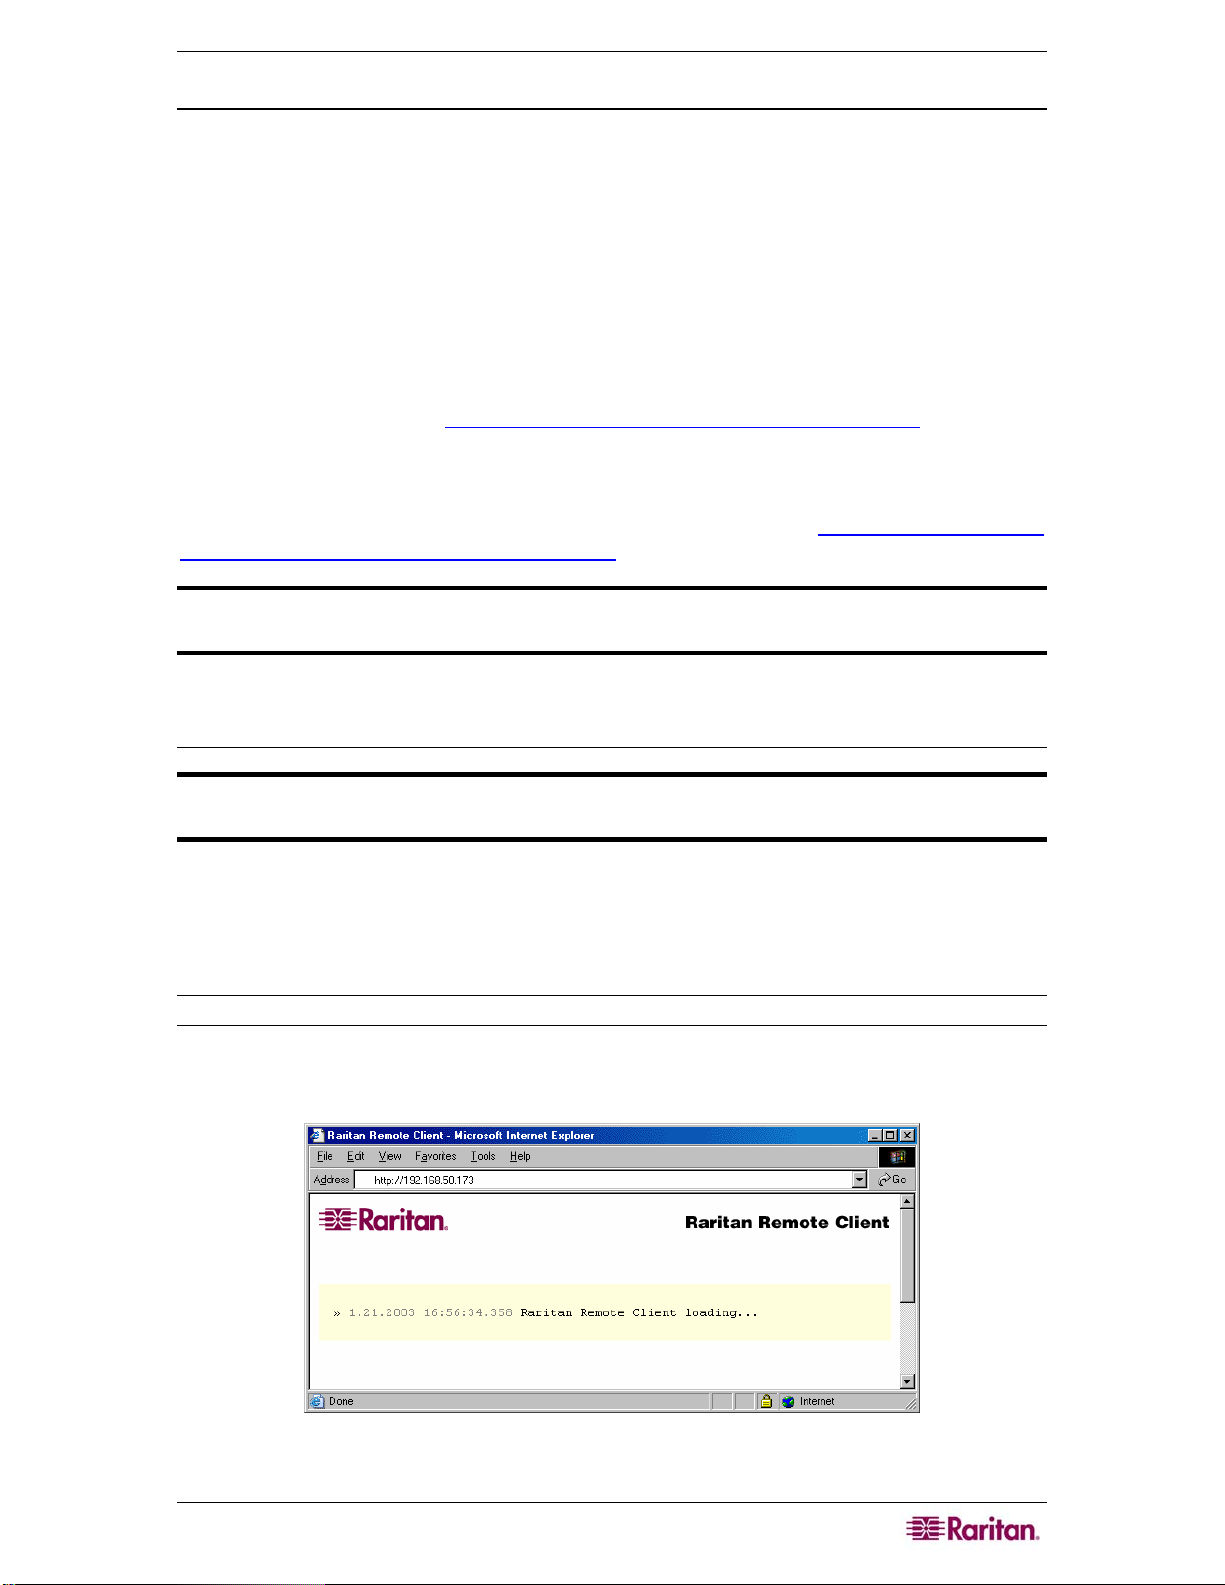
Installing and Launching RRC
Important: RRC works only with MS Internet Explorer. If you are using a
different Web browser, MPC automatically loads, instead of RRC.
1. Log on to any Windows-based computer with network access to your Dominion device.
2. If you are using Windows NT, 2000, XP, or 2003, ensure that you are not a “restricted” user.
3. Launch Microsoft Internet Explorer (ensure that your Internet Explorer security settings allow
the download and execution of ActiveX controls).
Note: The IE default security setting of Medium is sufficient.
4. In the Internet Explorer Address bar, type the IP address you assigned to your Dominion
device the previous section, Initial Configuration. Press ENTER to load and launch RRC.
Figure 10 RRC Connection Window
Page 28

18 DOMINION KX USER GUIDE
5. When RRC launches, a device tree of all automatically detected Raritan devices found on
your subnet is displayed on the left side of the screen. If you do not find your Dominion unit
listed by name, create an icon manually by selecting Connection Æ New Profile. The Add
Profile window appears.
6. Type a device Description, specify a Connection Type, and add the Dominion unit’s IP
Address, and click OK. These specifications can be edited later, as described in the
MPC/RRC User Guide (
http://www.raritan.com/support/sup_prdmanuals.aspx).
7. In the Navigator panel on the left of the screen, double-click on the icon that corresponds to
your Dominion unit.
Page 29
CHAPTER 2: INSTALLATION 19
y
Establishing a Connection
When you double-click on your Dominion unit’s icon in MPC or RRC, its login screen appears.
Log on using your username and password (default: admin/raritan) to connect to your Dominion
unit. Use the Navigator, on the left side of the MPC or RRC window, to select and connect to a
server port.
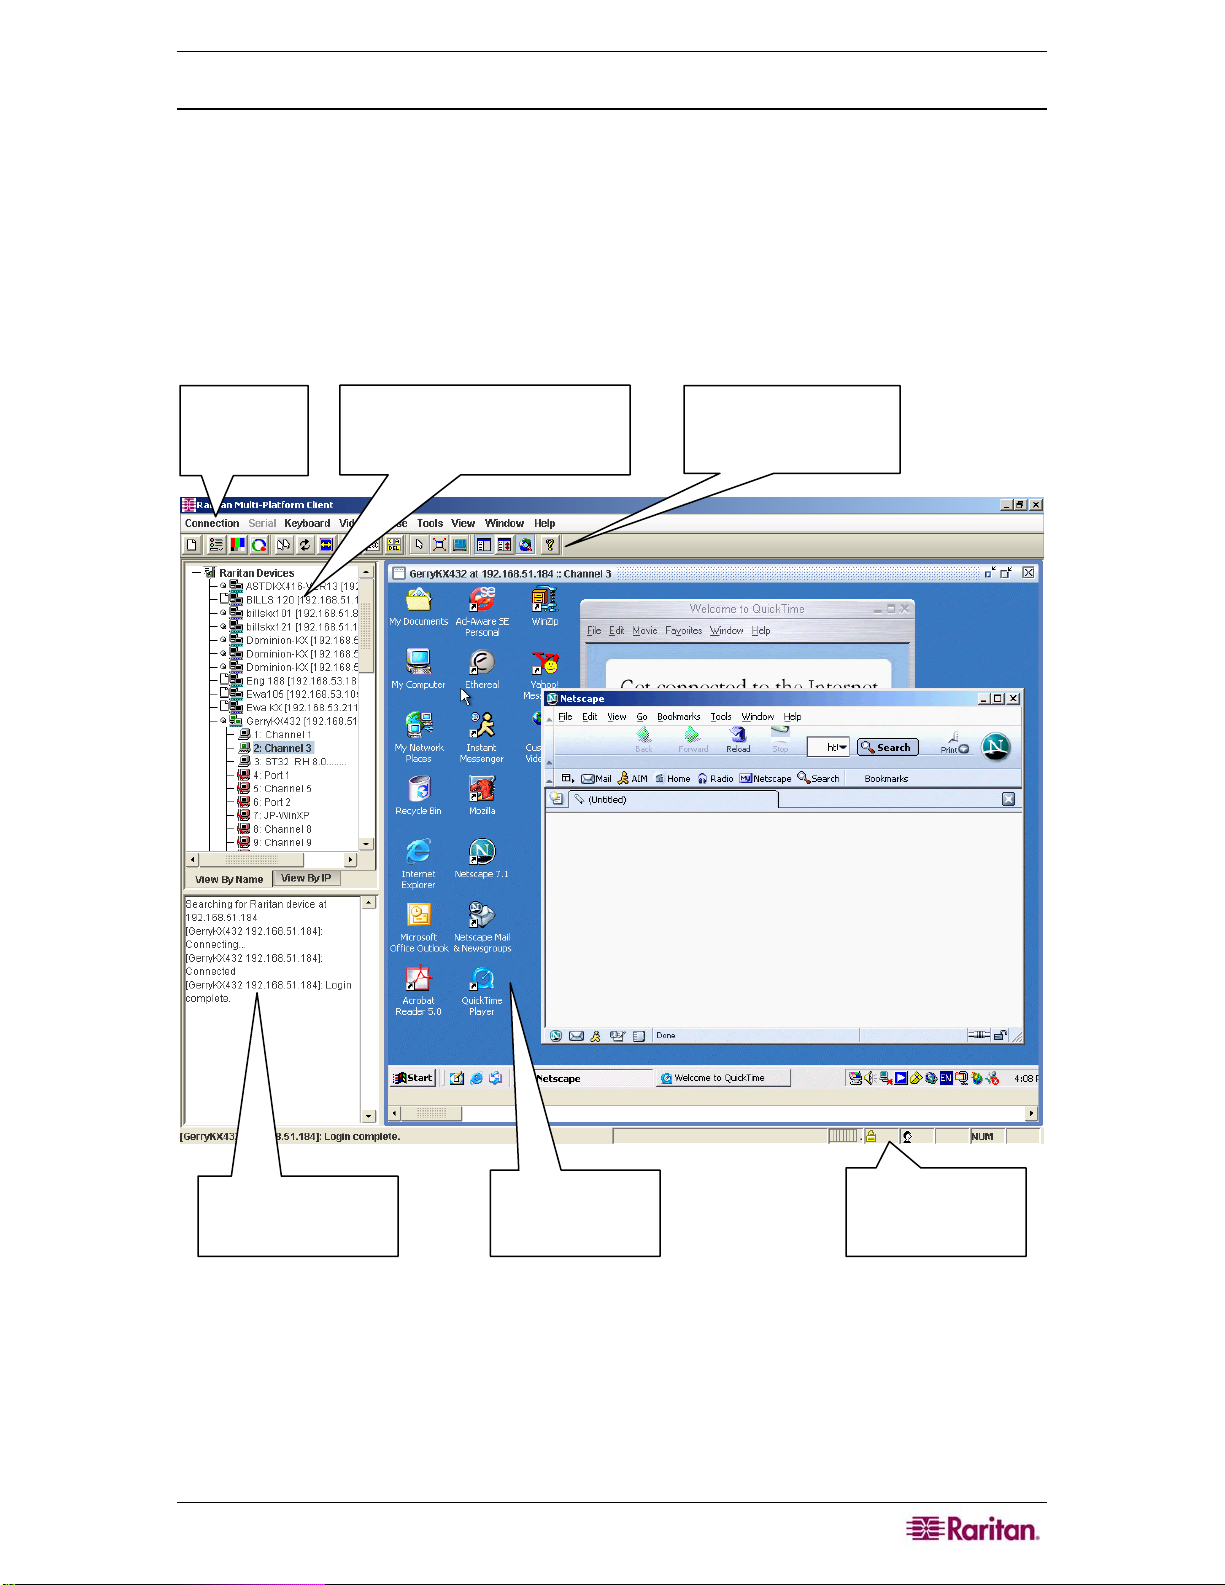
MPC Interface
MPC functions are grouped into six general sections on the screen. As a standalone product, or as
a Web applet, the MPC window contains these six main sections:
Menu Bar – offers
drop-down menus
of commands and
preferences.
Navigator– displays all known Raritan
networked devices. Connect to a device to
control the server or KVM switch attached
to that port.
Toolbar – shortcut buttons
to launch frequently-used
features and commands.
Message panel – simplified
log display of connection
attempts and other significant
s
stem events.
Remote KVM Console –
target device display.
Figure 11 MPC Window Layout
Status Bar – provides realtime information on
connection parameters.
Page 30
20 DOMINION KX USER GUIDE
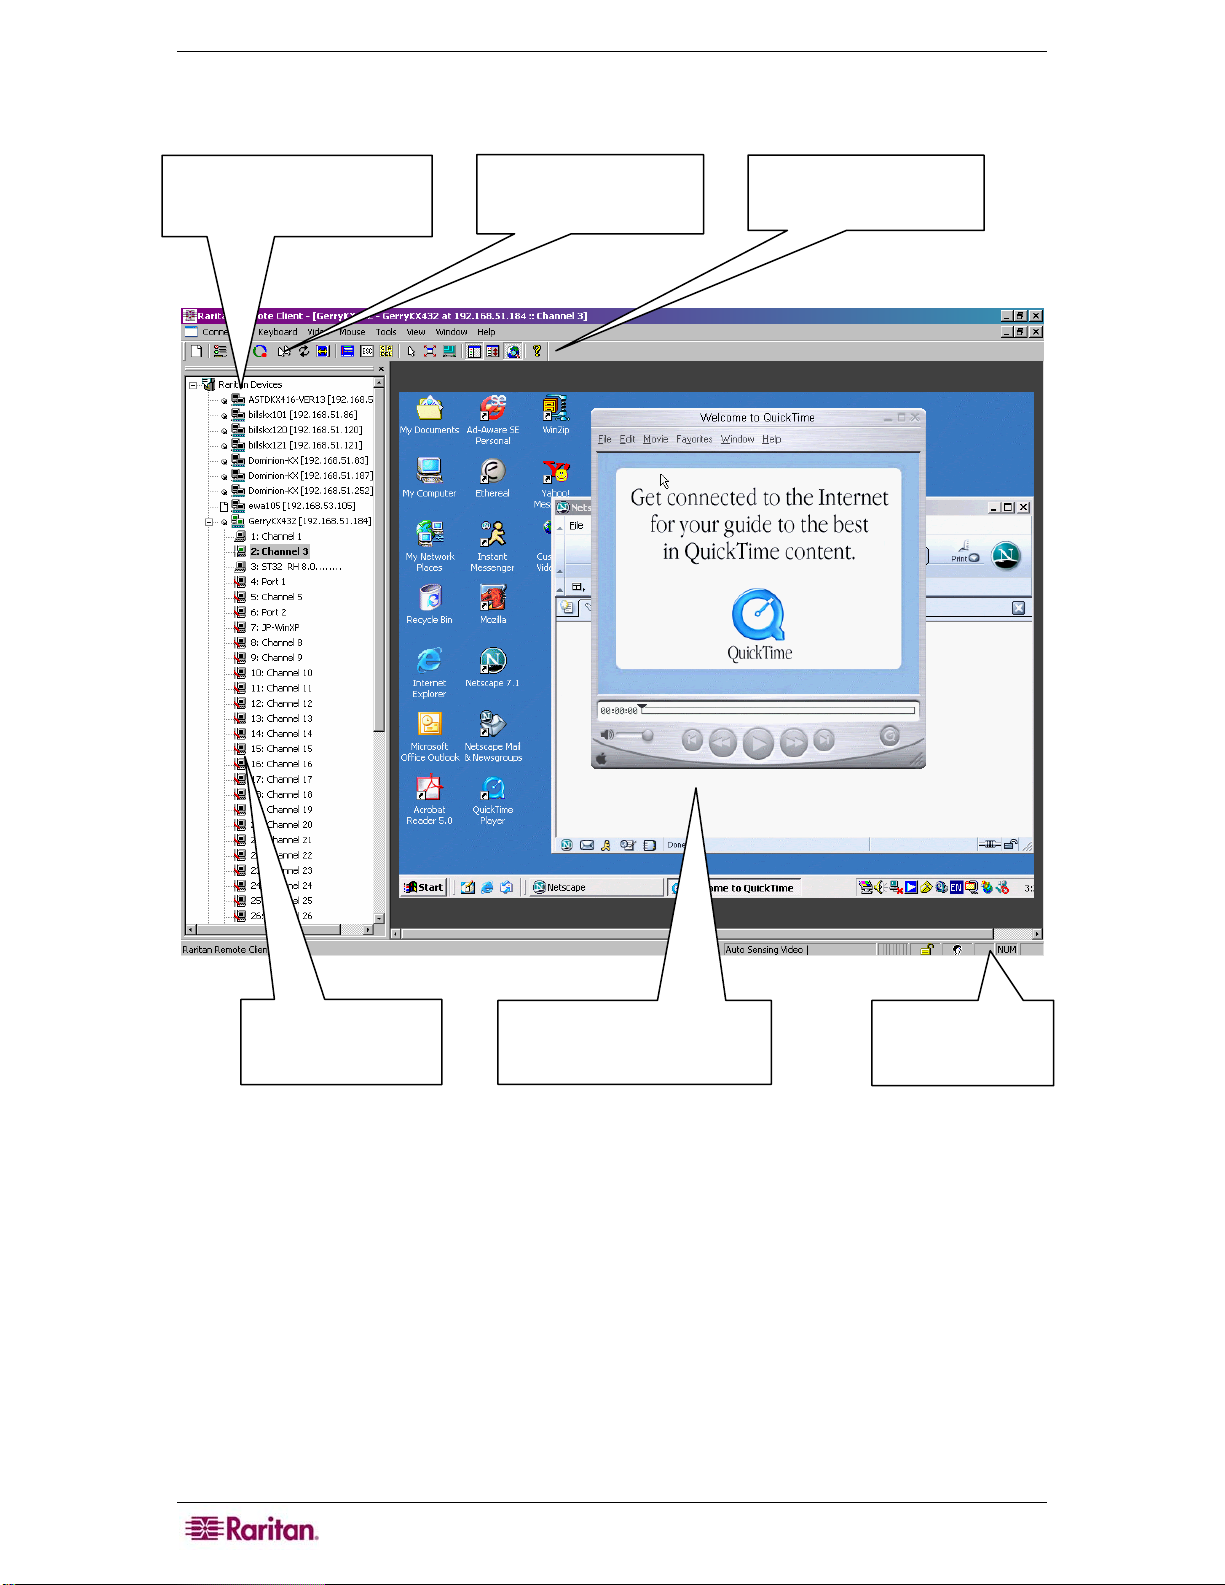
RRC Interface
The Navigator displays any known
Raritan networked appliances in a single
view. Select Connection Æ New
Profile to create new entries.
Click on the Synchronize Mouse
tool to converge the mouse
pointers displayed in KVM
windows.
The Toolbar provides shortcuts to
some of MPC’s and RRC’s most
frequently-used commands.
Double-click on any server
port to access and control the
attached target server.
When connected to a KVM console port,
keystrokes and video signals are
transmitted in real-time — exactly as if
you were situated locally.
Figure 12 RRC Screen
The Status Bar provides
real-time information on
connection parameters.
Page 31

CHAPTER 2: INSTALLATION 21
Mouse Pointer Synchronization
When controlling a target server, MPC and RRC display two mouse cursors: one belonging to
your client workstation and the other belonging to the target server. When properly configured,
the two mouse cursors will align. If you experience difficulty with mouse synchronization, please
refer to the section Configuring Target Servers, at the beginning of this chapter.
You are now connected to your Dominion unit and can use your own keyboard, monitor, and
mouse to control and execute commands on target machines, wherever they are located, as if you
were sitting in front of them.
For additional information and detailed instructions for using MPC and RRC, please refer to the
Raritan Multi-Platform Client and Raritan Remote Client User Guide, available on Raritan’s
Website
http://www.raritan.com/support/sup_prdmanuals.aspx, or on the Raritan User Manuals &
Quick Setup Guides CD ROM included with your Dominion shipment.
Keyboard Synchronization
The RRC will get the state of the keys (NUM, CAPS, SCRL) from the target server and will set
the client PC keyboard to match. When RRC exits it does not change the client PC settings.
MPC does not have this problem because MPC will logically keep the state of the keys (Java is
not allowed to set the physical keyboard setting). If you look at the bottom right-hand corner of
the MPC window, the key settings are there as perceived by the target machine and MPC. They
may not match the current setting of the client PCs keyboard.
RRC also has this display and the settings in the RRC window will match the client PC’s
keyboard. RRC has the ability to physically set the client PC keyboard.
Page 32

22 DOMINION KX USER GUIDE
Page 33

CHAPTER 3: ADMINISTRATIVE FUNCTIONS 23
Chapter 3: Administrative Functions
Dominion KX Manager is used to manage both the Dominion KX and the KX101 product lines.
When running on a Dominion KX, features specific to the KX101 are disabled, and when running
on a KX101, features specific to the Dominion KX are disabled. Specifics are called out
throughout this chapter.
Launching Dominion KX Manager
Dominion KX Manager is a Java Applet and requires Java to function. When launching KX or
KX101 via the Web, KX Manager checks the client’s version of Java. If the version is incorrect
or outdated, KX Manager leads you through the updated Java installation. Dominion KX
Manager currently requires the following:
• Sun Java 1.4.2_05 or greater
• Sun Java 1.5.0 or greater except Sun Java 1.5.0_02, due to issues with this Java version
Note: Because of a limitation in the JRE, Linux and Solaris clients receive an invalid response
from Alt-Gr on UK Language keyboards. Linux and Solaris do not pick up events for the Alt-Gr
key combination for Java 1.4.2 or 1.5. Java 1.6 appears to improve on this, although the
keyPressed and keyReleased events for Alt-Gr still identify it as an "unknown key code".
Also, a key pressed in combination with Al-tGr (such as on the UK keyboard AltGr-4, which is
the Euro symbol, will only generate a keyTyped followed by a keyReleased event for that value,
without a keyPressed event. Java 1.6 improves upon this by filling in the keyPressed event as well.
Launch KX Manager in one of these ways:
• Launch via RRC/MPC by clicking on the “admin” port on a device.
• Launch directly from a Web browser by typing :
http://IP-ADDRESS/admin
where IP-ADDRESS
you to grant permission to retrieve and launch KX Manager. After you grant permission, KX
Manager launches.
− If you are using Internet Explorer (IE), launch your browser and type the URL:
http://IP-ADDRESS/admin
− If you are using Netscape version 7.1 or higher, launch your browser and type the URL:
http://IP-ADDRESS/admin.html
where IP-ADDRESS
prompt you to grant permission to retrieve and launch KX Manager. After you grant
permission, KX Manager launches.
Important: Regardless of the browser you use, you must allow pop-ups from
the Dominion device’s IP address in order to launch KX Manager.
is the IP Address assigned to your KX device A browser will prompt
is the IP Address assigned to your KX device. A browser will
Page 34

24 DOMINION KX USER GUIDE
Figure 13 Dominion KX Manager Login Screen
1. Username / Password: Log on to KX Manager with an Administrator’s username and
password (defaults: admin and raritan (all lower case). To ensure security, please change the
default username and password as soon as possible
2. Port: If your device has been configured to use a different TCP port than the default port
5000, type that number here.
Note: Due to a Java issue, before upgrading a device, if you launch KX Manager, upgrade the
device, and then re-launch KX Manager, you will either generate a Java Exception or get an
older version of KX Manager. To fix this problem, exit all instances of your Browser before
upgrading your device.
Page 35

CHAPTER 3: ADMINISTRATIVE FUNCTIONS 25
KX Manager Interface
KX Manager provides an interface for performing configuration and administrative functions.
Many commands in the drop-down menus can by accessed by right-clicking on icons in the
server and user lists on the left side of the screen.
Device Tree –
View all devices in
your KX
configuration
View Tabs – View
devices in the
Device Tree By
Channel, By Name,
or By Status
Menu Bar – Holds dropdown command menus
for working in KX
Manager.
Tool Bar – Shortcut buttons
for the most commonly-used
commands in KX Manager.
User / Group Tree
– View all Users
and Groups in your
KX configuration.
Details Panel –
Detailed
information on
objects selected in
the trees appears in
this section.
Figure 14 KX Manager Main Screen
There are three ways to view devices. Click on the View Tabs to change your view:
• View by Channel (number)
• View by Name
• View by Status – when viewing channels by Status, channels appear in the following order,
sorted alphanumerically:
− Busy Channels
− Available Channels
− Unavailable Channels
Page 36

26 DOMINION KX USER GUIDE
Network Configuration
Use the Setup menu to customize network configuration settings like IP Address and Ethernet
speed on your Dominion KX unit.
• If you have a remote connection to KX Manager, you must reboot the unit after making
Network Configurations in order to activate the new settings.
• Selecting to apply new Network settings will log out any users connected through the local
port.
Important: Important: Before changing Network Configuration values, ensure
that there are no other active user connections to the device; all connections
will be dropped when the KX unit reboots.
1. On the Setup menu, click Configuration, and then click Network. The Network
Configuration window appears.
Figure 15 Network Configuration Window
The fields, as you read down the left side of the Network Configuration window, and then the
right, are as follows:
− Manager name: Type a unique name for the device. The default name for a Dominion
KX unit is: “Dominion-KX” and for a KX101 unit is KX_KIM-<last five digits of
serial number>, for example, a KX101 with serial number S00002 would have a default
name of KX_KIM-00002. Remote users will see and use this name to identify this
Page 37

CHAPTER 3: ADMINISTRATIVE FUNCTIONS 27
− particular device. However, if an MPC or RRC user has created a Connection Profile for
a device, that user will see the Description field from the Profile instead.
Note: Spaces are NOT permitted in the Manager Name.
− Enable modem interface: (Dominion KX only) Enables the device’s internal modem
port to allow remote users to dial into the device. Default value: Disabled.
− Modem Initialization String: Used to configure the modem for the settings
below. Because different modems have different ways of settings these values, this
document does not specify how to set these values, rather the user should refer to the
modem to create the appropriate modem-specific string.
Modem Settings:
• Enable RTS/CTS flow control
• Send data to the computer on receipt of RTS
• CTS should be configured to only drop if required by flow control.
DTR should be configured for Modem resets with DTR toggle.
•
•
DSR should be configured as always on.
• DCD should be configured as enabled after a carrier signal is detected. (that
is, DCD should only be enabled when modem connection is established with
the remote side)
• If the modem string is left blank, the following string is sent to the modem by
default: ATS0=0Q0&D3&C1
Use default TCP port 5000: Besides the initial download of Raritan Remote
Client and KX Manager (which occurs over secure HTTPS Port 443), all
communication to and from the Dominion KX occurs over a single, configurable
TCP Port. The default is Port 5000, but you can configure it to use any TCP port
except 80 and 443. To access the KX unit from beyond a firewall, your firewall
settings must enable two-way communication through the default port 5000 or
the non-default port configured above.
− Enable syslog forwarding: Click on this check box to the device’s log messages to a
remote syslog server. Type the IP Address of your syslog server in the Remote IP
address field and click on the Category and Priority threshold drop-down arrows to
select the level of event sensitivity.
− Set System ACL: Click to set a global-level access control list for your KX unit by
ensuring that your device does not respond to packets being sent from disallowed IP
addresses. The Access Control List window appears.
Figure 16 Access Control List Window
These ACL values are global, affecting the KX unit as a whole. Your device allows
you to create ACLs for each user group, for example, you can create a user group
“Outsourced Vendors,” that is permitted to access Dominion KX only from a given
IP address range (please see the section
Users, Groups, and Access Permissions in
this chapter, for more information on how to create group-specific ACLs).
Page 38

28 DOMINION KX USER GUIDE
Click OK to acc ept the Access Control List changes or Cancel to close the window
without saving changes.
Important: Please note that ACL rules are evaluated in the order in which they
are listed. For instance, if in the above example, the two ACL rules were
reversed, Dominion KX101 would accept no communication at all. Use the
buttons on the right of the window to adjust the order of your list.
− Enable automatic failover: (Dominion KX only) Click on this check box to allow
Dominion KX to automatically recover its network connection using a second network
port if the active network port fails. Ping interval determines how often Dominion KX
will check the status of the network connection (setting this too low may cause excess
network traffic). Timeout determines how long a network port must be “dead” before the
switch is made. Both network ports must be connected to the network and this option
must be checked for Automatic Failover to function. Default Ping interval: 30 seconds;
default Timeout: 60 second.
Note: The default Ping interval and Timeout generate a condition that when the KX device tries
to switch over, any remote sessions will be dropped. Users must re-establish the session.
Reducing these intervals to much lower values will allow remote sessions to stay connected but
will result in increased network traffic.
2. Click OK to set Network Configurations or click Cancel to close the window without saving
changes.
3. If your changes require rebooting the device, a reboot message appears.
Page 39

CHAPTER 3: ADMINISTRATIVE FUNCTIONS 29
Security Settings
1. On the Setup menu, click Security, and then click Setting. The Security Settings window
appears.
Figure 17 Security Configuration Window
− Encryption mode – click on the drop-down arrow to select one of the following:
No Encryption: Nothing is secure. The communication channel is open to anyone to
read and there is no data encryption.
SSL authentication, NO data encryption: Usernames and passwords are secured,
but KVM transmissions are not. 128-bit Secure Socket Layer (SSL) protocol
provides a private communications channel between the KX unit and the Remote PC
during initial connection authentication. No encryption security in place during
remote KVM data transfer.
SSL authentication, data encryption: Secures user names, passwords and KVM
data, including video transmissions. 128-bit Secure Sockets Layer (SSL) protocol
provides a private communications channel between the KX unit and the Remote PC
during initial connection authentication. After authentication, KVM data is also
transferred with 128-bit encryption, but using a protocol much more efficient than
SSL (RC4 encryption, but without SSL headers). Raritan recommends this option.
SSL authentication, SSL data encryption: Secures user names and passwords, and
provides high-level security for KVM data. 128-bit Secure Sockets Layer (SSL)
protocol provides a private communications channel between the KX unit and the
Remote PC during initial connection authentication. 128-bit SSL encryption is also
in place during remote KVM data transfer. Note that because the SSL protocol was
not designed for KVM communication, this mode is less efficient but no more secure
than the recommended setting, above.
− PC share mode – Determines global concurrent remote access, enabling up to eight
remote users to simultaneously log on to one KX unit and concurrently view and control
Page 40

30 DOMINION KX USER GUIDE
the same target server through the device. Click on the drop-down arrow to select one of
the following:
Private mode (default): No PC Share. Each target server can be accessed
exclusively by only one user at a time.
PC share mode: Target servers can be accessed by eight users (administrator or
non-administrator) at one time. If there is a remote user and a local user sharing the
target, control is based on first active keyboard/mouse input. However, if only
remote users are sharing targets, each remote user has equal keyboard and mouse
control. PC share timeout value is the idle time that is used to determine when a
remote user or local user can take control of the keyboard/mouse from the other.
Uneven control will happen if a user does not stop typing or moving the mouse.
Automatic color calibration for the session is based on the first connected user’s
settings; subsequent connected users may notice visual differences from their usual
calibration. The first user’s settings are the default settings for the duration of the
session.
Note: PC share mode is a global setting. For individual user access settings see Keyboard and
Mouse Control and Concurrent Access Mode on the User Account Settings screen. Each user
profile can be set individually to enable/disable keyboard and mouse control, and concurrent
access.
− Log out idle users: Click on the check box to automatically disconnect remote users
after a certain amount of inactive time has passed. Type the amount of time in the After
field.
Note: If you invoke KX Manager via the Admin channel in RRC, be aware that this timer can
affect your session. Launch KX Manager outside of RRC or disable this parameter for the
session to avoid having RRC’s user idle time logout your KX Manager session.
− Enable strong passwords: Requires user passwords to have a minimum of 6 characters
with at least one alphabetical character and one non-alphabetical character (punctuation
or number). The first four characters of the password and the username cannot match.
Strong password rules affect only those usernames and passwords stored by Dominion
KX. If you configure the device to authenticate to a remote server such as LDAP,
RADIUS, or Active Directory, these rules are not enforced by the device (please see th e
section
Remote Authentication in this chapter for more information on remote
authentication).
− Enable multiple logins: When this rule is selected, a given username/password
combination can be connected into the device from multiple client workstations at a time.
− Password expiration time: Type a number of days in this field to force users to change
their passwords after a set duration.
− Private key: Type a private key password. Only those remote users who know the
private key, in addition to their own usernames and passwords, can log in and connect to
the device.
− Re-enter key: Type private key password again for confirmation. Remember that
passwords are case sensitive. Private key passwords must be alphanumeric; special
characters cannot be used.
− Local device reset mode: Determines how the local factory and password reset feature
in the OSD operates. Click on the drop down arrow to select one of the following:
Enable local factory reset (Default)
Enable local admin password reset
Disable all local resets
2. Click OK to set Security Configurations or click Cancel to close the window without saving
changes.
Page 41

CHAPTER 3: ADMINISTRATIVE FUNCTIONS 31
Time and Date
The Time and Date screen allows you to access the device’s current settings to set time, date,
time zone, adjustment for Daylight Savings, and Network Time Protocol (NTP).
Figure 18 Time and Date Settings
Page 42

32 DOMINION KX USER GUIDE
Users, Groups, and Access Permissions
Overview
The device stores an internal list of user and group names to determine access authorization and
permissions. This information is stored internally in a hashed / encrypted format.
Note to CC-SG Users
If you are using Dominion KX in a CommandCenter Secure Gateway configuration, this section
of the User Manual does not apply to you. When the device is controlled by CommandCenter
Secure Gateway, CC-SG determines the allowed users and groups. Please see the
CommandCenter Secure Gateway User Guide, Administrator Guide, or Deployment Guide
at
http://www.raritan.com/support/sup_prdmanuals.aspx#com for additional information.
Note to Raritan Customers Upgrading from Previous Firmware Versions
If you previously configured Raritan products such as Dominion KSX and IP-Reach running
legacy firmware versions earlier than v3.2, read this entire section carefully
firmware version v3.2 and above, the implementation of users and groups has changed
significantly to provide more flexible and powerful configurations.
. Beginning with
Relationship between Users and Group Entries
You may want to organize users in your device into groups. Assigning users to groups saves time
by allowing you to manage permissions for all users in a group at once, instead of managing
permissions on a user-by-user basis.
User information helps in authenticating users accessing your KX unit. Upon successful
authentication, the device uses Group information to determine the user’s permissions – which
server ports are accessible, whether rebooting the unit is allowed, and other features.
You may choose not to associate specific users with groups. In this case, the KX unit classifies
the user as “Individual.”
The user list on the left side of the screen displays both User and Group names created for the
device. Users belonging to a Group are nested under their group name.
User Groups
Every Dominion KX unit has three default user groups, which cannot be deleted:
ADMIN User group for original, factory-default administrative user.
NONE Permissions defined for this group are employed for a user when your
Dominion KX is configured for remote authentication via LDAP or RADIUS
(see next section), and a login attempt is successful but no user group is returned
by the remote authentication server.
UNKNOWN Permissions defined for this group are employed for a user when your
Dominion KX is configured for remote authentication via LDAP or RADIUS
(see next section), and a login attempt is successful but the user group returned
by the remote authentication server is not found in Dominion KX.
In addition to these three default groups, there is an “Individual” type of group that is built into
the Dominion KX. This is used for a given user to have its own group, separate from other
groups.
Page 43

CHAPTER 3: ADMINISTRATIVE FUNCTIONS 33
Creating or Editing User Groups and Access Permissions
Define User Groups before creating individual Users. When creating a user, you must assign that
user to an existing user group. In addition, User Groups are used even if you implement remote
authentication (via RADIUS or LDAP).
1. To create a new User Group: On the User menu, click Add User Group. To edit an
existing User Group: Select the group that you wish to edit in the user list, right-click on the
icon, and select Edit User Group. Either the Add Group or the Edit Group window
appears.
Figure 19 Add Group Window
Page 44

34 DOMINION KX USER GUIDE
Figure 20 Edit Group Window
2. Type a name for the new user group, or edit the name for an existing user group in the Group
name field.
3. Check the boxes before the permissions you want to assign to all users who belong to this
group.
− The first group of permissions (the upper table) controls user authorization for using
these specific administrative functions within KX Manager and RRC. For example, if you
check the box before Manage user accounts, the members in this group can create new
user accounts in KX Manager. Likewise if you check Restart, shutdown device, the
members can reboot the Dominion KX from RRC. Please note that in order to access the
diagnostic panel in RaritanConsole, both Manage diagnostics and Path, time/date...
must be checked. Several administration functions are available within MPC and from
Dominion KX’s Local Console Port; these functions are available only to members of the
default ADMIN group. If you enable Manage user accounts and Manage user groups,
a confirmation windows appears to allow you to confirm your choice; click OK to
confirm, or click Cancel to exit.
− In the second group of permissions (the lower table), uncheck Enable group to disable
all access and permissions for members of this group. Check Concurrent access (PC
Share) to allow group members simultaneous log-on capability to Dominion KX with
concurrent view and control of targets, such as a PC Share session. (Modem access is
disabled in KX101.)
4. In the Basis panel of the screen, click on the radio button before one of the options to indicate
this is a New group, to specify it as an Individual group, or to copy the permissions from an
existing Public group. If you select Public group, the names of currently existing groups
appear in the field below; click on one of them to apply that group’s properties to the group
you are adding.
Page 45

CHAPTER 3: ADMINISTRATIVE FUNCTIONS 35
Important: Checking the check boxes before ‘Manage user accounts’ and
‘Manage user groups’ allows the members of the group to change the
permissions of all users, including their own. Carefully consider granting these
permissions.
5. Other permission elements on the Add Group or Edit Group screens include:
− This Group panel, Used by field - Displays all users assigned to this group. The Select
Users button allows administrators to move previously configured users into this group.
− Select Ports – Click this button to specify which server ports can be accessed by users
who belong to this group. For each server port, users may be allowed to control the
connected target server; view the video (but not interact with) the connected target server;
or be denied permission altogether.
Figure 21 Select Ports Window
Page 46

36 DOMINION KX USER GUIDE
− Set ACL – Click this button to limit access to the device by users in this group to specific
IP addresses. (This feature applies only to users belonging to a specific group, unlike the
“Set System ACL” functionality found in the device’s Network Configuration (see
previous section
Network Configuration), which applies to all access attempts to the
device).
Figure 22 Set Access Control List for Group Window
Important: Please note that ACL rules are evaluated in the order that they are
listed
6. Click OK to save Group properties or click Cancel to close the window without saving.
Moving Users Between Groups
To organize users into groups, select the user group you want to modify, and on the User menu,
click Add User to Group (or click [Select Users] in the Groups window).
When the Select Users screen appears, add users to the group by selecting the user in the All
Users list and clicking [Æ] to move the user to the Users in Group list. To remove users from
the group, select the user in the Users in Group list and click [Å] to move the user to the All
Users list.
Deleting User Groups
To delete existing user groups, select the group that you wish to delete, right-click on the group
icon, and select Delete User Group. Before deleting a group, ensure that there are no users
assigned to it, or those users will also be deleted.
Page 47

CHAPTER 3: ADMINISTRATIVE FUNCTIONS 37
Creating or Editing Users
1. To create a new User: On the User menu, click Add User. To edit an existing User:
Select the user that you wish to edit in the user list, right-click on the icon, and select User
Properties. The Add User or the Edit User window appears:
Figure 23 Add User Window
Figure 24 Edit User Window
2. Type a unique user name or edit the existing user name in the Username field.
3. Click on the Group Name drop-down arrow and select a User Group to which you want to
assign this user. If you do not want to associate this user with an existing User Group, select
Individual Group from the drop-down list, and then click Individual Settings to assign
access permissions and privileges for this user.
4. Type a new password or edit an existing password in the Password field. Retype the
password in the Confirm password field. Any character can be used to create a password.
5. Click OK to save User properties or click Cancel to close the window without saving.
Deleting Users
To delete an existing user, select the user that you wish to delete, right-click on the user icon, and
select Delete User.
Page 48

38 DOMINION KX USER GUIDE
Remote Authentication
Introduction
Note to CC-SG Users
If you are using Dominion KX in a CommandCenter Secure Gateway configuration, this section
of the User Manual does not apply to you. When the device is controlled by CommandCenter
Secure Gateway, CC-SG determines Remote Authentication. Please see the CommandCenter
Secure Gateway User Guide, Administrator Guide, or Deployment Guide at
http://www.raritan.com/support/sup_prdmanuals.aspx#com for additional information.
Note to Raritan Customers Upgrading from Previous Firmware Versions
If you have previously implemented RADIUS authentication on Raritan products such as
Dominion KSX and IP-Reach running legacy firmware versions earlier than v3.2, read this entire
section carefully. Beginning with firmware version v3.2 and above, the implementation of
external authentication has changed significantly to provide more flexible and powerful
configurations.
Supported Protocols
In order to simplify management of usernames and passwords, device provides the capability to
forward authentication requests to an external authentication server. The device supports two
external authentication protocols: LDAP and RADIUS.
Note on Microsoft Active Directory
Microsoft Active Directory uses the LDAP protocol natively, and can function as an LDAP
server and authentication source for Dominion KX. If it has the IAS (Internet Authorization
Server) component, a Microsoft Active Directory server can also serve as a RADIUS
authentication source.
Note on Remote Login Usernames and Passwords
The Dominion KX login username and password are both limited to 16 characters. Keep this
limitation in mind when setting up remote authentication, because remote authentication
usernames and password could exceed this minimum length.
Remote Authentication Implementation
Priority
When a user tries to authenticate to a Dominion KX unit that is configured for external
authentication, Dominion KX first checks its own internal user database for that username. If the
username is not found in the Dominion KX internal database, the request is forwarded to the
external authentication server.
• If Username is not found in the Dominion KX internal database: Request is forwarded to
external authentication server to determine whether the login is allowed or denied.
• If Username is found in the Dominion KX internal database and Password is correct:
Login is allowed.
• If Username is not found in the Dominion KX internal database and Password is
incorrect: Login is denied; the request does NOT get forwarded to the external
authentication server.
Page 49

CHAPTER 3: ADMINISTRATIVE FUNCTIONS 39
Authentication vs. Authorization
When your device is configured for remote authentication, the external authentication server is
used primarily for the purposes of authentication, not authorization.
Authorization is determined by the KX unit on the basis of user groups. That is, once a given user
is allowed to access the device in general (authenticated), that user’s specific permission
(authorization) is determined by the device, based upon the user’s group.
The external authentication server can assist in authorization by informing the device about the
user group to which a user belongs whenever the authentication server approves a given user’s
login request. The sections Implementing LDAP Remote Authentication and Implementing
RADIUS Remote Authentication that follow explain this in more detail.
The flow diagram below illustrates the steps taken:
User login with
username /
password
Login
denied
Permissions
determined by
internal user group
Permissions
determined by
internal user group
YES
found in internal
Permissions
determined by
internal user group,
“UNKNOWN”
password
correct?
YES
Login
allowed
Internal
lookup of
user group
User group
database?
NO
YES
YESNO
username in
internal
database?
User group
name provided
by authentication
server?
NO
Permissions
determined by
internal user group,
“NONE”
NO NO
External
authentication server
configured?
YES
External
authentication
query
Valid
username /
password?
YES
Login
allowed
External
authentication
reply
NO
Login
denied
Login
denied
Figure 25 Authorization Flow Diagram
Note the importance of the group to which a given user belongs, as well as the need to configure
the groups named, “UNKNOWN” and “NONE.” If the external authentication server returns a
group name that is not recognized by the KX101, that user’s permissions are determined by the
permanent group named “UNKNOWN.” If the external authentication server does not return a
group name, that user’s permissions are determined by the permanent group named “NONE.”
Please see the sections LDAP or RADIUS in this chapter to determine how to configure your
authentication server to return user group information to KX101 as part of its reply to an
authentication query.
Page 50

40 DOMINION KX USER GUIDE
General Settings for Remote Authentication
1. On the Setup menu, click Security, and then click Remote Authentication to configure your
Dominion unit for remote authentication. The Remote Authentication window appears:
Figure 26 Remote Authentication Window
2. Select the option button of the remote authentication protocol you prefer (LDAP or
RADIUS).
3. Type the IP Address of your primary and secondary remote authentication servers in the
Primary server IP address and Secondary server IP address fields.
4. Type the server secret needed to authenticate against your remote authentication servers in
the Secret phrase field. Re-type the server secret in the Confirm secret phrase field.
5. If you selected LDAP as your remote authentication protocol, please read the next section
Implementing LDAP Remote Authentication to complete the fields in the LDAP panel of
the Remote Authentication window. If you selected RADIUS, please skip to Implementing
RADIUS Remote Authentication to complete the fields in the RADIUS panel of the
window.
6. When finished, click OK to save the Remote Authentication changes or click Cancel to exit
without saving.
Note: Upon receipt of an Access-Request from a valid client, an appropriate reply MUST be
transmitted. An Access-Request SHOULD contain a User-Name attribute. It MUST contain either
a NAS-IP-Address attribute or a NAS-Identifier attribute (or both). Raritan recommends using
the NAS-IP-Address matches <IP Address>.
Implementing LDAP Remote Authentication
Reminder: Microsoft Active Directory functions natively as an LDAP authentication server.
If you choose LDAP authentication protocol, complete the LDAP fields as follows:
• Default Port / User Defined Port: By default, LDAP uses port 389. To use a different port,
click User defined ports, and then enter a different port number in the Custom port field.
• Base DN, Base Search: This describes the name you want to bind against the LDAP, and
where in the database to begin searching for the specified Base DN. An example Base DN
value might be: “cn=Administrator,cn=Users,dc=testradius,dc=com” and an example Base
Search value might be: “cn=”Users,dc=raritan,dc=com”. Consult your authentication server
administrator for the appropriate values to enter into these fields.
Page 51

CHAPTER 3: ADMINISTRATIVE FUNCTIONS 41
• Certificate File: Consult your authentication server administrator for the appropriate values
to type into this field in order to process LDAP authentication queries from Dominion KX.
Returning User Group Information via LDAP
When an LDAP authentication attempt succeeds, Dominion KX determines the permissions for a
given user based on the permissions of the user’s group. Your remote LDAP server can provide
these user group names by returning an attribute named as follows:
rciusergroup attribute type: string
This may require a schema extension on your LDAP server. Please consult your authentication
server administrator to enable this attribute.
Returning User Group Information from Microsoft Active Directory
Returning user group information from Microsoft’s Active Directory for Windows 2000 Server
requires updating the LDAP schema. This should be attempted only by an experienced Active
Directory administrator. Please refer to your Microsoft documentation for more detail.
1. Install the schema plug-in for Active Directory – please refer to Microsoft Active Directory
documentation for instructions.
2. Run Active Directory Console and select Active Directory Schema.
Setting the Registry to Permit Write Operations to the Schema
To allow a domain controller to write to the schema, you must set a registry entry that permits
schema updates.
1. Right-click the Active Directory Schema root node in the left pane of the window, and then
click Operations Master.
2. Click on the check box before The Schema may be modified on this Domain Controller.
3. Click OK.
Page 52

42 DOMINION KX USER GUIDE
Creating a New Attribute
To create new attributes for the rciusergroup class:
1. Click the + symbol before Active Directory Schema in the left pane of the window.
2. Right-click Attributes in the left pane.
3. Click New, and then select Attribute. When the warning message appears, click Continue
and the Create New Attribute window appears.
Figure 27 Create New Attribute Window
4. Type rciusergroup in the Common Name field.
5. Type rciusergroup in the LDAP Display Name field.
6. Type 1.3.6.1.4.1.13742.50 in the Unique x5000 Object ID field.
7. Click on the Syntax drop-down arrow and select Case Insensitive String from the list.
8. Type 1 in the Minimum field.
9. Type 24 in the Maximum field.
10. Click OK to create the new attribute.
Page 53

CHAPTER 3: ADMINISTRATIVE FUNCTIONS 43
Adding Attributes to the Class
1. Click Classes in the left pane of the window.
2. Scroll to the user class in the right pane, and right-click on it.
3. Select Properties from the menu. The user Properties window appears.
4. Click on the Attributes tab.
5. Click Add.
6. Select rciusergroup from the Select Schema Object list.
Figure 28 Adding the Attributes to the Class
7. Click OK.
8. Click OK.
Updating the Schema Cache
1. Right-click Active Direc tory Schema in the left pane of the window and select Reload the
Schema from the shortcut menu.
2. Minimize the Active Directory Schema MMC console.
Page 54

44 DOMINION KX USER GUIDE
Editing RCI User Group Attributes for User Members
To run Active Directory script on Windows 2003 server, please use the script provided by
Microsoft. These scripts are loaded onto your system with a Microsoft Windows 2003 installation.
ADSI, or Active Directory Service Interface, acts as a low-level editor for Active Directory,
allowing you to perform common administrative tasks such as adding, deleting, and moving
objects with a directory service. For additional information, visit Microsoft’s Web site:
http://www.microsoft.com/technet/prodtechnol/windowsserver2003/library/TechRef/ebca33
24-5427-471a-bc19-9aa1decd3d40.mspx.
To edit the individual user attributes within the group rciusergroup:
1. On the Windows Start menu, click Run.
2. Type regsvr adsiedit.msc. The ADSI Edit window appears.
Figure 29 ADSI Edit Window
3. In the left pane of the window, select the CN=User folder.
4. Locate the user name whose properties you want to adjust in the right pane. Right-click on
the user name and select Properties.
5. Click on the Attributes tab.
Page 55

CHAPTER 3: ADMINISTRATIVE FUNCTIONS 45
6. Click on the Select a property to view drop-down arrow and select rciusergroup from the
list.
Figure 30 User Properties Screen
7. In the Attribute Values panel of the window, type the user name you would like returned to
RRC in the Edit Attribute field.
Figure 31 Edit Attribute - adding user to KX group
8. Click Set.
9. Click OK.
Page 56

46 DOMINION KX USER GUIDE
Returning User Group Information via RADIUS
When a RADIUS authentication attempt succeeds, the device determines the permissions for a
given user based on the permissions of the user’s group.
Your remote RADIUS server can provide these user group names by returning an attribute,
implemented as a RADIUS FILTER-ID. The FILTER-ID should be formatted as follows:
Raritan:G{GROUP_NAME}
where GROUP_NAME is a string, denoting the name of the group to which the user belongs.
RADIUS Communication Exchange Specifications
KX101 sends the following information to RADIUS server in an authentication query:
ATTRIBUTE DATA
USER-NAME The user name entered at the login screen.
USER-PASSWORD In PAP mode, the encrypted password entered at the login screen.
CHAP-PASSWORD In CHAP mode, the CHAP protocol response computed from the
password and the CHAP challenge data.
NAS-IP-ADDRESS Dominion KX’s IP Address
NAS-IDENTIFIER The Dominion KX unit name as configured in “Network
Configuration” (see previous section).
NAS-PORT-TYPE The value ASYNC (0) for modem connections and ETHERNET
(15) for network connections.
NAS-PORT Always 0.
STATE If this request is in response to an ACCESS-CHALLENGE, the state
data from the ACCESS-CHALLENGE packet will be returned.
PROXY-STATE If this request is in response to an ACCESS-CHALLENGE, the
proxy state data from the ACCESS-CHALLENGE packet will be
returned.
Page 57

CHAPTER 3: ADMINISTRATIVE FUNCTIONS 47
The KX unit sends the following RADIUS attributes to the RADIUS server with each accounting
request:
ATTRIBUTE DATA
SESSION-TYPE Either START (1) for log in or STOP (2) for log out.
SESSION-ID A string containing a unique session name. The name is in the
format of “NAS-IDENTIFIER:user IP address:unique session
number”
Example: “Dominion KX:192.168.1.100:122”
USER-NAME As above.
NAS-IP-ADDRESS As above.
NAS-IDENTIFIER As above.
NAS-PORT-TYPE As above.
NAS-PORT As above.
FILTER-ID Any FILTER-ID attributes returned by the RADIUS server during
authentication will be sent in each accounting request.
CLASS Any CLASS attributes returned by the RADIUS server during
authentication will be sent in each accounting request.
ACCT-AUTHENTIC How the user was authenticated. Either RADIUS (1) if the user was
authenticated by the RADIUS server or LOCAL (2) if the user was
authenticated by Dominion KX’s built-in user name database.
TERMINATE-CAUSE If this is a S TOP request, the reason the user was terminated. Either
USER_REQUEST (1), LOST_SERVICE (3), SESSION_TIMEOUT
(5), or ADMIN_RESET (6).
Page 58

48 DOMINION KX USER GUIDE
Forced User Logoff
To manually log a user off a device, select that user in the user tree, right-click on the user icon,
and select Logoff User.
Figure 32 Logoff User Menu Option
Viewing KX Unit Event Log (Status)
On the Setup menu, click Status to view the device’s Event Log. The device Status window
appears, displaying events by date and time. Click Export and browse for a location to save the
displayed log file to a text file. Click Copy Log to copy the display to your clipboard.
Figure 33 Dominion KX Status Window
Page 59

CHAPTER 3: ADMINISTRATIVE FUNCTIONS 49
Rebooting the Device
To reboot the device, do either of the following:
• Open the RRC/MPC Tools menu and select Restart device.
• Right-click the KVM device and select Restart device.
Device Diagnostic Console
On the Setup menu, click Diagnostics to view a Diagnostic window from KX Manager (without
having to launch RRC).
Figure 34 Device Diagnostic Window
To determine the Firmware Upgrade on the KX device, type buildinfo at the prompt and press
Enter. For releases KX 1.3 and higher, the Firmware Upgrade Version appears. This version
number is in the same format as used on the Raritan.com firmware upgrade page.
Page 60

50 DOMINION KX USER GUIDE
Device System Information
On the Setup menu, click System information to view Model type, hardware version, Firmware
version, Serial number, and MAC Address of the device. The FPGA version field is inactive.
Figure 35 System Information Window (for Dominion KX)
Figure 36 System Information Window (for KX101)
Page 61

CHAPTER 3: ADMINISTRATIVE FUNCTIONS 51
Configuration Backup and Restore
On the File menu, click Backup, and then click User-Group Information to download User
Group information. On the File menu, click Backup, and then click Device Configuration to
download the complete device configuration to your local computer.
To restore User-Group information saved on your local computer, on the File menu, click
Restore, and then click User-Group Information. To restore a Device configuration saved on
your local computer, on the File menu, click Restore, and then click Device Configuration.
Performance Settings
Use this window to set up the device’s video data transfer and bandwidth parameters.
1. On the Setup menu, click Configuration, and then click Performance. The Performance
Settings window appears.
Figure 37 Performance Settings Window
− Pause video stream for idle users: Click on the drop-down arrow to pause the flow of
video data during periods of prolonged inactivity to prevent inactive users from
needlessly consuming bandwidth. Options: Never / 5 / 15 / 30 / 60 / 120 minutes. Please
note: if Pause Video Stream is enabled and the keyboard or mouse do not respond on the
channel after the timeout, disconnect and reconnect to the channel to resume operation.
− Total bandwidth usage: Click on the drop-down arrow to set a maximum amount of
bandwidth that can be consumed by this Dominion KX unit (global). The lower the
bandwidth allowed, the slower the performance that may result. Options: No Limit /
10Mbps / 5Mbps / 2Mbps / 1Mbps / 512Kbps / 256Kbps / 128Kbps.
− Bandwidth per user: Click on the drop-down arrow to set a maximum amount of
bandwidth that can be consumed by each user logged onto this Dominion KX unit.
Options: No Limit / 10Mbps / 5Mbps / 2Mbps / 1Mbps / 512Kbps / 256Kbps / 128Kbps.
2. Click OK to set Performance Settings or click Cancel to close the window.
Page 62

52 DOMINION KX USER GUIDE
PC Properties
To view PC Properties, select a server in the server list and on the Setup menu, click Properties,
and then click PC (or select a server in the server list, right-clicking on it, and click Properties).
• Name: This is the name given to the target in that channel. Administrators can change the
name by typing a new one in this field. The target name can also be changed directly in the
target list by clicking on the name once after it has been highlighted.
• Type: This describes what type of target is connected to this port. This value will always be
CPU for a server target.
• Status: The availability of a target is shown in this field. Available indicates that no one is
currently viewing the target, Busy indicates that a user is currently using the target, and
Unavailable indicates that a configured target has been powered off or disconnected.
• Power Strip and Outlet: These fields are used for associating the selected target with a
connected Remote Power Control Strip (please see the
for additional information).
Power Control section in this chapter
Figure 38 PC Properties Screen (shown on a Dominion KX with a Power Strip association)
Page 63

CHAPTER 3: ADMINISTRATIVE FUNCTIONS 53
Power Control (Dominion KX only)
The Dominion KX supports up to eight (8) power strips. Users may group or assign up to four
outlets to any of the Dominion channels. Once assigned, the power management function is
available in MPC and RRC.
Setup Preparation
You must have a power strip and the P2CIM-PWR Computer Interface Module (CIM). The CIM
is included with the power strip shipment; however, if you need a replacement CIM, you can
purchase a P2CIM-PWR from Raritan Computer, Inc. or an authorized Raritan reseller.
Connecting the Power Strip
1. Connect the male RJ-45 of the P2CIM-PWR to the female RJ-45 connector on the power
strip.
2. Connect the female RJ-45 connector of the P2CIM-PWR to any of the available female
system port connectors on the Dominion KX using a straight through Cat 5 cable.
3. Power ON the power strip.
4. Power ON the Dominion KX unit.
Configuring the Power Strip
1. Once the power strip has been added, KX Manager will automatically recognize that a power
device is connected. The Device Tree in the left panel of the window will change the
appropriate target icon to indicate that a power strip is connected to that port.
2. Select the power strip icon, right-click on it, and click Properties. When the Power Strip
Properties screen appears, type a name for the new power strip and click OK.
3. In the Devices Tree, select the target server(s) powered through the power strip. Right-click
on the server icon and click Properties. The PC Properties window appears.
Figure 39 Associating a Target with a Power Outlet
4. Click on one of the Power Strip cells in the table and a list of available power strips
connected to the Dominion KX appears. Click on the appropriate power strip.
5. Click on the Outlet cell in the same row as the power strip selected. A list of available outlets
appears; select the outlet to which the device is connected.
6. Repeat these steps for all devices plugged into multiple outlets.
Page 64

54 DOMINION KX USER GUIDE
Once outlets have been assigned, Remote Power Management to the associated server will be
available through RRC.
Note: Be sure to assign the correct outlets to each channel. If more than one outlet is physically
associated with a different server, you could accidentally switch OFF the wrong server.
Power Strip Management
To view Power Strip Properties; name, model, number of outlets, and serial number:
• Right-click on the Power Strip channel / icon in the Device Tree.
Figure 40 Power Strip Properties Window
OR
• On the View menu, click Power Strip. When the Power Strip View window of connected
Power Strips appears, select a Power Strip in the list, right-click on it, and click Properties.
− A list of the Power Strip’s outlet appears under it. Select and right-click on an outlet, then
click Properties, to view the outlet’s Properties window. In this window, you can
change the outlet’s name (as shown in the Power Strip View window), view the device
type that is plugged into that outlet (either an associated Paragon Target, or a nonassociated Appliance), and delete any previously made associations.
Figure 41 Power Strip View Window
Page 65

CHAPTER 3: ADMINISTRATIVE FUNCTIONS 55
Power Supply Management (Dominion KX only)
Dominion KX displays the status of its Power Supplies, one per unit, except for the KK464,
which displays two Power Supplies. The Power Supply icon in the Device tree indicates whether
the Power Supply is Active or Inactive:
Active Power Supply
Inactive Power Supply
as shown in the Device Tree below:
Figure 42 Active and Inactive Power Supplies in the Device Tree
Power Supply Properties
The Power Supply properties screen displays its status. None of the fields in this window can be
edited, as these properties are obtained directly from the Power Supply device.
Figure 43 Power Supply Properties Window
Page 66

56 DOMINION KX USER GUIDE
CC UnManager
KX Manager supports CC UnManager, an “Un-Manage” feature that allows a Dominion that is
managed by a Command Center Secure Gateway (CC-SG) device, but not under control by that
CC-SG device, to remove itself from CC-SG management, or to “Un-Manage” itself. CC
UnManager is designed to restore full control to the Dominion unit in the event the CC-SG goes
off-line.
If the CC-SG loses communication with the Dominion unit, after 10 minutes the Dominion unit
automatically allows users to log on using its own (the Dominion’s own) internal user and
password information.
If users attempt to log onto the Dominion unit while it is under CC-SG control, the Dominion unit
will issue either a Communication Error message or a Login Incorrect message.
Logging in with CC UnManager
When you launch KX Manager while the Dominion is under CC-SG control, it generates a
warning that prompts you to remove it from CC-SG management.
Figure 44 KX Manager Warning if KX is Under CC-SG Management
If you click Yes to remove the Dominion from CC-SG control, KX Manager issues a
confirmation window. Click Confirm to remove the Dominion from CC-SG control or click
Cancel to maintain CC-SG control of the Dominion device.
Figure 45 KX Manager Removing KX from CC-SG Management
If you click No and leave the Dominion device under CC-SG management, KX Manager issues a
warning: any changes you make to this Dominion device while it is still under CC-SG
management may have negative effects on the CC-SG unit controlling it and on itself.
Figure 46 KX Manager Change Warning
Page 67

CHAPTER 3: ADMINISTRATIVE FUNCTIONS 57
Activating CC UnManager
If you are already logged into a Dominion unit that is under CC-SG management, but not under
CC-SG control, you can issue the CC UnManager command to remove the Dominion from CCSG management.
On the Setup menu, click Configuration and then click CC UnManager.
Figure 47 CC UnManager Command
Page 68

58 DOMINION KX USER GUIDE
Event Management
Dominion KX offers SNMP agent support through Dominion KX’s Event Management feature.
To run SNMP agent support properly, first set path, time and date permissions.
1. On the Setup menu, click Configuration, and then click Events. The Event Management
window appears.
Figure 48 Event Notification Activation Tab
2. Click on the Event Management tab to select and configure Events that you want to generate
SNMP notification events (traps).
3. Click on the checkboxes for those Event line items you wish to enable or disable. Enable or
disable entire Categories by checking or unchecking the specific Category line checkboxes.
Please see the SNMP Trap table that follows for additional information on SNMP Agents and
Traps.
4. To configure the Dominion unit as an SNMP Agent, click on the SNMP tab. Otherwise, click
OK when finished, or Cancel to exit without saving changes.
Note: No SNMP Traps are generated for the “Port Connect” and “Port Disconnect” trap when a
user connects or disconnects from the Dominion KX device from the local (OSD) port.
Page 69

CHAPTER 3: ADMINISTRATIVE FUNCTIONS 59
SNMP Agent Configuration
Use the SNMP screen to configure the SNMP connection between the Dominion KX (SNMP
Agent) and an SNMP manager.
1. In the Event Management window, click on the SNMP tab
2. Click on the Enable SNMP checkbox to enable the SNMP Agent feature; uncheck this
checkbox to disable SNMP Agent.
3. In the Name, Contact, and Location fields, type the SNMP Agent’s (this Dominion unit’s)
name as it appears in the Navigator panel, a contact name related to this unit, and where the
Dominion unit is physically located.
4. Type the Agent’s Community Strings (the Dominion unit’s strings) and specify whether
they are Read Only or Read/Write.
5. Configure up to five SNMP managers with by specifying their IP Addresses, SNMP Port
Numbers, and the Manager’s Community String.
6. Click OK when finished, or Cancel to exit without saving changes.
Figure 49 SNMP Configuration Tab
Page 70

60 DOMINION KX USER GUIDE
SNMP Trap Configuration
The Raritan Enterprise MIB can be accessed via the FAQ Support section on Raritan’s Web site,
http://www.raritan.com/support/sup_faq.aspx. Click on the View FAQ drop-down arrow and
select Dominion KX from the list. When directed to the Dominion KX FAQ section, click on the
first MIB query, and then click on the link to view MIB file.
TRAP NAME DESCRIPTION
rebootStarted The KX has begun to reboot, either through recycling power
to the system or by a warm reboot from the OS.
rebootCompleted The KX has completed its reboot.
userLogin A user has successfully logged into the KX and authenticated.
userLogout A user has successfully logged out of the KX properly.
userAuthenticationFailure A user attempted to log in without a correct username and/or
password.
portConnect A previously authenticated user has gained control of a
particular KVM resource and begun a KVM control session.
portDisconnect A user engaging in a KVM session closes the session
properly.
userSessionTimeout A user with an active session has experienced a session
termination due to timeout.
userConnectionLost A user with an active session has experienced an abnormal
session termination.
portStatusChange A new user record has been added to the KX user database.
userModified A user record has been deleted.
groupAdded A group record has been modified in the KX user database.
groupDeleted A group record has been deleted.
startCCManagement The device has been put under CC SG Management.
stopCCManagement The device has been removed from CC SG Management.
factoryReset The device has been reset to factory defaults.
deviceUpgradeStarted The KX has begun updating itself via an RFP file.
deviceUpgradeComplete The KX has completed updating itself via an RFP file.
KXPowerSupplyFailure A power supply on a dual-power KX has failed.
userPasswordChanged This event will signal if the password of any user within the
product is modified.
networkFailure One of the Ethernet interfaces of the product can no longer
communicate over the network.
Page 71

CHAPTER 4: LOCAL CONSOLE PORT ACCESS 61
Chapter 4: Local Console Port Access
Local Port Functionality
When you are located at the server rack, Dominion KX provides standard KVM switch
functionality via its Local Console Ports, which features an On-Screen Display (OSD) for quick,
convenient switching between servers. The Dominion KX Local Console Port provides a direct
analog connection to your connected servers; the performance is exactly as if you were directly
connected to the server’s keyboard, mouse, and video ports.
Dominion’s local port supports the following language keyboards: US, UK, German, and French
(remote ports support US, US International, UK, German, French, and Japanese).
Note: The IBM Mini Keyboard model ACK-540 may lock the local port of the DKX while OSD is
showing. Leaving the PS2 connectors (keyboard and mouse) attached may lock the OSD on the
local console after 1-2 minutes.
Physical Connections
Local Console Ports can be found on the rear panel of the Dominion KX.
Figure 50 Local User Panel on Dominion KX
Monitor: Attach a standard multisync VGA monitor to the HD15 (F) video port.
Keyboard: Attach either a standard PS/2 keyboard to the Mini-DIN6 (F) keyboard port or a
standard USB mouse to one of the USB Type A (F) ports.
Mouse: Attach either a standard PS/2 mouse to the Mini-DIN6 (F) mouse port or a standard USB
mouse to one of the USB Type A (F) ports.
Note: USB keyboard and mouse ports are to be used only for keyboard and mouse access – other
USB devices such as external drives, scanners, etc. should not be connected to these ports.
Simultaneous Users
The Dominion KX Local Console Port provides an independent access path to your connected
servers. Using the Local Console Port does not
over the network, and even when users have connected to Dominion KX over the network, you
may still simultaneously access your servers from the rack via the Local Console Port.
Security and Authentication
To use the Dominion KX Local Console Port, first authenticate with a valid username and
password. Dominion KX provides a fully-integrated authentication and security scheme, whether
you access Dominion KX via the network or via the Local Console Port. In both cases, users use
the same username and password, and Dominion KX allows access only to those servers to which
a user has access permissions (please see
information on creating server access and security settings).
prevent users from simultaneously connecting
Chapter 3: Administrative Functions for additional
Page 72

62 DOMINION KX USER GUIDE
If your Dominion KX has been configured for external authentication services (LDAP, Active
Directory, or RADIUS), authentication attempts at the Local Console Port also are authenticated
against the external authentication service.
Local Factory and Password Reset
If you forget the administrator password, there is currently no way to reset it to factory default to
gain access. However, you can hard-reset a Dominion KX unit with this special user name and
password, as described below.
• Type the username admin and the password R*E*S*E*T. This password is case-sensitive.
• This username and password work only from your local access port. When working remotely,
only the actual password assigned to admin will gain access.
• When this sequence is recognized, the device will not
the specified reset action (Local Device Reset mode) as specified in the KX Manager
Security Settings panel.
If Enable Local Factory Reset is performed, reset the network and other parameters
from the OSD and then reboot the Dominion KX unit.
Note: Passwords can consist of twenty (20) alphanumeric characters on the English keyboard, as
well as the following symbols: !"#$%&'()*+,-./:;<=>?@[\]^_`{|}~
allow access as usual, but will perform
Selecting Servers
Allowable Characters
The following characters are permitted in DCIM Channel Names:
Letters: Upper and lowercase a – z, A – Z
Numbers: 0 – 9
Special characters:
Only these characters should be entered in the OSD due to hardware limitations in the OSD and
CIMs. If other characters are entered, they will be blocked or changed to other valid characters.
For example, underscore (‘_’) should not be used. If it is entered, it will be changed by the OSD
to the letter M.
Accessing the OSD
To select a server for controlling at the Local Console Port, access the OSD:
• If you are presently logged out of the Local Console Port: Type a valid username and
password, and the OSD appears.
• If a server is presently already selected: Press the OSD “Hot Key” Scroll Lock twice
rapidly to access the OSD.
Minus (‘-’)
plus (‘+’),
slash (‘/’),
period (‘.’)
space (‘ ‘)
Important: The Local Console Port OSD Hotkey is Scroll Lock, Scroll Lock (this
combination can be changed via the OSD). Keep in mind that certain hotkeys
are reserved by the operating system, and you must not assign them to DKX
functions.
Page 73

CHAPTER 4: LOCAL CONSOLE PORT ACCESS 63
Server Display Options
While you operate the Local Console Port, Dominion KX will display a list of those servers to
which you have permission to access.
Figure 51 Local Server Display
Your servers can be sorted and displayed by two different parameters:
• Select by Channel: Press F2 while in the OSD to display your servers listed in numerical
order, as determined by the physical Dominion KX server port to which they are connected.
• Select by Name: Press F12 while in the OSD to display your servers listed in alphabetical
order by name.
Page 74

64 DOMINION KX USER GUIDE
Accessing a Server
While viewing the Server Display in the OSD, press the Ç and È arrow keys to scroll through
the list of servers. Eight servers are listed per page, and if your list spans multiple pages, press the
PgUp and PgDown keys to scroll between screens.
Select a server (when the server is highlighted with the yellow bar) you want to access and press
ENTER. The OSD disappears and you are connected directly to the server you have selected.
To return to the OSD, press the “hotkey” (Scroll Lock) twice rapidly.
Local Port Administration
Dominion KX should ideally be managed via Dominion KX Manager (please see Chapter 3:
Administrative Functions, Launching Dominion KX Manager for additional details).
However, the Dominion KX Local Console Port provides access to select administrative
functions. Only users with administrative privileges can access these functions, via the
Administrative Functions menu.
Renaming Servers
Assign names to the servers connected to Dominion KX from the Local Console Port, while you
are physically located next to the servers themselves.
1. Log on to Dominion KX as a user with administrative privileges, and press F5 to activate the
Administrative Menu.
Figure 52 Administrative Menu
2. Select Option 5, Channel Configuration. The Channel Configuration menu appears.
Figure 53 Channel Configuration Menu
3. Use the Ç and È keys to select a server port to rename, and press ENTER.
4. When the highlight turns green, type a name (up to 19 characters) to identify the server
connected to that port.
5. Press ENTER to save and complete.
Page 75

CHAPTER 4: LOCAL CONSOLE PORT ACCESS 65
Power Management
Control channels with power associations on the local console using the F3 key. If you select a
channel without a power association, a No Outlet / Access Denied message appears at the base
of the Channel Configuration menu.
1. From the Channel Configuration menu (above), select the channel to turn off, turn on, or
recycle power to and press the F3 key. The Server Power Control screen appears.
2. Use the Ç and È keys to select a channel.
A. Press the letter X to power Off the channel.
B. Press the letter O to power On the channel.
C. Press the letter R to Recycle power to the channel.
Figure 54 Power Management Screen
3. When finished, press ESC to return to the Channel Configuration menu.
Changing Network Settings
1. Log on to Dominion KX as a user with administrative privileges, and press F5 to activate the
Administrative Menu.
2. Select Option 3, Network Settings. The Network Settings menu appears.
Figure 55 Network Settings Menu
3. Use the Ç and È keys to navigate through the menu. To edit a setting, press ENTER. When
the highlight turns green, that setting can be edited; use numerical keys as well as the Ç and
È arrow keys to change values.
4. Press S to save changes, and then press ESC to exit the menu.
Important: Dominion KX must be rebooted for new network settings to take
effect.
Page 76

66 DOMINION KX USER GUIDE
Setting Session Timeout
Session Timeout applies only to local users. When the local user is viewing target video and there
is no keyboard or mouse activity for a specified amount of time, that user is logged out of the
target video, but the OSD remains active.
Note: Please do not confuse Session Timeout with Idle User Timeout, which applies to all users,
whether local or remote. When Idle User Timeout expires, the user is disconnected from the video
and also logged out of the client application (the OSD, MPC, RRC).
1. Log on to Dominion KX as a user with administrative privileges, and press F5 to activate the
Administrative Menu.
Figure 56 Administrative Menu
2. Select Option 1, User Station Profile. The User Station Profile screen appears.
Figure 57 User Station Profile Screen
3. Use the Ç and È keys to navigate through the menu to the Session Timeout field.
4. Press ENTER.
5. When the highlight turns green, use numerical keys or the Ç and È keys to change values.
By default, the session timeout feature is set to 00 minutes, which means there is no timeout,
and users are never logged off for inactivity. You can set a timeout period in one minute
increments, up to a maximum of 30 minutes.
6. Press S to save changes, and then press ESC to exit the menu.
Page 77

CHAPTER 4: LOCAL CONSOLE PORT ACCESS 67
Help Menu
To get information or help about the OSD of the Dominion KX Local Console Port, press F1.
The Help Menu appears.
Figure 58 Help Menu
Hardware / Firmware Information
If you need hardware and firmware information specific to your Dominion KX unit, log into the
Local Console Port of your Dominion KX unit, and press F8. The System Information screen
appears.
Figure 59 System Information Window
Dominion KX firmware version 1.4 operates on all Dominion models: DKX116, DKX132,
DKX216, DKX232, DKX416, DKX432, and DKX464. To determine the firmware upgrade
version on an existing KX device to upgrade from the Raritan website (
www.raritan.com) in the
Firmware Upgrades section, click the System Information command on the Setup menu in KX
Manager (or press the F8 key from the OSD) to display the current firmware version.
FIRMWARE VERSION KX FIRMWARE UPGRADE
VERSION
0A28 Version 1.0
0A34 Version 1.0.3
0A47 Version 1.1
0B12 Version 1.2
0B1B Version 1.3
0B2O Version 1.4
Page 78

68 DOMINION KX USER GUIDE
Local User Security Settings
1. Log on to Dominion KX as a user with administrative privileges, and press F5 to activate the
Administrative menu (
2. Select Option 2, User Security. The User Security menu appears.
Figure 52).
Figure 60 User Security Menu
3. To display all computers, enter Yes in the Display All Computers field. To display only
active ones (the default), enter No in the field.
4. To set a logoff timeout, enter On and then enter the number of minutes for the timeout period
in the Logoff Timeout field.
5. Select an operation mode in the Operation Mode field. The default is PC Share.
6. Enter a period of time for the login to remain blank in the Login Blank field. Default is 1
minute.
7. Press S to save changes, and then press ESC to exit the menu.
Page 79

APPENDIX A: SPECIFICATIONS 69
Appendix A: Specifications
Digital KVM Switches
PART
NUMBER
DKX116
DKX132
DKX216
DKX232
DKX416
DKX432
DKX464
PRODUCT
WEIGHT
8.65 lb
3.92 kg
9.0 lb
4.1 kg
8.65 lb
3.92 kg
9.0 lb
4.08 kg
9.0 lb
4.08 kg
9.5 lb
4.3 kg
13.73 lb
6.24 kg
PRODUCT DIMENSIONS (WXDXH) POWER
17.3" x 11.4" x 1.75"
439 mm x 290 mm x 44 mm
17.3" x 11.4" x 1.75"
439 mm x 290 mm x 44 mm
17.3" x 11.4" x 1.75"
439 mm x 290 mm x 44 mm
17.3" x 11.4" x 1.75
439 mm x 290 mm x 44 mm
17.3" x 11.4" x 1.75"
439 mm x 290 mm x 44 mm
17.3" x 11.4" x 1.75"
439 mm x 290 mm x 44 mm
17.3" x 11.4" x 3.5"
439 mm x 290 mm x 90 mm
100V/240V 47/63Hz 0.6A
100V/240V 50/60Hz 0.6A
100V/240V 50/60Hz 0.6A
100V/240V 50/60Hz 0.6A
100V/240V 50/60Hz 1A
100V/240V 50/60Hz 1A
Dual Power
100V/240V 47/63Hz 1.8A
Computer Interface Modules (CIMs)
PART
NUMBER
DCIM-PS2
DCIM-USB
DCIM-SUSB
DCIM-SUN
PRODUCT
WEIGHT
0.2 lbs
0.09 kg
0.2 lbs
0.09 kg
0.2 lbs
0.09 kg
0.2 lbs
0.09 kg
PRODUCT DIMENSIONS (WXDXH)
1.3" x 3.0" x 0.6"
33 mm x 76 mm x 15 mm
1.3" x 3.0" x 0.6"
33 mm x 76 mm x 15 mm
1.3" x 3.0" x 0.6"
33 mm x 76 mm x 15 mm
1.3" x 3.0" x 0.6"
33 mm x 76 mm x 15 mm
Remote Connection
Network: 10BASE-T, 100BASE-TX Ethernet
Modem: Dedicated Modem Port (DB9M) for External Serial Modem
Qualified for use with US Robotics external serial modems
(as of press date – check Raritan website for latest manual with updated modem
certifications).
Protocols: TCP/IP, UDP, SNTP, HTTP, HTTPS, RADIUS, LDAP
Page 80

70 DOMINION KX USER GUIDE
Raritan Remote Client (RRC) Applet
Operating System Requirements: Windows XP / 2000 with DirectX.
• Windows NT support for some international keys are limited due to limited Microsoft support
for DirectX on the Windows NT platform
Dominion KX Manager (Remote Administration Applet)
For consistent operation across multiple OS and Web Browsers, Sun Java Runtime Environment
(JRE) version 1.4.2_05 is used. If this version is not installed on the desktop client, your system
will prompt you to install.
TCP Ports Used
• HTTP, Port 80 (optional) – All requests received by Dominion KX via HTTP (port 80) are
automatically forwarded to HTTPS for complete security. Dominion KX responds to Port 80
for user convenience, relieving users from having to explicitly type “https://” in the URL field
to access Dominion KX, but while still preserving complete security.
• HTTPS, Port 443 (optional) – This port is used for a single purpose only: to send the
Dominion KX web-accessible clients (Raritan Remote Client and Dominion KX Manager) to
the user. No other communication occurs on this port. If you do not wish to use Dominion
KX’s web-access capabilities and instead prefer to use the installed client software provided
on CD-ROM, you can prevent access to Port 443 via your firewall and Dominion KX can still
function.
• Dominion KX (Raritan KVM Over IP) Protocol, Configurable Port 5000 – With the
exception of the above, all communication to Dominion KX occurs over a single,
configurable TCP Port. By default, this is set to Port 5000, but you may configure it to use
any TCP port of your choice (except 80 and 443). For details on how to configure this setting,
please see
• SNTP (Time Server) on Configurable UDP Port 123 (optional) – Dominion KX offers the
optional capability to synchronize its internal clock to a central time server. This function
requires the use of UDP Port 123 (the standard for SNTP), but can also be configured to use
any port of your designation.
• LDAP on Configurable Ports 386 and 636 (optional) – If Dominion KX is configured to
remotely authenticate user logins via the LDAP protocol, ports 386 and 636 will be used, but
the system can also be configured to use any port of your designation.
• RADIUS on Configurable Port 1812, 1645, or custom port (optional) – If Dominion KX
is configured to remotely authenticate user logins via the RADIUS protocol, either port 1812
or 1645 will be used, but the system can also be configured to use any port of your
designation.
• RADIUS Accounting on Configurable Port – If Dominion KX is configured to remotely
authenticate user logins via the RADIUS protocol, and also employs RADIUS accounting for
event logging, an additional port of your designation will be used to transfer log notifications.
• SYSLOG on Configurable UDP Port 123 (optional) – If Dominion KX is configured to
send messages to a Syslog server, then the indicated port(s) will be used for communication uses UDP Port 514.
• SNMP Default UDP Ports (optional) – Port 161 is used for inbound/outbound read/write
SNMP access and port 162 is used for outbound traffic for SNMP traps.
Chapter 3: Administrative Functions, Network Configuration.
Page 81

APPENDIX A: SPECIFICATIONS 71
Target Server Connection Distance and Video Resolution
Keyboard: PS/2 or USB
Mouse: PS/2 or USB
Video: VGA
DOMINION KX
MODELS
KX116
KX132
KX216
KX232
KX416
KX432
KX464
Generally, distances closer to the lower range will provide excellent video quality in most
environments. Distances towards the upper end of the range should show acceptable quality, but
in some environments degradation of the video signal may start to appear.
• The maximum supported distance is a function of many factors including the type/quality of
CAT5 cable, server type, and server manufacturer, the video driver and monitor,
environmental conditions and user expectations.
• The KX416 and KX432 models provided enhanced video signal quality at longer distances
across the three types of servers tested. For maximum distance, utilize one of the KX4
models.
• The use of Paragon CIMs will not increase the distance between the KX and the target server.
• Due to the multiplicity of server manufacturers and types, OS versions, video drivers, etc. and
the subjective nature of video quality, Raritan cannot guarantee performance across all
distances in all environments.
75 to 150 ft
19.5 to 45 m
75 to 150 ft
19.5 to 45 m
LINUX
SERVERS
DCIM-PS2, USB DCIM-PS2/USB DCIM-SUN/SUSB
WINDOWS
SERVERS
50 to 100 ft
15 to 30 m
75 to 150 ft
19.5 to 45 m
SUN
SOLARIS
50 to 75 ft
15 to 19.5 m
75 to 150 ft
19.5 to 45 m
Supported Video Resolutions
Text Modes
640x480 @ 60Hz 1024x768 @ 60Hz
640x480 @ 72Hz 1024x768 @ 70Hz
640x480 @ 75Hz 1024x768 @ 75Hz
640x480 @ 85Hz 1024x768 @ 85Hz
720x400 @ 70Hz 1152x864 @ 60Hz
720x400 @ 85Hz 1152x864 @ 70Hz
800x600 @ 56Hz 1152x864 @ 75Hz
800x600 @ 60Hz 1280x960 @ 60Hz
800x600 @ 72Hz 1280x1024 @ 60Hz
800x600 @ 75Hz
800x600 @ 85Hz
Page 82

72 DOMINION KX USER GUIDE
Certified Modems
1. US Robotic 56K Fax and Modem
2. ZOOM v90; RS232 interface
3. ZOOM v92; RS232 interface
4. USR (US Robotic) Sportster 56K v90
5. USR (US Robotic) Courier 56K v90
6. Trust 56K V.92 External Modem
Page 83

APPENDIX B: NOVELL EDIRECTORY 73
Appendix B: Novell eDirectory
This information is offered as an overview of Novell’s eDirectory. For more detailed information,
please visit Novell’s Website.
1. Log on to the tree with Admin rights to [Root], or some equivalent that has rights to modify
the schema of eDirectory. Open Console One and select your tree in the left panel.
2. On the Tools menu, click Schema Manager.
3. In the Schema Manager window, click on the Attributes tab, then create Create to create a
new attribute.
Page 84

74 DOMINION KX USER GUIDE
4. Console One will launch the Create Attribute Wizard. Click Next.
5. Type rciusergroup in the Attribute name field and type 1.3.6.1.4.1.13742.50 in the ASN1
ID field. Click Next.
Page 85

APPENDIX B: NOVELL EDIRECTORY 75
6. Click on the Syntax drop-down arrow and select Case Ignore String from the list. Click
Next.
7. Click on the check boxes before Single valued and Sized to set those flags. Type 1 in the
Lower field and type 24 in the Upper field. Click Next.
Page 86

76 DOMINION KX USER GUIDE
8. A Summary screen displaying your data appears. Click Finish to create the attribute in
eDirectory, or click Back to return to previous screens and change your data.
9. When you finish, you return to the Schema Manager screen.
Page 87

APPENDIX B: NOVELL EDIRECTORY 77
10. Click on the Classes tab, select the User class, and click Info. The Class Manager screen
appears.
11. Click Add Attribute to add the rciusergroup attribute to the User class. The Add Optional
Attribute window appears.
12. Select rciusergroup in the Available attributes pane on the left, and then click the blue arrow
Æ to add the attribute to the Add these attributes pane on the right. Click OK.
13. Click Close and in the next screen, click Close once more to return to the main Console One
screen.
Important: Ensure that you want to change this attribute; this is a permanent
change.
Page 88

78 DOMINION KX USER GUIDE
14. Add a value to the attribute using Console One, LDIF operations with ICE, or ldapmodify
(please note: these are outside scope of this document). If using Console One, right-click on
the user object and click Properties. Click on the Other tab to add attribute and value for
rciusergroup.
15. Click Add.
16. Select the rciusergroup attribute and click OK to add the attribute to your User object.
Page 89

APPENDIX B: NOVELL EDIRECTORY 79
17. When you return to the Properties screen, rciusergroup appears in the Attributes tree. Ty pe
the name of the User Group you created on the Dominion KX device and then click Apply.
18. An Updating Other Page screen appears. Click OK to continue.
19. When the Properties window appears, click Close.
20. In MPC or RRC, connect to the Dominion device by double-clicking on its icon in the Device
Tree and perform tasks as allowed by the user group you specified.
Page 90

80 DOMINION KX USER GUIDE
Page 91

APPENDIX C: FAQS 81
Appendix C: FAQs
General Questions
QUESTION ANSWER
What is Dominion KX? Dominion KX is a digital KVM (keyboard / video / mouse) switch that
enables IT administrators to access and control 16 or 32 servers over
the network with BIOS-level functionality. Dominion KX is completely
hardware and OS-independent; users can troubleshoot and reconfigure
servers even when servers are down.
At the rack, Dominion KX provides the same functionality,
convenience, space savings, and cost savings as do traditional analog
KVM switches. However, Dominion KX also integrates the industry’s
highest-performing KVM Over IP technology, thereby allowing
multiple administrators to access server KVM consoles from any
networked workstation in the world.
How does Dominion KX
differ from remote
control software?
Can Dominion KX
be rack mounted?
How large is Dominion
KX?
When using Dominion KX remotely, the interface, at first glance, may
seem similar to remote control software such as PC Anywhere,
Windows Terminal Services / Remote Desktop, VNC, etc. However,
because Dominion KX is not a software but a hardware solution, it is
much more powerful:
OS and hardware independent – Dominion KX can be used to manage
any type of server running any OS, whether Intel, Sun, PowerPC
running Windows, Linux, Solaris, Novell, etc.
State-independent / Agent-less – Dominion KX does not require the
managed server OS to be up and running, nor does it require any special
software to be installed on the managed server.
Out-of-Band – Even if the managed server’s own network connection is
unavailable, it can still be managed through Dominion KX.
BIOS-level access – Even if the server is hung at boot up, requires
booting to safe mode, or requires system BIOS parameters to be altered,
Dominion KX still works flawlessly to enable these configurations to
be made.
Yes, Dominion KX ships standard with 19" rack mount brackets. It can
also be reverse rack mounted such that the server ports face forward.
Dominion KX is only 1U in height, fits in a standard 19" rack mount,
and occupies only 11.4" (29 cm) in depth. The Dominion KX464,
supporting 64 server ports, however is a 2U device.
Page 92

82 DOMINION KX USER GUIDE
Remote Access
QUESTION ANSWER
How many users can
remotely access servers
on each Dominion KX?
Can two people look at
the same server at the
same time?
Can two people access
the same server, one
remotely and one from
the local port?
In order to access
Dominion KX from a
client, what hardware,
software, or network
configuration is
required?
What is the file size of
the applet used to access
Dominion KX? How
long does it take to
retrieve?
Currently, Dominion models KX416, KX432, and KX464 offer
concurrent remote transmissions of up to four unique servers at any
time. Dominion KX can, thereby, provide any of the following
permutations:
• 1 User, viewing four unique servers simultaneously
• 2 Users, each viewing two unique servers simultaneously
• 8 Users – eight users viewing one server; four users each viewing
two unique servers simultaneously
• Any other permutations of up to 8 users, viewing up to 4 unique
servers total.
Yes, up to eight people can look at the same server at the same time.
Yes, the local port is completely independent of the remote “ports.” The
local port can access the same server using the PC Share feature.
Because Dominion KX is completely Web-accessible; it does not
require proprietary software to be installed on clients used for access.
(Although an optional installed client is available on the Raritan Web
site (
www.raritan.com) for the purposes of accessing Dominion KX via
modem).
Dominion KX can be accessed through major Web browsers including:
Internet Explorer, Netscape, Mozilla, and Firefox. Dominion KX can
now be accessed on Windows, Linux, SUN Solaris, and Macintosh
desktops, with the introduction of Raritan’s Java-based Multi Platform
Client (MPC).
Dominion KX administrators can also perform remote management (set
passwords and security, rename servers, change IP address, etc.). To
perform remote management from a given workstation, you must also
have Java Runtime Environment of v1.4.2.05 or later installed.
The applet used to access Dominion KX is approximately 1.4MB in
size. The following chart describes the time required to retrieve
Dominion KX’s applet at different network speeds:
100Mbps
60Mbps
10Mbps
6Mbps
512Kbps
56Kbps
38Kbps
Theoretical 100Mbit
network speed
Likely practical 100Mbit
network speed
Theoretical 10Mbit
network speed
Likely practical 10Mbit
network speed
Cable modem download
speed (typical)
Dial-up modem
theoretical speed
Likely practical dial-up
modem speed
0.1
seconds
0.2
seconds
1.1
seconds
2
seconds
22
seconds
3
minutes
5
minutes
Page 93

APPENDIX C: FAQS 83
QUESTION ANSWER
How do I access servers
connected to Dominion
KX if the network ever
becomes unavailable?
Dominion KX offers a dedicated modem port for attaching an external
modem. With this dedicated modem, your servers can still be remotely
accessed in the event of a network emergency. Furthermore, Dominion
KX’s local ports always allow access to your servers from the rack, no
matter the network condition.
Can non-Windows users
use RRC?
Yes, using Raritan MPC, non-Windows users can connect to target
servers through the Dominion KX. MPC can be run via Web browsers
and standalone. Please refer to Raritan’s MPC User Guide for more
information.
My connection dropped
and I got the error
message “There was an
This might happen based the frequency with which you try to connect
via modem. Reboot the KX unit and modem, and for future
connections, wait at least two (2) minutes between attempts.
unexpected
communications error –
connection terminated”
– what should I do?
Page 94

84 DOMINION KX USER GUIDE
Ethernet and IP Networking
QUESTION ANSWER
How much bandwidth
does Dominion KX
require?
What is the slowest
connection (lowest
bandwidth) over which
Dominion KX can
operate?
What is the speed of
Dominion KX’s
Ethernet interfaces?
Can I access Dominion
KX over a wireless
connection?
Dominion KX offers integrated IP-Reach technology – the very best
video compression available. Raritan has received numerous technical
awards confirming its high video quality transmissions and the low
bandwidth utilization.
Raritan pioneered the KVM Over IP functionality that allows users to
tailor their video parameters to conserve network bandwidth. For
instance, when connecting to Dominion KX through a dial-up modem
connection, video transmissions can be scaled to grayscale – allowing
you to be fully productive while ensuring high performance.
With that in mind, the following data refers to Dominion KX at its
default video settings – again, these settings can be tailored to your
environment. They can be increased to provide even higher quality
video (color depth), or decreased to optimize for low-speed
connections.
As a general rule, a conservative estimate for bandwidth utilization (at
Dominion KX’s default settings) is approximately 0.5Mbit/seconds per
active KVM user (connected to and using a server), with very
occasional spikes up to 2MBit/seconds. This is a very conservative
estimate because bandwidth utilization will typically be even lower.
Bandwidth required by each video transmission depends on what task is
being performed on the managed server. The more the screen changes,
the more bandwidth is utilized. The table below summarizes some use
cases and the required bandwidth utilization at Dominion KX’s default
settings on a 10Mbit/s network:
Idle Windows Desktop 0 Mbps
Move Cursor Around Desktop 0.18Mbps
Move Static 400x600
0.35Mbps
Window/Dialog Box
Navigate Start Menu 0.49Mbps
Scroll an Entire Page of Text 1.23Mbps
Run 3D Maze Screensaver 1.55Mbps
33Kbps or above is recommended for acceptable KX performance over
a modem connection.
Dominion KX offers two 10/100 speed Ethernet interfaces, with
configurable speed and duplex settings (either auto-detected or
manually set). Dominion KX does not require a gigabit Ethernet
interface because its output (see above question) would never even
come close to exceeding the 100Mbit/sec limit of 10/100 Ethernet
networking.
Yes. Dominion KX not only utilizes standard Ethernet, but also uses
very conservative bandwidth with very high quality video. Thus, if you
have a wireless client with network connectivity to Dominion KX, you
can configure and manage your servers at BIOS-level wirelessly.
Page 95

APPENDIX C: FAQS 85
QUESTION ANSWER
Can Dominion KX used
over the WAN
(Internet), or just over
the corporate LAN?
Yes. Whether via a fast corporate LAN, the less predictable WAN
(Internet), a cable modem, or dial-up modem, Dominion KX’s KVM
Over IP technology can accommodate your connection. Raritan’s IP-
Reach KVM Over IP technology is integrated into every Dominion KX
unit. Raritan pioneered configurable video compression technology,
leading the industry by years, as evidenced by its awards.
Can I use Dominion KX
with a VPN?
How many TCP ports
must be open on my
firewall in order to
enable network access to
Dominion KX? Are
Yes. Dominion KX uses standard Internet Protocol (IP) technologies
from Layer 1 through Layer 4. Traffic can be easily tunneled through
any standard VPN.
Only one. Dominion KX protects your network security by only
requiring access to a single TCP port to operate. This port is completely
configurable for additional security.
To utilize Dominion KX’s optional Web browser capability, the
standard HTTPS port 443 must also be open.
these ports configurable?
Does the secondary
network port provide
redundant fail-over, or
load balancing?
The secondary network port provides redundant fail-over capabilities:
should the primary Ethernet port (or the switch/router to which it is
connected) fail, Dominion KX will fail-over to the secondary network
port with the same IP address – ensuring that your server operations are
not disrupted. Note that Automatic Failover is disabled by default.
Does Dominion KX
require an external
authentication server to
operate?
No. Dominion KX is a completely self-sufficient appliance. After
assigning an IP address to Dominion KX, it is ready to use – with web
browser and authentication capabilities completely built-in.
Of course, should you desire to use an external authentication server
(such as LDAP, Active Directory, RADIUS, etc.), Dominion KX
allows you to, and will even fail-over to its own internal authentication
should your external authentication server become unavailable. In this
way, Dominion KX’s design philosophy is optimized to provide ease of
installation, complete independence from any external server, and
maximum flexibility.
Can Dominion KX be
used with CITRIX?
Dominion KX may work with remote access products like CITRIX if
configures appropriately, but Raritan cannot guarantee it will work with
acceptable performance. Customers should realize that products like
CITRIX utilize video redirection technologies similar in concept to
digital KVM switches so that two KVM over IP technologies are being
used simultaneously.
Can the Dominion KX
utilize DHCP?
DHCP addressing can be used, however, Raritan recommends fixed
addressing since the DKX is an infrastructure device and can be
accessed and administered more effectively with a fixed IP address.
I’m having problems
connecting to the
Dominion KX over my
IP network. What could
be the problem?
The Dominion KX relies on the customer’s LAN/WAN network. Some
possible problems include: 1) Ethernet AutoNegotiation. On some
networks 10/100 autonegotiation does not work properly and the KX
unit must be set to 100MB/full duplex or the appropriate choice for its
network. 2) Duplicate IP Address. If the IP Address of the KX is the
same as another device, network connectivity may be inconsistent. 3)
Port 5000 conflicts. If another device is using port 5000, the KX default
port must be changed (or the other device must be changed). 4) When
changing the IP Address of a KX or swapping in a new KX, sufficient
time must be allowed for the KX IP and MAC Addresses to be known
throughout the Layer 2 and Layer 3 networks.
Page 96

86 DOMINION KX USER GUIDE
Servers
QUESTION ANSWER
Does Dominion KX
depend on a Windows
server to operate?
Do I need to install a
Web server such as
Microsoft Internet
Information Services
(IIS) in order to utilize
Dominion KX’s Web
browser capability?
What software do I have
to install in order to
access Dominion KX
from a particular
workstation?
What should I do to
prepare a server for
connection to Dominion
KX?
What comes in the
Dominion KX box?
Absolutely not. Because you depend on your KVM infrastructure to
always be available in any scenario whatsoever (as you will likely need
to use your KVM infrastructure to fix problems), Dominion KX is
designed to be completely independent from any external server.
For example, should your data center come under attack from a
malicious Windows worm or virus, you will need to use your KVM
solution to resolve the situation. Therefore, it is imperative that your
KVM solution, in turn, must not rely on these same Windows servers
(or any server, for that matter) to be operational in order for the KVM
solution to function.
To this end, Dominion KX is completely independent. Even if you
choose to configure your Dominion KX to authenticate against an
Active Directory server – if that Active Directory server becomes
unavailable, Dominion KX’s own authentication will be activated and
fully functional.
No. Dominion KX is a completely self-sufficient appliance. After
assigning an IP address to Dominion KX, it is ready to use – with Web
browser and authentication capabilities completely built-in.
None. Dominion KX can be accessed completely via a Web browser.
(Although an optional installed client is provided on Raritan’s Web site
(
www.raritan.com) for the purpose of accessing Dominion KX via
modem.) A Java-based client is now available for non-Windows users.
Servers connected to Dominion KX do not require any software agents
to be installed, because Dominion KX connects directly via hardware to
servers’ keyboard, video, and mouse ports. In order to provide users
with the best mouse synchronization during remote connections.
(a) Dominion KX unit; (b) Quick Setup Guide; (c) standard 19" rack
mount brackets; (d) User manual CD-ROM; (e) Network cable; (f)
Crossover cable; (g) Localized AC Line Cord; (h) Warrantee certificate
and other documentation.
Page 97

APPENDIX C: FAQS 87
Installation
QUESTION ANSWER
Besides the unit itself,
what do I need to order
from Raritan to install
Dominion KX?
What kind of Cat5
cabling should be used
in my installation?
What types of servers
can be connected to
Dominion KX?
For each server that you wish to connect to Dominion KX, you will
require a Dominion computer interface module (DCIM), a very small
dongle that connects directly to the keyboard, video, and mouse ports of
your server.
Dominion KX can use any standard UTP (twisted pair) cabling,
whether Cat5, Cat5e, or Cat6. Often in our manuals and marketing
literature, Raritan will simply say “Cat5” cabling for short. In actuality,
any brand UTP cable will suffice for Dominion KX.
Dominion KX is completely vendor independent. Any server with a
standards-compliant keyboard, video, and mouse ports can be
connected.
How do I connect
servers to Dominion
KX?
How far can my servers
be from Dominion KX?
Some operating systems
“lock up” if you
disconnect a keyboard or
mouse during operation.
What prevents servers
connected to Dominion
KX from “locking up”
when users switch away
from them?
Are there any agents that
must be installed on
servers connected to
Dominion KX?
How many servers can
be connected to each
Dominion KX unit?
What happens if I
disconnect a server from
Dominion KX and
reconnect it to another
Dominion KX unit, or
connect it to a different
port on the same
Dominion KX unit?
For each server that you wish to connect to Dominion KX, you will
require a Dominion computer interface module (DCIM), a very small
dongle that connects directly to the keyboard, video, and mouse ports of
your server. Then, connect each dongle to Dominion KX using standard
UTP (twisted pair) cable such as Cat5, Cat5e, or Cat6.
Servers can be up to 150 feet (45 m) away from Dominion KX (please
see table in
Each Dominion computer interface module (DCIM) dongle acts as a
virtual keyboard and mouse to the server to which it is connected. This
technology is called KME (keyboard/mouse emulation). Raritan’s
KME technology is data center grade, battle-tested, and far more
reliable than that found in lower end KVM switches: it incorporates
more than 15-years of experience, has been deployed to millions of
servers worldwide.
Servers connected to Dominion KX do not require any software agents
to be installed, because Dominion KX connects directly via hardware to
servers’ keyboard, video, and mouse ports.
Dominion KX models range, offering up to 32 server ports per 1U sized
unit and 64 server ports in a 2U sized unit; this is the industry’s highest
digital KVM switch port density.
Dominion KX will automatically update the server port names when
servers are moved from port to port. Furthermore, this automatic update
does not just affect the local access port, but it propagates to all remote
clients and the optional CC-SG management appliance.
Appendix A: Specifications for additional information).
Page 98

88 DOMINION KX USER GUIDE
QUESTION ANSWER
How do I connect a
serially controlled (RS-
232) device to Dominion
KX, such as a Cisco
router/switch or a
headless Sun server?
If you only have a few serially-controlled devices, you may connect
them to Dominion KX using Raritan’s serial computer interface module
(CIM), Raritan AUATC.
However, if you have four or more serially controlled devices, we
recommend the use of Raritan’s Dominion SX model line of secure
console servers. For multiple serial devices, Dominion SX offers more
functionality at a better price point than Dominion KX, while being just
as easy to use, configure and manage, and can be completely integrated
with your Dominion Series deployment. In particular, many UNIX and
networking administrators appreciate the ability to directly SSH to a
Dominion SX unit (which Dominion KX, a digital KVM switch, does
not offer).
Page 99

APPENDIX C: FAQS 89
Local Port
QUESTION ANSWER
Can I access my servers
directly from the rack?
When I am using the
local port, do I prevent
other users from
accessing servers
remotely?
Can I use a USB
keyboard or mouse at
the local port?
How do I select between
servers while using the
local port? Is there an
On-Screen Display
(OSD)?
How do I ensure that
only authorized users
can access servers from
the local port?
If I use the local port to
change the name of a
connect server, does this
change propagate to
remote access clients as
well? Does it propagate
to the optional CC-SG
appliance?
If I use Dominion KX’s
remote administration
tools to change the name
of a connected server,
does that change
propagate to the local
port OSD as well?
Yes, at the rack Dominion KX functions just like a traditional KVM
switch – allowing you to control up to 64 servers using a single
keyboard, mouse, and monitor.
No. The Dominion KX local port has a completely independent access
path to the servers. This means a user can access servers locally at the
rack – without compromising the number of users that access the rack
remotely at the same time.
Yes. Dominion KX offers both PS/2 and USB keyboard and mouse
ports on the local rack. Note that the USB ports are USB v1.1, and
support keyboards and mice only – not USB devices such as scanners
or printers.
Yes. Dominion KX’s local access port displays an on-screen display
interface that presents a list of all servers connected to the Dominion
KX unit. Users interact with this convenient on-screen display interface
to select a connected server.
Dominion KX offers the very best local port authentication scheme
available on the market: users attempting to use the local port must pass
the same level of authentication as those accessing remotely. This
means that:
If you have configured Dominion KX to interact with an external
RADIUS, LDAP, or Active Directory server, users attempting to access
the local port will authenticate against the same server.
If the external authentication servers are unavailable, Dominion KX
fails-over to its own internal authentication database.
Dominion KX has its own standalone authentication, enabling instant
on out-of-the-box installation.
Yes. The local port presentation is identical and completely in sync
with remote access clients, as well as Raritan’s optional CC-SG
management appliance. To be clear, if you change the name of a server
via the Dominion KX on-screen display, this updates all remote clients
and external management servers in real-time.
Yes, if you change the name of a server remotely, or via Raritan’s
optional CC-SG management appliance, this update immediately
affects Dominion KX’s on-screen display.
Page 100

90 DOMINION KX USER GUIDE
Power Control
QUESTION ANSWER
What type of power
control capabilities does
Dominion KX offer?
Does Dominion KX
support servers with
multiple power supplies?
What if each power
supply is connected to a
different power strip?
Does remote power
control require any
special server
configuration?
What type of power
strips does Dominion
KX support?
Because Dominion KX enables you to remotely manage servers; it also
incorporates the critical functionality of hard power control to servers.
Instead of using a third-party tool for power control (likely with lower
security and fail-safe capabilities as Dominion KX), you can use
Dominion KX’s fully integrated remote power control.
When remotely connected to an appropriately configured Dominion
KX, simply select the power control options to hard reboot a hung
server. Note that a hard reboot provides the physical equivalent of
unplugging the server from the AC power line, and re-inserting the
plug.
Yes. Dominion KX can be easily configured to support multiple power
supplies connected to multiple power strips. Up to eight (8) powerstrips
can be connected to a KX device. Four power supplies can be
connected per target server to multiple power strips.
Some servers ship with default BIOS settings such that the server does
not restart after losing and regaining power. See your server user
manual for more details.
Dominion KX can support any serially controlled power strips supplied
by any vendor, by using our Serial (RS-232) computer interface
module.
However, to take advantage of Dominion KX’s integrated power
control user interface, and more importantly, integrated security, you
must use Raritan’s power strips (“remote power control units”). These
power strips come in many outlet, connector, and amp variations –
simply order any Raritan power strip whose part number ends in the “-
PK” designation.
 Loading...