

Page 1

Dominion KX G1
User Guide
1.4.8
DKX116 DKX132, DKX216, DKX232, DKX416, DKX432,
DKX464
Copyright © 2008 Raritan, Inc.
DKX-0K-E
February 2008
255-80-6040
Page 2

This document contains proprietary information that is protected by copyright. All rights reserved.
No part of this document may be photocopied, reproduced, or translated into another language
without express prior written consent of Raritan, Inc.
© Copyright 2008 Raritan, Inc., CommandCenter®, Dominion®, Paragon® and the Raritan company
logo are trademarks or registered trademarks of Raritan, Inc. All rights reserved. Java® is a registered
trademark of Sun Microsystems, Inc. Internet Explorer® is a registered trademark of Microsoft
Corporation. Netscape® and Netscape Navigator® are registered trademarks of Netscape
Communication Corporation. All other trademarks or registered trademarks are the property of their
respective holders.
FCC Information
This equipment has been tested and found to comply with the limits for a Class A digital device,
pursuant to Part 15 of the FCC Rules. These limits are designed to provide reasonable protection
against harmful interference in a commercial installation. This equipment generates, uses, and can
radiate radio frequency energy and if not installed and used in accordance with the instructions, may
cause harmful interference to radio communications. Operation of this equipment in a residential
environment may cause harmful interference.
VCCI Information (Japan)
Raritan is not responsible for damage to this product resulting from accident, disaster, misuse, abuse,
non-Raritan modification of the product, or other events outside of Raritan's reasonable control or not
arising under normal operating conditions.
C
U
L
US
1F61
I.T.E .
LISTED
Page 3

Contents
What's New in the User Guide vii
Safety Guidelines 9
Rack Mount Safety Guidelines............................................................................................................9
Chapter 1 Introduction 1
Dominion KX Overview......................................................................................................................2
Product Photos.....................................................................................................................................4
Product Features ..................................................................................................................................5
Hardware...................................................................................................................................5
Software.....................................................................................................................................6
Terminology.........................................................................................................................................6
Important Information.........................................................................................................................7
Default IP Address....................................................................................................................7
Login ..........................................................................................................................................7
Service Pack...............................................................................................................................8
User Guide Scope......................................................................................................................8
Supported Browsers..................................................................................................................8
Supported Paragon CIMs....................................................................................................................9
Supported Keyboard and Mouse Devices..........................................................................................9
Package Contents...............................................................................................................................10
Chapter 2 Installation 11
Configuring Target Servers...............................................................................................................11
Server Video Resolution .........................................................................................................11
Desktop Background...............................................................................................................12
Mouse and Video Settings......................................................................................................12
Configuring Network Firewall Settings ...........................................................................................19
Physical Connections.........................................................................................................................20
1. AC Power Line ....................................................................................................................20
2. Modem Port (optional)........................................................................................................21
3. Network Ports......................................................................................................................21
4. Local Access Console Ports (optional) ...............................................................................21
5. Server Ports..........................................................................................................................22
iii
Page 4

Contents
Initial Configuration ..........................................................................................................................23
Note to CC-SG Users...............................................................................................................23
Assigning an IP Address ........................................................................................................23
Connecting To and Naming Target Servers..........................................................................24
Changing the Default Password ............................................................................................25
Upgrading Device Firmware..................................................................................................26
Updating User Passwords......................................................................................................26
Multi-Platform Client and Raritan Remote Client...........................................................................26
Requirements and Installation ...............................................................................................26
Operation.................................................................................................................................52
Administrative Functions.....................................................................................................121
Special Characters in MPC ...................................................................................................144
Chapter 3 Administrative Functions 146
Launching Dominion KX Manager.................................................................................................147
KX Manager Interface......................................................................................................................149
Network Configuration ...................................................................................................................150
Security Settings...............................................................................................................................154
Time and Date ..................................................................................................................................158
Users, Groups, and Access Permissions.........................................................................................158
Note to Raritan Customers Upgrading from Previous Firmware Versions......................158
Note to CC-SG Users.............................................................................................................159
Relationship between Users and Group Entries .................................................................159
Creating or Editing User Groups and Access Permissions ................................................160
Moving Users Between Groups............................................................................................164
Deleting User Groups ...........................................................................................................164
Creating or Editing Users .....................................................................................................165
Deleting Users .......................................................................................................................166
Remote Authentication....................................................................................................................166
Note to Raritan Customers Upgrading from Previous Firmware Versions......................166
Note to CC-SG Users.............................................................................................................167
Supported Protocols..............................................................................................................167
Note on Microsoft Active Directory.....................................................................................167
Note on Remote Login Usernames and Passwords............................................................167
Remote Authentication Implementation.............................................................................168
General Settings for Remote Authentication.......................................................................170
iv
Page 5

Contents
Forced User Logoff ..........................................................................................................................179
Viewing KX Unit Event Log (Status)..............................................................................................179
Restarting the Device.......................................................................................................................180
Device Diagnostic Console in KX Manager ...................................................................................181
Device System Information.............................................................................................................181
Configuration Backup and Restore.................................................................................................182
Performance Settings.......................................................................................................................183
PC Properties....................................................................................................................................184
Power Control (Dominion KX only)...............................................................................................185
Setup Preparation..................................................................................................................185
Power Strip Management................................................................................................................187
Power Supply Management (Dominion KX only).........................................................................188
Power Supply Properties ......................................................................................................189
CC UnManager ................................................................................................................................189
Logging in with CC UnManager..........................................................................................190
Activating CC UnManager...................................................................................................191
Event Management..........................................................................................................................191
SNMP Agent Configuration............................................................................................................193
Chapter 4 Local Console Access 197
Physical Connections.......................................................................................................................198
Simultaneous Users...............................................................................................................199
Security and Authentication.................................................................................................199
Local Factory and Password Reset .................................................................................................200
Selecting Servers ..............................................................................................................................201
Server Display Options.........................................................................................................201
Accessing a Server.................................................................................................................201
Local Console Administration ........................................................................................................202
Accessing the Local Console.................................................................................................202
Renaming Servers..................................................................................................................203
Server Display Options.........................................................................................................204
Setting Administrative User Preferences.............................................................................205
Allowable Characters............................................................................................................206
Changing Network Settings .................................................................................................207
Power Management..............................................................................................................208
Diagnostic Functions.............................................................................................................209
Setting Session Timeout........................................................................................................210
Help Menu.............................................................................................................................212
Power Information................................................................................................................213
Hardware/Firmware Information........................................................................................214
v
Page 6

Contents
Local User Security Settings............................................................................................................215
Disable Auto Screen Clear Option..................................................................................................216
Appendix A Specifications 217
Digital KVM Switches......................................................................................................................217
Computer Interface Modules (CIMs)...................................................................................218
Remote Connection..........................................................................................................................218
Raritan Remote Client (RRC) Applet..............................................................................................218
Dominion KX Manager (Remote Administration Applet)............................................................218
TCP Ports Used................................................................................................................................219
Target Server Connection Distance and Video Resolution ...........................................................220
Supported Video Resolutions .........................................................................................................221
Certified Modems ............................................................................................................................222
Appendix B Novell eDirectory 223
Appendix C FAQs 237
General Questions............................................................................................................................237
Remote Access..................................................................................................................................238
Ethernet and IP Networking...........................................................................................................242
Servers ..............................................................................................................................................245
Installation........................................................................................................................................246
Local Console...................................................................................................................................248
Power Control..................................................................................................................................249
Computer Interface Modules (CIMs)..............................................................................................250
Scalability .........................................................................................................................................251
Security.............................................................................................................................................252
Manageability...................................................................................................................................253
Miscellaneous...................................................................................................................................254
Index 255
vi
Page 7

W
hat's New in the User Guide
The following sections of the user guide have changed or information
has been added to based on enhancements and changes to the equipment
and/or user documentation.
• Red Hat 4/Red Hat 9/SUSE Linux 10.1
• Making Linux Settings Permanent
• Setup Preparation
Please see the release notes for a more detailed explanation of the
changes applied to this version of the user guide.
vii
Page 8

Page 9

Safety Guidelines
To avoid potentially fatal shock hazard and possible damage to Raritan
equipment:
• Do not use a 2-wire power cord in any product configuration.
• Test AC outlets at your computer and monitor for proper polarity
and grounding.
• Use only with grounded outlets at both the computer and monitor.
When using a backup UPS, power the computer, monitor, and
device off the supply.
Rack Mount Safety Guidelines
For Raritan products that require rack mounting, follow these
precautions:
• Operation temperature in a closed rack environment may be greater
than room temperature. Do not exceed the rated maximum ambient
temperature of the devices (see Appendix A: Specifications (see
"Specifications" on page 217) for additional information).
• Ensure sufficient airflow through the rack environment.
• Mount equipment in the rack carefully to avoid uneven mechanical
loading.
• Connect equipment to the supply circuit carefully to avoid
overloading circuits.
• Ground all equipment properly to the branch circuit, especially
supply connections such as power strips (other than direct
connections).
9
Page 10

Page 11

Chapter 1 Introduction
In This Chapter
Dominion KX Overview............................................................................... 2
Product Photos.............................................................................................. 4
Product Features ........................................................................................... 5
Terminology.................................................................................................. 6
Important Information.................................................................................. 7
Supported Paragon CIMs............................................................................. 9
Supported Keyboard and Mouse Devices................................................... 9
Package Contents........................................................................................ 10
1
Page 12

Dominion KX Overview
Dominion KX Overview
The Dominion KX is an enterprise-class, secure, digital KVM switch that
provides BIOS-level access and control of 64 servers from anywhere in
the world via a web browser. At the rack, The Dominion KX provides
BIOS-level control of up to 64 servers and other IT devices from a single
keyboard, monitor, and mouse. The Dominion KX's integrated remote
access capabilities provide the same BIOS-level control of your servers,
from anywhere in the world, via a web browser.
The Dominion KX is easily installed using standard UTP (Cat 5/5e/6)
cabling. Its advanced features include 128-bit encryption, remote power
control, dual Ethernet, LDAP, RADIUS, Active Directory, syslog
integration, and web management. These features enable you to deliver
higher uptime, better productivity, and bulletproof security - at any time
from anywhere.
For larger data centers and enterprises, multiple Dominion KX units
(along with Dominion SX units for remote serial console access and
Dominion KSX for remote/branch office management) can be integrated
into a single logical solution via Raritan's CommandCenter Secure
Gateway (CC-SG).
The Dominion KX series includes KX132 and KX464 models. The
Dominion KX132 offers an economical alternative with the same KX
reliability. The KX464 is a 64-port digital KVM switch that offers a dual
power option for added reliability. In addition, intelligent mouse
synchronization and SNMP management are also available with these
devices.
2
Page 13

Chapter 1: Introduction
Diagram key
UTP (Cat5/5e/6) Server
Cabling
Computer Interface Module
Dominion KX
WinXP
Win2000
Linux/UNIX
Novell
Sun Solaris
External Modem (optional)
Modem Access
Remote Network Access
Local Rack Access
LAN
PSTN
3
Page 14
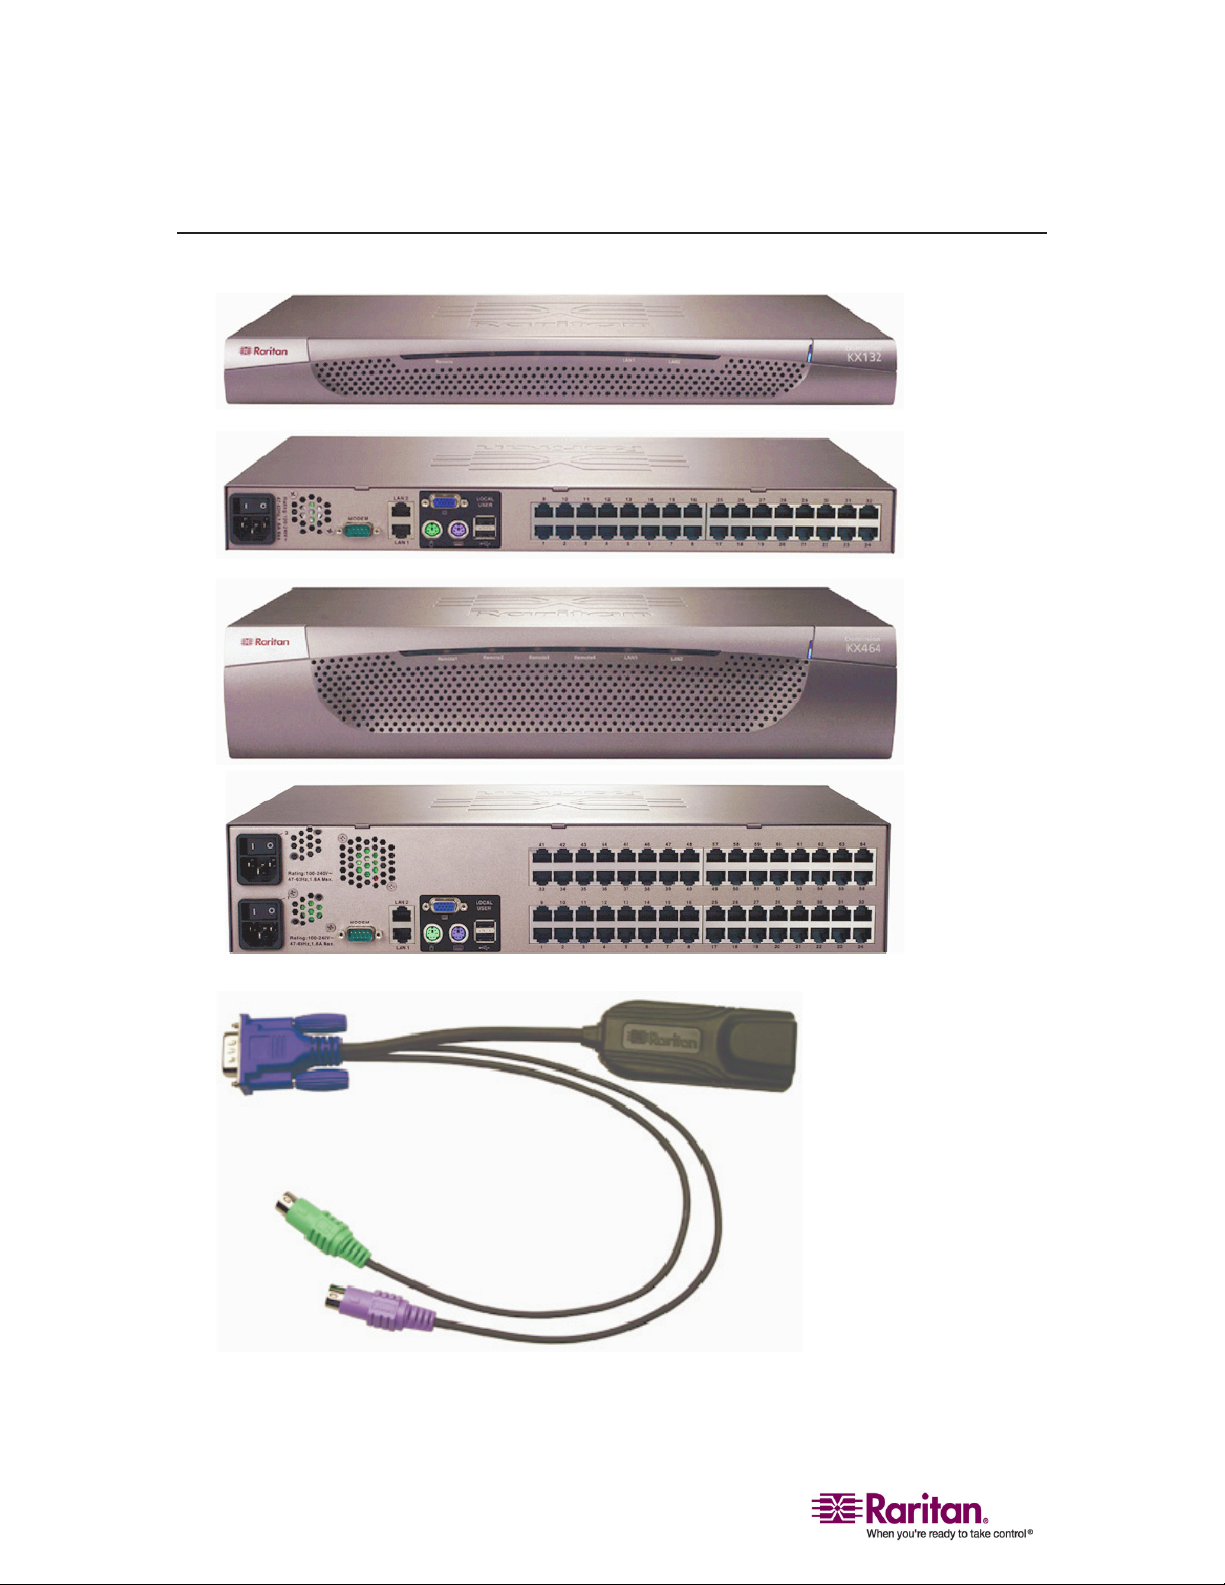
Product Photos
Product Photos
4
Page 15

Chapter 1: Introduction
Product Features
Hardware
• 1U or 2U rack-mountable (brackets included)
• Dual power with failover (with the KX464)
• Dual-failover Ethernet ports
• 16, 32, or 64 (on KX464) server ports
• Multiple user capacity
• UTP (Cat5/5e/6) server cabling
• Dual failover 10/100 LAN
• Modem-ready via external modem port
• FLASH upgradeable
• Auto-switching power supply
• Local user port for rack access
PS/2 and USB keyboard/mouse ports
Fully concurrent with remote users
Onscreen display
• Centralized access security
• Integrated power control
• LED indicators for power, network activity, and remote user status
• Integrated KVM over IP remote access
• Cross-platform server support
5
Page 16

Terminology
Terminology
Software
• Plug and play device
• Web-based access and management
• Intuitive graphical user interface
• Integration with Raritan's CommandCenter Secure Gateway (CC-
SG)
• High-color (15-bit+) palette support
• 128-bit encryption of complete KVM signal, including video
• LDAP, RADIUS, Active Directory, or Internal Authentication
• DHCP or fixed IP addressing
• SNMP management
• Intelligent mouse synchronization
• CC UnManage (via the Dominion KX Manager)
This manual uses the following terms for components of a typical
Dominion KX configuration. Refer to the diagram for clarification, if
needed.
6
Page 17

Chapter 1: Introduction
Diagram key
Target
servers
Servers with graphical video cards and user interfaces (for example.,
Windows, Linux, Solaris, etc.) to be accessed remotely via the Dominion
KX.
Remote PC A networked computer used to access and control target devices
Local
access
console
CIM
(Computer
Interface
connected to the Dominion KX.
An optional user console, consisting of a keyboard, mouse, and multi-sync
VGA monitor, that is directly attached to the Dominion KX to control
target servers locally (directly at the rack, not through the network).
Server dongles (Raritan P/N DCIM-xxxx) that connect to each target
server. Available for PS/2, Sun, USB, and Sun USB keyboards and mouse
ports.
Modules)
Important Information
Default IP Address
Dominion KX default IP address
Default IP address 192.168.0.192
Login
Dominion KX defaults
Default login admin
Default password raritan (passwords are case sensitive;
enter the default password using all
lower case)
Default user privileges Administrative
To ensure security, change the default password as soon as possible. For
backup and business continuity purposes, Raritan suggests that
customers create a backup administrator login and keep the password in
a secure location.
7
Page 18

Important Information
Service Pack
Dominion KX users with Microsoft Internet Explorer version 5.01 or
Windows 2000 must upgrade to Service Pack 4 (SP4) or higher.
User Guide Scope
This user guide applies to Dominion KX devices using firmware 1.4.8,
which operates on all Dominion models: DKX116, DKX1342, DKX216,
DKX232, DKX416, DKX432, and DKX64.
To determine the firmware upgrade version on an existing KX device,
choose System Information on the Setup menu in KX Manager or press
the F8 key on your keyboard. To upgrade your firmware, go to the
Support > Firmware Upgrades > Dominion KX page on the Raritan
website (http://www.raritan.com http://www.raritan.com).
Supported Browsers
The Dominion KX supports the following browsers:
• Internet Explorer 6
• Mozilla 1.7
• Safari 2.0 or later (Mac OS 10.4.9 or later)
• Netscape 7.2
• Firefox 1.0 or later
Note: Netscape 8 has an option that allows you to change the rendering
engine. When Firefox is selected as the rendering engine from Netscape,
the Multi-Platform Client (MPC) is used to access targets. When Internet
Explorer is selected as the rendering engine from Netscape, the Raritan
Remote Client (RRC) is used to access targets. See Multi-Platform Client
and Raritan Remote Client (on page 26) for more information on using
RRC and MPC.
8
Page 19

Chapter 1: Introduction
Supported Paragon CIMs
The Dominion KX version 1.4 and higher supports the following CIMs:
• DCIM-PS2 for PS/2 KB/MS
• DCIM-SUN for SUN KB/MS
• DCIM-USBG2 for USB KB/MS (not Sun)
• DCIM-USBG2 for SUN USB KB/MS
• P2CIM-PWR for power strip control
• UUSBPD
• P2CIM-PS2
• P2CIM-SUN
• P2CIM-USB
• P2CIM-SUSB
• UKVMPD
• USKVMPD
Note: There is a small switch on the DCIM-USBG2 that should be set to
the S position for use with SUN Solaris servers.
Supported Keyboard and Mouse Devices
The Dominion KX supports the following on local console devices:
• USB keyboard and USB mouse (two distinct connectors)
• PS/2 keyboard and PS/2 mouse (two distinct connectors)
• PS/2 keyboard with a USB mouse
• USB keyboard with a PS/2 mouse
• Combo USB keyboard/mouse with one USB plug
• USB hubs (up to 3, in any combination)
• PS/2 to USB adapters (in most cases)
• USB to PS/2 adapters (in most cases)
• Keyboards that allow additional USB keyboards, mice, and/or hubs
to be plugged into the keyboard itself (keyboard functions as a hub)
• Various keyboard trays and drawers
9
Page 20

Package Contents
Package Contents
The Dominion KX ships as a fully configured, stand-alone product in a
standard 1U 19" rackmount chassis. Each Dominion KX unit ships with
the following contents:
Amount
included
1 Dominion KX unit
1 Dominion KX printed quick setup guide
1 Raritan user guide CD-ROM
1 Rackmount kit
1 AC power cord
1 Cat5 network cable
1 Cat5 network crossover cable
1 Set of 4 rubber feet (for desktop use)
Item
10
Page 21

Chapter 2 Installation
In This Chapter
Configuring Target Servers........................................................................ 11
Configuring Network Firewall Settings .................................................... 19
Physical Connections.................................................................................. 20
Initial Configuration ................................................................................... 23
Multi-Platform Client and Raritan Remote Client.................................... 26
Configuring Target Servers
Before installing the Dominion KX, you must configure any target
servers that will be accessed via the Dominion KX to ensure optimum
performance. Note that the configuration requirements outlined in this
section apply only to target servers, not to the client workstations
(remote PCs) that are used to access the Dominion KX remotely.
Server Video Resolution
Ensure that each target server's video resolution and refresh rate is
supported by the Dominion KX and that the signal is noninterlaced.
Dominion KX supports the following video resolutions:
Resolutions
640x480 @ 60Hz 800x600 @ 56Hz 1024x768 @ 60Hz
640x480 @ 72Hz 800x600 @ 60Hz 1024x768 @ 70Hz
640x480 @ 75Hz 800x600 @ 72Hz 1024x768 @ 75Hz
640x480 @ 85Hz 800x600 @ 75Hz 1024x768 @ 85Hz
720x400 @ 70Hz 800x600 @ 85Hz 1152x864 @ 60Hz
720x400 @ 85Hz
1152x864 @ 70Hz
1152x864 @ 75Hz
1280x960 @ 60Hz
1280x1024 @ 60Hz
11
Page 22

Configuring Target Servers
Desktop Background
For optimal bandwidth efficiency and video performance, target servers
running graphical user interfaces such as Windows, Linux, X-Windows,
Solaris, and KDE should be configured with desktop backgrounds set to
a predominantly solid, plain, light-colored graphic. The desktop
background need not be completely solid; but desktop backgrounds
featuring photos or complex gradients should be avoided.
Mouse and Video Settings
Mouse Modes
The Dominion KX operates in Standard Mouse mode by default, which
requires that acceleration be disabled. However, depending on your
operating system, you can choose to work in Intelligent Mouse mode. In
either mode, mouse parameters must be set to specific values (described
in this user guide). See Single Mouse Mode/Dual Mouse Mode (on page
99) for more information.
Note: Although Absolute Mouse mode appears on the Mouse menu, it is
disabled at this time.
Note that mouse configurations will vary on different target operating
systems system. Consult your operating system guidelines for further
details.
12
Page 23

Chapter 2: Installation
Windows XP/Windows 2003 Mouse Settings
On target servers running Microsoft Windows XP, disable the Enhanced
Pointer Precision option and set the mouse motion speed exactly to the
middle speed setting.
These parameters are found in Control Panel > Mouse > Pointer Options.
Disable transition effects in Control Panel > Display > Appearance >
Effects.
Note: For target servers running Windows NT, 2000, or XP, you may
wish to create a user name that will be used only for remote connections
through the Dominion KX. This will enable you to keep the target
server's slow mouse pointer motion/acceleration settings exclusive to the
Dominion KX connection only.
Windows XP and 2000 login screens revert to preset mouse parameters
that differ from those suggested for optimal Dominion KX performance.
As a result, mouse synchronization may not be optimal at these screens.
If you are comfortable adjusting the registry on Windows target servers,
you can obtain better Dominion KX mouse synchronization at login
screens by using the Windows registry editor to change the following
settings:
• Default user mouse motion speed = 0
• Mouse threshold 1= 0
• Mouse threshold 2 = 0.
Important: Only the default, Standard mouse mode works with these
operating systems.
Windows 2000/ME Mouse Settings
On target servers running Microsoft Windows 2000/ME, set the mouse
pointer acceleration to None and the mouse motion speed exactly to the
middle speed setting. These parameters are found in Control Panel >
Mouse. Disable transition effects in Control Panel > Display > Effects.
Windows 95/98/NT Mouse Settings
On target servers running Microsoft Windows 95/98/NT, set the mouse
motion speed to the slowest setting in Control Panel > Mouse > Motion.
Disable window, menu, and list animation in Control Panel > Display >
Effects.
13
Page 24

Configuring Target Servers
Linux Mouse Settings
On target servers running Linux graphical interfaces, set the mouse
acceleration to exactly 1 and set the threshold to exactly 1. Enter this
command: xset mouse 1 1.
Ensure that each target server running Linux is using a resolution
supported by the Dominion KX at a standard VESA resolution and
refresh rate. Each Linux target server should also be set so the blanking
times are within +/- 40% of VESA standard values.
To check for these parameters:
1. Go to the Xfree86 Configuration file XF86Config
2. Using a text editor, disable all non-Dominion KX supported
3. Disable the virtual desktop feature, which is not supported by the
4. Check blanking times (+/- 40% of VESA standard).
resolutions.
Dominion KX.
5. Restart the computer.
Note: In many Linux graphical environments, the command <Ctrl+Alt+ +
(plus key)> will change the video resolution, scrolling through all
available resolutions that remain enabled in the XF86Config file.
Red Hat 4/Red Hat 9/SUSE Linux 10.1
On target servers running Linux graphical interfaces, follow these steps
to configure mouse settings:
1. Choose Main Menu > Preferences > Mouse. The Mouse Preferences
dialog appears.
2. Click to select the Motion tab.
3. Within the Speed group, set the Acceleration slider to the exact
center position.
4. Within the Speed group, set the Sensitivity towards low.
5. Within the Drag & Drop group, set the Threshold towards small.
6. Close the Mouse Preferences dialog.
14
Page 25

Chapter 2: Installation
Making Linux Settings Permanent
Note: These steps may vary slightly depending on the specific version of
Linux in use.
¾ To add a prompt:
1. Choose Main Menu > Preferences > More Preferences > Sessions. The
Sessions dialog appears.
2. On the Session Options tab, check the "Prompt on logout" checkbox
and click OK. This option prompts you to save your current session
when you logout.
3. Upon logging out, check the "Save current setup" option.
4. Click OK.
¾ To remove a prompt:
1. Choose Main Menu > Preferences > More Preferences > Sessions. The
Session dialog appears.
2. On the Session Options tab, deselect the "Prompt on logout"
checkbox.
3. Check the "Automatically save changes to the session" checkbox and
click OK. This option automatically saves your current session when
you log out.
Note: Mouse settings are associated with the user account (user name
and password). The mouse settings will be fixed as long as the same user
account is used (even if the user logs out or reboots the machine).
15
Page 26

Configuring Target Servers
Sun Solaris Video and Mouse Settings
Sun Solaris Mouse Settings
On target servers running the Solaris operating system, set the mouse
acceleration value to exactly 1 and the threshold value to exactly 1.
This can be performed from the graphical user interface or with the
following command line: xset mouse a t where a is the acceleration
and t is the threshold.
¾ To configure the mouse settings for Sun Solaris 10.1:
1. Choose the Launcher. The Application Manager > Desktop Controls
dialog appears.
2. Choose Mouse Style Manager. The Style Manager - Mouse dialog
appears.
3. Set the Acceleration slider to 1.0.
4. Set the Threshold slider to 1.0.
5. Click OK.
16
Page 27

Chapter 2: Installation
Sun Solaris Video Settings
All target servers must be configured to one of the display resolutions
supported by the Dominion KX (see Server Video Resolution (on page
11)). The most popular supported resolutions for Sun machines are:
• 1024 x 768 @ 60 Hz
• 1024 x 768 @ 70 Hz
• 1024 x 768 @ 75 Hz
• 1024 x 768 @ 85 Hz
• 1152 x 900 @ 66 Hz
• 1152 x 900 @ 76 Hz
• 1280 x 1024 @ 60 Hz
Further, target servers running the Solaris operating system must output
VGA video (H-and-V sync, not composite sync).
¾ To change your Sun video card output from composite
sync to the non-default VGA output:
1. Issue the Stop+A command to drop to bootprom mode.
2. Next, issue the command setenv output-device
screen:r1024x768x70 to change the output resolution.
3. Issue the “boot” command to reboot the server.
You may also contact your Raritan representative to purchase a video
output adapter. 13W3 Suns with composite sync output require an
APSSUN II Guardian converter for use with the Dominion KX. HD15
Suns with composite sync output require the 1396C converter to convert
from HD15 to 13W3 and an APSSUN II Guardian converter to support
composite sync. HD15 Suns with separate sync output require an
APKMSUN Guardian converter for use with the Dominion KX.
Note: Some of the standard SUN background screens may not center
precisely on certain SUN servers, specifically, those with dark borders.
Use another background or place a light colored icon in the upper left
hand corner.
17
Page 28

Configuring Target Servers
Apple Macintosh Mouse Settings
For target servers running an Apple Macintosh operating system, no
specific mouse setting is required. However, when using the Dominion
KX to access and control your target server, you must set Multi-Platform
Client (MPC) to use Single Cursor mode (see Single Mouse Mode/Dual
Mouse Mode (on page 99) for information on working with Single Cursor
mode).
Single Cursor mode for Apple Macintosh target servers is supported
using MPC. Single button mice are also supported on Mac OS 10.4.x and
later clients when MPC is launched in a browser and as a standalone
application . Hold down the Ctrl key and click with the mouse to
emulate right clicking in MPC.
The standalone version of MPC supports Apple Macintosh modem
connections as well.
Note: See the Raritan Multi-Platform Client and Raritan Remote Client
User Guide, available on Raritan's website in the Support section or on
the Raritan user guides & quick setup guides CD ROM included with
your Dominion KX shipment for details on installing and operating MPC
and RRC.
Note: If both non-MAC and MAC targets are connected, it is strongly
recommended to use a 2-button mouse on a MAC target to avoid
confusion when switching between MAC and non-MAC targets.
IBM AIX Mouse Settings
For target servers running the IBM-AIX UNIX operating system, follow
these steps to make mouse settings permanent:
1. Go to Style Manager.
2. In Style Manager dialog, choose the Mouse option.
3. In the Mouse dialog, use the sliders to set the Acceleration setting to
1.0 and the Threshold to 1.0.
4. Click OK.
18
Page 29

Chapter 2: Installation
Configuring Network Firewall Settings
If you wish to access the Dominion KX through a network firewall, your
firewall must allow communication on TCP Port 5000. The Dominion KX
can also be configured to use a different TCP port of your designation
(see Network Configuration (on page 150) for additional information).
Optional: Take advantage of the Dominion KX's web-access capabilities.
To do this, the firewall must also allow inbound communication on TCP
Port 443 - the standard TCP port for HTTPS communication.
To take advantage of the Dominion KX's automatic redirection of HTTP
requests to HTTPS (for example, so users may type the more common
http:// instead of https://), the firewall must also allow inbound
communication on TCP Port 80 - the standard TCP port for HTTP
communication.
Note: Depending on hardware status, firewall ports may require
different settings. Refer to the table:
Port Old device New device
5000 UDP Can be used for
Will be used for discovery
discovery
5002 UDP Can be used for
Not supported
discovery
5000 TCP Can be used for
connecting to the
Will be used for connecting
to the device
device
5001 TCP Can be used for
Not supported
connecting to the
device
19
Page 30

Physical Connections
Physical Connections
The numbers in the diagram correspond to the topics in this section of
the user guide that describe the connection.
1. AC Power Line
Attach the included AC power cord to the Dominion KX and plug it into
an AC power outlet.
If you are installing a KX464 and want dual power failover protection,
attach the second included AC power cord and plug it into a different
power source.
20
Page 31

Chapter 2: Installation
2. Modem Port (optional)
The Dominion KX features a dedicated modem port for remote access
even when the LAN/WAN is unavailable. Using a straight-through serial
(RS-232) cable, connect an external serial modem to the port labeled
MODEM on the back of the Dominion KX (see Specifications (on page
217) for a list of certified modems and Administrative Functions (on
page 146) for additional information on modem functions).
Use both network ports only if you want to use one as a failover port;
using both ports is not mandatory. As with failover power supply, plug
the second serial cable into a different switch than the first cable.
Note: Raritan recommends configuring the modem by enabling the CD
(carrier detect) setting.
3. Network Ports
The Dominion KX provides two Ethernet ports for failover purposes (not
for load-balancing). By default, only LAN1 is active and automatic
failover is disabled. In the event that the Dominion KX internal network
interface or the network switch to which it is connected becomes
unavailable, the port labeled LAN2 will become enabled and will use the
same IP address.
Connect a standard Ethernet cable (included) from the network port
labeled LAN1 to an Ethernet switch, hub, or router. To make use of the
Dominion KX's Ethernet failover capabilities, you must also connect a
standard Ethernet cable from the network port labeled LAN2 to an
Ethernet switch, hub, or router and then Enable Automatic Failover on
the Network Configuration page in KX Manager.
4. Local Access Console Ports (optional)
For convenient access to target servers while at the rack, use the
Dominion KX's Local Access Console ports. Attach a multisync VGA
monitor, mouse, and keyboard to the ports labeled Local User using
either a PS/2 keyboard and mouse, or a USB keyboard and mouse.
The USB keyboard and mouse ports are to be used only for keyboard
and mouse access. Other USB devices such as external drives, scanners,
etc. should not be connected to these ports.
21
Page 32

Physical Connections
5. Server Ports
The Dominion KX uses standard UTP cabling (Cat5/5e/6) to connect to
each target server. See Appendix A: Specifications (see "Specifications"
on page 217) for additional information.
To connect a target server to the Dominion KX, use the appropriate
Computer Interface Module (CIM):
• DCIM-PS2
• DCIM-SUN
• DCIM-USB
• DCIM-SUSB
• PS/2 keyboard/mouse
• Sun keyboard/mouse
• USB keyboard/mouse
• USB keyboard/mouse for Sun Microsystems servers
Attach the HD15 video connector of your CIM to the video card of your
target server. Ensure that your target server's video has already been
configured to a supported resolution and refresh rate. For Sun servers,
also ensure that your target server's video card has been set to output
standard VGA (H-and-V sync) and not composite sync.
Attach the keyboard/mouse connector of your CIM to the corresponding
ports of your target server. Then, using a standard straight-through UTP
(Cat5/5e/6) cable, connect the CIM to an empty server port on the back of
your Dominion KX unit.
Note: Other CIMs supported by DKX version 1.3 and higher include:
P2CIM-PS2, P2CIM-SUN, P2CIM-USB, P2CIM-SUSB, UKVMPD,
USKVMPD, UUSBPD, and P2CIM-PWR (for power strip control).
When using a DCIM-SUSB, follow these steps to change keyboard layout
code:
1. Open a Text Editor dialog on the Sun workstation.
2. Ensure that the NUM LOCK key is active and press the left Ctrl key
and the DEL key on your Keypad. The Caps Lock LED starts to
blink, which indicates that the CIM is in Layout Code Change mode.
22
3. The text window displays the following: Raritan Computer, Inc.
Current keyboard layout code = 22h (US5 Unix).
4. Type the layout code desired (for example, 31 for Japanese
keyboard).
Page 33

Chapter 2: Installation
5. Press Enter.
6. Shut down the unit and power ON once again so that the DCIM-
SUSB performs a reset (power cycle).
7. Use MPC or C/MPC to switch in again and press keys to verify all
character is correct.
Initial Configuration
IMPORTANT: In some environments, the default 10/100 Mb
autonegotiation does not properly set the network parameters, leading
to network issues. For an example, visit
http://www.cisco.com/warp/public/473/3.html.
In these cases, setting the Dominion KX to 100 Mbps/Full Duplex (or
whatever is appropriate to your network) addresses the issue.
To set this parameter, on the Network Settings page, select
Autonegotiate and set the values appropriate to your network.
Note to CC-SG Users
If you are using the Dominion KX in a CC-SG configuration, perform the
installation steps as outlined and, when finished, consult the
CommandCenter Secure Gateway User Guide, Administrator Guide, or
Deployment Guide to proceed. These guides can be found on the Raritan
website.
Assigning an IP Address
1. Power on the Dominion KX via the power switch on the back of the
unit. Wait approximately 45 seconds as the Dominion KX boots.
2. After the KX unit boots, the onscreen display (local console) appears
on the monitor attached to the Dominion KX's Local Access Console.
Log in with the default user name/password of admin/raritan and
press Enter.
3. Press the F5 key on your keyboard to activate the Administrative
menu.
4. Choose Option 3, Network Settings, and press Enter.
5. Specify TCP/IP parameters for your Dominion KX unit: IP address,
subnet mask, and default gateway. When finished, press the S key to
save the settings. The Dominion KX unit will automatically reboot.
23
Page 34

Initial Configuration
6. Connect one end of a straight-through Ethernet cable (included) to
the port labeled LAN1 on the rear panel of the Dominion KX, and
connect the other end to a network switch or router. Your Dominion
KX unit is now network accessible.
Note: If two Dominion KX units are assigned the same IP address, an IP
conflict results. A Raritan Remote Console attempting to connect to one
of the units may get a “Bad Parameter” message. This is because the RRC
discovers devices and maintains a list of discovered devices using the IP
address of the device as the key. The device ID is also stored with the
key. If another KX is discovered with the same IP address, the RRC will
not know there an IP conflict. When the RRC starts communicating with
the second device, it uses the device ID from the first device. As a result,
the second device issues the Bad Parameter message.
Connecting To and Naming Target Servers
Connect one end of a standard, straight-through UTP cable (Cat5/5e/6) to
an unoccupied server port and connect the other end to the RJ45 port on
a Dominion KX Computer Interface Module (CIM): DCIM-PS2 (PS/2
ports), DCIM-USBG2 (USB ports and Sun servers), or DCIM-SUN (Sun
ports with HD15 video).
Note: There is a small switch on the DCIM-USBG2 that should be set to
the S position for use with Sun Solaris servers.
1. Connect the remaining ports on the CIM to the corresponding KVM
ports of the server that you wish to manage using the Dominion KX.
Continue connecting to all servers that you wish to manage using the
Dominion KX.
2. On the local access console, log in with the default user
name/password of admin/raritan.
3. Press the F5 key to activate the Administrative menu and choose
Option 5, Channel Configuration.
4. Choose a server port to rename and press the Enter key. When the
cursor changes to a green color, assign a name (up to 20 characters,
alphanumeric, no symbols allowed) to identify the server connected
to that port.
5. Press Enter to complete the change.
6. Press Esc to exit the menu.
24
Page 35

Chapter 2: Installation
Changing the Default Password
1. Find and log in to any workstation with (a) network connectivity to
your Dominion KX unit, and (b) Java Runtime Environment v1.4.2_2
or higher installed (Java Runtime Environment is available at
http://java.sun.com/).
2. Launch a web browser such as Internet Explorer or Mozilla.
3. If you are using Internet Explorer (IE) type the following URL:
http://IP-ADDRESS/admin, where IP-ADDRESS is the IP address that
you assigned to your Dominion KX unit.
4. The Dominion KX remote management tool, Dominion KX Manager,
will launch. Log in with the default username and password
(admin/raritan).
5. In the User Navigation tree in the left panel of the page, select the
Admin User icon.
6. Right-click on the Admin User icon and choose Edit User from the
shortcut menu.
7. Type a new password in the Password field. Retype the password in
the Confirm Password field. Passwords consist of twenty (20)
English alphanumeric characters and the following symbols:
!"#$%&'()*+,-./:;<=>?@[\]^_`{|}~.
8. Click OK to save User properties.
The Default Password can also be changed from Raritan Multi-Platform
Client and Raritan Remote Client (MPC and RRC). See Changing a
Password (on page 127)in the Multi-Platform Client and Raritan
Remote Client (on page 26) section of this guide.
25
Page 36

Multi-Platform Client and Raritan Remote Client
Upgrading Device Firmware
You will upgrade the Dominion KX's firmware using MPC or RRC. See
Upgrading Device Firmware (on page 126) in the Multi-Platform Client
and Raritan Remote Client (on page 26) section of this guide for more
information.
Note: When you upgrade a device, the device goes into a Maintenance
mode. All sessions are disconnected and the device can execute only
certain required software components. This allows the system to be in a
clean, well understood state so that firmware update operations can
occur reliably.
Updating User Passwords
After upgrading your firmware (see Upgrading Device Firmware (on
page 126)), the Change Password dialog automatically appears. Fill in
new password information. You are also able to manually change a
user's password at any time. See Changing a Password (on page 127).
Multi-Platform Client and Raritan Remote Client
Requirements and Installation
MPC Requirements and Installation Instructions
Note to CC-SG Users
If you are using Dominion KX II in a CC-SG configuration, do not use
the CC-SG proxy mode if you are also planning to use the MultiPlatform Client (MPC).
MPC Minimum System Requirements
The minimum system requirements for the Multi-Platform Client are:
• CPU Speed: 1.0 GHz
• RAM: 512 Mbytes
Note: Running the client software on system configurations below either
of these specifications may impact performance and result in errors.
26
Page 37

Chapter 2: Installation
MPC Supported Browsers
MPC supports the following browsers:
• Internet Explorer 6 and 7
• Firefox® 1.5 and 2.0
• Mozilla® 1.7
• Safari 2.0
Raritan Multi-Platform Client (MPC) Supported Operating Systems
When launched as a web applet or as a standalone application, MPC
allows you to reach target servers via different Raritan Dominion devices
and IP Reach models.
Raritan MPC is compatible with the following platforms:
• Windows XP
• Windows 2000 SP4
• Windows Vista
• Red Hat Linux® 9.0
• Red Hat Enterprise Workstation 3.0 and 4.0
• SUSE Linux Professional 9.2 and 10
• Fedora Core 5 and above
• Mac®
• Solaris™
Launching MPC from a Web Browser
Important: Regardless of the browser you use, you must allow pop-ups
from the Dominion device's IP address in order to open MPC.
1. To open MPC from a client running any supported browser (see
"MPC Supported Browsers" on page 27), type http://IP-
ADDRESS/mpc into the address line, where IP-ADDRESS is the IP
address of your Raritan device. MPC will open in a new window.
This window will not contain a menu bar, toolbar, scroll bar, or
address bar. Work in this window and toggle to other open windows
using the Alt+Tab command.
Note: The Alt+Tab command will toggle between windows only on
the local system.
When MPC opens, the Raritan devices that were automatically
detected and which are found on your subnet are displayed in the
Navigator in tree format.
27
Page 38

Multi-Platform Client and Raritan Remote Client
2. If your device is not listed by name in the navigator, add it manually:
a. Choose Connection > New Profile. The Add Connection window
opens.
b. In the Add Connection window, type a device Description,
specify a Connection Type, add the device IP Address, and click
OK. These specifications can be edited later.
3. In the Navigator panel on the left of the page, double-click on the
icon that corresponds to your Raritan device to connect to it.
Note: Depending on your browser and browser security settings, you
may see various security and certificate check and warning messages. It
is necessary to accept the options in order to open MPC.
28
Page 39

Chapter 2: Installation
Installing and Opening Standalone MPC
Raritan recommends that you open only one standalone MPC session at
a time. Opening more than one standalone MPC session on the same
client at the same time may cause performance problems and system
errors.
Note: Note that the installer file names and the install directories/folder
paths that are documented in the device user guides may differ slightly
from what is outlined in this guide.
Important: MPC modem connectivity is supported on Windows,
Linux, and Sun Solaris but not Macintosh. When working in
Windows, use Standalone MPC.
You must have the MPC JAR file to install MPC for any of these
operating systems.
1. Download the installation file, MPC-installer.jar from the Raritan
website on the Support - Firmware Upgrades page
(http://www.raritan.com/support/firmwareupgrades). Click on
Dominion Family and scroll to the Standalone Multi-Platform Client
link.
2. If copying MPC-installer.jar from a known location, double-click on
the file to start installation.
Windows
Checking JRE Version in Windows
1. Do one of the following to check the JRE version in Windows:
Determine your version of the JRE from the Java website:
http://www.java.com/en/download/help/testvm.xml.
Click on the Windows Start button at the bottom left of your
page and click Control Panel.
Tip: In the upper left corner of the page, you may see a panel named
Control Panel with the option Switch to Classic View or Switch to
Category View. For easier viewing, opt for Classic View.
a. Search the Control Panel files for a Java icon. When you locate
the Java icon, double-click on it to open the Java Control panel.
Click on the General tab and then click on the About button to
check the current Java Runtime Environment (JRE).
29
Page 40

Multi-Platform Client and Raritan Remote Client
b. If the JRE is version 1.4.2_05 or later, proceed with the MPC
Installation. If the Java icon does not exist in the Control Panel or
if the JRE version is prior to 1.4.2_05, go to the Sun Microsystems
website at http://java.sun.com/products/ to download the latest
version of JRE.
2. For future Java access and to automatically open it, set your path to
the Java executable.
a. Right-click on the My Computer icon on your desktop and click
Properties.
b. Click on the Advanced tab and then click "Environment
variables".
c. Edit the Path address so that it contains the path to the Java
executable.
For example, if Java is installed on C:\j2re1.4.2_05 and your path
is currently set to C:\WINDOWS\SYSTEM32, then change the
path to read C:\WINDOWS\SYSTEM32;C:\j2re1.4.2_05
Installing MPC for Windows
1. Download the MPC-installer.jar installation file or copy the file from
a known location. See Installing and Launching Standalone MPC
(see "Installing and Opening Standalone MPC" on page 29) for
information on locating the MPC-installer.jar file.
2. Double-click on the jar file icon to open the installation dialog.
30
Page 41

Chapter 2: Installation
3. After the initial dialog appears, click Next.
4. Choose the directory where you want to install MPC and click Next.
Click Browse to locate a non-default directory.
5. Click Next.
31
Page 42

Multi-Platform Client and Raritan Remote Client
6. In the Shortcut dialog, choose a shortcut location, determine who
should have the shortcut, and determine whether you want the
shortcut on the desktop. When finished, click Next.
Once the installation is complete, the final dialog indicates where
you will find an uninstaller program and provides an option for
generating an automatic installation script. Click Done to close the
Installation dialog.
Opening MPC in Windows
1. Click on the Windows Start menu and then choose All Programs >
Raritan Multi-Platform Client. Alternatively, double-click the MPC
desktop shortcut icon if you created one.
2. Double-click on the desired device in the Navigator to establish a
connection.
3. Type your Username and Password in the device dialog and then
click OK to log in.
32
Page 43

Chapter 2: Installation
Linux
Java Runtime Environment (JRE) Requirements
for MPC
Raritan recommends using Java® Runtime Environment (JRE) version
1.5 for optimum performance but MPC will function with JRE version
1.4.2_05 or greater (with the exception of JRE 1.5.0_02). JRE 1.6 is also
supported but has not been fully tested.
Determine your version of the JRE from the Java website:
http://www.java.com/en/download/help/testvm.xml.
You may need some configuration depending on your OS and browser.
Configuration instructions are provided with the JRE download.
Note: Modem use is not supported with Raritan's Dominion KX101.
Important: When launching MPC from a browser, it is highly
recommended that you disable the Java Applet caching.
Although no actual problems have occurred when Java caching is turned
on, some non-impacting Java exceptions have occurred. Generation of
these Java-exceptions can appear in the Java Applet Console window
and may degrade performance.
For Linux/UNIX environments, the Java Control Panel is located in the
JRE's bin directory; the location varies based on where JRE was installed
by your Linux/UNIX administrator.
Tip: It is also recommended that you clear the Java cache.
¾ To disable Java caching and clear the cache (use these
steps with Microsoft Windows XP and JRE 1.5.0):
1. From the Start menu, click Control Panel.
33
Page 44

Multi-Platform Client and Raritan Remote Client
2. Double-click on the Java icon to launch it. The Java Control Panel
dialog appears.
34
3. To disable Java caching:
Page 45

Chapter 2: Installation
a. From the General tab, click the Settings button. The Temporary
Files Settings dialog appears.
b. Click the View Applets button. The Java Applet Cache Viewer
opens.
c. Deselect the Enable Caching checkbox if it is already checked.
d. Click OK.
4. To clear the Java cache:
a. From the Temporary Files Settings dialog, click the Delete Files
button. The Delete Temporary Files dialog appears.
35
Page 46

Multi-Platform Client and Raritan Remote Client
b. Select the temporary files that you want to delete.
c. Click OK.
Checking JRE Version in Linux
1. In a graphical environment, open a terminal window.
2. Type java version in the command line and press Enter on your
keyboard. The currently-installed version of Java Runtime
Environment (JRE) is displayed.
If your path variable is not set to where the java binaries have been
installed, you may not be able to see the JRE version.
3. Set your path:
a. To set your path and assuming JRE 1.4.2_05 is installed in
/usr/local/java: you must set your PATH variable.
b. To set the path for bash shell, export
PATH=$PATH:/usr/local/java/j2re1.4.2_05/bin.
c. To set the path for tcsh or csh, set PATH = ($PATH
/usr/local/java/j2re1.4.2_05/bin).
These commands can be typed at the terminal each time you login.
Alternatively, you can add it to your .bashrc for bash shell, .cshrc for
csh, or tcsh so that each time you login the PATH is already set.
36
Page 47

Chapter 2: Installation
Refer to your shell documentation if you encounter problems.
4. If the JRE is version 1.4.2_05 or higher, proceed with the MPC
installation. If the version is prior to 1.4.2_05, go to the Java website
at http://java.sun.com/products/ to download the latest Runtime
Environment.
Installing MPC for Linux
You must have Administrative privileges to install MPC.
1. Download the MPC-installer.jar file or copy it from a known
location.
2. Open a terminal window and open the directory where the installer
is saved.
3. Type java -jar MPC-installer.jar and press Enter to run the installer.
37
Page 48

Multi-Platform Client and Raritan Remote Client
4. After the initial page loads, click Next.
5. Use the Browse function to select a directory to install MPC if the
directory is different from the default path displayed in the "Select
the installation path" field.
6. Click Next to open the Shortcut dialog.
7. On the Shortcut dialog:
Choose a shortcut location from the "Select a Program Group for
the Shortcuts:" field.
Select either "current user" or "all users" to define who should
have access to the shortcut.
Check the "Create shortcut on the desktop" checkbox if you want
the shortcut to appear on the desktop.
38
Page 49

Chapter 2: Installation
8. When finished, click Next.
Note: Once MPC is installed successfully, a shortcut will be available
on the desktop. However, for Linux users, you will need to log out of
and then back into your session before the shortcut will be visible on
the desktop.
Once the installation is complete, the final page indicates where you
will find an uninstaller program and provides you with the option to
generate an automatic installation script.
39
Page 50

Multi-Platform Client and Raritan Remote Client
9. Click Done to close the Installation dialog.
Opening MPC in Linux
1. Open a terminal window and change directories to the directory
where you installed MPC (default location: /usr/local/Raritan/Raritan
MPC/4.40.1.7/).
2. Type ./start.sh and press Enter to open MPC.
3. Double-click on the desired device to establish a connection, type
your Username and Password, and click OK to log in.
Solaris
Checking JRE Version on Sun Solaris
1. Launch a terminal window on the Sun Solaris desktop.
2. Type java version in the command line and press Enter. The
currently-installed version of Java Runtime Environment (JRE)
appears.
If your path variable is not set to where the java binaries have been
installed, you may not be able to see the JRE version.
a. To set your path and assuming JRE 1.4.2_05 is installed in
/usr/local/java, you must set your PATH variable.
b. To set path for bash shell, export
PATH=$PATH:/usr/local/java/j2re1.4.2_05/bin.
40
c. To set path for tcsh or csh, set PATH = ($PATH
/usr/local/java/j2re1.4.2_05/bin).
Page 51

Chapter 2: Installation
3. These commands can be typed at the terminal each time you login.
Alternatively, you can add it to your .bashrc for bash shell, .cshrc for
csh, or tcsh so that each time you login the PATH is already set.
Refer to your shell documentation if you encounter problems.
4. If the JRE is version 1.4.2_05 or higher, proceed with the MPC
installation. If the version is prior to 1.4.2_05, go to the Sun website
at http://java.sun.com/products/ to download the latest Runtime
Environment.
Installing MPC for Sun Solaris
You must have administrative privileges to install MPC.
1. Download the MPC-installer.jar file or copy it from a known
location.
2. Open a terminal window and navigate to the directory where the
installer is saved.
3. Type java -jar MPC-installer.jar and press Enter to run the installer.
41
Page 52

Multi-Platform Client and Raritan Remote Client
4. After the initial page loads, click Next.
5. Use the Browse function to navigate to the directory you want to
install MPC or select the default directory displayed in the "Select the
installation path" field.
6. Click Next.
7. When installation is complete, click Next.
8. Click Next again.
Once the installation is complete, the final dialog will indicate where
you will find an uninstaller program and provides the option to
generate an automatic installation script.
42
Page 53

Chapter 2: Installation
9. Click Done to close the Installation window.
Opening MPC on Sun Solaris
1. Open a terminal window and navigate to the directory where you
installed MPC (the default location is /usr/local/Raritan/Raritan
MPC/4.40.1.7).
2. Type ./start.sh and press Enter to open MPC.
3. Double-click on the desired device to establish a connection, type
your user name and password, and click OK to log in.
Macintosh
Checking JRE Version in Mac OSX
1. Launch a terminal window on the Macintosh desktop.
43
Page 54

Multi-Platform Client and Raritan Remote Client
2. Type the java version in the command line and press Enter. The
currently-installed version of the Java Runtime Environment (JRE) is
displayed.
3. If the JRE is version 1.4.2_05 or higher, proceed with the MPC
installation. If the version is prior to 1.4.2_05, go to the Apple website
to download the latest Runtime Environment.
Installing MPC for Mac OSX
You must have administrative privileges to install MPC.
1. Download the MPC-installer.jar file or copy it from a known
location.
2. Open a Finder window and locate the installer.
3. Double click on the MPC-installer.jar file to run the installer.
44
Page 55

Chapter 2: Installation
4. After the initial page opens, click Next.
5. Use the Browse function to select a directory to install MPC if the
directory is different from the default path displayed in the "Select
the installation path" field.
6. When installation is complete, click Next.
Once the installation is complete, the final dialog indicates where
you will find an uninstaller program and provides you with the
option to generate an automatic installation script.
45
Page 56

Multi-Platform Client and Raritan Remote Client
7. Click Done to close the Installation window.
Opening MPC in Mac OSX
1. Open a Finder window and navigate to the directory where you
installed MPC (the default location is /Applications/Raritan/Raritan
MPC/4.40.1.7).
46
2. Double-click on the desired device to establish a connection, type
your user name and password, and click OK to log in.
Page 57

Chapter 2: Installation
RRC Requirements and Installation Instructions
Important: RRC works only with Microsoft Internet Explorer. If you
are using a different web browser, MPC will load automatically.
Most users access RRC via Internet Explorer, while other users,
particularly those operating over a modem connection, access RRC
standalone. Both options are detailed in this guide.
Note: Modem use is not supported with Raritan's Dominion KX101.
RRC Minimum System Requirements
The minimum system requirements for the Raritan Remote Client are:
• CPU Speed: 1.0 GHz
• RAM: 512 Mbytes
Note: Running the client software on system configurations below either
of these specifications may impact performance and result in errors.
47
Page 58

Multi-Platform Client and Raritan Remote Client
Opening RRC from a Web Browser
Your IP-Reach and Dominion units feature web browser-access
capabilities and can provide a connection from any Windows-based,
remote PC running Microsoft Internet Explorer 6.0/7.0.
Security Settings
To access IP-Reach or a Dominion device via the web, your web browser
must be configured appropriately on the Internet Explorer security
settings tab. Specifically:
• "Download Signed ActiveX controls" should be set to either Enable
or Prompt.
• "Run ActiveX controls and plug-ins" should be set to either Enable or
Prompt.
Consult your Microsoft Internet Explorer documentation for additional
information.
Note: Microsoft Windows 2000, Microsoft Windows XP, and Microsoft
Windows 2003 restrict certain types of users from downloading and
running ActiveX controls and plug-ins regardless of the settings in
Internet Explorer. Consult your Microsoft Windows documentation for
more information.
Opening RRC
1. Ensure that your browser security settings are configured
appropriately and type the IP address assigned to your IP-Reach or
Dominion unit in the URL field of your web browser. See the Initial
Configuration section in the device user guide for additional
information on configuring IP addresses.
Note: IP-Reach and Dominion units ship with the default IP address
of 192.168.0.192. Note that an IP address must be used. Host names
are not currently supported.
48
Page 59

Chapter 2: Installation
You will be redirected to an HTTPS (128-bit) secure webpage so you
can open RRC.
2. Depending on your browser and its security configuration, you may
see any or all of the following dialogs asking you to confirm you
want to access and open an externally-provided application. Click
Yes to accept these prompts.
49
Page 60

Multi-Platform Client and Raritan Remote Client
Removing RRC from the Browser Cache
• To remove RRC from your browser cache for any reason, follow the
standard procedure for your web browser software.
¾ To remove cached files in Internet Explorer v6.0:
1. If you have used RRC recently, exit all instances of Internet Explorer
and restart Internet Explorer.
2. On the Internet Explorer Tools menu, choose Internet Options.
3. When the Internet Options dialog appears, click on the General
Settings tab and then click Delete Files.
4. Click on the Settings tab and then click View Objects.
5. Internet Explorer will display a list of cached objects. Select any
entries named “TeleControl Class,” “Raritan Console,” or “Power
Board” and delete them.
50
Page 61

Chapter 2: Installation
Installing and Opening Standalone RRC
Note: This step is optional. IP-Reach or Dominion can be accessed from a
remote PC either by installing RRC software or by opening RRC via a
web browser. Accessing IP-Reach or Dominion via a web browser does
not require any software installation on a remote PC.
This section lists the steps required to invoke RRC using standalone
software, which may be useful for accessing IP-Reach or Dominion via
modem or if you wish to close firewall access to ports 80 and/or 443.
1. Launch your web browser and go to Raritan's website
(http://www.raritan.com/).
2. Click Support in the top navigation bar and then click Firmware
Upgrades in the left navigation panel (or type the URL
http://www.raritan.com/support/firmwareupgrades).
3. Scroll down the page until you see the appropriate product name
and click on it.
4. Locate the version of the standalone RRC client you are using. The
entry for the standalone RRC client is a .zip file which contains the
release notes and the installer for standalone RRC. Check the release
notes for the latest information.
5. Download the .zip file or simply click on the .zip file entry.
6. Double-click on the installer executable in the .zip file and follow the
instructions in the InstallShield Wizard to complete the RRC
installation. Be sure to check the release notes for the latest
information and any release specific instructions.
Depending upon the configuration of your PC, the RRC installation
program may also automatically install DirectX and Microsoft
Foundation Class libraries (if they are required). If they are installed,
you will be asked to restart your PC after the installation.
7. A Raritan Remote Client icon will appear on your desktop after the
installation is complete. Click on this icon to open the standalone
RRC application.
The standalone application can be uninstalled using the Add or
Remove Programs function in the Windows Control Panel.
Note: You must uninstall the application before installing a new version
of standalone RRC.
51
Page 62

Multi-Platform Client and Raritan Remote Client
Modem Connectivity in MPC
¾ To make modem connectivity available on Unix, Linux,
and Mac OS for non-root users:
1. As the root, change the group for /etc/ppp directory and required
files:
a. chgrp uucp /etc/ppp
b. chgrp uucp /etc/ppp/pap-secrets
c. chgrp uucp /etc/ppp/peers
2. Change the permissions for /etc/ppp chmod g+rwx /etc/ppp
3. Change the permissions for /etc/ppp/pap-secrets chmod g+rwx
/etc/ppp/pap-secrets
4. Change the permissions for /etc/ppp/peers chmod g+rwx
/etc/ppp/peers
5. Set the suid bit to pppd chmod u+s /usr/sbin/pppd (/usr/bin/pppd
depending on the location of pppd)
6. Assign users to the uucp group:
a. /usr/sbin/usermod -G {existing groups for user1},uucp user1
b. /usr/sbin/usermod -G {existing groups for user2},uucp user2, etc.
7. When logged in as the normal user, update the path for access to
pppd and the chat export PATH=$PATH:/usr/sbin (/usr/bin
depending on the location of pppd).
Note: For both root and non-root users, ensure that the options file exists
under /etc/ppp
Operation
Note: Unless otherwise indicated, the contents of this section are the
same in MPC and RRC.
52
Page 63

Chapter 2: Installation
Connection Profiles
Connection profiles store important information about your Raritan
device such as the IP address, custom TCP ports, preferred compression
settings, and custom security keys. A profile is required to access devices
outside your subnet and to access devices using a dial-up connection.
Through profiles, you can set up personalized connections. These
profiles are not shared among other users.
Tip: If your Raritan device is configured to use a custom TCP port or a
group security key, first create a connection profile so that you can access
the device.
Connection profiles are created, modified, deleted, established, and
closed in the same way for both MPC and RRC.
Creating Profiles
¾ To create a profile:
1. There are two ways to create a profile:
For automatically discovered devices, right-click on the device
name in the Navigator and choose Add Profile from the shortcut
menu.
For other devices, choose Connection > New Profile.
The Add Connection dialog appears. Options are organized into
three tabs.
2. On the Connect tab, type a meaningful description of the device in
the Description field (up to 32 alphanumeric, special characters (see
"Special Characters in MPC" on page 144) characters are allowed).
This description identifies the Raritan device in the Navigator.
3. From the Product drop-down, choose the Raritan product you are
using.
4. Select the Connection Type from the drop-down to specify the type
of connection.
Note: Only TCP/IP is available for Generation 2 (G2) Raritan devices.
a. If TCP/IP Connection is selected for a LAN/WAN connection,
complete the information in the Find Raritan device By section:
Type the IP Address assigned to your Raritan device.
53
Page 64

Multi-Platform Client and Raritan Remote Client
Type the name assigned to your Raritan device during initial
setup.
Type the Domain Name Server (DNS) name. Use this option if
you use a DNS server to resolve a DNS name to the IP Address
assigned to your Raritan device.
Note: You cannot use this option for Raritan Generation 2 (G2)
devices.
54
a. Select Dial Up Connection from the Connection Type drop-down
for a direct analog modem connection to the Raritan device.
Type the parameters that MPC or RRC should use to establish a
connection. Dial up connection does not apply to Generation 2
(G2) or KX101.
Enter the phone number for the dial-up connection. Remember to
include any additional codes that should be dialed to establish a
connection, such as country codes, area codes, or outside line
access codes.
Select the modem (as configured in Windows) from the drop-
down list that will be used to dial and connect to your Raritan
device.
Page 65

Chapter 2: Installation
Note: For security reasons, you must use the MPC standalone client
if you require modem access. Further, one modem on a client PC can
be used for only one device connection.
• Check Use Default Port Number to use the default port number
(5000). For TCP Ports, Dominion KX and IP-Reach are automatically
configured to use TCP Port 5000 when communicating with
MPC/RRC. If you do not want to use the default port number,
uncheck the checkbox and type the port number in the Port Number
field.
1. Update the Compression tab (not available for Generation 2 (G2)
Raritan devices):
a. Select the Connection Speed from the drop-down. IP Reach and
Dominion can automatically detect available bandwidth and not
limit bandwidth use, but you can also adjust this usage
according to bandwidth limitations. Depending on the Raritan
device in use, different options may be available.
55
Page 66

Multi-Platform Client and Raritan Remote Client
b
y
• Auto Detect
• 100mb Ethernet
• 10mb Ethernet
• 1.5mb (Max DSL/T1)
• 1mb (Fast DSL/T1)
• 512 kb (Medium DSL/T1)
• 384 kb (Slow DSL/T1)
• 256 kb (Cable)
• 128 kb (Dual ISDN)
• 56 kb (ISP Modem)
• 33 kb (Fast Modem)
• 24 kb (Slow Modem)
a. Select the Color Depth from the drop-down. IP-Reach and
Dominion can dynamically adapt the color depth transmitted to
remote users in order to maximize usability in all bandwidth
constraints. Depending on the Raritan device in use, different
options may be available.
• Auto Select Color
• 15-bit RGB Color
• 12-bit RGB Color
• 8-bit RGB Color
• 5-bit Color
• 4-bit Color
• 4-bit Gray
• 3-bit Gray
• 2-
it Gra
• Black and White
Important: For most administrative tasks (server monitoring,
reconfiguring, etc.), administrators do not require the full 24-bit or
32-bit color spectrum made available by most video graphics cards.
Attempting to transmit such high color depths wastes network
bandwidth.
a. Select Progressive Update to increase the usability in constrained
bandwidth environments. When Progressive Update is enabled,
IP-Reach or Dominion initially sends an image of the remote
desktop at lower color depths, and then provides higher color
depth images as bandwidth allows.
56
Page 67

Chapter 2: Installation
Note: When Color Depth is set to Auto Select Color (default),
Progressive Update is automatic. IP-Reach or Dominion will
enable/disable Progressive Update as required, disabling it for fast
connections and enabling it for slow connections.
b. When using IP-Reach or Dominion over an unpredictable public
WAN (particularly in international scenarios), checking the
Internet Flow Control checkbox ensures that packets transmitted
by IP-Reach or Dominion are received and reconstructed by
MPC/RRC in the correct order.
c. Use the slider to select the desired level of video Smoothing (15-
bit mode only). The level determines how aggressively to blend
page regions with small color variation into a single smooth
color. Smoothing improves the appearance of the target video by
reducing the video noise that is displayed.
d. Select "Frames per second". This setting instructs MPC on how
often to redraw the video display of the target. This only affects
the client display behavior and has no bearing on the data rate of
the video being sent to the client. Setting this option higher
makes the video appear smoother but also requires more
processing power.
Note: "Frames per second" option is only available in MPC.
57
Page 68

Multi-Platform Client and Raritan Remote Client
1. Update the Security tab.
Note that the Security tab is disabled for Generation 2 Raritan
devices. If your Dominion or IP-Reach unit is configured to use a
private security key, input that key to gain the authorization
required to initiate a connection to that IP-Reach or Dominion unit.
a. Type the private security key in the Private Key field.
b. Retype the private security key in the Confirm Private Key field
to ensure no typographical errors were made.
58
Page 69

Chapter 2: Installation
2. Click OK to create the connection profile.
Modifying Profiles
¾ To modify a profile in MPC or RRC:
1. Select the device in the Navigator panel and right-click on it.
59
Page 70

Multi-Platform Client and Raritan Remote Client
2. Choose Modify Profile. The Modify Connection dialog appears.
3. Update the fields as appropriate.
4. Click OK.
Deleting Profiles
¾ To delete a profile in MPC or RRC:
1. Select the device with a profile in the Navigator and right-click on it.
2. Choose Delete Profile.
3. When prompted to confirm the deletion, click Yes to delete the
profile for this device or click No to return to the application without
deleting.
60
Page 71

Chapter 2: Installation
Establishing a New Connection
Note: Depending on your version of the JRE, you might receive a
certificate message when using the standalone application to access a
Dominion device. You have to accept the certificate in order to establish
the connection.
To connect to a device, double-click the device's icon in the Navigator,
then type your user name and password to connect. You can also rightclick on the device name in the Navigator and select New Connection.
Note: The default IP-Reach or Dominion login user name is admin and
the default password is raritan. You have administrative privileges using
these login credentials.
Passwords are case sensitive and must be entered in the exact case
combination in which they were created. To ensure security, change the
default user name password as soon as possible.
If you do not see an icon for your IP-Reach or Dominion device in the
Navigator, follow the instructions in the Creating Profiles section (see
"Creating Profiles" on page 53) to create a new connection profile.
If you are having problems connecting to a device, be sure to check the
following:
• Username: Raritan usernames are not case-sensitive.
• Password: Raritan passwords are case-sensitive.
• TCP Port: If you have configured your device to use a non-default
TCP Port, this information must be entered into its connection
profile.
• Firewall Settings: If you are accessing a device through a firewall,
that firewall must be configured to allow two-way communication
on TCP Port 5000 (or the custom TCP Port to which your device has
been configured).
• Security Key: If you have configured your device to require a group
security key, that key must be entered into the device's connection
profile.
Note: If you are running MPC on Internet Explorer with both a Microsoft
firewall and a non-Microsoft firewall utility installed, IE will display a
message telling you that MPC is already running (even if it is not in fact
running). To avoid this, deactivate one of your firewalls, or use a
browser such as Mozilla or Firefox.
61
Page 72

Multi-Platform Client and Raritan Remote Client
Closing a Remote Connection
1. To close the IP-Reach or Dominion connection, select the device in
the Navigator and right-click on it.
2. Choose Disconnect from the shortcut menu.
3. To exit MPC or RRC completely, click Exit on the Connection menu.
MPC Connection Information
Note: RRC can support only one modem connection at one time.
¾ To obtain information about your MPC connection:
• Choose Connection > Connection Info. The Connection Info dialog
appears.
62
The following information is displayed about the current connection:
Connection
Description
information
Device Name The name of your Dominion or IP-Reach
device.
IP Address The IP Address of your Dominion or IP-Reach
device.
Port The KVM Communication TCP/IP Port used to
access the target device.
Data In/Second Data rate in.
Data Out/Second Data rate out.
Page 73

Chapter 2: Installation
Connection
Description
information
FPS The frames per second transmitted for video.
Connect Time The duration of the connect time.
Horizontal
The page resolution horizontally.
Resolution
Vertical Resolution The page resolution vertically.
Refresh Rate How often the page is refreshed.
Protocol Version The RFB Protocol version.
¾ To copy this information:
• Click Copy to Clipboard in the Connection Info dialog. The
information is now available to be pasted into the program of your
choice.
Connect to a Remote KVM Console
Once you establish a connection with a Raritan IP-Reach or Dominion
device, that unit's icon in the navigator expands to display all ports
enabled for remote access.
63
Page 74

Multi-Platform Client and Raritan Remote Client
Choose one of the following options to establish a remote KVM console
connection:
• Double-click on the KVM port you want to control. This method
closes any previous connection before connecting to the new port.
• Right-click on the port and choose Switch from the shortcut menu.
This method closes any previous connection before connecting to the
new port.
• Right-click on the port and choose New Connection from the
shortcut menu. This method allows you to connect to the selected
port without closing any previous connections and create a new
connection if the device supports multiple concurrent connections.
Once connected, Raritan KVM over IP devices display real-time video
output of the target server (this video is compressed and encrypted
according to the configuration settings specified by the administrator).
You now have complete, low-level control of the KVM console as if you
were physically located next to the server.
• To close a connection, right-click on the connected device and click
Disconnect.
• To exit completely, on Connection > Exit.
64
Page 75

Chapter 2: Installation
Window Layout
MPC Interface
MPC functions are grouped into six general sections on the page. As a
standalone product or using a web browser, the MPC window contains
these main sections.
65
Page 76

Multi-Platform Client and Raritan Remote Client
RRC Interface
The RRC window is almost identical to the MPC window.
66
Page 77

Chapter 2: Installation
Navigator
The navigator provides a tree view of every known Raritan device. From
this panel, you can access all Raritan networked devices for which a
connection profile exists and/or all Raritan devices automatically
identified on the network.
Note: Automatic Raritan device identification uses the UDP protocol and
will typically identify all Raritan devices on your subnet. Network
administrators rarely allow UDP broadcasts to function outside of a
subnet. Automatic Raritan device identification will find only those
Raritan devices that are configured to use the default TCP Port (5000) or
another broadcast port, which is defined on the Advanced tab of the
Options dialog (choose Tools > Options to access the Options dialog in
MPC and RRC).
67
Page 78

Multi-Platform Client and Raritan Remote Client
Devices
In MPC, devices are named according to the Manager Name field on the
Manager's Network Configuration page. Dominion devices are named
according to the Device Name field on the Dominion Console Network
Settings page.
In RRC, profiled devices are listed in the Navigator according to the data
in the Description field of the device's profile. Automatically-identified
devices will be identified according to the name assigned to them in that
device's network configuration setting.
Device Ports
For each device to which you are connected, you are able to expand the
tree associated with it to see each device port to which you have access.
Ports with a green icon indicate that you are connected to that port. The
port that is bolded in the Navigator indicates that it is the port currently
displayed (active) in the remote desktop area of the application.
If no name is assigned to a port, by default it is listed as 'Unnamed' in the
Navigator. So, if you create a port and do not provide a name for it or if
you delete an existing port's name, it will be use 'Unnamed' when you
reconnect to the device.
If all device ports to which you are connecting are already occupied, an
alert message appears and you must wait until one of the ports is
available in order to connect.
68
Page 79

Chapter 2: Installation
Navigator Icons
Each device in the Navigator is assigned two icons. One icon represents
the device's connection profile and the other icon represents its network
status. A connection profile is generally created by a user in order to
store personalized information about specific devices (see Creating
Profiles (on page 53) for additional information). The connection status
indicates the current status of the device.
Device Connection Profile Icons (Left Icon)
Icon Description
device.
Modem Profile - A modem connection profile exists for
Profiled - A network connection profile exists for this
this device.
Not Profiled - The device was found on the network
Device Network Status Icons (Right Icon)
but a connection profile does not exist for it.
Icon Description
Connected (green) - You are currently authenticated
and connected to this device.
Available (black) - This device is currently available on
the network but you are not currently connected to it.
Unavailable - A profile exists for this device but it is
not currently available on the network. (Note that all
devices to which you are not currently connected and
that have modem profiles will use this icon.)
Port Connection Status Icons
For each server port listed in the Navigator, the following icons can be
associated with it depending on its status:
Icon Description
Connected
Available for connection.
Unavailable (either no device is connected or access is
blocked).
69
Page 80

Multi-Platform Client and Raritan Remote Client
Icon Description
on permissions).
Customizing the Navigator
In use by another user (may be unavailable depending
Navigator Customization
Use specific tools in the toolbar to customize some Navigator attributes:
Icon Description
Display/Hide Navigator. You can also select Navigator
in the View menu to toggle between displaying and
hiding the Navigator.
Refresh Navigator. Updates the device status
information displayed in the Navigator.
Browse Discovered Devices. When enabled, Show
Discovered Devices will display devices that are “not
profiled” but have been found on the network. This
option can also be enabled by choosing View > Show >
Discovered Devices.
Note: The Browse Discovered Devices option is the
only method of connecting to a Raritan device
configured to use a DHCP IP address.
MPC Navigator Tabs
MPC tabs at the base of its Navigator pane. These tabs allow you to
change how you display devices.
Click the View By Name tab to sort the list alphabetically by name or
click the View By IP tab to sort the list numerically by IP address.
Note that these tabs are available only in the MPC interface.
70
Page 81

Chapter 2: Installation
Display and Sorting Options
To better organize your view of all ports, use the Show and Sort options
in the View menu. Note that you do not need an open connection to a
target to show and sort targets in the Navigation panel.
Showing Ports
• Discovered Devices: Shows or hides discovered devices from the
Navigator view. You will not see broadcast messages when this
option is disabled (not selected).
• Unassigned Channels: Shows or hides channels with no assigned
targets. Note that the default for Generation 1 (G1) devices is to
show unassigned channels (option is enabled), whereas the default is
to hide unassigned channels (option is disabled) for Generation 2
(G2) devices.
• Tools: Shows or hides the Admin and Diagnostic ports.
71
Page 82

Multi-Platform Client and Raritan Remote Client
Note: These settings are saved from session to session.
Sorting Ports
Use the Sort options on the View menu to organize port information.
You are able to sort ports by channel number, channel name, or channel
status.
Channel Number: When sorted by channel (View > Sort > Channel),
ports are listed numerically.
72
Page 83

Chapter 2: Installation
Name: When sorted by name (View > Sort > Name), port names are
sorted alphanumerically within each group.
Status: When sorted by status (View > Sort > Status), ports are sorted in
the following order:
• Active Channels
• Busy Channels
• Available Devices
• Unavailable Devices
73
Page 84

Multi-Platform Client and Raritan Remote Client
Toolbars
Standard Toolbar
The Standard toolbar provides one-click access to the most frequentlyused commands.
¾ To display the Standard toolbar:
• Choose View > Standard Toolbar.
Following is a list of the buttons in the standard toolbar as well as a
description of the action performed once the buttons are selected.
Additionally, if there are menu options or shortcut menu options that
will perform the same task, they are listed, too.
Button
Button
Name
New Profile
Connection
Properties
Video Settings
Description
Creates a new Navigator entry for a
Raritan device.
Same result as choosing Connection > New
Profile in the menu.
Opens the Modify Connection Properties
dialog from which you can manually
adjust bandwidth options (such as
connection speed, color depth, and so
forth).
Same as choosing Connection > Properties
or choosing Connection Properties on the
shortcut menu, which is opened by
pressing Ctrl+Left Alt+M.
Opens the Video Settings dialog, allowing
you to manually adjust video conversion
parameters.
Same as choosing Video > Video Settings
or choosing Video Settings on the shortcut
menu, which is opened by pressing
Ctrl+Left Alt+M.
74
Adjusts color settings to reduce excess
Color
Calibration
color noise.
Same as choosing Video > Color Calibrate.
Page 85

Chapter 2: Installation
Button
Button
Name
Synchronize
Mouse
Refresh
Screen
Auto-sense
Video Settings
Enter OnScreen Menu
Description
In dual-mouse mode, forces realignment of
the target server mouse pointer with the
mouse pointer.
Same as choosing Mouse > Synchronize
Mouse or choosing Synchronize Mouse on
the shortcut menu, which is opened by
pressing Ctrl+Left Alt+M.
Forces a refresh of the video screen.
Same as choosing Video > Refresh Screen
or choosing Refresh Screen on the shortcut
menu, which is opened by pressing
Ctrl+Left Alt+M.
Forces a refresh of the video settings
(resolution, refresh rate).
Same as choosing Video > Auto-sense
Video Settings.
Not applicable for IP-Reach or Dominion.
Used by the application with other Raritan
products.
Same as choosing Keyboard > Enter OnScreen Menu.
Not applicable for IP-Reach or Dominion.
Used by the application with other Raritan
Exit OnScreen Menu
products.
Alternatively, select Esc on the keyboard.
Same as choosing Keyboard > Exit OnScreen Menu.
Sends a Ctrl+Alt+Del hot key combination
Send
Ctrl+Alt+Del
to the target server.
Same as choosing Keyboard > Send
Ctrl+Alt+Del.
75
Page 86

Multi-Platform Client and Raritan Remote Client
Button
Button
Name
Single Cursor
Mode
Full Screen
Mode
Scaling
Description
Starts Single Cursor mode in which the
local mouse pointer no longer appears
onscreen.
Same as choosing Mouse > Single Cursor
Mode. Press Ctrl+Alt+X to exit this mode.
Alternatively, choose Single/Double
Cursor from the shortcut menu, which is
opened by pressing Ctrl+Left Alt+M.
Maximizes the screen real estate to view
the target server desktop.
Same as choosing View > Target Screen
Resolution (in MPC) or Full Screen (in
RRC). Alternatively, press Ctrl+Left Alt+M
to open the shortcut menu and then
choose Full/Normal Screen or press the F
key on your keyboard.
Increases or reduces the target video size
so you can view the entire contents of the
target server window without using the
scroll bar.
Toggles the Navigator panel between
Show/Hide
Navigator
visible and hidden.
Same as choosing View > Navigator.
Refresh
Navigator
Forces a refresh of the data displayed in
the Navigator.
Toggles between displaying and not
displaying Raritan devices in the
Navigator that are automatically identified
on the network and that do not have
preconfigured profiles associated with
Show/Hide
Browse All
Devices
them.
Displays the application version
About
information.
Same as choosing Help in the menu bar.
76
Page 87

Chapter 2: Installation
Connected Server(s) Toolbar
The Connected Server(s) toolbar is comprised of a button for each
connected target server port, thus enabling quick access to connected
targets. When you connect to a port, a button corresponding to that port
is added to the toolbar and labeled with the name of the port.
Conversely, when you disconnect from a port, the corresponding button
is removed from the toolbar. When a Raritan device is disconnected, all
of the buttons corresponding to the ports of that device are removed
from the toolbar.
Note: The Connected Server(s) Toolbar does not appear in Single Mouse
mode.
By default, the Connected Server(s) toolbar is enabled (visible). To
disable it, deselect Connected Server(s) Toolbar in the View menu.
Buttons corresponding to windows that do not support full screen mode
are not shown in the toolbar. For example, serial ports, generation one
(G1) admin ports, and G1 diagnostic ports will not be displayed in the
toolbar in full screen mode.
While in full screen mode, you are able to view the Connected Server(s)
toolbar by hovering your mouse over the top of the screen. To use this
feature, the Connected Servers Toolbar option must be selected in the
View menu.
¾ To display the Connected Server(s) toolbar (when not
already visible):
• Choose View > Connected Server(s) Toolbar.
¾ To view the window for a target server:
• Click the button that corresponds to the appropriate connected
target server you want to view. The window for the corresponding
target server is displayed and the button for the selected port is
highlighted. In full screen mode, note that this action is window
swapping, not video switching.
Note: When you click a button that is already highlighted, the
corresponding window is minimized. If you click that button again, the
window is brought forward and maximized.
77
Page 88

Multi-Platform Client and Raritan Remote Client
Status Bar
The status bar displays session information about your connection to a
Raritan IP-Reach or Dominion device. This information includes:
Diagra
m key
Session
information
Video sensing
status/path
indicator
Bandwidth
usage indicator
Security
indicator
Description
Indicates when video sensing occurs
during connections to target KVM server
ports.
Indicates how much of your total
available bandwidth is currently being
used. The connection speed setting
determines total available bandwidth.
This setting is defined on the
Compression tab of the Connection
Properties dialog, which is accessed by
choosing Connection > Properties, or
pressing Ctrl+Left Alt+ M and then
choosing Connection Properties.
Indicates whether the current remote
connection is protected by encryption.
Encryption requirements are set during
IP-Reach or Dominion configuration of
your Raritan KVM over IP device.
78
When a Raritan IP-Reach or Dominion
device is configured for no encryption or
SSL authentication, the Security Indicator
is represented on the status bar by an
open lock icon.
When SSL authentication, data
encryption, or SSL encryption is applied,
the security indicator is represented on
the status bar by a closed lock.
Page 89

Chapter 2: Installation
Diagra
m key
Session
information
Concurrent
connections
indicator
Description
Indicates that multiple remote users are
currently connected to the same IP-Reach
or Dominion target server on the device.
One icon indicates a single user is
connected and two icons indicates two or
more users are connected.
Concurrent connection ability can be set
globally under PC share mode on the
Manager Security Settings page or set per
individual user in the Concurrent Access
Mode setting on the KX Manager User
Account Settings page. For Dominion KX
II, concurrent connection ability can be set
using the PC Share Mode option in the
Dominion KX II Security Settings page:
PC-Share permits concurrent access and
Private limits server access to one user at
a time.
Lock key
indicators
Indicates the status of the current target
KVM Server, in respect to the activation
of the Caps-Lock, Num-Lock, and ScrollLock keys. If these keys are enabled on
the target server being viewed, this
affirmative status will be reflected on the
status bar.
Note: If a light is used on your keyboard to indicate the Scroll Lock, Num
Lock, and Caps Lock key is active, it may or may not be in sync with the
lock key indicator status displayed on the RRC status bar. Refer to the
status bar as your guide if this occurs.
Screen Modes
Besides a standard view, MPC and RRC provide a full screen view and a
scaling option. These options increase the remote desktop area and make
viewing the target video easier.
This option it is called Full Screen mode in RRC and Target Screen
Resolution mode in RRC. In both applications, you can click the Full
Screen button
Ctrl+Left Alt+M+F hot key combination to enable it.
on the toolbar to activate Full Screen mode or use the
79
Page 90

Multi-Platform Client and Raritan Remote Client
MPC Target Screen Resolution Mode
Target Screen Resolution mode provides you with the ability to view the
target server desktop in full screen mode, which removes all toolbars
from view.
Activate Target Screen Resolution mode once you are connected to a
target by doing one of the following:
• Click the Full Screen icon
in the toolbar and then click OK in the
confirmation message that appears.
• Choose View > Target Screen Resolution and then click OK in the
confirmation message that appears.
• Press Ctrl+Left Alt+M to open the shortcut menu. Next, press the F
key on your keyboard or use your mouse to choose Full/Normal
Screen. Click OK in the confirmation message that appears.
80
Page 91

Chapter 2: Installation
To exit full screen mode, use the shortcut menu or click the Close icon
that appears at the top right of the page when you hover your mouse
along the top of the screen.
While in Target Screen Resolution mode, you are able to view the
Connect Server toolbar by hovering your mouse over the top of the
screen. To use this feature, the Connected Servers Toolbar option must
be selected in the View menu.
Additionally, while in Target Screen mode, your monitor's resolution
may be adjusted to match the resolution of the target server (provided
your graphics system supports it). If your graphics system does not
support the resolution of the target system, you will be unable to activate
full screen mode and a message will appear requesting that you change
your video resolutions first.
Tip: To view the video resolutions your system supports in a Windows
environment, access your computer's Control Panel from the Windows
Start menu, double-click on Display, and click on the Settings tab.
Note: The Ctrl+Left Alt+M key combination does not work for certain
target servers if you are running JRE 1.5.0_01. To return from full page
mode, use Alt+Tab and choose MPC.
81
Page 92

Multi-Platform Client and Raritan Remote Client
RRC Full Screen Mode
Full screen mode removes the surrounding RRC graphical interface and
your local desktop area, filling your screen with the video from the
target server. Your screen's resolution will be adjusted to match the
resolution of the target server (provided your graphics system supports
it). If your graphics system does not support the resolution of the target
system, you will be unable to activate full screen mode and a message
will appear requesting that you change your video resolutions first.
Note: To view the video resolutions your system supports in a Windows
environment, access your computer's Control Panel from the Windows
Start menu, double-click on Display, and click on the Settings tab.
Activate full screen mode in one of the following ways once you are
connected to a target:
• Click the Full Screen icon
in the toolbar and then click OK in the
confirmation message that appears.
• Choose View > Full Screen and then click OK in the confirmation
message that appears.
• Press Ctrl+Left Alt+M to open the shortcut menu. Next, press the F
key on your keyboard or use your mouse to choose Full/Normal
Screen. Click OK in the confirmation message that appears.
82
Page 93

Chapter 2: Installation
Scaling
Scaling your target window size allows you to view the entire contents
of the target server window. This feature increases or reduces the size of
the target video to fit the window size and maintains the aspect ratio.
This allows you to see the entire target server desktop while in standard
view.
To activate Scale Video mode, do one of the following:
• Choose View > Scale Video.
83
Page 94

Multi-Platform Client and Raritan Remote Client
• Click the Scaling button on the toolbar.
To exit this mode and return the target window to its previous size,
deselect Scale Video on the View menu or click the Scaling button once
again.
Note: Enabling Scale Video will scale the complete target video image to
fit the remote desktop area as it grows or shrinks. You can combine this
setting with target screen resolution for a full page affect on targets with
a higher resolution than your desktop.
84
Page 95

Chapter 2: Installation
RRC Scaling (Shared)
Scaling your target window size allows you to view the entire contents
of the target server window. This feature increases or reduces the size of
the target video to fit the window size and maintains the aspect ratio.
This allows you to see the entire target server desktop while in standard
view.
To activate Scale Video mode, do one of the following:
• Choose View > Scale.
• Click the Scaling button
on the toolbar.
To exit this mode and return the target window to its previous size,
choose Scale on the View menu or click the Scaling button once again.
Note: Enabling Scale Video will scale the complete target video image to
fit the remote desktop area as it grows or shrinks. You can combine this
setting with target screen resolution for a full page affect on targets with
a higher resolution than your desktop.
85
Page 96

Multi-Platform Client and Raritan Remote Client
Auto-Scroll
The auto-scroll feature automatically scrolls the video display in the
direction of the cursor as the cursor approaches the edge of the display.
A thin border appears around the perimeter of the remote desktop area
to indicate the function is on. When enabled, if you see scroll bars and
then move the cursor onto the border, the page will automatically scroll
in the appropriate direction.
The scroll border is activated by selecting Show Scroll Borders in the
Options dialog, which is accessed by choosing Tools > Options.
86
Page 97

Chapter 2: Installation
Shortcut Menu
To access the shortcut menu, use either the default keyboard
combination of Ctrl+Left Alt+M or the keyboard combination you assign.
See Changing the Shortcut Menu Keyboard Combination (on page 88) for
more information.
Execute any of the commands on the shortcut menu by either clicking
the command in the menu or using a key combination. If you are using a
key combination to execute a command, you will press Ctrl+Left Alt+M
and then press the key on your keyboard that corresponds to the
underlined letter in the shortcut menu. For example, press Ctrl+Left
Alt+M+F to enter full screen mode. See the table below for information
on invoking commands from the shortcut menu using keyboard
combinations.
Note: You must use the Left Alt key on your keyboard when using the
Ctrl+Left+Alt combination.
To Press Ctrl+Left
Alt+M+_
Toggle between Full/Normal screen mode* F
Perform video autosensing** A
Display connection information* I
Display or set connection properties* P
Display or set video settings* V
Refresh the page R
Color calibrate** C
Synchronize mouse Y
Change to/from single/double cursor mode S
Send Ctrl+Alt+Del to the target system D
Send Ctrl+Alt+M to the target system N
Exit a dialog or menu without altering the
Esc
keyboard state
87
Page 98

Multi-Platform Client and Raritan Remote Client
* If Full Screen mode is active, executing this command will
automatically end Full Screen mode.
** If Full Screen mode is active, executing this command will
automatically end Full Screen mode only in RRC.
TIP: If at some point you forget the keyboard combination used to open
the shortcut menu, press Ctrl+Left Alt at the same time. The keyboard
combination will be displayed across the bottom of the page for five
seconds.
88
Changing the Shortcut Menu Keyboard Combination
¾ To change the keyboard combination that opens the
shortcut menu used in MPC, do the following:
1. Choose Tools > Options to open the Options dialog.
2. From the Keyboard Shortcut Menu HotKey drop-down, select the
keyboard combination you want to use to open the shortcut menu.
3. Click OK or Apply.
Page 99

Chapter 2: Installation
Once a new keyboard combination is assigned, the new combination will
be displayed in the shortcut menu and the onscreen message that
displays when the combination is used.
89
Page 100

Multi-Platform Client and Raritan Remote Client
Keyboard Macros
A hot key combination is a set of keystrokes that performs an action
when pressed. For example, the hot key combination Ctrl+Alt+0 might be
created to minimize all windows.
A keyboard macro is a shortcut that sends a hot key combination to a
target server. Using keyboard macros ensures that hot key combinations
intended to be used on the target server are sent to and interpreted only
by the target server, and not by the computer on which MPC or RRC is
running.
Raritan strongly suggests the use of keyboard macros instead of hot key
combinations since certain hot key combinations have been found not to
work properly, depending on the platform and behavioral difference
between the application and web browser version. Specifically, using hot
keys can result in your own client PC intercepting the command and
performing the action instead of sending the command to the target
server as intended.
Building a Keyboard Macro
¾ To build a macro:
1. On the Keyboard menu, click Keyboard Macros.
2. When the Keyboard Macros dialog appears, click Add. The Add
Keyboard Macro dialog then appears.
3. Build the keyboard macro by editing the fields in the dialog.
a. Type a name in the Keyboard Macro Name field. This name will
appear in the Keyboard menu after it is created.
b. From the Hot-Key Combination field, select a keyboard
combination from the drop-down list. This allows you to execute
the macro with a predefined keystroke. Optional
c. In the Keys to Press drop-down list, select each key you would
like to use to emulate keystrokes. Select the keys in the order by
which they are to be pressed. After each selection, select Press
Key.
As each key is selected, it will appear in the Keys to Release field.
For example, select the Windows key and the letter D key. When
these keys are selected, the macro will be executed. Add a key
release attribute to the macro if needed (see next step).
90
 Loading...