

Page 1
CC-SG V1 Quick Setup Guide 1
QSG-CCV1-0O-v5.2.0-E 255-80-5110-01-RoHS
CommandCenter Secure
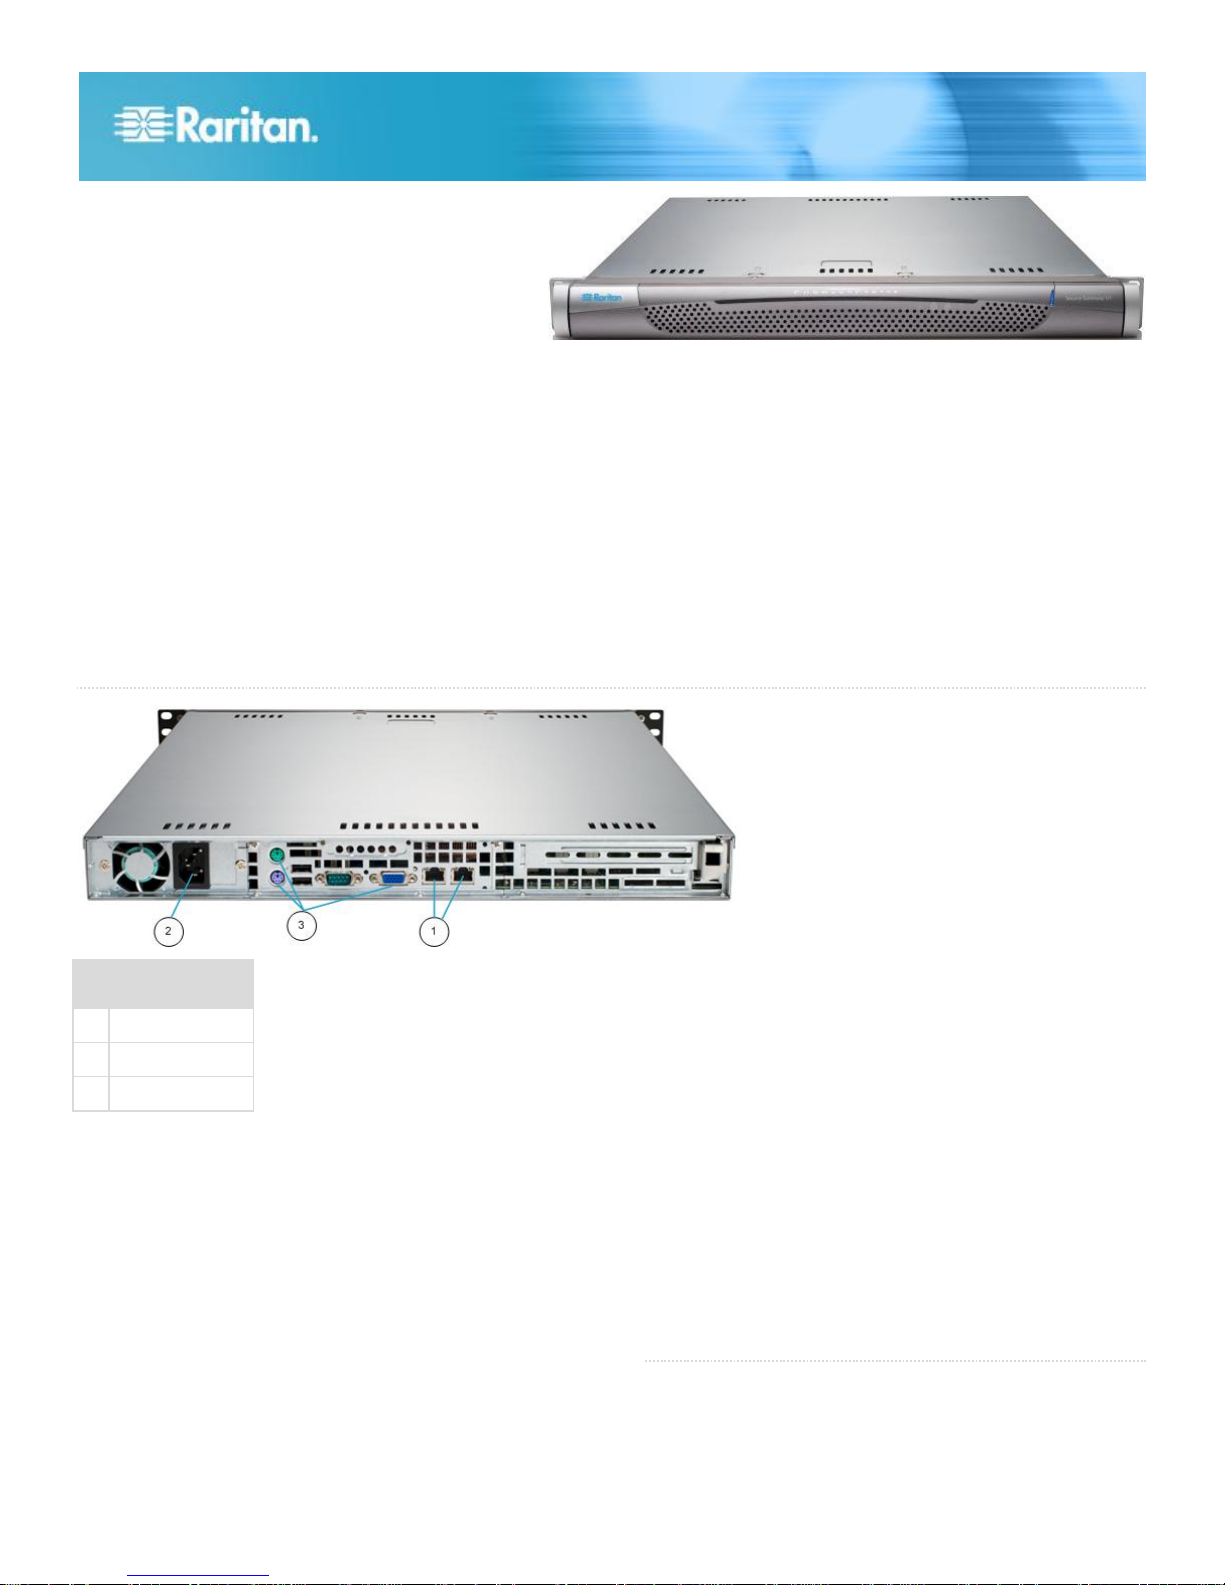
Diagram Key
1
LAN ports
2
Power
3
KVM ports
Gateway V1 Models
Quick Setup Guide
Thank you for your purchase of the CommandCenter Secure Gateway, Raritan's management software platform
engineered to consolidate secure access and control of IT devices. This Quick Setup Guide explains how to install and
configure the CommandCenter Secure Gateway.
For additional information on any aspect of the CommandCenter Secure Gateway, see the accompanying online help
accessed from the CommandCenter Secure Gateway or from the CommandCenter Secure Gateway User Guide, which
can be downloaded from the Firmware and Documentation section of Raritan's website
(http://www.raritan.com/support/firmware-and-documentation/).
I. Unpack CC-SG
With your shipment, you should receive:
(1) CommandCenter Secure Gateway V1 unit
(1) CommandCenter Secure Gateway V1 front bezel
(1) Rack mount kit
(1) Power supply cord
(1) CAT 5 network cable
(1) Printed Quick Setup Guide
(1) Registration and Warranty papers
Determine Rack Location
Decide on a location in the rack for CC-SG, in a clean,
dust-free, well-ventilated area. Avoid areas where heat,
electrical noise, and electromagnetic fields are generated and
place it near a grounded power outlet.
QS Rule
Page 2

CC-SG V1 Quick Setup Guide 2
QSG-CCV1-0O-v5.2.0-E 255-80-5110-01-RoHS
II. Rack-mount CC-SG
Identify Rail Sections
Your rack mount kit contains two rack rail assemblies. Each
assembly consists of two sections: an inner fixed chassis rail
(A) that secures to the unit and an outer fixed rack rail (B) that
secures to the rail brackets. A sliding rail guide sandwiched
between the two should remain attached to the outer fixed
rack rail. The A and B rails must be detached from each other
for installation.
To remove the inner fixed chassis rail (A), pull it out as far as
possible until you hear a clicking sound when a locking tab
emerges from inside the rail assembly and locks the inner rail.
Depress the locking tab to pull the inner rail completely out.
Do this for both rack rail assemblies.
Install the Chassis Rails
1. Position the inner fixed chassis rail sections you just
removed along one side of the chassis; ensure the five
screw holes line up.
2. Screw the rail securely to the side of the chassis.
3. Repeat steps 1 and 2 for the other rail on the other side of
the chassis. Attach rail brackets if installing into a Telco
rack.
Install Rack Rails
1. Determine where you want the CC-SG belongs in the
rack.
2. Position the outer fixed rack rail/sliding rail guide
assemblies at the desired location in the rack, keeping the
sliding rail guide facing the inside of the rack.
3. Screw the assembly securely to the rack using the
brackets provided.
4. Attach the other assembly to the other side of the rack,
making sure that both are at the exact same height and
with the rail guides facing inward. Ideally, two people
should work on this together.
Install CC-SG into the Rack
Once the rails are attached to both the chassis and the rack,
install CC-SG into the rack.
1. Line up the rear of the chassis rails with the front of the
rack rails.
2. Slide the chassis rails into the rack rails, keeping the
pressure even on both sides (you may have to depress
the locking tabs when inserting). When CC-SG has been
pushed completely into the rack, you should hear the
locking tabs click.
Locking Tabs
Both chassis rails have a locking tab that serves two
functions:
To lock CC-SG into place when installed and pushed fully
into the rack (normal operating position).
To lock CC-SG in place when extended from the rack,
preventing the unit from falling out of the rack when pulled
out for servicing.
QS Rule
III. Connect Cables
Once the CC-SG unit is installed into the rack, you can
connect cables. See the diagrams on page 1.
1. Connect the CAT 5 network LAN cable to the LAN 1 port
on the rear panel of the CC-SG unit. It is strongly
recommended to connect a second CAT 5 network LAN
cable to the LAN 2 port. Connect the other end of each
CAT 5 cable to the network.
2. Attach the included AC power cord to the power port on
the rear panel of the CC-SG unit. Plug the other end of the
AC power cord into an AC power outlet.
3. Connect KVM cables to the corresponding ports on the
rear panel of the CC-SG unit.
QS Rule
IV. Log in to Local Console to Set CC-SG IP
Address
1. Power ON CC-SG by pressing the POWER button on the
front of the CC-SG unit.
2. Attach the front bezel by snapping it onto the front of the
CC-SG unit.
3. Log in as admin/raritan. Usernames and passwords are
case-sensitive.
4. You will be prompted to change the local console
password.
a. Type the default password (raritan) again.
b. Type and then confirm the new password. The new
password must be a strong password consisting of at
least eight characters that are a combination of letters
and numbers.
5. Press CTRL+X when you see the Welcome screen.
6. Choose Operation > Network Interfaces > Network
Interface Config. The Administrator Console appears.
7. In the Configuration field, select DHCP or Static. If you
select Static, type a static IP address. If needed, specify
DNS servers, netmask, and gateway address.
8. Select Save. Wait a few minutes as CC-SG restarts.
Default CC-SG Settings
IP Address: 192.168.0.192
Subnet Mask: 255.255.255.0
Username/Password: admin/raritan
QS Rule
Page 3
CC-SG V1 Quick Setup Guide 3
QSG-CCV1-0O-v5.2.0-E 255-80-5110-01-RoHS
V. Get Your License
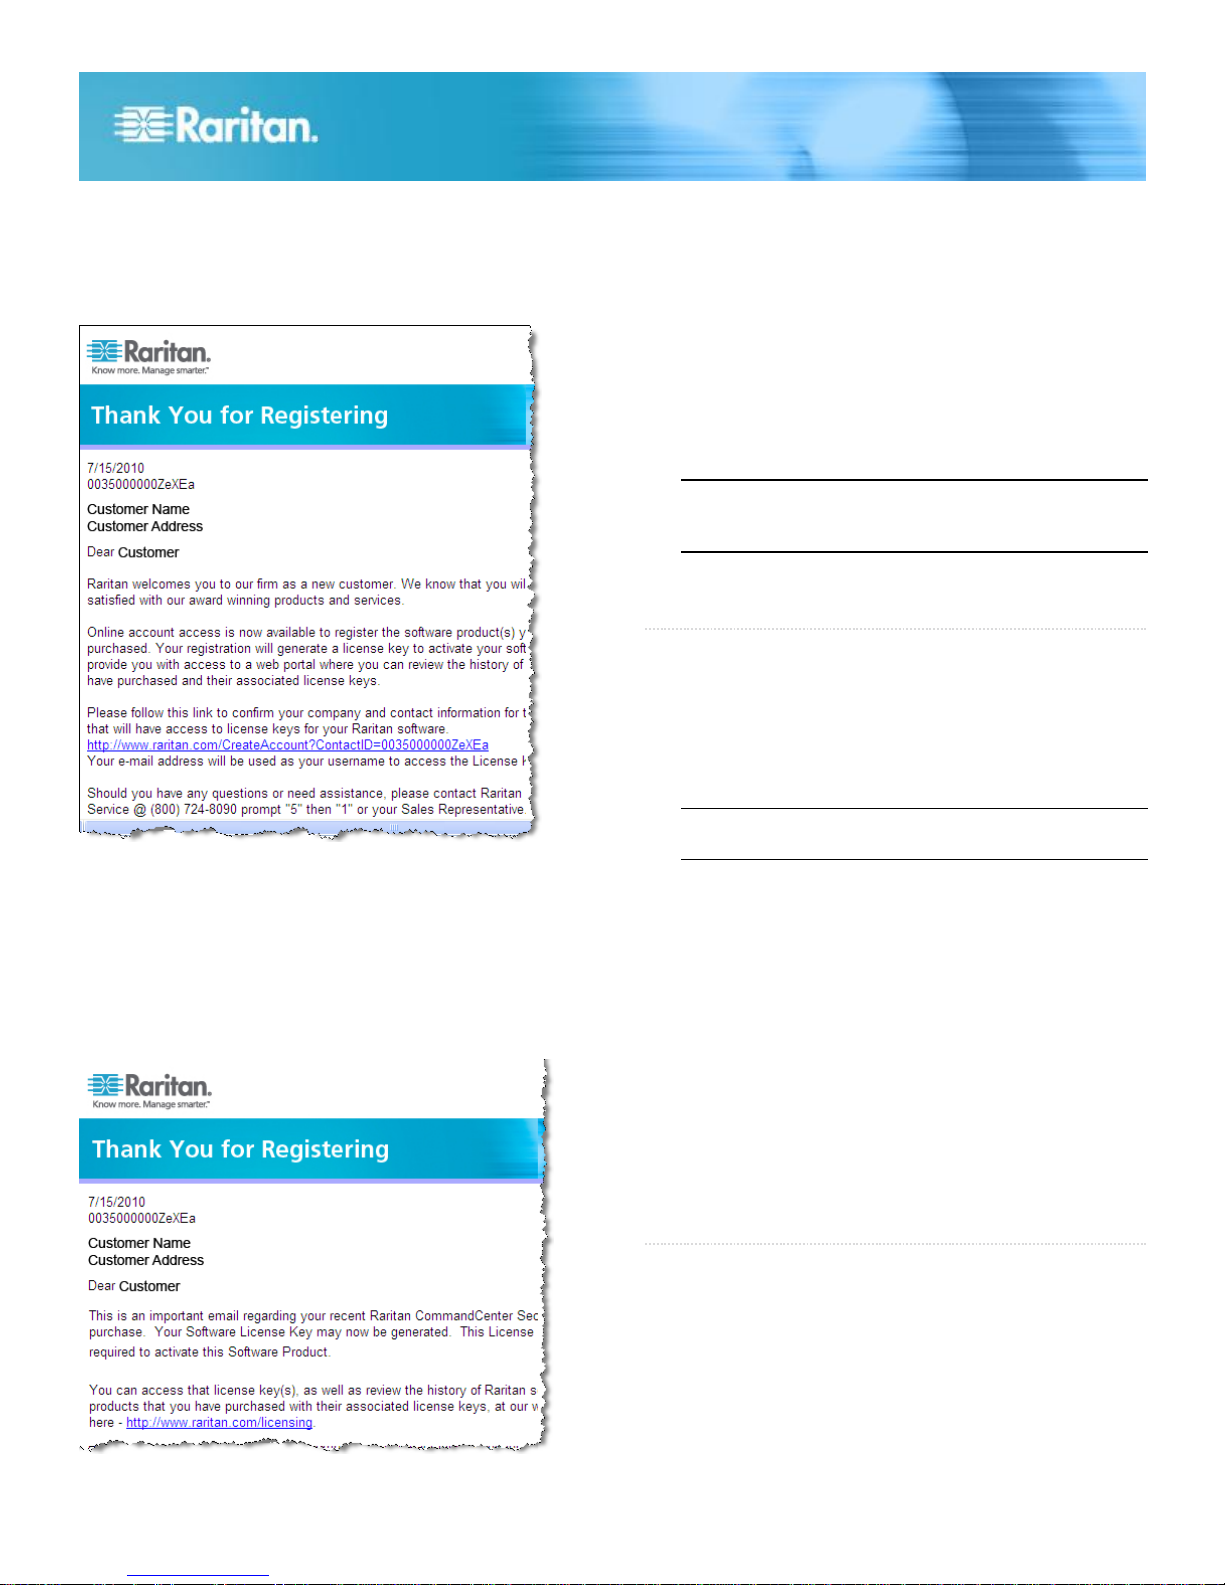
1. The license administrator designated at time of purchase
will receive an email from Raritan Licensing Portal from
the email address [email protected], with the subject
line Thank You for Registering.
4. Click the link in the email to go to the Software License
Key Login page on Raritan's website and login with the
user account just created.
5. Click the Product License tab. The licenses you purchased
display in a list. You may have only 1 license, or multiple
licenses.
6. To get each license, click Create next to the item in the
list, then enter the CommandCenter Secure Gateway Host
ID. You can copy and paste the Host ID from the License
Management page. See Find Your Host ID (on page 3).
7. Click Create License. The details you entered display in a
pop-up. Verify that your Host ID is correct.
Warning: Make sure the Host ID is correct! A license
created with an incorrect Host ID is not valid and requires
Raritan Technical Support's help to fix.
8. Click OK. The license file is created.
9. Click Download Now and save the license file.
QS Rule
VI. Log in to CC-SG
Once CC-SG has restarted, you can log in to CC-SG from a
remote client.
1. Launch a supported browser and type the URL of the
CC-SG: https://<IP address>/admin.
For example, https://192.168.0.192/admin.
2. Click the link in the email to go to the Software License
Key Login page on Raritan's website. Create a user
account and login. The username is your email address.
The licensing account information page opens. Your
license files will be available shortly.
3. Check your email for another message from Raritan
Licensing Portal from the email address
[email protected], with the subject line Your Raritan
Commandcenter SG Software License Key is Available.
Note: The default setting for browser connections is
HTTPS/SSL encrypted.
2. When the security alert window appears, accept the
connection.
3. You will be warned if you are using an unsupported Java
Runtime Environment version. Follow the prompts to
either download the correct version, or continue. The
Login window appears.
4. Type the default username (admin) and password (raritan)
and click Login.
The CC-SG Admin Client opens.
Find Your Host ID
1. Choose Administration > License Management.
2. The Host ID of the CommandCenter Secure Gateway unit
you are logged into displays in the License Management
page. You can copy and paste the Host ID.
QS Rule
VII. Install and Check Out Your License
1. Choose Administration > License Management.
2. Click Add License.
3. Read the license agreement and scroll down the whole
text area, then select the I Agree checkbox.
4. If you have multiple licenses, such as a "base"appliance
license plus Add-On license for additional nodes or
WS-API, you must upload the physical appliance license
first. Click Browse, then select the license file to upload.
Page 4

CC-SG V1 Quick Setup Guide 4
QSG-CCV1-0O-v5.2.0-E 255-80-5110-01-RoHS
5. Click Open. The license appears in the list. Repeat for
Add-On licenses.
You must check out licenses to activate the features.
6. Select a license from the list then click Check Out. Check
out all the licenses you want to activate.
See the CC-SG Administrators Guide for more details about
licenses.
QS Rule
VIII. Next Steps
See the CommandCenter Secure Gateway Deployment Guide
for information on deploying other Raritan devices for CC-SG
management.
See the CommandCenter Secure Gateway Administrator
Guide for information on configuring CC-SG.
Additional Information
For more information about the CommandCenter Secure
Gateway™ and the entire Raritan product line, see Raritan's
website (www.raritan.com). For technical issues, contact
Raritan Technical Support. See the Contact Support page in
the Support section on Raritan's website for technical support
contact information worldwide.
Raritan's products use code licensed under the GPL and LGPL. You can
request a copy of the open source code. For details, see the Open Source
Software Statement at
(http://www.raritan.com/about/legal-statements/open-source-software-statement
/) on Raritan's website.
 Loading...