

Page 1

SwitchMan
User’s Manual
SW2
SW4
Page 2

User’s Manual
SW2
SW4
Copyright © 2001
Raritan Computer, Inc
SW-0A-E JULY 2001
Raritan Computer Inc.
400 Cottontail Lane
Somerset, NJ08873
USA
Tel: 1-732-764-8886
Fax: 1-732-764-8887
E-mail: [email protected]
Http://www.raritan.com
SwitchMan
Raritan Computer Europe, B.V.
Eglantierbaan 16
2908 LV Capelle aan den IJssel
The Netherlands
Tel: 31-10-284-4053
Fax: 31-10-284-4049
E-mail: [email protected]
Http://www.raritan.com
Raritan Computer Japan, Inc.
Kuga Building 7F, 11-6
Kuramae 4-chome Taitoo-Ku
Tokyo 111-0051, Japan
Tel: 81-3-5833-6360
Fax: 81-3-5833-6336
E-mail: [email protected]
Http://www.raritan.co.jp
Raritan Computer Taiwan, Inc.
5F, 121, Lane 235, Pao-Chiao Rd.,
Hsin-Tien City, Taipei Hsien
Taiwan
Tel: 886-2-8919-1333
Fax: 886-2-8919-1338
E-mail: [email protected]
Http://www.raritan.com.tw
Page 3

3
FCC NOTIFICATION
This equipment has been tested and found to comply with the limits a Class B digital
device, pursuant to Part 15 of the FCC Rules. These limits are designed to provide
reasonable protection against harmful interference in a commercial installation. This
equipment generates, uses and can radiate radio frequency energy and if not installed
and used in accordance with the instructions, may cause harmful interference to radio
communications. Operation of this equipment in a residential environment may cause
harmful interference.
Product names mentioned in this document are trademarks or registered trademarks of
their respective companies. PS/2, PC/AT, and IBM are registered trademarks of the
International Business Machines Corporation.
CANADIAN NOTIFICATION
This Class B digital apparatus meets the requirements of the Canadian Interference-Causing
Equipment Regulations.
Cet appareil numérérique de la classe B respecte toutes les exigences du reglement sur le
matériel brouilleur du Canada.
Page 4

4
TTAABBLLEE OOFF CCOONNTTEENNTTSS
Overview 1
Feature 2
Installtion Procedures 3
Installation Notes 4
Operation 5
Front Panel 5
Selection Channels 5
Scan Channels 5
Set Scan Rate 5
Hot Key Mode 6
Hot-key Activation 6
Select A Computer Channel by Number 6
Select A Computer Channel by Using Arrow Keys 6
Scanning Channels 7
Set Scan Rate 7
Change Hot-key Mode Activator 7
Exit Hot-key Mode 7
Hot-key Command Table 8
Troubleshooting 9
Appendix 11
Specification of SwitchMan 11
Specifications of Cables 11
Page 5

5
Overview
SwitchMan is the desktop KVM (keyboard, video, mouse) switch for those
who run more than one computer at a desk. By having only one keyboard,
monitor, and mouse, you reclaim your desktop while saving time and
money. SwitchMan uses the same bulletproof design as Raritan's
professional-grade products and is available in two-channel and fourchannel models.
Raritan's unique keyboard and mouse emulation technology dedicates
individual processors to each channel. Every computer continuously "sees"
its own keyboard and mouse to ensure flawless booting and switching. You
can select computers by touching individual channel buttons on the front
panel or by using simple hot-key commands.
SwitchMan's versatile design gives you the choice of either a horizontal or
a space-saving vertical installation. Standard features like Scan and LED
indicators make operation of SwitchMan simple and convenient. Connect
your computers to SwitchMan by using industry standard KVM cables. For
the highest resolution video, use Raritan's premium tangle-proof cables.
Plug your standard PS/2 keyboard, VGA monitor, and PS/2 mouse right
into SwitchMan.
Figure 1. SwitchMan (SW4 4-channel)
Page 6
6
Feature
∗ Compatible with all PS/2-style or AT-style
computers
∗ Individual front panel selection buttons with LED
indicators
∗ Dedicated keyboard/mouse emulators for each
computer to provide flawless operation
∗ High-resolution video to1600X1200
∗ PS/2 IntelliMouse support
∗ Scan button to scan computers at a
programmable rate
∗ Places either horizontally or vertically to save
additional space
∗ Powered by connected compuers
∗ Use Raritan's premium, tangle-proof cables for
highest resolution video requirements
∗ Use inexpensive, industry standard KVM cables
for typical applications.
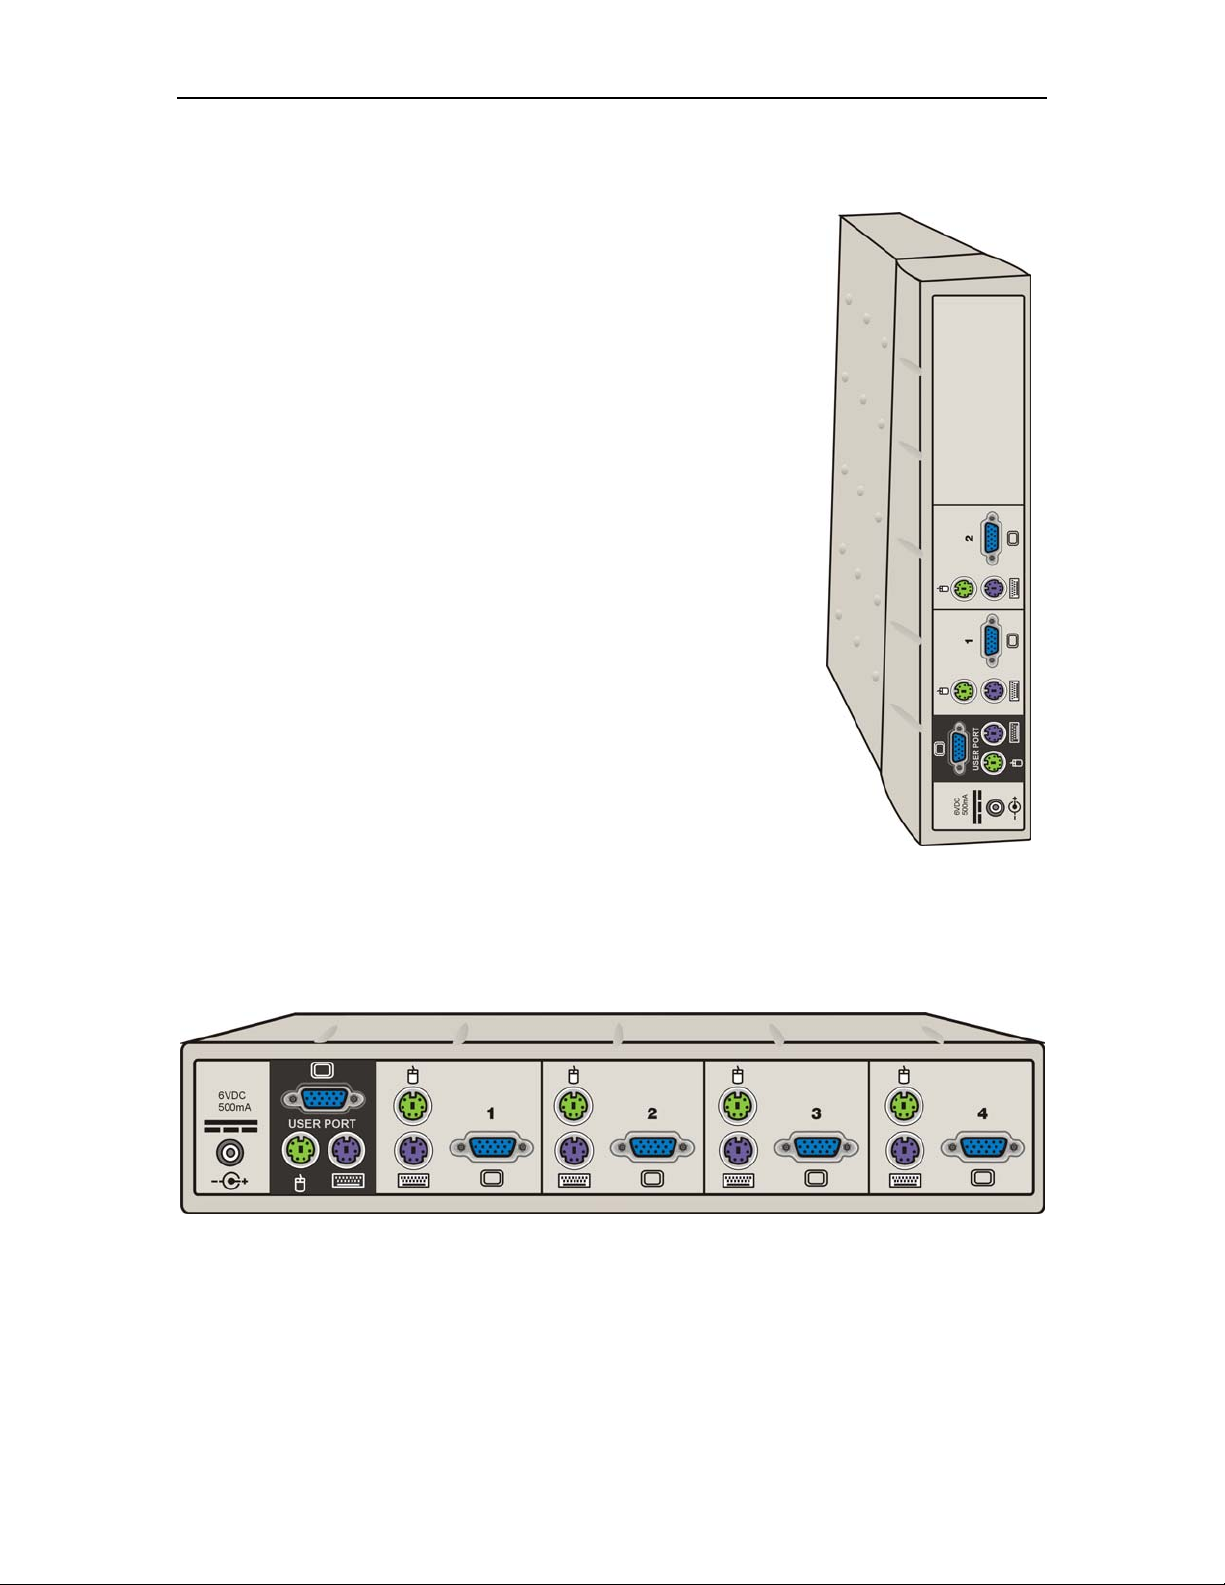
Figure 2. SW2 (back panel, vertical position)
Figure 3. SW4 (back panel, horizontal position)
Page 7

7
Installation Procedures
Begin installation by connecting one computer to SwitchMan. Once the first
computer is operational, then connect additional computers.
SwitchMan can use industry standard keyboard, video, and mouse (KVM)
cables or can use Raritan's premium, tangle-proof KVM cables.
Caution: Make sure that each computer is powered OFF before it is
connected to SwitchMan.
1. Connect your keyboard, monitor, and mouse to the back panel of
SwitchMan. Use the black section marked USER PORTS for these
connections.
2. Using either end of the KVM cables, connect the keyboard, monitor, and
mouse connectors to the section marked PC 1 on the SwitchMan back
panel. (See figure 2 for SW2 or figure 3 for SW4)
Note: With Raritan's tangle-proof KVM cables, each connector is
marked with a symbol- keyboard, monitor, mouse-for
ease of connection
3. Plug the other ends of the KVM cable into the corresponding ports on
the first computer
4. Power ON the computer. The LED above the channel selection button
for the powered computer illuminates.
5. The video from the connected computer is displayed on the monitor. The
keyboard and mouse operate as if they were connected directly to the
computer.
Note: SwitchMan is automatically powered ON when at least one
connected computer is powered ON.
6. After the first computer is working, connect the remaining computers to
SwitchMan. Make sure each computer is powered OFF before it is
connected to SwitchMan.
Page 8
8
Installation Notes
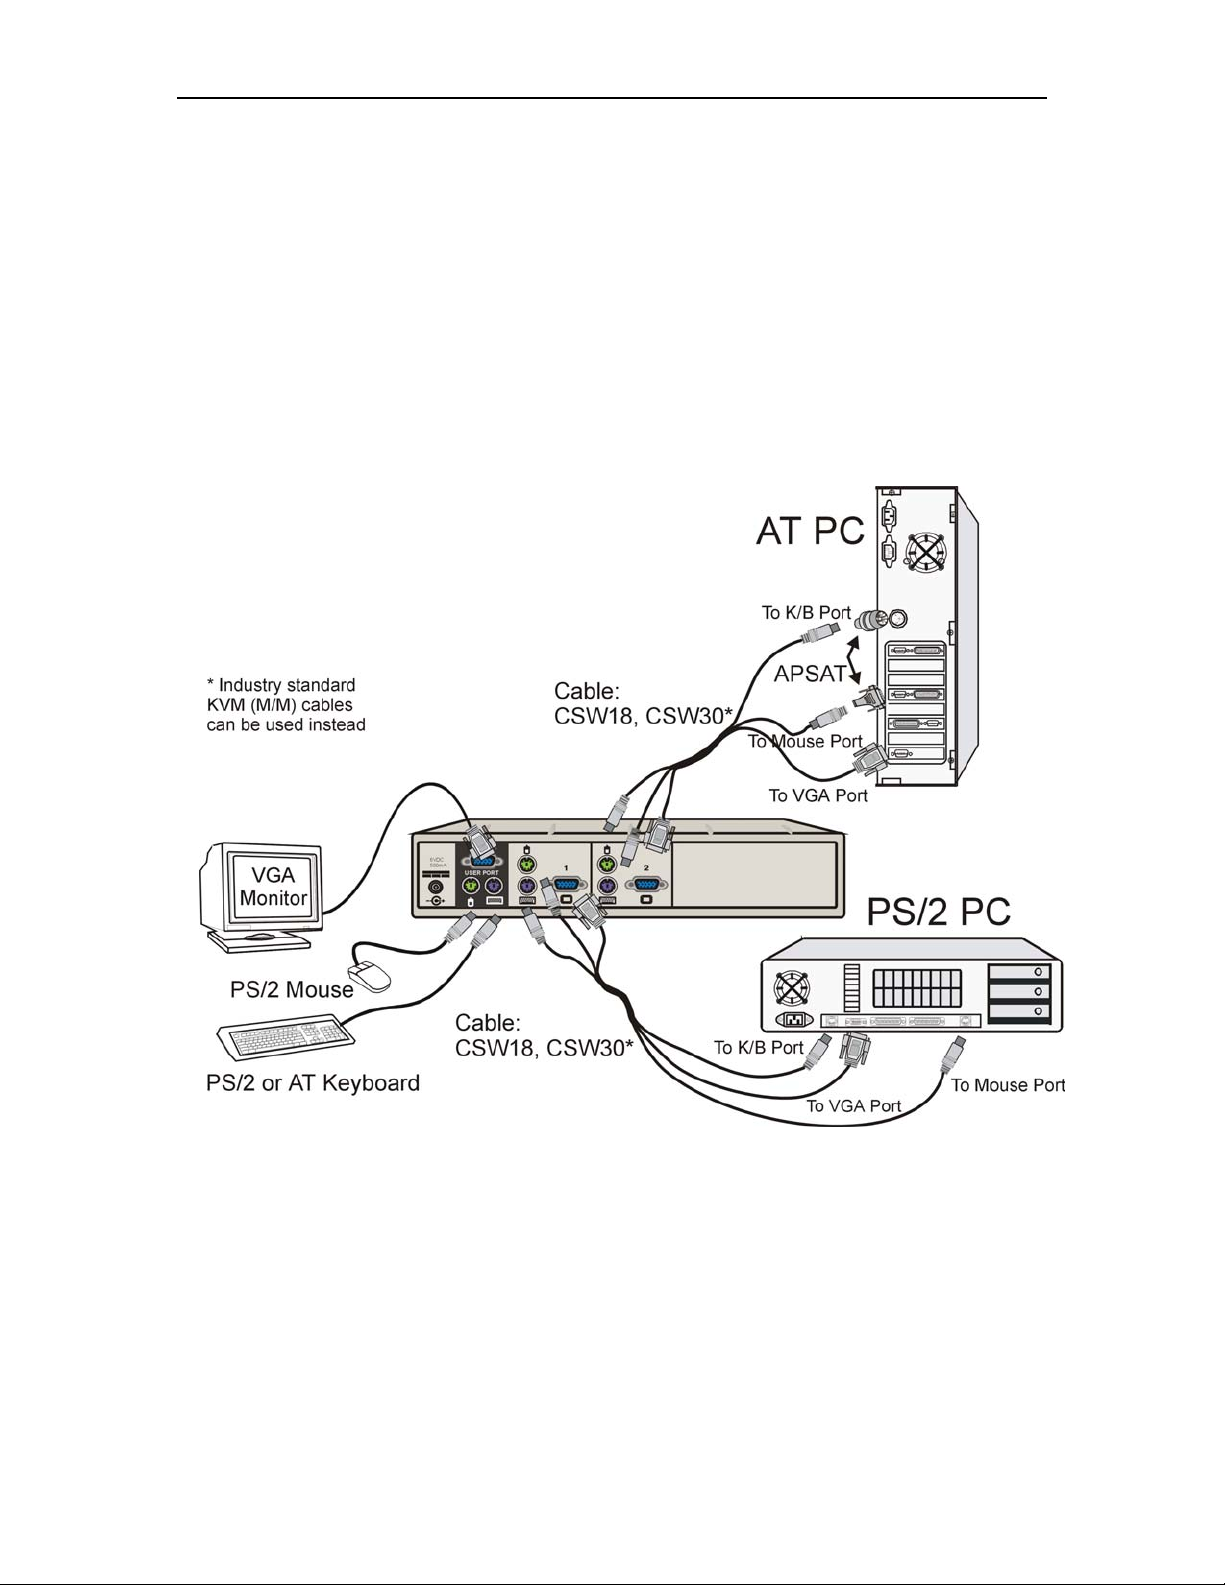
∗ Switchman computer ports are PS/2 style. You may also connect AT-
style computers. Use Raritan keyboard/mouse port adapter “APSAT” on
PS/2 cables to plug into a computer with “AT” keyboard port and serial
mouse port.
∗ Switchman converts keyboard and mouse signals to PS/2 and requires
either a PS/2 mouse and PS/2 keyboard or an AT Extended keyboard
with adapter.
Figure 4. Cabling diagram
Page 9

9
Operation
You can select a computer from the front panel of SwitchMan or through
the keyboard in hot-key mode. The LEDs on the front panel of SwitchMan
indicate which computer, or channel, is currently selected and ready for
use
SwitchMan automatically senses which channels are active-that is, those
that have computers that are connected and powered ON. In Scan mode,
SwitchMan cycles through these active channels. The video is displayed,
and the keyboard and mouse are active for each successive computer.
Front Panel
Select channels
To select a computer from the front panel, simply press the button
corresponding to the desired channel. The LED above the channel
illuminates and the video from that connected computer is displayed. The
keyboard and mouse become active for that computer.
The monitor will remain blank if you choose an inactive channel.
Scan channels
Scan is a feature that automatically steps through each active channel.
When Scan is active, SwitchMan allows you to view the video of each
active channel for a set interval (scan rate). SwitchMan then cycles to the
next active channel. The default scan rate is three seconds. You can set
the scan rate from the front panel or in hot-key mode
To activate Scan, press the scan button on the SwitchMan front panel.
To exit Scan, press the scan button (toggle ON/OFF) again.
Note: SwitchMan automatically skips inacti ve ch an n els in Sca n mo de.
Set Scan rate
The scan rate can be changed through front panel buttons to preset
intervals. Press the scan button followed by the channel selection button
that corresponds to the desired scan rate (see chart below). The light
above the button blinks twice to acknowledge the setting, and scanning
continues at the new rate.
Page 10

10
Channel 1 = 1 second
Channel 2 = 3 seconds
Channel 3 = 8 seconds
Channel 4 = 16 seconds
To exit Scan, press the scan button (toggle ON/OFF).
Hot-Key Mode
When you activate hot-key mode, SwitchMan captures and interprets
keystrokes as front panel functions. No keystrokes pass through to the
computer(s).
Note: Hot-key mode operation requires a PS/2-style or an Extended ATstyle keyboard.
Hot-key activation
To enter hot-key mode, press <Scroll Lock> twice rapidly. SwitchMan
enters hot-key mode, and the three keyboard LEDs-Num Lock, Caps Lock
and Scroll Lock-blink continuously. To exit hot-key mode, press the <Esc>
key.
Select a computer channel by number
You can select channels by using hot-key mode. The LED on the front
panel above the corresponding computer is turned ON.
1. Activate hot-key mode.
2. Press the <c> key.
3. Press number key corresponding to the computer.
4. Press <Enter>.
For example, to select channel two, enter hot-key mode and then press
<c> <2> <Enter>.
Select a computer channel by using arrow keys
In hot-key mode, you can step through the channels. Press the <á> or <à>
arrow to increment and press the <ß> or <â> arrow keys to decrement the
channel numbers.
Page 11

11
Scanning channels
In hot-key mode, press the <s> key to activate Scan. The LED above the
scan button is illuminated, and SwitchMan begins scanning active
channels.
Set Scan rate
You can change the default Scan rate to an interval from 1 to 99 seconds.
The LED above the most recently selected channel buttons blinks twice to
acknowledge the change, and scanning starts at the new rate.
1. Enter hot-key mode.
2. Press the <s> key.
3. Press number key for the desired rate (1-99).
4. Press <Enter>.
For example, to set the rate to 30 seconds, enter hot-key mode and then press <s> <30>
<Enter>.
Change hot-key mode activator
While in hot-key mode, you can change the key that activates hot-key mode. The default
activation key is <Scroll Lock>. <Num Lock> or <Caps Lock> can be used instead.
To make a new hot-key mode activator, enter hot-key mode and then press <Scroll
Lock>, <Caps Lock>, or <Num Lock> followed by <Enter>. The new hot-key activator is
now set.
Exit hot-key mode
To exit hot-key mode at any time, press <Esc>. The LEDs on the keyboard stop blinking,
and the keyboard reverts to normal function
When in hot-key mode, if the keyboard is inactive for 30 seconds, SwitchMan
automatically exits hot-key mode.
Page 12
12
N
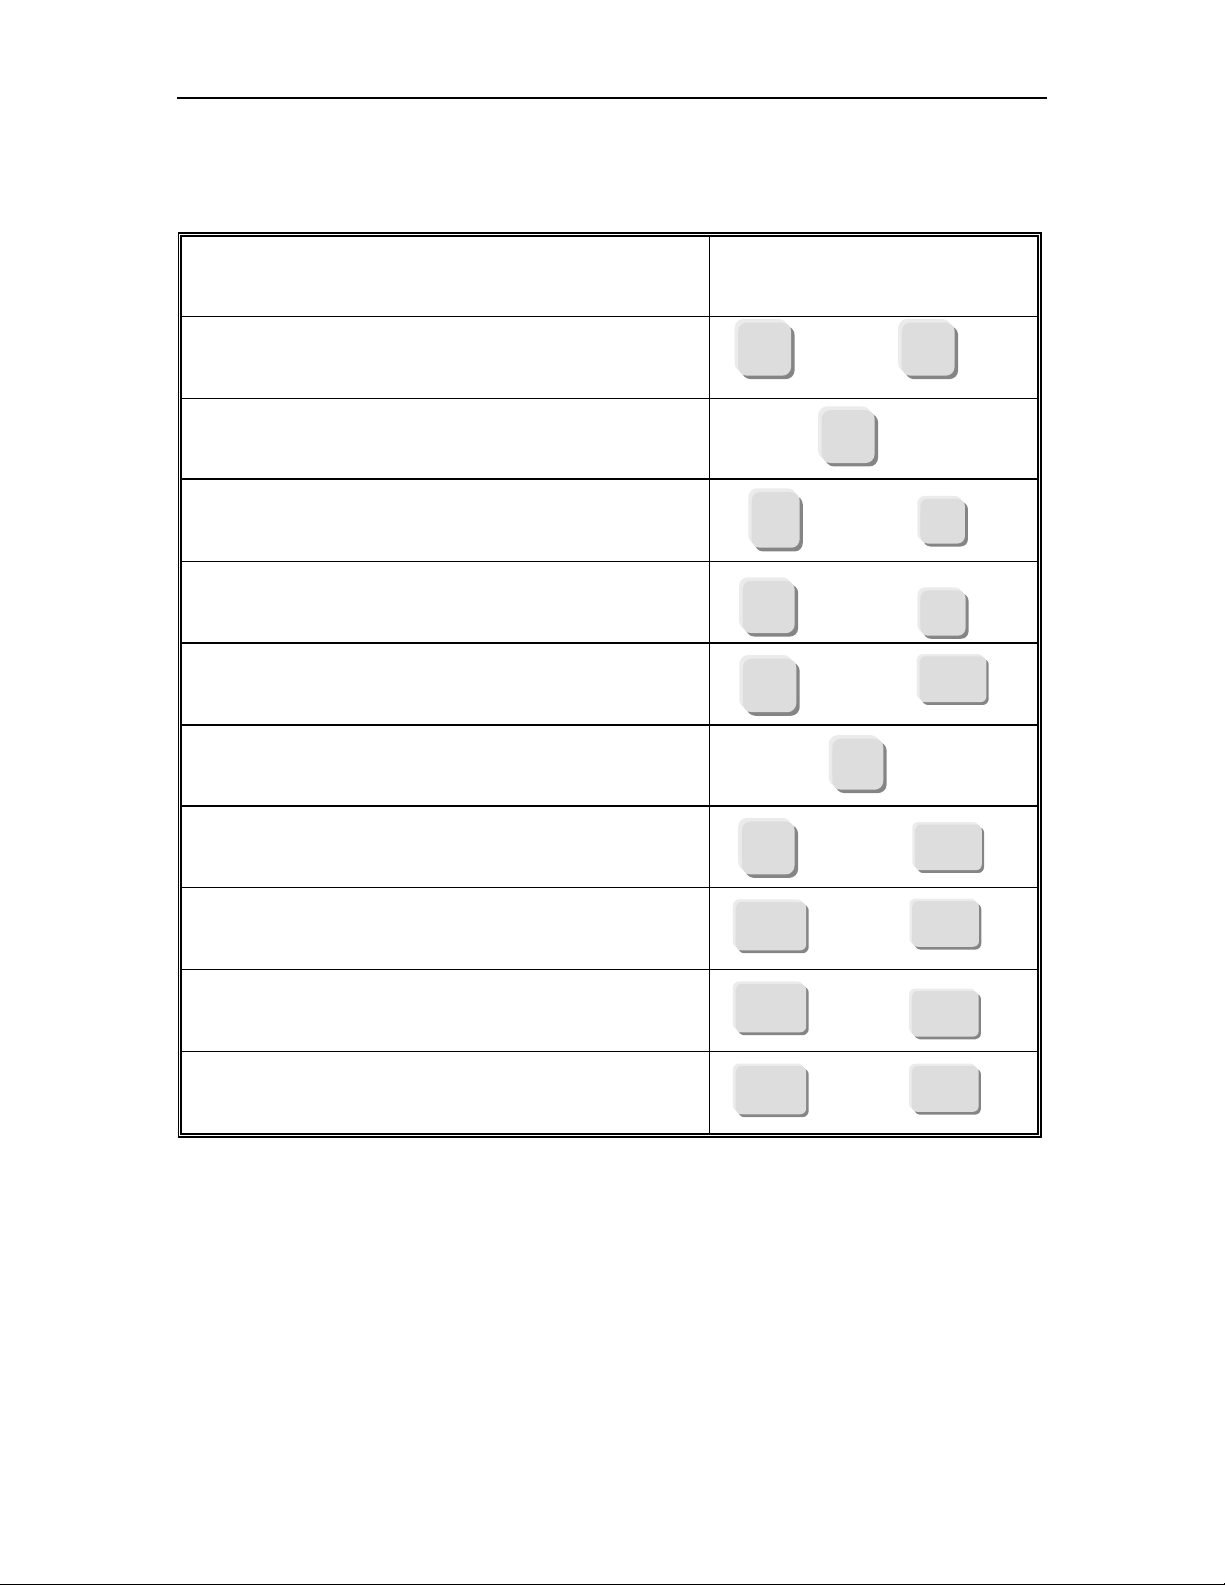
Hot-key command table
TASKS KEY STROKES
Activate hot-key mode
Exit hot-key mode
Increment channel number
Decrement channel number
Select channel number
Toggle Scan ON/OFF
Set Scan rate
Make Num Lock the hot-key mode activator
Scr Scr
+
Esc
or
or
C
+ (n) +
Enter
S
S
um Lock
+ (n) +
+
Enter
Enter
Make Scroll Lock the hot-key mode activator
Make Caps Lock the hot-key mode activator
Scr Lock
Caps Lock
+
+
Enter
Enter
Page 13

13
Troubleshooting
The following table lists probable solutions for problems that may be
encountered during SwitchMan installation or operation.
Trouble
Symptom
No front panel
LEDs
flashes
continuously
Probable Cause Solution
Bad connection(s) Check cable connection(s)
Computer not
powered ON
Notebook computer
or Guardian device
in use
Computer not
powered ON for that
channel
Keyboard or mouse
sending input
through SwitchMan
Power ON computer
Not enough power to run
SwitchMan. Install notebook
or Guardian after connecting
other PCs.
Otherwise, do not use
Notebook or Guardian.
Power ON the computer. Channel LED
Stop using the keyboard
and/or mouse during channel
selection.
for computer
Keyboard error
from computer
Loose video
connection(s)
Problems with the
monitor
Computer keyboard
cable connection
Check and reconnect cables No video display
Power OFF the computers.
Connect directly to the
computer the monitor that is
not functioning properly.
If the problem persists, it is
not due to SwitchMan.
If the display is correct when
directly connected, contact
SwitchMan dealer.
Check keyboard cable
connection of the computer
not operating properly.
Page 14

14
Unit does not
activate hot-key
mode
Unable to select
Channel
Keyboard or
mouse does not
respond or does
not work properly
Keyboard Hot-key mode works only
with PS/2 or Extended ATstyle keyboards.
Unit in Scan mode Exit Scan mode
Keyboard and
mouse cables are
loose or have been
crossed
Check connection(s) of the
keyboard and mouse to
SwitchMan and computer.
Be sure keyboard is full PS/2
or Extended AT style, and
mouse is PS/2 style.
Power OFF the computer.
Switch the keyboard and
mouse connectors, and
reboot the computer.
If the problem persists,
power OFF the computer.
Connect the keyboard
directly to the computer to
determine whether the
problem is with the computer
port.
For Raritan technical support, either go to:
www.raritanonline.com
Or call your local reseller or distributor
If the problem is not with the
computer port, connect the
computer to a different PC
channel in the back of
SwitchMan and restart the
computers.
If the problem persists,
contact dealer.
Page 15
Appendix
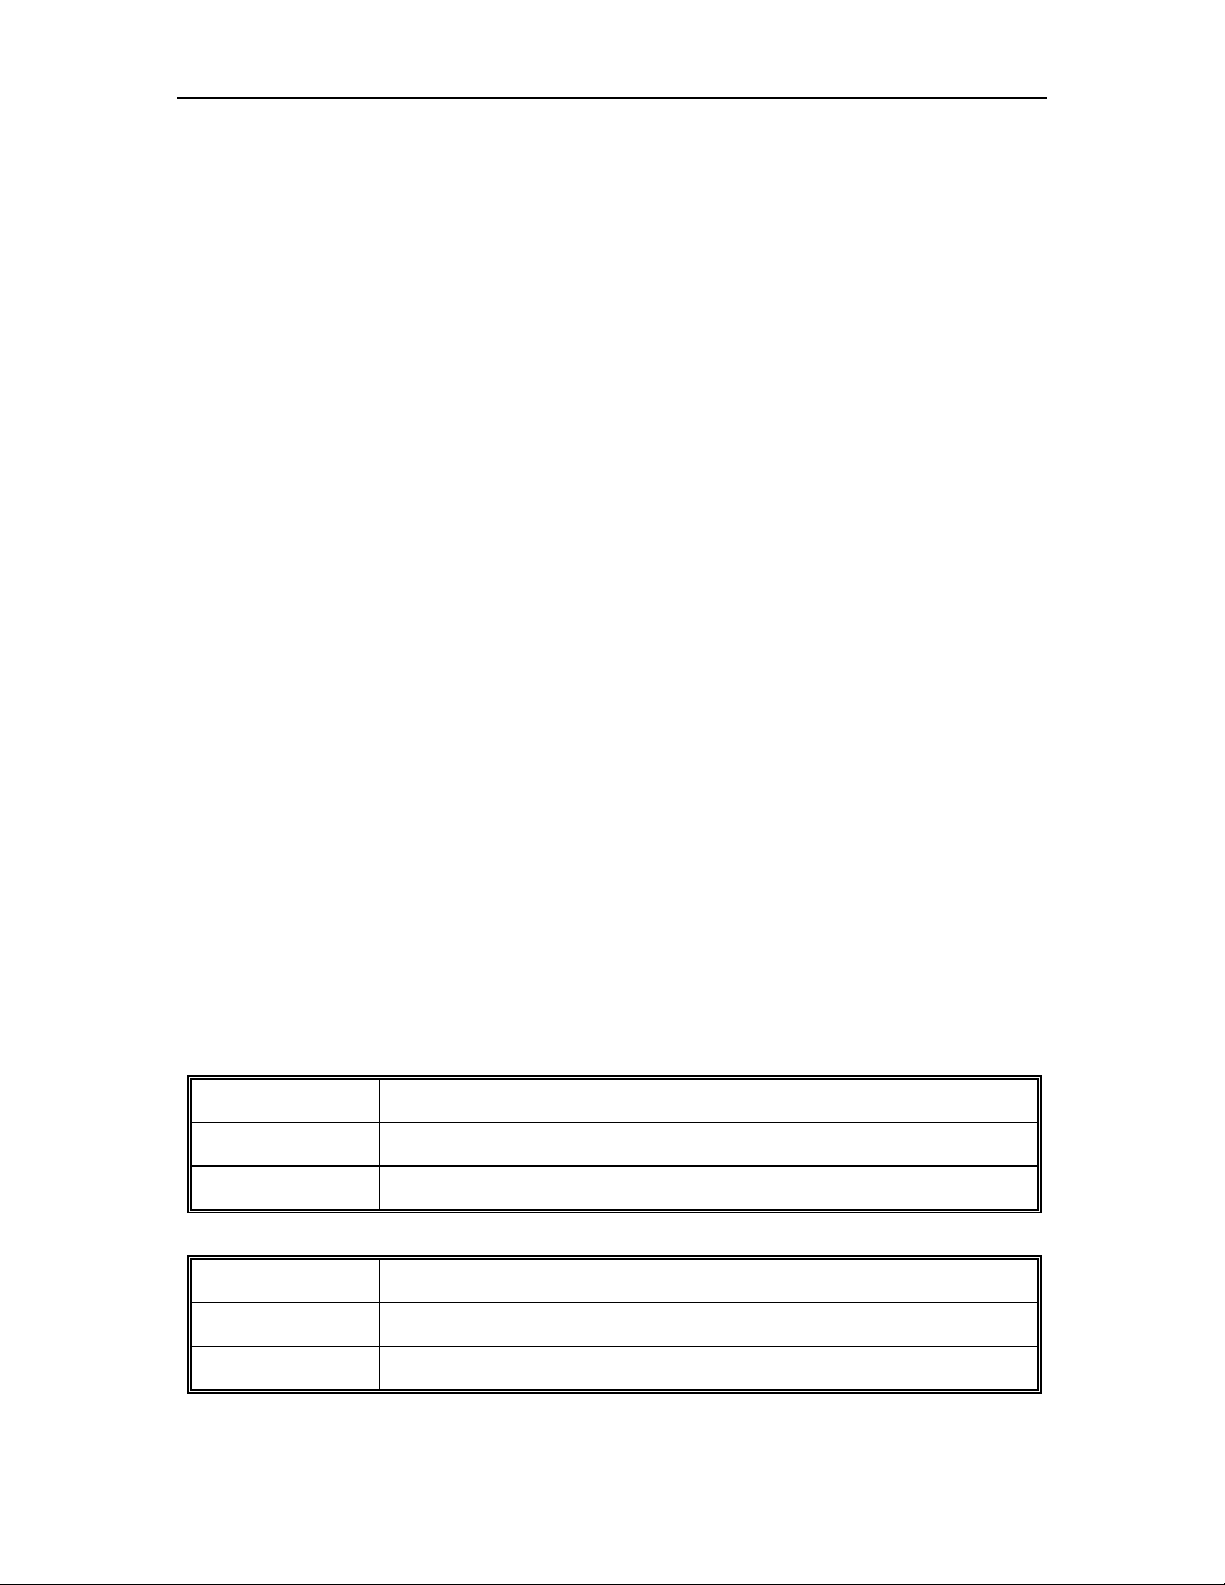
Specifications of SwitchMan
SW2 (2-Channel SwitchMan)
SW4 (4-Channel SwitchMan)
Dimensions 10.00" (W) x 5.50" (D) x 2.13" (H)
256mm x 140mm x 53mm
Weight 1.7 lb. (0.77 kg)
DC Power Input 6V/1.4 amp. Adapter (optional)
P/N A10D1-06MP
User connection ports VGA monitor HD15 female video
PS/2 keyboard mini-DIN 6 pin female
PS/2 mouse mini-DIN 6 pin female
15
Computer connection ports VGA monitor HD15
Female video
PS/2 keyboard mini-DIN 6 pin female
PS/2 mouse mini-DIN 6 pin female
Serial mouse DB9 female
Agency approvals FCC Class B
CE
Warranty One year
Specifications of Cables
Use Raritan's premium, tangle-proof cables or Raritan's standard cables*
Raritan premium, tangle-proof cables: One cable required for each PC
CSW18 6' cable for PS/2 and VGA connections
CSW30 10' cable for PS/2 and VGA connections
APSAT AT/serial converter kit for above cables
Raritan standard cables: One cable kit required for each PC
CSK18 6' cable for PS/2 and VGA connections
CSK30 10' cable for PS/2 and VGA connections
APSAT AT/serial converter kit for above cables
 Loading...