

Raritan PST1202, PST2402, PST3202, PST1203, PST2403 Operation, Maintenance, And Installation Instructions
...Page 1
®
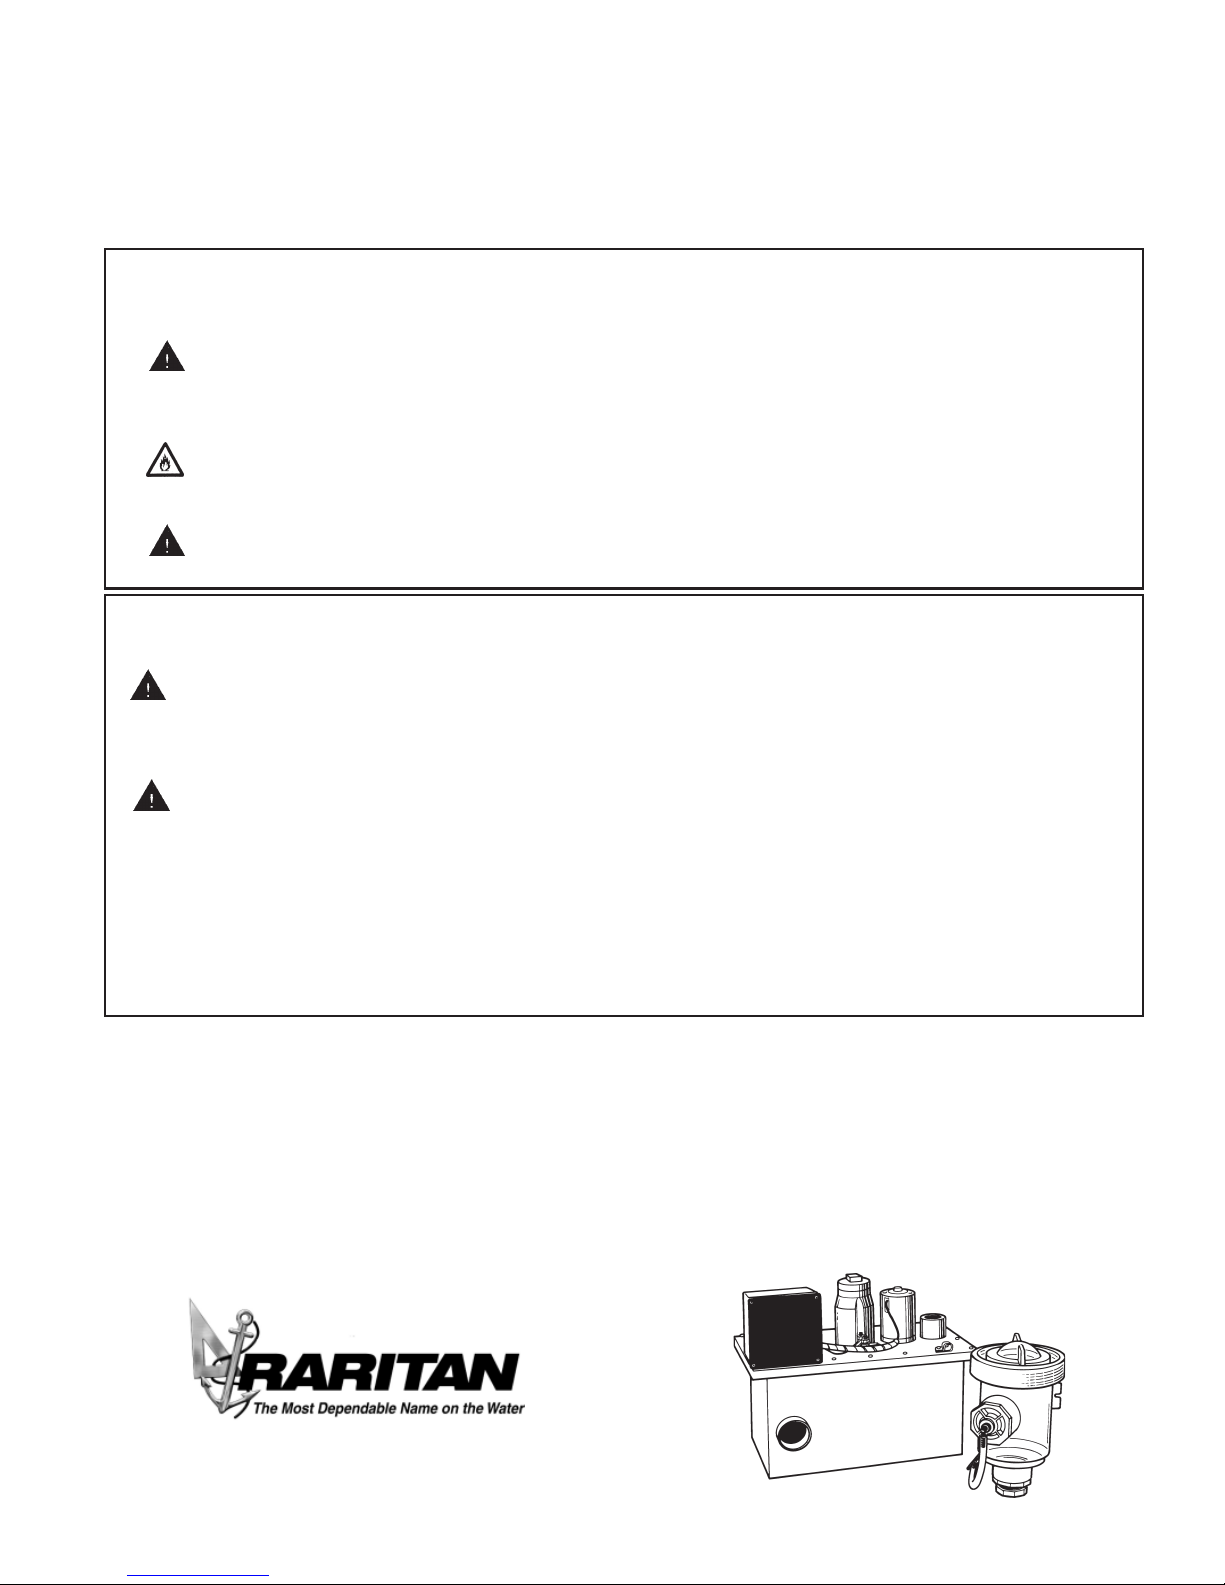
PURASAN
OPERATION, MAINTENANCE AND INSTALLATION INSTRUCTIONS
(Models PST*02 and PST*03 [*specify 12,24,32] Manufactured after September, 2004)
THE FOLLOWING ARE CAUTIONARY STATEMENTS THAT MUST BE READ AND
FOLLOWED DURING BOTH INSTALLATION AND OPERATION
WARNING: Raritan Engineering Company, Inc. recommends that a qualified person or electrician install this product.
Equipment damage, injury to personnel or death could result from improper installation. Raritan Engineering
Company, Inc. accepts no responsibility or liability for damage to equipment, or injury or death to personnel
that may result from improper installation or operation of this product.
WARNING: HAZARD OF SHOCK AND FIRE
Always use recommended fuse or circuit breaker and wire size.
WARNING: HAZARD OF FLOODING - When leaving the boat unattended always be sure seacocks are closed. Any
installation made below waterline should have double hose clamps securing lines. The halogen disinfectant is
corrosive to aluminum, copper and steel. The plumbing system must not include any aluminum, copper
or steel fittings, piping or holding tanks.
IMPORTANT SAFETY INSTRUCTIONS FOR HANDLING PURASAN® TABLETS AND SOLUTION
WARNING: HAZARD OF DANGEROUS CHEMICAL REACTION
1. Use ONLY Purasan Tablets.
2. DO NOT add any other chemicals or cleaning products to the toilet or the treatment system. Raritan C.P. - Cleans
Potties and R.C. Raritan Concentrate are the only factory-recognized cleaning product that may be used in the
toilet.
WARNING: HAZARD OF SEVERE INJURY
1. DO NOT allow tablets to come in contact with skin, eyes or clothing. If contact occurs, immediately wash
affected area with fresh water. Remove and wash any affected clothing.
2. Use a well ventilated area when handling Purasan Tablets. DO NOT breathe dust from tablets - severe damage to
mucous membrane of the respiratory passages could occur.
3. Do not ingest.
4. Follow all cautions and warnings associated with handling of tablets.
5. When reloading the Tablet Dispenser, ventilate area well and wear chemical resistant protective gloves and eye
protection.
6. DO NOT ATTEMPT TO REFILL EMPTY CARTRIDGES.
The Purasan is a U. S. Coast Guard Certified Type I Marine Sanitation Device for use on inspected and
uninspected vessels 65 feet and under. It must be operated within areas that are not declared a Federal No
Discharge Zone (NDZ) by the U.S. Environmental Protection Agency (EPA). This is applicable for all U.S.
territorial waters inside the three mile limit. Other countries - check with local authorities.
The Purasan is designed for recreational use and accommodates most marine toilets it can be used with one or,
in some cases, two toilets. The Purasan is available in 12, 24 or 32 V DC.
The system consists of a Treatment tank, Tablet dispenser and Switch panel with cable. A portion of incoming
water passes over the halogen tablets creating a solution that is then dispensed into the treatment tank and mixes
with the macerated waste sanitizing it for discharge.
1-800-352-5630
www.raritaneng. com
1
Page 2
(depends on installation chosen)
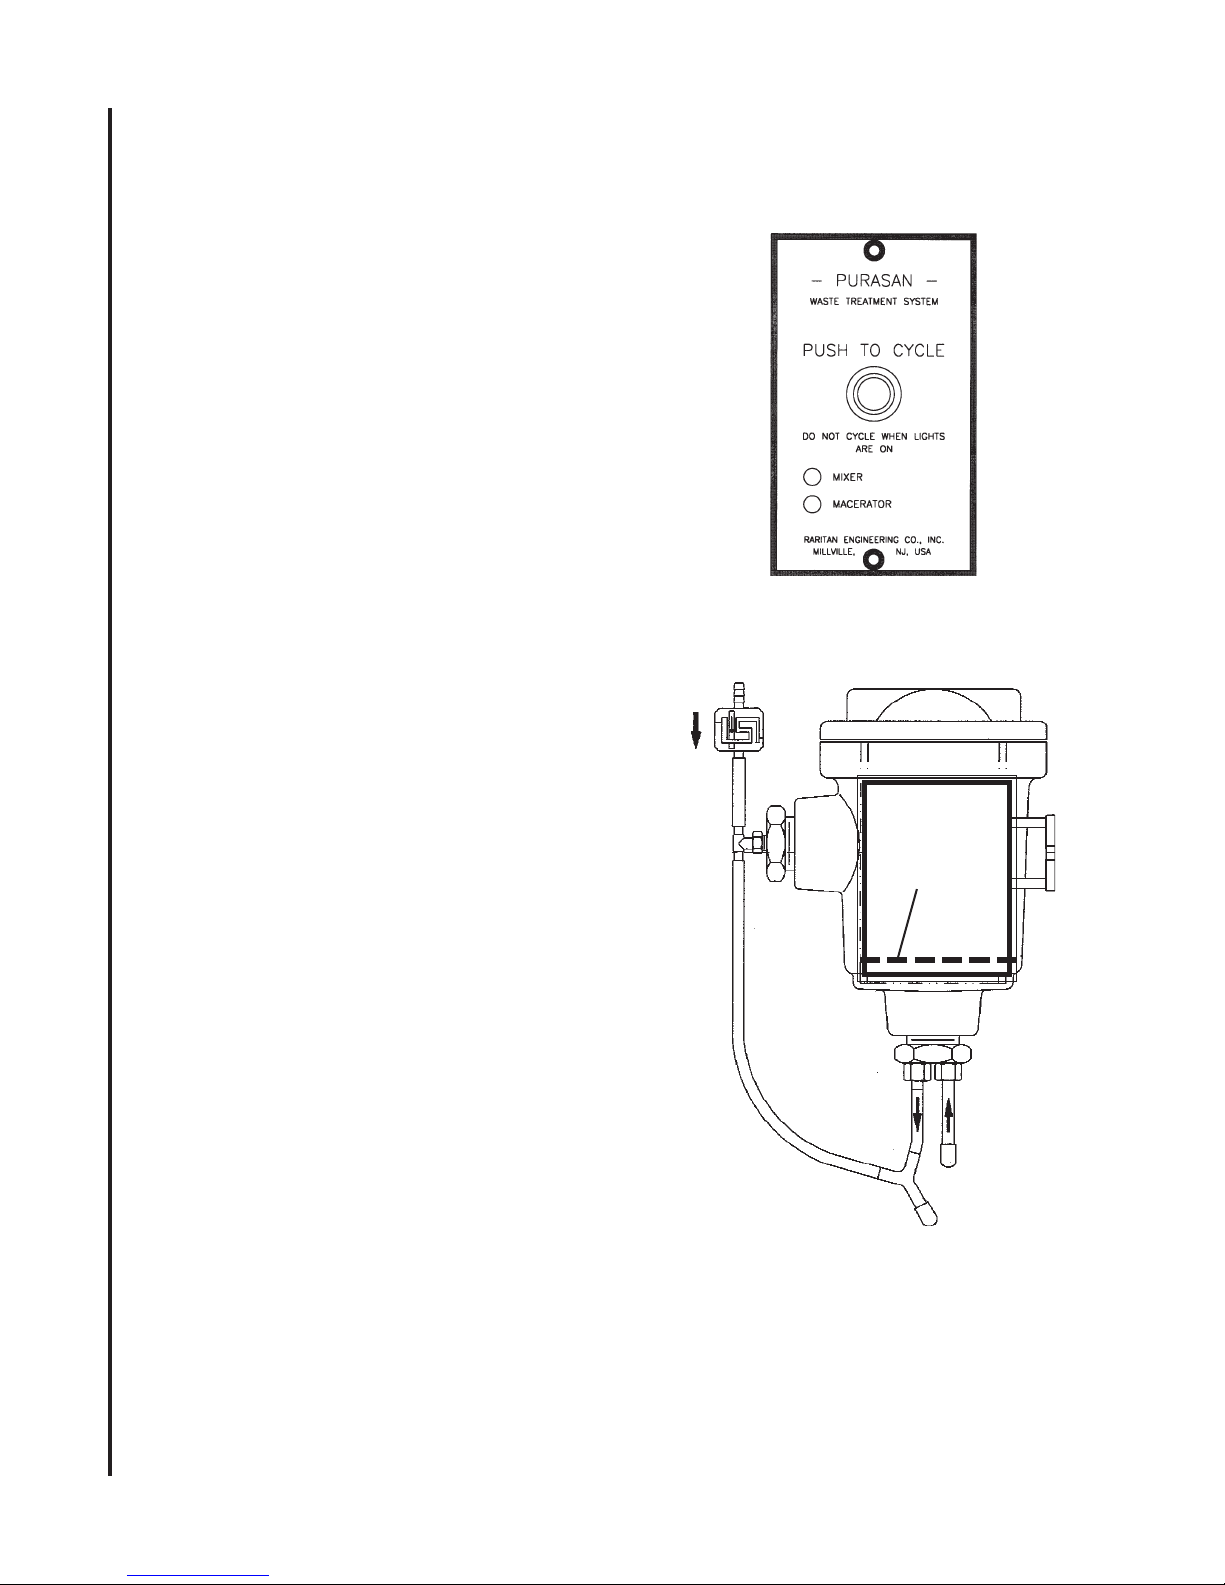
Single Button operation -
Both toilet and Purasan are operated by one of the
following options:
Option #1:
Switch Panel
"Push to Cycle" button activates both the toilet
and treatment cycle.
Note: Toilet flush time is set at 10 seconds,
after initial 10 seconds holding the button down
will momentarily flush the toilet.
Option #2:
Toilet Push Button -
Flushing toilet will activate treatment cycle.
OPERATION
Note: Toilet may be flushed as often as necessary, do not exceed recommended flush volume.
Independent Button operation -
1. Press "Push to Cycle" button
2. Flush toilet as often as necessary, do not
exceed recommended flush volume.
SWITCH PANEL
TABLET DISPENSER
Recommended Flush Volume Total flush volume must not exceed 1.5 gallons
(5.7 liters) per cycle.
After Toilet is flushed:
Water is diverted to the tablet dispenser and
must rise to the water level line (dotted line)
but no higher.
The Purasan should not be activated again
until the cycle is complete.
How it works -
Each time toilet is flushed an equal amount of
previously treated waste is discharged. The Purasan
does not pump waste out, the flushing action of the
toilet moves the waste through the Purasan.
Water is diverted to the tablet dispenser during the
flush cycle and should rise to the water level line
(dotted line), this creates a solution that drains into
the treatment unit.
The first chamber macerates to reduce particle size
and uniformly mix the waste with injected halogen
solution. The second chamber mixes to ensure
uniform treatment of contents.
When activated both motors come on and run for
the entire cycle of two minutes.
LABEL
with water
level line
2
Page 3
Use ONLY Purasan Tablets.
DO NOT add any other chemicals or cleaning
products to the toilet or the treatment system.
Raritan C.P. - Cleans Potties and R.C. Raritan
Concentrate are the only factory-recognized cleaning
products that may be used in the toilet.
MAINTENANCE
WARNING: Read and understand all safety
instructions (including Material Safety Data
sheet) for handling Purasan Tablets before
performing any work on the Purasan.
Recommended Visual Inspection
√ Tablet level in cartridge monthly
√ Tubes to and from dispenser are unobstructed
√ Tubes to treatment tank are unobstructed
Replace tablet cartridge only when completely empty.
Clean or replace tubes if any obstruction is found.
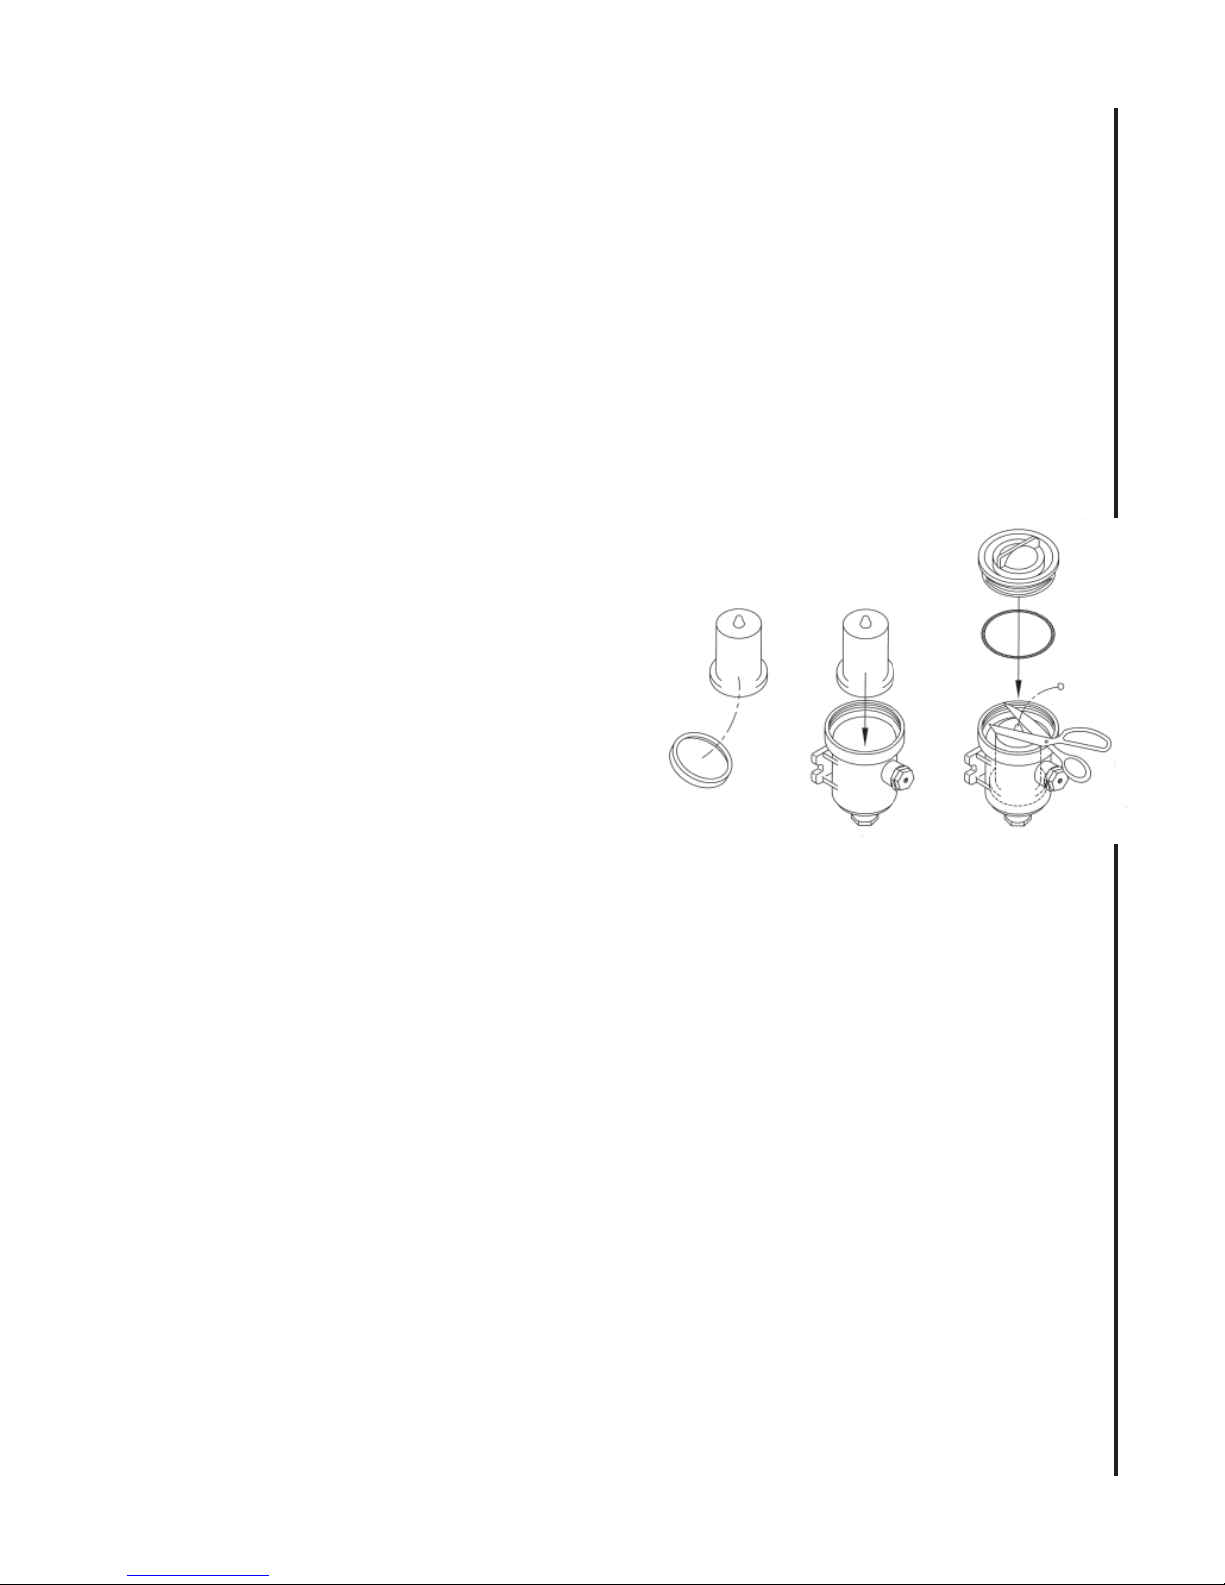
REPLACING TABLET CARTRIDGE
(#41-135)
CAUTION: Tablet dispenser may be under pressure. Open lid SLOWLY
Remove used tablet cartridge -
1. With adequate ventilation available - Unscrew
tablet dispenser lid and lift out used tablet cartridge.
2. Rinse thoroughly with water to remove any residual tablet particles.
3. Clean plug assembly
CAUTION: Never dispose of tablets in a dry state
refer to MSDS for proper disposal.
4. Dispose of empty cartridge with other recyclable
plastics.
Loading new tablet cartridge in dispenser
1. Hold new tablet cartridge over tablet dispenser
with large end down. Remove tablet cartridge cap
and allow any loose tablet particles to drop into
the tablet dispenser. Slide tablet cartridge down
into tablet dispenser.
2. Cut nipple off top of tablet cartridge to create
an air hole.
3. Replace lid on tablet dispenser.
CLEANING: Do not add any other chemicals or
cleaning products to the toilet or the treatment system.
MAINTENANCE
INSTALLING TABLET CARTRIDGE
3
Page 4
Tablet Dispenser
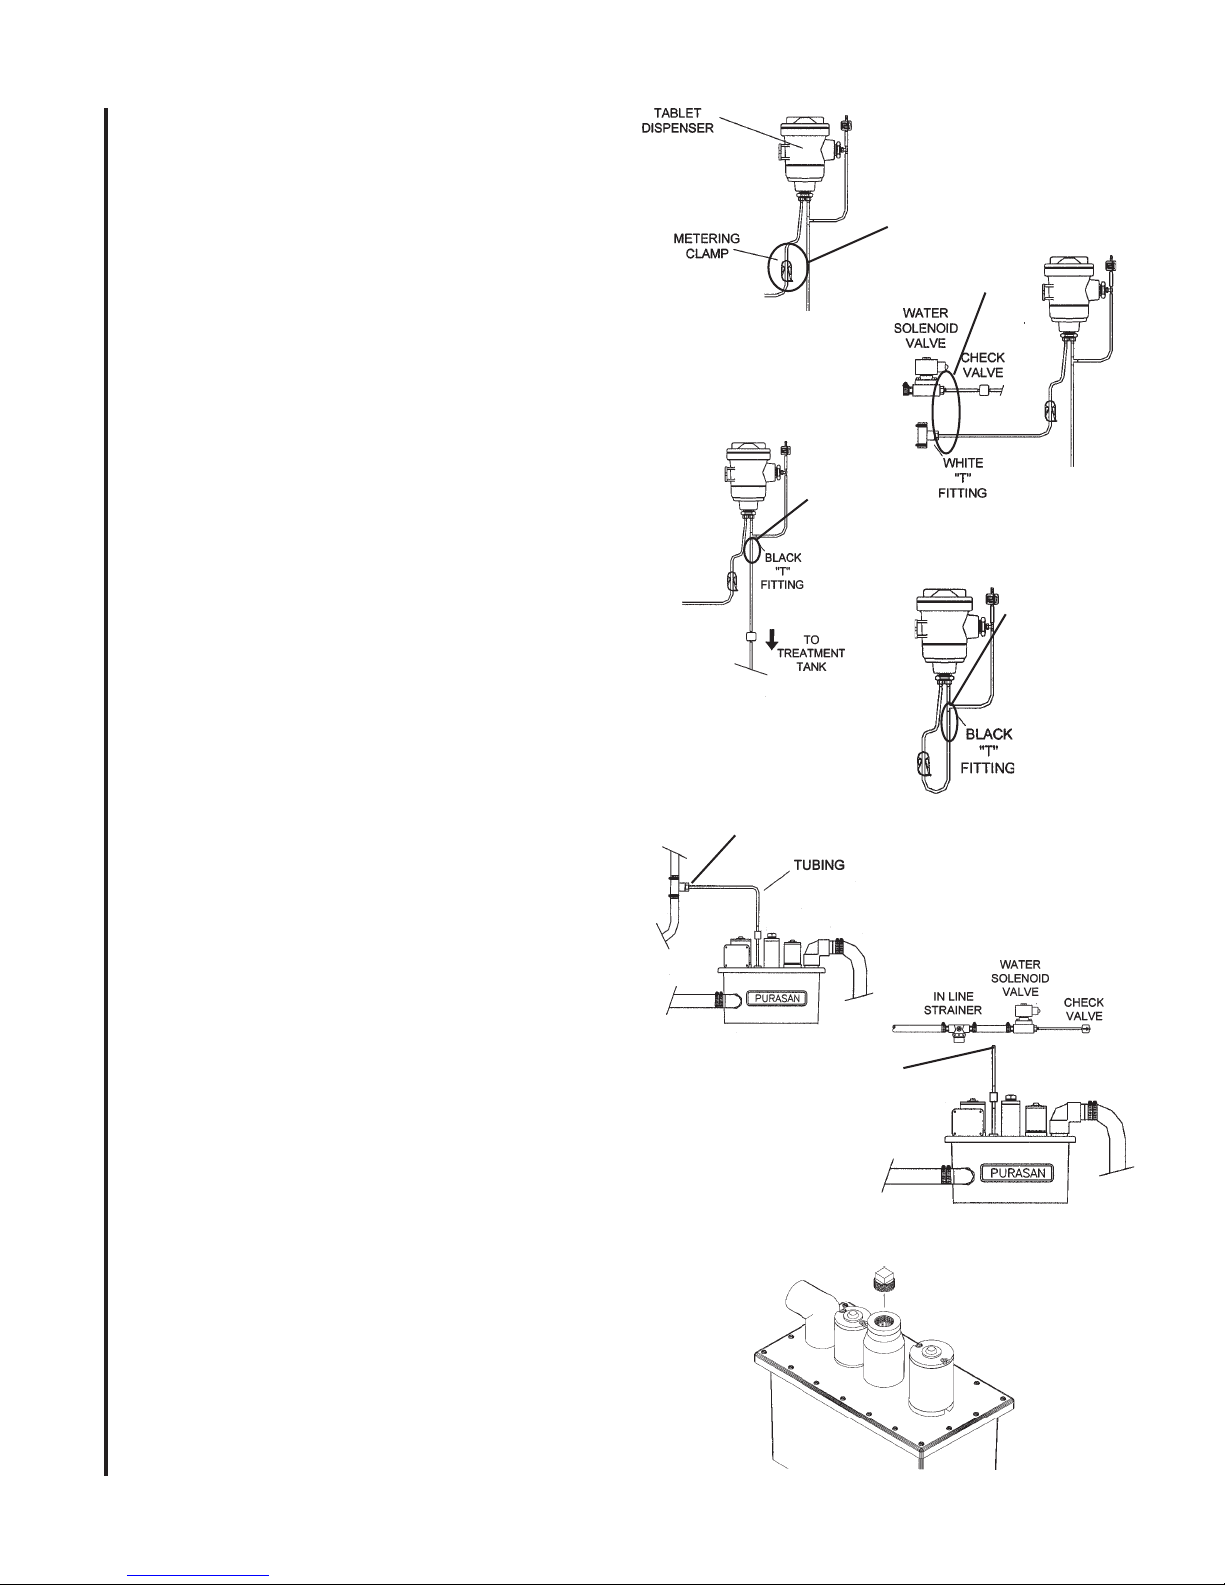
1. Close flow metering clamp and disconnect power
to water solenoid, if used, to prevent intake water from entering tablet dispenser.
2. Flush toilet and activate treatment cycle several
times to leave just water in tank.
3. Carefully remove small tube from white “T”
fitting or check valve from water solenoid valve.
Drain tube into a clean plastic container.
4. Carefully remove the small tube at the bottom of
the black “T” fitting. Drain tube into a clean plastic container.
5. Connect Tube removed in step 3 to black “T”
fitting
6a. White “T’ fitting:
WINTERIZING
Connect tube removed in step 4 to white “T”
6b. Water Solenoid Valve
plug tube removed in step 4
shut off water to valve
step 1
step 4
Close
Remove
and drain
step 3
Remove
and drain
Connect
tube
removed
in step 3
drain water from valve, hoses and strainer
7. Take solution collected in plastic container and
pour into toilet bowl. Rinse container and dispose of properly.
8. Flush toilet several more times to dilute solution
and clear it from system.
Treatment Unit
WARNING: DO NOT use anti-freeze of any kind
to winterize the Purasan system.
1. Turn off power and disconnect wires to Purasan
2. Close seacocks.
3. Slowly open crossover plug
Caution: Open plug slowly if treatment tank is at
the lowest point water will spill out
4. Using a pump, remove water from both sides of
the treatment tank through crossover cap.
5. Disconnect and drain hoses.
Connect tube
removed in step 4
step 6a
plug tube
removed in
step 5
step 4
step 6b
crossover plug
Winterizing the Toilet - Follow the instructions in
the Owner’s Manual for that particular toilet.
IMPORTANT: If toilet requires anti-freeze or other
chemicals for winterizing, DO NOT allow these
chemicals to enter the Purasan system.
4
Page 5

Recommissioning
IMPORTANT:
Do not load Tablet Cartridge into Dispenser until system is
powered and operational.
Do Not Operate Purasan until Treatment Unit is filled with
water.
Treatment Tank
1. Reconnect hoses and open seacocks.
2. Reconnect wires and turn power on.
NOTE: Purasan treatment tank must be full before activating a cycle.
IMPORTANT: Do Not connect Tablet Dispenser at this time.
3. Fill the treatment tank:
• Single button operation - Remove crossover plug from
Treatment Unit and fill with a minimum of three gallons of
water, replace crossover plug and O-ring.
• Independent operation - flush toilet allowing three gallons of
water to pass into Purasan
4. Turn on power to Purasan.
5. Check for leaks.
RECOMMISSIONING\START-UP
Reconnecting the Tablet Dispenser
IMPORTANT
• Make sure everything is working properly before proceeding.
• These instructions are the reverse operation outlined in winterizing
the Tablet Dispenser, steps 3 through 6.
1. Remove tube from the bottom of the black “T” fitting and reattach to the white “T” fitting or solenoid valve.
2. Reconnect hose on tank to the black “T” fitting on dispenser.
START UP
1. Remove Crossover Cap from treatment unit tower. Pour 3
gallons (11.5 liters) of water into Treatment Unit. Replace
Crossover Cap.
2. Turn on power to unit.
3. Fill toilet bowl half full of water before beginning.
4. Close metering clamp completely, then open slightly.
5. Flush toilet. Check water level in Tablet Dispenser during flush
cycle. Water level should rise to water line marked on Tablet
Dispenser while toilet is flushed, then drain out.
6. Adjust clamp until water reaches the line; opening clamp allows
more water into Tablet Dispenser. Flush toilet each time clamp
adjustment is changed to be sure water continues to be at the
proper level.
7. Load Tablet Cartridge.
5
Page 6
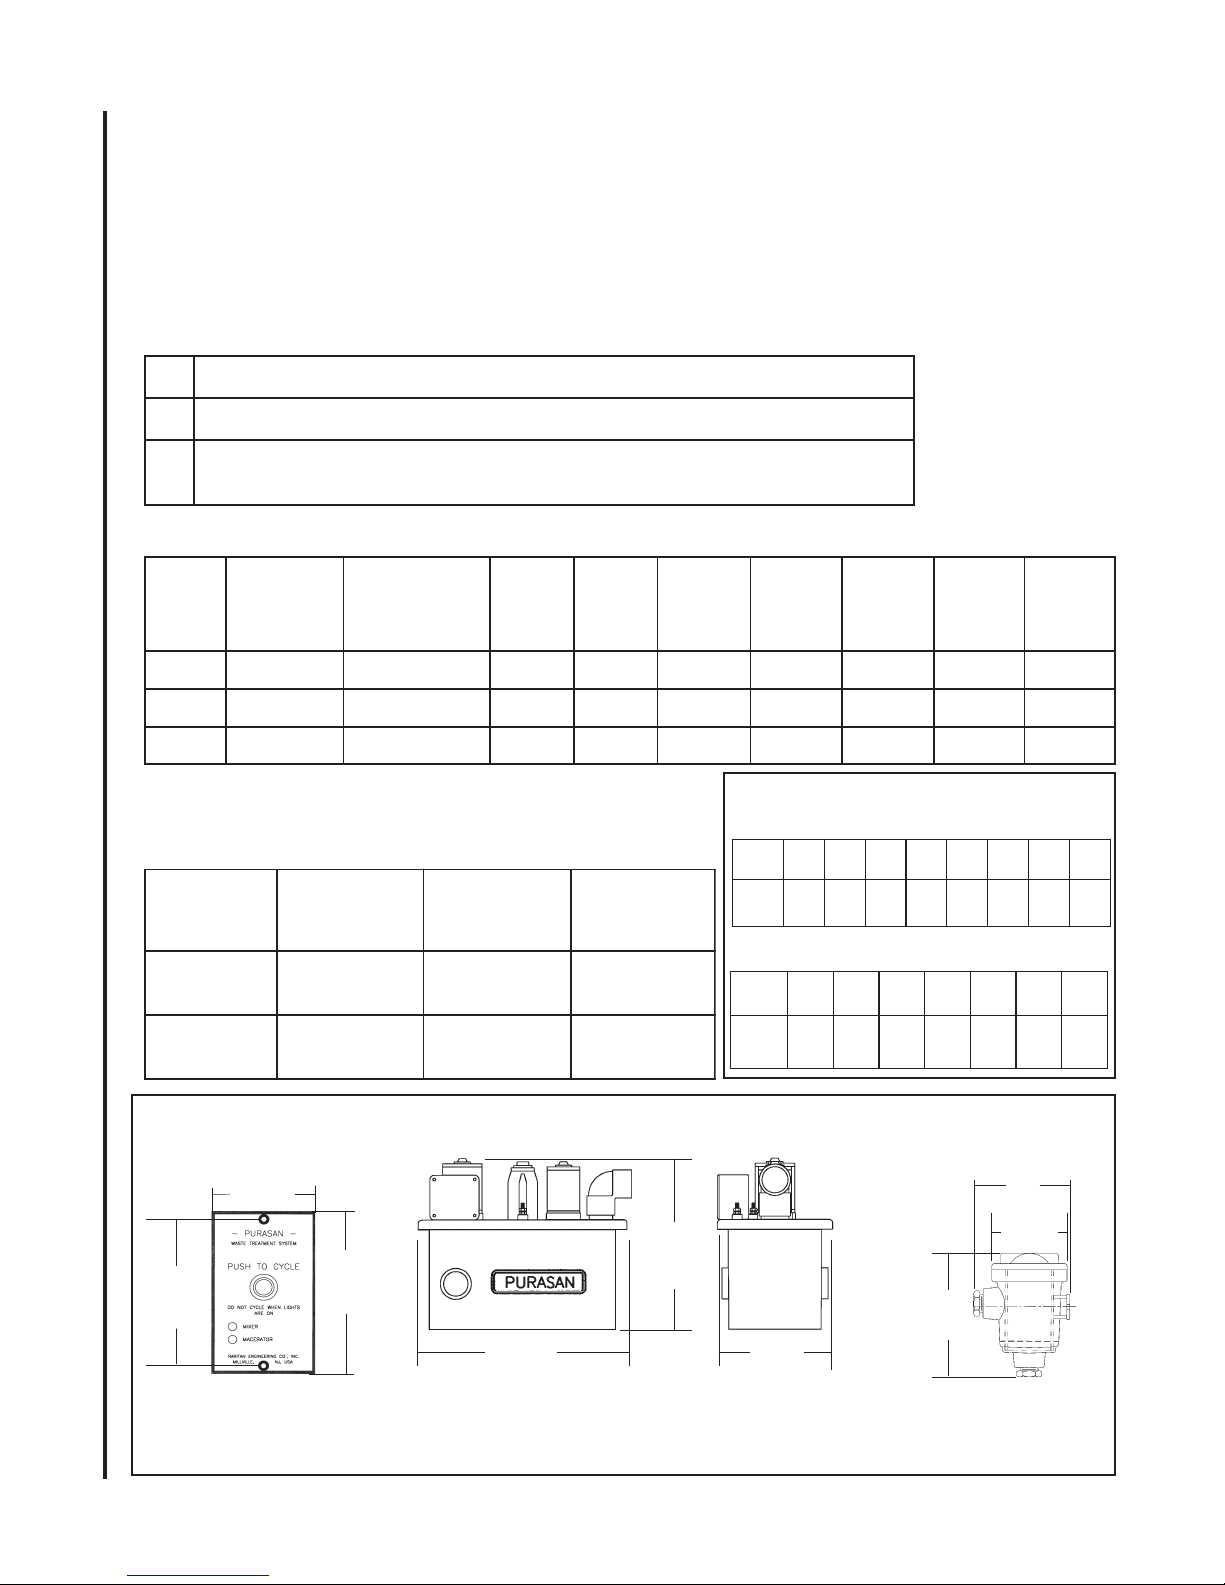
U.S.C.G. Type I MSD Certification #159.015/106/0
Maximum Roll/Pitch Angle: 30°
Maximum Temperature Exposure: 120° F (49° C)
Maximum Total Flush Volume: 1.5 gallons/flush (5.7 liters/flush)
Water - fresh, salt or brackish
NOTES: for Wiring
.1
.2
.3
Recommended Wire and Fuse/Circuit Breaker Size
stinU
egatloV
CDV210201
SPECIFICATIONS
CDV42518
CDV23518
tiucriC
esuf/rekaerB
)spma(ezis
ward.pmA
lanimon@
egatlov
01
teef
GWA21GWA21GWA01GWA01GWA01GWA8GWA6
GWA41GWA41GWA41GWA21GWA21GWA01GWA01
GWA41GWA41GWA41GWA41GWA41GWA21GW
Fuse Specifications
CDV21
epytesuF
)1F(1ESUF
rotoMrexiM
)2F(2ESUF
rotoMrotarecaM
4/16LDM
812-23
21LDM
022-24
egarepmamumixaM
rebmuntrap
wardpma5
wardpma5
CDV42
epytesuF
rebmuntrap
4/16LDM
wardpma4
812-23
4/16LDM
wardpma4
812-23
xaM
egarepmamumixaM
5LDM
5LDM
.ecruosotkcabdnatinuotecruosmorferasecnatsiD
2
mm(GWAmuminimeriwrotcudnocdednemmoceR
o
501nodesaberasezisrotcudnocdednemmoceR
.pordegatlov%3rof)
.noitalusnidetarC
.sgnitarnoitalusnirehtorofsdradnatSCYBAotrefeR
51
teef
02
teef
52
teef
03
teef
04
teef
5
0
teef
A21
CONVERSIONS
Wire - AWG to mm
614121018642
GWA
CDV23
epytesuF
egarepmamumi
rebmuntrap
2
5.15.20.40.60.010.610.520.53
mm
Feet to Meters
wardpma4
812-43
wardpma4
812-43
01510252030405
teeF
1.36.41.66.72.92.212.51
reteM
2
SWITCH PANEL
DIMENSIONS
2 ¼”
(5.7cm)
3 3/8”
c/c
(8.6cm)
3 ¾”
(9.5cm)
TREATMENT UNIT DIMENSIONS
Height:
13 ½"
(34.3cm)
Width:
16" (40.6cm)
Depth:
8 ¾" (22.3cm)
6
TABLET DISPENSER
DIMENSIONS
7 ¼”
(18.4cm)
6” (15.2cm)
Diameter
9 ¾”
(24.8cm)
Page 7
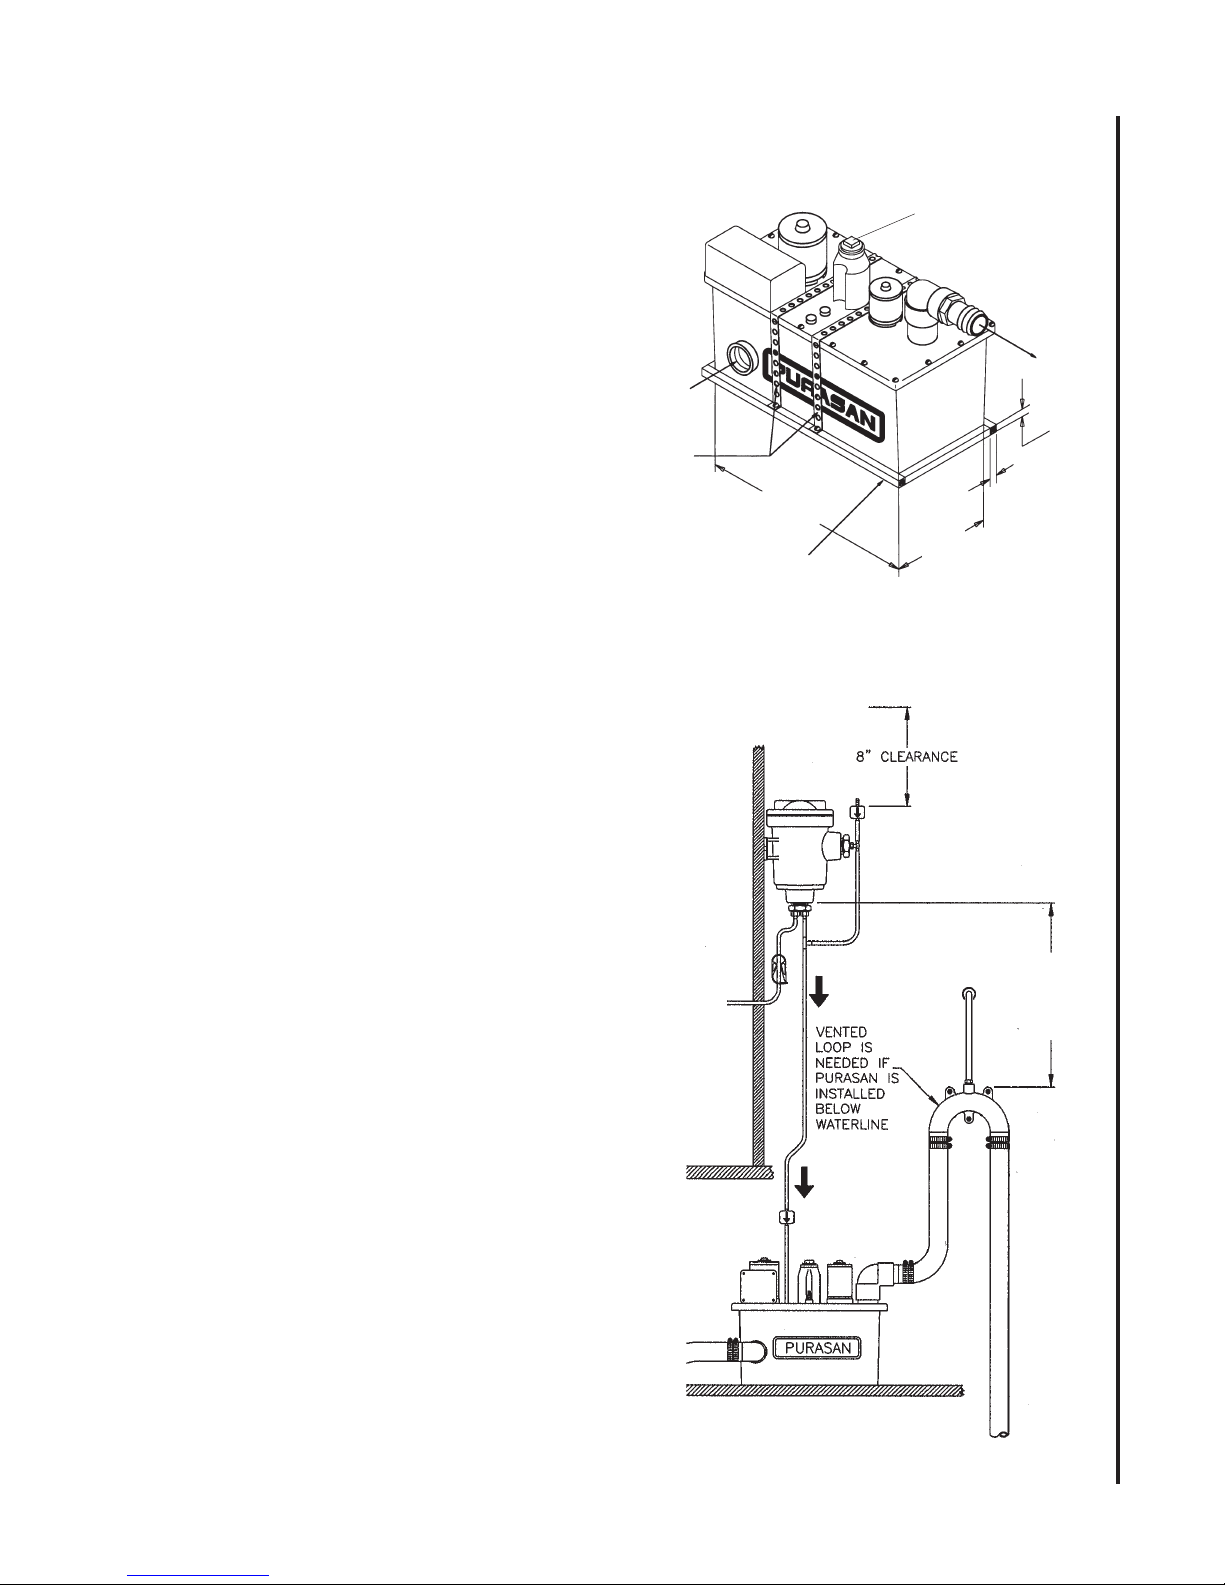
MOUNTING
Treatment Tank
WARNING: DO NOT locate in an area where
ambient temperature exceeds 120o F (49o C).
1. Locate top of treatment tank at or below
discharge of toilet and within six feet (1.5 m).
Note: If mounting treatment tank higher
than discharge. Contact Raritan
2. Make and secure mounting frame to flat
surface.
3. Secure tank to frame using 3/4" (1.9 cm)
mounting straps.
Note: Placing a 3/8" (.9 cm) rubber pad under tank
will help to reduce vibration and noise.
Switch Panel
Note: Cable supplied is 12 feet.
1. Locate in head compartment where indicator
lights will be visible.
2. Using template provided, mark the cutout for
the panel.
3. Route cable between Switch Panel and
Purasan Treatment Unit.
4. Attach wires per wiring section to back of
switch panel.
5. Mount panel using 4 screws. Apply a bead of
nonpermanent sealant around rear edges of
panel if located in shower area.
Treatment Unit Mounting
INTAKE
Mounting
Straps -
not
included
Mounting Frame*
14 1/8"
(35.9cm)
INSTALLATION
Crossover Plug
DISCHARGE
1" (2.5cm)
1" (2.5cm)
7"
(17.8 cm)
Purasan Tablet Dispenser
1. Locate bottom of Tablet Dispenser a minimum
of 15” (38 cm) above the top surface of the
Treatment Unit or top of vented loop (if used).
2. Locate Tablet Dispenser with a minimum of
8” (20 cm) of clearance for removing the lid
and periodically changing the cartridge.
Note: Supplied tubing to connect intake water
to dispenser is 6 feet (1.8 m) in length.
3. Attach to wall or suitable structure using 1/4”
(6 mm) bolts.
IMPORTANT: Do Not load Tablet Cartridge
into Tablet Dispenser at this time. Load
Tablet Cartridge after completing Start Up
procedure.
15” or
higher
7
Page 8
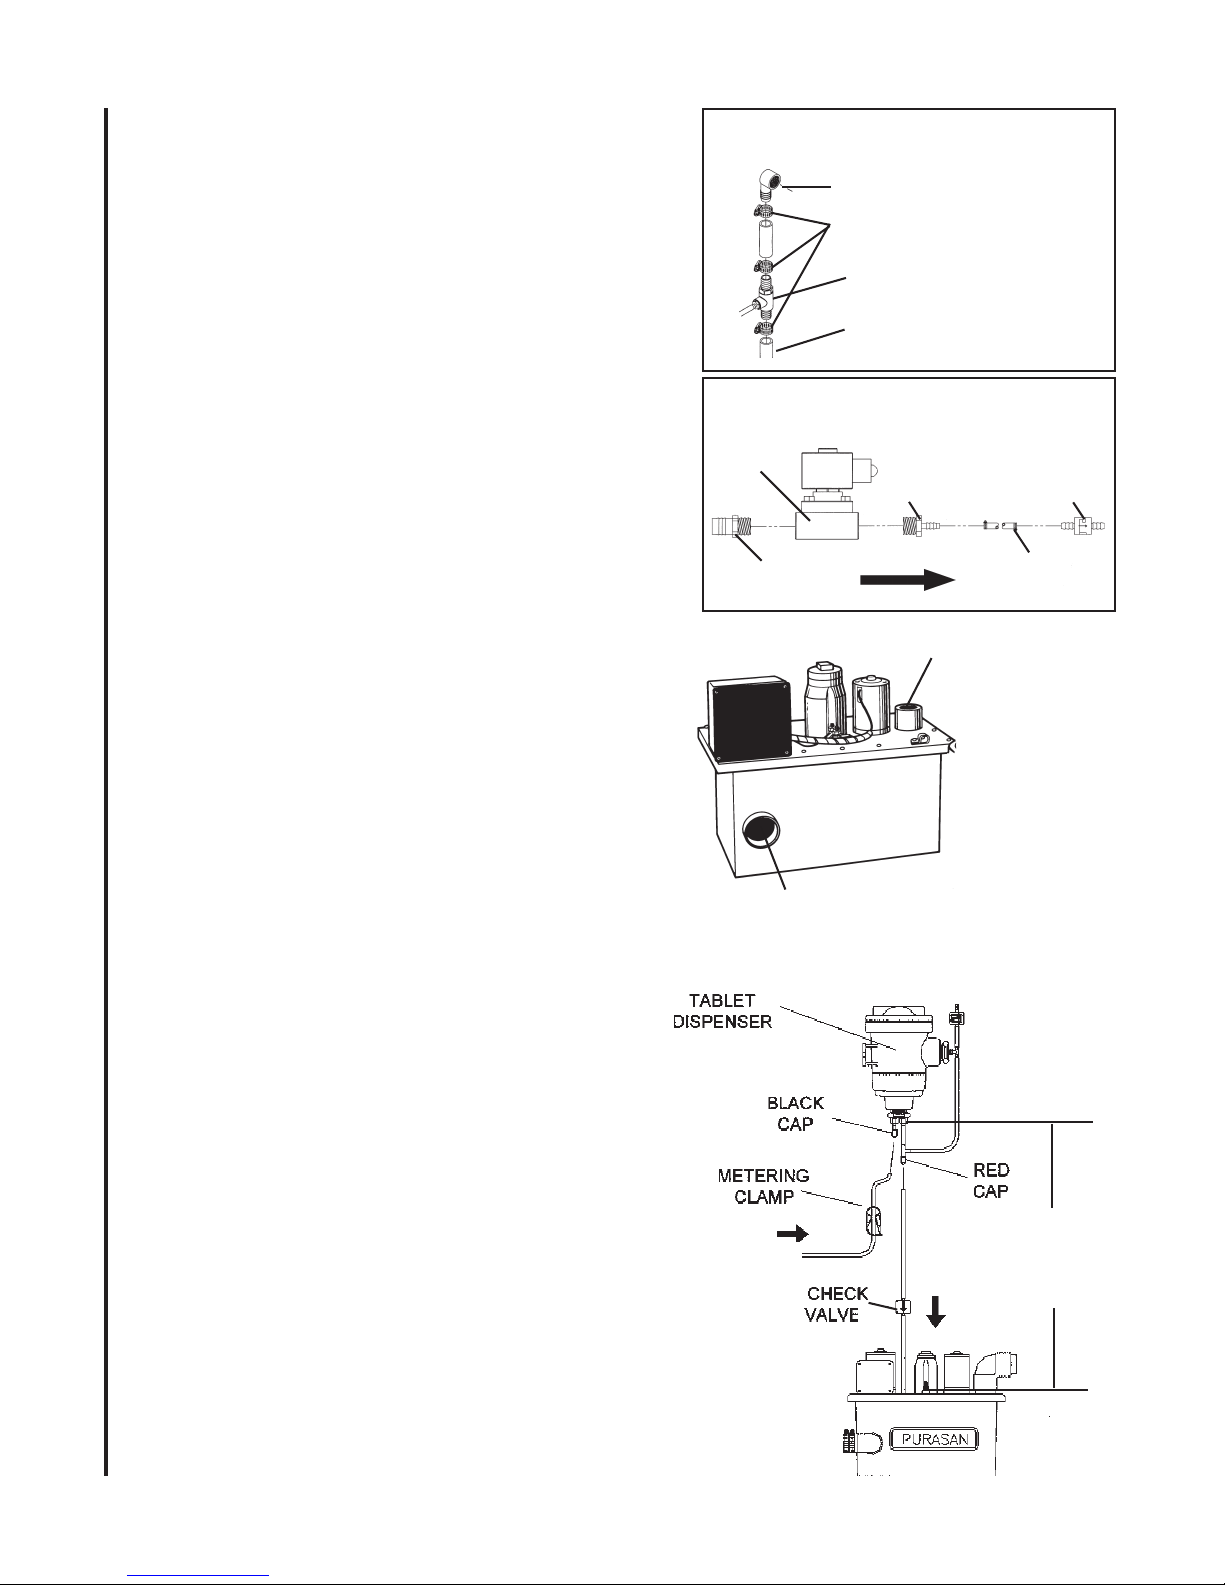
Raw Water Toilets -
1. Turn off power to toilet.
2. Close intake and discharge seacocks and
drain water from toilet system.
3. Disconnect intake hose from bowl elbow.
4. Remove existing bowl elbow and install new
bowl elbow supplied with Purasan.
5. Insert the “T” fitting in the hose between the
output of the pump and the new bowl elbow.
Fresh Water/Manual Toilets -
1. Connect reducer bushing to incoming side of
solenoid valve.
2. Connect 1/4” nipple fitting to outgoing side
of solenoid valve.
3. Install supplied strainer between water source
and solenoid
4. Check valve MUST be installed between solenoid valve and tablet dispenser.
Raw water toilets
Bowl elbow with restrictor
Hose clamps
T Fitting
Water supply from
pressure side of pump
Pressurized fresh water toilets
water
solenoid
adapter
restrictor
fitting
Check
valve
Tubing with
clamps
WARNING:
INSTALLATION
• All installations made below the waterline MUST
be protected by installing vented loops
• Always double clamp fittings below waterline
• Do Not use metal fittings
NOTE: Use PTFE tape or nonpermanent thread
sealing compound on threaded PVC fittings and
connections. Avoid low areas in hose that would
allow untreated waste to collect.
1. Connect discharge of toilet to one intake port.
2. Insert plug or second toilet discharge into other
intake port.
3. Determine position and glue discharge elbow to
top of tank using PVC cement.
4. Connect discharge hose from elbow to thru hull
fitting.
IMPORTANT: Be certain that the discharge
elbow is in the correct position before gluing.
Tablet Dispenser
IMPORTANT: 1/4” Tube to treatment tank must
run downward with no loops, kinks or upward
turns.
1. Connect 1/4” tubing from the black “T” fitting at
the dispenser (red cap) to the check valve on the
top of the treatment unit.
2. Slide flow metering clamp onto remaining tube
3. Install tube with flow metering clamp from White
“T” (in raw water installation) or Solenoid valve
(in pressurized freshwater installation) to bottom
of tablet dispenser (black cap).
Discharge from
Purasan to thru-hull
INTAKE
Discharge from toilet to either side
- Install plug in side not used
15 minimum
to top of tank
or vented loop
(if used)
8
Page 9
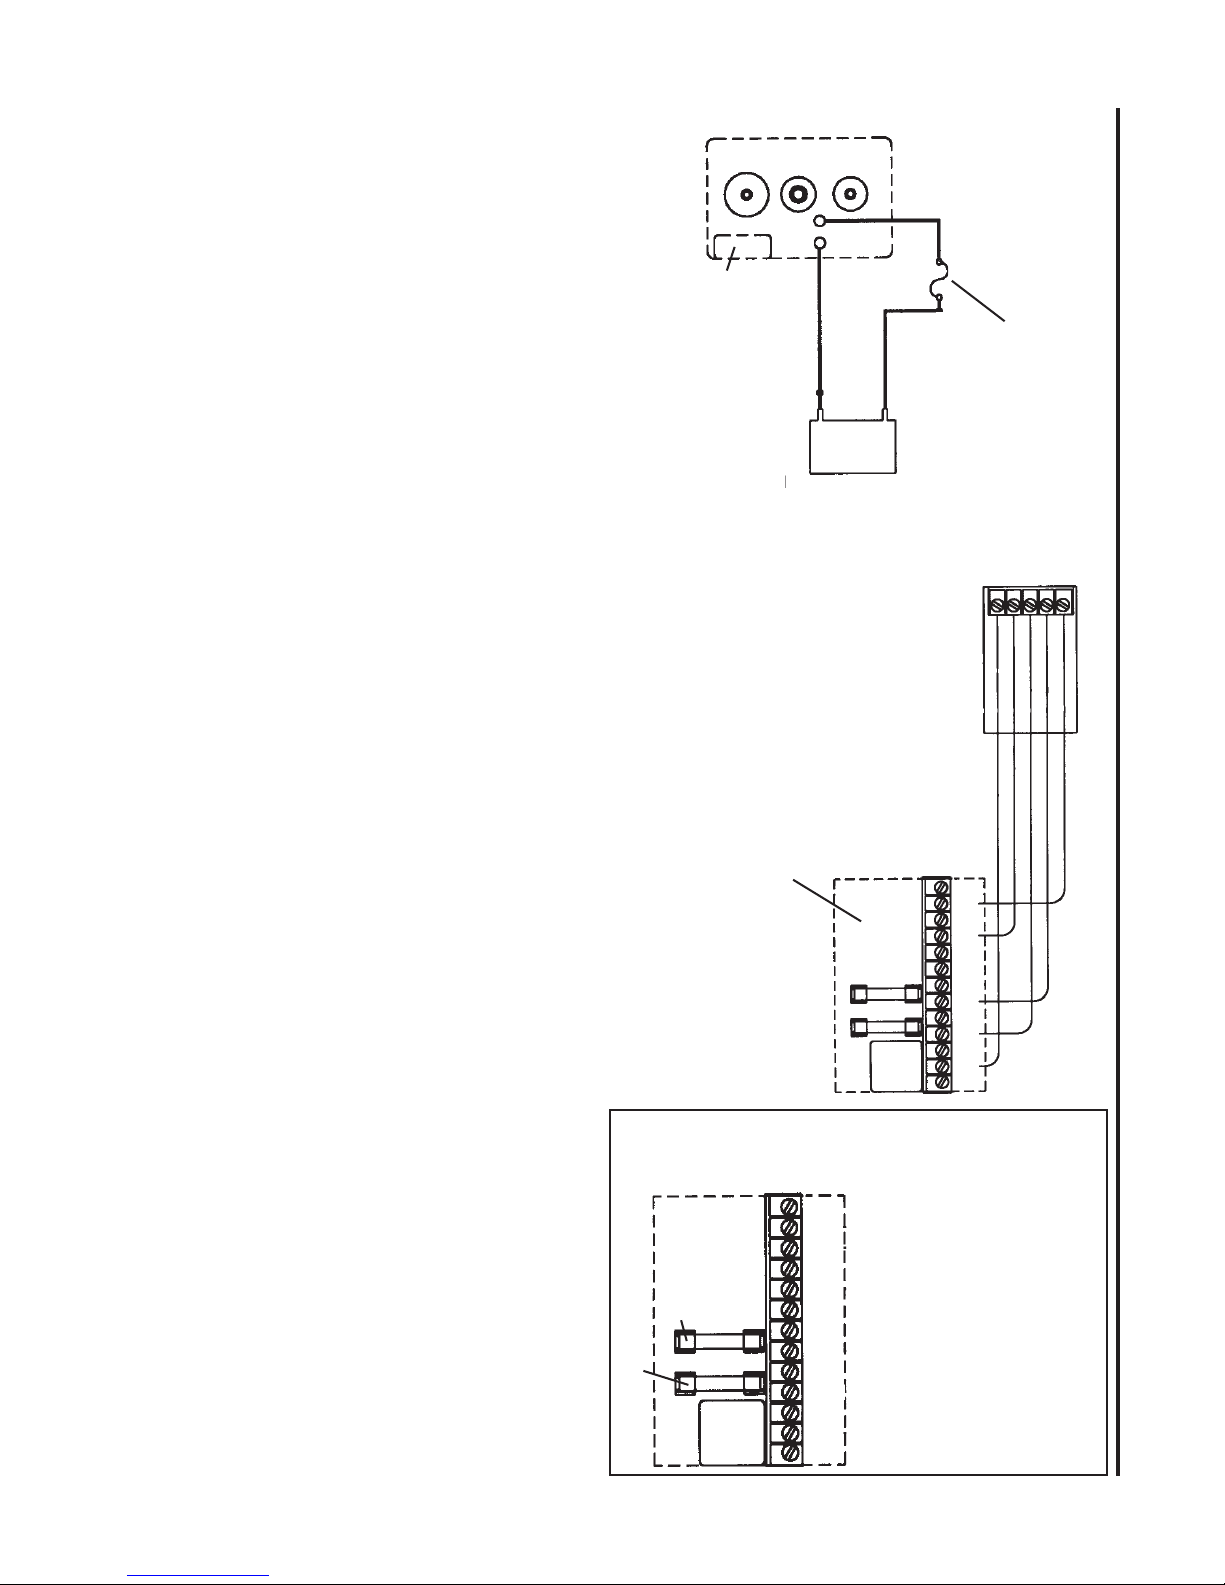
WIRING
WARNING: Hazard of Shock and Fire
• Always use proper wire, wire connectors
and fuse/circuit breaker. See Specification
Chart.
• Secure wire properly.
• Do not connect other appliances to Purasan
circuit.
• Make sure power is off before proceeding.
• Improper wiring can damage the Circuit
Board and void warranty.
NOTE: Raritan recommends that the electric
toilet be installed for single touch operation.
Purasan Treatment Unit
+
_
Control Box
_
+
Battery
WIRING
Fuse/breaker per
specifications
Treatment Unit
1. Determine proper wire size from wire chart on
specifications page.
2. Run supply wire from source to Positive (POS)
and Negative (NEG) terminals on Treatment tank.
3. Fuse or circuit breaker must be installed between
source and Purasan on positive wire.
Switch Panel
1. Connect cable from Switch Panel to Circuit
Board as follows:
S1 to S1 - red wire
S2 to S2 - orange wire
L1 to L1 - green wire
L2 to L2 - white wire
S4 to S4 - black wire
S1- Red
S2 - Orange
L1 - Green
L2 - White
S4 - Black
Switch Panel
Control
- IN
S4
S6
S2
S3
S5
H1
L2
M2+
L1
M1+
S1
+IN
WIRE CONNECTIONS - Not all connections will
be made, depends on installation options chosen
F1 - Mixer
F2 - Macerator
9
- IN Battery Negative
S4 Black to switch panel
S6 Orange to switch panel #2
S2 Orange to switch panel #1
S3 (+) external out
S5 Auxiliary switch
H1 (-) to solenoid (Toilet #1)
L2 White to switch panel (s)
M2+ (+) to mixer motor
L1 Green to switch panel (s)
M1+ (+) to macerator motor
S1 Red to switch panel(s)
+IN Battery Positive
Page 10
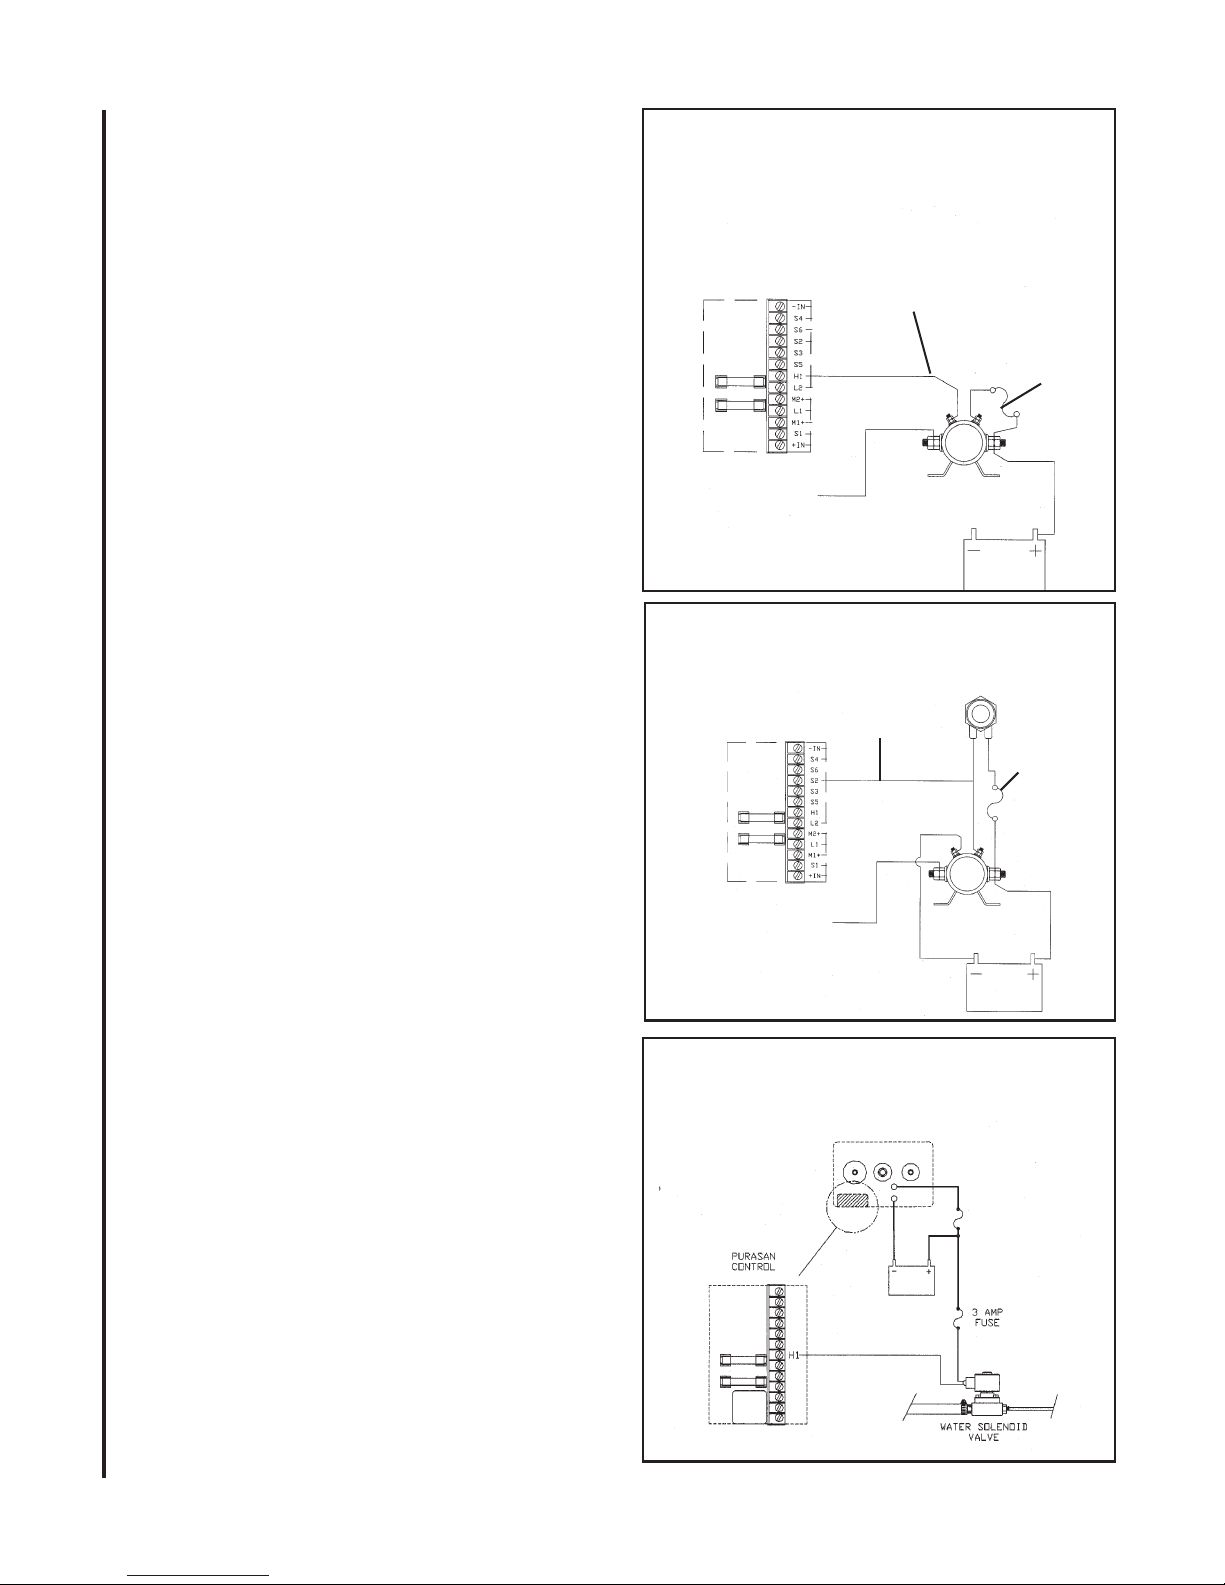
Flushing Option #1:
"Push to Cycle" button activates both the toilet
and treatment cycle.
Note: Toilet flush time is set at 10 seconds, after
initial 10 seconds holding the button down will
momentarily flush the toilet.
1. Mount Switch Panel near toilet.
CAUTION: Use only the Raritan #CDS (fail-
WIRING
ure to do so will damage to the Control
Board, voiding warranty).
TYPICAL INSTALLATION - Flushing Option #1
“Push to Cycle” also activates toilet single toilet installation
Small post on
CDS to H1
jumper wire
with
3 amp fuse
2. Run 16 ga. wire from terminal H1 on Circuit
Board to one of the small relay terminals.
3. Run a wire from the other small relay terminal
to the Positive supply from battery with a 3 amp
fuse.
Flushing Option #2:
Toilet Push Button -
Flushing toilet will activate treatment cycle.
Note: Toilet may be flushed as often as necessary,
do not exceed recommended flush volume.
1. Mount Switch Panel near toilet.
CAUTION: Use only the Raritan #CDS (failure
to do so will damage to the Control Board,
voiding warranty).
2. Run 16 ga. wire from small relay terminal to S2
on Circuit board and one post of the PBS (push
button switch)
on Treatment tank
Purasan Circuit Board
To toilet
positive (+)
TYPICAL INSTALLATION - Flushing Option #2
“Push Button” also activates Purasan single toilet installation
Small post on CDS
to S2 and PBS
on Treatment tank
Purasan Circuit Board
To toilet
positive (+)
CDS
Battery
PBS
3 amp
Fuse
CDS
Battery
Freshwater, dual installation and manual
toilets:
Solenoid valve supplies water to
tablet dispenser -
1. Mount Switch Panel near toilet.
2. Run 16 ga. wire from battery positive to one of
the wires on the solenoid with 3 amp fuse in line.
3. Run 16 ga. wire from wire on solenoid not used
to H1 on Purasan Circuit Board.
TYPICAL INSTALLATION - freshwater, dual
installation and manual toilets
Solenoid required to supply water to tablet
dispenser
Battery
10
Page 11

No Water to tablet dispenser
• Clogged check valve (T-fitting #41-200)
Clean or replace check valve
• Clogged intake fitting to dispenser
Clean plug assembly
• Intake pump or solenoid valve not functioning
Check pump or solenoid for proper operation
• Intake tubing clogged
clean or replace intake tubing
• Bowl Elbow was not changed
install bowl elbow with restrictor, supplied
Overflow or water level too high in dispenser
• Metering clamp not adjusted properly
Adjust clamp (see start up)
• Clogged discharge fitting in tablet dispenser
Clean plug assembly
• Clogged Check valve (41-111)
Clean or replace check valve
• Tablet dispenser not mounted correctly
Tablet dispenser must be 15” or higher from top of
vented loop or treatment lid
Nothing happens when button is pushed
TROUBLESHOOTING
TROUBLESHOOTING
WARNING: After the tablet dispenser
has had water added, it contains a very
strong halogen solution. Always wear
protective gloves and ventilate well to
work on tablet dispenser. Before doing
any maintenance or repairs, follow
WINTERIZING/STORAGE procedures
TABLET DISPENSER
CAUTION: Tablet Dispenser may be
under pressure open lid slowly to relieve
pressure.
• Fuses blown
Check fuses
• Switch panel bad
Replace switch panel
11
Page 12
10
43
41-100
32
31
45
6
49
42
29
28
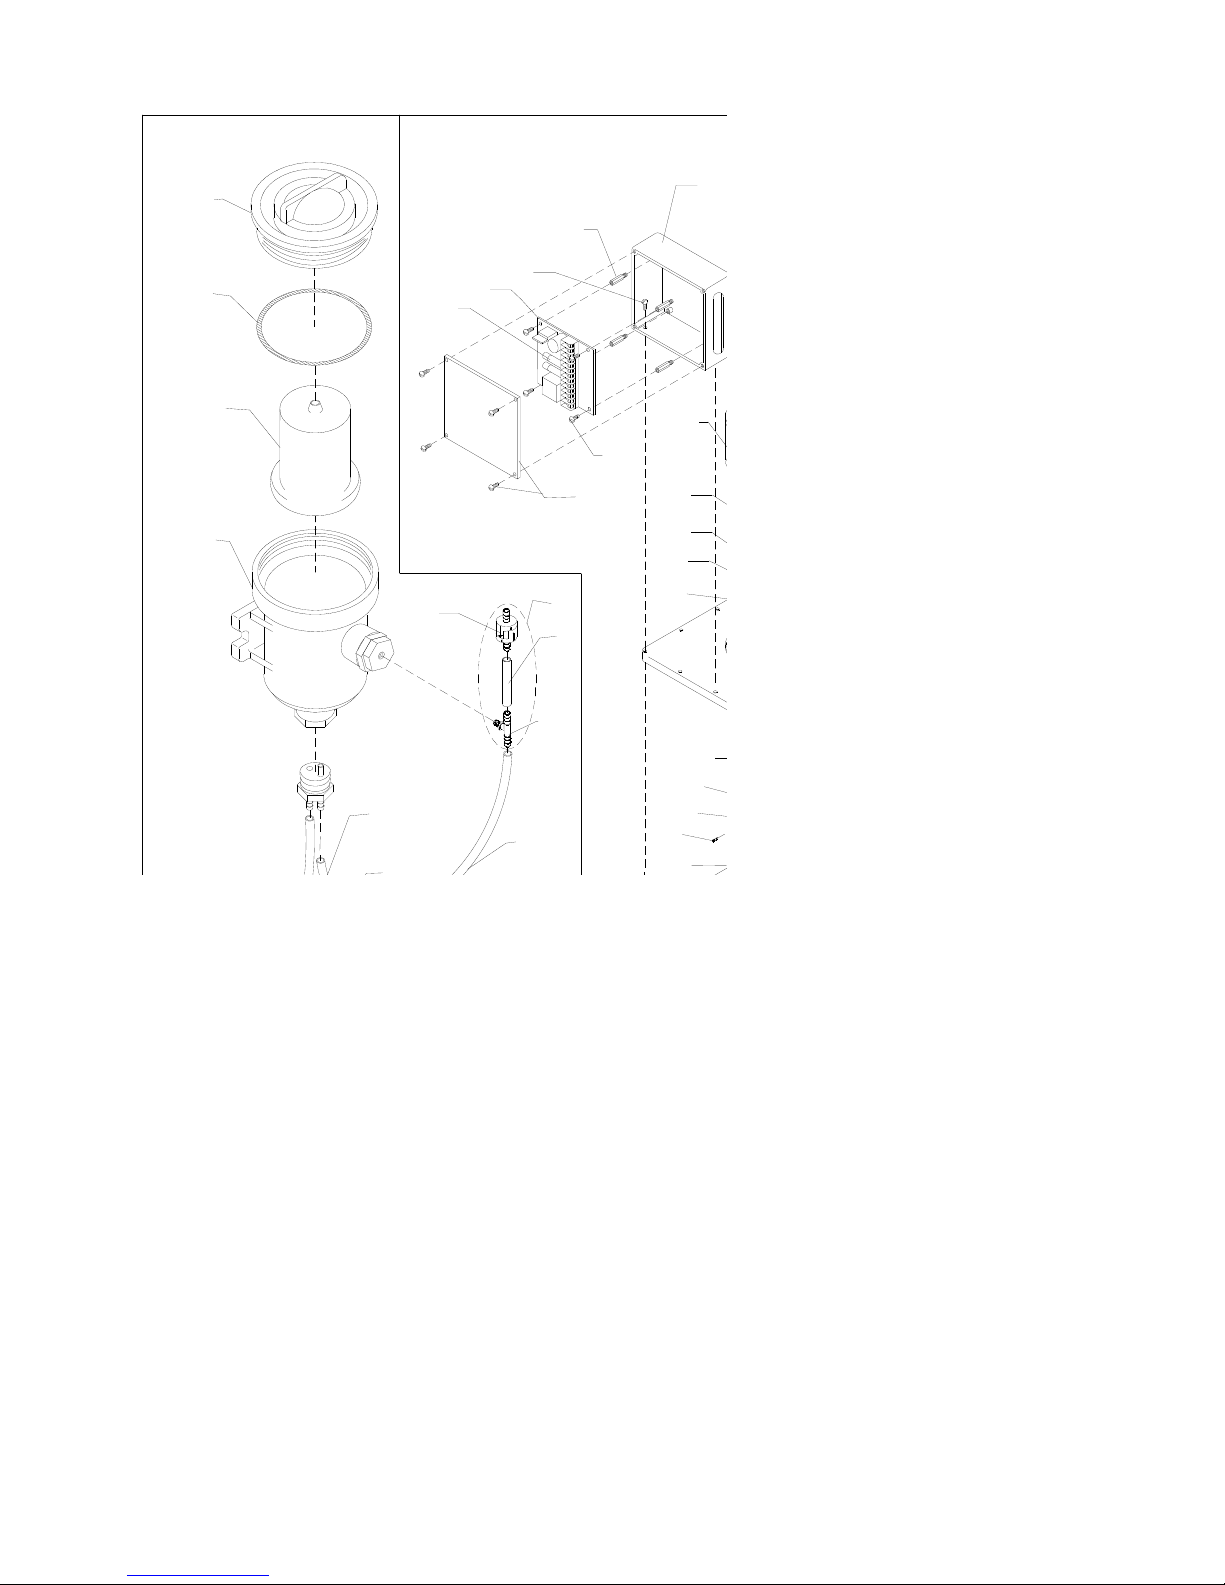
EXPLODED PARTS
23
53
23
50
55
23
43
22
47
56
64
63
21
7
8
18
17
12
Page 13

PURASAN PARTS LIST
Item Part # Description
1 32-102AW Mixer Motor 2 1/2" Dia. 12 V DC
1 33-102AW Mixer Motor 2 1/2" Dia. 24 V DC
1 34-102AW Mixer Motor 2 1/2" Dia. 32 V DC
2 31-121 Hose Fitting (2)
3 31-120 Discharge Elbow 90
6 31-106 Cover Hold down Bolt, 10-32 x 7/8", S/S (18)
7 31-103 Motor Shaft Bushing (2)
8 31-113-3 Motor Hold down Bolt, 10-32x1", S/S (4)
9 31-109 Mixer Impeller
10 31-110-1 Impeller Bolt, 12-24 x 5/8", S/S (2)
11 31-110-2 Impeller Lock Washer, #12, S/S (2)
12 31-114 Cover Hold down Nut, 10-32 (18)
13 31-115 Treatment Tank
14 31-122 Intake Plug
15 41-102 Tank Divider
16 31-112 Cover Gasket
17 31-108 Macerator Set Screw
18 31-107 Macerator Impeller
19 31-101W Treatment Cover
21 31-102 Motor Shaft Seal (2)
22 33-101AW Macerator Motor 12 V DC
22 34-101AW Macerator Motor 24, 32 V DC
23 31-305 1/4" I.D. Tubing
24 41-115 Union Tee 1/4" Barbed
25 31-104C Crossover Plug
26 31-105 O-Ring
27 41-125 Bottom Plug Assy.
28 41-130 Dispenser Body (PVC)
29 41-135 Cartridge (refill) PURASAN Tablets
Note: Cartridge must be shipped in a
separate container, call 856-825-4900.
30 31-101-2 Slinger (2)
31 RWS5 "O" Ring
32 41-131 Dispenser Cap
33 31-307D1 Outlet Adapter
34 31-307E O Ring
37 31-307D T-Check Valve Body
38 41-205 Check Valve Assy.
41-200 T-Check Valve, Complete (33,34,37,38)
39 41-350 Switch Panel Complete
40 41-355 Control Cable
41 31-304C Flow Metering Clamp
42 32-218 Fuse: F1, MDL 6 1/4
42-220 Fuse: F2, MDL 12 (12 V DC, 1 Req’d.)
32-218 Fuse: F1/F2, MDL 6 1/4 (24 V DC, 2 Req’d)
34-218 Fuse: F1/F2, MDL 5 (32 V DC, 2 Req’d.)
43 41-301 Control Box w/Cover and Screws
45 F41-312 Standoff (4)
47 CH46VT Circuit Board Mounting Screw (4)
49 42-303 Circuit Board, 12 V DC
43-303 Circuit Board, 24 V DC
44-303 Circuit Board. 32 V DC
42-300 Electronic Control Complete*, 12 V DC
43-300 Electronic Control*, 24 V DC
44-300 Electronic Control*, 32 V DC
*Incl. #43, 45, 47, 49
o
(12 V DC, 1 Req’d.)
Item Part # Description
50 41-110 Vent Kit for Tablet Dispenser (Incl. #53,
54, & 55)
51 M31 #14 Brass Flat Washer (4)
52 M30 1/4"-20 Brass Nut (4)
41-100 Tablet Dispenser Complete(less cartridge)
41-200 T-Fitting (Incl. #33, 34, 37 &38)
42-1000 Treatment Unit Complete 12 V DC
43-1000 Treatment Unit Complete 24 V DC
44-1000 Treatment Unit Complete 32 V DC
CDS* Continuous Duty Solenoid
PSTDC03 Purasan Dual Control
53 41-111 Check Valve
54 31-305 2" (5cm) long 1/4" I.D. Tubing
55 41-106 "T" Fitting
56 31-325 Adapter
57 31-319 3/8” x 1 3/4” Tubing
58 41-111 Check Valve
61 31-102-3 Mixer seal washer
62 31-102-4 Mixer retaining ring
63 31-102-1 Macerator seal washer
64 31-102-2 Macerator retaining ring
Pressurized Kit Part # 41-254
190601 In-line Strainer
31-305 1/4” tubing
41-111 Cartridge check valve
41-261 fitting with restrictor
41-280 hose clamps
PLA14 adapter: 1/2” MNPT X 3/4”
PLA15 adapter: 3/8” x 1/4”
PLA16 adapter: female 1/2” x 1/4”
Pump Kit Part # 41-253
31-305 Tubing
41-200 T-fitting
41-260 Bowl elbow with restrictor
PLA15 Adapter: 3/8” x 1/4”
* Specify Voltage (12, 24 and 32 VDC)
EXPLODED PARTS
13
Page 14
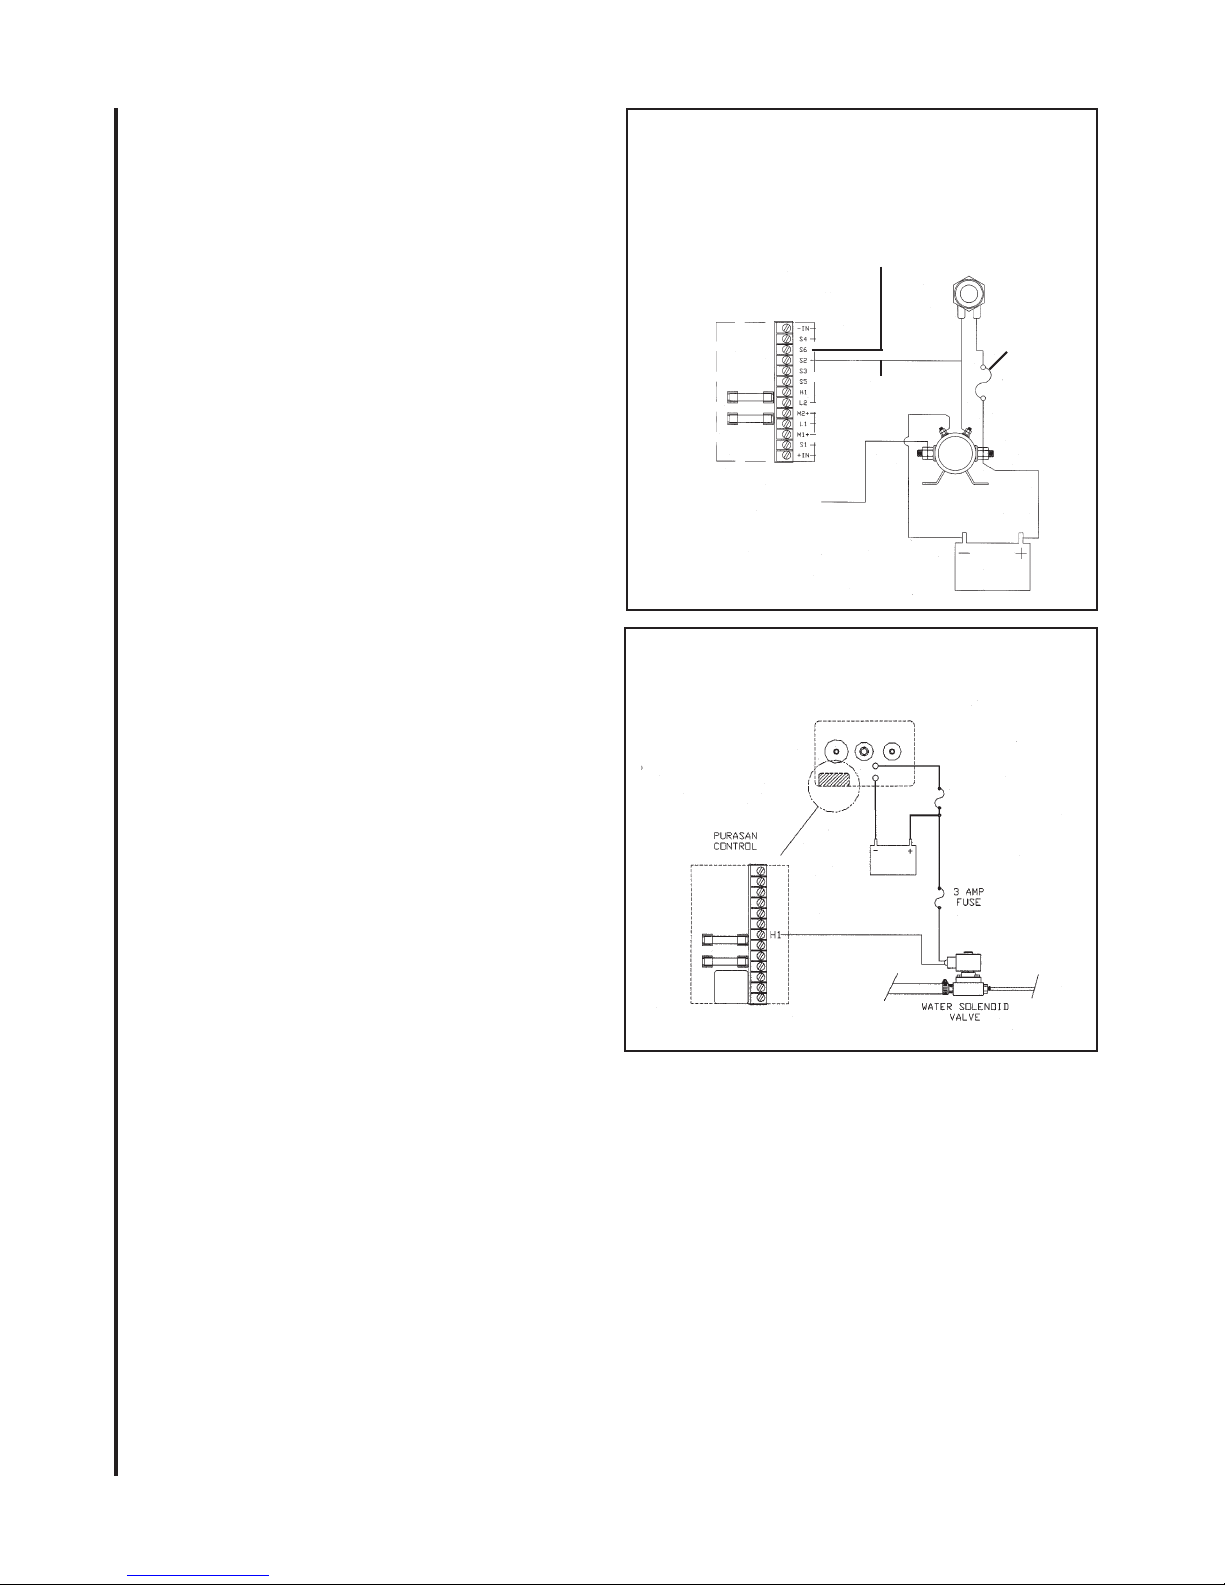
IMPORTANT:
Dual toilet installations require either
independant operation of toilet and
treatment cycle or activation from the
toilet of the treatment cycle.
Dual installations require only one
dispenser, water to fill dispenser MUST
be supplied using a freshwater solenoid.
WIRING
Switch Panel (2nd one)
1. Connect cable from Switch Panel to Circuit
Board as follows:
S1 to S1 - red wire
S2 to S6 - orange wire
L1 to L1 - green wire
L2 to L2 - white wire
S4 to S4 - black wire
Toilet activation starts treatment cycle
Flushing toilet will activate treatment cycle.
Note: Toilet may be flushed as often as
necessary, do not exceed recommended flush
volume.
1. Mount Switch Panel near toilet.
CAUTION: Use only the Raritan #CDS
DUAL INSTALLATION
(failure to do so will damage to the Control Board, voiding warranty).
2. Run 16 ga. wire from small relay terminal
to S2 on Circuit board and one post of the
PBS (push button switch)
3. Run 16 ga. wire from small realy terminal
on second solenoid to S6 on Circuit board
and one post of the second PBS.
4. Wire freshwater solenoid see below.
DUAL INSTALLATION “Push Button” also activates Purasan -
Small post on CDS
to S6 and PBS for
second toilet
Small post on CDS
to S2 and PBS
on Treatment tank
Purasan Circuit Board
To toilet
positive (+)
Freshwater Solenoid valve wiring
Battery
CDS
Battery
PBS
3 amp
Fuse
Freshwater Solenoid valve wiring
1. Run 16 ga. wire from battery positive to one
of the wires on the solenoid with 3 amp fuse
in line.
2. Run 16 ga. wire from wire on solenoid not
used to H1 on Purasan Circuit Board.
PLUMBING
Follow installation instructions on page 8 and
connect second toilet to second intake port
14
Page 15

NOTE:
Discharge of raw, untreated sewage is prohibited in all U.S. waters inside the three mile limit except in the Gulf of Mexico
where the limit is nine miles. "Y" valves, if installed, must direct toilet discharge to a U.S.C.G. approved treatment
system or holding tank and must be secured in that position while inside the three-mile limit.
The EPA standards state that in freshwater lakes, freshwater reservoirs or other freshwater impoundments whose inlets or outlets
are such to prevent the ingress or egress by vessel traffic subject to this regulation, or in rivers not capable of navigation by
interstate vessel traffic subject to this regulation, marine sanitation devices certified by the U.S. Coast Guard installed on all
vessels shall be designed and operated to prevent the overboard discharge of sewage, treated or untreated, or any waste derived
from sewage. The EPA standards further state that this shall not be construed to prohibit the carriage of Coast Guard-certified
flow-through treatment devices which have been secured so as to prevent such discharges. They also state that waters where a
Coast Guard-certified marine sanitation device permitting discharge is allowed including coastal water estuaries, the Great
Lakes and interconnected waterways, freshwater lakes and impoundments accessible through locks, and other flowing waters
that are navigable interstate by vessels subject to this regulation (40 CFR 140.3)
15
Page 16
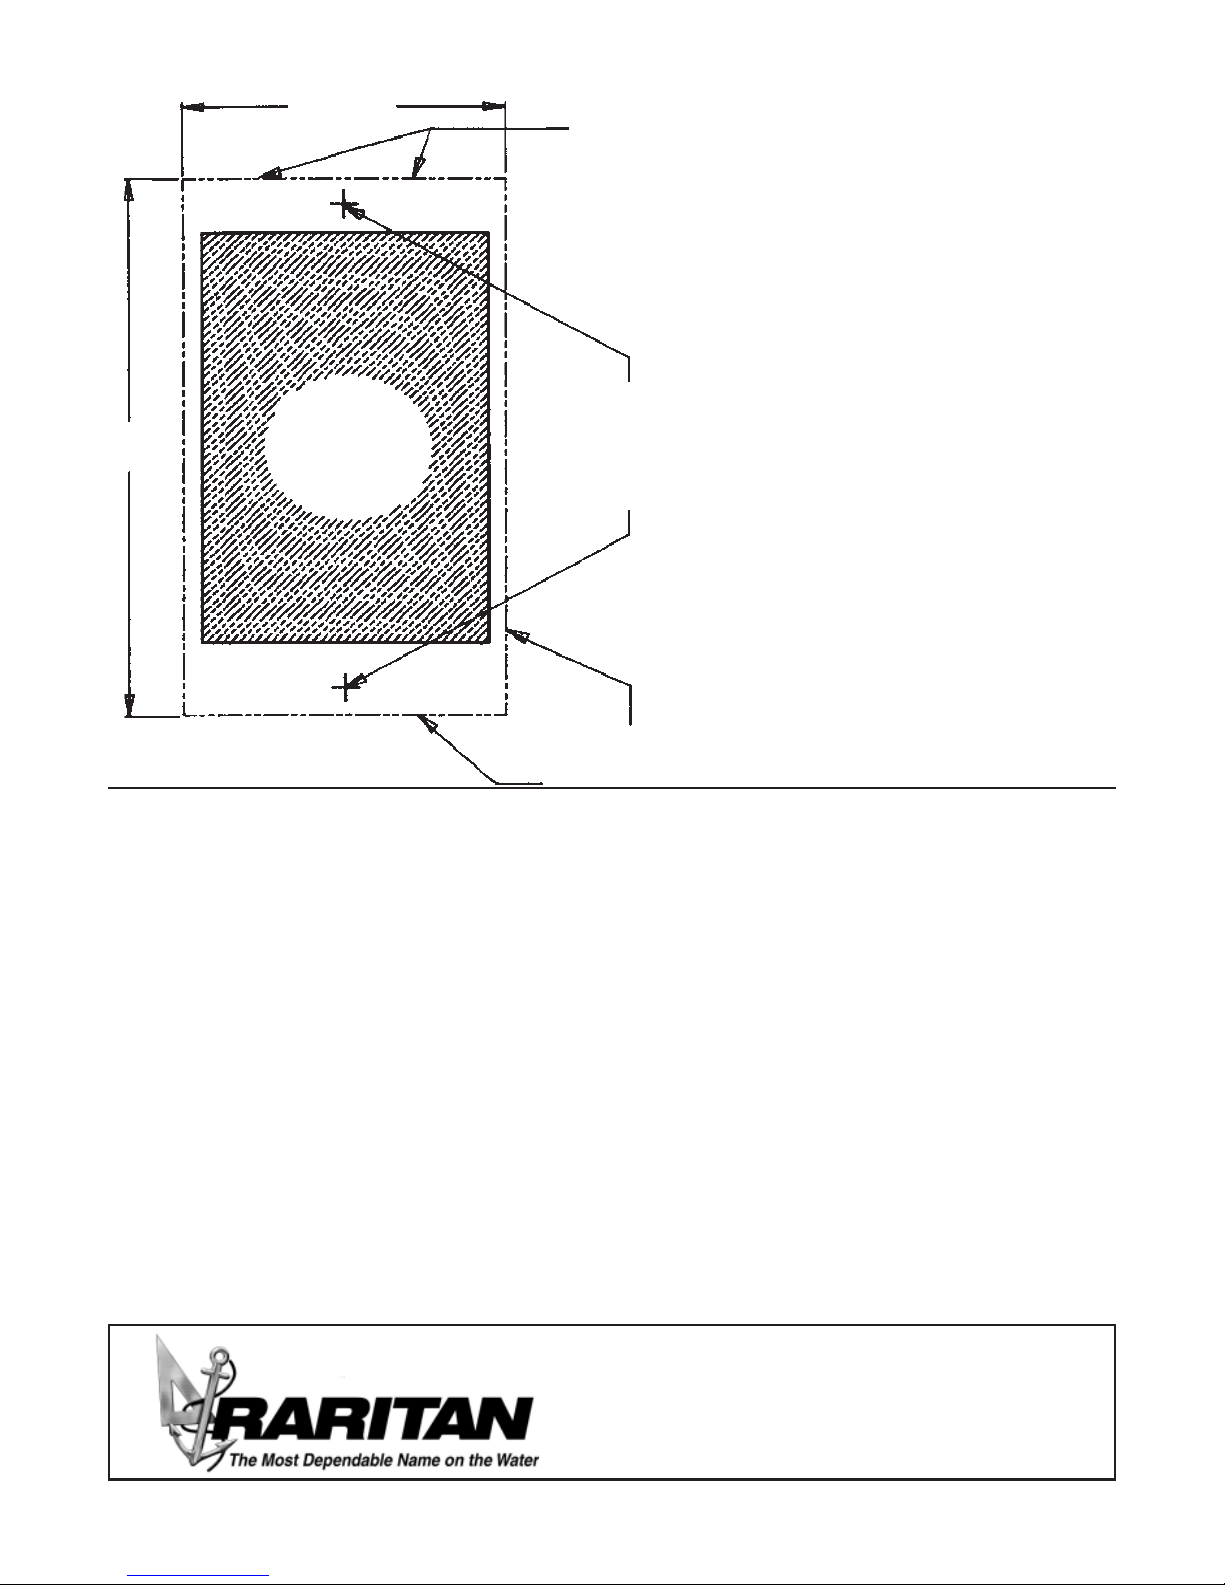
2 1/4"
(5.7cm)
Level
Across
Top
Template for
Switch Panel
3 3/4"
9.5cm
CUT OUT
HATCHED
AREA
Mark (2)
Mounting
Holes
Outline Of
Switch Panel
LIMITED WARRANTY
Raritan Engineering Company warrants to the original purchaser that this product is free of defects in materials or workmanship for a period of one year
from the products date of purchase. Should this product prove defective by reason of improper workmanship and/or materials within the warranty period
, Raritan shall, at its sole option, repair or replace the product.
1. TO OBTAIN WARRANTY SERVICE, Consumer must deliver the product prepaid, together with a detailed description of the problem, to Raritan at 530
Orange St., Millville, N.J. 08332, or 3101 SW 2nd Ave. Ft. Lauderdale, FL 33315. When requesting warranty service, purchaser must present a sales slip
or other document which establishes proof of purchase. THE RETURN OF THE OWNER REGISTRATION CARD IS NOT A CONDITION PRECEDENT
OF WARRANTY COVERAGE. However, please complete and return the owner Registration Card so that Raritan can contact you should a question of
safety arise which could affect you.
2. THIS WARRANTY DOES NOT COVER defects caused by modifications, alterations, repairs or service of this product by anyone other than Raritan;
defects in materials or workmanship supplied by others in the process of installation of this product; defects caused by installation of this product other than
in accordance with the manufacturers recommended installation instructions or standard industry procedures; physical abuse to, or misuse of, this product.
This warranty also does not cover damages to equipment caused by fire, flood, external water, excessive corrosion or Act of God.
3. ANY EXPRESS WARRANTY NOT PROVIDED HEREIN, AND ANY REMEDY FOR BREACH OF CONTRACT WHICH BUT FOR THIS
PROVISION MIGHT ARISE BY IMPLICATION OR OPERATION OF LAW, IS HEREBY EXCLUDED AND DISCLAIMED. ALL IMPLIED
WARRANTIES SUCH AS THOSE OF MERCHANTABILITY AND OF FITNESS FOR A PARTICULAR PURPOSE, IF APPLICABLE, AS WELL AS
ANY IMPLIED WARRANTIES WHICH MIGHT ARISE BY IMPLICATION OF LAW, ARE EXPRESSLY LIMITED TO A TERM OF ONE YEAR.
SOME STATES DO NOT ALLOW LIMITATIONS ON HOW LONG A LIMITED WARRANTY LASTS, SO THE ABOVE LIMITATION MAY NOT
APPLY TO YOU.
4. UNDER NO CIRCUMSTANCES SHALL RARITAN BE LIABLE TO PURCHASER OR ANY OTHER PERSONS FOR ANY SPECIAL OR
CONSEQUENTIAL DAMAGES, WHETHER ARISING OUT OF BREACH OF WARRANTY, BREACH OF CONTRACT, OR OTHERWISE. SOME
STATES DO NOT ALLOW THE EXCLUSION OR LIMITATION OF INCIDENTAL OR CONSEQUENTIAL DAMAGES, SO THE ABOVE
LIMITATION OR EXCLUSION MAY NOT APPLY TO YOU.
5. No other person or entity is authorized to make any express warranty, promise or affirmation of fact or to assume any other liability on behalf of Raritan
in connection with its products except as specifically set forth in this warranty.
6. This warranty gives you specific legal rights, and you may also have other rights which vary from state to state.
L405 0911kgs Specifications Subject to Change Without Notice Printed in U.S.A.
530 Orange Street, Millville, NJ 08332 USA
Telephone: 856-825-4900 FAX: 856-825-4409
Website: www.raritaneng.com
Southern Office and Plant:
3101 SW Second Avenue, Fort Lauderdale, FL 33315 USA
Telephone: 954-525-0378 FAX: 954-764-4370
16
 Loading...