

Raritan Dominion KX II-101-V2 User Manual

Dominion KX II-101-V2
User Guide
Release 3.5.0
Copyright © 2012 Raritan, Inc.
KX2101V2-v3.5.0-D-E
September 2012
255-62-3059-00

This document contains proprietary information that is protected by copyright. All rights reserved. No
part of this document may be photocopied, reproduced, or translated into another language without
express prior written consent of Raritan, Inc.
© Copyright 2012 Raritan, Inc. All third-party software and hardware mentioned in this document are
registered trademarks or trademarks of and are the property of their respective holders.
FCC Information
This equipment has been tested and found to comply with the limits for a Class A digital device,
pursuant to Part 15 of the FCC Rules. These limits are designed to provide reasonable protection
against harmful interference in a commercial installation. This equipment generates, uses, and can
radiate radio frequency energy and if not installed and used in accordance with the instructions, may
cause harmful interference to radio communications. Operation of this equipment in a residential
environment may cause harmful interference.
VCCI Information (Japan)
Raritan is not responsible for damage to this product resulting from accident, disaster, misuse, abuse,
non-Raritan modification of the product, or other events outside of Raritan's reasonable control or not
arising under normal operating conditions.
If a power cable is included with this product, it must be used exclusively for this product.
In Raritan products which require Rack Mounting, please follow these precautions:
Operation temperature in a closed rack environment may be greater than room temperature. Do
not exceed the rated maximum ambient temperature of the appliances. See Specifications (on
page 184).
Ensure sufficient airflow through the rack environment.
Mount equipment in the rack carefully to avoid uneven mechanical loading.
Connect equipment to the supply circuit carefully to avoid overloading circuits.
Ground all equipment properly, especially supply connections, such as power strips (other than
direct connections), to the branch circuit.

iii
Contents
Chapter 1 Introduction 1
KX II-101-V2 Overview .................................................................................................................. 2
KX II-101-V2 Help .......................................................................................................................... 3
What's New in the Help ....................................................................................................... 4
Related Documentation ....................................................................................................... 4
Product Photos .............................................................................................................................. 5
Product Features ........................................................................................................................... 5
Interfaces ............................................................................................................................. 5
Network Configuration ......................................................................................................... 5
System Management Features ........................................................................................... 6
Administration Features ....................................................................................................... 6
User Features ...................................................................................................................... 7
Power ................................................................................................................................... 7
Video Resolution.................................................................................................................. 7
Mounting .............................................................................................................................. 7
Terminology ................................................................................................................................... 7
Package Contents .......................................................................................................................... 8
Chapter 2 Installation and Configuration 9
Overview ........................................................................................................................................ 9
Default Login Information ............................................................................................................... 9
Getting Started ............................................................................................................................. 10
Step 1: Configure the Target Server.................................................................................. 10
Step 2: Configure Network Firewall Settings ..................................................................... 21
Step 3: Connect the Equipment ......................................................................................... 22
Step 4: Configure the KX II-101-V2 ................................................................................... 27
Chapter 3 Working with Target Servers 35
Interfaces ..................................................................................................................................... 35
KX II-101-V2 Remote Console Interface ........................................................................... 35
Multi-Platform Client (MPC) ............................................................................................... 43
Virtual KVM Client (VKC) ............................................................................................................. 44
Overview ............................................................................................................................ 44
Connecting to a KVM Target Server.................................................................................. 44
Toolbar Buttons and Status Bar Icons ............................................................................... 44
Power Controlling a Target Server .................................................................................... 46
Disconnecting KVM Target Servers .................................................................................. 46
Connection Properties ....................................................................................................... 47
Connection Information ..................................................................................................... 49
Keyboard Options .............................................................................................................. 49

Contents
iv
Video Properties ................................................................................................................ 55
Mouse Options ................................................................................................................... 60
VKC Virtual Media ............................................................................................................. 64
Tool Options ...................................................................................................................... 64
View Options ...................................................................................................................... 68
Help Options ...................................................................................................................... 69
Chapter 4 Virtual Media 71
Overview ...................................................................................................................................... 72
Prerequisites for Using Virtual Media ................................................................................ 74
Virtual Media in a Windows XP Environment .................................................................... 75
Virtual Media in a Linux Environment ................................................................................ 76
Virtual Media in a Mac Environment .................................................................................. 78
Conditions when Read/Write is Not Available ................................................................... 78
Using Virtual Media ...................................................................................................................... 78
Connecting to Virtual Media ......................................................................................................... 80
Local Drives ....................................................................................................................... 80
Mounting CD-ROM/DVD-ROM/ISO Images ...................................................................... 81
Disconnecting Virtual Media ........................................................................................................ 82
Chapter 5 User Management 83
User Groups ................................................................................................................................. 83
User Group List.................................................................................................................. 84
Relationship Between Users and Groups ......................................................................... 84
Adding a New User Group ................................................................................................. 84
Modifying an Existing User Group ..................................................................................... 88
Users ............................................................................................................................................ 89
View KX II-101-V2 User List .............................................................................................. 89
View Users by Port ............................................................................................................ 90
Disconnecting Users from Ports ........................................................................................ 90
Logging Users Off the KX II-101-V2 (Force Logoff) .......................................................... 91
Adding a New User ............................................................................................................ 91
Modifying an Existing User ................................................................................................ 92
Blocking and Unblocking Users ......................................................................................... 92
Authentication Settings ................................................................................................................ 93
Implementing LDAP/LDAPS Remote Authentication ........................................................ 94
Returning User Group Information from Active Directory Server ...................................... 98
Implementing RADIUS Remote Authentication ................................................................. 99
Returning User Group Information via RADIUS .............................................................. 101
RADIUS Communication Exchange Specifications ......................................................... 102
User Authentication Process ........................................................................................... 103
Changing a Password ................................................................................................................ 105
Chapter 6 Device Management 106
Network Settings ........................................................................................................................ 106
Network Basic Settings .................................................................................................... 107
LAN Interface Settings ..................................................................................................... 110

Contents
v
Device Services ......................................................................................................................... 111
Enabling Telnet ................................................................................................................ 111
Enabling SSH .................................................................................................................. 111
HTTP and HTTPS Port Settings ...................................................................................... 112
Entering the Discovery Port ............................................................................................. 112
Enabling Direct Port Access via URL .............................................................................. 112
Configuring SNMP Agents ............................................................................................... 113
Keyboard/Mouse Setup ............................................................................................................. 115
Serial Port Settings .................................................................................................................... 115
Admin Port ....................................................................................................................... 116
Raritan Power Strip Control ............................................................................................. 116
Modem ............................................................................................................................. 116
Configuring Date/Time Settings ................................................................................................. 117
Event Management .................................................................................................................... 118
Configuring Event Management - Settings ...................................................................... 118
Configuring Event Management - Destinations ............................................................... 125
Port Configuration ...................................................................................................................... 126
Managing KVM Target Servers (Port Page) .................................................................... 127
Power Control .................................................................................................................. 128
Analog KVM Switch ................................................................................................................... 133
Resetting the KX II-101-V2 Using the Reset Button .................................................................. 134
Changing the Default GUI Language Setting ............................................................................ 135
Chapter 7 Managing USB Connections 136
Overview .................................................................................................................................... 137
USB Connection Settings .......................................................................................................... 137
Advanced USB Connection Settings ......................................................................................... 138
Chapter 8 Security Management 140
Security Settings ........................................................................................................................ 140
Login Limitations .............................................................................................................. 140
Strong Passwords............................................................................................................ 142
User Blocking ................................................................................................................... 143
Encryption & Share .......................................................................................................... 145
Enabling FIPS 140-2 ....................................................................................................... 148

Contents
vi
Configuring IP Access Control ................................................................................................... 149
SSL Certificates ......................................................................................................................... 152
Security Banner ......................................................................................................................... 155
Chapter 9 Maintenance 156
Audit Log .................................................................................................................................... 156
Device Information ..................................................................................................................... 157
Backup and Restore .................................................................................................................. 158
Upgrading Firmware .................................................................................................................. 160
Upgrade History ......................................................................................................................... 161
Factory Reset ............................................................................................................................. 161
Rebooting the KX II-101-V2 ....................................................................................................... 162
Stopping CC-SG Management .................................................................................................. 163
Chapter 10 Diagnostics 165
Network Interface Page ............................................................................................................. 165
Network Statistics Page ............................................................................................................. 165
Ping Host Page .......................................................................................................................... 168
Trace Route to Host Page ......................................................................................................... 168
Device Diagnostics .................................................................................................................... 170
Chapter 11 Command Line Interface (CLI) 172
Overview .................................................................................................................................... 172
Accessing the KX II-101-V2 Using the CLI ................................................................................ 173
SSH Connection to the KX II-101-V2 ......................................................................................... 173
SSH Access from a Windows PC .................................................................................... 173
SSH Access from a UNIX/Linux Workstation .................................................................. 174
Logging in .................................................................................................................................. 174
Navigation of the CLI ................................................................................................................. 174
CLI Prompts ..................................................................................................................... 174
Completion of Commands ............................................................................................... 175
CLI Syntax -Tips and Shortcuts ....................................................................................... 175
Common Commands for All Command Line Interface Levels ........................................ 175
CLI Commands .......................................................................................................................... 176
Diagnostics ...................................................................................................................... 177
Configuration ................................................................................................................... 178
Listports Command.......................................................................................................... 180
Userlist Command ........................................................................................................... 180

Contents
vii
Chapter 12 CC-SG Management 181
Overview .................................................................................................................................... 181
Removing a KX II-101-V2 from CC-SG Management ............................................................... 182
Using CC-SG in Proxy Mode ..................................................................................................... 183
Appendix A Specifications 184
Physical Specifications .............................................................................................................. 184
Supported Operating Systems (Clients) .................................................................................... 185
Supported Browsers .................................................................................................................. 186
Connectors ................................................................................................................................. 186
Certified Modems ....................................................................................................................... 187
Supported Video Resolutions .................................................................................................... 187
Supported Keyboard Languages ............................................................................................... 188
TCP and UDP Ports Used ......................................................................................................... 189
Network Speed Settings ............................................................................................................ 191
9 Pin Pinout ................................................................................................................................ 192
Appendix B Updating the LDAP Schema 193
Returning User Group Information ............................................................................................. 193
From LDAP ...................................................................................................................... 193
From Microsoft Active Directory ...................................................................................... 193
Setting the Registry to Permit Write Operations to the Schema ............................................... 194
Creating a New Attribute ............................................................................................................ 194
Adding Attributes to the Class ................................................................................................... 195
Updating the Schema Cache ..................................................................................................... 197
Editing rciusergroup Attributes for User Members ..................................................................... 197
Appendix C Rack Mount 201
Attach the L Bracket to the KX II-101-V2 for a Horizontal Mount .............................................. 201
Appendix D Informational Notes 203
Java Runtime Environment (JRE) ............................................................................................. 203
IPv6 Support Notes .................................................................................................................... 204
Operating System IPv6 Support Notes ........................................................................... 204
Keyboard, Video and Mouse Notes ........................................................................................... 204
Sun Blade Video, Keyboard, and Mouse Support Limitation .......................................... 205
BIOS Access Limitation from a Local Keyboard .............................................................. 205
HP UX RX 1600 Keyboard and Mouse Configuration ..................................................... 206
Compaq Alpha and IBM P Server Mouse Mode Limitation ............................................. 206
Windows 2000 and Windows 2003 Server Keyboard Limitations ................................... 206
CC-SG ....................................................................................................................................... 206
Proxy Mode and MPC ..................................................................................................... 206

Contents
viii
Appendix E FAQs 207
General FAQs ............................................................................................................................ 207
IPv6 Networking ......................................................................................................................... 208
Index 211

1
In This Chapter
KX II-101-V2 Overview .............................................................................. 2
KX II-101-V2 Help ...................................................................................... 3
Product Photos .......................................................................................... 5
Product Features ....................................................................................... 5
Terminology ............................................................................................... 7
Package Contents ..................................................................................... 8
Chapter 1
Introduction
Chapter 1: Introduction
2
KX II-101-V2 Overview
Thank you for purchasing the Dominion KX II-101-V2. The KX II-101-V2
provides a single keyboard, video, and mouse (KVM) port for connection
to a target server, and a single IP port for connection to an IP network.
Within the KX II-101-V2 device, KVM signals from your server are
converted to IP format and compressed for transmission over an IP
network.
The KX II-101-V2 dongle form-factor makes it easy to install near the
target server, and each individual KX II-101-V2 device has its own IP
address. Each device is powered via an external AC-DC power pack.
The KX II-101-V2 can operate as a standalone appliance or integrated
into a single logical solution, along with other Raritan access products,
using Raritan's CommandCenter Secure Gateway (CC-SG) 5.4 or later
management unit.

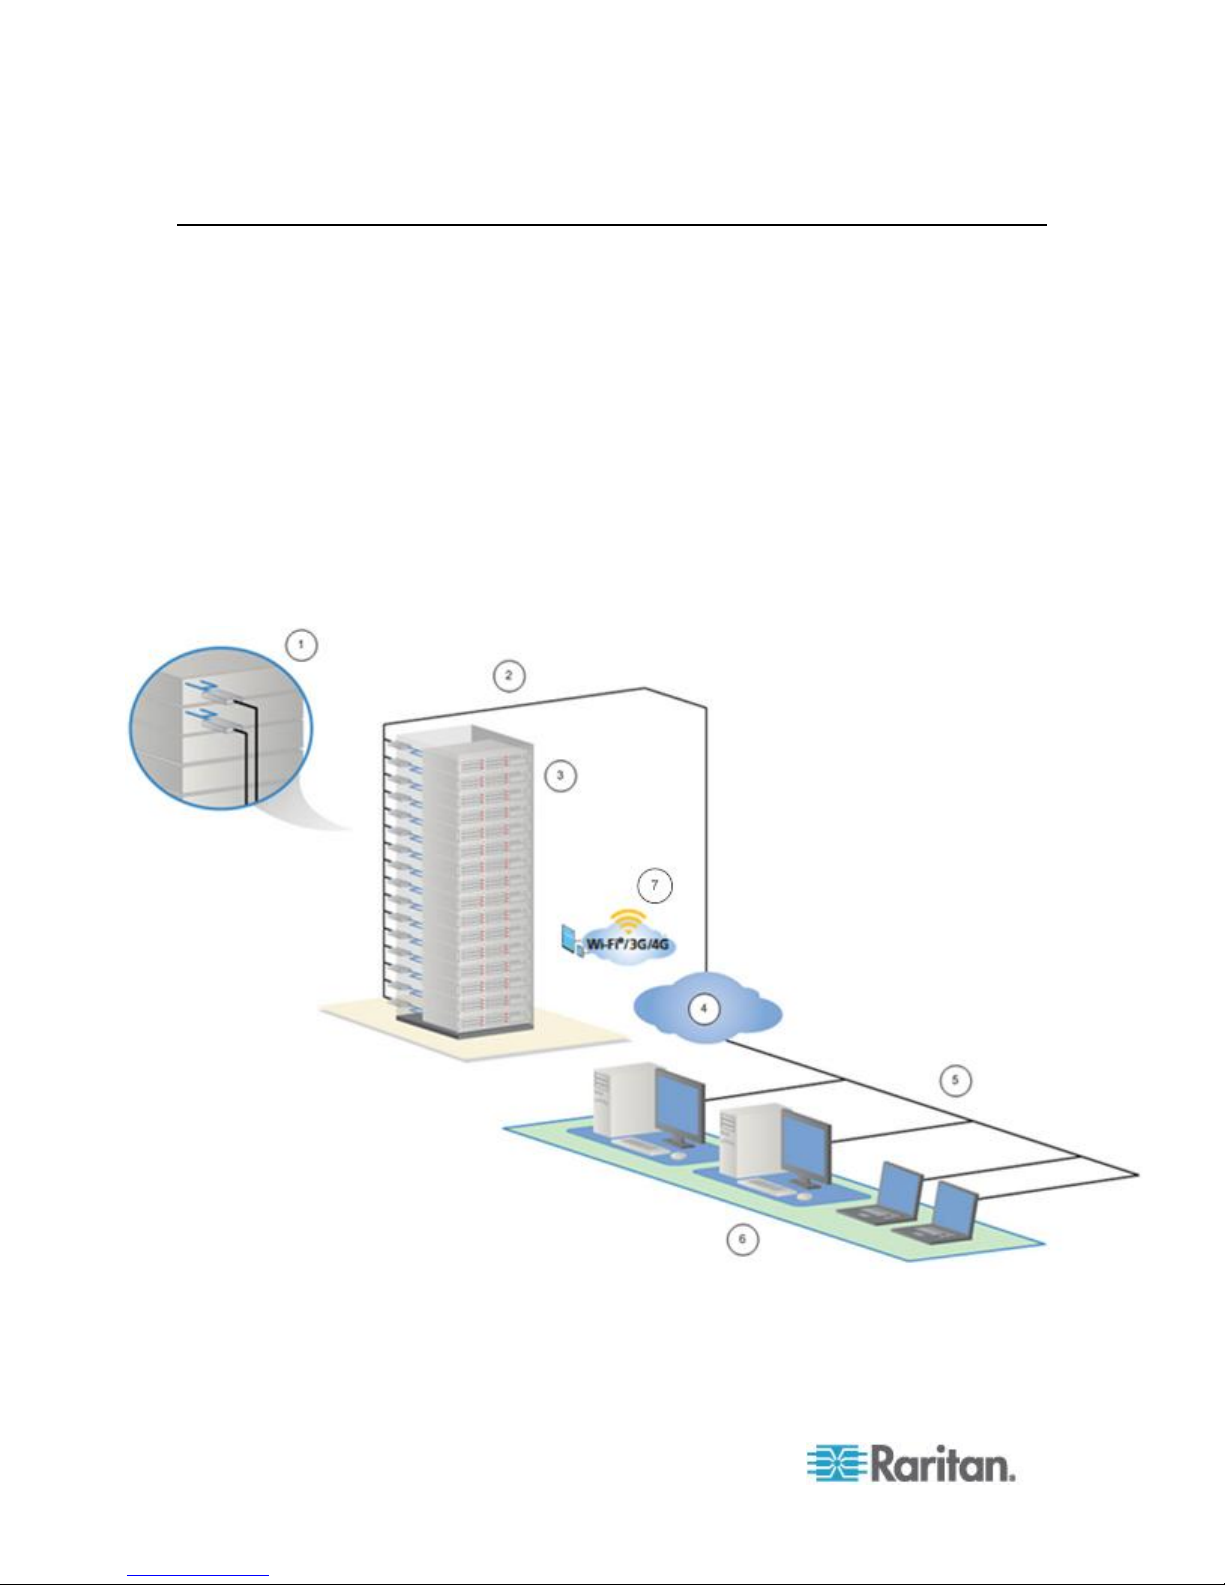
Chapter 1: Introduction
3
Diagram key
KX II-101-V2
LAN
Windows®, Linux® and Sun™ servers
TCP/IP
LAN
Remote (network) access
Mobile access via iPhone® and iPad® using CC-SG
KX II-101-V2 Help
The KX II-101-V2 help provides information on how to install, set up, and
configure the KX II-101-V2. It also includes information on accessing
target servers, using virtual media, managing users and security, and
maintaining and diagnosing the KX II-101-V2.
See the KX II-101-V2 release notes for important information on the
current release before you begin using the KX II-101-V2.
A PDF version of the help can be downloaded from the Raritan
Firmware and Documentation page on the Raritan website. Raritan
recommends that you refer to the Raritan website for the most up-to-date
user guides available.
To use online help, Active Content must be enabled in your browser. If
you are using Internet Explorer 7, you must enable Scriplets. Consult
your browser help for information on enabling these features.

Chapter 1: Introduction
4
What's New in the Help
The following information has been added based on enhancements and
changes to the equipment and/or user documentation.
Support for FIPS 140-2 encryption
Support for a login security banner
Mobile access from iPad® and iPhone® to servers connected to a KX
II-101-V2 being managed by CC-SG
SNMPv3 support
Ability to upload your own SSL certificate to the KX II-101-V2
Support for 1920x1080 & wide screen video resolutions
Configurable TCP/IP port numbers (Stealth Mode)
Direct access to the KX II-101-V2 while under CC-SG 5.4 or later
management
Virtual media support for Linux® and Mac®
Japanese, Traditional Chinese and Simplified Chinese user interface
support
Support for IPv4 and IPv6 in a dual stack environment
Disconnecting users from ports
Forced user log off
Updates to the SNMP trap and SNMP agent user interface in KX II-
101-V2
Please see the KX II-101-V2 Release Notes for a more detailed
explanation of the changes applied to the appliance and this version of
the help.
Related Documentation
The KX II-101-V2 help is accompanied by the KX II-101-V2 Quick Setup
Guide, which can be found on the Raritan Firmware and
Documentation page of Raritan's website
(http://www.raritan.com/support/firmware-and-documentation).
Installation requirements and instructions for client applications used with
the KX II-101-V2 can be found in the KVM and Serial Access Clients
Guide, also found on the Raritan website. Where applicable, specific
client functions used with the KX II-101-V2 are included in the help.
Chapter 1: Introduction
5
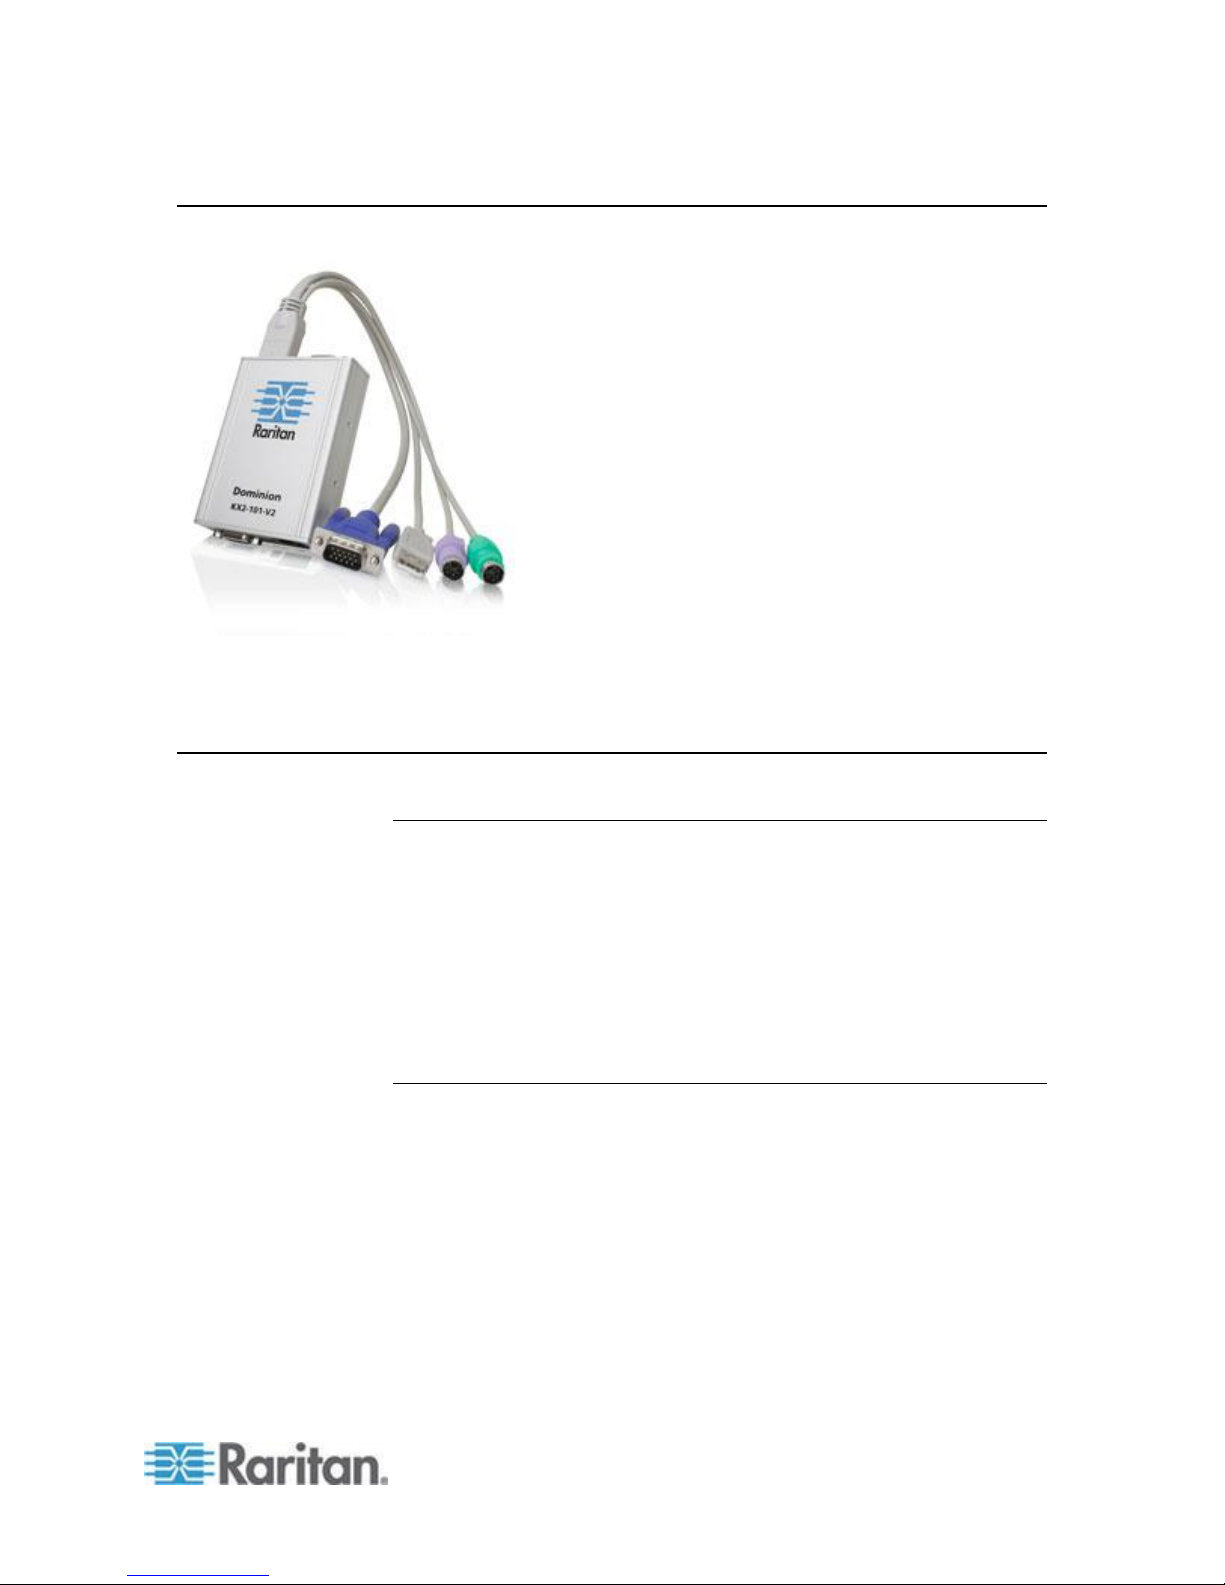
Product Photos
KX II-101-V2
Product Features
Interfaces
Integrated PS/2 KVM connection
USB connection for control and virtual media
Serial Admin port for initial device configuration and diagnostics, as
well as use with an external modem access and Raritan power strip
control
Local port for monitor connection
Ethernet LAN port supporting 10/100-base-T autosensing, full duplex
Network Configuration
DHCP or static IP device address

Chapter 1: Introduction
6
System Management Features
Firmware upgradable over Ethernet
Failsafe firmware upgrade capability
Clock that can be set manually or via synchronization with Network
Time Protocol (NTP/SNTP)
Local, timestamped, administrator activity log SNMP V2 agent that
can be disabled by the administrator
Support for RADIUS and LDAP/LDAPS authentication protocols
Administration Features
Web-based management
LDAP, Active Directory®, RADIUS, or internal authentication and
authorization
DHCP or fixed IP addressing
Integration with Raritan's CommandCenter Secure Gateway (CC-
SG) management unit
Mobile access from iPad® and iPhone® to servers connected to a KX
II-101-V2 being managed by CC-SG
Support for FIPS 140-2
Support for a login security banner
SNMPv3 support
Ability to upload your own SSL certificate to the KX II-101-V2
Configurable TCP/IP port numbers (Stealth Mode)
Support for IPv4 and IPv6 in a dual stack environment
Disconnecting users from ports
Forced user log off

Chapter 1: Introduction
7
User Features
Term
Description
Target Server
Server to be accessed remotely via the KX II-101V2 and its connected KVM configuration.
Remote PC
A Windows®, Linux®, or Apple Macintosh® computer
used to access and control target servers
connected to the KX II-101-V2.
Admin serial
port
Use the Admin serial port to connect to the serial
port on the PC using a male DB9 cable. Then use
a standard emulation software package (for
example, HyperTerminal) to access the Admin
serial port. The Admin serial port is used for
network configuration.
Local User port
Enables a user in immediate proximity to the target
server to use the native monitor without unplugging
the KX II-101-V2.
Web-based access through common browsers
Intuitive graphical user interface (GUI)
PC Share mode, which enables more than one remote user to
connect to the target
TCP communication
English, Japanese, Traditional Chinese and Simplified Chinese user
interface and help
Virtual media access
Absolute Mouse Synchronization™
Plug-and-play
256-bit encryption of complete KVM signal, including video and
virtual media
Power
Powered by an external AC/DC adapter
Video Resolution
Up to 1920x1080 at up to 60 Hz and wide screen video resolutions
Terminology
Mounting
Rack mounting bracket

Chapter 1: Introduction
8
Term
Description
Virtual media
Enables a KVM target server to remotely access
media from client PC and network file servers.
Package Contents
Each KX II-101-V2 device ships with:
KX II-101-V2 - KVM over IP
KVM cable
Power adapter - AC/DC 5VDC with universal adapter
Mounting bracket kit
Printed Quick Setup Guide
Printed application release notes (if applicable)
Printed technical notes (if applicable)

9
In This Chapter
Overview .................................................................................................... 9
Default Login Information .......................................................................... 9
Getting Started ........................................................................................ 10
Default
Value
User name
The default user name is admin. This user has
administrative privileges.
Password
The default password is raritan.
Passwords are case sensitive and must be entered in the
exact case combination in which they were created. For
example, the default password raritan must be entered
entirely in lowercase letters.
The first time you start the KX II-101-V2, you are required
to change the default password.
IP address
The KX II-101-V2 ships with the default IP address of
192.168.0.192.
Important: For backup and business continuity purposes, it is strongly
recommended that you create a backup administrator user name and
password and keep that information in a secure location.
Chapter 2
Installation and Configuration
Overview
This chapter describes how to install and configure the KX II-101-V2.
Installation and configuration consists of the following steps:
Step 1: Configure the Target Server (on page 10)
Step 2: Configure Network Firewall Settings (on page 21)
Step 3: Connect the Equipment (on page 22)
Step 4: Configure the KX II-101-V2 (on page 27)
In order to ensure optimum performance, before installing the KX II-101V2 configure the target server you want to access via the KX II-101-V2.
Note that the following configuration requirements apply only to the
target server, not to the computers that you will be using to access the
KX II-101-V2 remotely.
Default Login Information

Chapter 2: Installation and Configuration
10
Getting Started
Resolutions
640x350 @70Hz
1024x768@85
640x350 @85Hz
1024x768 @75Hz
640x400 @56Hz
1024x768 @90Hz
640x400 @84Hz
1024x768 @100Hz
640x400 @85Hz
1152x864 @60Hz
KX II-101-V2 users with Microsoft® Internet Explorer® version 6 or
Windows 2000® must upgrade to Service Pack 4 (SP4) or higher.
The KX II-101-V2 ships with a static default IP address. On a network
without a DHCP server, you must configure a new static IP address, net
mask, and gateway address using either the KX II-101-V2 serial admin
console or the KX II-101-V2 Remote Console.
See Assigning an IP Address (on page 28) for information on assigning
an IP address to the KX II-101-V2 using the Remote Console. See
Configure the KX II-101-V2 Using a Terminal Emulation Program
(Optional) (on page 32) for information on setting an IP address using
the Serial Admin Console.
Step 1: Configure the Target Server
Before installing the KX II-101-V2, first configure the target server you
want to access via the KX II-101-V2 in order to ensure optimum
performance. Note that the following configuration requirements apply
only to the target server, not to the computers that you will be using to
access the KX II-101-V2 remotely.
Setting the Server Video Resolution
For optimal bandwidth efficiency and video performance, a target server
running a graphical user interface such as Windows®, X-Windows®,
Solaris™, and KDE should be configured with desktop backgrounds set to
a predominantly solid, light-colored graphic. Backgrounds featuring
photos or complex gradients should be avoided.
Ensure that the server's video resolution and refresh rate are supported
by the KX II-101-V2 and that the signal is non-interlaced. The KX II-101V2 supports these resolutions:

Chapter 2: Installation and Configuration
11
Resolutions
640x480 @60Hz
1152x864 @70Hz
640x480 @66.6Hz
1152x864 @75Hz
640x480 @72Hz
1152x864 @85Hz
640x480 @75Hz
1152x870 @75.1Hz
640x480 @85Hz
1152x900 @66Hz
720x400 @70Hz
1152x900 @76Hz
720x400 @84Hz
1280x720@60Hz
720x400 @85Hz
1280x960 @60Hz
800x600 @56Hz
1280x960 @85Hz
800x600 @60Hz
1280x1024 @60Hz
800x600 @70Hz
1280x1024 @75Hz
800x600 @72Hz
1280x1024 @85Hz
800x600 @75Hz
1360x768@60Hz
800x600 @85Hz
1366x768@60Hz
800x600 @90Hz
1368x768@60Hz
800x600 @100Hz
1400x1050@60Hz
832x624 @75.1Hz
1440x900@60Hz
1024x768 @60Hz
1600x1200 @60Hz
1024x768@70
1680x1050@60Hz
1024x768@72
1920x1080@60Hz
Sun Video Resolution
Sun™ systems have two resolution settings, a command line resolution
and a GUI resolution. For information about the resolutions supported by
the KX II-101-V2, see Setting the Server Video Resolution (on page
10).
Note: If none of the supported resolutions work, make sure the monitor is
multisync. Some monitors will not work with an H&V sync.
Command Line Resolution
1. Run the following command as the root: # eeprom output-device
To check the command line resolution:

Chapter 2: Installation and Configuration
12
To change the command line resolution:
1. Run the following command: # eeprom output-
device=screen:r1024x768x75 where 1024x768x75 is any resolution
that the KX II-101-V2 supports.
2. Restart the computer.
GUI Resolution/32 Bit
To check the GUI resolution on 32 bit cards:
1. Run the following command: # /usr/sbin/pgxconfig –prconf
To change the GUI resolution on 32 bit cards:
1. Run the following command: # /usr/sbin/pgxconfig –
res1024x768x75 where 1024x768x75 is any resolution that the KX II101-V2 supports.
2. Restart the computer.
GUI Resolution/64 Bit
To check the GUI resolution on 64 bit cards:
1. Run the following command: # /usr/sbin/m64config –prconf
To change the resolution on 64 bit cards:
1. Run the following command: # /usr/sbin/m64config –
res1024x768x75 where 1024x768x75 is any resolution that the KX II101-V2 supports.
2. Restart the computer.
GUI Resolution/Solaris 8
To check the resolution on Solaris™ 8 for 32 bit and 64 bit cards:
1. Run the following command: # /usr/sbin/fbconfig –prconf
To change the resolution on Solaris 8 for 32 and 64 bit cards:
1. Run the following command: # /usr/sbin/fbconfig –res1024x768x75
where 1024x768x75 is any resolution that the KX II-101-V2 supports.
2. Restart the computer.

Chapter 2: Installation and Configuration
13
Mouse Settings
The KX II-101-V2 operates in several mouse modes: Absolute Mouse
Synchronization™, Intelligent Mouse mode and Standard Mouse mode.
Note: Do not use an animated mouse while using Intelligent Mouse
mode.
Mouse parameters do not have to be altered for Absolute Mouse
Synchronization. For both the Standard and Intelligent Mouse modes,
mouse parameters must be set to specific values, which are described in
this section.
Mouse configurations will vary on different target operating systems.
Consult your OS documentation for additional details.
Windows XP, Windows 2003 and Windows 2008 Settings
To configure KVM target servers running Microsoft® Windows
XP® operating system, Windows 2003® operating system or
Windows 2008® operating systems:
1. Configure the mouse settings:
a. Choose Start > Control Panel > Mouse.
b. Click the Pointer Options tab.
c. In the Motion group:
Set the mouse motion speed setting to exactly the middle
speed.
Disable the "Enhance pointer precision" option.
Disable the Snap To option.
Click OK.
Note: When you are running Windows 2003 on your target server, if
you access the server via KVM and perform any one off the actions
listed below, mouse synchronization may be lost if it has been
previously enabled. You will need to select the Synchronize Mouse
command from the Mouse menu in the client to enable it again.
Following are the actions that may cause this to occur:
- Opening a text editor.
- Accessing the Mouse Properties, Keyboard Properties, and Phone
and Mode Options from the Windows Control Panel.
2. Disable transition effects:
a. Select the Display option from the Control Panel.
b. Click the Appearance tab.
c. Click Effects.

Chapter 2: Installation and Configuration
14
d. Deselect the "Use the following transition effect for menus and
tooltips" option.
e. Click OK.
3. Close the Control Panel.
Note: For KVM target servers running Windows XP, Windows 2000 or
Windows 2008, you may wish to create a user name that will be used
only for remote connections through the KX II-101-V2. This will enable
you to keep the target server's slow mouse pointer motion/acceleration
settings exclusive to the KX II-101-V2 connection.
Windows XP, 2000, and 2008 login pages revert to preset mouse
parameters that differ from those suggested for optimal KX II-101-V2
performance. As a result, mouse synchronization may not be optimal for
these screens.
Note: Proceed only if you are comfortable adjusting the registry on
Windows KVM target servers. You can obtain better KX II-101-V2 mouse
synchronization at the login pages by using the Windows registry editor
to change the following settings: HKey_USERS\.DEFAULT\Control
Panel\Mouse: > MouseSpeed = 0;MouseThreshold
1=0;MouseThreshold 2=0.
Windows 7 and Windows Vista Settings
To configure KVM target servers running Windows Vista®
operating system:
1. Configure the mouse settings:
a. Choose Start > Settings > Control Panel > Mouse.
b. Select "Advanced system settings" from the left navigation panel.
The System Properties dialog opens.
c. Click the Pointer Options tab.
d. In the Motion group:
Set the mouse motion speed setting to exactly the middle
speed.
Disable the "Enhanced pointer precision" option.
Click OK.
2. Disable animation and fade effects:
a. Select the System option from the Control Panel.
b. Select Performance Information then Tools > Advanced Tools >
Adjust to adjust the appearance and performance of Windows.
c. Click the Advanced tab.

Chapter 2: Installation and Configuration
15
d. Click Settings in the Performance group to open the
Performance Options dialog.
e. Under Custom options, deselect the following checkboxes:
Animation options:
Animate controls and elements inside windows
Animate windows when minimizing and maximizing
Fade options:
Fade or slide menus into view
Fade or slide ToolTips into view
Fade out menu items after clicking
3. Click OK and Close the Control Panel.
To configure KVM target servers running Windows 7® operating
system:
1. Configure the mouse settings:
a. Choose Start > Control Panel > Hardware and Sound > Mouse.
b. Click the Pointer Options tab.
c. In the Motion group:
Set the mouse motion speed setting to exactly the middle
speed.
Disable the "Enhanced pointer precision" option.
Click OK.
2. Disable animation and fade effects:
a. Select Control Panel > System and Security.
b. Select System and then select "Advanced system settings" from
the left navigation panel. The System Properties dialog appears.
c. Click the Advanced tab.
d. Click the Settings button in the Performance group to open the
Performance Options dialog.
e. Under Custom options, deselect the following checkboxes:
Animation options:
Animate controls and elements inside windows
Animate windows when minimizing and maximizing
Fade options:

Chapter 2: Installation and Configuration
16
Fade or slide menus into view
Fade or slide ToolTips into view
Fade out menu items after clicking
3. Click OK and Close the Control Panel.
Windows 2000 Settings
To configure KVM target servers running Microsoft® Windows
2000® operating system:
1. Configure the mouse settings:
a. Choose Start > Control Panel > Mouse.
b. Click the Motion tab.
Set the acceleration to None.
Set the mouse motion speed setting to exactly the middle
speed.
Click OK.
2. Disable transition effects:
a. Select the Display option from the Control Panel.
b. Click the Effects tab.
Deselect the "Use the following transition effect for menus
and tooltips" option.
3. Click OK and close the Control Panel.
Note: For KVM target servers running Windows XP, Windows 2000 or
Windows 2008, you may wish to create a user name that will be used
only for remote connections through the KX II-101-V2. This will enable
you to keep the target server's slow mouse pointer motion/acceleration
settings exclusive to the KX II-101-V2 connection.
Windows XP, 2000, and 2008 login pages revert to preset mouse
parameters that differ from those suggested for optimal KX II-101-V2
performance. As a result, mouse synchronization may not be optimal for
these screens.
Note: Proceed only if you are comfortable adjusting the registry on
Windows KVM target servers. You can obtain better KX II-101-V2 mouse
synchronization at the login pages by using the Windows registry editor
to change the following settings: HKey_USERS\.DEFAULT\Control
Panel\Mouse: > MouseSpeed = 0;MouseThreshold
1=0;MouseThreshold 2=0.

Chapter 2: Installation and Configuration
17
Linux Settings (Red Hat 4 and 5, and Fedora 14)
Note: The following settings are optimized for Standard Mouse mode
only.
To configure KVM target servers running Linux® (graphical user
interface):
1. Configure the mouse settings:
a. Choose Main Menu > Preferences > Mouse. The Mouse
Preferences dialog appears.
b. Click the Motion tab.
c. Within the Speed group, set the Acceleration slider to the exact
center.
d. Within the Speed group, set the Sensitivity towards low.
e. Within the Drag & Drop group, set the Threshold towards small.
f. Close the Mouse Preferences dialog.
Note: If these steps do not work, issue the xset mouse 1 1 command
as described in the Linux command line instructions.
2. Configure the screen resolution:
a. Choose Main Menu > System Settings > Display. The Display
Settings dialog appears.
b. From the Display tab, select a Resolution supported by the KX II-
101-V2.
c. From the Advanced tab, verify that the Refresh Rate is
supported by the KX II-101-V2.
Note: Once connected to the target server, in many Linux graphical
environments, the <Ctrl> <Alt> <+> command will change the video
resolution, scrolling through all available resolutions that remain enabled
in the XF86Config or /etc/X11/xorg.conf, depending on your X server
distribution.
To configure KVM target servers running Linux (command line):
1. Set the mouse acceleration to exactly 1 and set the threshold to
exactly 1. Enter this command: xset mouse 1 1. This should be set
for execution upon login.
2. Ensure that each target server running Linux is using a resolution
supported by the KX II-101-V2 at a standard VESA resolution and
refresh rate.
3. Each Linux target server should also be set so the blanking times are
within +/- 40% of VESA standard values:
a. Go to the Xfree86 Configuration file XF86Config.

Chapter 2: Installation and Configuration
18
b. Using a text editor, disable all non-KX II-101-V2 supported
resolutions.
c. Disable the virtual desktop feature (not supported by the KX II-
101-V2).
d. Check blanking times (+/- 40% of VESA standard).
e. Restart computer.
Note: If you change the video resolution, you must log off of the target
server and log back in for the video settings to take effect.
Note for Red Hat and Fedora KVM Target Servers
If you are running Red Hat® on the target server using a USB CIM, and
are experiencing problems with the keyboard and/or mouse, there is an
additional configuration setting you can try.
Tip: You might have to perform these steps even after a fresh OS
installation.
To configure Red Hat servers using USB CIMs:
1. Locate the configuration file (usually /etc/modules.conf) in your
system.
2. Using the editor of your choice, make sure that the alias usbcontroller line in the modules.conf file is as follows:
alias usb-controller usb-uhci
Note: If there is another line using usb-uhci in the /etc/modules.conf
file, it needs to be removed or commented out.
3. Save the file.
4. Reboot the system in order for the changes to take effect.
Linux Settings (for Standard Mouse Mode)
Note: The following settings are optimized for Standard Mouse mode
only.
To configure KVM target servers running Linux® (graphical user
interface):
1. Configure the mouse settings:
a. Red Hat 5 users, choose Main Menu > Preferences > Mouse.
Red Hat 4 users, choose System > Preferences > Mouse. The
Mouse Preferences dialog appears.
b. Click on the Motion tab.

Chapter 2: Installation and Configuration
19
c. Within the Speed group, set the Acceleration slider to the exact
Resolution
1024x768@60Hz
1024x768@70Hz
1024x768@75Hz
1024x768@85Hz
1280x1024@60Hz
center.
d. Within the Speed group, set the Sensitivity towards low.
e. Within the Drag & Drop group, set the Threshold towards small.
f. Close the Mouse Preferences dialog.
Note: If these steps do not work, issue the xset mouse 1 1 command
as described in the Linux command line instructions.
2. Configure the screen resolution:
a. Choose Main Menu > System Settings > Display. The Display
Settings dialog appears.
b. On the Settings tab, select a Resolution supported by the KX II-
101-V2.
c. Click OK.
Note: Once connected to the target server, in many Linux graphical
environments, the <Ctrl> <Alt> <+> command will change the video
resolution, scrolling through all available resolutions that remain enabled
in the XF86Config or /etc/X11/xorg.conf, depending on your X server
distribution
Note: If you change the video resolution, you must log out of the target
server and log back in for the video settings to take effect.
Sun Solaris Settings
A Solaris™ target server must be configured to one of the display
resolutions supported by the KX II-101-V2. The most popular supported
resolutions for Sun™ machines are:

Chapter 2: Installation and Configuration
20
Set the mouse acceleration value to exactly 1 and the threshold to
exactly 1. A target server running the Solaris operating system must
output VGA video (H-and-V sync, not composite sync). Set this at the
graphical user interface or with the command line xset mouse a t where
a is the acceleration and t is the threshold.
To change your Sun video card output from composite sync to
the non-default VGA output:
1. Issue the Stop+A command to drop to bootprom mode.
2. Issue the #eeprom output-device=screen:r1024x768x75 command to
change the output resolution.
3. Issue the boot command to reboot the server.
Alternatively, contact your Raritan representative to purchase a video
output adapter. Suns with composite sync output require APSSUN II
Raritan guardian for use with the KX II-101-V2. HD15 Suns with separate
sync output require an APKMSUN Raritan guardian for use with the KX
II-101-V2.
Apple Macintosh Settings
Mac® works with the KX II-101-V2 'out of the box.' However, you must
use Absolute Mouse Synchronization and enable Absolute Mouse mode
and mouse scaling for Mac servers on the KX II-101-V2 Port page.
To enable this setting:
1. Choose Device Settings > Port Configuration. The Port Configuration
Page opens.
2. Click the Port Name for the port you want to edit.
3. In the USB Connection Settings section, select the Enable Absolute
Mouse checkbox and the "Enable Absolute mouse scaling for MAC
server" checkbox. Click OK.
See Port Configuration (on page 126).
IBM AIX Settings
1. Go to the Style Manager.

Chapter 2: Installation and Configuration
21
2. Click on Mouse Settings and set the Mouse Acceleration to 1.0 and
Threshold to 3.0.
Step 2: Configure Network Firewall Settings
To access the KX II-101-V2 through a network firewall, your firewall must
allow communication on TCP Port 5000. Alternatively, the KX II-101-V2
can be configured to use a different TCP port of your own designation.
To take advantage of the KX II-101-V2's web-access capabilities, the
firewall must allow inbound communication on TCP Port 443 - the
standard TCP port for HTTPS communication. To take advantage of the
KX II-101-V2's redirection of HTTP requests to HTTPS (so that users
may type the more common, http://xxx.xxx.xxx.xxx, instead of
https://xxx.xxx.xxx.xxx), the firewall must also allow inbound
communication on TCP Port 80 - the standard TCP port for HTTP
communication.

Chapter 2: Installation and Configuration
22
Step 3: Connect the Equipment
Diagram key
Power
connector
Single power adapter.
KVM cable
with monitor,
PS/2 and
USB
connectors
(included)
Attach the supplied KVM cable
to the target server's keyboard,
video and mouse ports
Ethernet
LAN
Provides LAN connectivity.
The KX II-101-V2 has the physical connections described in the diagram.
Each letter in the diagram corresponds to a step in the equipment
connection process described here.
 Loading...