

Raritan Dominion KX101 Quick Installation And Setup Manual
4. If not using Power over
Ethernet (PoE), connect the
included AC power adptor kit
into the Power Port and plug
the other end into a nearby AC
power outlet.
5. The LAN LED indicates
Ethernet activity and blinks
while the KX101 is in use.
6. When powered up, the
KX101 goes through an initial
boot-up sequence. During this
sequence, the blue Raritan light
blinks. When boot-up has completed, the blinking stops and the
KX101 is operational. You may
want to connect the KVM cable to
the appropriate KVM ports of the
target server and proceed to section III. Initial Configuration.
Dominion
®
KX101
Quick Installation and Setup Guide
For more detailed instructions, please consult the User Manual found on the enclosed CD-ROM or on the web at www.raritan.com. Rev. A August 2005 255-62-4004
I. Prepare Devices and Network for Remote Operation
Congratulations on your purchase of Dominion KX101. KX101 provides a single KVM port for connection to a
target server and a single IP port for connection to an IP network. Control the KX101 via Raritan’s
CommandCenter (v. 2.2 and above) or independently via Raritan’s KX Manager and RRC management software platforms. Before installing KX101, configure any target servers that you wish to access with it as outlined
below.
All Servers
A. For optimal bandwidth efficiency and video performance, set the
OS desktop background to a predominantly solid, plain, light-colored graphic.
B. Ensure that the server’s video
resolution and refresh rate are
supported by KX101, and the signal is non-interlaced:
Text Mode
640x480@60Hz 640x480@72Hz
640x480@75Hz 640x480@85Hz
800x600@60Hz 800x600@72Hz
800x600@75Hz 800x600@85Hz
1280x1024@60Hz 1024x768@60Hz
1024x768@70Hz 1024x768@75Hz
1024x768@85Hz 1152x864@60Hz
1152x864@75Hz 1600x1200@60Hz
Network / Firewall
In order to enable remote access
to KX101, your network and firewall must allow communication on
TCP Port 5000. Alternatively,
KX101 can also be configured to
use a different TCP port of your
own designation (see User
Manual).
Optional: If you wish to access
KX101 via web browser, your firewall must also allow access to
TCP Port 443 (Standard HTTPS).
You may also wish to allow
access to TCP Port 80 (Standard
HTTP) for additional convenience; KX101 will forward all
HTTP requests to HTTPS, allowing end users to securely use
either “http” or “https” as a URL.
Windows XP
Disable “Enhanced pointer precision”, and set the mouse motion
speed exactly to the middle speed
setting. These options are located
in Control Panel > Mouse >
Pointer Options. Disable transition effects in
Control Panel > Display >
Appearance > Effects.
Windows 2000
Set mouse pointer acceleration to
“None” and the mouse motion
speed exactly to the middle speed
setting. Disable transition effects
in Control Panel >Display> Effects.If
in Intelligent or Absolute (USB
only) Mouse Synchronization
Mode, acceleration is supported.
Linux (with Graphical
Desktop)
For optimal results, set mouse
acceleration to exactly 1, and
threshold to exactly 1.
Sun Solaris (with
Graphical Desktop)
For optimal results, set mouse
acceleration to exactly 1.0. Also,
be sure that your video card is set
to a supported resolution and is
outputting VGA (H-and-V Sync,
not composite sync). This nondefault configuration can be set in
the bootprom mode by issuing the
command:
setenv output-device screen :
r1024x768x70
Then issue the “boot” command
to reboot.
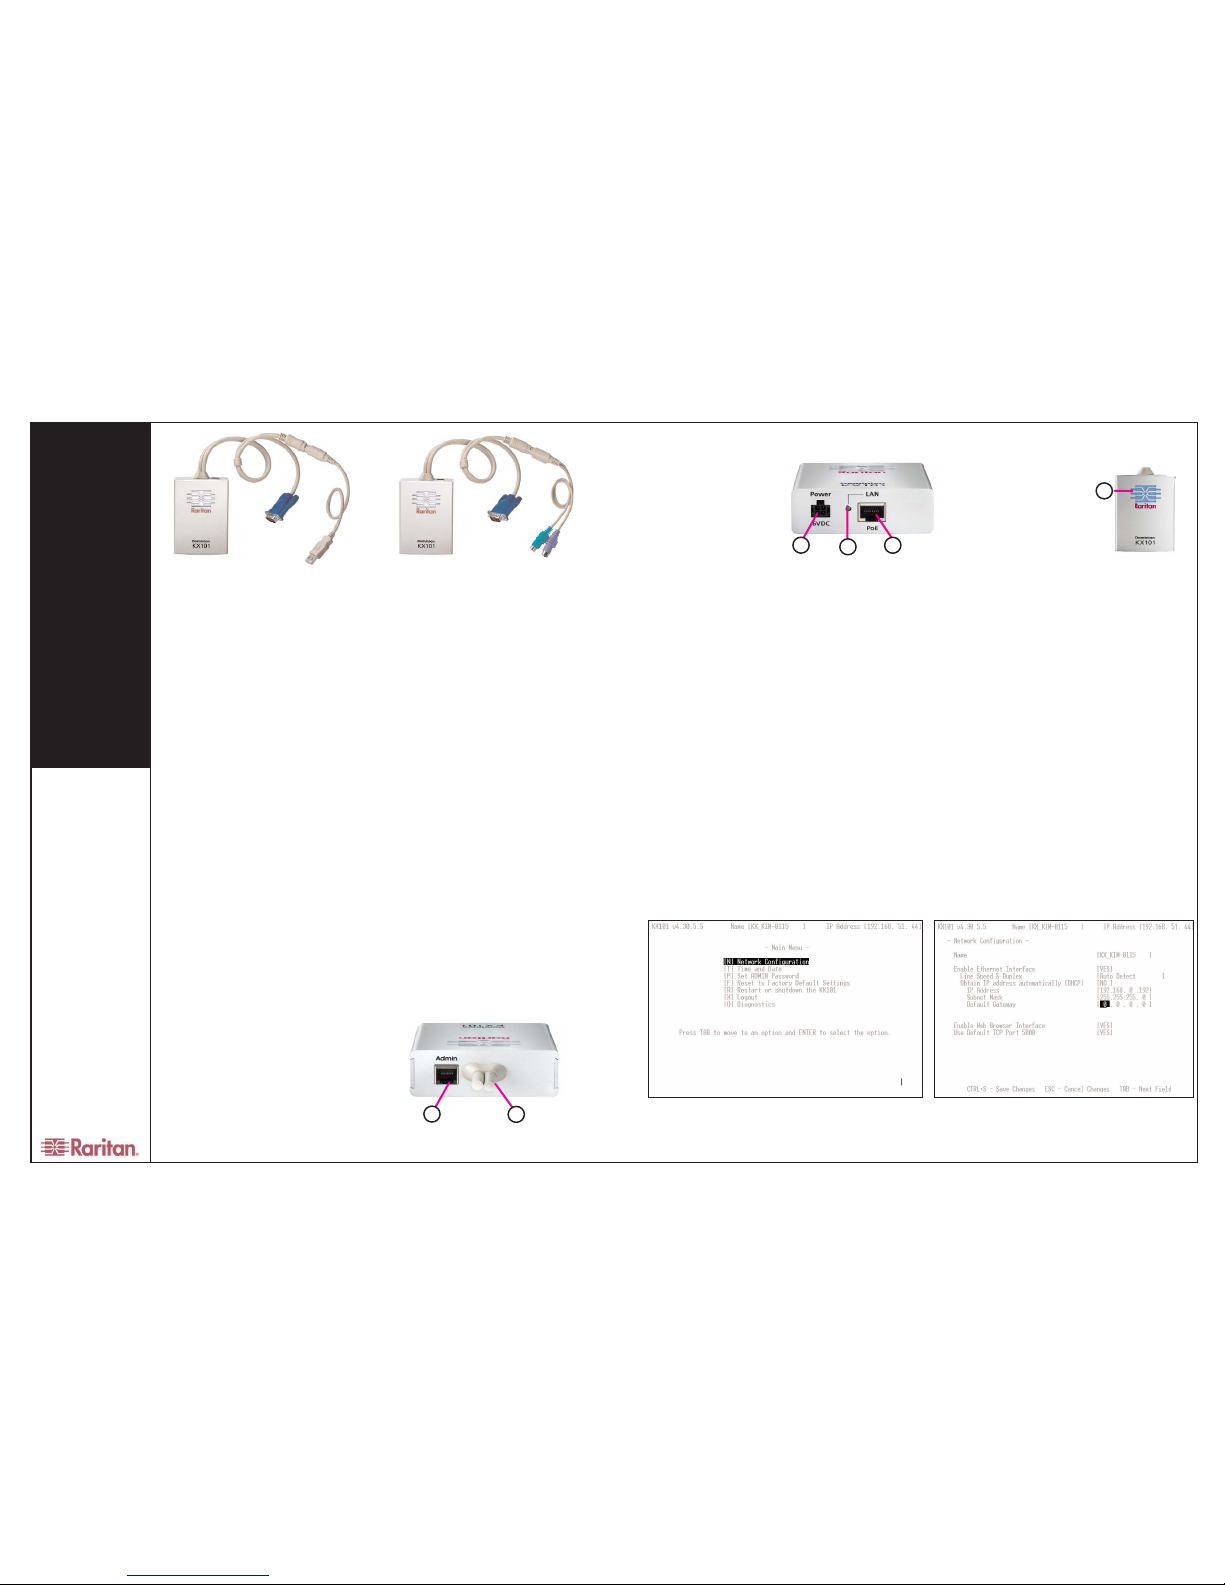
II. Connect to Network and Attach to Server
KX101 unit with USB pigtail KX101 unit with PS2 pigtail
III. Initial Configuration
Initial configuration of the KX101 is performed via the local administration port. To
connect to this port, plug one end of the
RJ11 cable included in the KX101 kit into
the ADMIN port on the unit. Plug the other
end of the cable into the serial port of a PC
using the serial-to-RJ11 adaptor provided.
On the PC, access the serial port with a terminal emulation program (e.g., Hyper
Terminal) using the following settings: 9600
baud, 8 data bits, no parity, one stop bit, and
no flow control.
Pressing the “Enter” key in the terminal
emulation program displays the KX101
Login screen. Enter the default password
“raritan” and the Main Menu of the KX101
administrative interface is displayed.
Follow the on-screen instructions to navigate the menus. Select Network
Configuration (Figure 1) and configure
these settings (Figure 2).
1. Name: Type a unique name for the
KX101, using alphanumeric characters and
not starting with a number.
2. Enable Ethernet Interface: Designate
whether KX101 should enable its Ethernet
adapter as active (default: YES).
3. Line Speed & Duplex: Enter the visual
efficiency for the monitor: Auto detect, 10
Mbps/Full Duplex, 10 Mbps/Half Duplex,
100 Mbps/Full Duplex, or 100 Mbps/Half
Duplex.
4. Obtain IP address automatically
(DHCP): Recommended to set to NO. The
default YES enables dynamic IP addressing
for KX101. Each time KX101 boots, it
requests an IP address from the local
DHCP server. Note that this setting can
make remote access to KX101 from outside
the LAN difficult, since the dynamically
assigned IP address must be known in
order to initiate a connection.
5. If DHCP is set to NO, then enter an IP
address, network mask, and gateway
address. Even though KX101 ships with
DHCP as factory default, it is recommended
to assign a fixed IP address to the KX101
unit.
6. Enable Web Browser Interface:
Enables Web browser access to KX101
(default: YES).
7. Use Default TCP Port 5000:
-YES (default): Utilizes the default port
5000.
-NO: Enter an alternate port number.
8. Press Ctrl+S to save entries and return to
the Main Menu.
9. On the Main Menu, select [R] Restart or
shutdown the KX101, and press the Enter
key.
10. When prompted, press the letter R on
your keyboard to restart KX101.
11. KX101 will restart and the KX101
Initialization screen appears upon boot up.
KX101 is now ready for initial connection.
Physical Setup
1. Before powering on a KX101 unit, align and attach
the desired USB or PS2 cable attachment to the MiniDIN-8 connector of the KX101 integrated KVM cable.
2. Plug one end of the included RJ11 cable into the
ADMIN port and plug the other end into the serial port
on your PC using the provided serial-to-RJ11 adapter.
3. If Power over Ethernet (PoE) is used, connect a
10/100BT cable to the LAN port of the KX101 and plug
the other end into a PoE-provisioned LAN.
continued above right
1
6
Figure 2
Figure 1
II. Connect to Network and Attach to Server (cont)
2
3
4
5
Dominion
®
KX101
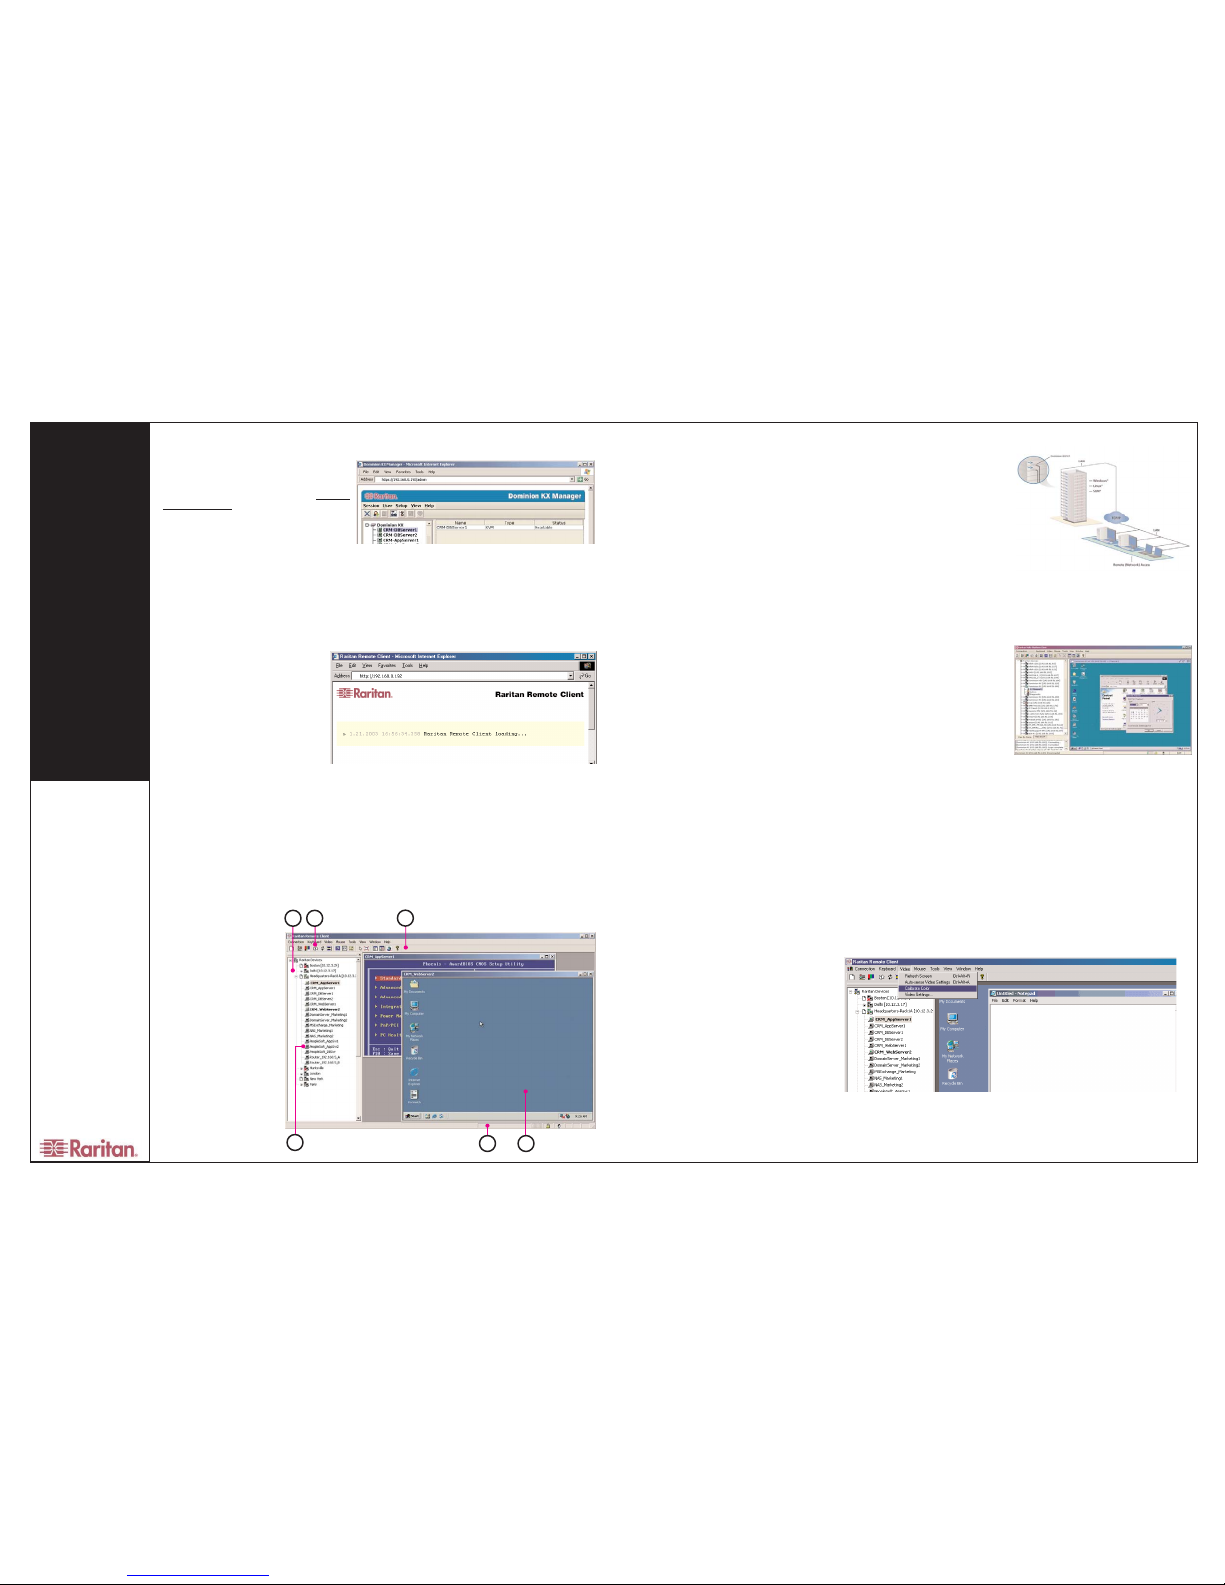
VI. Remotely Access and Control Connected Servers
Familiarize yourself with the features of RRC. After logging on to your unit with the default username/password
(admin / raritan), use the RRC Navigator found on the left-hand side of the RRC window to select and connect
to a port.
VI. Remotely Access and Control Connected Servers (cont)
1. The RRC Navigator dis-
plays any known KX101 units
in a single view. Select
Connection > New Profile to
create new entries.
2. Click on “Synchronize
Mouse” to converge the
mouse pointers displayed in
KVM windows. Should your
mouse pointers fail to converge, be sure to review
Section I (“Prepare Devices
and Network for Remote
Operation”, above) to correctly
configure your managed server.
continued above right
3. The RRC Toolbar provides easy access
to RRC’s most frequently-used features.
4. Double-click on server port to establish
access to and BIOS-level control of the server’s KVM ports.
Double-clicking another server port on the
same KX101 unit will switch your session to
that server. If your KX101 hardware model
supports multiple simultaneous remote server connections, you can right-click on a port
to open an additional session.
5. The RRC Status Bar provides real-time
information on connection parameters.
6. When connected to a KVMconsole port,
keystrokes and video signals are transmitted
in real-time, exactly as if you were situated
locally.
VIII. Maximize Remote KVM Performance
KX101’s dynamic video compression algorithms maintain usability of KVM consoles under varying bandwidth environments. KX101 can
optimize its output not just for the corporate LAN, but also for lower-bandwidth WAN and dial-up connections. By adjusting color depth
and limiting video output, KX101 offers the optimal balance between video quality and system responsiveness in any bandwidth constraint. Familiarize yourself with the following parameters to adjust performance options even further.
VII. Raritan Multi-Platform Client
Color Calibration
Some video cards output non-standard signal levels. Perform a color calibration upon
inital setup to optimize transmitted color for accuracy:
1. On the remote server desktop that you are controlling with KX101, ensure that a
solid white color covers approximately 15% or more of the screen. One simple way
to accomplish this is to open the Notepad application and maximize its window size:
2. On the RRC menu bar, select Video > Calibrate Color to perform the color cali-
bration.
Video Smoothing
Setting the video smoothing level too high
can prohibit KX101 from correctly transmitting color gradations.
On the menu bar, select Connection >
Properties to adjust the Smoothing level to
an appropriate setting for your environment.
Noise Filter
All video graphics cards generate electrical
noise that cannot be seen by the naked eye
when displayed on a monitor. KX101 reduces
the bandwidth it consumes by intelligently
ignoring extraneous signal noise.
Setting the noise filter too high can prohibit
KX101 from correctly transmitting screen
changes.
On the menu bar, select Video > Video
Settings to adjust the Noise Filter level to an
appropriate setting for your environment.
IV. Assign Names to Server Ports
Using Your Web Browser
1. On any workstation with network connectivity
to your KX101, and with Java Runtime
Environment 1.4.x (or later) installed, launch a
Web browser and enter the URL, http://IP-
ADDRESS/admin, where IP-ADDRESS is the
IP address that you designated in Step III. earlier.
2. The Dominion KX Manager applet will load
and launch. Log on with the default username/password of admin / raritan.
3. Use Dominion KX Manager to navigate to the server port that you wish to change, and assign a name (up
to 20 characters) to identify that server.
V. Launch Raritan Remote Client (RRC)
KX101 provides secure Web-browser access from any Windows-based computer, enabling remote access to
your server(s) without the burden of having software on-hand.
1. Log on to any Windows-based computer. If you are using Windows, Windows
2000, or XP, ensure that you are not a
“restricted” user.
2. Launch Internet Explorer. Ensure that
your security settings are configured
appropriately.
NOTE: The IE default security setting of
“Medium” is sufficient.
3. In the URL text field of your Web
browser, type the IP address assigned to
your KX101 unit as designated in Step III. earlier.
4. KX101 will redirect you to an HTTPS (128-bit) secure web page for launching RRC. Depending on your
browser's security configuration, you may see security dialog boxes, confirming access and launch of an externally-provided program. Click Yes to advance through any of these prompts. If your KX101 unit is not automatically detected, select Connection > New Profile in the menu bar to create a new entry.
5. Double-click on the entry corresponding to your KX101, and log on with the default username/password of
admin/raritan. Double-click on a port to connect to the connected server with full BIOS-level control.
1 2
3
5
6
4
Launched as web applet or as a standalone application, Multi-Platform Client
allows you to reach target servers via
Raritan KX101. Additional Raritan devices
will be supported in future releases.
All installations of Multi-Platform Client
require Sun Microsystems' Java Runtime
Environment (JRE) version 1.4.2_05 or
greater. Some configuration may be needed depending on your OS and browser.
Instructions for this are provided with the
JRE download.
To launch Multi-Platform Client from any
browser (except for Internet Explorer running on a Windows PC), enter http://<IP
address> into your browser (where <IP
address> is the IP address of the Raritan
device).
To launch MPC from a Windows PC running Internet Explorer, enter: http://<IP
address>/mpc.
 Loading...