

Raritan Dominion KSX DKSX440, Dominion KSX DKSX880 User Manual

User Manual
DKSX440
DKSX880

This page intentionally left blank.

c
D
User Manual
DKSX440
DKSX880
U
C
LISTE
Copyright ©2003 Raritan Computer, Inc.
KSX-0A-E
August 2003
255-80-5020
Raritan Computer Inc.
400 Cottontail Lane
Somerset, NJ 08873
USA
Tel. 1-732-764-8886
Fax. 1-732-764-8887
sales@raritan.com
http://www.raritan.com
Raritan Computer Europe, B.V.
Eglantierbaan 16
2908 LV Capelle aan den IJssel
The Netherlands
Tel. 31-10-284-4040
Fax. 31-10-284-4049
sales.europe@raritan.com
http://www.raritan.com
1F61
US
L
I.T.E.
Raritan Computer Japan, Inc.
Kuga Building 7F
11-6, Kuramae 4-chome
Taitoo-ku, Tokyo 111-0051, Japan
Tel. 81-3-5833-6360
Fax. 81-3-5833-6336
sales.japan@raritan.com
http://www.raritan.co.jp
Raritan Computer Taiwan, In
5F, 121, Lane 235,
Pao-Chiao Rd., Hsin Tien
Taipei Hsien, Taiwan, ROC
Tel. 886-2-8919-1333
Fax. 886-2-8919-1338
sales.asia@raritan.com
http://www.raritan.com.tw

This page intentionally left blank.
FCC Information
This equipment has been tested and found to comply with the limits for a Class A digital device, pursuant to Part 15
of the FCC Rules. These limits are designed to provide reasonable protection against harmful interference in a
commercial installation. This equipment generates, uses, and can radiate radio frequency energy and if not installed
and used in accordance with the instructions, may cause harmful interference to radio communications. Operation of
this equipment in a residential environment may cause harmful interference.
Trademark Information
Product names mentioned in this document are trademarks or registered trademarks of their respective companies.
Dominion, IP-Reach, Paragon, MasterConsole MX
are trademarks or registered trademarks of Raritan Computer, Inc. PS/2, RS/6000, and PC/AT are registered
trademarks of International Business Machines Corporation. Sun is a registered trademark of Sun Microsystems.
Microsoft and Windows are registered trademarks of Microsoft Corporation. All other marks are the property of
their respective owners.
4
, MasterConsole II, MasterConsole, and their respective logos
Japanese Approvals

This page intentionally left blank.

TABLE OF CONTENTS i
Table of Contents
CHAPTER 1: INTRODUCTION ...........................................................................1
DOMINION KSX OVERVIEW........................................................................................................................ 1
PRODUCT PHOTOS ....................................................................................................................................2
PRODUCT FEATURES.................................................................................................................................3
TERMINOLOGY ..........................................................................................................................................4
PACKAGE CONTENTS.................................................................................................................................5
CHAPTER 2: INSTALLATION ............................................................................7
CONFIGURING TARGET KVM SERVERS ......................................................................................................7
Server Video Resolution................................................................................................................... 7
Desktop Background ........................................................................................................................7
Windows XP / Windows 2003 Settings ............................................................................................7
Windows 2000 / ME Settings ...........................................................................................................8
Windows 95 / 98 / NT Settings .........................................................................................................8
Linux Settings ...................................................................................................................................8
Sun Solaris Settings .........................................................................................................................8
Apple Macintosh Settings.................................................................................................................9
CONFIGURING TARGET SERIAL DEVICES ....................................................................................................9
CONFIGURING NETWORK FIREWALL SETTINGS ........................................................................................... 9
PHYSICAL CONNECTIONS.........................................................................................................................10
INITIAL CONFIGURATION........................................................................................................................... 13
CONNECT TO DOMINION KSX REMOTELY ................................................................................................. 16
Launch Raritan Remote Client (RRC)............................................................................................16
Establish a Connection...................................................................................................................17
HAPTER 3: RARITAN REMOTE CLIENT ..........................................................19
C
INVOKING RARITAN REMOTE CLIENT (RRC) VIA WEB BROWSER ...............................................................19
Security Settings.............................................................................................................................19
Launching Raritan Remote Client ..................................................................................................19
Removing RRC From Browser Cache ...........................................................................................20
OPTIONAL: INSTALLING RARITAN REMOTE CLIENT SOFTWARE...................................................................21
RRC WINDOW LAYOUT ...........................................................................................................................21
RRC NAVIGATOR....................................................................................................................................22
Navigator Options...........................................................................................................................23
Creating New Profiles.....................................................................................................................23
Establishing a New Connection......................................................................................................25
Closing a Remote Connection........................................................................................................25
RRC TOOLBAR AND SHORTCUTS.............................................................................................................26
RRC STATUS BAR ..................................................................................................................................27
REMOTE DESKTOP: KVM CONSOLE CONTROL .........................................................................................28
Single Mouse Mode / Dual Mouse Mode .......................................................................................30
Full Screen Mode ...........................................................................................................................30
Keyboard Macros ...........................................................................................................................31
Connection and Video Properties...................................................................................................34
Color Calibration.............................................................................................................................36
REMOTE DESKTOP: SERIAL CONTROL ......................................................................................................37
Remote Connection........................................................................................................................37
Changing Serial Settings................................................................................................................38
Viewing Serial Console History ......................................................................................................38
Serial Console Logging ..................................................................................................................39
Cutting and Pasting Serial Data .....................................................................................................39

ii TABLE OF CONTENTS
REMOTE DESKTOP: POWER CONTROL .....................................................................................................40
Remote Connection........................................................................................................................40
REMOTE DOMINION KSX DEVICE ADMINISTRATION...................................................................................43
Configuration Menus ......................................................................................................................43
Firmware Upgrade..........................................................................................................................43
Device Restart ................................................................................................................................43
Device Configuration Backup and Restore .................................................................................... 43
Log Files .........................................................................................................................................43
HAPTER 4: ADMINISTRATIVE FUNCTIONS......................................................45
C
ACCESSING THE ADMINISTRATIVE FUNCTIONS ..........................................................................................45
Local Admin Console......................................................................................................................45
Remote Admin Console .................................................................................................................46
NAVIGATING THE ADMINISTRATIVE MENUS................................................................................................46
NETWORK CONFIGURATION .....................................................................................................................47
PATH CONFIGURATION ............................................................................................................................ 48
SECURITY CONFIGURATION......................................................................................................................48
PERFORMANCE SETTINGS .......................................................................................................................50
RADIUS CONFIGURATION .......................................................................................................................51
TIME AND DATE .......................................................................................................................................54
KEY CONFIGURATION ..............................................................................................................................54
ADMINISTER USER ACCOUNTS .................................................................................................................55
Add New Users...............................................................................................................................55
Change User Profile .......................................................................................................................57
Delete Users...................................................................................................................................57
Log Off Users .................................................................................................................................57
VIEW DOMINION KSX STATUS .................................................................................................................58
RESTART OR SHUTDOWN THE DOMINION KSX ..........................................................................................58
DIAGNOSTICS ..........................................................................................................................................58
APPENDIX A: SPECIFICATIONS ......................................................................59
REMOTE CONNECTION.............................................................................................................................59
RARITAN REMOTE CLIENT (RRC) SOFTWARE........................................................................................... 59
KVM INPUT.............................................................................................................................................59
APPENDIX B: SERIAL PORT PIN-OUT DIAGRAMS ..............................................61
DOMINION KSX RJ45 SERIAL PIN-OUT....................................................................................................61
SCSDB25F NULLING SERIAL ADAPTER PIN-OUT .....................................................................................61
SCSDB25M NULLING SERIAL ADAPTER PIN-OUT ....................................................................................61
SCSDB9F NULLING SERIAL ADAPTER PIN-OUT .......................................................................................62
SCSDB9M NULLING SERIAL ADAPTER PIN-OUT ......................................................................................62
CUSTOM, NULLING RJ45 CABLE ..............................................................................................................63
CRLVR-15 CUSTOM ROLLOVER CABLE FOR MOST SUN / CISCO RJ45 SERIAL PORTS..............................63
APPENDIX C: RADIUS SERVER SETTINGS .....................................................65
RADIUS AUTHENTICATION PRIORITY AND FLOWCHART ............................................................................65
CONTROLLING DOMINION KSX USER PERMISSIONS VIA RADIUS FILTER-ID ...........................................65
CONTROLLING DOMINION KSX USER PERMISSIONS VIA RADIUS FILTER-ID ...........................................66
RADIUS ATTRIBUTES GENERATED BY DOMINION KSX.............................................................................67
RADIUS ACCESS CHALLENGE ................................................................................................................68
APPENDIX D: SNMP FEATURES....................................................................69
APPENDIX E: FREQUENTLY ASKED QUESTIONS ...............................................71

TABLE OF CONTENTS iii
APPENDIX F: TROUBLESHOOTING ..................................................................73
PROBLEMS AND SUGGESTED SOLUTIONS .................................................................................................73
EVENT LOG FILE AND ON-SCREEN ERROR CODES....................................................................................77

This page intentionally left blank.

Important Information
Login
• The default Dominion KSX login user name is <admin>, with the password <raritan>. This user has
administrative privileges.
• Passwords are case sensitive and must be entered in the exact case combination in which they were created.
• The default password <raritan> must be entered entirely in lowercase letters.
• To ensure security, change the default password as soon as possible.
Default IP Address
• Dominion KSX ships with the default IP address of 192.168.0.192.
Firmware
• This manual applies to Dominion KSX Firmware v3.10 and above.

This page intentionally left blank.

CHAPTER 1: INTRODUCTION 1
Chapter 1: Introduction
Dominion KSX Overview
Congratulations on your purchase of Dominion KSX, the complete solution for remote office administration.
Dominion KSX is the first hardware based, integrated solution to provide remote KVM access, serial device
management and power control in a single unit. With Dominion KSX, administrators may troubleshoot and control
remote office server closets as if physically present at the branch office. Unlike remote control software solutions,
Dominion KSX provides:
• One consolidated view of all IT equipment deployed at branch office locations
• A single, platform-independent solution offering centralized, integrated and secure control
• Network independent access via built-in modem for emergency access even when the network is down
• BIOS-level control of KVM equipment and console level control of serial devices
Raritan's Dominion KSX is designed specifically to make the management of your IT infrastructure at branch
locations easier, faster and more cost-effective. This innovative device combines secure console level access and
cold start power control of everything in your server closets. This means from anywhere you access the Web, you
can directly access, troubleshoot and even reboot all of your remote equipment including:
• Domain Servers
• File/Print Servers
• Headless Servers
• Network Appliances
• Serial IT Equipment
• Switches
• Routers
• Firewalls
• Security Interfaces
• Application Servers
• Load Balancers
• Environmental Control
2 DOMINION KSX USER MANUAL
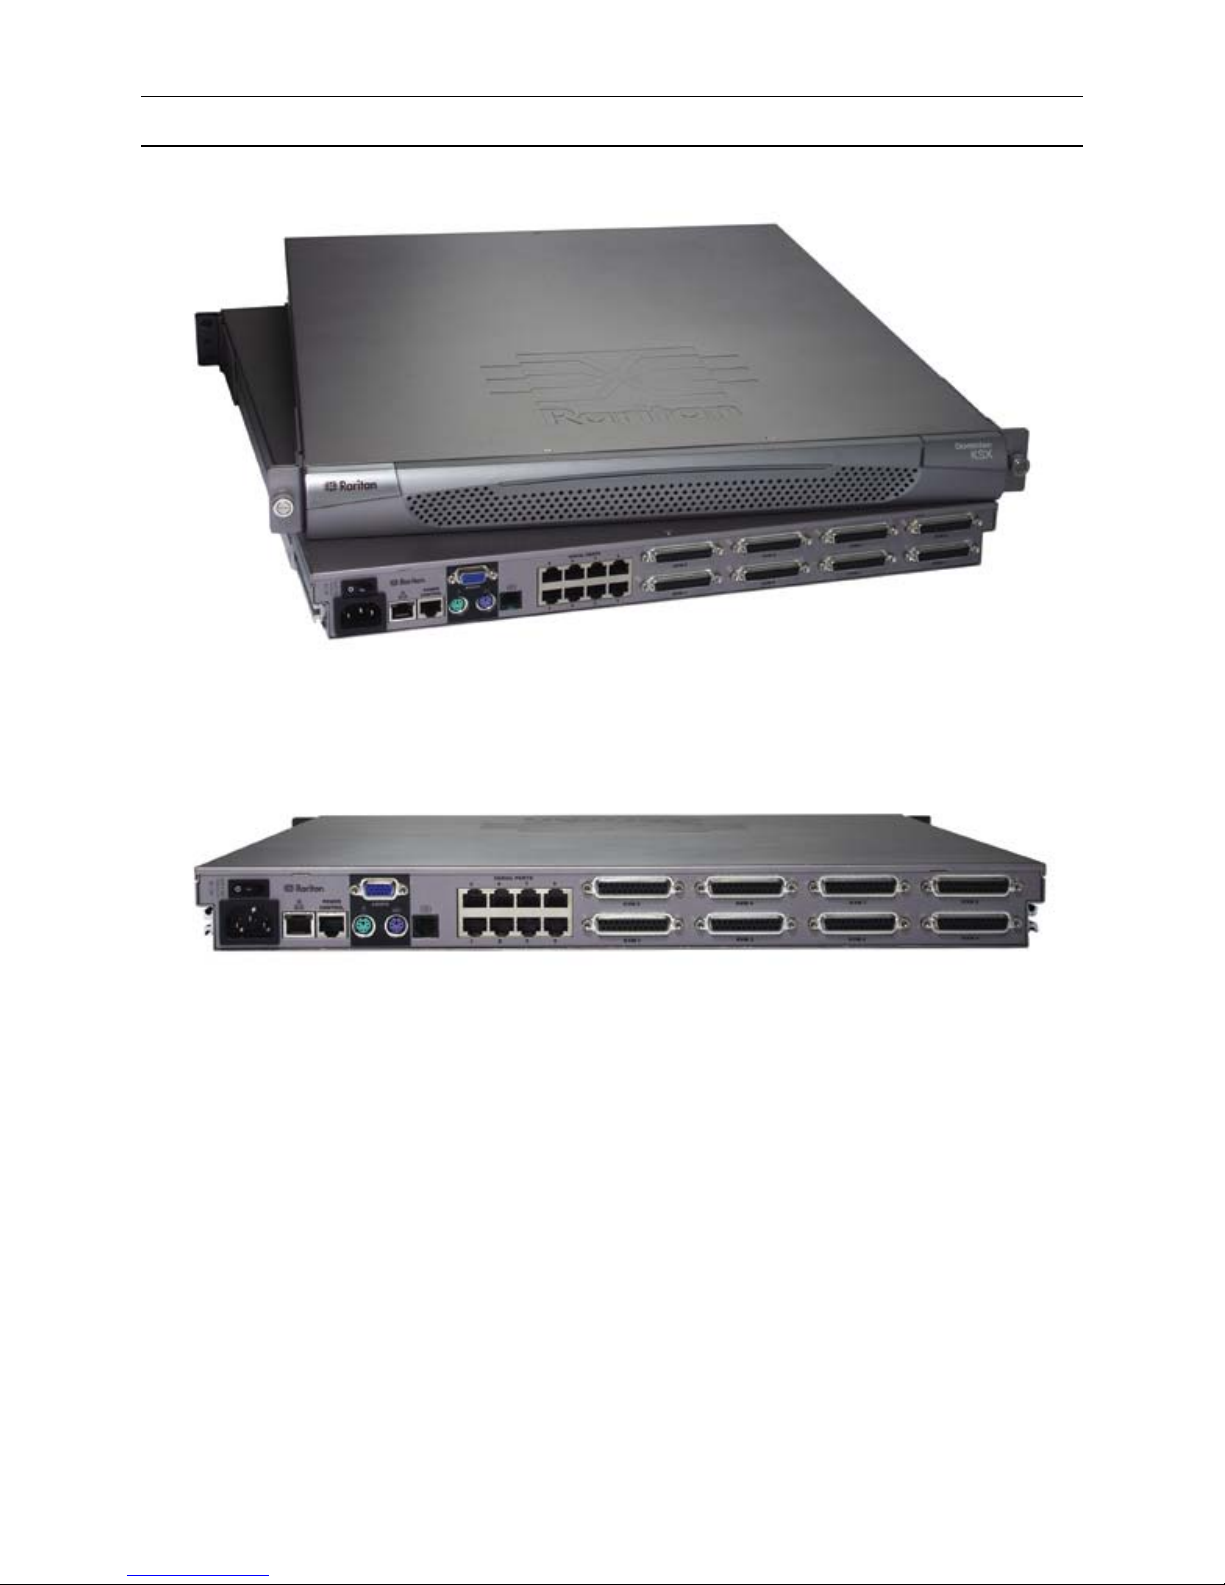
Product Photos
Dominion KSX Stacked View
Dominion KSX Rear View

CHAPTER 1: INTRODUCTION 3
Product Features
Access
• Remote access via the Internet, LAN/WAN, or dial-up modem
• Single integrated solution for remote serial console and KVM console access
• Web browser accessible
• Integrated, graphical remote power control interface
• Integrated modem allows remote office devices to be accessible even if network is unavailable
• Remote access to 4 or 8 KVM ports
• Remote access to 4 or 8 serial console ports
Performance
• Superior compression algorithm for exceptional performance over low-bandwidth connections
• No impact on target server performance
• Automatic sensing of video resolution for optimum display
• High-performance mouse tracking and synchronization
Security
• SSL 128-bit RSA public key, 128-bit RC4 private key encryption
• Single, configurable TCP port for firewall protection
• Supports RADIUS authentication protocol
• Customizable user profiles
Administration
• Remote Administration via Web Browser interface
• SNMP Support
• Firmware upgradeable over Ethernet
• Simplified installation and user interface
• Local user console for direct analog access to KVM devices
• Extensive downloadable user event log
• DHCP or fixed IP addressing
4 DOMINION KSX USER MANUAL
Terminology
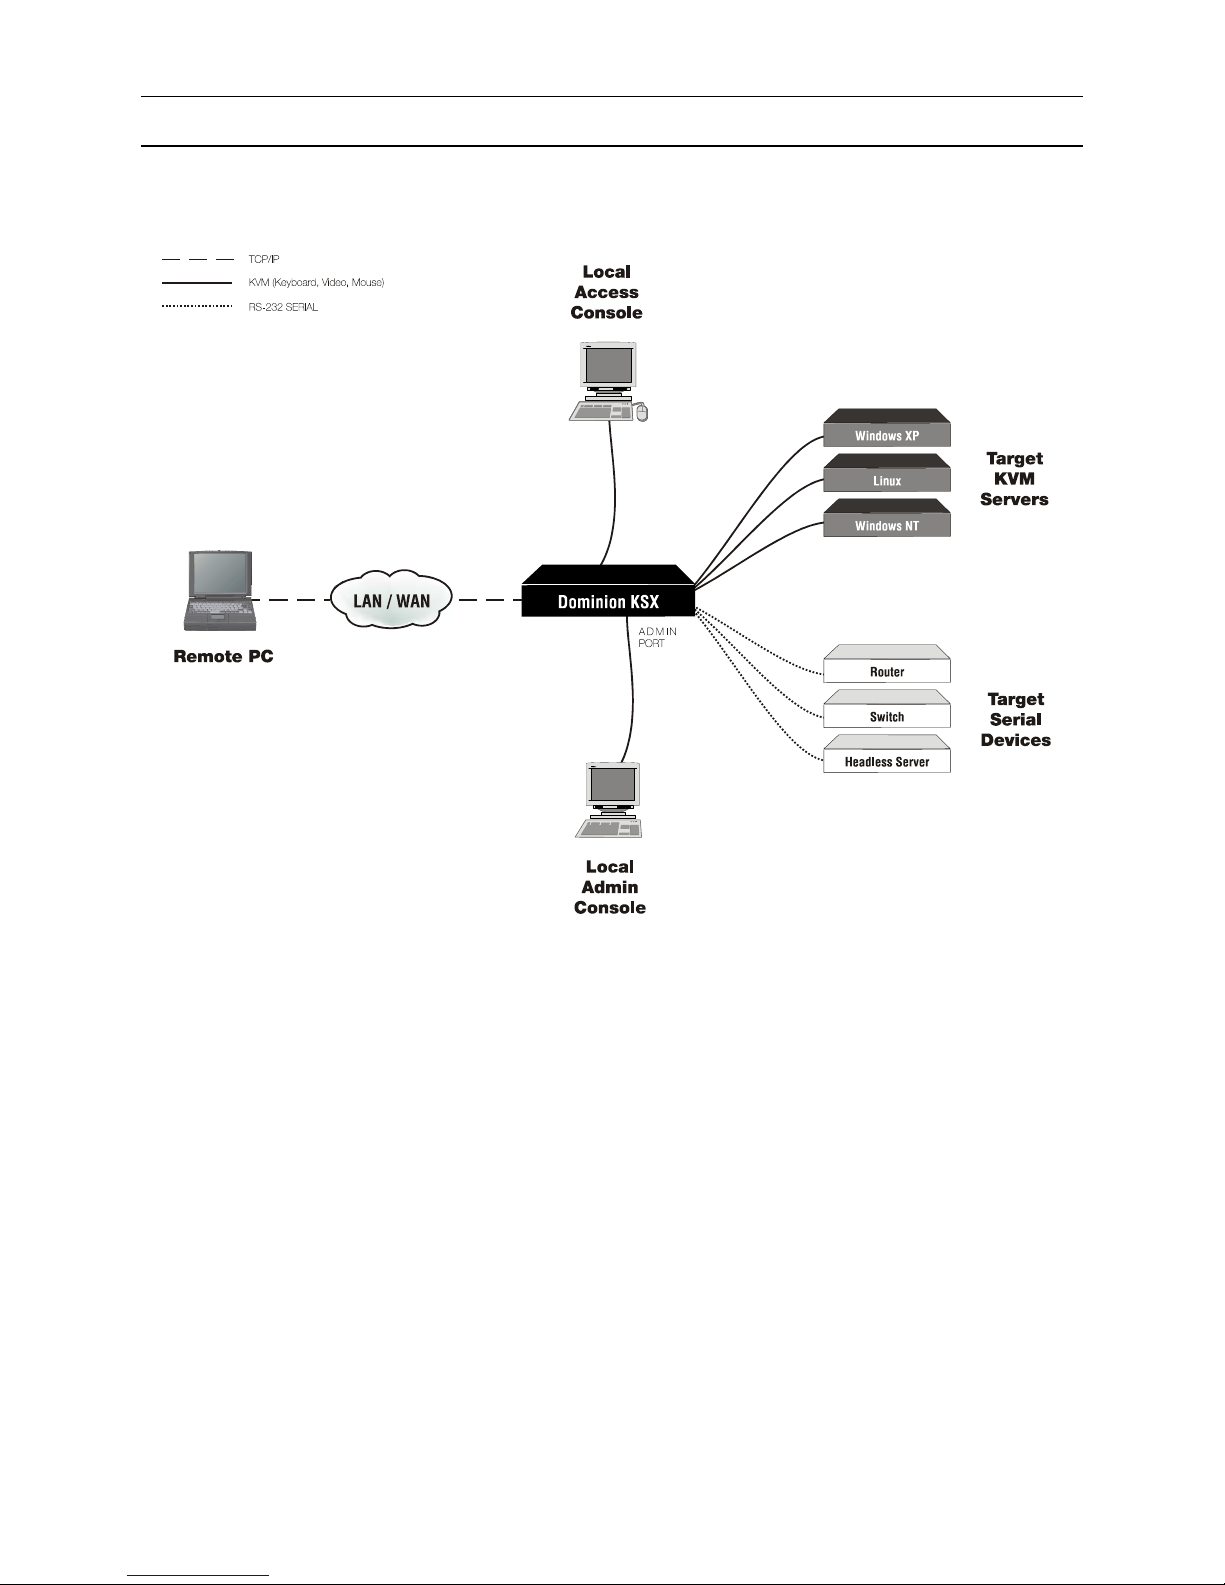
This manual makes use of the following terms to indicate components of a typical Dominion KSX configuration.
While reading the manual, please refer to the diagram below for clarification when necessary.
Target KVM Servers
Target Serial Devices
Remote PC
Local Access Console
Local Admin Console
Servers with graphical video cards and user interfaces (e.g., Windows, Linux,
Solaris, etc.) to be accessed remotely via Dominion KSX.
Serially-controlled (RS-232) devices to be accessed remotely via Dominion
KSX. For example, headless servers, routers, switches, CSU/DSU, etc.
A networked Windows-based computer used to access and control target
devices connected to Dominion KSX.
An optional user console, consisting of a PS/2 keyboard, PS/2 mouse, and
multi-sync VGA monitor, directly attached to Dominion KSX to control
Target KVM Servers locally (not through the network).
A PS/2 keyboard and VGA monitor directly attached to Dominion KSX, used
for administration and setup. From this console, Dominion KSX
administration menus can be performed directly. Target KVM Servers and
Target Serial Devices cannot be viewed using this screen.
While Dominion KSX also allows remote administration via the network,
the local admin console provides the most convenient means to perform
initial setup.

CHAPTER 1: INTRODUCTION 5
Package Contents
Dominion KSX ships as a fully configured stand-alone product in a standard 1U 19” rackmount chassis, along with
the following contents:
(1) Dominion KSX unit
(1) Dominion KSX Quick Installation
and Setup Guide
(1) Raritan User Manual CD-ROM
(1) Raritan Remote Client software
CD-ROM
(1) Raritan Remote Client software license
certificate for five named users
(1) Rackmount Kit
(1) AC Power Cord
(1) RJ11 telephone cord
(1) Cat5 Network cable

6 DOMINION KSX USER MANUAL

CHAPTER 2: INSTALLATION 7
Chapter 2: Installation
Configuring Target KVM Servers
Before installing Dominion KSX, you must first configure any target KVM servers that you wish to access via
Dominion KSX in order to ensure optimum performance, as outlined below. Note that the following configuration
requirements apply only to Target KVM Servers, not to the computers that you will be using to access Dominion
KSX remotely (see Chapter 1: Introduction, Terminology).
Server Video Resolution
Ensure that each Target KVM Server’s video resolution and refresh rate is supported by Dominion KSX, and the
signal is non-interlaced. Dominion KSX supports the following video resolutions:
Text Modes
640x480 @ 60Hz
640x480 @ 72Hz
640x480 @ 75Hz
640x480 @ 85Hz
800x600 @ 56Hz
800x600 @ 60Hz
800x600 @ 72Hz
800x600 @ 75Hz
800x600 @ 85Hz
1024x768 @ 60Hz
1024x768 @ 70Hz
1024x768 @ 75Hz
1024x768 @ 85Hz
1152x864 @ 60Hz
1152x864 @ 75Hz
1280x1024 @ 60Hz
Desktop Background
For optimal bandwidth efficiency and video performance, target servers running graphical user interfaces such as
Windows, Linux, X-Windows, Solaris, and KDE should be configured with desktop backgrounds set to a
predominantly solid, plain, light-colored graphic. The desktop background need not be completely solid; but desktop
backgrounds featuring photos or complex gradients should be avoided.
Windows XP / Windows 2003 Settings
On target servers running Microsoft Windows XP, disable the “Enhanced Pointer Precision” option, and set the
mouse motion speed exactly to the middle speed setting. These parameters are found in Control Panel → Mouse →
Mouse Pointers.
For Target Servers running Windows NT, 2000, or XP, you may wish to create a username
Note:
that is to be used only for remote connections through Dominion KSX. This will enable you to
keep the Target Server’s slow mouse pointer motion/acceleration settings exclusive to the
Dominion KSX connection only, as other users may desire faster mouse speeds.
Note:
Windows XP and 2000 login screens revert to pre-set mouse parameters that differ from
those suggested for optimal Dominion KSX performance. As a result, mouse sync will not be
optimal at these screens. If you are comfortable adjusting the registry on Windows target servers,
you can obtain better Dominion KSX mouse synchronization at login screens by using the
Windows registry editor to change the following settings: Default user mouse motion speed = 0;
mouse threshold 1= 0; mouse threshold 2 = 0.
Disable transition effects in Control Panel → Display → Appearance → Settings.

8 DOMINION KSX USER MANUAL
Windows 2000 / ME Settings
On target servers running Microsoft Windows 2000 / ME, set the mouse pointer acceleration to “none” and the
mouse motion speed exactly to the middle speed setting. These parameters are found in Control Panel → Mouse.
Disable transition effects in Control Panel → Display → Effects.
Windows 95 / 98 / NT Settings
On target servers running Microsoft Windows 95 / 98 / NT, set the mouse motion speed to the slowest setting in
Control Panel → Mouse → Motion.
Disable window, menu, and list animation in Control Panel → Display → Effects.
Linux Settings
On target servers running Linux graphical interfaces, set the mouse acceleration to exactly 1 and set threshold to
exactly 1.
As mentioned above, please ensure that each target server running Linux is using a resolution supported by
Dominion KSX at a standard VESA resolution and refresh rate. Each Linux target server should also be set so the
blanking times are within +/- 40% of VESA standard values.
To check for these parameters:
• Go to the Xfree86 Configuration file XF86Config
• Using a text editor, disable all non-Dominion KSX supported resolutions
• Disable the virtual desktop feature, which is not supported by Dominion KSX
• Check blanking times (+/- 40% of VESA standard).
• Restart computer
In many Linux graphical environments, the command <Ctrl+Alt+Plus> will change the
Note:
video resolution, scrolling through all available resolutions that remain enabled in the
XF86Config file.
Sun Solaris Settings
As mentioned, all target servers must be configured to one of the display resolutions supported by Dominion KSX,
as listed on page 6. The most popular supported resolutions for Sun machines are:
• 1024x768@60Hz
• 1024x768@70Hz
• 1024x768@75Hz
• 1024x768@85Hz
• 1152x900@66Hz
• 1152x900@76Hz
• 1280x1024@60Hz
Target servers running the Solaris operating system must output VGA video (H-and-V sync, not composite sync).
To change your Sun video card output from composite sync to the non-default VGA output, first issue the Stop+A
command to drop to bootprom mode. Then, issue the command:
setenv output-device screen:r1024x768x70
to change the output resolution. Issue the “boot” command to reboot the server.
Alternatively, you may contact your Raritan representative to purchase a video output adapter. 13W3 Suns with
composite sync output require APSSUN II Raritan guardian for use with Dominion KSX. HD15 Suns with
composite sync output require 1396C Raritan converter to convert from HD15 to 13W3 and an APSSUN II Raritan
guardian converter to support composite sync. HD15 Suns with separate sync output require an APKMSUN Raritan
guardian for use with Dominion KSX.
On target servers running the Solaris operating system, set the mouse acceleration value to exactly 1 and threshold to
exactly 1.
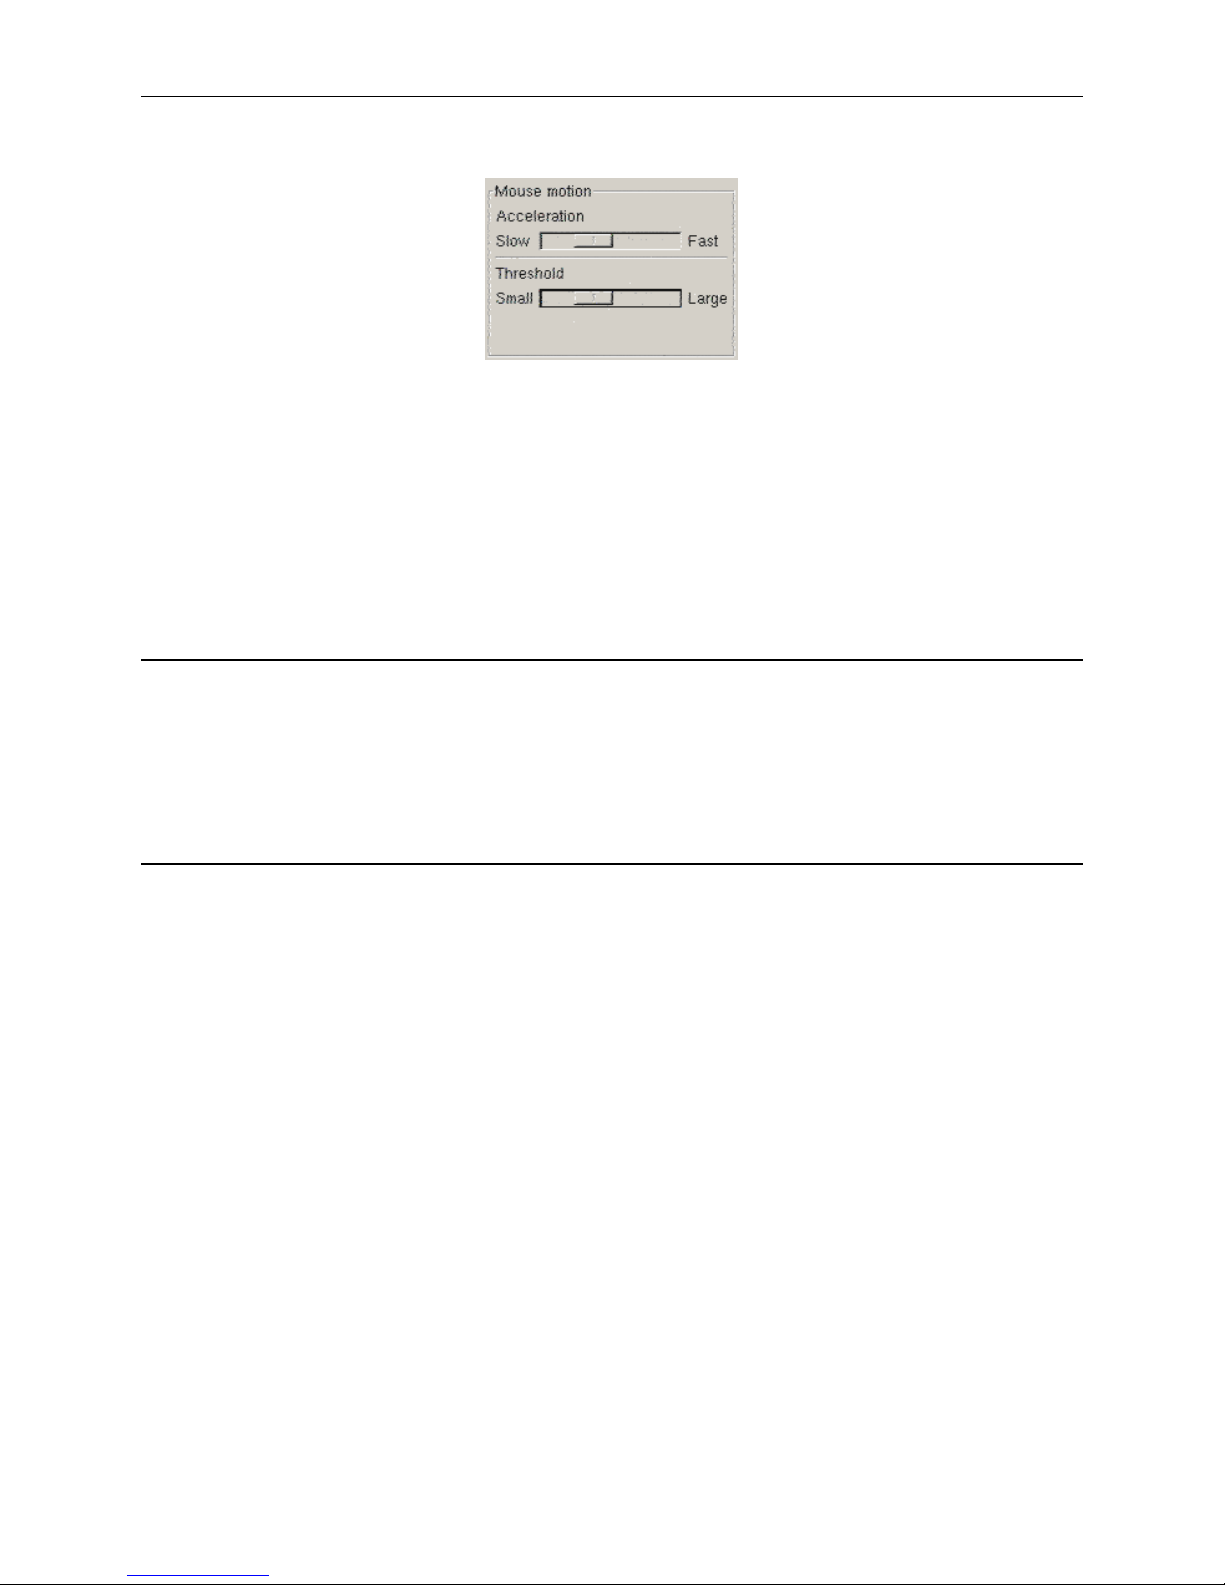
CHAPTER 2: INSTALLATION 9
This can be performed from the graphical user interface (as shown below), or with the command line “xset mouse a
t” where “a” is the acceleration and “t” is the threshold.
Apple Macintosh Settings
For target servers running an Apple Macintosh operating system, while no specific mouse setting is required, please
be aware that while using Dominion KSX to access and control your target server, you must set the Dominion KSX
client (Raritan Remote Client) to “single cursor” mode (see Chapter 3: Raritan Remote Client, Remote KVM
Console Control, Single Mouse Mode).
Dual cursor mode is not supported; the two mouse pointers will not appear in sync if you attempt to control a
Macintosh server via Dominion KSX in dual cursor mode.
Configuring Target Serial Devices
For each target serial device that you wish to connect to Dominion KSX for remote access, please:
• Ensure that the serial terminal settings are set to a VT-100 emulation. Dominion KSX supports only standard
VT-100 emulation.
• Either change the serial communication parameters to 9600 baud N-8-1 (Dominion KSX default), or note the
communication parameters for later reference.
Configuring Network Firewall Settings
If you wish to access Dominion KSX through a network firewall, your firewall must allow communication on TCP
Port 5000. Alternatively, Dominion KSX can be configured to use a different TCP port of your own designation (see
Chapter 4: Administrative Functions, Network Configuration).
Optional: If you wish to take advantage of Dominion KSX's web-access capabilities, the firewall must also allow
inbound communication on TCP Port 443 – the standard TCP port for HTTPS communication. If you wish to take
advantage of Dominion KSX's automatic redirection of HTTP requests to HTTPS (i.e., so users may type the more
common, "http://xxx.xxx.xxxx", instead of "https://xxx.xxx.xxxx"), then the firewall must also allow inbound
communication on TCP Port 80 – the standard TCP port for HTTP communication.
10 DOMINION KSX USER MANUAL
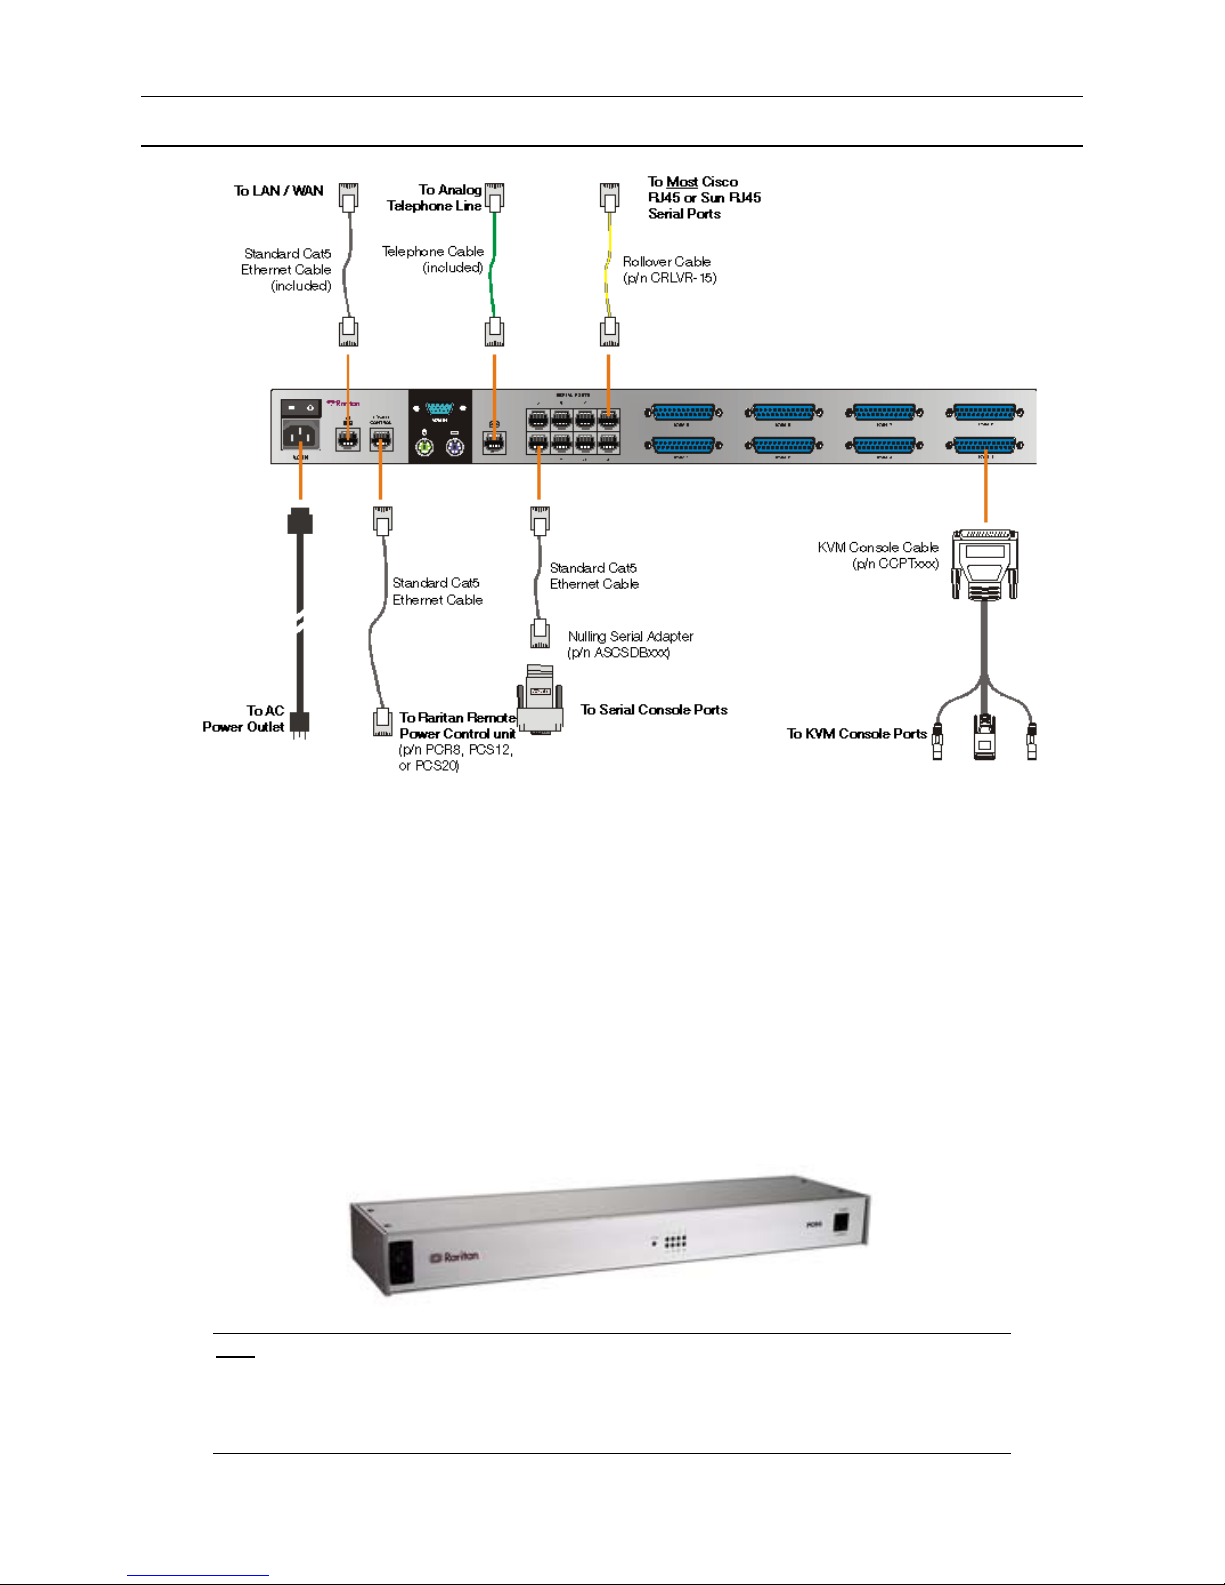
Physical Connections
Back Panel of Dominion KSX
AC Power Line
Attach the included AC power cord to Dominion KSX and into an AC Power Outlet.
Network Port
Connect a standard Ethernet cable from the network port to an Ethernet switch, hub, or router.
Power Control Port (optional)
To employ Dominion KSX’s integrated power control graphical interface, connect a standard Cat5 Ethernet cable
from the port labeled “Power Control” to the equivalently labeled port found on a Raritan Remote Power Control
unit (p/n PCR8, PCS12, or PCS20).
: This port works only with Raritan brand Remote Power Control units. You may use similar
Note
products from other vendors by connecting them as a standard serial device. However, note that
Dominion KSX does not present a graphical interface to other vendors’ power control products,
only a standard command-line interface; Dominion KSX’s graphical power control interface
applies only to Raritan brand Remote Power Control units.

CHAPTER 2: INSTALLATION 11
Local Admin Console
Attach a PS/2 keyboard and multisync monitor to the indicated ports (see diagram above) in the back of Dominion
KSX. The local Admin Console is very useful during initial setup, and may be removed thereafter.
Telephone Line Port (optional)
Dominion KSX features an integrated modem for remote access even when the LAN/WAN is unavailable. Use the
included telephone cable to connect the port labeled “Tel Line” to an analog telephone jack.
Serial Input Ports
Connect RS-232 serially-controlled devices to Dominion KSX for the ability to remotely access terminal console
ports on devices such as headless servers, routers, switches, and network appliances. For each serial console port for
which you wish to provide remote access via Dominion KSX, connect the serial interface to Dominion KSX as
appropriate to the physical form factor of your serial console port:
• DB9 Serial Ports: Attach one end of a standard, straight-through Cat5 cable to an unoccupied RJ45 serial port
on the back of your Dominion KSX. Attach the other end of the Cat5 cable to a Raritan nulling serial adapter:
P/N ASCSDB9F for DB9 (M) serial ports; and P/N ASVSDB9M for DB9 (F) serial ports. Then, attach the
Raritan nulling serial adapter directly to your device’s serial console port.
• DB25 Serial Ports: Attach one end of a standard, straight-through Cat5 cable to an unoccupied RJ45 serial port
on the back of your Dominion KSX. Attach the other end of the Cat5 cable to a Raritan nulling serial adapter:
P/N ASCSDB25F for DB25 (M) serial ports; and P/N ASVSDB25M for DB25 (F) serial ports. Then, attach the
Raritan nulling serial adapter directly to your device’s serial console port.
• RJ45 Serial Ports (from Sun and Cisco): Most
Sun and Cisco RJ45 Serial Ports may be connected directly to
an unoccupied RJ45 serial port on the back of your Dominion KSX, using a “rollover” cable whose pin-outs are
described in Appendix B: Serial Port Pin-Out Diagrams, “CRLVR-15 Custom Rollover Cable for Most Sun /
Cisco RJ45 Serial Ports”. This cable is often provided by Sun and Cisco in shipments of their products whose
serial ports have the RJ45 form factor. Alternatively, this cable may be purchased directly from Raritan – order
part number CRLVR-15.
• RJ45 Serial Ports (from vendors other than Sun and Cisco): Unfortunately, no widely accepted standard for
RS-232 serial signal transmission through an RJ45 form factor port currently exists. Therefore, to connect an
RJ45 serial port to Dominion KSX, refer to your vendor’s product manual to obtain a pin-out diagram of its
RJ45 serial console port. Then, using Cat5 cable with RJ45 terminators, crimp a cable in order whose pin-out
corresponds correctly to Dominion KSX specifications as found in Appendix B of this manual.
For your reference, the following chart can assist you in creating, modifying, or confirming such a custom
cable:
Dominion
KSX Serial
Port Pin
1 RTS CTS
2 DTR DSR and DTD §
3 TXD RX (“RXD”)
4 GND GND
5 SGND GND or SGND
6 RXD TX (“T XD”)
7 DSR DTR
8 CTS RTS
Function
Proper Nulling
Connection to
Your Serial Console*
§
§
§
Port Pin of Your
Serial Console**
Notes:
* Standard serial nulling signal associations as specified by RS-232.
** Fill in this column with values specified by the device manual provided with your serially-controlled device.
§
In most cases, this signal is optional – generally used only if hardware flow control is enabled.

12 DOMINION KSX USER MANUAL
KVM Input Ports
To connect servers with graphical video cards, such as those running Microsoft Windows or Linux, attach the DB25
end of a Raritan KVM Console Cable (p/n CCPTxxx) to a KVM port found on the back panel of Dominion KSX.
Connect the other end of the cable to corresponding PS/2 keyboard, mouse, and VGA video ports of the server to
which you wish to provide remote network access.
KVM Output / Local Access Console Ports (optional) (on front of chassis)
For convenient access to Target KVM Servers while onsite (in the presence of Dominion KSX), you may choose to
take advantage of Dominion KSX’s Local Access Console ports, located on the front of the chassis. To do so, first
remove the front bezel by pulling it horizontally towards you. Then, attach a multisync VGA monitor, PS/2 mouse,
and PS/2 keyboard to the ports located on the right hand side.
CHAPTER 2: INSTALLATION 13
Initial Configuration
The steps below allow you to quickly set up Dominion KSX for the first time using the Dominion KSX Setup
Wizard. The Dominion KSX Setup Wizard appears only when accessing the Administrative Menus on an
unconfigured Dominion KSX, and guides you through initial configuration parameters. The easiest way to perform
this initial configuration is by using the Local Admin Console (see ‘Physical Connection’ instructions in the
previous sections).
1. Power ON Dominion KSX via the power switch on the back of the Dominion KSX unit.
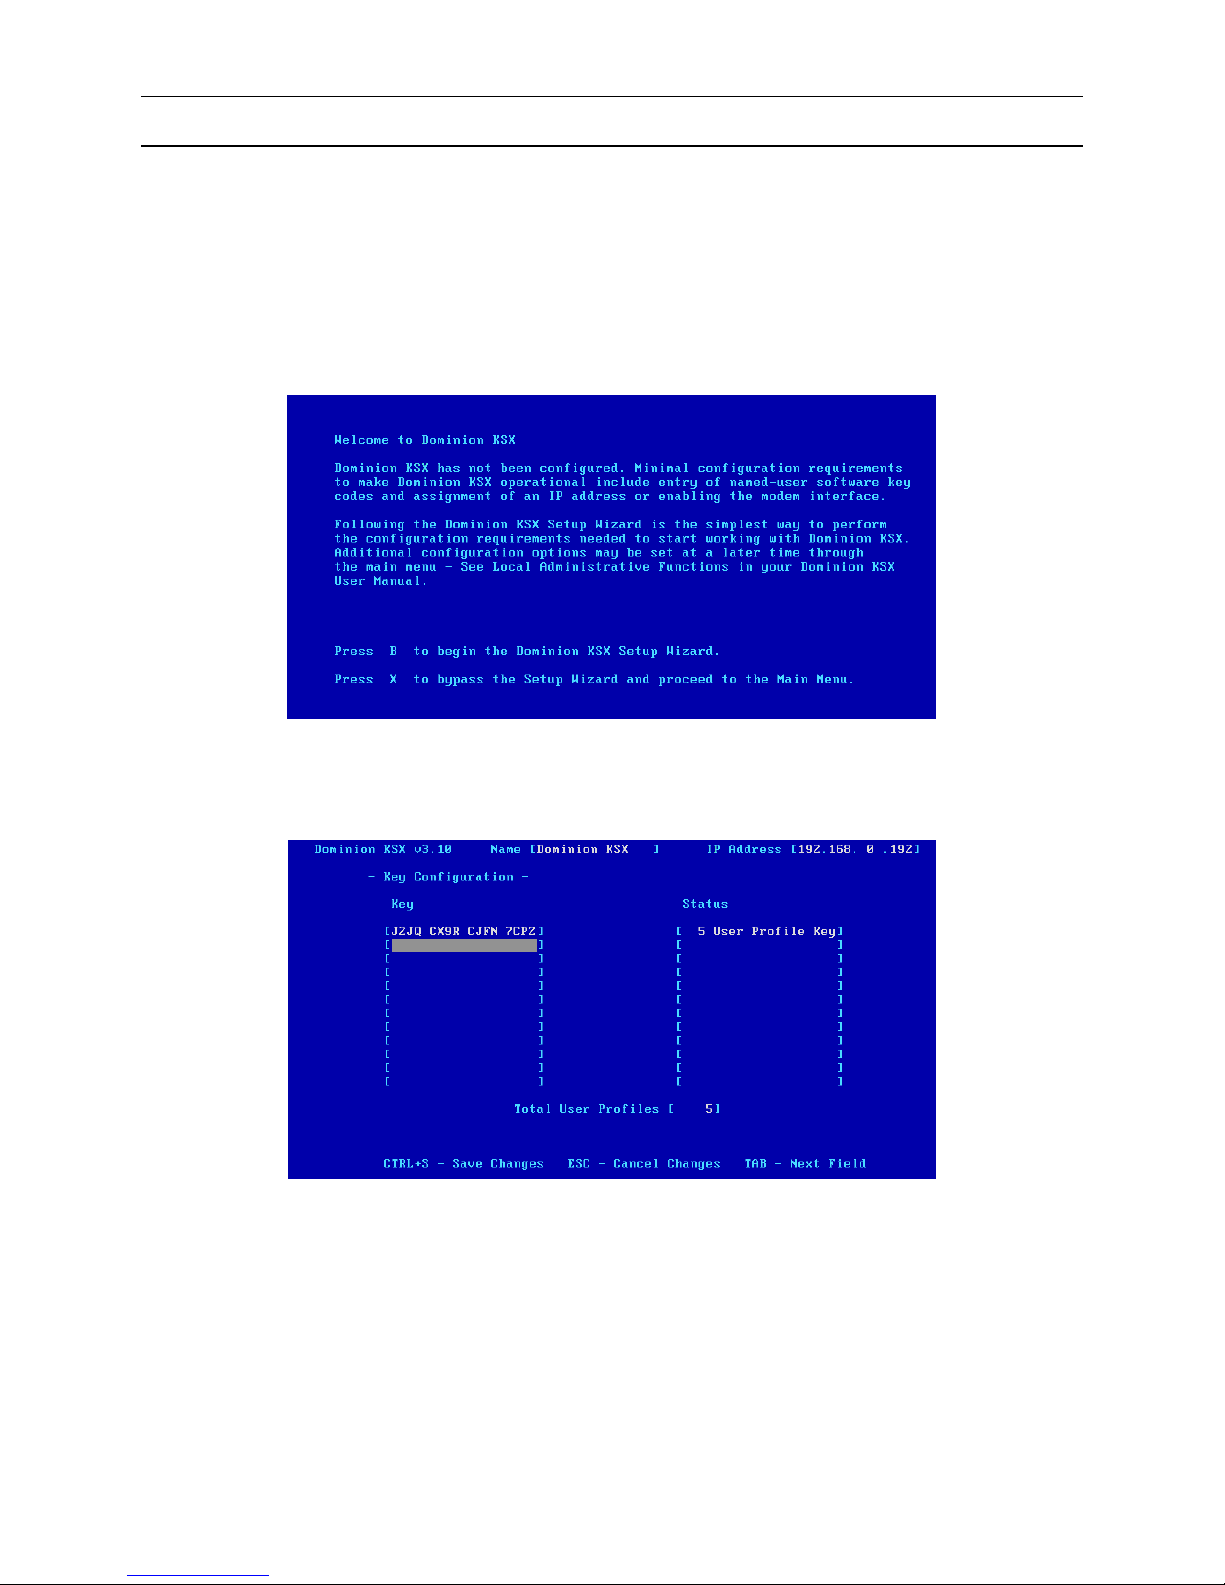
2. The Welcome to Dominion KSX Setup Wizard Screen will appear on the Local Admin Console.
3. Press the letter <B> on the Local Admin Console keyboard to begin the Dominion KSX Setup Wizard.
4. The Key Configuration Screen will appear.
On this screen, enter each Raritan Remote Client User License Key purchased, pressing <Tab> or <Enter>
after each key is entered. Raritan Remote Client User License Key codes can be found on the license certificates
shipped with your unit.
When all named-user keys are entered, press <Ctrl+S> to save the keys entered.
14 DOMINION KSX USER MANUAL
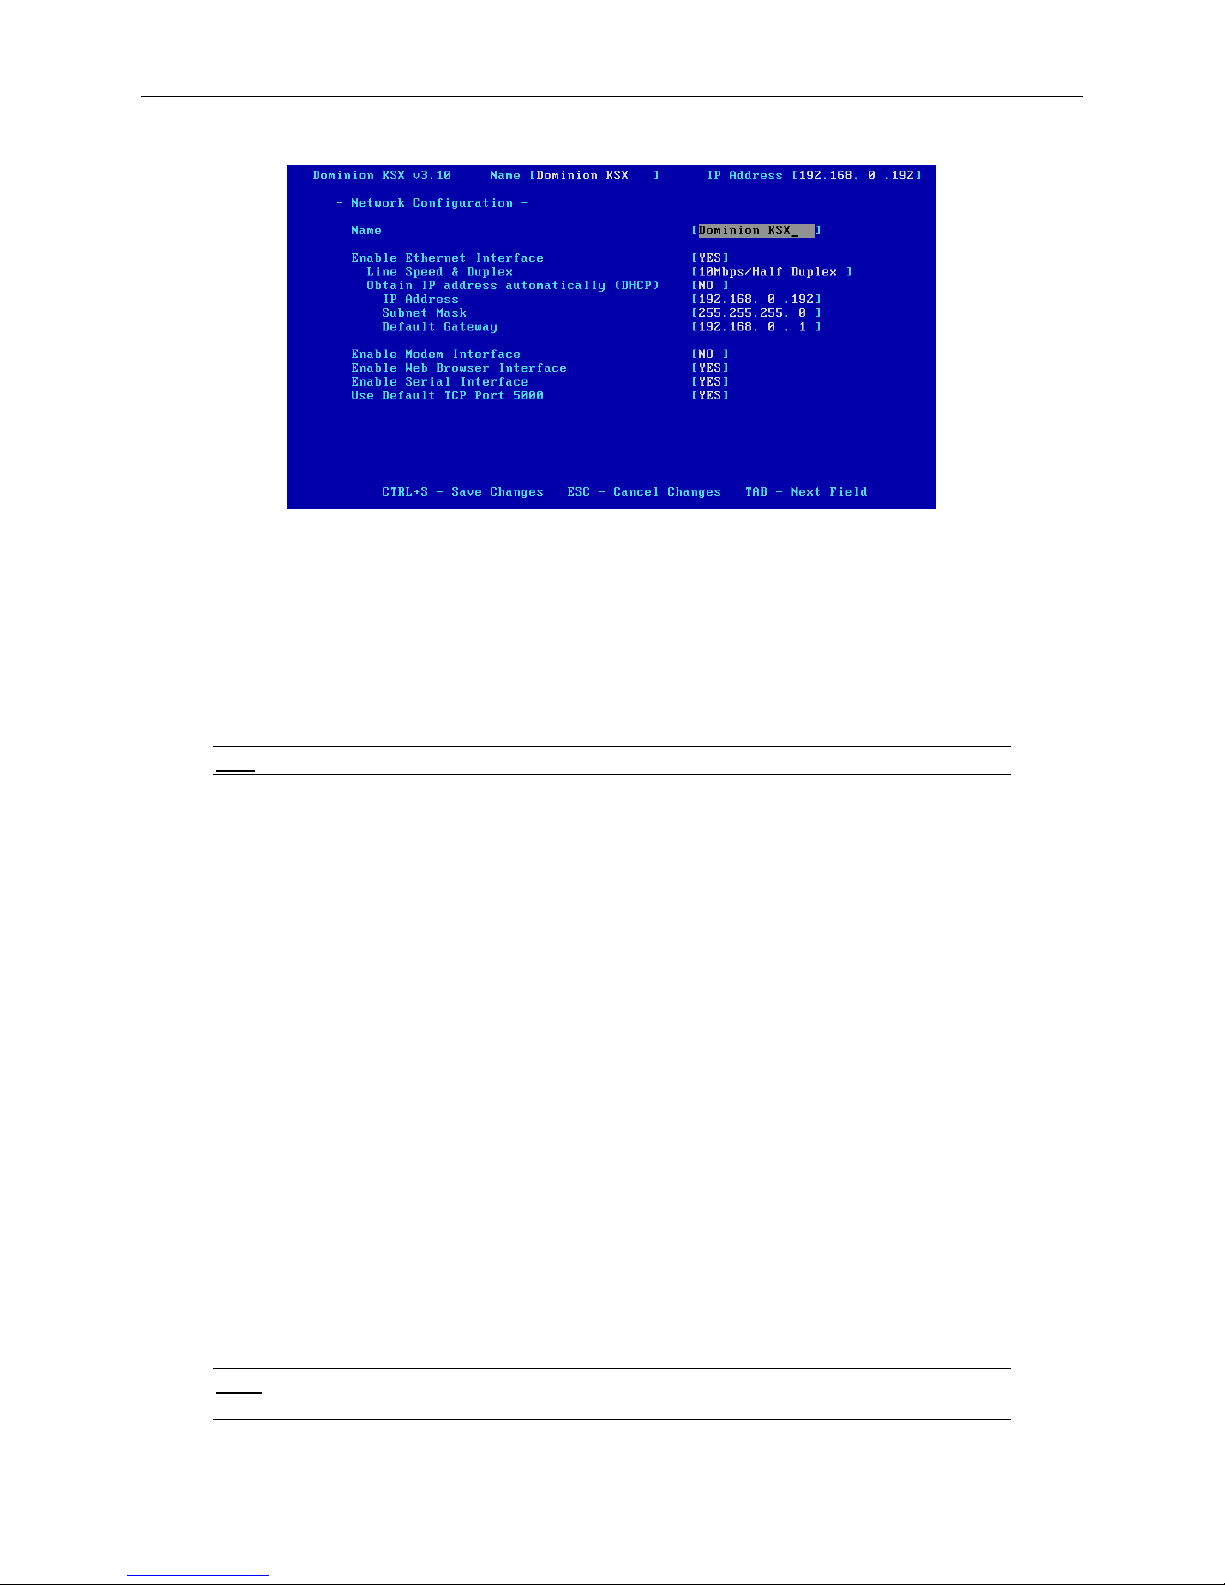
5. All entered key codes will be saved and the Network Configuration Screen will appear.
6. Use the <Tab>, <↑> or <↓> keys to select each line on the Network Configuration screen and the <space bar>,
or the <←> or <→> keys to toggle between available entries. Press the <Enter>, <Tab> or <↓> keys when
your entry on each line is complete. Below are descriptions of each field, and the appropriate values to assign.
• Name: Designate a unique name for this Dominion KSX unit, for example, “Miami Sales Office” The default
name is Dominion KSX.
• Enable Ethernet Interface: Designates whether Dominion KSX should enable its Ethernet adapter as active
(default: YES).
: Network connections must be 10BASE-T or 100BASE-TX Ethernet
Note
- Line Speed & Duplex: Enter the network speed to be used by Dominion KSX’s Ethernet interface: Auto
detect, 10 Mbps/Full Duplex, 10 Mbps/Half Duplex, 100 Mbps/Full Duplex, or 100 Mbps/Half Duplex
- Obtain IP address automatically (DHCP):
♦ YES: Enables dynamic IP addressing for Dominion KSX. Each time Dominion KSX boots, it will
request an IP address from the local DHCP server. Note that this setting can make remote access to
Dominion KSX from outside the LAN difficult, since the dynamically assigned IP address must be
known in order to initiate a connection.
♦ NO (default): Assigns a fixed IP address to the Dominion KSX unit (recommended).
IP Address: Enter the IP address for Dominion KSX given by your Network
Administrator.
Subnet Mask: Enter a Subnet Mask provided by your Network Administrator.
Default Gateway: Enter the Default Gateway if your Network Administrator specifies
one.
• Enable Modem Interface: Enables Dial-up Modem access (default: YES).
• Enable Web Browser Interface: Enables web browser access to Dominion KSX (default: YES).
• Enable Serial Interface: Enables remote access to the serial devices connected to Dominion KSX’s Serial IN
port (default: YES).
• Use Default TCP Port 5000:
- YES (default): Utilizes the default port 5000.
- NO: Enter an alternate port number.
Note: In order to access Dominion KSX from beyond a firewall, your firewall settings must enable
two-way communication through the default port 5000 or the non-default port configured above.
CHAPTER 2: INSTALLATION 15
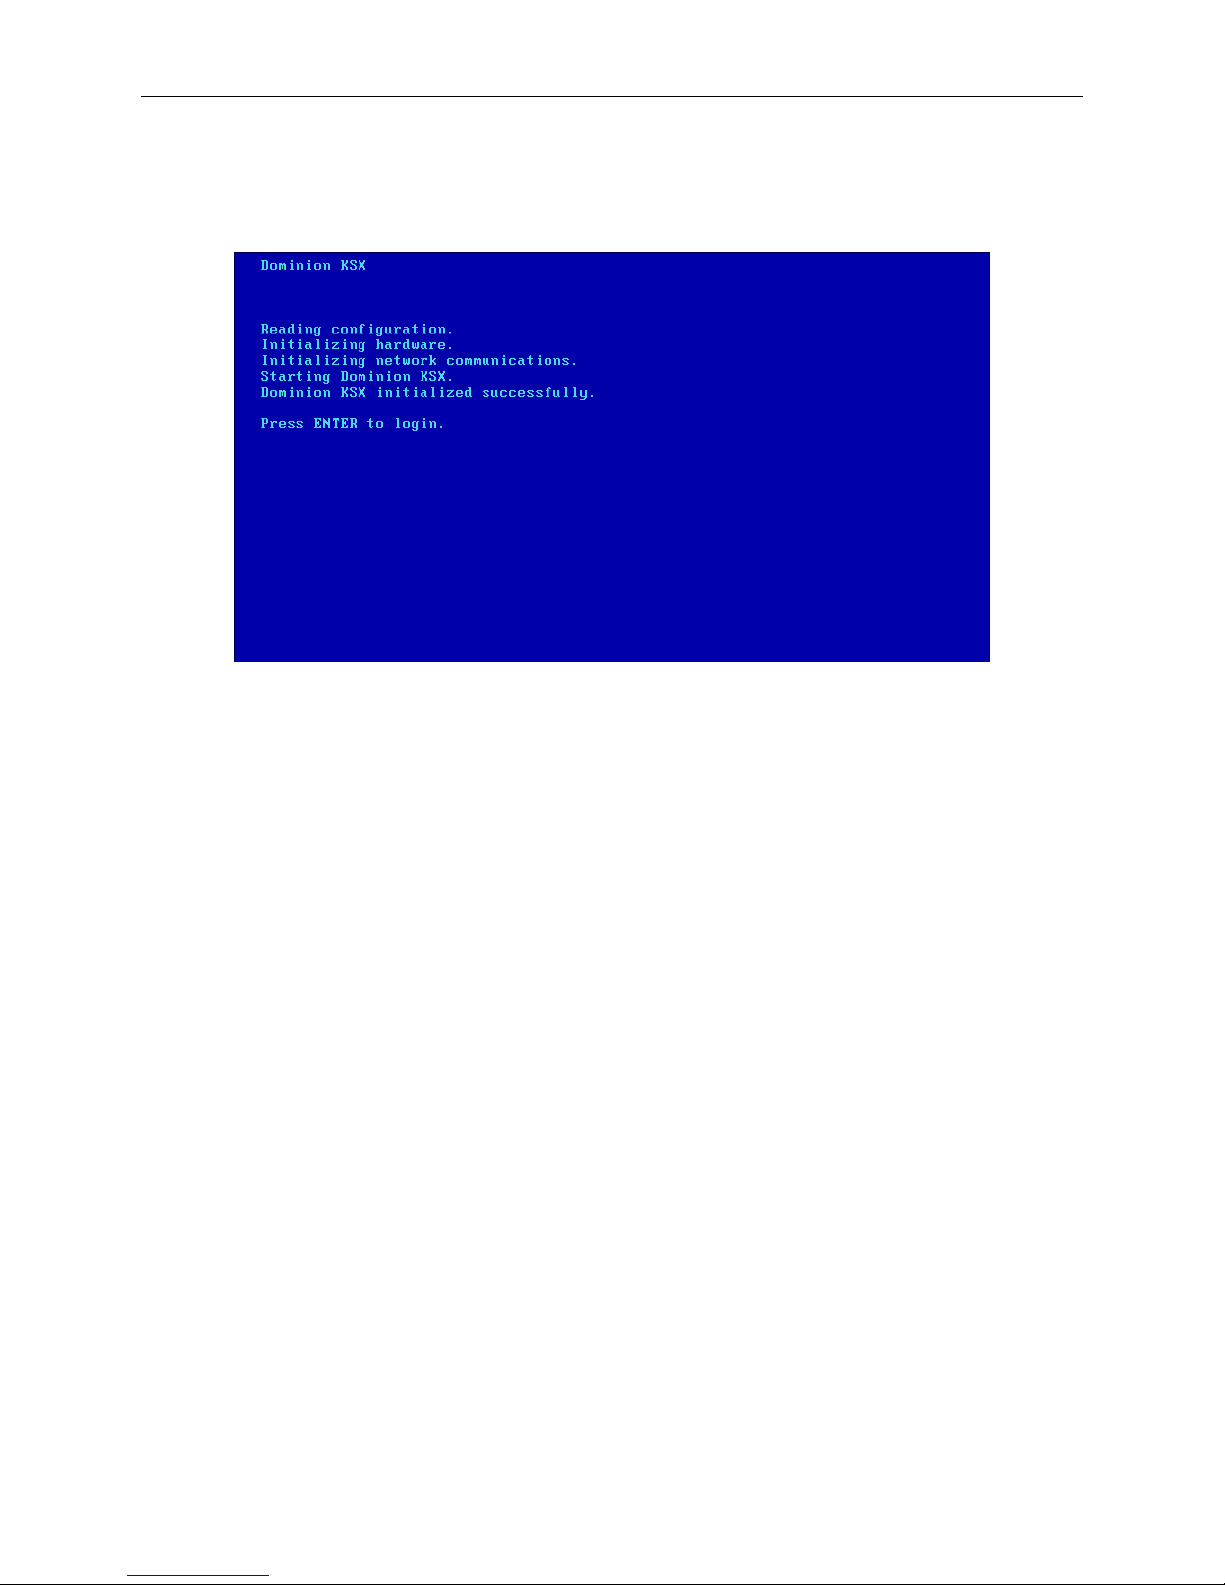
7. Press <Ctrl+S> to save entries. The Main Menu will appear.
8. On the Main Menu, select [R] Restart or shutdown the Dominion KSX, and press the <Enter> key.
9. When prompted, press the letter <R> on your keyboard to restart Dominion KSX.
10. Dominion KSX will restart and the Dominion KSX Initialization screen will appear upon boot up.
11. Congratulations! Dominion KSX is now ready for initial connection.
Proceed to the next section to initiate your first remote connection to Dominion KSX. After you have become
familiar with the remote operation of Dominion KSX, consult Chapter 4: Administrative Functions to review the
complete administrative functions provided by Dominion KSX.
16 DOMINION KSX USER MANUAL
Connect to Dominion KSX Remotely
Having completed the physical installation of Dominion KSX, you are now ready to establish an initial network
connection. Below are basic instructions for doing so. Please see Chapter 3: Raritan Remote Client for detailed
instructions, being sure to review the “KVM Session Properties” and “Color Calibration” sections to optimize your
Dominion KSX performance for Target KVM Servers.
Launch Raritan Remote Client (RRC)
1. Log into any Windows-based computer with network access to Dominion KSX.
2. If you are using Windows NT, 2000, XP, or 2003, ensure that you are not a “restricted” user.
3. Launch Microsoft Internet Explorer. Ensure that your Internet Explorer security settings allow the download
and execution of ActiveX controls.
Note
: The Windows default security setting, “Medium”, will suffice.
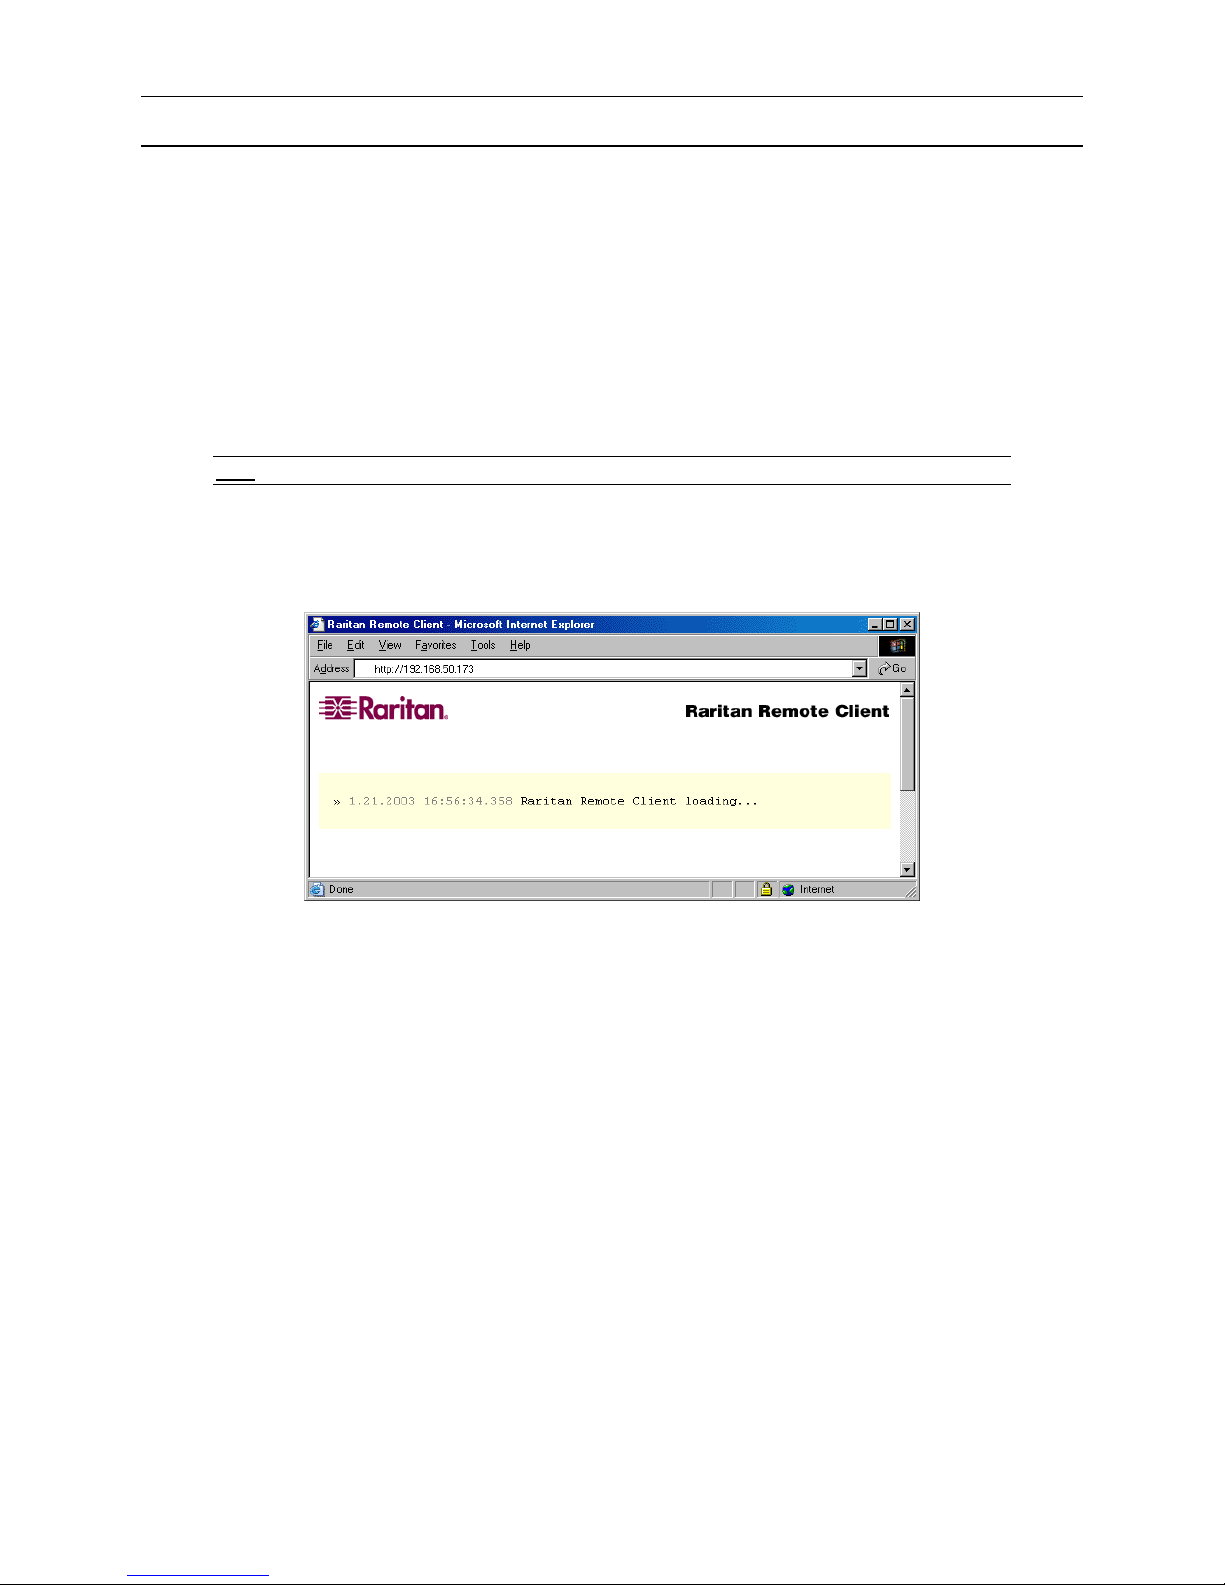
4. In the text field found on the Internet Explorer “Address” bar, type in the IP address you assigned to Dominion
KSX in Step 6 of the previous section, “Initial Configuration.” Press the <Enter> key to load and launch the
web access client, called Raritan Remote Client.
5. After launching Raritan Remote Client, you will see a tree list on the left-hand side of the screen with a list of
all automatically-detected Raritan devices found on your subnet. If you do not find your Dominion KSX unit
listed there by name, create one manually by selecting Connection → New Profile on the menu bar. See
Chapter 3: Raritan Remote Client, RRC Navigator and Creating New Profiles for more information.
6. Double-click on the entry corresponding to your Dominion KSX unit, found on the left-hand side of Raritan
Remote Client.
CHAPTER 2: INSTALLATION 17
p
p
p
Establish a Connection
Immediately upon double-clicking on the entry corresponding to your Dominion KSX unit, found on the left-hand
side of Raritan Remote Client (RRC), Dominion KSX will request your user credentials. (See your Dominion KSX
User Manual for user account administration). Login with the default username and password (“admin”/“raritan”).
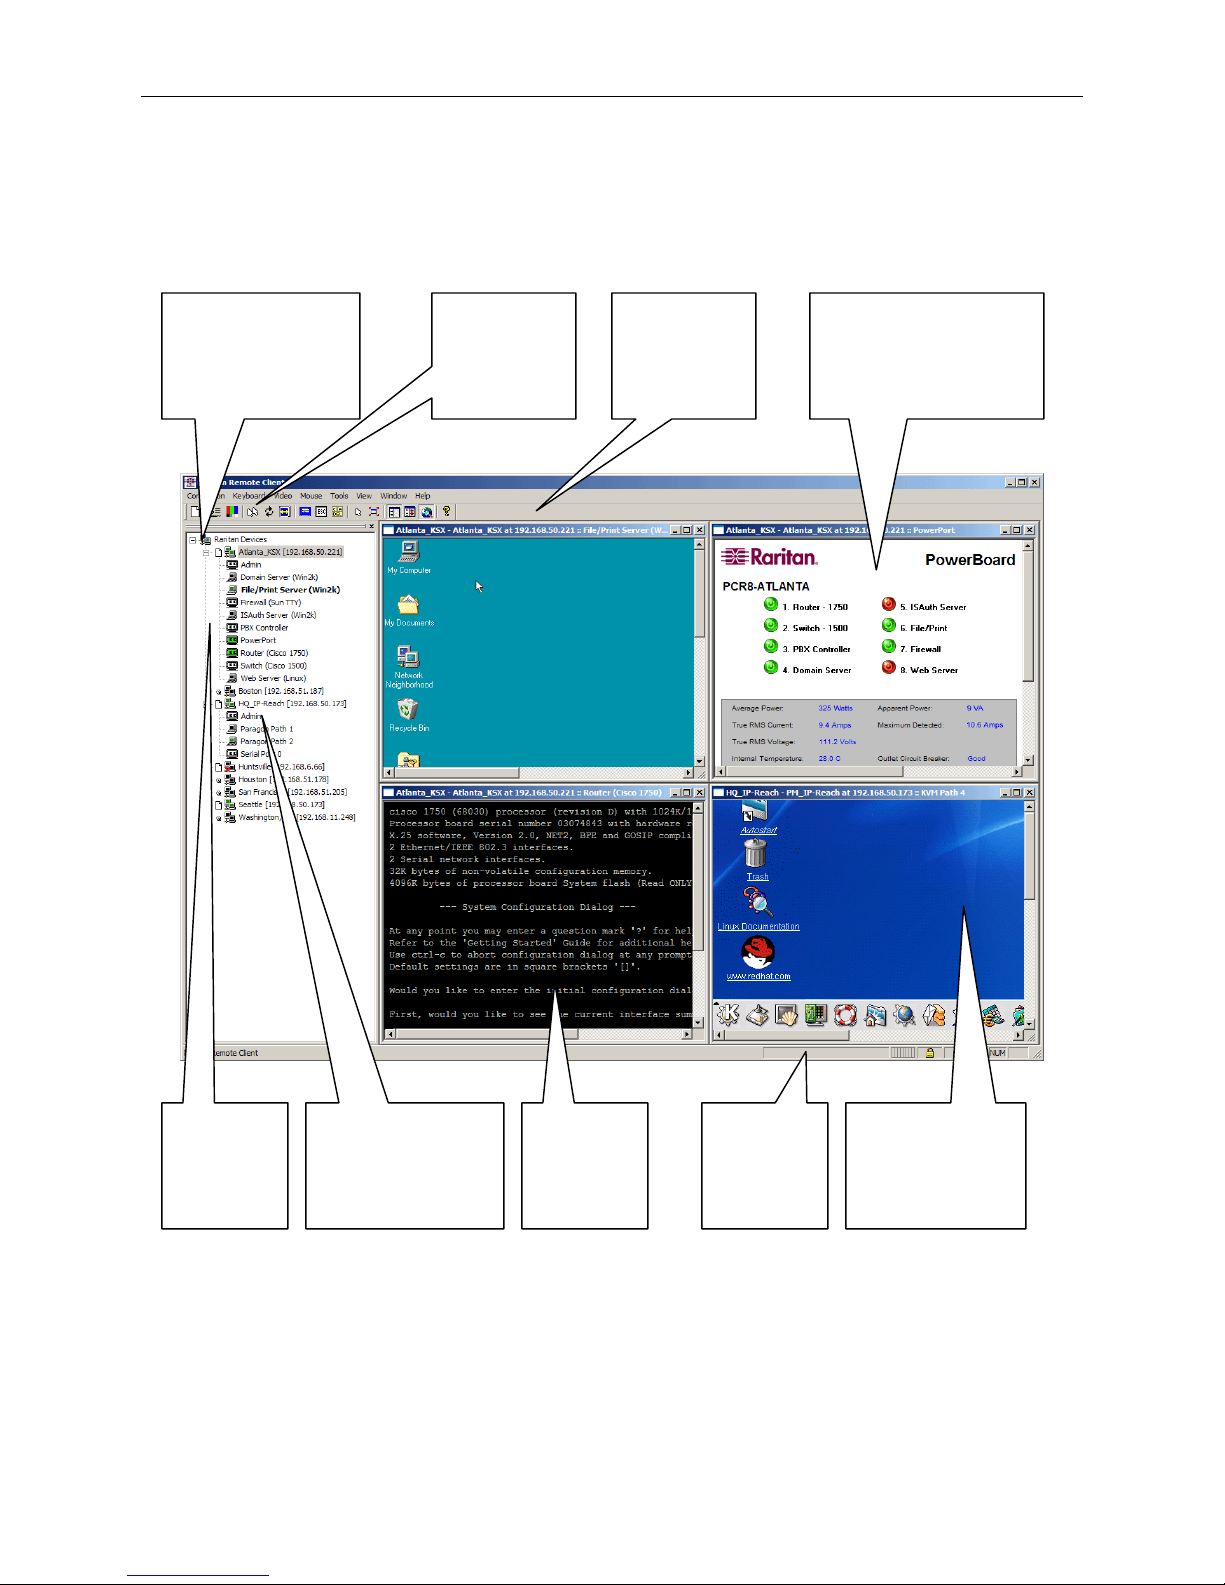
You will immediately be connected to your Dominion KSX unit. Use the RRC Navigator, found on the left-hand
side of the RRC window, to select and connect to a port.
The RRC Navigator displays
any known Raritan
networked appliances in a
single view.
Select Connection New
Profile to create new entries.
Click on
“Synchronize
Mouse” to converge
the mouse pointers
displayed in KVM
windows.
The RRC Toolbar
rovides easy access
to RRC’s most
frequently utilized
features.
If a Raritan Remote Power Control
Unit is attached to Dominion KSX,
double-click on “PowerPort” in the
RRC Navigator to invoke the
graphical power control interface.
Double-click on
any serial or
KVM port to
establish access to
and control of the
device attached.
RRC works with many
different Raritan IP-based
roducts, each of which may
be configured remotely by
double-clicking on the
“Admin” port.
RRC provides
VT100 console
access to devices
connected to the
Serial Ports of
Dominion KSX.
The RRC Status
Bar provides realtime information
on connection
arameters.
When connected to a
KVM console port,
keystrokes and video
signals are transmitted in
real-time — exactly as if
you were situated locally.
 Loading...