

Page 1

Schnellinstallationsanleitung
Inhalt/Content
RAPTOR-GAMING
M3 PLATINUM
Schnellinstallationsanleitung
Quick Installation Guide
2
RAPTOR-GAMING
RAPTOR-GAMINGRAPTOR-GAMING
RAPTOR-GAMING
D
GB
2
Page 2

Inhalt/Content
Stand: 20.01.2008
VERSION M3 PLATINUM 1.0
CE-Erklärung
Wir, Raptor Gaming Technology GmbH, Rheinstraße 7, 41836 Hückelhoven, Deutschland, erklären hiermit,
dass das Produkt:
RAPTOR-GAMING M3 PLATINUM, auf das sich diese Erklärung bezieht, mit den folgenden Normen bzw.
normativen Dokumenten übereinstimmt:
1. EN 55022
2. EN 55024
Folgende Betriebsbedingungen und Einsatzumgebungen sind vorauszusetzen: Wohnbereich, Geschäfts- und
Gewerbebereiche sowie Kleinbetriebe.
Dieser Erklärung liegt zugrunde: Prüfbericht(e) des EMV-Prüflaboratoriums.
Die Informationen in diesem Dokument können sich jederzeit ohne weitere Vorankündigung ändern und stellen
in keiner Weise eine Verpflichtung von Seiten des Verkäufers dar. Keine Garantie, direkt oder indirekt, wird
gegeben in Bezug auf Qualität, Aussagekraft oder Fehlerfreiheit dieses Dokuments.
Der Hersteller behält sich das Recht vor, den Inhalt dieses Dokuments oder/und der zugehörigen Produkte
jederzeit zu ändern, ohne zu einer Benachrichtigung einer Person oder Organisation verpflichtet zu sein. In
keinem Fall haftet der Hersteller für Schäden jedweder Art, die aus dem Einsatz oder der Unfähigkeit, dieses
Produkt oder die Dokumentation einsetzen zu können, erwachsen, selbst wenn die Möglichkeit solcher Schäden
bekannt ist.
Dieses Dokument enthält Informationen, die dem Urheberrecht unterliegen. Alle Rechte sind vorbehalten. Kein
Teil oder Auszug dieses Handbuchs darf kopiert oder gesendet werden, in irgendeiner Form oder für irgendeinen
Zweck, ohne ausdrückliche schriftliche Genehmigung des Urheberrechtsinhabers. Produkt und Markennamen,
die in diesem Dokument genannt werden, dienen nur zu Zwecken der Identifikation. Alle eingetragenen Warenzeichen, Produkt- oder Markennamen, die in diesem Dokument genannt werden, sind eingetragenes Eigentum
der jeweiligen Besitzer.
© Raptor Gaming Technology GmbH
Alle Rechte vorbehalten (20.01.2008)
2
RAPTOR-GAMING
Inhalt
1 Schnellinstallationsanleitung........................................................................5
1.1 Anschließen Ihrer RAPTOR-GAMING M3 PLATINUM..............................5
1.2 Installation der Treibersoftware...............................................................6
2 DPI-Wechseltaste der RAPTOR-GAMING M3 PLATINUM..............................7
3 Individuelle Gewichtsanpassung der RAPTOR-GAMING M3 PLATINUM.......9
4 Individuelle Anpassung der Mausgleiter der RAPTOR-GAMING M3 PLATINUM....14
5 USB Kabelmanagementsystem der RAPTOR-GAMING M3 PLATINUM.........16
6 Verwendung der zusätzlichen Handballenauflage RAPTOR-GAMING-WRIST-REST...18
7 Fehlersuche und Behebung...........................................................................19
8 Wichtige ergonomische Informationen.......................................................20
9 Elektromagnetische Charakteristiken (EMC)...............................................21
10 Federal Communication Commission Interference Statement......................22
11 Service & Support.........................................................................................23
Content
1 Quick Installation Guide.............................................................................25
1.1 Connecting your RAPTOR-GAMING M3 PLATINUM............................25
1.2 Installation of the driver software.......................................................26
2 DPI change-button of the RAPTOR-GAMING M3 PLATINUM......................27
RAPTOR-GAMING
3
Page 3

Inhalt/Content
Deutsch
3 Individual weight adjustment for the RAPTOR-GAMING M3 PLATINUM.......29
4 Individual adjustment of the mouse-sliders of the RAPTOR-GAMING M3 PLATINUM.34
5 USB Cable Managementsystem of the RAPTOR-GAMING M3 PLATINUM...36
6 Use of the additional handwrist RAPTOR-GAMING-WRIST-REST.................37
7 Troubleshooting..........................................................................................38
8 Important ergonomic information...............................................................39
9 Electromagnetic Characteristics (EMC).......................................................40
10 Federal Communication Commission Interference Statement......................40
11 Service & Support.........................................................................................41
4
RAPTOR-GAMING
Schnellinstallationsanleitung1
Anschließen Ihrer RAPTOR-GAMING M3 PLATINUM1.1
So schließen Sie Ihre RAPTOR-GAMING M3 PLATINUM an Ihren USBAnschluss an:
Schalten Sie Ihren Computer ein.a.
Suchen Sie einen freien USB-Anschluss an Ihrem Computer oder b.
USB-Hub.
Schließen Sie den USB-Stecker Ihrer RAPTOR-GAMING M3 c.
PLATINUM an den USB-Anschluss an.
Wenn Sie als Betriebssystem Windows ME/2000/XP/VISTA nutzen, d.
wird Windows das neue Gerät finden und den Standardtreiber
automatisch laden.
RAPTOR-GAMING
5
Page 4

Schnellinstallationsanleitung
Deutsch
Installation der Treibersoftware1.2
Um die mitgelieferte Applikationssoftware zu installieren, beachten Sie
bitte folgendes:
Legen Sie die beigefügte CD in das CD-ROM-/DVD-Gerät Ihres PCs ein.a.
Die CD sollte automatisch starten und die Installation wird beginnen. b.
Bitte folgen Sie einfach den Anweisungen auf dem Bildschirm.
Wenn Sie die Auto-Run-Funktion in Ihrem Betriebssystem
ausgeschaltet haben, klicken Sie bitte auf die Datei setup.exe im
Verzeichnisbaum der CD.
Wichtige Informationen zur Treibersoftware
Standardsoftware unterstützt nur die Standardfunktionen der PCMaus. Standardtreiber unterstützen auch keine programmierbaren
Tastenfunktionen.
6
RAPTOR-GAMING
DPI-Wechseltaste der RAPTOR-GAMING M3 PLATINUM2
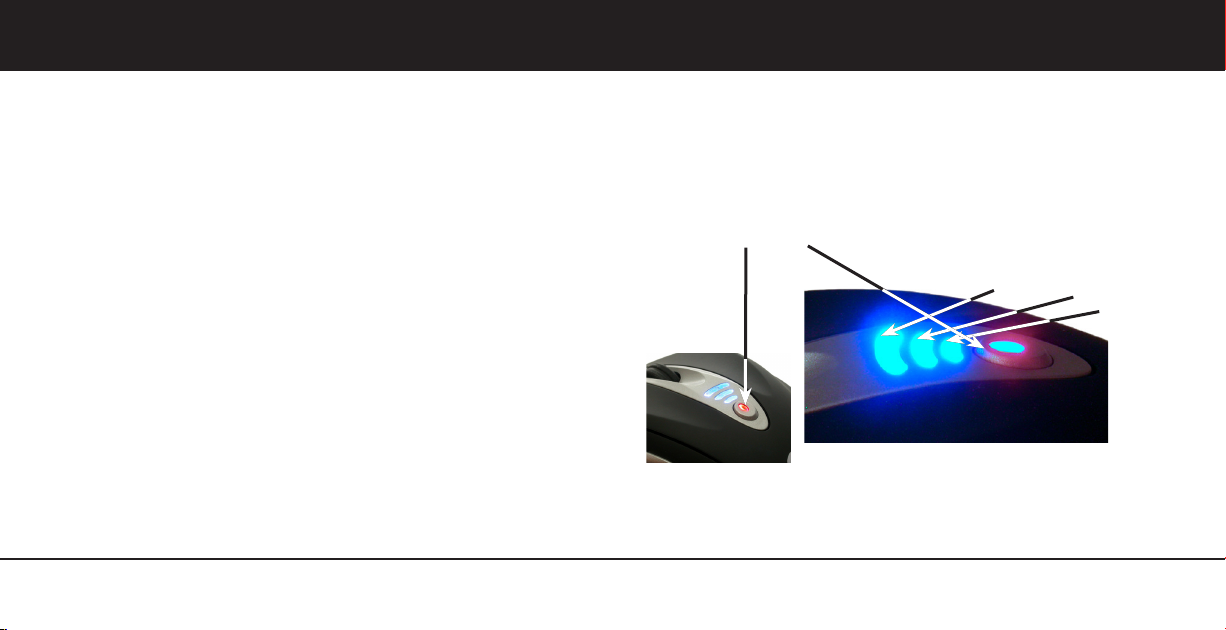
Die RAPTOR-GAMING M3 PLATINUM kann mit der DPI-Wechseltaste in
Stufen auf 800 – 1600 – 2400 oder 3200 dpi eingestellt werden.
DPI-Wechseltaste
LED 3
RAPTOR-GAMING
LED 2
LED 1
7
Page 5

Schnellinstallationsanleitung
Deutsch
800 DPI (= keine LED an)
8
Mit der DPI-Wechseltaste können eingestellt werden:
1600 DPI (= LED 1 an)
2400 DPI (= LED 1 + 2 an)
3200 DPI (= LED 1 + 2 + 3 an)
Ablauf der DPI- Einstellung:
DPI-Wechseltaste drücken. Die DPI-Wechseltaste leuchtet nun rot.1.
Drehe nun das Mausrad nach vorne um die DPI zu erhöhen; 2.
rückwärts um die DPI herabzusetzen.
Drücke nun wieder die DPI-Wechseltaste und die gewählte DPI 3.
Einstellung wird übernommen und gespeichert. Die rote LED ist
nun wieder ausgeschaltet.
Mit der Treibersoftware können zusätzliche DPI Feinjustierungen
vorgenommen werden.
RAPTOR-GAMING
Anmerkung:
Um diese Funktion zu nutzen, muss die auf der CD beiliegende
Treibersoftware installiert und gestartet sein. Bitte beachten Sie dazu
Kapitel 1.2 Installation der Treibersoftware.
Individuelle Gewichtsanpassung der RAPTOR-GAMING M3 3
PLATINUM
Das Gewicht der Maus kann sehr einfach zwischen 110 – 155 Gramm
eingestellt werden.
Im Auslieferzustand ist die RAPTOR-GAMING M3 PLATINUM auf das
Maximalgewicht von ca. 155 Gramm eingestellt. Alle Zusatzgewichte sind in
den Gewichts-Aufnahmeformen eingesteckt und in der RAPTOR-GAMING
M3 PLATINUM eingelegt.
RAPTOR-GAMING
9
Page 6

Schnellinstallationsanleitung
Deutsch
Ablauf der Gewichtsanpassung
Um das Gewicht zu verändern, entfernen Sie einfach die vordere oder (a)
hintere Abdeckung unterhalb der M3 PLATINUM. Drücken Sie einfach
einen der beiden Arretierungspins zurück und heben Sie die Abdeckung ab.
10
RAPTOR-GAMING
2 x Arretierungspins
RAPTOR-GAMING M3 PLATINUM (mit allen Gewichten, Gewichtsaufnahmeformen
und Gewichtsabdeckungen)
21 x RAPTOR-STEEL-WEIGHTS
(21 x Metallgewichte a 2 gr.)
Gewichtsabdeckungen +
Mausgleiter
Gewichtsaufnahmeformen
RAPTOR-GAMING
11
Page 7

Schnellinstallationsanleitung
Deutsch
Stecken oder entfernen Sie nun die RAPTOR-STEEL-WEIGHTS (b)
(Metallgewichte) aus den weichen Gewichtsaufnahmeformen.
12
RAPTOR-GAMING
RAPTOR-GAMING
Danach können Sie die Gewichtsaufnahmeform in die RAPTOR-(c)
GAMING M3 PLATINUM einlegen und dann setzen Sie die
jeweilige Gewichtsabdeckung einfach wieder auf. Beachten
Sie dabei bitte, dass die Arretierungspins wieder richtig in der
RAPTOR-GAMING M3 PLATINUM einrasten.
Um die Zockermaus mit dem Minimumgewicht von nur 110 gr. zu
nutzen, können Sie beide Gewichts-Aufnahmeformen komplett
mit den Gewichten aus der RAPTOR-GAMING M3 PLATINUM
entnehmen.
FERTIG! Nun hat Ihre RAPTOR-GAMING M3 PLATINUM ihr neues Gewicht.
13
Page 8
Schnellinstallationsanleitung
Individuelle Anpassung der Mausgleiter der RAPTOR-4
GAMING M3 PLATINUM
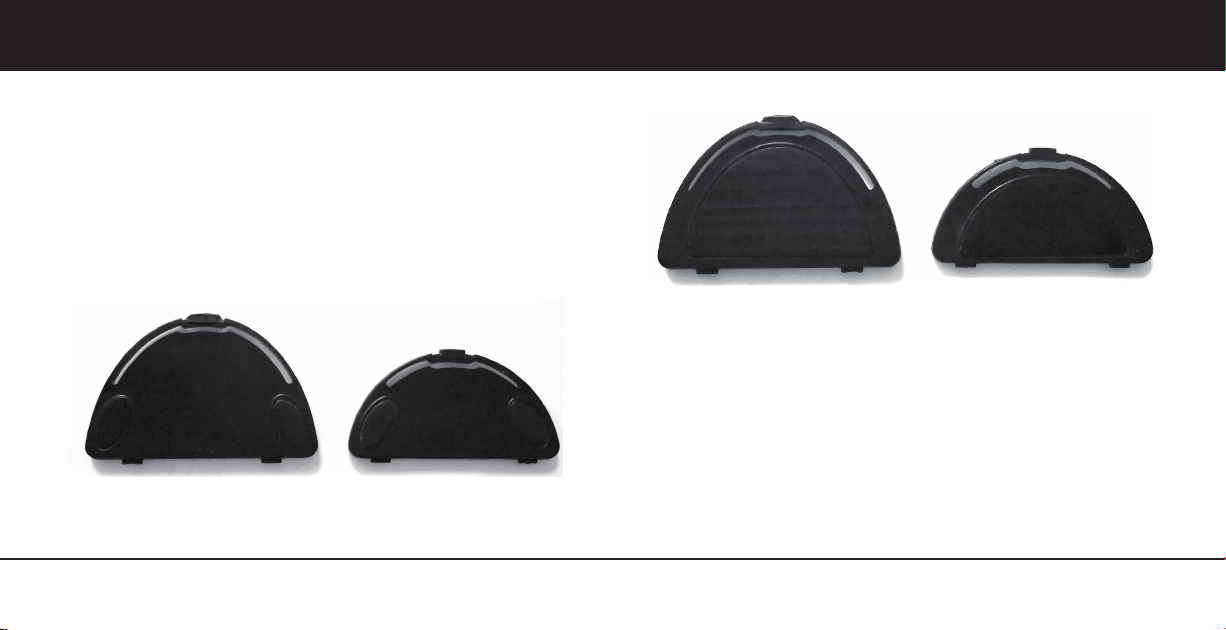
Auf den beiden Gewichtsabdeckungen sind ebenfalls 2 verschieden große
Mausgleiter integriert. Die Abdeckungen sind jeweils mit zwei kleinen auf
der einen Seite und mit einem großen Mausgleiter auf der anderen Seite
bestückt.
Einfach die Gewichtsabdeckung wie in Kapitel 3. a) beschrieben abnehmen
und auf die gewünschte Seite drehen.
Gewichtsabdeckung mit kleinen Mausgleitern.
Deutsch
Gewichtsabdeckung mit großen Mausgleitern.
14
RAPTOR-GAMING
RAPTOR-GAMING
15
Page 9
Schnellinstallationsanleitung
Deutsch
USB Kabelmanagementsystem der RAPTOR-GAMING M3 5
PLATINUM
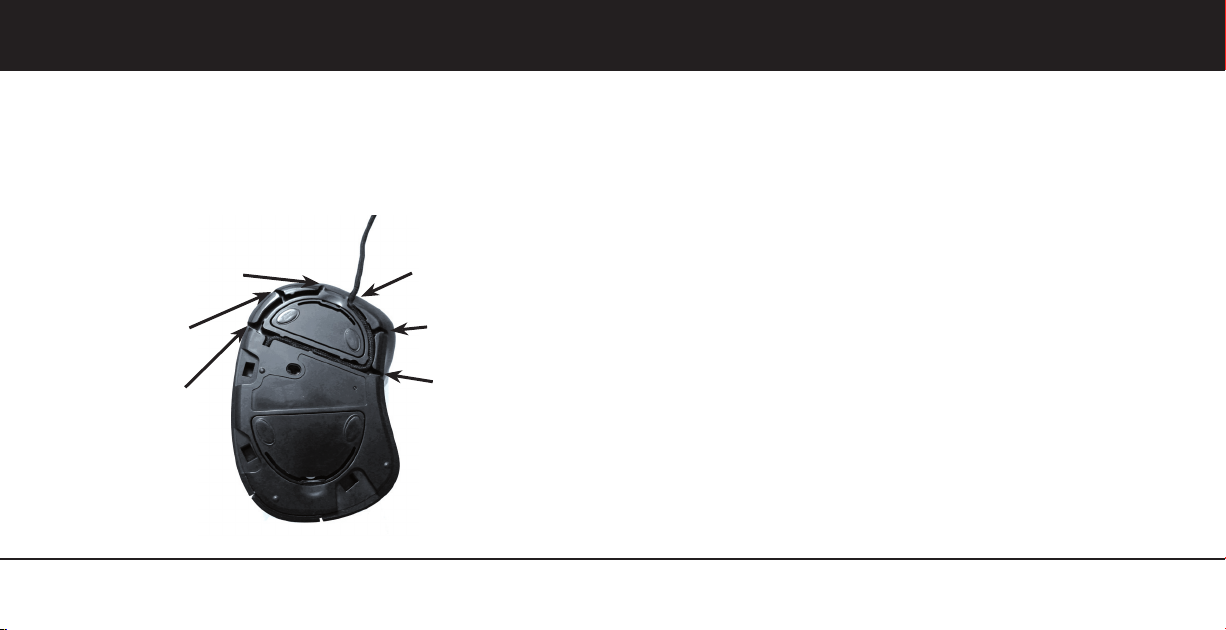
Das USB Kabel der RAPTOR-GAMING M3 PLATINUM kann auf einfachste
Weise in eine der 6 verschiedenen Richtungen eingestellt werden.
Position 3 links vorne
Position 2 links
Position 1 links
RAPTOR-GAMING M3 PLATINUM (von unten)
16
RAPTOR-GAMING
Position 3 rechts vorne
Position 2 rechts
Position 1 rechts
Lösen Sie einfach das USB Kabel aus der aktuellen Position und legen
Sie es in die gewünschte Führung und Position. Stellen Sie bitte sicher, dass
das USB Kabel fest unter den Haltepins eingerastet ist.
RAPTOR-GAMING
17
Page 10
Schnellinstallationsanleitung
Deutsch
Verwendung der zusätzlichen Handballenauflage RAPTOR-6
GAMING-WRIST-REST
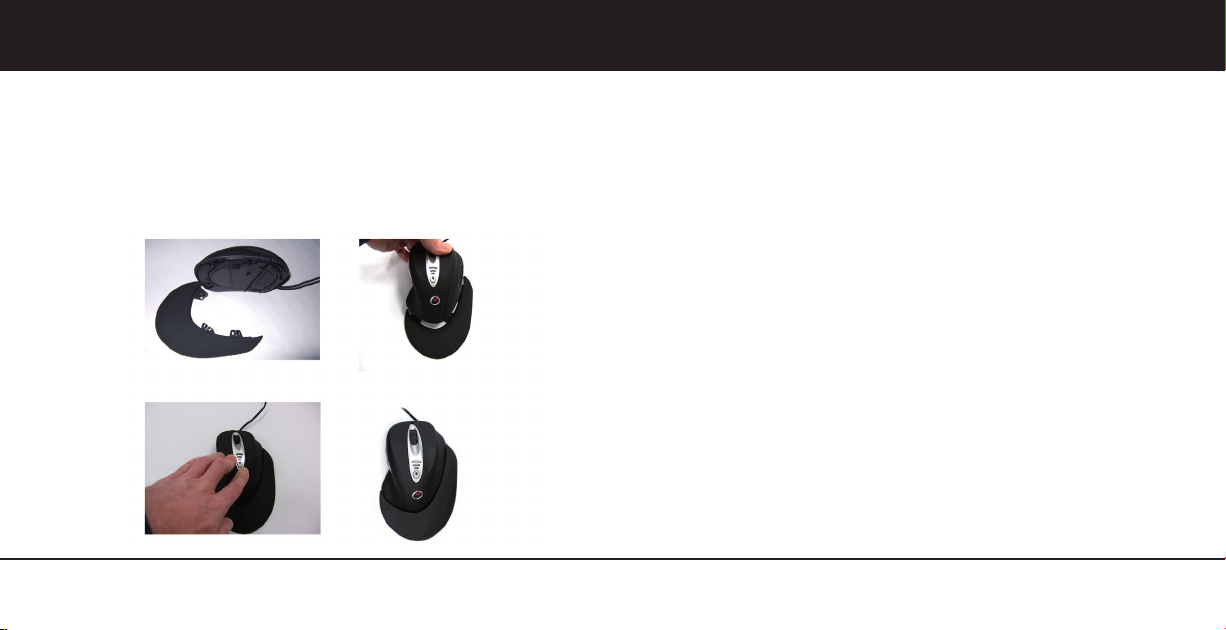
Um die zusätzliche RAPTOR-GAMING-WRIST-REST Handballenauflage zu
nutzen, legen Sie die Handballenauflage auf eine flache Oberfläche und
stecken nun die RAPTOR-GAMING M3 PLATINUM darauf.
1. 2.
3. 4.
18
RAPTOR-GAMING
Fehlersuche und Behebung7
Stellen Sie sicher, dass das USB Kabel der RAPTOR-GAMING M3 a.
PLATINUM an den korrekten Anschluss – einen USB-Anschluss –
angeschlossen ist.
Vergewissern Sie sich, dass Ihr USB-Anschluss die korrekte b.
Konfiguration hat. Die korrekte Anschlusskonfiguration finden Sie in
der Dokumentation zu Ihrem Computer/USB-Hub. Möglicherweise
stehen andere Systemgeräte (z. B. eine Modemkarte) in Konflikt mit der
PC-Maus. Prüfen Sie die IRQ-/Adresseinstellungen dieser Geräte auf
Konflikte und ändern Sie die Einstellungen nach Bedarf. Ziehen Sie Ihre
Computerdokumentation zu Rate, um diese Änderungen vorzunehmen.
Ermitteln Sie, ob das Problem von der RAPTOR-GAMING M3 PLATINUM c.
oder vom System verursacht wird: Testen Sie die Maus an einem
anderen System oder verwenden Sie eine andere Maus an Ihrem
System.
Die PC-Maus funktioniert nicht. Überprüfen Sie die USB-d.
Kabelverbindungen und stellen Sie sicher, dass der USB-Stecker richtig
in dem USB-Anschluss Ihres PC-Systems eingesteckt ist und/oder starten
Sie Ihren PC neu.
RAPTOR-GAMING
19
Page 11

Schnellinstallationsanleitung
Deutsch
Wenn die RAPTOR-GAMING M3 PLATINUM nach dem Booten Ihres e.
PC-Systems nicht erkannt wird, liegt dies möglicherweise an der USBAnschlusskonfiguration Ihres Systems. Stecken Sie den USB-Stecker der
Maus einfach einmal aus und wieder ein und die Maus wird erkannt
und funktioniert.
Wichtige ergonomische Informationen8
Einige Experten sind der Meinung, dass die Nutzung von Mäusen oder
Trackballs zu schweren Verletzungen an Händen, Handgelenken, Nacken
oder Rücken führen kann. Wenn Sie in diesen Bereichen Schmerzen, ein
Taubheitsgefühl oder eine Schwäche verspüren, wenden Sie sich an einen
Arzt oder qualifizierten Heilpraktiker.
20
RAPTOR-GAMING
Sicherheitshinweise, um die Verletzungsgefahr zu verringern:
Machen Sie häufig Pausen. Stehen Sie mehrmals pro Stunde auf und a.
gehen Sie etwas im Raum umher.
Gestalten Sie Ihr Arbeiten/Spielen im Tagesablauf abwechslungsreich.b.
Halten Sie Ihre Ellbogen am Körper und Ihre Schultern entspannt.c.
Stellen Sie Ihre Tastatur und Ihre Maus so auf, dass Sie die Arme nicht d.
danach strecken müssen.
Vermeiden Sie, Ihre Handgelenke auf scharfen Kanten abzustützen.e.
Elektromagnetische Charakteristiken (EMC)9
Diese Gerät erfüllt die Bestimmungen der Part 15 der FCC-Bestimmungen.
Der Betrieb unterliegt folgenden Bestimmungen: Dieses Gerät verursacht
keine gefährdenden Interferenzen. Das Gerät muss Interferenzen vertragen
können, auch die Art Störungen, die zu einem fehlerhaften Betrieb führen
können.
RAPTOR-GAMING
21
Page 12

Schnellinstallationsanleitung
Deutsch
Federal Communication Commission Interference 10
Statement
Dieses Gerät wurde getestet und als in den Grenzen eines Klasse B
Digitalgeräts eingestuft, in Übereinstimmung mit Teil 15 der FCCBestimmungen. Die Grenzwerte der FCC- Bestimmungen wurden entwickelt,
um eine ausreichende Abschirmung gegen schädliche Interferenzen im
häuslichen Bereich zu gewährleisten. Dieses Gerät erzeugt, nutzt und kann
Radiofrequenzenergie abgeben. Bei unsachgemäßem Einsatz kann es zu
Störungen der Radiofrequenzen führen. Es gibt jedoch keine Garantie für
das Ausbleiben von Störungen bei einer speziellen Installation. Wenn dieses
Gerät den Rundfunk oder Fernsehempfang stört, was Sie überprüfen können,
wenn Sie das Gerät ein- und ausschalten, sollten Sie die Interferenz mittels
einer der folgenden Methoden versuchen zu beseitigen:
• Richten Sie die Empfängerantenne neu aus oder platzieren Sie sie um.
• Entfernen Sie das Gerät aus der unmittelbaren Nähe des Empfängers.
• Schließen Sie das Gerät und den Empfänger an verschiedene Stromquellen an.
• Fragen Sie Ihren Händler oder einen erfahrenen Rundfunktechniker nach
Unterstützung.
22
RAPTOR-GAMING
Nur Geräte, die als „Klasse B“-Geräte gekennzeichnet sind, sollten
angeschlossen werden und müssen über abgeschirmte Schnittstellenkabel
verfügen.
Beachten Sie, dass jede Veränderung oder Modifikation an dem Gerät, die
nicht ausdrücklich von der Gruppe, die für die Befolgung der Bestimmungen
verantwortlich ist, genehmigt wurde, Ihnen die Berechtigung entziehen
könnte, Geräte dieser Art zu betreiben. Dieses Gerät liegt innerhalb der
Bestimmungen von Teil 15 der FCC-Regeln. Der Betrieb unterliegt folgenden
Bestimmungen:
1. Das Gerät darf keine gefährliche Strahlung abgeben.
2. Das Gerät muss Interferenzen vertragen können, auch die Art Störungen,
die zu einem fehlerhaften Betrieb führen können.
Service & Support 11
www.raptor-gaming.com
RAPTOR-GAMING
23
Page 13

Schnellinstallationsanleitung
Deutsch
Quick Installation Guide
Date: 20.01.2008
VERSION M3 PLATINUM 1.0
CE Declaration
We: Raptor Gaming Technology GmbH, Rheinstrasse 7, 41836 Hueckelhoven, Germany hereby declare that
the product:
RAPTOR-GAMING M3 PLATINUM to which this declaration refers is in compliance with the following
standards or standardizing documents:
1. EN 55022
2. EN 55024
The following are the stipulated operating and environmental conditions for said compliance: residential,
business and commercial environments and small-company environments.
This declaration is based on: Test report(s) of the EMC testing laboratory
The information in this document is subject to change without notice and shall not be deemed as a warranty by
the seller. No warranties, express or implied, are made with regard to the quality, suitability or accuracy of this
document.
The manufacturer reserves the right to change the contents of this document and/or the associated products
at any time without the provision of prior notice to specific persons or organizations. The manufacturer shall
not be held liable for damages of any kind arising from the use, or the inability to use this product or its
documentation, even if the possibility of such damage is known.
The information in this document is subject to copyright. All rights are reserved. No part of this manual may
be reproduced or transmitted in any form or for any purpose without the express written permission of the
copyright holders. Product and brand names contained in this document are used for identification purposes
only.
All registered trademarks, product designations or brand names used in this document are the registered
property of their respective owners.
© Raptor Gaming Technology GmbH
All rights reserved (20.01.2008)
24
RAPTOR-GAMING
Quick Installation Guide1
Connecting your RAPTOR-GAMING M3 PLATINUM1.1
To connect your RAPTOR-GAMING M3 PLATINUM to a USB port:
Turn your computer on.1.
Locate a free USB port on your computer or USB hub.2.
Plug the USB connector of your RAPTOR-GAMING M3 PLATINUM 3.
into the USB port.
If your system is Windows ME/2000/XP/VISTA, Windows will find the 4.
new device and install the standard driver automatically.
RAPTOR-GAMING
25
Page 14
Quick Installation Guide
english
Installation of the driver software1.2
To install the delivered software application please note:
Put the CD into your CD-ROM/DVD drive.a.
It’s an auto run CD, insert the CD and follow the instructions on the b.
screen. If you have turned off your auto run function, please run the
file „setup-exe“ on the CD.
Important notes for the driver software
The standard software only support standard functions.
The standard driver provided by Windows will not support programmable
function keys.
26
RAPTOR-GAMING
DPI change-button of the RAPTOR-GAMING M3 PLATINUM2
The RAPTOR-GAMING M3 PLATINUM can be adjusted in steps to
800 – 1600 – 2400 or 3200 dpi with the DPI change-button.
DPI-change button
LED 3
RAPTOR-GAMING
LED 2
LED 1
27
Page 15

Quick Installation Guide
english
With the DPI change-button the following settings can be done:
800 DPI (= no LED on)
1600 DPI (= LED 1 on)
2400 DPI (= LED 1 + 2 on)
3200 DPI (= LED 1 + 2 + 3 on)
Adjustment for DPI :
Push the DPI change-button and unlock the DPI setting. The red 1.
LED is now switch on.
Scroll the mouse wheel forward to increase the DPI level; 2.
backward to reduce the DPI level.
will be locked. The red LED is now switch off.
28
Push the DPI change-button again and the selected DPI setting 3.
DPI fine adjustments can be done with the driver software.
Note:
To use this function, the driver software on the CD has to be installed and
started. Please note the chapter 1.2 Installation of the driver software.
RAPTOR-GAMING
Individual weight adjustment for the RAPTOR-GAMING 3
M3 PLATINUM
The weight of the PC-Mouse can be easily adjusted between 110 – 155
gramm. The standard weight of the RAPTOR-GAMING M3 PLATINUM is the
minimum weight of ca. 110 gramm.
The additional weights are shipped in the weight-holding devices and
separately packed in the RAPTOR-WEIGHTBAG.
Process of the weight adjustment
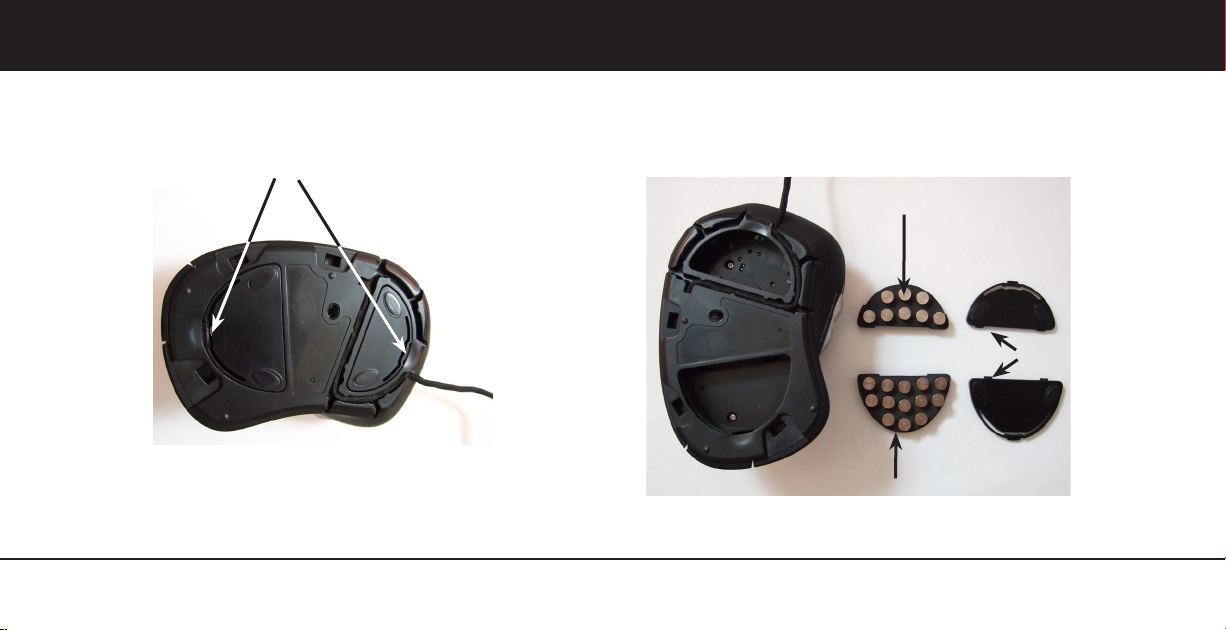
To change the weight just remove the front- or rear weight-cover (a)
below the RAPTOR-GAMING M3 PLATINUM. Simply press one of the
two arresting pins and lift the cover.
RAPTOR-GAMING
29
Page 16
Quick Installation Guide
english
RAPTOR-GAMING M3 PLATINUM (with all weights, weight holding devices and
weight-covers)
2 x arresting pins
30
RAPTOR-GAMING
RAPTOR-GAMING
21 x RAPTOR-STEEL-WEIGHTS
(21 x metal weights a 2 gr.)
weight-covers + mousesliders
weight-holding device
31
Page 17
Quick Installation Guide
english
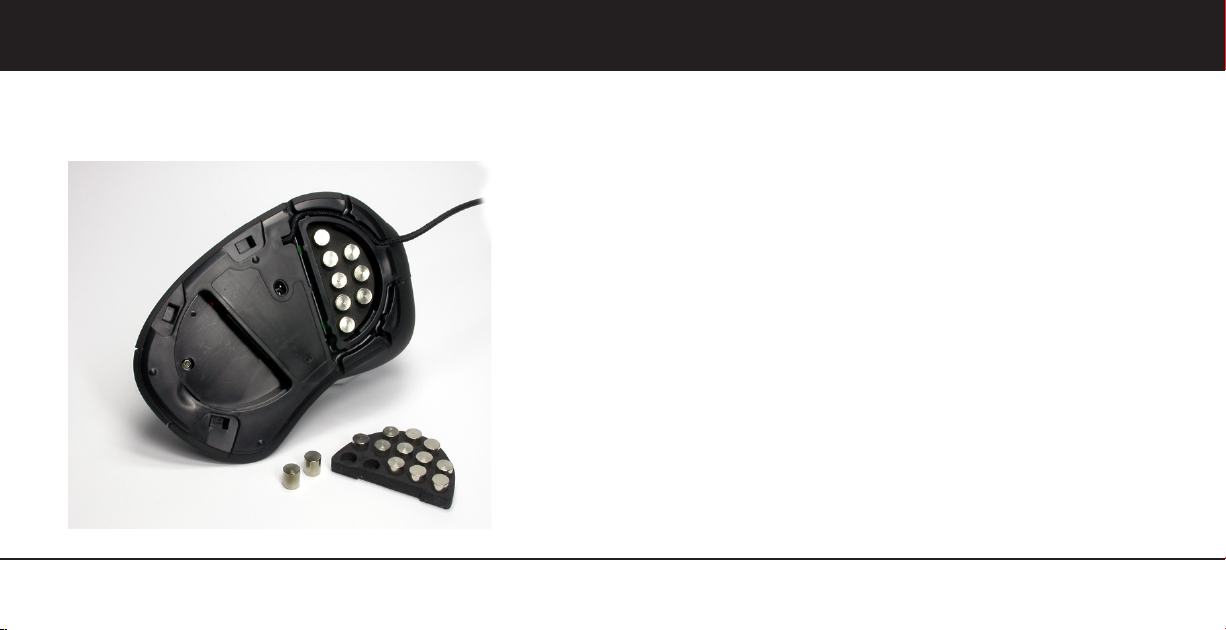
Put in or remove the RAPTOR-STEEL-WEIGHTS (metal weights) from (b)
the soft weight-holding device.
32
RAPTOR-GAMING
RAPTOR-GAMING
After this you can put the weights-holding device with the weights (c)
into the RAPTOR-GAMING M3 PLATINUM and then put the respective
weight-cover back onto the mouse body. Please make sure that the
arresting pins are correctly clicked into place on the RAPTOR-GAMING
M3 PLATINUM.
READY! Now your RAPTOR-GAMING M3 PLATINUM has its new weight.
33
Page 18
Quick Installation Guide
Individual adjustment of the mouse-sliders of the 4
RAPTOR-GAMING M3 PLATINUM
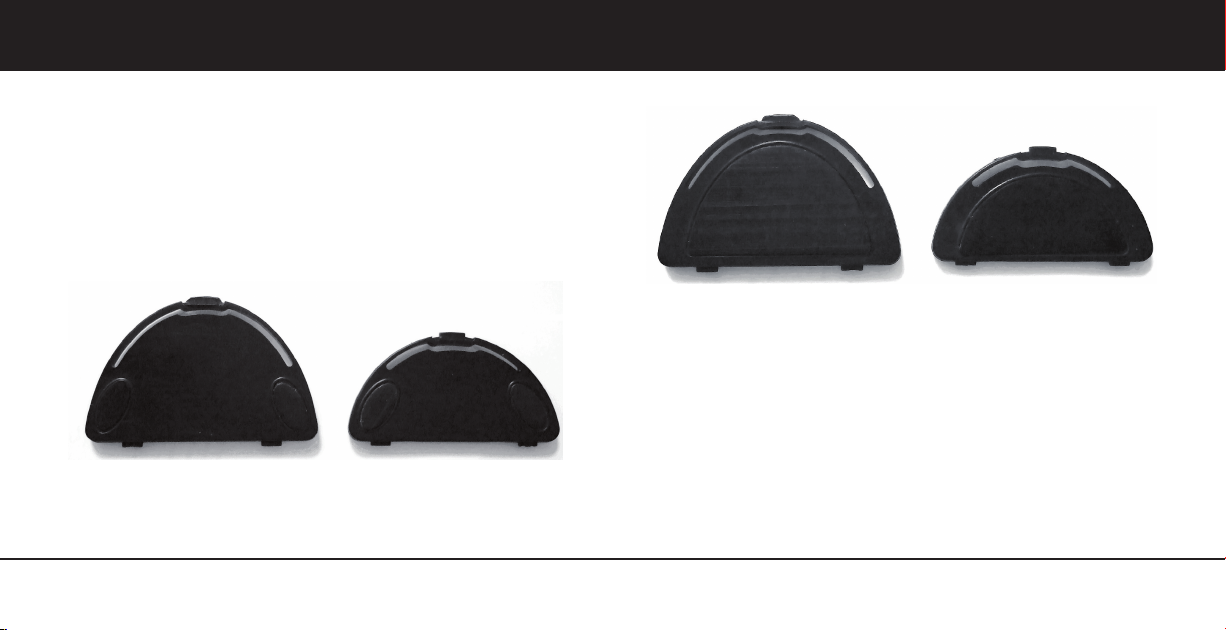
There are 2 different sized mouse-sliders integrated on the two weightcovers. One side is equipped with 2 smaller sliders and the other side of
them does each cover a big mouse-slider.
Simply take of the weight-cover as described in chapter 3. a) and switch it to
the side needed.
weight-covers with small mouse-sliders
english
weight-covers with big mouse-sliders
34
RAPTOR-GAMING
RAPTOR-GAMING
35
Page 19
Quick Installation Guide
english
USB Cable Managementsystem of the RAPTOR-GAMING 5
M3 PLATINUM
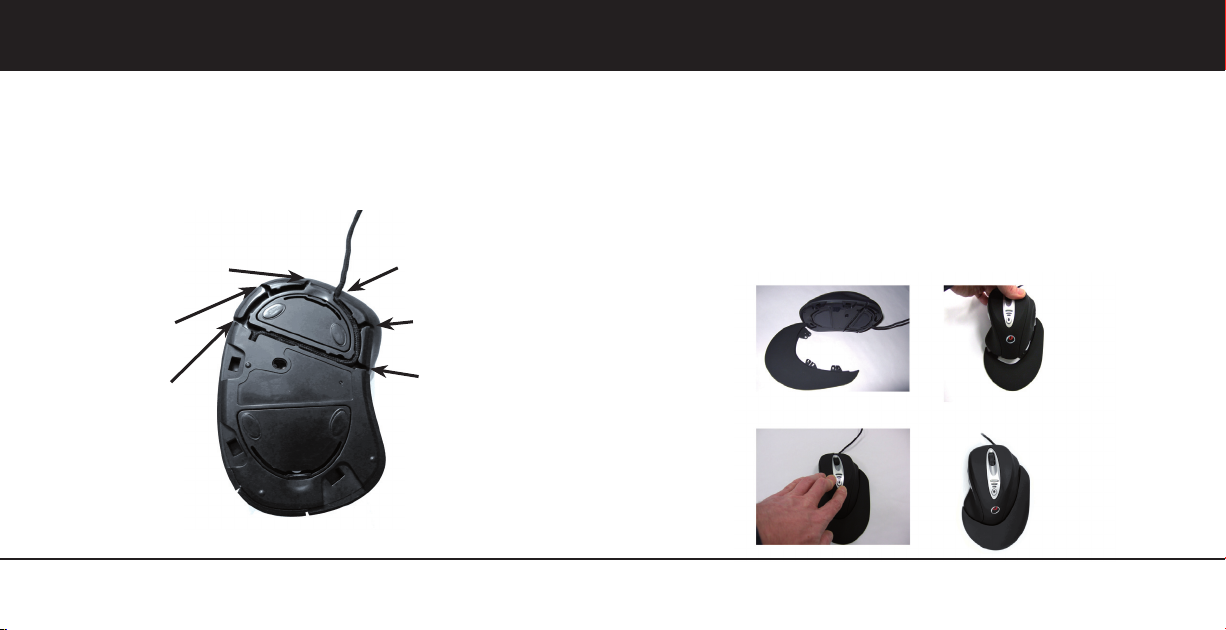
The USB cable of the RAPTOR-GAMING M3 PLATINUM can be easily
adjusted in 6 different directions.
Position 3 right front
Position 2 right
Position 1 right
RAPTOR-GAMING M3 PLATINUM (from below)
36
RAPTOR-GAMING
Position 3 left front
Position 2 left
Position 1 left
Simply remove the USB cable from the current position and put it into the
needed direction and position. Please make sure that the USB cable sits tight
beneath the holding pins.
Use of the additional handwrist RAPTOR-GAMING-WRIST-6
REST
To use the additional RAPTOR-GAMING-WRIST-REST just place the handwrist
on a flat surface and put the RAPTOR-GAMING M3 PLATINUM on it.
1. 2.
3.
4.
RAPTOR-GAMING
37
Page 20

Quick Installation Guide
english
Troubleshooting7
Make sure the USB cable of your RAPTOR-GAMING M3 PLATINUM is a.
plugged into the correct port – a USB port.
Make sure your USB port has the proper configuration. Refer to your b.
computer/USB hub documentation for the correct port configuration.
You may have other system devices (e.g. a modem card) that conflict
with the mouse. Check the IRQ/address settings of these devices for
conflicts, and change the setting as required. Refer to your computer
documentation to make these changes.
Determine whether the RAPTOR-GAMING M3 PLATINUM is causing the c.
problem or whether the trouble is elsewhere in your system: test the
mouse on a different system or use a different mouse on your computer.
PC mouse does not function – check the USB cable connection and d.
make sure it is firmly attached to the USB port of the computer and/or
restart the computer again.
If the RAPTOR-GAMING M3 PLATINUM is not recognised after booting e.
your PC system the root cause might be your USB-port configuration.
Please disconnect the USB cable and plug it in again and the PC mouse
does work properly.
38
RAPTOR-GAMING
Important ergonomic information8
Some experts believe that using any mouse or trackball may cause serious
injury to hands, wrists, arms, neck, or back. If you feel pain, numbness, or
weakness in these areas, please seek the attention of a qualified health care
professional.
To reduce the risk of injury, follow these precautions:
Take frequent breaks. Get up and walk around several times every hour.a.
Vary your tasks/gaming throughout the day.b.
Keep shoulders relaxed with your elbows at your side. c.
Position your keyboard and mouse so you do not have to reach.d.
Avoid resting your wrists on sharp edges.e.
RAPTOR-GAMING
39
Page 21

Quick Installation Guide
english
Electromagnetic Characteristics (EMC)9
This unit complies with Part 15 of FCC Rules. Operation is subject to
following two conditions:
This device may not cause harmful interference.
This device must accept any interference received, including interference that
may cause undesired operation.
Federal Communication Commission Interference 10
Statement
This equipment has been tested and found to comply with the limits for a
Class B digital device, pursuant to Part 15 of the FCC Rules. These limits are
designed to provide reasonable protection against harmful interference in
a residential installation. This equipment generates, uses and can radiate
radio frequency energy and, if not installed and used in accordance with
the instructions, may cause harmful interference to radio communications.
However, there is no guarantee that interference will not occur in a particular
installation. If this equipment does cause harmful interference to radio or
television reception, which can be determined by turning the equipment off
and on, the user is encouraged to try to correct the interference by one of
40
RAPTOR-GAMING
the following measures:
• Reorient or relocate the receiving antenna.
• Increase the separation between the equipment and receiver.
• Connect the equipment into an outlet on a circuit different from that to
which the receiver is connected.
• Consult the dealer or an experienced radio/TV technician for help.
Only devices which are classified as Class B devices should be installed and
properly shielded and grounded cables and connectors must be used to meet
FCC emission limits.
FCC Caution: Any changes or modifications not expressly approved by the
party responsible for compliance could void the user’s authority to operate
this equipment. This device complies with Part 15 of the FCC Rules. Operation
is subject to the following two conditions:
(1) This device may not cause harmful interference.
(2) This device must accept any interference received, including interference
that may cause undesired operation.
Service & Support 11
www.raptor-gaming.com
RAPTOR-GAMING
41
 Loading...