

Page 1

FCC Information
FCC
This equipment has been tested and found
to comply with limits for Class B digital device
pursuant to Part 15 of Federal Communications
Commission (FCC) rules.
FCC Compliance Statement
These limits are designed to provide reasonable protection against frequency interference in
residential installation. This equipment generates,
uses, and can radiate radio frequency energy, and
if not installed or used in accordance with the
instructions, may cause harmful interference to
radio communication. However, there is no guarantee that interference will not occur in television
reception, which can be determined by turning
the equipment off and on. The user is encouraged
to try and correct the interference by one or
more of the following measures:
• Reorient or relocate the receiving antenna
• Increase the separation between the equipment and the receiver
• Connect the equipment into an outlet
on a circuit different from that to which the
receiver is connected to.
6
CAUTION!
The Federal Communications Commission warns
the user that changes or modifi cations to the unit
not expressly approved by the party responsible
for compliance could void the user’s authority to
operate the equipment.
Warranty Information
3 Year Limited Warranty
IPSG warrants this product to be free of defects
in materials or workmanship. This warranty does
not include damage resulting from accident or
misuse. If this product should become defective,
return to your place of purchase. This warranty
is in lieu of all other warranties expressed or
implied including the implied warranties of
merchantability of fi tness for a particular purpose, whether arising by law, custom or conduct,
and the rights and remedies provided under this
warranty are exclusive and in lieu of any other
rights or remedies. In no event shall IPSG be
liable for consequential damages. Contact us
at www.ipsgproducts.com.
IPSG, Hilliard, OH, 1-877-743-3549
www.ipsgproducts.com
Printed in China
TM
Inland is a trademark of Inland Products Corporation.
Laser Wireless Desktop
User Manual
Page 2
User’s Record
To provide quality customer service and
technical support, it is suggested that you keep
the following information as well as your store
receipt and this user’s manual.
Date of Purchase:
Serial Number:
Package Contents
Your new Laser Wireless Desktop will ship
with the following items:
• Wireless Desktop
• Laser Wireless Mouse
• Recharging cradle with USB connector
• 2 AAA Ni-MH rechargeable batteries
for the mouse
• 2 AA Alkaline batteries for keyboard
• User’s Manual and Warranty Information
System Requirements
Please be sure that you meet all of the system
requirements below to avoid diffi culties during
installation.
• IBM PCs or 100% compatibles
• Windows
®
ME, 2000, XP
• Available USB port
System Specifi cations
Your new keyboard and mouse complies
with the following specifi cations:
• 1600dpi
• USB Interface
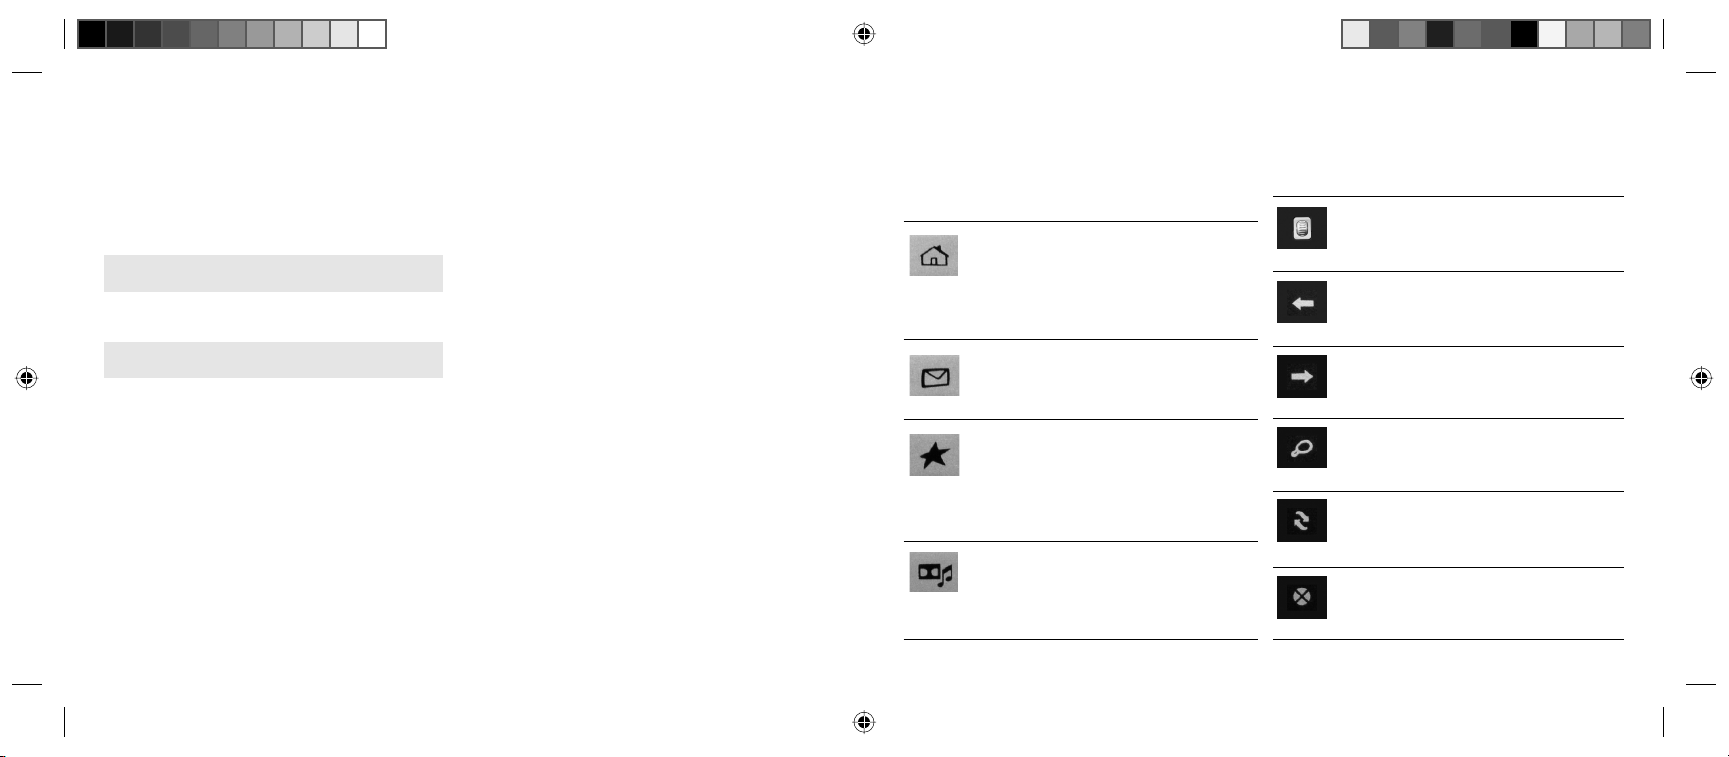
C. Application Access Keys
By default, your computer has a set of preinstalled applications, when your computer is
powered on these applications can be accessed
using the below set of keys:
Access Homepage
Press this button to access your
default homepage from your default
web browser (e.g. Microsoft
®
Internet
Explorer).
Access E-mail Client
Press this button to open your default
e-mail client (e.g. Microsoft
®
Outlook).
Access Favorites
Press this button to access your
“Favorites” folder from your default
web browser (e.g. Microsoft
®
Internet
Explorer).
Access Media Player
Press this button to open your default
media player (e.g. Windows
®
Media
Player).
D. Internet Navigation Keys
When your web browser is open (e.g. Microsoft
Internet Explorer), you can use the below set of
keys to navigate around the open webpage:
Scroll Wheel
Scroll this wheel to go up or down
on the open page (if applicable).
Back
Press this button to go back to
the previous page (if applicable).
Forward
Press this button to proceed to
the next page (if applicable).
Search
Press this button to open the search
panel.
Refresh
Press this button to refresh the
current page.
Stop
Press this button to stop loading
the current page.
®
5
Page 3

beginning of the playing track; doubleclick it to go to the previous track.
Step Forward
Press this button to go to the next
track.
Stop
Press this button to stop the current
track.
Volume Control
Adjust this dial to adjust the volume
of your speakers (Left = Volume
Down; Right = Volume Up).
Mute
Press this button to mute the volume
on your speakers.
B. System Keys
Depending on your system’s motherboard
confi guration, when your system is powered
on you can use the below set of keys to
control your computer:
Power Off
Press this button to power off your
computer by default.*
Standby
Press this button to put your computer in Standby mode by default.*
Wakeup
When your computer is in Standby
mode, press this button to wake it up.
My Computer
Press this button to access “My
Computer”.
Installation
Note: The pictures shown in the User’s Manual
are for demonstration purposes only. Your computer
or product may look slightly different.
1. Connect your rechargeable cradle
with built-in receiver to your computer
a. Turn on your computer and wait for it to
load.
b. Connect your rechargeable cradle into
an available USB port on your computer.
c. Your computer will detect your USB device,
and the necessary drivers will be installed
automatically.
2. Install Batteries into your Mouse
a. Remove the battery compartment cover
from the bottom of your mouse.
b. Install the AAA rechargeable batteries into
the battery compar tment following the
battery orientation guide in the battery bay.
c. Replace the battery compar tment cover
back onto your mouse until it securely locks.
d. Your mouse will establish a connection with
the receiver. If a connection is not established,
proceed to the Establish a Connection section
of this manual.
Calculator
Press this button to open Windows
®
Calculator.
* This function can be confi gured in Windows® Power Management
4
depending on your system’s motherboard confi guration.
1
Page 4

3. Install Batteries into your Keyboard
a. Remove the battery compartment cover
from the bottom of your keyboard.
b. Install two AA Alkaline batteries into the
battery compar tment following the battery
orientation guide in the battery bay.
c. Replace the battery compar tment cover
back onto your keyboard until it securely
locks.
d. Your keyboard will establish a connection
with the receiver automatically. Your keyboard
and mouse are now ready to be used. For
more information about your special function
keys please see the Special Function Keys
Section of the manual. If a connection is not
automatically established, proceed to the
Establish a Connection section of this manual.
2
4. Establish a Connection
a. To connect your keyboard, press the connect
button on the wireless USB receiver, and then
press the connect button on the bottom of
your keyboard. (NOTE: If a successful connection is not able to be established, please remove the batteries from your keyboard for 10
seconds to clear the memory. Then replace the
batteries and attempt
to connect the receiver
and keyboard again).
b. To connect your mouse, press the connect
button on the wireless USB
receiver, and
then press the
connect button
on the bottom
of your mouse.
c. There are two LED Indicators on your
wireless USB receiver which indicate
the status of your keyboard, mouse and
computer:
LED Status Description
Indicator
Signal LED -Solid Connected/no activity
(Green) -Blinking Scanning for a connection
-Blinking Keyboard and/or mouse
slowly are inactive
Charge LED -Solid On Charging mouse
(Red) -Off Battery full/not charging
Special Function Keys
There are 4 sets of pre-programmed special
function keys located on your keyboard, please
see the chart indicating each set and a description
of each set below:
A. Media Navigation Keys
When your default media player is turned
on and active, you can use the below set of
keys to navigate your playlist:
Play/Pause
Press this button to play (or pause)
the current track.
Step Backward
Press this button to go back to the
3
 Loading...