

Page 1

EcoPro300
Range Road EcoPro300
Firewood Processor
Range Road Enterprises Ltd
Box 944
Eckville AB T0M 0X0
www.range-road.ca
Crated Unit
Assembly Manual
Page 2

EcoPro300
Crated Unit
1.) Undo 8 -18mm x 19mm Nuts and bolts , 2 on each leg of top frame
2.) Lift top of Metal crate off and move out of work area.
3.) Remove Shrinkwrap.
4.) Remove and Unwrap components
5.) Lift Unit off of the crate, if using straps be careful not to bend or
stress any components
Range Road Enterprises Ltd
Box 944
Eckville AB T0M 0X0
www.range-road.ca
Page 3

EcoPro300
6.) Insert axle into the square tube at the rear of the processor, centre
the axle in the housing and the tighten the bolts, Make sure the holes in
the axles are facing up, when the bolts are tightened then tighten the nuts
7.) Once the bolts are tight, tighten the nuts to lock the bolts in place
8.) Mount the fenders on the axle, snug the bolts but do not tighten, holes
in the fenders go to the rear
9.) Gently remove dust seals from the rear of the hubs
10.) Grease all 4 bearing cones with wheel bearing grease
11.) Re-install bearings and dust seals
12.) Remove the nuts from the axle shaft
13.) Install wheel and hub onto the axle and install the outside bearing
cones.
Range Road Enterprises Ltd
Box 944
Eckville AB T0M 0X0
www.range-road.ca
Page 4

EcoPro300
14.) Re-install axle nut and tighten until whell is hard to turn, then
back the nut off until the whell turns freely.
15.) Line up holes and install cotter pin
16.) Install hub cap and tap lightly to get it into place
17.) Torque wheel nuts to 70-80 ft/lbs
18.) Centre fender over tire and tighten the 13mm nuts and bolts
19.) Install tripod leg in front mount and lower processor to the ground
20.) If this unit was supplied with both a spring and a gas cylinder for the
saw return it is up to the assembler which method to use
- If you use the spring continue to 20a and skip 20b
- if using the gas cylinder skip 20a and continue at 20b
20a)- if you decide to use the spring, a 7mm socket on an extension works
to lock the spring in its tab, the 7mm socket fits over the end of the
spring and allows you to safely apply downward pressure to put the spring in
place under the tab
Range Road Enterprises Ltd
Box 944
Eckville AB T0M 0X0
www.range-road.ca
Page 5

EcoPro300
20b) If you decide to use the gas cylinder, remove the 18mm bolt at the
end of the swivel plate shaft beside the spring
20b) Slide the swivel plate up and remove the spring, slide the plate back
into place and re-tighten the bolt
21.) Mount sawdust chute to side of processor with Allan head boolts and
10mm nuts
22.) Mount small safety cage with 4 13mm nuts and bolts
23.) Remove 2 - 18mm bolts from swivel plate
24.) Mount Chainsaw arm to swivel plate and tighten 2 – 18mm bolts
25.) screw the gas cylinder into the swivl head that is already mounted to
the small safety cage (if using gas cylinder to return sawbar and not using
the spring in step 20)
- If you are using the spring skip steps 25 & 26
Range Road Enterprises Ltd
Box 944
Eckville AB T0M 0X0
www.range-road.ca
Page 6

EcoPro300
26.) Mount gas cylinder to the sawbar handle and tighten nut
27.) Place large safety cage on the end without any bolts, remove all 10mm
nuts & bolts, place blue chainsaw cover on the end of safety cage and line
up the bolt holes, tighten all 10mm nut & bolts
28.) Remove 13mm nuts from bar oil tank and mount tank to the chainsaw
safety cover, tighten 13mm nuts.
29.) Remove 10mm nut & bolt from safety cage pivot point and remove
cotter pin from round bar on safety cage
30.) Set safety cage in place
Range Road Enterprises Ltd
Box 944
Eckville AB T0M 0X0
www.range-road.ca
Page 7
EcoPro300
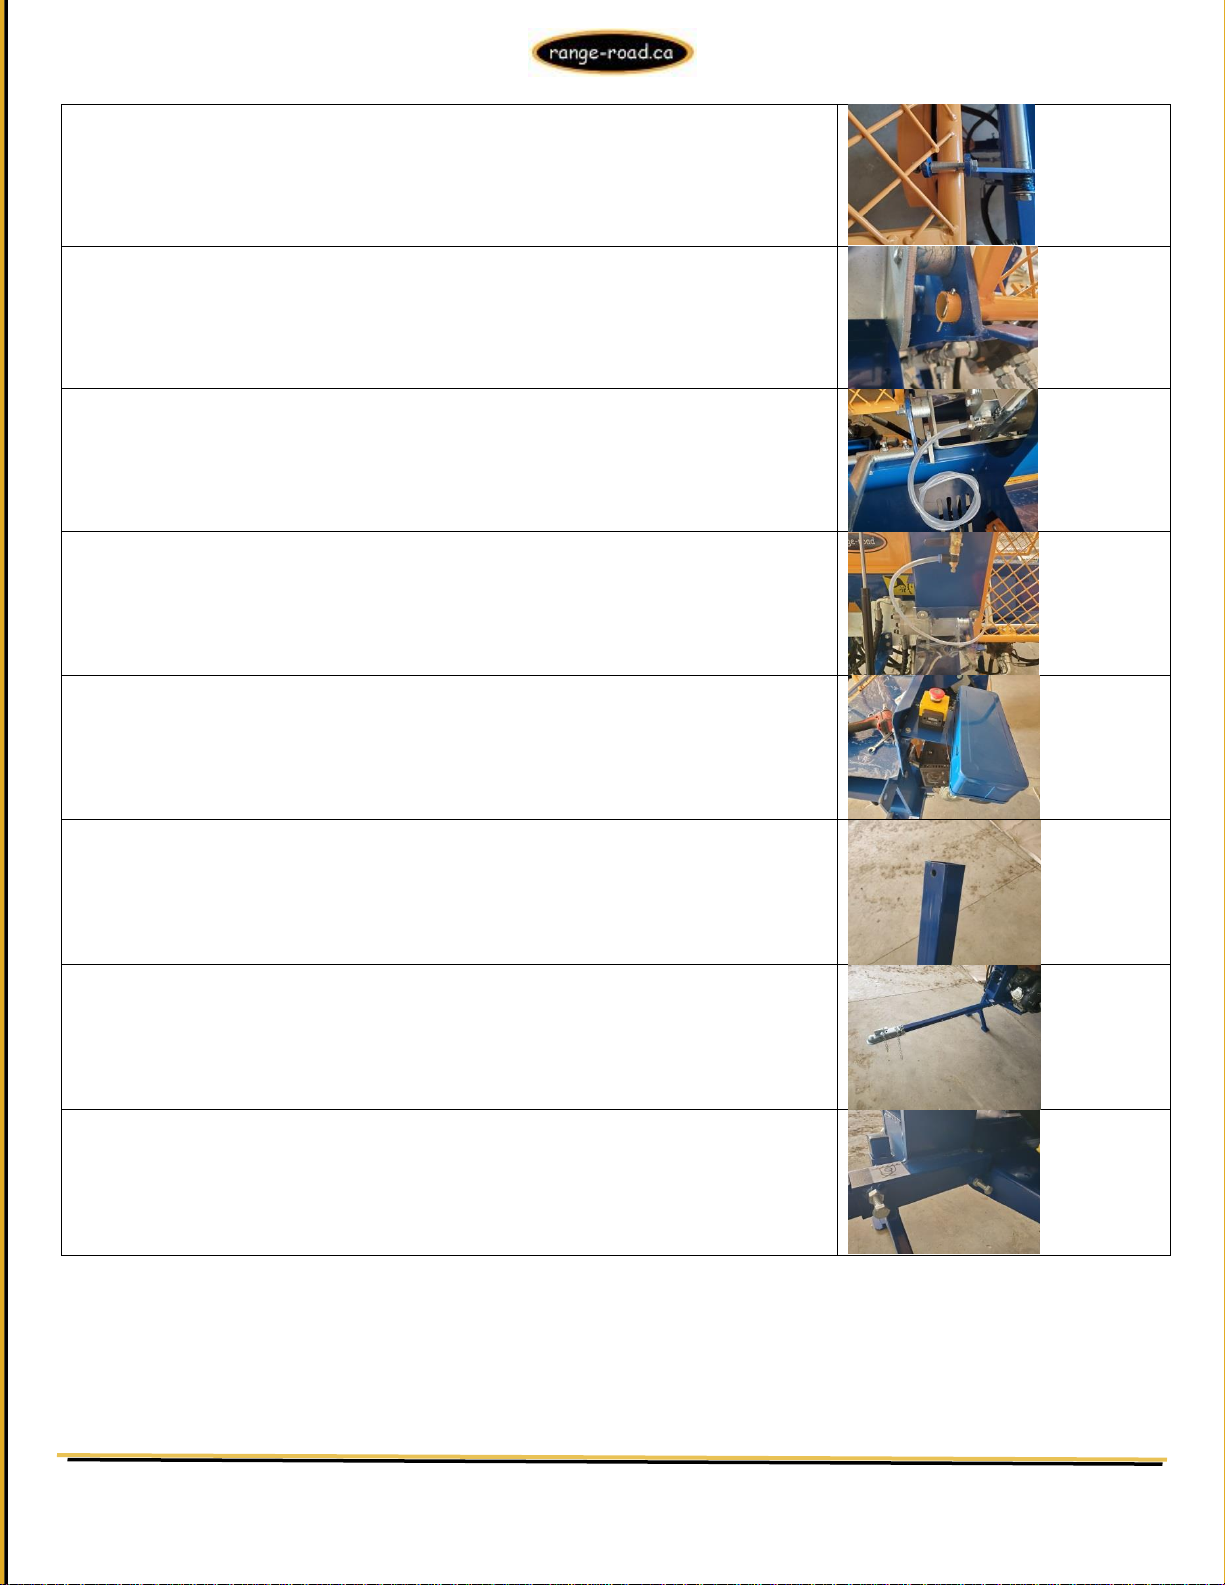
31.) Re-install 10mm bolt & nut to hold cage in place, do not tighten as the
safety cage needs to swivel.
32.) Re-install cotter pin in end of safety cage round bar
33.) Remove nut from chainsaw tensioner and put plastic tubing in place, retighten the nut to hold the plastic tubing and seal, do not over tighten.
34.) Run the tubing through the safety cage, make sure cage can open and
close freely, push the end of the tubing into the tank fitting.
35.) Put toolbox into place and tighten 22 – 13mm nuts and bolts
36.) Remove the 16mm bolt & 17mm nut from the end of the hitch
drawbar.
37.) Place drawbar in receiver tube by the engine, re-install 16mm bolt and
17mm nut, tighten.
38.) Tighten both 18mm bolts on the receiver tube, tighten the lock nuts.
Range Road Enterprises Ltd
Box 944
Eckville AB T0M 0X0
www.range-road.ca
Page 8

EcoPro300
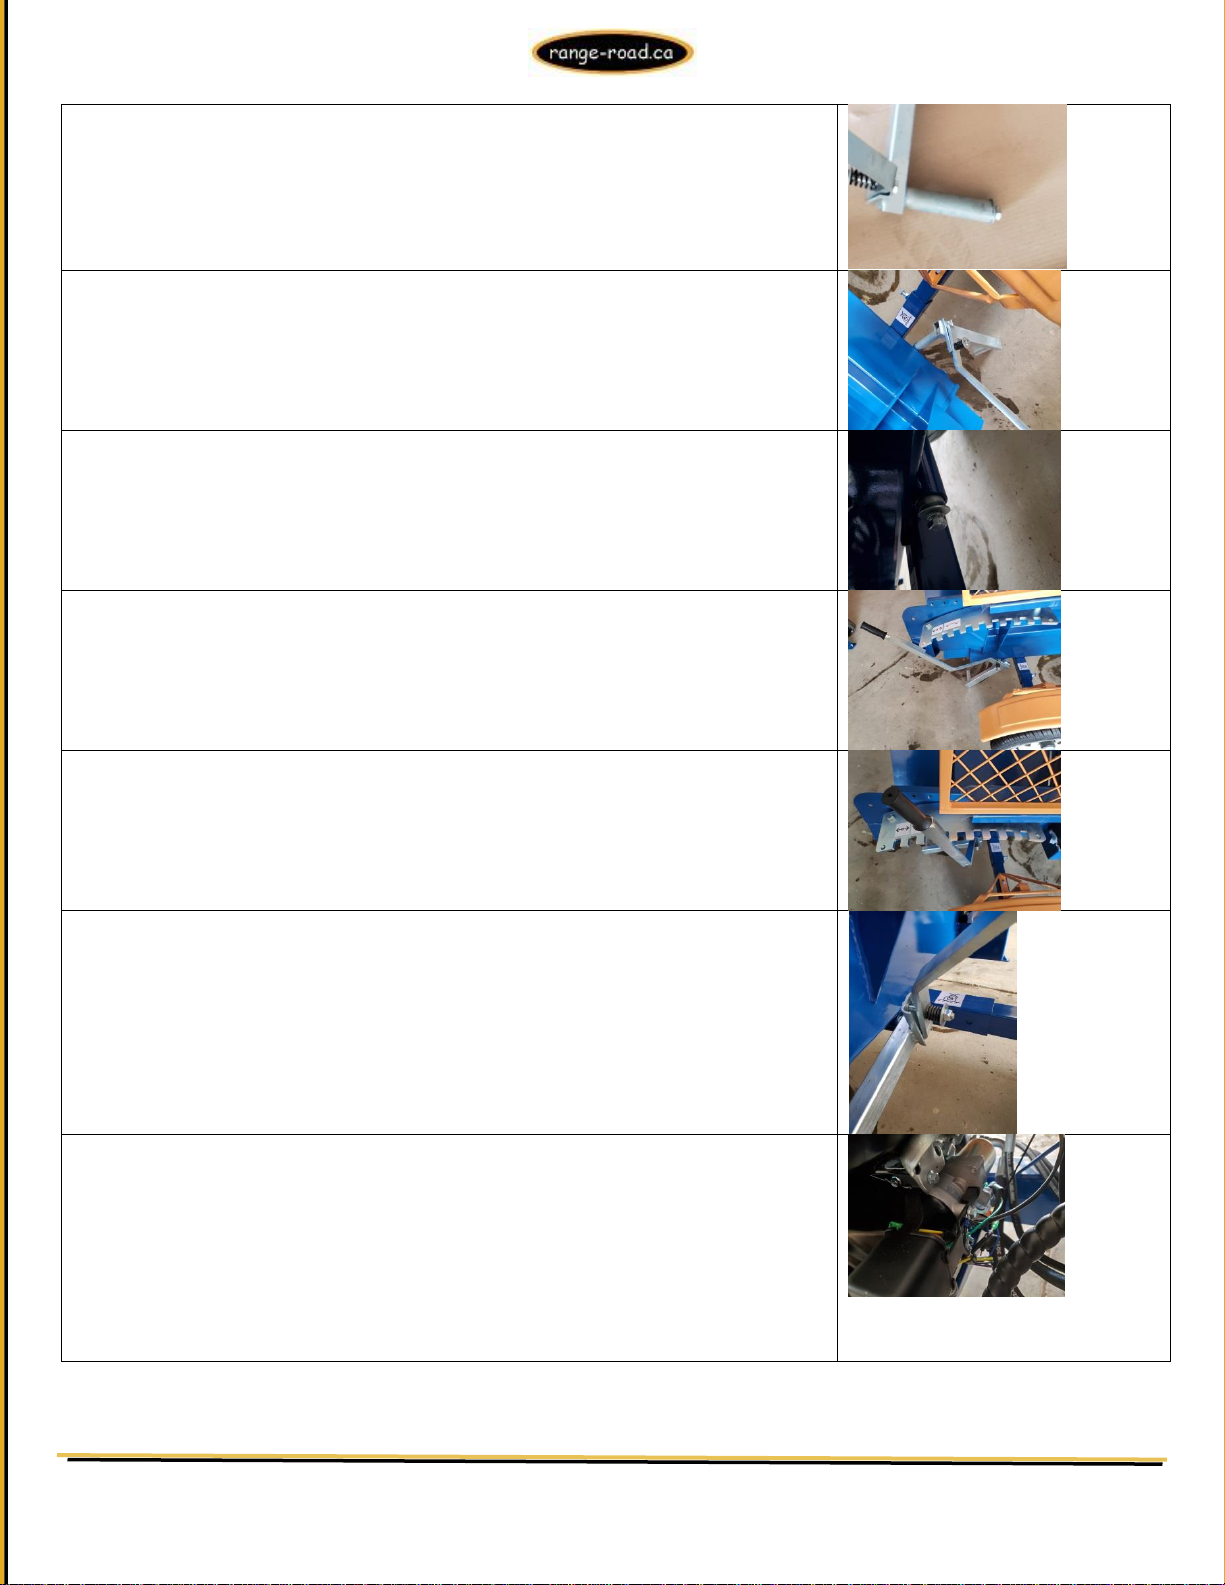
39.) Mount the tongue jack and tighten the bolts.
The manual log roller arm mounts in this position.
40.) Remove the cotter pin and slide out the pin & roller.
41.) Line up the tab holes and re-insert the pin and roller
42.) re-insert cotter pin and bend the end of the cotter pin so it stays in
place.
43.) Place the end of the log holder spring in the hole of the log holder and
tighten bolt.
44.) Remove 18mm bolts & 19mm nuts from side of processor.
45.) Assemble wedge adjuster as shown.
46.) The nut goes on a few threads, once everything is in position you can
tighten this to adjust the tension of the wedge adjuster to where you
prefer it.
Range Road Enterprises Ltd
Box 944
Eckville AB T0M 0X0
www.range-road.ca
Page 9
EcoPro300
47.) Remove the bolt & washer from the end of the swivel bar.
48.) Slide the swivel bar through the mount behind the axle.
49.) Re-install the bolt & washer and tighten.
50.) Install wedge adjustment plate and tighten 2 – 18mm bolts & 19mm
nuts.
51.) Pull the adjuster bar into postion.
52.) Tighten the tensioner bolt until the bar has the tension on it that you
prefer.
53.) Mount the battery ground cable to the 10mm ground bolt on the
engine.
Range Road Enterprises Ltd
Box 944
Eckville AB T0M 0X0
www.range-road.ca
Page 10

EcoPro300
54.) Mount the red battery cable to the lower position of the solenoid on
the engine.
55.) Connect the battery terminals to the other end of the battery cables,
+ to red cable, - to black cable.
56.) Connect terminal to battery and tighten.
57.) Tighten bolts on chain and coupler.
58.) Remove the outfeed conveyor from it’s box.
59.) Unwrap all the components.
60.) Mount the conveyor base section to the rear of the processor using
the 2 bolts provided.
Range Road Enterprises Ltd
Box 944
Eckville AB T0M 0X0
www.range-road.ca
Page 11

EcoPro300
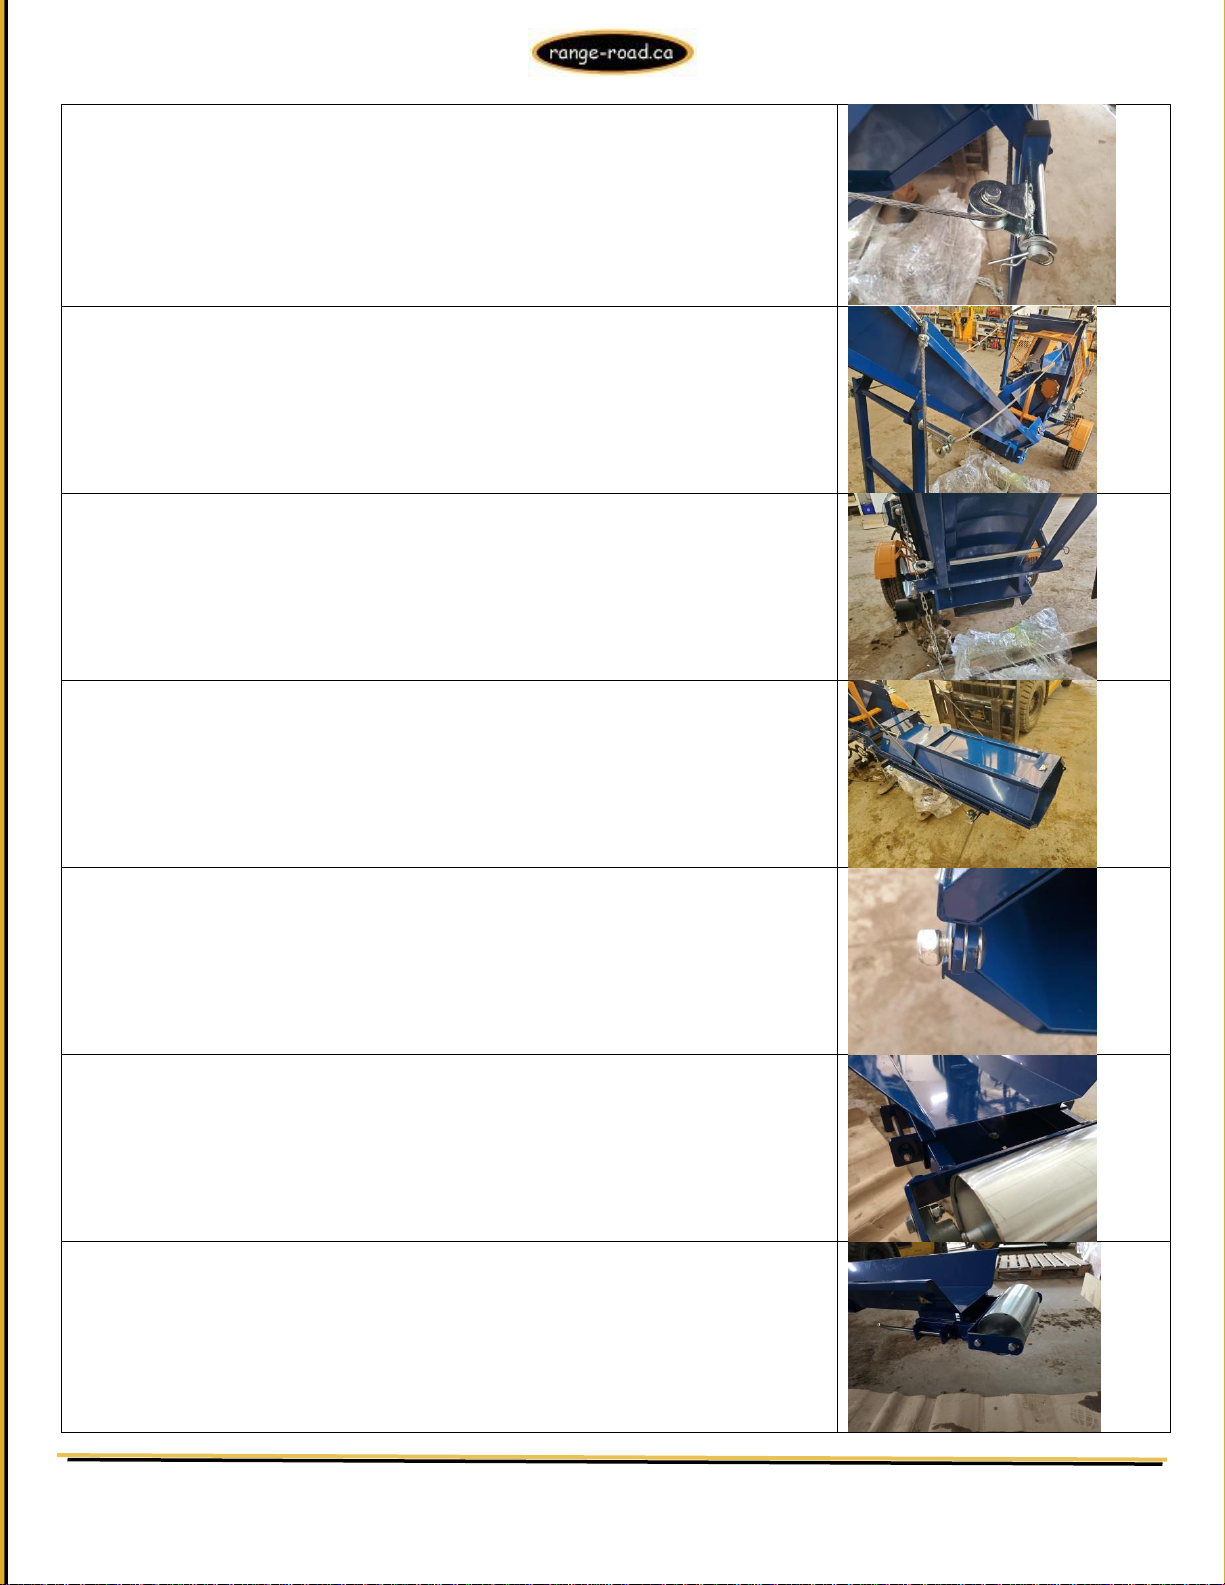
61.) Mount the winch support arm to the processor with the 4 bolts
provided.
62.) Mount the winch to the plate on the top of the support arm.
63.) Lift the conveyor section up and line up the holes in the leg with the
tab holes and push the long pin through.
64.) Loosen the winch cable and mount rollers to the pins and put in safety
clips
Range Road Enterprises Ltd
Box 944
Eckville AB T0M 0X0
www.range-road.ca
Page 12
EcoPro300
65.) The hook end of the winch cable goes to the loop on the winch support
arm.
66.) Lift the leg and put lower pin through the leg and tabs to hold it in
place.
67.) Lower the conveyor and place the second section of the conveyor
upside down on the first section.
68.) Install bolts and washers at swivel point, remember when tightening
the nuts that the conveyor section must be able to swivel, so do not tighten
too much.
69.) Swing upper section of conveyor out and install the roller head
Range Road Enterprises Ltd
Box 944
Eckville AB T0M 0X0
www.range-road.ca
Page 13
EcoPro300
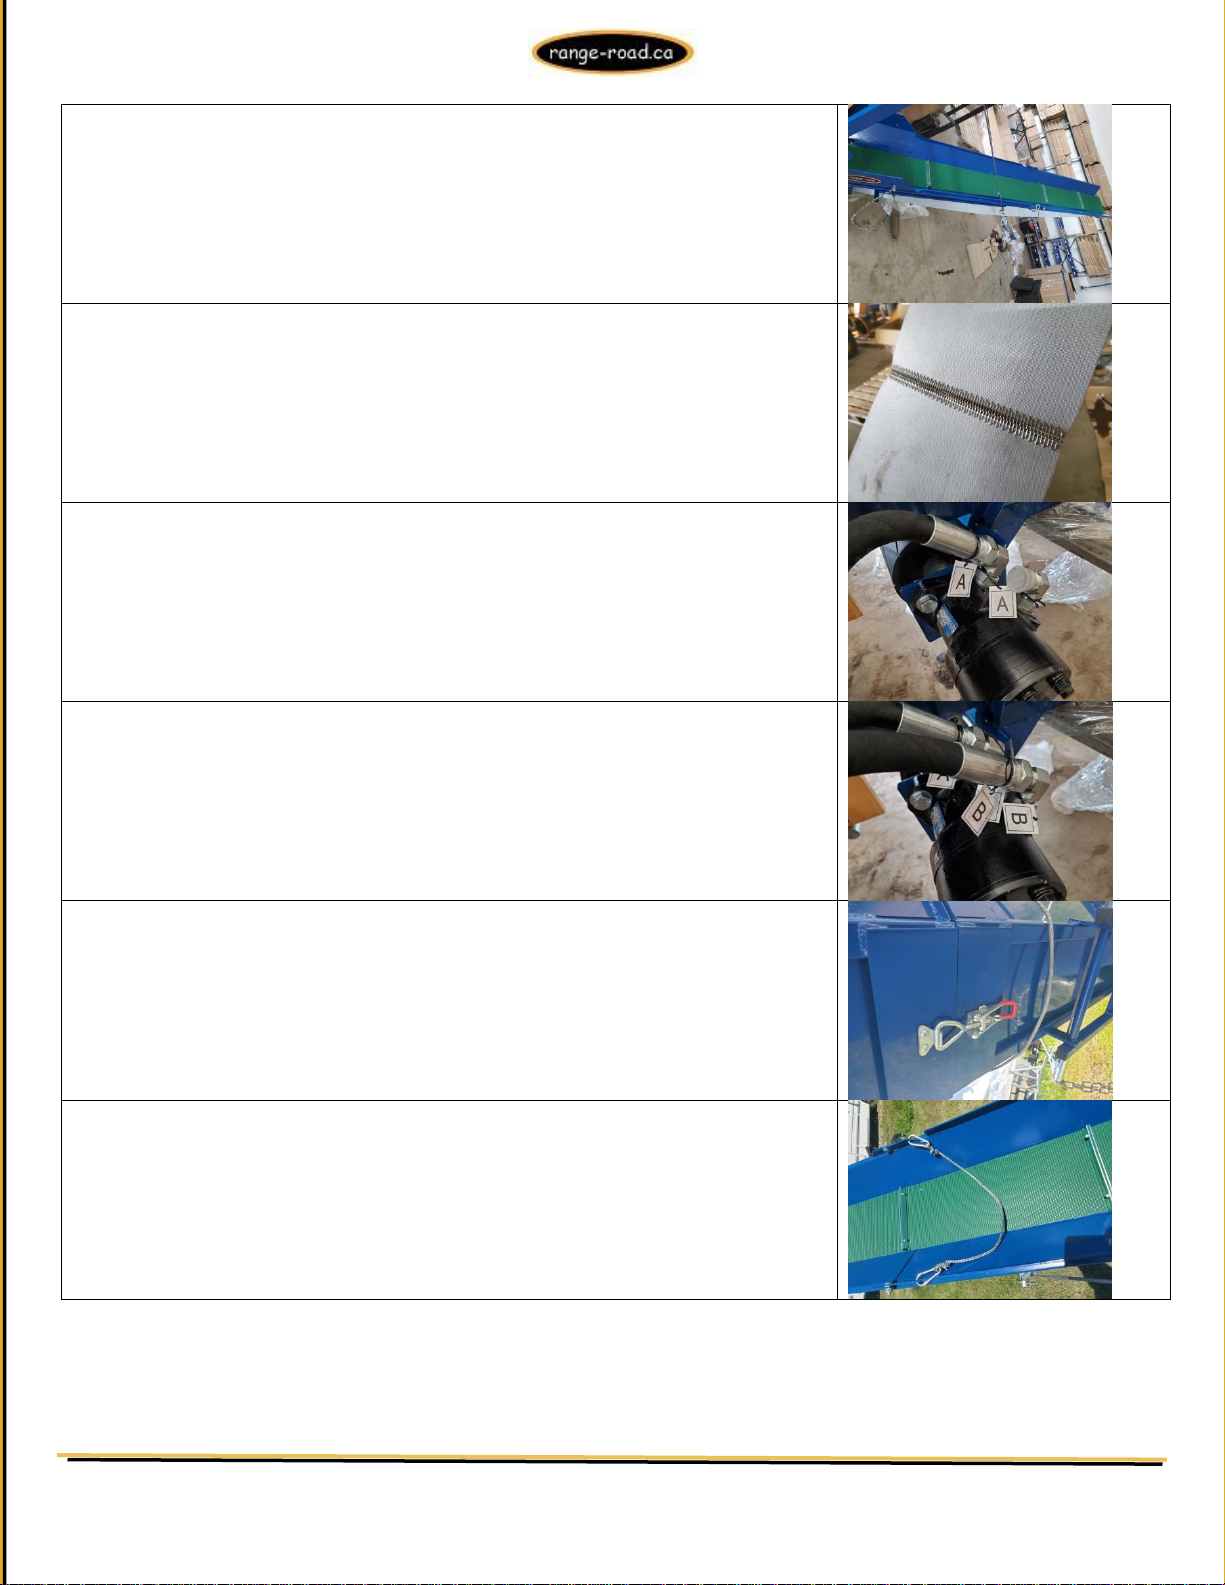
70.) Install conveyor belt.
71.) Connect the belt together and put the pin through the lacing.
72.) Connect the hydraulic hoses to the conveyor.
“A” is the pressure hose.
“B” is the return hose
73.) when the conveyor is extended for use the safety clasp should be
engaged
74.) This short wire is for use when folding the conveyor, it holds the belt
in place.
Disconnect this from one side when using the conveyor.
Range Road Enterprises Ltd
Box 944
Eckville AB T0M 0X0
www.range-road.ca
Page 14
EcoPro300
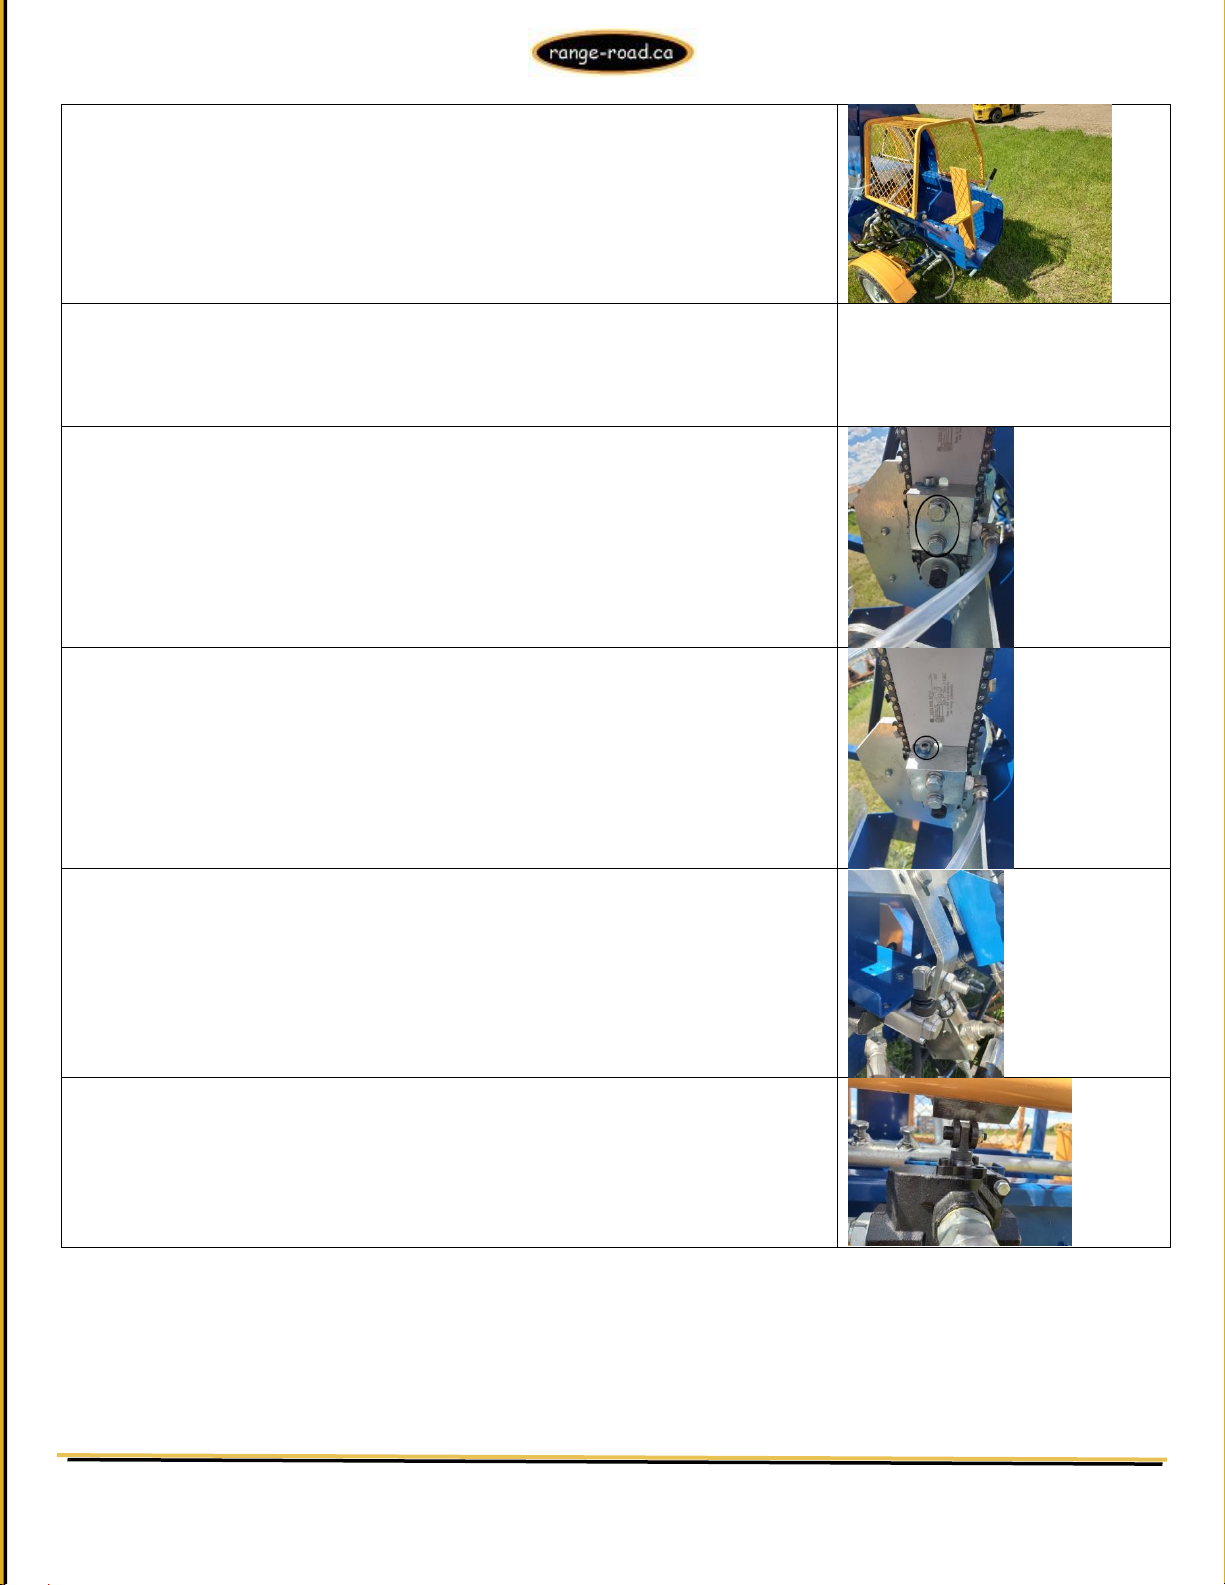
75.) Place splitting wedge in unit.
Adjustments to make before starting engine
76.) To adjust the chain tension, loosen these 2 - 13mm bolts.
77.) The chain can now be adjusted to ensure the tension is set
correctly. Proper chain tension is achieved when the chain can be
pulled away from the bar by hand ¼”--‐
½”. To tighten or loosen the
chain, the two bolts can be loosened using a 12mm wrench. Next, the
allen key bolt can be turned clockwise to tighten or counter--‐
clockwise
to loosen the chain. The two 12mm bolts can be tightened again to
hold the bar securely
.
78.) To adjust the chainsaw actuator tab so it will activate valve when
moved, make sure that the bolt head and valve rocker line up and the bolt
is adjusted to allow chainsaw to engage at the position you want it to.
79.) The safety cage by-pass valve must be adjusted so that when the
cage is closed the plunger is all the way down with no polished surface
showing.
Range Road Enterprises Ltd
Box 944
Eckville AB T0M 0X0
www.range-road.ca
Page 15
EcoPro300
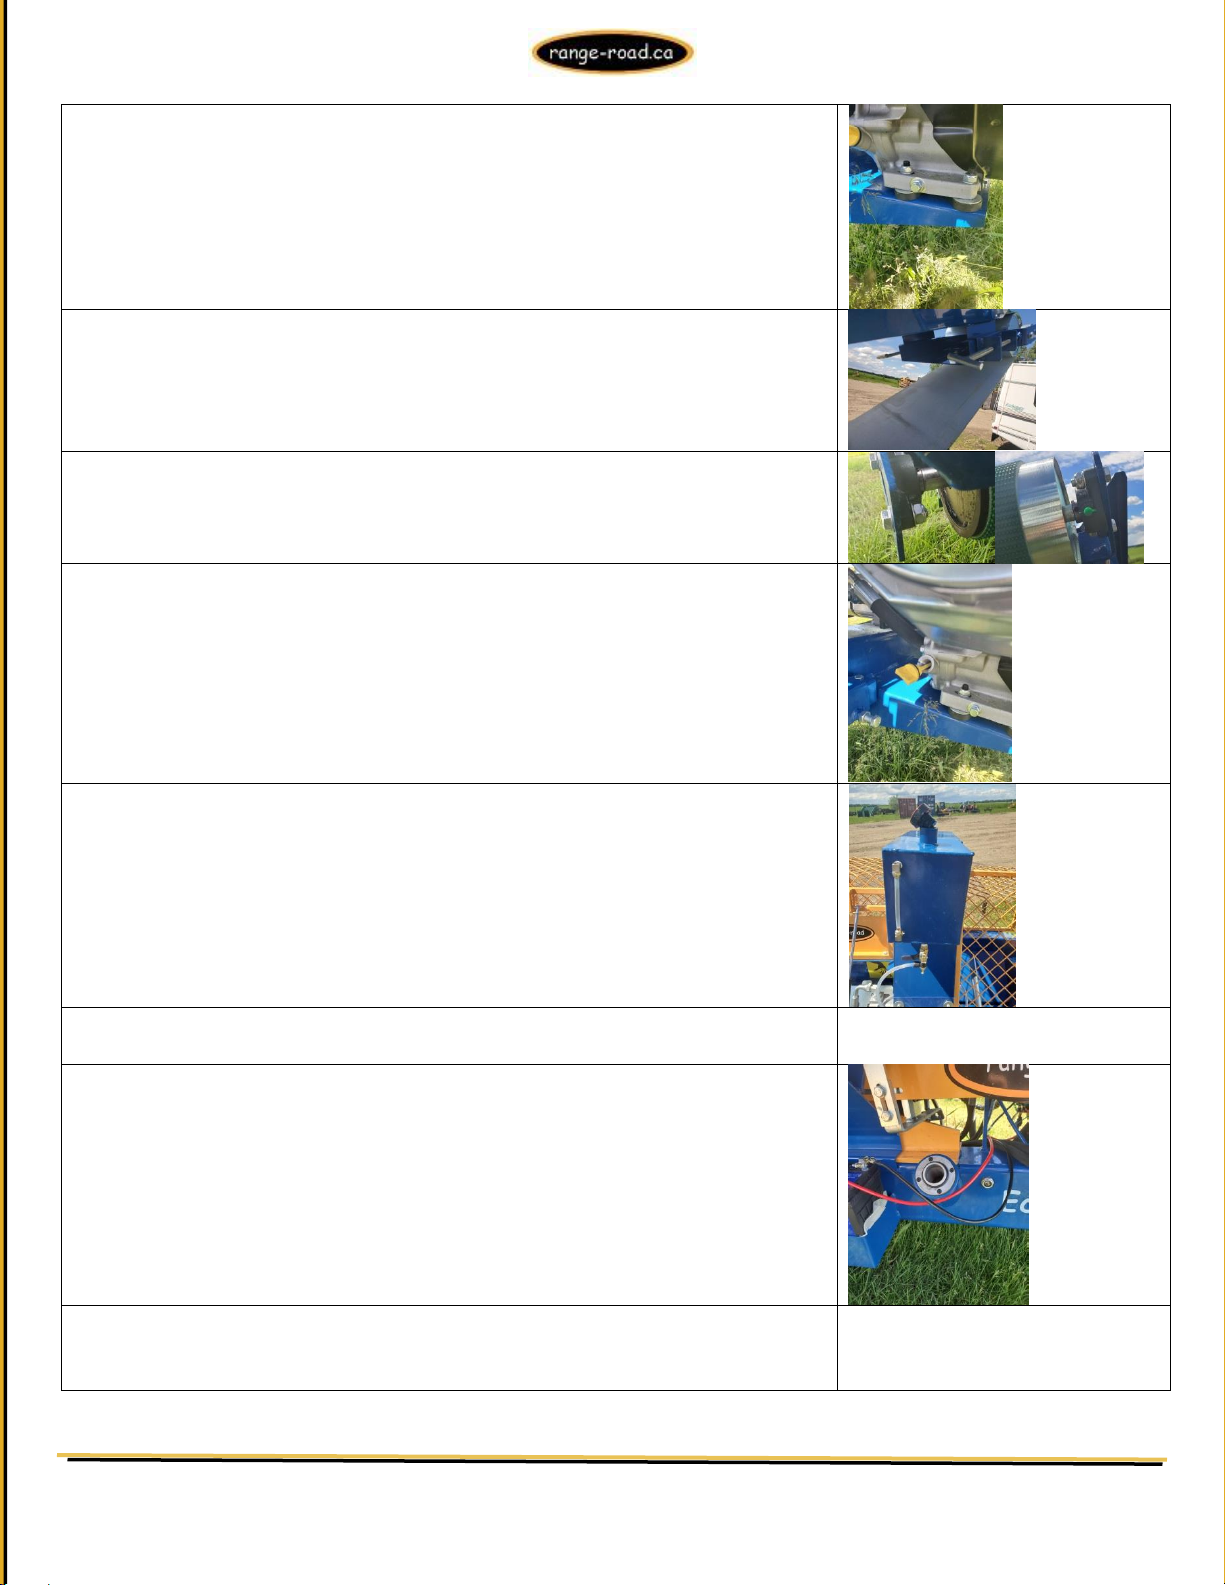
80.) Advisable but not required - Undo 17mm nuts on engine mount bolts
and apply Loctite, re-tighten
89.) Turn adjusting bolts until conveyor is snug, if belt is too loose drive
pulley will spin without turning belt, if it is too tight a jammed piece of
wood could tear belt
90.) Grease conveyor bearings, 2 at top of conveyor, 1 at bottom
91.) Check engine oil, top up or fill as necessary
92.) Add bar oil
94.) Make sure all return hoses are run the cleanest way, so they won’t rub
or pull tight, you may have to swap Tee’s or hose positions
95.) Add 26L AW32 hydraulic oil, in cold climates AW22 can be used and in
hot conditions AW46 can be used
96.) Check all bolts, hoses and fittings, including engine mount bolts to
make sure nothing is loose
Range Road Enterprises Ltd
Box 944
Eckville AB T0M 0X0
www.range-road.ca
Page 16
EcoPro300
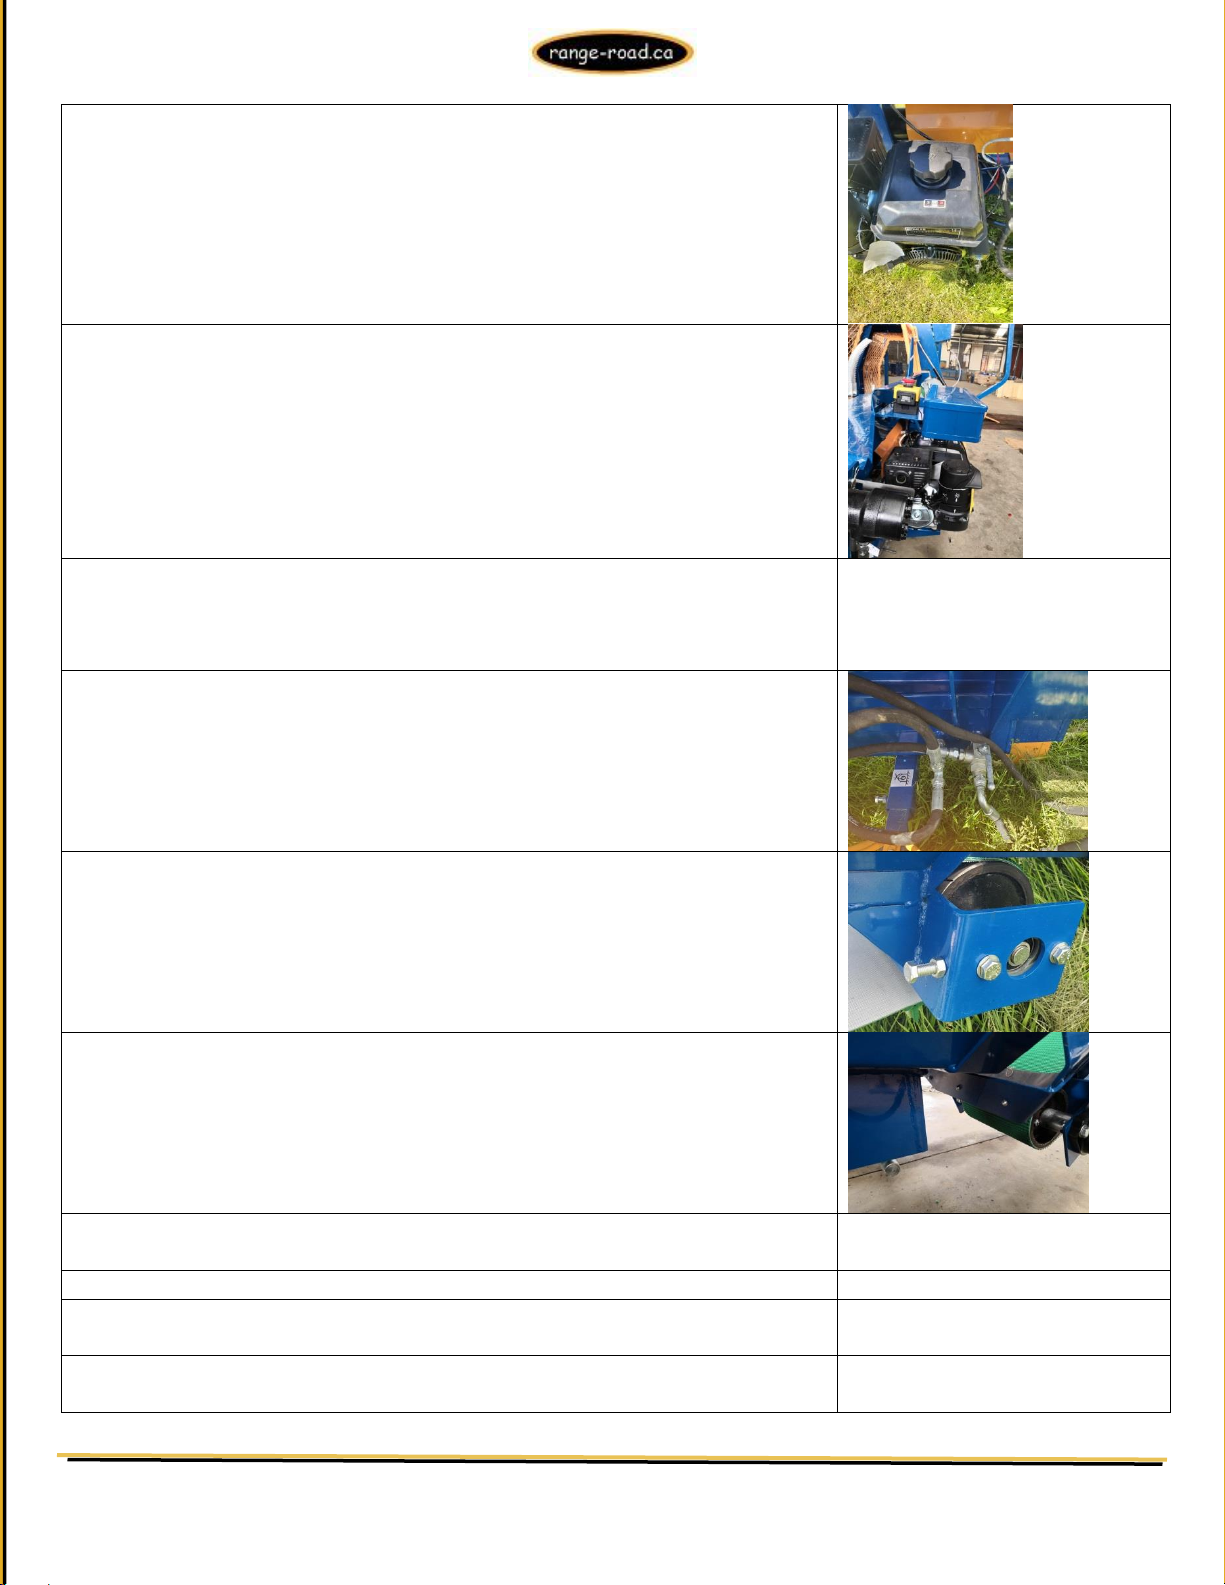
97.) Add fuel to engine fuel tank, do not fill above red level marker in tank
neck, the tank vents through the cap, if fuel is above this line engine will
not run very well and will stall. Premium fuel is recommended, Farm Fuel
should not be used.
98.) The emergency stop button is pushed down to stop the engine so make
sure it is in the run position, turn it slightly and the button will pop up if it
is in the off position.
99.) Make sure that manual ram engagement bar is in up position, Start
engine and let idle until engine and hydraulic oil are at operating
temperature
100.) This valve is used to control the flow to the conveyor, you can control
the speed or shut it right off, for cold starts this valve should be closed
until the hydraulic oil is warm and then opened to allow the conveyor to run
run.
101.) While engine is warming up, adjust conveyor belt to run in center of
upper and lower pulleys, upper puller has bolts on either side for
adjustment, lower puller has this bolt, slightly loosen the 2 bearing nuts and
bolts and use this bolt to adjust the position then tighten bearing bolts.
When adjusted properly belt rides in center of lower pulley
102.) When unit is up to operating temperature operate saw and ram
multiple times to make sure they are adjusted and working properly
103.) Shut unit off
104.) Check all nuts, bolts, hose and fittings one more time, check for
leaks
Range Road Enterprises Ltd
Box 944
Eckville AB T0M 0X0
www.range-road.ca
Page 17

EcoPro300
Ram Hood Adjustment
The 2 brackets on the ram hood must be checked for adjustment to make
sure the ram does not extend to far and that when it returns it does not
have a hard hitting stop.
1st) The rear bracket hits the manual ram bar as the rams goes out, it
needs to be adjusted so that it hits the return bar before the ram is fully
extended. This is set from the factory but should always be checked.
2nd) The front bracket hits the post on the manual return arm as the ram
returns home, this must hit the post before the ram hits its internal stops,
softening the stop.
This should be adjusted so that the ram hood does not stick out into the
splitting valley when it is in the home position, it should not be sunk into the
housing, it should sit almost flush will the front wall.
Again – this is set at the factory – do not adjust unless there is a problem.
Optional: If the customer is only cutting and splitting shorter lengths, the
bar can be reversed to shorten the stroke and reduce the cycle time
Range Road Enterprises Ltd
Box 944
Eckville AB T0M 0X0
www.range-road.ca
Page 18

EcoPro300
Range Road Enterprises Ltd
Box 944
Eckville AB T0M 0X0
www.range-road.ca
 Loading...