

Rangemaster RWS60 Installation, Operation And Maintenance Instructions

RANGEMASTER REFRIGERATED WINE STORAGE UNIT
Installation
Operation
and
Maintenance
Instructions
Refrigerated
Wine Storage Unit with
MicroSentry™ Refrigeration Monitor
RWS60
Note: This appliance is intended to be used exclusively for
the storage of wine.

TABLE OF CONTENTS
Unpacking your wine storage unit .........................
Removing the packaging......................
Warranty Registration .....................
Installing your wine storage unit ..............
Selecting the location..........................
Cabinet Clearances ..........................................
Leveling legs .....................................
Electrical Connection .............................
Using Your MicroSentry™ Control.........
Dimensions for RWS60 glass door...........
Recommended Rough in Opening Dimensions
for RWS60 glass door......
Features ................................................
Care and Cleaning .........
Cleaning condenser air flow.....
Cleaning the cabinet......
Cleaning the interior......................................
Cleaning the wine shelves......
Cleaning the door gasket.....
Replacing the light bulb........
Aligning the door .......................................................
Energy Saving Tips .........................................................
Troubleshooting Guide.........................
Obtaining Service ..............................
Guarantee .........................................
Appendix A additional MicroSentry™ features..................
...............
.........................
................................
.................
...............
...............
...................
......................
............
.....................
......................
......................
...........
...................
.......................
...................
.......................
..............
............................
........
..........
..................
...................
.........................
...........
.........
.................
.........
...
.............
......
..........
.....
...
...........
............
............
...............
...
.......
2
.
2
2
..
3
..
3
.
3
3
4
..
5
.
7
7
.
8
..
9
9
9
9
..
9
..
9
.
9
10
11
12
..
13
.
13
14
1
NOTE
This appliance is not intended for use by persons (including
children) with reduced physical, sensory, or mental capabilities, or lack of experience and knowledge, unless they have
been given supervision or instruction concerning use of the
appliance by a person responsible for their safety.
This product contains the following fluorinated greenhouse gases.
• HFC245fa - GWP = 950
• HFC134a - GWP = 1300
UNPACKING YOUR WINE STORAGE UNIT
Important Safety Instructions
Warnings and safety instructions appearing in this guide
are not meant to cover all possible conditions and situations
that may occur. Common sense, caution, and care must
be exercised when installing, maintaining, or operating this
appliance.
Recognize Safety Symbols,
Words, and Labels.
CAUTION-Hazards or unsafe practices which could
result in personal injury or property or product damage.
WARNING-Hazards or unsafe practices which could
result in personal injury.
NOTE
NOTE-Important information to make a problem free
installation.
Note to Customer
This merchandise was carefully packed and thoroughly
inspected before leaving our plant. Responsibility for its safe
delivery was assumed by the retailer upon acceptance of
the shipment. Claims for loss or damage sustained in transit
must be made to the retailer.
DO NOT RETURN DAMAGED MERCHANDISE TO THE
MANUFACTURER - FILE THE CLAIM WITH THE RETAILER.
If the unit was shipped or has been laying on its back for
any period of time allow the wine storage unit to sit upright
for a period of at least 24 hours before plugging in. This
will assure oil returns to the compressor. Plugging the wine
storage unit in immediately may cause damage to internal
parts.
Warranty Registration
It is important to register your product as soon as possible
after taking delivery of your wine storage unit. You can register online at www.rangemaster.co.uk.
The following information will be required when registering
your unit.
Model Number
Serial Number
Date of Purchase
Supplier’s name and address
Installer’s name and address
The model number and serial number can be found on the
data badge which is located inside the wine storage unit on
the left side toward the top of the cavity.
Remove Packaging
Your wine storage unit has been packed for shipment with
all parts that could be damaged by movement securely fastened. Cut the banding material at the bottom of the carton,
unfold the carton at the bottom and remove the carton from
the appliance. Remove the plastic bag, styrofoam corner
posts, and any tape holding the door closed and internal
components in place. The owners manual is shipped inside
the wine storage unit in a plastic bag.
Important
Keep your carton packaging until your wine storage unit has
been thoroughly inspected and found to be in good condition. If there is damage, the packaging will be needed as
proof of damage in transit. Afterwards please dispose of all
items responsibly in particular the plastic bags which can be
a suffocation hazard.
Help Prevent Tragedies
Child entrapment and suffocation are not problems of the
past. Junked or abandoned refrigerators are still dangerous,
even if they sit out for “just a few days”.
If you are getting rid of your old refrigerator, please follow
the instructions below to help prevent accidents.
Before you throw away your old refrigerator or freezer:
• Take off the doors or remove the drawers.
• Leave the shelves in place so children may not easily
climb inside.
2
INSTALLING YOUR WINE STORAGE UNIT
Select Location
The proper location will ensure peak performance of your
appliance. We recommend a location where the unit will
be out of direct sunlight and away from heat sources. To
assure your product performs to specifications the recommended installation location temperature range is from
18 to 27°C for indoor built in units,18 to 32°C for indoor
freestanding units.
Cabinet Clearance
Ventilation is required from the bottom front section of the
unit. Keep this area open and clear of any obstructions.
Adjacent cabinets and counter top can be installed around
the unit as long as the grille and door access remain unobstructed.
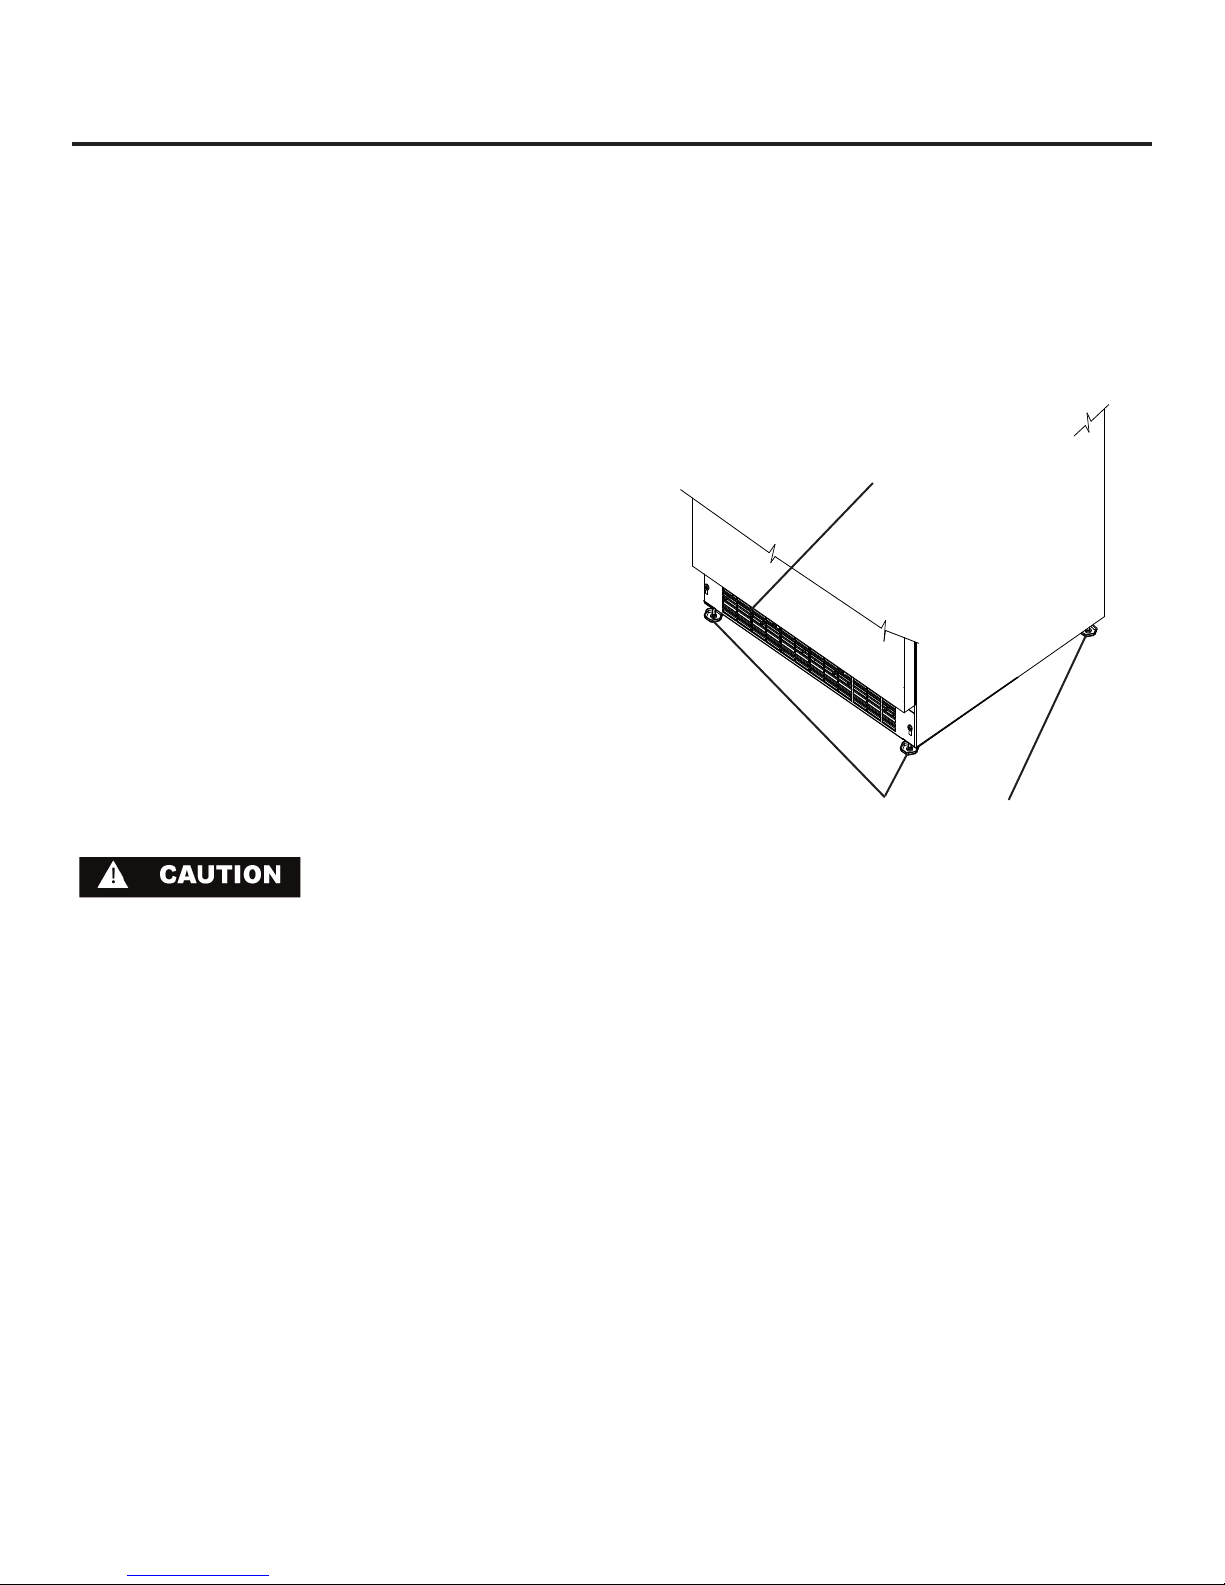
Leveling Legs
Adjustable legs at the front and rear corners of the unit
should be set so the unit is firmly positioned on the floor and
level from side to side and front to back. Turn leveling legs
clockwise to raise unit, counterclockwise to lower it. (See
Figure 1).
Front Grille,
keep this
area open.
Figure 1
Front Grille
Do not obstruct the front grille. The openings within the front
grille provide air to flow into and exit from the refrigerator
condenser. For this reason it is important this area to not be
obstructed and be kept clean. Rangemaster does not recommend the use of custom made grilles as air flow may be
restricted because of inadequate openings. (See Figure 1).
Leveling Legs
3
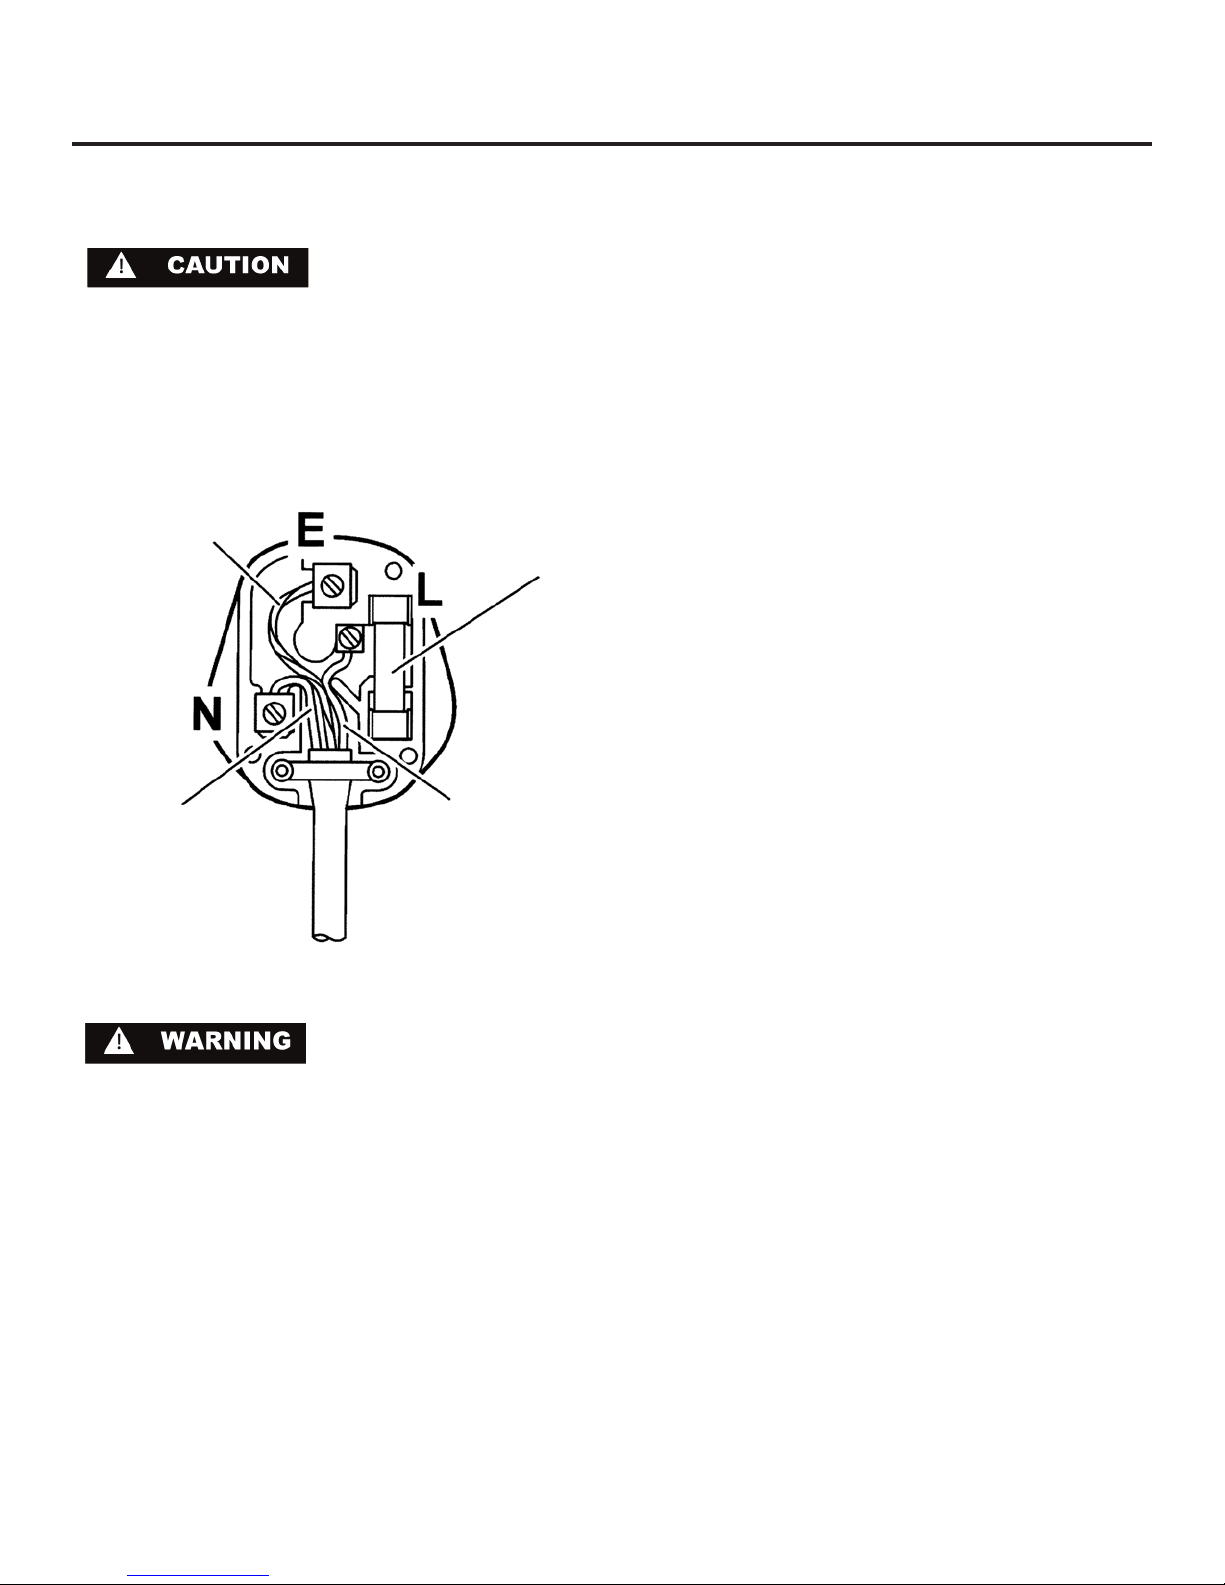
ELECTRICAL CONNECTION
Electrical Connection
Use nominal 230 VAC, 50 Hz only.
Do not use an extension cord with this appliance.
Green/Yellow
(earth)
Blue (neutral)
Fuse (13A)
Brown (live)
13A must be used and fitted with a 13A fuse “ASTA” approved to BS 1363.
If you replace the fuse, the cover must be refitted. If the
cover is lost, the plug must not be used until a replacement
has been obtained from your supplier. The color of the fuse
cover is that of the insert in the base of the fuse recess or
elsewhere on the plug. Always state this color when ordering a replacement cover.
If your appliance has a moulded plug, you do NOT have to
do the following assembly as shown in Figure 2. Appliances
with moulded plugs are ready to use as is.
IMPORTANT: The wires should be connected to the terminals of the plug as follows:
• Earth to the terminal marked E or coloured Green or
Green/Yellow.
• Neutral to the terminal marked N or coloured Blue.
• Live to the terminal marked L or coloured Brown.
When wiring the plug, ensure that all strands of wire are
retained in each terminal. The flexible main cable, plug and
socket must not be exposed to flue products or be allowed
to come in contact with a hot surface. The cable must not
be trapped or pulled taut when the appliance is pushed into
position.
THIS UNIT SHOULD NOT, UNDER ANY CIRCUMSTANCES,
BE UNEARTHED.
Figure 2
THIS APPLIANCE MUST BE EARTHED. All external wiring
must comply with the IEE Regulations for the Electrical Equipment of Buildings. Connections to the electrical supply can
be made with either a plug and socket or be permanently
wired via a double-pole switch.
The appliance is supplied with a 250VAC PVC (85 degrees
C) core cable (0.5mm x 2 metres long). Any replacement
cable fitted must follow this specification. The unit may be
supplied with either a moulded or rewirable plug. Should
the plug not fit the socket at the installation site, it should be
removed and replaced with the correct type of plug.
If a moulded plug is fitted which is not suitable, it must be
removed and disposed of. To avoid the risk of electrocution, a plug must not be left where a child may plug it into a
supply socket. It must not be used for any other appliance.
A three pin plug to BS 1363 with a capacity of not less than
4
 Loading...