

Page 1
Integrated Freezer
User Guide
&
Installation & Service Instructions
U110832-01
Page 2
Contents
1. Before You Start 1
Safety 1
Electrical Safety 3
CE Declaration of conformity 3
Disposal of your old appliance 3
Packaging and the Environment 3
2. About Your Freezer 4
Using the appliance 5
3. Using the Control Panel 6
Operating your Freezer 6
Accessories 7
4. Food Storage Tips 8
Food storage 8
Tips on Freezing Food 9
5. Food Storage Table 10
6. Cleaning and Maintenance 12
7. Troubleshooting 14
8. Installation 16
Installation warnings 16
Positioning Your Appliance 17
Electrical Supply Connection 18
9. Circuit diagram 23
10. Technical Data 24
11. Warranty/After Sales Service 26
Due to our policy of continual improvement, we reserve the right to change specications without prior notice.
Page 3
1. Before You Start
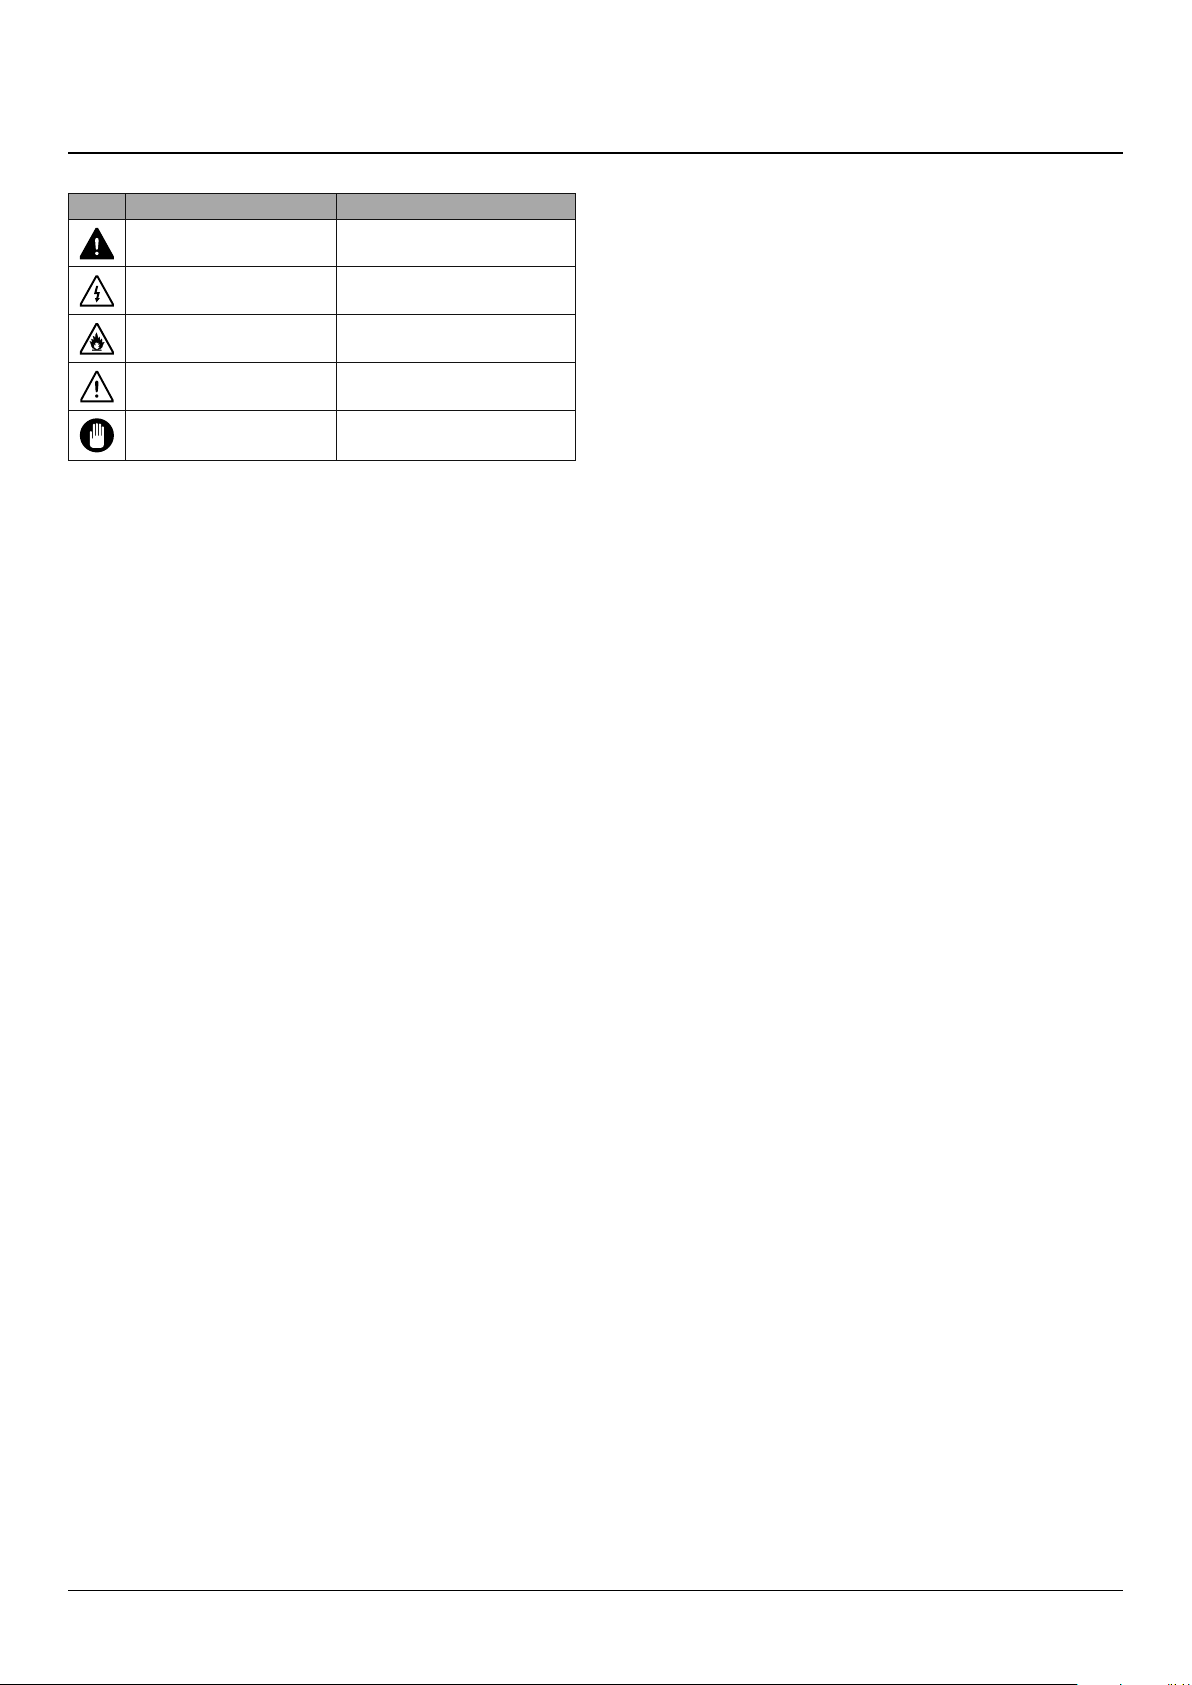
Icon Type Meaning
WARNING Serious injury or death risk
RISK OF ELECTRIC SHOCK Dangerous voltage risk
Thank you for buying a Rangemaster appliance. We hope
that it provides a stylish yet practical solution to your cooling
needs. We hope that this handbook supplies you with all the
information you require. If there is anything you are unsure of
please contact us (see ‘Warranty’ section for Customer Care’s
details).
FIRE Fire risk
CAUTION Injury or property damage risk
IMPORTANT Operating the system correctly
WARNING: This appliance must be earthed.
Please leave the appliance to stand for at least six
hours. This will allow the cooling system to settle
following transportation.
Always make sure a qualied person installs this
appliance.
This appliance is designed for domestic use only.
Using it for any other purpose could invalidate any
warranty or liability claim.
• Before you plug the appliance into the mains, clean
the inside of the appliance using warm water and
bicarbonate of soda, then dry thoroughly.
• Check that no parts of the appliance are damaged,
especially parts of the cooling system, pipes or leads.
If damage has occurred, DO NOT install the appliance;
you should contact a qualified service engineer or
return the appliance to its place of purchase.
• If the accessories inside the appliance have been
disturbed during transit, reposition them in accordance
with the instructions.
• Make sure that the electrical supply to your plug socket
is correct for this appliance – the required information is
on the data badge of the appliance.
• Once the appliance is installed, cleaned and dry, it is
ready to be plugged in and switched on.
Safety
The data badge is located inside the appliance
(refrigeration compartment).
WARNING: Use potable (drinking) water with this
appliance.
WARNING: Keep this appliance clear of any
obstruction.
DO NOT damage the refrigerant circuit. If it does
become damaged, do not use the appliance.
WARNING: DO NOT use mechanical devices (such as
hairdryers) to defrost this appliance.
If your appliance uses R600a as a refrigerant (this
information will be provided on the label of the
cooler) you should take care during transportation
and installation to prevent the cooler elements
from being damaged. R600a is an environmentally
friendly and natural gas, but it is explosive. In
the event of a leak due to damage of the cooler
1
Page 4

elements, move your appliance away from open
ames or heat sources and ventilate the room where
the appliance is located for a few minutes.
• When replacing old appliances, make sure that you
have disabled any locking mechanisms before disposal
– it may even be best to remove the appliance door
completely to prevent children from becoming trapped
inside the appliance.
• The appliance must be connected to the power supply
safely. Loose connections, broken plugs and bare wires
are a safety hazard. Make sure that all connections are
sound.
• Before undertaking any routine maintenance or minor
repairs, disconnect the appliance from the electrical
supply.
• DO NOT touch cold surfaces of the appliance while it is
in use as this will cause hands to stick to them leading
to freezer burns.
• When moving the appliance take care not to damage
the leads, pipes or condenser unit. Should these parts
become damaged, contact a qualified service engineer.
• Effervescent liquids (fizzy drinks) should never be
frozen. These liquids expand during freezing and
this may lead to the bottles/containers shattering or
exploding.
• Foods that are intended to be defrosted or cooked first,
such as breads or meats, must not be eaten in their
frozen state.
• If food looks or smells strange, do not attempt to eat it.
If in doubt throw it away. Spoiled food can be harmful to
your health.
• Never use sharp, metal implements to scrape ice off the
surface of this appliance. Only use implements, which
are fit for this purpose (such as plastic scrapers) and use
carefully to avoid damaging the lining of the appliance.
• The cooling system contains refrigerant and oils, all of
which are harmful to health if leaked. Should leakage
occur, disconnect the appliance and ventilate the room
it is installed in. Take care to ensure that you do not get
any coolant near to, or in, your eyes. Contact a service
engineer or arrange to have the appliance removed.
DO NOT use the appliance under any circumstances.
WARNING: Keep ventilation openings, in the
appliance enclosure or in the built-in structure, clear
of obstruction.
WARNING: DO NOT use electrical appliances inside
the food storage compartments of the appliance,
unless they are of the type recommended by the
manufacturer.
WARNING: DO NOT damage the refrigerant circuit.
WARNING: In order to avoid any hazards resulting
from the instability of the appliance, it must be
xed in accordance with the following instructions:
If your appliance uses R600a as a refrigerant (this
information will be provided on the label of the
cooler) you should take care during transportation
and installation to prevent the cooler elements
from being damaged. R600a is an environmentally
friendly and natural gas, but it is explosive. In
the event of a leak due to damage of the cooler
elements, move your appliance away from open
ames or heat sources and ventilate the room where
the appliance is located for a few minutes.
While carrying and positioning the appliance, do not damage
the cooler gas circuit.
DO NOT store explosive substances such as aerosol cans with
a ammable propellant in this appliance.
This appliance is intended to be used in household and
domestic applications only.
If the socket does not match the appliance plug, it must be
replaced by the manufacturer, a service agent or similarly
qualied persons in order to avoid a hazard.
A specially grounded plug has been connected to the power
cable of your appliance. This plug should be used with
a specially grounded socket of 13 amperes. If there is no
such socket in your house, please have one installed by an
authorised electrician.
This appliance can be used by children aged from 8 years and
above and persons with reduced physical, sensory or mental
capabilities or lack of experience and knowledge if they have
been given supervision or instruction concerning use of the
appliance in a safe way and understand the hazards involved.
Children shall not play with the appliance. Cleaning and
user maintenance shall not be made by children without
supervision.
If the supply cord is damaged, it must be replaced by the
manufacturer, an authorised service agent or similar qualied
persons, in order to avoid a hazard.
This appliance is not intended for use at altitudes exceeding
2000 m.
WARNING: DO NOT use mechanical devices or other
means to accelerate the defrosting process, other
than those recommended by the manufacturer.
2
Page 5
Electrical Safety
ArtNo.000-0001
Wa
CE Declaration of conformity
WARNING: When positioning the appliance, ensure
the supply cord is not trapped or damaged.
WARNING: DO NOT locate multiple portable socket-
outlets or portable power supplies at the rear of the
appliance.
DO NOT use plug adapter.
rning triangle
WARNING; Risk of re / ammable materials
• The plug must be accessible after installation.
• The operating voltage for your appliance is 220-240 V at
50Hz.
• Connections to the mains supply should be in
accordance with local regulations.
• Insert the plug into a socket with an efficient ground
connection. If the socket has no ground contact or the
plug does not match, we recommend you consult a
qualified electrician for assistance.
• The appliance must be connected with a properly
installed fused socket. The power supply (AC) and
voltage at the operating point must match with the
details on the name plate of the appliance (the name
plate is located on the inside left of the appliance).
• The appliance must be plugged into an earthed socket.
• We declare that our products meet the applicable
European Directives, Decisions and Regulations and the
requirements listed in the standards referenced.
Disposal of your old appliance
• The symbol on the product or on its packaging indicates
that this product may not be treated as household
waste. Instead it shall be handed over to the applicable
collection point for the recycling of electrical and
electronic equipment. By ensuring this product is
disposed of correctly, you will help prevent potential
negative consequences for the environment and
human health, which could otherwise be caused by
inappropriate waste handling of this product. For more
detailed information about recycling of this product,
please contact your local city office, your household
waste disposal service or the shop where you purchased
the product.
Packaging and the Environment
• Packaging materials protect your machine from damage
that may occur during transportation. The packaging
materials are environmentally friendly as they are
recyclable. The use of recycled material reduces raw
material consumption and therefore decreases waste
production.
• The plug MUST be accessible after the appliance has
been positioned.
• The appliance is supplied with a standard three-pin
plug, of which the one for grounding should never be
removed.
• Hold the plug, not the electrical cable, when
unplugging the appliance.
• Make sure that the appliance does not trap the electric
cable.
• DO NOT step on the cable.
• Avoid damage to the electric cable when moving the
appliance.
Notes:
• Please read the instruction manual carefully before
installing and using your appliance. We are not
responsible for the damage occurred due to misuse.
• Follow all instructions on your appliance and instruction
manual, and keep this manual in a safe place to resolve
the problems that may occur in the future.
• This appliance is produced to be used in homes and it
can only be used in domestic environments and for the
specified purposes. It is not suitable for commercial or
common use. Such use will cause the guarantee of the
appliance to be cancelled and our company will not be
responsible for the losses to be occurred.
• This appliance is produced to be used in houses and
it is only suitable for cooling / storing foods. It is not
suitable for commercial or common use and/or for
storing substances except for food. Our company is not
responsible for the losses to be occurred in the contrary
case.
3
Page 6
4
3
2
1
5
6
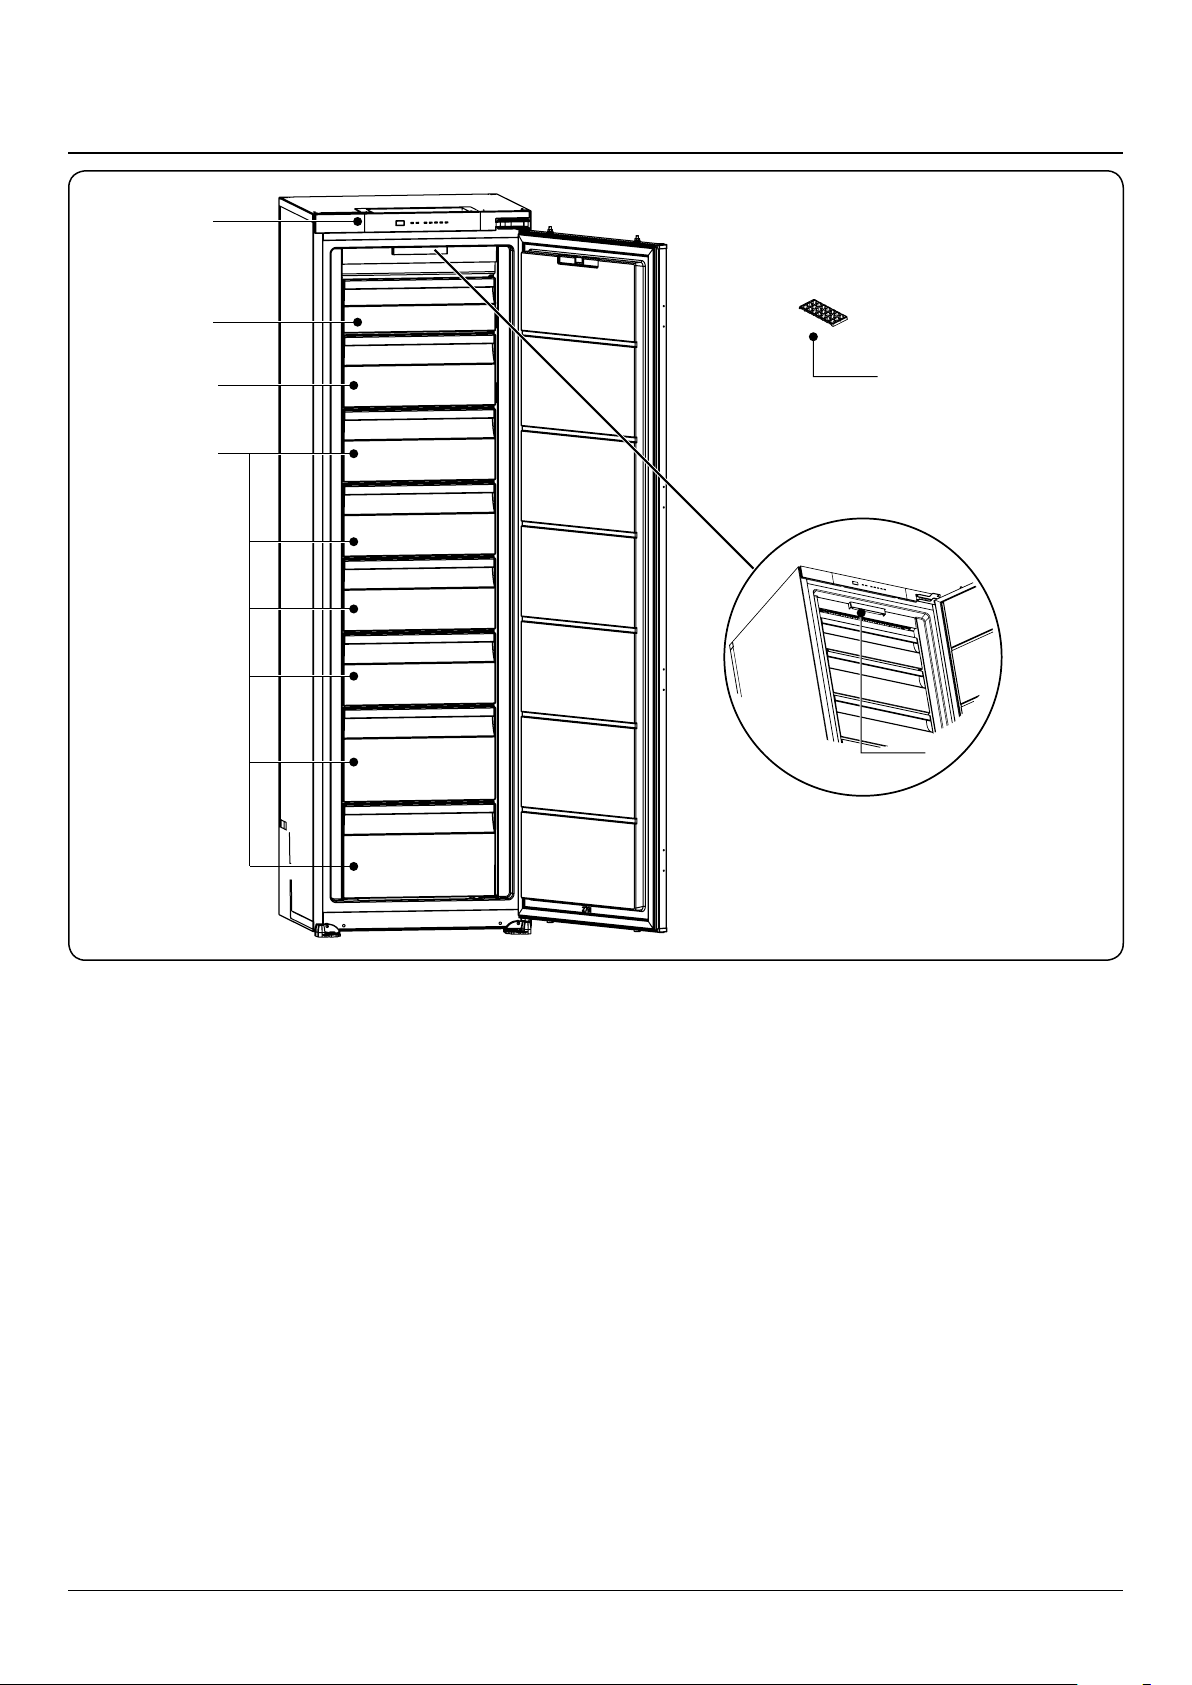
2. About Your Freezer
Fig. 2.1
The freezer is shown in Fig. 2.1 and has the following
features:
1. Control panel
2. Freezer upper room ap
3. Freezer bottom room ap / Freezer compartment
4. Freezer compartment drawers
5. Ice tray
6. Freezer LED strip
drawer
4
Page 7
Using the appliance
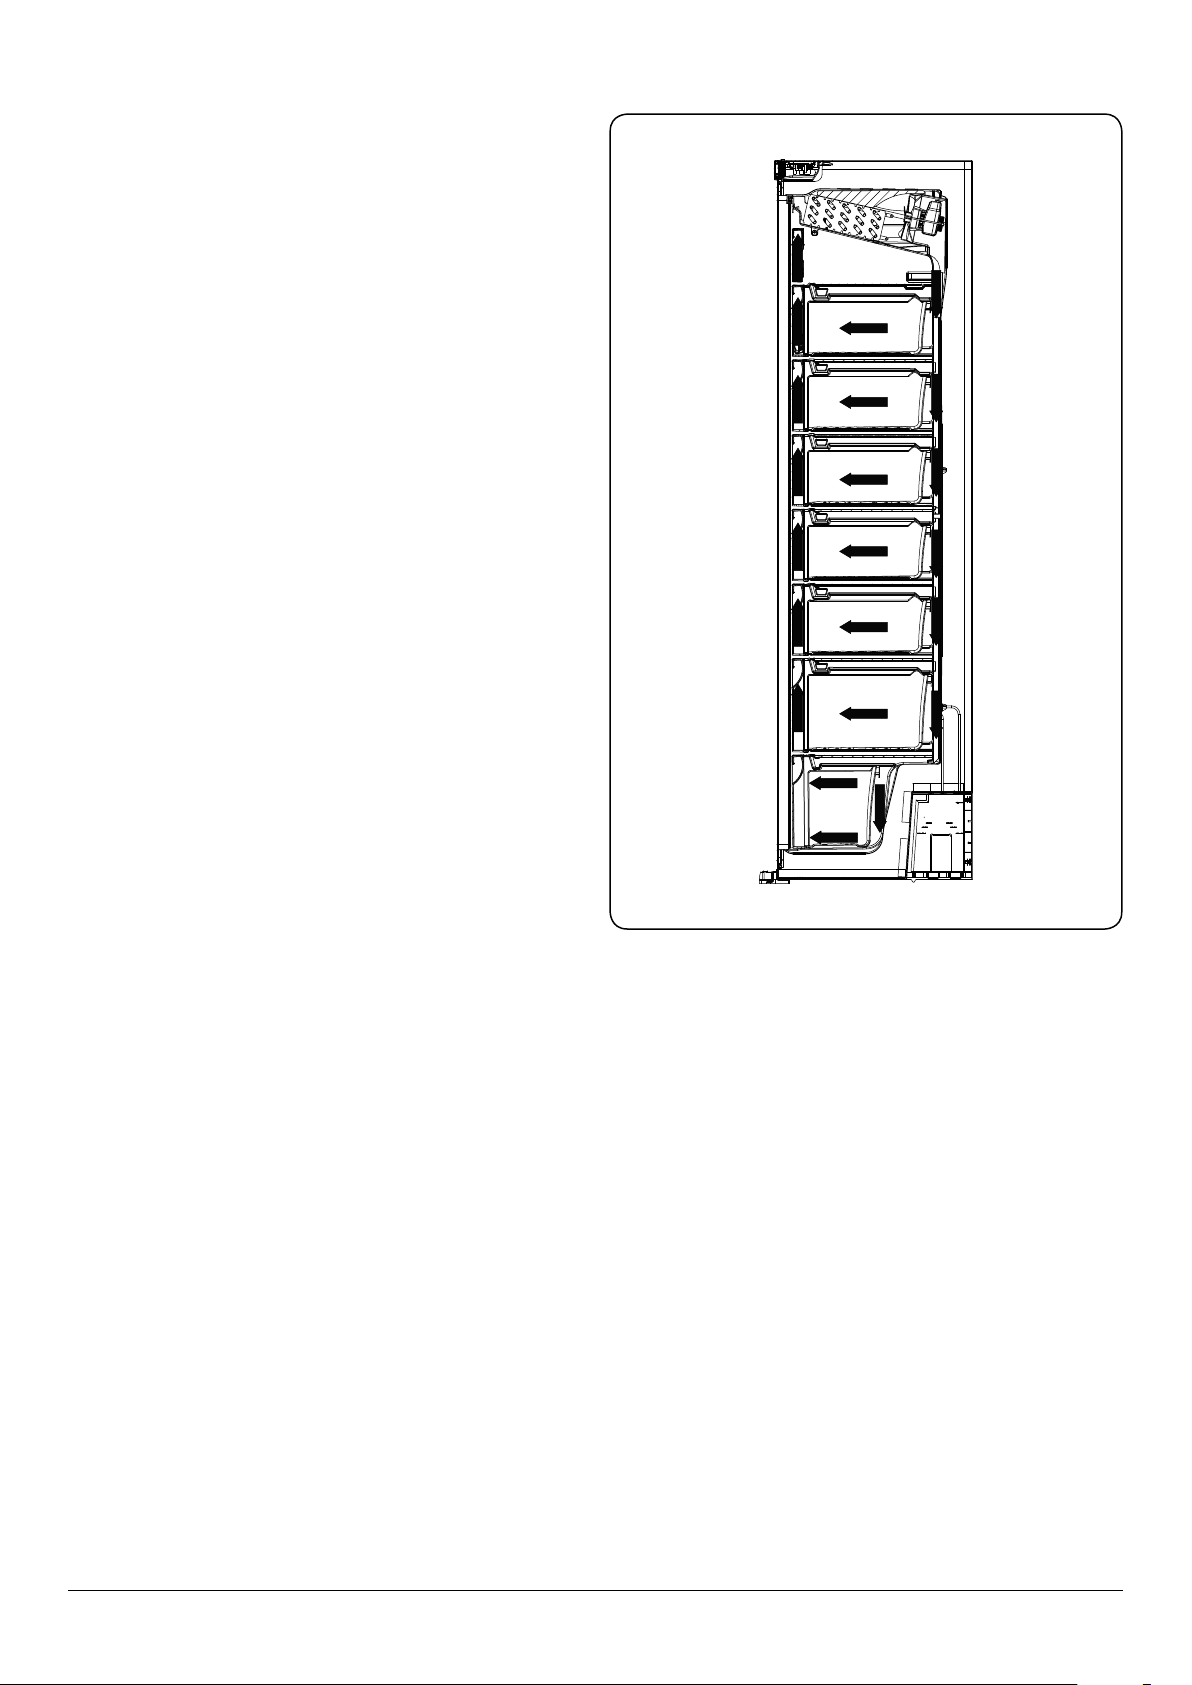
Information on No-Frost Technology (Fig. 2.2)
No-frost freezers have a dierent operating system to static
freezers. In normal (static) freezers, the humidity entering the
freezers due to opening the door and the humidity inherent
in the food causes ice to form in the freezer compartment.
To remove the frost and ice from the freezer compartment,
it is required to periodically switch the fridge o and place
frozen food in a separate cooled container.
The situation is completely dierent in Nofrost fridges. A
built-in fan blows dry and cold air evenly into the cooler
and freezer compartments. The cold air disperses uniformly
between the shelves, ensuring all your food is cooled evenly,
thus preventing humidity and icing to occur.
Therefore, your No-frost fridge allows ease of use, in addition
to its huge capacity and stylish appearance.
In the refrigerator compartment, there will be nearly same
conguration with freezer compartment. Air, that is emitted
with the fan, located at the top of refrigerator compartment,
is cooled while passing through the gap behind the air duct.
At the same time, air is blown out through the holes on the
air duct so that cooling process is successfully completed in
the refrigerator compartment.
Fig. 2.2
Holes in the air duct are designed such that the air
distribution becomes homogenous in this compartment.
As there is no air passage between freezer and refrigerator
compartment, there will be no odor mixing.
As a result of these, your fridge with new generation cooling
technology, gives you, ease of use beside the huge volume
and esthetic appearance.
5
Page 8

-16-18 -20-22 -24
1 2 3 4
3. Using the Control Panel
-16-18 -20-22 -24
Fig. 3.1
Fig. 3.2
Using the Control Panel
1. Freezer temperature set button
2. Super freeze symbol (Super freeze LED)
3. Alarm symbol (Alarm LED)
4. Freezer adjusted temperature indicator
Operating your Freezer
Freezer Temperature Set Button
This button allows setting temperature of the freezer. In order
to set values for freezer, press button 1 (Fig. 3.1).
Super Freeze Mode
When would it be used?
• To freeze large quantities of food.
• To freeze fast food.
• To freeze food quickly.
• To store seasonal food for a long time.
To use the super freeze mode press the temperature set
button until super freezer light comes on (Fig. 3.2). To cancel
press the temperature set button the setting will be restored
to -18°C.
Do not exceed the maximum load for freezing – which is
given as 15 kg / 24-hours (see data badge for details).
For optimal appliance performance in maximum freezer
capacity, set the appliance to active super freeze mode 24
hours before you put the fresh food into the freezer.
NOTE: The super freezing mode will be cancelled
automatically after 24 hours or when the freezer sensor
temperature falls below -32 °C.
6
Page 9
Freezer Temperature Settings
• The initial temperature of the setting display is -18°C.
• To change the temperature press freezer setting button
once. Every time you press the button, the setting
temperature will decrease.
Recommended Temperature Values for Freezer (Table 3.1)
When to adjust Inner Temperature
For minimum freezing capacity -16°C, -17°C
In normal usage -18°C, -19°C,
-20°C, -21°C
For maximum freezing capacity -22°C, -23°C, -24°C
Table 3.1
Temperature Settings Warnings
• It is not recommended that you operate your freezer in
environments colder than 10°C in terms of its efficiency.
• Do not start another adjustment before completing one
adjustment.
• Temperature adjustments should be made according
to the frequency of door openings, the quantity of food
kept inside the freezer and the ambient temperature in
the location of your freezer.
• In order to allow your appliance to reach the operating
temperature after being connected to mains, do not
open the door frequently or place large quantities of
food in the freezer. Please note that, depending on the
ambient temperature, it may take 24 hours for your
freezer to reach the operating temperature.
• If the appliance is switched off or unplugged, wait at
least 5 minutes before plugging the appliance in or
restarting it this will prevent damage to the compressor.
• Your appliance is designed to operate in the ambient
temperature (T/SN = 10°C - 43°C) intervals stated in
the standards. We do not recommend operating your
appliance out of the stated temperature limits in terms
of cooling effectiveness.
Fig. 3.3
Fig. 3.4
Accessories
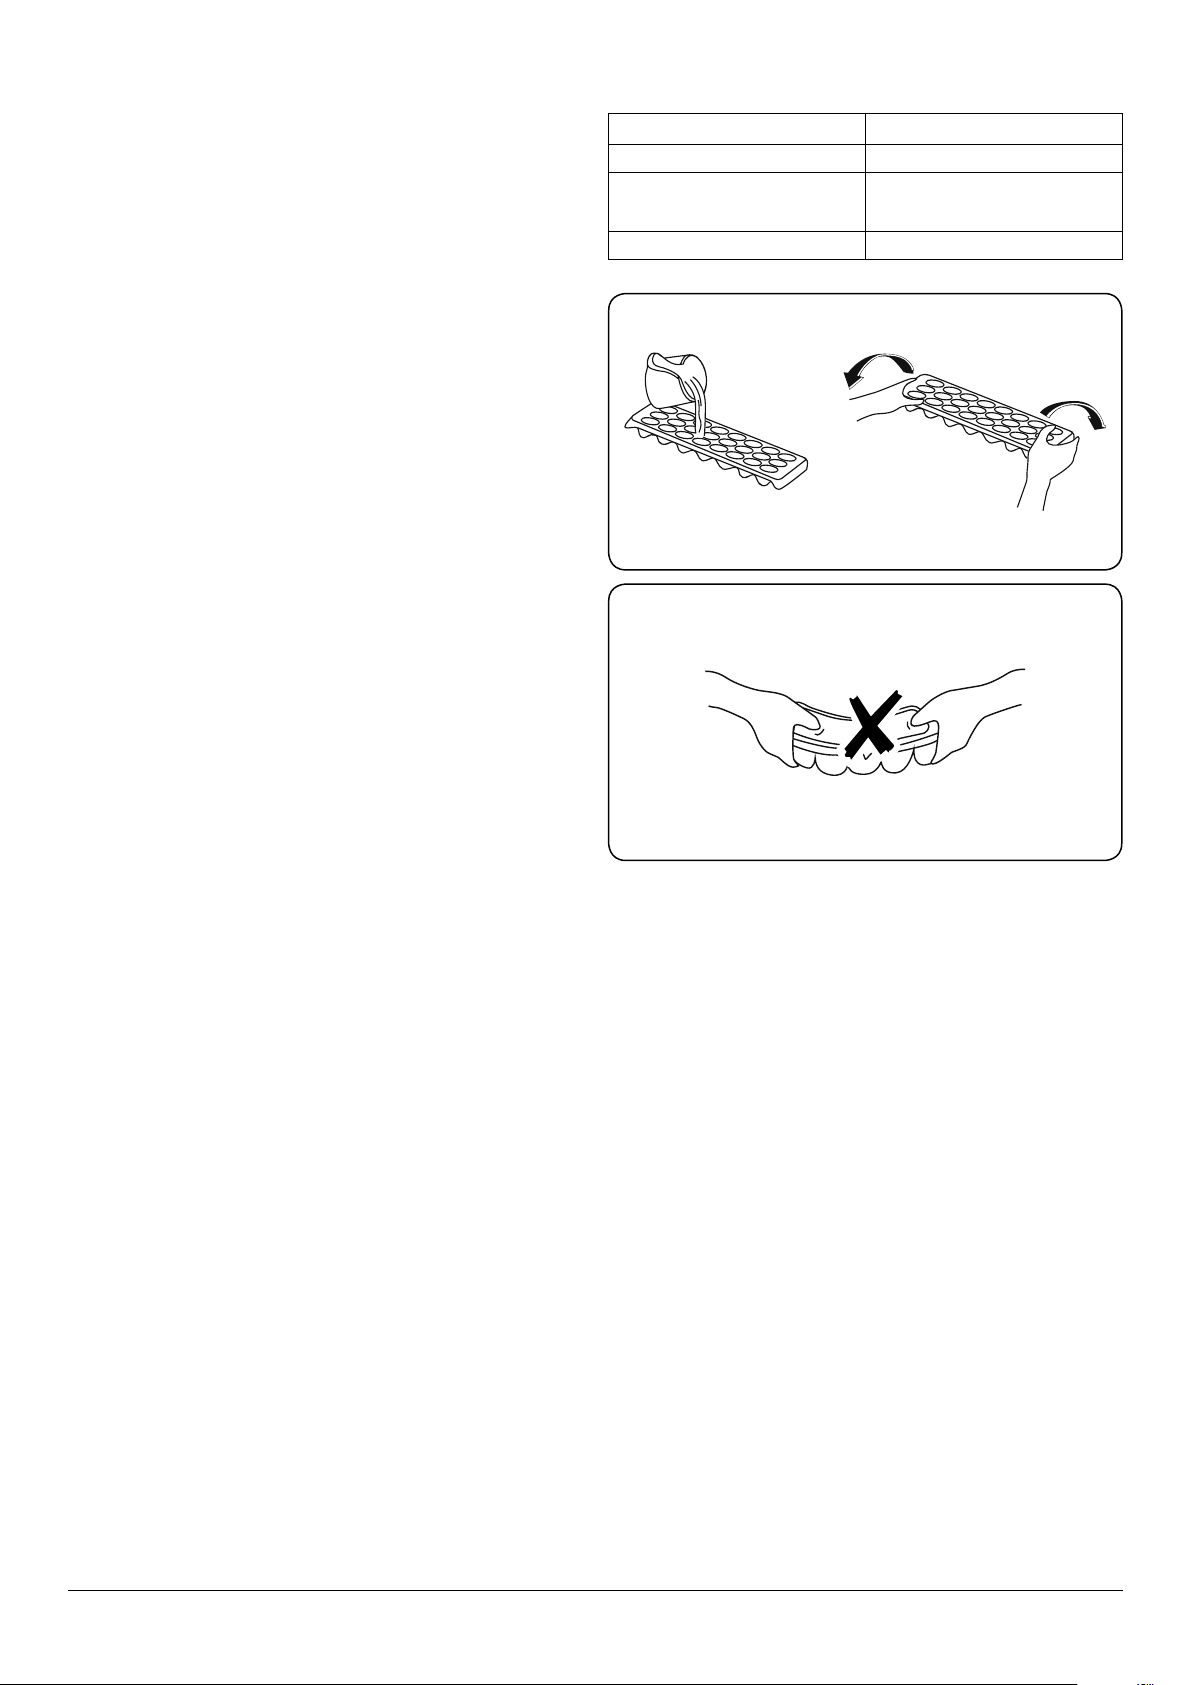
Ice Tray (Fig. 3.4)
Fill the ice tray with water and place in the freezer
compartment (Fig. 3.3).
After the water has completely frozen, you can twist the tray
to remove the ice cube (Fig. 3.3) s.
Do not bend the icetray to remove the ice (Fig. 3.4)
Do not ll the icebox with water in order to make ice.
It will break.
7
Page 10
4. Food Storage Tips
Food storage
Freezer Compartment
• The freezer is used for storing frozen food, freezing fresh
food, and making ice cubes.
• To freeze fresh food, ensure that as much of the surface
of the food as possible is in contact with the cooling
surface.
• Do not store fresh food next to frozen food as it can
thaw the frozen food.
• Before freezing fresh food, divide it into portions that
can be consumed in one sitting.
• Consume thawed frozen food within a short period of
time after defrosting
• Never place warm food in the freezer compartment as it
will thaw the frozen food.
• Always follow the manufacturer’s instructions on food
packaging when storing frozen food. If no information
is provided food, should not be stored for more than 3
months from the date of purchase.
• To use the maximum freezing capacity of your freezer
move the frozen food in the upper basket to other
baskets and activate “Super freeze” mode. “Super freeze”
mode will be deactivated automatically after 24 hours.
Place the food you want to freeze to the upper basket
of the freezer without exceeding the freezing capacity
of your freezer. Then reactivate the “Super freeze” mode.
You can put your food next to other frozen food after
it is completely frozen (minimum 24 hours after “Super
freeze” mode is activated for the 2nd time).
• To freeze a small amount of food (up to 3 kg) in your
freezer, place your food without touching already frozen
food and activate “Super freeze” mode. You can put your
food next to other frozen food after it is completely
frozen (after minimum 24 hours).
Attention. To save energy, when freezing small
amounts of food, reset the temperature to the
previous value as soon as the food is completely
frozen.
NOTE: If you attempt to open the freezer door immediately
after closing it, you will nd that it will not open easily. This
is normal. Once equilibrium has been reached, the door will
open easily.
• When purchasing frozen food, make sure that it has
been stored under appropriate conditions and that the
packaging is not damaged.
• Frozen food should be transported in appropriate
containers and placed in the freezer as soon as possible.
• Do not purchase frozen food if the packaging shows
signs of humidity and abnormal swelling. It is probable
that it has been stored at an unsuitable temperature
and that the contents have deteriorated.
• The storage life of frozen food depends on the room
temperature, the thermostat setting, how often the
door is opened, the type of food, and the length of time
required to transport the product from the shop to your
home. Always follow the instructions printed on the
packaging and never exceed the maximum storage life
indicated.
• The maximum amount of fresh food (in kg) that can be
frozen in 24 hours is indicated on the appliance label.
• To use the maximum capacity of the freezer
compartment, use the glass shelves for the upper and
middle section, and use the lower basket for the bottom
section.
• To use the maximum load capacity of your freezer, and
to store large quantities of food, remove all drawers
except the bottom one. Large items can be stored
directly on the shelves.
8
Page 11

Tips on Freezing Food
• As with storing fresh foods, suitable packaging, correct
temperature and food hygiene will enhance the quality
of the food you are freezing.
• Avoid putting hot foods into the freezer. First let them
cool until they reach room temperature.
• Make sure that all foods for freezing are of a high
quality, and suitable for freezing.
• Use packaging material that is odourless and airproof
(such as plastic bags) to store food in so different foods
can be mixed without affecting the quality. Make sure
that it is airtight. Leaking packaging will dehydrate the
products and lead to loss of beneficial vitamins.
• Keep the surface of the packaging dry – this keeps the
packs from freezing together.
• Mark packages with the kind of food contained and the
date of storage.
When storing commercially frozen foods, please follow these
guidelines:
• Always follow manufacturers’ guidelines for the length
of time you should store food for. Do not exceed these
guidelines!
• Try to keep the length of time between purchase and
storage as short as possible to preserve food quality.
• Buy frozen foods, which have been stored at a
temperature of –18 °C or below.
• Avoid buying food which has ice or frost on the
packaging – This indicates that the products might have
been partially defrosted and refrozen at some point –
temperature rises affect the quality of food.
• Should there be a power cut, or the freezer /
refrigeration appliance fail for any length of time you
may need to remove food from the freezer and store
in a cold, hygienic place (i.e. garage or out house area)
until the power is restored, or the appliance is repaired.
• Food needs to be frozen quickly, so it is best to
freeze small portions whenever possible and ensure
that they are as cold as possible before storage. The
recommended maximum weight for each portion is
2.5 kg.
• Keep food which is fresh away from food which is
already frozen, if you need to freeze fresh food every
day, make sure that it is in small portions to prevent this.
• Do not exceed the maximum load for freezing – which is
given as 15 kg / 24-hours (see data badge for details).
• Write the expiry date and food names on the outside of
the packaging so you can be assured of the food type
and when it is safe to eat.
• Take food from the freezer to defrost when needed.
Defrosted food cannot be refrozen unless it is cooked.
• Do not put too much fresh food into the freezer at once.
This could go beyond the freezer’s cooling capacity (see
‘Technical Data’).
• To prevent undue temperature rises you should wrap
the foods in layers of insulating material, such as
newspaper, to help to maintain their temperature. It is
also important that any food affected by this situation
should be either consumed or cooked and refrozen
(where suitable) soon afterwards in order to prevent
health risks.
9
Page 12
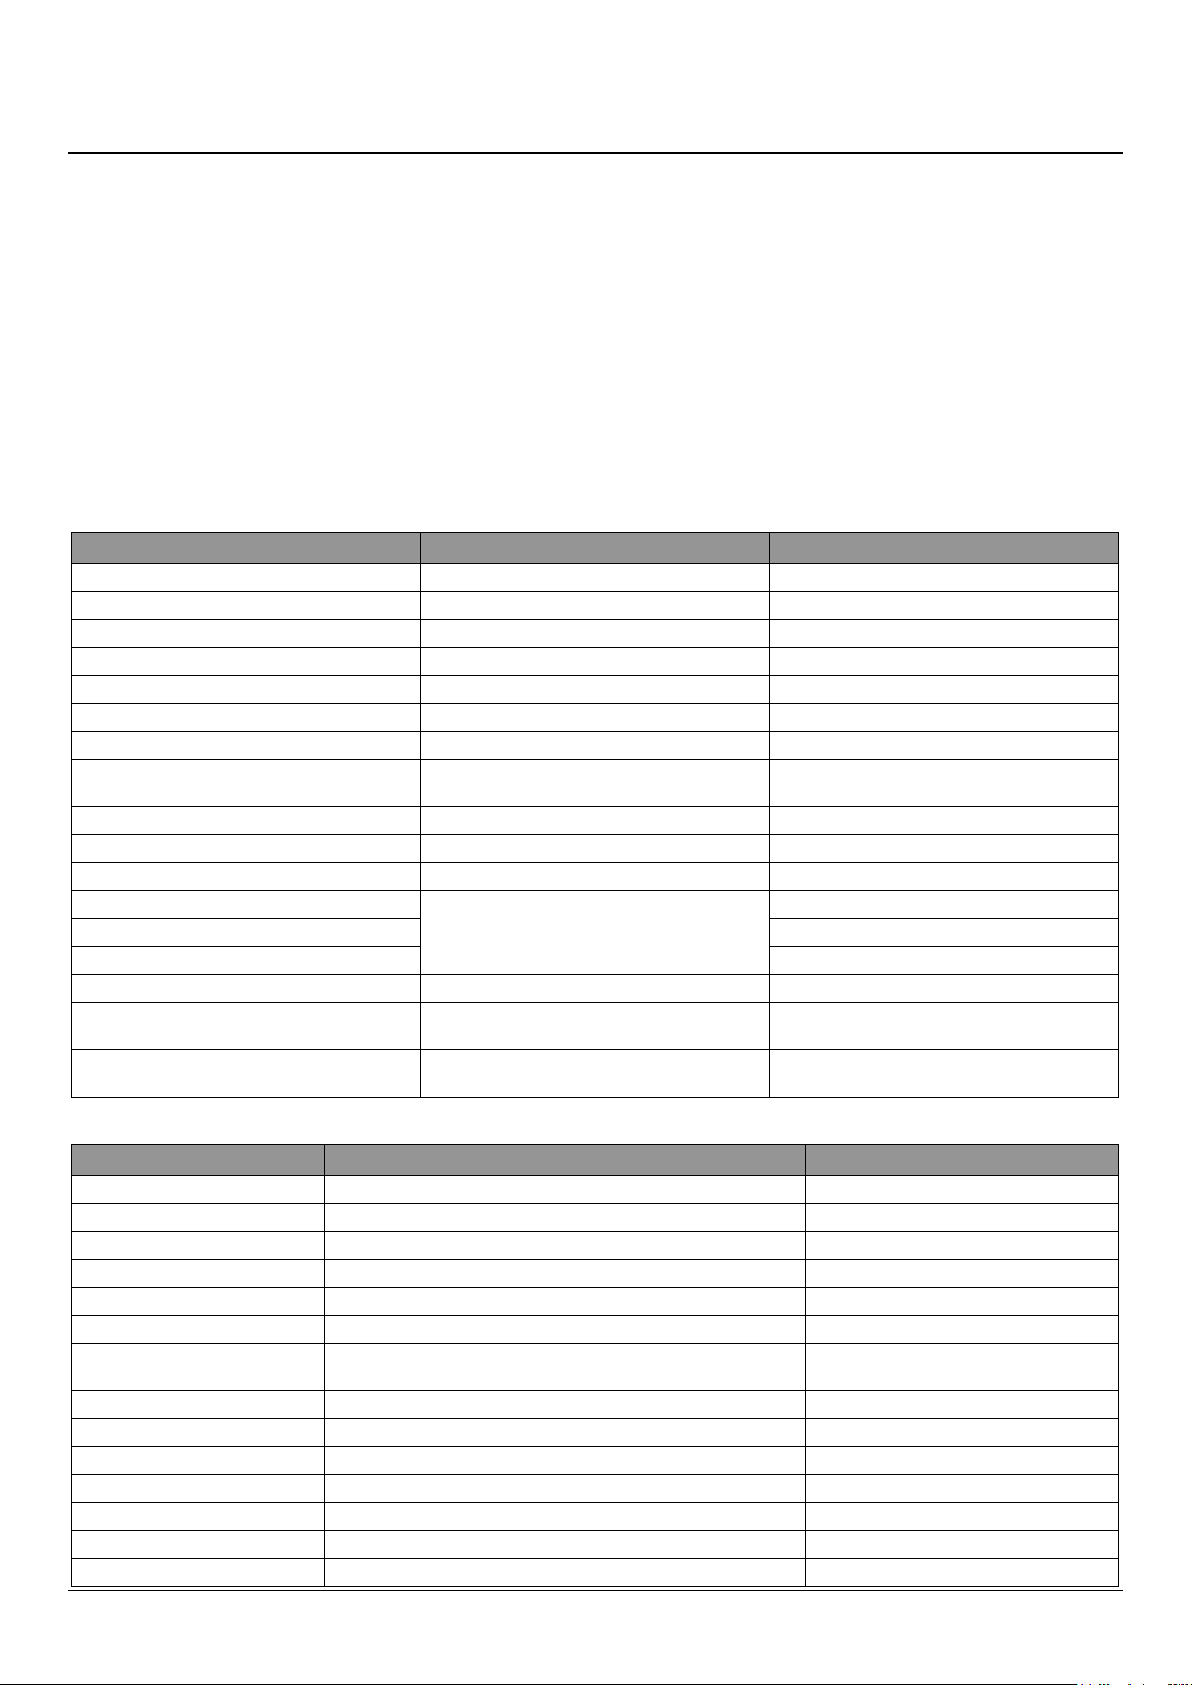
5. Food Storage Table
DocNo.031-0004 - Cooking table - electric & fan single cavity
All storage times given in the table below are intended to be
used as a guide only. Storage times of fruits and vegetables
depend on the quality of the food. Individual cases may vary.
Packaged fruits and vegetables are consumed until
expiration.
Important
The taste of some spices found in cooked dishes (anise,
basilica, watercress, vinegar, assorted spices, ginger, garlic,
onion, mustard, thyme, marjoram, black pepper, etc.) changes
The storage time of food is dependent on the type of oil
used. Suitable oils are margarine, calf fat, olive oil and butter.
Unsuitable oils are peanut oil and pig fat.
Food in liquid form should be frozen in plastic cups/
tupperware and other food should be frozen in plastic folios
or bags.
The table below is a quick guide to show you the most
ecient way to store the major food groups in your freezer
compartment.
and they assume a strong taste when they are stored for a
long period of time. Therefore, add small amounts of spices to
food to be frozen, or the desired spice should be added after
the food has thawed
Meat and sh Preparation Maximum storage time (months)
Steak Wrap in foil 6 - 8
Lamb meat Wrap in foil 6 - 8
Veal roast Wrap in foil 6 - 8
Veal cubes In small pieces 6 - 8
Lamb cubes In pieces 4 - 8
Minced meat In packaging without using spices 1 - 3
Giblets (pieces) In pieces 1 - 3
Bologna sausage/salami
Chicken and turkey Wrap in foil 4 - 6
Goose and duck Wrap in foil 4 - 6
Deer, rabbit, wild boar In 2.5 kg portions or as llets 6 - 8
Freshwater sh (Salmon, Carp, Crane, Catsh)
Lean sh (Bass, Turbot, Flounder) 4
Fatty shes (Tuna, Mackarel, Bluesh, Anchovy) 2 - 4
Shellsh Clean and in a bag 4 - 6
Caviar
Snails
Should be kept packaged even if it has a
membrane
After cleaning the bowels and scales of the sh,
wash and dry it. If necessary, remove the tail and
head.
In its packaging, or in an aluminium or plastic
container
In salty water, or in an aluminium or plastic
container
2
2 - 3
3
NOTE: Thawed frozen meat should be cooked as fresh meat. If the meat is not cooked after defrosting, it must not be re-frozen.
Vegetables and Fruits Preparation Maximum storage time (months)
String beans and beans Wash, cut into small pieces and boil in water 10 - 13
Beans Hull, wash and boil in water 12
Cabbage Clean and boil in water 6 - 8
Carrot Clean, cut into slices and boil in water 12
Pepper Cut the stem, cut into two pieces, remove the core and boil in water 8 - 10
Spinach Wash and boil in water 6 - 9
Cauliower
Eggplant (Aubergine) Cut into pieces of 2cm after washing 10 - 12
Corn Clean and pack with its stem or as sweet corn 12
Apple and pear Peel and slice 8 - 10
Apricot and Peach Cut into two pieces and remove the stone 4 - 6
Strawberry and Blackberry Wash and hull 8 - 12
Cooked fruits Add 10 % of sugar to the container 12
Plum, cherry, sourberry Wash and hull the stems 8 - 12
Remove the leaves, cut the heart into pieces and leave it in water with
a little lemon juice for a while
10 - 12
10
Page 13
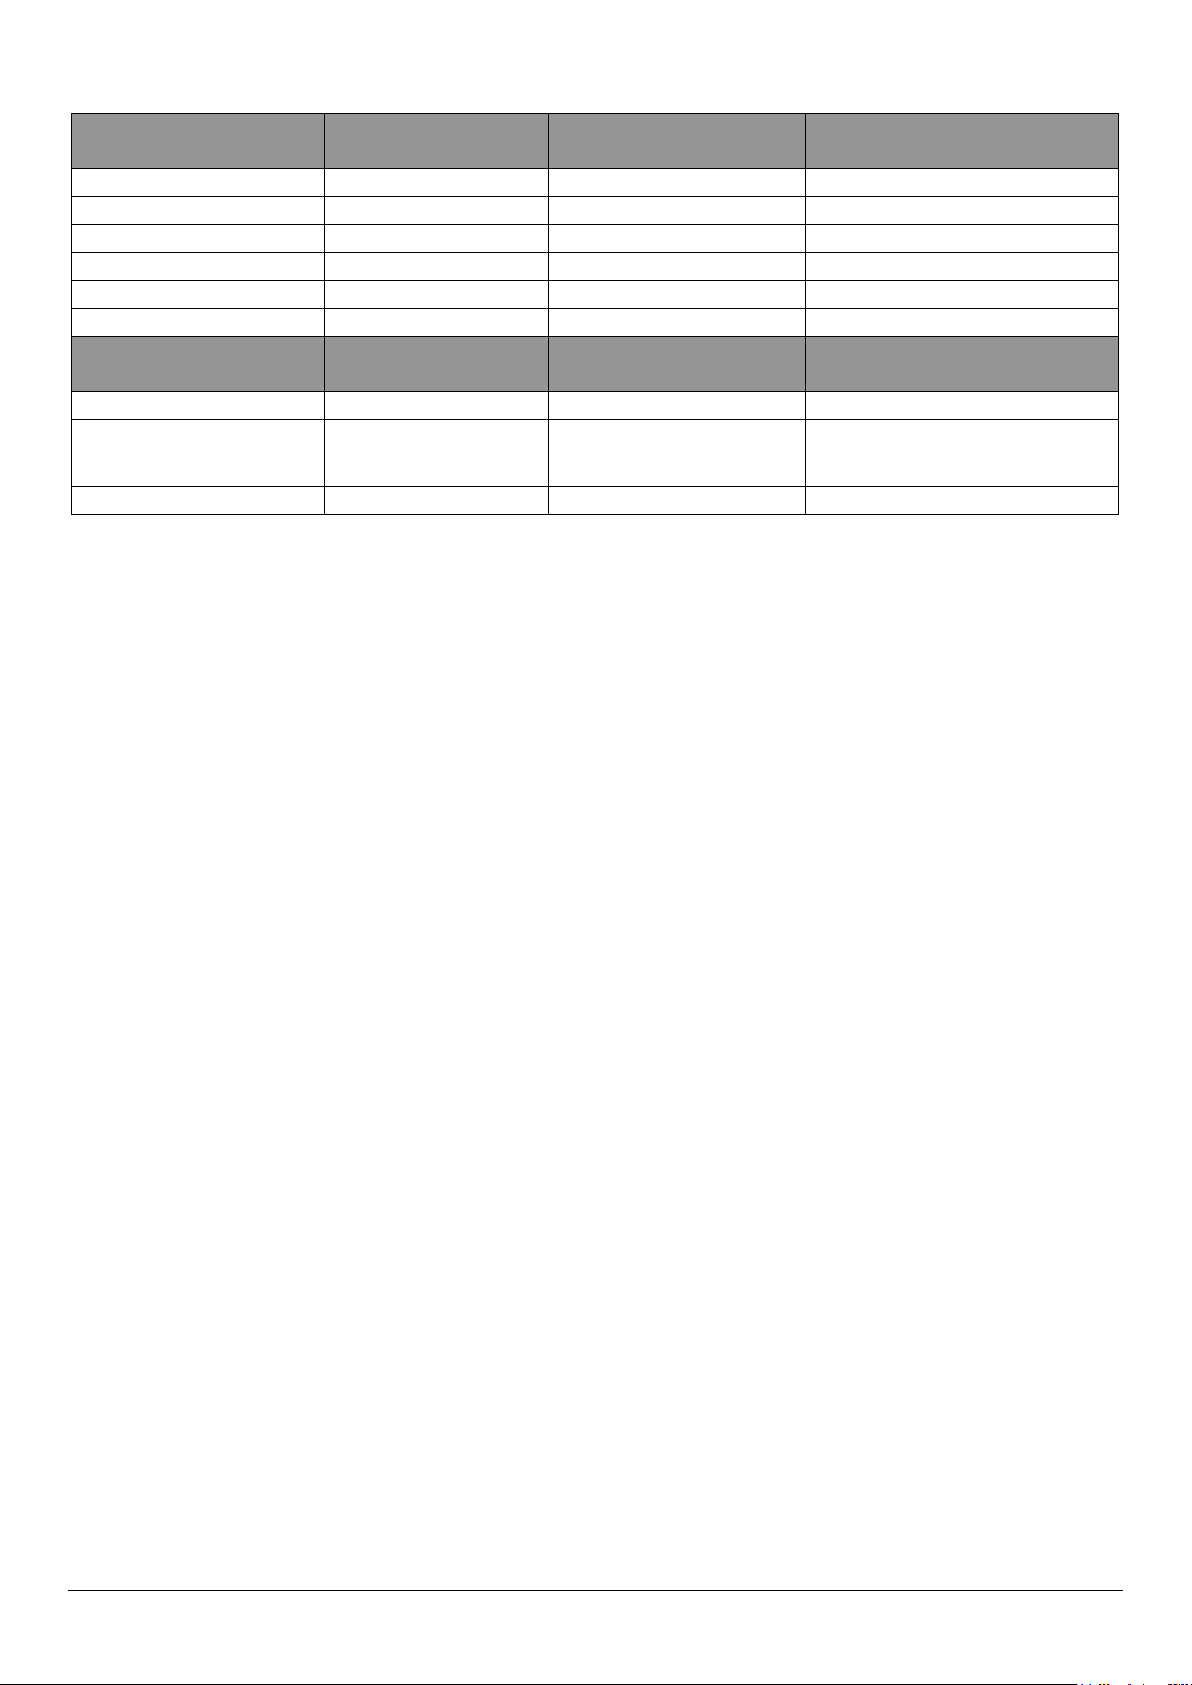
Maximum storage time
(months)
Bread 4 - 6 2 - 3 4-5 (220-225 °C)
Biscuits 3 - 6 1 - 1.5 5-8 (190-200 °C)
Pastry 1 - 3 2 - 3 5-10 (200-225 °C)
Pie 1 - 1.5 3 - 4 5-8 (190-200 °C)
Phyllo dough 2 - 3 1 - 1.5 5-8 (190-200 °C)
Pizza 2 - 3 2 - 4 15-20 (200 °C)
Dairy products Preparation
Packet (Homogenized) Milk In its own packet 2 - 3 Pure Milk – in its own packet
Cheese - excluding white cheese In slices 6 - 8
Butter, margarine In its packaging
Thawing time at room
temperature (hours)
Maximum storage time
(months)
Thawing time in oven (minutes)
Storage conditions
Original packaging may be used for short-
term storage. Keep wrapped in foil for longer
periods.
11
Page 14

6. Cleaning and Maintenance
Cleaning
Disconnect the appliance from the power supply
before cleaning.
Do not wash your appliance by pouring water on it.
DO NOT use harsh abrasives, or aggressive cleaners
as these can damage the interior of the appliance.
The freezer is heavy. When moving the freezer be
careful to protect the oor. Keep the freezer vertical
and do not tilt the freezer – this prevents damage to
the oor.
DO NOT spray or rinse the freezer with water or
other liquids. This could harm the electrical parts.
Use a dry cloth when cleaning near the electrical
parts (such as the light bulb or switch).
DO NOT clean the freezer with a sti or wire brush.
DO NOT use an organic solvent such as detergent,
petrol, lacquer, thinners, acetone or acid.
To prevent your skin sticking to cold steel parts,
make sure your hands are not wet when touching
the parts.
DO NOT use HOT water to clean the glass shelves, as
they may break or crack.
Empty the appliance of food and remove the shelves.
Clean the interior using warm water and bicarbonate of soda
with a soft cloth. Make sure that the interior is then dried
carefully with a suitable cloth.
After washing, rinse with clean water and dry carefully. When
you have nished cleaning, reconnect the plug to the mains
supply with dry hands.
Shelves and other accessories (plastic and glass parts) can be
cleaned in the sink using liquid dishwashing liquid and warm
water. Make sure all soap is rinsed o and all parts are dry
before replacing them inside the appliance.
Always keep the door seals clean.
Make sure that no water enters the lamp housing and other
electrical components.
The appliance should be cleaned regularly using a solution of
bicarbonate of soda and lukewarm water.
Clean the accessories separately by hand with soap and
water. Do not wash accessories in a dish washer.
Clean the condenser with a brush at least twice a year.
This will help you to save on energy costs and increase
productivity.
12
Page 15
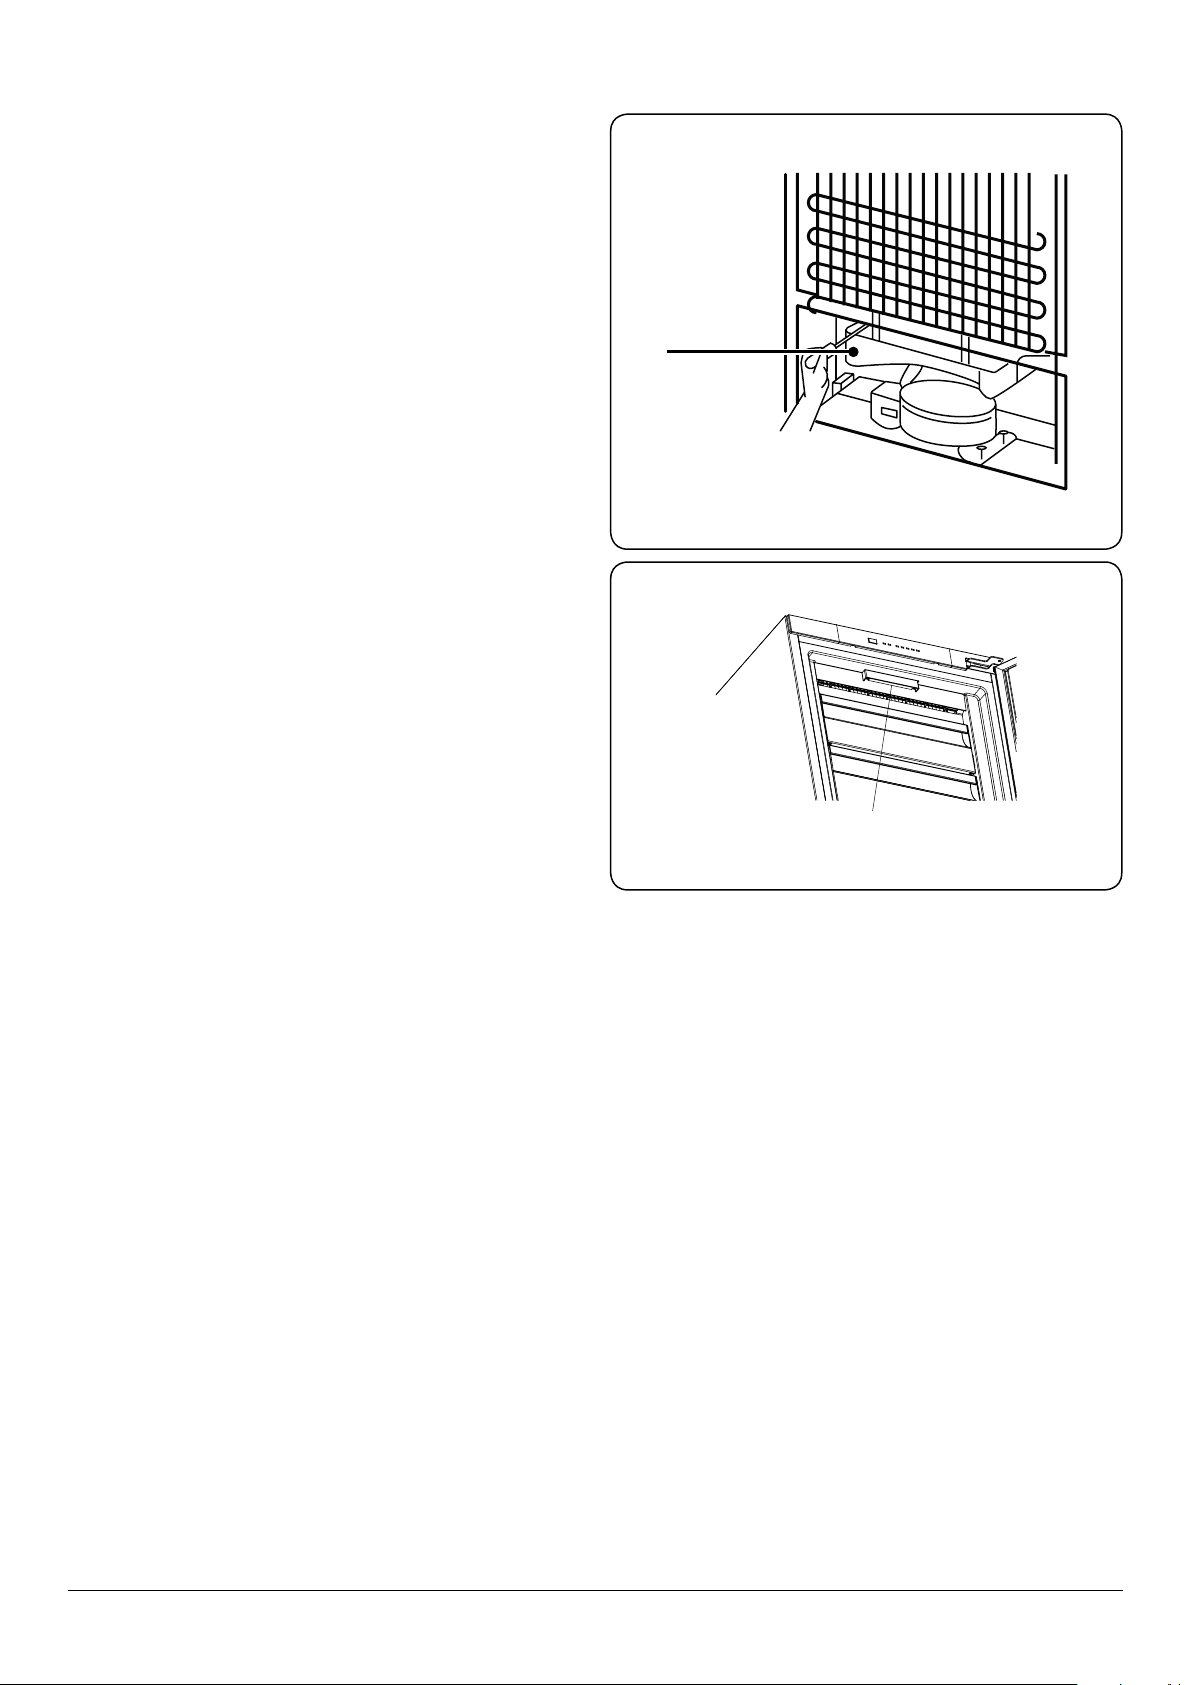
Defrosting the freezer (Fig. 6.1)
Evaporator
T
ray
LED strip
Your appliance performs automatic defrosting. The water
formed as a result of defrosting passes through the water
collection spout, ows into the vaporisation container behind
your appliance and evaporates there.
Make sure you have disconnected the plug of your appliance
before cleaning the vaporisation container.
Remove the vaporisation container from its position by
removing the screws as indicated. Clean it with soapy water
at specic time intervals. This will prevent odours from
forming.
Replacing LED Lighting (Fig. 6.2) (Selected models)
Please refer to the Warranty chapter as this should be
changed by authorised personnel only.
The LED interior lights come on when the door is opened.
The performance of the light is not aected by any of the
appliances other settings.
Note: The numbers and location of the LED strips may
change according to the model.
Fig. 6.1
Fig. 6.2
13
Page 16
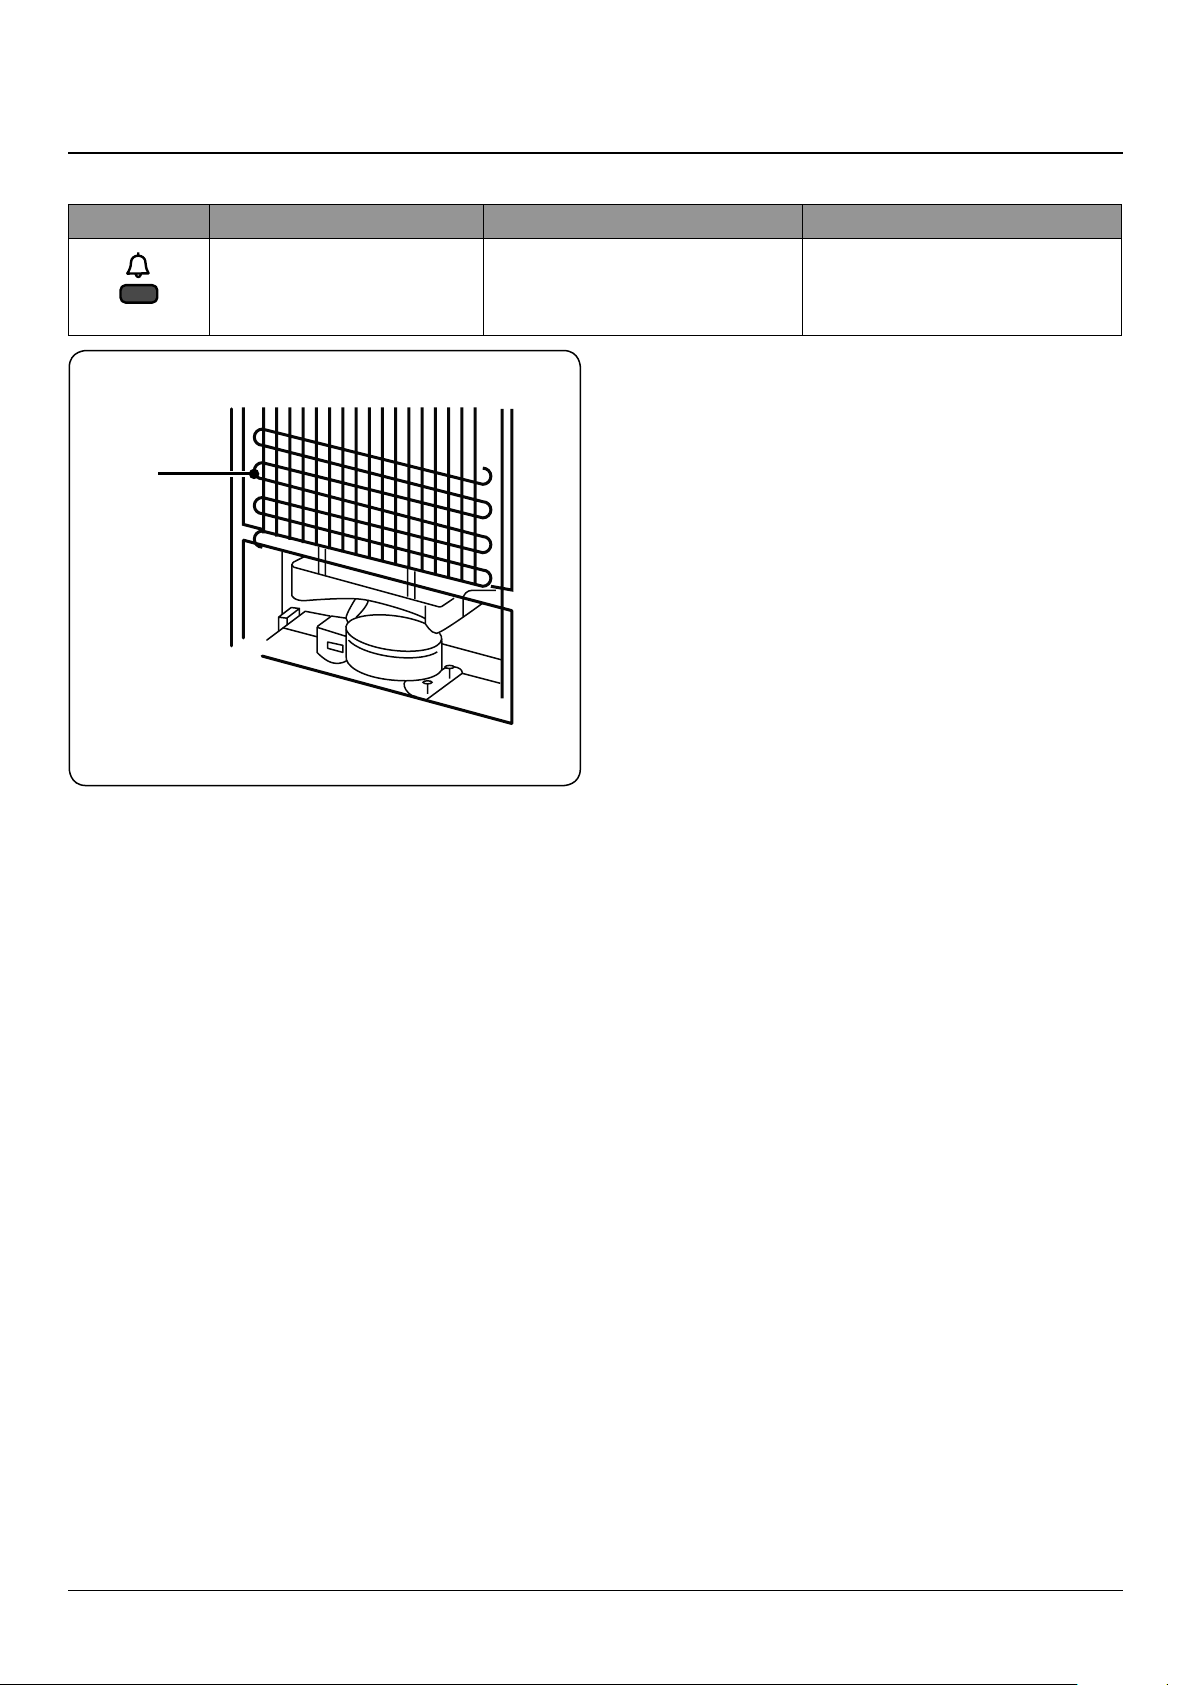
7. Troubleshooting
Condenser
Before calling for service, please rst read the following table: this could save you time and money.
Error type Meaning Why What to do
Fig. 7.1
“Failure” Warning There is/are some part(s) out of order or there
is a failure in the cooling process.
The product is plugged for the rst time or a
long-time power interruption for 1 hour.
If you are experiencing a problem with your appliance, please check
the following before contacing the after-sales service.
Only a qualied service engineer should service the appliance and
only approved spare parts should be used.
Isolate the electricity supply before carrying out any
maintenance.
Your appliance does not operate
Check if:
• There is power
• The plug is connected to the socket correctly
• The socket fuse or the mains fuse has blown
Check the door is open or not and check if
the product working 1 hour. If the door is not
open and the product had worked 1 hour,
call service for assistance as soon as possible.
• The socket is faulty. To check this, plug another working
appliance into the same socket.
Your appliance is performing poorly
Check if:
• The appliance is overloaded
• The doors are closed properly
• There is any dust on the condenser (Fig. 7.1)
• There is an adequate distance between the appliance
and surrounding walls. Please refer to Installation
chapter.
Your appliance is operating noisily
The following noises can be heard during normal operation
of the appliance.
• Cracking (ice cracking) noise occurs: During
automatic defrosting. When the appliance is cooled or
warmed (due to expansion of appliance material).
• Motor noise: Indicates the compressor is operating
normally. The compressor may cause more noise for a
short time when it is first activated.
• Bubbling noise and splashing occurs: Due to the flow
of the refrigerant in the tubes of the system.
• Air blowing noise occurs: During normal operation of
the system due to the circulation of air.
14
Page 17

The edges of the appliance in contact with the door joint
are warm
Especially during summer (warm seasons), the surfaces in contact
with the door joint may become warmer during the operation of the
compressor, this is normal.
There is a build-up of humidity inside the appliance
Check if:
• All food is packed properly. Containers must be dry
before being placed in the freezer.
• The freezer doors are opened frequently. Humidity of
the room will enter the freezer each time the doors
are opened. Humidity increases faster if the doors are
opened frequently, especially if the humidity of the
room is high.
• There is a build-up of water droplets on the rear wall.
This is normal after automatic defrosting (in Static
Models).
The doors are not opening or closing properly
Check if:
Tips for saving energy
1. Install the appliance in a cool, well ventilated room, but
not in direct sunlight and not near a heat source (such
as a radiator or oven) otherwise an insulating plate
should be used.
2. Allow warm food and drinks to cool before placing them
inside the appliance.
3. Drinks or other liquids should be covered when inside
the appliance. If left uncovered, the humidity inside the
appliance will increase, therefore the appliance uses
more energy. Keeping drinks and other liquids covered
helps preserve their smell and taste.
4. Avoid keeping the doors open for long periods and
opening the doors too frequently as warm air will enter
the appliance and cause the compressor to switch on
unnecessarily often.
5. The door gasket must be clean and pliable. Replace
gaskets if worn.
• There is food or packaging preventing the door from
closing
• The door compartments, shelves and drawers are
placed properly
• The door gaskets are broken or torn
• Your freezer is level.
Recommendations
To stop the appliance completely, unplug from main socket
(for cleaning and when the door is left open)
Important:
In the case of a power failure, or if the appliance is unplugged
and plugged in again, the gas in the cooling system of
your refrigerator will destabilise, causing the compressor
protective thermal element to open.
Your freezer will start to operate normally after 5 minutes.
If the appliance will not be used for a long period of time
(such as during holidays), disconnect the plug. Defrost and
clean the refrigerator, leaving the door open to prevent the
formation of mildew and odour.
If the problem persists after you have followed all the
instructions above, please consult the nearest Authorised
Service Centre.
This appliance is designed for domestic use and for the stated
purposes only. It is not suitable for commercial or common
use. If the consumer uses the appliance in a way that does
not comply with these instructions, we emphasise that the
manufacturer and the dealer will not be responsible for any
repair or failure within the guarantee period.
15
Page 18

8. Installation
Installation warnings
Before using your appliance for the rst time, please pay
attention to the following points:
• Your appliance may have an odour when it is operated
for the first time. This is normal and the odour will fade
when your appliance starts to cool.
• Before connecting your appliance, ensure that the
information on the data plate (voltage and connected
load) matches that of the mains electricity supply. If in
doubt, consult a qualified electrician.
• We do not accept responsibility for any damages that
occur due to ungrounded usage.
• Place your appliance where it will not be exposed to
direct sunlight.
• Your appliance must never be used outdoors or
exposed to rain.
• Your appliance must be at least 50 cm away from stoves,
gas ovens and heater cores, and at least 5 cm away from
electrical ovens.
• If your appliance is placed next to a deep freezer,
there must be at least 2 cm between them to prevent
humidity forming on the outer surface.
• Do not cover the body or top of appliance with lace. This
will affect the performance of your appliance.
• Do not place anything on top of your appliance.
• Do not place heavy items on the appliance.
• Clean the appliance thoroughly before use (see
Cleaning and Maintenance).
• The installation procedure into a kitchen unit is given in
the installation manual. This product is intended to be
used in the kitchen.
• Before using your appliance, wipe all parts with a
solution of warm water and a teaspoon of sodium
bicarbonate. Then, rinse with clean water and dry.
Return all parts to the appliance after cleaning.
16
Page 19

Positioning Your Appliance
The refrigerator must be carried by at least 4 people.
The original packaging and foam may be kept for retransportation (optional).
Fasten your appliance with thick packaging, bands or strong
cords and follow the instructions for transportation given on
the package.
Remove all movable parts (shelves, accessories, vegetable
bins, etc.) or x them into the appliance against shocks using
bands during re-positioning and transportation.
An ambient sensor, main board and hinge covers are
available on your refrigerator. During cleaning, make sure no
uid enters this area.
Choosing the Right Location
Avoid exposing the appliance to direct sunlight, and sources
of heat (such as radiators, heaters or cookers).
If this appliance is situated in a cold environment (such as
a shed, outhouse or garage) it will aect its performance.
You may nd that the performance of the appliance is not
consistent and this may damage foods. A consistent ambient
temperature of 10 °C or above is recommended.
Refrigerator should be placed against a wall with a free
distance not exceeding 75 mm.
17
Page 20

Electrical Supply Connection
Connect the appliance to the electrical supply (220-240V ~
50Hz) with the plug and lead, which are tted.
Connections to the mains supply should be in accordance
with local regulations.
DO NOT use plug adapter.
The appliance must be plugged into an earthed
socket.
Always make sure that the plug is accessible after
the appliance has been positioned.
If the electrical cable is damaged or worn, turn o the
refrigerator and consult an authorised agent for replacement.
• The appliance is supplied with a standard 13 amp 3-pin
mains plug fitted with a 13-amp fuse. Should the fuse
require replacement, it must be replaced with a fuse
rated at 13 amp and approved to BS1362.
• If the mains plug which is fitted is unsuitable for the
socket outlet in your home or is removed for any other
reason, please contact an approved electrician.
During Usage
• Do not connect your appliance to the mains electricity
supply using an extension lead.
• Do not use damaged, torn or old plugs.
• Do not pull, bend or damage the cord.
• This appliance is designed for use by adults. Do not
allow children to play with the appliance or hang off the
door.
• Never touch the power cord/plug with wet hands. This
may cause a short circuit or electric shock.
• Do not place explosive or flammable material in your
appliance. Place drinks with high alcohol content
vertically in the appliance compartment and make sure
their tops are tightly closed.
• When removing ice from the icemaking compartment,
do not touch it. Ice may cause frost burns and/or cuts.
• Do not touch frozen goods with wet hands. Do not
eat ice-cream or ice cubes immediately after they are
removed from the ice-making compartment.
• Do not re-freeze thawed frozen food. This may cause
health issues such as food poisoning.
• If your old appliance or freezer has a lock, break or
remove the lock before discarding it, because children
may get trapped inside it and may cause an accident.
• Old appliances and freezers contain isolation material
and refrigerant with CFC. Therefore, take care not to
harm environment when you are discarding your old
appliances.
18
Page 21
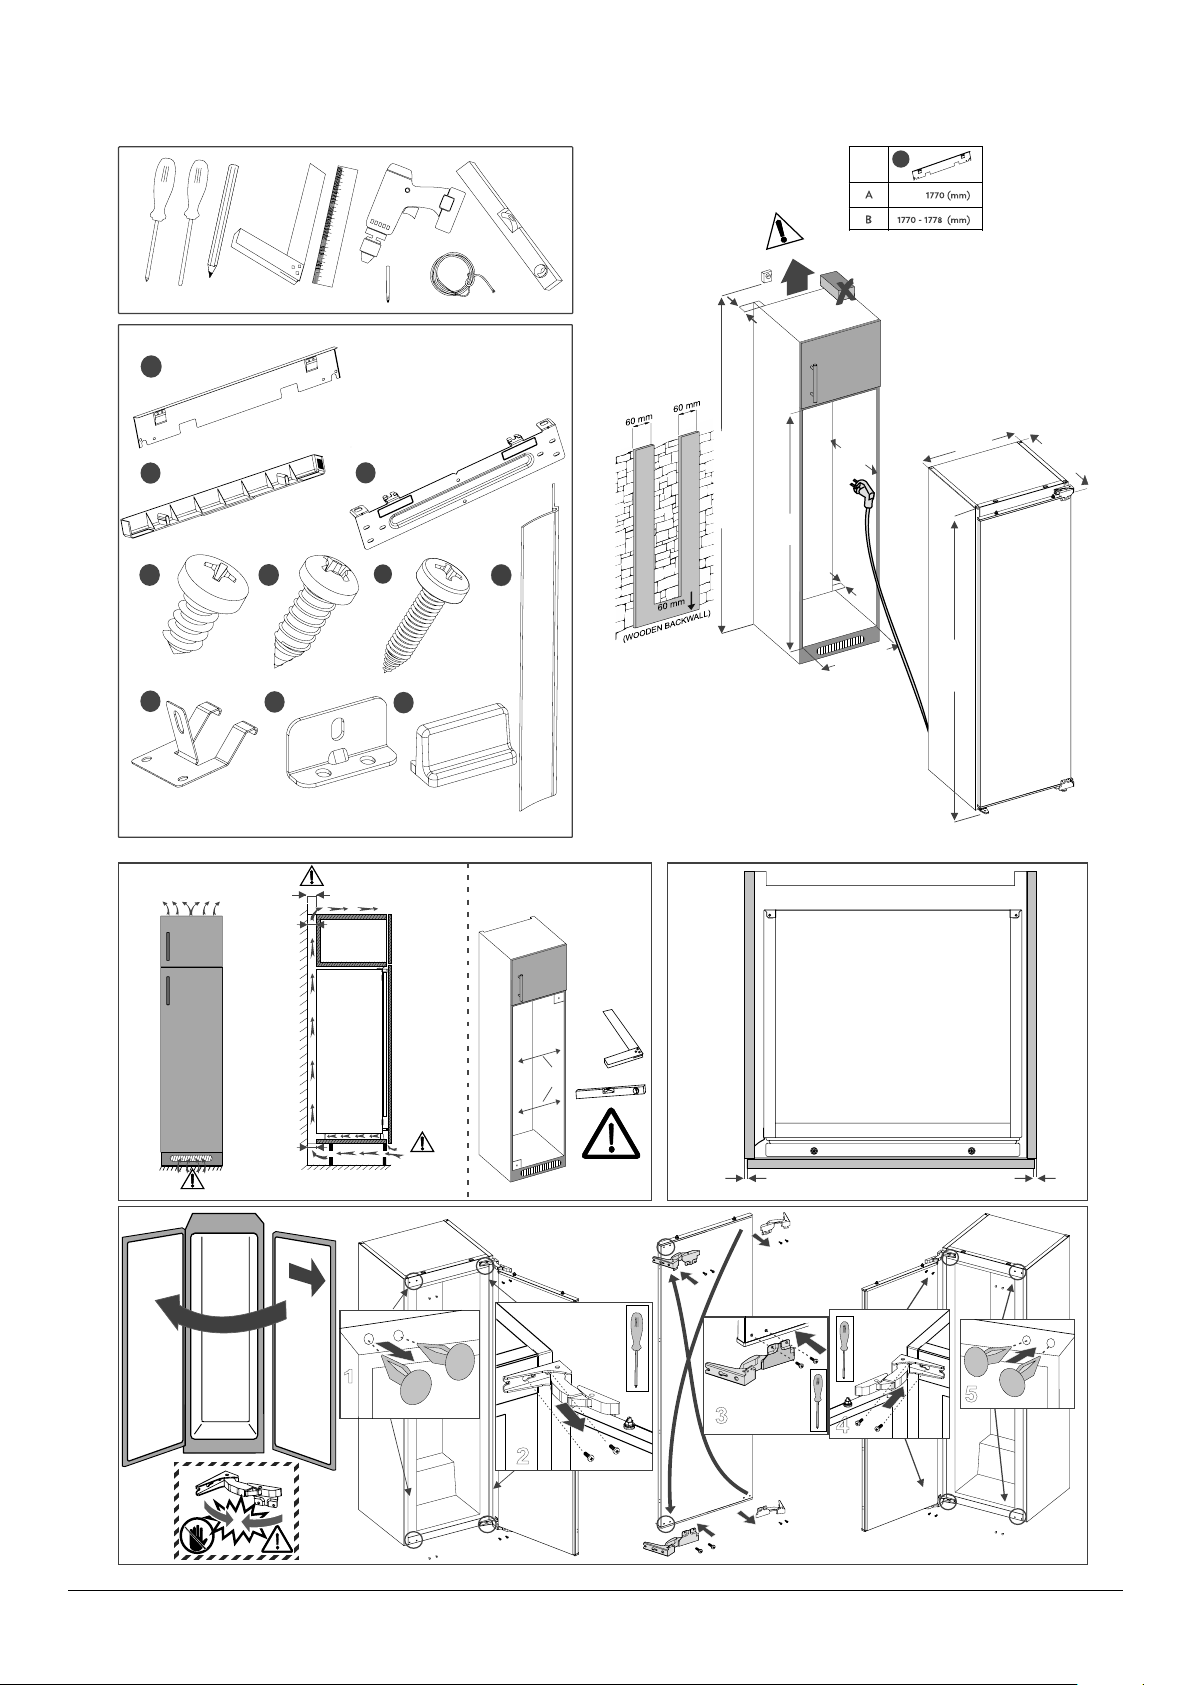
min. 200 cm²
1b1a
1a
(1 x)
2
(1 x)
4
(2 x)
8
(2 x)
5
(25 x)
(4 x)
pH2pH2
75mm
1b
(1 x)
560 mm
(recommended)
3
mm0012.xam
min
550mm
540 mm
545 mm
3
(1 x)
B
6
(4 x)
9
4
10
(4 x)
4
7
(1 x)
(Recommended)
75mm
560-570mm
A
200cm²
min.75 mm
min.75 mm
200cm²
90°
=
200cm²
1
90°
2mm 2mm
5
3
4
4
2
19
Page 22
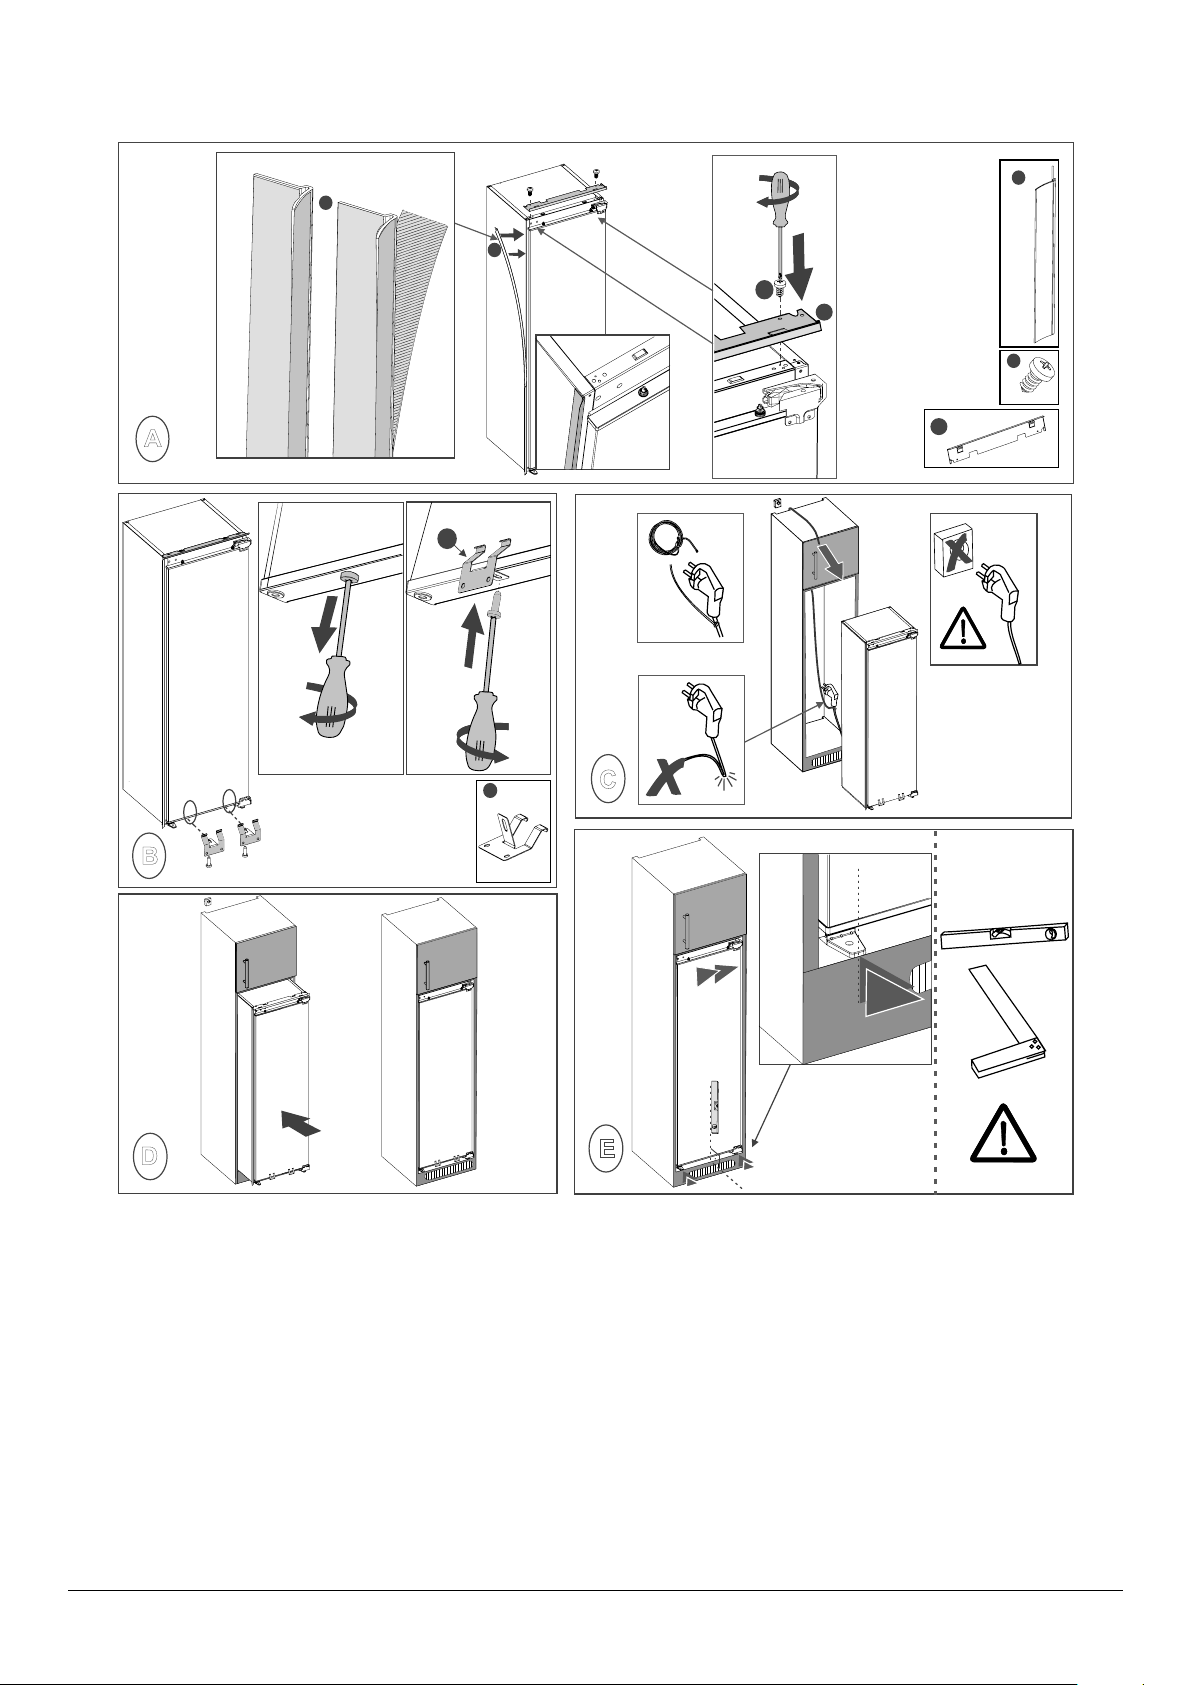
(2 x)
(1 x)
4
7
7
4
7
4
1a
B
A
1
1a
(1 x)
2
8
1
2
C
(2 x)
8
12
D
20
E
90°
Page 23
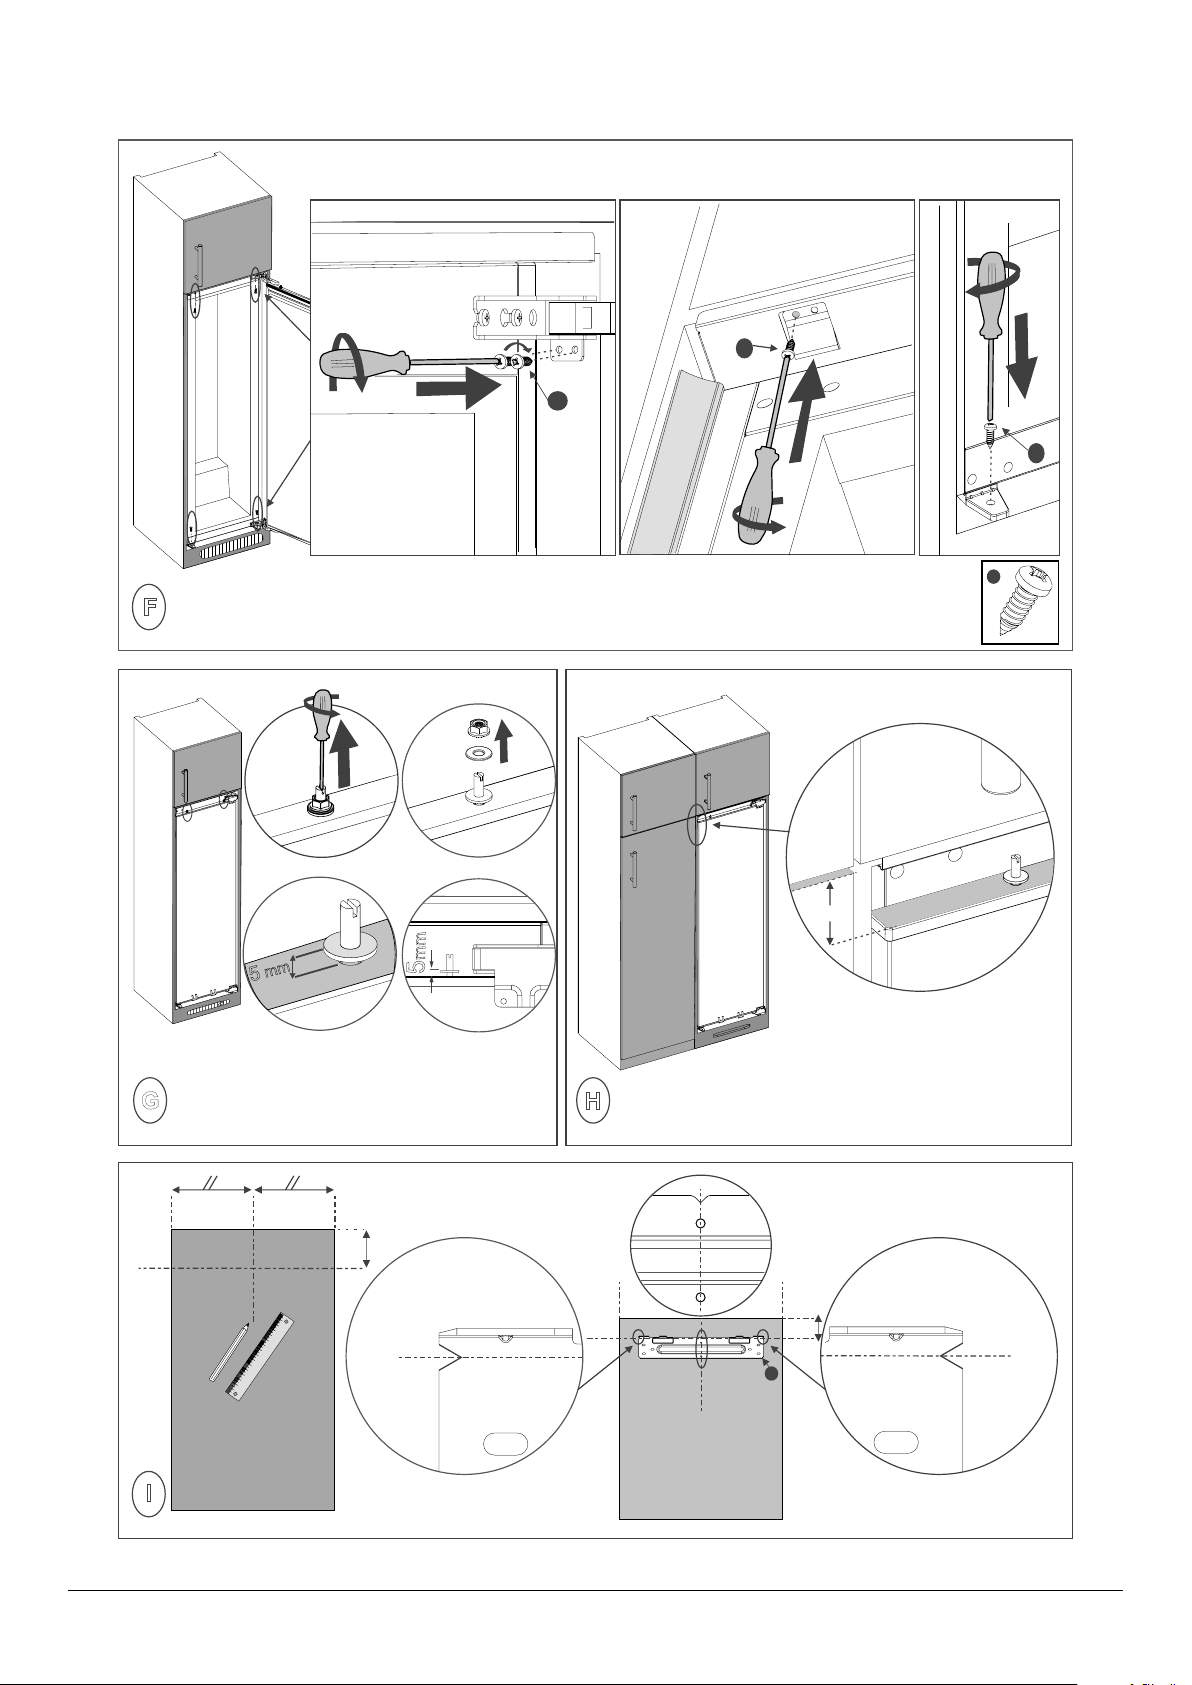
5
m
m
2
2
5
5
5
3
3
1
2
3
(8x)
5
F
1
2
X
m
m
5
G
X
H
X
3
I
21
Page 24
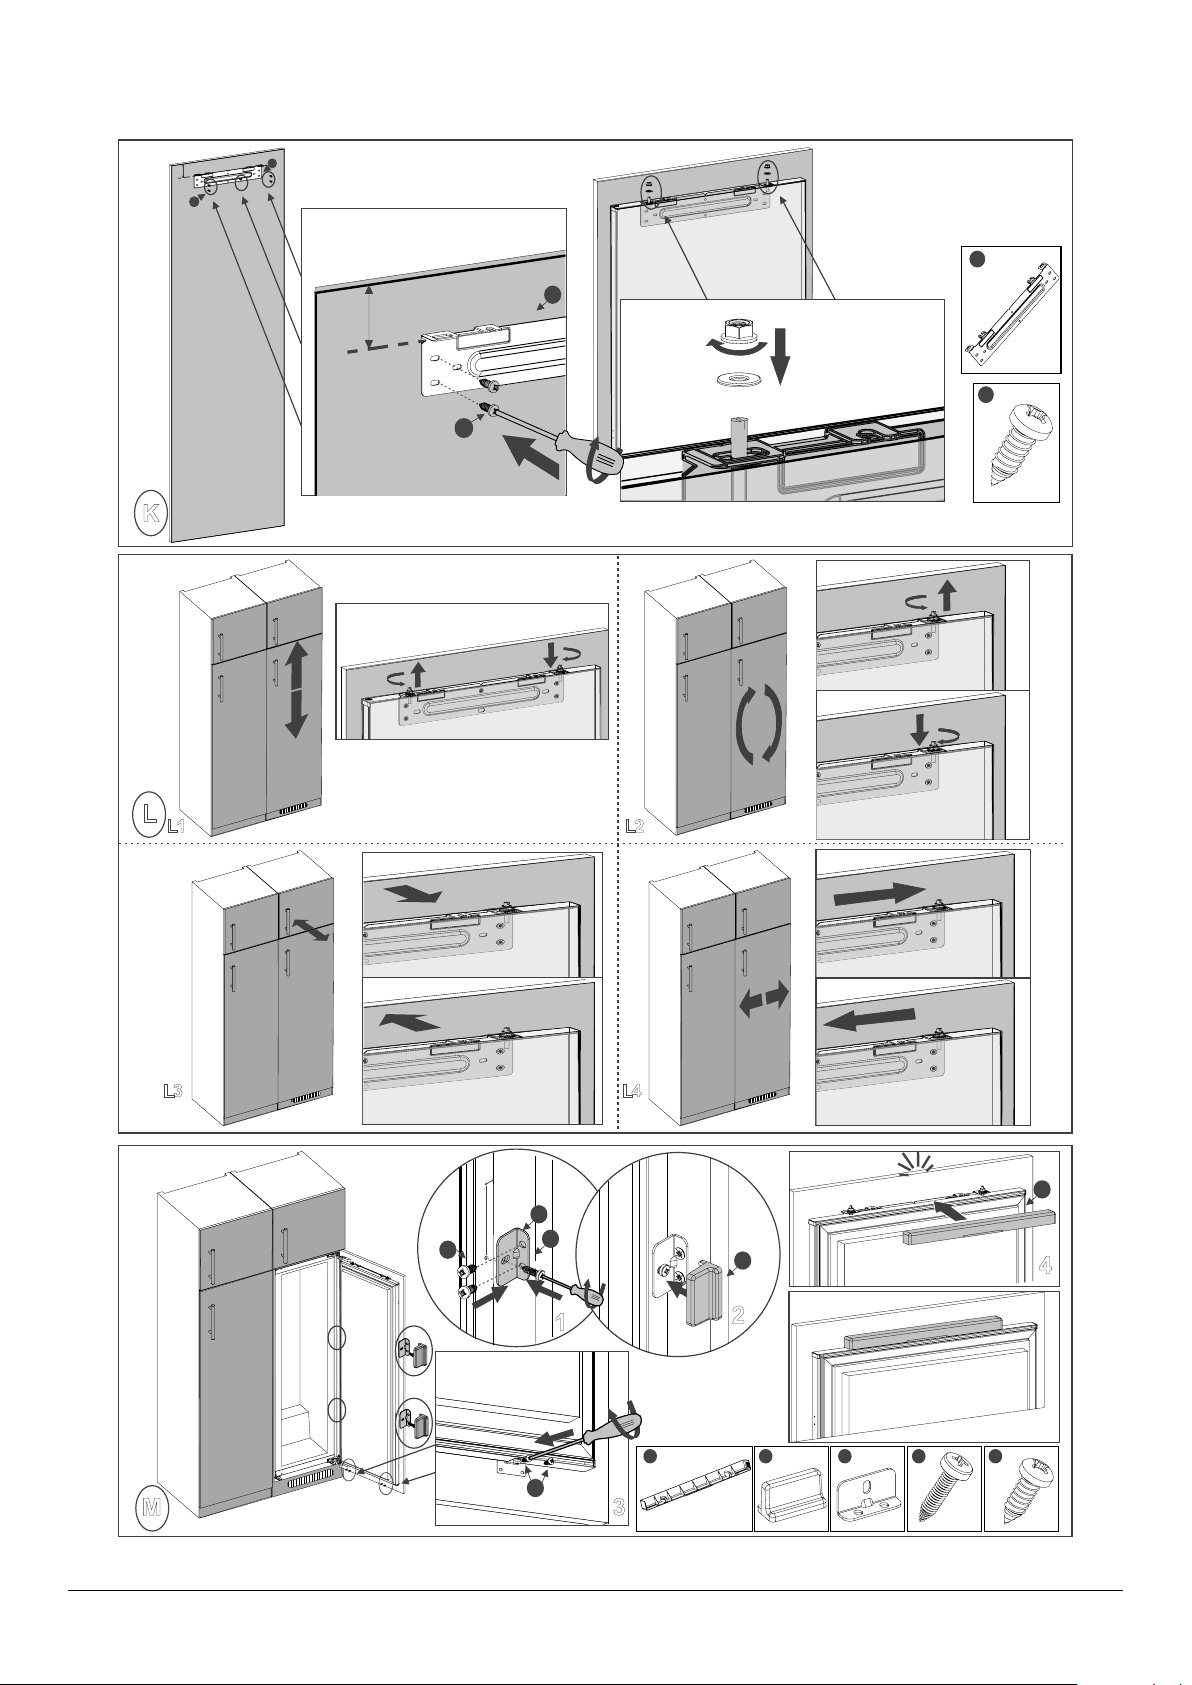
x
5
3
3
(1 x)
x
3
2
K
L
L1
1
5
5
2
(5 x)
1
L2
M
L4L3
9mm
9
click
6
(4 x)(4 x)
9
5
6
10
1
2
5
(1 x)
2
10
(4 x)
5
(12 x)
2
4
3
22
Page 25
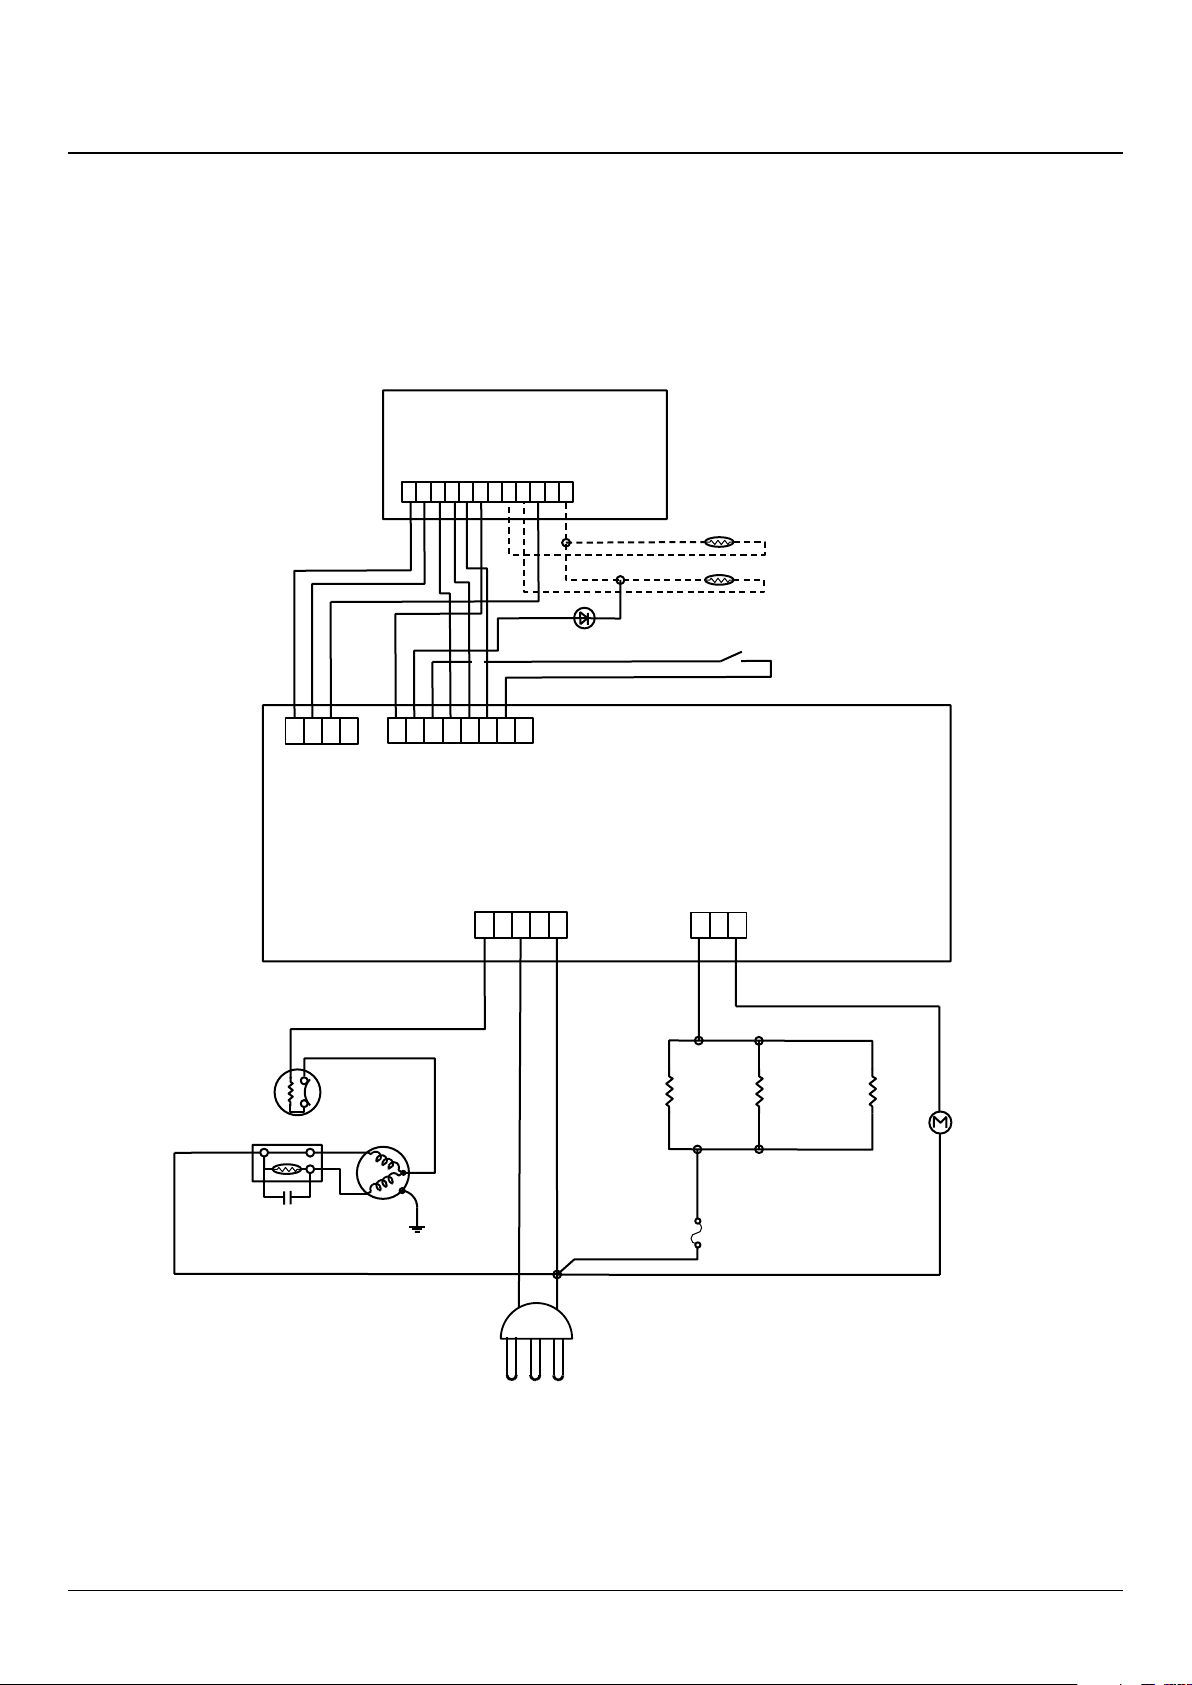
9. Circuit diagram
ArtNo.095-0003 - Circuit diagram - 90 induction
20BD53 DISPLAY
123456789101112
FREEZER SENSOR
SERPANTIN SENSOR
RED
1234
POSITIVE TEMPERATURE
COEFFICIENT
RAN CAPASITOR
WHITE
BROWN
CN3
OVERLOAD
PROTECTOR
COMPRESSOR
RED
BROWN
ORANGE
12345678
CN8
GREY
PINK
WHITE
YELLOW
CN2 CN2
12345
BLACK
BROWN
BLUE
LED
DOOR SWITCH
20BD52 MAINBOARD
123
WHITE
YELLOW
DEFROST
RESISTANCE
THERMAL
FUSE
TRAY
RESISTANCE
DRAIN
RESISTANCE
FAN
LEN
23
Page 26
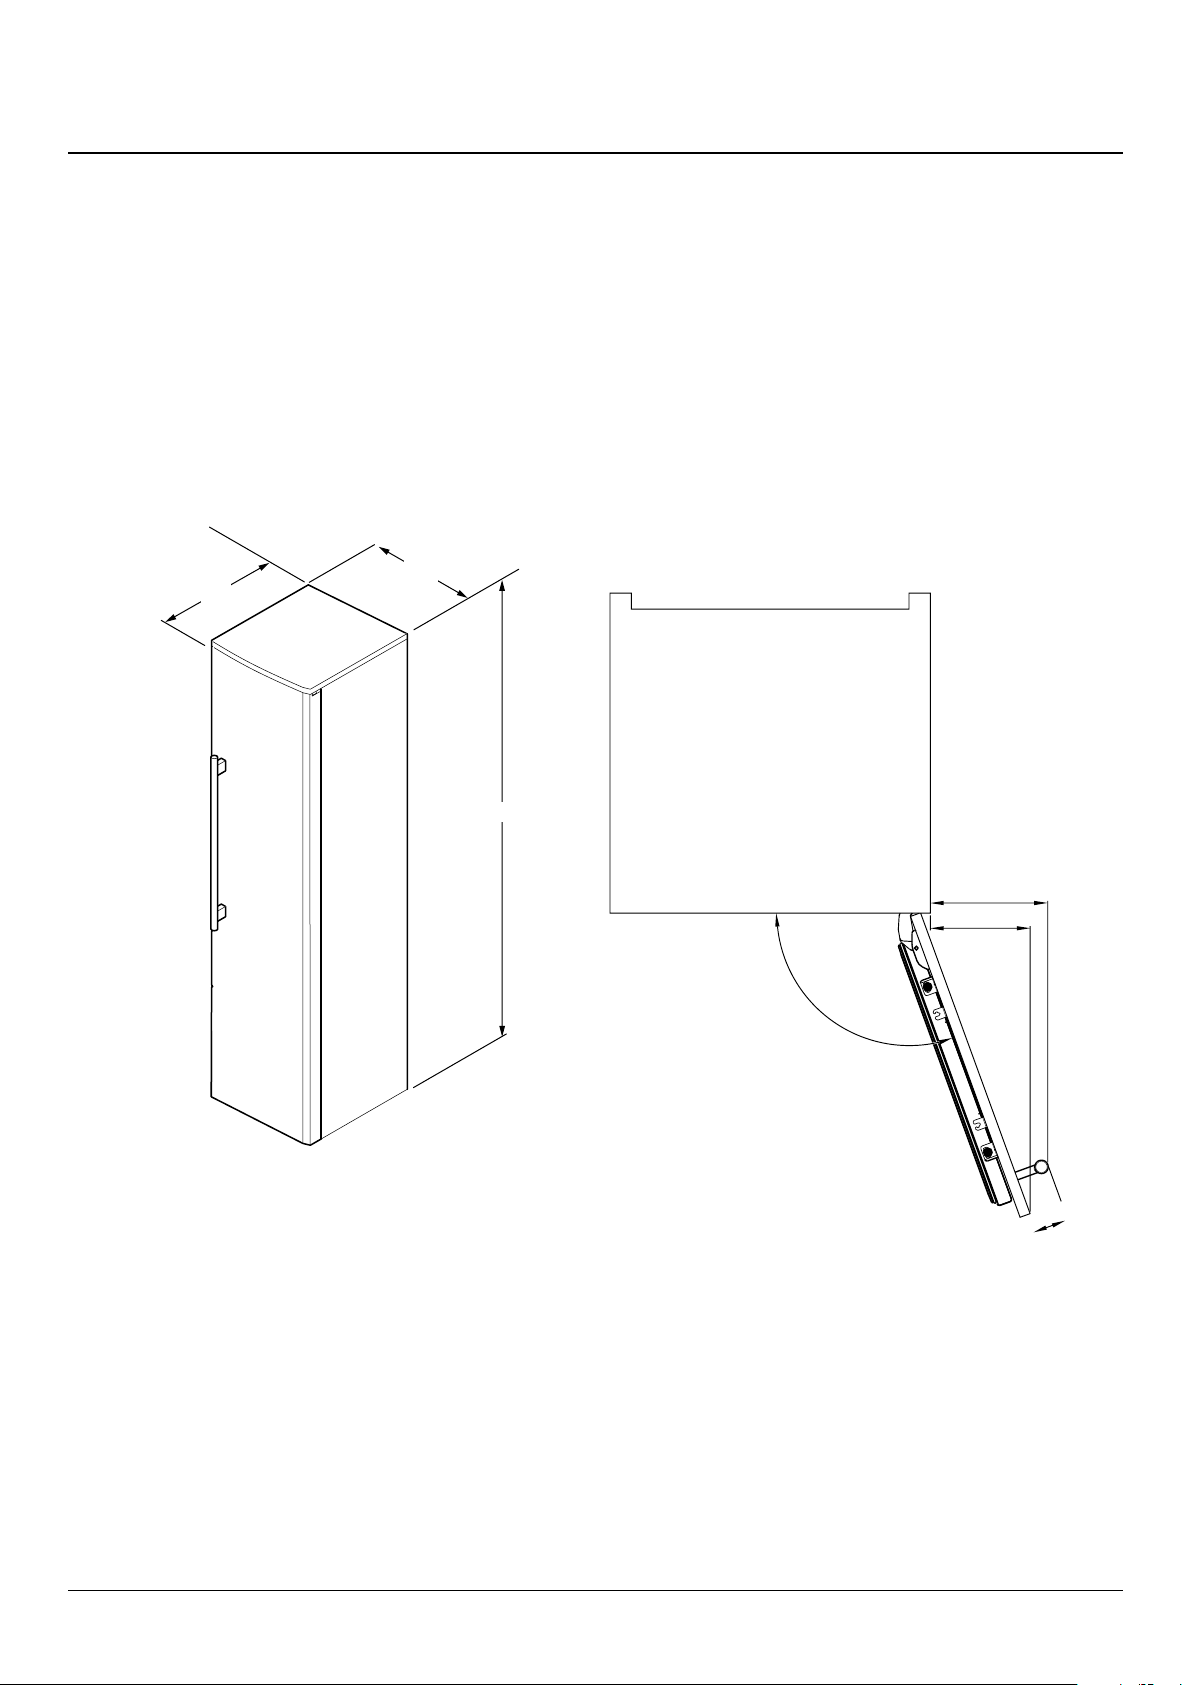
10. Technical Data
INSTALLER: Please leave these instructions with the user.
DATA BADGE LOCATION: Left-hand side of the refrigerator compartment.
COUNTRY OF DESTINATION: GB, IE.
Dimensions
540
545
DocNo.600-0008 - Technical data - DxD 910
All dimensions in mm
1770
Max. 110°
Door Clearances
This illustration is prepared according to 20mm
furniture thickness.
The hinge can open up to 110° and the handle on
the furniture is a sample.
220
187
62.5
24
Page 27
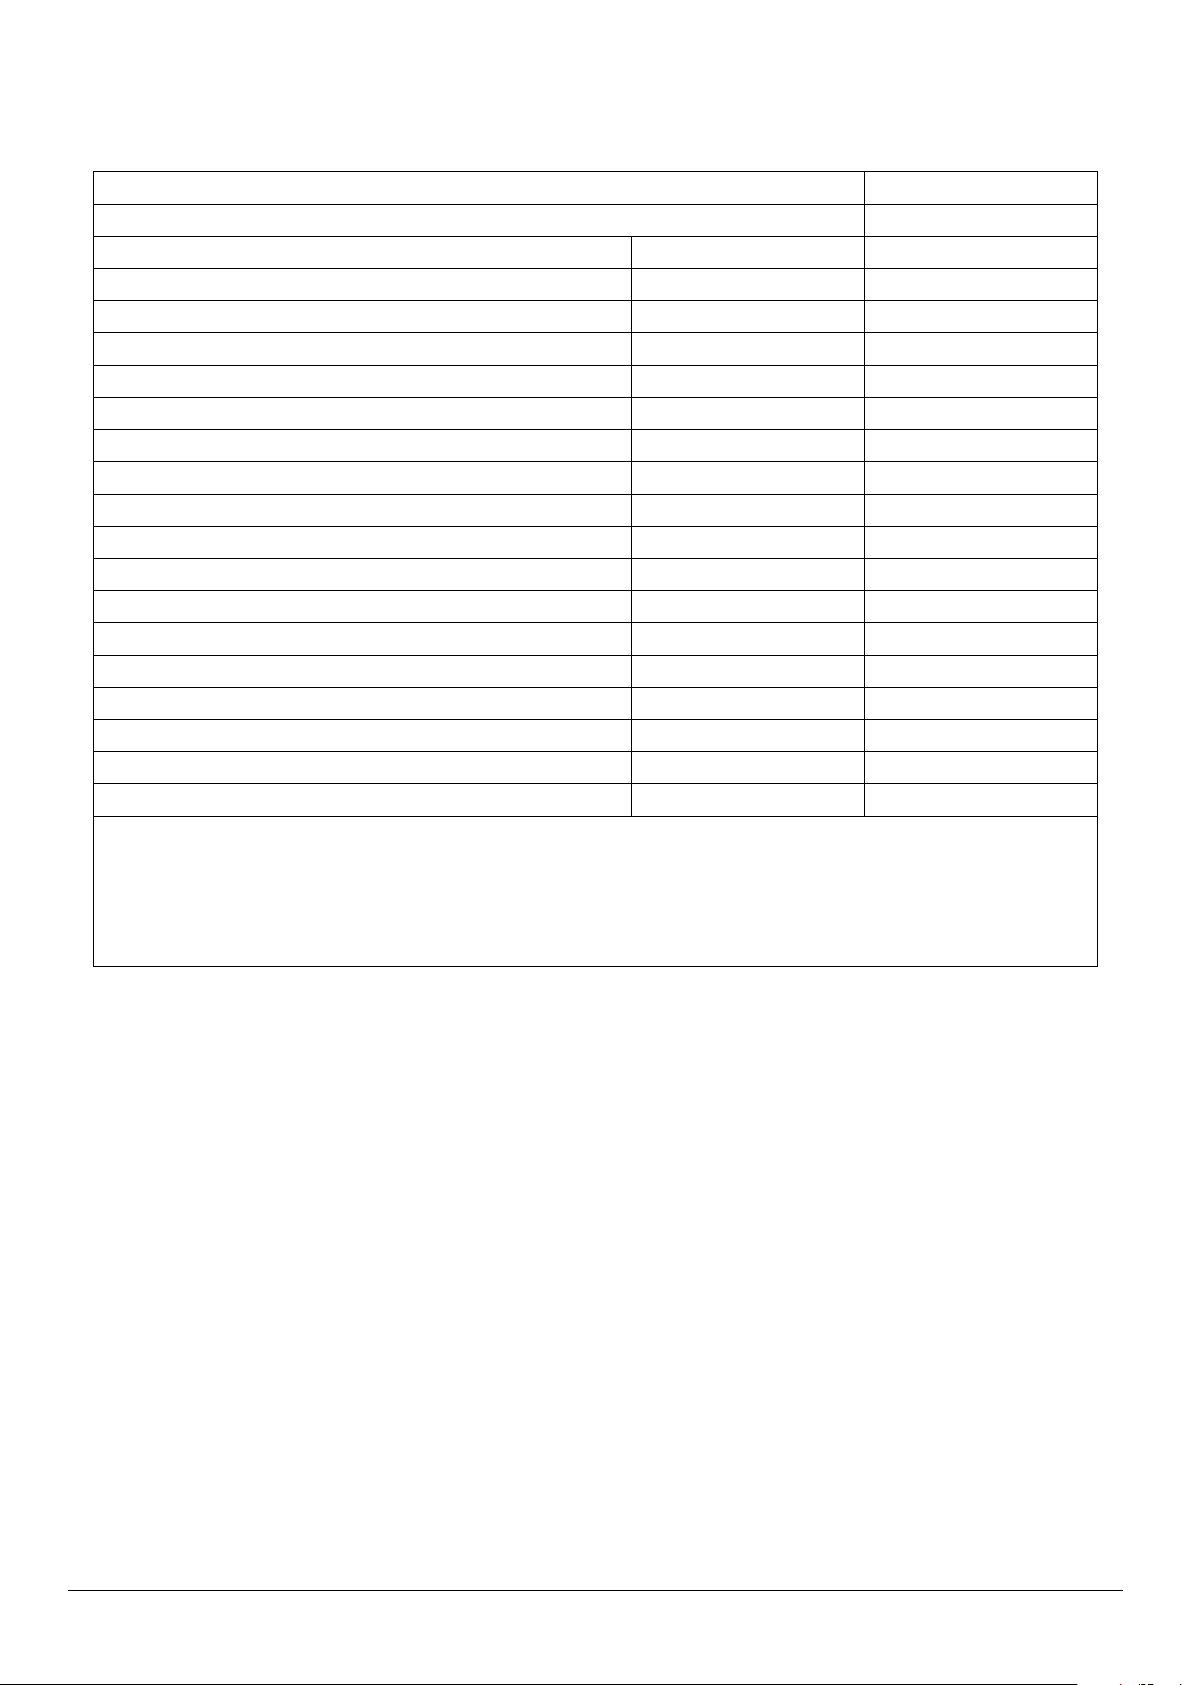
Ratings
Brand RANGEMASTER
Model identication RTFZ18/INT
Product category 8 (Freezer)
Mass kg 62
Number of cavities 1
Energy class A+
Annual energy consumption* 297 kWh
Total gross volume 221 litres
Total net volume 197 litres
Refrigerator gross volume - litres
Refrigerator net volume - litres
Chiller compartment net volume - litres
Freezer gross volume 221 litres
Freezer net volume 197 litres
Star rating ****
Refrigeration system NO FROST
Temperature rise time (-18°C/-9°C) 9 Hours
Freezing capacity 15kg / 24 h
Climate class ** T/SN (10°C - 43°C)
Noise emission 41 dB(A)
Energy consumption of 297 kWh per year, calculated on the basis of results obtained in 24 hours under normalised test
conditions. Real energy consumption depends on the conditions in which the equipment is used as well as where it is
placed.
This appliance is designed for use at an ambient temperature within the 10°C - 43°C range.
25
Page 28
11. Warranty/After Sales Service
If consultation or technical assistance is needed, please
provide the local authorised service agent with the purchase
invoice and the product code/serial number.
Please refer to the Technical Data to locate the product
number/serial number.
The 2 years free maintenance for the operation of the
appliance started from the date of purchase of this product.
Any cosmetic damage to the appliance must be reported
within 30 days of delivery.
For in-warranty service please call: 0844 847 6711.
For general enquiries please call: 0870 789 5107.
26
Page 29

NOTE
27
Page 30

NOTE
28
Page 31

NOTE
29
Page 32
• DocNo.000-0001 - Back cover Rangemaster
Clarence Street, Royal Leamington Spa,
Warwickshire, CV31 2AD, England.
www.rangemaster.co.uk
 Loading...