

Rangemaster RTFR18/INT User Manual & Installation & Service Instructions

Integrated Fridge
User Guide
&
Installation & Service Instructions
U110831-01

Contents
1. Before You Start 1
Safety 1
Electrical Safety 3
CE Declaration of conformity 3
Disposal of your old appliance 3
Packaging and the Environment 3
2. About Your fridge 4
3. Using the Control Panel 5
Operating your Fridge 5
Accessories 7
4. Food Storage Tips 8
Food storage 8
Tips on Storing Fresh Food 9
5. Cleaning and Maintenance 10
Cleaning 10
When not in use 11
6. Troubleshooting 12
Tips for saving energy 13
7. Installation 14
Installation warnings 14
Positioning Your Appliance 15
Electrical Supply Connection 16
8. Circuit diagram 21
9. Technical Data 22
10. Warranty/After Sales Service 24
Due to our policy of continual improvement, we reserve the right to change specications without prior notice.
1. Before You Start
Icon Type Meaning
WARNING Serious injury or death risk
RISK OF ELECTRIC SHOCK Dangerous voltage risk
Thank you for buying a Rangemaster appliance. We hope
that it provides a stylish yet practical solution to your cooling
needs. We hope that this handbook supplies you with all the
information you require. If there is anything you are unsure of
please contact us (see ‘Warranty’ section for Customer Care’s
details).
FIRE Fire risk
CAUTION Injury or property damage risk
IMPORTANT Operating the system correctly
WARNING: This appliance must be earthed.
Please leave the appliance to stand for at least six
hours. This will allow the cooling system to settle
following transportation.
Always make sure a qualied person installs this
appliance.
This appliance is designed for domestic use only.
Using it for any other purpose could invalidate any
warranty or liability claim.
• Before you plug the appliance into the mains, clean
the inside of the appliance using warm water and
bicarbonate of soda, then dry thoroughly.
• Check that no parts of the appliance are damaged,
especially parts of the cooling system, pipes or leads.
If damage has occurred, DO NOT install the appliance;
you should contact a qualified service engineer or
return the appliance to its place of purchase.
• If the accessories inside the appliance have been
disturbed during transit, reposition them in accordance
with the instructions.
• Make sure that the electrical supply to your plug socket
is correct for this appliance – the required information is
on the data badge of the appliance.
• Once the appliance is installed, cleaned and dry, it is
ready to be plugged in and switched on.
Safety
The data badge is located inside the appliance
(refrigeration compartment).
WARNING: Use potable (drinking) water with this
appliance.
WARNING: Keep this appliance clear of any
obstruction.
DO NOT damage the refrigerant circuit. If it does
become damaged, do not use the appliance.
WARNING: DO NOT use mechanical devices (such as
hairdryers) to defrost this appliance.
If your appliance uses R600a as a refrigerant (this
information will be provided on the label of the
cooler) you should take care during transportation
and installation to prevent the cooler elements
from being damaged. R600a is an environmentally
friendly and natural gas, but it is explosive. In
the event of a leak due to damage of the cooler
1

elements, move your appliance away from open
ames or heat sources and ventilate the room where
the appliance is located for a few minutes.
• When replacing old appliances, make sure that you
have disabled any locking mechanisms before disposal
– it may even be best to remove the appliance door
completely to prevent children from becoming trapped
inside the appliance.
• The appliance must be connected to the power supply
safely. Loose connections, broken plugs and bare wires
are a safety hazard. Make sure that all connections are
sound.
• Before undertaking any routine maintenance or minor
repairs, disconnect the appliance from the electrical
supply.
• DO NOT touch cold surfaces of the appliance while it is
in use as this will cause hands to stick to them leading
to freezer burns.
• When moving the appliance take care not to damage
the leads, pipes or condenser unit. Should these parts
become damaged, contact a qualified service engineer.
• Effervescent liquids (fizzy drinks) should never be
frozen. These liquids expand during freezing and
this may lead to the bottles/containers shattering or
exploding.
• Foods that are intended to be defrosted or cooked first,
such as breads or meats, must not be eaten in their
frozen state.
• If food looks or smells strange, do not attempt to eat it.
If in doubt throw it away. Spoiled food can be harmful to
your health.
• Never use sharp, metal implements to scrape ice off the
surface of this appliance. Only use implements, which
are fit for this purpose (such as plastic scrapers) and use
carefully to avoid damaging the lining of the appliance.
• The cooling system contains refrigerant and oils, all of
which are harmful to health if leaked. Should leakage
occur, disconnect the appliance and ventilate the room
it is installed in. Take care to ensure that you do not get
any coolant near to, or in, your eyes. Contact a service
engineer or arrange to have the appliance removed.
DO NOT use the appliance under any circumstances.
WARNING: Keep ventilation openings, in the
appliance enclosure or in the built-in structure, clear
of obstruction.
WARNING: DO NOT use electrical appliances inside
the food storage compartments of the appliance,
unless they are of the type recommended by the
manufacturer.
WARNING: DO NOT damage the refrigerant circuit.
WARNING: In order to avoid any hazards resulting
from the instability of the appliance, it must be
xed in accordance with the following instructions:
If your appliance uses R600a as a refrigerant (this
information will be provided on the label of the
cooler) you should take care during transportation
and installation to prevent the cooler elements
from being damaged. R600a is an environmentally
friendly and natural gas, but it is explosive. In
the event of a leak due to damage of the cooler
elements, move your appliance away from open
ames or heat sources and ventilate the room where
the appliance is located for a few minutes.
While carrying and positioning the appliance, do not damage
the cooler gas circuit.
DO NOT store explosive substances such as aerosol cans with
a ammable propellant in this appliance.
This appliance is intended to be used in household and
domestic applications only.
If the socket does not match the appliance plug, it must be
replaced by the manufacturer, a service agent or similarly
qualied persons in order to avoid a hazard.
A specially grounded plug has been connected to the power
cable of your appliance. This plug should be used with
a specially grounded socket of 13 amperes. If there is no
such socket in your house, please have one installed by an
authorised electrician.
This appliance can be used by children aged from 8 years and
above and persons with reduced physical, sensory or mental
capabilities or lack of experience and knowledge if they have
been given supervision or instruction concerning use of the
appliance in a safe way and understand the hazards involved.
Children shall not play with the appliance. Cleaning and
user maintenance shall not be made by children without
supervision.
If the supply cord is damaged, it must be replaced by the
manufacturer, an authorised service agent or similar qualied
persons, in order to avoid a hazard.
This appliance is not intended for use at altitudes exceeding
2000 m.
WARNING: DO NOT use mechanical devices or other
means to accelerate the defrosting process, other
than those recommended by the manufacturer.
2

Electrical Safety
ArtNo.000-0001
Wa
CE Declaration of conformity
WARNING: When positioning the appliance, ensure
the supply cord is not trapped or damaged.
WARNING: DO NOT locate multiple portable socket-
outlets or portable power supplies at the rear of the
appliance.
DO NOT use plug adapter.
rning triangle
WARNING; Risk of re / ammable materials
• The plug must be accessible after installation.
• The operating voltage for your appliance is 220-240 V at
50Hz.
• Connections to the mains supply should be in
accordance with local regulations.
• Insert the plug into a socket with an efficient ground
connection. If the socket has no ground contact or the
plug does not match, we recommend you consult a
qualified electrician for assistance.
• The appliance must be connected with a properly
installed fused socket. The power supply (AC) and
voltage at the operating point must match with the
details on the name plate of the appliance (the name
plate is located on the inside left of the appliance).
• The appliance must be plugged into an earthed socket.
• We declare that our products meet the applicable
European Directives, Decisions and Regulations and the
requirements listed in the standards referenced.
Disposal of your old appliance
• The symbol on the product or on its packaging indicates
that this product may not be treated as household
waste. Instead it shall be handed over to the applicable
collection point for the recycling of electrical and
electronic equipment. By ensuring this product is
disposed of correctly, you will help prevent potential
negative consequences for the environment and
human health, which could otherwise be caused by
inappropriate waste handling of this product. For more
detailed information about recycling of this product,
please contact your local city office, your household
waste disposal service or the shop where you purchased
the product.
Packaging and the Environment
• Packaging materials protect your machine from damage
that may occur during transportation. The packaging
materials are environmentally friendly as they are
recyclable. The use of recycled material reduces raw
material consumption and therefore decreases waste
production.
• The plug MUST be accessible after the appliance has
been positioned.
• The appliance is supplied with a standard three-pin
plug, of which the one for grounding should never be
removed.
• Hold the plug, not the electrical cable, when
unplugging the appliance.
• Make sure that the appliance does not trap the electric
cable.
• DO NOT step on the cable.
• Avoid damage to the electric cable when moving the
appliance.
Notes:
• Please read the instruction manual carefully before
installing and using your appliance. We are not
responsible for the damage occurred due to misuse.
• Follow all instructions on your appliance and instruction
manual, and keep this manual in a safe place to resolve
the problems that may occur in the future.
• This appliance is produced to be used in homes and it
can only be used in domestic environments and for the
specified purposes. It is not suitable for commercial or
common use. Such use will cause the guarantee of the
appliance to be cancelled and our company will not be
responsible for the losses to be occurred.
• This appliance is produced to be used in houses and
it is only suitable for cooling / storing foods. It is not
suitable for commercial or common use and/or for
storing substances except for food. Our company is not
responsible for the losses to be occurred in the contrary
case.
3
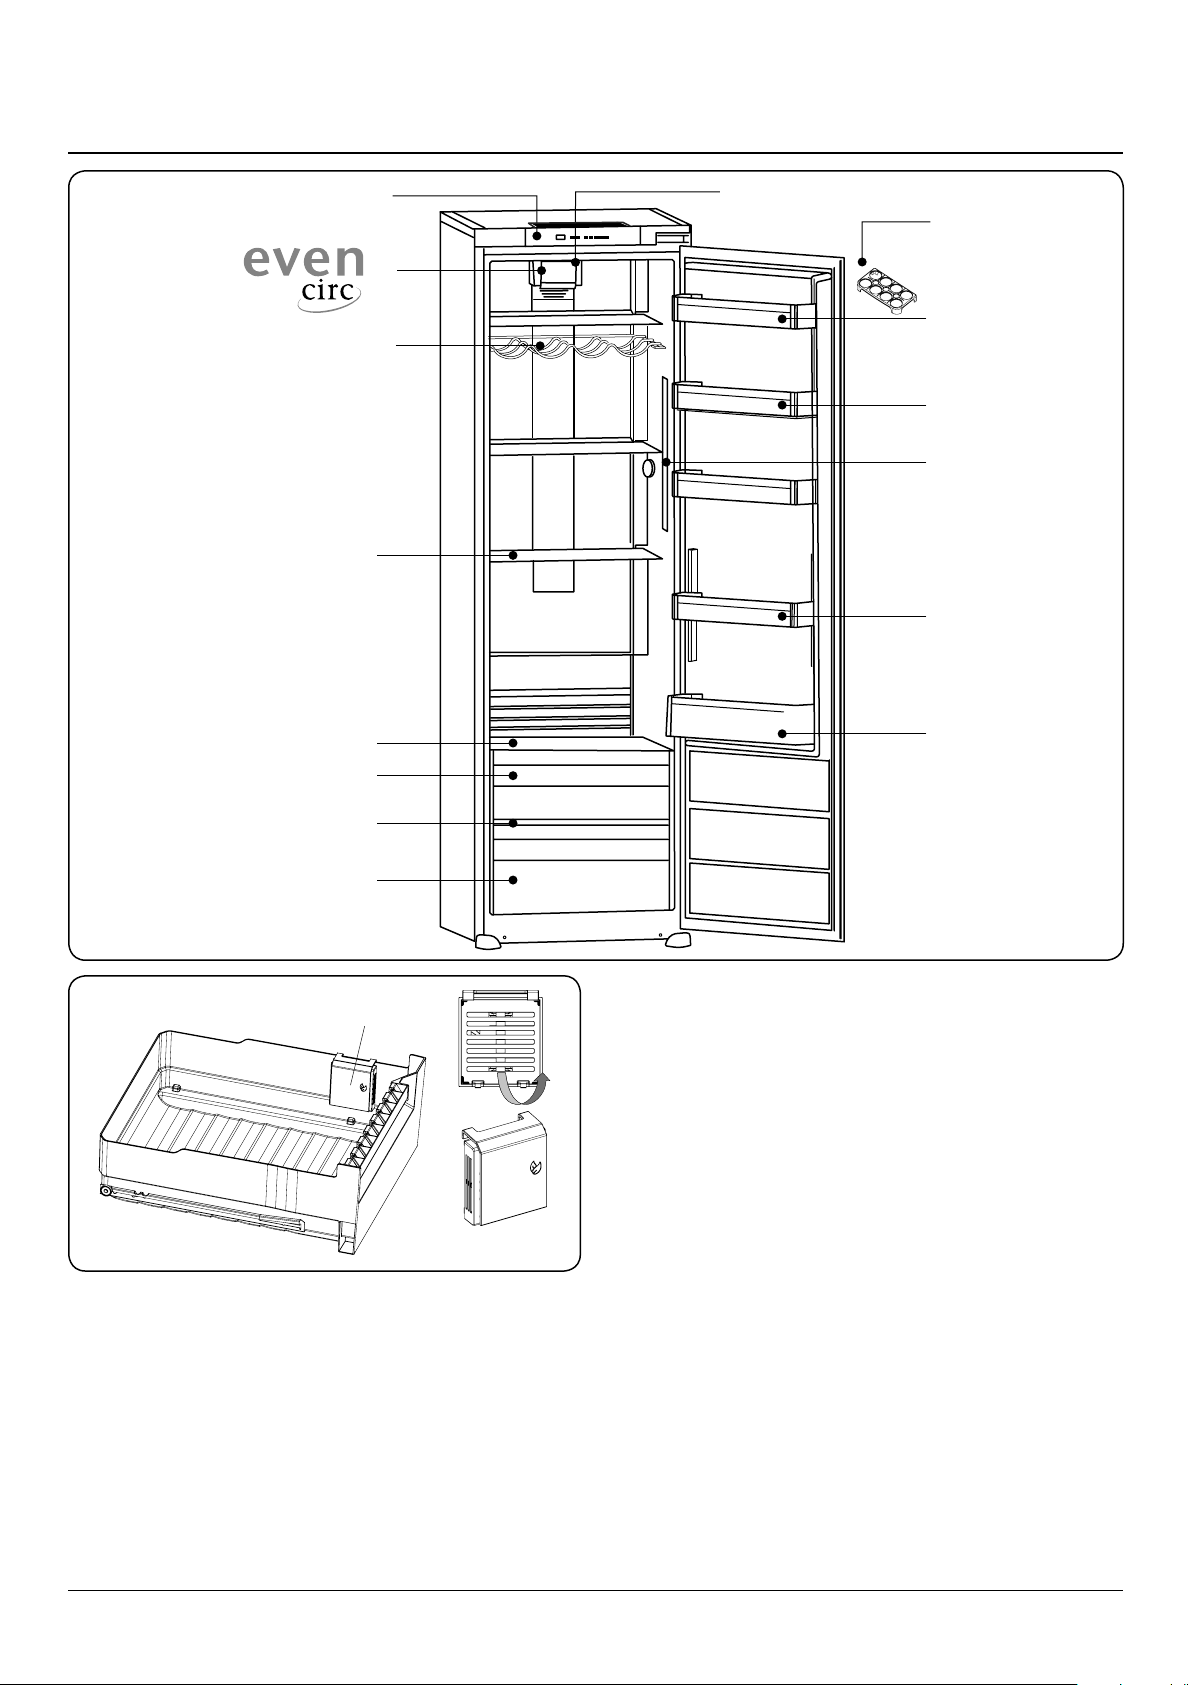
6
7
8
9
6
2
5
10
4
3
1
14
13
12
11
Range Fresh Preserver
2. About Your fridge
Fig. 2.1
Fig. 2.2
The fridge is shown in Fig. 2.1 and has the following features:
1. Control panel
2. Even-Circ™
3. LED light
4. Egg tray
5. Wine rack
6. Door shelves
7. LED light strips
8. Opti-lift™
9. Bottle shelf
10. Fridge shelves
11. Upper crisper cover
12. Upper crisper
13. Crisper cover
14. Lower Crisper
Range Fresh (Fig. 2.2)
Range Fresh Preserver helps to remove ethylene gas
(a bioproduct released naturally from fresh foods) and
unpleasant odors from the crisper.
It must be regenerated once a year under a full day sunlight
for 24 hours, for example on a window sill.
To regenerate the lter, remove the casing of the lter box by
pulling it in the direction of the arrow (Fig. 2.2).
The lter should not be washed with water or in any
detergent.
4
3. Using the Control Panel
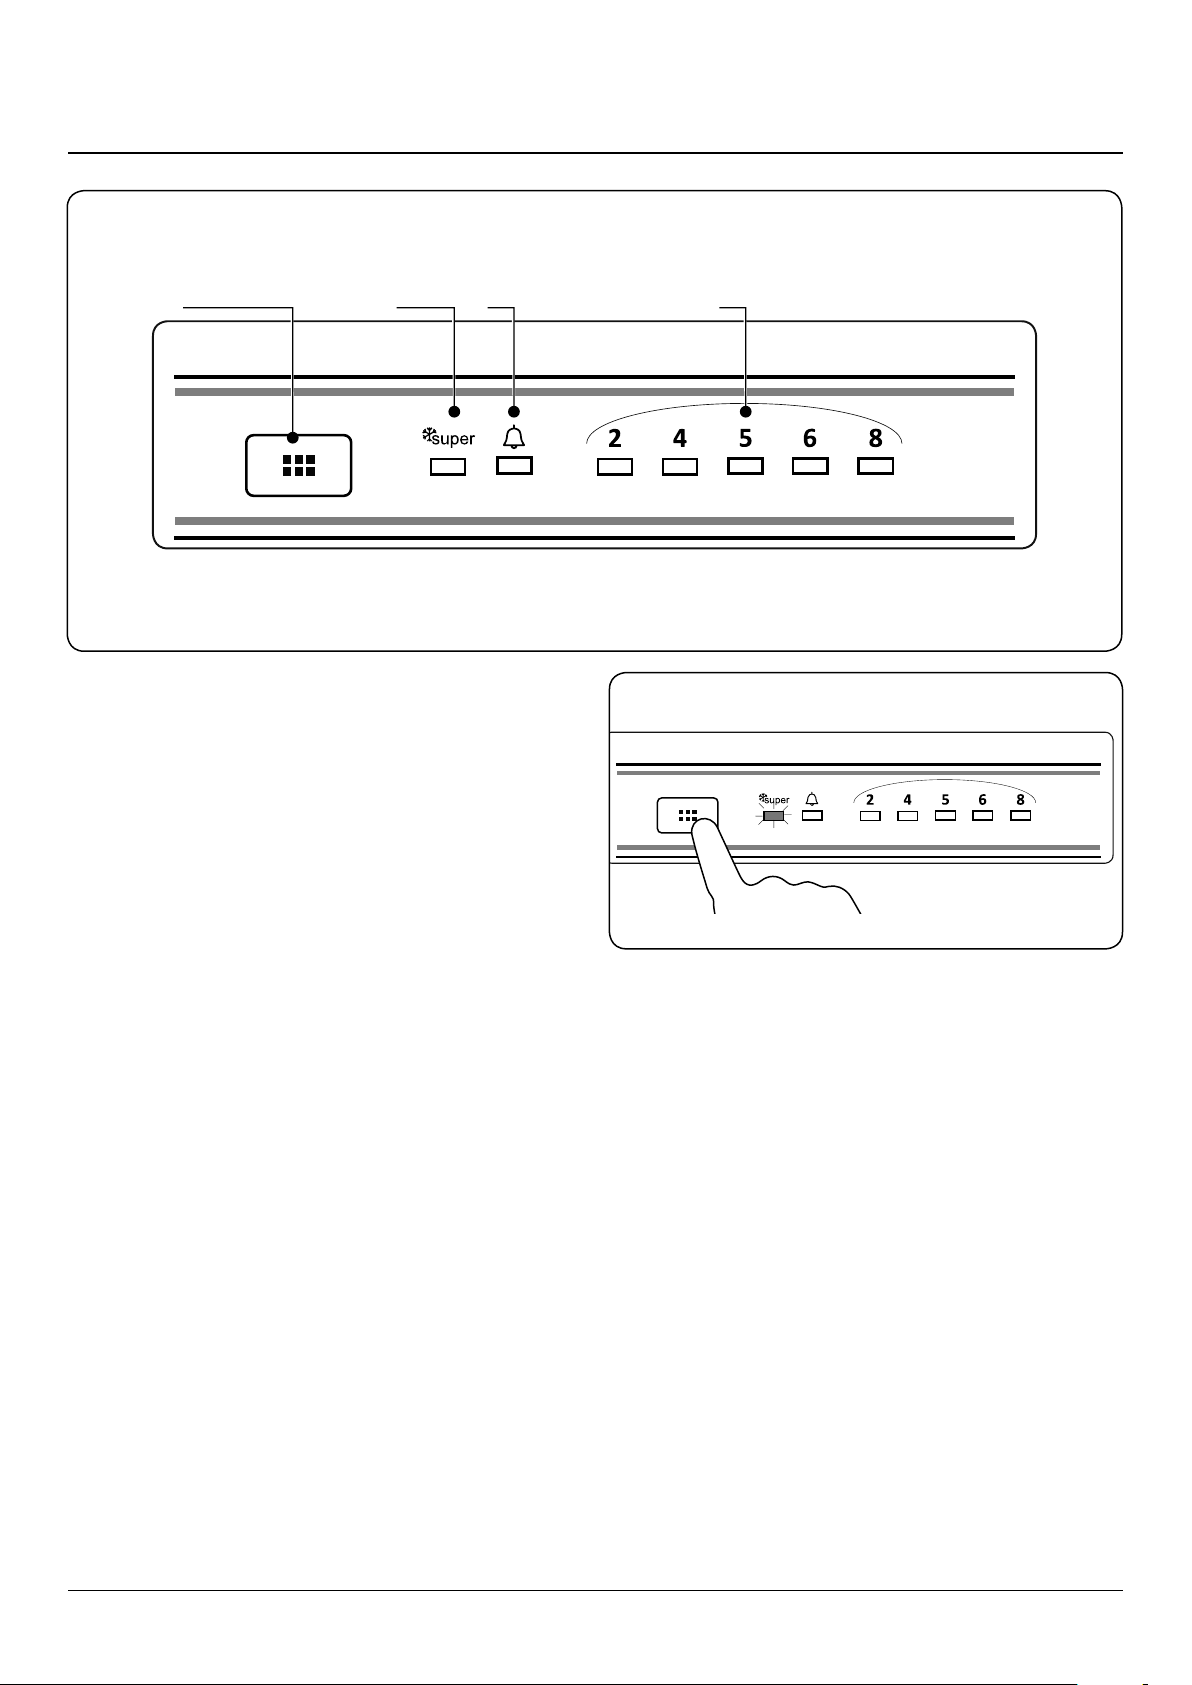
1 2 3 4
Fig. 3.1
Using the Control Panel
1. Fridge temperature set button
2. Super cooling symbol (Super cooling LED)
3. Alarm symbol (Alarm LED)
4. Fridge adjusted temperature indicator
Operating your Fridge
Fridge Temperature Set Button
This button allows setting temperature of the fridge. In order
to set values for fridge partition, press this button. Use this
button also to activate super cooling mode.
Super Cooling Mode
When would it be used?
• To cooling huge quantities of food.
• To cooling fast food.
• To cooling food quickly.
• To store seasonal food for a long time.
Fig. 3.2
To use the super cool mode press the temperature set button
until super freezer light comes on (Fig. 3.2). To cancel press
the temperature set button.
For optimal appliance performance in maximum cooling
capacity, set the appliance to active super cooling mode 6
hours before you put the fresh food into the fridge.
During this mode:
If you press temperature set button, the mode will be
cancelled and the setting will be restored from 2.
The super cooling mode will be cancelled automatically after
6 hours or when cooling sensor temperature falls below 2 °C.
5
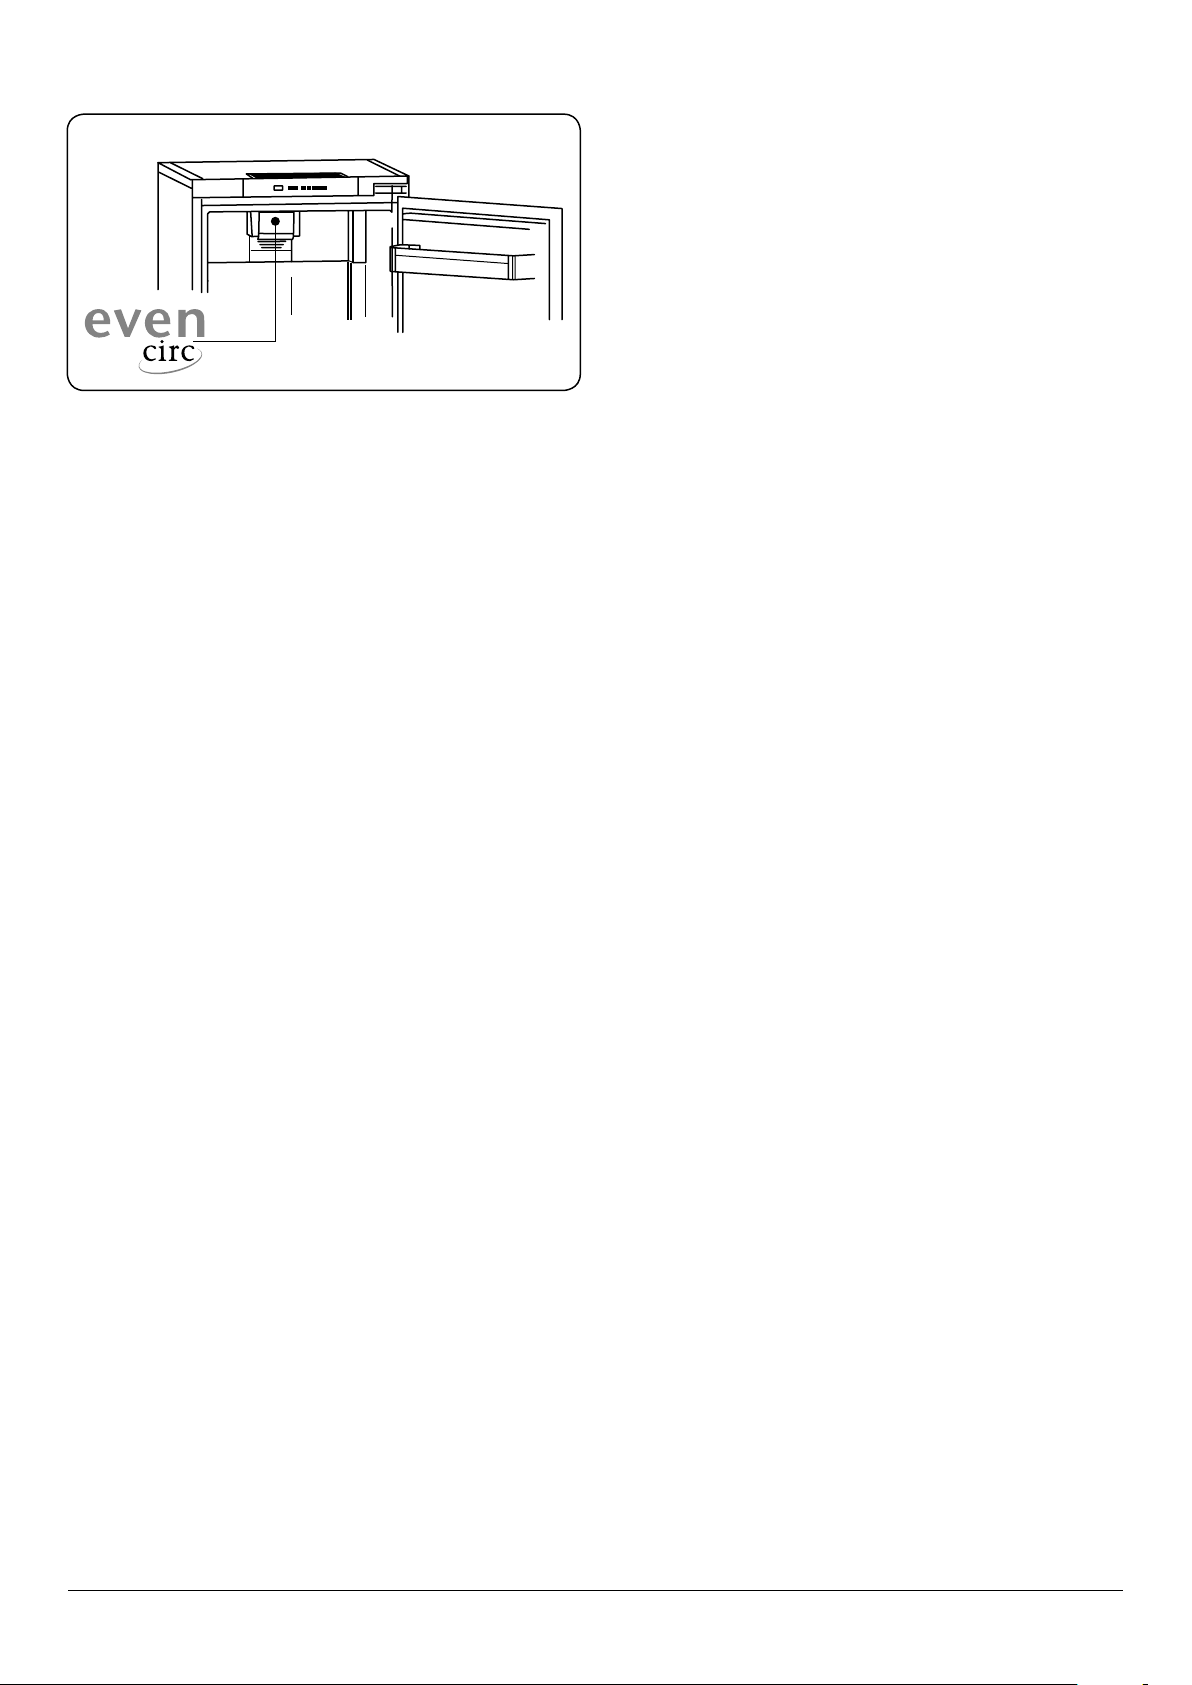
Fig. 3.3
Fridge Temperature Settings
• The initial temperature of the setting display is 5°C.
• Press fridge setting button once.
• Every time you press the button, the setting
temperature will increase. (2°C, 4°C, 5°C, 6°C, 8°C, Super
cooling)
• If you press fridge setting button until super cooling
symbol is displayed on your fridge.
• After 3 seconds the wuper cooling light will blink.
• If you keep on pressing, it will restart from last value.
Temperature Settings Warnings
• It is not recommended that you operate your fridge in
environments colder than 10°C in terms of its efficiency.
• Do not start another adjustment before completing one
adjustment.
• Temperature adjustments should be made according
to the frequency of door openings, the quantity of food
kept inside the fridge and the ambient temperature in
the location of your fridge.
• When you first switch on the appliance, allow it to
operate for 24 hours in order to reach normal operating
temperature.
• During this time, do not open the door or place a lot of
food inside the appliance.
• If the appliance is switched off or unplugged, wait at
least 5 minutes before plugging the appliance in or
restarting it this will prevent damage to the compressor.
• Your appliance is designed to operate in the ambient
temperature (T/SN = 10°C - 43°C) intervals stated in
the standards. We do not recommend operating your
appliance out of the stated temperature limits in terms
of cooling effectiveness.
Even-circ(Fig. 3.3)
Do not block the air inlet and outlet openings when storing
food, otherwise air circulation provided by the turbo fan will
be impaired.
6
Accessories
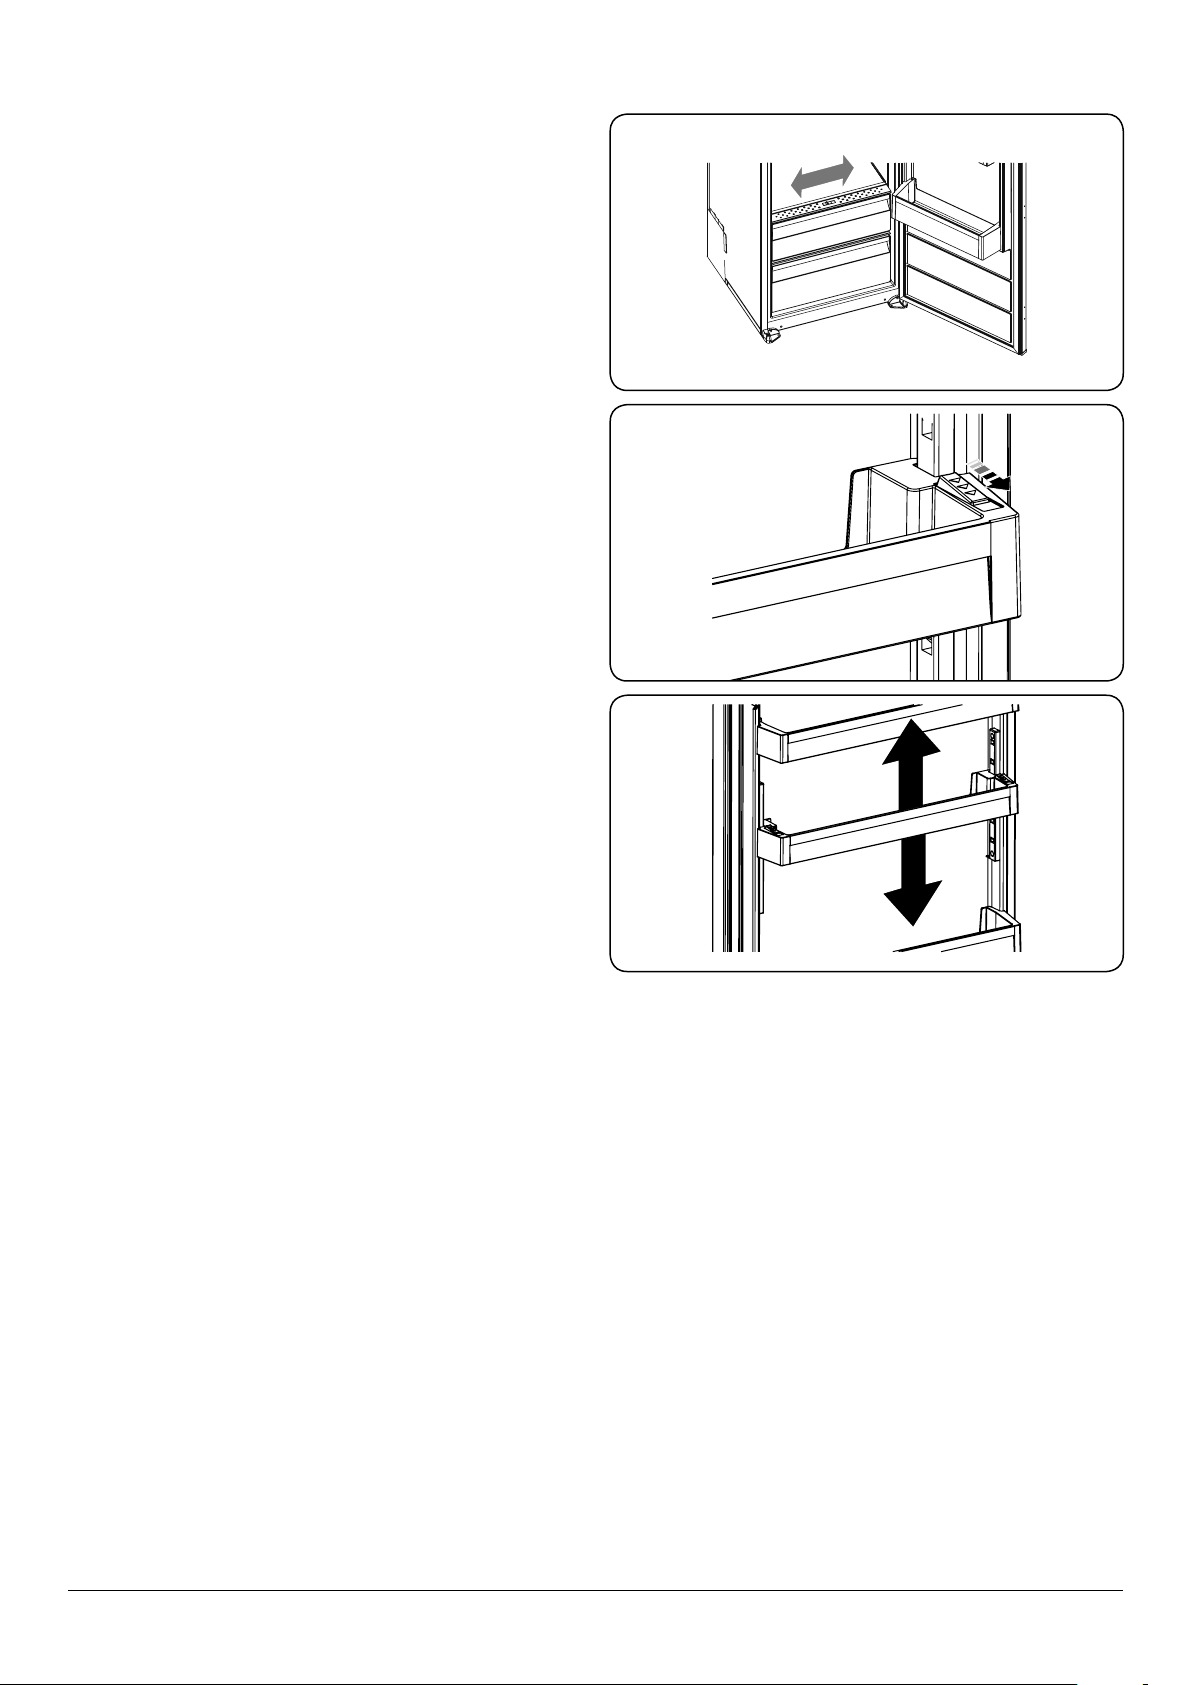
The Fresh Dial (Fig. 3.4)
If the crisper is full, the fresh dial located in front of the crisper
should be opened.
This allows the air in the crisper and the humidity rate to be
controlled, to increase the life of food within.
The dial, located behind the shelf, must be opened if any
condensation is seen on the glass shelf.
Opti-lift™
Fig. 3.4
Six dierent height adjustments can be made to provide
storage areas that you need by adjustable door shelf.
To change the position of adjustable door shelf.
Remove all foods, bottles and liquids from Opti-lift™ tray
before adjusting height.
Hold the bottom of the shelf and pull the buttons on the side
of the door shelf direction of arrow (Fig. 3.5). Position door
shelf to the height you need by moving up and down. After
you set the position, release the buttons on the side of the
door shelf (Fig. 3.6) Before releasing the door shelf, move up
down and make sure the door shelf is xed.
Note: Before moving door shelf is loaded, you must hold the
shelf by supporting the bottom. Otherwise, door shelf could
fall o the rails due to the weight. So damage may occur on
the door shelf or rails.
Fig. 3.5
Fig. 3.6
7
4. Food Storage Tips
Food storage
Fridge Compartment
• To reduce humidity and avoid the consequent
formation of frost, always store liquids in sealed
containers in the fridge. Frost tends to concentrate in
the coldest parts of the evaporating liquid and, in time,
your appliance will require more frequent defrosting.
• Never place warm food in the fridge. Warm food should
be allowed to cool at room temperature and should be
arranged to ensure adequate air circulation in the fridge
compartment.
• Make sure no items are in direct contact with the
rear wall of the appliance as frost will develop and
packaging will stick to it. Do not open the fridge door
frequently.
• We recommend that meat and clean fish are loosely
wrapped and stored on the glass shelf just above the
vegetable bin where the air is cooler, as this provides
the best storage conditions.
• Store loose fruit and vegetables in the crisper.
Food Maximum
storage time
Vegetables and fruits 1 week Vegetable bin
Meat and sh 2 - 3 Days Wrap in plastic foil,
Fresh cheese 3 - 4 Days On the designated
Butter and margarine 1 week On the designated
Bottled products e.g.
milk and yoghurt
Eggs 1 month On the designated egg
Cooked food All shelves
Until the expiry date
recommended by the
producer
How and where
to store
bags, or in a meat
container and store on
the glass shelf
door shelf
door shelf
On the designated
door shelf
shelf
Table 4.1
• Storing fruit and vegetables separately helps prevent
ethylene-sensitive vegetables (green leaves, broccoli,
carrot, etc.) being affected by ethylene-releaser fruits
(banana, peach, apricot, fig etc.).
• Do not put wet vegetables into the fridge.
• Storage time for all food products depends on the initial
quality of the food and an uninterrupted refrigeration
cycle before fridge storage.
• To avoid cross-contamination do not store meat
products with fruit and vegetables. Water leaking from
meat may contaminate other products in the fridge. You
should package meat products and clean any leakages
on the shelves.
• Do not put food in front of the air flow passage.
• Consume packaged foods before the recommended
expiry date.
NOTE: Potatoes, onions and garlic should not be stored in
the fridge. The table Table 4.1 is a quick guide to show you
the most ecient way to store the major food groups in your
fridge compartment.
8
 Loading...