

Rangemaster RMB610BL-SS Instruction manual

RMB610BL/SS
Electric Oven
User Guide
&
Installation & Service Instructions
U110586 - 04


Contents
1. Before You Start... 1
Installation and Maintenance 1
Electrical Safety 1
Before First Use 1
Personal Safety 1
Cleaning 2
2. Oven Overview 3
Setting the time 4
Changing the time 4
Using the oven 5
Change a function mode 6
Change a function temperature 6
To stop the oven at a specic time of day Please
set the oven function rst. 7
To start and stop the oven automatically Please
set the oven function rst. 8
Setting the minute minder 9
To set the child lock 9
Using the rapid heat 10
Setting a memory The memory function can be
used to save a frequently used setting. 11
To recall a memory 11
8. Installation 18
Dear Installer 18
Location of the Oven 18
Positioning the Oven 19
Provision for Ventilation 19
Electrical Connection 22
Current Operated Earth Leakage Breakers 23
Levelling 23
Customer Care 23
9. Circuit Diagram 24
10. Technical Data 25
11. Warranty/After Sales Service 26
3. Function Overview 12
4. Cooking Tips 13
Tips on Cooking with the Timer 13
General Oven Tips 13
5. Cooking Table 14
6. Cleaning Your Oven 15
Essential Information 15
Control Panel and Doors 15
Oven 16
Changing the bulb 16
Back light Fig. 8.5 16
7. Troubleshooting 17


1. Before You Start...
Thank you for buying a Rangemaster appliance. It should give
you many years trouble-free cooking if installed and operated
correctly. It is important that you read this section before you
start.
CAUTION: This appliance is for cooking purposes
only. It must not be used for other purposes, for
example room heating. Using it for any other
purpose could invalidate any warranty or liability
claim. Besides invalidating claims this wastes fuel
and may overheat the control knobs.
Installation and Maintenance
The electrical installation should be in accordance
with BS 7671, or with the relevant national and local
regulations. Have the installer show you the location of
the oven control switch and mark it for easy reference.
It is recommended that this appliance is serviced
annually. Only a qualied service engineer should service
the oven, and only approved spare parts should be used.
Make sure that the oven is wired in and switched on.
Always allow the oven to cool and then switch it o at the
mains before cleaning or carrying out any maintenance work,
unless otherwise specied in this guide.
• Before electrical reconnection, check that the appliance
is electrically safe.
The appliance should be powered down before
replacing the lamp to avoid the possibility of electric
shock. During oven operation, the interior surfaces
become very hot.
Before First Use
Before using the oven for the rst time clean it thoroughly.
Switch o the unit at the isolator or mains supply. Remove all
packing materials and accessories. Using hot water and a mild
detergent, wipe the oven interior and then rinse carefully
with a damp cloth. Wash the oven shelves and accessories in
a dishwasher or using hot water and a mild detergent and dry
thoroughly.
Slide the oven shelves into the oven and close the door. To
dispel any manufacturing smells, turn the oven to 200°C and
run for an hour.
Before using the grill for the rst time you should also turn on
the grill and run for 15 minutes with the grill pan in position,
pushed fully back, and the grill door open.
Personal Safety
Electrical Safety
The electrical installation must be installed in accordance
with all relevant British Standards/Codes of Practice, BS 7671.
Or with the relevant national and local regulations and with
the local gas and electricity supply companies’ requirements.
Otherwise, all installations must be in accordance with the
relevant instructions in this booklet.
Read the instructions before installing or using this appliance.
• The rating plate is located on the right side of the door.
• This appliance is heavy so take care when moving it.
• The appliance may be installed in a kitchen/kitchen
diner but NOT in a room containing a bath or shower.
• This appliance MUST be earthed.
• The appliance MUST NOT be connected to an ordinary
domestic power point.
• Set the clock to make sure that the appliance is
functional – see the relevant section in this manual.
• The appliance must be installed in accordance with the
regulations in force and only in a well ventilated space.
• Failure to install the appliance correctly could invalidate
any warranty or liability claims and lead to prosecution.
• DO NOT manouvre the appliance while it is plugged
into the electricity supply.
Accessible parts will become hot during use and will
retain heat even after you have stopped cooking.
Keep babies and children away from the oven.
When the oven is not in use, ensure that the control
knobs are in the OFF position.
To minimise the possibility of burns, always be
certain that the controls are in the OFF position and
that the entire oven is cool before attempting to
clean.
Use dry oven gloves when applicable – using damp
gloves might result in steam burns when you touch a
hot surface. Never operate the oven with wet hands.
DO NOT use a towel or other bulky cloth in place of a
glove – it might catch re if it touches a hot surface.
Always keep combustible wall coverings or curtains,
etc., a safe distance away from your oven, and never
wear loose-tting or hanging clothes while using the
appliance.
DO NOT store or use aerosols, or any other
potentially combustible or ammable materials, in
the vicinity of the oven.
Care should be taken to avoid touching the heating
elements inside the main oven.
Whole chickens and large joints of meat should be
defrosted thoroughly in the refrigerator. Do not
defrost in a warm oven or while the adjoining oven
is in operation or still warm.
1
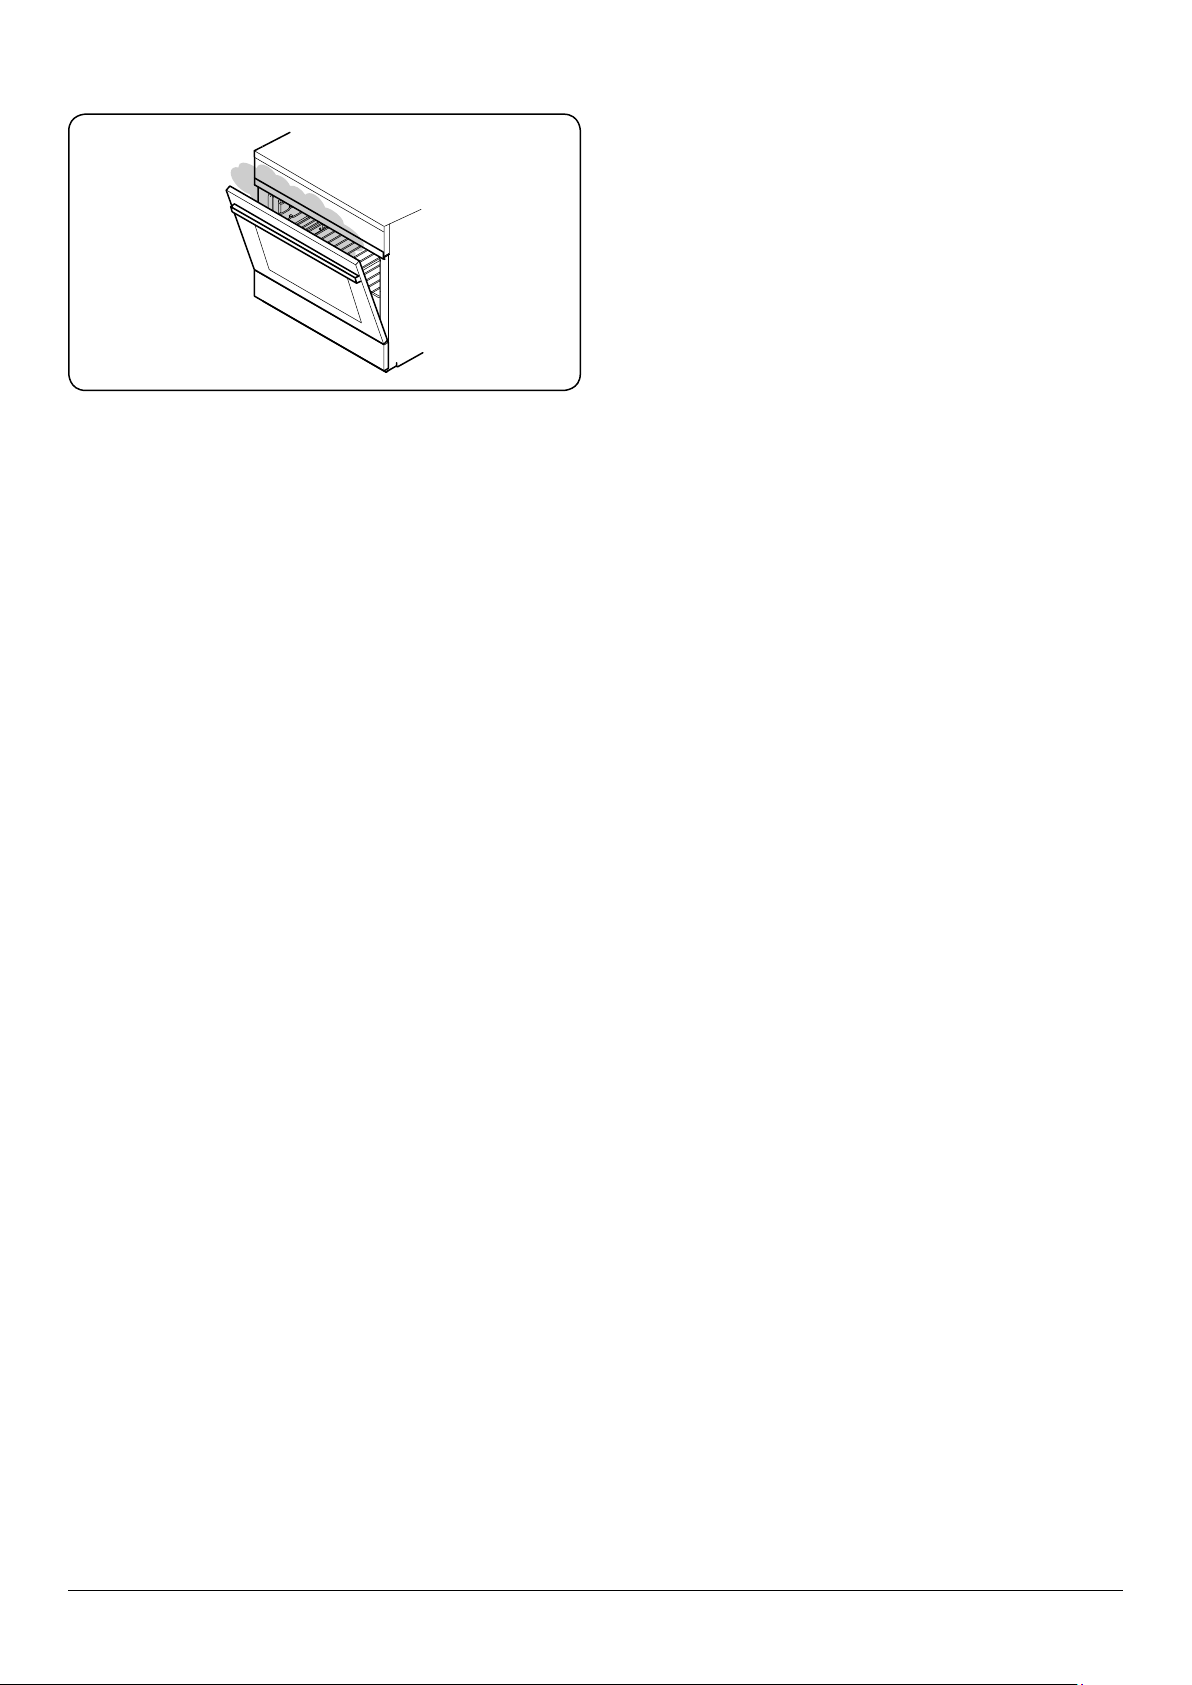
Fig. 1.1
Cooking high moisture content foods can create a
‘steam burst’ when the oven door is opened. When
opening the oven stand well back and allow any
steam to disperse (Fig. 1.1).
When the oven is on, DO NOT leave the oven door
open for longer than necessary.
When cooking dishes that contain alcohol, the
alcohol may evaporate due to the high temperatures
and the vapour can catch re if it comes into contact
with a hot part of the oven.
Frozen foods such as pizzas should be cooked
on the wire grill. If the baking tray is used, it may
become deformed due to the great variation in
temperatures.
Do not pour water into the bottom of the oven when
it is hot. This could cause damage to the enamel
surface.
The oven door must be closed during cooking.
Fruit juices will leave stains, which will leave a mark
on the enamel surfaces of the oven. When cooking
very moist cakes, use the deep pan.
Do not rest oven accessories on the open oven door.
DO NOT use a steam cleaner on your appliance.
Never heat unopened food containers. Pressure
build-up may cause the containers to burst and
cause injury.
DO NOT use aluminium foil to cover shelves, linings
or the oven roof.
This appliance is heavy, so take care when moving it.
The appliance is not intended to be operated by
means of external timer or separated remote-control
system.
This appliance can be used by children aged from 8
years and above and persons with reduced physical,
sensory or mental capabilities or lack of experience
and knowledge if they have been given supervision
or instruction concerning use of the appliance in a
safe way and understand the hazards involved.
Children less than 8 years of age should be kept
away unless continuously supervised. Children
shall not play with the appliance. Cleaning and user
maintenance shall not be made by children without
supervision.
Cleaning
In the interests of hygiene and safety, the oven should
be kept clean at all times as a build up in fats and other
foodstus could result in a re.
Clean only the parts listed in this guide.
Clean with caution. If a wet sponge or cloth is used to wipe
spills on a hot surface, be careful to avoid steam burns. Some
cleaners can produce noxious fumes if applied to a hot
surface.
2
0:00
1
56
34
78
9 10
11
12
2
ArtNo.325-0011 - BI oven R6012
88:88
A
C
B
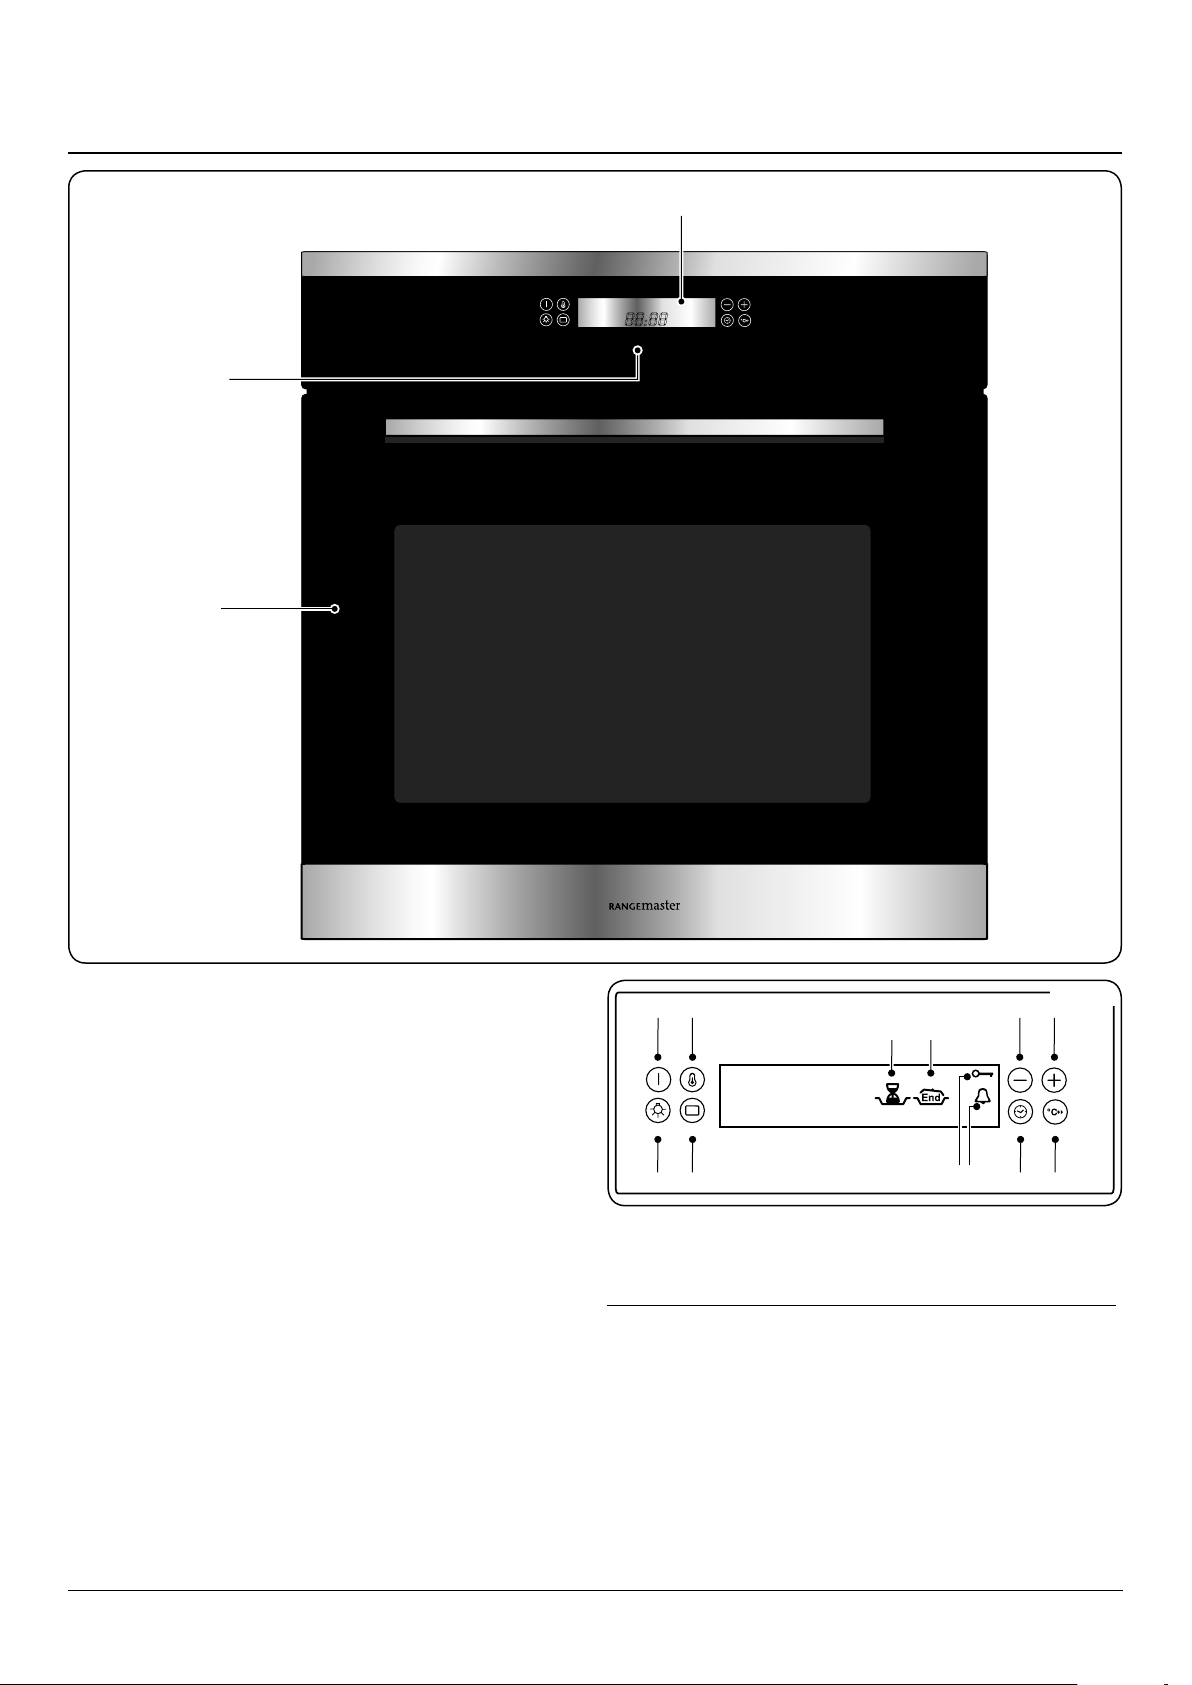
2. Oven Overview
Fig. 2.1
The oven (Fig. 2.1) has a 10-function oven cavity with a TFT
screen and touch sensitive control panel.
Checking the Parts
The oven is supplied with the following parts:
• 2x Shelves
• 1x Grill pan and trivet
• 1x Handle
• Built-in fixing kit 4x woodscrews (4mm x 25 mm)
IMPORTANT:
When correctly installed, your product will meet
all safety requirements laid down for this type of
product. However, special care should be taken
around the rear or the underneath of the appliance
as these areas are not designed or intended to be
touched and may contain sharp or rough edges that
could cause injury.
Key: Fig. 2.1
A. Display
B. Controls
C. Oven
Key: Fig. 2.2
1. ON /OFF
2. Temperature
3. - Adjustment
4. + Adjustment
5. Light
6. Function
selection
Fig. 2.2
7. Clock
8. Rapid Heat
9. Duration (Auto)
10. End time (Auto)
11. Child lock
12. Minute minder
3
9:00
10:00
8:45
10:30
9:45
10:30
00:00
9:00
9:00
10:00
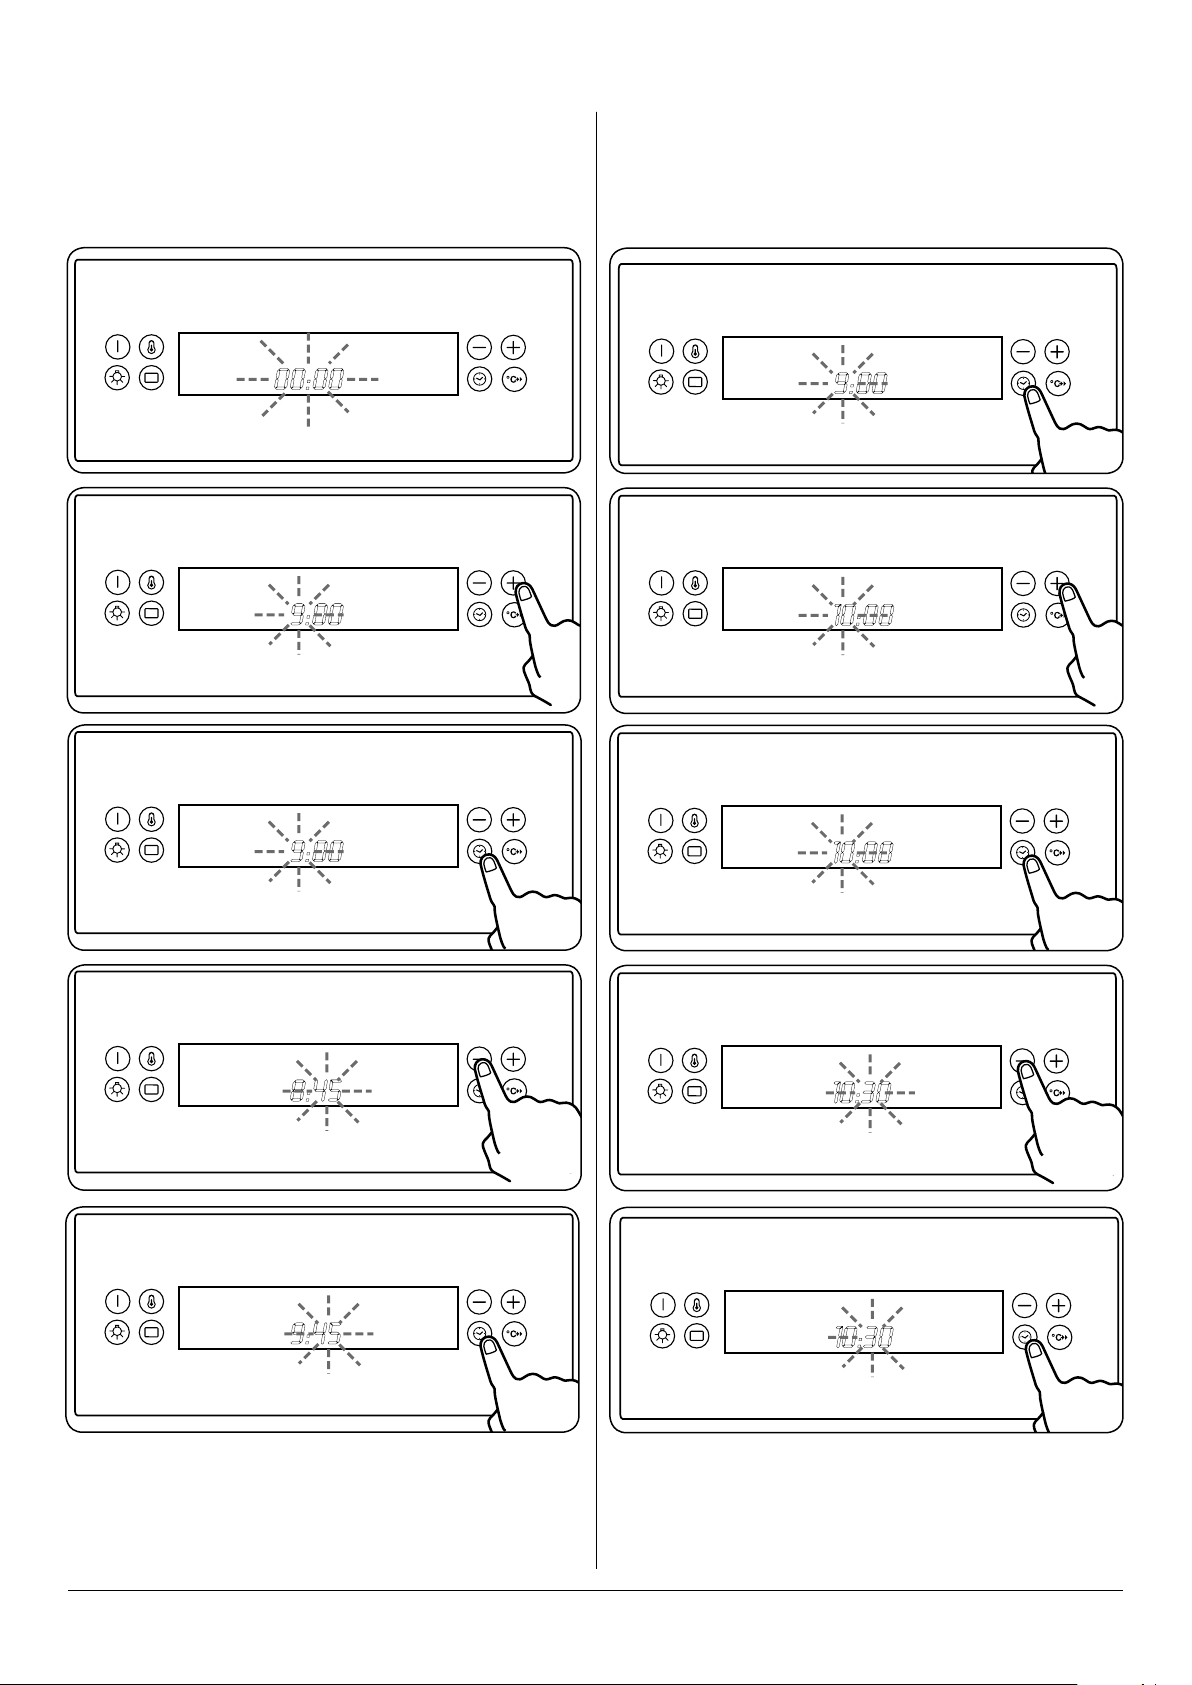
Once the cooker is connected and switched on, the display
will start to ash. The clock must be set to the time of day
before the oven will work.
If the clock time needs to be reset or adjusted, please follow
the procedure below.
Setting the time
Step 1. The clock must be set before using the oven.
Step 2. Hour will ash.
Step 3. Conrm hour.
Changing the time
Step 1. The clock must be set before using the oven.
Press for 3 seconds then press again for 1 second.
Step 2. Hour will ash.
Step 3. Conrm hour.
Step 4. Minutes will ash.
Step 5. Conrm minutes.
Step 4. Minutes will ash.
Step 5. Conrm minutes.
4
80c
80c
180c
180c
180c
180c
9:03
180c
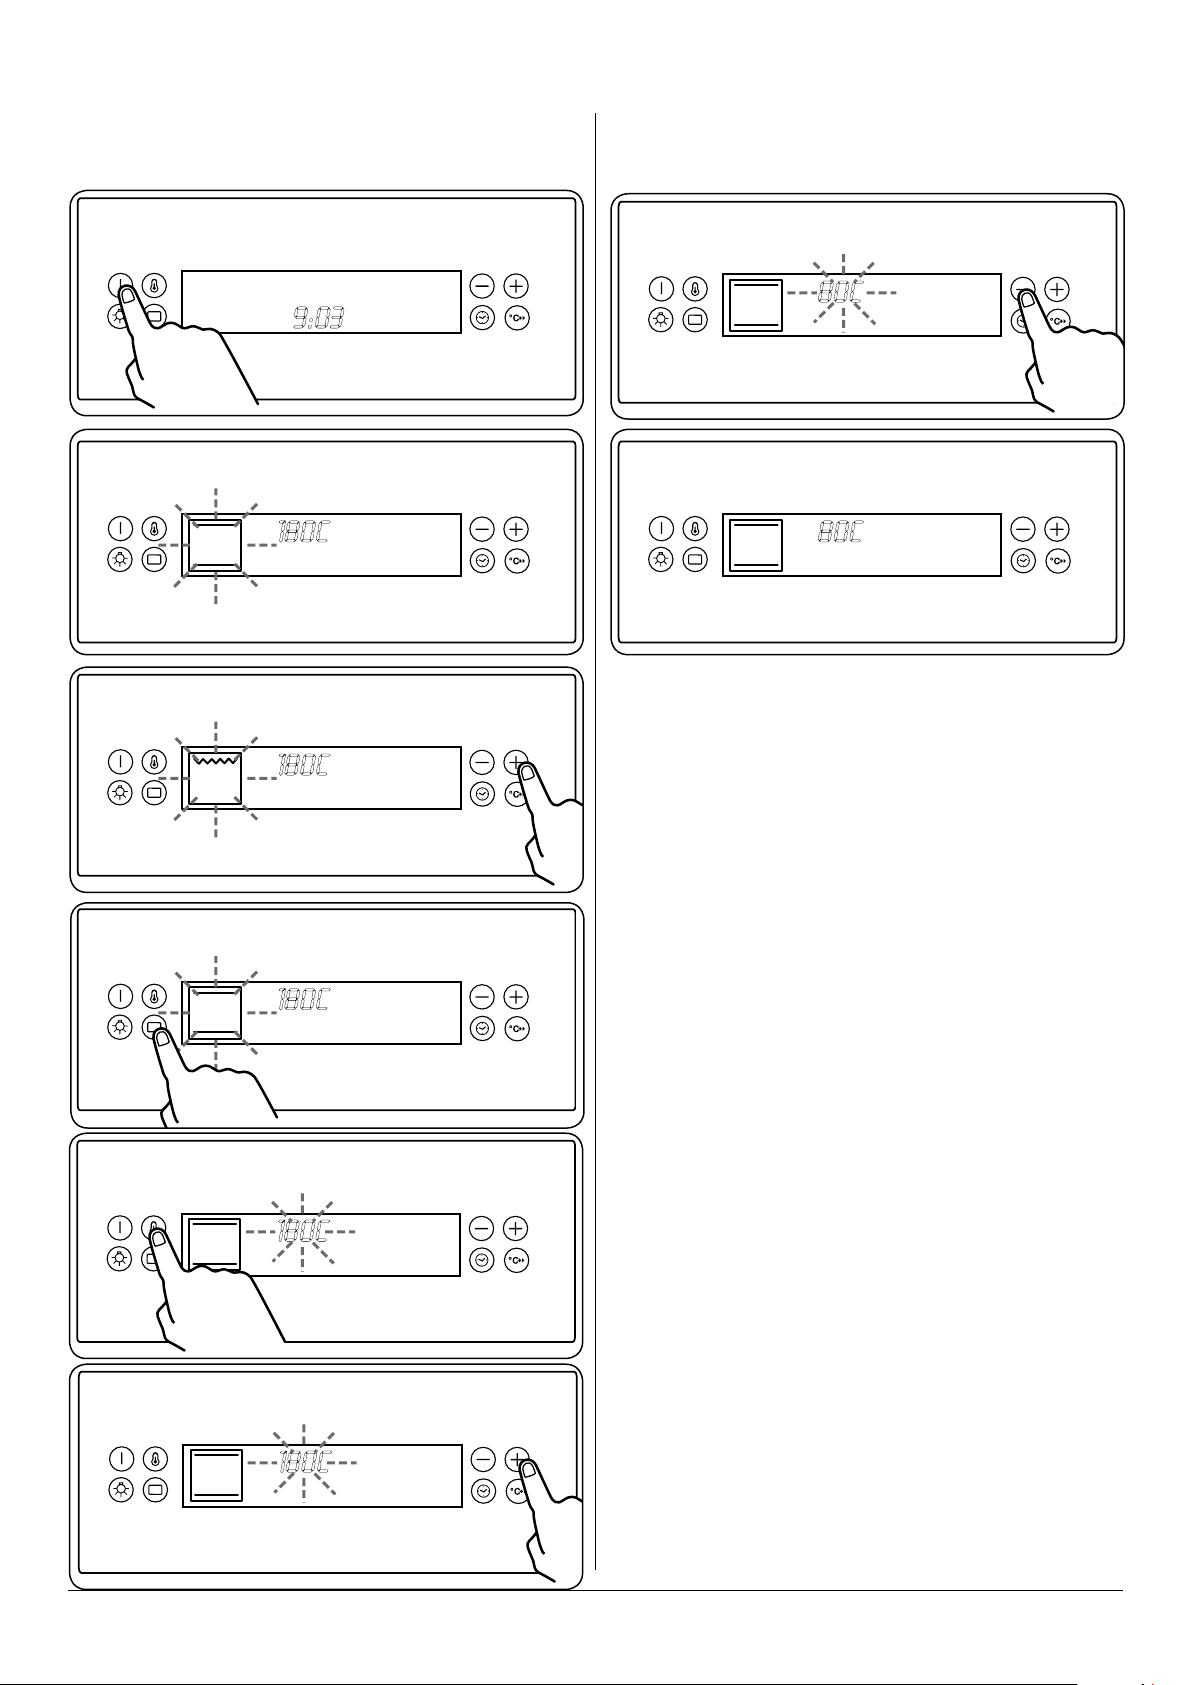
Using the oven
Please read the following steps before using the oven.
Step 1. Switch on.
Step 2. Function display will ash.
Step 3. Choose a function.
Step 7. Set the temperature - decrease.
Step 8. Press the temperature button to start and conrm
selection.
Step 4. Conrm function mode.
Step 5. Press temperature until display ashes.
Step 6. Set the temperature - increase.
5
180c
180c
180c
180c
180c
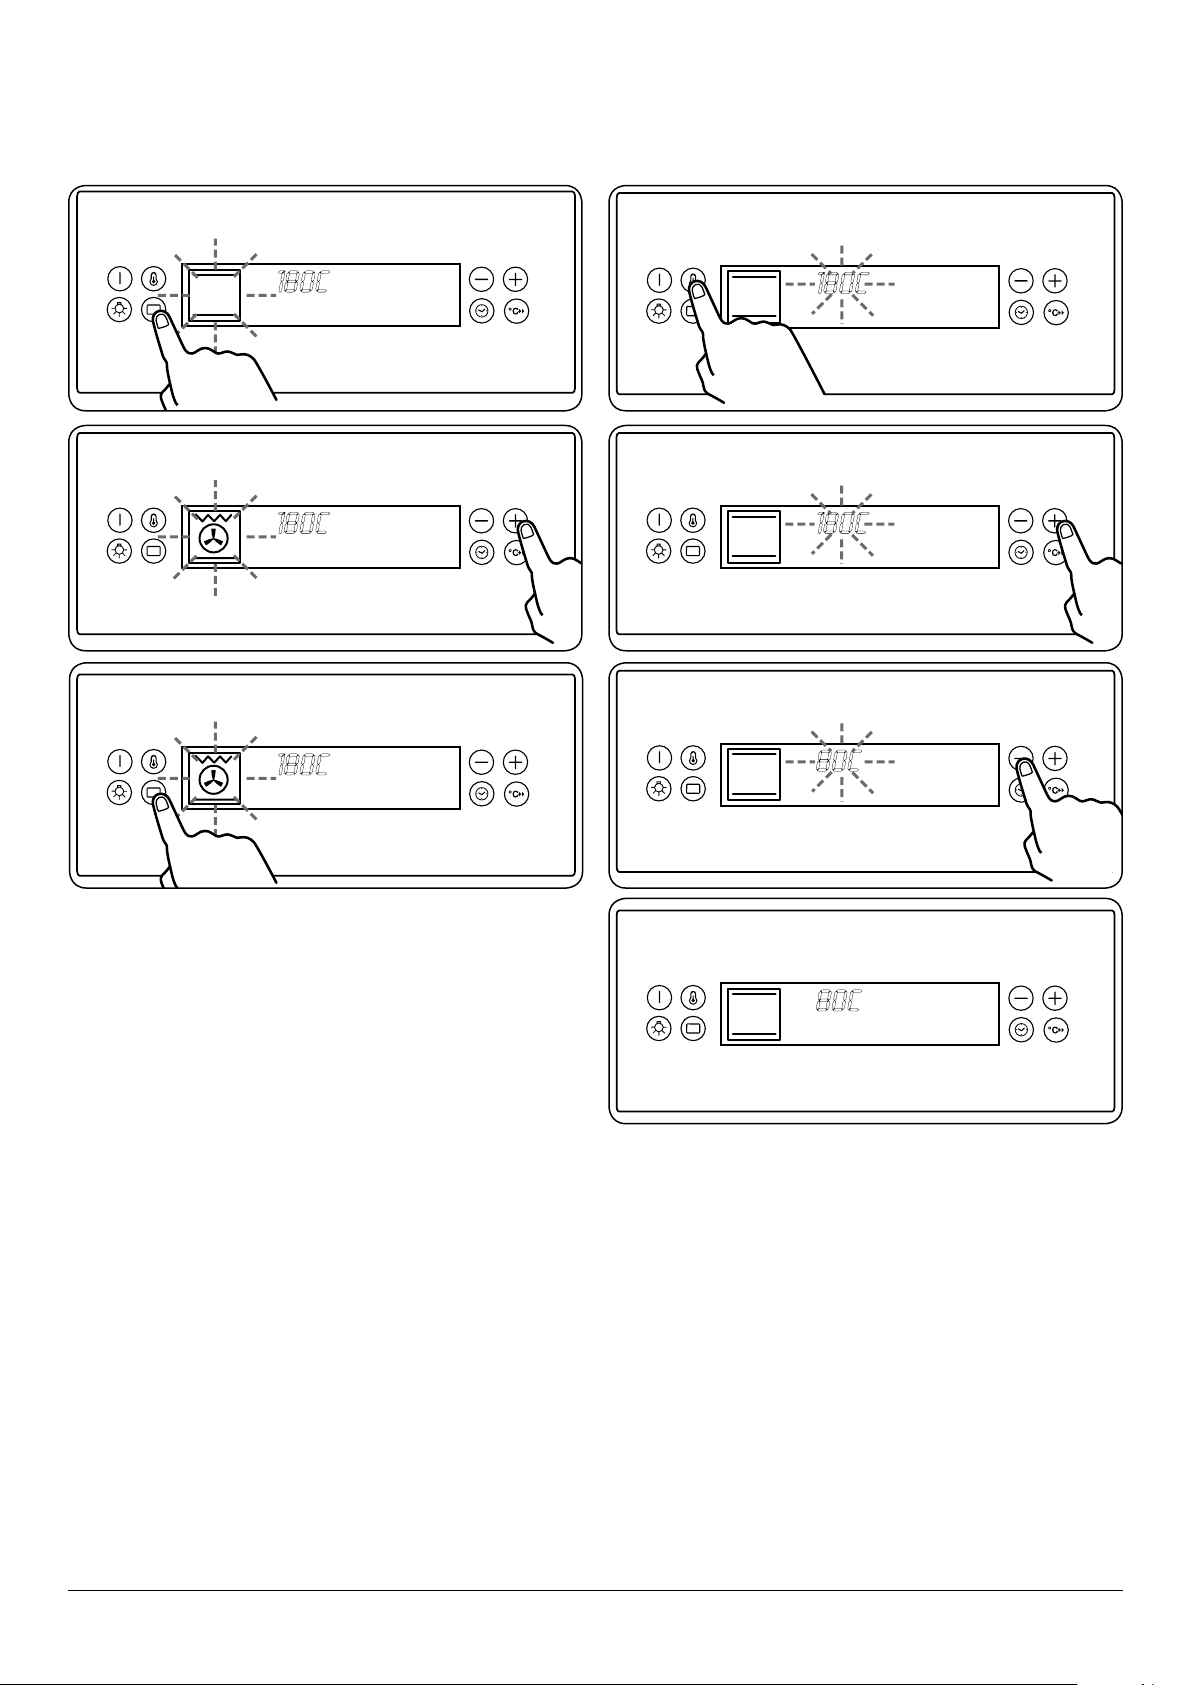
Change a function mode Change a function temperature
80c
80c
Step 1. Press the Function button the display will ash. Step 1. Press temperature until display ashes.
Step 2. Choose a function. Step 2. Set the temperature - increase.
Step 3. Conrm function mode.
Press for 1 second.
Step 3. Set the temperature - decrease.
Step 4. Press the temperature button to start and conrm
selection.
6
 Loading...