

Page 1

RMB608BL/SS
Electric Oven
User Guide
&
Installation & Service Instructions
U110590 - 02
Page 2

Page 3

Contents
1. Before You Start... 1
2. Oven Overview 3
3. Function Overview 4
4. Programming Overview 5
5. Cooking Tips 7
6. Cooking Table 8
7. Cleaning Your Oven 9
8. Troubleshooting 11
9. Installation 12
10. Circuit Diagram 16
11. Technical Data 17
12. Warranty/After Sales Service 18
Page 4

Page 5

1
Thank you for buying a Rangemaster oven. It should give you
many years trouble-free cooking if installed and operated
correctly. It is important that you read this section before you
start, particularly if you have not used an electric oven before.
CAUTION: This appliance is for cooking purposes
only. It must not be used for other purposes, for
example room heating. Using it for any other
purpose could invalidate any warranty or liability
claim. Besides invalidating claims this wastes fuel
and may overheat the control knobs.
Installation and Maintenance
The electrical installation should be in accordance
with BS 7671, or with the relevant national and local
regulations. Have the installer show you the location of
the oven control switch and mark it for easy reference.
It is recommended that this appliance is serviced
annually. Only a qualied service engineer should service
the oven, and only approved spare parts should be used.
Make sure that the oven is wired in and switched on.
Always allow the oven to cool and then switch it o at the
mains before cleaning or carrying out any maintenance work,
unless otherwise specied in this guide.
Before First Use
Before using the oven for the rst time clean it thoroughly.
Switch o the unit at the isolator or mains supply. Remove all
packing materials and accessories. Using hot water and a mild
detergent, wipe the oven interior and then rinse carefully
with a damp cloth. Wash the oven shelves and accessories in
a dishwasher or using hot water and a mild detergent and dry
thoroughly.
Slide the oven shelves into the oven and close the door. To
dispel any manufacturing smells, turn the oven to 200°C and
run for an hour.
Before using the grill for the rst time you should also turn on
the grill and run for 15 minutes with the grill pan in position,
pushed fully back, and the grill door open.
Personal Safety
Accessible parts will become hot during use and
will retain heat even after you have stopped
cooking.
Keep babies and children away from the
oven.
When the oven is not in use, ensure that the control
knobs are in the OFF position.
To minimise the possibility of burns, always be
certain that the controls are in the OFF position and
that the entire oven is cool before attempting to
clean.
Use dry oven gloves when applicable – using damp
gloves might result in steam burns when you touch a
hot surface. Never operate the oven with wet hands.
Do not use a towel or other bulky cloth in place of a
glove – it might catch re if it touches a hot surface.
Always keep combustible wall coverings or curtains,
etc., a safe distance away from your oven, and never
wear loose-tting or hanging clothes while using the
appliance.
Do not store or use aerosols, or any other potentially
combustible or ammable materials, in the vicinity
of the oven.
Care should be taken to avoid touching the heating
elements inside the main oven.
Whole chickens and large joints of meat should be
defrosted thoroughly in the refrigerator. Do not
defrost in a warm oven or while the adjoining oven
is in operation or still warm.
Cooking high moisture content foods can create a
‘steam burst’ when the oven door is opened. When
opening the oven stand well back and allow any
steam to disperse.
When the oven is on, DO NOT leave the oven door
open for longer than necessary.
Never heat unopened food containers. Pressure
build-up may cause the containers to burst and
cause injury.
Do not use aluminium foil to cover shelves, linings or
the oven roof.
This appliance is heavy, so take care when moving it.
The appliance is not intended to be operated by
means of external timer or separated remote-control
system.
This appliance can be used by children aged from 8
years and above and persons with reduced physical,
sensory or mental capabilities or lack of experience
and knowledge if they have been given supervision
or instruction concerning use of the appliance in a
safe way and understand the hazards involved.
Children less than 8 years of age should be kept
away unless continuously supervised. Children
shall not play with the appliance. Cleaning and user
maintenance shall not be made by children without
supervision.
1. Before You Start...
Page 6

2
Cleaning
In the interests of hygiene and safety, the oven should
be kept clean at all times as a build up in fats and other
foodstus could result in a re.
Clean only the parts listed in this guide.
Clean with caution. If a wet sponge or cloth is used to wipe
spills on a hot surface, be careful to avoid steam burns. Some
cleaners can produce noxious fumes if applied to a hot
surface.
Page 7
3
ArtNo.325-0011 - BI oven R6012
1
2
4
5
8
7
6
3
A
C
B
Fig. 2.1
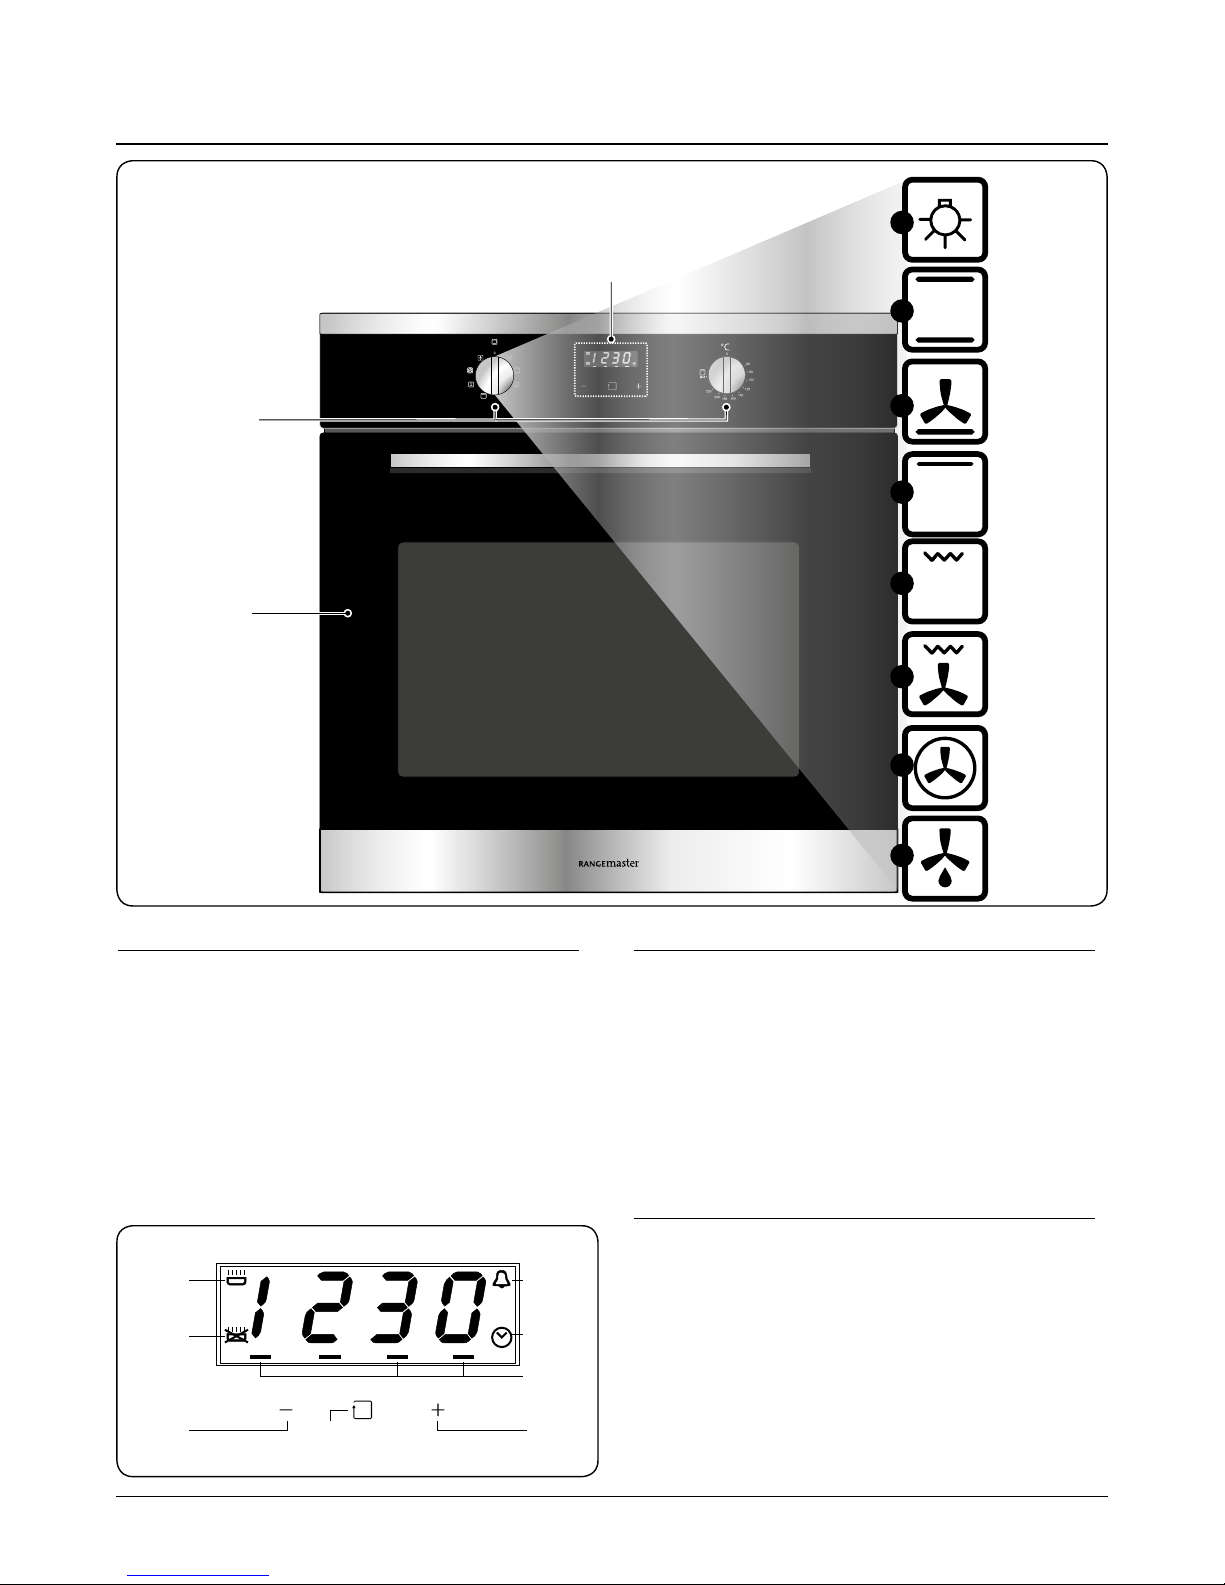
1. Oven Light
2. Conventional
3. Delicate
4. Top Heat
5. Grill
6. Fan Grill
7. Bake (Fan Oven)
8. Defrost
Key: Fig. 2.1
A. 3 buttons, clock and
function display
B. Temperature and
function retractable
knobs
C. 8 Function oven
2. Oven Overview
6 7
2
4
1
3
5
8
Fig. 2.2
Key: Fig. 2.2
1. Cooking time
2. Minute minder
3. End cooking time
4. Clock
5. Indicators
6. Decrease
7. Menu
8. Increase
Checking the Parts
The oven is supplied with the following parts:
• 1x Handle
• 2x Shelf
• 1x Grill pan and trivet
• Built-in fixing kit, 4x woodscrews 4 mm x 25 mm
Page 8
4
3. Function Overview
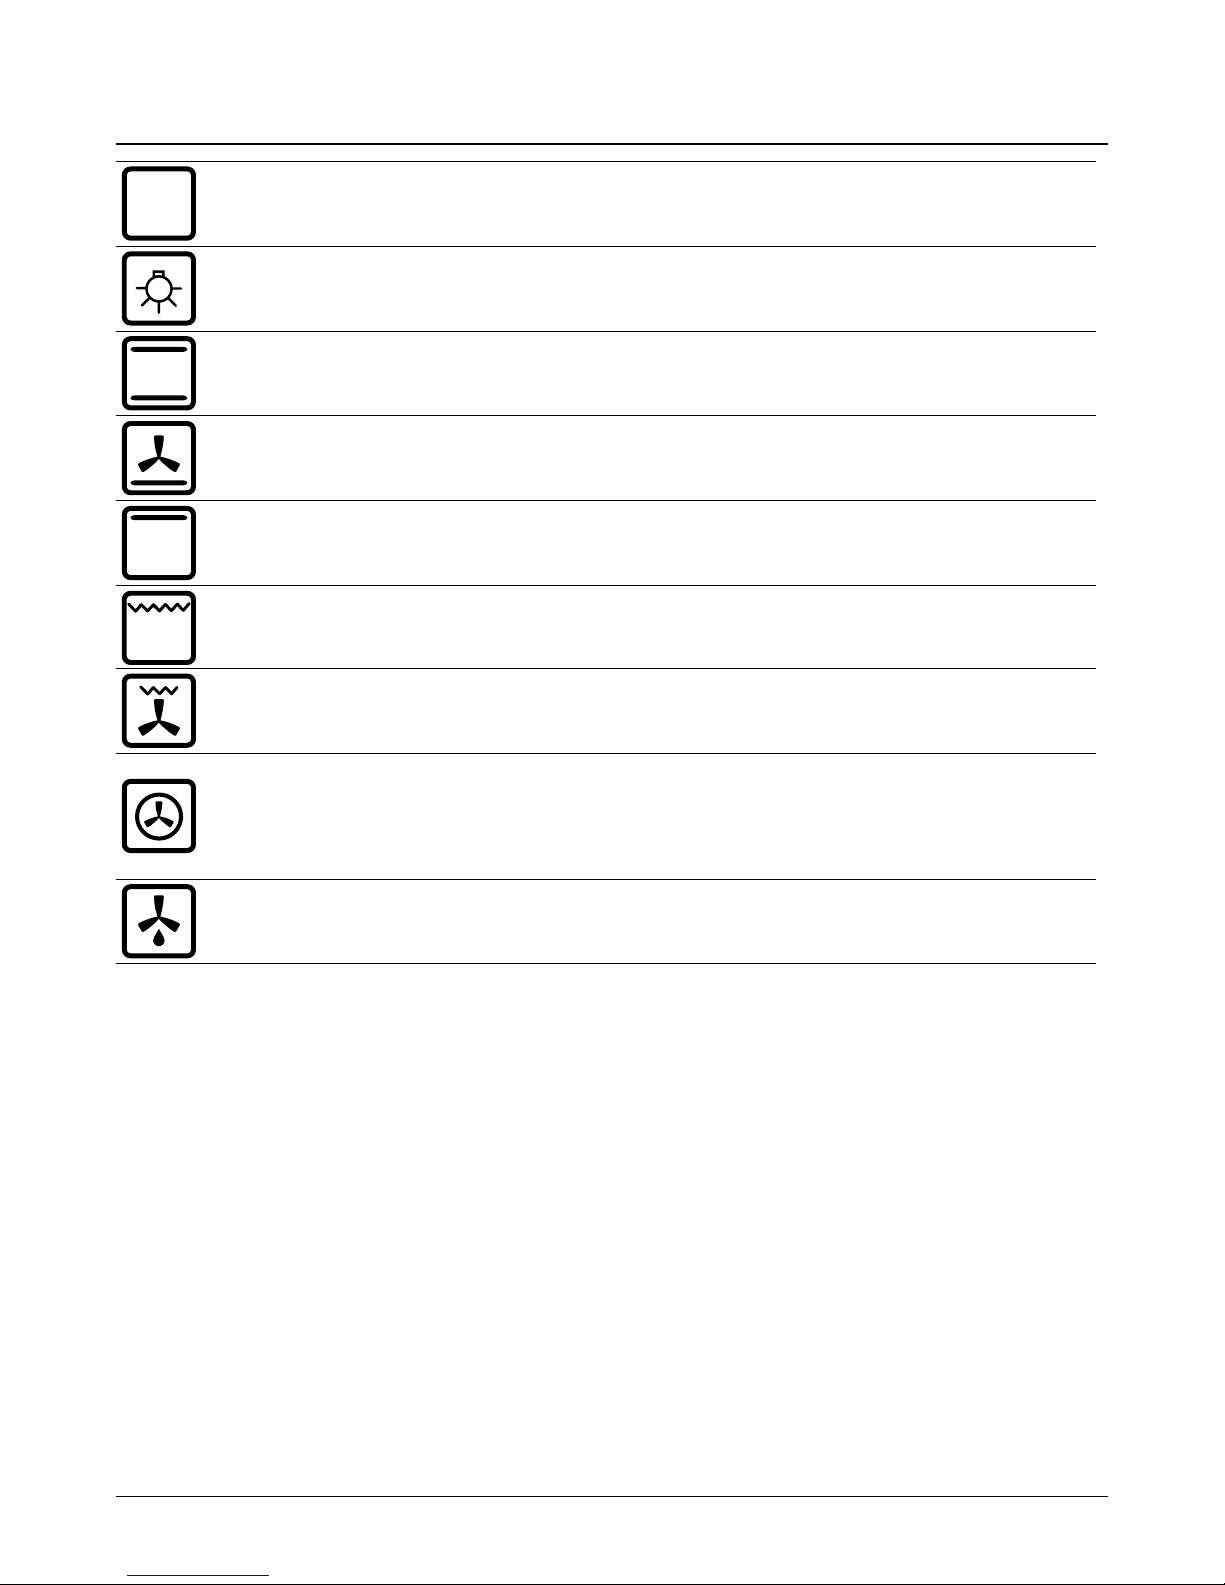
No Function Mode
Selected
Oven Light The oven light will operate on all selected function.
Conventional heat
Shelf position 2 or 3
This function uses the upper and lower heating elements. Natural convection
creates a perfect cooking zone in the centre of the oven, ideal for dark fruit cakes
and pastries.
Delicate
Gentle form of heating using base heat and fan. Suitable for pastries, cakes and
open tarts for examples quiches.
Top Heat Top heating is used to brown the food at the end of cooking
Grill
This function radiates the heat from the grill element and the top element. This fully
temperature variable grill is ideal for grilling a family meal.
Fan Grill (Fanned Grill)
This function uses the fan to circulate the heat from the grill element around the
food.
Bake (Fan Oven)
Using the circular element and the fan, this cooking function blows the air into and
around the oven cavity.
Temperatures are achieved quicker, reducing or even removing the need for
preheating. Both cooking temperatures and cooking times can be reduced for a
more energy ecient cooking programme.
Defrost
Shelf position 1, 2 or 3
Using the fan, this oven function circulates the air around the oven cavity, speeding
up the natural defrost process.
For each grill function please note:
• Always grill with the oven door closed.
• Put the grill pan as close to the grill as possible.
• Do not grill for more than 30 minutes at a time.
• Preheat the grill for up to five minutes with the oven door
closed.
• Unless otherwise stated, the temperature can be
set between 50°C and 250°C in 5°C increments. The
temperature can be adjusted at any time by using the “+”
or “-” keys.
Page 9
5
Oven Shelf levels
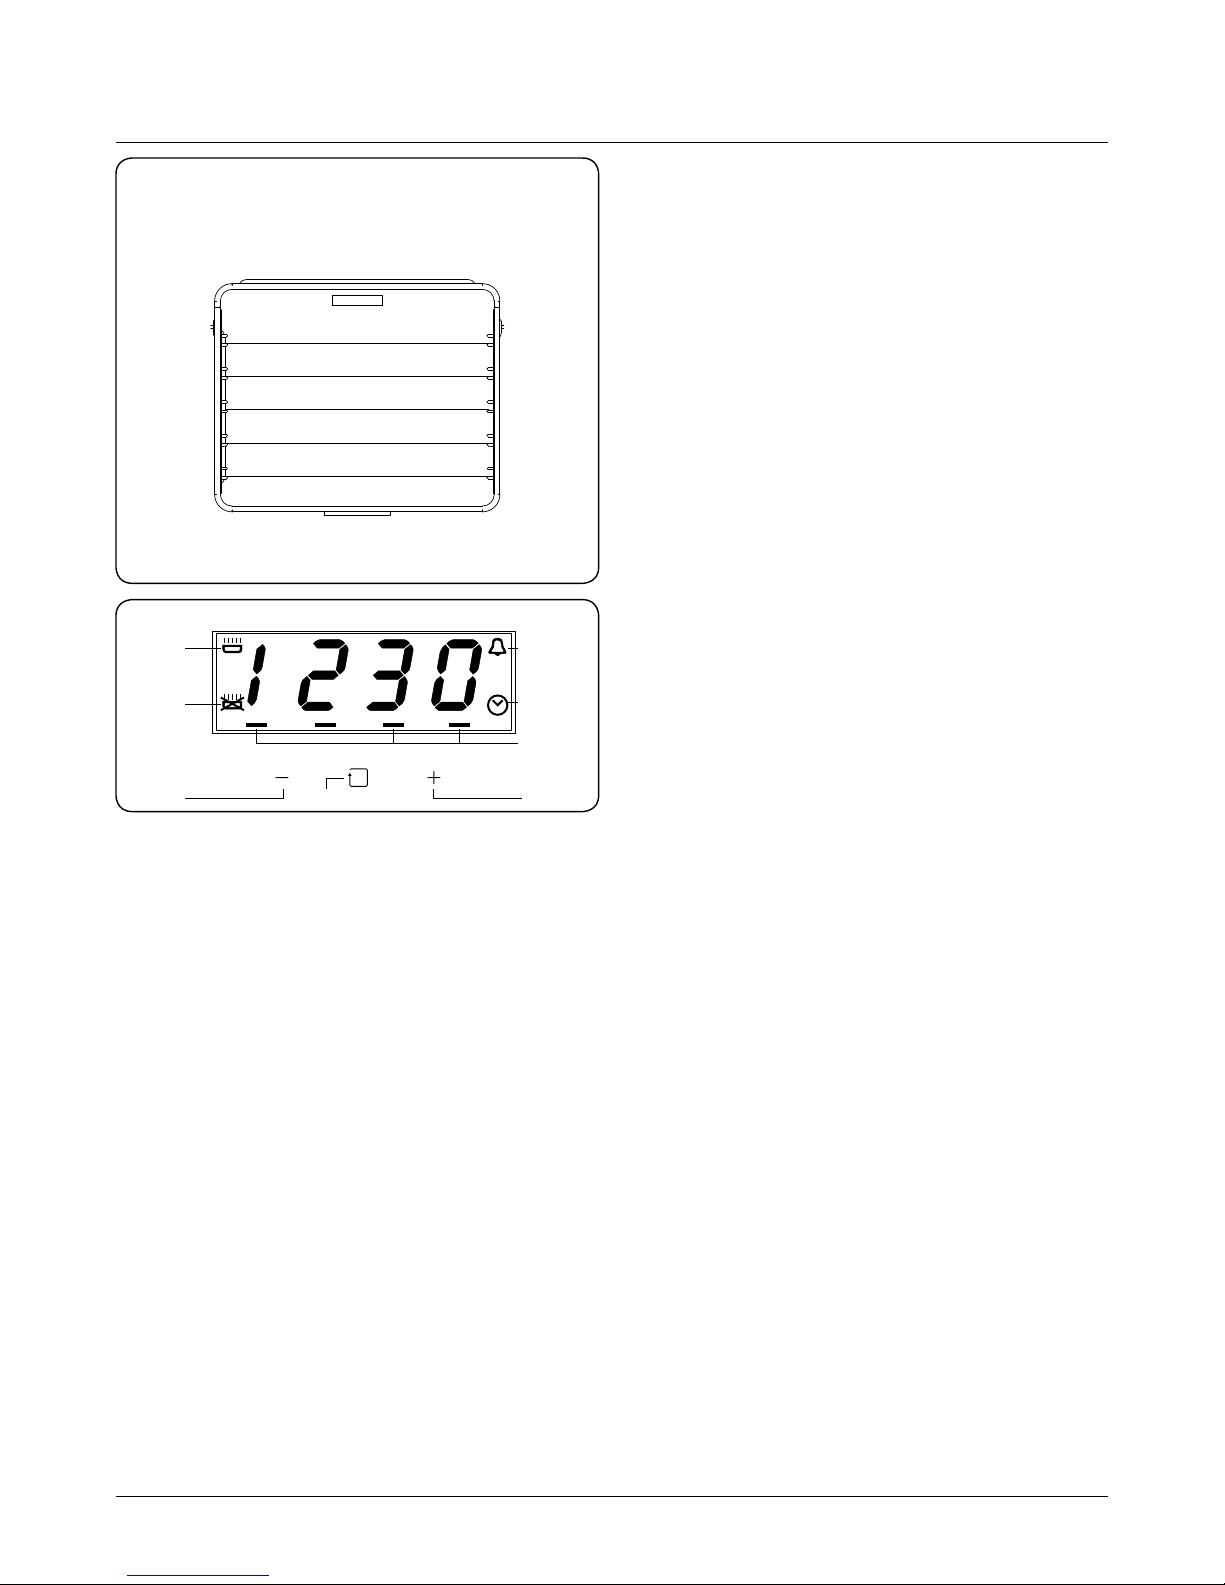
Always count shelf levels from the bottom upwards (Fig. 4.1)
When correctly installed, your product will meet
all safety requirements laid down for this type of
product. However, special care should be taken
around the rear or the underneath of the appliance
as these areas are not designed or intended to be
touched and may contain sharp or rough edges that
could cause injury.
Setting the clock
The clock is preset to 12:00, and will revert to this after a
power failure. Press Menu (7) and press repeatedly untill the
clock indicator flashes (5), while the clock indicator flashes,
touch ‘-’ (6) or ‘+’ (8) to set the time (Fig. 4.2). When you set
the correct time, the clock will set after approximately five
seconds delay and the indicator will disappear.
Minute minder
The minute minder can be used when the oven is switched
on or o. It can be set for up to 23 hours and 59 minutes.
To set the minute minder:
1. Press Menu (7) and press repeatedly untill the until the
minute minder indicator (5), (2) ashes (Fig. 4.2).
2. Then press either the ‘-’ (6) or ‘+’ (8) to select the
required duration for the minute minder (2). When
you have set the duration, touch Menu (7) or wait
for approximately ve seconds. The minute minder
indicator (5) will stay on to conrm the minute minder
is on.
3. When the countdown is complete, there will be an
alarm which will continue for two minutes and the
minute minder indicator will ash. To switch o the alert
beep, touch any key.
Note: The alarm will cut o after two minutes if it is not
switched o manually.
At the end of the countdown, the minute minder will
not switch o the oven. Remember to turn o the
oven manually.
6 7
2
4
1
3
5
8
1
2
3
4
5
Fig. 4.1
Fig. 4.2
4. Programming Overview
Page 10
6
Semi-automatic cooking
The lower oven can be set to switch o automatically with a
preset time of 10 hours. Cannot be used on the top oven.
This features works by knowing the cooking duration. For
example if the time is 13:30 and the food is required to bake
for 45 minutes, the lower oven will stop working at 14:15.
1. Select your desired lower oven function and
temperature (the oven will switch on).
2. Press Menu (7) and press repeatedly untill the cooking
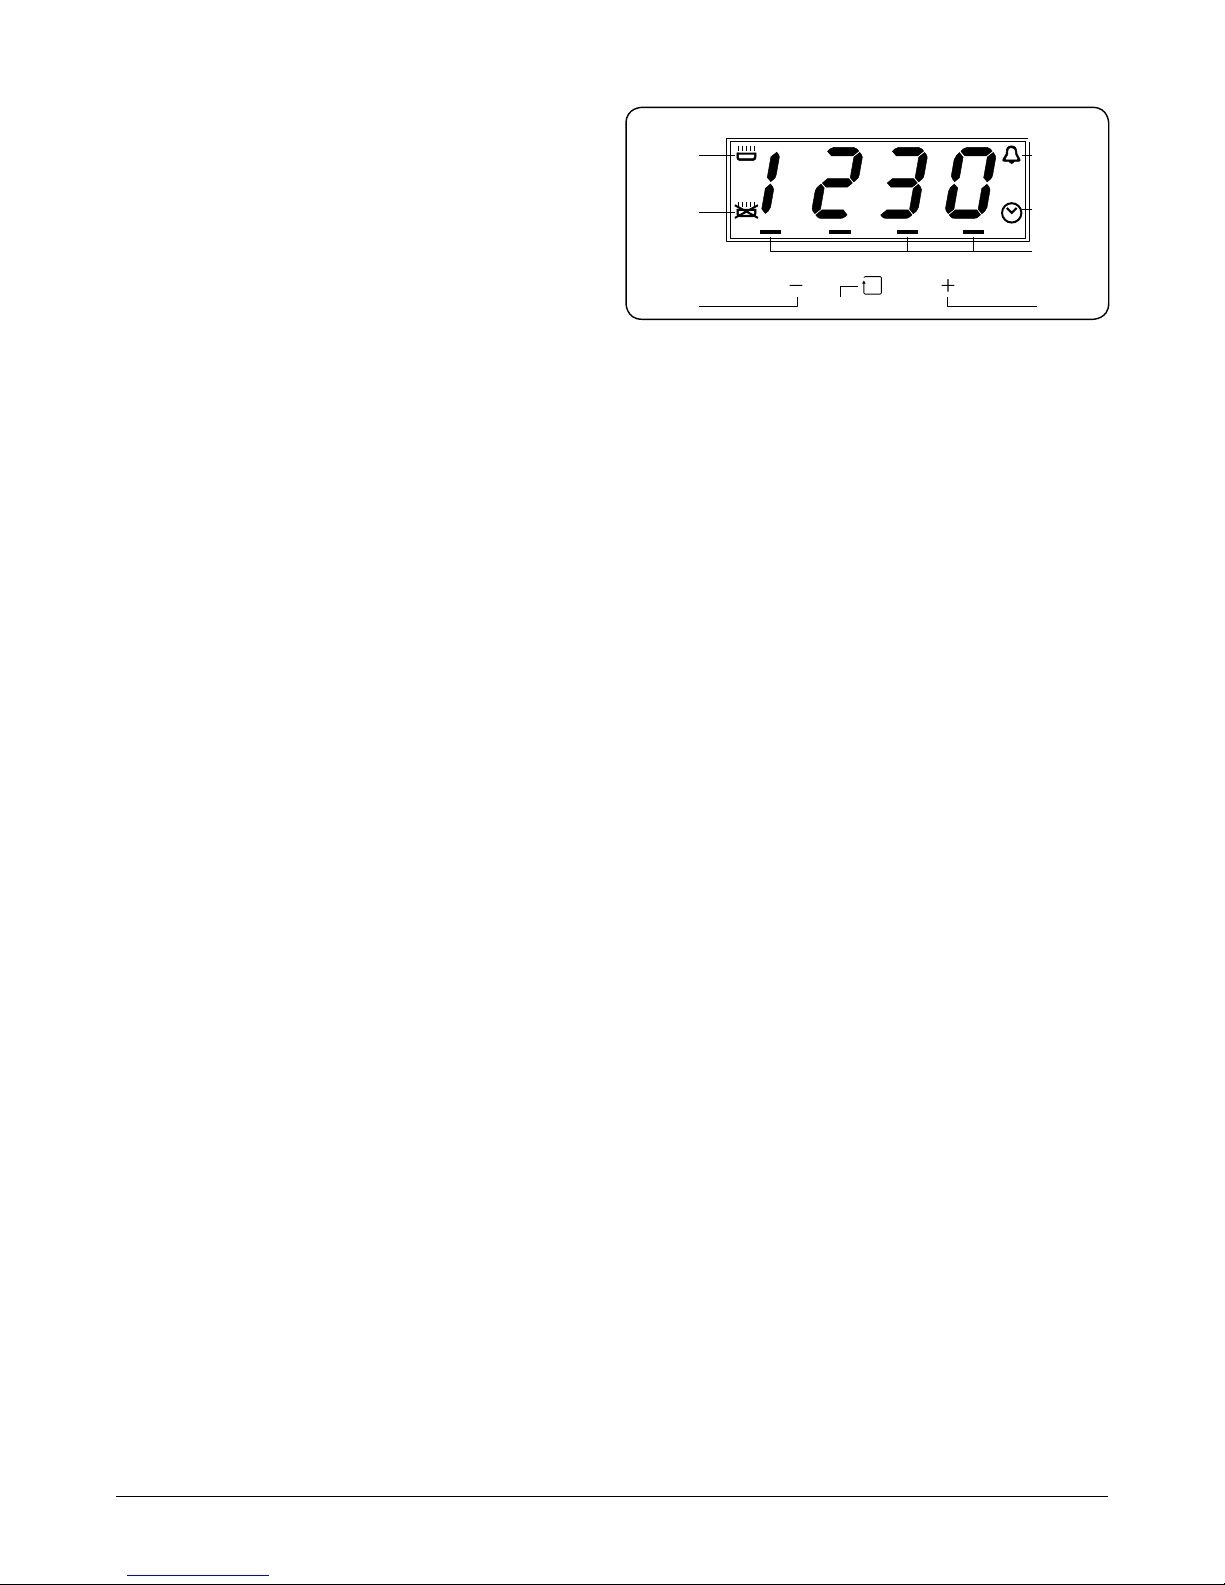
time indicator ashes (Fig. 4.3).
3. Then press either the ‘-’ (6) or ‘+’ (8) to select the
required duration to set the semi-automatic cooking.
When you have set the duration, wait for approximately
ve seconds. The cooking time indicator will relower lit
to conrm the semi-automatic program is on.
4. When the cooking time is complete, the lower oven
will emit an alarm, switch o the function and oven
light. The alarm will continue for two minutes and the
cooking time indicator will ash. To switch o the alarm,
press any button.
At the end of the cooking programme, remember to
turn o the oven manually.
Automatic cooking (Delayed Start)
The lower oven can be set to switch o automatically with a
preset time of 10 hours. Cannot be used on the top oven.
This features allows you to adjust your cooking start time by
knowing when you want the cooking time to end.
For example if the time is 13:30 and the food is required to
bake for 45 minutes, the lower oven will stop working at
14:15. However you can change the nish time for example to
16:30, the lower oven will switch on at 15:45.
1. Follow the steps for setting a semi-automatic
programme above, and then:
2. Press Menu (7) and press repeatedly untill the end of
cooking time indicator ashes (Fig. 4.3).
3. Then press either the ‘-’ (6) or ‘+’ (8) to select the
required end of cooking time. When you have set the
end time wait for approximately ve seconds.
4. The cooking time and end of cooking time indicators
will relower lit to conrm the automatic programme
is on. The oven will switch o until the automatic
programme starts. When the program starts, the
cooking time indicator will switch o.
5. When the automatic cooking is complete, the oven will
emit an alarm which will continue for two minutes and
the cooking time indicator will ash. To switch o the
alert beep, touch any key.
At the end of the cooking programme, remember to
turn o the oven manually.
6 7
2
4
1
3
5
8
Fig. 4.3
Page 11

7
Tips on Cooking with the Timer
If you want to cook more than one dish, choose dishes that
require approximately the same cooking time. However,
dishes can be ‘slowed down’ slightly by using small containers
and covering them with aluminium foil, or ‘speeded up’
slightly by cooking smaller quantities or placing them in
larger containers.
Very perishable foods such as pork or sh should be avoided
if a long delay period is planned, especially in hot weather.
DO NOT place warm food in the oven to be timed.
DO NOT use a timed oven that is already warm.
DO NOT use the timed oven if the adjoining oven is
already warm.
Whole poultry must be thoroughly defrosted before being
placed in the oven. Check that meat and poultry are fully
cooked before serving.
General Oven Tips
The wire shelves should always be pushed rmly to the back
of the oven.
Baking trays with food cooking on them should be placed
level with the front edge of the oven’s wire shelves. Other
containers should be placed centrally. Keep all trays and
containers away from the back of the oven, as overbrowning
of the food may occur.
For even browning, the maximum recommended size of a
baking tray is 340 mm (13½”) by 340 mm (13½”).
When the oven is on, do not leave the door open for
longer than necessary, otherwise the knobs may get very
hot.
• Always leave a ‘‘finger’s width’’ between dishes on
the same shelf. This allows the heat to circulate freely
around them.
• To reduce fat splashing when you add vegetables to hot
fat around a roast, dry them thoroughly or brush lightly
with cooking oil.
• Where dishes may boil and spill over during cooking,
place them on a baking tray.
• The ‘Cook & Clean’ oven liners (see ‘Cleaning Your
Cooker’) work better when fat splashes are avoided.
Cover meat when cooking.
• Sufficient heat rises out of the oven while cooking to
warm plates in the grill compartment.
• If you want to brown the base of a pastry dish, preheat
the baking tray for 15 minutes before placing the dish in
the centre of the tray.
5. Cooking Tips
Page 12
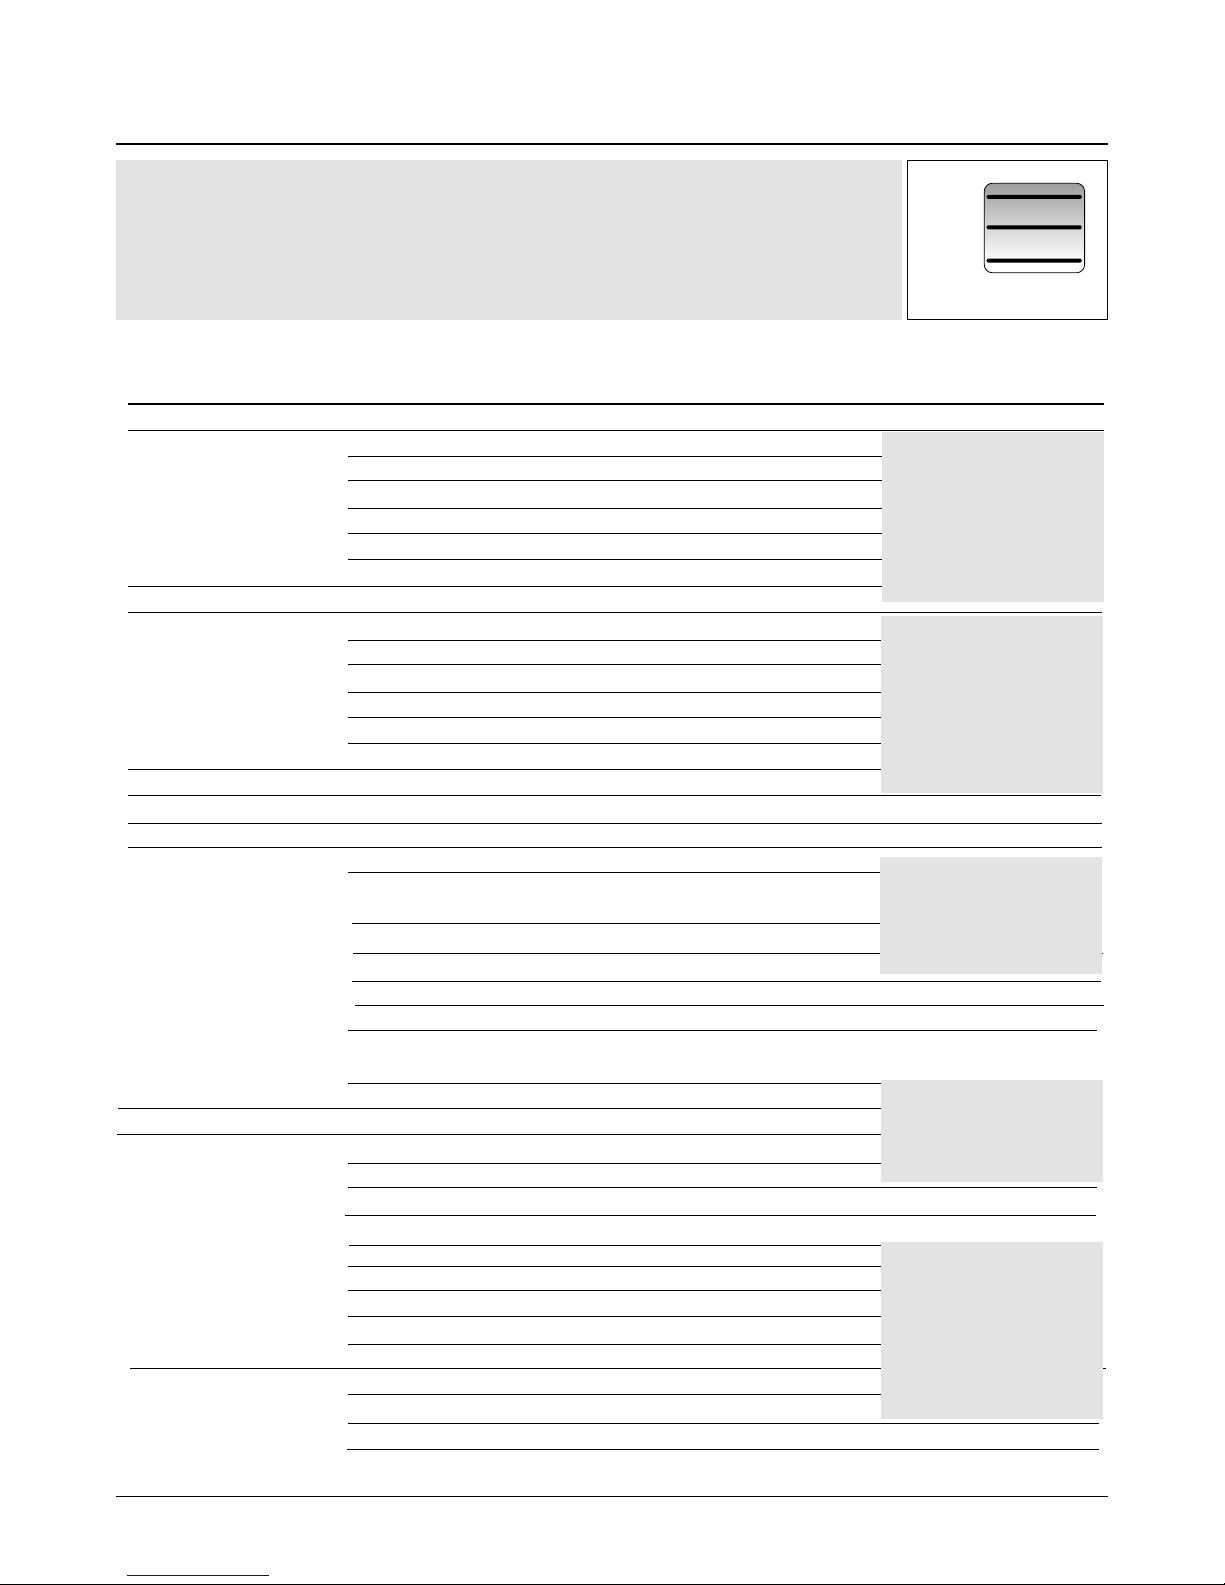
8
6. Cooking Table
ArtNo.050-0007
Oven shelf positions
Oven Shelf Positions
Top (T)
Centre (C)
Base (B)
The oven control settings and cooking times given in the table below are intended to be used
AS A GUIDE ONLY. Individual tastes may require the temperature to be altered to provide a
preferred result.
Food is cooked at lower temperature in a fan oven than in a conventional oven. When using
recipes, reduce the fan oven temperature by 10 °C and the cooking time by 5-10 minutes. The
temperature in the fan oven does not vary with height in the oven so you can use any shelf.
Food
Meat
Beef (no bone)
Lamb
Pork
Poultry
Chicken
Turkey
Duck
Casserole
Yorkshire Pudding
Cake
Very rich fruit - Christmas,
wedding, etc.
Fruit 180 mm tin
Fruit 230 mm tin
Madeira 180 mm
Queen cakes
Scones
Victoria sandwich
180 mm tin
210 mm tin
Desserts
Shortcrust tarts
Fruit pies
Tartlets
Puff pastry
Meringues
Baked egg custard
Baked sponge pudding
Milk pudding
Bread
Fish
Fillet
Whole
Steak
Approximate Cooking Time
30-35 minutes per 500g +30-35 minutes.
20-25 minutes per 500g +20-25 minutes.
30-35 minutes per 500g +30-35 minutes.
25-30 minutes per 500g +25-30 minutes.
35-40 minutes per 500g +35-40 minutes.
25-30 minutes per 500g +25-30 minutes.
20-25 minutes per 500g +20-25 minutes.
15-20 minutes per 500g +15-20 minutes.
20 minutes per 500g +20 minutes.
15 minutes per 500g +15 minutes.
25-30 minutes per 500g.
20 minutes per 500g.
2-4 hours according to recipe.
Large tins 30-35 minutes; individual 10-20 minutes.
45-50 minutes per 500g of mixture.
2-2½ hours.
Up to 3½ hours.
80-90 minutes.
15-25 minutes.
10-15 minutes.
20-30 minutes.
30-40 minutes.
20-30 minutes on a preheated tray.
35-45 minutes.
10-20 minutes according to size.
20-40 minutes according to size.
2-3 hours.
45-60 minutes.
40-45 minutes.
2 to 3 hours.
20-30 minutes.
15-20 minutes.
15-20 minutes per 500g.
Steaks according to thickness.
Conventional Oven
Temperature °C
(Shelf Position)
160 (C)
200 (C)
160 (C)
200 (C)
160 (C)
200 (C)
160 (C)
200 (C)
160 (C)
200 (C)
160 (C)
200 (C)
140-150 (C)
220 (C)
140 (C/B)
150 (C/B)
150 (C/B)
160 (C/B)
190 (C/B)
220 (C/B)
180 (C/B)
180 (C/B)
200 (C/B)
200 (C/B)
200 (C/B)
210 (C/B)
100 (C/B)
160 (C/B)
180 (C/B)
140-150 (C/B)
210 (C)
Fanned Grilling
190 (C/B)
190 (C/B)
190 (C/B)
Fan Oven
Temperature
°C
150
190
150
190
150
190
150
190
150
190
150
190
130-140
210
130
140
140
150
180
210
170
170
190
190
190
200
90
150
170
130-140
200
190 (C/B)
190 (C/B)
190 (C/B)
Thoroughly thaw frozen joints before
cooking. Meat may be roasted at
220°C (210°C for fan oven) and the
cooking time adjusted accordingly.
For stuffed and rolled meats, add
approximately 10 minutes per 500g,
or cook at 200°C (190°C) for 20
minutes then 160°C (150°C) for the
remainder.
For stuffed poultry, you could cook
at 200°C (190°C) for 20 minutes
then 160°C (150°C) for remainder.
Do not forget to include the weight
of the stuffing.
For fresh or frozen prepacked
poultry, follow instructions on the
pack. Thoroughly thaw frozen
poultry before cooking.
Using the conventional oven: when
two tier cooking leave at least one
runner space between shelves.
Position the baking tray with the
front edge along the front of the
oven shelf.
ArtNo.050-0001 Gas cooking table
Using the conventional oven: for
even browning the maximum size of
baking tray recommended is 340 mm
x 340 mm. This ensures free heat
circulation.
If cooking a two tier load, the trays
should be interchanged
approximately halfway though the
cooking time.
Up to three tiers can be cooked in a
fan oven at the same time but make
sure to leave at least one runner
space between each shelf being
cooked on.
Page 13
9
2
1
ArtNo.325-0001 - BI oven door hinges
B
A
Essential Information
Allow the oven to cool and isolate the electricity supply
before carrying out any thorough cleaning and maintenance.
Never use paint solvents, washing soda, caustic
cleaners, biological powders, bleach, chlorine based
bleach cleaners, coarse abrasives or salt.
Do not mix dierent cleaning products – they may
react together with hazardous results.
Any abrasive cleaner will scratch the surface and
could erase the control panel markings. Stainless
steel can be eectively cleaned by simply using a
dilute solution of water and mild detergent and
drying to a shine with clean cloth.
All parts of the oven can be cleaned with hot soapy water,
take care that no surplus water seeps into the appliance.
Remember to switch on the electricity supply before reusing the oven.
Regular cleaning is recommended. For easier cleaning, wipe
away any spillages immediately.
Control Panel and Doors
Avoid using any abrasive cleaners, including cream cleaners,
on brushed stainless steel surfaces. For best results use a
liquid detergent.
The control panel, knobs and doors should only be cleaned
with a soft cloth wrung out in clean, hot soapy water. After
cleaning, polish with a dry cloth.
The oven door is tripled glazed, the inner glass may be
removed for cleaning both inner glass and the inside face of
the outer glass.
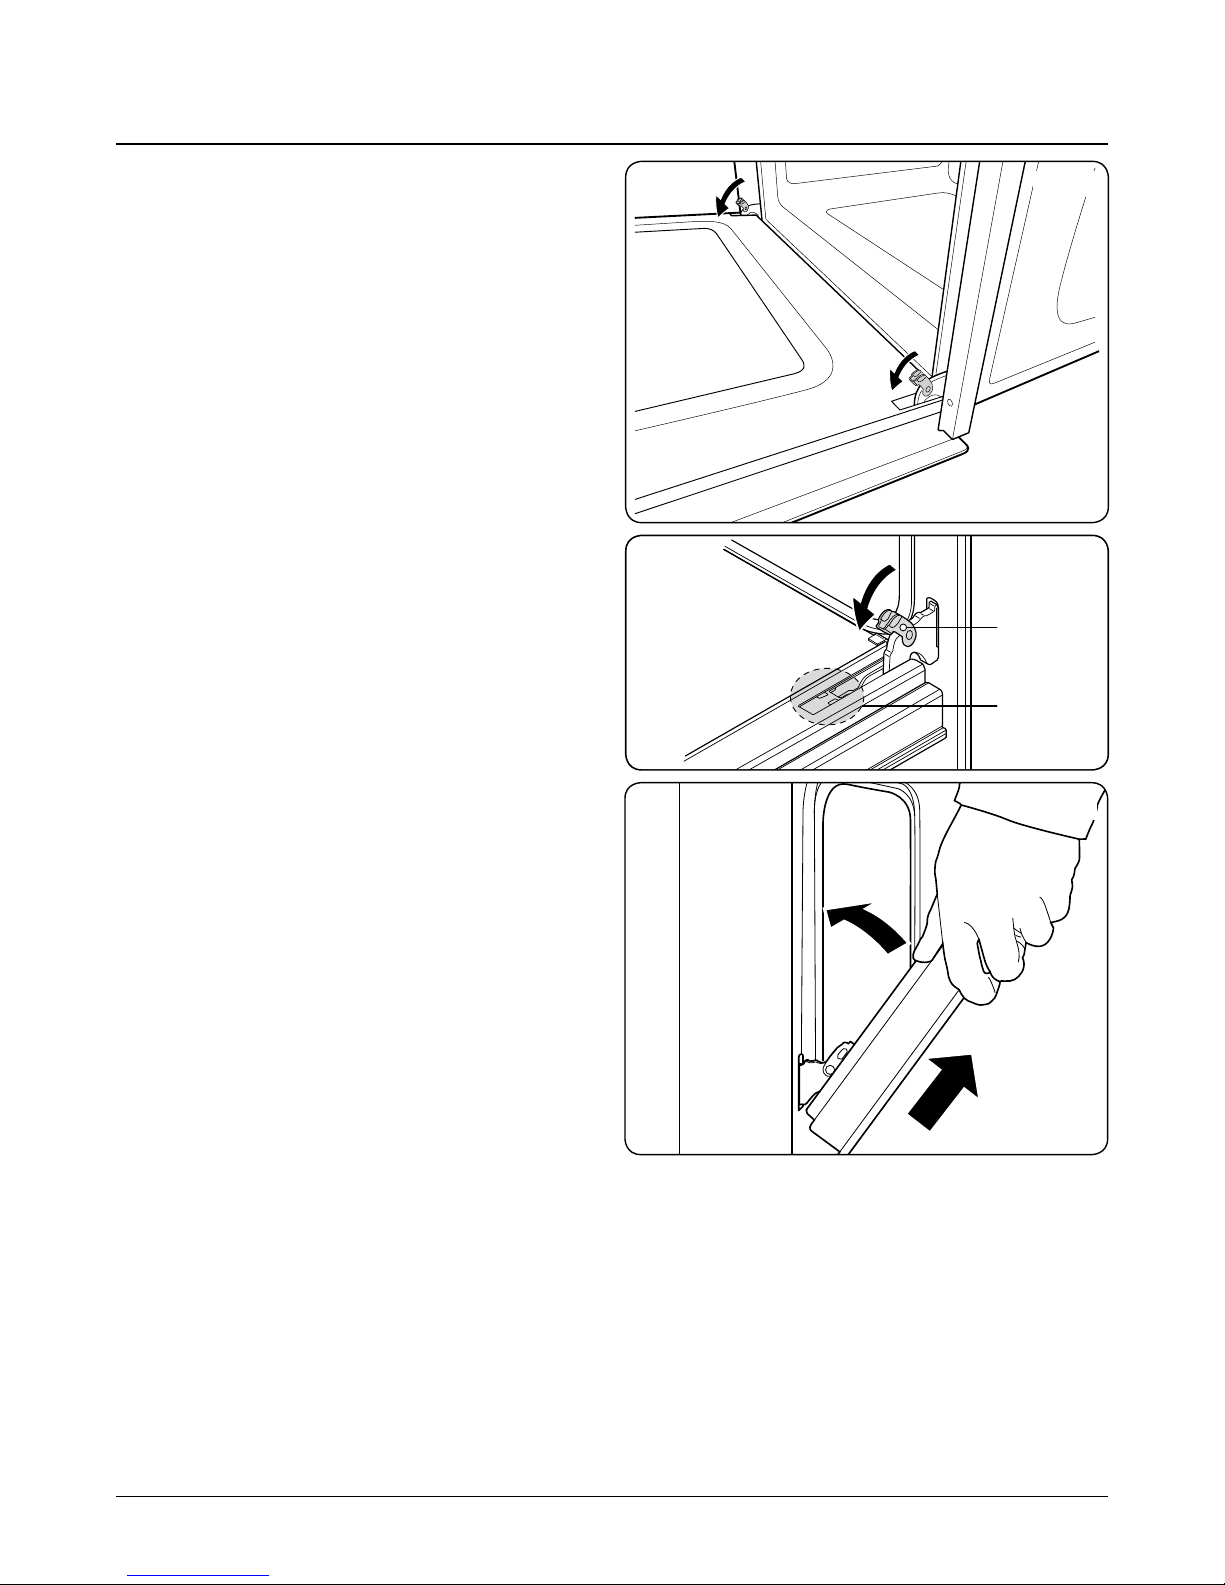
Removing the Oven Door
To aid cleaning and to make access to the oven cavity
easier, the oven door can be removed.
1. Open the door to the full extent. Unlock the locking
clips on both the left and right hinges (Fig. 7.1).
2. Gently close and align the the left and right hinge levers
“A” are hooked to part “B” of the door (Fig. 7.2).
3. Grip the sides of the door and withdraw by going
forwards and upwards (Fig. 7.3).
4. Rest the door on a soft surface.
7. Cleaning Your Oven
Fig. 7.1
Fig. 7.2
Fig. 7.3
Page 14
10
ArtNo.324-0005 Oven light bulb
Removing the glass from the door
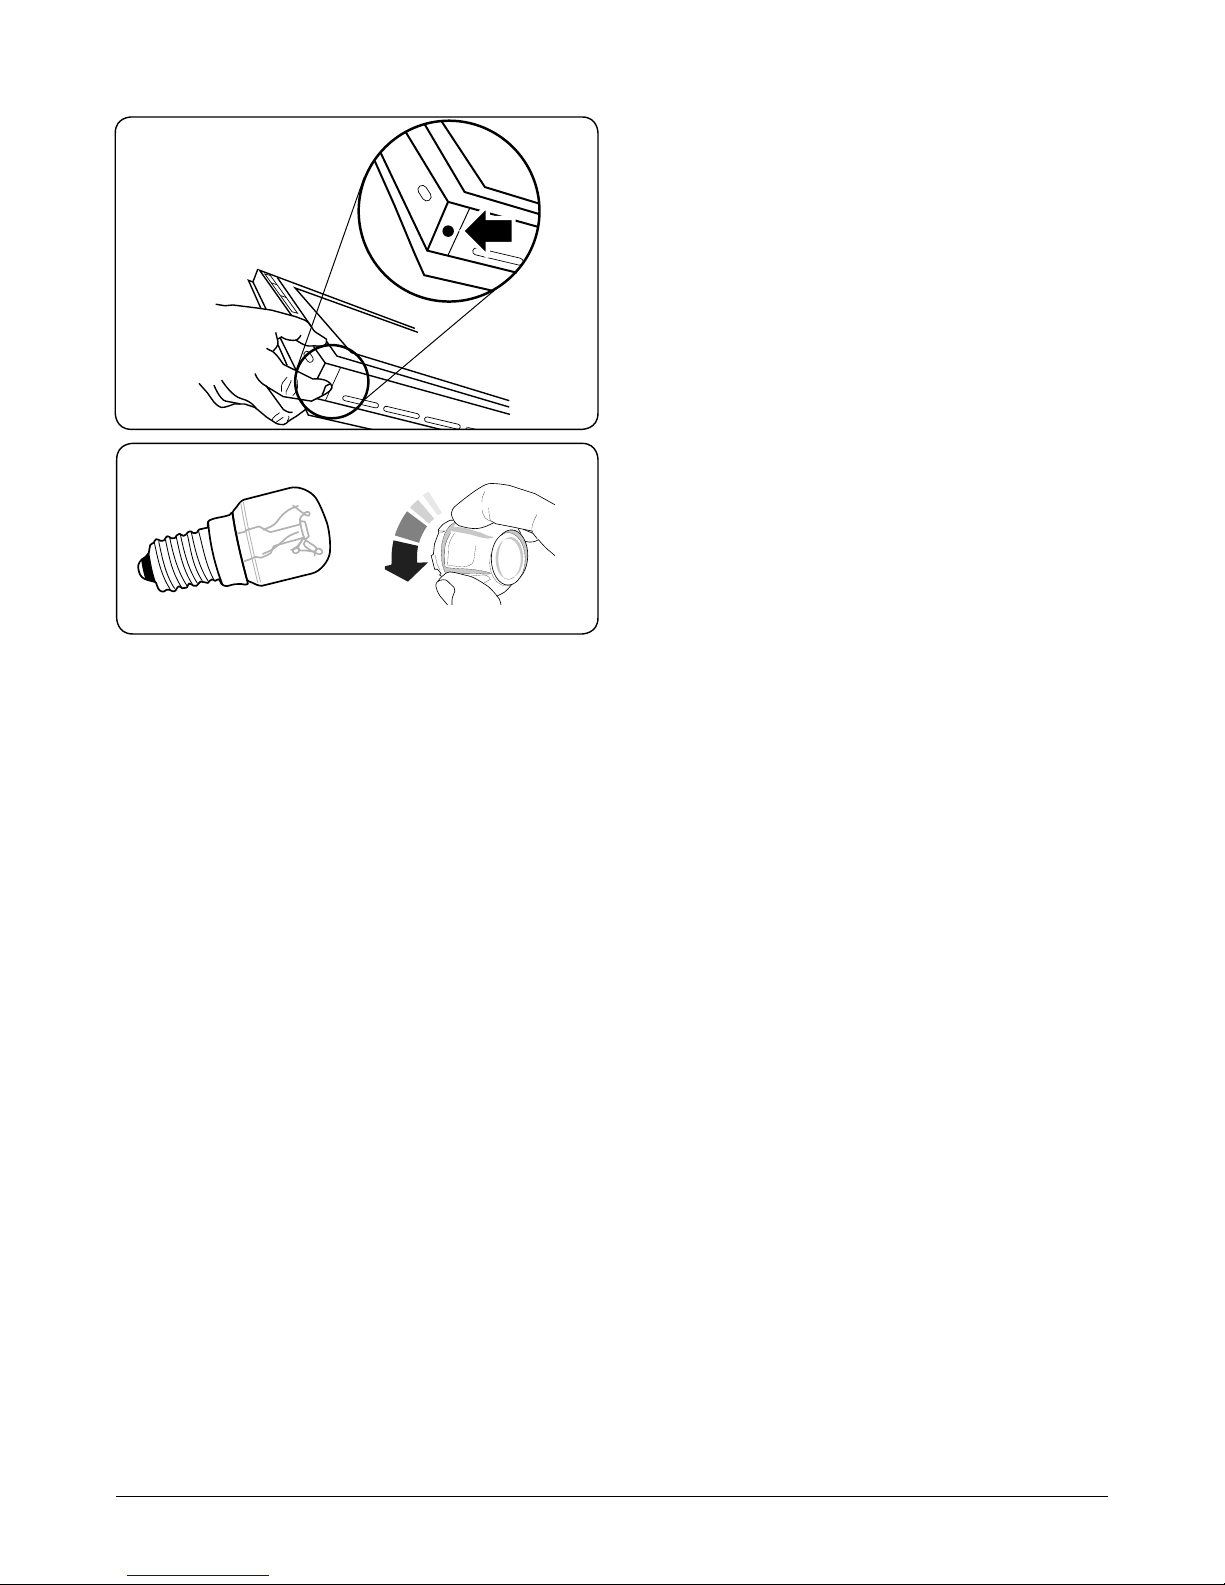
1. Follow the procedure to remove the door.
2. Place the door on a soft and clean surface. With both
hands hold the door and push the buttons on either
side of the oven door (Fig. 7.4).
3. One the top cap has been removed you will have access
to the glass. Flip the glass retainers and gently remove
the glass.
4. Clean the glass with soap and water and place on a
clean, dry and soft surface.
5. Reassemble the door in the reverse order.
Refitting the Oven Door
To ret the door, slide the hinges back into their slots. Rotate
the locking ‘U’ clips back to t onto the hinges.
Oven
DO NOT use steel wool, oven cleaning pads, or any
other materials that will scratch the surface.
Changing the bulb
Back light
Fig. 7.5
You can buy a replacement bulb (which is not covered
under the warranty) from a good electrical shop. Ask
for a 15 W – 230 V lamp, FOR OVENS. It must be a special
bulb, heat resistant to 300 °C.
● Turn o the power at the circuit breaker.
● Before removing the existing bulb, turn o the power
supply and make sure that the oven is cool. Open the
oven door and remove the oven shelves.
● Unscrew the protective cover by turning counter-
clockwise. It may be very sti. We recommend that you
wash and dry the glass cover at this point.
● Carefully unscrew the old bulb and insert the new bulb.
● Screw back the bulb cover. Turn on the circuit breaker
and check that the bulb now lights. Ret the protective
cover.
IMPORTANT
Never use screwdrivers or other utensils to remove
the light cover. This could damage the enamel of the
oven or the lamp holder.
Remove only by hand.
Never replace the bulb with bare hands as
contamination from your ngers can cause
premature failure. Always use a clean cloth or
gloves.
Please note: The bulb replacement is not covered by
your guarantee.
Fig. 7.4
Fig. 7.5
Page 15

11
Steam is coming from the oven.
When cooking foods with a high water content (e.g.
oven chips) there may be some steam visible at the top
of the door. Take care when opening the oven door,
as there may be a momentary pu of steam when the
door is opened. Stand well back and allow any steam to
disperse.
The oven fan is noisy.
The note of the fan may change as the oven heats up –
this is perfectly normal.
Grill not cooking properly.
Are you using the pan and trivet supplied with the
cooker? Is the pan being used on the runners, not the
oor of the compartment? Is the grill tray pushed fully
back to stop?
The knobs get hot when I use the oven or the grill. Can I
avoid this?
Yes, this is caused by heat rising from the oven or the
grill and heating them up. Do not leave the oven door
open. Make sure that the grill pan is pushed right back
to the ‘back stop’ when grilling. Always grill with the
compartment door closed.
If there is an installation problem and I don’t get my original
installer to come back to x it, who pays?
You do. Service organizations will charge for their callouts if they are correcting work carried out by your
original installer. Therefore, it is in your own interest to
keep track of this installer so that you can contact them
as required.
Power failure.
In the event of a failure in the electrical supply
remember to reset the clock to ensure that the timed
oven continues to operate.
Food is cooking too slowly, too quickly, or burning.
Cooking times may dier from your previous
oven. Check that you are using the recommended
temperatures and shelf positions – see the ‘Oven Cooking
Guide’ – then adjust the settings according to your own
individual tastes.
The oven is not cooking evenly.
Do not use a baking tray with dimensions larger than
those specied in the section, ‘General Oven Tips’.
If you are cooking a large item, be prepared to turn it
round during cooking.
If two shelves are used, check that space has been left for
the heat to circulate. When a baking tray is put into the
oven, ensure that it is placed centrally on the shelf.
Check that the door seal is not damaged and that the
door is held rmly against the seal.
A dish of water when placed on the shelf should be the
same depth all over. (For example, if it is deeper at the
back, then the back of the cooker should be raised up or
the front lowered). If the cooker is not level arrange for
your supplier to level it for you.
Oven temperature getting hotter as the cooker gets older.
If turning the temperature down using the oven control
knob has not worked, or has only worked for a short
time, then you may need a new thermostat. This should
be tted by a service person.
The oven light is not working.
The bulb has probably blown. Follow the Chaning the
bulb procedure
DocNo.054-0001 - Troubleshooting BI oven
8. Troubleshooting
Page 16
12
INSTALLATION
Check the appliance is electrically safe when you have nished.
Dear Installer
Before you start your installation, please complete the details
BELOW.
If your customer has a problem relating to your installation
they will be able to contact you easily.
You must be aware of the following safety
requirements & regulations:
This appliance shall be installed in accordance with the
regulations in force and in a well-ventilated space. Read the
instructions before installing or using this appliance.
The cooker must be installed in accordance with:
• All relevant British Standards / Codes of Practice
• The relevant Building / IET regulations
Location of the Oven
The oven may be installed in a kitchen/kitchen diner but NOT
in a room containing a bath or shower.
This appliance is designed for domestic cooking only. Use for
any other purpose could invalidate any warranty or liability
claim.
This appliance should not be installed in a boat or
caravan.
The hob must be installed in accordance with the relevant
Building regulations and IET regulations.
You will need the following tools and equipment to complete
the oven installation satisfactorily:
1. Electric drill
2. Steel tape measure
3. Cross head screwdriver
4. Pencil
5. Multimeter (for electrical checks)
ArtNo.050-0011 - Installer information table
Installer’s Name
Appliance Serial Number
Installer’s Telephone Number
Installer’s Company
9. Installation
DocNo.064-0003 - Installation - R6012 oven
Page 17
13
INSTALLATION
Check the appliance is electrically safe when you have nished.
Positioning the Oven
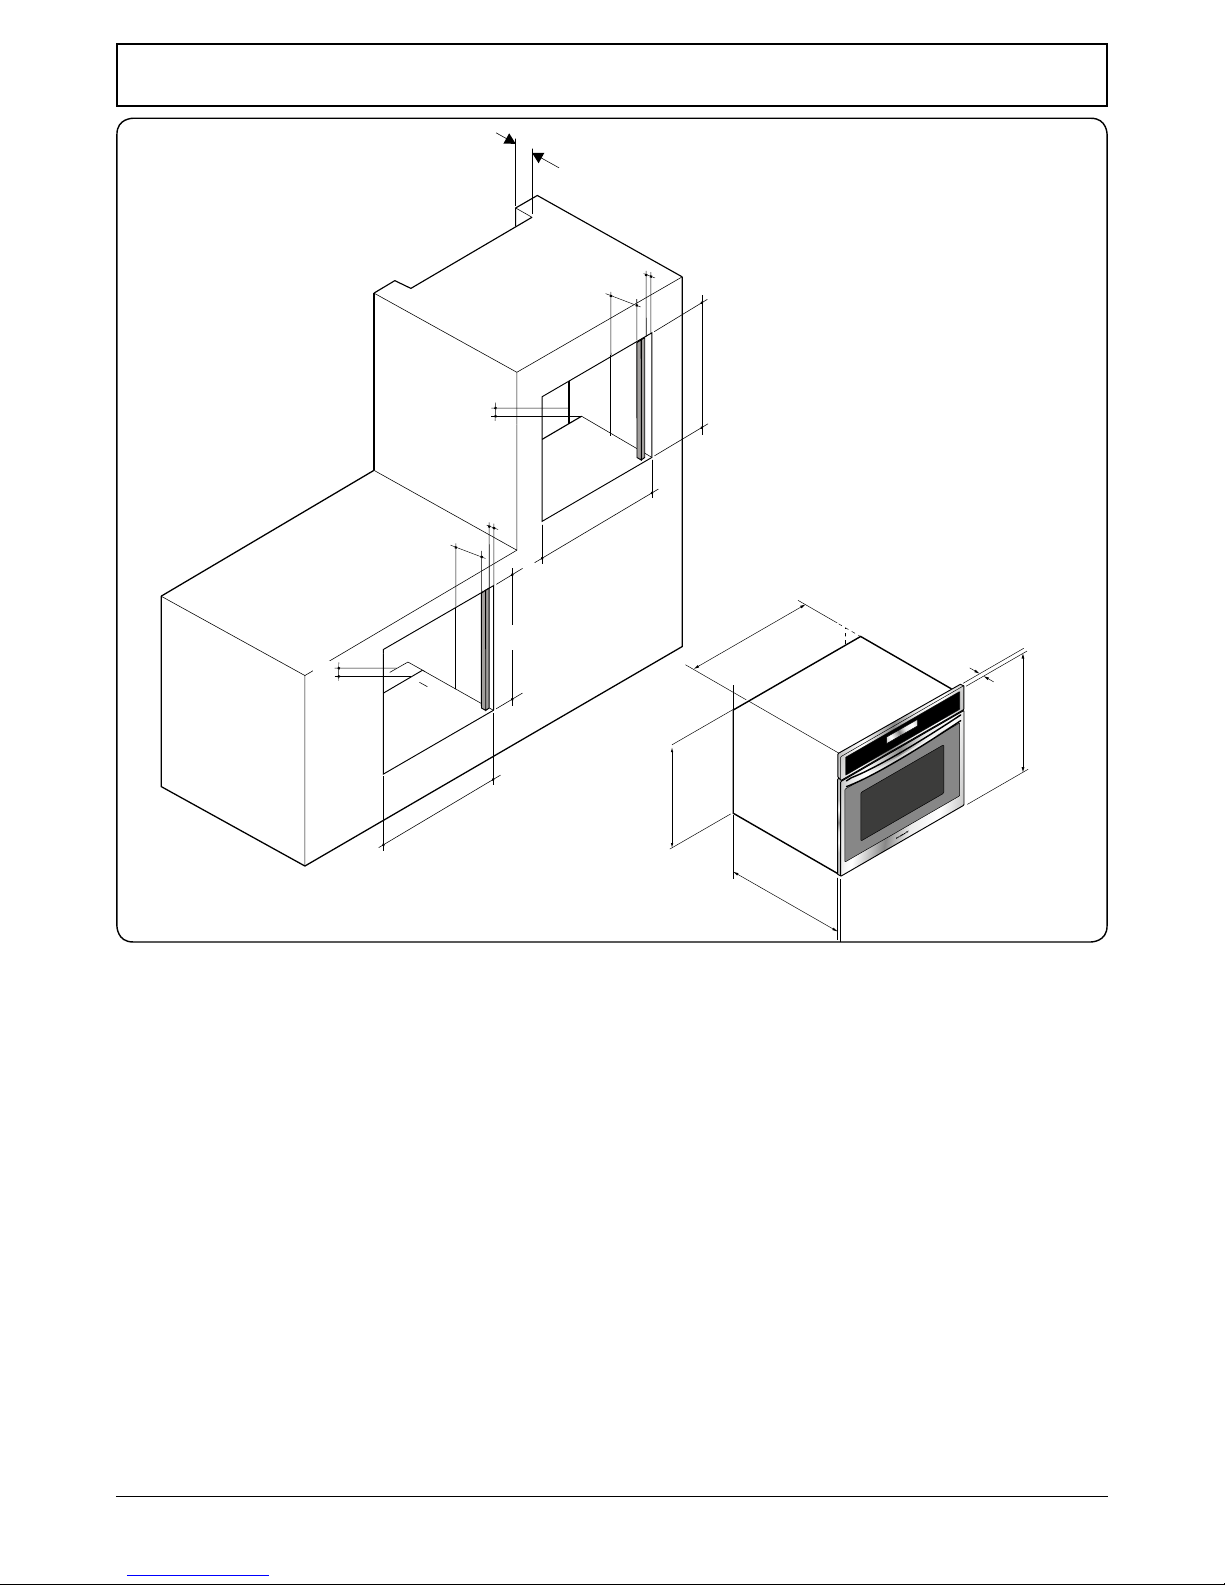
The oven can be installed under a worktop (Fig. 9.1) or at
high level in a tall kitchen unit and depending on the type of
installation it is designed to t into a standard 560 mm or 600
mm wide oven housing.
The oven is 595mm across the trims and an unrestricted
opening of 560mm minimum depth is needed, as measured
from the front of the cabinet door to the rear of the housing.
The worktop and any associated hob should be tted BEFORE
installing this oven.
It is recommended that if installing a built-in oven directly under
the hob then there should be a minimum air gap of 20 mm
between the oven and the bottom of the hob. Failure to maintain
a suitable clearance may impair the performance of the hob.
Ensure that air can ow freely around the housing area. If the
oven is being installed into a fully enclosed built-under oven
housing unit it may be necessary to cut a small slot in the top
of the plinth tted under the unit. Cut a section 400 mm wide
and a minimum of 15mm high to allow air to pass under the
unit. Alternatively cut a section 400 x450mm in the base of
the carcass.
45
595
595
595
594
577.2
568.8
21
594
45
595
22
200 min
22
200 min
45
Fig. 9.1
Failure to allow adequate ventilation to the appliance may
result in overheating or damage to adjacent units and could
invalidate the guarantee.
Surfaces of furniture and walls adjacent to the appliance
should be heat, splash and steam resistant. All cabinet doors
must be at least 4mm from the oven at all points.
Certain types of vinyl or laminate kitchen furniture are
particularly prone to heat damage and discolouration. We
cannot accept responsibility for damage caused by normal
use of the appliance to any material that de-laminates
or discolours at temperatures less than 65°C above room
temperature.
When placing the oven in the housing, do not use the oven
door or handle as a lever for lifting the oven as damage may
result.
If you lower the oven door, you will see 4 screw holes, 2 on
each side of the oven. The oven should then be secured to
the housing by tting screws into these holes.
The housing should not be free standing but be
secured to the wall and/or adjacent ttings.
All dimensions in mm
Page 18
14
INSTALLATION
Check the appliance is electrically safe when you have nished.
Provision for Ventilation
The appliance housing used must provide adequate
ventilation.
For built-in installation, a minimum ventilation space of
85 – 90mm 40mm must exist between the rear of the
appliance and the back of the housing or an adjacent wall.
If a tall housing is to be installed ush with the ceiling, a
20cm² ventilation cut-out must be provided at the top of the
housing.
Electrical Connection
This appliance must be installed by a qualied electrician
to comply with the relevant Institution of Engineering and
Technology (I.E.T.) regulations and also the local electricity
supply company requirements.
WARNING: THIS APPLIANCE MUST BE EARTHED
This appliance must be connected by a competent person,
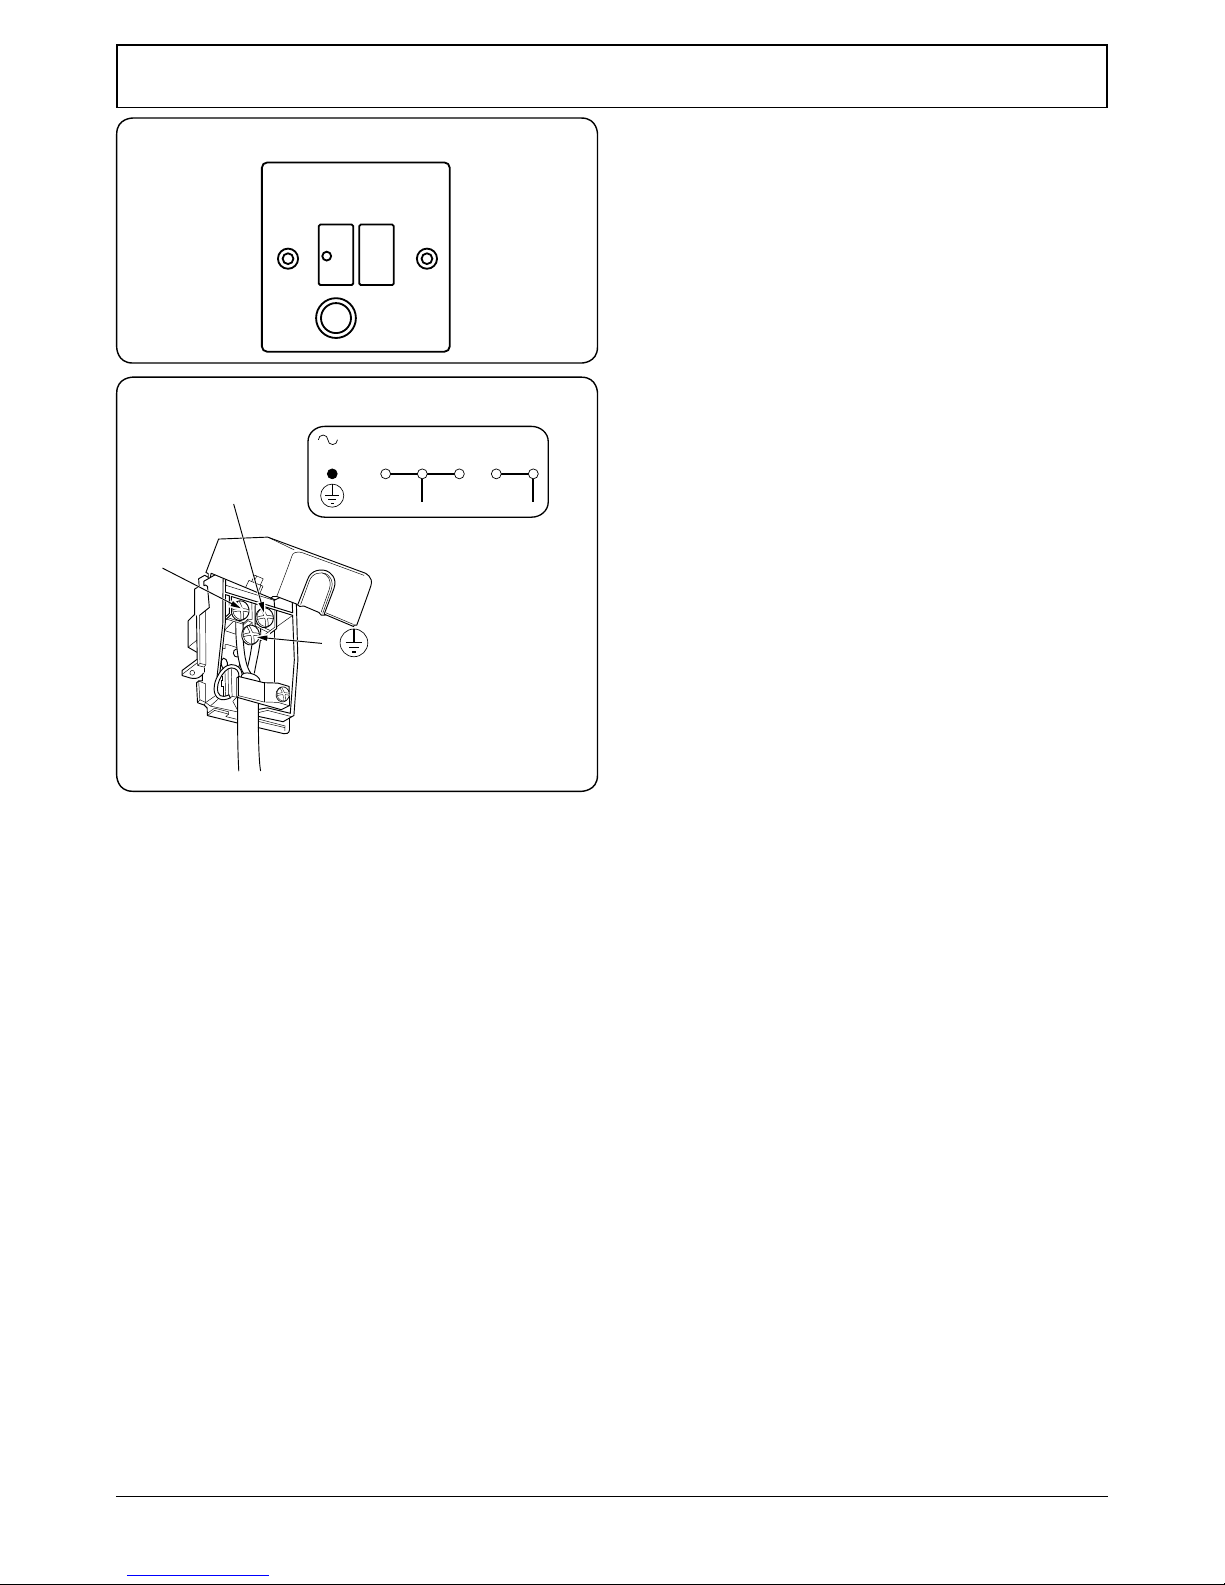
using xed wiring via a double pole switched fused spur
outlet, protected by a 13A fuse (Fig. 9.2).
We recommend that the appliance is connected by a
qualied electrician, who is a member of the N.I.C.E.I.C. and
who will comply with the I.E.T. and local regulations. The
wires in the mains lead are coloured in accordance with the
following code:
This appliance must not be connected to an ordinary
domestic power point.
The mains terminal is situated on the back of the oven
(Fig. 9.3).
• GREEN AND YELLOW = EARTH
• BLUE = NEUTRAL
• BROWN = LIVE.
As the colours of the wires in the mains lead for the appliance
may not correspond with the coloured markings identifying
the terminals in your spur box, proceed as follows:
1. The wire which is coloured green and yellow must be
connected to the terminal marked E (Earth) or coloured
Green.
2. The wire which is coloured blue must be connected to
the terminal marked N (Neutral) or coloured Black.
3. The wire which is coloured brown must be connected to
the terminal marked L (Live) or coloured Red.
Connect the cable to the correct terminals. Check that the
links are correctly tted and that the terminal screws are tight.
Secure the mains cable using the cable clamp.
Ensure the cable route avoids the risk of trapping or touching
hot surfaces.
ArtNo.130-0006 - Electrical connections BI oven (60)
L
N
220V - 240V
1 2 3
R
L
PE
4 5
N
E
DOUBLE POLE SWITCHED
FUSE SPUR OUTLET
13A
FUSE ON
Fig. 9.2
Fig. 9.3
Page 19
15
INSTALLATION
Check the appliance is electrically safe when you have nished.
105 mm
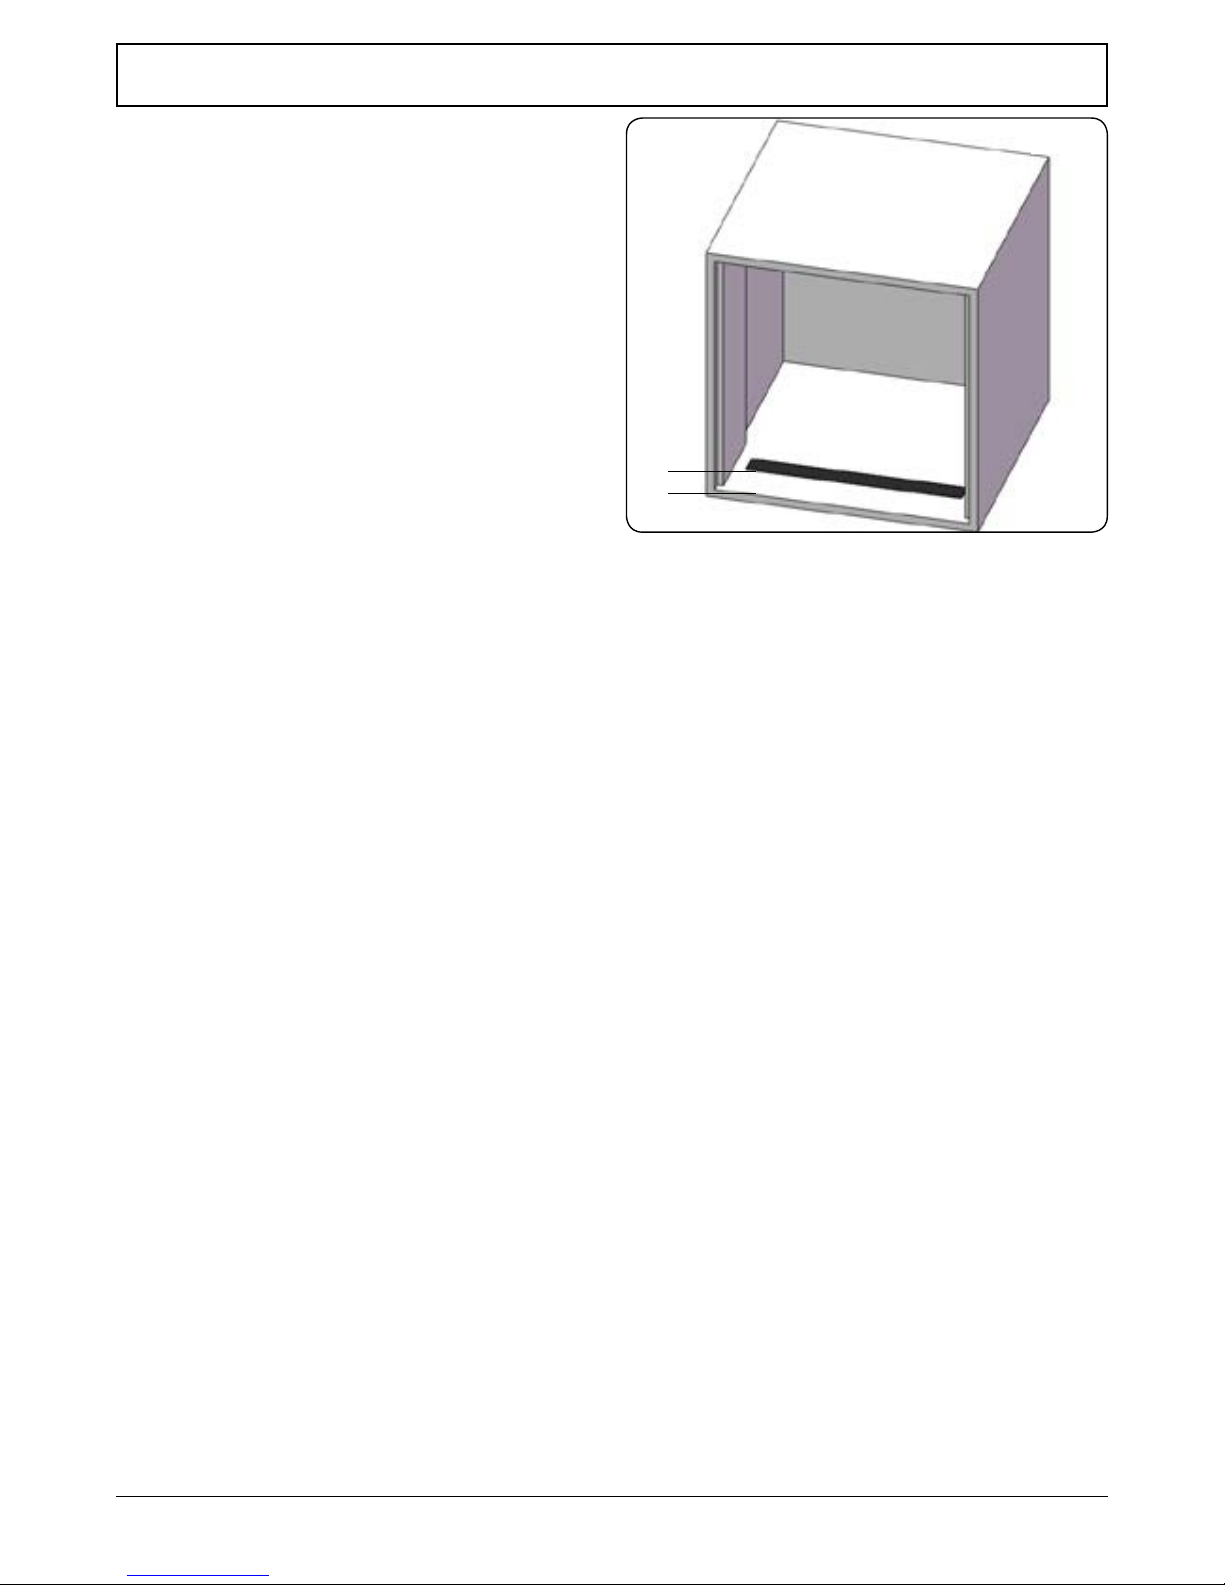
Fig. 9.4
Current Operated Earth Leakage
Breakers
Where the installation is protected by a 30mA sensitivity
residual current device (RCD), the combined use of your
appliance and other domestic appliances may occasionally
cause nuisance tripping. In these instances the kitchen circuit
may need to be recongured. This work should be carried out
by a qualied electrician.
Levelling the appliance
• 4x self-adhesive black shims metal are included with a
thickness of 0.5 cm.
These shims are only used when you notice the appliance is
uneven in the cabinet and it is not lined up with Rangemaster
built-in appliance.
Check that the dimensions of the cabinet are correct for this
appliance.
To level the appliance by using the shim, measure the front of
the cabinet 105 mm and place a shim (Fig. 9.4).
The worktop should already be tted and levelled, and the
cabinets mounted 90° to the worktop. It is only necessary to
ensure the top front edge of the appliance unit supports the
front edge of the worktop and line up the appliance trims
with the doors.
Customer Care
Please complete your contact details in the front of this
section. Please inform the user how to operate the appliance
and hand over the instruction pack.
Page 20
16
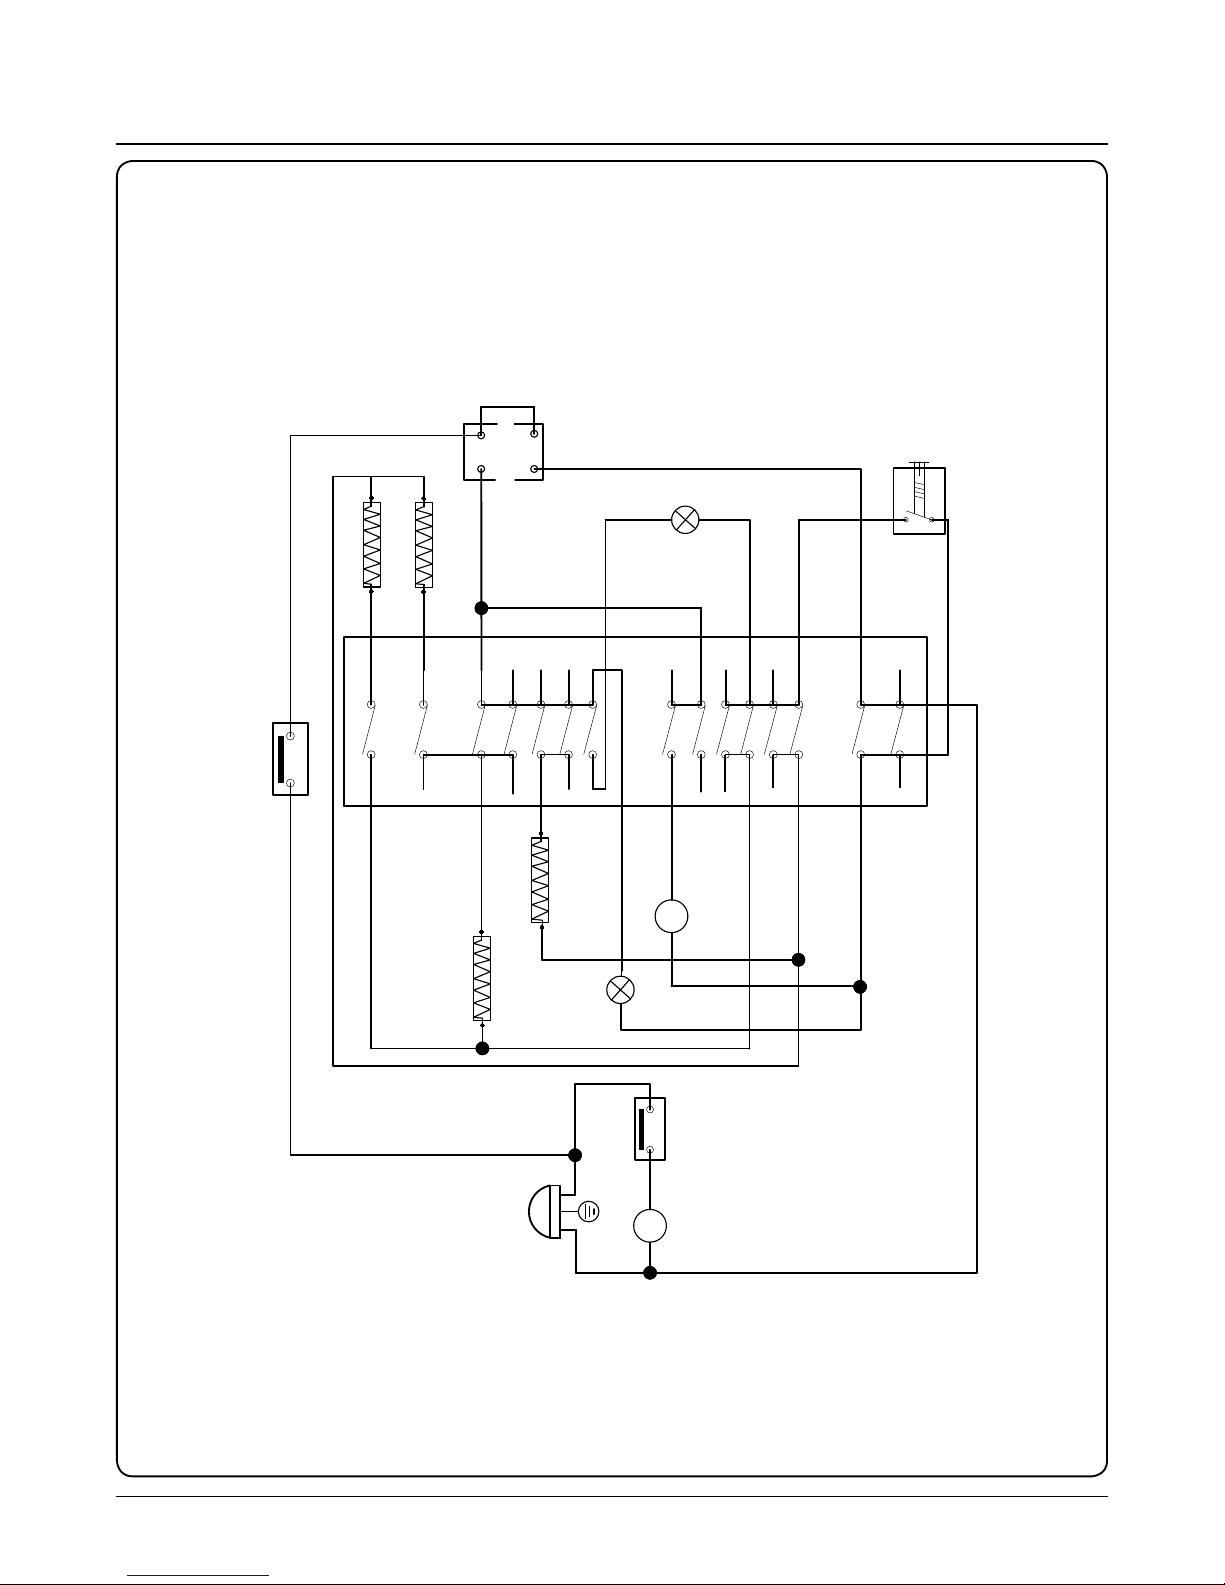
10. Circuit Diagram
19a
17a
15a
13a
11a
9a
8a
6a
4a
2a
1a
1
2
6
4
11
9
8
15
17
19
13
65°C
Temperature adjust
Heat
dissipation
fan
M1
POWER
LN
E
Circulation fan
sub assembly
M3
Light
Back grill
Top center grill
Thermostat switch
Lamp
Top outer grill
Bottom grill
120°C Temperature adjust
Relay 2a
Relay 1a
ACL
ACN
Electronic timer
3a
3
5a
5
7a
7
10a
10
12a
12
14a
14
16a
16
18a
18
DocNo.094-0003 - Circuit diagram R6012 oven
Page 21
17
11. Technical Data
INSTALLER: Please leave these instructions with the user.
DATA BADGE LOCATION: Back of the oven.
COUNTRY OF DESTINATION: GB, IE.
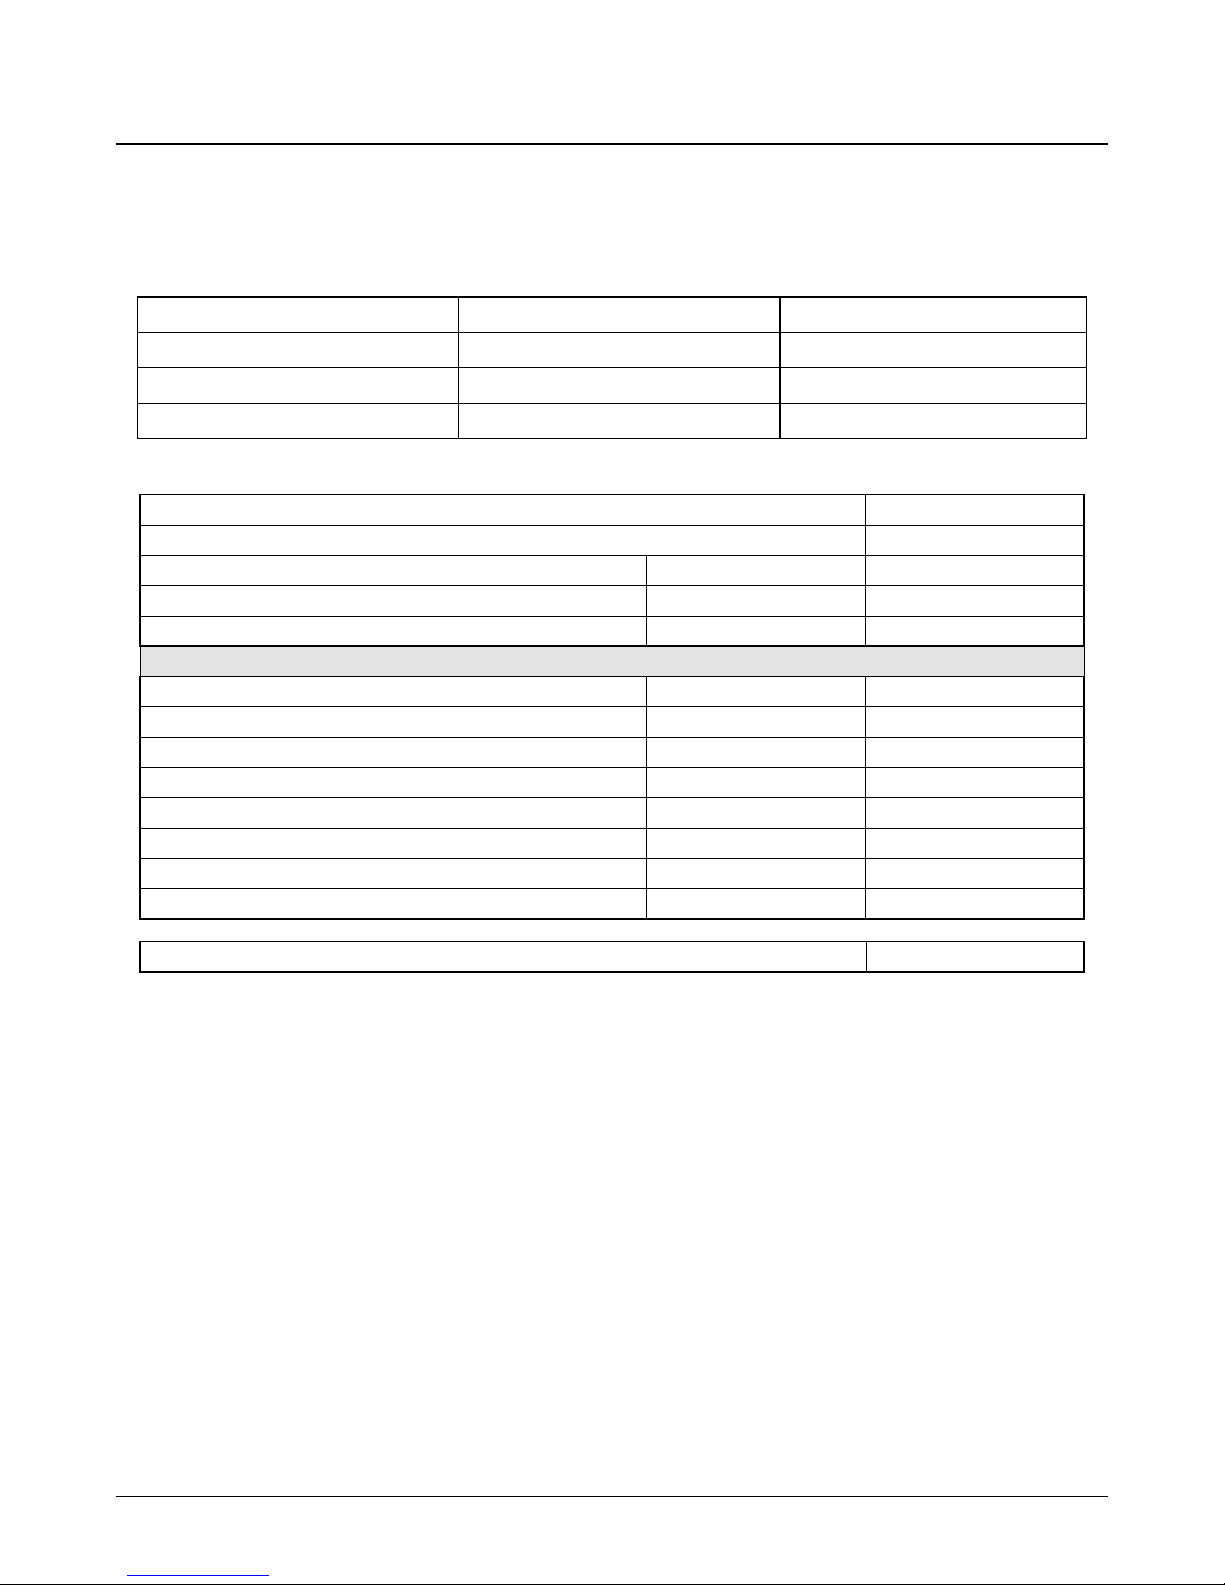
Dimensions
Dimensions Oven
Housing
Height
594 mm 600
Width
594 mm 560 - 600
Depth
568.8 mm 560 (min)
Oven Data
Brand Rangemaster
Model identication RMB608BL/SS
Type of oven Electric
Mass kg 37.3
Number of cavities 1
Single Cavity Eciency
Fuel type Electric
Cavity type
*Drop Down Door Multifunction*
Volume Litres 73
Energy consumption - conventional kWh / cycle 0.83
Energy consumption - fanned (forced air) conventional kWh / cycle 0.71
Energy eciency index - conventional 96.5
Energy eciency index - fanned (forced air) conventional 89.5
Energy class A
Maximum total electrical load at 230 V (approximate total including, oven lights, oven fan, etc.) 2.424 kW
Page 22

18
If consultation or technical assistance is needed, please
provide the local authorised service agent with the purchase
invoice and the product code/serial number.
The 2 years free maintenance for the operation of the
appliance started from the date of purchase of this product.
Any cosmetic damage to the appliance must be reported
within 90 days of delivery.
Free from a landline: +44 (0) 800 8046261
Depending on your mobile network, call from this number is
free: +44 (0) 3707 895107
DocNo.111-0003 Warranty No.10
12. Warranty/After Sales Service
Page 23

19
Notes
Page 24
Clarence Street, Royal Leamington Spa,
Warwickshire, CV31 2AD, England.
Tel: +44 (0) 800 8046261
E-mail: [email protected]
 Loading...