

Page 1

RMB45MCBL/SS
User Guide
&
Installation & Service Instructions
U110666 - 03
Page 2

Page 3

Contents
1. Before You Start... 1
Installation and Maintenance 1
Before First Use 1
Personal Safety 1
Cleaning 2
2. Oven Overview 3
Setting the clock for the rst time 4
Changing the time 4
What kind of ovenware can be used? 5
Cooking with microwave 5
Using the Microwave 7
Setting the delayed start
for the Microwave 8
Cooking with the Grill 9
Using the Grill 9
Setting the delayed start for the Grill 10
Using the Convection 11
Setting the delayed start
for the Convection 12
Using the Microwave Grill 13
Setting the delayed start
for the Microwave Grill 14
Using the Grill Convection 15
Setting the delayed start for the Grill
Convection 16
Using the Microwave Convection 17
Setting the delayed start
for the Microwave Convection 18
Using the Microwave Grill Convection 19
Setting the delayed start for
the Microwave Grill Convection 20
Defrosting with microwaves 21
Using the Defrost 22
Setting the delayed start for Defrost 23
Pause during cooking 24
Cancel cooking 24
Child Lock 24
Modifying Parameters 24
Cooling Fan 25
Door Interlock Switch 25
Troubleshooting 26
3. Installation 29
Before The Installation 29
Location of the Oven 29
Electrical Connection 32
4. Circuit Diagram 33
5. Technical Data 34
6. Warranty/After Sales Service 35
Page 4

1. Before You Start...
Thank you for buying a Rangemaster Microwave Combo
Oven. It should give you many years trouble-free cooking if
installed and operated correctly. It is important that you read
this section before you start, particularly if you have not used
a Microwave Combo Oven before.
CAUTION: This appliance is for cooking purposes
only. It must not be used for other purposes, for
example room heating. Using it for any other
purpose could invalidate any warranty or liability
claim. Besides invalidating claims this wastes fuel
and may overheat the control knobs.
Installation and Maintenance
The electrical installation should be in accordance
with BS 7671, or with the relevant national and local
regulations. Have the installer show you the location of
the oven control switch and mark it for easy reference.
It is recommended that this appliance is serviced
annually. Only a qualied service engineer should service
the oven, and only approved spare parts should be used.
Make sure that the oven is wired in and switched on.
Always allow the oven to cool and then switch it o at the
mains before cleaning or carrying out any maintenance work,
unless otherwise specied in this guide.
This appliance is for household use and complies with EEC
directives. This appliance can only be used for cooking and
heating food.
Before First Use
Before using the oven for the rst time clean it thoroughly.
Switch o the unit at the isolator or mains supply. Remove all
packing materials and accessories. Using hot water and a mild
detergent, wipe the oven interior and then rinse carefully
with a damp cloth. Wash the oven shelves and accessories in
a dishwasher or using hot water and a mild detergent and dry
thoroughly.
Personal Safety
Accessible parts will become hot during use and
will retain heat even after you have stopped
cooking.
oven.
When the oven is not in use, ensure that the control
knobs are in the OFF position.
To minimise the possibility of burns, always be
certain that the controls are in the OFF position and
that the entire oven is cool before attempting to
clean.
Cooking high moisture content foods can create a
‘steam burst’ when the oven door is opened. When
opening the oven door stand well back and allow
any steam to disperse. Take care that no water seeps
into the appliance.
Use dry oven gloves when applicable – using damp
gloves might result in steam burns when you touch a
hot surface. Never operate the oven with wet hands.
DO NOT use a towel or other bulky cloth in place of a
glove – it might catch re if it touches a hot surface.
Always keep combustible wall coverings or curtains,
etc., a safe distance away from your oven, and never
wear loose-tting or hanging clothes while using the
appliance.
DO NOT store or use aerosols, or any other
potentially combustible or ammable materials, in
the vicinity of the oven.
DO NOT pour spirits (e.g. brandy, whisky, schnapps,
etc.) over hot food. Danger of explosion!
Care should be taken to avoid touching the heating
elements inside the main oven.
Whole chickens and large joints of meat should be
defrosted thoroughly in the refrigerator. Do not
defrost in a warm oven or while the adjoining oven
is in operation or still warm.
Keep babies and children away from the
When the oven is on, DO NOT leave the door open
for longer than necessary.
NEVER heat unopened food containers. Pressure
build-up may cause the containers to burst and
cause injury.
DO NOT use aluminium foil to cover vents, shelves,
linings or the oven roof.
This appliance is heavy, so take care when moving it.
The appliance is not intended to be operated by
means of external timer or separated remote-control
system.
DO NOT lean on the oven door when open. This may
damage the oven, especially in the hinge zone. The
door can bear a maximum weight of 8 kg.
1
Page 5

This appliance can be used by children aged from 8
years and above and persons with reduced physical,
sensory or mental capabilities or lack of experience
and knowledge if they have been given supervision
or instruction concerning use of the appliance in a
safe way and understand the hazards involved.
Children less than 8 years of age should be kept
away unless continuously supervised. Children
shall not play with the appliance. Cleaning and user
maintenance shall not be made by children without
supervision.
To avoid condensation, do not leave cooked food
longer than necessary.
To get the best cooking out of your oven, we
recommend that you pour fresh water before
cooking.
Cleaning
Before attempting to clean the oven, switch o from
the mains.
After cooking we recommend that you clean
any residue left from the cooked food and the
condensation produced on the inner glass of the
oven immediately.
DO NOT use harsh abrasive cleaners or sharp metal
scrapers to clean the oven door glass since they can
scratch the surface, which may result in shattering of
the glass.
NEVER use paint solvents, washing soda, caustic
cleaners, biological powders, bleach, chlorine based
bleach cleaners, coarse abrasives or salt.
DO NOT mix dierent cleaning products – they may
react together with hazardous results.
Avoid using any abrasive cleaners, including cream
cleaners. For best results, use a liquid detergent or
use a soft cloth wrung out in clean hot soapy water.
In the interests of hygiene and safety, the oven
should be kept clean at all times as a build up in fats
and other foodstus could result in a re.
Clean only the parts listed in this guide.
Clean with caution. If a wet sponge or cloth is used
to wipe spills on a hot surface, be careful to avoid
steam burns. Some cleaners can produce noxious
fumes if applied to a hot surface.
2
Page 6

A B C D E F G H I
161514131211109
87654321
A
C
B
H
G
F
D
E
2. Oven Overview
Fig. 2.1
The Microwave Combo oven (Fig. 2.1) has a 8-function oven
cavity with a touch sensitive control panel.
Key: Fig. 2.1
A. Function Display
B. Controls
C. Microwave Combo
D. Grill
E. Turntable Plate
F. Turntable Ring
G. Drive Shaft
H. Door Seal
Oven
Key: Fig. 2.2
A. ON /OFF button
B. Timer Setting
C. Function Adjustment
D. Set/Conrm
E. Display
F. Child Lock
G. +
H. -
I. Start / Pause
1. Microwave
2. Grill
3. Convection
4. Microwave Grill
5. Microwave Convection
6. Grill Convection
7. Microwave Grill
Convection
8. Defrost
Fig. 2.2
9. Cooking Duration
10. Delay time
11. Microwave Power
12. Temperature
13. Clock
14. Child Lock
15. Show
16. Weight
3
Page 7
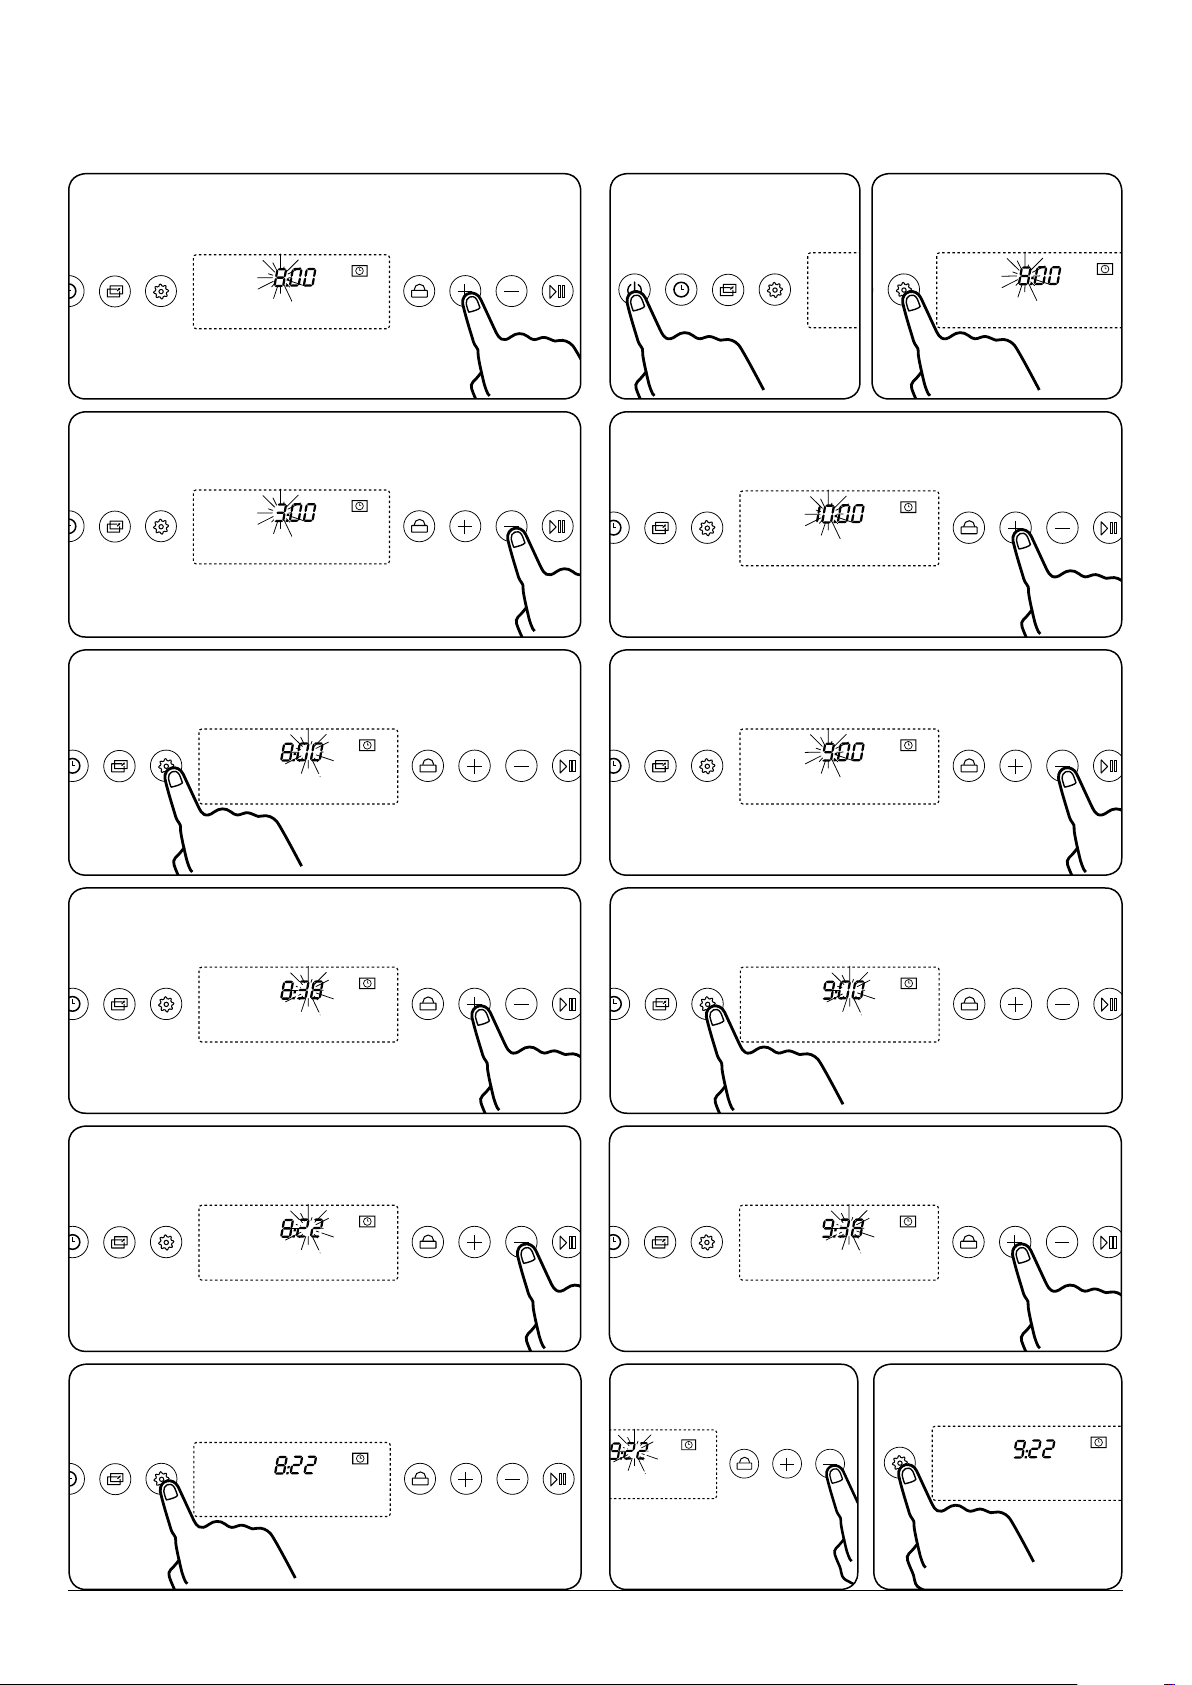
Setting the clock for the first time Changing the time
Step 1. Set the hour by pressing the +.
Step 2. Decrease the hour.
Step 3. Set the minutes.
Step 1. Firmly press the
"Standby" button.
Step 3. Increase the hour.
Step 4. Decrease the hour.
Step 2. Firmly press the
setting button.
Step 4. Increase the minutes.
Step 5. Decrease the minutes.
Step 6. Conrm the correct time
Step 5. Set the minutes.
Step 6. Increase the minutes.
Step 7. Decrease the
minutes.
Step 8. Conrm the correct
time
4
Page 8

What kind of ovenware can be
used?
Microwave function
Grilling
In the case of the grill function, the ovenware should be
resistant to temperature of at least 300°C. Plastic dishes are
not suitable for the grill function.
Metal pans, dishes or containers with metal parts or
decorations cannot be used in the microwave. Glassware and
clay with metallic decoration or content (e.g. lead crystal)
cannot be used for microwave oven.
The ideal material for microwave oven is glass, refractory
china or clay, or heat resistant plastic. Very thin, fragile glass
or china should only be used for short period of time (e.g.
heating)
To test ovenware, put the item in the oven for 20 seconds
at maximum microwave power, after 20 seconds, take the
ovenware out immediately, it is suitable to use if it is cold or
just slightly warm. However, it is not suitable for microwave
oven if it heats up a lot or causes electric arcing.
Combination functions
In the combination functions (microwave + conventional
heating elements), the ovenware used should be suitable for
microwave and grill.
Aluminum containers and foil
Pre-cooked food in aluminum containers or in aluminum
foil can be put in the microwave if the following aspects are
respected.
Please read the manufacturer's recommendations written on
the external packing.
The aluminum containers cannot be more than 3 cm high or
come in contact with the cavity walls (minimum distance 3
cm). Any aluminum lid or top should be removed.
The cooking time is longer because the microwaves only
permeate into food from the top. If you have any doubts, it is
best to use only dishes suitable for microwave use.
Aluminum foil cannot come into contact with the
cavity walls since this may cause electrical arcing.
Lids
We recommend you use glass or plastic lids or cling lm:
• In case of excessive evaporation (mainly during very
long cooking times)
• Cooking time is shorter
• The aroma is preserved
To prevent a build-up of pressure when cooking in sealed
containers, the lid should have holes or openings to allow for
sucient ventilation. Plastic bags should be opened. Baby
feeding bottles or jars with baby food and similar containers
can only be heated without tops/lids on, otherwise they may
burst.
Cooking with microwave
Read the safety instructions before using your
microwave
• Before heating or cooking foods with peel or skin (e.g.
apples, tomatoes, potatoes, sausages) peel them so that
they do not burst. Cut the food up before starting to
prepare it.
• Before using a container or dish make sure that it is
suitable for microwave use.
• When cooking food with very little moisture (e.g.
defrosting bread, making popcorn, etc.) evaporation is
very quick. The oven then works as if it was empty and
the food may burn. The appliance and the container
may be damaged in such situation. You should therefore
5
Page 9

set just the cooking time necessary and you should
keep a close eye on the cooking process.
• If you have several containers, such as cups, for example,
set them out uniformly on the turntable plate
• DO NOT seal plastic bags with metal clips. Use plastic
clips instead. Prick the bags for several holes so that the
steam can escape.
• Check that they reach at least a temperature of 70°C.
When heating or cooking foods.
• Steam on the oven door during cooking may start
to appear. This situation is normal and may be more
noticeable if the room temperature is low. The process
of cooking is not affected by this. After you have
finished cooking, clean up the water coming from the
condensation.
• When heating liquids, use containers with a wide
opening, so that the steam can evaporate easily.
• Prepare the foods as per the instructions and keep in
mind the cooking times and power levels indicated in
the tables.
• Keep in mind that the figures given are only
indicative and can vary depending on the initial state,
temperature, moisture and type of food. It is depending
on the initial state, temperature, moisture and different
types of food. It is advisable to adjust the times and
power levels to each situation. Depending on the exact
characteristics of the food you may need to increase or
shorten the cooking times or increase or decrease the
power levels.
• The greater the amount of food, the longer the cooking
time. Keep in mind that: Double the quantity = double
the time. Half the quantity = half the time
• The lower the temperature, the longer the cooking time.
• Foods containing a lot of liquid heat up more quickly
• Cooking will be more uniform if the food is evenly
distributed on the turntable. If you put dense foods on
the outer part of the plate and less dense ones on the
centre of the plate, you can heat up different types of
food simultaneously.
• You can open the oven door at any time. When you do
this the oven switches off automatically. The microwave
will only start working again when you close the door
and press the start key.
• It takes less time if we put a cover over food, but the
cover should have vents avoiding extreme pressure.
6
Page 10

TimeMicrowave
Power rating
Using the Microwave
Step 1. Firmly press the "Standby" button.
Step 2. Overview of the display
Step 3. Press the "Timer" to set the time.
Step 7. Increase the power rating.
Step 8. Decrease the power rating.
Step 9. Press the "Pause/Start" button to conrm the
setting.
Step 4. Increase time.
Step 5. Decrease time.
Step 6. Press the "Function" button to change/set the
power rating. Refer to Table 2.1 Microwave rating.
NOTE:
At the end of each cooking process the oven will emit 3
beeps every 30 seconds for ve minutes or until the oven
door is open or when you press the Start / Pause.
7
Page 11

TimeMicrowave
Power rating
Setting the delayed start for the Microwave
Step 1. Firmly press the "Standby" button.
Step 2. Overview of the display
Step 3. Press the "Timer" to set the time.
Step 7. Increase the power rating.
Step 8. Decrease the power rating.
Step 9. After setting the power ratings. Press the "Timer"
button twice to set the delayed start. The current time will
appear.
Step 4. Increase time.
Step 5. Decrease time.
Step 6. Press the "Function" button to change/set the
power rating. Refer to Table 2.1 Microwave rating.
Step 10. Calculate the time to start the Microwave.
Step 11. Press "start" to conrm start time. Once set, the
display will show the function and "AUTO" text.
NOTE:
At the end of each cooking process the oven will emit 3
beeps every 30 seconds for ve minutes or until the oven
door is open or when you press the Start / Pause.
8
Page 12

Cooking with the Grill
TimeGrill
Table 2.6 page 28
IMPORTANT POINTS:
• There will be some smoke and smell when the grill is
used for the first time. That is because of oil left from the
manufacture process.
• The glass of oven door becomes very hot when the
oven is working. Keep children away.
• When the grill is used for extended period of time, it is
normal to find that the elements will switch themselves
off temporarily due to the safety thermostat.
• Important: When food is to be grilled or cooked in
containers you should check that the container is
suitable for microwave use. See the section on types of
ovenware!
• When the grill is used it is possible that some splashes
of fat may go onto the elements and be burnt. This is a
normal situation and does not mean there is any kind of
operation fault.
• After you have finished cooking, clean the interior and
the accessories so that cooking remains do not become
encrusted.
Using the Grill
Step 1. Firmly press the "Standby" button.
Step 2. Press the + button to choose Grill
Step 3. Press the "Timer" to set the time.
Step 4. Increments of + and - of 30secs
Step 5. Press the "Pause/Start" button to conrm the
setting.
NOTE:
At the end of each cooking process the oven will emit 3
beeps every 30 seconds for ve minutes or until the oven
door is open or when you press the Start / Pause.
9
Page 13

TimeGrill
Setting the delayed start for the Grill
Step 1. Firmly press the "Standby" button.
Step 2. Press the + button to choose Grill
Step 3. Press the "Timer" to set the time.
Step 7. Press "Start" to conrm start time. Once set, the
display will show the function and "AUTO" text.
NOTE:
At the end of each cooking process the oven will emit 3
beeps every 30 seconds for ve minutes or until the oven
door is open or when you press the Start / Pause.
Step 4. Increments of + and - of 30secs
Step 9. After setting the cooking duration. Press the
"Timer" button twice to set the delayed start. The current
time will appear.
Step 6. Calculate the time to start the Grill.
10
Page 14

Using the Convection
TimeConvection
Temperature
Step 1. Firmly press the "Standby" button.
Step 2. Press the + button to choose Convection.
Step 3. Press the "Timer" to set the time.
Step 7. Decrease temperature.
Step 8. Press the "Pause/Start" button to conrm the setting.
Step 9. Press the "Childlock" button, to conrm if the
convection oven has reached your desired temperature.
Step 4. Set the time. Increments of + and - of 30secs.
Step 5. Press the "Function" to set the temperature.
Step 6. Increase temperature.
NOTE:
At the end of each cooking process the oven will emit 3
beeps every 30 seconds for ve minutes or until the oven
door is open or when you press the Start / Pause.
11
Page 15

TimeConvection
Temperature
Setting the delayed start for the Convection
Step 1. Firmly press the "Standby" button.
Step 2. Press the + button to choose Convection.
Step 3. Press the "Timer" to set the time.
Step 7. Decrease temperature.
Step 8. After setting the temperature. Press the "Timer"
button twice to set the delayed start. The current time will
appear.
Step 9. Calculate the time to start the Convection.
Step 4. Set the time. Increments of + and - of 30secs.
Step 5. Press the "Function" to set the temperature.
Step 6. Increase temperature.
Step 10. Press "start" to conrm start time. Once set, the
display will show the function and "AUTO" text.
NOTE:
At the end of each cooking process the oven will emit 3
beeps every 30 seconds for ve minutes or until the oven
door is open or when you press the Start / Pause.
12
Page 16

Using the Microwave Grill
TimeMicrowave Grill
Power rating
The microwave and the grill work simultaneously and it is
ideal for quickly browning foods after cooking.
Make sure your cookware and/or dish is suitable for
microwave grill and that it is also suitable for microwave use.
The cookware and/or dish to be used in the combined
function should adhere to Table 2.2 Microwave Grill ratings.
The values given in the table are valid when there is no
preheat.
The control settings and cooking times given in the Table
2.2 Microwave Grill ratings are intended to be used AS A
GUIDE ONLY. Individual tastes may require the temperature
to be altered to provide a preferred result.
Please allow for standing time and unless otherwise
instructed do not forget to turn the meat pieces.
Step 1. Firmly press the "Standby" button.
Step 5. Increments of -30secs.
Step 6. Press the "Function" to change/set the power
rating. Refer to Table 2.2 Microwave Grill ratings.
Step 7. Increase the power rating.
Step 2. Press the + button to choose Microwave Grill.
Step 3. Press the "Timer" to set the time.
Step 4. Increments of +30secs.
Step 8. Decrease the power rating.
Step 9. Press the "Pause/Start" button to conrm the
setting.
NOTE:
At the end of each cooking process the oven will emit 3
beeps every 30 seconds for ve minutes or until the oven
door is open or when you press the Start / Pause.
13
Page 17

Setting the delayed start for the Microwave Grill
TimeMicrowave Grill
Power rating
Step 1. Firmly press the "Standby" button.
Step 2. Press the + button to choose Microwave Grill.
Step 3. Press the "Timer" to set the time.
Step 7. Increase the power rating.
Step 8. Decrease the power rating.
Step 9. After setting the power rating. Press the "Timer"
button twice to set the delayed start. The current time will
appear.
Step 4. Increments of +30secs.
Step 5. Increments of -30secs.
Step 6. Press the "Function" to change/set the power
rating. Refer to Table 2.2 Microwave Grill ratings.
Step 10. Calculate the time to start the Microwave Grill.
Step 11. Press "start" to conrm start time. Once set, the
display will show the function and "AUTO" text.
NOTE:
At the end of each cooking process the oven will emit 3
beeps every 30 seconds for ve minutes or until the oven
door is open or when you press the Start / Pause.
14
Page 18

Using the Grill Convection
TimeGrill Convection
Temperature
Step 1. Firmly press the "Standby" button. Step 7. Increase temperature.
Step 2. Press the + button to choose Grill Convection. Step 8. Decrease temperature.
Step 3. Press the "Timer" to set the time.
Step 4. Increments of +30secs.
Step 5. Increments of -30secs.
Step 9. Press the "Pause/Start" button to conrm the
setting.
Step 10. Press the "childlock" button, to conrm if the Grill
Convection has reached your desired temperature.
NOTE:
At the end of each cooking process the oven will emit 3
beeps every 30 seconds for ve minutes or until the oven
door is open or when you press the Start / Pause.
Step 6. Press the "Function" to set the temperature.
15
Page 19

Setting the delayed start for the Grill Convection
TimeGrill Convection
Temperature
Step 1. Firmly press the "Standby" button. Step 7. Increase temperature.
Step 2. Press the + button to choose Grill Convection. Step 8. Decrease temperature.
Step 3. Press the "Timer" to set the time.
Step 4. Increments of +30secs.
Step 5. Increments of -30secs.
Step 8. After setting the temperature. Press the "Timer"
button twice to set the delayed start. The current time will
appear.
Step 10. Calculate the time to start the Grill Convection..
Step 11. Press "start" to conrm start time. Once set, the
display will show the function and "AUTO" text.
Step 6. Press the "Function" to set the temperature.
NOTE:
At the end of each cooking process the oven will emit 3
beeps every 30 seconds for ve minutes or until the oven
door is open or when you press the Start / Pause.
16
Page 20

Time
Microwave
Convection
Power rating
Using the Microwave Convection
Step 1. Firmly press the "Standby" button. Step 7. Increase the power rating.
Step 2. Press the + button to choose
Microwave Convection.
Step 3. Press the "Timer" to set the time.
Step 4. Increments of +30secs.
Step 8. Decrease the power rating.
Step 9. Press the "Pause/Start" button to conrm the
setting.
NOTE:
At the end of each cooking process the oven will emit 3
beeps every 30 seconds for ve minutes or until the oven
door is open or when you press the Start / Pause.
Step 5. Increments of -30secs.
Step 6. Press the "Function" to change/set the power
rating.
17
Page 21

Time
Microwave
Convection
Power rating
Setting the delayed start for the Microwave Convection
Step 1. Firmly press the "Standby" button. Step 7. Increase the power rating.
Step 2. Press the + button to choose
Microwave Convection.
Step 3. Press the "Timer" to set the time.
Step 4. Increments of +30secs.
Step 8. Decrease the power rating.
Step 9. After setting the power rating. Press the "Timer"
button twice to set the delayed start. The current time will
appear.
Step 10. Calculate the time to start the Microwave
Convection..
Step 5. Increments of -30secs.
Step 6. Press the "Function" to change/set the power
rating.
Step 11. Press "start" to conrm start time. Once set, the
display will show the function and "AUTO" text.
NOTE:
At the end of each cooking process the oven will emit 3
beeps every 30 seconds for ve minutes or until the oven
door is open or when you press the Start / Pause.
18
Page 22

Time
Microwave Grill
Convection
Power rating
Using the Microwave Grill Convection
Step 1. Firmly press the "Standby" button.
Step 2. Press the + button to choose
Microwave Grill Convection.
Step 3. Press the "Timer" to set the time.
Step 7. Increase the power rating.
Step 8. Decrease the power rating.
Step 9. Once set, press start. The power rating will
alternated between temperaure and power.
Step 4. Increments of +30.
Step 5. Increments of -30.
Step 6. Press the "Function" to change/set the power
rating.
NOTE:
At the end of each cooking process the oven will emit 3
beeps every 30 seconds for ve minutes or until the oven
door is open or when you press the Start / Pause.
19
Page 23

Time
Microwave Grill
Convection
Power rating
Setting the delayed start for the Microwave Grill Convection
Step 1. Firmly press the "Standby" button.
Step 2. Press the + button to choose
Microwave Grill Convection.
Step 3. Press the "Timer" to set the time.
Step 7. Increase the power rating.
Step 8. Decrease the power rating.
Step 9. After setting the power rating. Press the "Timer"
button twice to set the delayed start. The current time will
appear.
Step 4. Increments of +30.
Step 5. Increments of -30.
Step 6. Press the "Function" to change/set the power
rating.
Step 10. Calculate the time to start the Microwave
Convection..
Step 11. Press "start" to conrm start time. Once set, the
display will show the function and "AUTO" text.
NOTE:
At the end of each cooking process the oven will emit 3
beeps every 30 seconds for ve minutes or until the oven
door is open or when you press the Start / Pause.
20
Page 24

Defrosting with microwaves
• When defrosting, use only dishes that are appropriate
for microwaves.
• The defrost function by weight and the tables refer
Table 2.5 page 28.
• The defrosting time depends on the quantity and
thickness of the food. When freezing food keep the
defrosting process in mind. Distribute the food evenly in
the container.
• Thick portions of food should be turned over several
times in the process of baking.
• Distribute the frozen food as evenly as possible since
narrow and thick portions defrost more quickly than the
thicker and broader parts.
• Fat-rich foods such as butter, cheese and cream should
not be completely defrosted. If they are kept at room
temperature they will be ready to be served in a few
minutes. With ultra-frozen cream, if you find small pieces
of ice in it, you should mix these in before serving.
• Place poultry on an upturned plate so that the meat
juices can run off more easily.
• Bread should be wrapped in a napkin so that it does not
become too dry.
• Remove frozen food from its wrapping and do not
forget to take off any metal twist-tags. For containers
that are used to keep frozen food in the freezer and
which can also be used for heating and cooking, all
you need to do is take off the lid. For all other cases you
should put the food into containers that are suitable for
microwave use.
• The liquid resulting from defrosting, principally that
from poultry, should be discarded. In no event should
such liquids be allowed to come into contact with other
foods.
• Do not forget that by using the defrosting function
you need to allow for standing time until the food is
completely defrosted.
• In defrost process, please turn food over when
microwave oven alarm sounds and the display says
"turn".
21
Page 25

ProgramDefrost
Weight
Using the Defrost
Half way through the defrost process, the appliance will stop
and emit 3 beeps every 30 seconds. The defrost icon will
become static and the word "turn" will appear. Open the
door, turn the food over and press the Start / Pause button
to continue defrosting.
Step 1. Firmly press the "Standby" button.
Step 2. Press the + button to choose Defrost
Step 3. Choose a program.
Refer to Table 2.3 Defrost ratings.
Step 5. Increase the weight.
Step 6. Decrease the weight.
Step 7. Press the "Pause/Start" button to conrm the
setting.
Step 4. Press the "Function" to change/set the weight.
NOTE:
At the end of each cooking process the oven will emit 3
beeps every 30 seconds for ve minutes or until the oven
door is open or when you press the Start / Pause.
22
Page 26

ProgramDefrost
Weight
Setting the delayed start for Defrost
Step 1. Firmly press the "Standby" button.
Step 2. Press the + button to choose Defrost
Step 3. Choose a program.
Refer to Table 2.3 Defrost ratings.
Step 6. Decrease the weight.
Step 7. After setting the weight. Press the "Timer" button
twice to set the delayed start. The current time will appear.
Step 8. Calculate the time to start the Defrost
Step 4. Press the "Function" to change/set the weight.
Step 5. Increase the weight.
Step 9. Press "start" to conrm start time. Once set, the
display will show the function and "AUTO" text.
NOTE:
At the end of each cooking process the oven will emit 3
beeps every 30 seconds for ve minutes or until the oven
door is open or when you press the Start / Pause.
23
Page 27

Pause during cooking
Press the "Pause/Start" button.
Cancel cooking
Modifying Parameters
The parameters of weight, time and temperature can only be
modied when the cooking has been stopped.
If you need to change the cooking duration, press the
"Timer" to change the time.
To cancel the cooking process, press the "Standby" button
until you hear the beep to conrm cancellation.
Child Lock
Press "Child Lock" for 3 seconds. A beep will sound to
conrm child lock is active and the icon will appear. Repeat
to unlock.
If you need to change either the weight or temperature,
press the "Function" to change the time.
24
Page 28

Cooling Fan
The appliance is equipped with a cooling fan which comes
into operation as soon as a cooking function starts.
Operation of the fan generates a normal airow which comes
out above the door and may continue for a short time even
after the appliance is switched o.
Always keep the door and the oven front very clean to ensure
that the door opens and closes properly.
Make sure water does not permeate into the microwave
ventilation holes.
Regularly take out the turntable plate and the respective
support and clean the cavity base, especially after any liquid
spillage.
Door Interlock Switch
If you try to start the oven when the door is open the light
will come on and the screen will display "door". The screen
will return to the original display after 3 seconds.
The light comes on when in use and when the oven door is
open in "Standby" mode. If the oven door is open longer then
10 minutes the light will switch o after 10 minutes.
Cleaning and Maintenance
Before carrying out any operations, disconnect the appliance
from the electricity supply. Take the plug out of the socket or
switch of the oven's power circuit.
Never use a jet of steam for cleaning the inside of
the oven.
The microwave oven should be cleaned regularly,
with all food remains being removed. The surface
of microwave may deteriorate if it is not clean. That
may reduce the oven's working life and possibly
result in a dangerous situation.
Cleaning Stainless Steel
To keep stainless steel in a good condition, it should be
cleaned regularly.
Daily Cleaning Routine
When cleaning and caring for stainless steel surfaces, always
use only specic products which do not contain abrasives or
chlorine-based acids.
Instructions for use: Pour the product onto a damp cloth
and wipe over the surface, then rinse thoroughly and dry
with a soft cloth or chamois leather.
Microwave should not work without turntable.
If the oven cavity is very dirty, put a glass of water on the
turntable and switch on the microwave oven for 2 or 3
minutes at maximum power. The steam released will soften
the dirt which can then be cleaned easily using a soft cloth.
Unpleasant odors (e.g. after cooking sh) can be eliminated
easily. Put a few drops of lemon juice in a cup with water.
Put a spoonful of coee in the cup to avoid the water
boiling over. Heat the water for 2 to 3 minutes at maximum
microwave power.
Cleaning The Cavity Ceiling
If the oven ceiling is dirty, to avoid the danger of burning ,
wait until the grill is cold before lowering it.
DO NOT use abrasive cleaning products or sharp objects.
To avoid any risk, do not remove the mica cover.
The glass lamp cover is located on the oven ceiling and can
be removed easily for cleaning. For this you just need to
unscrew it and clean it with water and dishwashing liquid.
Rinse Of Door Seal And Front Panel
Please rinse in time if there are residues left in door seal or on
front panel. Do not use rough cleaning tools like hard brush,
coarse cloth, wire netting, knife or any other sharp tools,
using those sharp tools may scratch door seal or the surface
of the front panel. Please use non-abrasive detergent. You can
use wooden or plastic cleaning tools if it is necessary.
Cleaning The Accessories
Clean the accessories after each use. If they are very dirty,
soak them rst of all and then use a brush and sponge. The
accessories can be washed in a dish washing machine.
Food Stains Or Spills
Never use metal scouring pads or sharp scrapers which may
damage the surface of the oven.
Use ordinary non-abrasive products with the aid of wooden
or plastic utensils if necessary. Rinse thoroughly and dry with
a soft cloth or chamois leather.
Cleaning The Oven Cavity
Cleaning is the only maintenance normally required. Every
time after cooking, clean the inner cavity with a damp cloth
since this is an easier way to remove splashes or spots that
may stick to the cavity.
To remove dirt that is harder to shift, use a non-aggressive
cleaning product. Do not use oven sprays or other aggressive
or abrasive cleaning products.
Make sure that the turntable plate and the respective support
are always clean. Do not switch on the oven unless the
turntable and the respective support are in place.
25
Page 29

Troubleshooting
Replacing The Light Bulb Fig. 2.3
1. Take o the plug from power supply.
2. Take o the lampshade
3. Take down halogen lamp Warning: Hot lamp!
4. Fill new halogen lamp (230V-25W).
5. Operate according to the instruction.
6. Install lampshade well.
7. Connect the power.
The lamp is not suggested for consumer to replace.
The replacing should be done by a professional
mechanic.
Fig. 2.3
26
Page 30

The control settings and cooking times given in the tables are intended to be used AS A GUIDE ONLY. Individual tastes may
require the temperature to be altered to provide a preferred result.
Display 1000W 800W 600W 400W 200W 0W
Power High Medium High Medium Medium Low Low Cool
Table 2.1 Microwave rating
Food Quantity (g) Dish Power (W) Time (min) Standing time
(min)
Cheese topped pasta 500 Low dish 400 12-17 3-5
Cheese topped potatoes 800 Low dish 600 20-22 3-5
Lasange Approx 800 Low dish 600 15-20 3-5
Grilled Cream Cheese Approx 500 Low dish 400 18-20 3-5
2 Fresh Chicken legs (Grilled) 200 Each Low dish 400 10-15 3-5
Chicken Approx 1000 Low land wide sh 400 35-40 3-5
Cheese topped onion soup 2x 200 cups Soup bowls 400 2-4 3-5
Table 2.2 Microwave Grill ratings
Program Food Weight (g) Time (min) Duration (min)
PR 01 Meat 100 - 2000 2:20-43:30 20 - 30
PR 02 Poultry 100 - 2500 2:10-58:10 20 - 30
PR 03 Fish 100 - 2000 2:00-40:00 20 - 30
PR 04 Fruit 100 - 500 2:36-13:00 10 - 20
PR 05 Bread 100 - 800 2:25-19:20 10 - 20
Table 2.3 Defrost ratings
Name Weight (g) Water Fire Power Time (min)
Cauliower 500 100 800 9-11 2-3
Broccoli 300 50 800 6-8 2-3
Mushroom 250 25 800 7-9 2-3
Peas, carrots /
frozen carrots
Potatoes 250 25 800 5-7 2-3
Chives 250 25 800 5-7 2-3
Frozen cabbage 300 50 800 6-8 2-3 Cover well
300 / 250 100 / 25 800 8-10 2-3
Follow up
Time (min)
Notice
Cut into slices Cover
well
Cut into slices or
blocks, cover well
Peel and cut into
uniform size, cover
well
Cut into segments or
slices, cover well
Table 2.4 Vegetables
27
Page 31

Name of food Weight (g) Defrosting (min)
100
200
Meat (veal, beef, pork)
Beef stew
Minced meat
Sausage
Poultry
Chicken
Dorking
Fish llet
Trout Prawn
Fruit
Bread
Butter 250 8-10 10-15
Cheese 250 6-8 10-15
Cream 250 7-8 10-15
500
1000
1500
2000
500
1000
100
500
200
500
250
1000
2500
200
250
100
500
200
300
500
200
500
800
2-3
4-5
10-12
21-23
32-34
43-45
8-10
17-19
2-4
10-14
4-6
9-12
5-6
20-24
38-42
4-5
5-6
2-3
8-11
4-5
8-9
11-14
4-5
10-12
15-17
Follow up Time
(min)
5-10
5-10
10-15
20-30
20-30
25-35
10-15
20-30
10-15
20-30
10-15
15-20
5-10
20-30
25-35
5-10
5-10
5-10
15-20
5-10
5-10
10-20
5-10
10-15
10-20
Frequency of turnover
1
1
2
2
2
3
2
3
2
3
2
3
1
2
3
1
1
1
2
1
1
2
1
1
2
Table 2.5 Defrosting with microwaves
Name Quantity (g) Time (min) Instructions
Fish
Bass 800 18-24 Spread lightly with butter.
Sardines/gurnard 6-8 Fish 15-20
Afterhalf of cooking time turn
and spread with seasonning.
Meat
Sausages 6-8 Units 22-26
Frozen hamburgers 3 Units 18-20
Spare rib (approx.3 Cm thick) 400 25-30
Toast 4 Units 3/2-3 Watch toasting
Toasted sandwiches 2 Units 5-10 Watch toasting
Prick after half cooking time and
turn
After half of cooking time, baste
and turn
Table 2.6 Cooking with Grill
28
Page 32

Check the appliance is electrically safe and gas sound when you have nished.
3. Installation
INSTALLATION
Dear Installer
Before you start your installation, please complete the details
below.
Installer’s Name
Installer’s Company
ArtNo.050-0011 - Installer information table
Installer’s Telephone Number
Appliance Serial Number
If your customer has a problem relating to your installation
they will be able to contact you easily.
You must be aware of the following safety requirements &
regulations:
This appliance shall be installed in accordance with the
regulations in force and in a well-ventilated space. Read the
instructions before installing or using this appliance.
The cooker must be installed in accordance with:
• All relevant British Standards / Codes of Practice
• The relevant Building / IET regulations
Before The Installation
Open the oven door and take out all the accessories and
remove the packing material.
Make sure that the oven is not damaged by any way. Check
that the oven door closes correctly and the inside of the door
and front oven panel are not damaged.
Do not use the oven if the power cable or the plug is
damaged, if the oven does not function correctly or if it has
been damaged or dropped. Put the oven on a at and stable
surface. The oven should not be installed close to any heat
source, radios or televisions.
During installation, make sure that the power cable does
not come into contact with any moisture or objects with
sharp edges and the back of the oven. High temperature can
damage the cable. Warning: after the oven is installed you
should make sure you can access the plug.
Location of the Oven
The oven may be installed in a kitchen/kitchen diner but NOT
in a room containing a bath or shower.
This appliance is designed for domestic cooking only. Use for
any other purpose could invalidate any warranty or liability
claim.
This appliance should not be installed in a boat or
caravan.
The hob must be installed in accordance with the relevant
Building regulations and IET regulations.
You will need the following tools and equipment to
complete the oven installation satisfactorily:
1. Electric drill
2. Steel tape measure
3. Cross head screwdriver
4. Pencil
5. Multimeter (for electrical checks)
29
Page 33

INSTALLATION
542
455
21
595
445
514
542
455
21
595
445
514
558-565
458
min 500cm
min 500cm
min 500
448-452
558-565
min 550
100
500cm
Check the appliance is electrically safe and gas sound when you have nished.
Fig. 3.1
All dimensions in mm unless otherwise shown
30
Page 34

INSTALLATION
Check the appliance is electrically safe and gas sound when you have nished.
DO NOT use the handle to lift the oven
31
Page 35

INSTALLATION
ArtNo.130-0006 - Electrical connections BI oven (60)
L
N
220V - 240V
123
R
L
PE
4 5
N
E
DOUBLE POLE SWITCHED
FUSE SPUR OUTLET
13A
FUSE ON
Check the appliance is electrically safe and gas sound when you have nished.
Electrical Connection
This appliance must be installed by a qualied electrician
to comply with the relevant Institution of Engineering and
Technology (I.E.T.) regulations and also the local electricity
supply company requirements.
WARNING: THIS APPLIANCE MUST BE EARTHED
This appliance must be connected by a competent person,
using xed wiring via a double pole switched fused spur
outlet, protected by a 13A fuse (Fig. 3.2).
We recommend that the appliance is connected by a
qualied electrician, who is a member of the N.I.C.E.I.C. and
who will comply with the I.E.T. and local regulations. The
wires in the mains lead are coloured in accordance with the
following code:
This appliance must not be connected to an ordinary
domestic power point.
The mains terminal is situated on the back of the oven
(Fig. 3.3).
• GREEN AND YELLOW = EARTH
• BLUE = NEUTRAL
Fig. 3.2
Fig. 3.3
• BROWN = LIVE.
As the colours of the wires in the mains lead for the appliance
may not correspond with the coloured markings identifying
the terminals in your spur box, proceed as follows:
1. The wire which is coloured green and yellow must be
connected to the terminal marked E (Earth) or coloured
Green.
2. The wire which is coloured blue must be connected to
the terminal marked N (Neutral) or coloured Black.
3. The wire which is coloured brown must be connected to
the terminal marked L (Live) or coloured Red.
Connect the cable to the correct terminals. Check that the
links are correctly tted and that the terminal screws are tight.
Secure the mains cable using the cable clamp.
Ensure the cable route avoids the risk of trapping or touching
hot surfaces.
Current Operated Earth Leakage
Breakers
Where the installation is protected by a 30mA sensitivity
residual current device (RCD), the combined use of your
appliance and other domestic appliances may occasionally
cause nuisance tripping. In these instances the kitchen circuit
may need to be recongured. This work should be carried out
by a qualied electrician.
32
Page 36

4. Circuit Diagram
K
′
D
180
130
110
150
100
130
80
120
140
140
Monitor switch
130
130
70
130
150
130
100
80
100
120
High tension
transformer
120
100
150
160
23
24
100
100
25
Ground terminal
150
Light
50
50
120
160
160
Magnetron
thermostat
100
130
135
150
120
120
200
100
Furnace chamber thermostat
PCB board
GND
160
Turntable motor
Circulating Fan
Cooling Fan
Top Element
Back Element
33
Page 37

5. Technical Data
INSTALLER: Please leave these instructions with the user.
DATA BADGE LOCATION: Back of the drawer.
COUNTRY OF DESTINATION: GB, IE.
Dimensions
Dimensions Oven (excluding front frame) Oven (including front frame)
Height 445 mm 455 mm
Width 544 mm 595 mm
Depth 514 mm 535 mm
Mass (kg) 36
Data
Brand Rangemaster
Model identication RMB45MCBL/SS
Type of drawer Electric
Number of cavities 1
Volume Litres 35
Max load kg 38.0
Maximum total electrical load at 230 V (approximate total including, oven lights, power steam/oven etc.) 1.400 kW
34
Page 38

6. Warranty/After Sales Service
If consultation or technical assistance is needed, please
provide the local authorised service agent with the purchase
invoice and the product code/serial number.
The 2 years free maintenance for the operation of the
appliance started from the date of purchase of this product.
Any cosmetic damage to the appliance must be reported
within 90 days of delivery.
Free from a landline: +44 (0) 800 8046261
Depending on your mobile network, call from this number is
free: +44 (0) 3707 895107
DocNo.111-0003 Warranty No.10
35
Page 39

Notes
36
Page 40

Clarence Street, Royal Leamington Spa,
Warwickshire, CV31 2AD, England.
Tel: +44 (0) 800 8046261
E-mail: consumers@agarangemaster.co.uk
 Loading...