

Rangemaster RMB45CFBL/SS, ECL45CFBL/BL User Manual & Installation & Service Instructions

RMB45CFBL/SS
ECL45CFBL/BL
User Guide
&
Installation & Service Instructions
U110868 - 02

Contents
1. Before You Start... 1
Before First Use 1
Personal Safety 1
Before the installation 1
Electrical Safety 2
Installation and Maintenance 2
Provision for Ventilation 2
Location of the appliance 2
Cleaning 2
2. Overview 3
Using the appliance for the rst time 4
Setting water hardness 7
Setting the clock for the rst time 8
Changing the time 8
3. Changing and Setting
the Parameters 16
5. Troubleshooting 31
6. Installation 33
Installation warnings 33
Provision for Ventilation 33
Before the installation 33
Location of the appliance 33
Installation 34
Automatic cup tray light 34
Electrical Connection 36
7. Circuit Diagram 39
8. Technical Data 40
9. Warranty/After Sales Service 41
Changing the units (not in menu list) 16
Setting auto-start time 17
Setting auto-o time 19
Reset 20
Number of use 21
Language 22
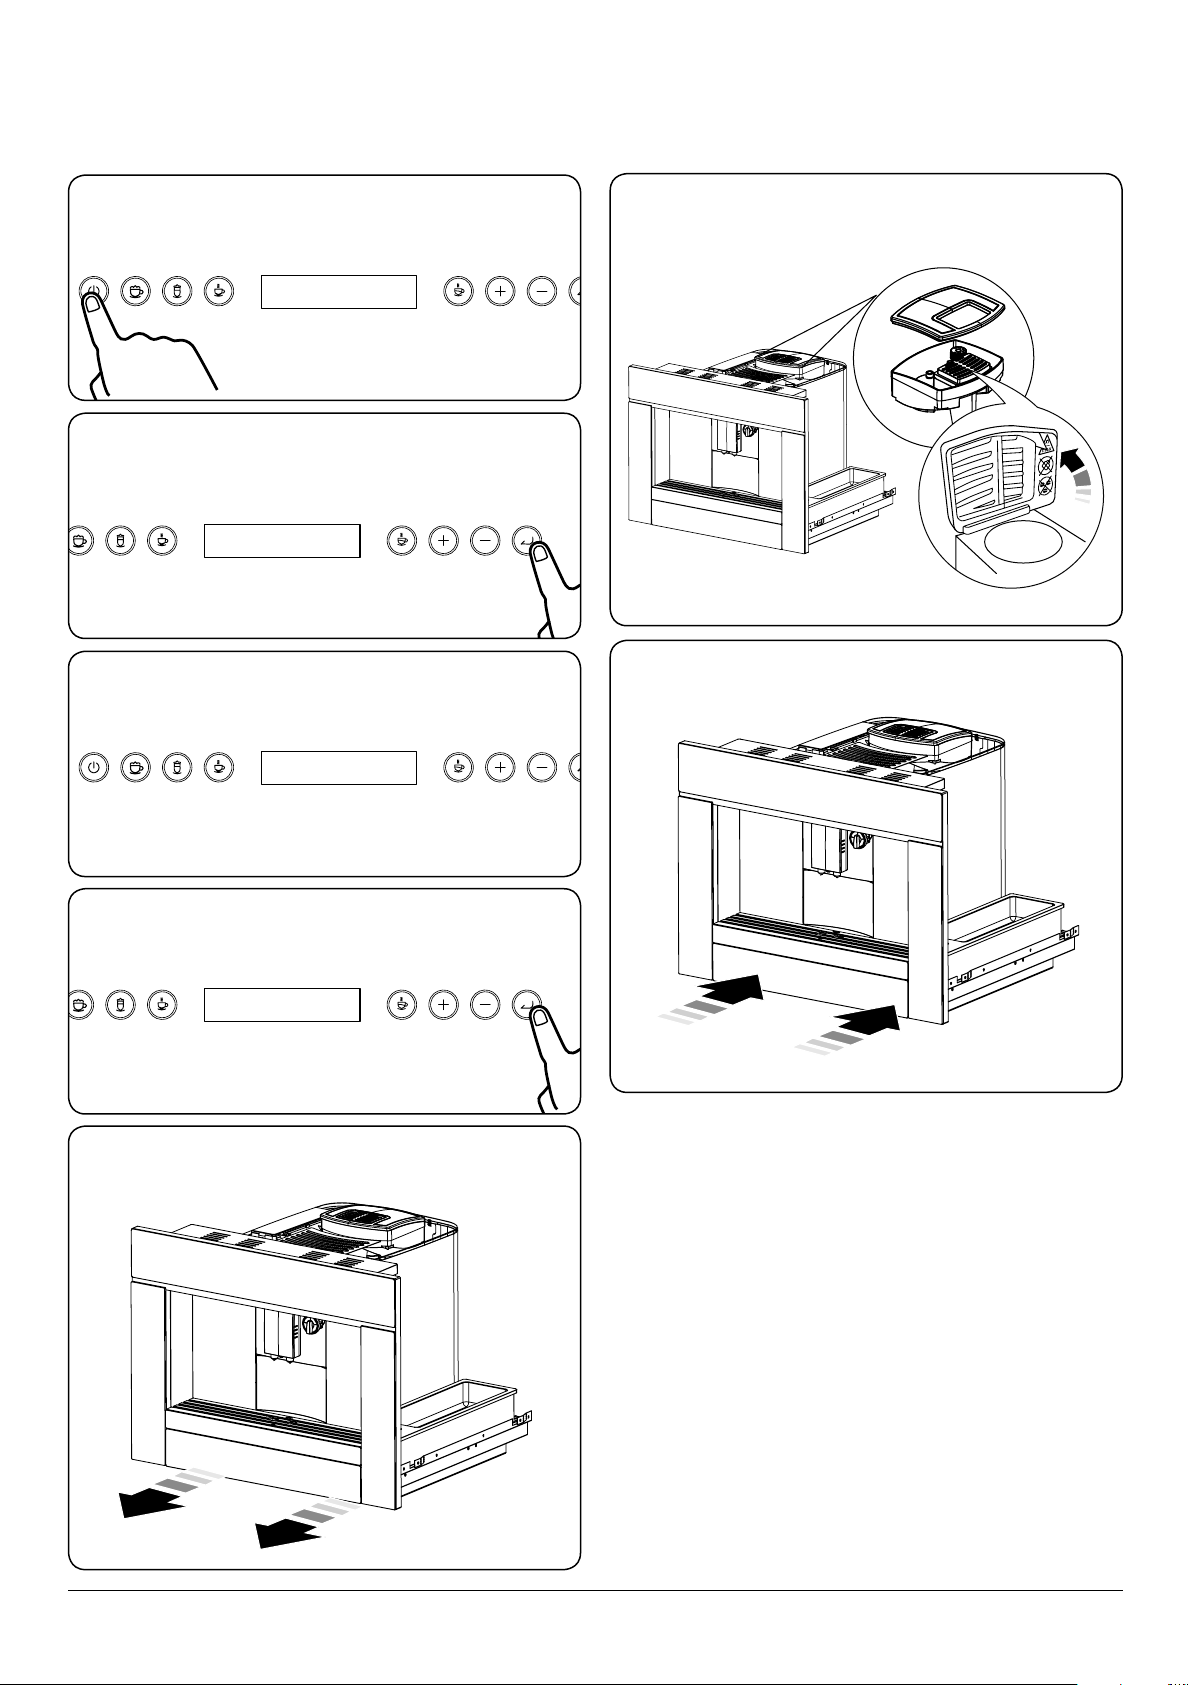
Emptying 23
4. Cleaning and Maintenance 24
Essential Information 24
Cleaning 24
Control Panel 24
Cleaning the drip tray 25
Cleaning the coee grounds container 25
Cleaning the infuser/clean brew 26
Manual operation of cleaning the infuser/
clean brew 27
Cleaning the water tank 28
Cleaning the spouts 28
Cleaning the pre-ground coee funnel 28
Cleaning the inside of the coee maker 28
Descaling 29

1. Before You Start...
Thank you for buying a Rangemaster appliance. It should give
you many years trouble-free cooking if installed and operated
correctly. It is important that you read this section before you
start.
CAUTION: This appliance is designed and made
to prepare coee and hot drinks. All other use is
considered improper. This appliance is not suitable
for commercial use. The manufacturer is not liable
for damage deriving from improper use of the
appliance.
Before First Use
Before using the appliance for the rst time clean it
thoroughly. Switch o the unit at the isolator or mains supply.
Remove all packing materials and accessories. Use hot water
and mild detergent to wipe the appliance and then rinse
carefully with a damp cloth.
Personal Safety
Keep all packaging (plastic bags, polystyrene foam)
away from children.
Do not immerse this machine in water.
Accessible parts will become hot during use and will
retain heat even after use. Keep babies and children
away from the appliance.
When the appliance is not in use, ensure that the
appliance is OFF.
To minimise the possibility of burns, always be
certain that the controls are OFF position and that
the entire appliance is cool before attempting to
clean.
Use dry gloves (e.g. oven gloves) when applicable –
using damp gloves might result in steam burns when
you touch a hot surface. Never operate the appliance
with wet hands. DO NOT use a towel or other bulky
cloth in place of a glove – it might catch re if it
touches a hot surface.
Always keep combustible wall coverings or curtains,
etc., a safe distance away from your appliance, and
never wear loose-tting or hanging clothes while
using the appliance.
DO NOT store or use aerosols, or any other
potentially combustible or ammable materials, in
the vicinity of the appliance.
This appliance is heavy, so take care when moving it.
The appliance is not intended to be operated by
means of external timer or separated remote-control
system.
This appliance can be used by children aged from 8
years and above and persons with reduced physical,
sensory or mental capabilities or lack of experience
and knowledge if they have been given supervision
or instruction concerning use of the appliance in a
safe way and understand the hazards involved.
Children less than 8 years of age should be kept
away unless continuously supervised. Children
shall not play with the appliance. Cleaning and user
maintenance shall not be made by children without
supervision.
Do not place container of liquids, ammable or
corrosive materials on top of the appliance.
When preparing the coee machine for use, please
use the special side holders.
Do not rest large heavy objects on the appliance.
Never make drinks, hot water or steam when the
appliance is extracted. Always make sure the
appliance is inactive before extracting it. Failure to
observe this precaution could lead to damage to the
appliance. The only exception is adjusting the coee
mill which must be done with the machine out Refer
to “Adjusting the coee mill” on page 4”.
This appliance produces hot water and steam may
form while it is in operation. Avoid contact with
splashes of water or hot steam. Avoid touching hot
surfaces when the appliance is in use.
Only a qualied service engineer should service the
appliance and only approved spare parts should
be used. It is recommended that this appliance is
serviced annually.
Before the installation
Installation must be performed by a qualied
professional in compliance with legislation in force
in the country of installation.
The packing elements (plastic bags. polystyrene
foam, etc.) should be kept out of reach of children as
they are a Safety hazard.
You should set the water hardness as soon as
possible following the instructions in the “Setting
water hardness” on page 7.
After removing the packaging, make sure the product is
complete and undamaged and that all accessories are
present. DO NOT use the appliance if it is visibly damaged.
Contact Customer Services.
DO NOT use the appliance if the power cable or the plug
is damaged, if the appliance does not function correctly or
if it has been damaged or dropped. Put the appliance on a
at and stable surface. The appliance should not be installed
close to any heat source, radios or televisions.
During installation, make sure that the power cable does not
come into contact with any moisture or objects with sharp
edges and the back of the appliance. High temperatures can
damage the cable.
1

Warning: After the appliance is installed you should
make sure you can access the electrical isolation
point.
Provision for Ventilation
The appliance housing used must provide adequate
ventilation.
Electrical Safety
The electrical installation must be installed in accordance
with all relevant British Standards/Codes of Practice, BS 7671.
Or with the relevant national and local regulations and with
the local gas and electricity supply companies’ requirements.
Otherwise, all installations must be in accordance with the
relevant instructions in this booklet.
Read the instructions before installing or using this appliance.
The appliance may be installed in a kitchen/kitchen diner but
NOT in a room containing a bath or shower.
This appliance MUST be earthed.
The appliance MUST NOT be tted with plug and connected
to a wall socket. Refer to “Electrical Connection” on page
36.
The appliance must be installed in accordance with the
regulations in force and only in a well ventilated space.
Failure to install the appliance correctly could invalidate any
warranty or liability claims and lead to prosecution.
DO NOT install the appliance on a loose platform. The
appliance is heavy and may tip if not adequately secured.
Refer to “Installation” on page 33.
DO NOT manouvre the appliance while it is connected into
the electricity supply.
If the appliance does not operate successfully, DO NOT
attempt to repair. Turn it o using the main switch (Refer to
the overview chapter) unplug from the mains socket and
contact customer services.
For built-in installation, a minimum ventilation space of 85 –
90mm 40mm must exist between the rear of the appliance
and the back of the housing or an adjacent wall.
If a tall housing is to be installed ush with the ceiling, a
20cm² ventilation cut-out must be provided at the top of the
housing.
Location of the appliance
Do not install the appliance in rooms where the
temperature may drop to 0°C or lower (the water in
the appliance could freeze and cause damage).
The appliance may be installed in a kitchen/kitchen diner but
NOT in a room containing a bath or shower.
This appliance is designed for domestic cooking only. Use for
any other purpose could invalidate any warranty or liability
claim.
Cleaning
In the interests of hygiene and safety, the appliance should
be kept clean at all times.
Clean only the parts listed in this guide.
Clean with caution. If a wet sponge or cloth is used to wipe
spills on a hot surface, be careful to avoid steam burns. Some
cleaners can produce noxious fumes if applied to a hot
surface.
If the plug or powder cable is damaged, it must be replaced
by the manufacturer, its service agent or similarly qualied
persons in order to avoid a hazard.
Installation and Maintenance
DO NOT install the appliance on a loose platform.
The appliance is heavy and may tip if not adequately
secured. Refer to “Installation” on page 33 before
proceeding installation of your appliance.
It is recommended that this appliance is serviced annually.
Only a qualied service engineer should service the
appliance, and only approved spare parts should be used.
Make sure that the appliance is wired in and switched on.
Always allow the appliance to cool and then switch it o at
the mains before cleaning or carrying out any maintenance
work, unless otherwise specied in this guide. Refer to
“Installation” on page 33 and “Electrical Connection”
on page 36 before proceeding installation of your
appliance.
2
12
12.00
4 56 783
A
K
L
F
O
N
M
B
E
C
D D
J
I
H
G
milk jug
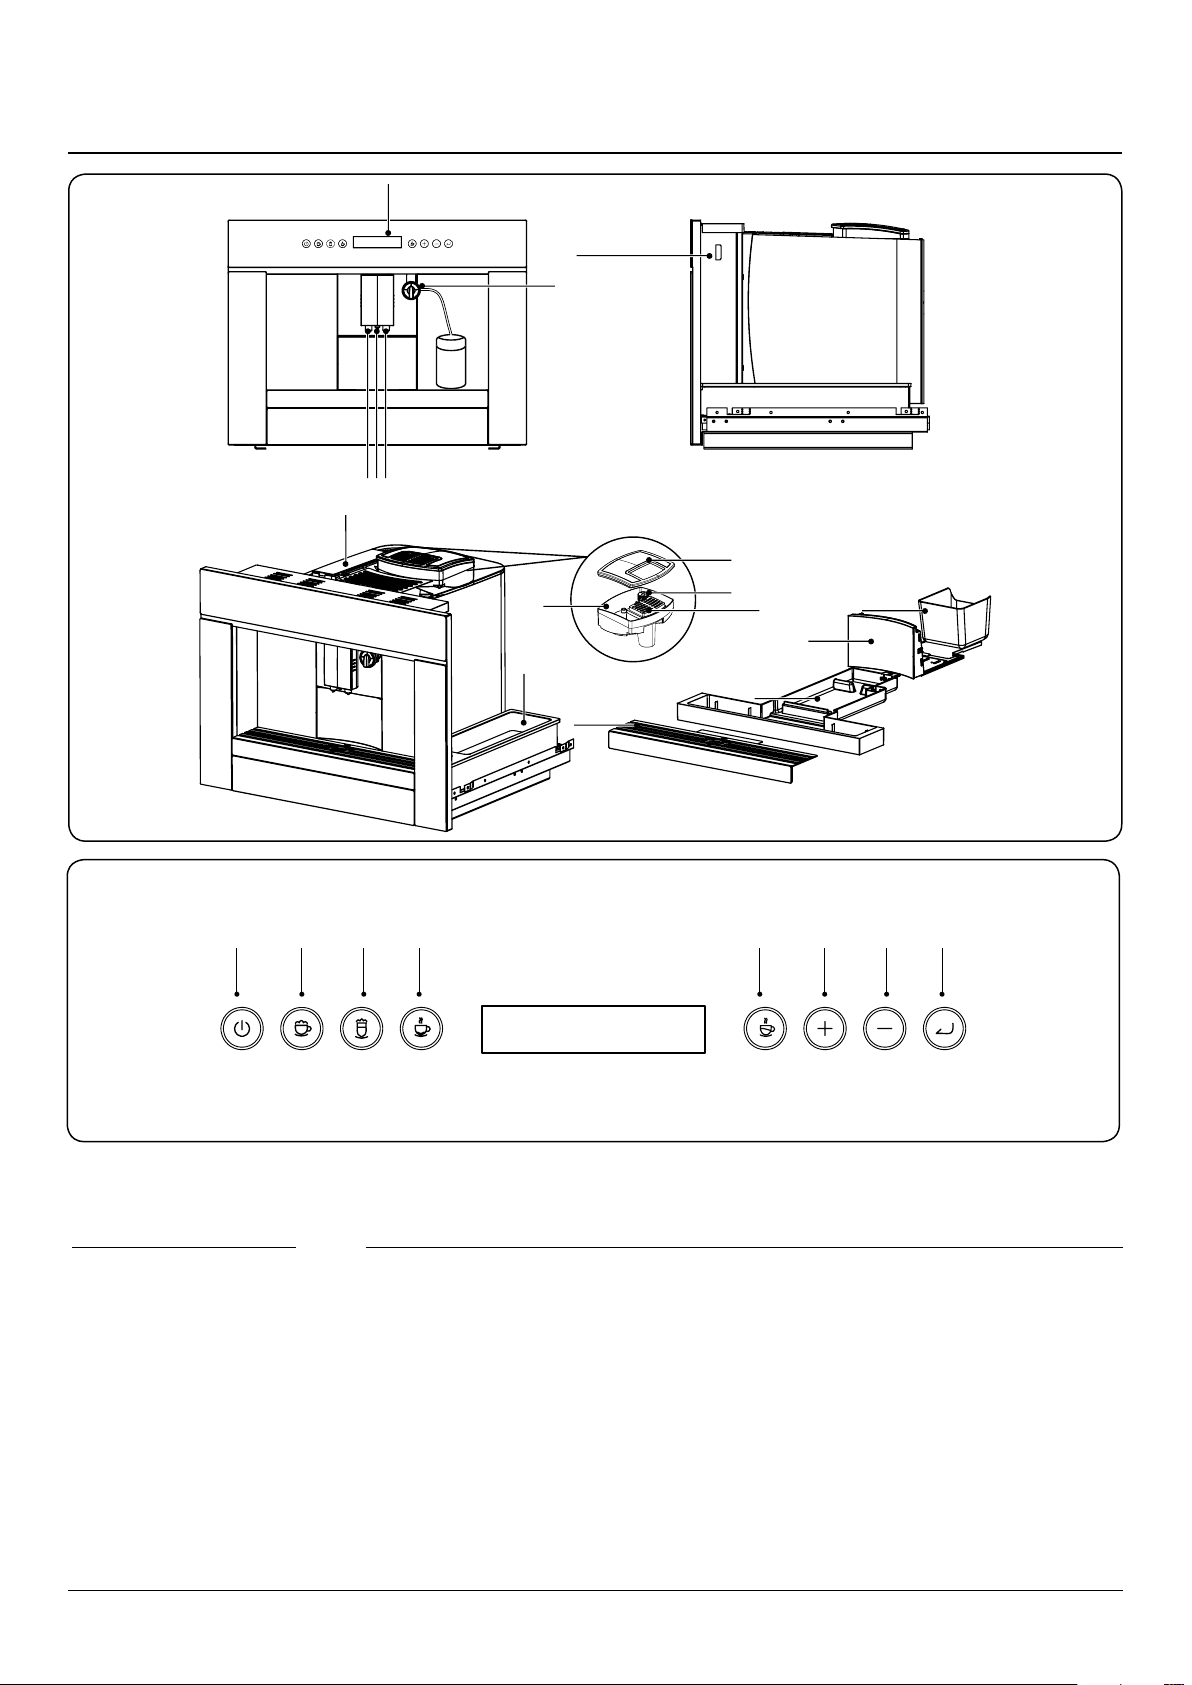
2. Overview
Fig. 2.1
Key: Fig. 2.1 Key: Fig. 2.1
A. Display screen
B. Milk / Cream knob
C. Cream nozzle
D. Coee nozzle
E. Main switch
F. Adjustable mill knob
G. Used coee grounds
container
H. Load tray
I. Drip tray
J. Metal drip tray
K. Tank
L. Coee bean container
M. Coee bean cover
N. Pre-ground coee
funnel
O. Storage for coee
bags
1. On / Standby
2. Cappuccino
3. Latte
4. Espresso
5. Coee
6. “+” button
7. “-” button
8. Pause / Enter
Fig. 2.2
3
SELF CHECK
HEATING
RINSING
READY
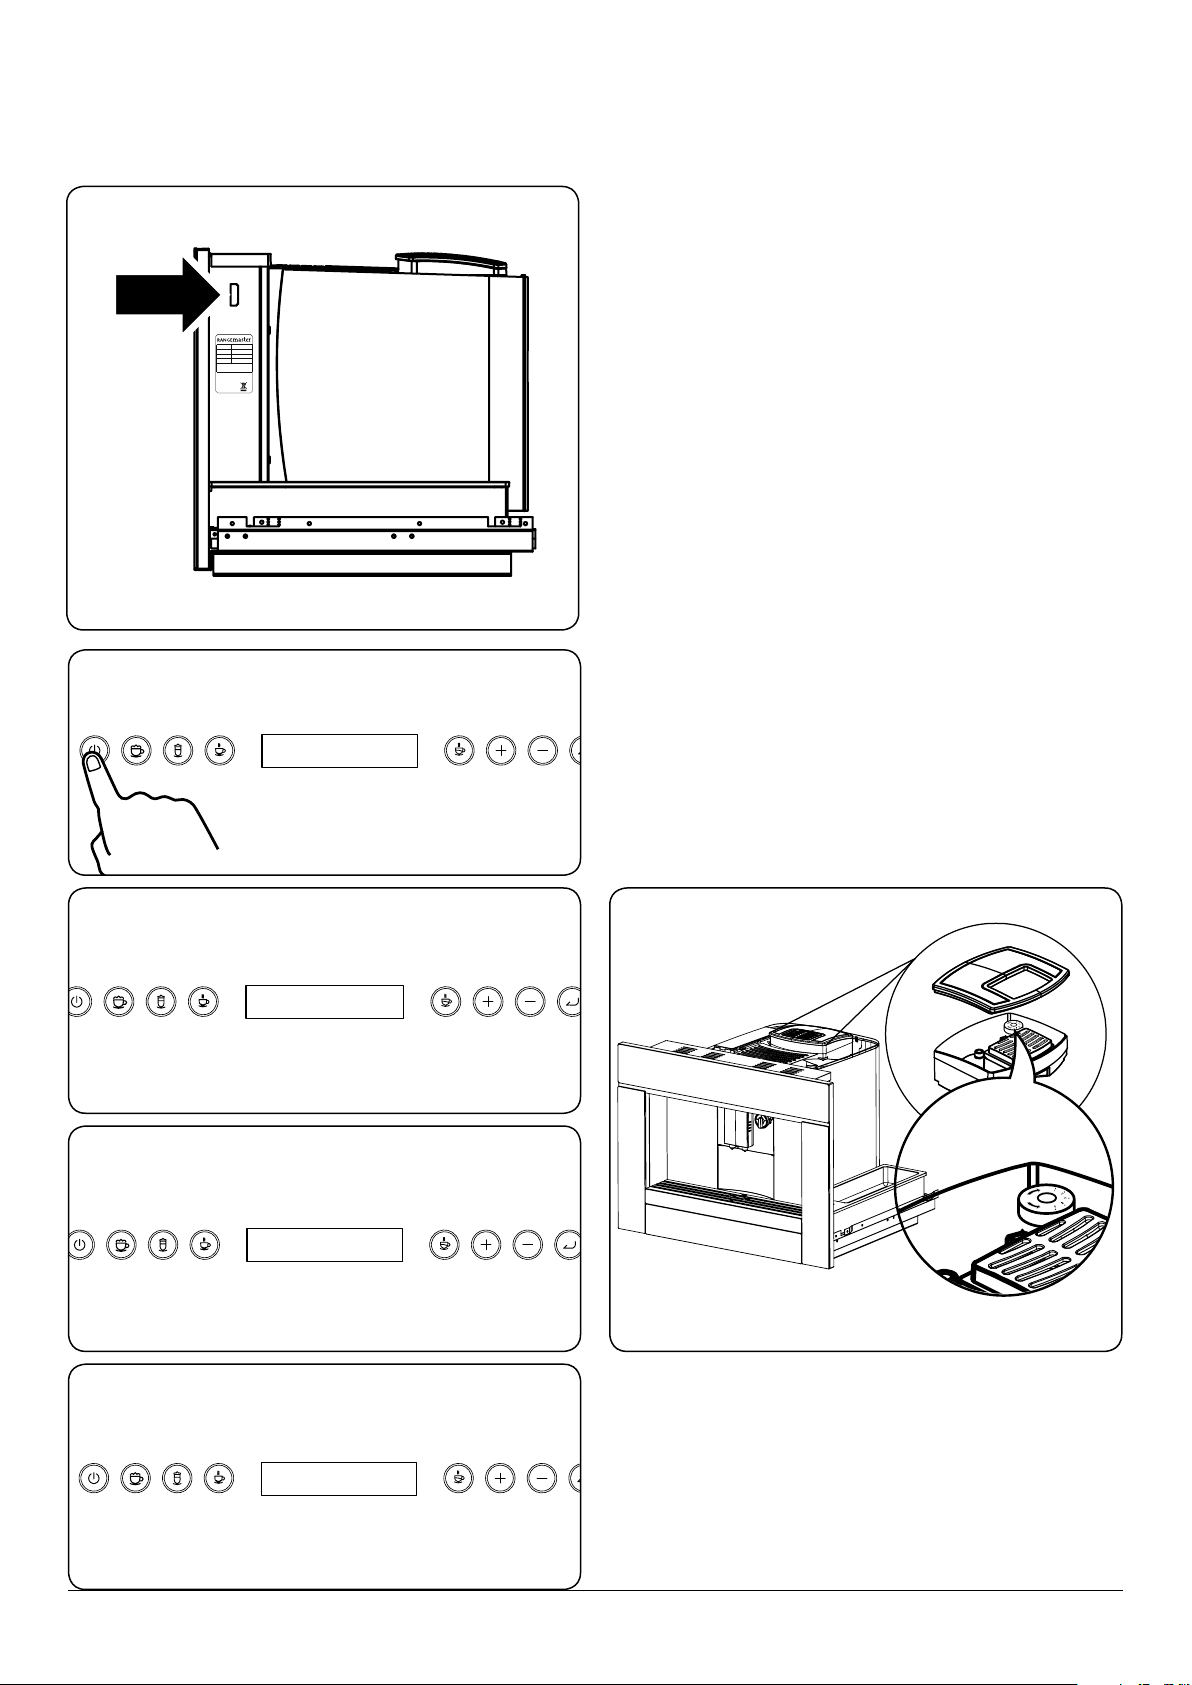
Using the appliance for the first time
AGA Rangemaster Limited
Leamington Spa
Warwickshire
CV31 2AD
England
Serial No.
Model
Frequency
Voltage
Power
RMB45CFBL/SS
Step 1. Once correctly installed, turn on the main switch.
Step 2. Press the "On / Standby". The appliance will do a
self-check.
Important! To prevent malfunction, never introduce
pre-ground coee, freeze dried coee, caramelized
beans or anything else which could damage the
appliance.
Adjusting the coffee mill
NOTE: If the coee is delivered too slow or not at all, turn the
grinding adjustment knob (Fig. 2.3). Proceed one click at a
time until coee delivery is satisfactory.
NOTE: If the coee is delivered too fast and the cream is not
satisfactory, turn the grinding adjustment knob (Fig. 2.3). one
click anticlockwise (Fig. 2.3). Proceed one click at a time until
coee delivery is satisfactory.
The coee mill is preset in the factory to make coee
correctly and should not require adjusting initially.
However, if after making the rst few coees you nd that
delivery is either too fast or too slow, this can be corrected by
adjusting the grinding adjustment knob (Fig. 2.3).
Important! The grinding adjustment knob (Fig.
2.3) must only be turned when the coee mill is in
operation. For slower delivery and creamier coee,
turn one click anticlockwise (ner, pre-ground
coee). For faster delivery (not a drop at a time),
turn one click clockwise (coarser pre-ground coee).
Step 3.
Step 4. Wait for some time, this appliance will
automatically start “rinsing".
Step 5. When rinse program is nished, the appliance will
display“ready”.
Fig. 2.3
4

Tips for a hotter coee
To make a small coee (less than 60 cc), rinse the cup with
hot water to preheat the cups. If you need to change the
temperature please refer to the "Change the temperature"
page 10.
• Unless preheated, do not use excessively thick cups as
they will absorb too much heat.
• Preheat the cups by rinsing them with hot water.
When the appliance displays “ll water", ll the tank with
water. It is normal for there to be a little water left in the tank
when the message is displayed.
Do not ll the water tank with hot or boiling water.
NOTE: Never extract the water tank while the
machine is delivering coee, if it is removed, it will
not be possible to make the coee and the appliance
will display “fill water”. If it is removed place the
water tank in its original position, the interrupted
program will continue to nish.
Note: The On / Standby button turns on your appliance from
standby. The appliance will automatically return to standby
mode after the coee is made.
5
Coffee Machine Menus
Main Menu Purpose
Use powder This mode will force the appliance to make the coee from
the pre-ground coee container.
Hot milk Adjust milk capacity and settings.
Hot cream Adjust cream capacity and settings.
Menu Sub Menu
Brew clean
• Maintenance
• Temperature
• Auto on Sets auto on time
• Water hardness Sets water hardness
• Filter Yes / No
• Auto off Sets auto o time
• Reset Resets factory default
• Information
• Language
Descale
Empty Ready
Back
Normal
High
Back
Version
Number of uses
Back
English
Back
• Exit Exit to main sub menu
Aroma Adjust aroma settings.
Display Adjust display settings.
Exit Exit out of menu mode
Table 2.1
6
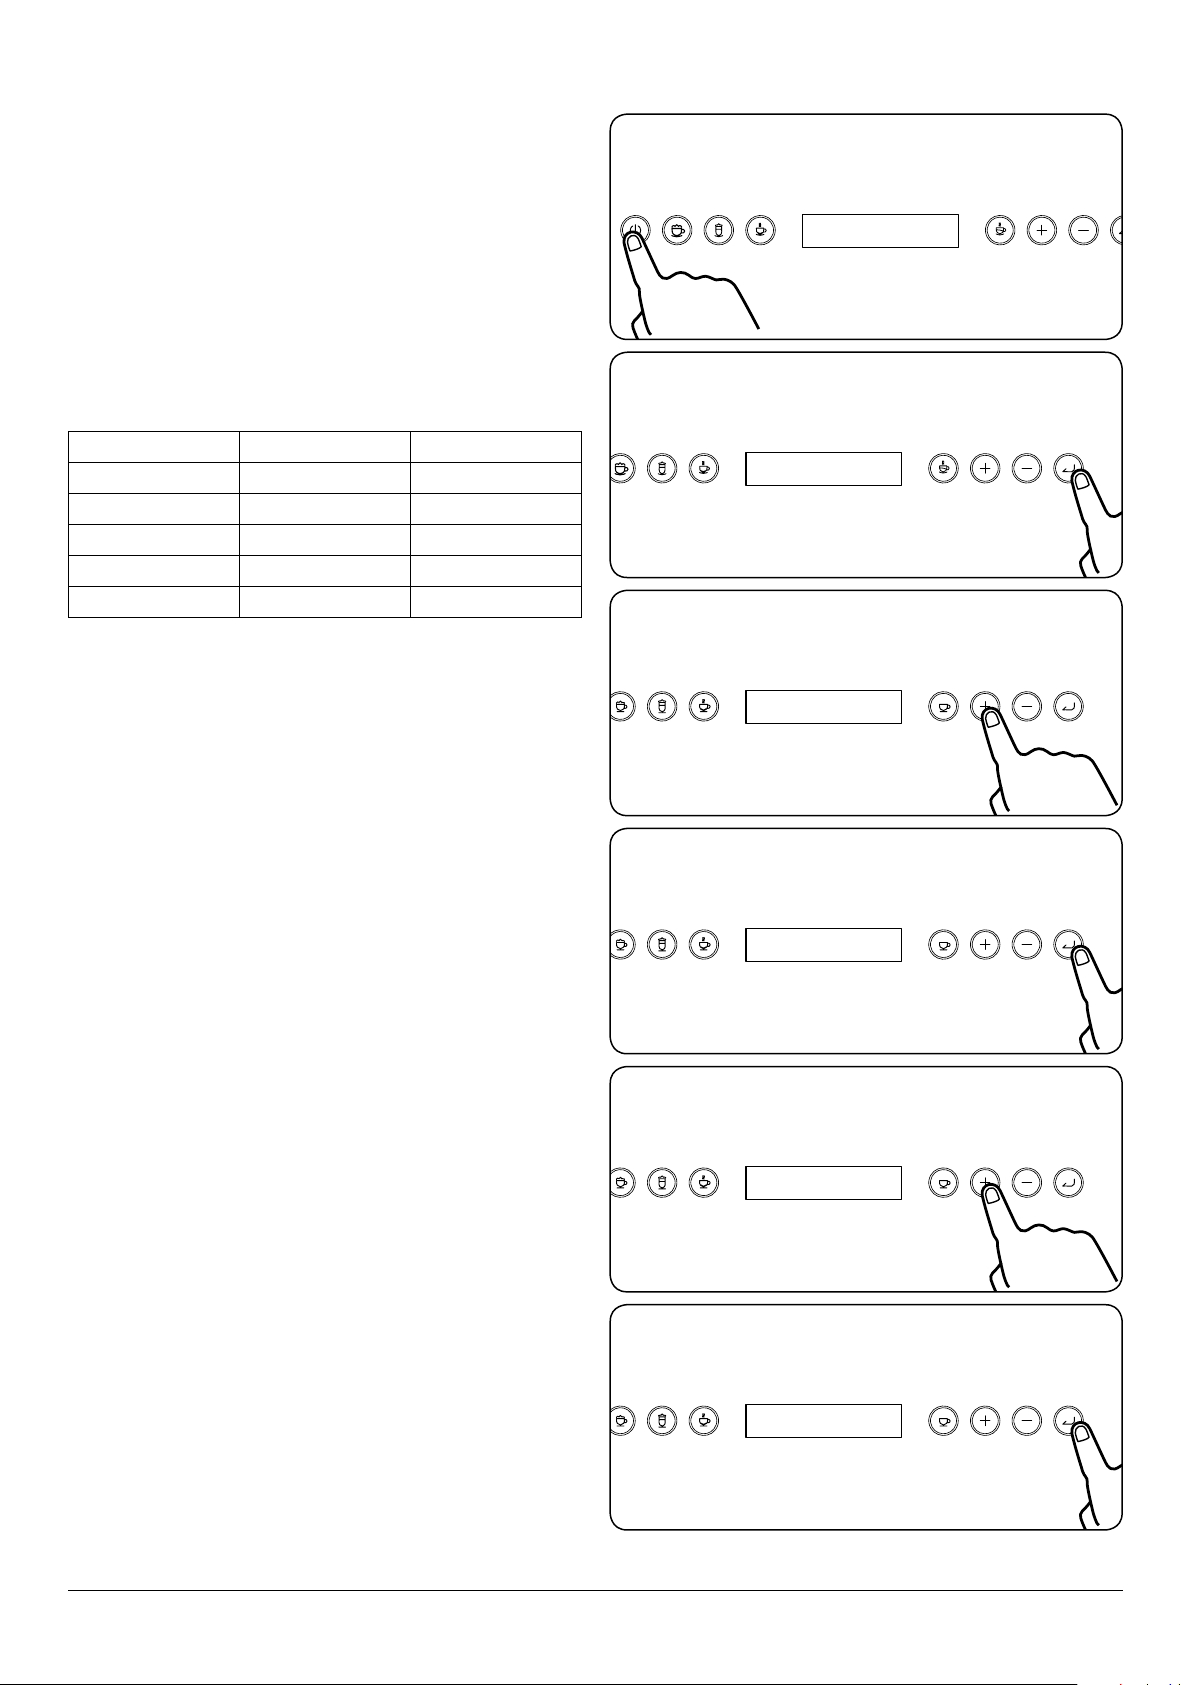
Setting water hardness
SELF CHECK
READY
WATER HARDNESS
WATER HARDNESS
LEVEL 4
LEVEL 4
The descale message is displayed after the appliance has
been operated for a set period of time, calculated on the
basis of the maximum quantity of lime scale which may be
contained in the water used.
The operating period can be extended if required, making
descaling less frequent by programming the appliance on the
basis of the real lime content in the water used.
Step 1. Press the "On / Standby" button. If the appliance has
not been used for awhile it will rinse.
Proprietary water hardness strips can be used to establish
water hardness of your water. Once you have established the
hardness. Proceed to set your appliance.
Level PPM CaCo
3
Hardness
1 Below 50 ppm Very soft
2 50 - 120 ppm Soft
3 120-240 ppm Medium hard
4 240 - 360 ppm Hard water
5 Above 360 ppm Very hard
Step 2. When the appliance displays "READY" press the
"Enter" button.
Step 3. Press the "+" button to scroll to "WATER HARDNESS".
Step 4. Press the "Enter" button.
Step 5. Press the "+" button to select water hardness level.
Step 6. Press the "Enter" button to conrm selection.
The appliance is now programmed to provide the
descale warning when necessary based on the actual
hardness of the water.
7
15.00
08.00
08.00
08.00
08.00
08.35
08.30
08.30
08.15
08.15
08.15
08.15
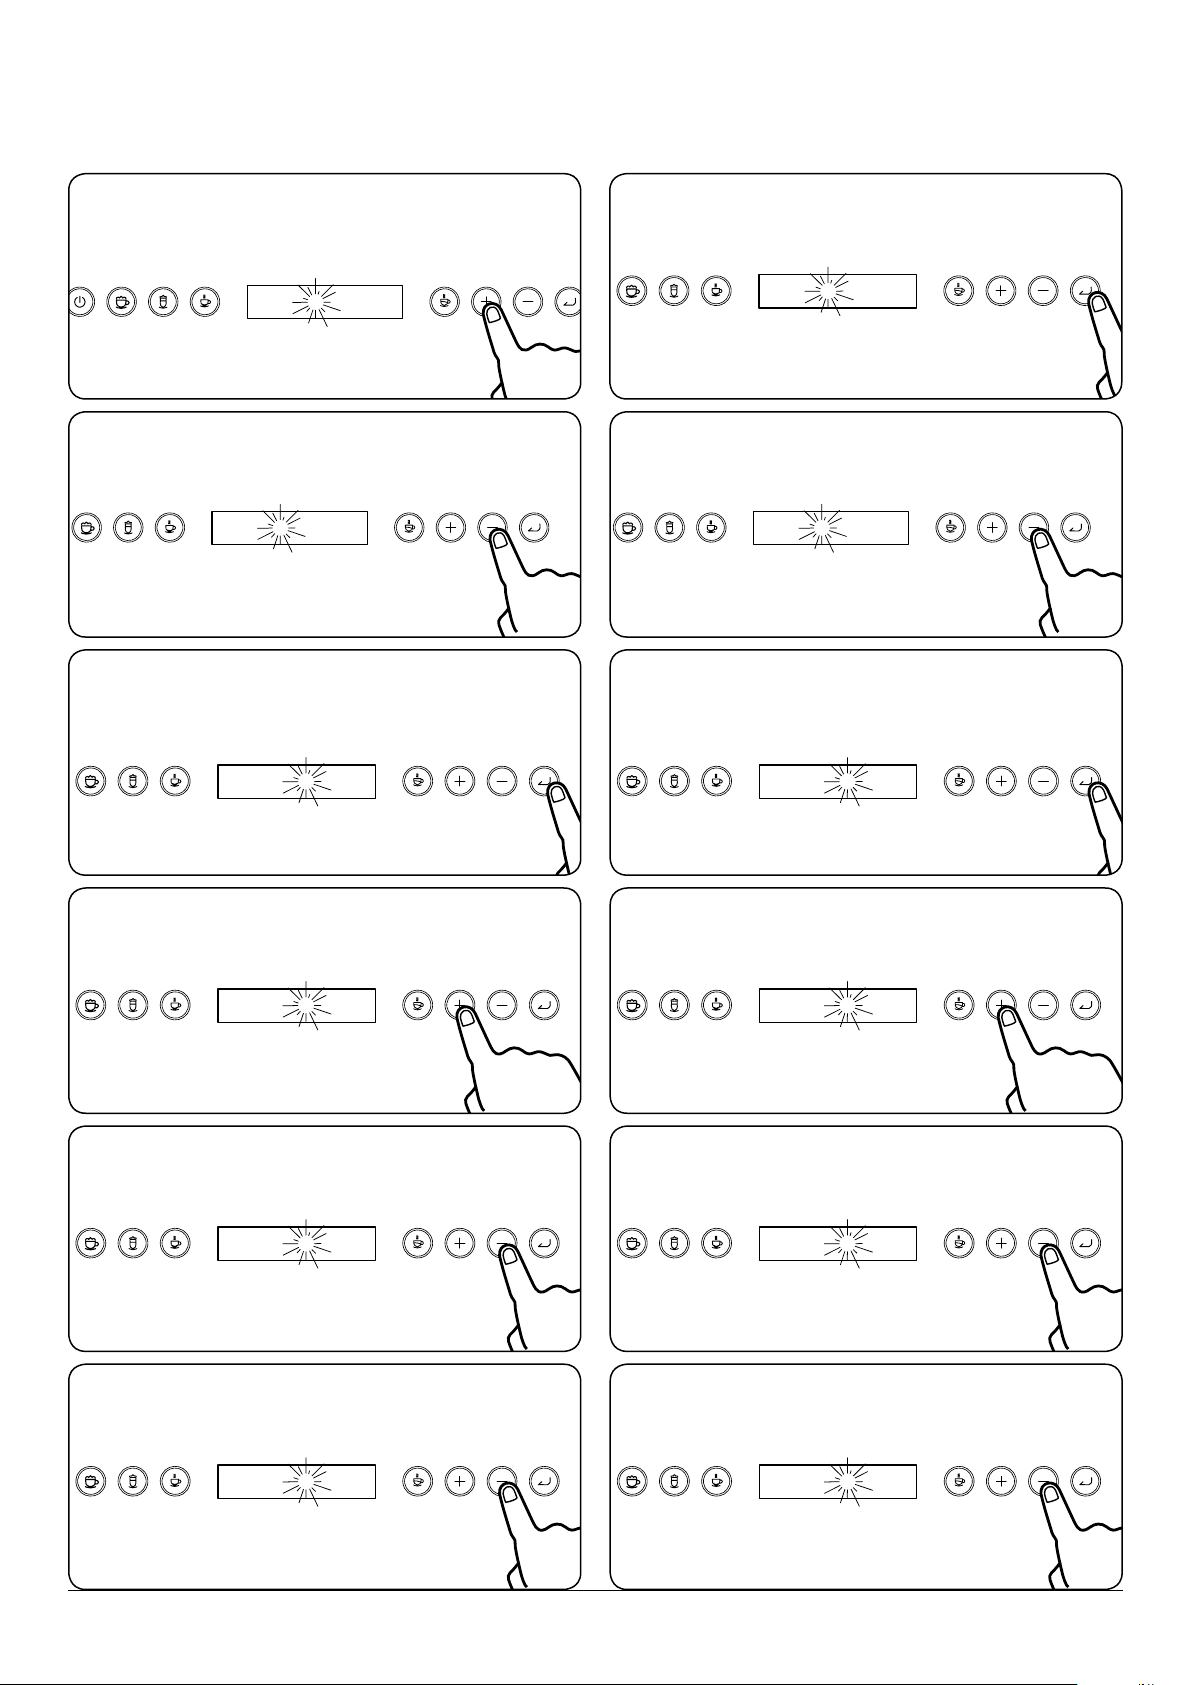
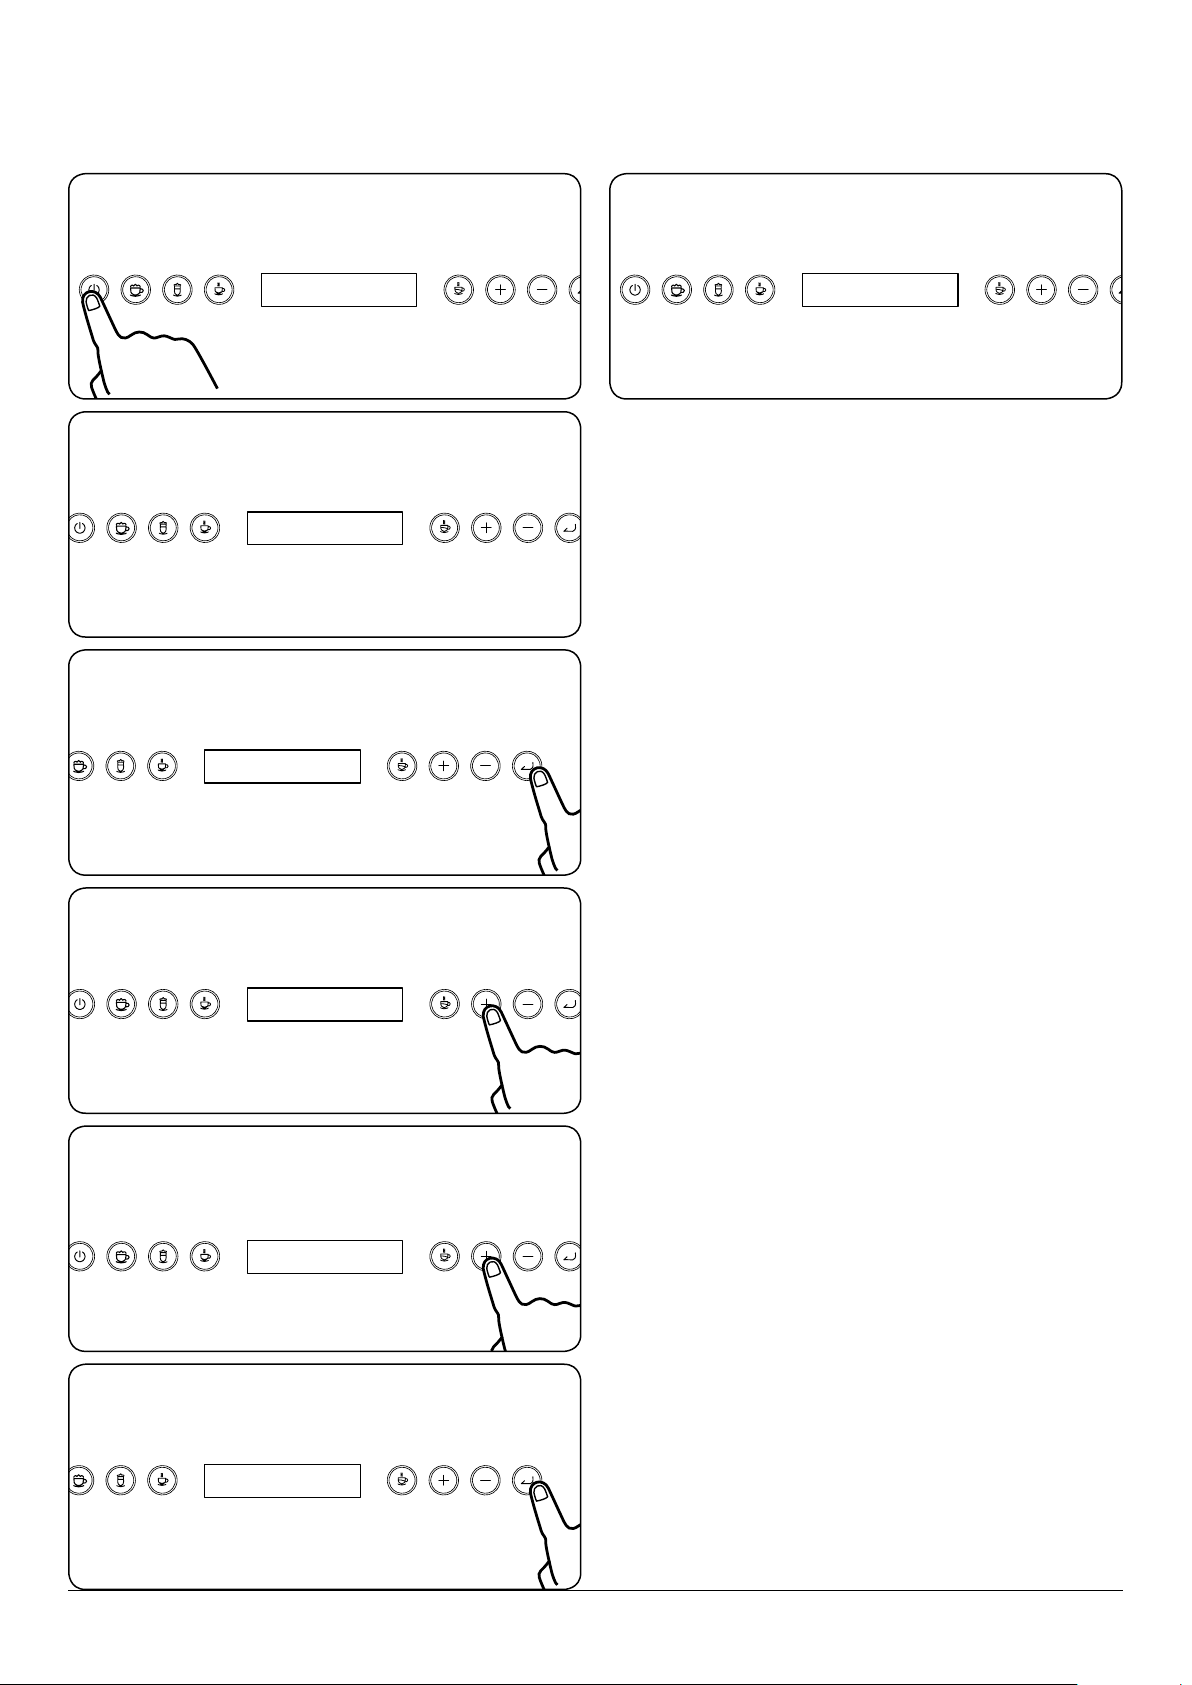
Setting the clock for the first time Changing the time
Once the appliance is connected and switched on, the
display will start to ash. The clock must be set to the time
of day.
Step 1. While the hour is ashing, press the +.
If the clock time needs to be reset or adjusted, please
follow the procedure below.
Step 1. Press "Enter" the hour will ash.
Step 2. Decrease the hour. Step 2. Decrease the hour.
Step 3. Press "Enter" to conrm and set the minutes. Step 3. Press "Enter" to conrm and set the minutes.
Step 4. Increase the minutes. Step 4. Increase the minutes.
Step 5. Decrease the minutes.
Step 5. Decrease the minutes.
No button needs to be pressed to conrm time. No button needs to be pressed to conrm time.
TIP. Press and hold "+" or "-" button to fast increase or
decrease hours / minutes.
TIP. Press and hold "+" or "-" button to fast increase or
decrease hours / minutes.
8
READY
RINSING
SELF CHECK
READY
AROMA
Mild
AROMA
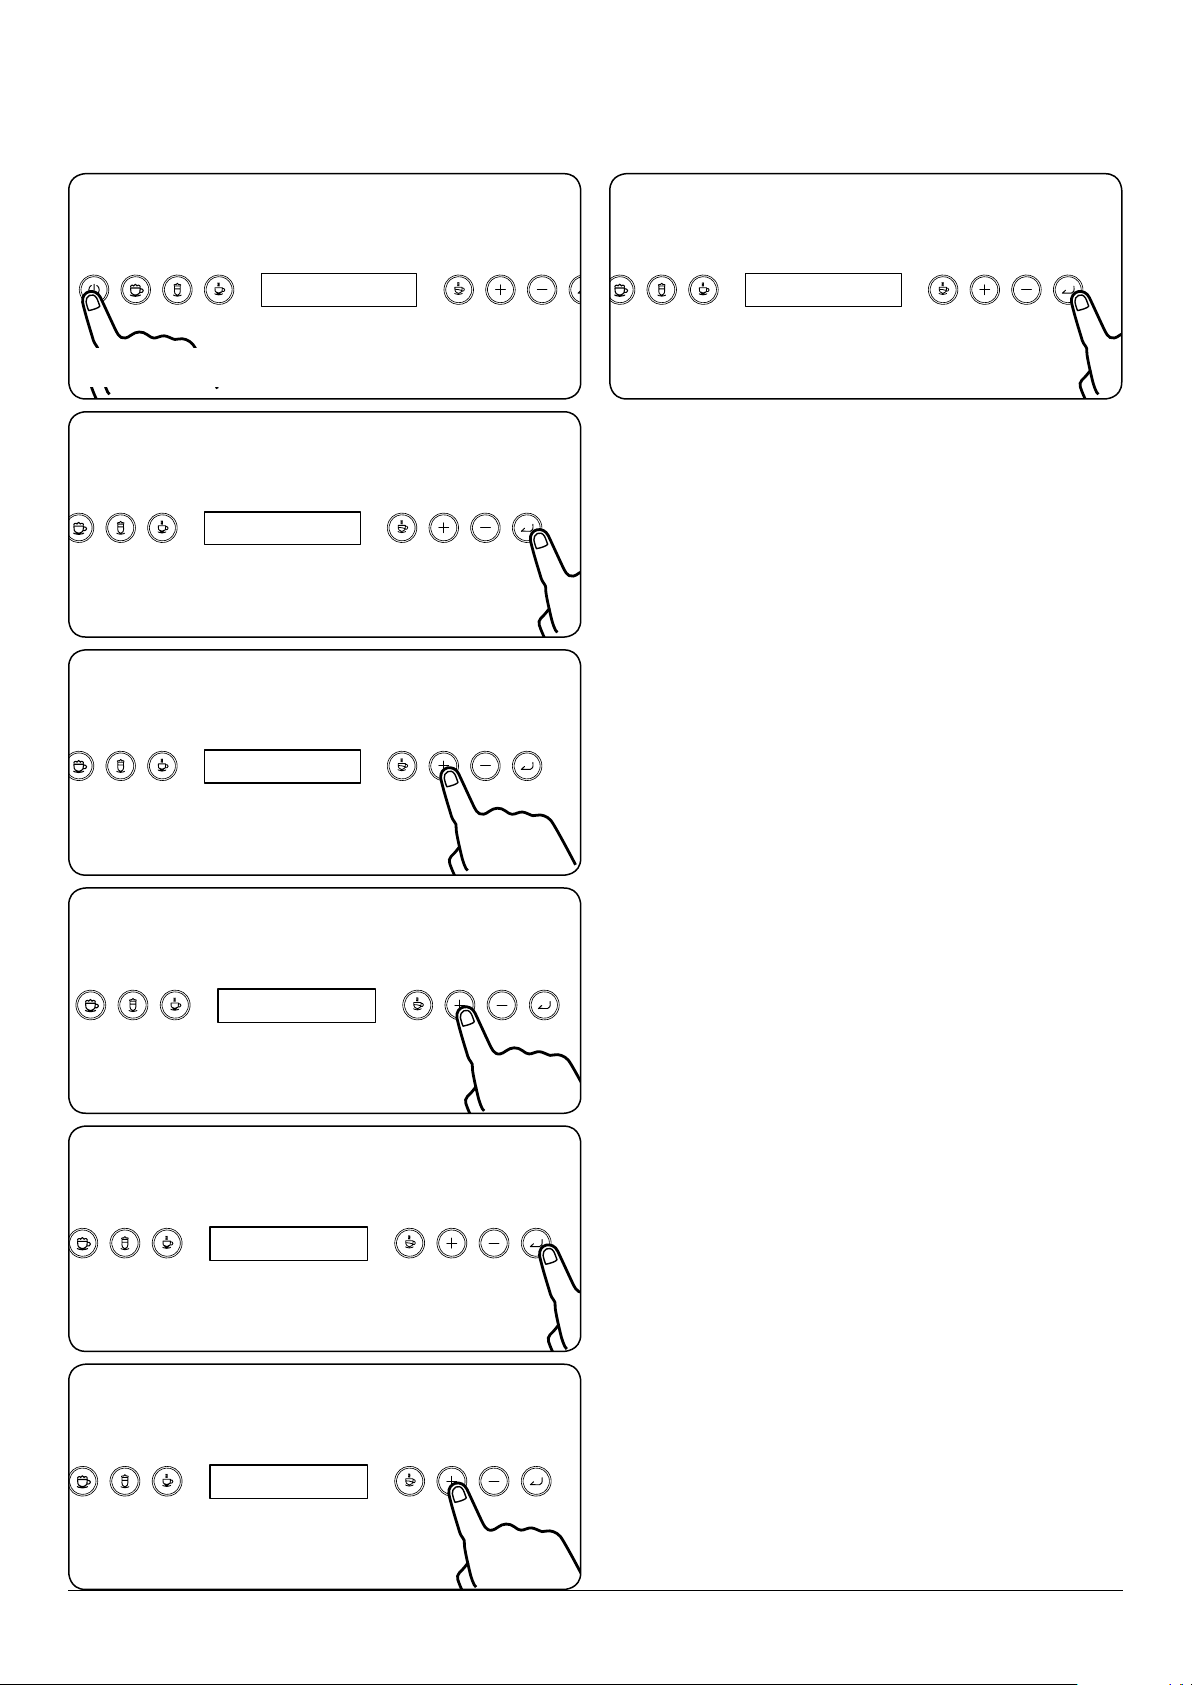
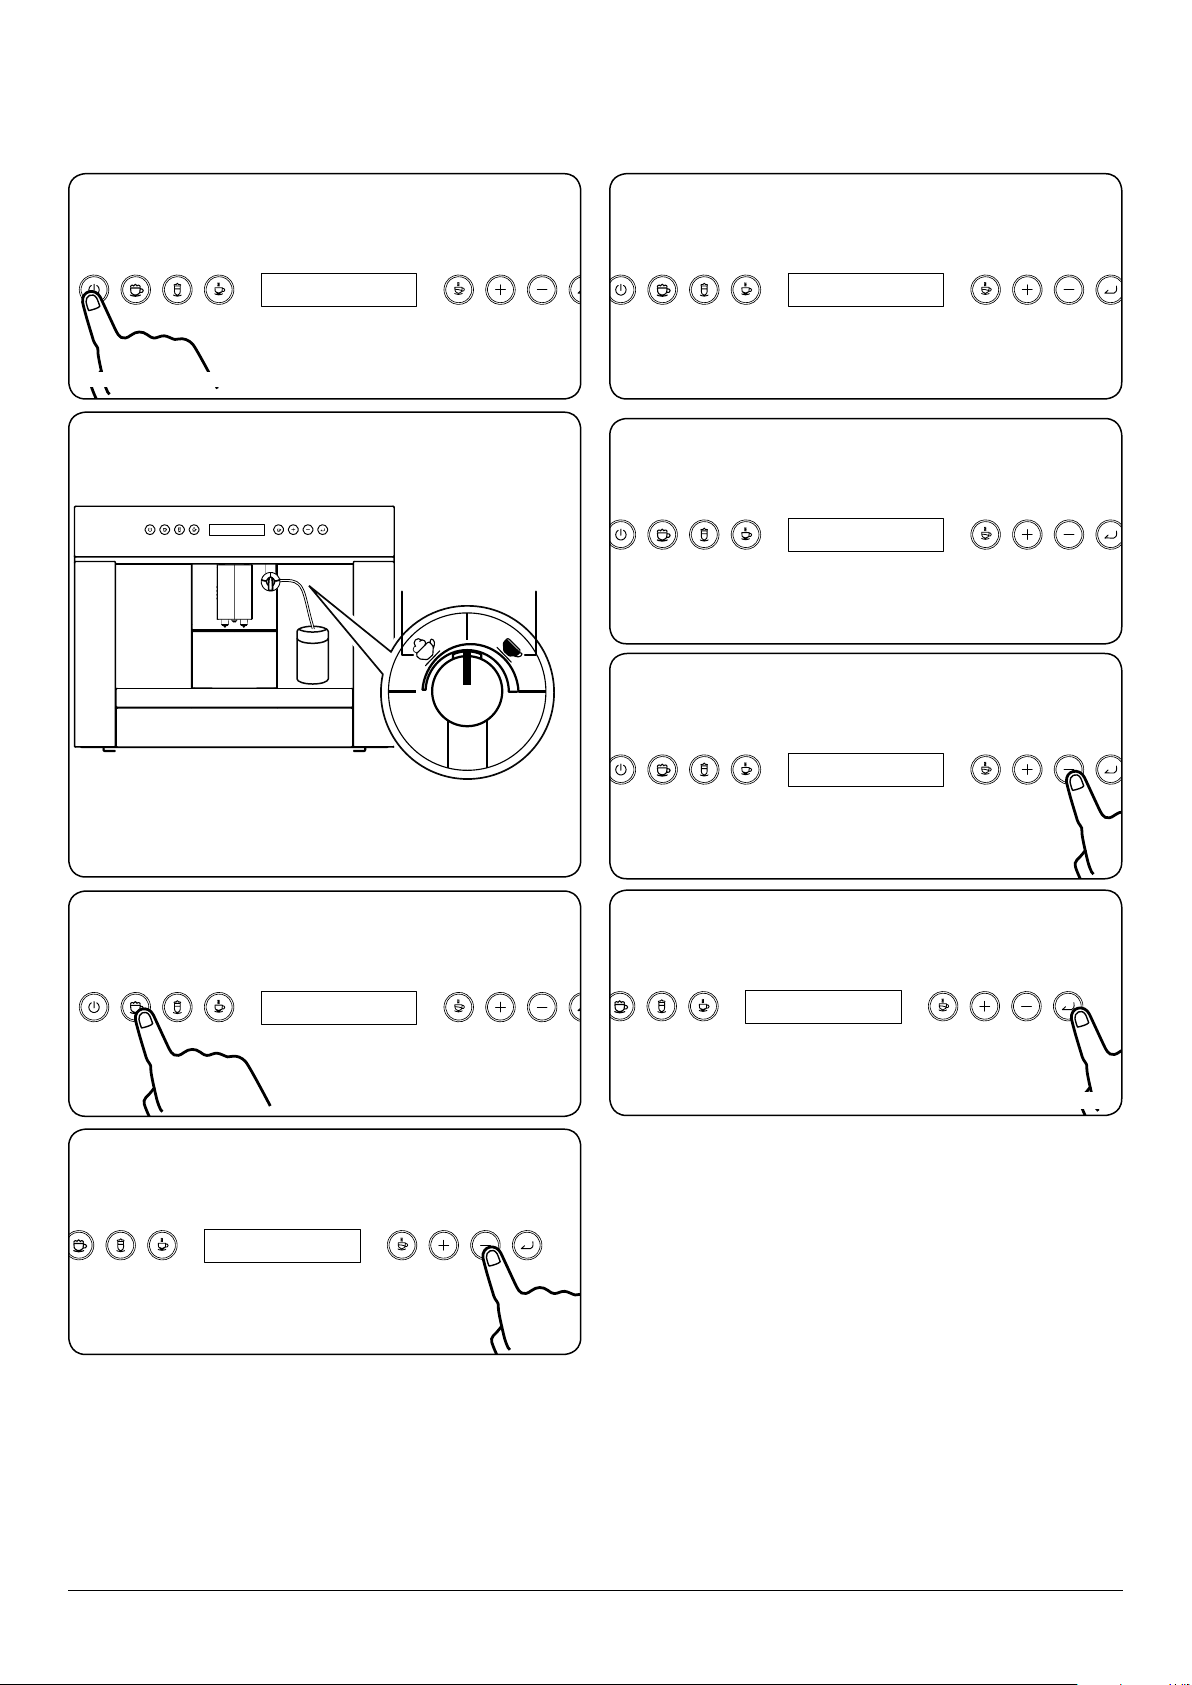
How to change the aroma with coffee beans?
Step 1. Press the "On / Standby" button. Step 7. Machine displays
Step 2. If the coee machine has not been used for awhile
it will rinse.
Step 3. When the machine displays "READY" press the "Enter"
button.
Step 4. Press the "+" button to scroll to "AROMA". Press the
"Enter" button.
Step 5. Use the "+" or "-" key to select "mild / normal /
strong".
Step 6. Press the "Enter" button to conrm selection.
9
TEMPERATURE
TEMPERATURE
HIGH
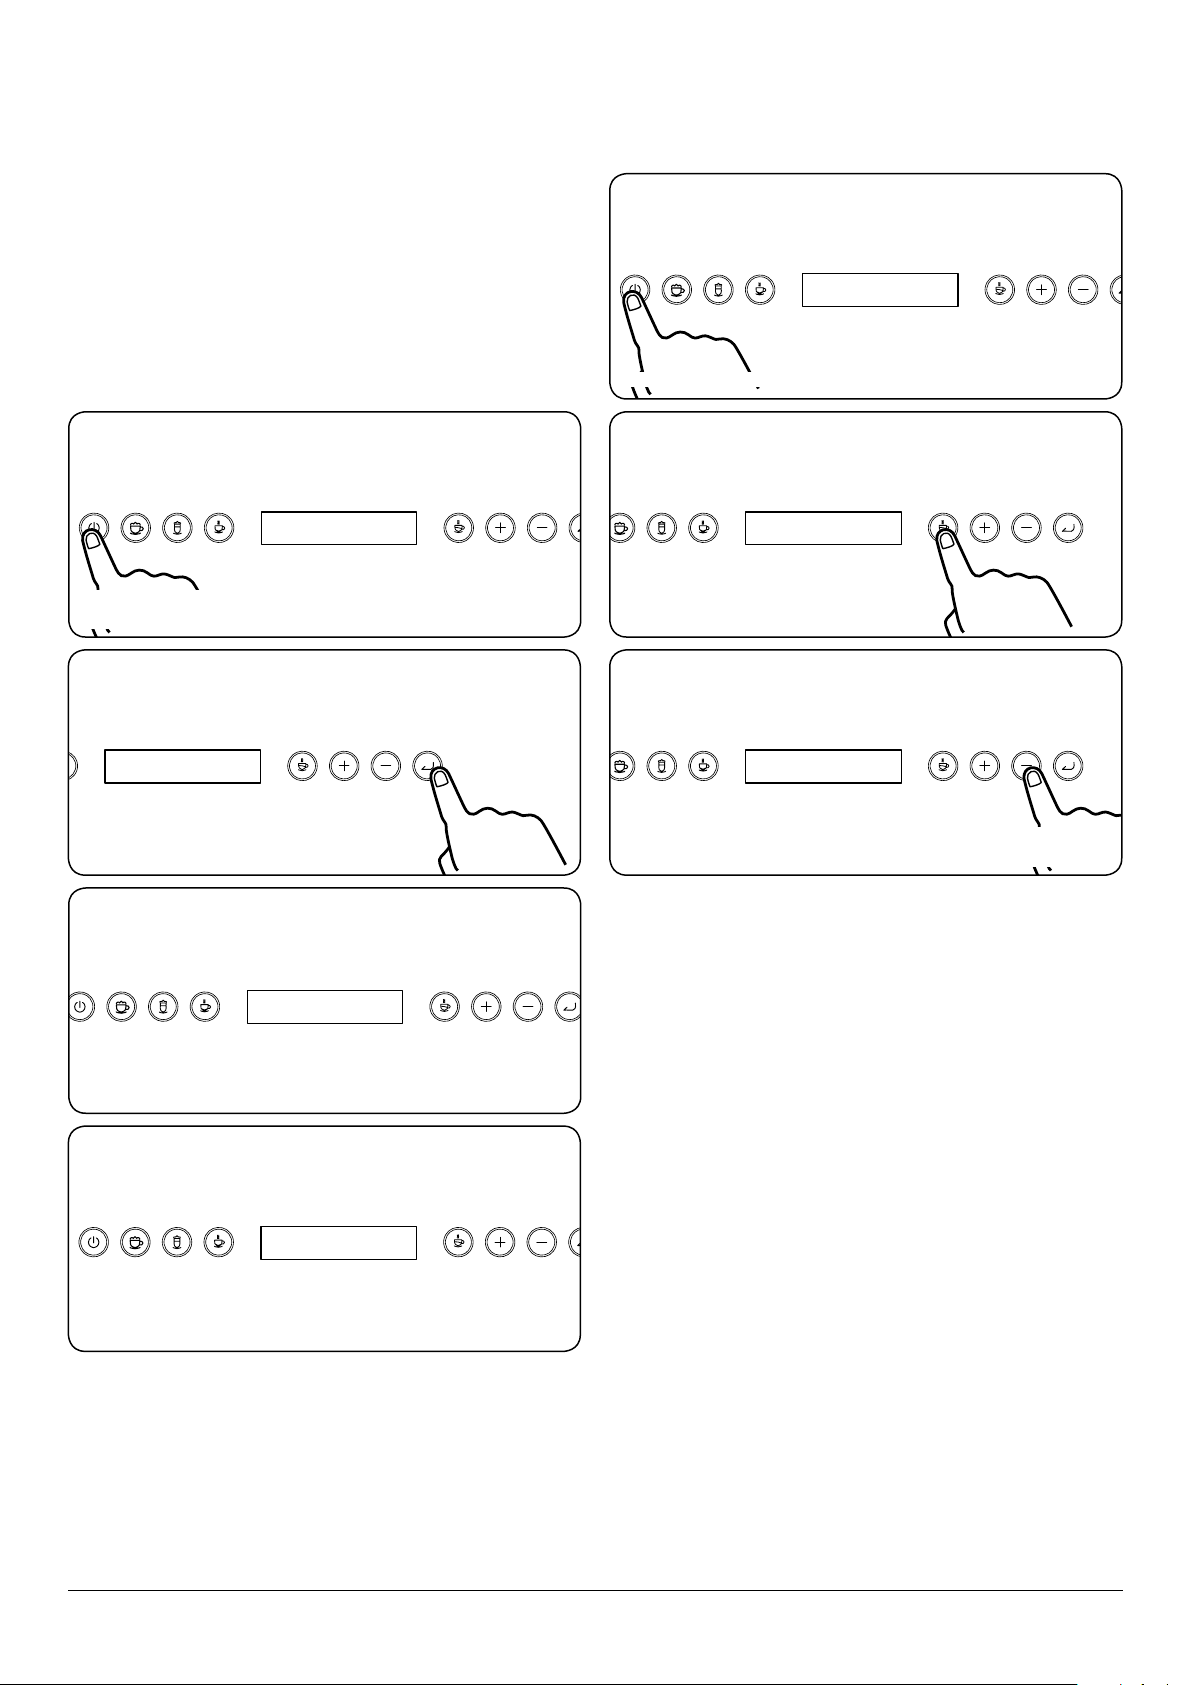
Change the temperature
SELF CHECK
HIGH
READY
MENU
If you want to adjust the temperature of your drink. Please
follow the below steps:
Step 1. Press the "On / Standby" button. If the coee
machine has not been used for awhile it will rinse.
Step 2. When the machine displays "READY" press the "Enter"
button.
Step 3. Press the "+" button to scroll to "MENU". Press the
"Enter" button.
Step 7. Press "Enter" to conrm selection.
Step 4. Use the "+" key to select "TEMPERATURE".
Step 5. Press "ENTER"
Step 6. Press "+" and choose either "High" or "NORMAL"
10
READY
Making coffee using coffee beansIf an extra rinse is required
READY
Press 2x
SELF CHECK
SELF CHECK
Coffee 200cc
Coffee 100cc
RINSING
If an extra rinse is required follow the process below. This will
force an extra rinse cycle.
NOTE: If the forced rinse cycle does not start, the coee
machine is too hot. Press "Pause" and "Enter" again to start
cooling down. When ready the machine will automatically
start the rinse cycle.
If the hot milk / hot cream, cappuccino, latte has been
completed the machine will automatically start rinse cycle.
To follow a rinse cycle:
Step 1. Press the "On / Standby" button. If the coee
machine has not been used for awhile it will rinse.
Step 2. When the appliance displays "READY" press the
"Enter" button twice.
Step 1. Press the "On / Standby" button. If the coee
machine has not been used for awhile it will rinse.
Adjust the aroma, temperature, before making a coee.
Step 2. Place a clean mug under the spout. When the
machine displays "READY" press the "Coee" button.
Step 3. While brewing the volume can be adjusted. You can
adjust the volume using the "+" or "-".
Step 3. Wait for some time, this appliance will
automatically start “rinsing".
Step 4. When nished it will be display:
Soon after the coee has stopped grinding the brewing will
commence. The coee machine will ll the mug.
11
Making espresso with pre-ground coffee (instead of beans)
SELF CHECK
READY
USE POWDER
FILL POWDER
Step 1. Press the "On / Standby" button. If the appliance has
not been used for awhile it will rinse.
Step 2. Press the "Enter" when the display states "READY"
Step 3. The appliance will state “use powder"
Step 6. Open the coee powder cap. Use the measuring
cup provided. Add one level measure to the powder unit.
Step 7. Once complete, recover the coee powder cap and
push the appliance in.
Step 4. The appliance will state “FILL powder"
Step 5. Pull the appliance out.
Adjust the aroma, temperature, before making a coee.
You can also use coee powder to make cappuccino latte
coee.
NOTE: Never introduce pre-ground coee when the machine
is o or before pressing any button. Otherwise the preground coee will spread through the inside of the appliance.
NOTE: Never add more than 1 level measure, otherwise the
appliance will not make the coee and the pre-ground coee
will be dispersed inside the appliance, making it dicult to
clean or the coee will be delivered too slow.
NOTE: Use the measuring cup provided to add the right
amount of coee.
NOTE: Introduce only pre-grounded coee for espresso
coee machines into the funnel. Never ll with coee beans,
freeze dried coee or other substance that could damage the
appliance.
NOTE: lf more than one measure of pre-grounded coee is
used and the funnel clogs, refer to Cleaning the infuser/
clean brew.
12
READY
milk
jug
Milk Froth Hot Milk
Making cappuccino using coffee beans
SELF CHECK
Coffee 200cc
Coffee 100cc
STEAM HEATING
HOT CREAM 30s
HOT CREAM 10s
PRESS RINSE
Step 1. Press the "On / Standby" button. If the coee
machine has not been used for awhile it will rinse.
Adjust the aroma, temperature, before making a coee.
Step 2. Set up the appliance as shown below.
Step 5. Once the brewing has ended, the appliance will
steam heat the milk.
Step 6. The appliance will dispense steam milk and will
display "HOT CREAM ##s". The milk will be added to the
cappuccino.
Step 7. While brewing the time can be adjusted. You can
adjust the time using the "+" or "-".
TIP. Hot milk froth is ideal for cappuccino.
Step 3. Place a clean mug under the spout. When the
machine displays "READY" press the "Cappuccino" button.
Step 4. While brewing the volume can be adjusted. You can
adjust the volume using the "+" or "-".
Soon after the coee has stopped grinding the
brewing will commence. The coee machine will
ll the mug.
Step 8. Each time a cappuccino is made the machine will
display "PRESS RINSE". Press the "Enter" button to complete
display rinse cycle.
The machine will clean the tube and revert back to "READY".
13
 Loading...