

Rangemaster RM326H, RM325H Installation Manual
®
MODELS RM325H & RM326H
l
(for use with RM60000 Series Range Hoods)
WARNING
NOTE: These b_owers are compatibme with o_der
"60000 Series" Rangemaster ® Hoods. Refer to the
installation instructions incmudedwith the hood,
visit www.breanocom, or contact Technicam
Support.
TO REDUCE THE R_SK OF F_RE, ELECTRIC SHOCK, OR iN-
JURY TO PERSON(S) OBSERVE THE FOLLOWING:
1. Use this unit only in the manner intended by the manufac-
turer. If you have questions, contact the manufacturer at the
address or telephone number listed in the warranty.
2. Before servicing or cleaning unit, switch power off at service
panel and lock service disconnecting means to prevent power
from being switched on accidentalIy. When the service dis-
connecting means cannot be Iocked, securely fasten a promi-
nent warning device, such as a tag, to the service panel.
3. Installation work and electrical wiring must be done by quali-
fied personnel in accordance with alI applicabIe codes and
standards, including fire-rated construction codes and stan-
dards.
4. Sufficient air is needed for proper combustion and exhausting
of gases through the flue (chimney) of fuel burning equipment
to prevent backdrafting.FolIow the heating equipment
manufacturer's guidelines and safety standards such as those
published by the National Fire Protection Association (NFPA),
and the American Society for Heating, Refrigeration and Air
Conditioning Engineers (ASHRAE), and the local code au-
thorities.
5. When cutting or driIIing into wall or ceiIing, do not damage
electrical wiring and other hidden utilities.
6. Dacted fans must always be vented to the outdoors.
7. Do not use this range hood with any additionaI solid-state speed
control device.
8. To reduce the risk of fire, use only steel ductwork.
9. This unit must be grounded.
TO REDUCE THE RiSK OF A RANGE TOP GREASE RRE:
a) Never leave surface units unattended at high settings. Believers
cause smoking and greasy spiIIovers that may ignite. Heat
oils siowly on low or medium settings.
b) Always turn hood ON when cooking at high heat or when cook-
ing flaming foods.
c) CIean ventilating fans frequently. Grease should not be aI-
lowed to accumuIate on fan or filter.
d) Use proper pan size. Always use cookware appropriate for
the size of the surface element.
TO REDUCE THE R_SK OF _NJURY TO PERSON(S) IN THE
EVENT OF A RANGE TOP GREASE RRE,OBSERVE THE FOL-
LOWING*:
1_ SMOTHER FLAMES with a close-fitting Iid, cookie sheet, or
metaI tray, then turn off the burner. BE CAREFUL TO PRE-
VENT BURNS. IF THE FLAMES DO NOT GO OUT IMMEDI-
ATELY, EVACUATE AND CALL THE FIRE DEPARTMENT.
2. NEVER PICK UP A FLAMING PAN -You may be burned.
3. DO NOT USE WATER, including wet dishcloths or towels -
This could cause a violent steam explosion.
4. Use an extinguisher ONLY if:
A. You know you have a CIass ABC extinguisher and you know
how to operate it.
B. The fire is small and contained in the area where it started.
C. The fire department has been called.
D. You can fight the fire with your back to an exit.
* Based on "Kitchen Fire Safety Tips" published by NFPA.
CAUTION
1. For general ventiIating use only. Do not use to exhaust haz-
ardous or explosive materials and vapors.
2. To avoid motor bearing damage and noisy and/or unbalanced
impellers, keep drywall spray, construction dust, etc. off power
unit.
3. This biower has a thermal overload which will automatically
shut off the motor if it becomes overheated.The motor will re-
start when it cools down.If the motor continues to shut off and
restart, have the hood serviced.
4. For best capture of cooking impurities, the bottom of the hood
should be a minimum of 24" and a maximum of 30" above the
cooking surface.
5. Please read specification label on product for further informa-
tion and requirements.
6. To reduce the risk of fire and to properly exhaust air on aducted
installation, be sure to duct air outside - Do not exhaust air
into spaces within walls or ceiling or into attics, crawl spaces,
or garage.
7. This product is equipped with a thermostat which may start
blower automatically. To reduce the risk of injury and to pre-
vent power from being switched on accidentally, switch power
off at service panel and Iock or tag service panel.
8. The RM325H & RM326H Blowers must be installed with
RM60000 Series Range Hoods only. Other Range Hoods can-
not be substituted. (Range Hood sold separately.)
Save this manual for Electrical
Inspector and Homeowner to use.
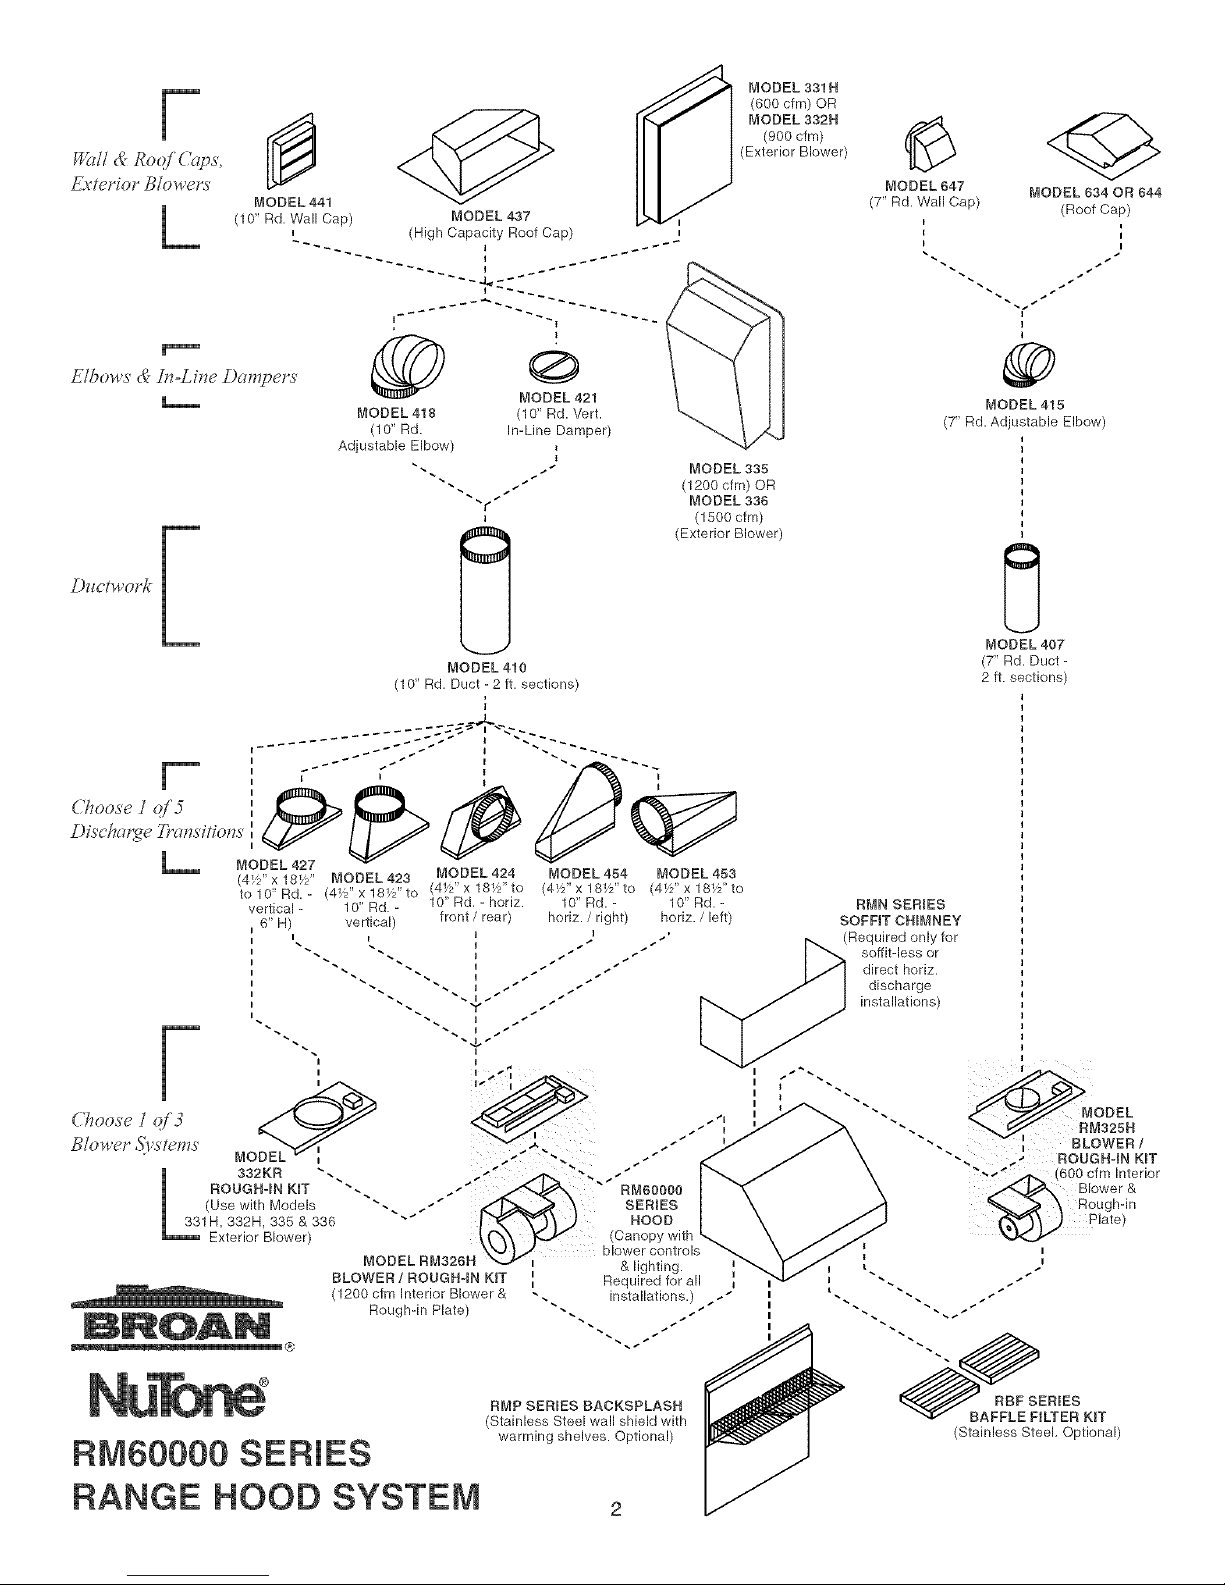
MODEL 331H (_ <__
(600 cfm) OR
[_ _ MODEL 332H
(900 cfm)
_7[[ (_" Ro{_i'('d]_S, (Exterior Blower)
GA'fCPJOP ]_[0w61%' MODEL 647 MODEL 634 OR 644
MODEL 441 (7" Rd, Wall Cap) (Roof Cap)
(10" Rd, Wall Cap) MODEL 437
I ,
i (High Capacity Roof Cap) n _ I
E/bows _%]n=Litle Dampers
MODEL 421 MODEL 415
MODEL 418 (1 O" Rd. Vert. (7" Rd. Adjustable Elbow)
(10" Rd. In-Line Damper)
Adjustable Elbow)
i
"- _" MODEL 335
_- ." (1200 cfm) OR
-r-" MODEL 336
I (1500 cfm)
MODEL 407
MODEL 410 (7" Rd. Duct-
(10" Rd, Duct - 2 ft. sections) 2 ft. sections)
Dis'c/_011_¢ _O_sitioos
MODEL 427
(4i'M x 18W' MODEL 423 MODEL 424 MODEL 454 MODEL 453
tol0"Rd.- (4W'x18W'to (4W'x18t'/'to (4t'Mx18W'to (4W'x18W'to
vertical - 10" Rd. - 10" Rd, - horiz. 10" Rd. - 1O"Rd. - RMN SER_EB
6" H) vertical) front / rear) horiz. / right) horiz. / left SOFFIT CHIMNEY
L ' i , (Required only for
".. -. __ • • _ soffit-less or
" "" _" • direct horiz.
"'_ ". ••'• •- discharge
"- " " -" installations)
c ,oos J d3 %=M// //,, "-..
ROUGH4N K_T
b..- _ (600 cfm Interior
ROUGH4NK_T ". ." _'.,,_ " RM60000 | Blower&
(Use with Models "'- .-" _ _ SER_ES / _- _ '_ Rough-in
L_IH,332H 335&336 " I"_ _--'1_ ..I HOOD | Slate)
Exterior Blower) t(_X _ (Can°py with k'_..
\",.J IJ blower controls
MODEL RM326H _ i & ._,÷ _._ I i
BLOWER / ROUGH=IN KiT Re__uired for all _ ".
1200 cfm Mterior Blower a -. ir_stallations. ." 1 "" " . ." •
_:_ Rough-in Plate) "-. .-'" I "'. " .•
RMP SERIES BACKSPLASH IES
(Stainless Steel wall shield with ER KFr
R 60000 SERIES warm,ngshe,vesOpt,ona,/ Sta,n,essStee,Opt,ona,/
RANGE HOOD SYSTEM
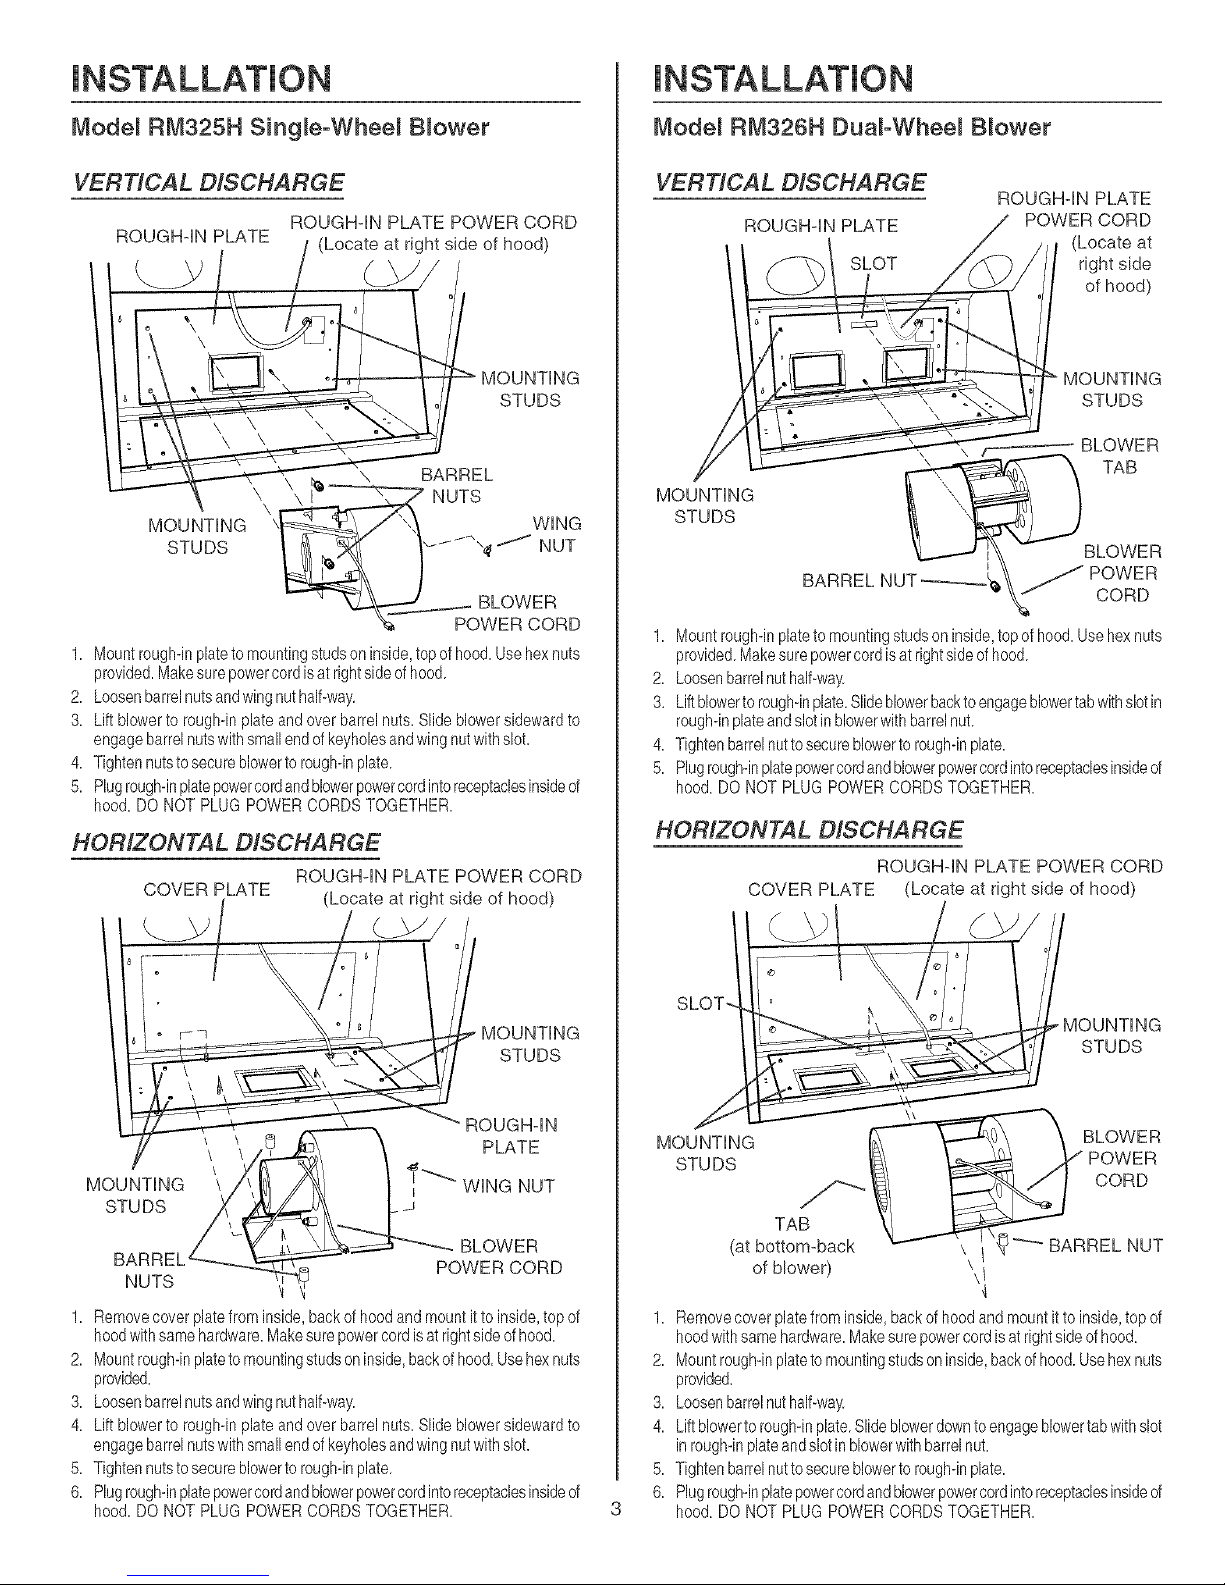
Mode_ RM325H Sing_e°Whee_ B_ower
VERTICAL DISCHARGE
ROUGH-IN PLATE POWER CORD
RO_H_N PLATE / (Loca_g_ side of hood)
STUDS
/ .__'_, _ \ BARREL
'_ POWER CORD
1. Mountrough-inplatetomountingstudsoninside,topofhood.Usehexnuts
provided.Makesurepowercordisatrightsideofhood.
2. Loosenbarrelnutsandwingnuthalf-way.
3. Lift blowerto rough-inplateandoverbarrelnuts.Slideblowersidewardto
engagebarrelnutswithsmallendofkeyholesandwingnutwithslot.
4. Tightennutstosecureblowerto roughdnplate.
5. Plugroughdnplatepowercordandblowerpowercordintoreceptaclesinsideof
hood.DO NOT PLUG POWEROORDSTOGETHER.
HORIZONTAL DISCHARGE
COVER PLATE
ROUGH-IN PLATE POWER CORD
(Locate at right side of hood)
MOUNTING
STUDS
' ROUGH-IN
\ \ PLATE
\
T_'_ WiNG NUT
MOUNTING \
STUDS J
BLOWER
POWER CORD
NUTS
1. Removecoverplatefrominside,backof hoodandmountit toinside,top of
hoodwithsamehardware.Makesurepowercordisatrightsideofhood.
2. Mountrough-inplatetomountingstudsoninside,backofhood.Usehexnuts
provided.
3. Loosenbarrelnutsandwingnuthalf-way.
4. Lift blowerto rough-inplateandoverbarrelnuts.Slideblowersidewardto
engagebarrelnutswithsmallendofkeyholesandwingnutwithslot.
5. Tightennutst°securebl°wert° r°ughdnplate
6. Plugroughdnplatepowercordandblowerpowercordintoreceptaclesinsided
hood.DO NOT PLUG POWEROORDSTOGETHER.
Mode_ RM326H Dua_-Whee_ B_ower
VERTICAL DISCHARGE
ROUGH-IN PLATE
1 SLOT
ROUGH-IN PLATE
POWER CORD
(Locate at
right side
of hood)
MOUNTING
STUDS
MOUNTING
STUDS
TAB
BLOWER
J POWER
CORD
1. Mountrough-inplatetomountingstudsoninside,topofhood.Usehexnuts
provided.Makesurepowercordisatrightsideofhood.
2. Loosenbarrelnuthalf-way.
3. Liftblowerto roughdnplate.Slideblowerbacktoengageblowertabwithslotin
rough-inplateandslotinblowerwithbarrelnut.
4. Tightenbarrelnutto secureblowerto roughdnplate.
5. Plugroughdnplatepowercordandblowerpowercordintoreceptaclesinsideof
hood.DO NOT PLUG POWEROORDSTOGETHER.
HORIZONTAL DISCHARGE
ROUGH-IN PLATE POWER CORD
COVER PLATE (Locate at right side of hood)
SLOT,
MOUNTING
STUDS
MOUNTING
STUDS
1.
2.
3.
4.
5.
6.
BLOWER
POWER
j_._ CORD
TAB
(at bottom-back \ / _'''_ BARREL NUT
of blower) \\1
,1
Removecoverplatefrominside,backofhoodandmountit to inside,topof
hoodwithsamehardware.Makesurepowercordisatrightsideofhood.
Mountrough-inplatetomountingstudsoninside,backofhood.Usehexnuts
provided.
Loosenbarrelnuthalf-way.
Liftblowertorough-inplate.Slideblowerdownto engageblowertabwithslot
inrough-inplateandslotinblowerwithbarrelnut.
Tightenbarrelnuttosecureblowertorough-inplate.
Plugrough-inplatepowercordandblowerpowercordintoreceptaclesinsided
hood.DO NOT PLUG POWEROORDSTOGETHER.
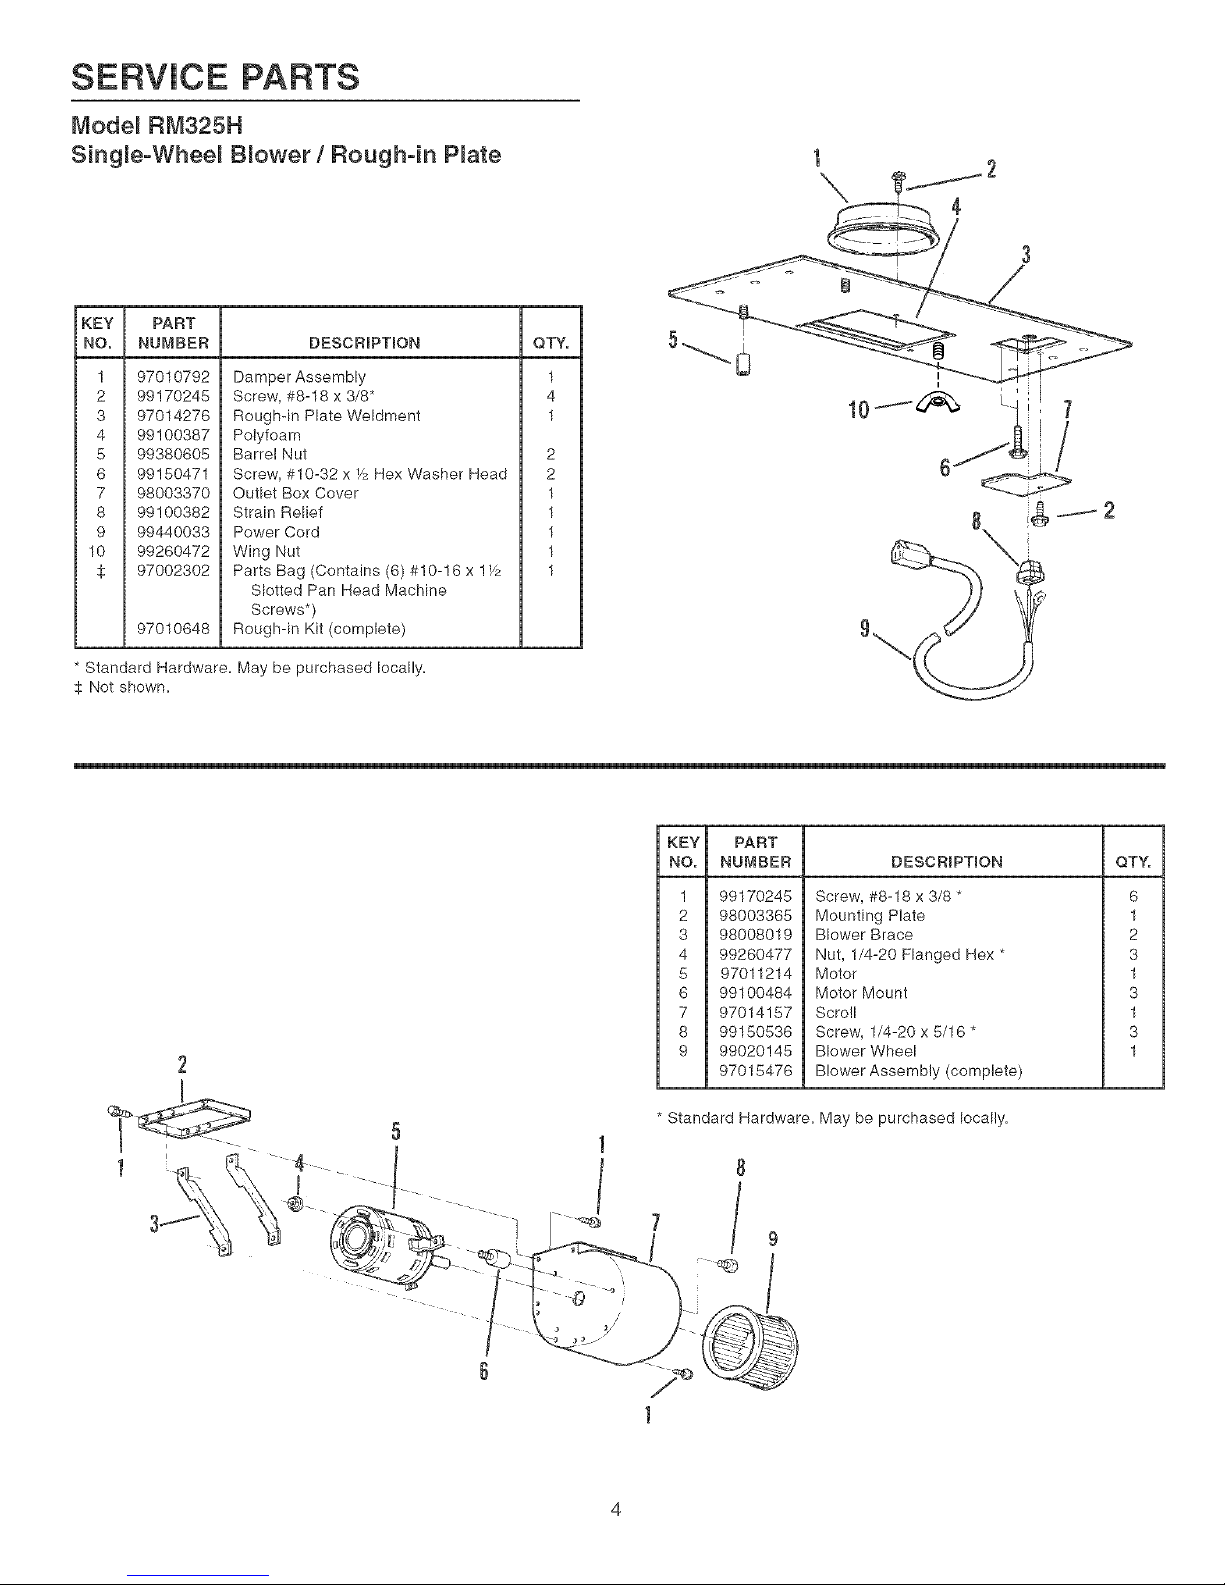
SERVICE PARTS
Mode_ RM325H
Sing_e°Whee_ B_ower/Rough-in P_ate
KEY PART
NO. NUMBER DESCRIPTmON QTY.
1 97010792
2 99170248
3 97014276
4 99100387
6 99380605
6 99150471
7 98003370
8 99100382
9 99440033
10 99260472
97002302
97010648
Damper Assembly 1
Screw, #8-18 x 3/8" 4
Roughdn Plate Weldment 1
Polyfoam
Barrel Nut 2
Screw, #10-32 x _JzRex Washer Head 2
Outlet Box Cover 1
Strain Relief 1
Power Cord 1
Wing Nut 1
Parts Bag (Contains (6) #10-! 6 x 11/2 1
Slotted Pan Head Machine
Screws*)
Rough-in Kit (complete)
* Standard Hardware, May be purchased locally,
_: Not shown,
2
KEY PART
NO. NUMBER DESCRIPTION QTY.
1
2
3
4
5
6
7
8
9
99170245
98003365
98008019
99260477
97011214
99100484
97014157
99150536
99020145
97015476
Screw, #8-18 x 3/8 *
Mounting Plate
Blower Brace
Nut, 1/4-20 Flanged Hex *
Motor
Motor Mount
Scro!l
Screw, 1/4-20 x 5/16 *
Blower Wheel
Blower Assembly (complete)
* Standard Hardware, May be purchased locally,
8
6
1
2
3
1
3
1
3
1
SERVICE PARTS
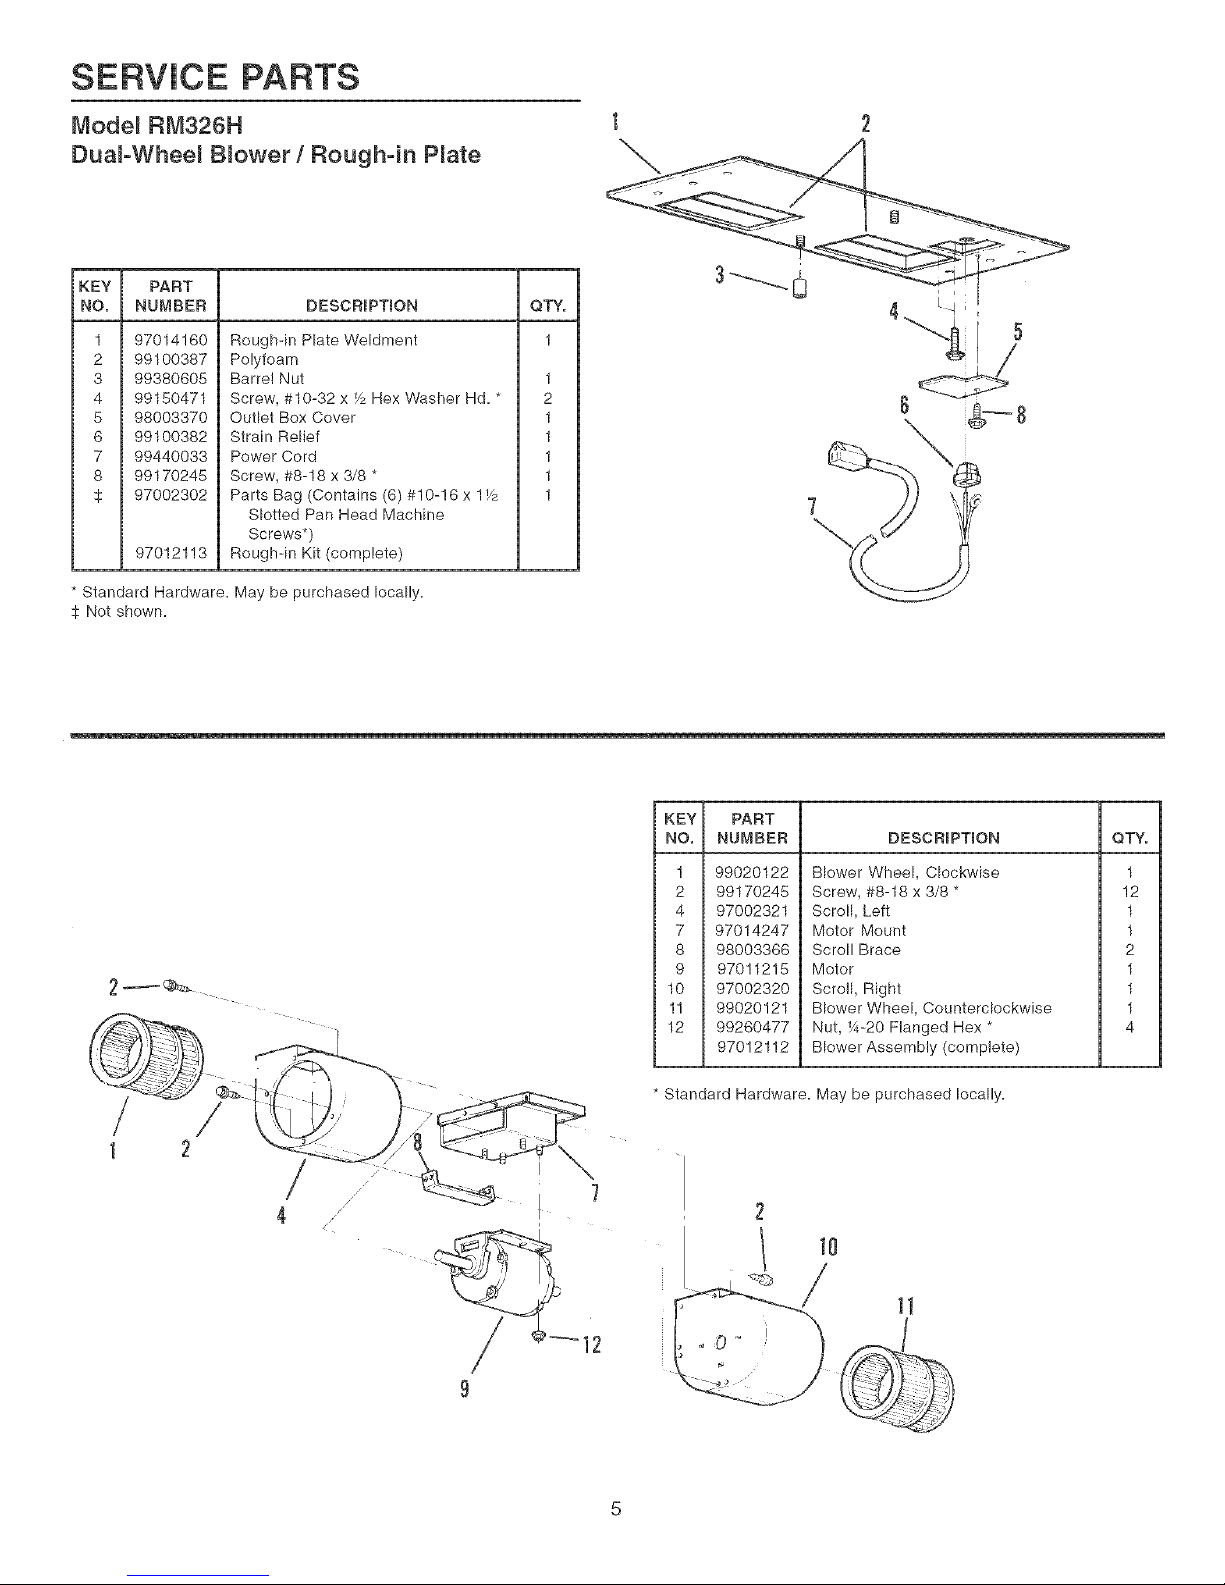
Mode_ RM326H
DuaFWhee_ B_ower/Rough-in P_ate
KEY PART
NO. NUMBER DESCRIPTION QTY.
11
2
3
4
5
6
7
8
¢
97014160
99100387
99380605
99150471
98003370
99100382
99440033
99170246
97002302
97012113
Roughqn Plate Weldment
Polyfoam
Barrel Nut 1
Screw, #10-32 x Fz Hex Washer Hd,* 2
Outlet Box Cover 1
Strain Relief 1
Power Cord 1
Screw, #8-18 x 3/8 * 1
Parts Bag (Contains (6) #10-! 6 x 1_/2 1
Slotted Pan Head Machine
Screws*)
Rough-in Kit (complete)
* Standard Hardware, May be purchased locally,
_: Not shown,
/
1
/
4
KEY PART
NO. NUMBER DESCRIPTION QTY.
1 99020122
2 99170245
4 97002321
7 97014247
8 98003366
9 97011216
10 97002320
11 99020121
12 99260477
97012112
Blower Wheel, Clockwise 1
Screw, #8-18 x 3/8 * 12
Scro!l, Left 1
Motor Mount 1
Scroll Brace 2
Motor 1
Scroll, Right 1
Blower Wheel, Counterclockwise 1
Nut, _#-20 Flanged Hex * 4
Blower Assembly (complete)
* Standard Hardware, May be purchased locally,
2
BROAN-NUTONE ONE YEAR LIMITED WARRANTY
Broan-NuTone warrants to the original consumer purchaser of its products that such products wilI be free from defects in materials or
workmanship for a period of one year from the date of original purchase. THERE ARE NO OTHER WARRANTIES, EXPRESS OR
iMPLiED, iNCLUDiNG, BUT NOT LiMiTED TO, iMPLiED WARRANTIES OR MERCHANT ABiLiTY OR FITNESS FOR A PARTICULAR
PURPOSE.
During this one-year period, Broan-NuTone will, at its option, repair or replace, without charge, any product or part which is found to be
defective under normal use and service.
THiS WARRANTY DOES NOT EXTEND TO FLUORESCENT LAMP STARTERS, TUBES, HALOGEN AND INCANDESCENDT BULBS.
This warranty does not cover (a) normal maintenance and service or (b) any products or parts which have been subject to misuse,
negligence, accident, improper maintenance or repair (other than by Broan-NuTone), faulty installation or installation contrary to
recommended installation instructions.
The duration of any implied warranty is limited to the one-year period as specified for the express warranty. Some states do not allow
limitation on how long an implied warranty lasts, so the above limitation may not apply to you.
BROAN-NUTONE'S OBLiGATiON TO REPAIR OR REPLACE, AT BROAN-NUTONE'S OPTION, SHALL BE THE PURCHASER'S
SOLE AND EXCLUSIVE REMEDY UNDER THiS WARRANTY. BROAN-NUTONE SHALL NOT BE LIABLE FOR iNCiDENTAL,
CONSEQUENTIAL OR SPECIAL DAMAGES ARiSiNG OUT OF OR iN CONNECTION WiTH PRODUCT USE OR PERFORMANCE.
Some states do not allow the exclusion or limitation of incidental or consequentiaI damages, so the above limitation or exclusion may not
apply to you.
This warranty gives you specific legal rights, and you may also have other rights, which vary from state to state. This warranty supersedes
all prior warranties.
To qualify for warranty service, you must (a) notify Broan-NuTone at the address or telephone number be!ow, (b) give the model number
and part identification and (c) describe the nature of any defect in the product or part. At the time of requesting warranty service, you must
present evidence of the original purchase date.
Broan-NuTone LLC, 926 W. State Street, Hartford, Wisconsin 53027 (1-800-637-1453)
NuTone, Inc., 4820 Red Band Road, Cincinnati, OH 45227 (1-800-543-8687)
Broan-NuTone Canada, _nc., 1140 Tristar Drive, Mississauga, Ontario, L5T 1H9 (1-888-882-7626)
 Loading...