

Rangemaster PROP90ECGB-C, PROP90EISS-C Instruction manual
Built from experience
USER GUIDE &
INSTALLATION INSTRUCTIONS
Classic - 3 button clock | Classic Deluxe
Kitchener | Professional+ - 90 Ceramic
U110774-01
Search Rangemaster UK
Show off your kitchen with ...
This is
#MyRangemaster
Simply snap and share a picture of your kitchen and tag #MyRangemaster for the chance to win £200 of
Rangemaster cookware. If selected we will also send a photographer round to professionally photograph you at
home with your range. You might even feature in some
of the UK’s top home interest titles!
To enter all you have to do is send in photos of your
Rangemaster kitchen and tell us in one sentence what
makes Rangemaster the heart of your kitchen? Entries
can be posted on our Facebook page, Instagram or Twitter by tagging @RangemasterUK and using #MyRangemaster. Or, if you prefer, simply send in your entry via
e-mail to marketing@agarangemaster.co.uk.
Rangemaster will feature a number of entries on the
website online gallery and on the Rangemaster Facebook
page, and some kitchens may be selected to be professionally photographed.
*
Terms & Conditions Apply
Our range cookers are well known for providing the best
possible cooking performance and years of faithful service.
However, a great cooker alone cannot guarantee perfect
results every time. The other vital ingredients are of course
enthusiasm and quality cookware.
We offer cookware to work perfectly with all fuel types
manufactured by Rangemaster, including induction hobs.
You can be assured of functionality with style, as well as the
quality and meticulous attention to detail you expect from
the pioneers of range cooking.
Visit www.rangemastercookshop.co.uk
*
Terms & Conditions
1. This is my Rangemaster is open to residents of UK mainland only, aged 18 years & over. 2. All entries should be submitted to the advertised e-mail address, or Rangemaster UK Facebook, Instagram or Twitter page
using the advertised hashtag & tag. 3. If we would like to professionally photograph your kitchen, you will be contacted via e-mail, Facebook / Twitter message or Instagram comment. 4. We cannot guarantee your
kitchen will be professionally photographed. 4. Any photographs received and professional photographs taken will belong to AGA Rangemaster plc with full usage rights. E&OE.

Contents
1. Before you start... 1
Personal safety 1
Electrical connection safety 1
Peculiar smells 2
Ventilation 2
Maintenance 2
Ceramic care 3
Oven care 4
Hob care 5
Grill/glide-out grill™ care 5
Cooling fan 5
Cooker care 5
Cleaning 5
2. Cooker overview 6
The hob 6
Grill / glide-out grill™ 8
Accessories 9
3. The ovens 10
4. 2 Button - rotary clock 13
5. 3-button clock 16
10. Troubleshooting 27
11. Installation 29
Dear Installer 29
Safety requirements and regulations 29
Provision of ventilation 29
Location of cooker 29
Positioning the cooker 30
Moving the cooker 30
Lowering the two rear rollers 31
Completing the move 31
Fitting the Stability Bracket 31
Repositioning the cooker following
connection
Levelling the cooker 31
Electrical connection 32
Final checks 32
Final tting 33
Customer care 33
31
12. Circuit diagrams 34
13. Technical data 37
6. 6 Button clock 18
7. Cooking tips 21
8. Cooking table 22
9. Cleaning your cooker 23
iii

iv

1. Before you start...
Your cooker should give you many years of trouble-free
cooking if installed and operated correctly. It is important
that you read this section before you start.
Personal safety
This appliance is for cooking purposes only. It must not be
used for other purposes, for example heating a room. Using
it for any other purpose could invalidate any warranty or
liability claim. Besides invalidating claims this wastes fuel and
may overheat the control knobs.
• This appliance can be used by children aged from
8years and above and persons with reduced physical,
sensory or mental capabilities or lack of experience
and knowledge if they have been given supervision or
instruction concerning use of the appliance in a safe
way and understand the hazards involved.
• Children less than 8 years of age should be kept away
unless continuously supervised. Children shall not play
with the appliance. Cleaning and user maintenance
shall not be made by children without supervision.
• This appliance is designed for domestic cooking only.
Use for any other purpose could invalidate any warranty
or liability claim.
• The appliance and its accessible parts become hot
during use and will retain heat even after you have
stopped cooking. Care should be taken to avoid
touching heating elements.
• A long term cooking process has to be supervised from
time to time. A short term cooking process has to be
supervised continuously.
• DANGER OF FIRE: DO NOT store items on the cooking
surfaces.
Electrical connection safety
The electrical installation must be installed in accordance
with all relevant British Standards/Codes of Practice, BS 7671.
Or with the relevant national and local regulations and with
the local gas and electricity supply companies’ requirements.
Otherwise, all installations must be in accordance with the
relevant instructions in this booklet.
Read the instructions before installing or using this appliance.
• This appliance is heavy so take care when moving it.
• The cooker may be installed in a kitchen/kitchen diner
but NOT in a room containing a bath or shower.
• This appliance MUST be earthed.
• The cooker MUST NOT be connected to an ordinary
domestic power point.
• It is normal for the hob control display to flash for about
2 seconds during first power setting.
• Set the clock to make sure that the oven is functional –
see the relevant section in this manual.
• The appliance must be installed in accordance with the
regulations in force and only in a well ventilated space.
• Failure to install the appliance correctly could invalidate
any warranty or liability claims and lead to prosecution.
• DO NOT install the appliance on a platform.
• DO NOT manouvre the cooker while it is plugged into
the electricity supply.
• Before electrical reconnection, check that the appliance
is electrically safe.
• To avoid overheating, DO NOT install the cooker behind
a decorative door.
• Accessible parts will become hot during use and will
retain heat even after you have stopped cooking. Keep
babies and children away from the cooker and never
wear loose-fitting or hanging clothes when using the
appliance.
• DO NOT use a steam cleaner on your cooker.
• A LWAYS keep combustible materials, e.g. curtains,
and flammable liquids a safe distance away from your
cooker.
• DO NOT spray aerosols in the vicinity of the cooker
while it is on.
1

Peculiar smells
When you rst use your cooker it may give o an odour. This
should stop after use.
Before using your cooker for the rst time, make sure that all
packing materials have been removed and then, to dispel
manufacturing odours, turn all the ovens to 200°C and run for
at least an hour.
Before using the grill for the rst time you should also turn on
the grill and run for 30 minutes with the grill pan in position,
pushed fully back and the grill door open.
Make sure the room is well ventilated to the outside air
(see ‘Ventilation’ below). People with respiratory or allergy
problems should vacate the area for this brief period.
Ventilation
The use of a cooking appliance results in the production
of heat and moisture in the room in which it is installed.
Make sure that the kitchen is well ventilated. Keep natural
ventilation holes open or install a powered cooker hood that
vents outside.
• NEVER leave the hotplate unattended at high heat
settings. Pans boiling over can cause smoking,
and greasy spills may catch on fire. Use a deep fat
thermometer whenever possible to prevent fat
overheating beyond the smoking point.
• Unattended cooking on a hob with fat or oil can be
dangerous and may result in fire.
• NEVER leave a chip pan unattended. ALWAYS heat fat
slowly, and watch as it heats. Deep fry pans should be
only one third full of fat.
• NEVER try to move a pan of hot fat, especially a deep
fat fryer. Wait until the fat is cool. Filling the pan too full
of fat can cause spill over when food is added. If you use
a combination of oils or fats in frying, stir them together
before heating, or as the fats melt.
• Foods for frying should be as dry as possible. Frost on
frozen foods or moisture on fresh foods can cause hot
fat to bubble up and over the sides of the pan. Carefully
watch for spills or overheating of foods when frying at
high or medium high temperatures.
Prolonged intensive use of the appliance may call for
additional ventilation, for example opening a window, or
more eective ventilation, for example increasing the level of
mechanical ventilation where present.
Maintenance
• Only a qualied service engineer should service the
appliance and only approved spare parts should be
used. It is recommended that this appliance is serviced
annually.
• DO NOT use cooking vessels on the hotplate that
overlap the edges.
• A LWAYS allow the cooker to cool and then switch it
off at the mains before cleaning or carrying out any
maintenance work, unless specified otherwise in this
guide.
• DO NOT use the control knobs to manoeuvre the
cooker.
• NEVER operate the cooker with wet hands.
• DO NOT use a towel or other bulky cloth in place of a
glove – it might catch fire if brought into contact with a
hot surface.
• DO NOT use the top of the flue (the slots along the back
of the cooker) for warming plates, dishes, drying tea
towels or softening butter.
• DO NOT use water on grease fires and never pick up
a flaming pan. Turn the controls off and then smother
a flaming pan on a surface unit by covering the pan
completely with a well fitting lid or baking tray. If
available, use a multi-purpose dry chemical or foamtype fire extinguisher.
• DO NOT modify this appliance. This appliance is not
intended to be operated by means of external timer or
separated remote-control system.
• If flammable materials are stored in the drawer, oven(s)
or grill(s) it may explode and result in fire or property
damage.
• DO NOT use hotplate protectors, foil or hotplate covers
of any description. These may affect the safe use of
your hotplate burners and are potentially hazardous to
health.
• NEVER heat unopened food containers. Pressure build
up may make the containers burst and cause injury.
• DO NOT use unstable saucepans. ALWAYS make sure
that you position the handles away from the edge of the
hotplate.
2
Ceramic care
ArtNo.312-0003 Moving pans
• Take care when touching the marked cooking areas of
the hob.
• Use adequately sized pans with flat bottoms that are
large enough to cover the surface of the hotplate
heating area. The use of undersized pans will expose a
portion of the surface unit to direct contact and may
result in the ignition of clothing.
• Only certain types of glass, glass-ceramic, earthenware
or other glazed containers are suitable for use on the
warming zone; others may break because of the sudden
change in temperature.
• Only certain types stainless steel, enamelled steel pans
or cast iron pans with enamelled bases are suitable for
induction hob cooking.
• Take care NOT to scratch the surface when placing
cookware on the glass panel.
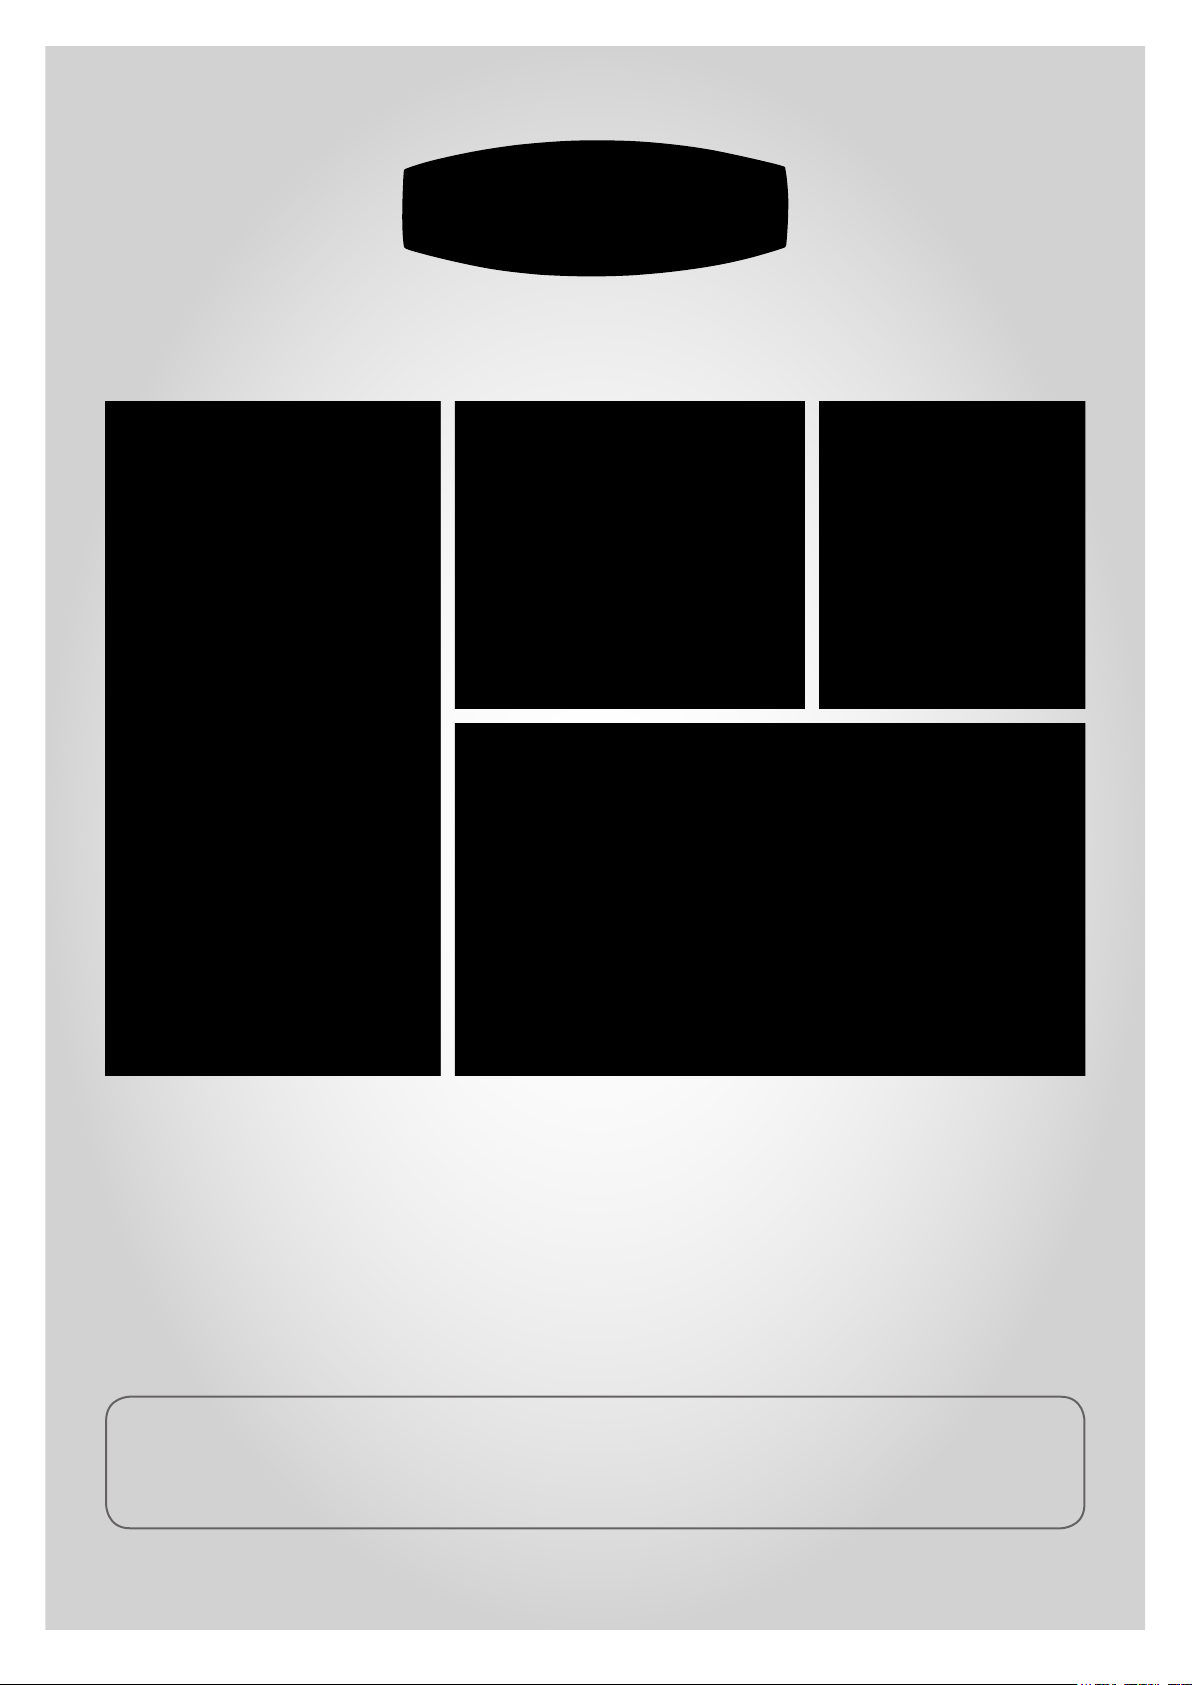
• Only certain types of glass, glass-ceramic, earthenware
or other glazed containers are suitable for hotplate
cooking; others may break because of the sudden
change in temperature. NEVER cook directly on the hob
surface (Fig. 1.1).
Fig. 1.1
Fig. 1.2
Fig. 1.3
• DO NOT leave the hob zones switched on unless being
used for cooking.
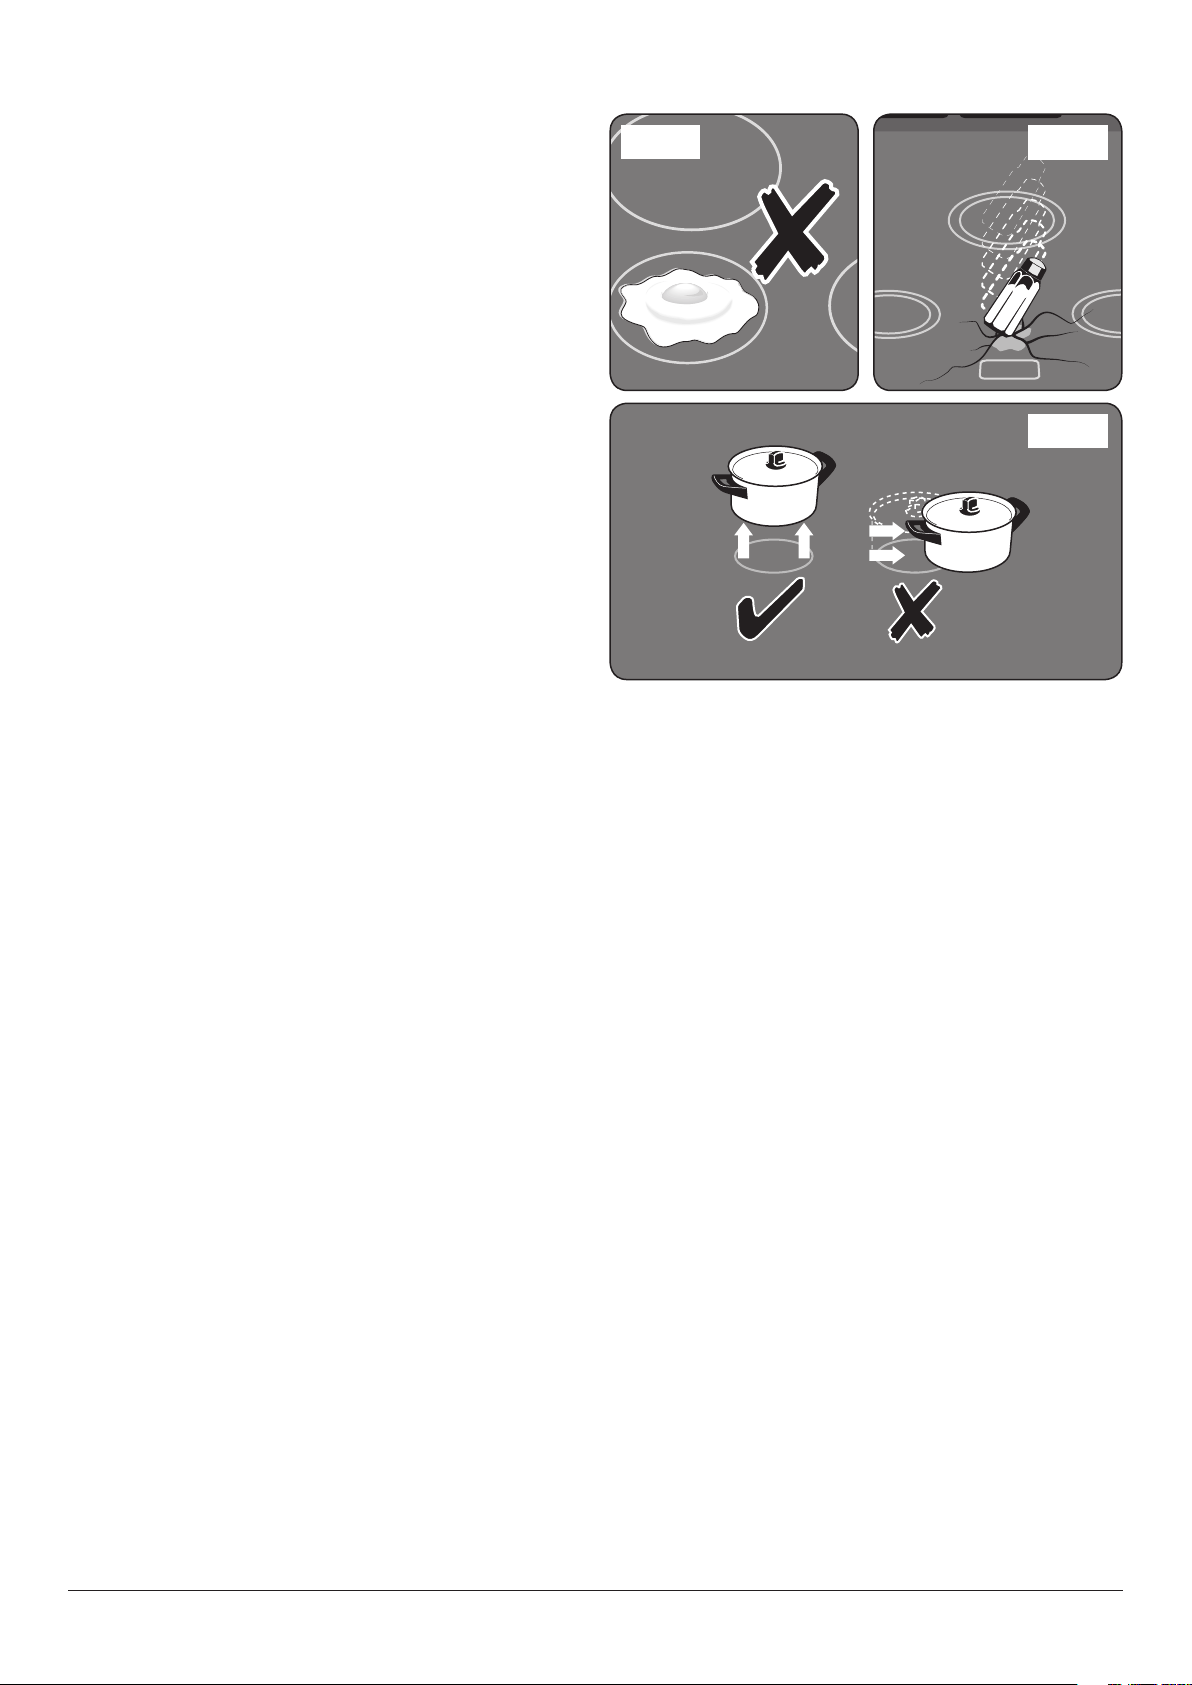
• DO NOT stand or rest heavy objects on the hob.
Although the ceramic surface is very strong, a sharp
blow or sharp falling object (e.g. a salt cellar) might
cause the surface to crack or break (Fig. 1.2).
• Should a crack appear in the surface, disconnect the
appliance immediately from the supply and arrange for
its repair.
• ALWAYS LIFT pans off the hob. Sliding pans may cause
marks and scratches (Fig. 1.3).
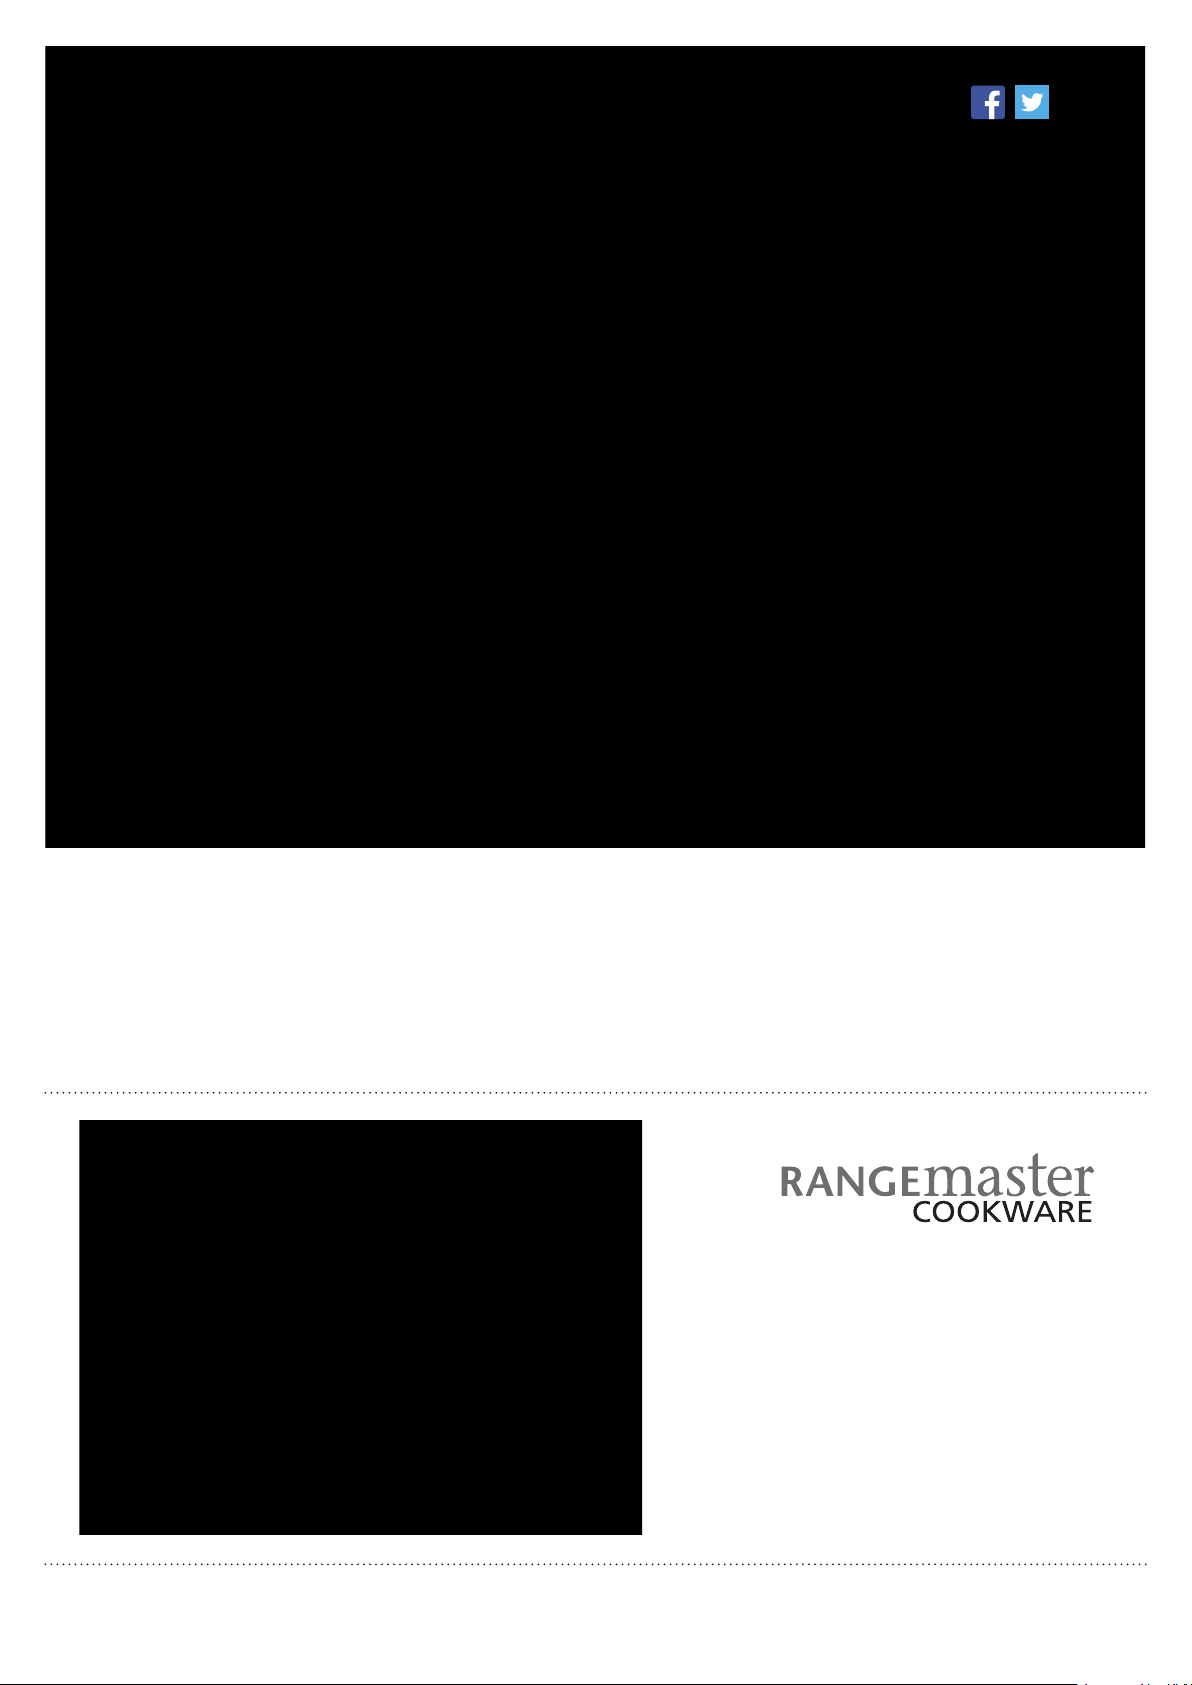
• Take care NOT TO PLACE HOT LIDS onto the hob
surface (Fig. 1.4). Lids that have been used to cover
a hot pan can “stick” or create a “vacuum” effect to
the Glass Hob. Should this occur, DO NOT attempt
to lift the lid off the glass surface, this may damage
the glass. Instead slide the lid to the edge of the hob
surface and remove, taking care not to scratch the hob
surface. Alternatively wait until the lid has cooled to
room temperature, the vacuum has been released, then
remove the lid by lifting it from the hob surface.
• DO NOT place anything between the base of the pan
and the hob surface (e.g. asbestos mats, aluminium foil,
wok stand).
• Take care NOT to place metallic objects such as knives,
forks, spoons and lids on the hob surface since they can
get hot.
• We recommend that you avoid wiping any surface unit
areas until they have cooled and the indicator light
3
ArtNo.312-0001 Not cooking surface
Fig. 1.4
has gone off. Sugar spills are the exception to this (see
‘Cleaning your Cooker’). After cleaning, use a dry cloth
or paper towel to remove any cleaning cream residue.
• The ceramic surface should be washed after use in
order to prevent it from becoming scratched or dirty.
However, you should clean the hob with caution as
some cleaners can produce noxious fumes if applied to
a hot surface.
• DO NOT leave the hob unattended. Care should be
taken to not allow your cookware to boil dry. It will
damage your cookware and Induction Glass Hob.
Fig. 1.5
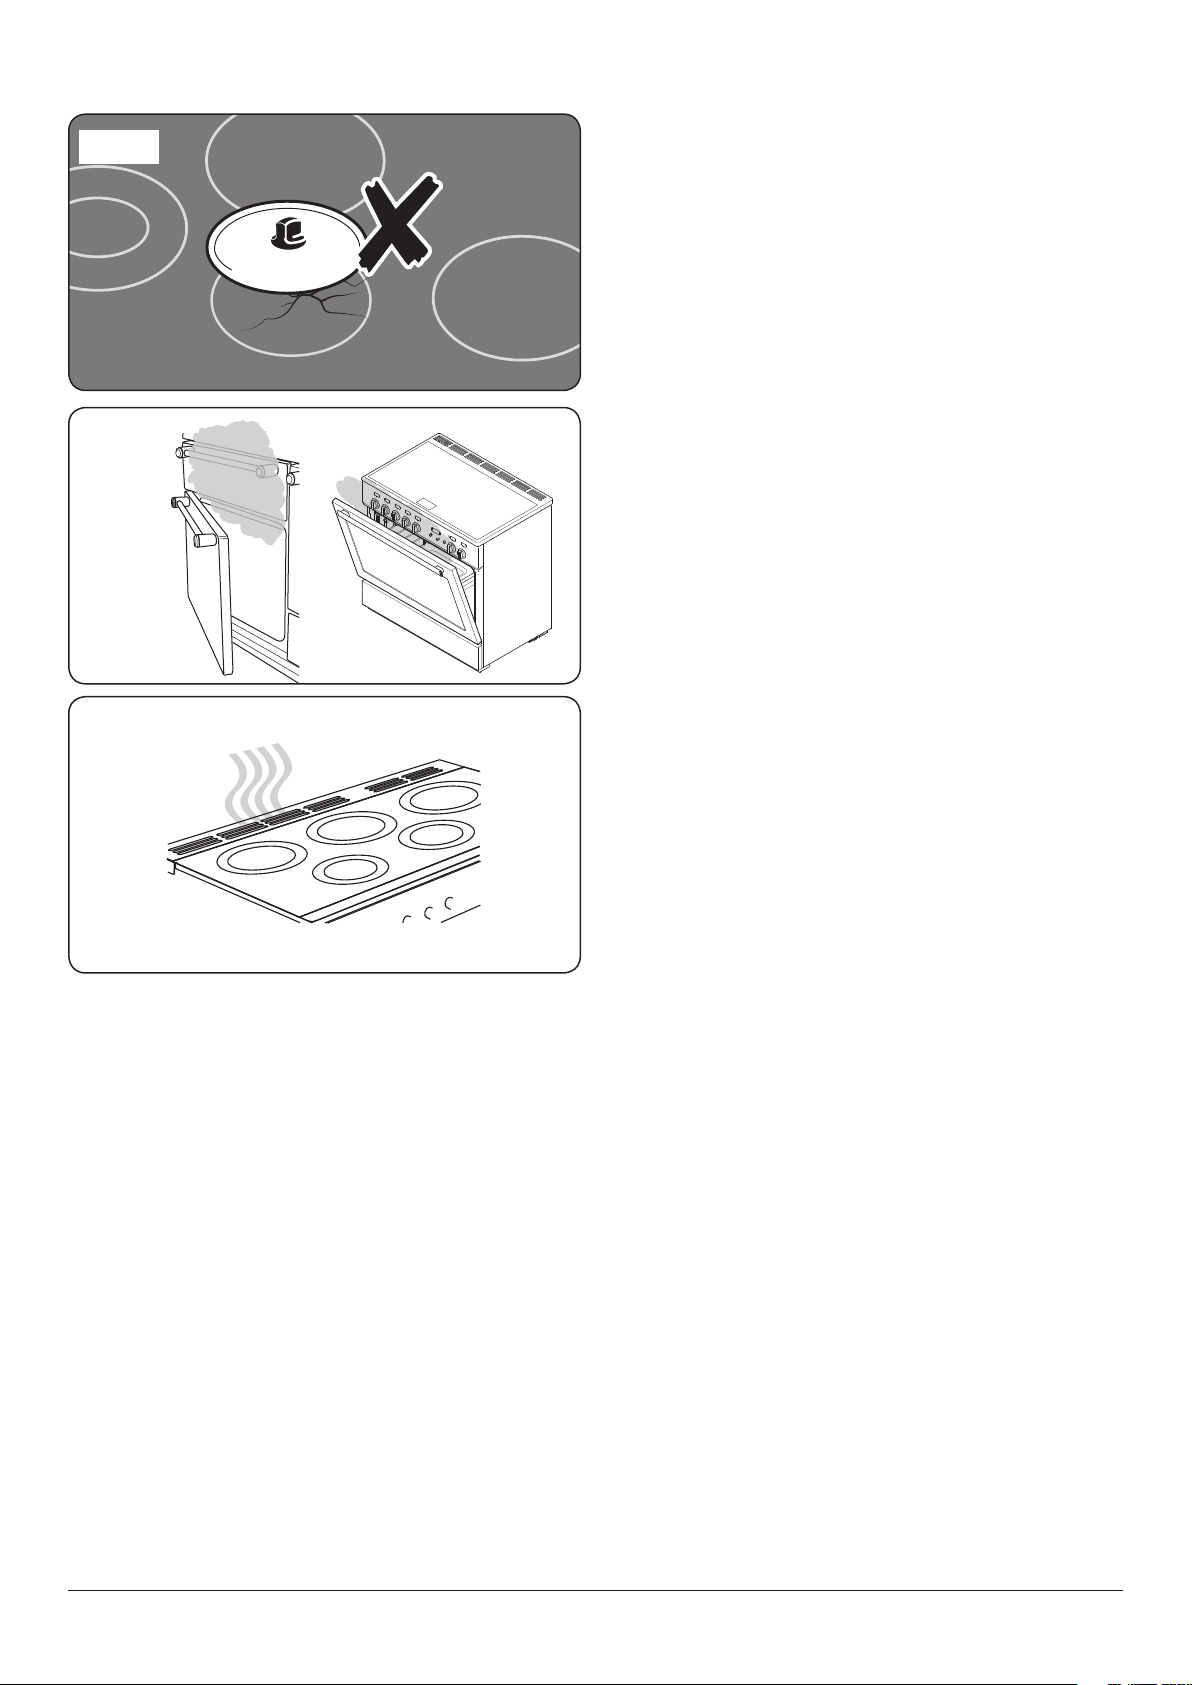
Fig. 1.6
ArtNo.324-0001 Steam burst
ArtNo.090-0007 90 Ceramic:
oven steam out the back
• After use, switch off the hob element by its control. DO
NOT rely on the pan detector.
Oven care
• When the oven is not in use and before attempting to
clean the appliance ALWAYS be certain that the control
knobs are in the OFF position.
• Use oven gloves to protect your hand from potential
burns.
• Cooking high moisture content foods can create a
‘steam burst’ when the oven door is opened (Fig. 1.5).
When opening the oven, stand well back and allow any
steam to disperse.
• The inside door face is constructed with toughened
safety glass. Take care NOT to scratch the surface when
cleaning the glass panel.
• Accidental damage may cause the door glass panel to
fracture.
• Keep oven vent ducts unobstructed.
• DO NOT use harsh abrasive cleaners or sharp metal
scrapers to clean the oven door glass since they can
scratch the surface, which may result in shattering of
the glass.
• Make sure the shelves are pushed firmly to the back
of the oven. DO NOT close the door against the oven
shelves.
• DO NOT use aluminium foil to cover shelves, linings or
the oven roof.
• When the oven is on, DO NOT leave the oven door
open for longer than necessary, otherwise the control
knobs may become very hot.
• DO NOT use the timed oven if the adjoining oven is
already warm.
• DO NOT place warm food in the oven to be timed.
• DO NOT use a timed oven that is already warm.
• Use dry oven gloves when applicable – using damp
gloves might result in steam burns when you touch a
hot surface.
4

Hob care
Cooker care
• NEVER allow anyone to climb or stand on the hob.
• DO NOT use the hob surface as a cutting board.
• DO NOT leave utensils, foodstus or combustible items
on the hob when it is not in use (e.g. tea towels, frying
pans containing oil).
• DO NOT place plastic or aluminium foil, or plastic
containers on the hob.
• A LWAYS turn the control to the OFF position before
removing a pan.
• Avoid heating an empty pan. Doing so may damage
both the hob and pan.
Grill/glide-out grill™ care
• When using the grill, make sure that the grill pan is
in position and pushed fully in, otherwise the control
knobs may become very hot.
• DO NOT leave the grill on for more than a few moments
without the grill pan underneath it, otherwise the knobs
may become hot.
• NEVER close the grill door when the grill is on.
• Accessible parts may be hot when the grill is in use.
Young children should be kept away.
As steam can condense to water droplets on the cool outer
trim of the oven, it may be necessary during cooking to wipe
away any moisture with a soft cloth. This will also help to
prevent soiling and discolouration of the oven exterior by
cooking vapours (Fig. 1.6).
Cleaning
• Isolate the electricity supply before carrying out any
thorough cleaning. Allow the cooker to cool.
• In the interests of hygiene and safety, the cooker should
be kept clean at all times as a build up in fats and other
food stuff could result in a fire.
• Clean only the parts listed in this guide.
• Clean with caution. If a wet sponge or cloth is used to
wipe spills on a hot surface, be careful to avoid steam
burns. Some cleaners can produce noxious fumes if
applied to a hot surface.
• NEVER use paint solvents, washing soda, caustic
cleaners, biological powders, bleach, chlorine based
bleach cleaners, coarse abrasives or salt.
• DO NOT mix different cleaning products – they may
react together with hazardous results.
• All parts of the cooker can be cleaned with hot soapy
water.
Cooling fan
This appliance may have a cooling fan. When the grill or oven
is in operation the fan will run to cool the fascia and control
knobs.
• Take care that no water seeps into the appliance.
• Before you remove any of the grill parts for cleaning,
make sure that they are cool or use oven gloves.
• DO NOT use any abrasive substances on the grill and
grill parts.
• DO NOT put the side runners in a dishwasher.
• DO NOT put the burner heads in a dishwasher.
• NEVER use caustic or abrasive cleaners as these will
damage the surface.
• DO NOT use steel wool, oven cleaning pads or any
other materials that will scratch the surface.
• NEVER store flammable materials in the drawer.
This includes paper, plastic and cloth items, such
as cookbooks, plastic ware and towels, as well as
flammable liquids.
• DO NOT store explosives, such as aerosol cans, on or
near the appliance.
• DO NOT use steel wool, oven cleaning pads, or any
other materials that will scratch the surface.
• DO NOT attempt to disassemble or clean around any
burner while another burner is on, otherwise an electric
shock could result.
5
ArtNo.312-0006 Correct pan sizes
2. Cooker overview
A
Fig. 2.1
B
C
D
DocNo.020-0002 - Overview - 90 Ceramic - Generic
1
1
1
3
4
2 2
3
4
1
3
4
146
146
146
2
5
3
2
5
3
2 2
2
5
3
3
4
E
Fig. 2.2
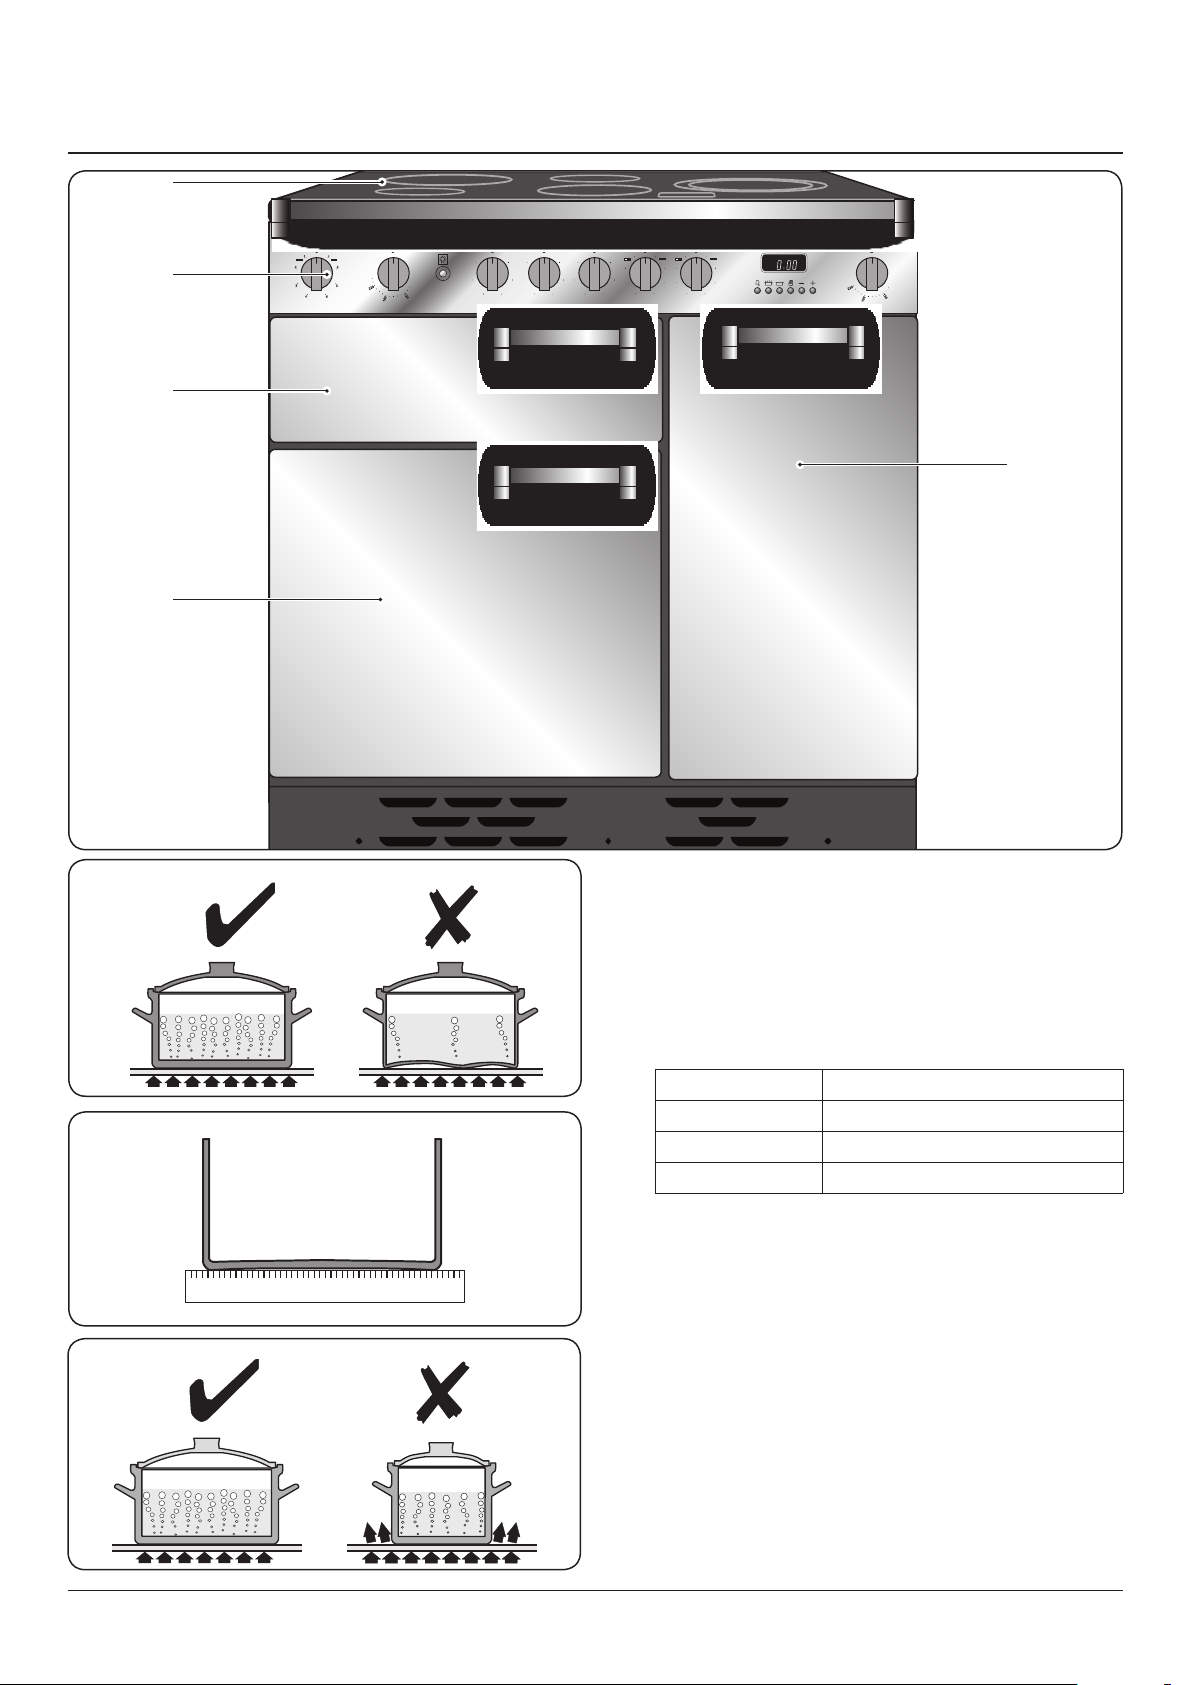
The 90 ceramic cooker (Fig. 2.1) has the following features:
A. Ceramic hob
B. Control panel
C. Separate grill or glide-out grill (depending on model)
D.
Fanned oven Multi-function oven
Kitchener Classic Deluxe timed oven
Fig. 2.3
Classic
Professional+
E. Fan oven
The hob
Use only pans that are suitable for ceramic hobs. We
recommend stainless steel and enamelled steel pans as pots
and pans with copper or aluminium bases leave traces on the
Fig. 2.4
hob that are dicult to remove.
The kind of pan you use and the quantity of food aects
the setting required. Higher settings are required for larger
quantities of food.
Pots and pans should have thick, smooth, at bottoms
(Fig. 2.2). This allows the maximum heat transfer from the
hob to the pan, making cooking quick and energy ecient.
Never use a round-bottomed wok, even with a stand.
6
ArtNo. 312-0012 - 90 Ceramic hob ratings
1.65 kW 1.1 kW 2.02 kW
1.1 kW 1.56 kW
Zone 2
Zone 1
Zone 3
Zone 4
Zone 5
ArtNo.312-0013 - 90 ceramic heat indicator light
The very best pans have bases that are very slightly curved up
when cold. If you hold a ruler across the bottom you will see
a small gap in the middle (Fig. 2.3). When they heat up the
metal expands and lies at on the cooking surface.
Make sure that the base of the pan is clean and dry to prevent
any residue burning onto the hob panel. This also helps
prevent scratches and deposits.
ALWAYS use pans that are the same size as (or slightly larger
than) the areas marked on the hob top (Fig. 2.4). Using
smaller pans wastes heat, and any spillage will be burnt on.
Using a lid will help the contents boil more quickly.
Take care when placing hot lids onto the hob
surface. Lids that have been covering boiling or
steaming foods can ‘stick’ to the ceramic glass.
Should this occur, DO NOT attempt to lift the lid
o the hotplate: this may damage the hob surface.
Instead, slide the lid to the edge of the hob surface
and remove.
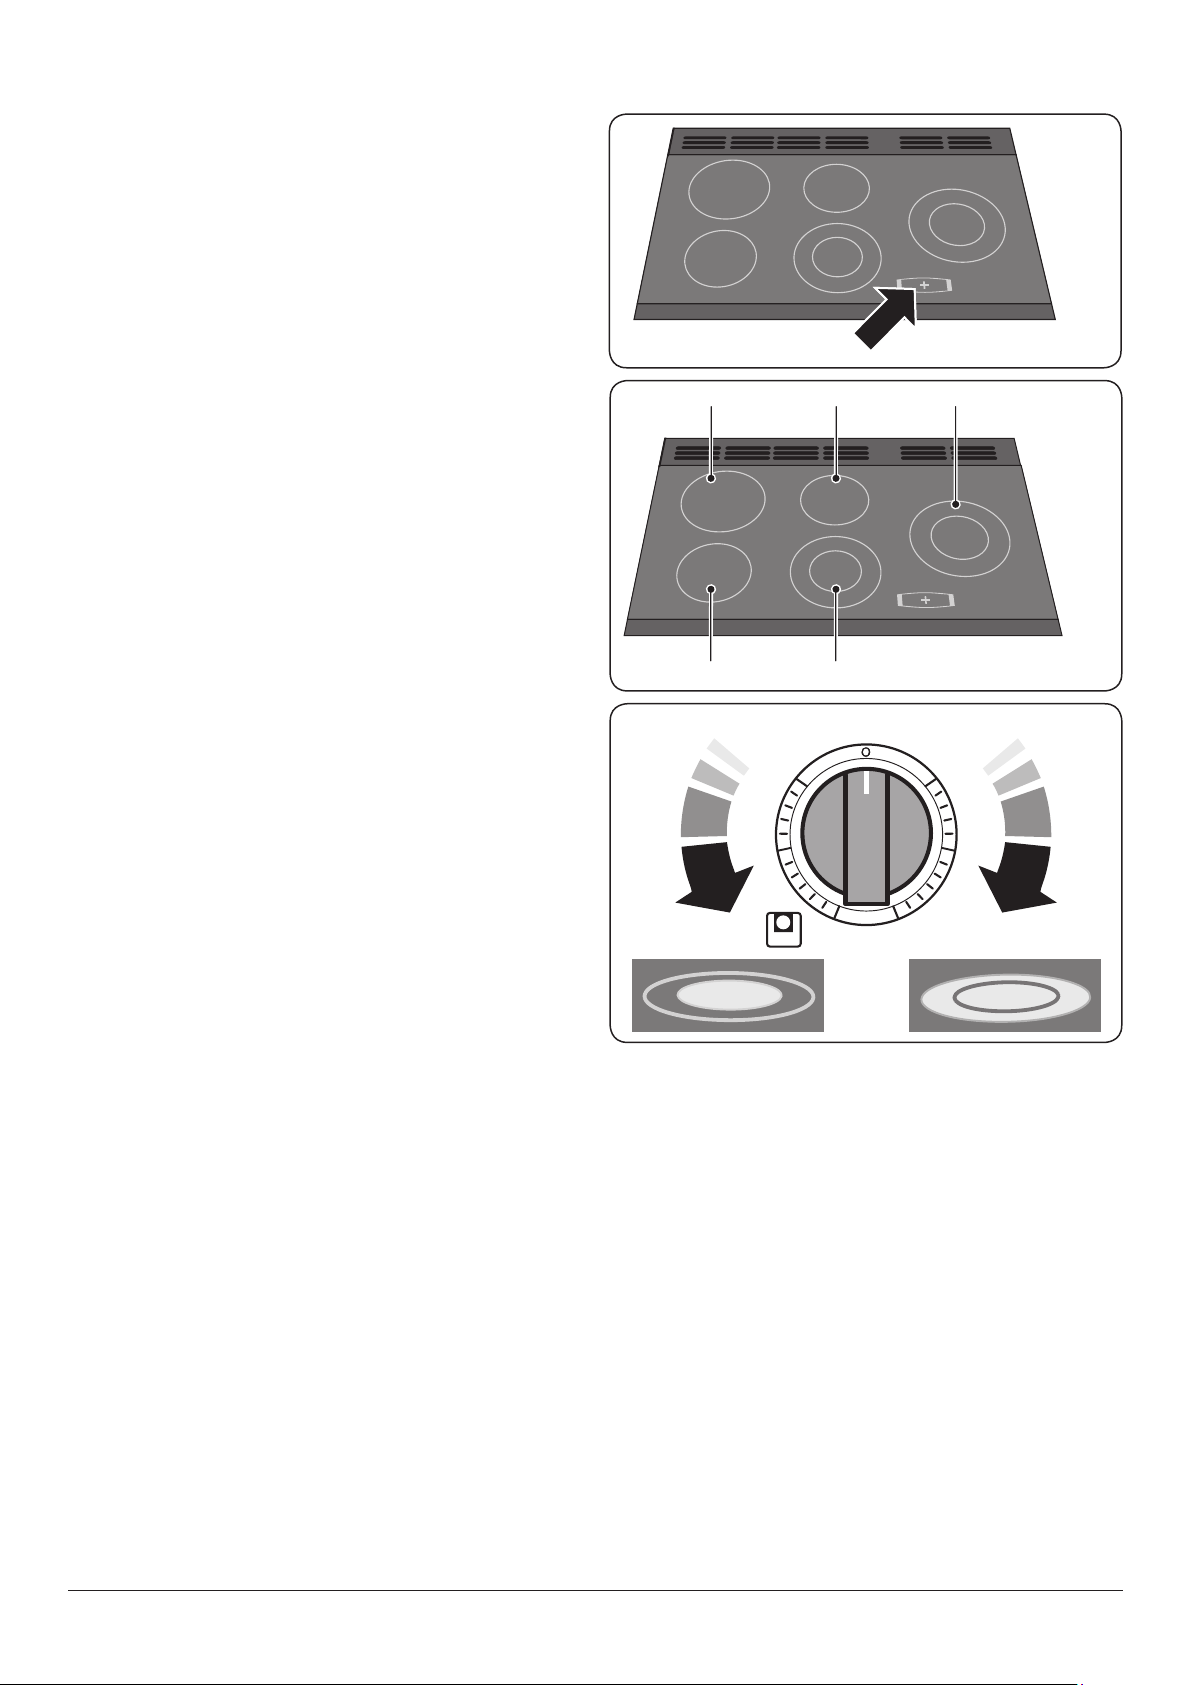
There are indicator lights for each of the cooking areas
(Fig. 2.5). The lights come on when a hob control is turned on
and stays lit while the surface cools.
ALWAYS take care before touching the surface, even
when the hob is turned o – it may be hotter than
you think.
The ratings of the dierent cooking areas are shown in
Fig. 2.6.
Fig. 2.5
Fig. 2.6
Fig. 2.7
1
1
The areas marked with two concentric circles have an inner
and an outer element. Rotate the control knob clockwise to
heat the whole area for larger pans; turn it counter-clockwise
to just heat the inner part for smaller pans (Fig. 2.7).
When cooking on the hob, you may see the hob area you
are using switch o and on: this is caused by a safety device
that limits the temperature of the hob. This is quite normal,
especially when cooking at high temperatures. If it happens
a lot with a particular pan, however, it may mean the pan is
not suitable – perhaps too small or too uneven – for a ceramic
hob.
For best results, preheat a covered serving dish for 10 minutes
before adding food to it.
Use only heat-resistant dishes.
2
3
3
2
7
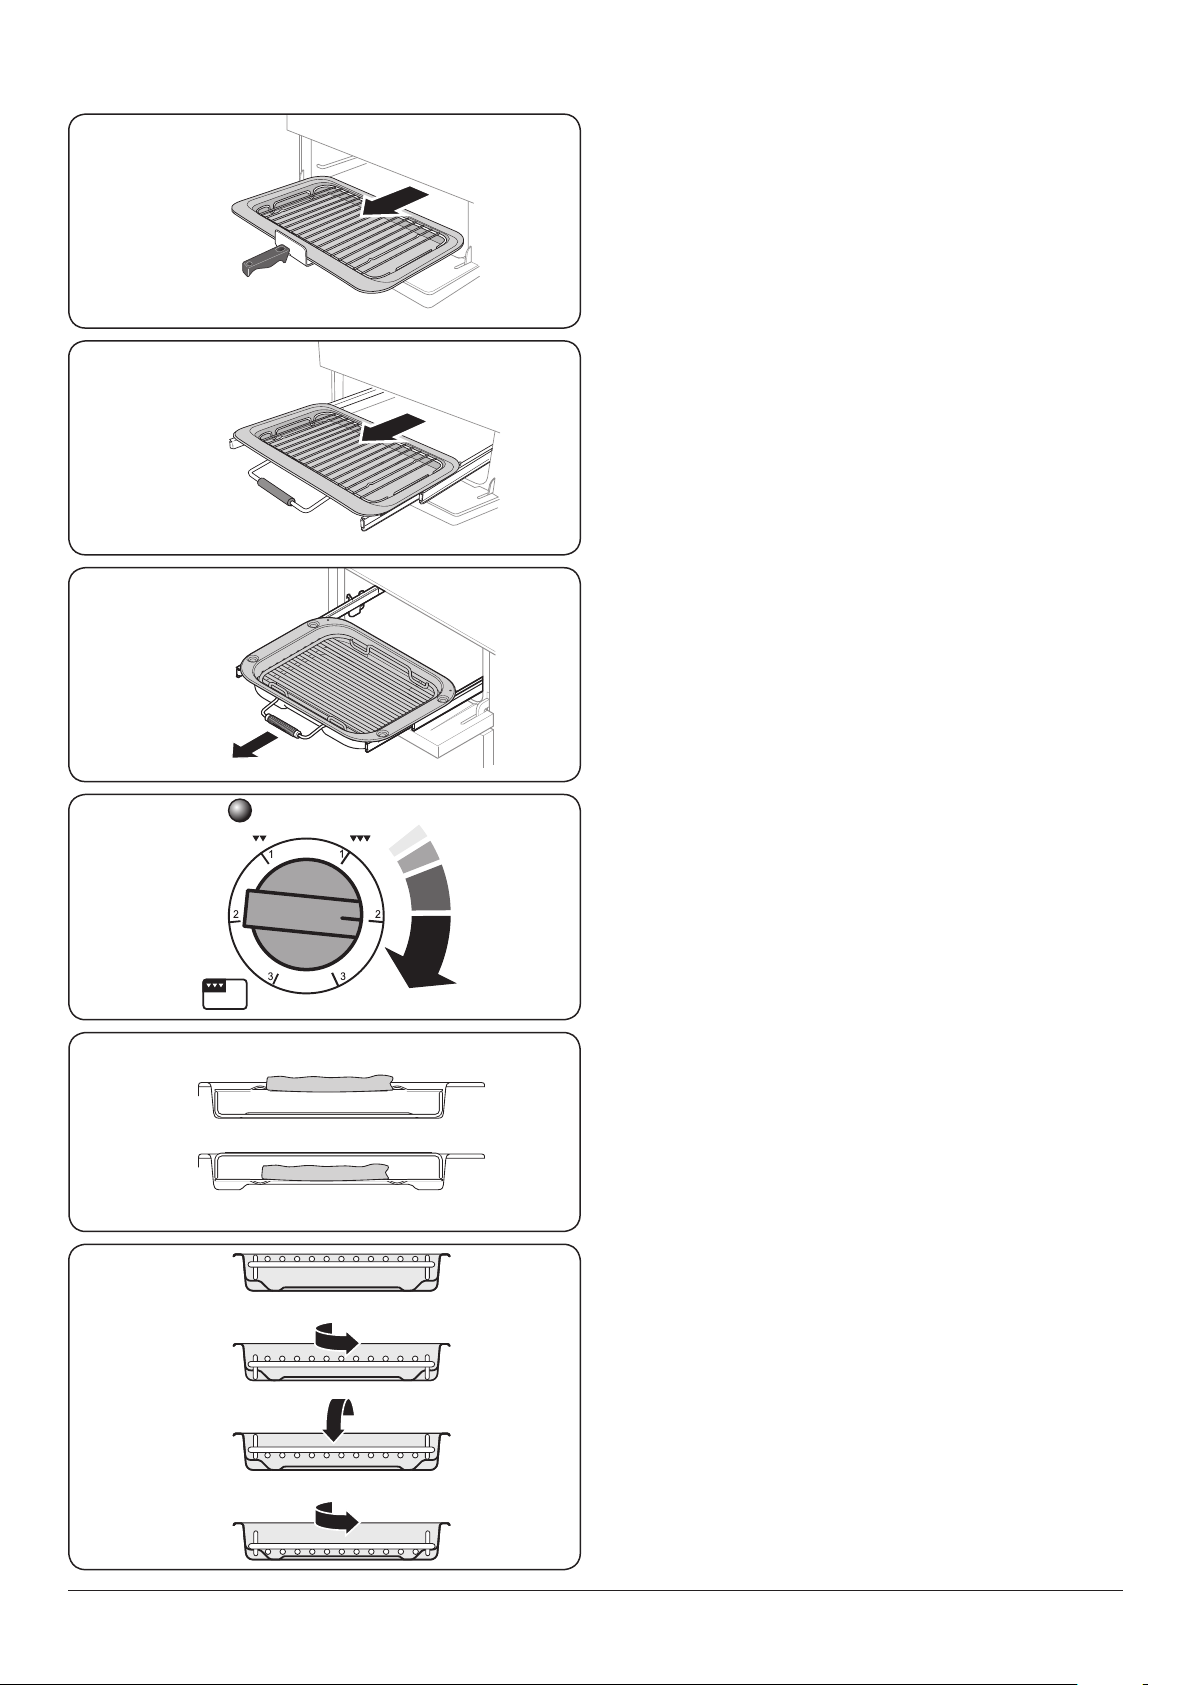
Fig. 2.8
Grill / glide-out grill™
Open the door and pull the grill pan (Fig. 2.8) or carriage
(Fig. 2.9 and Fig. 2.10) forward using the handle.
Fig. 2.9
Fig. 2.10
ArtNo.330-0003 - Grill pan w handle pulled forwards
ArtNo.331-0001Grill pan pulled forwards
The grill has two elements that allow either the whole area of
the pan to be heated or just the right-and half.
Adjust the heat to suit by turning the knob. To heat the whole
grill, turn the knob clockwise (Fig. 2.11).
To heat the right-hand half, turn the knob counter-clockwise.
The neon indicator light by the grill control will come on.
For best results, leave the grill pan in the grill chamber and
preheat the appropriate part(s) of the grill for two minutes.
The grill trivet can be removed and the food placed on it
while you are waiting for the grill to preheat.
DO NOT leave the grill on for more than a few
moments, without the grill pan underneath it,
otherwise the knobs may become hot.
Once the grill has preheated, take the grill pan out again and
put the trivet back in place with the food on it. Slide the grill
pan or carriage back into the grill chamber. Make sure that it
is pushed right in.
Accessible parts may be hot when the grill is in use.
Young children should be kept away.
The grill pan trivet in Fig. 2.8, Fig. 2.9, can be turned over to
give two grilling positions (Fig. 2.12).
Fig. 2.11
Fig. 2.12
Fig. 2.13
ArtNo.200-0003 -
Generic grill control to full
ArtNo.331-0002 Grill pan high/low position
1
2
The grll pan trivet in Fig. 2.10 can be turned to give four
grilling positions (Fig. 2.13).
NEVER close the grill door when the grill is on.
3
4
8
Accessories
ArtNo.320-0017
Main oven light
ArtNo.320-0013 Removing the shelf 3
ArtNo.320-0014 Handyrack on LH door
ArtNo.320-0011 Removing the shelf 1
ArtNo.320-0012 Removing the shelf 2
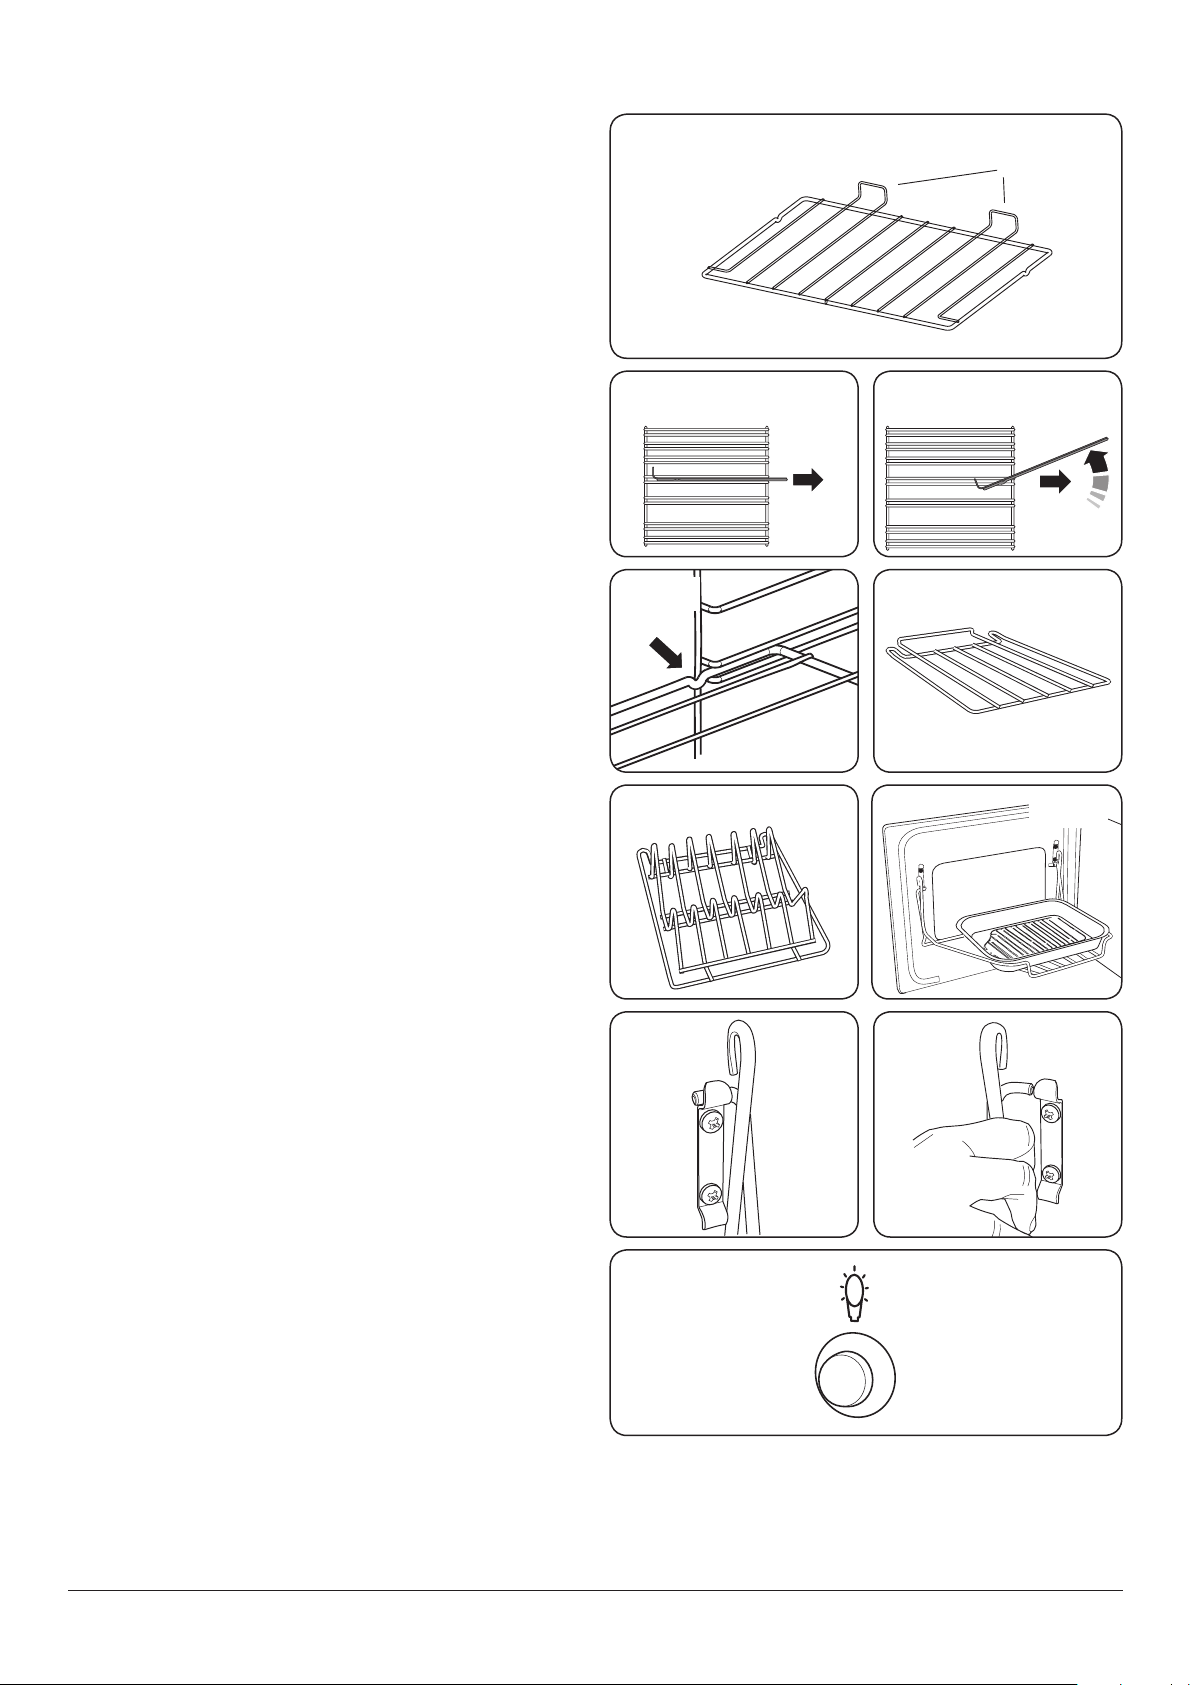
Oven Shelves – Left-hand (main) oven
The oven shelves (Fig. 2.14) can easily be removed and
retted.
Pull the shelf forward until the back of the shelf is stopped by
the shelf stop bumps in the oven sides (Fig. 2.15).
Lift up the front of the shelf so the back of the shelf will pass
under the shelf stop and then pull the shelf forward
(Fig. 2.16).
To ret the shelf, line up the shelf with a groove in the oven
side and push the shelf back until the ends hit the shelf stop.
Lift up the front so the shelf ends clear the shelf stops, and
then lower the front so that the shelf is level and push it fully
back (Fig. 2.17).
Oven Shelves – Right-hand (tall) oven
Fig. 2.15
Fig. 2.14
Shelf guard
Front
Fig. 2.16
The tall oven is supplied with four at cooking shelves
(Fig. 2.18) and a plate warming shelf (Fig. 2.19).
When using the tall oven, you can cook on all four shelves at
the same time, but make sure that they are well spaced out to
allow the hot air to circulate.
The Handyrack (Main Oven)
The Handyrack (Fig. 2.20) ts to the left-hand oven door
only. Food cooking on it is easy to attend to, because it is
accessible when the door is open.
The maximum weight that can be held by the Handyrack
is 5.5 kg (12 lb). It should only be used with the supplied
roasting tin, which is designed to t the Handyrack. Any other
vessel could be unstable.
It can be tted at two dierent heights. One of the oven
shelves must be removed and the other positioned to suit.
When the Handyrack is used in its highest position, other
dishes can be cooked on the bottom shelf position or base of
the oven.
When the Handyrack is used in its lowest position, other
dishes can be cooked on the second shelf position or base of
the oven.
Fig. 2.17
Fig. 2.19
ArtNo.324-0010 Plate warming shelf
Fig. 2.21
Fig. 2.18
ArtNo.324-0009 Tall oven shelf
Fig. 2.20
Fig. 2.22
To t the Handyrack, locate one side of it on the door bracket
(Fig. 2.21). Then spring the other side out to clip it onto the
other bracket (Fig. 2.22).
Main oven light
Press the button to turn the light on (Fig. 2.23).
If the oven light fails, turn o the power supply before
changing the bulb. See the ‘Troubleshooting’ section for
details on how to change the bulb.
ArtNo.320-0015
Fitting the Handyack 1
ArtNo.320-0016
Fig. 2.23
9
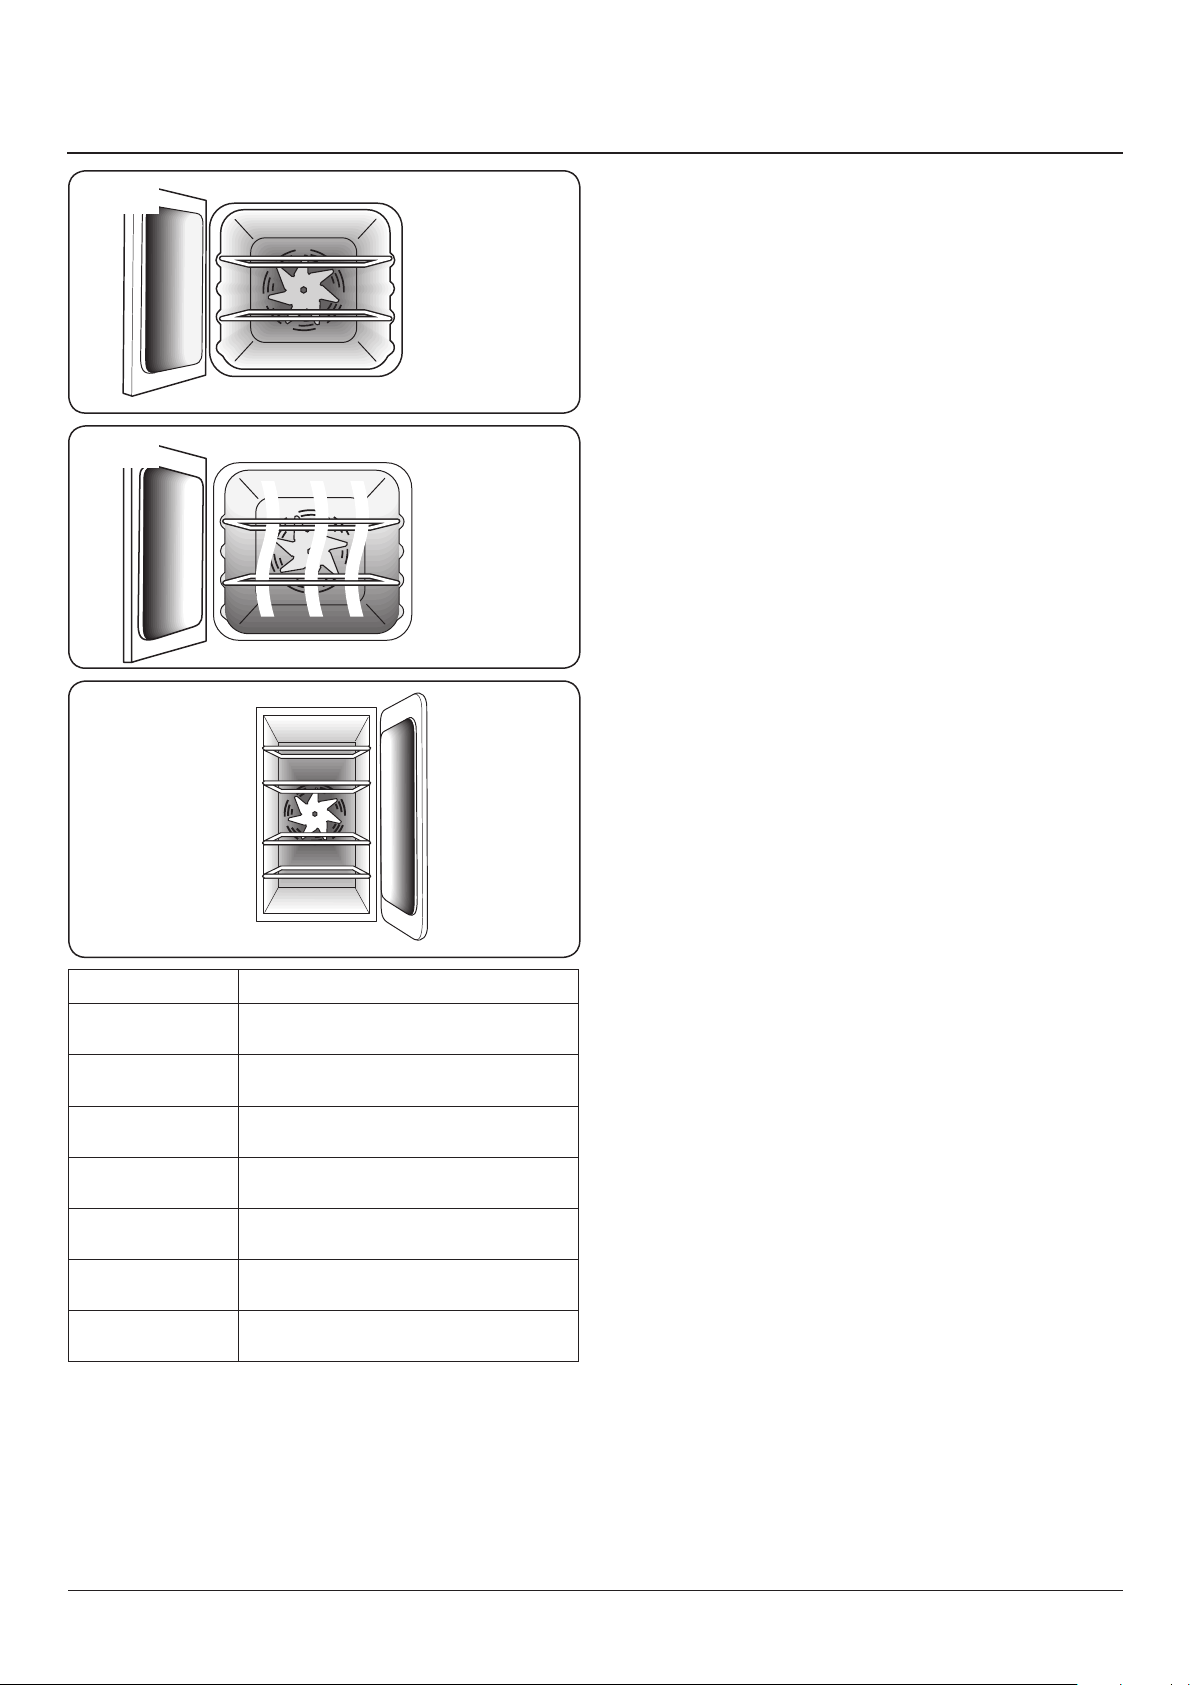
3. The ovens
ArtNo.321-0002 Fan assisted oven
Fig. 3.1
Fig. 3.2
Fig. 3.3
ArtNo.321-0006 - Multi-function oven
Fan oven
Multi-function oven
The clock must be set to the time of day before the left-hand
oven will work. Read the following section to set the clock.
References to ‘left-hand’ and ‘right-hand’ ovens apply as
viewed from the front of the appliance.
The left-hand oven is either a fan oven (Fig. 3.1) or a
multi-function oven (Fig. 3.2), depending on model.
The right-hand tall oven is a fan oven (Fig. 3.3).
Fan ovens circulate hot air continuously, which means
faster, more even cooking. The recommended cooking
temperatures for a fan oven are generally lower than those
for a non-fan oven.
Multi-function ovens have an oven fan and oven fan element,
as well as two extra heating elements. One element is in
the top of the oven and the second is under the oven base.
Take care to avoid touching the top element and element
deector when placing or removing items from the oven.
The multi-function oven has 3 main cooking functions: fan,
fan assisted and conventional cooking. These functions
should be used to complete most of your cooking.
The browning element and base heat can be used in the
latter part of the cooking process to ne tune the results to
your particular requirements.
ArtNo.323-0002 Tall oven
Function Use
Defrost
Fan oven
Fanned grilling
Fan assisted
Conventional
oven
Browning
element
Base heat
To thaw small items in the oven without heat
A full cooking function, even heat throughout,
great for baking
Grilling meat and sh with the door closed
A full cooking function good for roasting and
baking
A full cooking function for roasting and baking in
the lower half of the oven
To brown and crisp cheese topped dishes
To crisp up the bases of quiche, pizza or pastry
Tall fan oven
Use fanned grilling for all your grilling needs and defrost to
safely thaw small items of frozen food.
Table 3.1 gives a summary of the multi-function modes.
The multi-function oven has many varied uses. We suggest
you keep a careful eye on your cooking until you are familiar
with each function. Remember, not all functions will be
suitable for all food types.
Table 3.1
10

Multifunction oven functions
Rapid response (Classic Deluxe only)
The Rapid Response setting enables you to preheat
the oven faster than normal. It uses the fan oven
element with additional heat from one of the
elements in the top of the oven. Fan ovens heat up quickly;
but the Rapid Response feature speeds this process up
enabling you to start cooking sooner.
To use the Rapid Response feature, turn the function control
knob to R and set the temperature required. The light on the
control panel next to the function control will come on.
When the required temperature is reached the top element
will switch o and the light will go out.
The oven temperature is then maintained by the fan oven
element and fan.
Should you choose to place food into the cold oven prior to
cooking while using the Rapid Response function, make sure
that cakes, etc. are not positioned too near the top of the
oven.
large items that need thorough cooking, such as a large meat
roast.
It is also possible to bake on two shelves at one time,
although they will need to be swapped over during the
cooking time, as the heat at the top of the oven is greater
than at the base, when using this function.
This is a fast intensive form of cooking; keep an eye on the
food cooking until you have become accustomed to this
function.
Conventional oven (Top and Base Heat)
This function combines the heat from the top and
base elements. It is particularly suitable for roasting
and baking pastry, cakes and biscuits.
Food cooked on the top shelf will brown and crisp faster than
on the lower shelf, because the heat is greater at the top of
the oven than at the base, as in ‘Fan Assisted Oven’ function.
Similar items being cooked will need to be swapped around
for even cooking. This means that foods requiring dierent
temperatures can be cooked together, using the cooler zone
in the lower half of the oven and hotter area to the top.
Fan oven
This function operates the fan and the heating
element around it. An even heat is produced
throughout the oven, allowing you to cook large
amounts quickly.
Fan oven cooking is particularly suitable for baking on several
shelves at one time and is a good ‘all-round’ function. It may
be necessary to reduce the temperature by approximately
10 °C for recipes previously cooked in a conventional oven.
If you wish to preheat the oven, wait until the indicator light
has gone out before inserting the food.
Fanned grilling
This function operates the fan whilst the top element
is on. It produces a more even, less erce heat than a
conventional grill. For best results, place the food to
be grilled, on a grid over a roasting tin, which should be
smaller than a conventional grill pan. This allows greater air
circulation. Thick pieces of meat or sh are ideal for grilling in
this way, as the circulated air reduces the erceness of the
heat from the grill.
The oven door should be kept closed while grilling is in
progress, so saving energy.
You will also nd that the food needs to be watched and
turned less than for normal grilling. Preheat this function
before cooking.
For best results we recommend that the grill pan is not
located on the uppermost shelf.
Fan assisted oven
This function operates the fan, circulating air heated
by the elements at the top and the base of the oven.
The combination of fan and conventional cooking
(top and base heat) makes this function ideal for cooking
The exposed top element may cook some foods too quickly,
so we recommend that the food be positioned in the lower
half of the oven to cook. The oven temperature may also need
to be lowered.
Browning element
This function uses the element in the top of the oven
only. It is a useful function for the browning or
nishing of pasta dishes, vegetables in sauce,
shepherds pie and lasagne, the item to be browned being
already hot before switching to the top element.
Base heat
This function uses the base element only. It will crisp
up your pizza or quiche base or nish o cooking the
base of a pastry case on a lower shelf. It is also a
gentle heat, good for slow cooking of casseroles in the
middle of the oven or for plate warming.
The Browning and Base Heat functions are useful additions
to your oven, giving you exibility to nish o items to
perfection.
Defrost
This function operates the fan to circulate cold air
only. Make sure the temperature control is at 0°C and
that no heat is applied. This enables small items such
as desserts, cream cakes and pieces of meat, sh and poultry
to be defrosted.
Defrosting in this way speeds up the process and protects
the food from ies. Pieces of meat, sh and poultry should
be placed on a shelf, over a tray to catch any drips. Be sure to
wash the shelf and tray after defrosting.
Defrost with the oven door closed.
Large items, such as whole chickens and joints should not be
defrosted in this way. We recommend this be carried out in a
refrigerator.
11
 Loading...