

Page 1

Ice Maker
Installation
Operation &
Maintenance
Instructions
Page 2

2
Inspection
Remove Packaging
Your Ice Maker has been packed for shipment with all
parts that could be damaged by movement securely fastened. Before using, be sure all packing materials and
tape have been removed.
Important
Keep your carton packaging until your ice maker has
been thoroughly inspected and found to be in good condition. If there is damage, the packaging will be needed
as proof of damage in transit.
How to Install Your Ice Maker
Select Location: The proper location will ensure peak
performance of your appliance. Choose a location
where the unit will be out of direct sunlight and away
from heat sources. Best performance will be maintained when installed within the following parameters:
Cabinet Clearance: Ventilation is required from the
bottom front section of the unit. Keep this area open
and clear of any obstructions.
The adjacent cabinets and counter top can be build
around the unit as long as no top trim or counter top
is installed lower than the top of the hinge.
Electrical Connection
WARNING - THIS APPLIANCE MUST BE EARTHED. All external wiring must comply with the IEE
Regulations for the Electrical Equipment of Buildings.
Connections to the electrical supply can be made
with either a plug and socket or be permanently
wired via a double-pole switch.
The appliance is supplied with a 250V PVC(85°C)
core cable (0.5mm²x2.5 metres long). Any replacement cable fitted must follow this specification. The
unit may be supplied with either a moulded or
rewirable plug. Should the plug not fit the socket at
the installation site it should be removed and
replaced with the correct type of plug.
Moulded Plugs: If a moulded plug is fitted which is
not suitable, it must be removed and disposed of. To
avoid the risk of electrocution, a plug must not be left
where a child may plug it into a supply socket. It must
not be used for any other appliance. Athree pin plug
to BS 1363 with a capacity of not less than 13A must
be used and fitted with a 13Afuse ‘ASTA’approved to
BS 1363.
Ideal Ambient T emperature Range
Built-in 12° – 27°C
Free-Standing 12° – 32°C
Page 3
If you replace the fuse, the cover must be refitted. If the
cover is lost, the plug must not be used until a replacement has been obtained from your supplier . The colour
of the fuse cover is that of the insert in the base of the
fuse recess or elsewhere on the plug. Always st ate this
colour when ordering a replacement cover.
If your appliance has a moulded plug, you do
NOT have to do the following assembly as shown
in Figure 1. Appliances with moulded plugs are
ready to use as is.
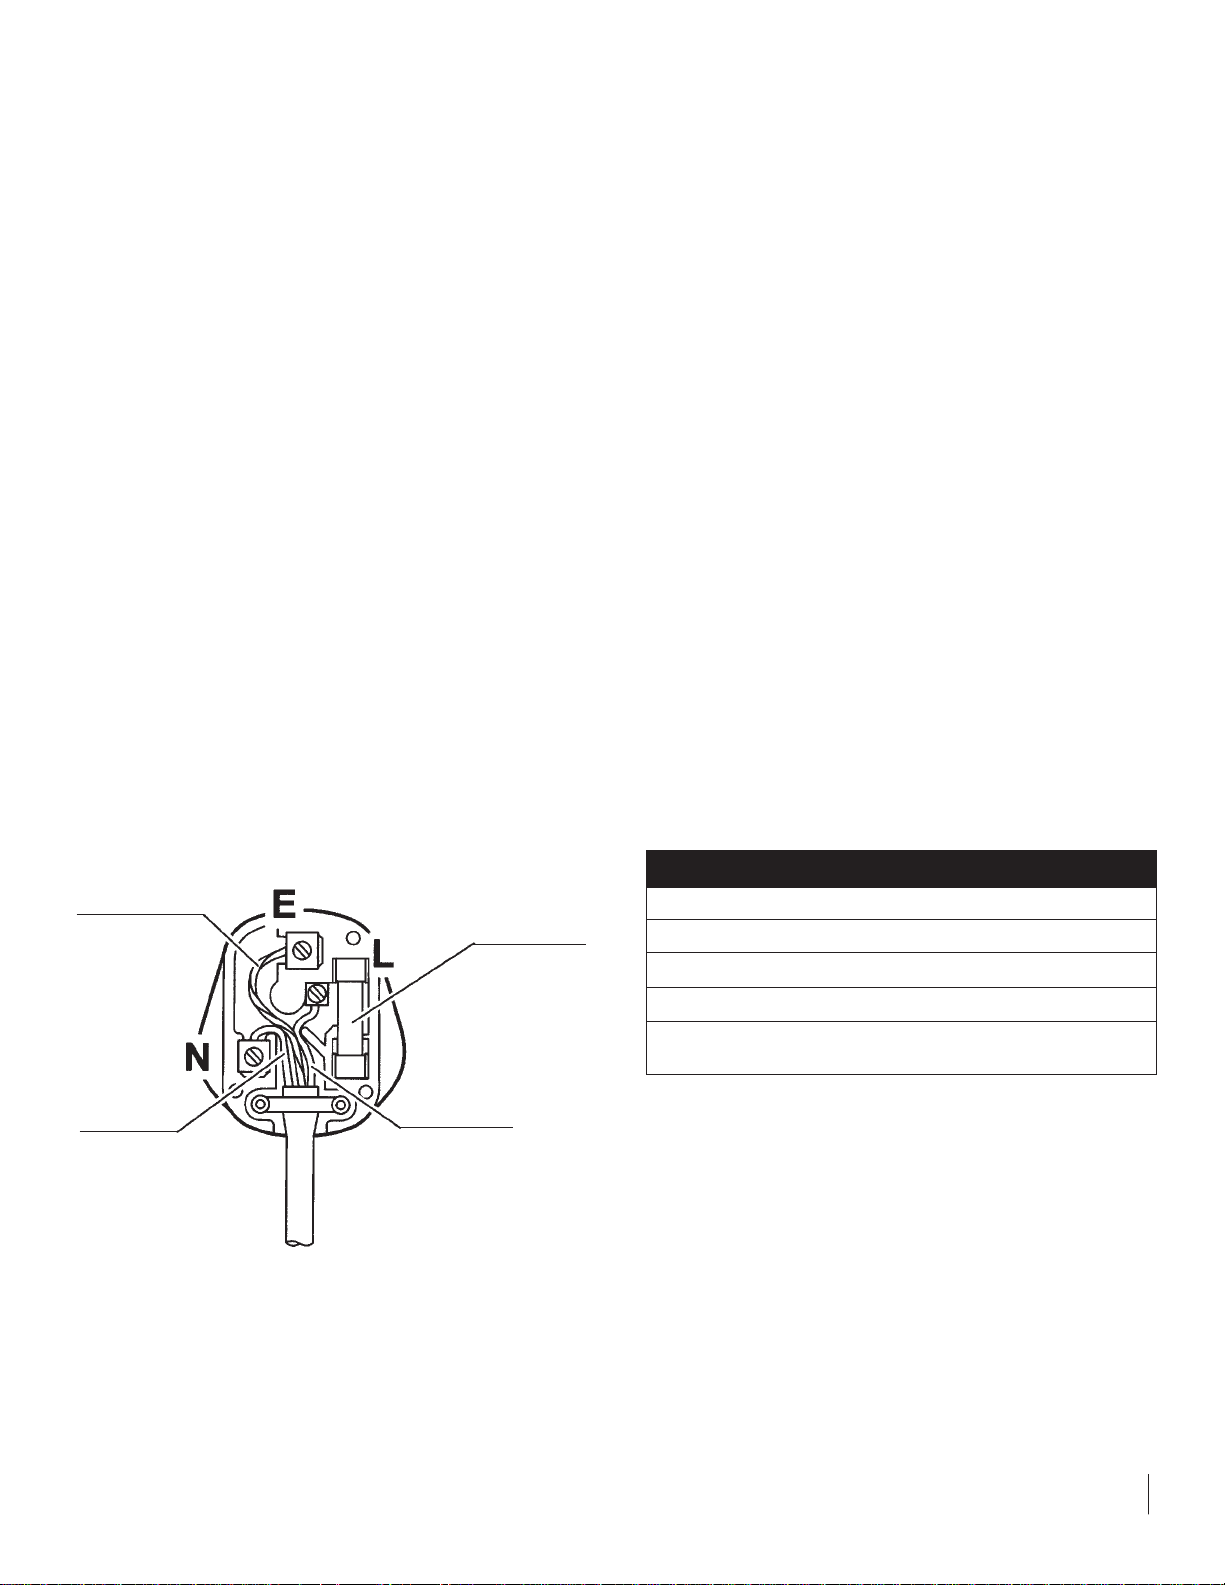
Important: The wires should be connected to the ter-
minals of the plug as follows:
Earth to the terminal marked E or
coloured Green or Green/Yellow.
Neutral to the terminal marked N or
coloured Black or Brown
Live to the terminal marked L, or coloured
Red or Brown
When wiring the plug, ensure that all strands of wire
are retained in each terminal. The flexible mains
cable, plug and socket must not be exposed to flue
products or be allowed to come in contact with a hot
surface. The cable must not be trapped or pulled taut
when the appliance is pushed into position.
Energy Saving Tips
Reduce door openings.
Close the door as soon as you can.
Keep the coils on the bottom of the ice maker clean.
Keep your ice maker away from the stove or other
heat sources.
Things To Remember
Allow 24 hours for your ice maker to reach a new
temperature setting.
The motor will start and stop often. It must do this to
maintain the temperature you select.
Keep your ice maker reasonably level.
Unplug the ice maker before working on anything
with the electrical system.
3
Under Counter Ice Maker Specifications
Dimensions W x H x D (mm) 375 x 864 x 559
Weight 37 kg
Ice Storage Capacity 5.4 kg
Ice Production Capacity 5.0 kg/day
Power Supply 230V
supplied with a 13 amp plug
Green/Yellow
(earth)
Blue
(neutral)
Fuse (13A)
Brown
(live)
Plug in the mains cable and switch on the electricity supply.
Figure 1
Page 4
4
How to Operate Your Ice Maker
•Make sure water is turned on.
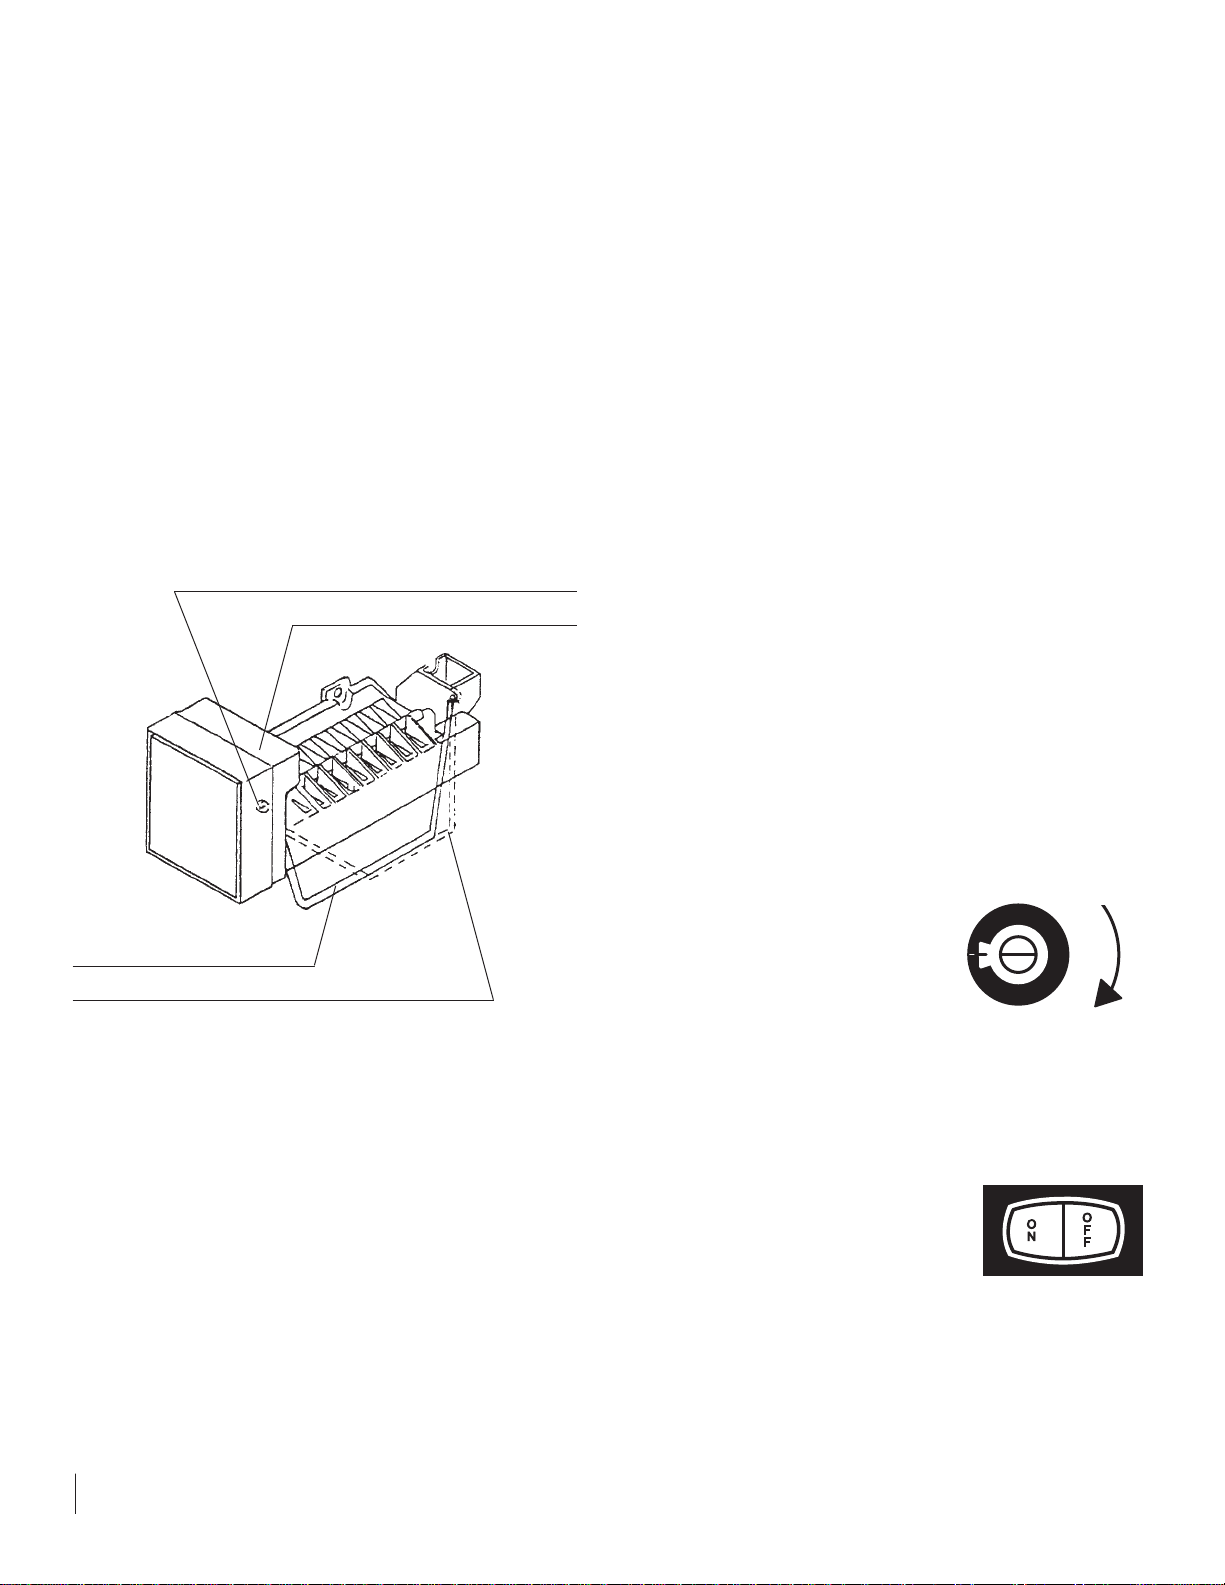
Note: Due to differing water pressures the ice maker
water input may require adjustment. For this purpose
an adjustment screw is on the right side of the ice
maker behind the white front ice maker cover. Care
will be needed to make this adjustment. Read the following paragraph carefully.
To remove the cover simply pull it forward. Turn the
screw clockwise to increase fill or counterclockwise to
decrease fill. Only one revolution is to be made.
Further adjustment could damage the control module
of the ice maker.
•Check to be sure the shut-off arm is down to its lowest
position to allow the ice making unit to produce ice.
•When the air temperature is cooled sufficiently
(approximately -12.2° C), the ice maker thermostat
will start operation automatically.
•When the storage bin is filled with ice pieces, the shutoff arm will automatically stop ice production.
•You may manually stop the ice maker by raising the
shut-off arm to lock in the uppermost position.
•The first few batches of ice pieces may be discoloured
or have an off flavour because of new plumbing.
Throw away these first ice pieces.
•When operation of the appliance is to be discontinued
for any length of time, the ice cube cavity in the ice
making device should be emptied and dried. The ice
bucket should be emptied and dried also.
•If the ice is not used regularly, it will clump together
with time. For best ice results discard ice in the bin on
monthly basis and allow the ice maker to make a new
batch of ice.
Care of the Unit
Exercise caution when sweeping, vacuuming, or mopping near the front of the unit. Damage to the grille
and/or rocker switch can occur.
For all cleaning of the ice maker, mix 2 tablespoons baking soda with 1 quart of warm water or use mild soap.
Do not use strong cleaners or scouring powder pads.
Door Gasket: The vinyl gasket may be cleaned with
mild soap and water or the above baking soda solution.
Temperature Control: The ice maker comes from
the factory with a pre-set control. When you first use your
unit allow it to run for 24
hours for the interior temperature to stabilize. If you wish to
adjust the interior temperature use a small blade screwdriver pushed through the
right hand side of the grille to
turn the temperature control
shaft. Turning it clockwise will make the unit cooler.
Turning it counterclockwise until it stops will make it
warmer. Turning it counterclockwise until it stops will
shut off the compressor and fan motor. Caution: Should
you turn off the control, allow at least five minutes
before restarting in order to give the motor control time
to automatically reset so that it
can restart the motor. Electrical
power to your unit is controlled
by the “ON/OFF” rocker switch
located in the front grille.
Arm Down, Ice Maker Will Operate
Arm Up, Until it Clicks and Locks in Place, Stops Operation
Water Adjustment Screw Behind Cover on Side of Housing
Cover (Pulls Off)
rocker switch
Temperature Control located
behind right side of air intake
exhaust grille.
c
o
l
d
e
r
Page 5

Cleaning of the Condenser: The condenser behind the
air grille should be cleaned periodically or more frequently if severe dust conditions prevail. This will insure
peak ice maker performance.
To reach the condenser, remove the grille at bottom of
unit by removing the screw at each end of the grille and
pulling the grille gently down without damaging or
removing the wires to the rocker switch.
Use a long handled paint brush to loosen dust and lint
from the condenser fins. Use of a thin nozzle vacuum
cleaner is also recommended.
To Defrost the Ice Maker
1. Push the rocker switch located on the grille to the
“OFF” position.
2. Remove the ice bucket and place a towel in the
lower front area of the ice maker to absorb the
defrost water.
3. After defrosting is completed replace the ice bucket and press the rocker switch to the “ON” position.
Warning: Do not use an ice pick, knife or any type of
sharp object to remove the ice. Doing so could puncture
the unit’s refrigerant system and damage it beyond
repair. You may speed up defrosting by filling the ice
bucket with hot water and placing it back in position.
Help Prevent Tragedies.
Each year children die because they climb inside a
discarded refrigeration product, get trapped inside
and suffocate. Take precautions to prevent such
tragedies by removing the door, taping or chaining it
shut before discarding.
Disposal
When you dispose of this product, do so in a way sympathetic to the environment. For further information contact your local authority.
5
Page 6

Before Calling for Service
Check plug and fuse. Test outlet with lamp. Be sure
rocker switch is on. Read installation, operation, &
maintenance instructions. Your questions may be
answered. If not, find your model number on the lower
section inside the door. Refer your number and problem
to the Service Department.
What To Do
If You Need Service
Before calling for service, check the trouble shooting
table. This table lists possible problems that you can remedy without difficulty to avoid an unnecessary service call.
If you do need service, contact your dealer or the manufacturer. In any correspondence, refer to the model number and serial number of your unit which is located on the
lower inside of the door. Retain your proof of purchase.
You may want to record these numbers in the space provided. Follow the procedure outlined on page 7.
Rangemaster Customer Care
Help With Problems
If you have difficulty , or a problem with your appliance,
this leaflet will help you to resolve the matter.
Please complete the appliance details below and keep
them safe for future reference - this information will
enable us to accurately identify your particular appliance
and help us to help you. Filling this in now will save you
time and inconvenience if you later have a problem with
your appliance. It may also be of benefit to keep your
purchase receipt with this leaflet. You may be required
to produce the receipt to validate a warranty field visit.
Date of Purchase
Dealer’s Name
Dealer’s Address
Dealer’s City
Dealer’s County Postcode
Appliance Serial No.
Model No.
6
Problem
Not enough cubes, but solid
Ice cubes are uneven
(Tapered)
Ice maker won’t make ice
Ice cubes are translucent
Too much water coming in
and spilling over.
Possible
Causes/Solutions
• Fan motor not running.
• Condenser coil behind
grille needs cleaning.
• Room too hot.
• Unit not level.
• Water supply shut off.
• Power switch in “OFF”
position.
• No current at the wall
outlet.
• Ejector blades are frozen.
Defrost the unit.
• Normal. Air trapped in the
water due to fast freezing.
• Water valve switch needs
adjustment. Remove Ice
Maker control cover and
adjust screw.
Page 7

7
Guarantee
Free 1st Year Parts & Labour Guarantee
Covers goods for the period of 12 months from the date of
purchase subject to the below exclusions.
Terms and Conditions
The appliance-
• Has been correctly installed in accordance with current legislation, relevant British Standards and Codes of Practice by a
competent person.
• Has been used solely in a domestic environment and for
domestic purposes. Guarantee only apply to normal
domestic use.
• Is in use in the UK/Channel Islands and has not been taken
abroad as a personal export. This offer is not available in the
Republic of Ireland.
• Has not been repaired by unauthorised persons, i.e. other
than organisations authorised to act on behalf of
Rangemaster Consumer Services.
• Offer only applied to new appliances, second hand appliances or reconditioned products are excluded.
•Has not been subject to misuse, accidental damage
or modification.
• This guarantee is not transferable.
• The guarantee covers any mechanical breakdown and cosmetic deterioration associated with a manufacturing defect.
• Proof and date of purchase will need to be established to
receive a service visit.
Exceptions: Items that are not included under the guarantee
include ice buckets and other consumable accessories. Any
damage caused other than through normal use. Cosmetic
deterioration deemed to be normal wear and tear.
Costs will be incurred if a service call is arranged and no fault
is found.
This warranty is in addition to your Statutory Rights.
If You Have a Problem
In the unlikely event that you have a problem with your appliance, please refer to your users documentation first to check
that you are using the appliance correctly.
If you are still having difficult, you can ring our Consumer
Services Centre on the number below, where on of our
coordinators will be pleased to advise you.
Rangemaster Consumer Services on 0870 789 5707
If you experience a technical failure, and require an engineer
to call please contact our service provider directly, on the
number below, to make an appointment. Please have your
appliances serial number on hand when you ring.
Service Provider on 0870 789 5707
Please Note
If you request an engineer to visit and the fault is not the
responsibility of Rangemaster, our service provider
reserves the right to make a charge.
Appointments not kept by you may be subject to a charge.
Please phone on 0870 789 5707
Out of Warranty
We recommend that Rangemaster appliances are serviced
regularly throughout their life to maintain the best
performance and efficiency.
Service work should only be carried out by technically
competent and suitably qualified personnel. For your own
safety, always ensure that work is carried out by an
approved electrician.
Electricians can be found listed in the Yellow Pages.
Spare Parts
To maintain optimum and safe performance, we
recommend that only genuine Rangemaster spare parts
are used.
These are available from your Rangemaster retailer and
from:
Cowley Components Ltd
Masons Road Telephone: 01789 269667
Stratford upon Avon Fax: 01789 415623
Warwickshire
CV37 9NR
Page 8

41008457 Rev. “A”
 Loading...