

Page 1

RMB45CFBL/SS
ECL45CFBL/BL
User Guide
&
Installation & Service Instructions
U110868 - 02
Page 2

Contents
1. Before You Start... 1
Before First Use 1
Personal Safety 1
Before the installation 1
Electrical Safety 2
Installation and Maintenance 2
Provision for Ventilation 2
Location of the appliance 2
Cleaning 2
2. Overview 3
Using the appliance for the rst time 4
Setting water hardness 7
Setting the clock for the rst time 8
Changing the time 8
3. Changing and Setting
the Parameters 16
5. Troubleshooting 31
6. Installation 33
Installation warnings 33
Provision for Ventilation 33
Before the installation 33
Location of the appliance 33
Installation 34
Automatic cup tray light 34
Electrical Connection 36
7. Circuit Diagram 39
8. Technical Data 40
9. Warranty/After Sales Service 41
Changing the units (not in menu list) 16
Setting auto-start time 17
Setting auto-o time 19
Reset 20
Number of use 21
Language 22
Emptying 23
4. Cleaning and Maintenance 24
Essential Information 24
Cleaning 24
Control Panel 24
Cleaning the drip tray 25
Cleaning the coee grounds container 25
Cleaning the infuser/clean brew 26
Manual operation of cleaning the infuser/
clean brew 27
Cleaning the water tank 28
Cleaning the spouts 28
Cleaning the pre-ground coee funnel 28
Cleaning the inside of the coee maker 28
Descaling 29
Page 3

1. Before You Start...
Thank you for buying a Rangemaster appliance. It should give
you many years trouble-free cooking if installed and operated
correctly. It is important that you read this section before you
start.
CAUTION: This appliance is designed and made
to prepare coee and hot drinks. All other use is
considered improper. This appliance is not suitable
for commercial use. The manufacturer is not liable
for damage deriving from improper use of the
appliance.
Before First Use
Before using the appliance for the rst time clean it
thoroughly. Switch o the unit at the isolator or mains supply.
Remove all packing materials and accessories. Use hot water
and mild detergent to wipe the appliance and then rinse
carefully with a damp cloth.
Personal Safety
Keep all packaging (plastic bags, polystyrene foam)
away from children.
Do not immerse this machine in water.
Accessible parts will become hot during use and will
retain heat even after use. Keep babies and children
away from the appliance.
When the appliance is not in use, ensure that the
appliance is OFF.
To minimise the possibility of burns, always be
certain that the controls are OFF position and that
the entire appliance is cool before attempting to
clean.
Use dry gloves (e.g. oven gloves) when applicable –
using damp gloves might result in steam burns when
you touch a hot surface. Never operate the appliance
with wet hands. DO NOT use a towel or other bulky
cloth in place of a glove – it might catch re if it
touches a hot surface.
Always keep combustible wall coverings or curtains,
etc., a safe distance away from your appliance, and
never wear loose-tting or hanging clothes while
using the appliance.
DO NOT store or use aerosols, or any other
potentially combustible or ammable materials, in
the vicinity of the appliance.
This appliance is heavy, so take care when moving it.
The appliance is not intended to be operated by
means of external timer or separated remote-control
system.
This appliance can be used by children aged from 8
years and above and persons with reduced physical,
sensory or mental capabilities or lack of experience
and knowledge if they have been given supervision
or instruction concerning use of the appliance in a
safe way and understand the hazards involved.
Children less than 8 years of age should be kept
away unless continuously supervised. Children
shall not play with the appliance. Cleaning and user
maintenance shall not be made by children without
supervision.
Do not place container of liquids, ammable or
corrosive materials on top of the appliance.
When preparing the coee machine for use, please
use the special side holders.
Do not rest large heavy objects on the appliance.
Never make drinks, hot water or steam when the
appliance is extracted. Always make sure the
appliance is inactive before extracting it. Failure to
observe this precaution could lead to damage to the
appliance. The only exception is adjusting the coee
mill which must be done with the machine out Refer
to “Adjusting the coee mill” on page 4”.
This appliance produces hot water and steam may
form while it is in operation. Avoid contact with
splashes of water or hot steam. Avoid touching hot
surfaces when the appliance is in use.
Only a qualied service engineer should service the
appliance and only approved spare parts should
be used. It is recommended that this appliance is
serviced annually.
Before the installation
Installation must be performed by a qualied
professional in compliance with legislation in force
in the country of installation.
The packing elements (plastic bags. polystyrene
foam, etc.) should be kept out of reach of children as
they are a Safety hazard.
You should set the water hardness as soon as
possible following the instructions in the “Setting
water hardness” on page 7.
After removing the packaging, make sure the product is
complete and undamaged and that all accessories are
present. DO NOT use the appliance if it is visibly damaged.
Contact Customer Services.
DO NOT use the appliance if the power cable or the plug
is damaged, if the appliance does not function correctly or
if it has been damaged or dropped. Put the appliance on a
at and stable surface. The appliance should not be installed
close to any heat source, radios or televisions.
During installation, make sure that the power cable does not
come into contact with any moisture or objects with sharp
edges and the back of the appliance. High temperatures can
damage the cable.
1
Page 4

Warning: After the appliance is installed you should
make sure you can access the electrical isolation
point.
Provision for Ventilation
The appliance housing used must provide adequate
ventilation.
Electrical Safety
The electrical installation must be installed in accordance
with all relevant British Standards/Codes of Practice, BS 7671.
Or with the relevant national and local regulations and with
the local gas and electricity supply companies’ requirements.
Otherwise, all installations must be in accordance with the
relevant instructions in this booklet.
Read the instructions before installing or using this appliance.
The appliance may be installed in a kitchen/kitchen diner but
NOT in a room containing a bath or shower.
This appliance MUST be earthed.
The appliance MUST NOT be tted with plug and connected
to a wall socket. Refer to “Electrical Connection” on page
36.
The appliance must be installed in accordance with the
regulations in force and only in a well ventilated space.
Failure to install the appliance correctly could invalidate any
warranty or liability claims and lead to prosecution.
DO NOT install the appliance on a loose platform. The
appliance is heavy and may tip if not adequately secured.
Refer to “Installation” on page 33.
DO NOT manouvre the appliance while it is connected into
the electricity supply.
If the appliance does not operate successfully, DO NOT
attempt to repair. Turn it o using the main switch (Refer to
the overview chapter) unplug from the mains socket and
contact customer services.
For built-in installation, a minimum ventilation space of 85 –
90mm 40mm must exist between the rear of the appliance
and the back of the housing or an adjacent wall.
If a tall housing is to be installed ush with the ceiling, a
20cm² ventilation cut-out must be provided at the top of the
housing.
Location of the appliance
Do not install the appliance in rooms where the
temperature may drop to 0°C or lower (the water in
the appliance could freeze and cause damage).
The appliance may be installed in a kitchen/kitchen diner but
NOT in a room containing a bath or shower.
This appliance is designed for domestic cooking only. Use for
any other purpose could invalidate any warranty or liability
claim.
Cleaning
In the interests of hygiene and safety, the appliance should
be kept clean at all times.
Clean only the parts listed in this guide.
Clean with caution. If a wet sponge or cloth is used to wipe
spills on a hot surface, be careful to avoid steam burns. Some
cleaners can produce noxious fumes if applied to a hot
surface.
If the plug or powder cable is damaged, it must be replaced
by the manufacturer, its service agent or similarly qualied
persons in order to avoid a hazard.
Installation and Maintenance
DO NOT install the appliance on a loose platform.
The appliance is heavy and may tip if not adequately
secured. Refer to “Installation” on page 33 before
proceeding installation of your appliance.
It is recommended that this appliance is serviced annually.
Only a qualied service engineer should service the
appliance, and only approved spare parts should be used.
Make sure that the appliance is wired in and switched on.
Always allow the appliance to cool and then switch it o at
the mains before cleaning or carrying out any maintenance
work, unless otherwise specied in this guide. Refer to
“Installation” on page 33 and “Electrical Connection”
on page 36 before proceeding installation of your
appliance.
2
Page 5
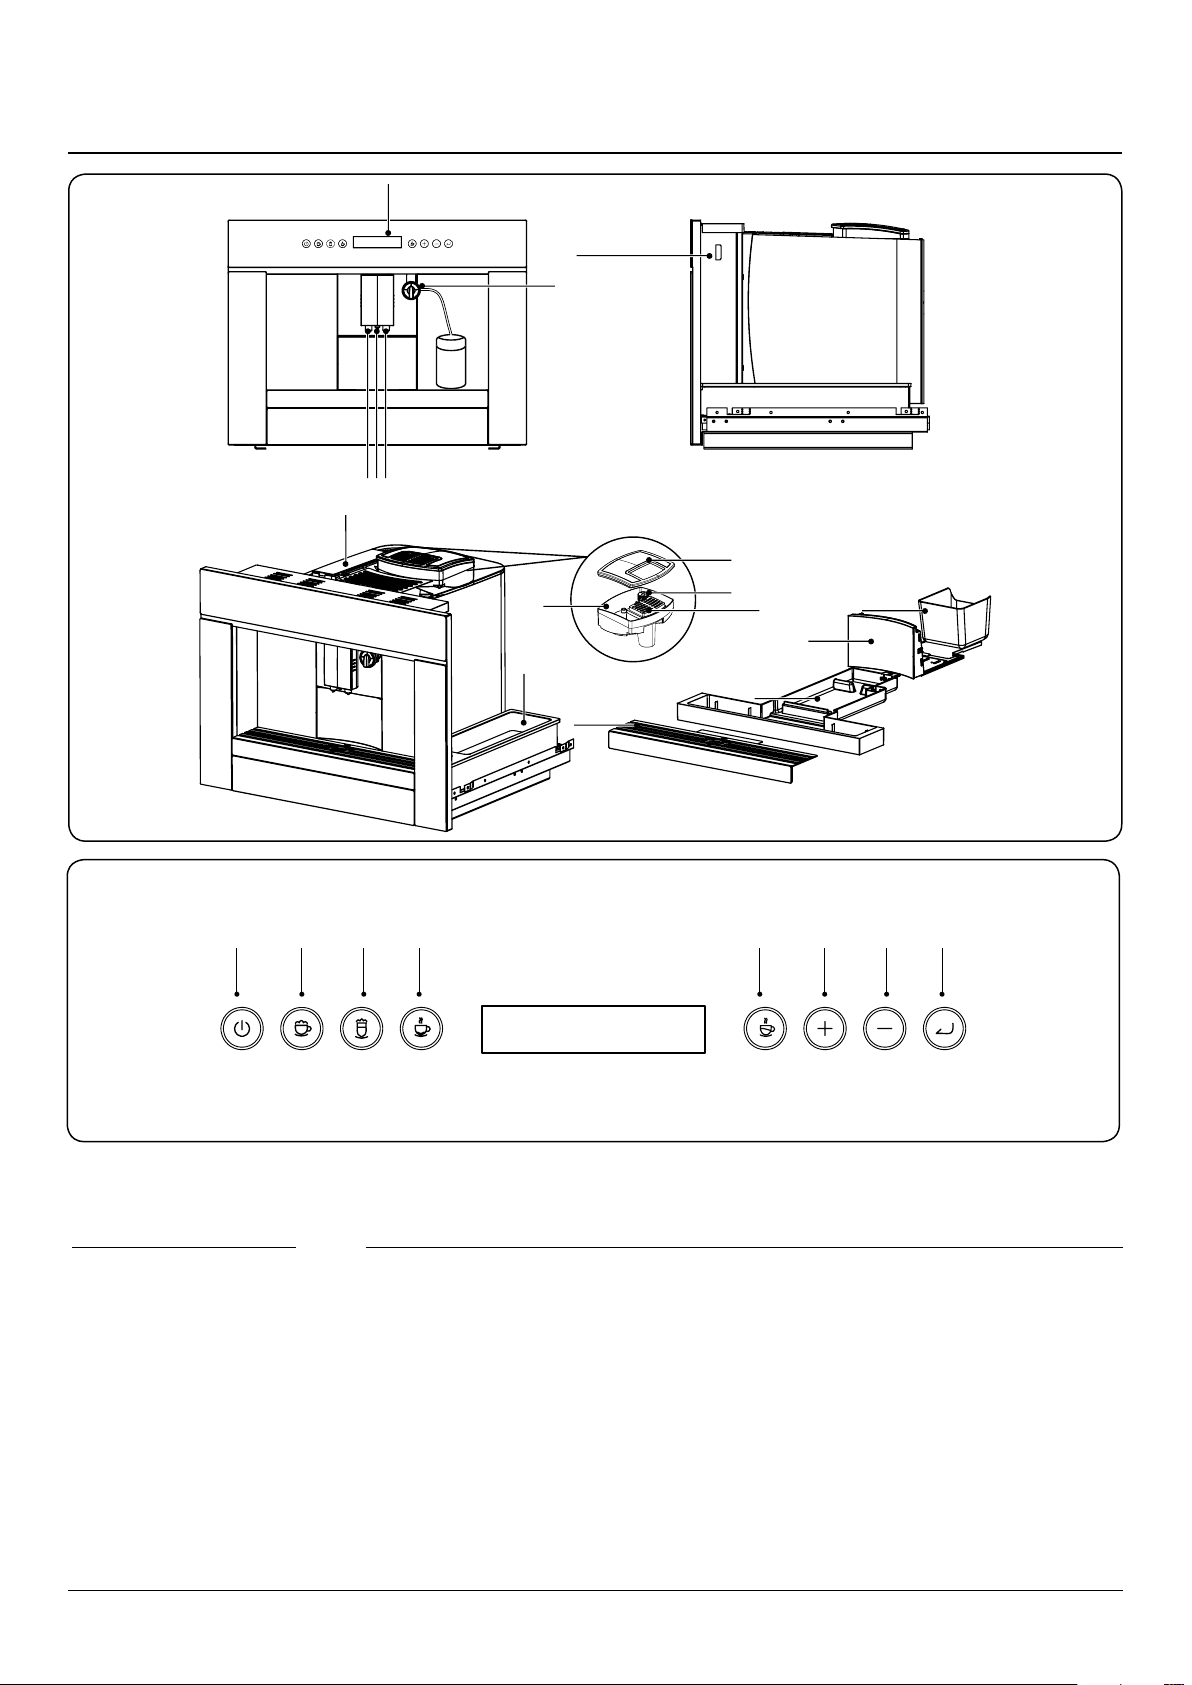
12
12.00
4 56 783
A
K
L
F
O
N
M
B
E
C
D D
J
I
H
G
milk jug
2. Overview
Fig. 2.1
Key: Fig. 2.1 Key: Fig. 2.1
A. Display screen
B. Milk / Cream knob
C. Cream nozzle
D. Coee nozzle
E. Main switch
F. Adjustable mill knob
G. Used coee grounds
container
H. Load tray
I. Drip tray
J. Metal drip tray
K. Tank
L. Coee bean container
M. Coee bean cover
N. Pre-ground coee
funnel
O. Storage for coee
bags
1. On / Standby
2. Cappuccino
3. Latte
4. Espresso
5. Coee
6. “+” button
7. “-” button
8. Pause / Enter
Fig. 2.2
3
Page 6
SELF CHECK
HEATING
RINSING
READY
Using the appliance for the first time
AGA Rangemaster Limited
Leamington Spa
Warwickshire
CV31 2AD
England
Serial No.
Model
Frequency
Voltage
Power
RMB45CFBL/SS
Step 1. Once correctly installed, turn on the main switch.
Step 2. Press the "On / Standby". The appliance will do a
self-check.
Important! To prevent malfunction, never introduce
pre-ground coee, freeze dried coee, caramelized
beans or anything else which could damage the
appliance.
Adjusting the coffee mill
NOTE: If the coee is delivered too slow or not at all, turn the
grinding adjustment knob (Fig. 2.3). Proceed one click at a
time until coee delivery is satisfactory.
NOTE: If the coee is delivered too fast and the cream is not
satisfactory, turn the grinding adjustment knob (Fig. 2.3). one
click anticlockwise (Fig. 2.3). Proceed one click at a time until
coee delivery is satisfactory.
The coee mill is preset in the factory to make coee
correctly and should not require adjusting initially.
However, if after making the rst few coees you nd that
delivery is either too fast or too slow, this can be corrected by
adjusting the grinding adjustment knob (Fig. 2.3).
Important! The grinding adjustment knob (Fig.
2.3) must only be turned when the coee mill is in
operation. For slower delivery and creamier coee,
turn one click anticlockwise (ner, pre-ground
coee). For faster delivery (not a drop at a time),
turn one click clockwise (coarser pre-ground coee).
Step 3.
Step 4. Wait for some time, this appliance will
automatically start “rinsing".
Step 5. When rinse program is nished, the appliance will
display“ready”.
Fig. 2.3
4
Page 7

Tips for a hotter coee
To make a small coee (less than 60 cc), rinse the cup with
hot water to preheat the cups. If you need to change the
temperature please refer to the "Change the temperature"
page 10.
• Unless preheated, do not use excessively thick cups as
they will absorb too much heat.
• Preheat the cups by rinsing them with hot water.
When the appliance displays “ll water", ll the tank with
water. It is normal for there to be a little water left in the tank
when the message is displayed.
Do not ll the water tank with hot or boiling water.
NOTE: Never extract the water tank while the
machine is delivering coee, if it is removed, it will
not be possible to make the coee and the appliance
will display “fill water”. If it is removed place the
water tank in its original position, the interrupted
program will continue to nish.
Note: The On / Standby button turns on your appliance from
standby. The appliance will automatically return to standby
mode after the coee is made.
5
Page 8
Coffee Machine Menus
Main Menu Purpose
Use powder This mode will force the appliance to make the coee from
the pre-ground coee container.
Hot milk Adjust milk capacity and settings.
Hot cream Adjust cream capacity and settings.
Menu Sub Menu
Brew clean
• Maintenance
• Temperature
• Auto on Sets auto on time
• Water hardness Sets water hardness
• Filter Yes / No
• Auto off Sets auto o time
• Reset Resets factory default
• Information
• Language
Descale
Empty Ready
Back
Normal
High
Back
Version
Number of uses
Back
English
Back
• Exit Exit to main sub menu
Aroma Adjust aroma settings.
Display Adjust display settings.
Exit Exit out of menu mode
Table 2.1
6
Page 9
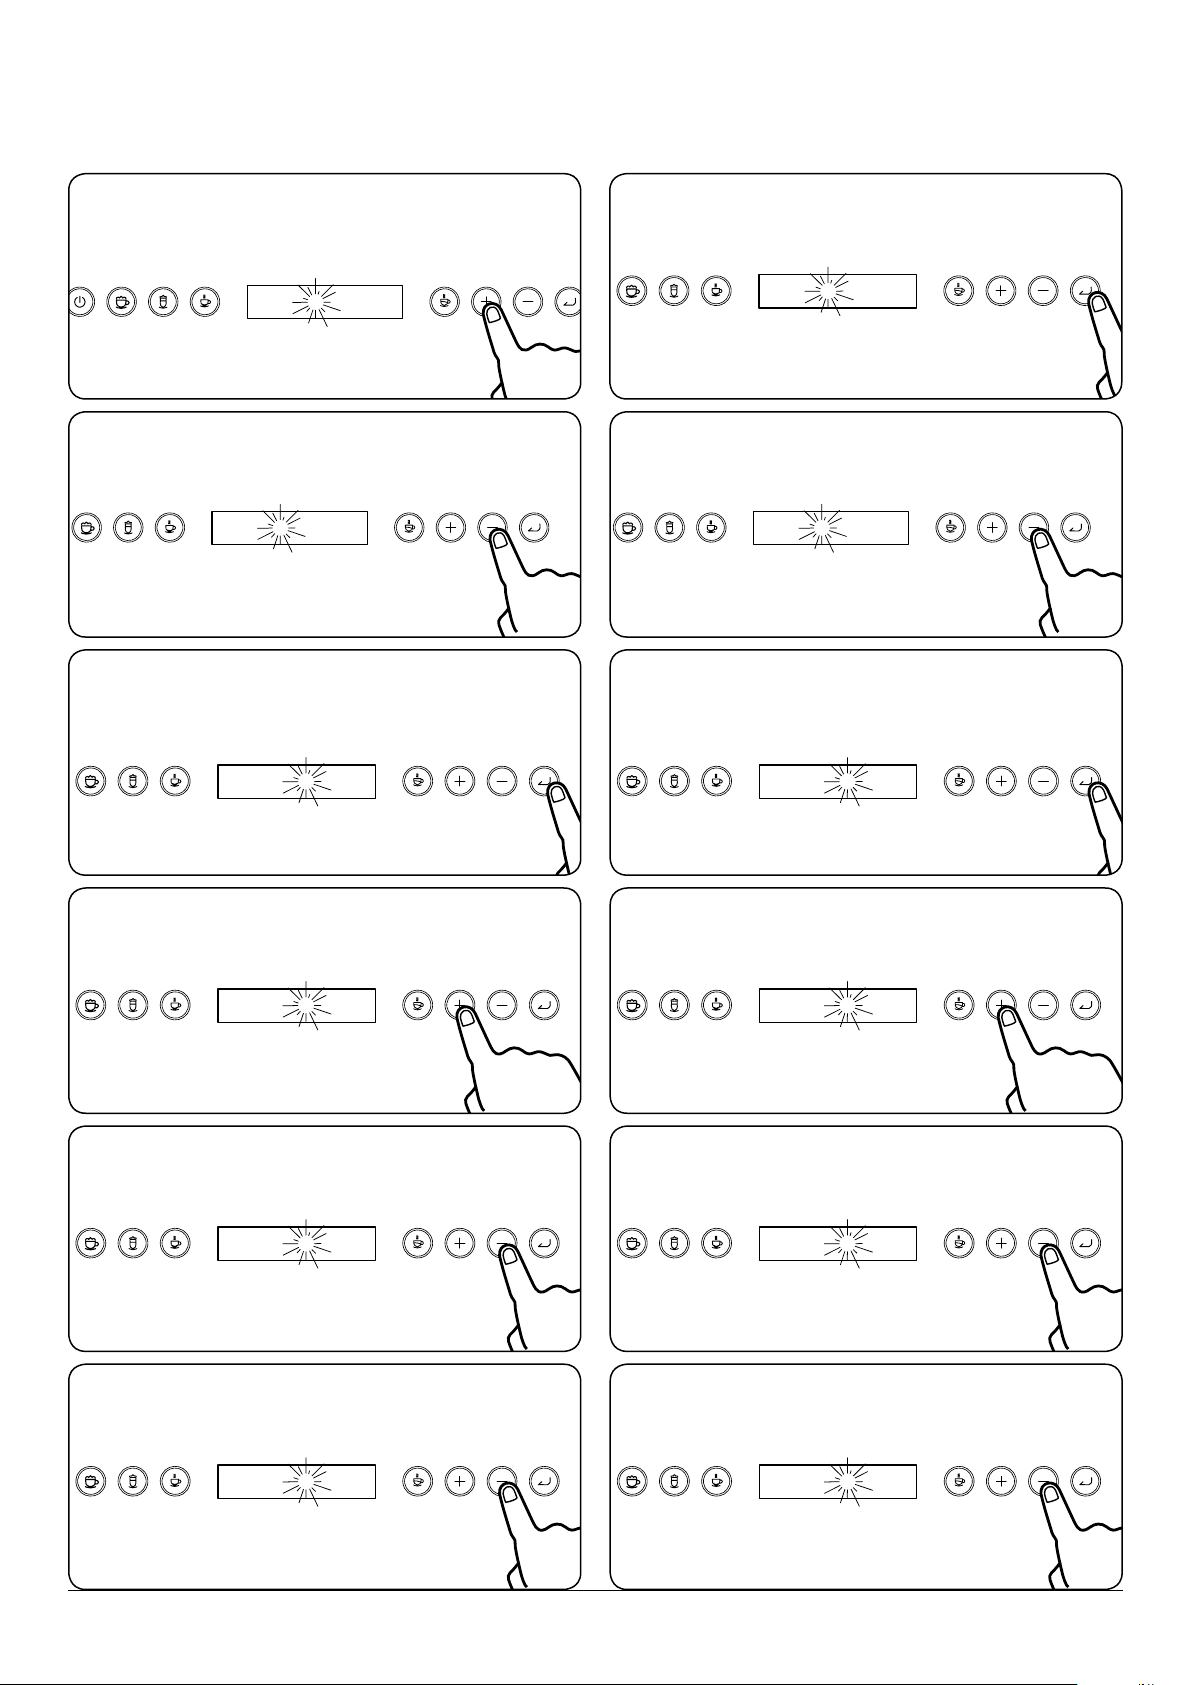
Setting water hardness
SELF CHECK
READY
WATER HARDNESS
WATER HARDNESS
LEVEL 4
LEVEL 4
The descale message is displayed after the appliance has
been operated for a set period of time, calculated on the
basis of the maximum quantity of lime scale which may be
contained in the water used.
The operating period can be extended if required, making
descaling less frequent by programming the appliance on the
basis of the real lime content in the water used.
Step 1. Press the "On / Standby" button. If the appliance has
not been used for awhile it will rinse.
Proprietary water hardness strips can be used to establish
water hardness of your water. Once you have established the
hardness. Proceed to set your appliance.
Level PPM CaCo
3
Hardness
1 Below 50 ppm Very soft
2 50 - 120 ppm Soft
3 120-240 ppm Medium hard
4 240 - 360 ppm Hard water
5 Above 360 ppm Very hard
Step 2. When the appliance displays "READY" press the
"Enter" button.
Step 3. Press the "+" button to scroll to "WATER HARDNESS".
Step 4. Press the "Enter" button.
Step 5. Press the "+" button to select water hardness level.
Step 6. Press the "Enter" button to conrm selection.
The appliance is now programmed to provide the
descale warning when necessary based on the actual
hardness of the water.
7
Page 10
15.00
08.00
08.00
08.00
08.00
08.35
08.30
08.30
08.15
08.15
08.15
08.15
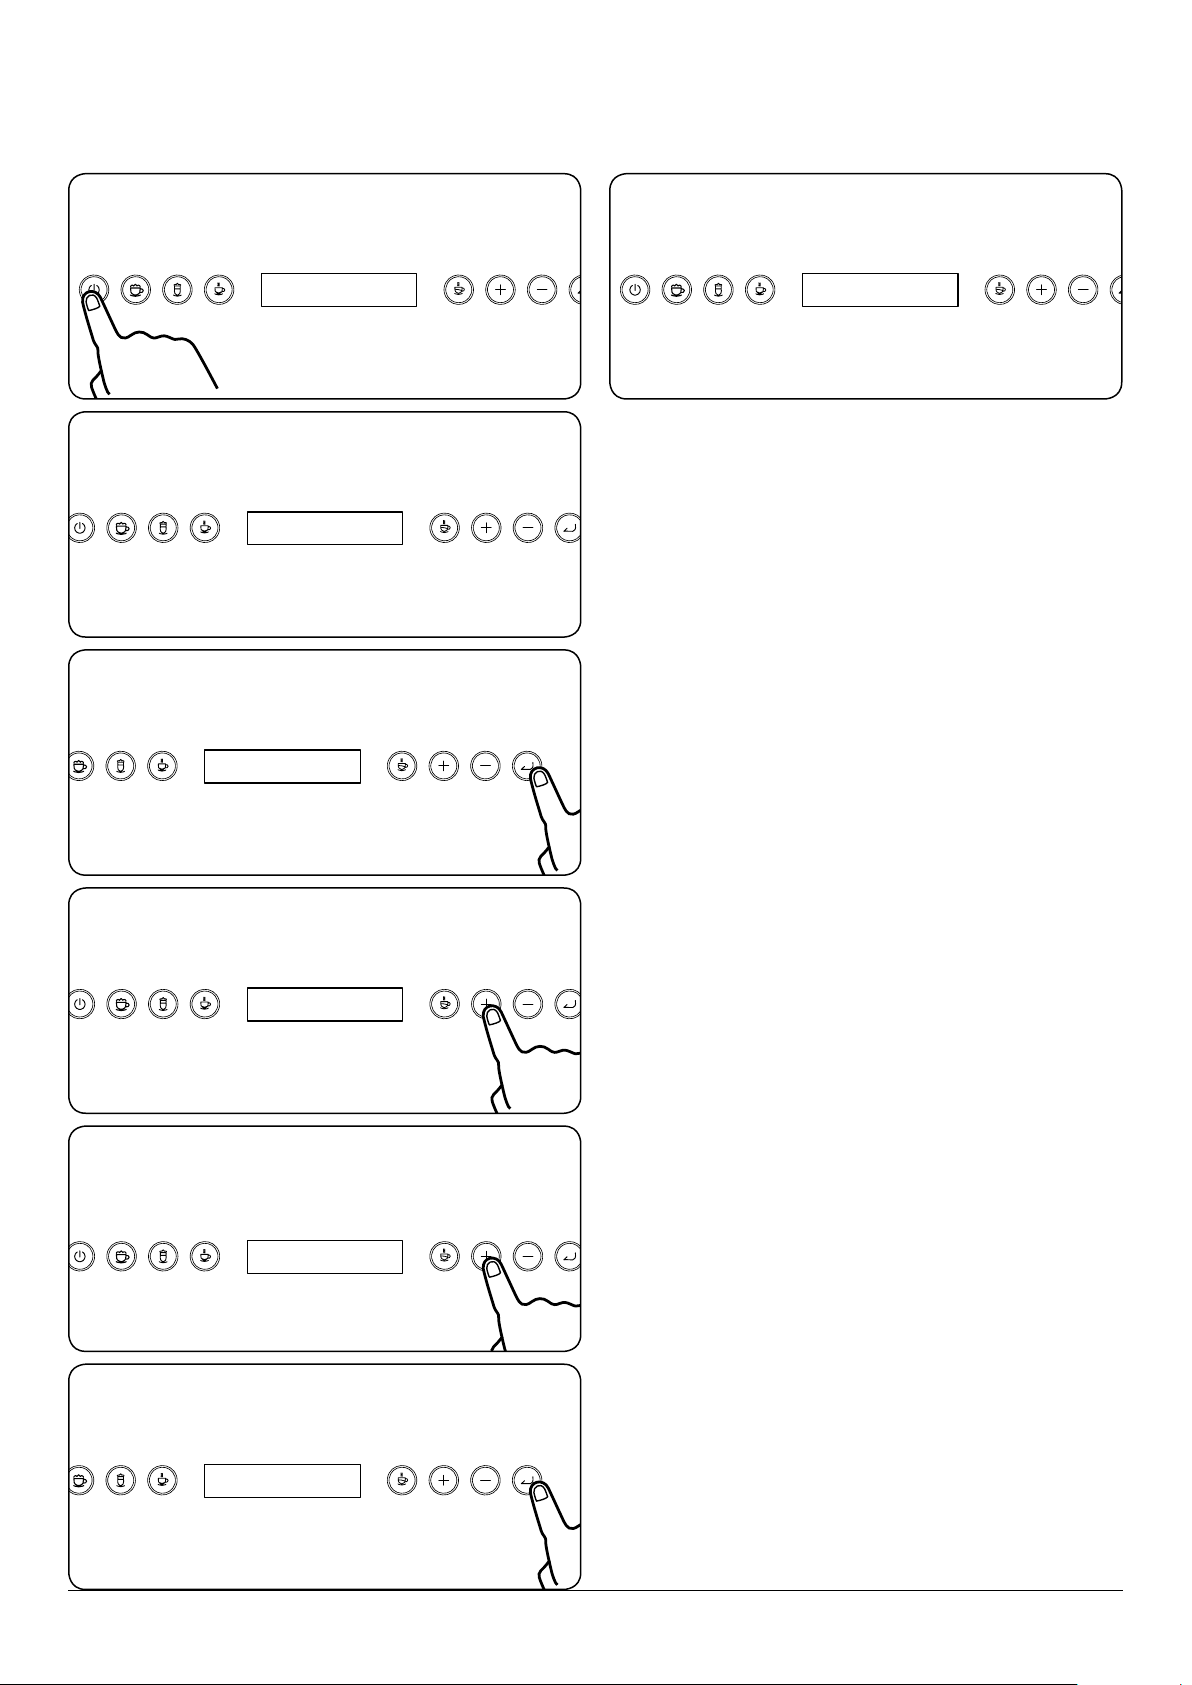
Setting the clock for the first time Changing the time
Once the appliance is connected and switched on, the
display will start to ash. The clock must be set to the time
of day.
Step 1. While the hour is ashing, press the +.
If the clock time needs to be reset or adjusted, please
follow the procedure below.
Step 1. Press "Enter" the hour will ash.
Step 2. Decrease the hour. Step 2. Decrease the hour.
Step 3. Press "Enter" to conrm and set the minutes. Step 3. Press "Enter" to conrm and set the minutes.
Step 4. Increase the minutes. Step 4. Increase the minutes.
Step 5. Decrease the minutes.
Step 5. Decrease the minutes.
No button needs to be pressed to conrm time. No button needs to be pressed to conrm time.
TIP. Press and hold "+" or "-" button to fast increase or
decrease hours / minutes.
TIP. Press and hold "+" or "-" button to fast increase or
decrease hours / minutes.
8
Page 11
READY
RINSING
SELF CHECK
READY
AROMA
Mild
AROMA
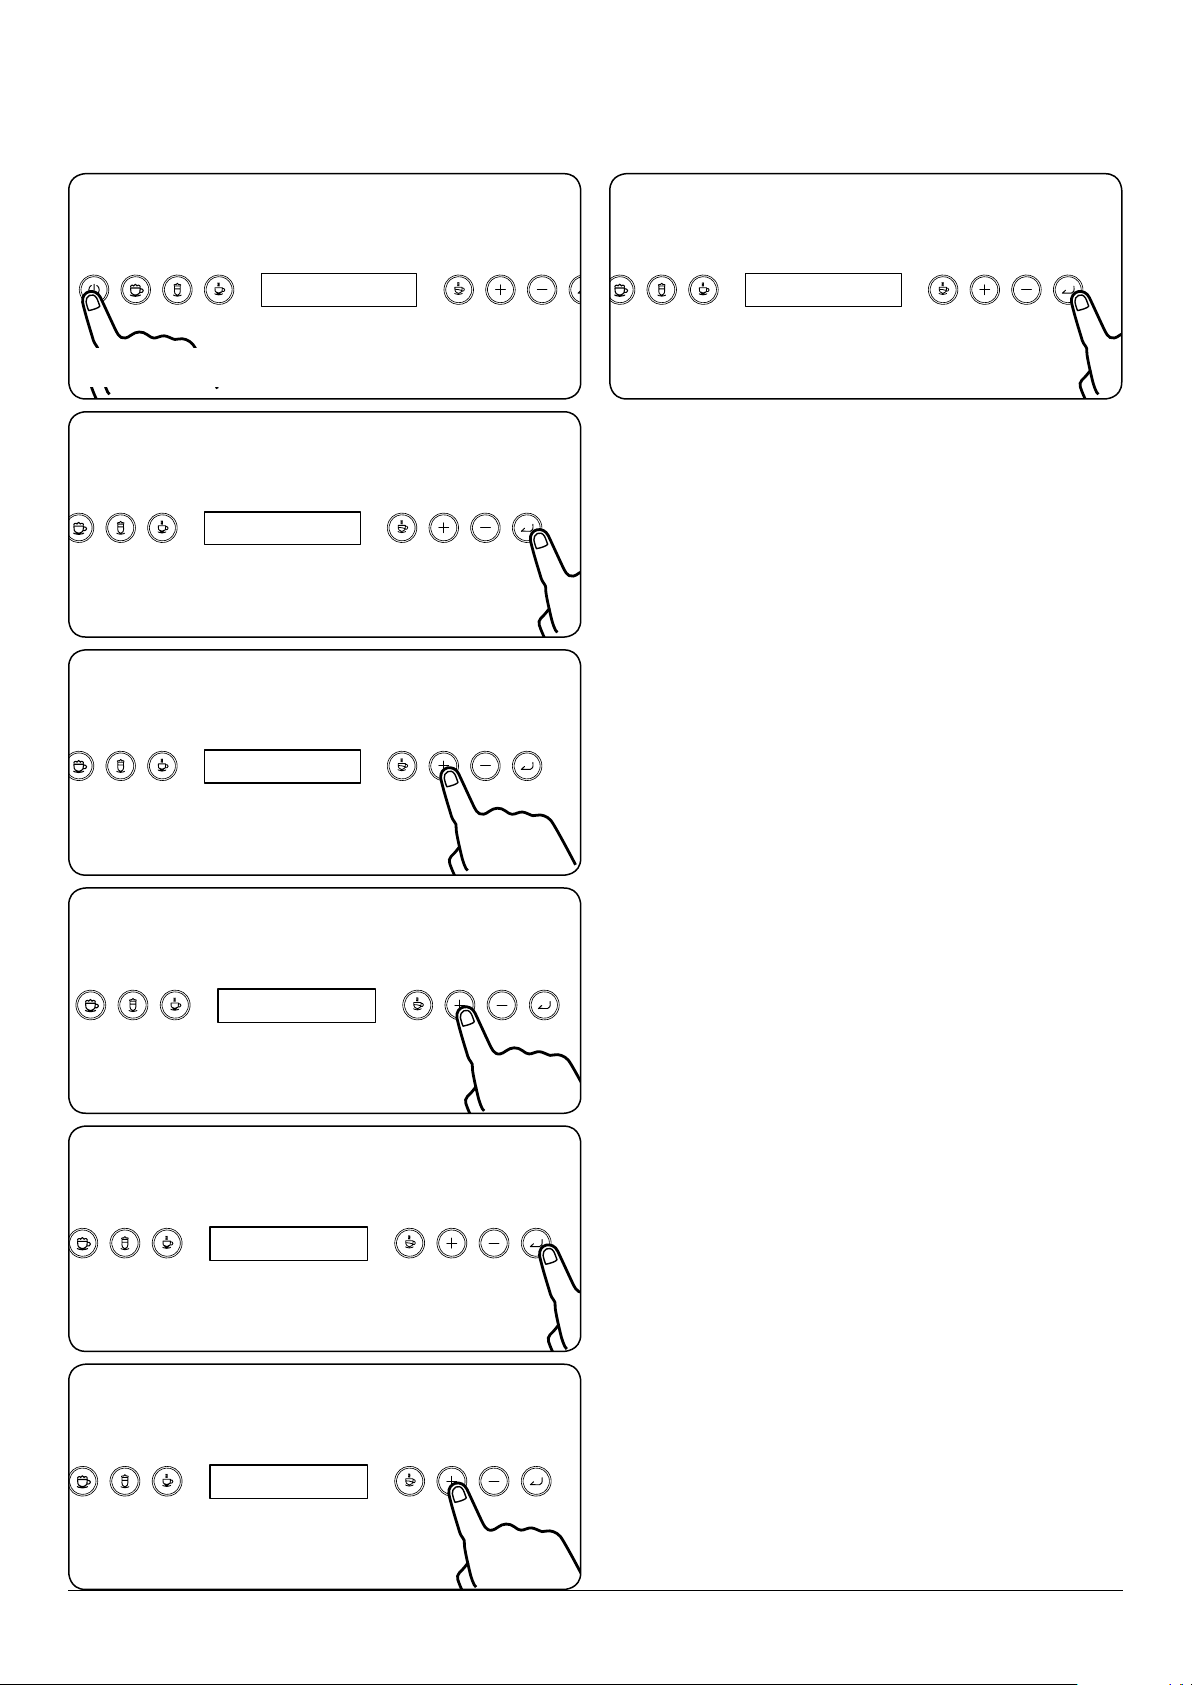
How to change the aroma with coffee beans?
Step 1. Press the "On / Standby" button. Step 7. Machine displays
Step 2. If the coee machine has not been used for awhile
it will rinse.
Step 3. When the machine displays "READY" press the "Enter"
button.
Step 4. Press the "+" button to scroll to "AROMA". Press the
"Enter" button.
Step 5. Use the "+" or "-" key to select "mild / normal /
strong".
Step 6. Press the "Enter" button to conrm selection.
9
Page 12
TEMPERATURE
TEMPERATURE
HIGH
Change the temperature
SELF CHECK
HIGH
READY
MENU
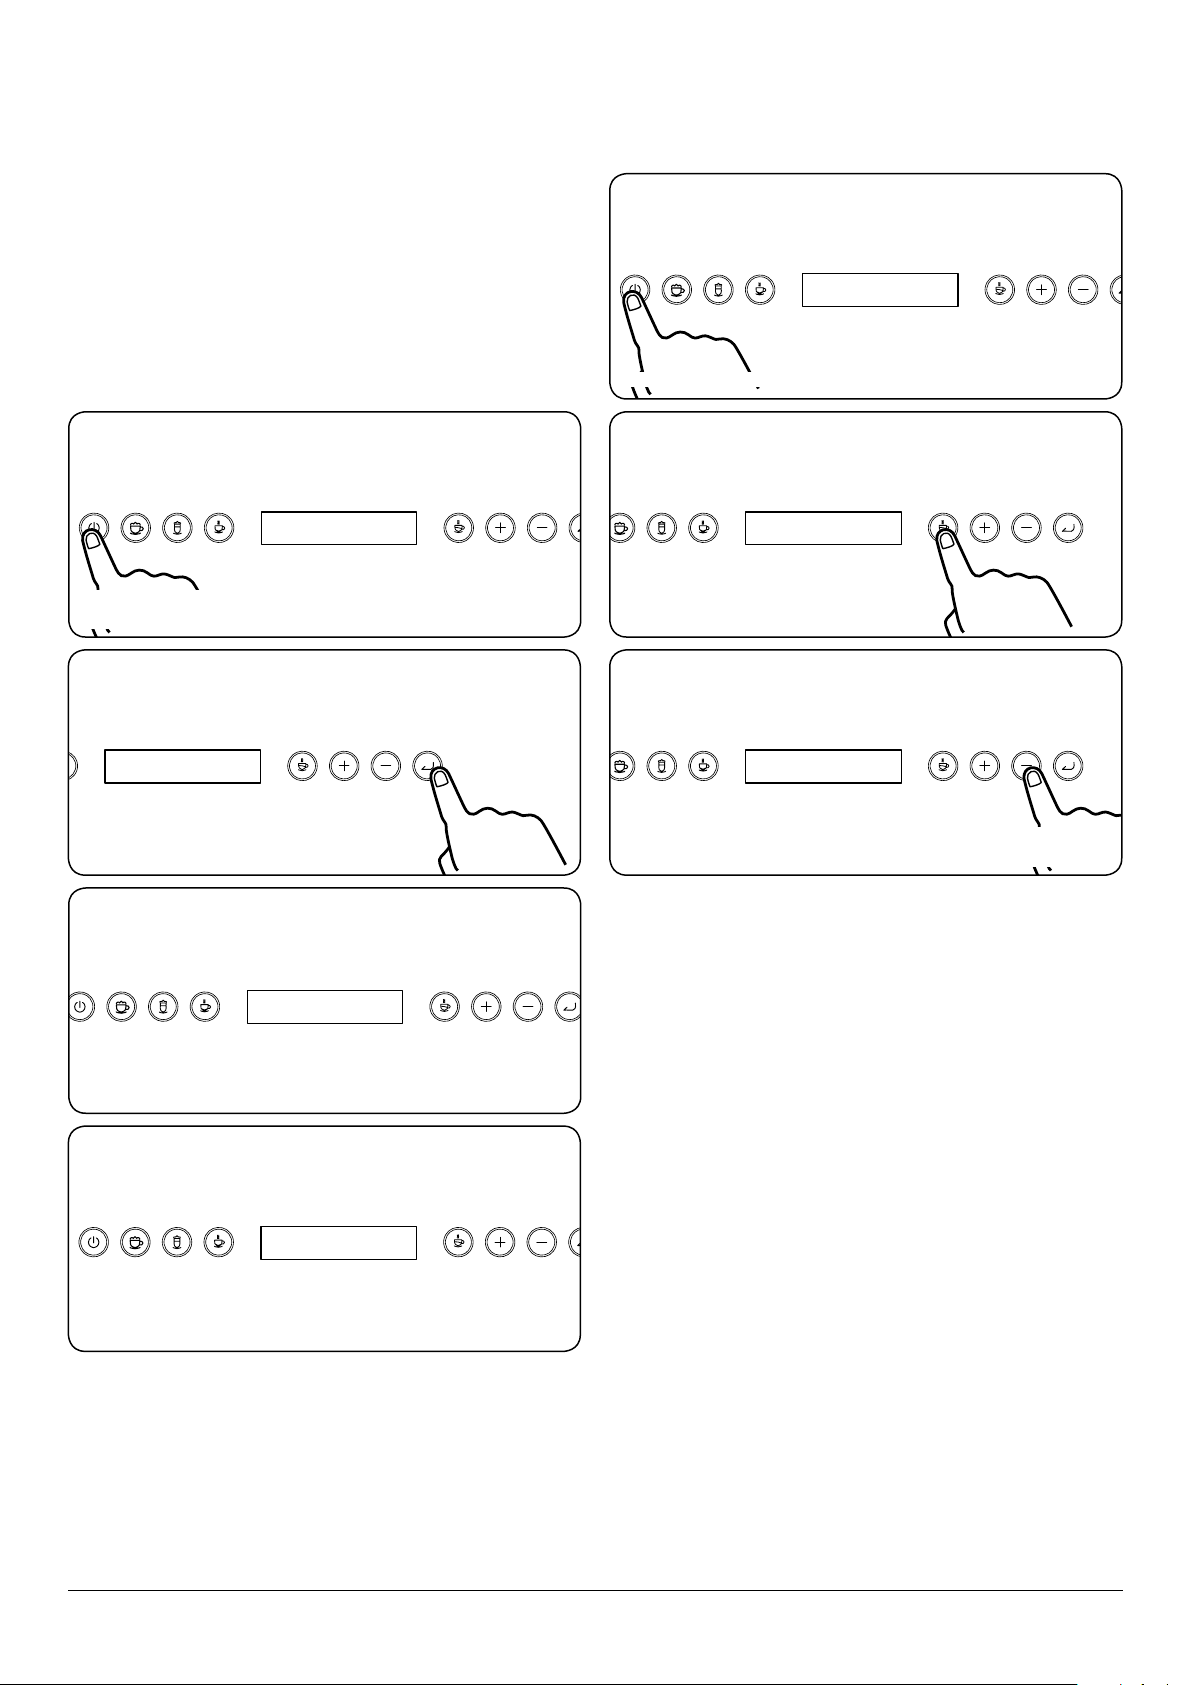
If you want to adjust the temperature of your drink. Please
follow the below steps:
Step 1. Press the "On / Standby" button. If the coee
machine has not been used for awhile it will rinse.
Step 2. When the machine displays "READY" press the "Enter"
button.
Step 3. Press the "+" button to scroll to "MENU". Press the
"Enter" button.
Step 7. Press "Enter" to conrm selection.
Step 4. Use the "+" key to select "TEMPERATURE".
Step 5. Press "ENTER"
Step 6. Press "+" and choose either "High" or "NORMAL"
10
Page 13
READY
Making coffee using coffee beansIf an extra rinse is required
READY
Press 2x
SELF CHECK
SELF CHECK
Coffee 200cc
Coffee 100cc
RINSING
If an extra rinse is required follow the process below. This will
force an extra rinse cycle.
NOTE: If the forced rinse cycle does not start, the coee
machine is too hot. Press "Pause" and "Enter" again to start
cooling down. When ready the machine will automatically
start the rinse cycle.
If the hot milk / hot cream, cappuccino, latte has been
completed the machine will automatically start rinse cycle.
To follow a rinse cycle:
Step 1. Press the "On / Standby" button. If the coee
machine has not been used for awhile it will rinse.
Step 2. When the appliance displays "READY" press the
"Enter" button twice.
Step 1. Press the "On / Standby" button. If the coee
machine has not been used for awhile it will rinse.
Adjust the aroma, temperature, before making a coee.
Step 2. Place a clean mug under the spout. When the
machine displays "READY" press the "Coee" button.
Step 3. While brewing the volume can be adjusted. You can
adjust the volume using the "+" or "-".
Step 3. Wait for some time, this appliance will
automatically start “rinsing".
Step 4. When nished it will be display:
Soon after the coee has stopped grinding the brewing will
commence. The coee machine will ll the mug.
11
Page 14
Making espresso with pre-ground coffee (instead of beans)
SELF CHECK
READY
USE POWDER
FILL POWDER
Step 1. Press the "On / Standby" button. If the appliance has
not been used for awhile it will rinse.
Step 2. Press the "Enter" when the display states "READY"
Step 3. The appliance will state “use powder"
Step 6. Open the coee powder cap. Use the measuring
cup provided. Add one level measure to the powder unit.
Step 7. Once complete, recover the coee powder cap and
push the appliance in.
Step 4. The appliance will state “FILL powder"
Step 5. Pull the appliance out.
Adjust the aroma, temperature, before making a coee.
You can also use coee powder to make cappuccino latte
coee.
NOTE: Never introduce pre-ground coee when the machine
is o or before pressing any button. Otherwise the preground coee will spread through the inside of the appliance.
NOTE: Never add more than 1 level measure, otherwise the
appliance will not make the coee and the pre-ground coee
will be dispersed inside the appliance, making it dicult to
clean or the coee will be delivered too slow.
NOTE: Use the measuring cup provided to add the right
amount of coee.
NOTE: Introduce only pre-grounded coee for espresso
coee machines into the funnel. Never ll with coee beans,
freeze dried coee or other substance that could damage the
appliance.
NOTE: lf more than one measure of pre-grounded coee is
used and the funnel clogs, refer to Cleaning the infuser/
clean brew.
12
Page 15
READY
milk
jug
Milk Froth Hot Milk
Making cappuccino using coffee beans
SELF CHECK
Coffee 200cc
Coffee 100cc
STEAM HEATING
HOT CREAM 30s
HOT CREAM 10s
PRESS RINSE
Step 1. Press the "On / Standby" button. If the coee
machine has not been used for awhile it will rinse.
Adjust the aroma, temperature, before making a coee.
Step 2. Set up the appliance as shown below.
Step 5. Once the brewing has ended, the appliance will
steam heat the milk.
Step 6. The appliance will dispense steam milk and will
display "HOT CREAM ##s". The milk will be added to the
cappuccino.
Step 7. While brewing the time can be adjusted. You can
adjust the time using the "+" or "-".
TIP. Hot milk froth is ideal for cappuccino.
Step 3. Place a clean mug under the spout. When the
machine displays "READY" press the "Cappuccino" button.
Step 4. While brewing the volume can be adjusted. You can
adjust the volume using the "+" or "-".
Soon after the coee has stopped grinding the
brewing will commence. The coee machine will
ll the mug.
Step 8. Each time a cappuccino is made the machine will
display "PRESS RINSE". Press the "Enter" button to complete
display rinse cycle.
The machine will clean the tube and revert back to "READY".
13
Page 16

READY
milk
jug
Milk Froth Hot Milk
Making latte using coffee beans
SELF CHECK
Coffee 200cc
Coffee 100cc
STEAM HEATING
HOT CREAM 30s
HOT CREAM 10s
PRESS RINSE
Step 1. Press the "On / Standby" button. If the coee
machine has not been used for awhile it will rinse.
Adjust the aroma, temperature, before making a coee.
Step 2. Set up the appliance as shown below.
Step 5. Once the brewing has ended, the appliance will
steam heat the milk.
Note: Latte will take longer to make then cappuccino.
Step 6. The appliance will dispense steam milk and
will display "HOT CREAM ##s". The milk will pour into your
cappuccino.
Step 7. While brewing the time can be adjusted. You can
adjust the time using the "+" or "-".
TIP. Hot milk is ideal for latte.
Adjust the aroma, temperature, before making a coee.
Step 3. Place a clean mug under the spout. When the
machine displays "READY" press the "Latte" button.
Step 4. While brewing the volume can be adjusted. You can
adjust the volume using the "+" or "-".
Soon after the coee has stopped grinding the brewing will
commence. The coee machine will ll the mug.
Step 8. Each time a cappuccino is made the machine will
display "PRESS RINSE". Press the "Enter" button to complete
display rinse cycle.
The machine will clean the tube and revert back to "READY".
14
Page 17

READY
milk jug
READY
milk
jug
Milk Froth Hot Milk
Making Hot milk or Milk froth
SELF CHECK
HOT MILK
HOT MILK
STEAM HEATING 10s
READY
PRESS RINSE
Step 1. Set up the appliance as shown below.
Step 2. Turn the knob to either the hot milk or milk froth.
Step 5. Press the "+" or "-" and select either the "Hot Milk" or
"Hot Cream".
Step 6. Press "Enter", “steam heating” will display.
Step 7. To adjust the cycle time. Press “+” or “-“ key, the cycle
time will increase or reduce by 1 second.
The machine will clean the tube and revert back to "READY".
Step 3. Press the "On / Standby" button. If the coee
machine has not been used for awhile it will rinse.
Step 4. Press the "Enter" when the display states "READY"
Step 8. Once complete the appliance will display "PRESS
RINSE" press the "Enter" button.
The machine will clean the tube and revert back to "READY".
15
Page 18

3. Changing and Setting the Parameters
SELF CHECK
READY
MENU
DISPLAY
CC/OZ
OZ
Step 1. You can modify the parameters and functions of
your appliance.
Step 2. When the appliance displays "READY" press the
"Enter" button.
Step 3. Use the "+" button to scroll to "MENU" press the
"Enter" button.
Changing the units (not in menu list)
Step 1. Follow the "Changing and setting the parameters"
steps. Scroll to "Display" using the "+" button and press
"Enter" button
Step 2. Press "Enter" again to selct "CC/OZ".
Step 3. Press "+" to choose a unit and press "Enter" to
conrm.
The time can also be set here.
16
Page 19

SELF CHECK
READY
MENU
MENU
AUTO ON
AUTO ON
Setting auto-start time
15.00
08.00
08.00
08.30
This function mean the machine will come on automatically
to be ready for use.
Before use please ensure:
• The correct time has been set.
• The drip tray is empty if auto-start time is set.
• The water tank is full.
• The coffee machine is ready with beans or pre-ground
coffee.
Step 1. Press the "standby" button. If the appliance has not
been used for awhile it will rinse.
Step 5. Press the "+" button to scroll to "AUTO ON".
Step 6. Press the "Enter" button
Step 7. While the hour is ashing, press the "+" button.
Step 2. When the appliance displays "READY" press the
"Enter" button.
Step 3. Press the "+" button to scroll to "MENU".
Step 4. Press the "Enter" button.
Step 8. Decrease the hour.
Step 9. Press "Enter" to conrm the hour and to set the
minutes.
Step 10. Increase the minutes.
17
Page 20

08.15
08.15
Step 11. Decrease the minutes.
Step 12. Press “enter” key which conrms the "AUTO ON".
NOTE: Do not switch o from the main switch,
otherwise it will reset.
18
Page 21

Setting auto-off time
SELF CHECK
READY
AUTO OFF
AUTO OFF
60 mins
60 mins
After setting the time you have the option to automatically
turn o the appliance. Make sure the correct time has been
set.
Danger of burns! During rinsing, a little hot water
ows from the coee spouts avoid contact with
splashes of hot water.
NOTE: If the appliance is not used for an extended period,
switch o the appliance from the main switch.
Step 1. Press the "standby" button. If the appliance has not
been used for awhile it will rinse.
Step 2. When the appliance displays "READY" press the
"Enter" button.
Step 3. Press the "+" button to scroll to "AUTO OFF".
Step 4. Press the "Enter" button.
Step 5. Press the "+" button to select the time.
Step 6. Press the "Enter" button to conrm selection. Once
conrmed the auto-o will switch o.
NOTE: DO NOT switch o from the on/o button or
the main switch, otherwise it will reset.
19
Page 22

Reset
SELF CHECK
READY
MENU
MENU
RESET
YES
RESET
This feature can be used to restore factory settings.
Step 6. Press "Enter"
Step 1. Press the "standby" button. If the appliance has not
been used for awhile it will rinse.
Step 2. When the appliance displays "READY" press the
"Enter" button.
Step 3. Press the "+" button to scroll to "MENU".
Step 7. Select either YES or NO and press "Enter".
Step 4. Press the "Enter" button.
Step 5. Press the "+" button.
20
Page 23

Number of use
SELF CHECK
READY
MENU
MENU
INFORMATION
NUMBER OF USE
NUMBER OF USE
INFORMATION
The feature can be used to check the number of cycles your
appliance has completed, please see full list at the end of this
section.
Step 6. Press "Enter"
Step 1. Press the "On / Standby" button. If the appliance has
not been used for awhile it will rinse.
Step 2. When the appliance displays "READY" press the
"Enter" button.
Step 3. Press the "+" button to scroll to "MENU".
Step 7. Press the "+" button.
Step 8. Press the "Enter" button.
"Number of Use" list:
• Total
• Cappuccino
Step 4. Press the "Enter" button.
Step 5. Press the "+" button.
• Espresso
• Coffee
• Coffee latte
• Use powder
• Hot cream
• Hot milk
• Clean
• Descale
• Clean brew
• Rinse milk unit
The information cannot be reset by the user.
21
Page 24

SELF CHECK
READY
MENU
MENU
LANGUAGE
LANGUAGE
Language
The language can be changed by following these steps.
Step 1. Press the "On / Standby" button. If the appliance has
not been used for awhile it will rinse.
Step 2. When the appliance displays "READY" press the
"Enter" button.
Step 3. Press the "+" button to scroll to "MENU".
Step 4. Press the "Enter" button.
Step 5. Press the "+" button.
Step 6. Press "Enter"
22
Page 25

SELF CHECK
READY
MAINTENANCE
MAINTENANCE
EMPTY READY
EMPTYING
EMPTY READY
Emptying
When the appliance is not in use or to transport to another
location we suggest to use this function:
Step 1. Press the "On / Standby" button. If the appliance has
not been used for awhile it will rinse.
Step 2. When the appliance displays "READY" press the
"Enter" button.
Step 6. Press the "Enter" button
Step 7. Pull the appliance out.
Step 3. Press the "+" button to scroll to "MAINTENANCE".
Step 4. Press the "Enter" button.
Step 5. Press the "+" button to scroll to "EMPTY READY".
Step 8. Remove the water tank and press the "Enter" button.
Step 9. the appliance will start clean out any residue, while
the screen displays “emptying”.
An alarm will be emitted 3 times and the display will become
black, which means the emptying program has nished.
23
Page 26

4. Cleaning and Maintenance
Essential Information
Allow the appliance to cool and isolate the electricity supply
before carrying out any thorough cleaning and maintenance.
Never use paint solvents, washing soda, caustic
cleaners, biological powders, bleach, chlorine based
bleach cleaners, coarse abrasives or salt.
DO NOT mix dierent cleaning products – they may
react together with hazardous results.
Any abrasive cleaner will scratch the surface and
could erase the control panel markings. Stainless
steel can be eectively cleaned by simply using a
dilute solution of water and mild detergent and
drying to a shine with clean cloth.
Regular cleaning is recommended. For easier cleaning, wipe
away any spillages immediately.
Cleaning
Disconnect the appliance from the power supply
before cleaning.
Do not wash your appliance by pouring water on it.
DO NOT use harsh abrasives, or aggressive cleaners
as these can damage the interior of the appliance.
Control Panel
Avoid using any abrasive cleaners, including cream cleaners,
on brushed stainless steel surfaces. For best results use a
liquid detergent.
The control panel, knobs and doors should only be cleaned
with a soft cloth wrung out in clean, hot soapy water. After
cleaning, polish with a dry cloth.
The appliance is heavy. When moving the appliance
be careful to protect the oor. Keep the appliance
vertical and do not tilt the appliance – this prevents
damage to the oor.
DO NOT spray or rinse the appliance with water or
other liquids. This could harm the electrical parts.
Use a dry cloth when cleaning near the electrical
parts (such as the light bulb or switch).
DO NOT clean the appliance with a sti or wire
brush.
DO NOT use an organic solvent such as detergent,
petrol, lacquer, thinners, acetone or acid.
Clean the appliance using warm water and bicarbonate of
soda with a soft cloth. Make sure that the interior is then
dried carefully with a suitable cloth.
After washing, rinse with clean water and dry carefully. When
you have nished cleaning, reconnect the appliance to the
mains supply with dry hands.
Shelves and other accessories (plastic and glass parts) can be
cleaned in the sink using liquid dishwashing liquid and warm
water. Make sure all soap is rinsed o and all parts are dry
before replacing them inside the appliance.
Make sure that no water enters the electrical components.
The appliance should be cleaned regularly using a solution of
bicarbonate of soda and lukewarm water.
Clean the accessories separately by hand with soap and
water. DO NOT wash accessories in a dish washer.
24
Page 27

EMPTY GROUNDS
EMPTY TRAY
Water Tank
Drip Tray
Load Tray
Water Spout
Coee Grounds
Container
Metal
Drip Tray
Pre-ground
coee funnel
Pre-ground
Coee unit
Fig. 4.1
Cleaning the drip tray
Important! If the drip tray is not emptied regularly,
the water could overow from the edge and seep
inside or around the coee maker. This could
damage the appliance and cabinet.
Step 1. This appliance will emit an alarm and will display
“empty Tray”.
Step 2. (Fig. 4.1)
1. Extract the drip tray.
2. Remove the grounds container.
3. Take out metal drip tray and bracket.
4. Wash the drip tray.
Cleaning the coffee grounds container
Until the ground container has been cleaned, the appliance
continues to display ”empty ground” and coee cannot be
made.
Step 1. When “EMPTY GROUND” is displayed, the ground
container must be emptied and cleaned.
Step 2. To clean, extract the drip tray (Fig. 4.1), empty and
clean the ground container and thoroughly remove all
residues.
25
Page 28

Cleaning the infuser/clean brew
SELF CHECK
READY
BREW CLEAN
CLEAN READY
EMPTY TRAY
ADD TABLET
CLEANING
MAINTENANCE
MAINTENANCE
BREW CLEAN
MENU
When you make total 300 cup of coee, the display will show
“clean READY”. We recommend to clean the infuser / brew as
soon as possible.
Propriatary tablets to clean your appliance can be readily
purchased. Follow the instructions provided with the tablets.
It is reccomended that following use of a cleaning tablet that
the water tank is washed and relled with fresh water and a
force rinse cycle is completed.
Step 6. Press the "+" button to scroll to "BREW CLEAN".
Step 1. Press the "On / Standby" button. If the appliance has
not been used for awhile it will rinse.
Step 2. When the appliance displays "READY" press the
"Enter" button.
Step 3. Press the "+" button to scroll to "MAINTENANCE".
Step 7. Press the "Enter".
The appliance is now programmed to provide the
descale warning when necessary based on the actual
hardness of the water.
Step 8. Press the "Enter".
Step 9. Extract the drip tray and empty the waste water and
reassemble the appliance.
Step 4. Press the "+" button to scroll to "MENU". Press the
"Enter" button.
Step 5. Press the "Enter" button.
Step 10. The display “add tablet”, press “Enter” button, the
clean brew program will begin.
Step 11. The appliance will display“cleaning”. After 10
minutes this program will nish and revert back to “ready”.
26
Page 29

Manual operation of cleaning the
SELF CHECK
READY
BREW CLEAN
CLEAN READY
EMPTY TRAY
ADD TABLET
CLEANING
INFORMATION
INFORMATION
Brew Clean
CLEAN READY
infuser/clean brew
A cleaning cycle can be completed by following the steps.
Propriatary tablets to clean your appliance can be readily
purchased. Follow the instructions provided with the tablets.
It is reccomended that following use of a cleaning tablet that
the water tank is washed and relled with fresh water and a
force rinse cycle is completed.
Step 1. Press the "On / Standby" button. If the appliance has
not been used for awhile it will rinse.
Step 2. When the appliance displays "READY" press the
"Enter" button.
Step 6. Press the “Enter” button.
Step 7. Press the "Enter".
The appliance is now programmed to provide the
descale warning when necessary based on the actual
hardness of the water.
Step 8. Press the "Enter".
Step 3. Press the "+" button to scroll to "INFORMATION".
Step 4. Press the "Enter" button.
Step 5. Press the "+" button.
Step 9. Extract the drip tray (Fig. 4.1) and empty the waste
water and reassemble the appliance.
Step 10. The display “add tablet”, press “Enter” button, the
clean brew program will begin.
Step 11. The appliance will display“cleaning”. After 10
minutes this program will nish and revert back to “ready”.
27
Page 30

Cleaning the water tank
1. Clean the water tank (Fig. 4.1) regularly (about once a
month) with a damp cloth and a little mild washing up
liquid.
2. Make sure to remove all washing up liquid residues.
Cleaning the spouts
1. Clean the spouts (Fig. 4.1) periodically using a sponge
or cloth.
2. Check regularly that the holes in the coee spout are
not blocked. If necessary, use a pin to poke the hole and
clean it.
Cleaning the pre-ground coffee funnel
1. Check regularly (about once a month) that the preground coee funnel (Fig. 4.1) is not blocked.
2. If necessary, remove coee deposits with a suitable
utensil.
Danger! Before performing any cleaning operations
the machine must be turned o by the main switch
(Fig. 2.1) and unplugged from the mains power
supply.
NOTE: After about 15 coees. The appliance displays ‘EMPTY
GROUND”, indicating that the ground container is full and must
be emptied and cleaned. Until the ground container has been
cleaned the appliance continues to display the message and
coee cannot be made.
• To clean, extract the drip tray (Fig. 4.1), empty and
clean.
• When cleaning, always extract the drip tray completely
to avoid it falling when the ground container is
removed.
• Empty the ground container and clean thoroughly to
remove all residues left on the bottom.
NOTE: When the appliance displays ‘empty tray”, indicating
that drip tray has full of waste water, that means you must
extract the drip tray and clean it.
When removing the drip tray, the ground container
must be emptied, even if it is not completely full.
If this is not done, the next coee you make, the
ground container may ll up more than expected
and clog the machine.
3. Never immerse the appliance in water.
Cleaning the inside of the coffee maker
1. Check regularly (about once a week) that the inside of
the appliance is not dirty.
2. If necessary, remove coee deposits with a suitable
utensil.
28
Page 31

Descaling
decalcify ready
30 min
EMPTY TRAY
TRAY MISSING
ADD DESCALING FLUID
Important! Descaler contains acids which may
irritate the skin and eyes.
It is vital to respect the manufacturer’s safety
warnings given on the descaler pack and the
warning relating to the procedure, in the event of
contact with the skin and eyes.
Important! FAILURE TO DESCALE THE APPLIANCE
REGULARLY INVALIDATES THE GUARANTEE.
Failure to descale the appliance as described also invalidates
the guarantee.
Over time, constant heating up of the water used to make the
coee leads to limescale building up in the inner circuits of
the appliance.
When“decalcify ready” is displayed, the appliance requires
descaling. In this state, you can continue to make coee,
steam, but we reccommend to descale as soon as possible.
Step 4. The appliance will display “Tray Missing”. Reassemble
the appliance after cleaning the drip tray.
Step 5. The appliance will display “ADD DESCALING FLUID”.
Propriatary coee machine descaling solution can be readily
purchased. Follow the instructions provided.
It is reccomended that following use of a cleaning tablet that
the water tank is washed and relled with fresh water and a
force rinse cycle is completed.
Step 1. Press the "Enter” button.
Step 2. Press the “Enter” button.
Step 6. Pull the appliance out.
Step 7. Remove the water tank and add the descaling uid.
Return the water tank to its original position.
Step 3. Extract the drip tray (Fig. 4.1) and empty the waste
water.
29
Page 32

RINSING
CHANGE WATER
DESCALING
DESCALING
CHANGE WATER
Step 8. Press “Enter” the appliance will begin to descale.
Step 9. Add fresh water to the water tank. Return the
water tank to its original position.
Step 10. Press “Enter” the appliance will begin to descale.
Step 11. Add fresh water. Return the water tank to its
original position.
Step 12. The appliance will begin to rinse, once nished it
will return to “ready” state.
30
Page 33

5. Troubleshooting
Display Message Possible Cause Remedy
Fill Water
Fault 3
Fault 3
Empty Grounds
Tray Missing
Fill Powder
Decalcify Ready The machine must be descale
The water tank is empty or positioned
incorrectly.
The grinding is too ne and the coee is
delivered too slowly.
The machine cannot make coee there
is air in the hydraulic circuit.
The total number coee made has
reached 15.
The tray not insert the machine or not in
right position
The “pre-ground Coee” function has
been selected without placing any preground coee in the funnel.
The funnel (A14) is blocked
DocNo.054-0001 - Troubleshooting BI oven
Fill the tank with water and / or insert it
correctly, pushing it as far as it will go.
Turn the grinding adjustment knob one
click clockwise towards big symbol.
Run “self check” Program and can
repair the machine
Extract the drip tray and empty the
grounds container and clean. then put
to original position.
Put the tray to original position.
Extract the appliance and place preground coee in the funnel by use
spoon.
Empty the funnel with the help of a knife
as described in the section “Cleaning the
pre-ground coee funnel’.
The descaling procedure described
in the“Descaling” section needs to be
performed as soon as possible
Important: when removing the
drip tray the grounds container
MUST be emptied, even if it is
not completely full.
Fill Beans The coee beans have run out Fill beans to container
Add more powder Not enough powder to make coee Use spoon to add powder
Clean the inside of the appliance
thoroughly, as described in the section
Clean Brew The inside of the appliance is very dirty
Table 5.1
“Cleaning and maintenance”. If the
message is still displayed after cleaning,
contact a service centre
31
Page 34

Problem Possible Cause Remedy
The coee is not hot The cups were not preheated
The infuser has cooled down because
2/3 minutes have elapsed since the last
coee was made
The coee is not creamy enough The coee is ground too coarsely
Wrong type of coee
The coee is delivered too slowly or a
drop at a time
The coee is delivered too quickly The coee is ground too coarsely
The coee is ground too nely
Warm the cups by rinsing them with hot
water
Before making coee ,heat the infuser
by press rinse
Turn the grinding adjustment knob one
click anticlockwise towards small symbol
while the coee mill is in operation
Use a type of coee for espresso coee
makers
Turn the grinding adjustment knob one
click anticlockwise towards big symbol
while the coee mill is in operation
Continue one click at a time until coee
delivery is satisfactory
The eect is only visible after delivering
two coees
Turn the grinding adjustment knob one
click anticlockwise towards small symbol
while the coee mill is in operation
The eect is only visible after delivering
two coees
Coee does not come out of one of the
spouts
Water comes out of the spouts instead
of coee(use coee powder).
The spouts are blocked Clean the spouts with a toothpick
The pre-ground coee may be blocked
in the funnel.
Table 5.2
Clean the funnel with a wooden or
plastic fork, clean the inside of the
machine.
32
Page 35

6. Installation
INSTALLATION
Check the appliance is electrically safe when you have nished.
Dear Installer
Before you start your installation, please complete the details
below.
Installer’s Name
Installer’s Company
ArtNo.050-0011 - Installer information table
Installer’s Telephone Number
Appliance Serial Number
• Before using your appliance, wipe all parts with a
solution of warm water. Then, rinse with clean water and
dry. Return all parts to the appliance after cleaning.
Provision for Ventilation
The appliance housing used must provide adequate
ventilation.
For built-in installation, a minimum ventilation space of 85 –
90mm 40mm must exist between the rear of the appliance
and the back of the housing or an adjacent wall.
If a tall housing is to be installed ush with the ceiling, a
275cm² ventilation cut-out must be provided at the top of the
housing.
Before the installation
Installation must be performed by a qualied
professional in compliance with legislation in force
in the country of installation.
The packing elements (plastic bags. polystyrene
foam, etc.) should be kept out of reach of children as
they are a Safety hazard.
If your customer has a problem relating to your installation
they will be able to contact you easily.
You must be aware of the following safety requirements &
regulations:
This appliance shall be installed in accordance with the
regulations in force and in a well-ventilated space. Read the
instructions before installing or using this appliance.
The cooker must be installed in accordance with:
• All relevant British Standards / Codes of Practice
• The relevant Building / IET regulations
Installation warnings
Before using your appliance for the rst time, please pay
attention to the following points:
• Before connecting your ppliance, ensure that the
information on the data plate (voltage and connected
load) matches that of the mains electricity supply. If in
doubt, consult a qualified electrician.
• We do not accept responsibility for any damages that
occur due to ungrounded usage.
• Do not place heavy items on the appliance.
• Clean the appliance thoroughly before use (see
Cleaning and Maintenance).
• This product is intended to be used in a proper kitchen
units only.
You should set the water hardness as soon as
possible following the instructions in the “Setting
water hardness” on page 7.
After removing the packaging, make sure the product is
complete and undamaged and that all accessories are
present. DO NOT use the appliance if it is visibly damaged.
Contact Customer Services.
DO NOT use the appliance if the power cable or the plug
is damaged, if the appliance does not function correctly or
if it has been damaged or dropped. Put the appliance on a
at and stable surface. The appliance should not be installed
close to any heat source, radios or televisions.
During installation, make sure that the power cable does not
come into contact with any moisture or objects with sharp
edges and the back of the appliance. High temperatures can
damage the cable.
Warning: After the appliance is installed you should
make sure you can access the electrical isolation
point.
Location of the appliance
Do not install the appliance in rooms where the
temperature may drop to 0°C or lower (the water in
the appliance could freeze and cause damage).
The appliance may be installed in a kitchen/kitchen diner but
NOT in a room containing a bath or shower.
This appliance is designed for domestic cooking only. Use for
any other purpose could invalidate any warranty or liability
claim.
33
Page 36

INSTALLATION
Check the appliance is electrically safe when you have nished.
This appliance should not be installed in a boat or
caravan.
The appliance must be installed in accordance with the
relevant Building regulations and IET regulations.
You will need the following tools and equipment to
complete the installation satisfactorily:
1. Electric drill
2. Steel tape measure
3. Cross head screwdriver
4. Pencil
Installation
Verify the minimum measure required for correct installation
of the appliance.
The appliance MUST be installed in adjustable housing. The
housing must be rmly xed to the wall.
Important: all installation or maintenance
operations must be performed with the appliance
disconnected from the mains electricity supply.
Kitchen furniture in direct contact with the
appliance must be heat resistant (<65°C).
To guarantee correct ventilation, leave a gap at the
bottom of the cabinet (refer to Fig. 6.1).
Automatic cup tray light
When the appliance is on, the lights near the coee spout will
illuminate.
IMPORTANT! DO NOT look at the lights directly or
use an optical instrument.
34
Page 37

INSTALLATION
560
594
454
474
21
450-454
560-565
min 550
50
275cm
Check the appliance is electrically safe when you have nished.
Fig. 6.1
(All dimensions in mm unless otherwise shown)
35
Page 38

INSTALLATION
DOUBLE POLE SWITCHED
FUSE SPUR OUTLET
13A
FUSE ON
Check the appliance is electrically safe when you have nished.
Electrical Connection
This appliance must be installed by a qualied electrician
to comply with the relevant Institution of Engineering and
Technology (I.E.T.) regulations and also the local electricity
supply company requirements.
Before connecting your appliance, ensure that
the information on the data plate (voltage and
connected load) matches that of the mains
electricity supply. If in doubt, consult a qualied
electrician.
Safety cut out devices must be included in the mains
power supply in compliance with the installation
regulations in the country concerned.
WARNING: THIS APPLIANCE MUST BE EARTHED
DO NOT use multiple sockets or extensions.
The power cable must be long enough to allow the
appliance to be extracted from the cabinet to ll the
coee beans container.
This appliance must be connected by a competent person,
using xed wiring via a double pole switched fused spur
outlet, protected by a 13A fuse (Fig. 6.2).
Fig. 6.2
We recommend that the appliance is connected by a
qualied electrician, who is a member of the N.I.C.E.I.C. and
who will comply with the I.E.T. and local regulations. The
wires in the mains lead are coloured in accordance with the
following code:
This appliance must be tted to a double pole 13A
fused switch socket.
This appliance MUST NOT be tted with a plug and
connected to standard wall plug.
The mains terminal is situated on the back of the appliance.
• GREEN AND YELLOW = EARTH
• BLUE = NEUTRAL
• BROWN = LIVE.
Ensure the cable route avoids the risk of trapping or touching
hot surfaces.
Current Operated Earth Leakage
Breakers
Where the installation is protected by a 30mA sensitivity
residual current device (RCD), the combined use of your
appliance and other domestic appliances may occasionally
cause nuisance tripping. In these instances the kitchen circuit
may need to be recongured. This work should be carried out
by a qualied electrician.
36
Page 39

INSTALLATION
Check the appliance is electrically safe when you have nished.
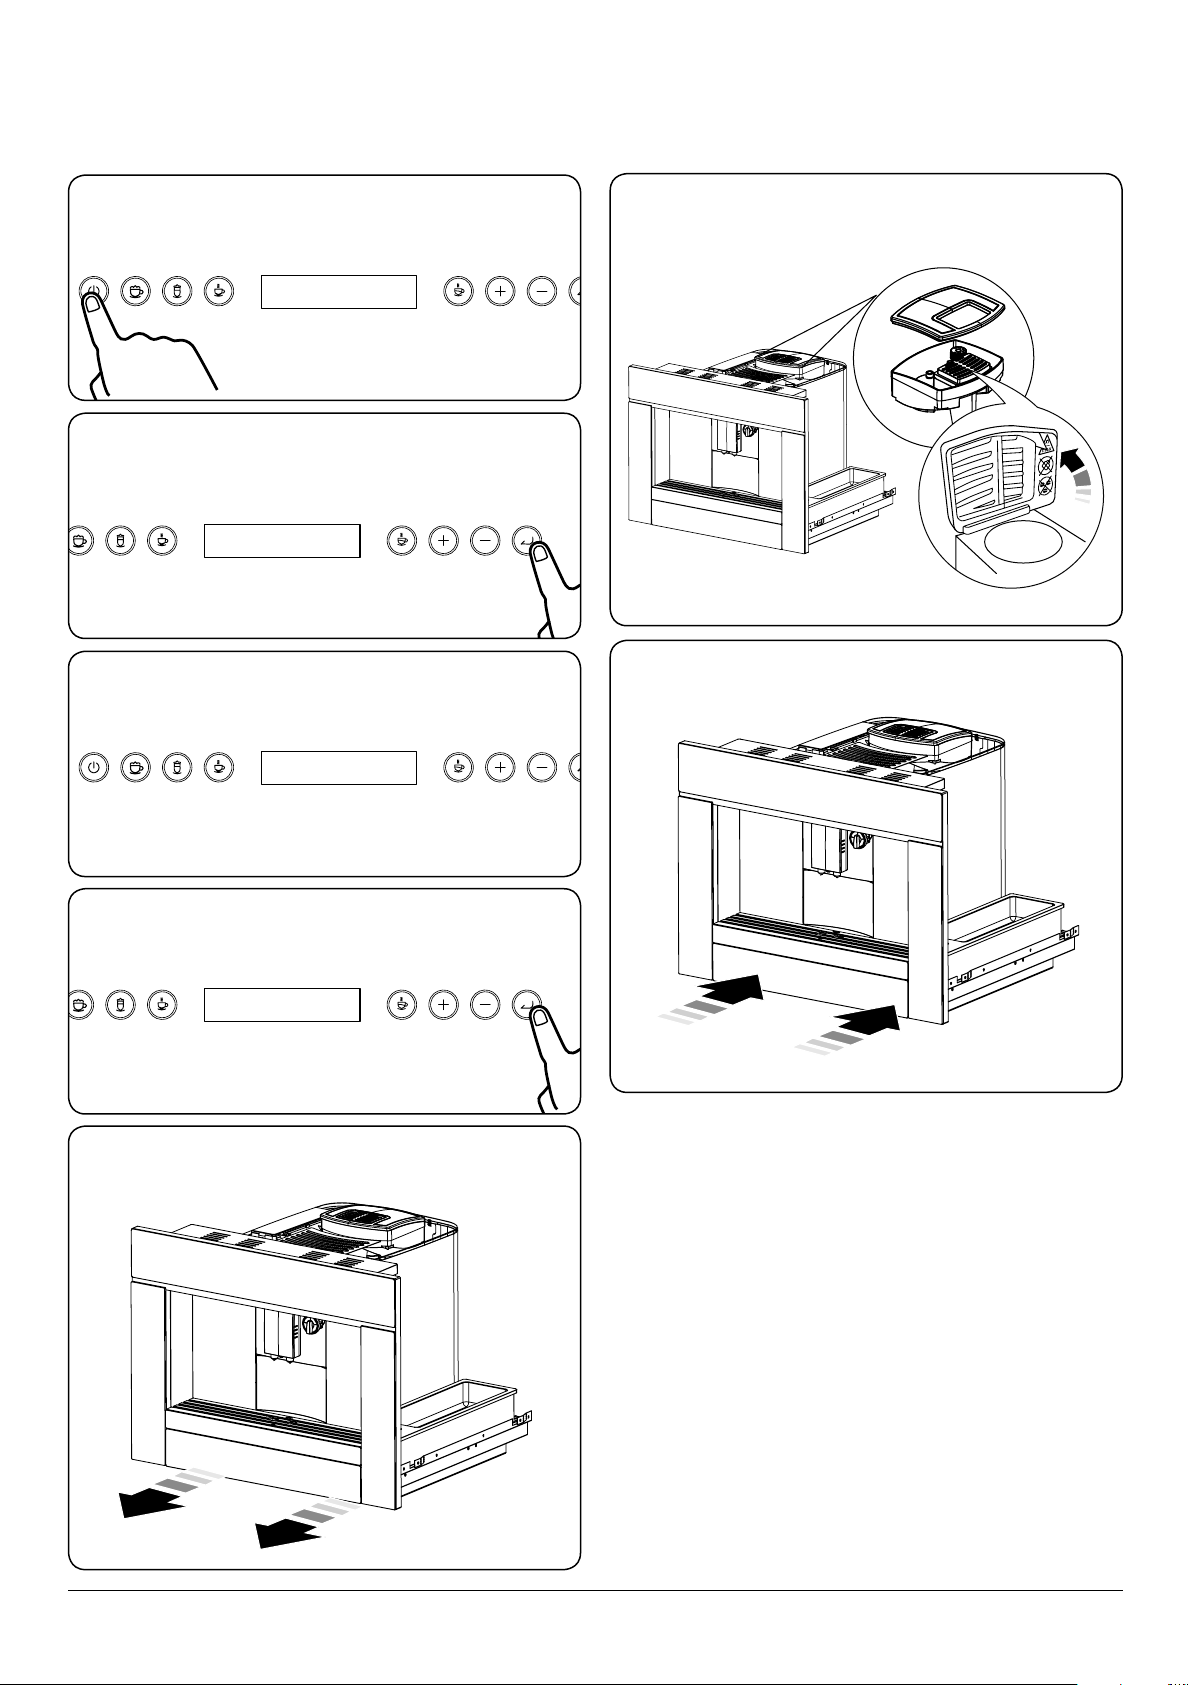
Step 1. install guide connect bracket. Fix screws to side of
cabinet.
Step 2. Fix screws to base of cabinet.
Step 4. Place the coee machine on the guide runners.
Step 4a. Secure with 2 screws on both sides.
DO NOT install the appliance on a loose platform. The
appliance is heavy and may tip if not adequately secured.
Step 3. Extract both the glide runners.
Step 4. Place the coee machine on the guide runners. Step 6. Open the tank cover.
Step 5. Pull out the coee machine. Open the coee bean
cover to add coee beans in container.
37
Page 40

INSTALLATION
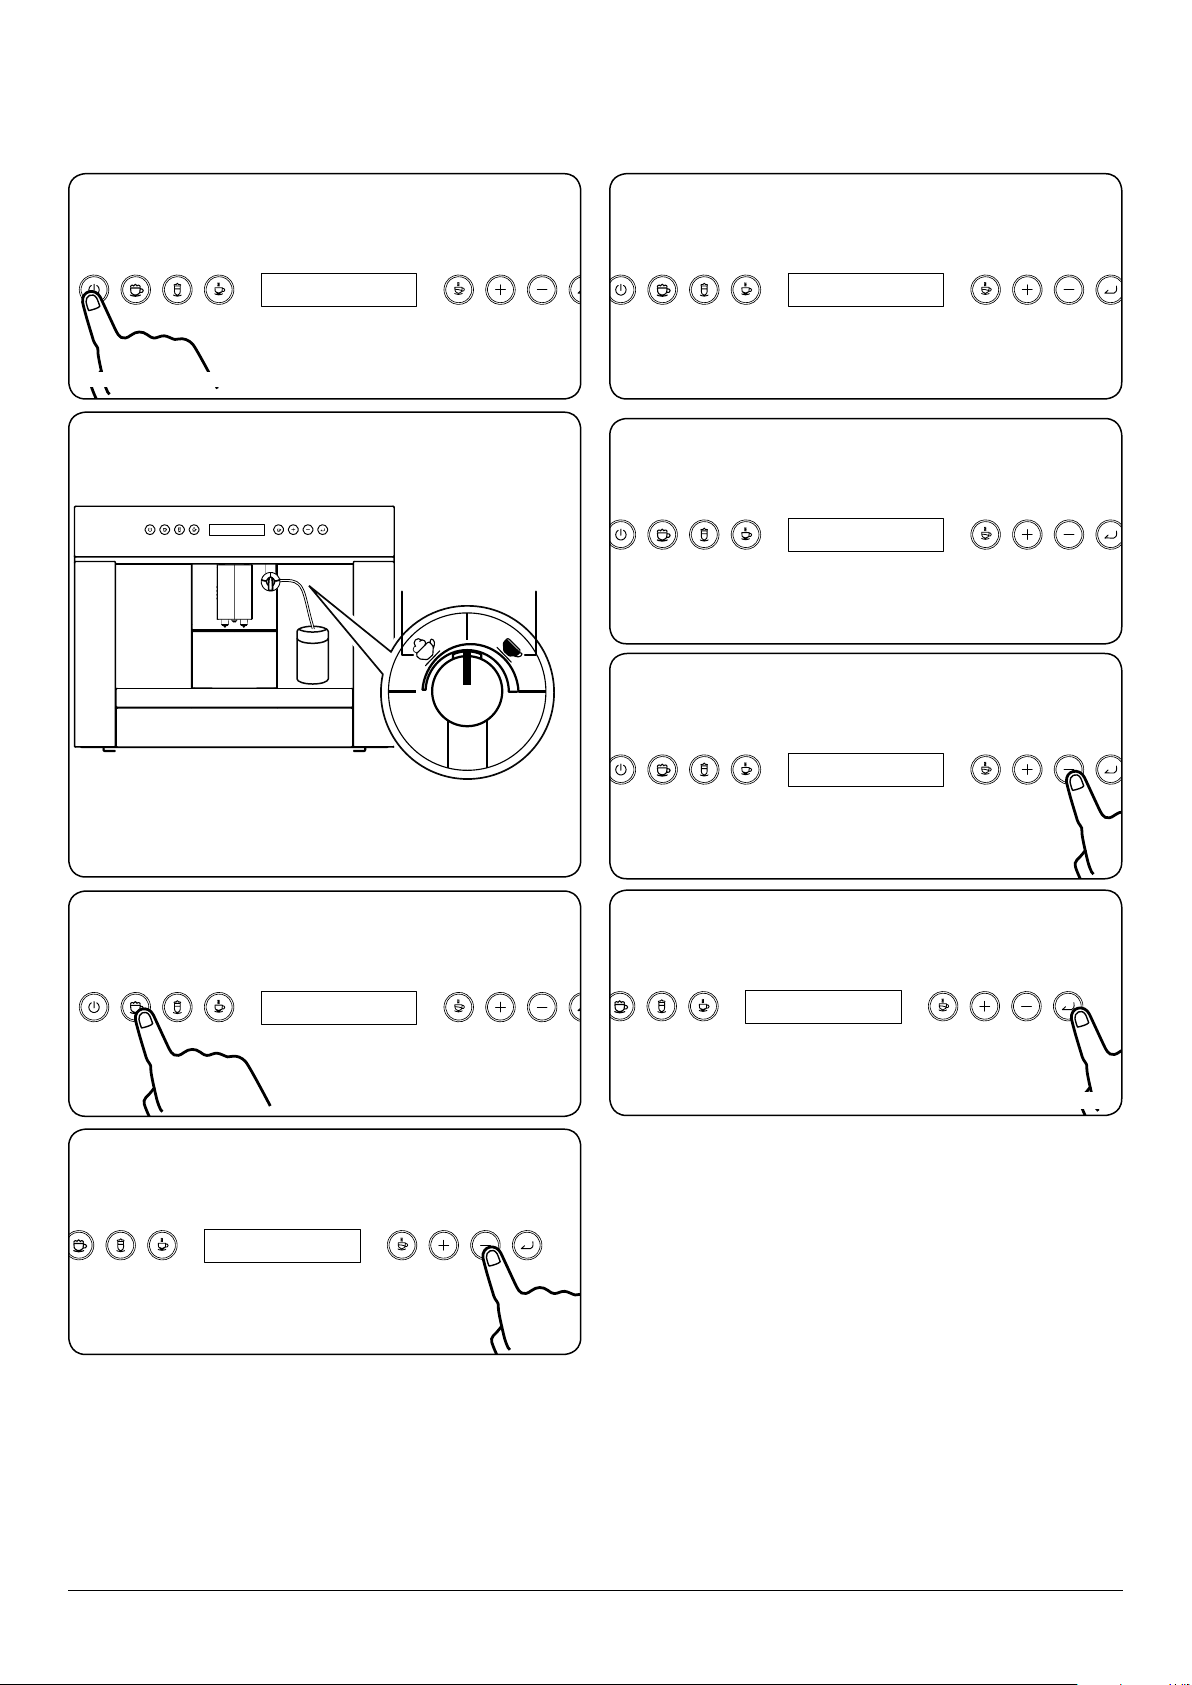
Check the appliance is electrically safe when you have nished.
Take out the tank and ll with water, re-insert in original
position. Turn on main switch (E) the appliance will switch on
slide back the appliance into the unit.
If the appliance is installed over a warmer drawer (500W max
allowed). Please make sure the installation instructions are
adhered to.
DO NOT install the appliance on a loose platform.
The appliance is heavy and may tip if not adequately
secured.
Fix the power cable with the clip to avoid it tangling when
the appliance is inserted or extracted.
The power cable must be long enough to allow the appliance
to be extracted from the cabinet to ll the coee beans
container.
38
Page 41

7. Circuit Diagram
Display PCB
PCB
L1
N1
PCB
LED
CON6
CON1
CON4
CON6
CON8
CON8
Knock switch
Electric
lter
Terminal
block
Grind
motor
Input
L1
N1
CON9
CON10
Valve
Tee Valve
Coee
Fuse
Fuse
Boil
Thermostat
Water valve
Water
valve
Steam
valve
Pump
CON7
CON5
CON2
CON3
Transformer
Step motor Mechanism
motor
CN1
CON1
CON5
Motor feedback
CON3
CON4
Drip tray micro switch
Water level sensor
Waste Water level sensor
Flow meter
39
Page 42

8. Technical Data
AGA Rangemaster Limited
Leamington Spa
Warwickshire
CV31 2AD
England
Serial No.
Model
Frequency
Voltage
Power
RMB45CFBL/SS
INSTALLER: Please leave these instructions with the user.
DATA BADGE LOCATION:
Slide the coee machine forward, the location of the data badge can be found near the main switch (Fig. 8.1).
COUNTRY OF DESTINATION: GB, IE.
Dimensions
Dimensions Coee maker
Height 454 mm
Width 474 mm
Depth 594 mm
Mass (kg) 28
Data
Brand Rangemaster
Model identication
RMB45CFBL/SS
ECL45CFBL/BL
Volume (water tank) Litres 1.8
Pump max pressure Bars 20
Maximum total electrical load at 220-240 V~50/60 Hz 1300-1500 W
Fig. 8.1
40
Page 43

9. Warranty/After Sales Service
If consultation or technical assistance is needed, please
provide the local authorised service agent with the purchase
invoice and the product code/serial number.
The 2 years free maintenance for the operation of the
appliance started from the date of purchase of this product.
Any cosmetic damage to the appliance must be reported
within 90 days of delivery.
Free from a landline: +44 (0) 800 8046261
Depending on your mobile network, call from this number is
free: +44 (0) 3707 895107
DocNo.111-0003 Warranty No.10
34
Page 44

Page 45

Page 46

Page 47

Page 48

Clarence Street, Royal Leamington Spa,
Warwickshire, CV31 2AD, England.
Tel: +44 (0) 800 8046261
E-mail: consumers@agarangemaster.co.uk
 Loading...