

Page 1
DxD 15
Refrigerator
User Guide
Installation & Service Instructions
U110466-01B
Page 2

Due to our policy of continual improvement, we reserve the right to change specications without prior notice.
Contents
1. Before You Start 1
Safety 1
2. About Your Refrigerator 2
About the Fresh Food Compartment 3
About the Freezer Compartment 4
Fridge Freezer Operation 5
Operating the Water Dispenser 7
Door Ajar Alarm 7
Power-breaking Memorising Function 7
3. Food Storage Tips 8
Tips on Storing Fresh Food 8
Tips on Freezing Food 9
4. Installation 10
Positioning Your Appliance 10
Removing and Installing
the Doors and Drawers
10
Adjustable Feet 11
Levelling the Doors 11
Installing the Bottom Decorative Strip
and Handles
11
Electrical Supply Connection 12
Water Supply Connection 12
5. Cleaning and Maintenance 13
Defrosting 13
Cleaning 13
Shutting O the Refrigerator 13
When Not in Use 13
The Light 13
Water Filter 13
6. Troubleshooting 14
7. Warranty/After Sales Service 18
8. Technical Data 19
Page 3

1
Thank you for buying a Rangemaster appliance. We hope
that it provides a stylish yet practical solution to your cooling
needs. We hope that this handbook supplies you with all the
information you require. If there is anything you are unsure of
please contact us (see ‘Warranty’ section for Customer Care’s
details).
WARNING: This appliance must be earthed.
Please leave the appliance to stand for at least six
hours. This will allow the cooling system to settle
following transportation.
Always make sure a qualied person installs this
appliance.
The freezer compartment is rated at 4 stars.
This appliance is designed for domestic use only.
Using it for any other purpose could invalidate any
warranty or liability claim.
• Before you plug the appliance into the mains, clean
the inside of the appliance using warm water and
bicarbonate of soda, then dry thoroughly.
• Check that no parts of the appliance are damaged,
especially parts of the cooling system, pipes or leads. If
damage has occurred, DO NOT install the appliance; you
should contact a qualified service engineer or return the
appliance to its place of purchase.
• If the accessories inside the appliance have been
disturbed during transit, reposition them in accordance
with the instructions.
• Make sure that the electrical supply to your plug socket
is correct for this appliance – the required information is
on the data badge of the appliance.
• Once the appliance is installed, cleaned and dry, it is
ready to be plugged in and switched on.
Safety
The data badge is located inside the appliance
(refrigeration compartment).
WARNING: Use potable (drinking) water with this
appliance.
WARNING: Keep this appliance clear of obstruction.
DO NOT damage the refrigerant circuit. If it does
become damaged, do not use the appliance.
WARNING: Do not use mechanical devices (such as
hairdryers) to defrost this appliance.
• When replacing old appliances, make sure that you
have disabled any locking mechanisms before disposal
– it may even be best to remove the appliance door
completely to prevent children from becoming trapped
inside the appliance.
• The appliance must be connected to the power supply
safely. Loose connections, broken plugs and bare wires
are a safety hazard. Make sure that all connections are
sound.
• Before undertaking any routine maintenance or minor
repairs, disconnect the appliance from the electrical
supply.
• DO NOT touch cold surfaces of the appliance while it is
in use as this will cause hands to stick to them leading to
freezer burns.
• When moving the appliance take care not to damage
the leads, pipes or condenser unit. Should these parts
become damaged, contact a qualified service engineer.
• Effervescent liquids (fizzy drinks) should never be frozen.
These liquids expand during freezing and this may lead
to the bottles/containers shattering or exploding.
• Foods that are intended to be defrosted or cooked first,
such as breads or meats, must not be eaten in their
frozen state.
• If food looks or smells strange, do not attempt to eat it.
If in doubt throw it away. Spoiled food can be harmful to
your health.
• Never use sharp, metal implements to scrape ice off the
surface of this appliance. Only use implements, which
are fit for this purpose (such as plastic scrapers) and use
carefully to avoid damaging the lining of the appliance.
• The cooling system contains refrigerant and oils, all of
which are harmful to health if leaked. Should leakage
occur, disconnect the appliance and ventilate the room
it is installed in. Take care to ensure that you do not get
any coolant near to, or in, your eyes. Contact a service
engineer or arrange to have the appliance removed.
DO NOT use the appliance under any circumstances.
• This appliance can be used by children aged from 8
years and above and persons with reduced physical,
sensory or mental capabilities or lack of experience
and knowledge if they have been given supervision
or instruction concerning hazards involved. Children
shall not play with the appliance. Cleaning and user
maintenance shall not be made by children without
supervision.
Electrical Safety
• Connections to the mains supply should be in
accordance with local regulations.
• The appliance must be plugged into an earthed socket.
• The plug MUST be accessible after the appliance has
been positioned.
• The refrigerator is supplied with a standard three-pin
plug, of which the one for grounding should never be
removed.
• Hold the plug, not the electrical cable, when unplugging
the refrigerator.
• Make sure that the refrigerator does not trap the electric
cable.
• Do not step on the cable.
• Avoid damage to the electric cable when moving the
refrigerator.
Damaged Electrical Cable
If the electrical cable is damaged or worn, turn o the
refrigerator and consult an authorised agent for replacement.
1. Before You Start
Page 4

2
Refrigerant Gas Information
IMPORTANT: This appliance is provided with refrigerant
gas, ISOBUTHANE (R600a). When moving the appliance
take care to ensure that it is not excessively struck or
shaken. Failure to do so could damage the appliance.
Damage to the refrigerating circuit, with possible leaking of
refrigerating gas, could create a risk of explosion caused by
external sparks or ames.
In the Event of Accidental Leakage
Allow the material to evaporate providing that adequate
ventilation is provided.
Behaviour of the Gas
This refrigerant gas is highly ammable so do not allow the
gas to come into contact with hot surfaces or naked ames.
Gas R600a is heavier than air: if released it forms a high
concentration at oor level where ventilation is poor.
First Aid
Inhalation
Take the exposed person from the polluted area and carry
them to a warm, well ventilated place.
Long exposure can cause the onset of asphyxia and
possible loss of consciousness. If necessary, practice articial
respiration, and in the most serious cases, administer oxygen
under close medical supervision.
Skin Contact
It is unlikely that occasional contact with the skin is
dangerous. If this should happen thoroughly wash the
aected zone.
Liquid splashes and atomised liquid can cause freezing burns.
Wash the aected part with plenty of water and call a doctor
to treat any burns.
Eye Contact
Wash with plenty of water, with eyelids well open, and call a
specialist doctor as soon as possible.
In any event, should you inhale or come into contact with
R600a gas, we advise you to consult your own doctor.
Caring for the Environment
Disposing of Your Packaging
Your new refrigerator was protected by suitable packaging
while on its way to you. All of the materials used are
environmentally friendly for disposal and can be recycled.
Please make a contribution to protecting the environment by
disposing of the packaging appropriately.
Disposing of Your Old Refrigerator
ArtNo.000-0019
Do not bin logo
This symbol on the product or its packaging
indicates that the product may not be treated as
household waste. Instead it should be handed
over your local community waste collection/
recycling centre.
Old appliances still have some residual value. An
environmentally friendly method of disposal will ensure that
valuable raw materials can be recovered and used again.
When an appliance has reached the end of its working life
unplug it from the mains. Cut o the mains cable and dispose
of it together with the plug.
Make the door unt for use (by removing the seals) or remove
the door so that children cannot accidentally lock themselves
in.
Cycloisopenthane, a ammable substance not harmful to
ozone, is used as an expander for the insulating foam.
When transporting the appliance, take care not to damage
the cooling circuit.
By ensuring this product is disposed of correctly, you will
help prevent potential negative consequences for the
environment and human health, which could otherwise be
caused.
For more detailed information about recycling of this
product, please contact your local council, your household
waste disposal service or the shop where you purchased the
product.
Page 5
3
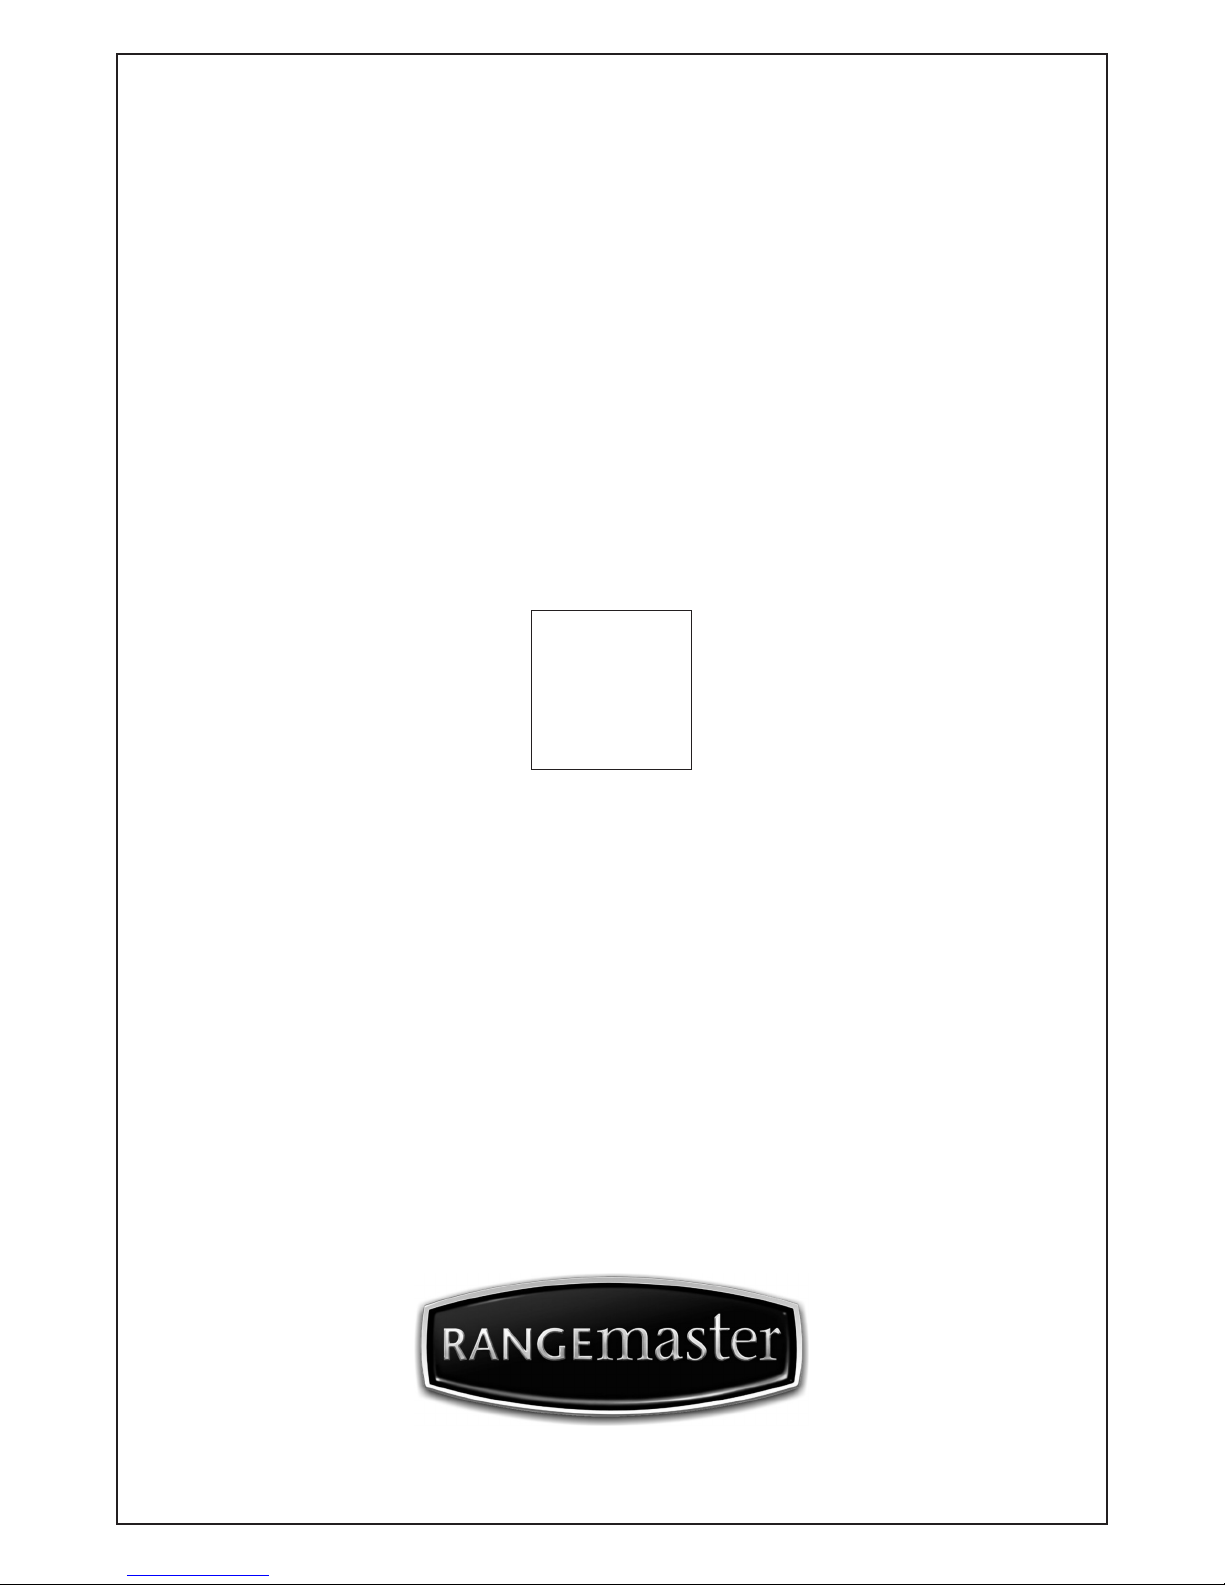
The refrigerator is shown in Fig.2.1 and has the following
features:
• Water filter: This unit comes equipped with a chlorine
and odour free filter.
• ‘Ready ice’: This is located in the upper freezer drawer
for quick ice cube access. A great place to store large
quantities of ice for parties and picnics.
• Extra large, spacious design. The refrigerator offers
large capacity fresh and frozen food in three convenient
compartments; a French door type refrigerated
compartment and two lower freezer drawers.
The upper freezer drawer is for ice cubes, regularly used
foods and “ left-overs”.
The lower freezer drawer is for deep, longer duration
freezing.
• CFC-free, Frost-free and Fast-freeze option.
• LED interior lights: come on when the door is opened.
The performance of the light is not affected by any of
the appliances other settings.
• Automatic temperature display.
• Door ajar alarm.
• Large humidity controlled pantry tray.
• Touch sensitive, large screen LED display.
ArtNo.600-0004 - Refrigerator layout
Dairy compartment
Refrigerator shelf
Wine/bottle rack
Meat, fruit and vegetable
crisper drawers
Bottle rack
Bottle rack
Full width pantry
Upper freezer drawer
with ice maker
Lower deep freeze drawer
Refrigerator shelf
LED lights
2. About Your Refrigerator
Fig.2.1
Page 6
4
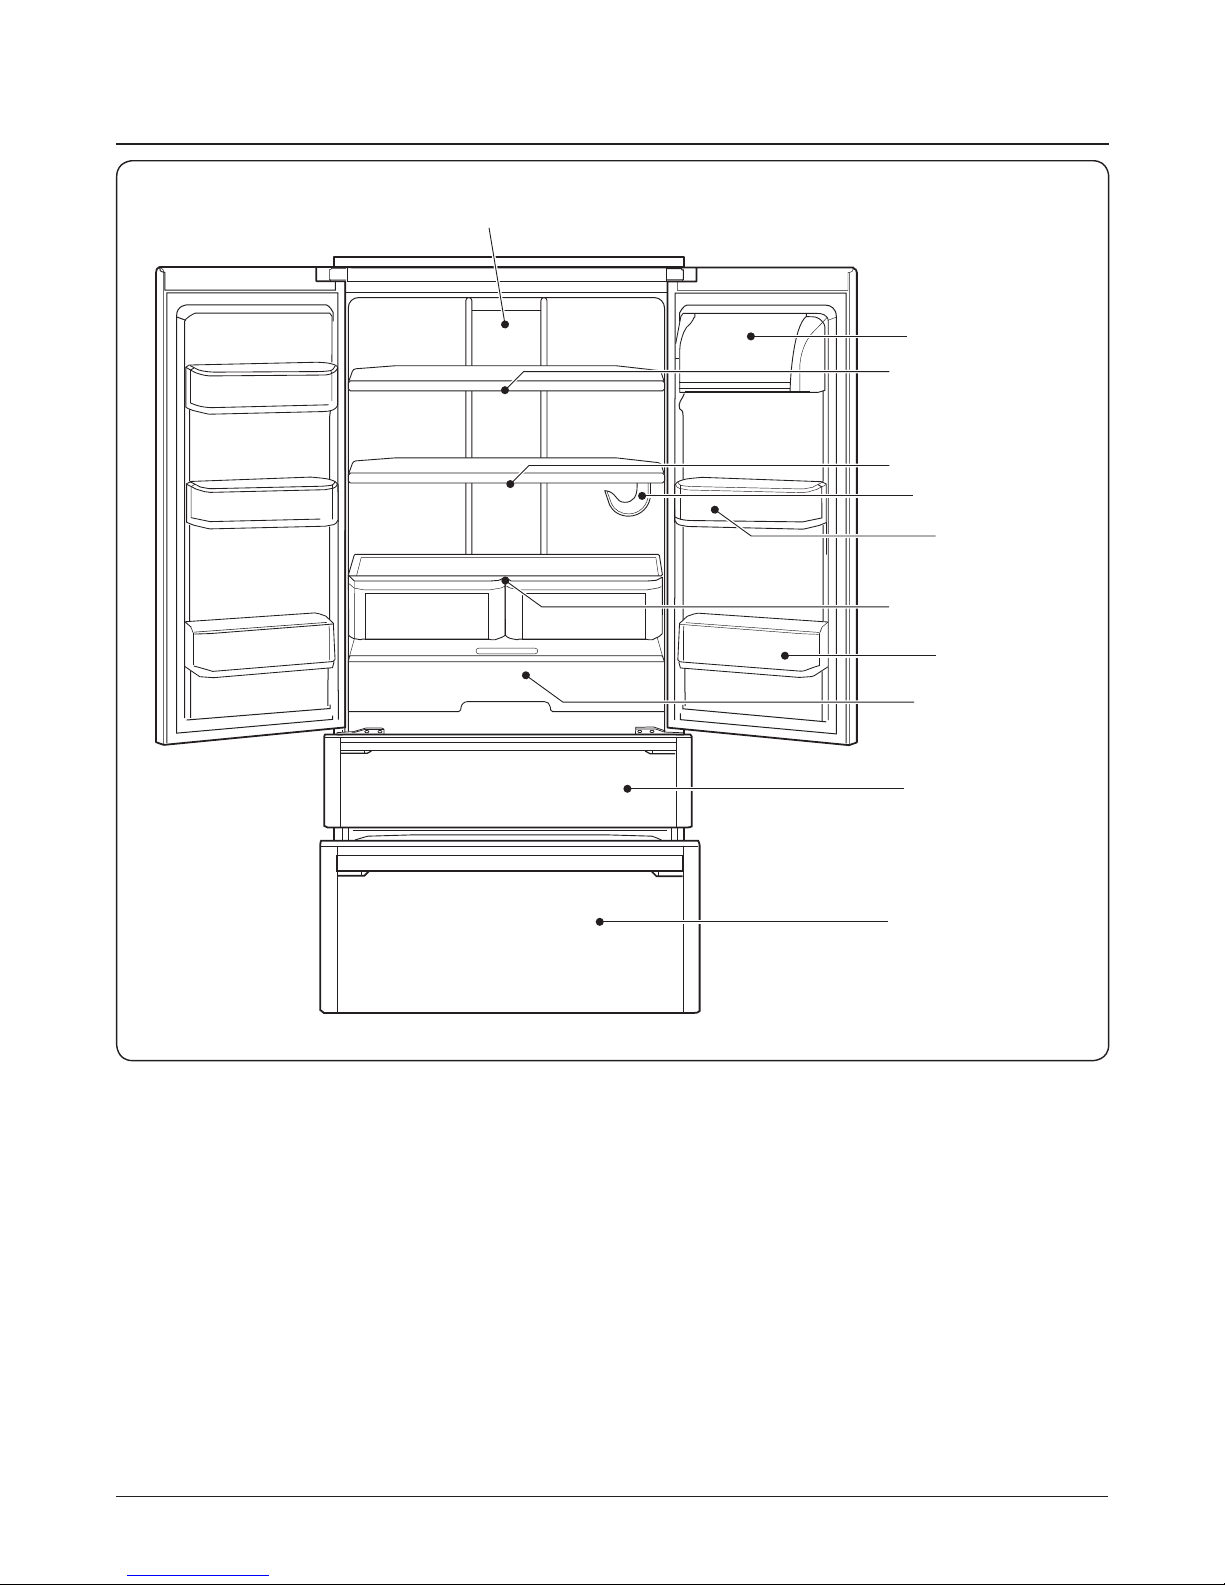
Shelf
Shelf runner
Crisper drawer
Glide-out
Runners
Crisper drawer
Runner grips
About the Fresh Food Compartment
It is recommended to leave storage space between the
foods for good cold air circulation. The temperatures in the
refrigerator are slightly warmer near the top and colder near
the base. Suggestions for storage (Fig.2.2):
1. Eggs, butter, cheese, etc.
2. Tins, cans, condiments, etc.
3. Drinks and all kinds of bottled foods.
4. Pickled foods, drinks or cans.
5. Meat, poultry, sh and raw foods.
6. Flour foods, cans, dairy, etc.
7. Cooked meats, sausage, etc.
8. Fruits, vegetables or salads.
Shelves
The height of the shelves can be adjusted to t your storage
needs.
The shelves will not pull out accidentally when you remove
foodstu from the appliance.
When adjusting the height of the shelf, rst remove any
food placed on the shelf. Tilt the front upwards so that the
restraining pegs are clear of the side guides (Fig.2.3) and pull
towards you. Keep the shelf tilted to allow the retaining stops
to clear the side guides.
When repositioning, make sure the shelf is pushed back fully
and the retaining stops have located securely.
Make sure that the two sides of the shelf are in level
positions otherwise food may drop o.
Crisper
The refrigerator has two drawers for storing fruits, vegetables
and/or deli products.
Removing the Crisper Drawers and Shelf
To remove one of the crisper drawers, pull it out fully and lift
it o the glide-out runners (Fig.2.4). The drawer will ‘pop’ out
of the runner.
To avoid accidents, make sure to push the runners
fully back.
To ret one of the drawers, pull the runners fully out. Locate
the rear drawer tabs to the rear of the runner. Extend the
runners further using the small grips and then locate the
drawer back into the runner tabs (Fig.2.5).
To remove the crisper cover lift up the shelf, then pull it
straight out in the direction shown (Fig.2.6).
1
4
5
6
7
8
2
3
Fig.2.2
Fig.2.3
Fig.2.4
Fig.2.5
Page 7
5
MAX MIN
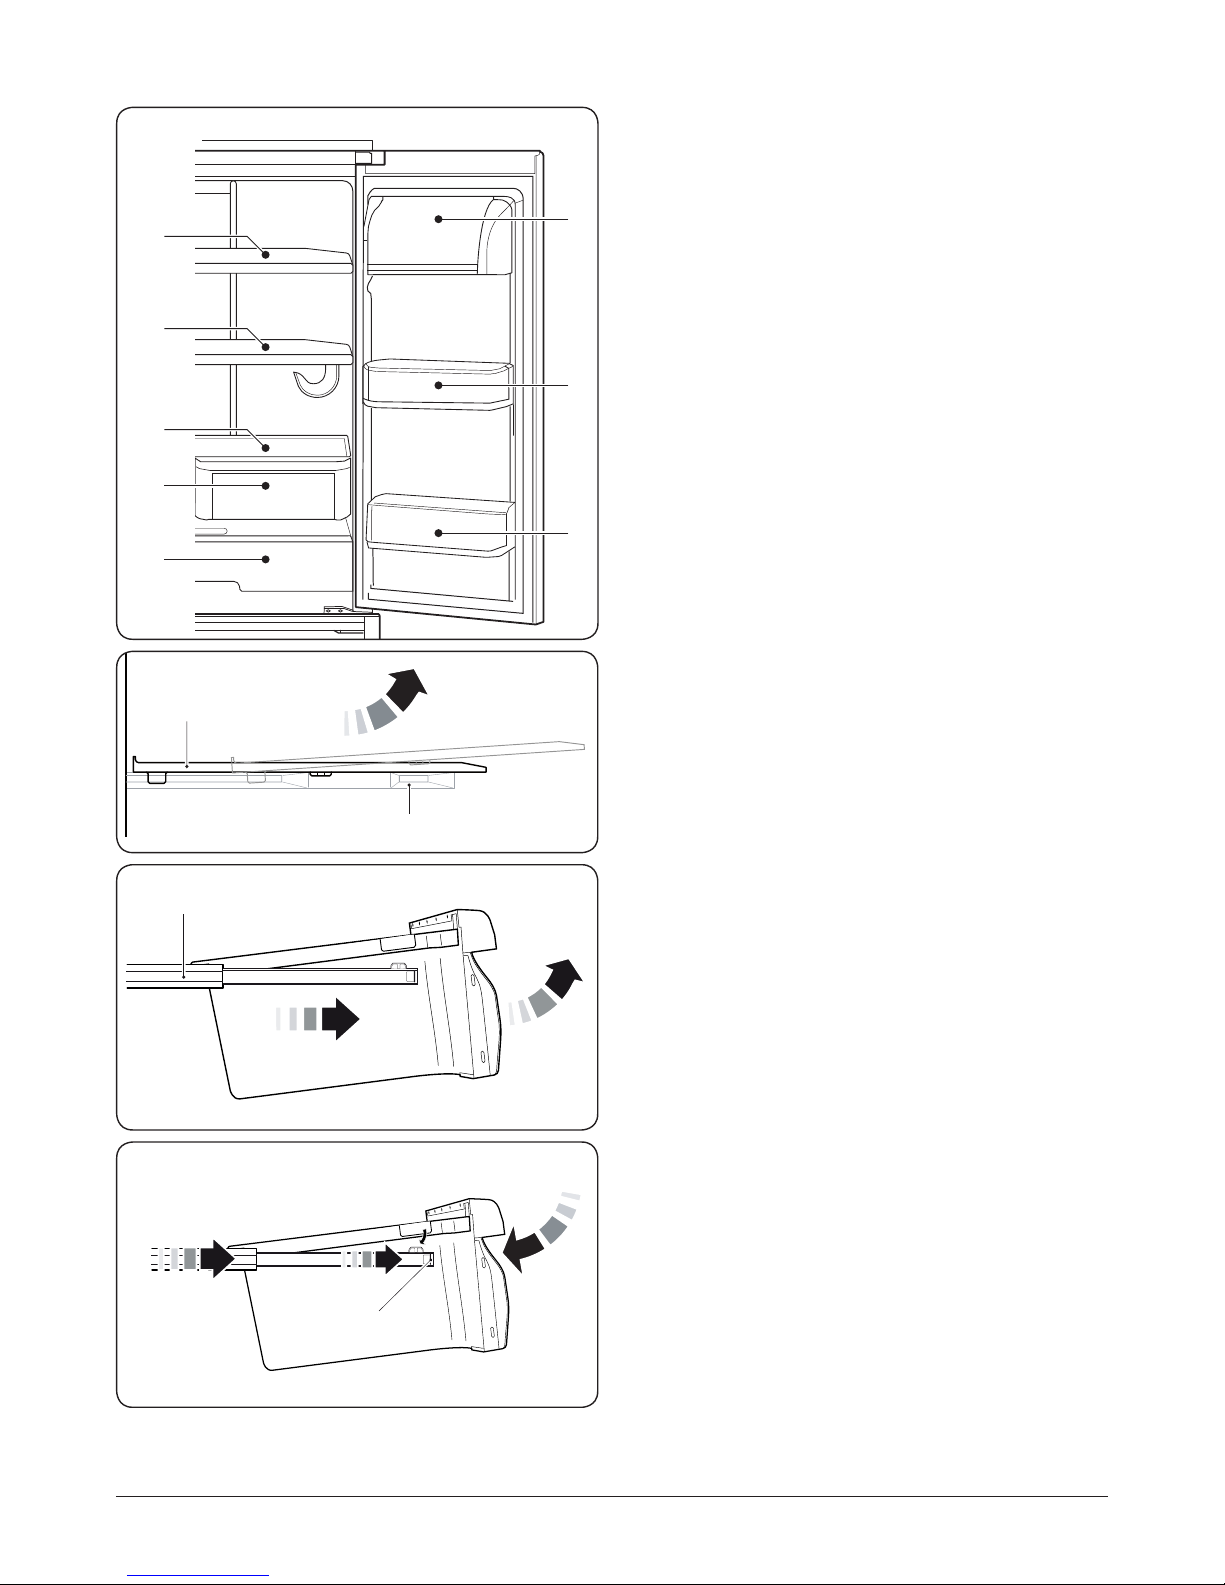
Full Width Pantry with Humidity Control
The refrigerator is specially designed to include a full
width pantry with humidity control which can be adjusted
depending on the type of food to be stored.
Slide the humidity control (Fig.2.7) to the right to increase
the humidity inside. In doing this, the crisper is suitable for
storing cucumbers, grapes, oranges, apples, peaches, lettuce
and other produce with a high moisture content.
Slide the humidity control (Fig.2.7) to the left to reduce the
humidity inside. This is suitable for storing meats, cheeses,
onions and other drier foods.
Bottle Rack Height Adjustment
Hold both sides of the bottle rack then lift and pull it straight
out for cleaning or to change location (Fig.2.8).
After cleaning, the bottle rack can be installed in the reverse
manner, and the position can be adjusted according to the
height of the food to be stored.
When adjusting the height of the bottle rack, it is
better to house the dairy bin above the bottle rack.
About the Freezer Compartment
The freezer compartment consists of upper and lower
drawers.
The upper freezer drawer (Fig.2.9) is arranged to load ice
cubes in a tray on the left-hand side and either more ice or
frequently frozen and frequently used foods on the righthand side of the drawer.
The lower deep freeze drawer (Fig.2.10) is for longer duration
freezing.
Note: Do not pull the freezer drawers with too much force as
food may fall out. Do not overpack the drawer otherwise food
will fall out when opening too fast.
Using the Ice Maker
Ice Maker Principles:
The ice maker tray periodically receives an automatic ow of
water to the ice maker ice cube tray. Once the water freezes
a sensor on the tray recognises cubes have been made and
automatically twists the tray to drop the ice cubes into the
ice bucket. The capacity of the ice maker depends on the
ambient temperature, frequency of the freezer door openings
and freezer compartment cooling temperature setting.
Typical ice harvest is 1.8 kg per day.
Note: After rst plugging in your refrigerator, it typically takes
24 hours to make your rst batch of ice cubes.
If This is Your First Ice Maker
Occasionally you may hear sounds, like the owing of water
or ice cubes dropping. These sounds are quite normal and are
not a cause for concern or complaint. In periods of infrequent
use ice cubes may stick together; again this is quite normal.
ArtNo.600-0020 - Removing the bottle rack
ArtNo.600-0005 - Freezer drawer 1
Ice maker
Ice or frozen
food section
ArtNo.600-0021 - Removing the crisper shelf
Fig.2.6
Fig.2.7
Fig.2.8
Fig.2.9
Fig.2.10
Page 8
6
Holiday
TEMPERATURE CONTROL
Frz.
Temp
OK
Ref.
Temp
3S
1
2
Lock
TEMPERATURE CONTROL
Frz.
Temp
OK
Ref.
Temp
3S
1
2
TEMPERATURE CONTROL
Frz.
Temp
OK
Ref.
Temp
3S
S.Frz. Ice Fuzzy Holiday Lock
C
D
F
A
B
H
E
J
G
I
K
If You Do Not Use Ice Too Often
Older ice cubes can get stale. Clean the ice container
periodically using warm water. Before putting it back, dry it
well so that the cubes do not stick to the surfaces.
If You Do Not Use the Ice Container For Long Periods of
Time:
If you will not be using the ice container for a long time,
throw out the remaining ice cubes, wash the container with
warm water, dry it with a towel and place back in the fridge.
Close the water supply to the ice maker (see ‘Closing the Water
Supply to the Ice Maker’).
Note: When opening the upper freezer drawer, avoid rapid
pull out which can cause the ice cubes to fall into the lower
deep freeze drawer.
When the ice maker is dropping ice into the ice
container, a signal of circling dashes appears on the
dispenser screen. It is recommended the user waits
for the ice cubes to drop before opening the top
freezer drawer.
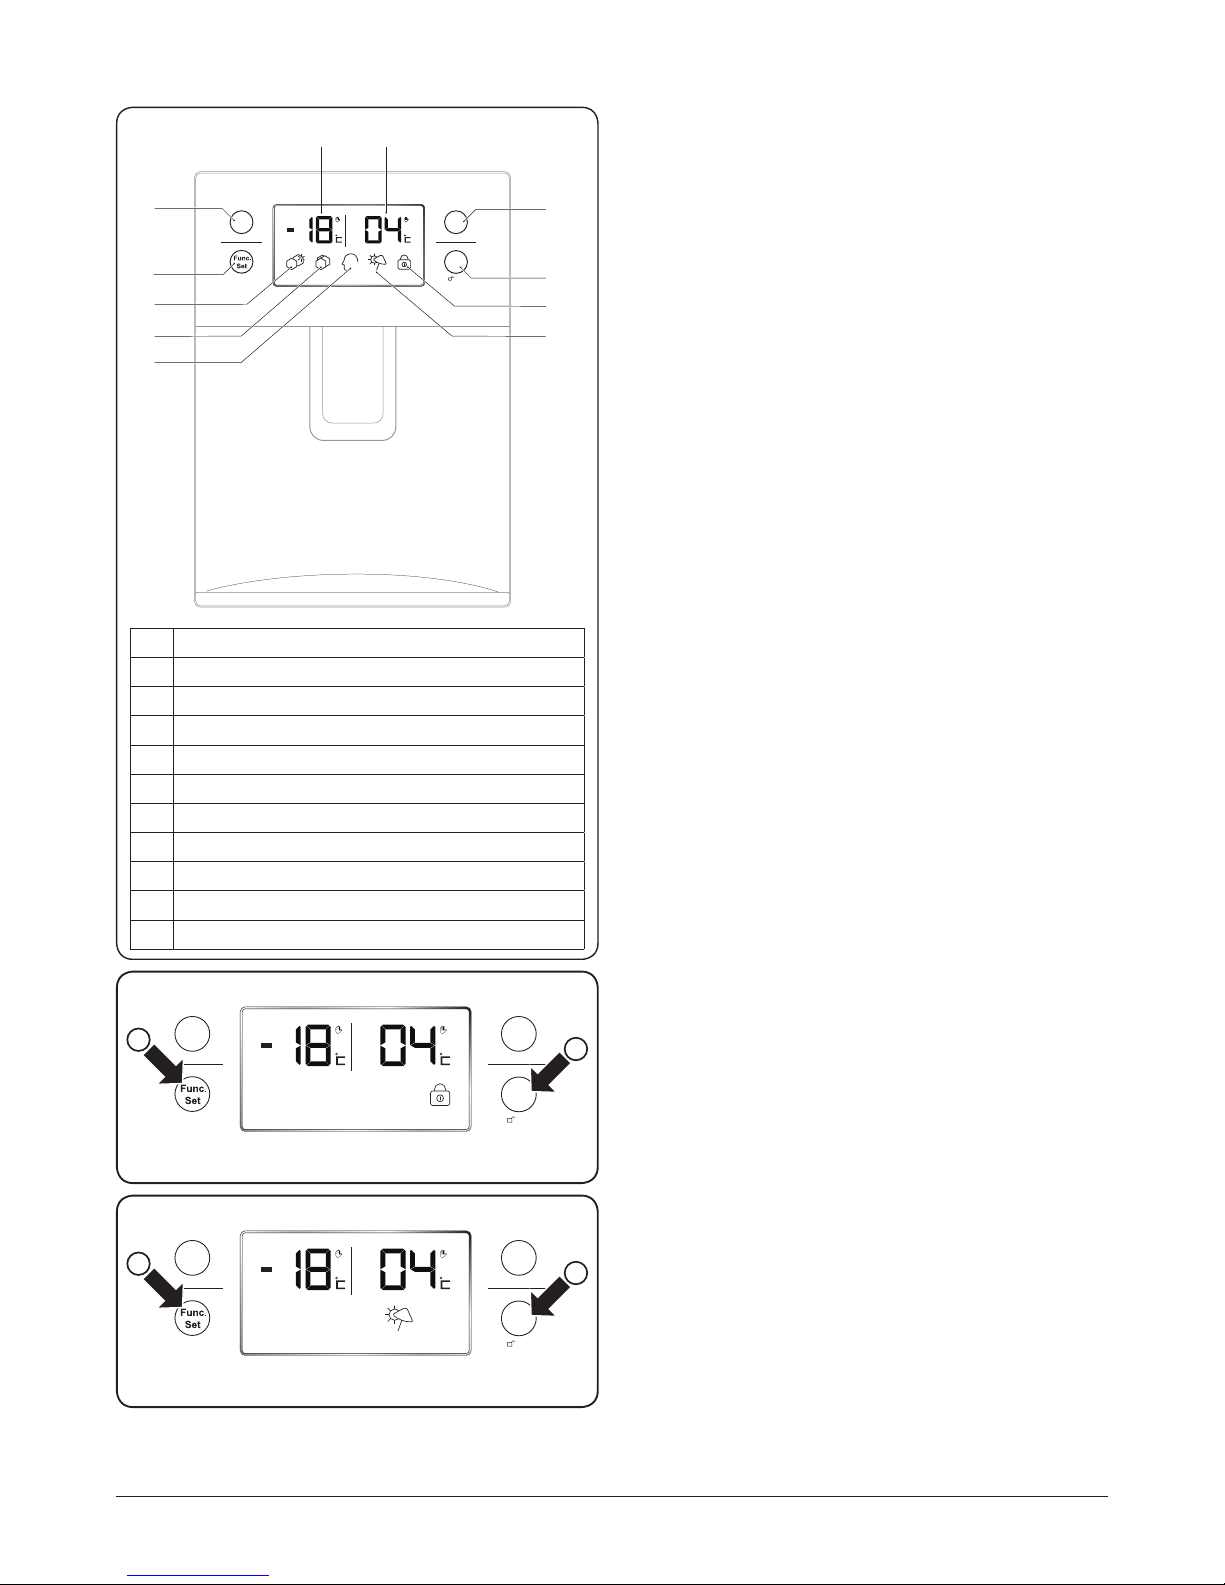
Fridge Freezer Operation
The water dispenser, digital display and function buttons are
shown in Fig.2.11.
Lock Mode
This feature will lock the temperature and function settings.
When locked, the lock icon is displayed.
To Lock
1. Press the ‘Func. Set’ button until the ‘Lock’ setting is
selected, the ‘Lock’ icon will ash (Fig.2.12).
2. Now press the ‘OK’ button to conrm selection. The
‘Lock’ icon will turn on and the refrigerator will lock.
To Unlock
Press and hold the ‘OK’ button for 3 seconds. The ‘Lock’ icon
will turn o and the refrigerator will unlock.
Holiday Mode
This feature allows you to leave the fridge section unused
while the freezer section operate as normal.
Before activating the Holiday mode, empty the
fridge section to avoid spoilage.
To Turn On
1. Press the
‘Func. Set’
button until ‘Holiday’ mode is
selected, the ‘Holiday’ icon will ash
(Fig.2.13)
.
2. Now press the ‘OK’ button to conrm selection. The
‘Holiday’ mode icon will turn on.
To Turn O
1. Press the
‘Func. Set’
button until ‘Holiday’ mode is
selected.
2. Now press the ‘OK’ button: the
‘Holiday’
mode icon will
turn o.
Fig.2.11
Fig.2.12
Fig.2.13
A Function selector button
B Function conrm button
C Freezer temperature button
D Fridge temperature button
E Freezer temperature display
F Fridge temperature button
G Quick freeze icon
H Lock icon
I Ice icon
J Holiday mode icon
K Fuzzy intelligence icon
Page 9

7
Fuzzy Mode Function
This function activates the articial intelligence and allows
the fridge-freezer to automatically adjust its internal
temperatures according to the outside temperature .
Note: With Fuzzy mode active, the fridge and freezer
temperature setting buttons will not work.
To Turn On
1. Press the
‘Func. Set’
button until ‘Fuzzy’ mode is selected,
the ‘Fuzzy’ icon will ash
(Fig.2.14)
.
2. Now press the ‘OK’ button: the
‘Fuzzy’
icon will turn on.
To Turn O
1. Press the ‘Func. Set’ button until ‘Fuzzy’ mode is selected.
2. Now press the ‘OK’ button: the ‘Fuzzy’ icon will turn o.
Ice Maker Function
When the fridge-freezer is rst powered on, the ice maker
defaults to o.
To Turn On
1. Press the
‘Func. Set’
button until ‘Ice’ mode is selected,
the ‘Ice’ icon will ash
(Fig.2.15)
.
2. Now press the ‘OK’ button: the
‘Ice’
icon will turn on.
To Turn O
1. Press the ‘Func. Set’ button until ‘Ice’ mode is selected.
2. Now press the ‘OK’ button: the ‘Ice’ icon will turn o.
IMPORTANT: Make sure that you empty the ice maker
container before you turn o the ice maker, as the ice will
melt.
Super Freeze Mode
This function is designed to freeze food completely in the
shortest possible time to maintain the nutrients within the
food.
Use this feature before putting large quantities of food into
the freezer chamber at any one time. We recommend that
you turn on the Super Freeze mode 12hours in advance, as
this will lower the temperature in the freezer compartment
before you place any food in it.
To Turn On
1. Press the
‘Func. Set’
button until ‘S-Frz.’ mode is selected,
the ‘S-Frz’ icon will ash
(Fig.2.16)
.
2. Now press the ‘OK’ button: the
‘S-Frz’
icon will turn on.
To Turn O
1. Press the ‘Func. Set’ button until ‘
S-Frz
’ mode is selected.
2. Now press the ‘OK’ button: the ‘
S-Frz
’ icon will turn o.
Note: Selecting the Super Freeze mode will automatically
disable the Fuzzy status.
By re-selecting Fuzzy mode the Super Freeze status is
automatically disabled.
Fuzzy
TEMPERATURE CONTROL
Frz.
Temp
OK
Ref.
Temp
3S
1
2
Ice
TEMPERATURE CONTROL
Frz.
Temp
OK
Ref.
Temp
3S
1
2
S.Frz.
TEMPERATURE CONTROL
Frz.
Temp
OK
Ref.
Temp
3S
1
2
Fig.2.14
Fig.2.15
Fig.2.16
Page 10

8
Temperature Setting and Control
Adjusting the Freezer Temperature
Press the ‘Frz. Temp’ button (Fig.2.17). The freezer
temperature display will start blinking, which means the
freezer section is in the temperature setting mode.
Press the ‘Frz. Temp’ button to scroll, in turn, through the
freezer temperature range from –14 °C through to –22 °C.
Without any further operation in 5 seconds, the blinking will
stop and the temperature will be set. The temperature will
also stay still at the time you press any other button during
the blinking.
Adjusting the Fresh Food Temperature
Press the ‘Ref. Temp’ button (Fig.2.18). The fridge temperature
display will start blinking, which means the fridge is in the
temperature setting mode.
Press the ‘Ref. Temp’ button to scroll, in turn, through the
fridge temperature range from 09 °C through to 01 °C.
Without any further operation in 5 seconds, the blinking will
stop and the temperature will be set. The temperature will
also stay still at the time you press any other button during
the blinking.
Operating the Water Dispenser
When using the water dispenser for the rst time you may not
get water out immediately since air will be in the line. Please
press the dispenser tab for at least 1 minute, to clear the air
and replace it with water from the water tank.
The rst few cups of water will be warmer than the remaining
cups. This is normal.
• Do not use a paper cup or one that is too tall to fit into
the dispenser cavity.
• When dispensing water please keep your cup under the
spout for a few seconds after finishing operating the tab
to catch all the water droplets.
• If the dispenser has not been used for a while, throw
away the first 5 cups of water to remove any impurities
in the lines.
Door Ajar Alarm
If any door is left open for more than 60 seconds the Door
Ajar Alarm function will start. An alarm will buzz at 30-second
intervals to alert the user that a door has been left open.
Power-breaking Memorising Function
When the refrigerator turns o as a result of a power surge,
the state of the refrigerator before the power break is
memorised. Once restarted, this allows the refrigerator to
operate with the programmed default values as before the
power break.
S.Frz.
TEMPERATURE CONTROL
Frz.
Temp
OK
Ref.
Temp
3S
S.Frz.
TEMPERATURE CONTROL
Frz.
Temp
OK
Ref.
Temp
3S
Fig.2.17
Fig.2.18
Page 11

13
Tips on Storing Fresh Food
• Make sure that foods, which have been cooked and
require chilling, are at room temperature before placing
them into the appliance. Make sure that these foods are
stored in suitable containers.
• Foods stored in the refrigerator should be cleaned and
dried before storing.
• Before foods are put into the refrigerator, it is
recommended that the foods should be pressurised,
so that the water cannot vaporise, and the fruits and
vegetables keep fresh and food smells will not mix.
• Stored foods can be marked in bags.
• Foods eaten daily should be stored at the front of the
shelf.
• Make sure that foodstuffs are stored systematically (raw
meats with raw meats, dairy with dairy) to avoid flavour
transfer and cross contamination. Raw meats should be
stored towards the bottom of the appliance to prevent
the possibility of it dripping onto uncooked food. Other
foods should be stored above raw meat.
• When storing food in the fresh food section always
make sure there is adequate space for airflow
circulation. This helps to maintain the shelf life of the
food.
• When storing food in the refrigerator make sure that
foods are not too close to the rear wall to avoid the risk
of freezing.
• It is suggested for radishes and other root vegetables to
trim the leaves. This keeps the nutrition in the root and
not absorbed by the leaves.
• Put frozen foods into the fresh food area to let them
defrost. The low temperature of the refrigerator reduces
the formation of bacteria and extends food life.
• Some foods like onions, garlic, bananas and root
vegetables are better stored at room temperature than
in the fridge.
• Melon, pineapples and bananas can go directly into the
freezer after preparing, for storage over a longer period.
• Packaging fresh foods properly, using the correct
temperature and taking into account food hygiene, will
enhance the quality of fresh foods stored within this
appliance.
• Use plastic bags, aluminium foil or other food wraps to
cover fresh foods not in packaging to prevent flavour
transfer and prevent contamination.
• Before storing items in multi-packs (i.e. yoghurt) remove
any excess packaging.
NEVER store anything that is ammable, volatile or
explosive inside the appliance.
• Beverages with high alcohol content should be stored
vertically in tightly sealed bottles.
• Delicate foods should be stored in the coolest part of
the appliance.
• Try not to open the door too often.
• Set the thermostat to make sure that foods remain
suitably cold; try to avoid freezing within the fridge.
Using a thermometer will help you to judge how cool
the appliance is. Place it into a glass of water and leave
it inside the appliance for several hours to get a reliable
reading.
• Some foods contain natural oils and acids (e.g. citric
acid) which can damage plastics if spilled – make sure
these foods are suitably contained.
• Unpleasant odours inside the fridge are a sign that
something has spilled and cleaning is required. Using
warm water with bicarbonate of soda will clean the
interior of the appliance and remove most spillages (see
‘Cleaning and Maintenance’).
• Always remember to remove perishable foods from this
appliance before taking prolonged trips of holidays.
3. Food Storage Tips
Page 12

14
Tips on Freezing Food
• As with storing fresh foods, suitable packaging, correct
temperature and food hygiene will enhance the quality
of the food you are freezing.
• Avoid putting hot foods into the freezer. First let them
cool until they reach room temperature.
• Make sure that all foods for freezing are of a high
quality, and suitable for freezing.
• Use packaging material that is odourless and airproof
(such as plastic bags) to store food in so different foods
can be mixed without affecting the quality. Make sure
that it is airtight. Leaking packaging will dehydrate the
products and lead to loss of beneficial vitamins.
• Keep the surface of the packaging dry – this keeps the
packs from freezing together.
• Mark packages with the kind of food contained and the
date of storage.
• Food needs to be frozen quickly, so it is best to
freeze small portions whenever possible and ensure
that they are as cold as possible before storage. The
recommended maximum weight for each portion is
2.5 kg.
• Keep food which is fresh away from food which is
already frozen, if you need to freeze fresh food every
day, make sure that it is in small portions to prevent this.
• Do not exceed the maximum load for freezing – which is
given as 10 kg / 24-hours (see data badge for details).
• Write the expiry date and food names on the outside of
the packaging so you can be assured of the food type
and when it is safe to eat.
• Take food from the freezer to defrost when needed.
Defrosted food cannot be refrozen unless it is cooked.
• Do not put too much fresh food into the freezer at once.
This could go beyond the freezer’s cooling capacity (see
‘Technical Data’).
When storing commercially frozen foods, please follow these
guidelines:
• Always follow manufacturers’ guidelines for the length
of time you should store food for. Do not exceed these
guidelines!
• Try to keep the length of time between purchase and
storage as short as possible to preserve food quality.
• Buy frozen foods, which have been stored at a
temperature of –18 °C or below.
• Avoid buying food which has ice or frost on the
packaging – This indicates that the products might have
been partially defrosted and refrozen at some point –
temperature rises affect the quality of food.
• Should there be a power cut, or the freezer /
refrigeration appliance fail for any length of time you
may need to remove food from the freezer and store
in a cold, hygienic place (i.e. garage or out house area)
until the power is restored, or the appliance is repaired.
• To prevent undue temperature rises you should wrap
the foods in layers of insulating material, such as
newspaper, to help to maintain their temperature. It is
also important that any food affected by this situation
should be either consumed or cooked and refrozen
(where suitable) soon afterwards in order to prevent
health risks.
• Layers of newspaper can also be used to help keep
foods cold while you are defrosting the freezer (see
‘Cleaning and Maintenance’).
Page 13

11
ArtNo.600-0034 - Clearances
15mm
ArtNo.600-0033 - Door clearances
15 15
590
400
400
All dimensions in mm
ArtNo.600-0009 - Removing the door
ArtNo.600-0011 - Disconnecting the pipes
Positioning Your Appliance
Choosing the Right Location
This appliance should be installed in a room that is dry
and well ventilated. To ensure adequate ventilation, the
refrigerator should be at least 15 mm clear on all sides
from kitchen cabinetry (Fig.4.1). Any units placed above
the appliance must be clear by 15mm to allow sucient
ventilation.
If locating the refrigerator close to a corner, sucient spacing
must be left for opening the doors and removing the shelves
(Fig.4.2).
This appliance should be at least 100 mm from any electric
or gas cooker and 300 mm from any coal or oil stove. If this is
not possible, ensure that appropriate insulation is used.
Avoid exposing the appliance to direct sunlight, and sources
of heat (such as radiators, heaters or cookers).
If this appliance is situated in a cold environment (such as
a shed, outhouse or garage) it will aect its performance.
You may nd that the performance of the appliance is not
consistent and this may damage foods. A consistent ambient
temperature of 10 °C or above is recommended.
Removing and Installing the Doors and
Drawers
In the event that you need to remove the
refrigerator doors, please follow the door removal
and installation instructions below.
It is suggested, for your safety, to have two or more
people to assist you in completing the below task to
avoid injury, product damage or property loss.
Door Removal and Installation
Undo the retaining screws on the top cover. Remove the top
cover and place to one side for reinstallation.
Right-hand Door
Using a suitable screwdriver, remove the top hinge screws
and remove the hinge. Lift the refrigerator door o the lower
hinge (Fig.4.3) and place it to one side.
Ret the door and cover in the reverse sequence.
Left-hand Door
Disconnect the wire cable connector (Fig.4.4) above the lefthand hinge.
Using a suitable screwdriver, remove the top hinge screws
and remove the hinge. Lift the refrigerator door o the lower
hinge and place it to one side.
Ret the cable, pipe, door and top cover in the reverse
sequence.
When removing the hinge and separating it from the
door body make sure to support the door to stop it
falling forward.
Fig.4.1
Fig.4.2
Fig.4.3
Fig.4.4
4. Installation
Page 14

12
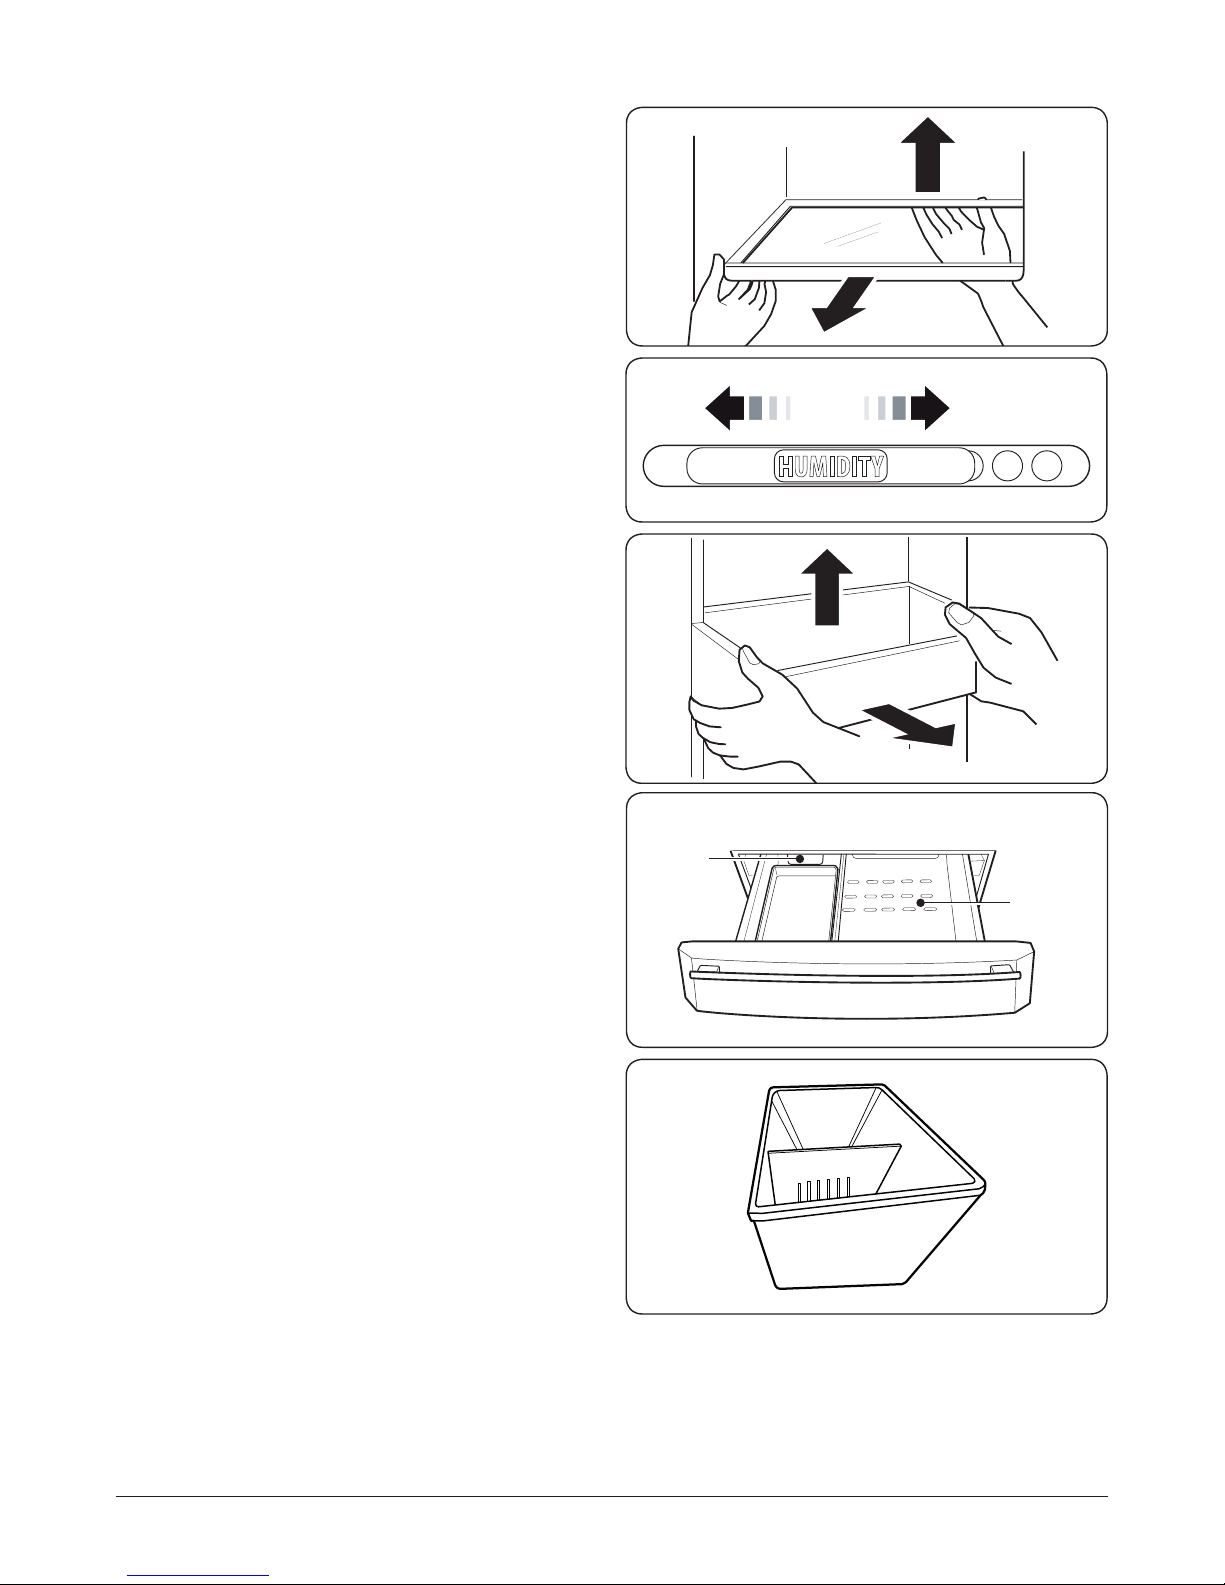
Removing the Upper Freezer Drawer Inner
Compartment
Open the drawer as far as possible. Remove the ice tray. Pull
the rear section of the drawer inner compartment upwards
slightly to enable the front section to be released from the
door (Fig.4.5).
Hold and pull the front section of the inner compartment
upwards to remove it from the refrigerator.
Removing the Lower Freezer Drawer Inner
Compartment
Open the drawer as far as possible. Pull the rear section of the
drawer inner compartment upwards slightly to enable the
front section to be released from the door (Fig.4.6).
Hold the front section of the inner compartment and pull it
upwards to remove it from the refrigerator.
Adjustable Feet
Make sure that the appliance is on solid level ooring. If the
refrigerator is placed on a plinth, at, strong and re resistant
materials must be used.
This appliance has front adjustable feet, which can be used to
level the appliance.
Insert a suitable at screwdriver into the slots of the
adjustable feet. Turn the screwdriver clockwise to raise the
feet (Fig.4.7), and anti-clockwise to lower the feet (Fig.4.8).
Levelling the Doors
If the door heights are uneven, spacer rings (supplied) can be
inserted to raise the door level.
Raise the door up from the lower hinge. Using a suitable pair
of pliers, insert a clip ring between the door and hinge
(Fig.4.9). Up to three clip rings can be inserted as required.
Installing the Bottom Decorative Strip
and Handles
The supplied decoratiove strip should be xed to the base of
the refrigerator, using the 2 screws provided.
The door handles x onto mounting studs (supplied).
1. Screw the mounting studs into the holes located on the
door shells.
2. Place the handle rmly over the mounting studs.
3. Using the M3 Allen key, tighten the grub screw xing
the handle to the door.
Do not over-tighten the grub screw.
ArtNo.600-0035 - Adjusting the feet
ArtNo.600-0003 - Door alignment
Fig.4.6
Fig.4.8
Fig.4.9
Fig.4.7
Fig.4.5
Page 15

13
Electrical Supply Connection
Connect the appliance to the electrical supply (220-240V ~
50Hz) with the plug and lead, which are tted.
Connections to the mains supply should be in accordance
with local regulations.
The appliance must be plugged into an earthed
socket.
Always make sure that the plug is accessible after
the appliance has been positioned.
Water Supply Connection
It is recommended to have this product installed by
a qualied technician.
Cut the water pipe according to need and avoid bending the
water pipe too much. Usually, the pipe length should be less
than 5 m. If the water pipe is too long, the ice and cold water
content will be aected because there may be insucient
water pressure.
Insert one end of the water supply pipe into the water inlet
on the rear of the appliance (Fig.4.10).
Connect the other end into the plastic adaptor. Screw the
adaptor onto a suitable ¾” check valve or washing machine
valve.
The water pressure should be between 207-827 kPa
(21-123 psi) for correct operation of the cold water dispenser
and ice maker.
Open the water valve to ush the pipe, check leakage in the
water pipe joints and allow the water to run until it is clear.
The water pipe cannot withstand heat. Keep it away from all
heat sources.
Before rst use, press the water dispenser pad several times
for 1 minute. Do not press for more than 1 minute to prevent
overheating of the pad activator solenoid. Cold water will
begin to ow from the outlet.
The water lter is there to lter impurities in the water, and to
make ice clean and hygienic. It cannot sterilise or destroy
anything, so be certain to connect the water pipe to a
drinkable water source.
• To prevent the pipe from freezing, do not install the
water pipe in a space below 0 °C.
When the temperature of the ice maker is equal to or below
–15 °C the ice maker will begin to make ice.
• Throw out the first few batches of ice cubes if you are
making ice for the first time or have not made it for a
long time.
• After the refrigerator is installed, put the water supply
pipe in a suitable place to prevent crushing and
damage.
• If the cubed ice becomes smaller, this may suggest that
the filter is blocked from the impurities.
ArtNo.600-0045 - Fitting the water pipe 1
Water pipe
Fig.4.10
Page 16

14
Defrosting
Defrosting is done automatically so there is no need to
manually defrost this appliance.
DO NOT use mechanical devices to accelerate the
defrosting process.
Cleaning
Disconnect the appliance from the power supply
before cleaning.
To keep internal odours to a minimum it is best to periodically
clean the inside shelves, crispers, bins and wall.
Empty the appliance of food and remove the shelves.
Clean the interior using warm water and bicarbonate of soda
with a soft cloth. Make sure that the interior is then dried
carefully with a suitable cloth.
DO NOT use harsh abrasives, or aggressive cleaners
as these can damage the interior of the appliance.
Shelves and other accessories (plastic and glass parts) can be
cleaned in the sink using liquid dishwashing liquid and warm
water. Make sure all soap is rinsed o and all parts are dry
before replacing them inside the appliance.
Always keep the door seals clean.
The fridge is heavy. When moving the refrigerator
be careful to protect the oor. Keep the refrigerator
vertical and do not tilt the refrigerator – this
prevents damage to the oor.
DO NOT spray or rinse the fridge with water or other
liquids. This could harm the electrical parts.
Use a dry cloth when cleaning near the electrical
parts (such as the light bulb or switch).
DO NOT clean the fridge with a sti or wire brush.
DO NOT use an organic solvent such as detergent,
petrol, lacquer, thinners, acetone or acid.
To prevent your skin sticking to cold steel parts,
make sure your hands are not wet when touching
the parts.
DO NOT use HOT water to clean the glass shelves, as
they may break or crack.
5. Cleaning and Maintenance
Shutting Off the Refrigerator
In the event of a power cut, food should remain safely cold for
about 3 hours.
Should there be a prolonged power cut you may need to
remove food from the freezer compartment and store it in
a cold place, wrapped in layers of newspaper to preserve
suitable temperatures.
Once power is restored replace the food back into the freezer
compartment.
Should food begin to defrost, or the power cut last longer
than expected, it is advised that you consume any food
removed from the freezer.
If the power outage is short term, most foods can be left
inside the freezer compartment – this is the best way of
preserving temperature – and surrounded by ice cubes from
the icebox. This is also an ideal solution for power outages
you may have been pre-warned about.
When experiencing a power cut of any kind, do not add any
extra foods to the freezer.
When Not in Use
If you are not using the appliance for an extended length
of time, it is recommended that you switch o the electrical
supply, empty any food out, clean the inside of the appliance
and leave the door ajar. This will save energy, and also prevent
a build up of stale odours inside.
The Light
The LED interior lights come on when the door is opened.
The performance of the light is not aected by any of the
appliances other settings.
Water Filter
To maintain water quality, the lter will need replacing from
time to time. We recommend that the water lter is replaced
every 2 years. However, if the water quality show signs of
deterioration, either visually or in taste, then the lter should
be changed sooner.
Page 17

15
6. Troubleshooting
Before calling for service, please rst read the following table: this could save you time and money.
Problem Cause Solution
The temperature is too low
1.1 The temperature inside the
freezer is too low, with the fresh
food temperatures ne.
1.1.1 The temperature inside the
freezer section is set too low.
1.1.1.1 Set the temperature in the freezer slightly
higher then wait 24 hours for new balance to be
achieved.
1.2 The temperature inside the
fresh food compartment is too
cold, while the freezer sections
are ne.
1.2.1 The temperature inside the
fresh food area is set too low.
1.2.1.1 Set the temperature inside the fresh food
section slightly warmer. The temperatures will
reach new balance within 24 hours.
1.3 The foods stored in the full
width pantry are frozen.
1.3.1 The control setting in the
fresh food area is set too cold.
1.3.1.1 Set the fresh food control setting slightly higher.
The new set point temperature will reach a
balance within 24 hours.
1.4 The foods stored in the crisper
are frozen.
1.4.1 The settings for the fresh
food compartment are too
cold.
1.4.1.1 Raising the fresh food control settings to a
slightly higher temperature and/or lowering the
humidity control setting will prevent frost or ice
forming.
1.5 Readings on the dispenser
display are showing error
codes.
1.5.1 An electronic operating
problem has been
encountered.
1.5.1.1 Call your service engineer who can diagnose the
problem and make correction.
The temperature is too high
2.1 The freezer drawer sections
or fresh food compartment
temperatures are too high.
2.1.1 The doors or drawers are
open frequently or for too
long each time.
2.1.1.1 Try to reduce frequency of opening doors and
drawers.
2.1.2 The doors or drawers are left
open.
2.1.2.1 Take extra care to keep gaskets sealing well
around the perimeter of the doors. Keep gaskets
clean and dirt free.
2.1.3 The condenser is dirty. 2.1.3.1 Periodically clean the condenser coil with a
vacuum cleaner attachment.
2.2 The temperature is too warm in
the freezer but okay in the fresh
food section
2.2.1 The temperature setting in
the freezer is set too warm.
2.2.1.1 Set the temperature colder for the freezer
section. Then allow it to balance within 24 hours
at new colder temperature.
2.3 The temperature is too warm in
the fresh food section but okay
in the freezer.
2.3.1 The temperature setting in
the fresh food section is set
too warm.
2.3.1.1 Set the food temperature control slightly colder.
The new colder temperature can be achieved
within 24 hours.
2.4 The temperature inside the
crisper is too warm.
2.4.1 The fresh food set
temperature is too warm.
2.4.1.1 Set the fresh food temperature colder and the
balance to colder temperature will be achieved
within 24 hours
Water, humidity or frost/ice in the fridge
3.1 Moisture formation on the
inside of the fridge.
3.1.1 It is in a hot or humid
environment.
3.1.1.1 Try raising the temperature slightly in the
aected compartment.
3.1.2 The door or drawer is left
open.
3.1.2.1 Check to make sure the door gaskets are clean
and sealing well against the metal cabinet
frame.
3.1.3 The door or drawer is opened
too frequently or for too long
each time.
3.1.3.1 Reduce the frequency of door openings.
3.1.4 Food containers or liquids are
left open.
3.1.4.1 Let hot foods cool to room temperature and
cover foods and liquids.
Page 18

16
Problem Cause Solution
3.2 Water droplets collect in the
lower crisper drawer areas.
3.2.1 Humidity settings are set too
high.
3.2.1.1 It is normal for some wet air to collect inside the
enclosed crisper. To reduce the accumulation
of moisture, lower the humidity setting and/or
raise the fresh food compartment temperature.
3.3 Water forms at underside of the
crisper glass covers.
3.3.1 Moisture given o from wet
foods.
3.3.1.1 When placing foods in the fridge rst pat them
with a dry cloth to remove excess moisture.
3.3.2 Door seal leaks or frequent
door openings in humid
environment.
3.3.2.1 Check the door gaskets and reduce door
openings. Possibly raise fresh food temperature.
Water/humidity/frost on the outside of the fridge
4.1 Wet air forms droplets of water
on the outside edges of the
fridge.
4.1.1 Warm, humid air in the
environment mixes with
cooler air at the door gasket
areas of the fresh food
and freezer compartments
causing condensation.
4.1.1.1
4.1.1.2
A small amount of dew or water moisture is
normal. It is best to wipe it down with a dry
cloth to improve performance.
A slight increase in the compartment
temperatures can reduce this moisture
formation.
4.1.1.3 Check door gasket for proper seal and clean.
Automatic Ice maker
5.1 The ice maker has stopped
making ice.
5.1.1 The ice cube height sensor
arm has detected a full tray
condition.
5.1.1.1 To make more ice cubes you may distribute
your ice to the center drawer right side (or lower
drawer) to increase ice cube harvest
5.1.2 The water supply valve is
closed.
5.1.2.1 Turn on the water supply valve.
5.1.3 The freezer section is not
cold enough.
5.1.3.1 Adjust the setting to the freezer to colder setting
and allow it to balance within 24 hours.
5.1.4 The water source saddle
valve is somehow blocked.
5.1.4.1 Check the water supply saddle valve for
obstruction and replace it if damaged.
5.2 The ice making capacity is low. 5.2.1 The freezer drawer area is not
cold enough.
5.2.1.1 Set the freezer drawer to a colder setting.
5.2.2 The water supply valve is not
at a high enough pressure or
not open all the way.
5.2.2.1
5.2.2.2
1.7–8.4 bar (25–121 psi) and add water booster
if too low.
Make sure the water valve supply is open all the
way.
5.2.2.3 Make sure the water lter is distributing enough
water and is not clogged.
5.2.3 The ice maker sensor arm is
restricted or out of position.
5.2.3.1 Make sure the drawer gaskets are sealing and
kept clean from dirt or debris.
5.3 The ice maker runs
continuously.
5.3.1 The ice maker level sensor is
stuck in the down position.
5.3.1.1 Check the movement of the ice maker sensor
arm so it rests in the ‘up’ position.
5.3.1.2 Make sure that no frozen packs or objects are
obstructing the ice maker sensor arm.
5.4 The ice cubes have a bad odour. 5.4.1 Uncovered, unwrapped,
foods are stored near the ice
cube container.
5.4.1.1 Cover, wrap, and position frozen foods away
from the ice cube container.
5.4.2 The water lter has
approached the end of its
useful life.
5.4.2.1 Check and replace the water lter.
5.4.3 The ice cubes have been set
for too long a period of time.
5.4.3.1 Dump out the stale ice cubes.
Page 19

17
Problem Cause Solution
Cold water dispenser
6.1 Cold water not dispensing. 6.1.1 The water supply pipe is not
open.
6.1.1.1 Open the water supply line all the way.
6.1.2 The water lter is blocked. 6.1.2.1 Replace the water lter.
6.1.3 The water line is blocked. 6.1.3.1 Check that the water tubes are not kinked or
restricted.
6.2 The water has a strange odour. 6.2.1 The water has been stored
too long without use.
6.2.1.1 Remove 10–12 cups of water and throw away.
Check if the odour improves.
6.2.2 The local potable water
source is suspect.
6.2.1.2 Contact your local water supply company to
check quality of the water.
6.3 The water supply pressure is
too low.
6.3.1 Water pressure level is below
specication minimum of 25
psi (1.7 bar).
6.3.1.1 Contact local plumbing supply dealer to install a
water booster to obtain 1.7–8.4 bar (25–121 psi)
water pressure rating.
The fridge has a bad odour
7.1 The inside of the fridge is dirty. 7.1.1 The inside walls, shelves, and
door bins need cleaning
7.1.1.1 Clean all inside surfaces with warm water and a
clean soft damp cloth then wipe dry.
7.1.2 The foods in the fridge have
been stored beyond their
useful life.
7.1.2.1 Wrap and cover foods to extend useful food life.
The door or drawer is hard to open and/or close
8.1 The door has a closing problem. 8.1.1 The door may have food
articles or packages that are
obstructing closure.
8.1.1.1 Reposition the shelves, door bins, or internal
containers to allow the door to close.
8.1.2 The level of the refrigerator is
causing the door to shift out
of position.
8.1.2.1 Ensure the oor is level using sturdy materials
that are also non ammable.
8.1.3 The door could be hitting
against adjacent cabinets or
appliances.
8.1.3.1 Provide a good 25mm (1”) clearance on all 3
sides and on top of the cabinet so doors can
open and close freely.
8.1.4 The door hinge alignment
may require adjustment.
8.1.4.1 Adjust hinges and add spacer clips supplied.
8.2 The drawers are hard to move
in or out, or will not close.
8.2.1 The stored foods are
interfering with the slide
mechanism.
8.2.1.1 Position the foods away from the drawer sides
and spread out the foods evenly within the
drawers.
8.2.2 The drawer slides are dirty
from food particles.
8.2.2.1 Clean the drawer and wipe down the slides
periodically so the slide ball bearings move
freely.
Page 20

18
Problem Cause Solution
General
9.1 The compressor does not work. 9.1.1 The refrigerator is in deep
freeze cooling
9.1.1.1 This is normal for a refrigerator that goes into
deep freeze automatically. The period of deep
freeze cooling lasts about 30 minutes.
9.1.2 The refrigerator is not
powered on.
9.1.2.1 Make sure the plug is inserted all the way into
the power outlet.
9.1.2.2 Has the circuit breaker tripped? Check and
change to a new 13A fuse and/or reset the
circuit breaker.
9.1.2.3 Check the electrical supply to the room. Call the
local electricity company.
9.2 The fridge operates frequently
or operates for a long time.
9.2.1 The room temperature or
ambient temperature is high.
9.2.1.1 It is normal for the fridge to operate
continuously.
9.2.2 The ice maker is in operation. 9.2.2.1 This is normal – the ice maker adds extra work
load in the refrigerator.
9.2.3 The doors or drawers are
frequently opened and
closed.
9.2.3.1 Try to reduce frequency of door or drawer
openings.
9.2.4 The control settings in
the freezer and fresh food
compartments are set to cold
level.
9.2.4.1 Raise up the compartment temperatures slightly
and allow 24 hours to reach new balance.
9.2.5 Door and/or drawer gasket
seals may be dirty, frayed or
cracked.
9.2.5.1 Clean o the gaskets and/or heat slightly with
hair dryer so gasket takes contour of metal
frame.
9.2.6 The condenser is dirty. 9.2.6.1 Clean the condenser.
9.3 The compressor frequently
cycles on and o.
9.3.1 The compartment
temperature sensors keep
the fridge at the set points
causing the compressor to
cycle.
9.3.1.1 This is normal. The fridge compressor will
provide the required cooling level.
9.4 A beeping noise from inside the
fridge.
9.4.1 One door or drawer of the
fridge is open for over 60
seconds.
9.4.1.1 This is normal and will repeat every 1 minute
until the door or drawer is closed.
Page 21

23
If consultation or technical assistance is needed, please
provide the local authorised service agent with the purchase
invoice and the product code/serial number.
The product number/serial number is located inside the
refrigerator on the top left-hand side.
The 2 years free maintenance for the operation of the
appliance started from the date of purchase of this product.
Any cosmetic damage to the appliance must be reported
within 90 days of delivery.
For in-warranty service please call: 0845 6035312.
For general enquiries please call: 0870 7895107.
7. Warranty/After Sales Service
Page 22

20
8. Technical Data
INSTALLER: Please leave these instructions with the user.
DATA BADGE LOCATION: Left-hand side of the refrigerator compartment.
COUNTRY OF DESTINATION: GB, IE.
Dimensions
ArtNo.600-0044 - DxD dimensions
700
910
All dimensions in mm
1820 (including top cover)
Depth with
open door
1070
Ratings
Electrical – voltage / frequency
220–240V 50Hz
Energy eciency class on a scale of A (more ecient) to G (less ecient) A+
Climate class (SN = 10–32 °C, N = 16–32 °C, ST = 18–38 °C, T = 18–43 °C) SN-T
Freezer compartment star rating */***
Temperature range - refrigerator / freezer (from > to) 9 > -1 °C / -16 > -24 °C
Gross capacity 629 litres
Net capacity 522 litres
Net capacity – refrigerator compartment 387 litres
Net capacity – freezer compartment 135 litres
Freezer capacity / 24 hours 10 kg / 24 hours
Energy consumption / year 415 kWh / year
Energy consumption (EN153) 1.14 kWh / 24 hours
Maximum noise level 45 dB(A)
Maximum storage time by power failure 10 hours
• DocNo.600-0008 - Technical data - DxD 910
Page 23

21
Notes
Page 24

www.rangemaster.co.uk
• DocNo.000-0001 - Back cover Rangemaster
Clarence Street, Royal Leamington Spa,
Warwickshire, CV31 2AD, England.
Tel: +44 (0) 1926 457400 Fax: +44 (0) 1926 450526
E-mail: consumers@rangemaster.co.uk
 Loading...