

Page 1

User Guide
)
Appendix
)
English (2–6
English (27
Page 2
User Guide (English)
Introduction
The MX6S splitter/mixer is equipped with the following features:
• 1 rack space size
• Split / Mix switch for each mono channel
• 2 input, 6+2 output splitter
• 6 Balance / Pan controls for each channel
• Main input and output level control
• Main Link function allows routing the Main Input signal to the Main Output.
• Balance and level controls with 6-segment LED meters on mono input channels
• Balanced XLR and TRS connectors
• Dual-voltage unit for global operation
Please see this guide’s Setup chapter to learn how to integrate MX6S with your audio system,
and then refer to the Operation chapter to start using MX6S.
Box Contents
MX6S
Power Cable
User Guide
Safety & Warranty Manual
Support
For the latest information about this product (documentation, technical specifications, system
requirements, compatibility information, etc.) and product registration, visit rane.com.
For additional product support, visit rane.com/support.
2
Page 3
Features
Front Panel
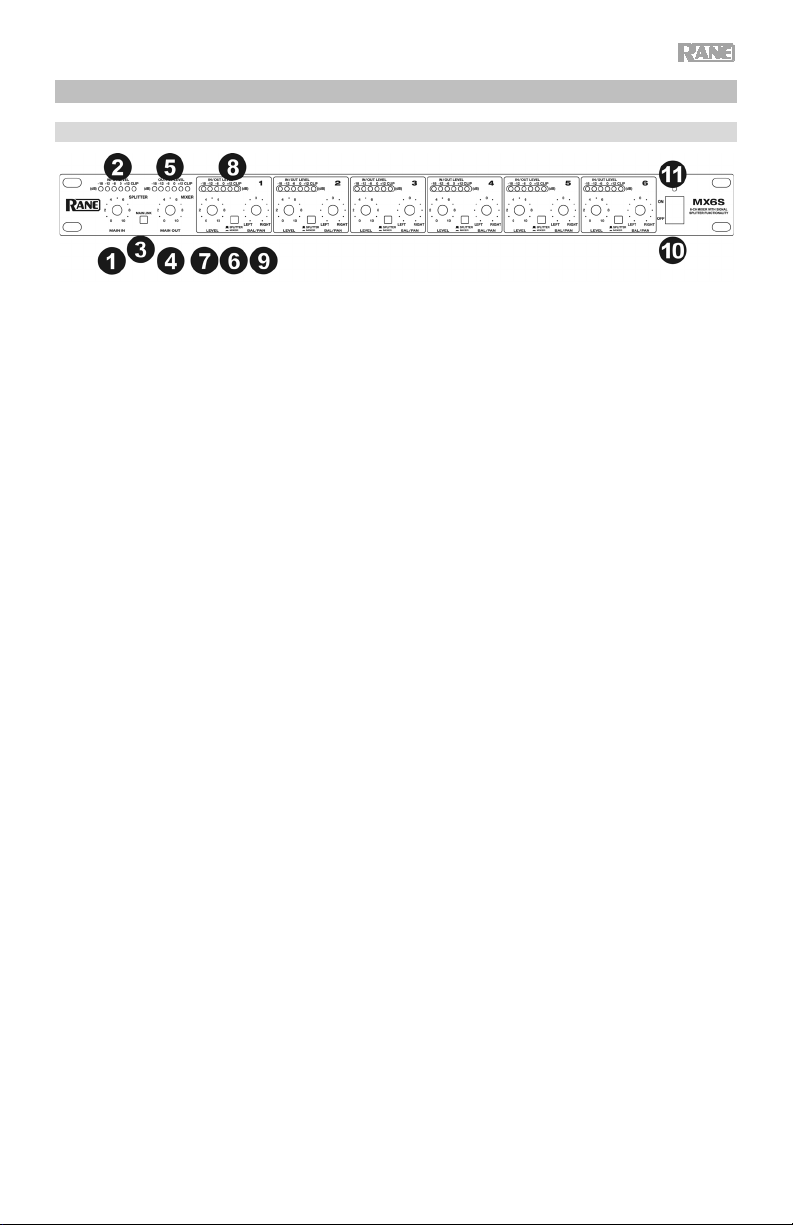
1. Main Input Level Control: Use this knob to adjust the level of the Main Input signal.
2. Input Level Meter: This LED meter shows the level of the Main Input signal. If the Clip
LED illuminates, turn down the Main Input to prevent the signal from distorting.
3. Main Link Control: Press this switch to send the Main Input signal to the Main Output.
4. Main Output Level Control: Use this knob to adjust the level of the Main Output signal.
5. Output Level Meter: This LED meter shows the level of the Main Output signal. If the Clip
LED illuminates, turn down the signal at either the input stage or the Main Output to avoid
distorting the signal.
6. Split/Mix: Use this switch to select the mode for each mono channel. For Splitter mode,
disengage the switch, and the Main Input signal will be split and routed to this channel
output. For Mixer mode, engage this switch, and the mono channel input signal will be
sent to the Main Output bus. This signal will combine with the main input signal when the
Main Link is activated. You can also route the mono channel input signal to the mono
channel output directly.
7. Channel Level Control: Use this knob to adjust the level of each mono channel. In
Splitter mode, this adjusts the output level of each individual mono channel. When in Mixer
mode, this adjusts how much of the mono channel input signal is sent to the Main Output
and/or each individual mono channel output.
8. Input/Output Level Meter: This LED meter shows the output level of each mono channel.
If the Clip LED illuminates, turn down the Main Input Level Control to prevent the signal
from distorting.
9. Balance/Pan Control: If the stereo main signal is split into the mono channel output, or
the mono input signal is routed to the stereo main output bus, use this knob to determine
the proportion between the left and the right channel.
10. Power Switch: Use this switch to turn the unit on or off.
11. Power LED: This LED will light up when the unit is powered on.
3
Page 4
Rear Panel
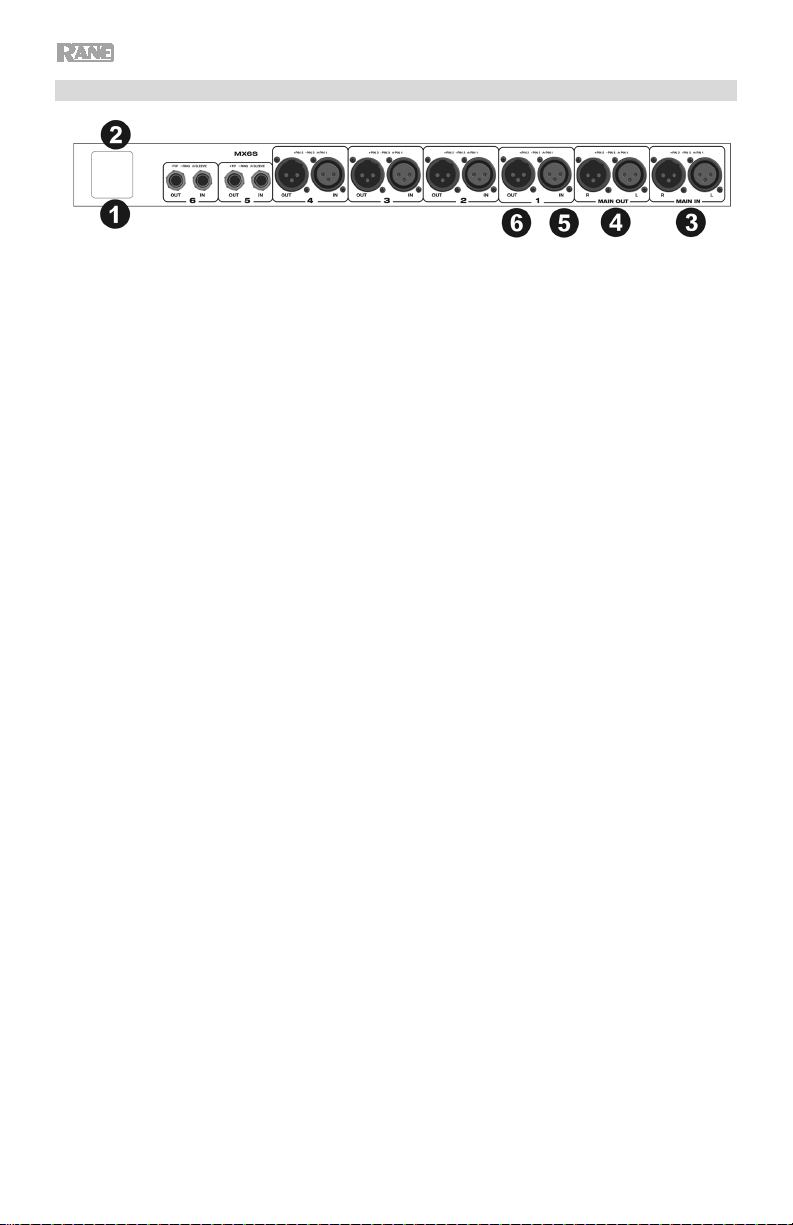
1. Fuse Holder: Check what the available voltage is in your country and confirm the voltage
switch for MX6S is configured correctly before connecting the power cable to MX6S.
Caution: The fuse should only be changed by a qualified technician. If the fuse continues
to blow after replacing, discontinue use of MX6S until it is repaired.
2. Power Connector: Connect the included power cable here.
Note: Do not connect the power cable to MX6S until the voltage has been correctly set.
3. Main Inputs: These two balanced XLR connectors are used to input the main stereo
signal. In Splitter mode, these can be sent to each mono channel output.
4. Main Outputs: These two balanced XLR connectors are used to output the main stereo
signal. By engaging the Main Link switch, the signal will be sent to the Main Input.
5. Mono Channel Inputs: For channels 1-4, use the XLR balanced connectors to input the
mono signal. For channels 5-6, use the TRS connectors.
6. Mono Channel Outputs: For channels 1-4, use the XLR balanced connectors to output
the mono signal. For channels 5-6, use the TRS connectors.
4
Page 5
Mono
6
Mono
5
Mono
4
Mono
Mono
Mono
Main
Main
Mono
6
Mono
Mono
Mono
3
Mono
2
Mono
1
Main Mixed
Main Input
Operation
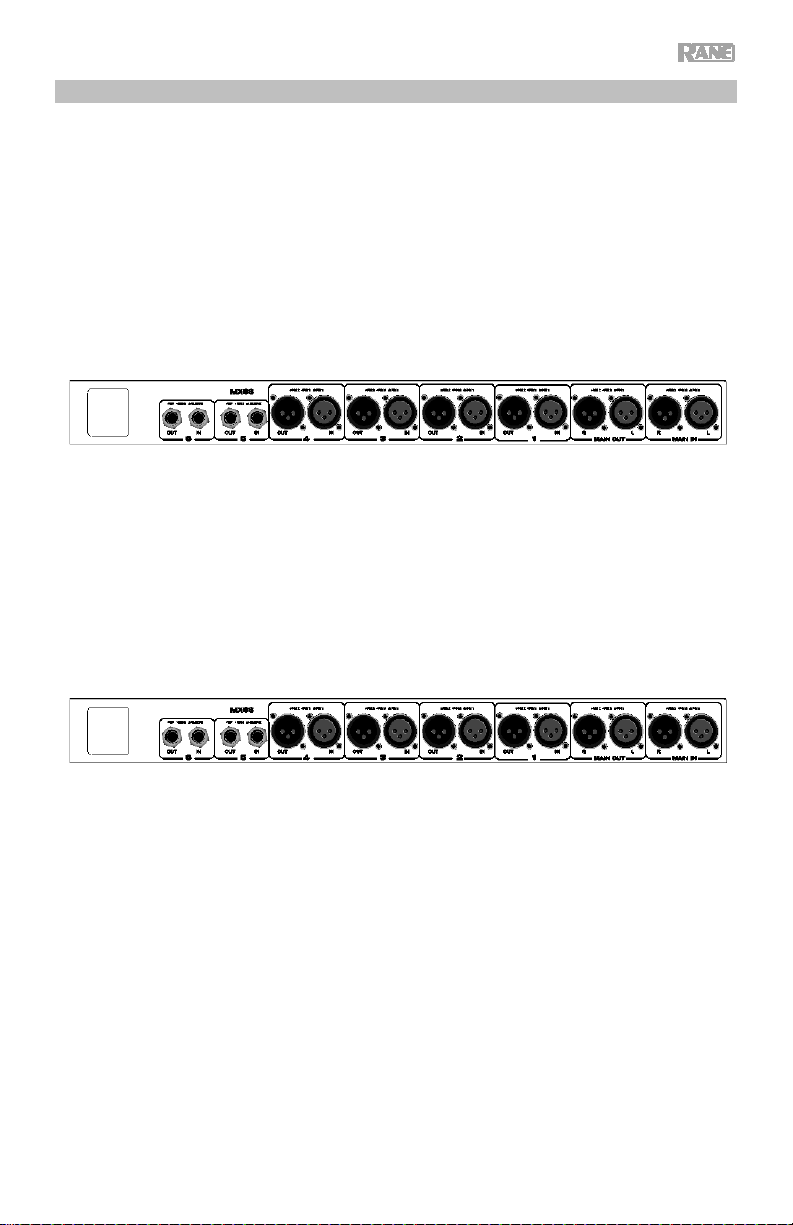
Using MX6S as a splitter:
You can split a specific Main Input signal to 6 outputs. With the Main Link switch engaged, 2
further outputs are added.
In this application, use the Split/Mix switch to select the Splitter operational mode for each
mono channel, apply the main signal from the Main Input connectors, and get the 6 outputs
from the Mono Output connectors of each channel. While the Main Link switch is engaged, the
Main Output will also be linked with the Main Input signal, and two further outputs are provided.
Channel
Output
Channel
Output
Channel
Output
Channel
Output
Using MX6S as a mixer:
Use this application to mix the main stereo signal with several mono signals. Use the Split/Mix
switch to select the mixer operational mode for each mono channel, input the signal from the
mono input of each channel, and output the main mixed signal from the Main Output. While the
Main Link switch is engaged, the Main Input will also be linked with the Main Output signal,
and two further input signals can be mixed with the Main Output signal.
Channel
Input
Channel
Input
5
Channel
Input
4
Rack Mounting
For secure mounting, use a universal rack shelf available from various rack manufacturers or
your local musical instrument dealer. MX6S fits into a standard 19" (483 mm) rack. Please
allow at least an additional 4" (102 mm) depth for the connectors on the rear panel. Be sure
there is enough space around the unit for sufficient ventilation. Do not place MX6S on high
temperature devices (such as power amplifiers) to avoid overheating.
3
Channel
Input
Channel
Output
2
Channel
Input
Channel
Output
1
Channel
Input
Output
Signal
Output
Input
Signal
5
Page 6
Tip
Sleeve
Pin 2
Pin 3
Pin 1,
linked to Pin 3
Balanced
Unbalanced
Tip
Tip
Sleeve
Ring
Pin 1
Tip
Sleeve
1
1
Tip
Sleeve
1
3
Tip
Sleeve
1
Tip
1
1
Center
Tip
Sleeve
Tip
Sleeve
Tip
Tip
Tip
Sleeve
Center
Screen
Tip
Center
1
1
Pin 3
Tip
Sleeve
Ring
Pin 2
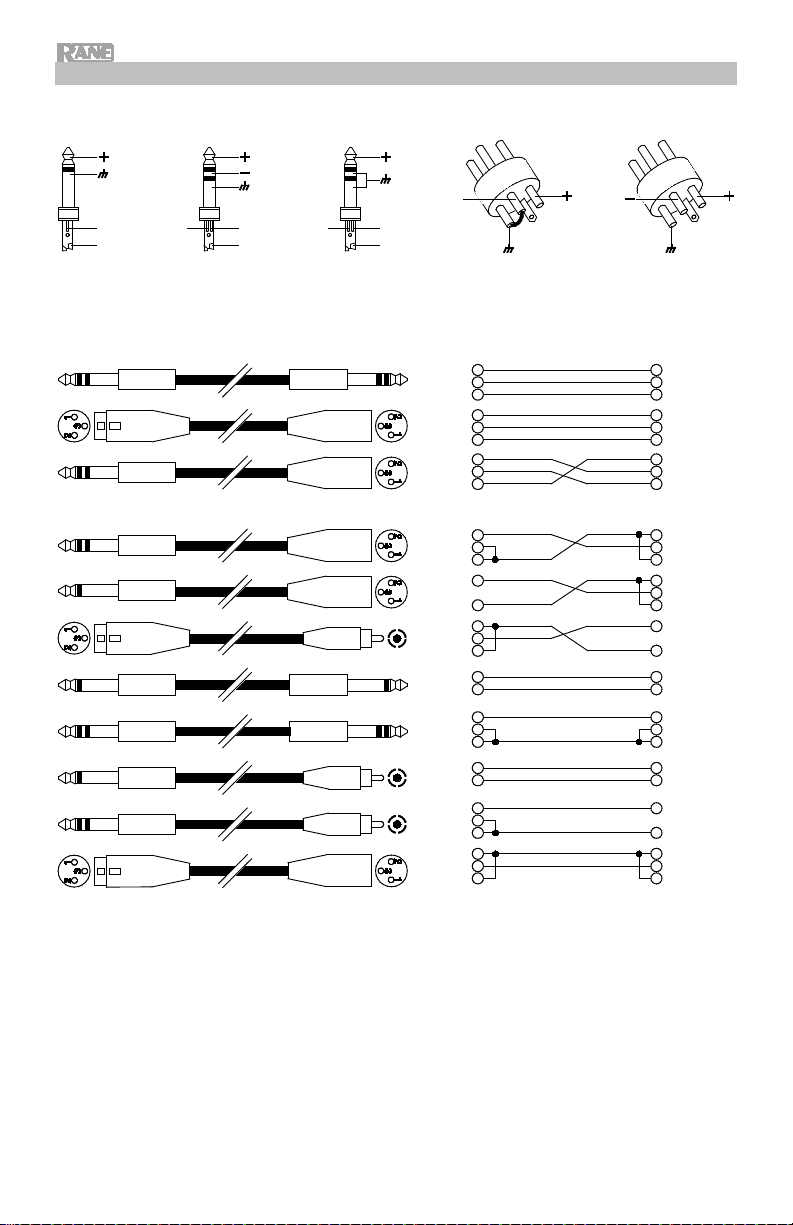
Wire Connections
You can wire your XLR or 1/4” (6.35 mm) TRS cables as balanced or unbalanced.
Here are some examples:
Determine the wiring configuration you need for your application and audio connections:
Ring
Sleeve
2
3
Ring
Ring
Sleeve
2
3
Ring
Sleeve
Ring
Sleeve
2
3
6
Ring
2
3
2
2
3
2
3
Screen
Ring
Sleeve
Screen
2
3
Page 7
Audio Inputs
Connectors
XLR and 1/4" TRS
Type
RF filtered, servo-balanced input
Impedance
50 k Ω balanced, 25 k Ω unbalanced
Nominal Operating Level
-10 dBV to +4 dBu
Max Input Level
+21 dBu balanced and unbalanced
CMRR
Typ. 40 dB, > 55 dB @ 1 kHz
Audio Outputs
Connectors
XLR and 1/4" TRS
Type
Electronically servo-balanced output stage
Impedance
60 Ω balanced, 30 Ω unbalanced
Max Output Level
+22 dBu balanced and unbalanced
Frequency Response
5 Hz – 200 kHz, +/- 3 dBu
S/N Ratio
>95 dBu, unweighted, 22 Hz – 22 kHz
THD
<0.002% typ. @ +4 dBu, 1 kHz, gain 1
Power Supply
Voltage
100–240 VAC, 50/60 Hz
Power Consumption
Max 15 W
Fuse
T500mAL AC 250 V
Dimensions (length x width x
7.54” x 1.7” x 19”
195 mm x 44 mm x 483 mm
Weight
5.73 lbs.
2.6 kg
Appendix (English)
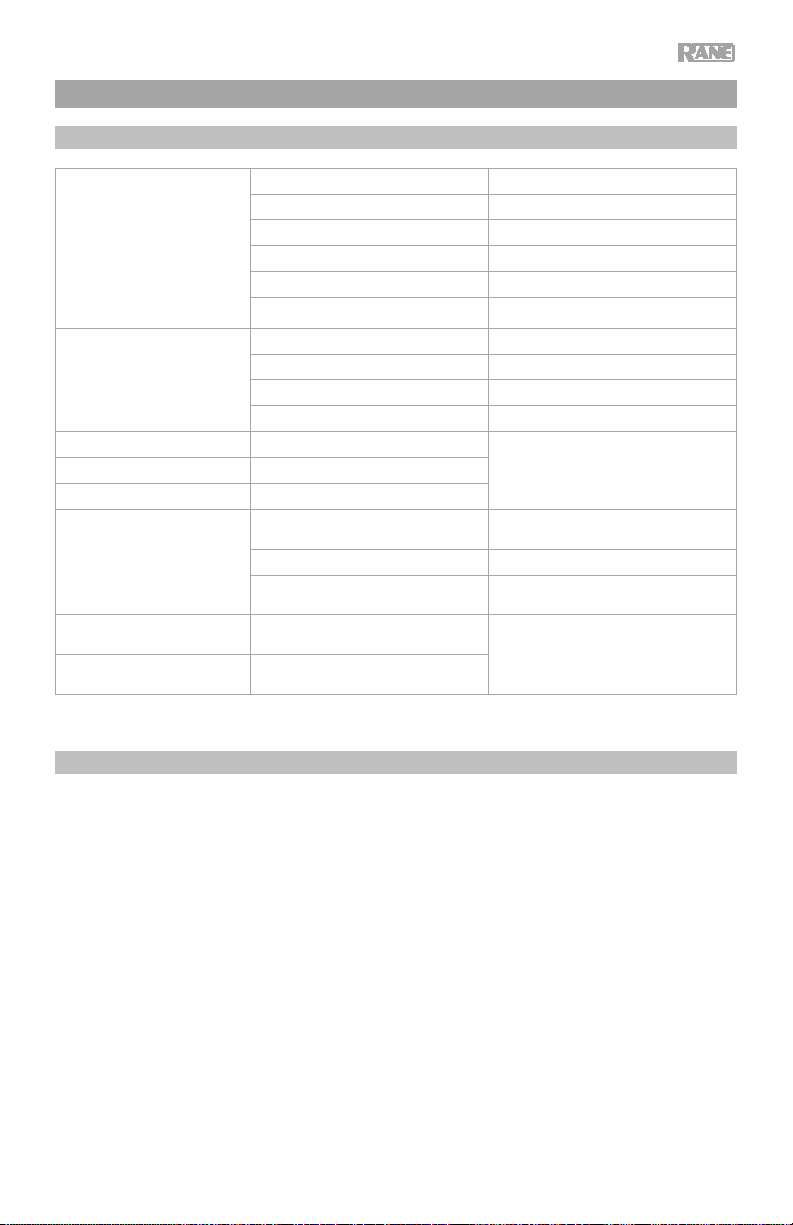
Technical Specifications
depth)
Specifications are subject to change without notice.
Trademarks & Licenses
Rane is a trademark of inMusic Brands, Inc., registered in the U.S. and other countries.
All other product names, company names, trademarks, or trade names are those of their respective owners.
7
Page 8

rane.com
Manual Version 1.3
 Loading...