

Page 1
INSTRUCTION MANUAL
FOR THE
UNION
NeedLe ANd AwL - LOCk-STITCh - SewINg MAChINe
Serial Number: _______________
Manufactured by:
Randall Leather Machinery Company
401 Irvine Street ~ Yoakum, Texas 77995 USA
1-800-327-9420 or 1-361-293-7015
www.campbell-randall.com
Page 2
Ra nd al l UnIOn lO ck -s tI tc h
Table of Contents
CATALOg TABLe OF CONTeNTS
geNeRAL INFORMATION
DESCRIPTION....................................................................................................................... 1
CHARACTERSISTCS..............................................................................................................1
APPLICATIONS...................................................................................................................... 1
GENERAL ADVISE................................................................................................................. 1
DIRECTION OF OPERATION................................................................................................ 1
MACHINE INSTALLATION..................................................................................................... 2
SEWING THREAD................................................................................................................. 4
NEEDLES & AWLS................................................................................................................. 4
THREADING THE MACHINE................................................................................................. 5
THREAD LUBRICANT & WAX............................................................................................... 6
BOBBIN SETUP...................................................................................................................... 6
COMMENCE SEWING........................................................................................................... 7
ADJUSTMENTS & SERVICING
COMMON ADJUSTMENTS.................................................................................................... 8
OILING & CLEANING............................................................................................................. 8
PRESSER-FOOT ADJUSTMENT........................................................................................... 9
THREAD LOCK.................................................................................................................... 10
THREAD TENSION.............................................................................................................. 10
STITCH LENGTH................................................................................................................. 10
THREAD GUIDE ADJUSTMENT.......................................................................................... 11
LOOPER CAM ADJUSTMENT.............................................................................................. 11
NEEDLE & AWL ALIGNMENT.............................................................................................. 12
SHUTTLE TIMING (FINE)..................................................................................................... 13
TROUBLe ShOOTINg
TROUBLE SHOOTING......................................................................................................... 13
PARTS ChARTS
APPeNdIX
PARTS RECORD.................................................................................................................... A
LUBRICATION AND SERVICE RECORD...............................................................................B
NOTES................................................................................................................................... C
Technical Support
1-800-327-9420
Since 1858
Page 3

Ra nd al l UnIOn lO ck -s tI tc h
GENERAL INFORMATION
Please read this Instruction Manual carefully before using your machine in order to guarantee
reliable operation and a long life. Refer to this Manual often for questions and adjustments.
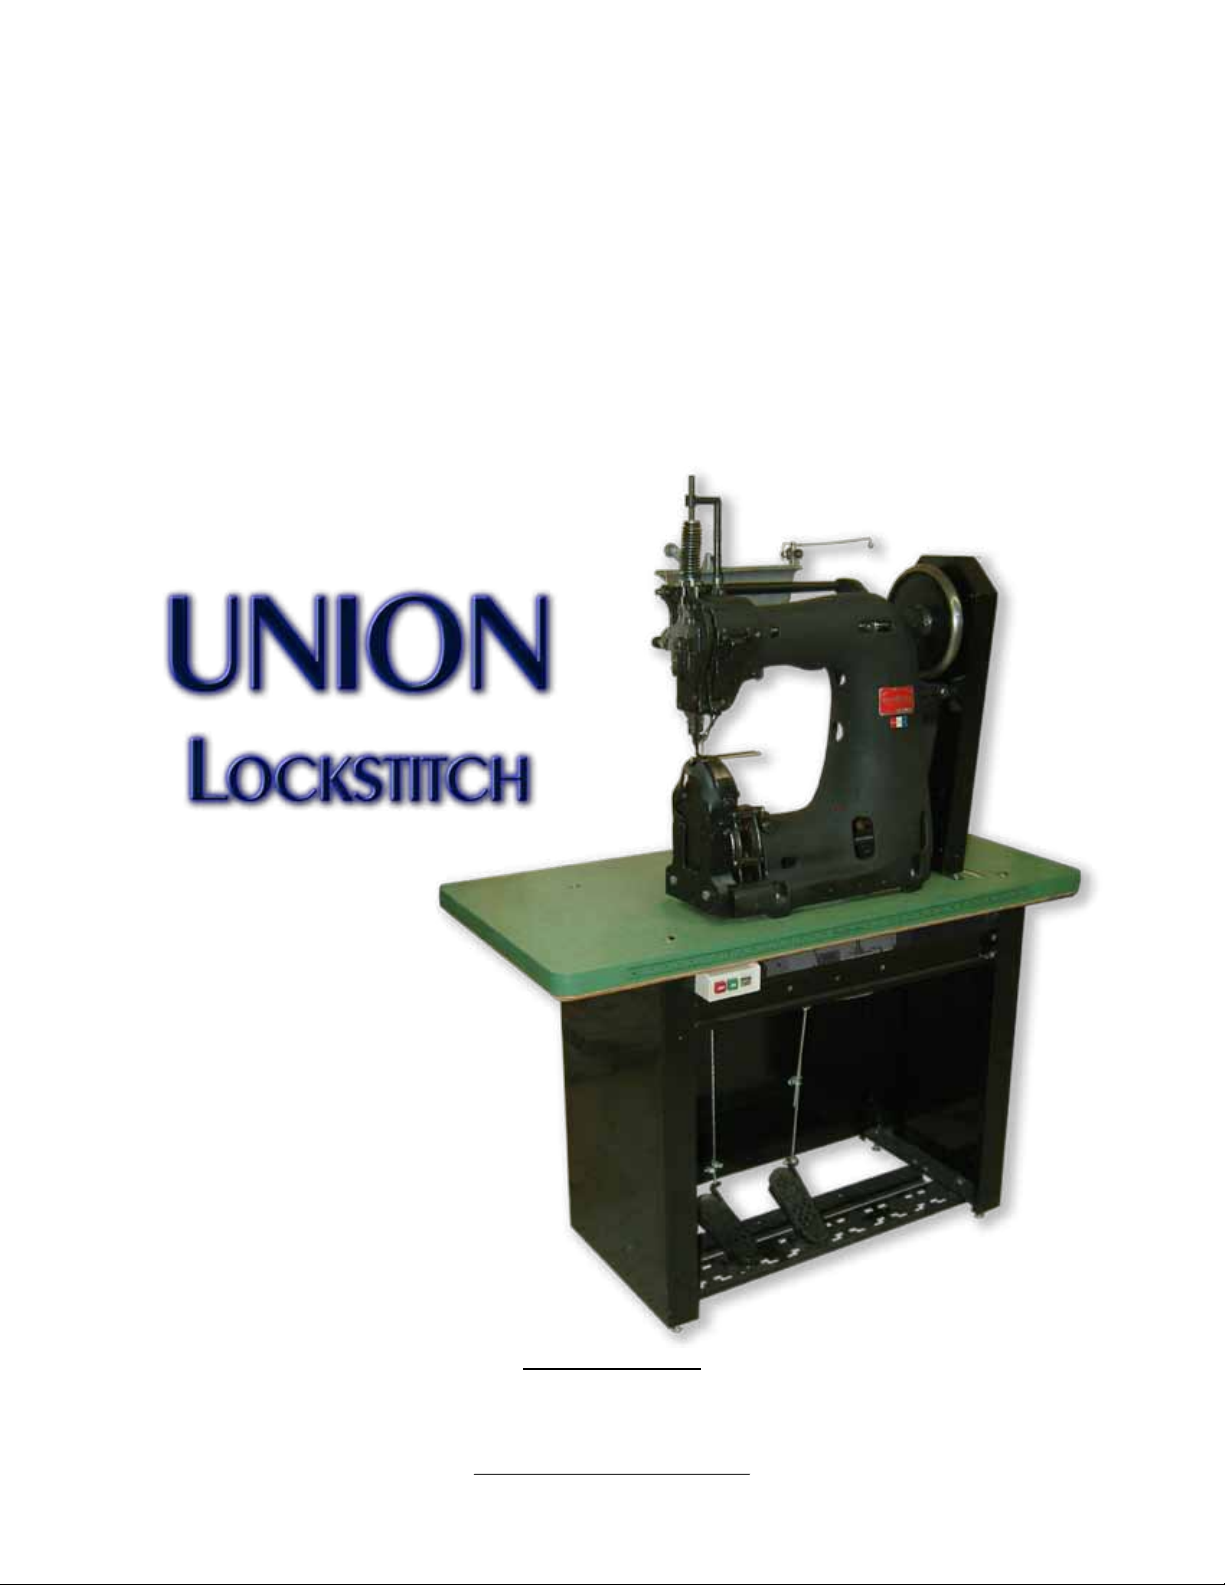
Description
The UNION Lock-Stitch Sewing Machine is a straight needle
and awl sewing machine for stitching heavy materials.
Characteristics
• Feed: Needle Feed, Jump Foot.
• Speed: The maximum speed recommended for
the UNION is 800 stitches per minute. Maximum
speed is limited to the type of material being sewn.
It is recommended the machine run slower than
the maximum speed to insure operator control
and longevity of the machine. We cannot warranty
machines or parts that are damaged due to excessive
speed.
• Work Capacity: The machine operates on all
thickness of leather and other materials up to ¾ inch.
The throat of the machine is 12 inches, and can sew
a row of stitching 12 inches from the edge of any
material.
• Bobbin: The bobbin is extra large and carries 100 to
150 yards of thread, requiring few bobbin changes.
• Stitch Length: 4 to 12 stitched per inch
General Information
General Advise
TO eNSURe PeRFeCT ACTION OF The MAChINe
• Do not operate the machine before lubricating it.
• Do not run the UNION in reverse. The machine hand wheel should
run counter-clockwise if you are facing the wheel.
• Use caution and give proper attention to the operation of your
machine when sewing
• Keep your hands away from the needle and awl when the power is
on and the machine is in operation
• Keep your hands away from all moving parts, nor place anything
close to them while operating the machine
• Do not make any adjustments or service the machine with the
power on.
• Do not run the machine with the presser foot resting on the needle
plate without material under the presser foot.
• Let the machine do its own feeding. Do not force material into or
way from the machine or you may bend or break a needle or awl.
• Do not crowd, retard or twist the work when sewing
• Do not run the machine with bobbin case and thread eye threaded
unless there is material under the presser foot.
• Have the machine in proper adjustment at all times
• Use good quality thread
• Keep your machine cleaned and well oiled
• Study this instruction book and become familiar with all parts of
your machine
• After receiving the machine, make sure all screws remain tight.
Applications
• Boot & Shoe Industry : fair stitching, moccasin seam or
any at sole work.
• Harness & Tack : for stitching all kinds of harness,
belting, and strap goods up to 3/4 inches thick.
• Sporting Goods : used by leading manufacturers for
stitching footballs, basket balls, volley balls, and soft balls.
It is noted for pulling a very tight seam.
Direction Operation:
Always run the hand wheel toward the operator, that is to
turn the wheel counterclockwise if you are facing the wheel.
Never attempt to sew with the machine in reverse (clockwise)
rotation, or damage to the machine or material will result. The
UNION is not capable of sewing in reverse, but back stitching
can be done by lifting the foot and crossing over the previous
stitches.
Since 1858
www.Campbell-Randall.com
1
Page 4

Ra nd al l UnIOn lOc k-St It c h
Installation
Ra nd al l UnIOn lOc k-St It c h
Please insepect the packaging for any loose parts before discarding.
Machine Installation
Motor Table
• Remove table from pallet and place in location
Machine Head
• Remove head from crating and place on table
• Secure the back of the machine with the included hook
bolts, and bolt the front of the machine head through the
table.
• Place the V-belt arounf the motor pulley, through the table
slot, and over the machine pulley. Ensure that the belt is
resting in the grooves of both pulleys, then tighten the belt
tension be lowering the motor with the adjustable motor
bracket. Lock the motor into postion with the bracket nuts
once the re tension is acheived.
Pedal Linkage
• Connect and adjust the right peddle linkage to the clutch
motor. Set the linkage with the center clamping bracket on
the rods.
• Connect the presser
foot cable from the
left pedal, through
the pulleys and up to
the connecting lever
behind the machine
hed. Secure with the
cable clamps.
Pulley Cover
• Secure the inside pulley cover with two screws on the
right hand side of the head, just bellow the hand wheel
• Set the outside cover together with the inside, then secure
with screws on the right hand face.
Tool Tray
• Place the tool tray on the front of the machine and secure
with the two supplied screws.
2
Technical Support
1-800-327-9420
Since 1858
Page 5

Ra nd al l UnIOn lOc k-St It c h
Wax Pot
• Place the wax pot over the stuf on the back of the
machine
• Pivot the wax pot up to the the machine casting and lock
in place with the clamping nut.
Installation
Presser Foot Spring
• Place the upper bracket and spring on top of the machin
head
• With the left hand, compress the coil spring and push the
bracket into the hole in the casting.
• With the right hand, secure the bracket in place by
tightening the screw with a slotted screw driver.
Since 1858
www.Campbell-Randall.com
3
Page 6

Ra nd al l UnIOn lOc k-St It c h
Thread / Needles & Awls
Ra nd al l UnIOn lOc k-St It c h
SewINg ThReAd
• The UNION can use thread size 138 to 554 synthetic or 3 to 12 cord cotton or linen
• Use only Left Twist thread in the machine (twist of the bobbin thread is not important). To determine
the thread twist, hold the thread and twist it counterclockwise between the thumb and forenger. If the
strands wind tighter, the thread is left (Z) twist. If the strands unwind, the thread is right (S) twist.
• If you are using a natural thread, wither linen or cotton, the label end of the spool of the thread must
be pointed up when placed in the thread holder. The bobbin thread should be one size smaller than
the top thread for a better lock. Make sure that the thread is not old, dry, or right twist.
• If you use a larger thread with an undersized needle, skipped stitches or frayed thread may occur.
NeedLeS & AwLS
Orders for needles and awls must specify the
quantity required, the size number, and also class
and variety. The following is an example of an
order with sufcient information: “100 UNION #2
Awls, Chisel Point”
Needles
• NOTE: The needle size is determined by the
size of the thread you sewing with.
• Needle Sizes: 1, 1 ½, 2, 2 ½, 3, 3 ½, & 4.
Awls
• Awl Sizes: 2, 2 ½, 3, 3 ½, 4, & 5
• Chisel Point Awl – harness or straight work.
• Oval Point Awl – boot siding, vamp closing &
belts.
• NOTE: The awl size should be 1 to 1-1/2 sizes
larger than the size of the needle. Make sure
that the awl is sharp and does not spring or
glance off the work when entering the work.
SIzeS OF NeedLeS TO ThReAd
Sizes will vary between applications.
Synthetic
Twisted
138 3 cord
207 4 cord
277 5 cord
346 6 cord
415 7 cord
554 8 cord
693 9 cord
Appearance of Chisel Point Awl: Turning the
awl so the edge of the blade will start its cut in a
different position can change the appearance of
the stitch.
Natural
Cord
Awl Parallel to Stitch Line
Awl Angled Left
Awl Angled Right
Awl Perpendicular to Stitch Line
Needle Size
1 to 1-1/2
1-1/2 to 2
2-1/2 to 3
3 to 3-1/2
4 to 4-1/2
4-1/2
5
SeTTINg The AwL
1. Turn the hand wheel so that awl bar (UL-85)
is at its highest position. Loosen the awl set
screw and remove the old awl
2. Insert the awl into the awl bar as far as it will
go. Set point in desired position. It is common
to have the point set a little to the right of
being squared across
3. Tighten set screw in awl bar
4
Technical Support
SeTTINg The NeedLe
1) Make sure that the needle is put into the needle bar (UL-210) as deeply as possible, then
tighten the needle bar screws in place.
2) Insure that the hook of the needle is looking
directly at the operator.
1-800-327-9420
Since 1858
Page 7

Ra nd al l UnIOn lOc k-St It c h
THREADING THE WAX POT
1. Mount your thread on the spool holder, with the side up
as indicated on the spool.
2. On the top of the wax pot, bring the thread through the
extended wire rst and then through the small hook.
3. Go underneath the tension disk and around over the top
of the disk.
4. Lift the arm (UL-30) out of the wax pot. Draw the thread
o over the top roller, down over the bottom roller and
then back over the top roller again. NOTE: If the thread
is carrying too much wax on it, then twist the thread
twice over then place back on the roller. This will clear off
excess wax.
5. To complete threading the wax pot, tighten the thumb nut
(UL-34) to secure the arm into the wax pot.
THREADING THE MACHINE
6. Fig. 1 : Put the threading wire (UL-531) through the wax pot
extension and pull the thread through.
7. Fig. 1 : Turn the hand wheel to get access to the lock (UL-
145). Put the threader through the lock (UL-145), grab the
thread and pull down through the lock (UL-145).
8. Fig. 2 : Now, to pull the thread through the bottom of the
lock (UL-145), put the threader (UL-531) thru the tension
spring (UL-157) and roller on the bottom of the tension
spring. This should put the thread behind the roller.
9. Fig. 3 : Turn the hand wheel until the take-up (UL-135) is at
its lowest point. Put the threading wire towards the back of
the machine in between the spring and metal base. Put the
threader (UL-531) through all 3 pieces at one time. Take the
threading wire and place the thread between the lock (UL-
145) and the roller (UL-147).
10. Pass thread through the Thread Guide (UL-165) and and
pull it through, leaveing about 8 inches loose. Note:make
sure that the thread pulls free.
11. Lift the foot, pull the thread through the slot and then pull
the thread towards the back of the machine.
Threading
2
2
3
UL-34
UL-30
4
UL-34
5
6
6
Since 1858
7
UL-531
8
UL-531
9
www.Campbell-Randall.com
11
5
Page 8

Ra nd al l UnIOn lOc k-St It c h
Wax / Bobbin
Ra nd al l UnIOn lOc k-St It c h
ThReAd wAX &
L
UBRICANT
Fresh wax strengthens the thread
and causes it to stick in place. The
stronger the thread, the less breakage
in the operation of the machine. Wax
will also lubricate your thread for
smoother operation. Wax is especially
recommended for threads made of
natural fibers.
Liquid Thread Wax
• Mix your wax thoroughly to ensure good results.
• Before sewing, clean your machine, oil rollers and
gummed up mechanisms. Pull out and cut off both upper
and lower threads that have hardened.
• Only use enough liquid wax in your machine wax pot to
cover your thread (approximately half full) or enough for a
days use. Anything in excess may thicken before it can be
used.
BOBBIN SeTUP
Removing the Bobbin
• Release the cover latch and open bobbin door
• Remove the bobbin cover (UL-291)
• Remove the bobbin (UL-290)
• Do not neglect to renew wax frequently, or your thread
may become unreliable and break. The fresher your wax,
the better your machine will work.
• It is best to wind your bobbins as you use them, as a fresh
bobbin will do better work than an old one.
• Be careful to have strippers in wax pot tight enough to
clean off all surplus wax
• Adjust Strippers as necessary and clean out the Wax Pot
occasionally
LAX Wax - Water Based Wax
• If LAX Wax Thread Lubricator is used, it is possible to thin
or clean the lube with water.
Hot Wax
• If hot wax is desired the machine must be requested with
special ordered heated wax pots
Thread Lubricant
• When sewing with synthetic threads, Lily White Oil or
Silicone Lubricant can be used.
Threading the Bobbin
• Insure that the bobbin spring (UL-292) has been placed in the
shuttle with the prongs of the spring bent facing the bobbin (to
the operator’s right).
• Put the bobbin into the shuttle. The thread should ow off
the bobbin easily, from the top and the bobbin in a clockwise
rotation.
• Place the bobbin cover (UL-291) over the bobbin and close
the bobbin door. Make sure that a length of thread is pulled
out of the bobbin door between the spring and the door latch.
Winding the Bobbin
• For natural threads, leave the label up on the spool of thread
• Put the thread through the extended wire of the bobbin winder and then through
the small wire hook. Come over the top of the thread disk twice for better
tension adjustment.
• Slide the threader (UL-531), through the wax pot and grab the thread and pull it
through the wax pot. The nuts on the wax pot will turn and adjust how much wax
to be applied on the thread.
• Fill the bobbin with equal tension (DO NOT wind the bobbin either very tight or
very loose, but with rm, even tension). Bobbins that are wound, either, very
tight or very loose, or in the same bobbin, tight and loose, will cause the stitch
length to vary all over the place; and this is the cause of the problem.
• Start off by winding the thread over the top of the bobbin a couple of times by
hand. Again the thread, coming out of the wax pot, should feed over the bobbin.
The bobbin will spin in a counter clockwise motion. Do not overll the bobbin.
Leave a small open area so that the thread is not unraveling off of the bobbin.
6
Technical Support
1-800-327-9420
Since 1858
Page 9

Ra nd al l UnIOn lOc k-St It c h
Sewing
TO COMMeNCe SewINg
NOTE: Read this manual thoroughly before sewing on the UNION for the rst time!
To Prepare for Sewing:
• Grip the top thread behind the presser foot with the left hand
• Slowly turn the balance wheel counterclockwise one full rotatation.
• The loop should catch the bobbin thread and pull it through the hole in the needle plate
• Lift the foot and pull about 8” (200 mm) of thread (from both top and bottom) through to the back of
the machine
• NOTE: When the take up (UL-135/UL-141) is at it’s highest point, the thread is locked. Turn the
balance wheel to lower the take up and release the thread.
• Turn the balance wheel unitl the awl is about to enter the work rst. The machine is now ready to sew.
To Commence Sewing:
• Lift the presser foot, place material under the presser foot, then lower presser foot
• Hold the loose thread in the left hand and commence sewing. The machine will pull the top thread on
the rst stitch.
• Let the machine do the feeding and do not twist or distort the work. All that is required of the operator
is to guide the work, and the machine will feed properly and sew a consistent, even stitch.
• NOTE: The machine may be in perfect adjustment and still fail to sew satisfactory if the operator is
careless in handling the work, or does not adjust the machine to accommodate for a difference in
work.
To Remove the Work:
• Stop the machine when the take up (UL-135/UL-141) is at it’s highest point and the thread is locked.
• Turn the balance wheel to lower the take up and release the thread.
• Remove your work and cut your thread with about 8” (200mm) left loose on the machine.
To Lock the Stitch:
• Although it is not always required, it may be necessary to lock your rst and last stitch in some
applications. This method prevents the threads from coming apart on the ends, and can be done
manually.
• Simply make the rst stitch, stop the machine just before the awl desends into the material, raise the
presser foot, position the work so that the awl will descend next to the rst hole of the last stitch made,
and then continue sewing along the desired line.
• The awl should descend just to the side of the rst stitch, otherwise, if the awl was set directly over
the thread it would cut through the previous stitch. If done correctly, the two stitches will be uniform so
that they will appear as one.
• It is also possible to lock the stitch by tying the end threads together, melting synthetic thread ends, or
locking the end with a rivet or similar fastener.
Since 1858
www.Campbell-Randall.com
7
Page 10

Ra nd al l UnIOn lOc k-St It c h
Adjustments
The following adjustments and explanation of reasons for making them
are to simplify the servicing of the UNION Lock-Stitch machine
• The successful operation of UNION machines can only be assured if proper maintenance and genuine RANDALL parts are used.
RANDALL LEATHER MACHINERY is not responsible for machines or parts that are damaged due to excessive speed, improper
installation, unauthorized modications, improper adjustment, poor maintenance, or use of improvised or generic parts.
• We wish to caution the operator not to strain the small screws and nuts. Use good judgment in handling them and they will not break
• At such a time as a change is made in a individual adjustment or there is a replacement of a part on the machine, a careful check
should be made of all adjustments and settings that may be directly or indirectly affected to insure that no change has taken place in the
assemblage.
• When making a replacement of a part in an outstanding machine, make certain that the correct component parts are being used.
• Consult the catalog for the proper presser foot and throat plate to use. There are many of various types of attachments, with each
serving a special purpose in respect to the different types of materials and the many kinds of work, which these machines are active in
sewing.
• RANDALL LEATHER MACHINERY reserves the right to make changes or improvements at any time, without thereby incurring any
obligation either to install the same on machinery or equipment previously sold or install the old part which has been changed, improved
or omitted in new machines or equipment subsequently sold. Prices and equipment subject to change without notice.
Inspection of Common Adjustments
Allowing that a machine is in good condition from a standpoint of wear and lost motion,
a quick check-up of the essential settings can be made in the following order:
• Check the hole for the needle in needle bar. Remove all dirt.
• Check for perfect alignment of awl with needle.
• Make sure that all screws remain tight.
• Keep the machine well oiled, (except in foot lift area).
• The wax pot should be approximatly half full of wax.
• Before making any adjustments, make sure that the needle and awl are not bent.
• The best way to test is to roll the needle and awl on a smooth at surface and see that it rolls true.
7. Tension on shuttle thread must not be too strong. Make sure there is no gap between the inside bobbin cover and the
shuttle.
11. When assembling the parts, make sure each piece that you put together is free without any play or binding.
12. All lower rocker shafts should be free without any side wise movement or binding.
Oiling & Cleaning
Oiling:
• The successful and economical operation of all machinery depends on thorough cleaning and oiling. The operator will
save much trouble as well as money by systematic careful attention to the machine in these respects. It is recommended
that the machine be cleaned oiled daily. Oiling the machine not only lubricates, for smoother operation, but it also cleans it
from dirt and contaminates that can shorten the lifespan of the machine.
• NEVER USE GREASE, on any mechanism. Grease will collect dirt and contaminants that will grind and damage parts.
• DO NOT OIL THE FOOT LIFTING MECHANISM (Parts UL-120 to UL-127). Oiling in this area will cause the presser-foot
not to lift and will result in inadequate feeding.
Cleaning:
It is advisable to keep the machine clean to prevent the build up of dirt and wax. This build up can damage mechanisms and
stain the products being sewn. Regularly clean the shuttle mechanism, arch covers, and thread path. If the machine uses
hard wax, regular cleaning is critical.
8
Technical Support
1-800-327-9420
Since 1858
Page 11

Ra nd al l UnIOn lOc k-St It c h
Presser Foot
Presser Foot Adjustment
ADJUSTING THE FOOT PRESSER
• Enough pressure must be used to hold the work rmly in the
needle plate. Light work will not require as much pressure as
heavy work. Too much pressure will cause the presser-foot
to mark you material. If the pressure is too light, the work will
move and irregular stitching or a broken needle may result.
• To apply more pressure on the foot, open the nut (UL-15) on
the top of the spring (UL-101) and turn the spring adjusting
screw (UL-103) clockwise for more spring pressure on the
foot.
• When you have enough spring pressure on the foot, tighten
the nut on top of the spring.
ADJUSTING THE FOOT LIFT
• The foot should lift just high enough to clear the work.
If the foot doesn’t lift high enough, the work not move
effectively causing smaller stitches or the awl will cut the
leather.
• Turn the balance wheel, until the foot lift adjusting arm
UL-116 (on the top left of the machine, if the operator is
sitting in front), is turned with the 2 screws facing to the left
of the machine.
• To make the foot lift higher, loosen the inside screw UL-
117 and tighten the outside screw.
• If the foot is lifting to high, loosen the outside screw and
tighten the inside screw.
• NOTE: Never put oil in the foot lift area, parts UL-120 to
UL-127. Oiling in this area will prevent the mechanism
from lifting.
UL-15
UL-103
UL-101
UL-117
UL-116
ADJUSTING THE LOWER FOOT LIMIT
• To set the lower limit postion of the presser foot, adjust
screw UL-21, located to the back left of the UL-101 spring.
• To lower the foot to the minimum position, loosen the nut
(UL-20) and turn the UL-21 screw counter-clockwise
• The UL-106 lifting arm will move lower onto the casting of
the machine. After setting the postion, re-tighten the nut
(UL-20).
PRESSER FOOT MOUNT
• If you have play in the foot, tighten the screw on the back
of the foot bar (UL-100)
Since 1858
www.Campbell-Randall.com
9
Page 12

Ra nd al l UnIOn lOc k-St It c h
Thread Lock / Tension
REGULATING THE THREAD LOCK
• Normally the lock should lay towards the bottom portion of the
work. The position would need to be changed if a thicker needle
plate is installed.
• First bring the take up (UL-135/UL-141) to its’ highest point.
• To regulate the thread lock by adjusting the position of eccentric
screw (UL-164).
• Loosen the nuts (UL-20) holding this screw on the back of the
brass block.
• By turning the UL-164 screw, the brass part UL-160 will move. If
the lock is showing on top, move part UL-160 up. If the lock is
showing on the bottom of the work, then lower part UL-160.
• When nished, tighten the nuts on the UL-164.
UL-160
UL-164
UL-164
THREAD TENSION
• Slight tension is needed on both the top and bottom threads.
Proper tension has been obtained when the thread pulls out easily
with light tension, without excessive binding. It is recommended to
use less tension when working with threads made of natural bers.
• To give more tension on the top thread, tighten the tension spring
nut (A) on upper wax pot.
• To apply more tension on the bobbin thread, adjust the lower
screw on the bobbin door (B). Loosen the nut, adjust the screw
(UL-243), and then tighten the nut (UL-174). Loosen screw to
decrease tension and tighten screw clockwise to increase tension.
• The upper screw (C) is used to move this part in and out in order
to compensate for wear.
STITCH LENGTH
• The stitch length is best set when the needle starts to desend after
feeding, and the shuttle point is in the 11 o’clock position.
• On the front rocker arm (UL-200) is a link that is horizontal to the
operator (bolt UL-226 and link UL-224).
• Adjust the link UL-224 up for a shorter stitch or down for a longer
stitch.
• Stitch length can be adjusted from 4 to 12 stitches per inch.
A
C
B
10
Technical Support
1-800-327-9420
Since 1858
Page 13

Ra nd al l UnIOn lOc k-St It c h
THREAD-GUIDE (UL-165) ADJUSTMENT
Setting the Thread-Guide:
• Set the guide so it delivers thread well into the needle
throat (hook) of the needle.
• The guide should clear the needle by approximately
1/16” (1.5mm) as it circles to the left of the needle and
slightly to the back.
• When the take-up is at its highest postion, just before
looper begins to move forward, the guide should be
about 1/64” in front of the looper.
• Adjust the thread guide forward and backward with
screw UL-173.
• Always check thread guide (UL-165) for sharp spots
that could break or strand the thread. Pass the thread
back and forth through the hole of thread guide to make
sure that this area is smooth.
Thread Guide
LOOPER FEED CAM
• With the shaft standing upright, the at area should be to
your left, cam (UL-181/ UL-161). The screw in the cam
should be all the way up. The looper can be made to delay
the thread, by loosing the screw in the take-up cam and
moving the screw to the top. The looper should hold the
thread until it has descended into the material. If not, the
thread would fall off the needle at its’ highest peak.
SeTTINg UL-180 LOOPeR :
• The thread arm looper (UL-180) should be set so it will
cast off the thread as the needle draws the thread loop
into the surface of the work.
• At the furthest point of its back swing (toward the
operator), the notched edge of the looper should be
approximately 3/16” behind the awl and approximately
3/16” below the thread guide. On the forward swing,
the looper should just clear the side of the presser foot.
The thread looper needs to move close to the needle
on the left side without touching.
• Test the looper for any play side to side. Side play can
be taken out by loosening UL-188 bushing screw, than
tap end of stud and re-tighten the screw. Replace if
worn.
• Keep looper free from sharp edges that can strand
the thread. If the looper is out of adjustment, it can rub
against the thread guide creating sharp edges. If there
are rough spots, use emery cloth or cord to smooth.
Since 1858
www.Campbell-Randall.com
11
Page 14

Ra nd al l UnIOn lOc k-St It c h
Alignment
ALIgNMeNT OF The NeedLe ANd AwL
Note: These adjustments are normally made only
when related parts have been installed or the
machine is knocked out of alignment. Inspect all
other adjustments before resorting to realigning
the needle and awl.
Inspecting the Alignment
Note: Before inspecting or changing the
alignment, insure that the needle or awl are not
bent.
• When the needle and awl are perfectly
aligned, the needle should comes up
through the material without exing or
hitting the sides of the awl hole.
• To see the alignment, set a piece of paper
under the foot. Turn the hand wheel
toward you until the awl makes a hole
in the paper. Again turn the hand wheel
and watch the position of the needle as it
ascends through the awl hole.
• If the needle appears to rip the paper
either in front or back of the awl hole,
adjust the alignment with the procedure
below.
UL-161
UL-161
UL-223
Awl - FRONT TO BACk
Both the needle and awl should be approximately 1/16” from
the front edge of the hole in the needle plate.
• The awl bar can be aligned by adjusting the gibs (UL-
77/78) with the slotted screws on the front face of the
head.
• There should be no play awl bar, but do not over tighten
the gibs which will cause the action to bind
Needle - FRONT TO BACk
• If there is play in the needle bar adjust the gibs (UL-
197R/L). Do not over tighten the gibs.
• Adjust the position of the shuttle housing (UL-235), by
loosening the four nuts (UL-229) and move the housing
forward or back by turning the screws UL-237.
• Once the needle and awl is approximately 1/16” from the
front edge of the hole in the needle plate, secure the nuts
(UL-229).
Needle - FRONT TO BACk
Before changing this alignment, make sure the awl is ad-
justed properly.
• Turn the hand wheel until the needle starts to ascend.
• Locate the cutout, on the bottom rear corner, left side of
the machine.
• Insert a screwdriver through the cut out and loosen screw
UL-161.
• Apply a wrench to the end of the nut, located to the left of
the bracket.
• This nut is part of the rocking shaft (UL-223). If you turn
the wrench away from you, the needle will move forward.
If you move the wrench towards you, the needle will move
back.
• After setting, tighten screw UL-161.
Alignment of the Needle - RIghT TO LeFT
• Remove the bottom cover UL-300/UL-301. This is on the bottom left side of the machine. You will see 3 nuts (UL-10),
once you take off the cover. The two center nuts will adjust the needle left or right.
• First, on the bottom left of the machine open the screw (UL-13) on the needle disk (UL-214). You, then need to open the
screw (UL-161) on the back of the machine (see the instruction section, “Adjusting The Needle Front To Back”). You do
this so when you perform the following adjustments, the machine will not bind. First, you need to open the two nuts (UL-
10), both on the front end of the casting and on the back end of the casting.
• NOTE: You will need only a slight adjustment here. If you want to move the needle to the left, just open the right bolt
(UL-11) (of the three on the front of the casting) counter-clockwise 1/8 turn and then turn the left screw equally. You need
to move the bolts on the back end of the casting equally clockwise. Also, once adjusted, tighten all the nuts (UL-10), both
front and back ends.
• NOTE: when you move the needle left or right, you need to re-adjust the alignment of the shuttle point (UL-276) to the
needle. If the thread breaks and jumps inside of the bobbin, there are 2 reasons for this: A) You do not have enough
12
Technical Support
1-800-327-9420
Since 1858
Page 15

Ra nd al l UnIOn lOc k-St It c h
Timing
Shuttle Point Alignment - RIghT TO LeFT
• The needle should be on center with the shuttle point (UL-276).
• If the needle is straight, align the needle to the center of the shuttle point by adjusting the two screws on either side of the
shuttle housing (UL-235).
• Loosen the screws and slide the shuttle to the left or right of the operator.
• NOTE: Make sure that the hook of the needle, directly faces the operator. If the hook on the needle is slightly turned, it
will cause skipping or breaking of the thread.
TIMINg OF The UNION LOCkSTITCh
Feed of the Needle in Relation to the Foot
• One way of knowing if the feed is out of adjustment, is that the stitches will suddenly get very small. This is because the
foot is not lifting and allowing the work to be pulled.
• Just as the needle is at its highest position, just as it begins to pull back on the work, the foot should begin to lift. The
needle should feed all the way back and begin to drop when the foot begins to drop.
• The adjustment is behind the UL-226 bolt that you used for determining the stitch length. Inside on the lower shaft is
cam UL-219. This is not a normal adjustment, so please contact Randall before changing.
• When the bell (UL-214) is upward, the UL-219 feed cam eccentric screws (UL-220) should be in a position where one is
in a downward position and the other facing the back of the machine.
• NOTE: The feed timing will affect the adjustment of the UL-165 Thread Guide and UL-180 Thread Looper
COURSe AdjUSTMeNT TIMINg
NOTE: Do not make changes to the coarse adjustment unless there
is insufcent movement to allow normal ne adjustments to the
shuttle and needle timing.
• On the top right of the machine you will see a cut-out that allows
access to adjust the gear UL-57. This is the main timing point
to synchronize the the upper section (awl, thread guide, looper,
take-up, and foot lift motion) with the lower section (needle, feed,
and shuttle motion)
WHEN NECESSARY, timing is accomplished as follows:
1. Turn the balance wheel so that the take-up, (UL-135/UL-141), is
at its highest point before it begins to drop.
2. Loosen the set screws on the bevel gear (UL-57) until is can
slide on the horizontal shaft (UL-50) and disconnect it from the
gear on the vertical shaft. This will allow the top of the machine
to work freely without motion in the bottom of the machine.
3. Hold gear UL-57 so it will not turn and, at the same time, using a
wide blade screw driver to pry against the teeth, turn the shuttle
shaft driving gear UL-72. DO NOT loosen the set screws. Make
one complete cycle, then bring the ascending needle barb point
to 1/4’” below the lower surface of the throat plate. As another
reference, the tip of the needle is 1/16” to 1/8” below the cut out
in the stitching plate (part UL-250*). This is where the bottom
portion of the machine needs to be set.
4. Move the gear UL-57 back to its engaged position with the
vertical shaft gear, leaving a very small amount of play between
the two gears. Make certain that the set screws are both over
the at spots on the shaft which may require the removal of the
set screws to locate, which are 90° to each other. Tighten one
set screw, then recheck the timing. If this is correct then set both
screws snug with a “T” wrench and pliers. If the balance wheel
moves when you tighten these screws, then the gear is not set
directly on the ats and it should be reset.
Since 1858
www.Campbell-Randall.com
13
Page 16

Ra nd al l UnIOn lOc k-St It c h
Timing
Shuttle Timing - FINe AdjUSTMeNT
The thread should release off the needle about halfway
on the shuttle hook. If the needle holds the thread too
long or too short, then the shuttle needs to be delayed or
advanced.
• On the lower right hand corner of the machine, in
a cut out in the casting, you will see a gear (UL-72)
with 2 screws on it. The shuttle gear shaft has a at
spot under the adjustment screws. Loosening one
screw and tightening the other causes the gear to shift
positions on the shaft, thus affecting the shuttle point
(UL-276).
• To advance the shuttle point, loosen the bottom screw
and tighten the top screw
• To delay the shuttle point, loosen the top screw and
tighten the bottom screw
• The shuttle point should be approxmatly 1/8” (3mm)
from the needle when the needle is on the way down
and level with the hook point. At this position, the hook
is about to enter the loop.
• When the Take-Up UL-135 is at its highest position, the
point of the needle should be about 1/16” below the
plate.
• Time the shuttle point so it just clears the descending
needle. Turn the ywheel back and forth with the
needle point close to the shuttle point to make certain
the needle clears the shuttle point without striking in
either direction.
• NOTE: After timing the shuttle point, it may be nessary
to change the ne adjustment of the needle
UL-276
UL-72
Needle Timing - FINe AdjUSTMeNT
This adjustment should be made AFTER timing the shuttle
point
• Locate the timing gear on the lower, far right cut out of
the casting.
• To raise the the needle, loosen the top screw and
tighten the bottom screw.
• To lower the the needle, loosen the bottom screw and
tighten the top screw.
• When the take up roll is at its highest point, the barb
of the needle should be 1/4” below the surface of the
throat plate.
14
Technical Support
1-800-327-9420
Since 1858
Page 17

Ra nd al l UnIOn lOc k-St It c h
Reference Points
Move the hand wheel until the take-up is at its highest point.
In this position:
• the needle is 1/16” below the plate
• the gap between the needle and the shuttle point should
be about 1/16”
• part auto foot lifter lever (UL-115) should be pointing
straight down
• the thread looper (UL-180) is just about to pick the thread
Move the hand wheel until the take-up is about to desend. In
this position:
• the Thread Guide UL-165 takes the thread into the
needle
• The awl should be at its highest point
Move the hand wheel until the needle begins to desend. In
this position:
• the thread looper (UL-180) should release the thread just
as the needle desends into the material
Move the hand wheel until the hook point is at the 11 o’clock
position:
• the thread should cast off the shuttle
Trouble Shooting
Since 1858
www.Campbell-Randall.com
15
Page 18

Ra nd al l UnIOn lOc k-St It c h
Trouble Shooting
Ra nd al l UnIOn lOc k-St It c h
SKIPPING STITCHES
Skipping stitches may be caused by one of several reasons and is usually a matter of adjustment.
1. Damaged Needle
2. Height of the needle is improperly set
3. The hook of the needle is turned and not properly catching the thread
4. Thread Tension not set
5. Thread-Guide out of alignment and is not delivering the thread into the eye of the needle
6. Thread-Arm is misaligned, therefore allowing the thread to drop before the needle eye enters work
7. Awl and Needle too small for work, especially in work of heavy construction
8. Shuttle Point out of alignment and is not dividing loop. (Note: Use a new needle when checking)
9. Needle and awl out of alignment
10. The needle holds the thread for too long or too short. Adjust shuttle timing.
11. Excessive wear on the Thread-Guide, Thread-Arm, or Needle mechanisms
IRREGULAR STITCHS
1. Small knots at random intervals under work (generally without breaking the thread) can be caused by uneven bobbin
tension. This can be caused by the bobbin not being wound evenly, poor quality thread, or use of an old waxed bobbin that dry. With older macines the bobbin tension mechanism can be worn and needs servicing. Wear on the shuttle
mechanism cuases periodic snags.
2. Irregular stitches or knots on top of work caused Take-Up Spring UL-157 being out of adjustment or bent out of
shape. The take-up spring should hold in such a manner that there is no slack between the take-up spring and the thread
guide.
STRANDING OR BREAKING THREAD
1. Needle damaged or bent
2. Needle barb is out square and causes stranding or breaking of thread by catching only part of the thread
3. Thread of wrong twist or poor quality. Avoid knotty natural threads. Thread is knotting in the topside caused by exces-
sive twist. Common with poor quality natural threads or synthetic threads that have too much stretch or excessive coiling
especially near the end of a spool.
4. Needle not casting off thread after shuttle picks up loop. Check needle timing and its position in relation to the shuttle
point.
5. After adjustment or changing from a high throat plate to a lower one the thread lock pulls tighter into material, causing
breakage. Normally leaver 2 to 2-1/2” of thread under the material. Reset thread lock lower.
6. Poor condition of Wax or Thread Lubricator. Always use fresh waxes and lubricants.
7. Bobbin thread tension too stiff, cuasing the thread to catch on the bobbin door spring.
8. Shuttle tension too weak, causing the thread loop to catch inside the boobin
9. Sharp edges on the presser-foot, needle plates, shuttle, looper or thread guide. Smooth sharp edges with emery cloth or
abrasive cord. Test by running thread through the hole and forcing it over the edges, pulling back and forth. Needle plates
or presser-feet may have sharp edges as a result of awl or needle damage from improper handling. Thread guide and
looper may have sharp points if they are rubbing together when sewing.
10. Thread Guide UL-165 incorrectly adjusted causeing needle hook to split the thread or hits the needle
11. Too much take-up. Normally leaves broken thread on top of work. Reset machine timming on upper section bach one
tooth.
12. Check that the alignment of needle is on center with shuttle point. In older machines there can be excessive play in the
shuttle mechanism, or where on the thread groove on the shuttle is deep enough to cause the thread to snag.
BREAKING NEEDLES
1. Needle is deected or bent while sewing thick, hard or difcult work. Use larger Needle and Awl.
2. Needle is too small for the thread
3. Needle comes in contact with the hardware or strikes exisitng hole at a bad angle.
4. Needle sets too high and hits shuttle point, possibly because bad shuttle timing or dirt in needle bar hole.
5. Needle alignment incorrect, causing needle to punch its own hole
6. Awl is bent
7. Feed timing off, with foot not lifting in time for needle feed
8. Presser-Foot Lifting mechanism worn or out of adjustment, not lifting for needle feed
16
Technical Support
1-800-327-9420
Since 1858
Page 19

Ra nd al l UnIOn lOc k-St It c h
LOOSE STITCHES - Bottom
1. Make certain machine is correctly threaded.
2. Top tension is too loose
3. Bottom tension is too tight. A strong bobbin thread may
cause trouble in pulling the thread-locks into the material.
4. The adjustment of thre lock is set too low. Often evident
when the needle plate elevation is changed.
5. Uneven bobbin tension. Rewind the bobbin
6. Check threading of shuttle and that the bobbin thread is
unwound from the bottom
7. Inspect the thread to be of good quality
8. The shuttle thread is too dry, if working with a waxed bob-
bin
9. The awl being set too low sometimes causes a short
loop on throat plate side, and the shuttle thread will whip
around the awl.
LOOSE STITCHES - Top
1. The thread arm pulling too large a loop.
2. The thread lock is set too high.
3. The upper thread tension is too high.
4. The shuttle thread tension is too weak.
IRREGULAR STITCHES AND SHORT STITCHES
Irregular stitches may be caused by one of several reasons
and is usually a matter of adjustment
1. Bad awl
2. Not enough presser-foot lift
3. Presser foot mechanism not lifting dut to worn parts
4. Oil on the Presser-Foot mechanism causes the lift lever
to slip
5. Crowding your work, or work hanging up somewhere on
the machine
6. Forcing work into machine, or holding work back, esspe-
cialy on large parts
7. Stitch length is too small for Needle and Awl combination
or thread
8. Feed timing incorrent, not allowing for foot to lift before
needle feed
Trouble Shooting
TROUBLE SHOOTING—Feed Timing: If your feed timing is
incorrect, it will affect your feed of
your work resulting in smaller or irregular stitches. It will, also,
affect the needle in relation to part
#165 and #180. TO CORRECT this problem, turn the hand
wheel until part #214 has the bell straight
upward. At this point, the screws #220 on part #219(cam)----
one screw should be pointing straight
down to the oor and the other screw should be pointing to
the back of the machine. Now, when the
needle is all the way at its’ highest point and starts to move
forward, the pressure foot should just start
to move up and the needle starts to carry the material over.
TROUBLE SHOOTING---Needle and Awl: The needle and
awl should be approximately 1/16” from
the front of the plate to the needle. TO CORRECT this prob-
lem, loosen the 4 nuts(#229) on part (#235) and adjust part
#235 to the front or rear by turning the 4 #237 until you obtain
your 1/16” ,then
securely tighten the nuts #229.
TROUBLE SHOOTING---Tighten or loosen the Thread: To
tighten the stitches, loosen the two (2)
nuts #20 on part #164 then, with your wrench, turn eccentric
stud #164 upward. This will take the
slack out of the thread. To loosen the thread, do the reverse,
then securely tighten the 2 nuts #20.
TROUBLE SHOOTING---Looper: The looper---part (#180)
should release the thread as soon as the
needle is about to decent into the work. TO CORRECT this
problem if the looper does not work pro-
perly, loosen the screw (#161)—thread guide screw on
cam—on part (#170) and move the screw up or
down. The standard position for this screw #161 is at the
down, must, position. Part #165, the looper
should be approximately 1/64”in front of part #180 when the
take-up is at its’ highest position and just
before part #180 starts to move forward. Screw #173 is used
to adjust the looper #161 backward and
forward.
WORK DOES NOT FEED PROPERLY
When your work does not feed properly it is usually because
the presser foot does not lift, as it should to allow the awl to
feed the work along. When the presser foot does not lift prop-
erly it can be due to one or more of the reasons listed below:
1. Lifting lever is worn, broken, or adjusted improperly.
2. Check the Presser Foot Bar Spring or weakness or breakage.
3. Check the lift of the presser foot bar. There should be a
1/8” lift at time of feeding work.
Since 1858
www.Campbell-Randall.com
17
 Loading...