

Ram Trucks 2015 Chassis Cab Commercial User Manual
O W N E R ’ S M A N U A L
2015
RAM TRUCK
DIESEL SUPPLEMENT

VEHICLES SOLD IN CANADA
With respect to any Vehicles Sold in Canada, the name
Chrysler Group LLC shall be deemed to be deleted and the
name Chrysler Canada Inc. used in substitution therefore.
DRIVING AND ALCOHOL
Drunken driving is one of the most frequent causes of
accidents.
Your driving ability can be seriously impaired with blood
alcohol levels far below the legal minimum. If you are
drinking, don’t drive. Ride with a designated nondrinking driver, call a cab, a friend, or use public transportation.
WARNING!
Driving after drinking can lead to an accident.
Your perceptions are less sharp, your reflexes are
slower, and your judgment is impaired when you
have been drinking. Never drink and then drive.
This manual illustrates and describes the operation of
features and equipment that are either standard or optional on this vehicle. This manual may also include a
description of features and equipment that are no longer
available or were not ordered on this vehicle. Please
disregard any features and equipment described in this
manual that are not on this vehicle.
Chrysler Group LLC reserves the right to make changes
in design and specifications, and/or make additions to or
improvements to its products without imposing any
obligation upon itself to install them on products previously manufactured.
Copyright © 2014 Chrysler Group LLC

RAM DIESEL SUPPLEMENT
RAM 1500 ..................................................................3
RAM 2500 / 3500 / 4500 / 5500 .......................................133
INDEX .....................................................................339


RAM 1500


SECTION PAGE
TABLE OF CONTENTS
1
INTRODUCTION .............................................................7
2
THINGS TO KNOW BEFORE STARTING YOUR VEHICLE ............................11
3
UNDERSTANDING YOUR INSTRUMENT PANEL . . . . . . . . . . . . . . . . . . . . . . . . . . . . . . . . . . . 15
4
STARTING AND OPERATING . . . . . . . . . . . . . . . . . . . . . . . . . . . . . . . . . . . . . . . . . . . . . . . . . . 69
5
MAINTAINING YOUR VEHICLE . . . . . . . . . . . . . . . . . . . . . . . . . . . . . . . . . . . . . . . . . . . . . . . . 95
6
MAINTENANCE SCHEDULE . . . . . . . . . . . . . . . . . . . . . . . . . . . . . . . . . . . . . . . . . . . . . . . . . . 125
1
2
3
4
5
6


INTRODUCTION
CONTENTS
! A MESSAGE FROM CHRYSLER GROUP LLC ....8
1

8INTRODUCTION
A MESSAGE FROM CHRYSLER GROUP LLC
Chrysler Group LLC welcomes you as a turbocharged
diesel-powered truck owner. Your diesel truck will sound,
feel, drive, and operate differently from a gasolinepowered truck. It is important that you read and understand this manual.
Almost 100% of the heavy trucks in the United States and
Canada are diesel-powered because of the fuel economy,
rugged durability, and high torque which permits pulling
heavy loads.
You may find that some of the starting, operating, and
maintenance procedures are different. However, they are
simple to follow and careful adherence to them will
ensure that you take full advantage of the features of this
engine.
NOTE:
•
Some aftermarket products may cause severe engine/
transmission and/or exhaust system damage. Your vehicle’s Powertrain Control Systems can detect and store
information about vehicle modifications that increase
horsepower and torque output such as whether or not
performance-enhancing powertrain components, commonly referred to as downloaders, power boxes, or
performance chips have been used.
•
Any chassis/suspension or tire size modifications to the
vehicle will effect the performance of the Adaptive
Cruise Control and Forward Collision Warning System.

This information cannot be erased and will stay in the
system’s memory even if the modification is removed.
This information can be retrieved by Chrysler Group
LLC, and service and repair facilities, when servicing
your vehicle. This information may be used to determine if repair will be covered by New Vehicle Limited
Warranty.
There is a probability that the use of a “performance chip”
will prohibit the engine from starting. In this instance, the
vehicle will need to be serviced by a authorized dealer in
order to return the vehicle to it’s factory settings.
INTRODUCTION 9
1


THINGS TO KNOW BEFORE STARTING YOUR VEHICLE
CONTENTS
! REMOTE STARTING SYSTEM ..............12
▫ How To Use Remote Start ................12
2
! ENGINE BREAK-IN RECOMMENDATIONS ....13

12 THINGS TO KNOW BEFORE STARTING YOUR VEHICLE
REMOTE STARTING SYSTEM
This system uses the Remote Keyless Entry
(RKE) transmitter to start the engine conveniently from outside the vehicle while still
maintaining security. The system has a range of
approximately 300 ft (91 m).
NOTE:
• The vehicle must be equipped with an automatic
transmission to be equipped with Remote Start.
• Obstructions between the vehicle and the RKE transmitter may reduce this range.
• The Remote Start system will wait for the “Wait To
Start” amber telltale to extinguish before cranking the
engine. This allows time for the engine pre-heat cycle
to pre-heat the cylinder air, and is normal in cold
weather. Refer to “Electronic Vehicle Information Display (EVIC)” in “Understanding Your Instrument
Panel” for further information on the “Wait To Start”
amber telltale and the pre-heat cycle.
How To Use Remote Start
All of the following conditions must be met before the
engine will remote start:
• Shift lever in PARK
• Doors closed
• Hood closed
• HAZARD switch off
• BRAKE switch inactive (brake pedal not pressed)
• Battery at an acceptable charge level
• RKE PANIC button not pressed
• Fuel meets minimum requirement
• System not disabled from previous remote start event

• Vehicle security alarm not active
• Water In Fuel Indicator Light is not illuminated
• “Wait To Start” telltale is not illuminated
WARNING!
• Do not start or run an engine in a closed garage or
confined area. Exhaust gas contains Carbon Monoxide (CO) which is odorless and colorless. Carbon
Monoxide is poisonous and can cause serious injury or death when inhaled.
• Keep Remote Keyless Entry (RKE) transmitters
away from children. Operation of the Remote Start
System, windows, door locks or other controls
could cause serious injury or death.
THINGS TO KNOW BEFORE STARTING YOUR VEHICLE 13
ENGINE BREAK-IN RECOMMENDATIONS
The diesel engine does not require a break-in period due
to its construction. Normal operation is allowed, providing the following recommendations are followed:
• Warm up the engine before placing it under load.
Do not operate the engine at idle for prolonged periods.
•
• Use the appropriate transmission gear to prevent
engine lugging.
• Observe vehicle oil pressure and temperature indicators.
• Check the coolant and oil levels frequently.
• Vary throttle position at highway speeds when carry-
ing or towing significant weight.
2

14 THINGS TO KNOW BEFORE STARTING YOUR VEHICLE
NOTE: Light duty operation such as light trailer towing
or no load operation will extend the time before the
engine is at full efficiency. Reduced fuel economy and
power may be seen at this time.
The engine oil installed in the engine at the factory is a
high-quality energy conserving type lubricant. Oil
changes should be consistent with anticipated climate
conditions under which vehicle operations will occur.
The recommended viscosity and quality grades are
shown under “Fluids, Lubricants and Genuine Parts”,
under “Maintaining Your Vehicle” in this manual. NONDETERGENT OR STRAIGHT MINERAL OILS MUST
NEVER BE USED.

UNDERSTANDING YOUR INSTRUMENT PANEL
CONTENTS
! INSTRUMENT CLUSTER .................16
▫ Instrument Cluster Descriptions ............17
! INSTRUMENT CLUSTER .................28
▫ Instrument Cluster Descriptions ............29
! ELECTRONIC VEHICLE INFORMATION
CENTER (EVIC) ........................40
▫ Electronic Vehicle Information Center (EVIC)
Displays — 3.5” Display .................40
▫ Diesel Particulate Filter (DPF) Messages ......47
Diesel Exhaust Fluid (DEF) Warning Messages . . .49
▫
▫ Diesel Exhaust Fluid (DEF) Fault Warning
Messages ............................50
▫ EVIC/DID Displays.....................52
▫ Oil Life Reset .........................53
▫ Vehicle Information (Customer Information
Features) ............................54
! DRIVER INFORMATION DISPLAY (DID) ......56
▫ Driver Information Display (DID) —
7” Display ..........................192
3
16 UNDERSTANDING YOUR INSTRUMENT PANEL
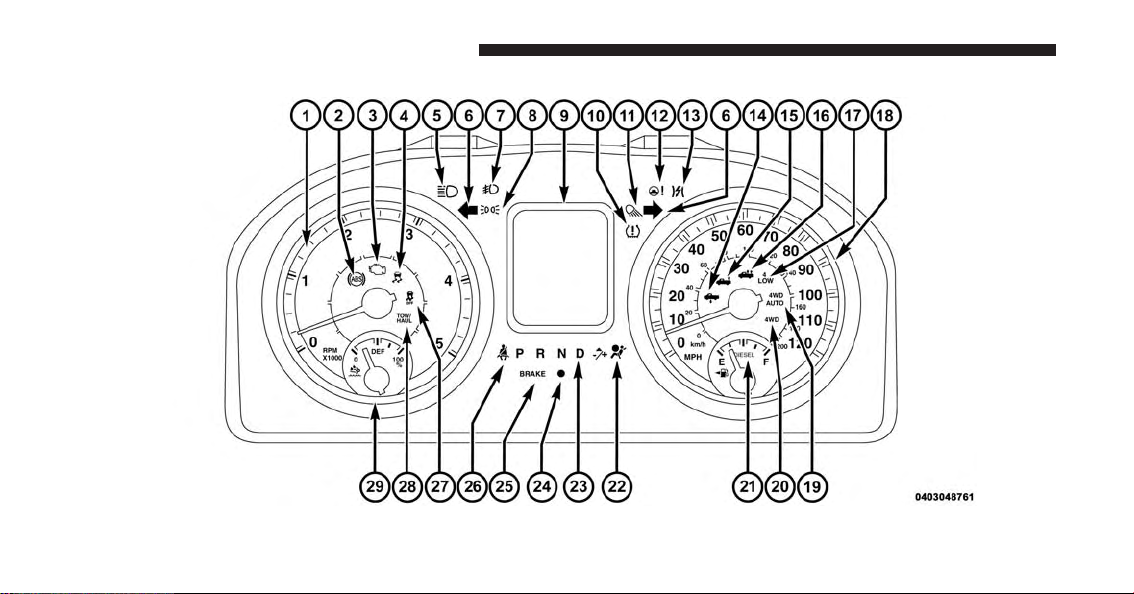
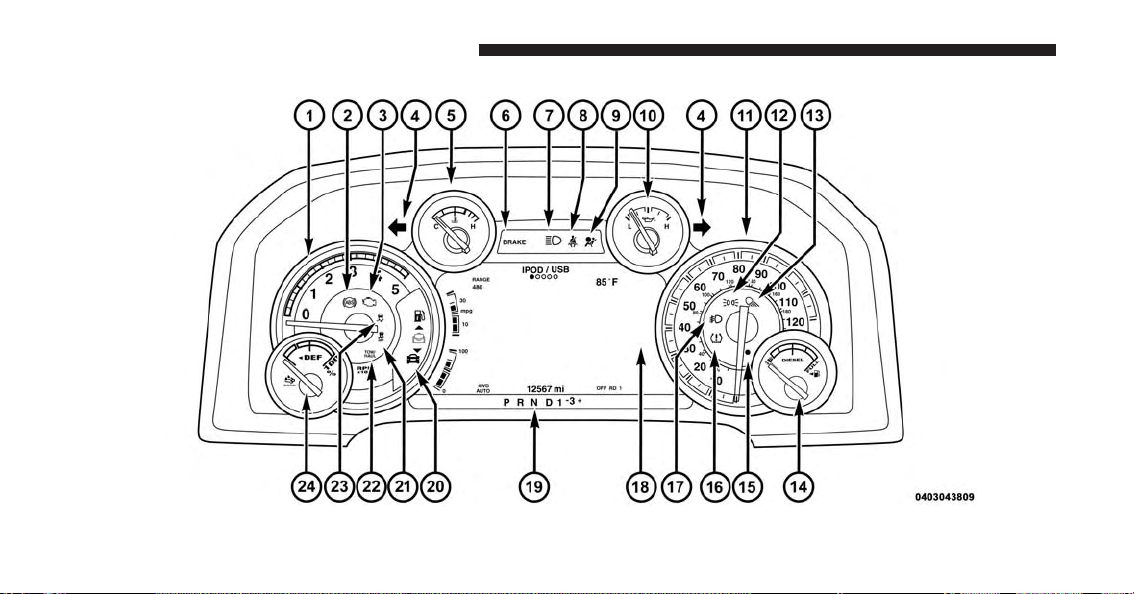
INSTRUMENT CLUSTER
Instrument Cluster Descriptions
1. Tachometer
The tachometer indicates engine speed in Revolutions
Per Minute (RPM x 1000).
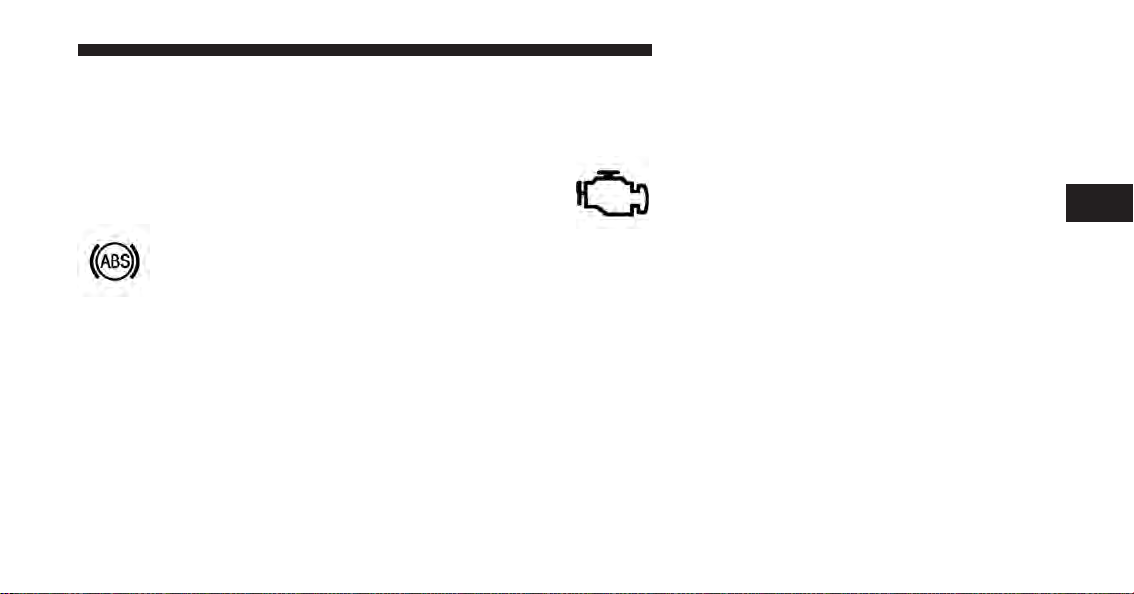
2. Anti-Lock Brake (ABS) Light
This light monitors the Anti-lock Brake System
(ABS). The light will turn on when the ignition
switch is turned to the ON/RUN position and
may stay on for as long as four seconds.
If the ABS light remains on or turns on while driving, it
indicates that the anti-lock portion of the brake system is
not functioning and that service is required. However,
the conventional brake system will continue to operate
normally if the BRAKE warning light is not on.
If the ABS light is on, the brake system should be serviced
as soon as possible to restore the benefits of anti-lock
brakes. If the ABS light does not turn on when the ignition
UNDERSTANDING YOUR INSTRUMENT PANEL 17
switch is turned to the ON/RUN position, have the light
inspected by an authorized dealer.
3. Malfunction Indicator Light (MIL)
The Malfunction Indicator Light (MIL) is part
of an Onboard Diagnostic (OBDII) system
which monitors the emissions and engine con-
trol system. If the vehicle is ready for emissions
testing, the light will come on when the ignition is first
turned on and remain on, as a bulb check, until the
engine is started. If the vehicle is not ready for emissions
testing the light will come on when the ignition is first
turned on and remain on for 15 seconds, then blink for
5 seconds, and remain on until the vehicle is started. If
the bulb does not come on during starting, have the
condition investigated promptly.
If this light comes on and remains on while driving, it
suggests a potential engine control problem and the need
for system service.
3

18 UNDERSTANDING YOUR INSTRUMENT PANEL
Although your vehicle will usually be drivable and not
need towing, see your authorized dealer for service as
soon as possible.
CAUTION!
Prolonged driving with the Malfunction Indicator
Light (MIL) on could cause damage to the engine
control system. It also could affect fuel economy and
driveability. If the MIL is flashing, severe catalytic
converter damage and power loss will soon occur.
Immediate service is required.
WARNING!
A malfunctioning catalytic converter, as referenced
above, can reach higher temperatures than in normal
operating conditions. This can cause a fire if you
(Continued)
WARNING! (Continued)
drive slowly or park over flammable substances such
as dry plants, wood, cardboard, etc. This could result
in death or serious injury to the driver, occupants or
others.
4. Electronic Stability Control (ESC) Activation/
Malfunction Indicator Light — If Equipped
The “ESC Activation/Malfunction Indicator
Light” in the instrument cluster will come on
when the ignition switch is turned to the
ON/RUN position. It should go out with the
engine running. If the “ESC Activation/Malfunction
Indicator Light” comes on continuously with the engine
running, a malfunction has been detected in the ESC
system. If this light remains on after several ignition
cycles, and the vehicle has been driven several miles
(kilometers) at speeds greater than 30 mph (48 km/h),

see your authorized dealer as soon as possible to have the
problem diagnosed and corrected.
NOTE:
The “ESC Off Indicator Light” and the “ESC Activation/
•
Malfunction Indicator Light” come on momentarily each
time the ignition switch is turned to ON/RUN.
• Each time the ignition is turned to ON/RUN, the ESC
system will be ON, even if it was turned off previously.
• The ESC system will make buzzing or clicking sounds
when it is active. This is normal; the sounds will stop
when ESC becomes inactive following the maneuver
that caused the ESC activation.
5. High Beam Indicator
This indicator shows that headlights are on
high beam. Push the multifunction lever for-
ward to switch the headlights to high beam,
and pull toward yourself (normal position) to return to
low beam.
UNDERSTANDING YOUR INSTRUMENT PANEL 19
6. Turn Signal Indicators
The arrow will flash with the exterior turn
signal when the turn signal lever is operated.
NOTE:
• A continuous chime will sound if the vehicle is driven
more than 1 mile (1.6 km) with either turn signal on.
• Check for an inoperative outside light bulb if either
indicator remains on and does not flash, or flashes at a
rapid rate.
7. Front Fog Light Indicator — If Equipped
This indicator will illuminate when the front
fog lights are on.
3

20 UNDERSTANDING YOUR INSTRUMENT PANEL
8. Park/Headlight ON Indicator — If Equipped
This indicator will illuminate when the park
lights or headlights are turned on.
9. Electronic Vehicle Information Center (EVIC)
The Electronic Vehicle Information Center (EVIC) features
an interactive display that is located in the instrument
cluster. For further information, refer to “Electronic Vehicle
Information Center (EVIC)” for further information.
10. Tire Pressure Monitoring Telltale Light
Each tire, including the spare (if provided),
should be checked monthly when cold and inflated to the inflation pressure recommended by
the vehicle manufacturer on the vehicle placard
or tire inflation pressure label. (If your vehicle has tires of
a different size than the size indicated on the vehicle
placard or tire inflation pressure label, you should determine the proper tire inflation pressure for those tires.)
As an added safety feature, your vehicle has been
equipped with a Tire Pressure Monitoring System
(TPMS) that illuminates a low tire pressure telltale when
one or more of your tires is significantly under-inflated.
Accordingly, when the low tire pressure telltale illuminates, you should stop and check your tires as soon as
possible, and inflate them to the proper pressure. Driving
on a significantly under-inflated tire causes the tire to
overheat and can lead to tire failure. Under-inflation also
reduces fuel efficiency and tire tread life, and may affect
the vehicle’s handling and stopping ability.
Please note that the TPMS is not a substitute for proper
tire maintenance, and it is the driver’s responsibility to
maintain correct tire pressure, even if under-inflation has
not reached the level to trigger illumination of the TPMS
low tire pressure telltale.

Your vehicle has also been equipped with a TPMS
malfunction indicator to indicate when the system is not
operating properly. The TPMS malfunction indicator is
combined with the low tire pressure telltale. When the
system detects a malfunction, the telltale will flash for
approximately one minute and then remain continuously
illuminated. This sequence will continue upon subsequent vehicle start-ups as long as the malfunction exists.
When the malfunction indicator is illuminated, the system may not be able to detect or signal low tire pressure
as intended. TPMS malfunctions may occur for a variety
of reasons, including the installation of replacement or
alternate tires or wheels on the vehicle that prevent the
TPMS from functioning properly. Always check the
TPMS malfunction telltale after replacing one or more
tires or wheels on your vehicle, to ensure that the
replacement or alternate tires and wheels allow the TPMS
to continue to function properly.
UNDERSTANDING YOUR INSTRUMENT PANEL 21
CAUTION!
The TPMS has been optimized for the original
equipment tires and wheels. TPMS pressures and
warning have been established for the tire size
equipped on your vehicle. Undesirable system operation or sensor damage may result when using replacement equipment that is not of the same size,
type, and/or style. Aftermarket wheels can cause
sensor damage. Using aftermarket tire sealants may
cause the Tire Pressure Monitoring System (TPMS)
sensor to become inoperable. After using an aftermarket tire sealant it is recommended that you take
your vehicle to an authorized dealership to have your
sensor function checked.
NOTE: The TPMS telltale is also accompanied by a “Low
Tire” message in the Electronic Vehicle Information Center (EVIC) screen indicating “Low Tire”.
3

22 UNDERSTANDING YOUR INSTRUMENT PANEL
11. Cargo Light
The cargo light will illuminate when the cargo
light is activated by pressing the cargo light
button on the headlight switch.
12. Electric Power Steering Malfunction Warning Light
This telltale is on when the Electric Power
Steering is not operating and needs service.
13. Electronic Throttle Control (ETC) Light
This light informs you of a problem with the
Electronic Throttle Control (ETC) system. The
light will come on when the ignition is first
turned ON and remain on briefly as a bulb
check. If the light does not come on during starting, have
the system checked by an authorized dealer.
If a problem is detected, the light will come on while the
engine is running. Cycle the ignition key when the
vehicle has completely stopped and the transmission is in
the PARK position. The light should turn off.
If the light remains lit with the engine running, your
vehicle will usually be drivable. However, see an authorized dealer for service as soon as possible. If the light is
flashing when the engine is running, immediate service is
required. You may experience reduced performance, an
elevated/rough idle or engine stall and your vehicle may
require towing.
14. Air Suspension Normal Ride Height Indicator
Lamp — If Equipped
This light will illuminate when the air suspension system
is set to the Normal Ride Height setting. For further
information, refer to “Air Suspension System” in “Starting And Operating”.
15. Air Suspension Off-Road 1 Indicator Lamp —
If Equipped
This light will illuminate when the air suspension system
is set to the Off-Road 1 setting. For further information,
refer to “Air Suspension System” in “Starting And
Operating”.
16. Air Suspension Off-Road 2 Indicator Lamp —
If Equipped
This light will illuminate when the air suspension system is
set to the Off-Road 2 setting. For further information, refer
to “Air Suspension System” in “Starting And Operating”.
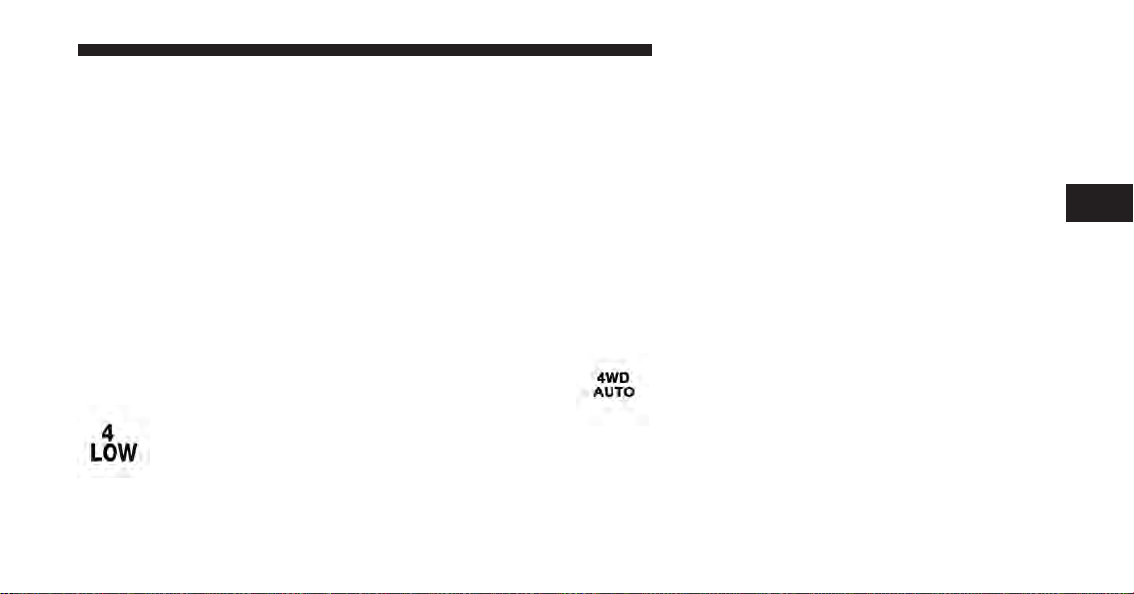
17. 4 LOW
This light alerts the driver that the vehicle is in
the four-wheel drive LOW mode. The front and
rear driveshafts are mechanically locked to-
gether forcing the front and rear wheels to
UNDERSTANDING YOUR INSTRUMENT PANEL 23
rotate at the same speed. Low range provides a greater
gear reduction ratio to provide increased torque at the
wheels.
For further information on four-wheel drive operation
and proper use, refer to “Four-Wheel Drive Operation —
If Equipped” in “Starting And Operating”.
18. Speedometer
The speedometer shows the vehicle speed in miles per
hour and/or kilometers per hour (mph/km/h).
19. 4WD AUTO Indicator Light — If Equipped
This light alerts the driver that the vehicle is in
the four-wheel drive auto mode, and the front
axle is engaged, but the vehicle’s power is sent
to the rear wheels. Four-wheel drive will be
automatically engaged when the vehicle senses a loss of
traction.
3

24 UNDERSTANDING YOUR INSTRUMENT PANEL
For further information on four-wheel drive operation
and proper use, refer to “Four-Wheel Drive Operation —
If Equipped” in “Starting And Operating”.
20. 4WD Indicator Light — If Equipped
This light alerts the driver that the vehicle is in
the four-wheel drive mode, and the front and
rear driveshafts are mechanically locked together forcing the front and rear wheels to
rotate at the same speed.
For further information on four-wheel drive operation
and proper use, refer to “Four-Wheel Drive Operation —
If Equipped” in “Starting And Operating”.
21. Fuel Gauge
Shows level of fuel in tank when ignition switch is in the
ON/RUN position.
22. Air Bag Warning Light
This light will turn on for four to eight seconds
as a bulb check when the ignition switch is first
turned to ON/RUN. If the light is either not on
during starting, stays on, or turns on while
driving, have the system inspected at an authorized
dealer as soon as possible. Refer to “Occupant Restraints”
in “Things To Know Before Starting Your Vehicle” for
further information.
23. Transmission Gear Position Indicator
The Transmission Gear Position Indicator is selfcontained within the instrument cluster. It displays the
gear range of the automatic transmission.
NOTE: The highest available transmission gear is displayed in the lower right corner of the EVIC whenever
the Electronic Range Select (ERS) feature is active. Use

the +/- selector on the shift lever or steering wheel to
activate ERS. Refer to “Automatic Transmission” in
“Starting And Operating” for further information.
24. Vehicle Security Light — If Equipped
This light will flash at a fast rate for approximately 15 seconds, when the vehicle security
alarm is arming, and then will flash slowly
until the vehicle is disarmed.
25. Brake Warning Light
This light monitors various brake functions,
including brake fluid level and parking brake
application. If the brake light turns on it may
indicate that the parking brake is applied, that
the brake fluid level is low, or that there is a problem with
the Anti-lock Brake System reservoir.
UNDERSTANDING YOUR INSTRUMENT PANEL 25
If the light remains on when the parking brake has been
disengaged, and the fluid level is at the full mark on the
master cylinder reservoir, it indicates a possible brake
hydraulic system malfunction or that a problem with the
Brake Booster has been detected by the Anti-Lock Brake
System (ABS)/Electronic Stability Control (ESC) system.
In this case, the light will remain on until the condition
has been corrected. If the problem is related to the brake
booster, the ABS pump will run when applying the brake
and a brake pedal pulsation may be felt during each stop.
The dual brake system provides a reserve braking capacity in the event of a failure to a portion of the hydraulic
system. A leak in either half of the dual brake system is
indicated by the Brake Warning Light, which will turn on
when the brake fluid level in the master cylinder has
dropped below a specified level.
The light will remain on until the cause is corrected.
3
26 UNDERSTANDING YOUR INSTRUMENT PANEL
NOTE: The light may flash momentarily during sharp
cornering maneuvers, which change fluid level conditions. The vehicle should have service performed, and
the brake fluid level checked.
If brake failure is indicated, immediate repair is necessary.
WARNING!
Driving a vehicle with the red brake light on is
dangerous. Part of the brake system may have failed.
It will take longer to stop the vehicle. You could have
a collision. Have the vehicle checked immediately.
Vehicles equipped with the ABS, are also equipped with
Electronic Brake Force Distribution (EBD). In the event of
an EBD failure, the Brake Warning Light will turn on
along with the ABS Light. Immediate repair to the ABS
system is required.
Operation of the Brake Warning Light can be checked by
turning the ignition switch from the OFF position to the
ON/RUN position. The light should illuminate for approximately two seconds. The light should then turn off
unless the parking brake is applied or a brake fault is
detected. If the light does not illuminate, have the light
inspected by an authorized dealer.
The light also will turn on when the parking brake is
applied with the ignition switch in the ON/RUN position.
NOTE: This light shows only that the parking brake is
applied. It does not show the degree of brake application.
26. Seat Belt Reminder Light
When the ignition switch is first turned to
ON/RUN, this light will turn on for four to
eight seconds as a bulb check. During the bulb
check, if the driver’s seat belt is unbuckled, a
chime will sound. After the bulb check or when driving,
if the driver’s seat belt remains unbuckled, the seat belt

reminder light will flash or remain on continuously. Refer
to “Occupant Restraints” in “Things To Know Before
Starting Your Vehicle” for further information.
27. Electronic Stability Control (ESC) OFF Indicator
Light — If Equipped
This light indicates that the Electronic Stability
Control (ESC) is in Partial Off or Full Off mode.
28. TOW/HAUL
The TOW HAUL button is located on the center
stack upper switch bank. This light will illuminate when TOW HAUL mode is selected.
29. DEF Gauge
The DEF Gauge displays the actual level of Diesel
Exhaust Fluid in the DEF tank. Diesel Exhaust Fluid
(DEF) is required to maintain normal vehicle operation
UNDERSTANDING YOUR INSTRUMENT PANEL 27
and emissions compliance. More information is available
in the Electronic Vehicle Information (EVIC) or Driver
Information Display (DID) section under the heading of
Diesel Exhaust Fluid (DEF) Warning Messages.
NOTE:
3
The gauge may take up to five seconds to update after
adding a gallon or more of Diesel Exhaust Fluid (DEF) to
the DEF tank. If you have a fault related to the DEF
system, the gauge may not update to the new level. See
your authorized dealer for service.
The DEF gauge may also not immediately update after a
refill if the temperature of the DEF fluid is below 12F
(-11C). The DEF line heater will possibly warm up the
DEF fluid and allow the gauge to update after a period of
run time. Under very cold conditions, it is possible that
the gauge may not reflect the new fill level for several
drives.
28 UNDERSTANDING YOUR INSTRUMENT PANEL
INSTRUMENT CLUSTER
 Loading...