


Page 1
WES+ Installation and Operations Manual V2.3 Ramtech Electronics 2017
3
WES+ Installation and
Operation Manual

Page 2
WES+ Installation and Operations Manual V2.3 Ramtech Electronics 2017
Contents
System Units
Unit Diagrams
WES+ Units
Fire Point
Detector – Heat
Detector – Smoke
Base Station
Link
Interface
Basic System
Health and Safety
Manual Handing, Storage and Transportation
Service and Maintenance
Damaged Units
Installation procedure
System operation
Raising the alarm
Manual activation
Automatic activation
Silencing the alarm
Resetting a call point
LED Indications
Unit Alive Indication
Amber LED Indication
Red LED Indication
Silent Tests
Initiating a silent test
Inspection of other system units
Cancelling a Silent Test
Moving a unit on site
Removing a unit from the site
Advanced systems – Base Stations
Menu Overview
Alarm
System Warnings
Base Station Controls
4
5
5
5
5
5
5
5
5
6
6
6
6
6
6
8
8
8
8
8
8
8
8
8
8
9
9
9
9
9
9
10
10
11
11
12

Page 3
WES+ Installation and Operations Manual V2.3 Ramtech Electronics 2017
Home screen
System Logs
Settings
Change Access Code
Unit Numbering
Date and Time
Backlight
Mobile Base
SIM Card Installation - GSM Base Station
Communications
Change Site Name
User Phone Details
Test Phone Number
GSM Status
SIM Card Information
Text Message
Interface
Fire Point Technical Data
Base Station Technical Data
Heat Detector Technical Data
Smoke Detector Technical Data
Link Technical Data
Interface Technical Data
Heat Detector Maintenance
Routine Inspection
Operational Test
Cleaning
Smoke Detector Maintenance
Routine Inspection
Operational Test
Cleaning
Contact Us
12
13
13
14
14
15
15
15
16
18
18
18
19
19
20
20
21
22
24
25
27
29
31
32
32
32
32
33
33
33
33
33

Page 4
WES+ Installation and Operations Manual V2.3 Ramtech Electronics 2017
Unit Diagrams
System Units
Sounder and Strobe
LED indicators
Call Point
Heat Dectector
LED indicators
LCD Display
Navigation Pad
Smoke
Detector
Cable Gland
Fire Point
Detector Units
Link
Base Station
Detector Units
Interface
Antenna
Antenna
Antenna
LED indicators

Page 5
WES+ Installation and Operations Manual V2.3 Ramtech Electronics 2017
Smoke detectors are silent but communicate with sounding units
automatically to raise the alarm if smoke is detected. NB: smoke
detectors are sensitive to dust and steam so are unsuitable for dusty
areas. If a detector has raised the alarm, its red LED indicator will ash
for 30 minutes or until the alarm is reset.
Smoke Detectors should be securely mounted to the ceiling and should
be regularly maintained (see Smoke Detector Maintenance section).
If proper maintenance is not carried out, there is a likelihood of
malfunction, including false alarms, which could disrupt operation on
site.
Smoke detectors may be identied by a reference ‘P’ on the detector
label (g.2)
Dust-resistant smoke detectors may be identied by a reference ‘DP’
on the detector label (g.3).
Note: Smoke detectors are intended for internal use in enclosed
spaces. Detectors will not function correctly if installed in open spaces
without ceilings, walls etc.
Base Station
Base stations include a buzzer, an LCD display, a navigation pad, and
if the GSM model has been selected, a modem to allow SMS
message sending. Base stations are not essential to a WES+ system,
but they provide centralised functionality and additional information
which is extremely useful on larger or complex sites.
Base Stations should be securely mounted. It is possible to use base
stations as mobile units (see Mobile Base section).
Link
Link units are used solely to relay WES+ radio messages on large or
complex sites if there is no need for additional call points. Link units
should be securely wall mounted.
Interface
Interface units allow external outputs to be triggered in the event of an
alarm. They can also take an input from an external trigger and set off
the alarm on the WES+ system.
P
WES+ units have three indicator LEDs, plus two push buttons, labelled
A and B.
All units should be securely xed using the two integrated mounting
points. We recommend that you use M4 x 50mm pan head screws
and wall plugs or other xings suitable for the particular wall/ceiling
material.
The tamper switch on the rear of each unit must be in contact with the
wall or ceiling for the unit to function correctly.
All WES+ units relay all WES+ radio messages for the relevant site.
Fire Point
Fire Point units include a manual call point used to raise the alarm
when necessary and a loud alarm sounder (with optional strobe light).
Fire Points should be securely mounted approximately 1.4 metres
above the oor.
Detector - Heat
Heat detectors automatically raise the alarm if the temperature rises
above a safe level. Heat detectors are silent, but communicate with re
points and base stations to raise an audible alarm. If a detector has
raised the alarm, its red LED indicator will ash for 30 minutes or until
the alarm is reset.
Heat detectors should be securely mounted to the ceiling and regularly
maintained (see Heat Detector Maintenance section). If proper
maintenance is not carried out, there is a likelihood of malfunction,
including false alarms, which could disrupt operation on site.
Heat detectors may be identied by a reference ‘A2’ on the detector
label (g.1)
WES+ Units Detector - Smoke
Fig 3
DP
Fig 2
Fig 1
A2
Note: Heat detectors are intended for internal use in enclosed spaces.
Detectors will not function correctly if installed in open spaces without
ceilings, walls etc.

Page 6
WES+ Installation and Operations Manual V2.3 Ramtech Electronics 2017
A basic system is made up of a minimum of three WES+ units. Fire
points are essential to all systems as these provide the audible
evacuation alarm.
Health and Safety
As with all site practices, working safely must be a priority when
installing the WES+ systems. It is important to observe appropriate
health and safety legislation on site, including national regulatory
obligations, as well as any local site- or client-specic requirements.
Prior to installation of WES+ equipment, an appropriate risk
assessment must be carried out and all reasonable efforts to remove
risk put in place. The following notes are intended as general guidance
only. Consideration must be given to design criteria, site conditions
other trades operating in the area during installation.
Prolonged or repeated exposure to loud noise such as re alarm
sirens may potentially lead to hearing damage. Ensure that protective
measures are taken that are appropriate to the exposure levels
expected on site.
WES+ units are not ATEX rated and have not been tested for use in
explosive atmospheres. These are not recommended for use in ATEX
applications.
Manual Handling, Storage and
Transportation
Whilst WES+ units are lightweight and designed to be easily handled
on-site, it is important that appropriate manual handling practices are
followed. Particular care should be taken when carrying units at height
or when ascending/descending elevated platforms, scaffolding and
ladders.
Units are stored and transported in boxes of 8. Refer to Product
Datasheets for full details of unit weights. Unopened boxes should be
stacked no more than 10 high, on a solid, stable surface. Individual
unboxed units should not be stacked on top of one another.
To avoid damage or injury during transit, ensure units are packaged
securely and restricted from moving around.
Service and Maintenance
Under normal conditions, WES+ units will function for up to three years
without the need for routine maintenance. A full range of servicing
options are available for aged units. Contact the WES+ Helpline for
details.
Basic System
It is essential that testing, repairs and servicing are carried out by
WES+ Engineers or approved, qualied partners. Modifying any part
of the unit can prevent correct functionality, even if the unit appears to
be working.
Damaged Units
Should a unit be dropped or impacted during installation, operation or
decommissioning, it should be inspected for signs of damage. Even if
no external damage is visible, the internal components may have been
affected. Test the unit for operation and if in doubt, remove the unit
from the network and contact Ramtech Technical Service.
Installation procedure
Note: WES+ units are only compatible with other WES+ units. It is not
possible to create a network using other version of the WES product
e.g. WES1, WES3. Ensure that all units intended to be used on site
are the WES+ units.
Installing WES+ on your site is easy. You will need to activate each unit
and add the units to the group so that they can communicate with each
other.
1- Activate units
DO NOT OPEN ANY UNIT AS THIS WILL INVALIDATE THE
WARRANTY
To activate a unit, hold down ‘A’ and press ‘B’ three times in quick
succession. All three LEDs will briey illuminate and then the amber
LED will ash.
Note: This operation activates the unit – no radio connection is
established at this point
2 - Start a new site group
Take two activated WES+ units
.
Press and hold ‘A’ on both units. The amber LEDs will illuminate
followed by the green LEDs to indicate that the units have been
successfully paired and a site group created. Release the ‘A’ buttons.
If the red LED illuminates, pairing has failed. Follow the ‘Removing a
unit from the site’ section to clear the two units and then repeat step
1 - Activate Units.

Page 7
WES+ Installation and Operations Manual V2.3 Ramtech Electronics 2017
Note: The system must include a least one Fire Point in order to
generate an audible alarm. Where a system comprises Detectors only,
no audible alert will be transmitted on site.
3- Add units to an existing site group
Take a WES+ unit which is part of the existing site group and an
un-paired, activated WES+ unit.
Press and hold A on two units, the amber LEDs will illuminate followed
by the green LEDs to indicate successful pairing.
Release the ‘A’ buttons.
The activated unit has now been added to the existing site group and
can communicate with all other WES+ units on that site group.
If the red LED illuminates, pairing has failed. Follow the ‘Removing a
unit from the site’ section to clear the two units and then repeat step
1 - Activate Units.
4– Position units
Once activated and paired, WES+ units can be installed on site.
Ensure any applicable national guidelines or Standards regarding
locating units on site are adhered to e.g. BS5389-1 in the UK.
Wherever possible, avoid positioning the unit directly adjacent to metal
frames, electric cables and similar equipment that may interfere with
the signal strength.
5– Securely x the units in place
Each WES+ unit must be securely xed in place to ensure correct
operation.
• Detector units are ceiling mounted and intended for indoor use
only. Installation of detectors may involve working at height and
or on elevated platforms. Ensure a risk assessment has been
carried out and all reasonable safety precautions are in place
before commencing work.
• Fire points must be securely xed, with the antenna upright,
to a robust vertical surface such as a wall or trolley. Where the
existing surface is unsuitable for direct xing, the Fire Point can
be mounted to backing board or pattressing such as plywood or
similar sheet material.
Each unit should be securely mounted using its two integrated
mounting points with M4 x 50mm pan head screws and wall plugs or
other xings selected for the particular wall or ceiling type. Ensure that
all xing points are secure and that the back tamper is fully depressed
after installation.
Note: WES+ units must be securely xed in place for correct operation
The tamper switch on the rear of the unit must be in contact with the
wall or ceiling.
6– Test the system
After installation of the units, it is essential to perform a silent alarm
test to conrm proper operation of the system. It is also best practice
to conduct a full Silent Test on a weekly basis. This test should also
be performed following any signicant change to the site environment
(new structure, wall or construction equipment installed) that may affect
the network signal.
To perform the test:
1. Go to any unit in the system
2. Check it is ashing its Green LED at the rate of once every 4
seconds
3. Press and hold B until the Amber LED illuminates, then release B
.
4. Check that the Green LED is now on.
5. Walk the site and conrm that the green LED is lit on every
installed WES+ unit.
6. A ashing Green LED means the unit has failed the test.
7. Units ashing Red then Amber and units still occasionally ashing
the green LED have failed the test. Refer to ‘Fault LED
Indication’ section to troubleshoot the problem.
8. At the end of the test, press and hold the B button on any WES+
unit to end the test.
Note : Following initial installation, wait for a minimum of 60 minutes
before starting the rst silent test. During this time, the WES+ units will
self-calibrate to adjust for background radio noise which may impact
the accuracy of the silent test.

Page 8
WES+ Installation and Operations Manual V2.3 Ramtech Electronics 2017
Manual activation
To raise the alarm, press any call point in the system. The call point will
latch into the pressed position and a mechanical yellow and black
striped ag will be displayed in the call point window as below.
Automatic activation
Smoke detection units will automatically raise the alarm if sufcient
smoke is detected.
Heat detection units will automatically raise the alarm if the
temperature rises above the threshold. The red ‘Alarm’ LED will only
ash on the unit(s) which raised the alarm.
Silencing the alarm
Note: it is vital to conrm that there is no re hazard before silencing
the alarm.
Do not attempt to open the unit or deactivate by removing the battery.
The alarm must be silenced either by using the reset key or at the
Base Station.
The re alarm will automatically silence 30 minutes after activation.
The re alarm can be manually cancelled from a call point that has
been pressed using the reset key provided. If necessary, a call point on
a nearer re point can be pressed and then reset to cancel the alarm.
Please wait for 5 seconds between pressing and resetting a call point.
After the alarm has cleared the system has a short (2 minute) re-arm
period during which the sirens will sound intermittently, and the amber
warning LEDs ash in groups of 5, following which the system is
re-armed and ready for use.
During the re-arm period, the alarm cannot be reactivated. It is
therefore vital to conrm that there is no re hazard before silencing
the alarm.
Any re point units with activated call points will periodically beep after
the re-arm period has ended as a reminder that the call points need to
be mechanically reset using the key before they can be used to raise
a re alarm.
1) Insert reset key with tab to the right as shown below.
2) Push key in as far as possible
3) Turn key anti-clockwise until a loud mechanical click is heard.
4) Remove the key
Ensure the call point is fully reset before removing the key. Partially
resetting a latched call point after the re alarm has been cancelled
can retrigger the re alarm.
Unit Alive Indication
Active units with no faults will ash their green LED once every 4
seconds to indicate that the unit is operational
Amber LED Indication
Each WES+ unit monitors itself for a number of faults. These are
indicated via the amber LED, which will ash in grouped patterns with
longer than usual gaps in between them.
Units displaying one of these patterns require further investigation and
should not be relied upon as part of the re alarm and detection system
until the fault has been corrected. Use the below chart to determine the
nature of the issue.
Group Flash 1 - Low Battery
Group Flash 2 - Low signal
Group Flash 3 - No signal
Group Flash 4 - Tamper
Group Flash 5 - Re-arm
Red LED Indication
If a detector has raised the alarm, its red LED indicator will ash during
a re alarm.
Raising the alarm Resetting a call point
System Operation
LED Indications

Page 9
WES+ Installation and Operations Manual V2.3 Ramtech Electronics 2017
It is recommended that the re system is tested weekly or whenever
a signicant change has been made to the installation or the building
under construction. WES+ is equipped with a silent test function that
allows you to test the radio link between units without activating an
audible re alarm. You can therefore ensure each unit in the system
has a robust radio link with sufcient capacity to allow for
environmental uctuations without disturbing the site.
Initiating a silent test
Press and hold the B button on any error free unit for more than 1
second to initiate a silent test. The amber LED will illuminate for up to
30 seconds to indicate that the unit has begun a test. The Silent Test
message is propagated by radio around the system.
The test result is indicated as follows:
Pass Green LED solid illumination
Radio OK, other fault
detected
Red LED ashes followed by Amber LED
group ashes to indicate fault (see ‘Amber
LED Indication’).
No Radio Signal Amber LED group ashes to indicate fault
(see ‘Amber LED indication’).
Inspection of other system units
After a silent test has been initiated, all other units should be inspected.
The test result can be determined by examining the LEDs on each unit:
Pass Green LED solid illumination
Radio OK, other fault
detected
Red LED ashes followed by Amber LED
group ashes to indicate fault (see above).
No Radio Signal Alive Indication or Red LED ashes
followed by Amber LED group ashes to
indicate fault (see above).
Cancelling a silent test
The silent test can be cancelled from any unit, except those which are
indicating the Alive Indication, by pressing and holding the B button for
more than 1 second.
The silent test will automatically cancel 20 minutes after activation.
The unit will detect that it has been removed from its installed position
and then reinstalled. Check that after reinstallation the unit is not
displaying any fault warnings on its amber LED.
After moving a unit, we recommend that you conduct a silent test
to check that the movement has not adversely affected radio
communication.
Before shipping a unit or moving it to another site it must rst be
deactivated, in order to:
• prevent accidental triggering
• preserve battery unit life
• clear site information which would prevent it forming or joining
another site
First, remove the unit to be deactivated from the wall/ceiling and
ensure the back tamper button is not pressed.
Hold down ‘A’ and then press ‘B’ three times in quick succession. All
three LEDs will briey illuminate and then extinguish and remain off.
Note: units cannot be deactivated during a re alarm.
Silent Tests Moving a unit on site
Removing the unit from the site

Page 10
WES+ Installation and Operations Manual V2.3 Ramtech Electronics 2017
One or more base station units can be added to a basic system to
provide additional system monitoring information. Base stations include
details about which units have raised re alarms, any units with current
fault warnings and historical event logs. The base station also allows
an authorised user to silence a re alarm using an access code.
Optional GSM functionality allows up to six users to receive text
messages in the event of a re or other system warnings occurring.
To conserve battery power, the LCD display and backlight turn off after
a short period of inactivity. Pressing any of the navigation buttons will
activate the display. If there are no current warnings or re alarms
across the system, the base station will display the home screen which
shows the site name and the date and time.
Pressing enter ( ) goes to the main menu to allow settings to be
changed or logs to be viewed.
Advanced systems - Base Stations
Menu overview
Main Menu
Settings
System Logs
Settings Menu*
Unit Numbering
Communications
Date and Time
Change Access
Code
Backlight
Mobile Base
Change Language
Communication
Menu**
Change Site
Name
User Phone
Details
GSM Status
SIM Card
Information
System Log
Menu
Alarms
Silent Tests
External
Tampers
Internal
Tampers
DT Head
Tampers
Low Signals
Low Batteries
Flat Batteries
Latched Units
Unit Removed
Clear All
Logs*
Change
Language
English
Deutsche
Français
User Phone
Details
Edit User Name
Edit Phone
Number
SMS Notications
Test Phone
Number
* Acces Code Required
** Only for GSM Base Stations

Page 11
WES+ Installation and Operations Manual V2.3 Ramtech Electronics 2017
At the end of the re-arming period the base station will return to the
home screen unless any system warnings have been received during
the re alarm or re-arm period
System Warnings
The base station will indicate warnings from itself or any other system
unit. When a warning is received the LCD will ash and the unit will
beep periodically.
Warnings are displayed in the format: date, time, unit number and type,
warning type. Some warnings, for example EXT, will self-clear if the
fault is resolved.
When an alarm has been raised by a re point or detector, the base
station will ash the LCD display, beep and display ALARM ALARM
ALARM together with which units raised the alarm. The newest event
will be at the top of the list.
Units are identied by unit number and unit type. F indicates a re
point, I an Interface and D a detector. For example, the above shows
that a Fire Point with the number 001 was activated at 08:53 on the
8th October.
An alarm can be silenced in three ways:
i) Resetting a call point
ii) Waiting 30 minutes after the last activation
iii) Using your access code to silence the alarm from the base station
To silence the alarm from the base station, press enter during the re
alarm. This will take you to the Silence Alarm screen.
Select ‘Yes’, and enter your access code when requested. During
the re-arming period the following message will be displayed for two
minutes.
Alarm

Page 12
WES+ Installation and Operations Manual V2.3 Ramtech Electronics 2017
It is not possible to exit the warning screen until all warnings have
either been resolved or acknowledged by an authorised user.
To acknowledge a warning, select it with the navigation pad and press
enter. You will need to enter your access code for the rst warning you
acknowledge.
Base Station Controls
The navigation pad, shown below, is used to move between menus,
change characters and select entries.
Menu items can be selected using the up and down arrows and then
pressing enter (middle arrow button).
Change characters using the up and down arrows while the character
is highlighted.
WES Warning Code Guide
Warning Code Warning Description Self-Cleaning SMS setting
BAT Low Battery Unit NNN has a low battery No 5
DET Detector Tamper Detector unit NNN has had its detector head
removed
Yes 3
EXT External Tamper Unit NNN has been removed from the wall/
ceiling
Yes 4
FLT Flat Unit NNN has turned off, its battery is at No 8
INT Internal Tamper Unit NNN has been opened up and potentially
tampered with or damaged
No 2
LAT Latched The call point on unit NNN is still latched in
after the alarm has been reset
Yes 10
REM Removed Unit NNN has been deactivated and removed
from the re alarm system
No 9
SIG Low Signal Unit NNN has a low radio signal Yes 6
TST Silent Test Unit NNN initiated a Silent Test Yes 7
Scroll through characters by holding down the up or down arrows.
Move to the next character or eld using the right arrow.
Use the left arrow button to move to a previous character.
To exit a menu, move to the left-most character and press the left
arrow key again.
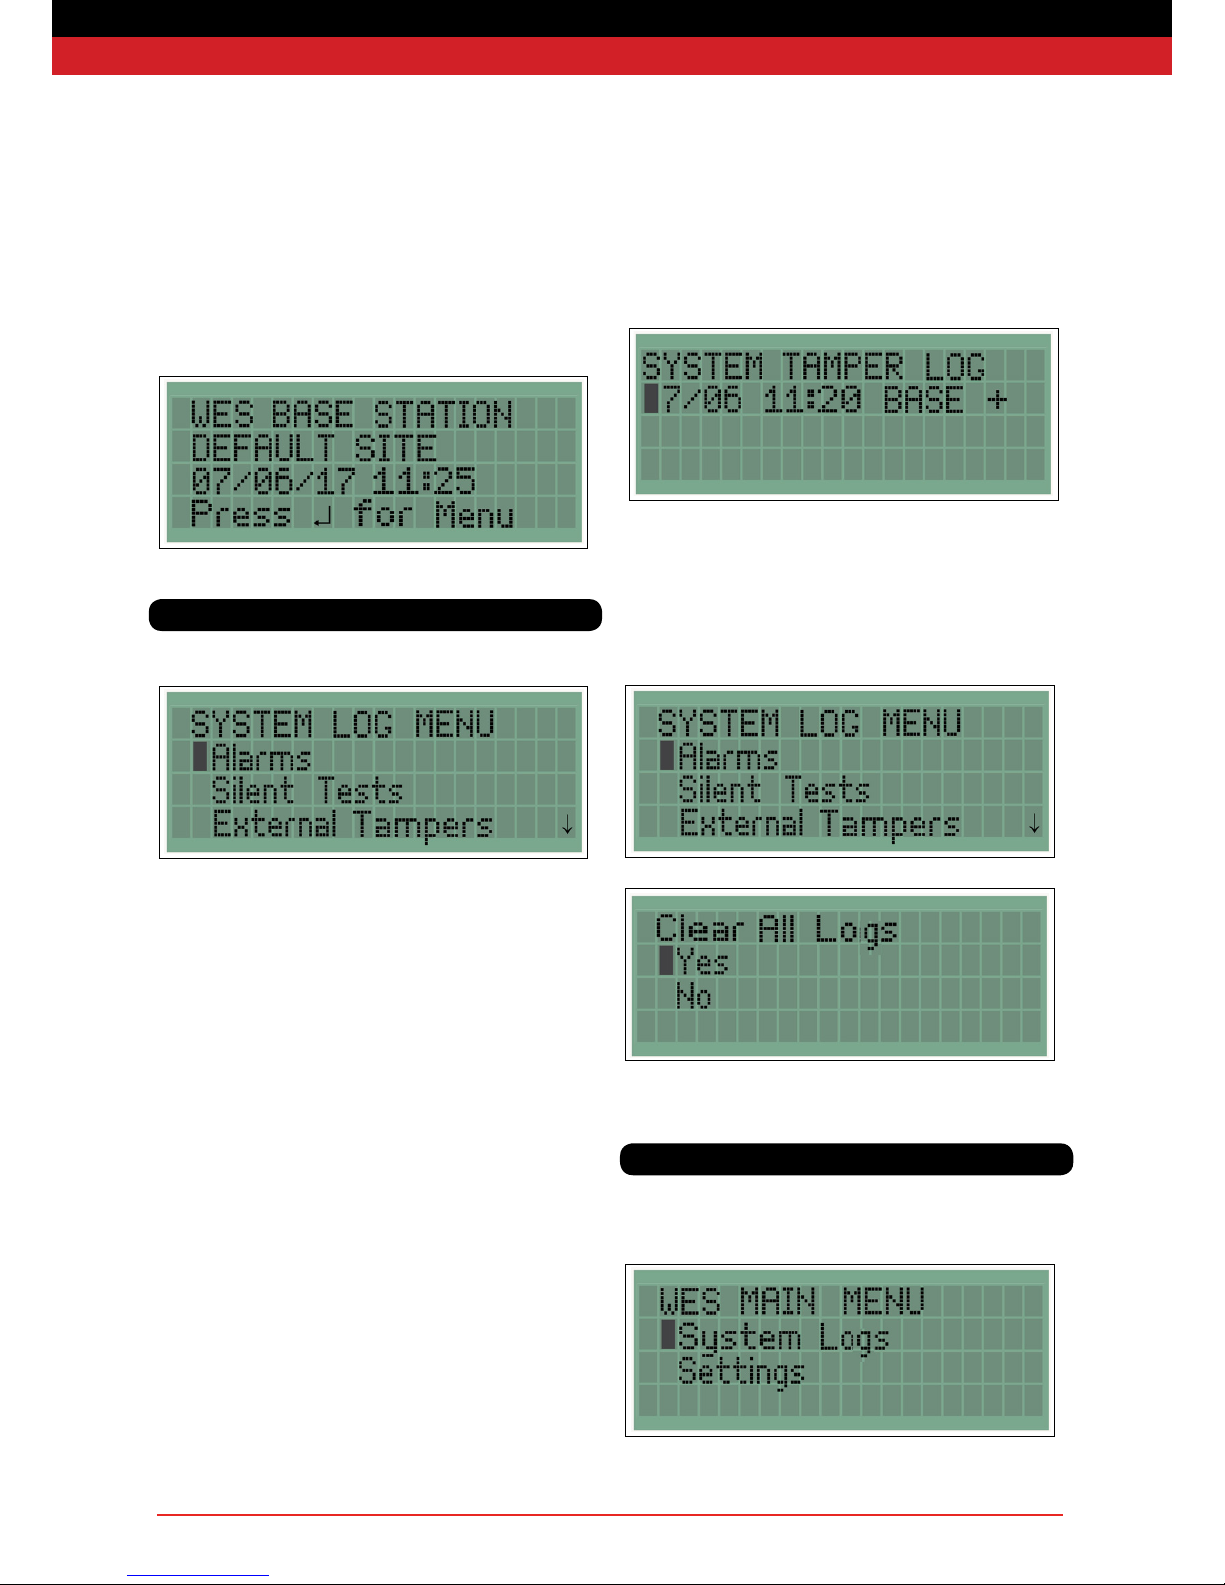
Home Screen
Pressing enter on the home screen opens the main menu, giving
access to the System Log Menu and the Settings Menu. The settings
are only available to authorised users with an access code.
If the base station has not yet been paired, it will display ‘Unpaired’
instead of the site name.
Page 13
WES+ Installation and Operations Manual V2.3 Ramtech Electronics 2017
Once a unit has been added to a site group, the site name will be
displayed. Note: by default, this is ‘DEFAULT SITE’. Please ensure you
change it to reect the location of your site, as this will be used in text
message alerts to identify the site where an alarm has been activated.
The following logs are accessible from the System Log menu:
• Fire Alarms
• Silent Tests
• External Tampers
• Internal Tampers
• DT Head Tampers
• Low Signals
• Low Batteries
• Flat Batteries
• Latched Units
• Unit Removed
All logs are in the same format with the most recent event at the top
of list.
Each log entry starts with the date and time the event was logged,
followed by the unit number and type and then a + or – symbol to
indicate the raising (+) or clearing (-) of an event. If there is a down
arrow in the bottom right corner, there are further log entries which can
be displayed by pressing the down arrow on the navigation pad.
The below example shows the External Tamper Log where unit BASE
had an External Tamper cleared at 11:20 on 23rd September.
Exit the log display using the left arrow key on the navigation pad.
Logs can be cleared by either deactivating the unit (see ‘Removing a
unit from the site’) or using the Clear All Logs option at the end of the
System Log Menu. This can only be performed by an authorised user
as it requires the access code.
System Logs
Settings
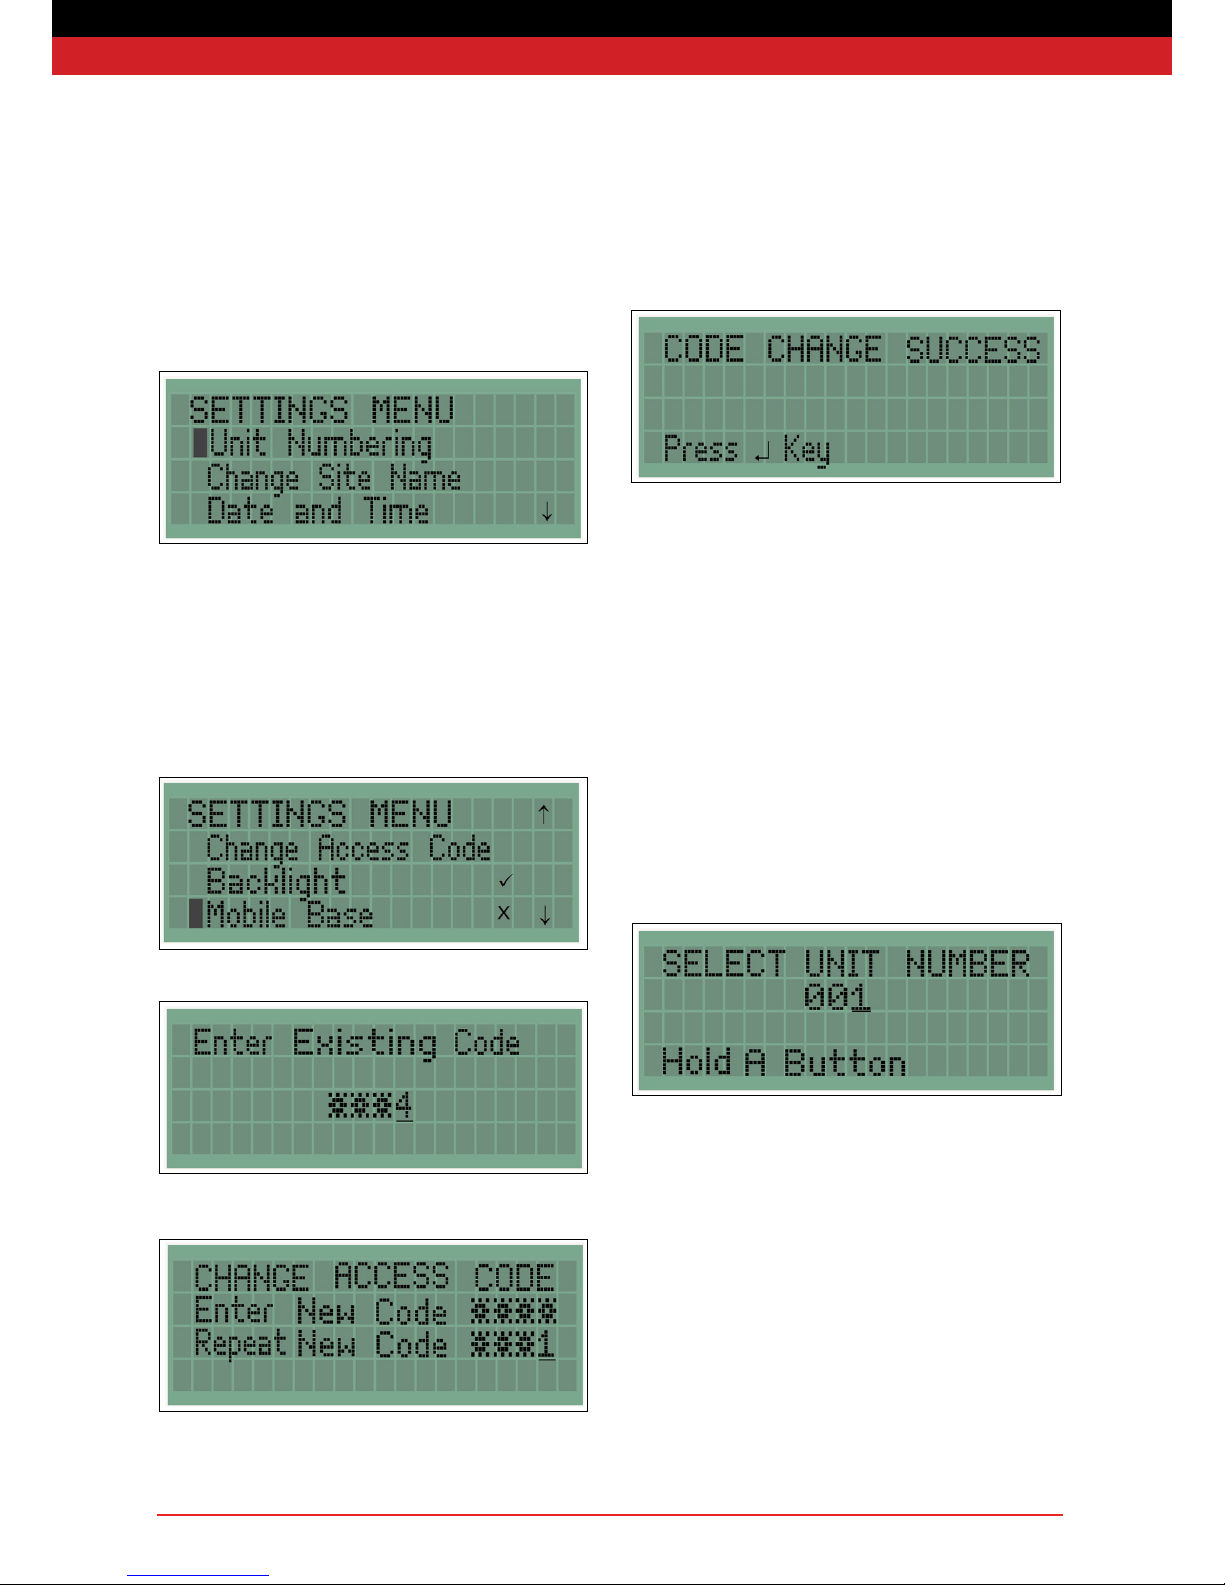
The Settings menu can be accessed from the Main Menu by selecting
Settings with the directional pad then pressing Enter.
Page 14
WES+ Installation and Operations Manual V2.3 Ramtech Electronics 2017
All settings are protected from unauthorised change by an access
code. By default, this is set to 1234. The access code can be reset
by deactivating and then activating the base station. All site specic
information will be cleared upon activation.
Change Access Code
We recommend that you change the default 1234 access code to a
secure code specic to site.
To change the access code, navigate down the Settings Menu until the
Change Access Code option is highlighted as shown. Press Enter to
select.
The existing Access Code will then be requested, as shown below.
The new Access Code then needs to be entered twice.
Conrmation of the Access Code change will be displayed.
Unit Numbering
By default, every WES+ unit is numbered 001 when activated. This unit
number can be changed so that you can assign unique identication
numbers to individual units or create groups of units with the same
number to enable you to pinpoint where an alarm has been triggered
or other fault identied.
This is done using the Unit Numbering feature, and any number
between 001 and 999 may be used.
Units must be either freshly activated or already paired to a unit on
the same site as the base station before renumbering.
To number a unit from a different site network, you will rst need to
deactivate and reactivate the site to remove the information specic to
the original site.
Select the number you wish to assign to a particular WES+ unit using
the navigation pad. Once the correct number is displayed, press and
hold the A buttons on both the base station and the unit you are
numbering. The amber LEDs on both units will illuminate and then the
green LEDs will ash to conrm successful renumbering.
To exit the Unit Numbering screen, press the left arrow when at the left
most digit of the unit number.

Page 15
WES+ Installation and Operations Manual V2.3 Ramtech Electronics 2017
In advanced systems, pairing units creates a clone of the installed
unit by replicating both the site code and unit number. Pairing in an
advanced system is performed in exactly the same way as pairing in a
basic system (see Basic System – Installation Procedure – Add other
units to an existing site group).
The process copies the unit number from a unit already installed on the
site to a freshly activated unit. This allows multiple units to be grouped
with the same number, if you require particular areas of a site to be
assigned a number according to a re plan or map on site .
Unit Numbering LED indications
When the A button is held down on two units, both will begin by
illuminating the amber LED followed by a conrmation LED pattern.
The following table indicates the meaning of the various LED patterns.
One of the units needs to be the Base Station
LED pattern Description
● Red
● Amber
● Green
Pairing started
● Red
● Amber
● Green
Pairing success. The two units are on the same
site and have the same unit number.
● Red
● Amber
● Green
Pairing failed. The units are already part of two
different existing sites. The units need to be
deactivated and reactivated to allow pairing to
succeed.
● Red
● Amber
● Green
Cloning failed. The two units are already part of
the same site but have different unit numbers. No
information has been changed on either unit.
● Red
● Amber
● Green
Unit numbering success. The unit has successfully
joined the same site as the base station and has
the unit number selected in the Unit Numbering
Screen.
A unit whose amber LED fails to illuminate will not pair. This may be
due to an internal tamper.
The date and time can be updated in the Date and Time screen
using the navigation pad and pressing enter to save. The Date and
Time is in Co-ordinated Universal Time (UTC) and will not
automatically change for British Summer Time.
Back Light
The LCD backlight can be disabled by pressing enter when the
Backlight option is highlighted. A tick indicates that the backlight is
enabled and a cross indicates it is disabled. By default the backlight is
enabled.
Mobile Base
It may be desirable for the base station to be used without being xed
to a wall, for example, if you need to keep it in the site ofce during the
day but move it to a security hut at night.
The Base Station unit can be made mobile by pressing enter on the
Mobile base option. A tick indicates that the Mobile Base option has
been enabled.
Unit Cloning Date and Time

Page 16
WES+ Installation and Operations Manual V2.3 Ramtech Electronics 2017
Reassemble of the Lid
1. Reattach the facia (19-way ribbon) to the PCB and reconnect the
battery connector.
2. Position the lid so that it is higher. (Fig1.)
3. Slide in place, ensuring that it aligned with the screws. (Fig 2)
4. Ensure that there are no trapped wires in between the lid and the
base
5. Screw down the lid using the T20 screwdriver with a maximum of
2Nm Torque.
Fig. 1
Direction is iindicated by the
orange arrow
Fig. 2
Starting point of the lid with screws.
Highlighted in Orange
Sim Card installation - GSM Base Station
Before installation the following parts and tools are required:
• Sim Card
• T20 Torx Screwdriver
Please ensure that you are in an ESO protected area before
undertaking the installation of the Sim card into the WES+
Base Station
The unit must be switched off and in Transit mode
Removal of the Lid
1. Using the T20 Torx screwdriver, remove all four screws from the
base station lid. (Fig. 1)
2. Slide the lid upwards to ensure that the tamper leaver does not
short circuit. (Fig. 2)
3. Carefully lift the lid, and disconnect the fascia (19 way ribbon)
from the PCB. Disconnect the battery connector.
4. Turn the lid over. Take the sim card and insert into the sim slot
as shown below. Make sure that the sim card connections are
facing down.
5. Now you are ready to reattach the fascia (19-way ribbon) to the
PCB, and reattach the lid.
Fig. 1
Removal of screws -
highlighted in Orange
Fig. 2
Sllide the lid upwards.
You can now switch on the unit.
Hold down the ‘A” button and press the ‘B’ button 3 times, to set up.
When you switch the unit on, you will see the following screen
Next press the menu button.
From the next menu WES+ Main Menu select Settings.
You will be asked to enter an access code (see overleaf). The default
code is 1234 unless your change it.
Reassemble of the Lid
1. Reattach the facia (19-way ribbon) to the PCB and reconnect the
battery connector.
2. Position the lid so that it is higher. (Fig1.)
3. Slide in place, ensuring that it aligned with the screws. (Fig 2)
4. Ensure that there are no trapped wires in between the lid and the
base
5. Screw down the lid using the T20 screwdriver with a maximum of
2Nm Torque.
Fig. 1
Direction is iindicated by the
orange arrow
Fig. 2
Starting point of the lid with screws.
Highlighted in Orange
Sim Card installation - GSM Base Station
Fig. 1
Removal of screws -
highlighted in Orange
Fig. 2
Sllide the lid upwards.
You can now switch on the unit.
Hold down the ‘A” button and press the ‘B’ button 3 times, to set up.
When you switch the unit on, you will see the following screen
Next press the menu button.
From the next menu WES+ Main Menu select Settings.
You will be asked to enter an access code (see overleaf). The default
code is 1234 unless your change it.

Page 17
WES+ Installation and Operations Manual V2.3 Ramtech Electronics 2017
Now select Communication from the Menu.
On the next menu select GSM-Status. Wait a short time for the unit
to nd a signal. If the unit fails to nd a signal - go back to the
beginning and start the process again.
In case of any problem with the sim card, cello tape the reaming
packaging to the back of your unit (as shown below).
Your unit is now ready to use.
Final Testing
Step
No.
Action Pass criteria Notes
1. Hold unit at on workbench.
Hold button “A” and press ‘B’
three times in quick succession
Red, Amber and Green LEDs simultameously ash
three times.
Amber LED then ashes in groups of 3
Brings unit out of “Transit’ mode.
If amber LED ashes in groups of 4 then
ensure back tamper is held down rmly
and wait for 10 seconds or until ashes
are in groups of three.
2. Hold “A” button down on both
units. Release buttons when
LEDs units illuminate green.
Amber LEDs on both units illuminate, then turn to
green.
This pairs the units with the re point to
test the radio communication and
conrms that the internal tamper is not
active.
3. Intermittent ashing green LED Green LED ashes once every four seconds Indicates no fault warnings are active.
4. Press the manual call point on
captive test re point
Check that unit sounds and strobe ashes, or display
and captive re point strobe ashes
Alarm has been raised by the unit and
a message has been sent via radio to
captive re point.
5 Reset manual call point Amber LED will ash in groups of 5, within 5 seconds
of call point reset.
Units in re-arm mode
6. Stand unit up (to release back
tamper), then hold ‘A:’ and press
“B” three in quick succession.
Red, Amber and Green LEDs simultaneously illuminate and then extinguish
Unit in transit mode
SIG Low Signal Unit NNN has a low radio signal Yes
TST Silent Test Unit NNN initiated a Silent Test Yes

Page 18
WES+ Installation and Operations Manual V2.3 Ramtech Electronics 2017
Base Stations with the optional SMS text alerts feature enabled
have a Communications menu which is used to set up text message
alerts, users and associated telephone numbers.
The communication menu has four options as shown below.
Change Site Name
The site name appears on the Home Screen and is included in every
text message so that you can quickly identify the source of the alarm
or warning. The site name should be changed to a uniquely
recognisable site location.
The site name is edited using the navigation pad and conrmed by
pressing enter.
Communications
User Phone Details
The user phone details allows up to six users’ names and telephone
numbers to be entered and the type of warning each user will
receive to be selected. Text message on a re alarm is set for each
user and cannot be altered. Only one text message is sent during each
re alarm although multiple units (re points and detectors) may be
activated during the re.
Once edited, USER X is replaced by the name of the user entered.
A user is selected using the navigation pad and pressing enter, the
user menu then appears.
Select Edit User Name and enter the name of this user with the
navigation pad.

Page 19
WES+ Installation and Operations Manual V2.3 Ramtech Electronics 2017
Press enter to conrm and then edit the phone number in the same
way.
The telephone number must be in international format with a
+ and then the country code.
For the UK the country code is +44. E.g. a mobile telephone number of
07806123456 would be entered as +447806123456, the starting 0 of
the telephone number is dropped.
The SMS Notications Menu can be used to select which events the
user is interested in. A tick will result in a message being sent for that
particular event
The notications are shown below, NNN is the unit number of the unit
with a fault warning.
1
Alarm
A re alarm has been raised on the
site, initiated by unit number NNN
2.
internal tamper
Unit NNN has been opened up
and potentially tampered with or
damaged
3. detector tamper
Detector unit NNN has had its
detector head removed
4. external tamper
Unit NNN has been removed from
the wall/ceiling
5.
low battery
Unit NNN has low battery
6.
low signal
Unit NNN has a low radio signal
7.
silent test Unit NNN has initiated a silent test
8.
at battery
Unit NNN has turned off, its battery
is at
9. removed
Unit NNN has been deactivated and
removed from the re alarm system
10.
latched
The call point on unit NNN is still
latched in after the alarm has been
reset
Test Phone Number
The nal option in the user menu is to test the phone number.
Note: the base station cannot check whether the text message has
arrived at the mobile telephone, just that it is delivered to the network.
It is important to conrm that the message has actually arrived at the
mobile telephone.
GSM Status
The status of the connection to a mobile telephone network can be
checked via the GSM Status option. Note that the modem is switched
off when not in use to conserve battery power, so this check can take a
few minutes to complete.
The screen will initially display…
…and then move to….
…then nally display…

Page 20
WES+ Installation and Operations Manual V2.3 Ramtech Electronics 2017
…to show whether the base station is able to send text messages. In
the above example it has connected to the Orange UK network and
has a signal strength of 14.
Signal strengths are:
0-9 Poor
10-14 OK
15-19 Good
>20 V. Good
Base Stations with ‘Poor’ signal strength should be relocated if
possible to improve signal strength for SMS messages.
SIM Card Information
The SIM card ID number can be read using the SIM Card Information
option.
Text Message
The text message begins with WES+ Base Station, followed by the
message type, site name, time and date as shown below.
WES Base Station Text Message:
Semt from DEFAULT SITE at 14-12: 57
on 29 July 2013
29 Jul
Note that the SMS messaging feature of WES+ is intended for
notication purposes only and is not to be relied upon as the sole
response to site alarms. Depending on network activity, text
messages may be received some time after the SMS message
has been generated.
Network Scan
The selection of a mobile telephone network can be undertaken
via the Network Scan option. Note this scan can take a few minutes to
complete. The screen will initially display...
...and then move to...
The network can be selected using the navigation pad and conrmed
by pressing enter.
In the above example giffgaff has been selected as the mobile telephone network

Page 21
WES+ Installation and Operations Manual V2.3 Ramtech Electronics 2017
The Interface has two auxiliary relay outputs and one auxiliary input.
These allow the WES+ system to be expanded to interact with external
devices.
Pictured right is the layout of the connections inside the Interface Unit
The Interface unit should be installed by a suitably qualied person.
DO NOT connect the Interface to mains current.
Interface
The input is unmonitored. The connection of automatic or manual re
detection devices and active re protection systems such as such as sprinklers, gas suppression systems etc. may require additional measures.
Cable disconnection or damage could result in the alarm not activating when required without any fault or warning indication.
All cable lengths must be less than 3 metres long.
Output
The outputs are rated for 24V at up to 2 Amps maximum.
Input
The input requires a “volt free” contact from a relay and should not be connected to power.
The input is unmonitored and connection of automatic or nanual re detection devices is not recommended.
Cable disconnection or damage could result in the alarm not activating when required without any fault or warning indication.
When NOT in Alarm
When in Alarm
Normanally Open (NO)
Normanally Open (NC)
Normanally Open (NO)
Normanally Open (NC)
Common (C)
Common (C)
Alarm NOT Triggered
Alarm Triggered
IN-IN+
IN-
IN+

Page 22
WES+ Installation and Operations Manual V2.3 Ramtech Electronics 2017
Fire Point Technical Data
Model Numbers: W2-FPT-CSS-U, W2-FPT-CSS-N, W2-FPT-SRO-U, W2-FPT-SRO-N
Device Parameters
Dimensions (mm) HxWxD 235 x 161 x 128 (excl. antenna 81mm and USB 15mm)
Weight 1.7kg
Operating Temperature: -25°C to +70°C
Humidity: Relative Humidity >95% (25°C to 55°C)
IP Code: IP55C
Main Sound Frequencies & Patterns: 800Hz to 970Hz swept at 1Hz – UK
1200Hz falling to 500Hz over 1 sec, silence 10ms – Germany
554Hz for 100ms and 440Hz for 400ms – France
Minimum A-weighted sound at 1 metre
Position Horizontal Plane dB(A) Vertical Plane dB(A)
15 83.7 85.3
45 89.4 91.6
75 96.5 94.8
105 96.5 97.6
135 90.4 91.3
165 85.0 83.9
Supply Parameters
Operating Voltage Range: 4.4-6.4V from internal battery
EN54-3 Voltage Range: 4.4-6.4V from internal battery
Power: 620μW average
Current Consumption: 120μA average
Battery type: Alkaline primary cells, 23Ah
Pack life: > 4 years
Estimated life (eld usage): > 5 years
RF Parameters
Operating frequency: 868.3MHz
Transmit power: 25mW max
Duty Cycle: <1%
Encryption: none
Channel spacing: single channel
Compatible with: other WES+ units
Protocol: proprietary

Page 23
WES+ Installation and Operations Manual V2.3 Ramtech Electronics 2017
Model Numbers: W2-FPT-CSS-R, W2-FPT-SRO-R
Device Parameters
Dimensions (mm) HxWxD 235 x 161 x 128 (excl. antenna 81mm)
Weight 1.1kg
Operating Temperature: -25°C to +70°C
Humidity: Relative Humidity >95% (25°C to 55°C)
IP Code: IP55C
Main Sound Frequencies & Patterns: 800Hz to 970Hz swept at 1Hz – UK
1200Hz falling to 500Hz over 1 sec, silence 10ms – Germany
554Hz for 100ms and 440Hz for 400ms – France
Minimum A-weighted sound at 1 metre
Position Horizontal Plane dB(A) Vertical Plane dB(A)
15 83.7 85.3
45 89.4 91.6
75 96.5 94.8
105 96.5 97.6
135 90.4 91.3
165 85.0 83.9
Supply Parameters
Operating Voltage Range: 4.4-6.4V from internal battery
EN54-3 Voltage Range: 4.4-6.4V from internal battery
Power: 620μW average
Current Consumption: 120μA average
Battery type: Alkaline primary cells, 7.6Ah
RF Parameters
Operating frequency: 868.3MHz
Transmit power: 25mW max
Duty Cycle: <1%
Encryption: none
Channel spacing: single channel
Compatible with: other WES+ units
Protocol: proprietary
Fire Point Technical Data

Page 24
WES+ Installation and Operations Manual V2.3 Ramtech Electronics 2017
Fire Pont Technical Data
Model Numbers: W2-BST-GSM-U, W2-BST-GSM-N, W2-BST-STD-U, W2-BST-STD-N
Device Parameters
Dimensions (mm) HxWxD 235 x 161 x 128 (excl. antenna 81mm and USB 15mm)
Weight 1.5kg
Operating Temperature: -25°C to +70°C
Humidity: Relative Humidity >95% (25°C to 55°C)
Supply Parameters
Operating Voltage Range: 4.4-6.4V from internal battery
Power: 620μW average
Current Consumption: 120μA average
Battery type: Alkaline primary cells, 23Ah
Pack life: > 4 years
Estimated life (eld usage): > 5 years
RF Parameters
Operating frequency: 868.3MHz
Transmit power: 25mW max
Duty Cycle: <1%
Encryption: none
Channel spacing: single channel
Compatible with: other WES+ units
Protocol: proprietary
Transmit Band (Tx) Receive Band Power
E-GSM 900 880 to 915 MHz 925 to 960 MHz 2 Watts EGSM 900 radio section
DCS 1800 1710 to 1785 MHz 1805 to 1680 MHz 1 Watt GSM1800 radio section
Base Station Technical Data

Page 25
WES+ Installation and Operations Manual V2.3 Ramtech Electronics 2017
Model Numbers: W2-DET-HTD-U, W2-DET-HTD-N
Device Parameters
Dimensions (mm) HxWxD 235 x 161 x 118 (excl. antenna 81mm and USB 15mm)
Weight 1.6kg
Operating Temperature: -25°C to +70°C
Humidity: Relative Humidity >95% (25°C to 55°C)
Heat Detector Class A2
Supply Parameters
Operating Voltage Range: 4.4-6.4V from internal battery
Power: 2.7mW average
Current Consumption: 520μA average
Battery type: Alkaline primary cells, 23Ah
Pack life: > 4 years
Estimated life (eld usage): > 5 years
RF Parameters
Operating frequency: 868.3MHz
Transmit power: 25mW max
Duty Cycle: <1%
Encryption: none
Channel spacing: single channel
Compatible with: other WES+ units
Protocol: proprietary
Heat Detector Technical Data

Page 26
WES+ Installation and Operations Manual V2.3 Ramtech Electronics 2017
Model Numbers: W2-DET-HTD-R
Device Parameters
Dimensions (mm) HxWxD 235 x 161 x 118 (excl. antenna 81mm)
Weight 1.3kg
Operating Temperature: -25°C to +70°C
Humidity: Relative Humidity >95% (25°C to 55°C)
Heat Detector Class A2
Supply Parameters
Operating Voltage Range: 4.0-6.4V from internal battery
Power: 1.3mW average
Current Consumption: 240 μA average
Battery type: Alkaline primary cells,15.2Ah
RF Parameters
Operating frequency: 868.3MHz
Transmit power: 25mW max
Duty Cycle: <1%
Encryption: none
Channel spacing: single channel
Compatible with: other WES+ units
Protocol: proprietary
Heat Detector Technical Data

Page 27
WES+ Installation and Operations Manual V2.3 Ramtech Electronics 2017
Model Numbers: W2-DET-SMD-U, W2-DET-SMD-N, W2-DET-SMP-U, W2-DET-SMP-N
Device Parameters
Dimensions (mm) HxWxD 235 x 161 x 108 (excl. antenna 81mm and USB 15mm)
Weight 1.6kg
Operating Temperature: -25°C to +70°C
Humidity: Relative Humidity >95% (25°C to 55°C)
Supply Parameters
Operating Voltage Range: 4.4-6.4V from iinternal battery
Power: 2.7mW average
Current Consumption: 520μA average
Battery type: Alkaline primary cells, 23Ah
Pack life: > 4 years
Estimated life (eld usage): > 5 years
RF Parameters
Operating frequency: 868.3MHz
Transmit power: 25mW max
Duty Cycle: <1%
Encryption: none
Channel spacing: single channel
Compatible with: other WES+ units
Protocol: proprietary
Smoke Detector Technical Data

Page 28
WES+ Installation and Operations Manual V2.3 Ramtech Electronics 2017
Model Numbers: W2-DET-SMD-R, W2-DET-SMP-R
Device Parameters
Dimensions (mm) HxWxD 235 x 161 x 108 (excl. antenna 81mm)
Weight 1.3kg
Operating Temperature: -25°C to +70°C
Humidity: Relative Humidity >95% (25°C to 55°C)
Supply Parameters
Operating Voltage Range: 4.4-6.4V from internal battery
Power: 1.3mW average
Current Consumption: 240μ A average
Battery type: Alkaline primary cells,15.2Ah
RF Parameters
Operating frequency: 868.3MHz
Transmit power: 25mW max
Duty Cycle: <1%
Encryption: none
Channel spacing: single channel
Compatible with: other WES+ units
Protocol: proprietary
Smoke Detector Technical Data

Page 29
WES+ Installation and Operations Manual V2.3 Ramtech Electronics 2017
Model Numbers: W2-LNK-NNN-U, W2-LNK-NNN-N
Device Parameters
Dimensions (mm) HxWxD 235 x 161 x 58 (excl. antenna 81mm and USB 15mm)
Weight 1.4kg
Operating Temperature: -25°C to +70°C
Humidity: Relative Humidity >95% (25°C to 55°C)
Supply Parameters
Operating Voltage Range: 4.4-6.4V from internal battery
Power: 620μW average
Current Consumption: 120μA average
Battery type: Alkaline primary cells, 23Ah
Pack life: > 4 years
Estimated life (eld usage): > 5 years
RF Parameters
Operating frequency: 868.3MHz
Transmit power: 25mW max
Duty Cycle: <1%
Encryption: none
Channel spacing: single channel
Compatible with: other WES+ units
Protocol: proprietary
Link Technical Data

Page 30
WES+ Installation and Operations Manual V2.3 Ramtech Electronics 2017
Model Numbers: W2-LNK-NNN-R
Device Parameters
Dimensions (mm) HxWxD 235 x 161 x 58 (excl. antenna 81mm and USB 15mm)
Weight 800g
Operating Temperature: -25°C to +70°C
Humidity: Relative Humidity >95% (25°C to 55°C)
Supply Parameters
Operating Voltage Range: 4.4-6.4V from iinternal battery
Power: 600μW average
Current Consumption: 110μW average
Battery type: Alkaline primary cells, 7.6Ah
RF Parameters
Operating frequency: 868.3MHz
Transmit power: 25mW max
Duty Cycle: <1%
Encryption: none
Channel spacing: single channel
Compatible with: other WES+ units
Protocol: proprietary
Link Technical Data

Page 31
WES+ Installation and Operations Manual V2.3 Ramtech Electronics 2017
Model Numbers: W2-INF-I2O-U-UK, W2-INF-I2O-N-UK
Device Parameters
Operating Temperature: -10°C to +55°C
Humidity: Relative Humidity >95% (25°C to 55°C)
Supply Parameters
Operating Voltage Range: 4.4-6.4V from internal battery
Power: 770μW average
Current Consumption: 150μW average
Battery type: Alkaline primary cells, 23Ah
RF Parameters
Operating frequency: 868.3MHz
Transmit power: 25mW max
Duty Cycle: <1%
Encryption: none
Channel spacing: single channel
Interface Technical Data

Page 32
WES+ Installation and Operations Manual V2.3 Ramtech Electronics 2017
The maintenance procedures described below should be conducted
with the following frequency:
One month after : Routine inspection
Installation Routine
Inspection every 3
months thereafter
Every 6 months : Operational Test
Every 12 months : Cleaning
All above frequencies of maintenance are dependent upon ambient
conditions. Best judgment should be used to ensure proper
maintenance.
Routine inspection
i) Ensure the detector head is secure and undamaged
ii) Check the heat entry apertures are in no way obstructed.
iii) Ensure the surface of the detector’s outer cover is clean. If there
are deposits due to the presence of oil vapour, dust etc, the detector
should be cleaned in accordance with the cleaning instructions
detailed later. It may be advisable to ensure that such cleaning is
conducted regularly in the future.
iv) Ensure no equipment which may generate excessive heat has
been installed in the vicinity of the detector since the last routine
inspection. If such equipment has been installed, you should notify
the Safety Ofcer or other competent authority that its presence
may cause false alarms.
Operational Test
The purpose of the Operational Test is to conrm the detector’s correct
operation in response to a heat condition.
i) Testing the detectors will trigger the site wide alarm. To avoid
unnecessary evacutation site personnel should be informed when
testing starts and when testing is complete.
ii) Test the detector with heat from a warm air gun designed for heat
detector testing (e.g. ‘No Climb - Solo’ heat sensor tester). =
Check that the detector gives an alarm condition within 10-20
seconds depending upon the detector grade and the applied air
temperature.
N.B. Hot air blowers sold for paint stripping, soldering pipes etc,
generate sufcient heat to damage the detector and should not be
used for testing heat detectors.
iii) After the detector has given the alarm condition, silence the system
from a re point or base station. It may be necessary to allow a
short time to elapse before resetting the detector, to allow any
residual heat from the test to disperse.
iv) Before proceeding to the next detector, ensure that the detector
just tested does not re-operate due to the presence of residual
heat.
Functional Test
The Functional Test checks the detector’s operation. These detectors
may be returned to Ramtech Electronics for Functional Testing.
Cleaning
Note: The detector head should NOT be disassembled.
i) Carefully remove the detector head from its base.
ii) Use a soft, lint-free cloth, moistened with alcohol for sticky depos
its, to clean the plastic casing.
iii) Using a soft bristle brush (e.g. an artist’s paint- brush) carefully
brush between the vanes and thermistor in a linear motion away
from the apertures on the plastic case.
iv) Ensure that no debris is left on or around the thermistor once
cleaning is complete.
v) If the unit needs further cleaning, or is damaged or corroded,
please return the complete detector to Ramtech Electronics for service.
Heat Detector Maintenance

Page 33
WES+ Installation and Operations Manual V2.3 Ramtech Electronics 2017
The maintenance procedures described below should be conducted
with the following frequency:
One month after : Routine inspection
installation and every 3
months thereafter
Every 6 months : Operational Test
Every 12 months : Cleaning
All above frequencies of maintenance are dependent upon ambient
conditions.
Routine inspection
i) Ensure the detector head is secure and undamaged
ii) Check the heat entry apertures are in no way obstructed.
iii) Ensure the surface of the detector’s outer cover is clean. If there
are deposits due to the presence of oil vapour, dust etc, the detector
should be cleaned in accordance with the cleaning instructions
detailed later. It may be advisable to ensure that such cleaning is
conducted regularly in the future.
iiv) Ensure no equipment which may generate excessive heat has
been installed in the vicinity of the detector since the last routine
inspection. If such equipment has been installed, you should notify
the Safety Ofcer or other competent authority that its presence
may cause false alarms.
Operational Test
The purpose of the Operational Test is to conrm the detector’s correct
operation in response to a heat condition.
v) Testing the detectors will trigger the site wide alarm. To avoid
unnecessary evacu T ation site personnel should be informed when
testing starts and when testing is complete.
vi) Introduce a discrete amount of smoke into the detector head, e.g.
using a ‘No Climb -Solo’ smoke test head. Check that the detector
gives an alarm condition within 15 seconds. Check the LED
indicator on the Detector illuminates and any remote indicator LED
tted also illuminates.
vii) Before proceeding to the next detector, ensure that the detector
just tested does not re-operate due to the presence of residual
heat.
Functional Test
The Functional Test checks the detector’s operation. These detectors
may be returned to Ramtech Electronics for Functional Testing.
Cleaning
Note : The detector head should NOT be disassembled.
i) Carefully remove the detector head from its base.
ii) Use a soft, lint-free cloth, moistened with alcohol for sticky depos
its, to clean the plastic casing.
iii) Using a soft bristle brush (e.g. an artist’s paint- brush) carefully
brush between the vanes and thermistor in a linear motion away
from the apertures on the plastic case.
iv) Ensure that no debris is left on or around the thermistor once
cleaning is complete.
v) If the unit needs further cleaning, or is damaged or corroded,
please return the complete detector to Ramtech Electronics for
service.
Further Information:
For further information please visit the WES+ website at
www.wesre.co.uk
Telephone +44 (0)115 822 3424
Email wes@ramtech.co.uk
Twitter @wesre
Website www.wesre.co.uk
Technical Support
Technical support is available over the phone by contacting the WES+
Helpline, and site visits can be arranged if required.
Smoke Detector Maintenance
Contact

Page 34
WES+ Installation and Operations Manual V2.3 Ramtech Electronics 2017
electronics
Tel: +44 (0)115 822 3424
Email: wes@ramtech.co.uk
Web: www.wesre.co.uk
Abbeyeld House, Abbeyeld Road, Nottingham NG7 2SZ UK
V2.3- 08-2017
 Loading...