

Page 1
INSTALLATION INSTRUCTIONS
FOR SIERRA GRILLE GUARD KIT #295919
ON 1999-2001 FORD F-150, F-250 4X4 LIGHT
DUTY & EXPEDITION 4X4
NOTICE
Ramsey kits are designed for use with Ramsey Winches only.
Use or sales of kits for other winches or applications voids warranty.
WARNING
Ramsey offers mounting kits and winches for various vehicles. In crash tests on a limited number
of automotive manufacturer's vehicles, winches/mounting kits, which have been properly
mounted, have not interfered with air bag operation.
The user/customer, or their installer, must verify that the mounting kit does not interfere with the
factory air bag sensors, which must not be relocated or modified in any way.
The user/customer should follow the vehicle manufacturer's recommendations and those of a
qualified mechanic to determine if the winch/mounting kit might interfere with the air bag
operation. The user/customer should then determine the suitability of a winch/mounting kit on a
particular vehicle.
PLEASE BE ADVISED THAT THE VEHICLE'S AIR BAG SYSTEM MAY NOT OPERATE
PROPERLY IF THE WINCH/MOUNTING KIT IS NOT MOUNTED IN COMPLIANCE WITH THE
VEHICLE MANUFACTURER'S RECOMMENDATIONS.
DO NOT ATTACH TOW HOOK TO ANY PART OF MOUNTING KIT UNLESS INSTRUCTED TO
DO SO.
DO NOT SUBSTITUTE ATTACHING HARDWARE ITEMS (BOLTS, NUTS, OR WASHERS).
READ AND UNDERSTAND WINCH OWNER'S MANUAL BEFORE INSTALLATION AND
OPERATION OF WINCH. SEE WARNING AND CAUTION.
IMPORTANT NOTES!
1. RIGHT AND LEFT HAND DIRECTIONS AS IF SEATED BEHIND STEERING WHEEL.
2. ALL FASTENING HARDWARE MUST BE LOOSELY ASSEMBLED UNTIL DIRECTED TO TIGHTEN.
RAMSEY WINCH COMPANY
P.O. BOX 581510
TULSA, OKLAHOMA 74158
KI-913351-0301-C
Page 2
STEP 1
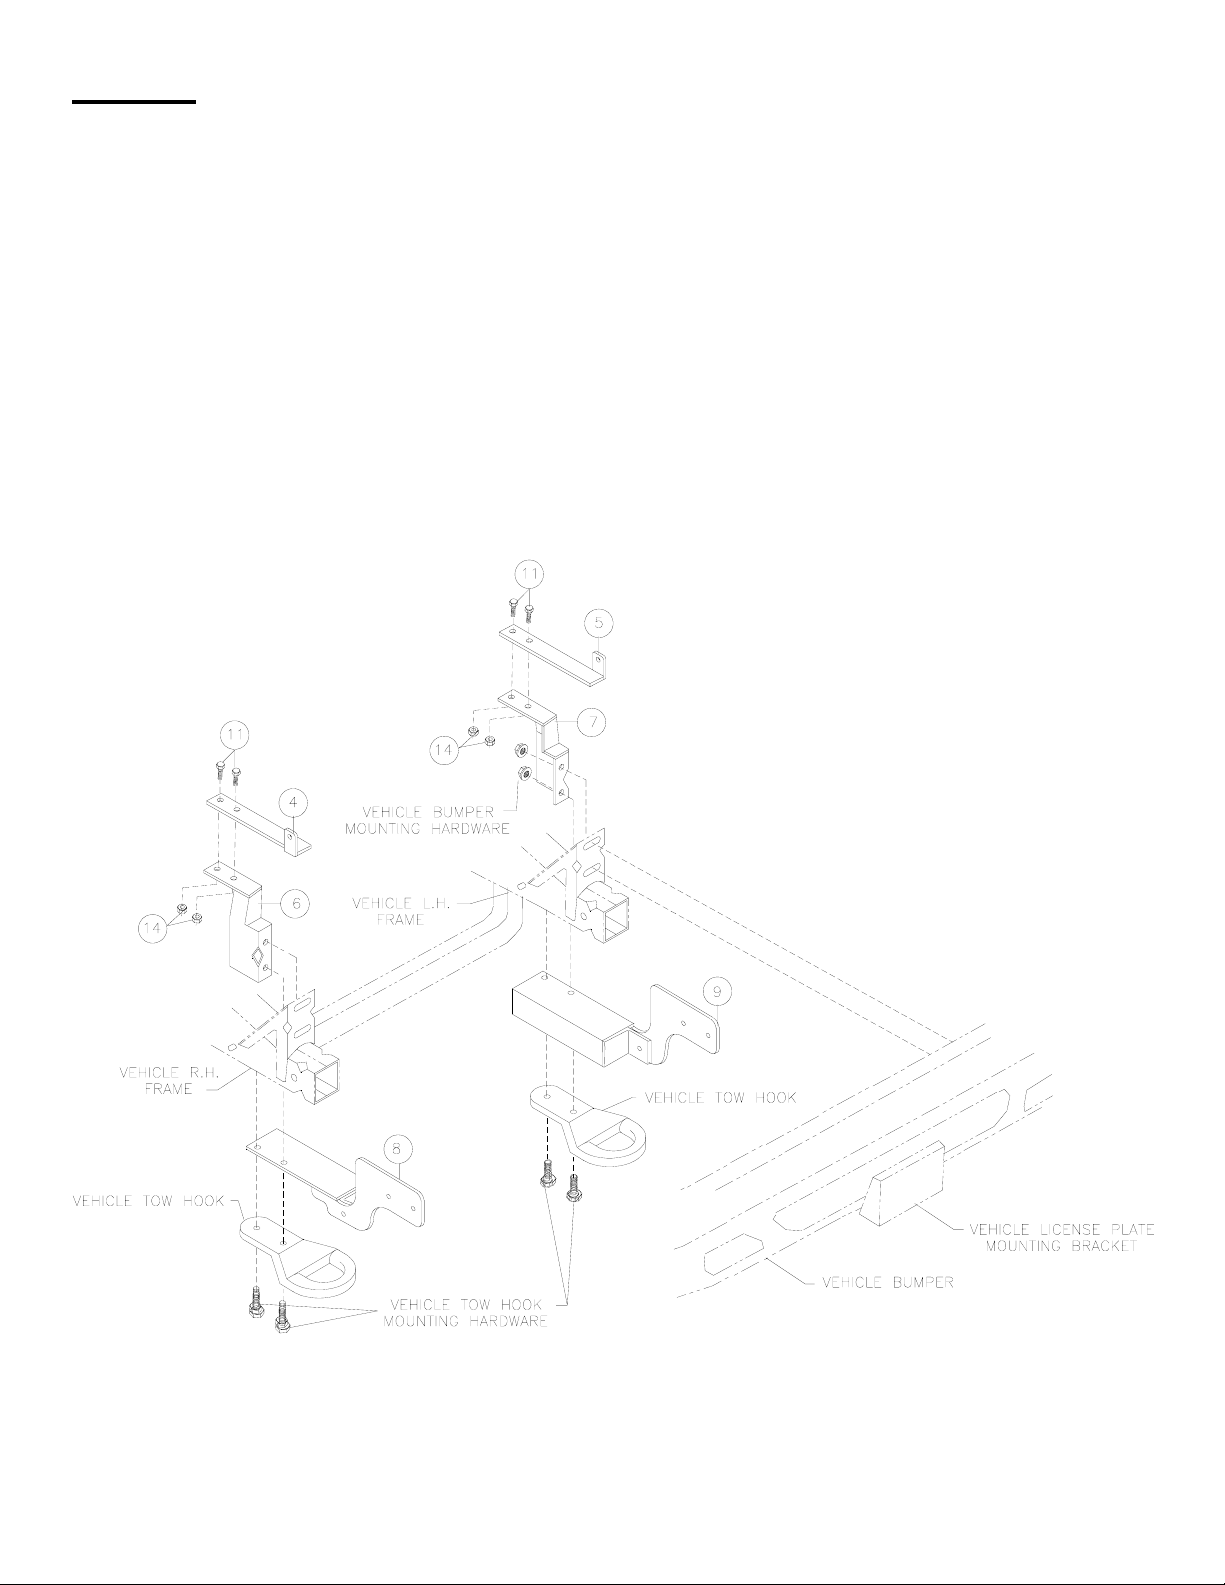
Remove vehicle license plate mounting bracket from vehicle bumper. This will allow more room to
access through opening in bumper for attaching kit brackets.
Remove vehicle tow hooks from bottom of vehicle frame. Attach lower R.H. and L.H. bracket
assemblies (item #8 & #9) to bottom of vehicle frame with tow hooks using existing vehicle tow hook
mounting hardware, as shown. DO NOT TIGHTEN HARDWARE COMPLETELY.
Remove vehicle bumper mounting hardware from R.H. side and place middle R.H. bracket assembly
(item #6) through opening in bumper and over bumper mounting studs. Secure to frame using
vehicle bumper mounting hardware. Repeat on L.H. side of bumper using middle L.H. bracket
assembly (item #7). DO NOT TIGHTEN HARDWARE COMPLETELY.
Place R. H. and L.H. upper strap assemblies (item #4 & #5) over top of bumper and attach to top of
middle bracket assemblies, as shown below. Use (2) 3/8-16NC x 1-1/4 lg. capscrews (item #11) and
nuts (item #14), each side. DO NOT TIGHTEN HARDWARE COMPLETELY.
1
KI-913351-0301-C
Page 3

STEP 2
Secure lowest end of side plate assembly (item #3) to outside of lower R.H. & L.H. brackets (item #8
& #9). Use (1) 3/8-16NC x 1-1/4 lg. hx.hd. capscrew (item #11) and nut (item #14), each side. DO
NOT TIGHTEN HARDWARE COMPLETELY. Pivot side plate assembly forward and place channel
(item #2), from behind side plate assembly, into place between R.H. and L.H. lower bracket
assemblies.
Pivot side plate assembly back into upright position. Place lower shims (item #19) between lower
brackets and side plates. Place shims (item #20) between ends of channel and lower brackets.
Align mounting holes at ends of channel with holes in side plates, shims and lower bracket
assemblies. Use (2) 3/8-16NC x 1-1/4 lg. capscrews (item #11) and nuts (item #14), each side, to
secure side plate assembly and shim to channel and lower bracket assemblies, as shown.
Use (1) 1/2-13NC x 1-1/4 lg. hx.hd. capscrew (item #12) with 1/2" nut (item #15), each side, to
secure R.H. and L.H. strap assemblies (item #4 and #5) and upper shim (item #18) to inside of side
plate assembly (item #3).
Squarely align kit with front of vehicle. TIGHTEN ALL HARDWARE TO PROPER TORQUE VALUE
(See Torque Value Chart, page 4).
2
KI-913351-0301-C
Page 4
Page 5

PARTS LIST FOR FORD SIERRA GRILLE GUARD KIT #295919
ITEM NO. QTY. PART NO. DESCRIPTION
1 1 R-LICENSE BRACKET ASSEMBLY-LICENSE PLATE MTG.
2 1 R-CHANNEL32 CHANNEL ASSEMBLY-WINCH MTG
3 1 R-P12307 CENTER UNIT
4 1 R-US300R BRACKET-UPPER R.H.
5 1 R-US300L BRACKET-UPPER L.H.
6 1 UM521R BRACKET ASSEMBLY-MIDDLE R.H.
7 1 UM521L BRACKET ASSEMBLY-MIDDLE L.H.
8 1 R-LM300R BRACKET ASSEMBLY-LOWER R.H.
9 1 R-LM300L BRACKET ASSEMBLY-LOWER L.H.
10 2 HCS1/4-20X1 CAPSCREW 1/4-20NC X 1 LG. HX.HD. GR.8 BLACK
11 10 HCS3/8X1.25 CAPSCREW 3/8-16NC X 1-1/4 LG. HX.HD. GR.8 BLACK
12 2 HCS1/2X1.25 CAPSCREW 1/2-13NC X 1-1/4 LG. HX.HD. GR.8 BLACK
13 2 LNUT1/4-20 NUT 1/4-20NC-HX.ELASTIC STOP-BLACK
14 10 LNUT3/8-16 NUT 3/8-16NC-HX.ELASTIC STOP-BLACK
15 2 LNUT1/2-13 NUT 1/2-13NC-HX.ELASTIC STOP-BLACK
16 2 WASHFLTPL1/4 FLAT-WASHER 1/4 PLASTIC
17 2 R-CABLETIE CABLE TIES
18 2 R-SHIM300U SHIM-UPPER
19 2 R-SHIM300L SHIM-LOWER
20 2 R-SHIM307C SHIM-CHANNEL END
21 1 R-LOOM LOOM
TORQUE VALUE CHART
SIZE TORQUE FT./LB. NM
1/4-20 5 7
3/8-16 34 46
1/2-13 87 118
4
KI-913351-0301-C
Page 6

 Loading...