

Rampage Trailview Tonneau Top Installation Instructions Manual
Installation Instructions
I-990235 Rev.1
Part No. 990235
07-17 Jeep Wrangler 2dr
For proper installation and best possible fit, please read all instructions BEFORE you begin.
For technical assistance or to obtain missing parts, please call Customer Relations at 1-800-241-7219.
Trailview Tonneau Top ™
Important Safety Information
• Periodically check all components for tightness.
• Be sure to wear safety goggles while installing.
• When using power tools, read and understand all operating instructions.
Contents
NOTE: Actual product may vary from illustration.
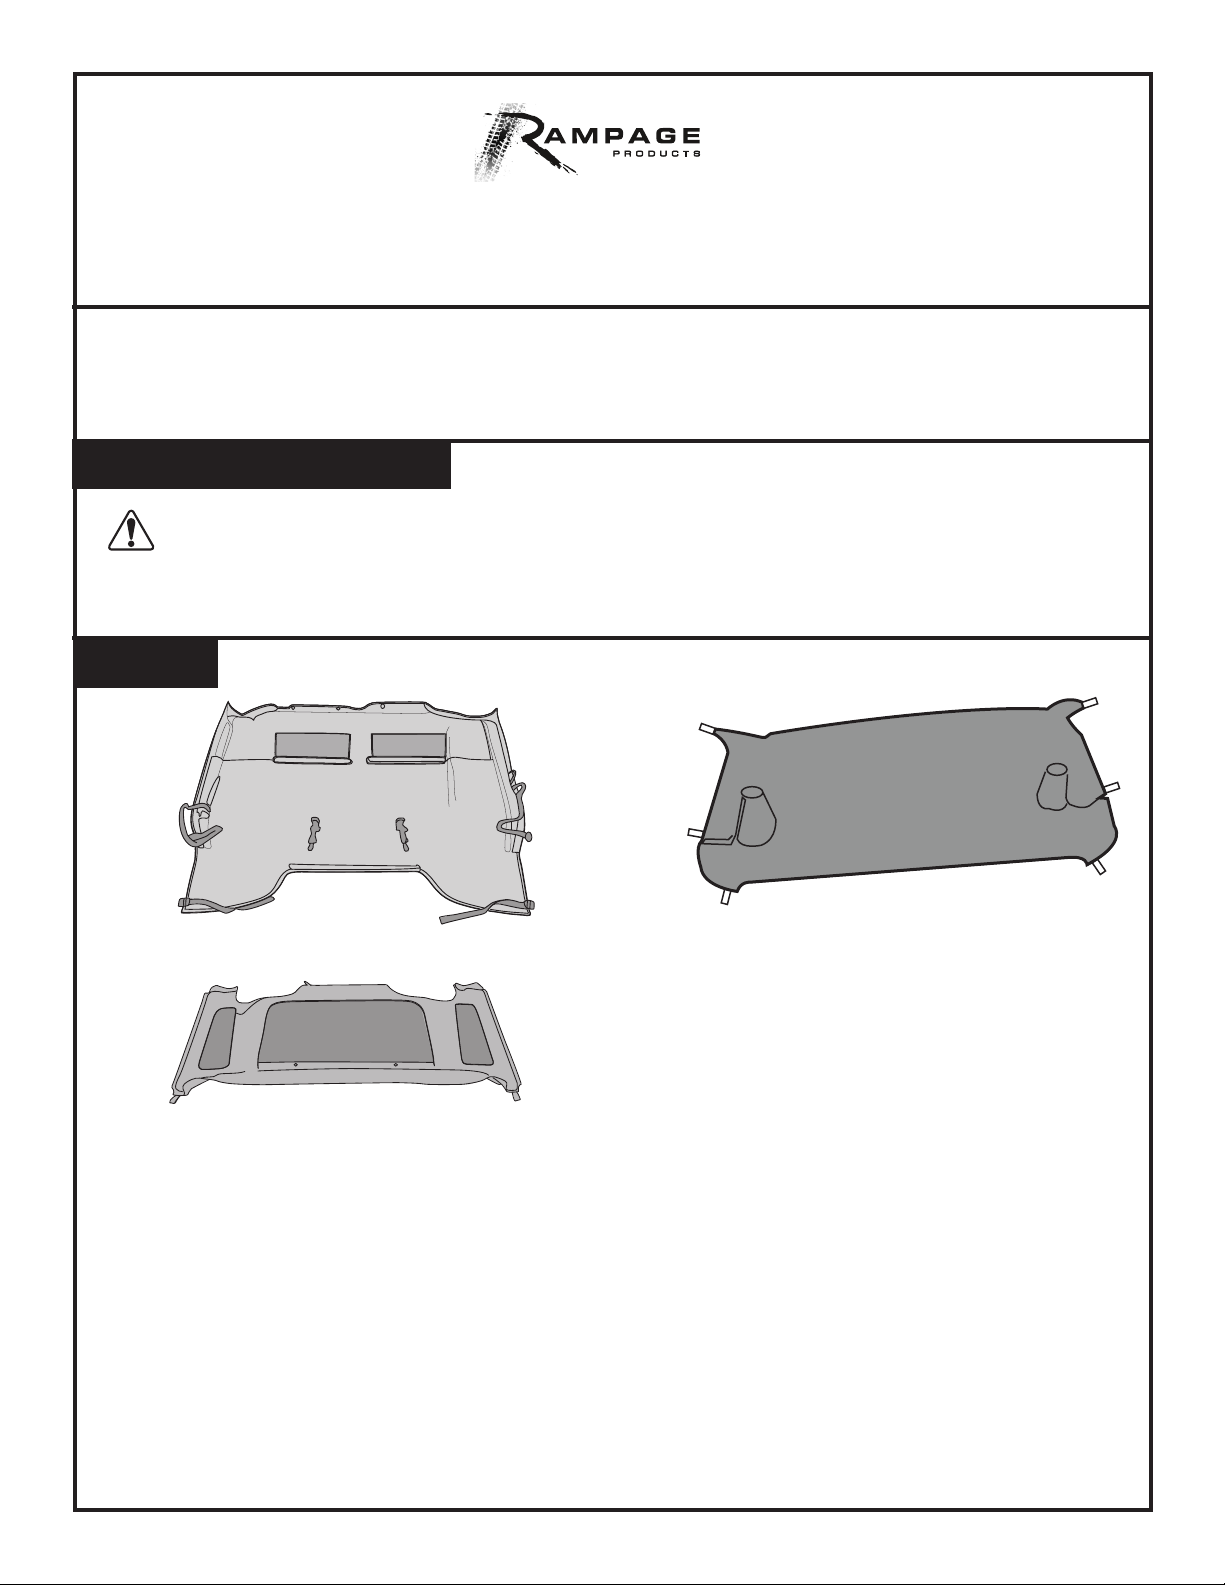
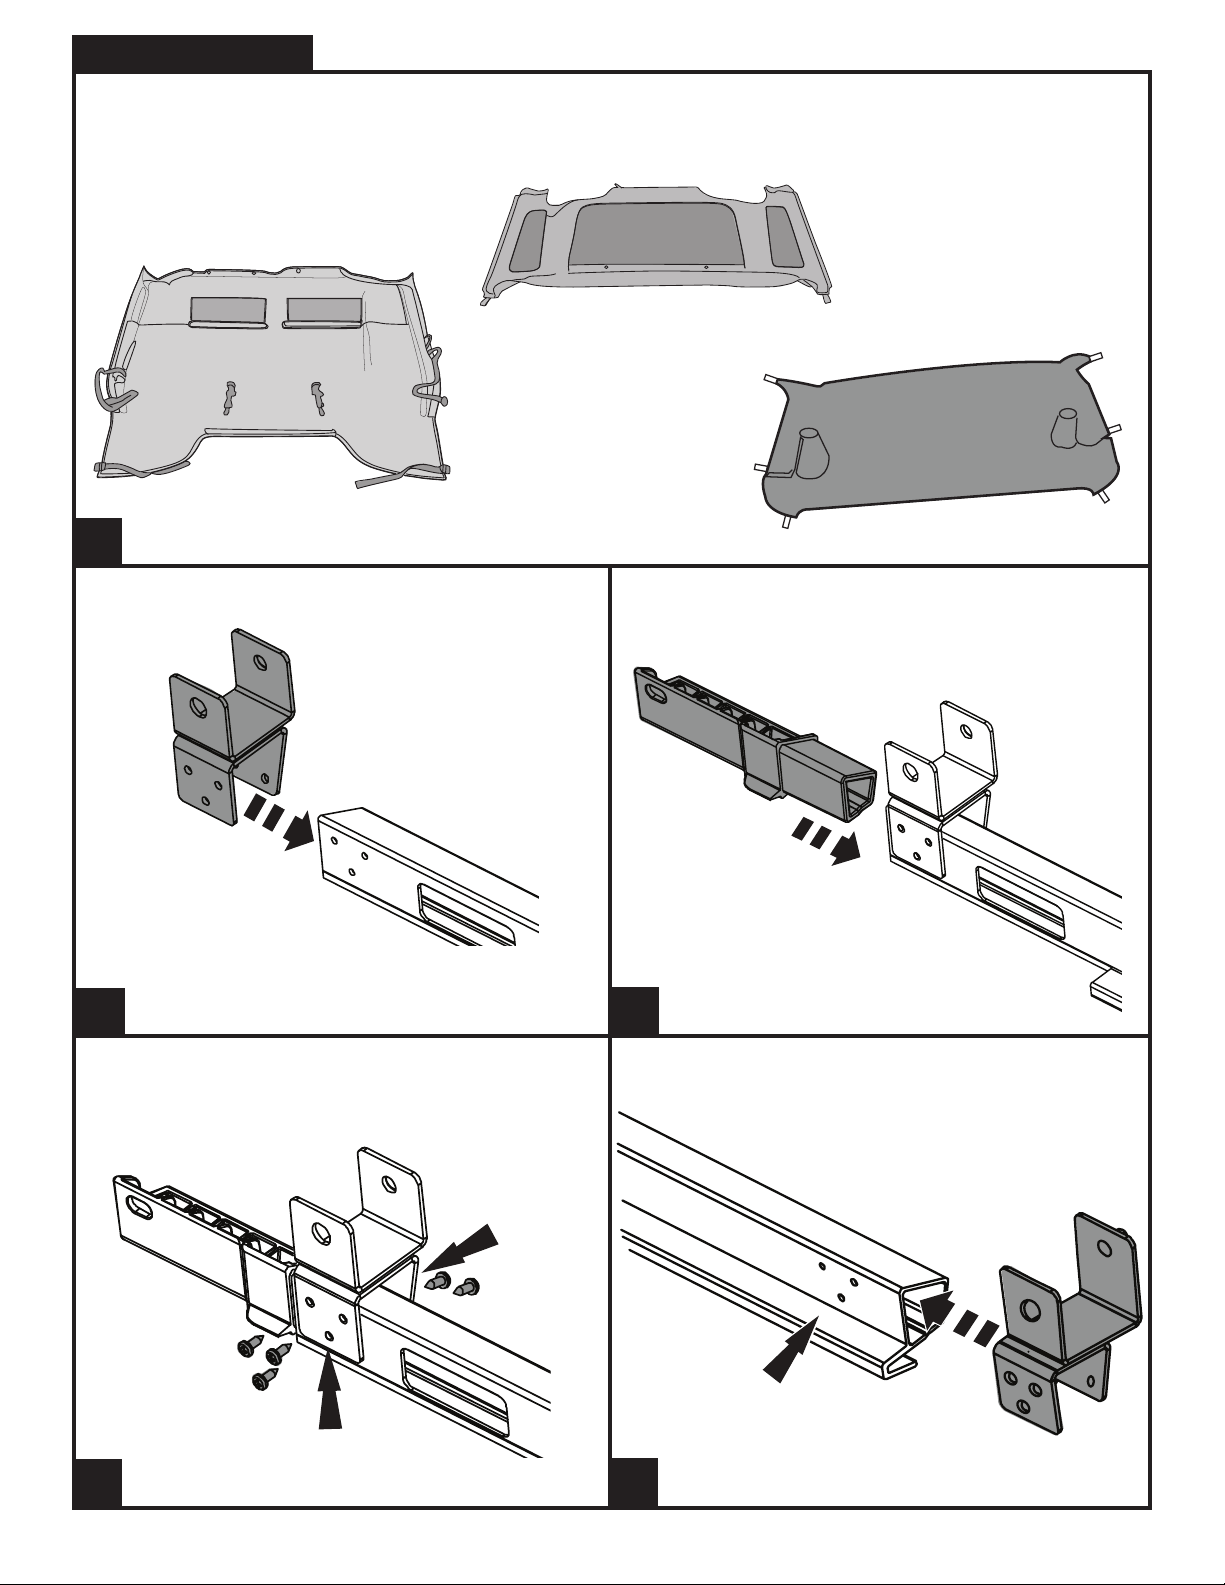
TrailView Main Deck x1
Back Window x1
Hinge Plate LH x1 Hinge Plate RH x1
Tailgate Bar x1
Tailgate Seal x1 Puddle Poles x2
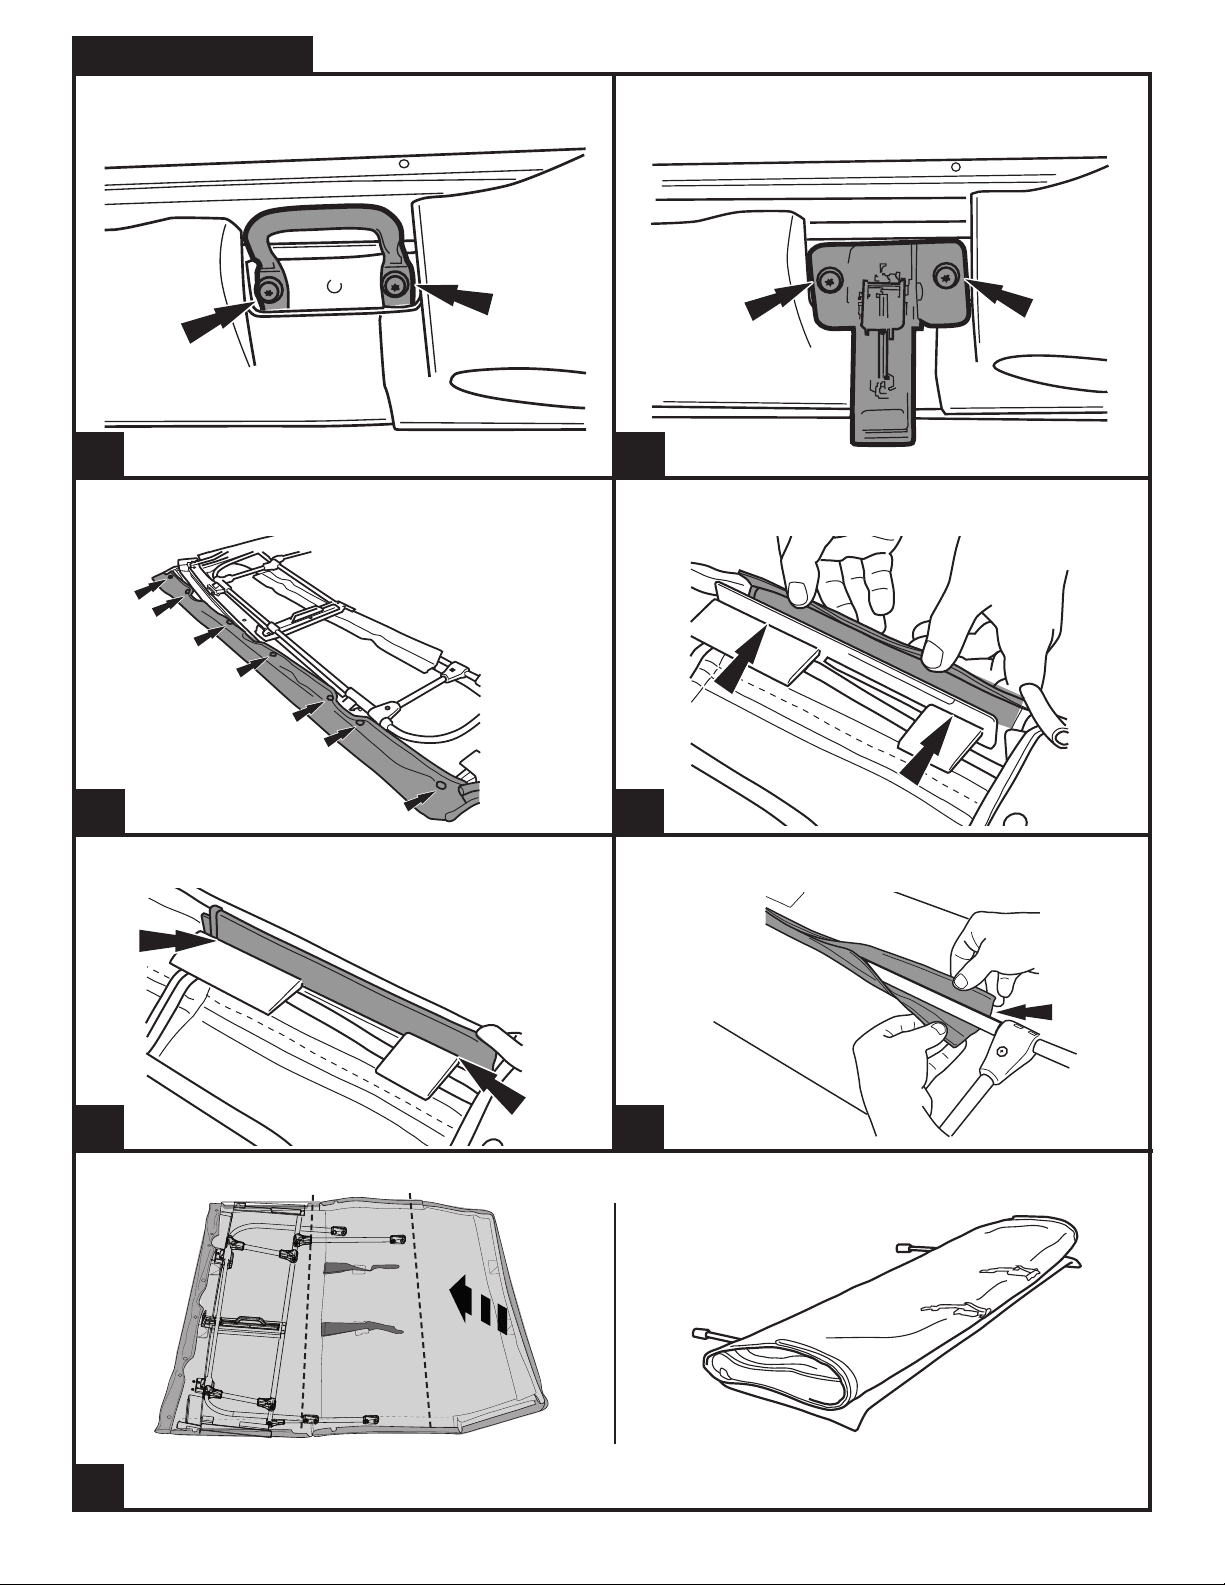
Retainer Tailgate Bar x2
Tonneau Cover x1
Self Tap Screw x4
Retainer Tailgate Plastic
x2
Flip Top Hardware x1
1

Contents cont.
NOTE: Actual product may vary from illustration.
LH Upright Lower
Plastic x1
Self Tap Screw x28
LH Front Plastic x1
Front Latch x2 Shoulder Bolt x2 nut x2 Tonneau Support x1
RH Upright Lower
Plastic x1
Upright Turn Knob x2 Door Surround
RH Front Plast x1
LH Upright x1
Bracket Front x2
Door Surround Knob -
Long x2
RH Upright x1
Door Surround
Bracket Rear x2
Door Surround Knob -
Tools Required
LH Upper Corner
Plastic x1
LH Front Door Bar x1 RH Front Door Bar x1
Med x2
RH Upper Corner
Plastic x1
Top Retention Strap x1
Phillips Screwdriver Ratchet and extensions
Pre-Installation Requirements
• Remove existing hard or soft top. For OEM (original/factory) soft tops, also remove:
• Windshield header bar
• Tube frame hardware from roll bar
• Side door surrounds
• Rear window, tailgate bar, tailgate clips
• For correct installation, mounting surface of par t should be between 70-95° F (21-35° C) prior to installation.
Torx Bit
T25
Allen Wrench Safety Glasses
2
Installation Steps
Important: For a smooth fit and ease of installation, this top should be installed at temperatures above 72 degrees. Below this
temperature, the fabric may contract an inch or more making it difficult to install. We highly recommend taking your new TrailView
Tonneau Top™out of the package and letting it sit inside a warm place or in direct sun light for 1-2 hours before you install the top. When
warm, this top will install quickly.
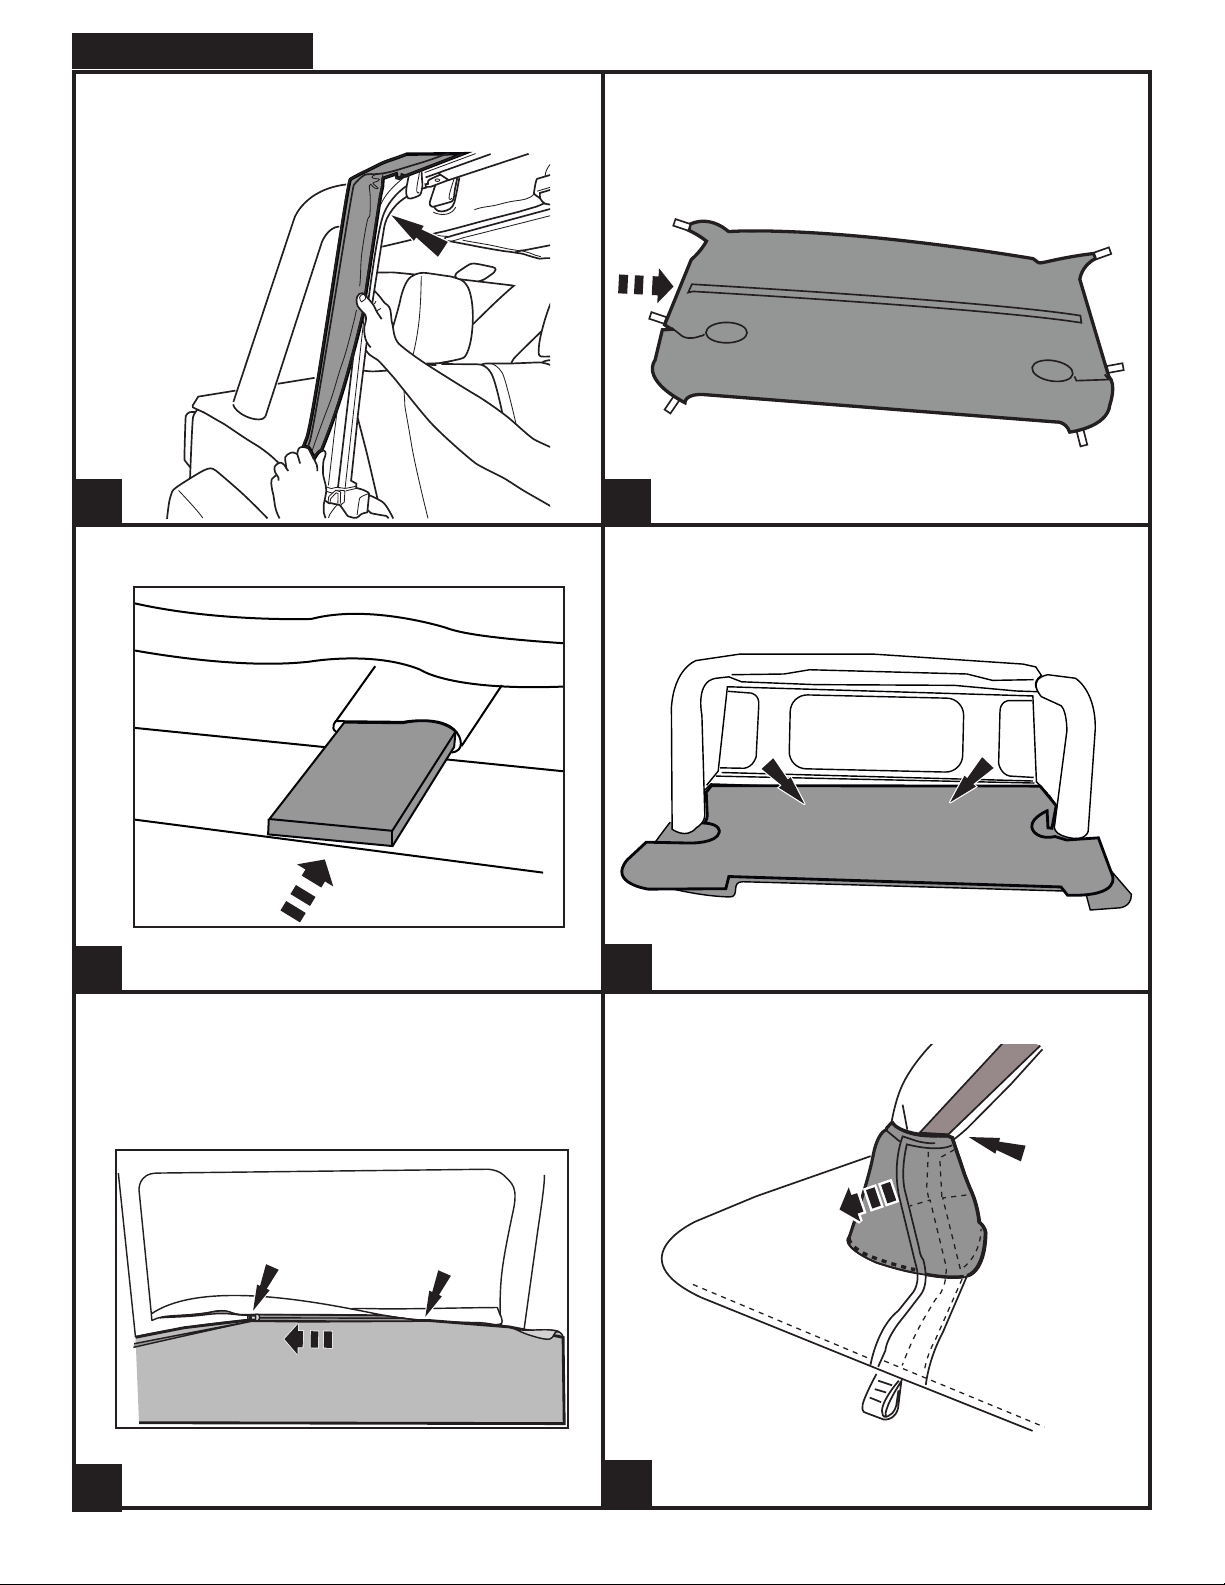
TrailView Main Deck x1
NOTE: Actual product may vary from illustration.
Back Window x1
Tonneau Cover x1
1
Install driver’s door surround. Slide front bracket onto front extrusion as
shown below.
TIP: Driver’s side pieces are sealed in green plastic packaging.
2
Passenger’s side pieces are sealed in clear plastic packaging.
Secure all pieces with 5 small self-drilling screws.
Push front plastic insert into front section of door surround.
3
Slide the rear bracket onto the rear surround section.
4
5
3
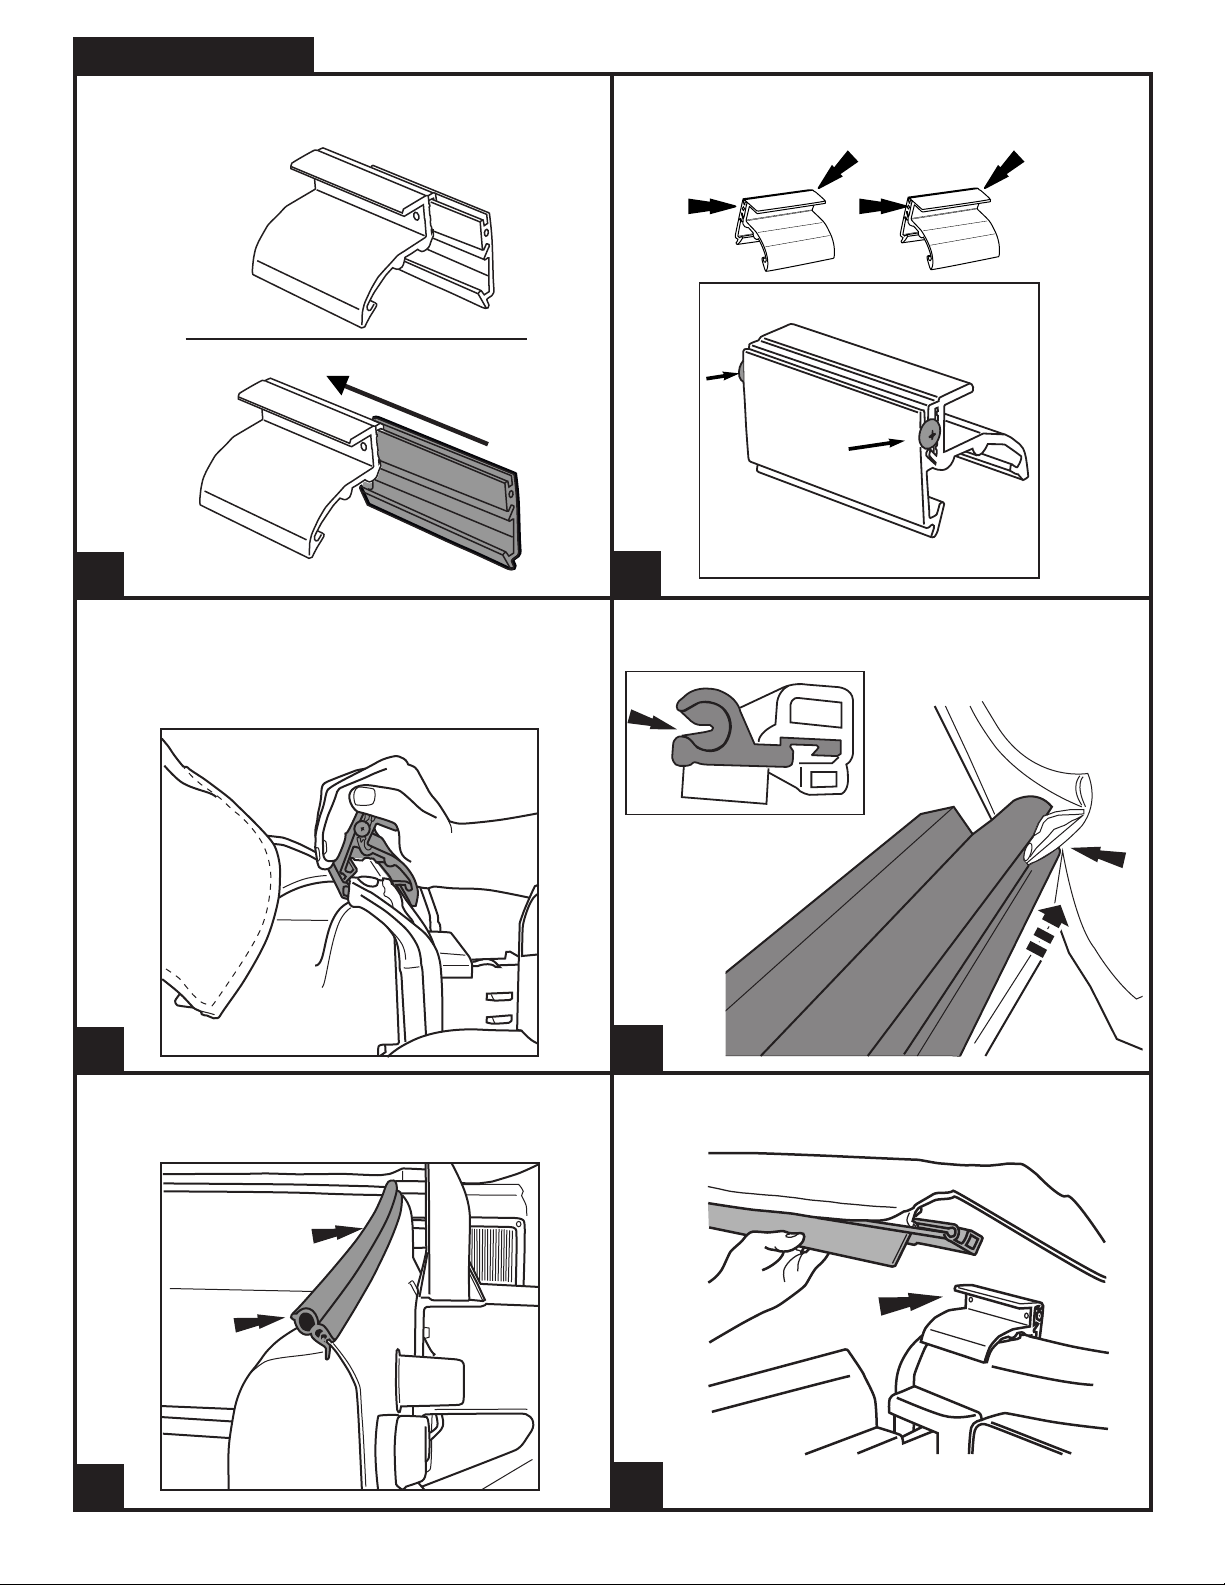
Installation Steps
Insert corner piece of vertical upright into assembled front and rear
surround parts with 5 screws.
Install vertical extrusion to upper corner part with a small turn-knob screw.
6
Install door surround base part into vertical extrusion with a self-drilling
screw.
8
Install Door surround onto the roll cage. Insert door surround knobs. Long
Rear (LR) knob at the rear. Long Front medium (LF) knob at the front and
the Small (SM) knob into the middle hole.
7
Repeat this section (steps 2-10) to assemble passenger’s side door
surround.
Right Front
Right Upright
9
Lift roll bar pad as shown for bracket clearance over the roll bar.
LF Medium
LR Long
TIP: Do Not fully tighten turns knob at this time.
10 11
4
Installation Steps
TIP: Make sure the rubber gasket at the top of the windshield is correctly
sealed against the front surround section. See photo below for proper fit:
Fit door surround mount plate on top of door surrounds.
12 13
Fit retention strap to driver side door surround mount plate on top of rear
hole in mount plate to hold tube when top is open.
14
Next, install the 2nd washer and Nylock nut on top of the strap and snug
with a 13mm socket wrench and 13mm wrench.
Put the retention strap in place with the bolt and washer through the
grommet as shown.
15
When the top is in the folded back position reach up and hook the retention
strap over the bar as shown.
16
Tighten all door surround knobs into door surround assembly at this time as shown below. Repeat steps on right side.
17
18
5
Installation Steps
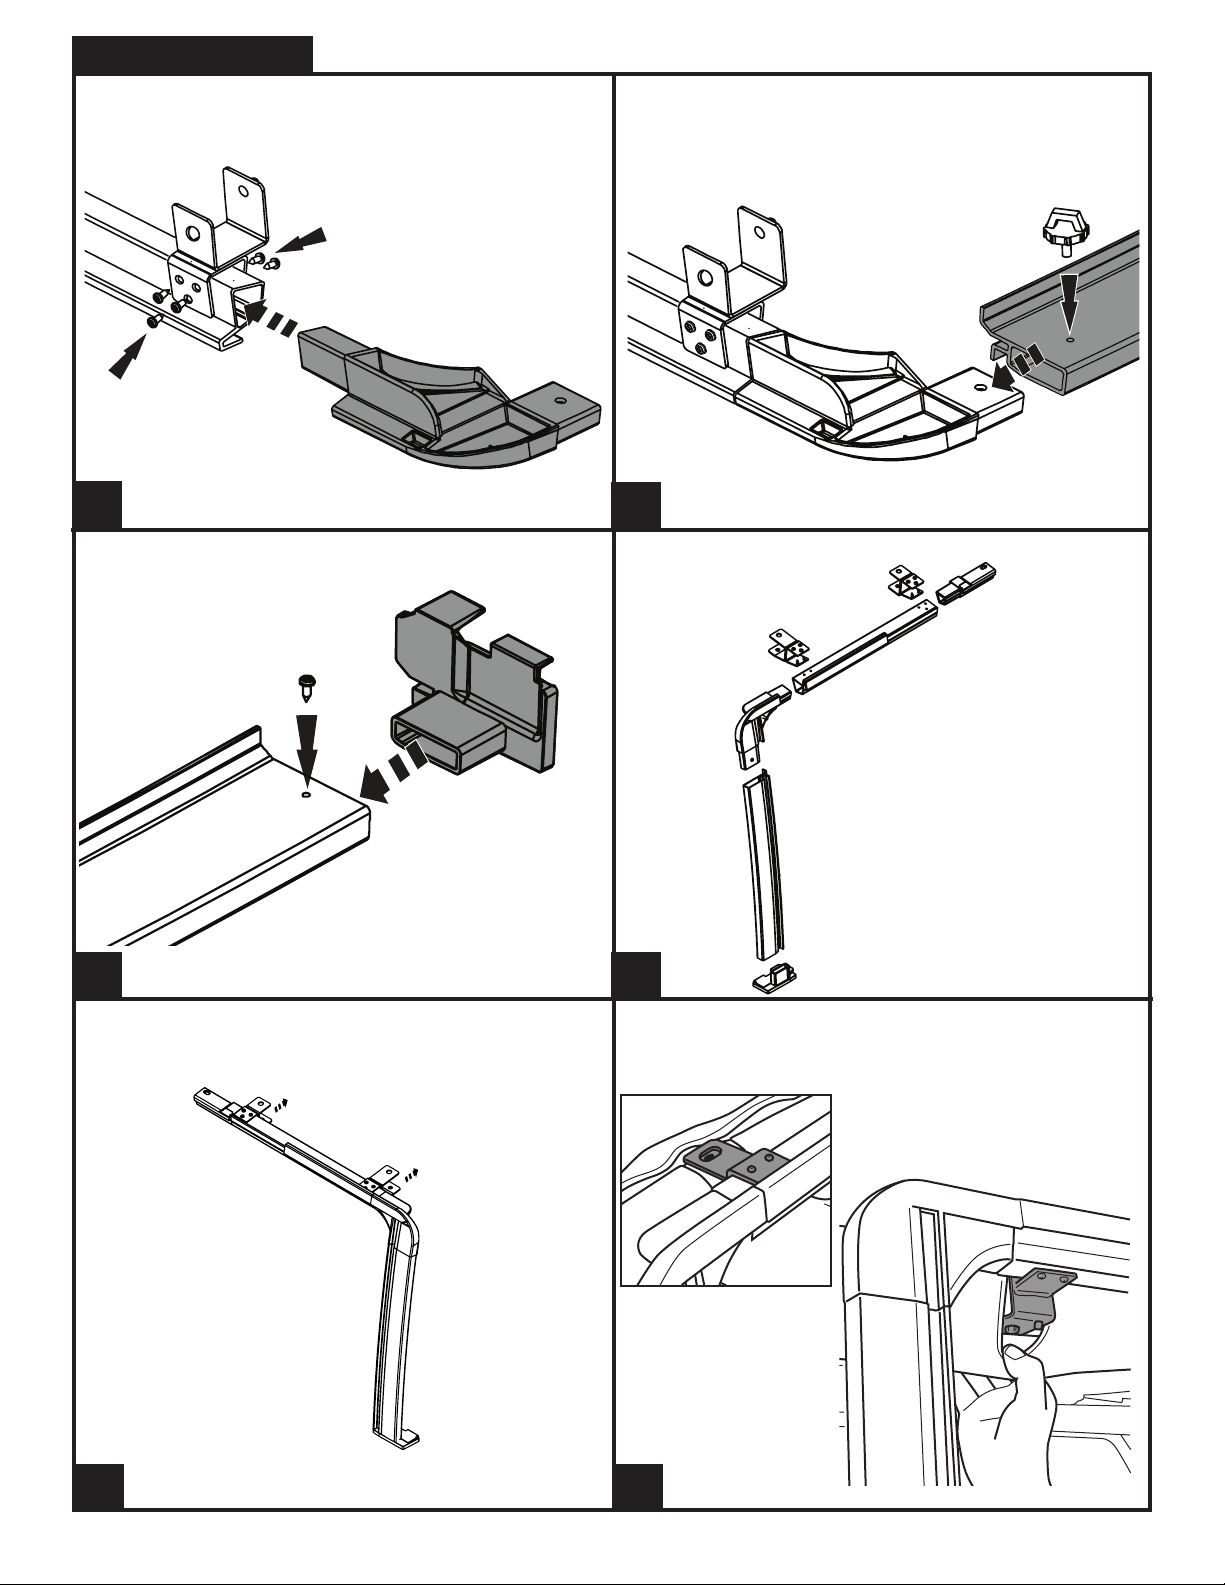
Using a Torx T25 bit to remove the foot man loop from the windshield on
both the driver’s and passenger’s side. Save screws for re-use.
Place provided latch as shown and reattach with the Torx T25 screw from
the previous step. Repeat Step 19, 20 for the other side.
19
Fold back the hardware tubes of the header channel assembly then install
the main deck fabric. Secure with snaps as shown.
20
Tuck the plastic strip behind latches. and along side rails. See photo
below for proper fit.
21 22
Tuck the plastic strip behind metal tabs and along side rails. Plastic strip will
tuck between the metal sides.
Secure the Flip Top Header Assembly to the Soft Top Deck by engaging the
Hook and loop flap around the tube.
23
Roll up the Soft Top Deck to make installation to the Flip Top Plates more manageable.
TIP: It may be helpful to have a second person for this step. Place the top face down and re-fold, beggining with the rear portion.
25
24
6
Installation Steps
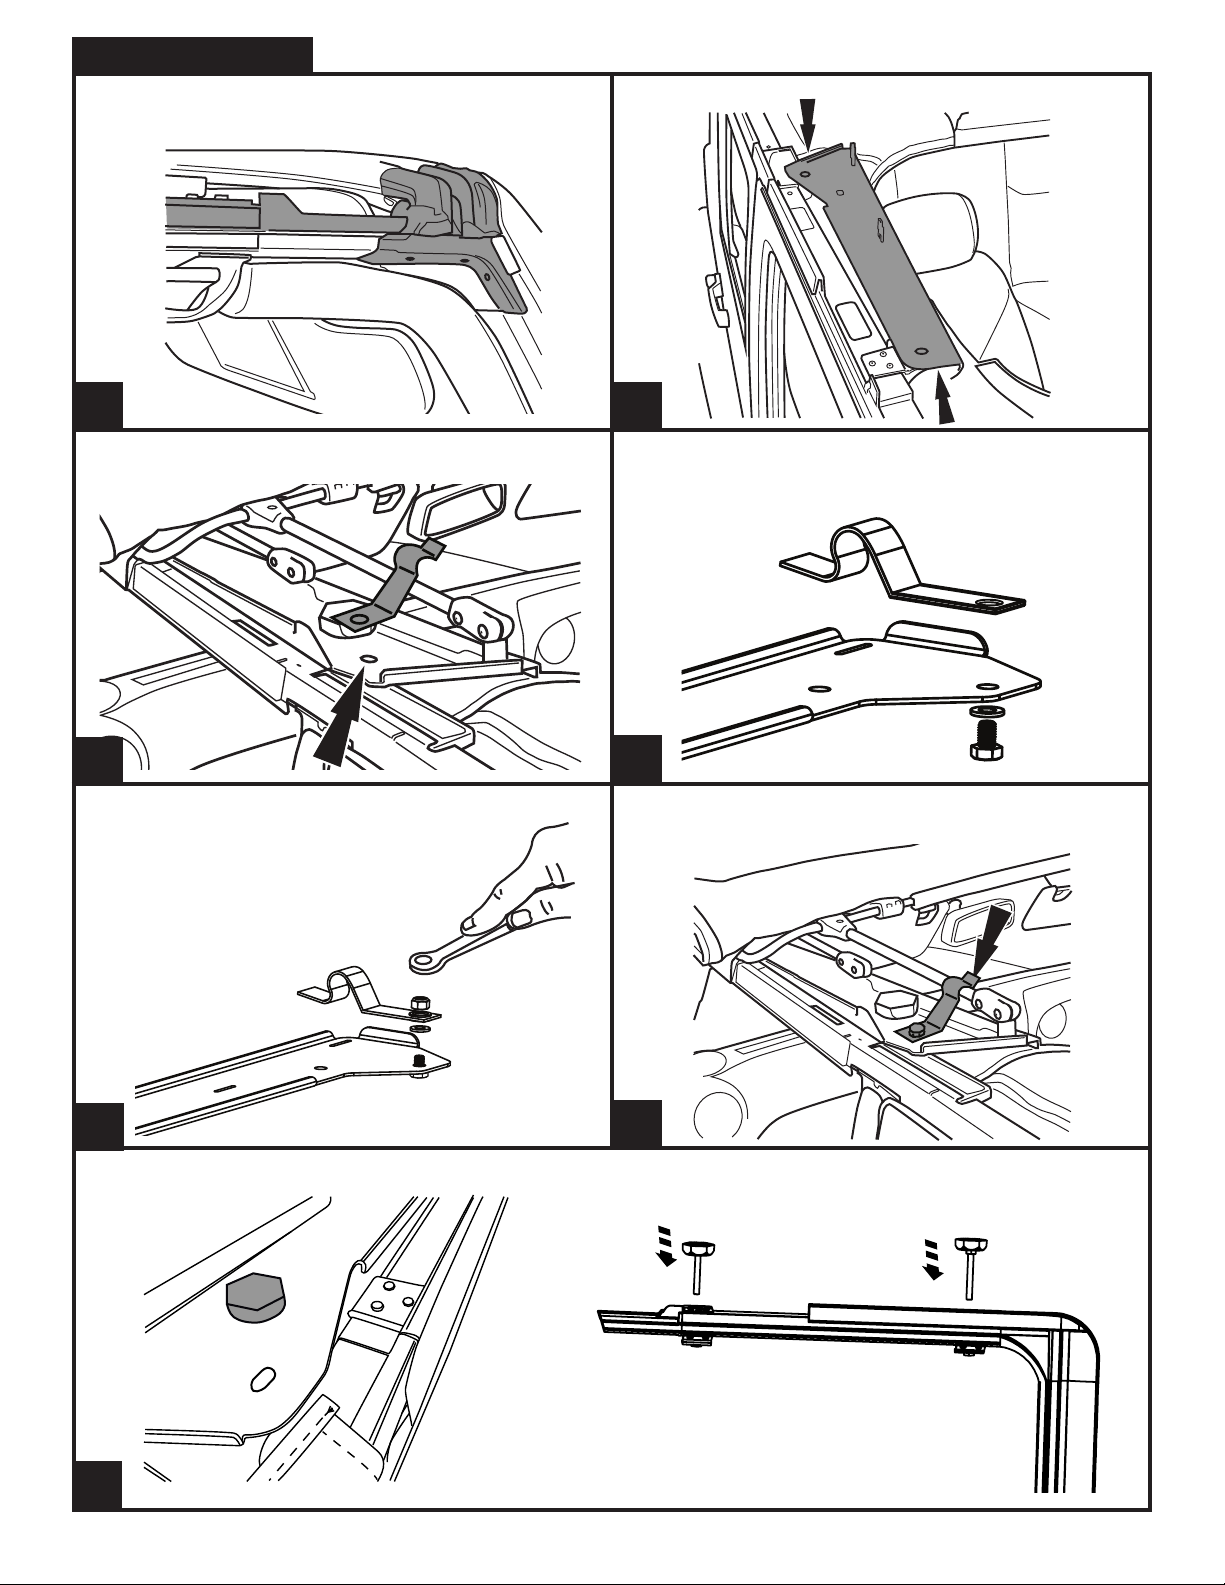
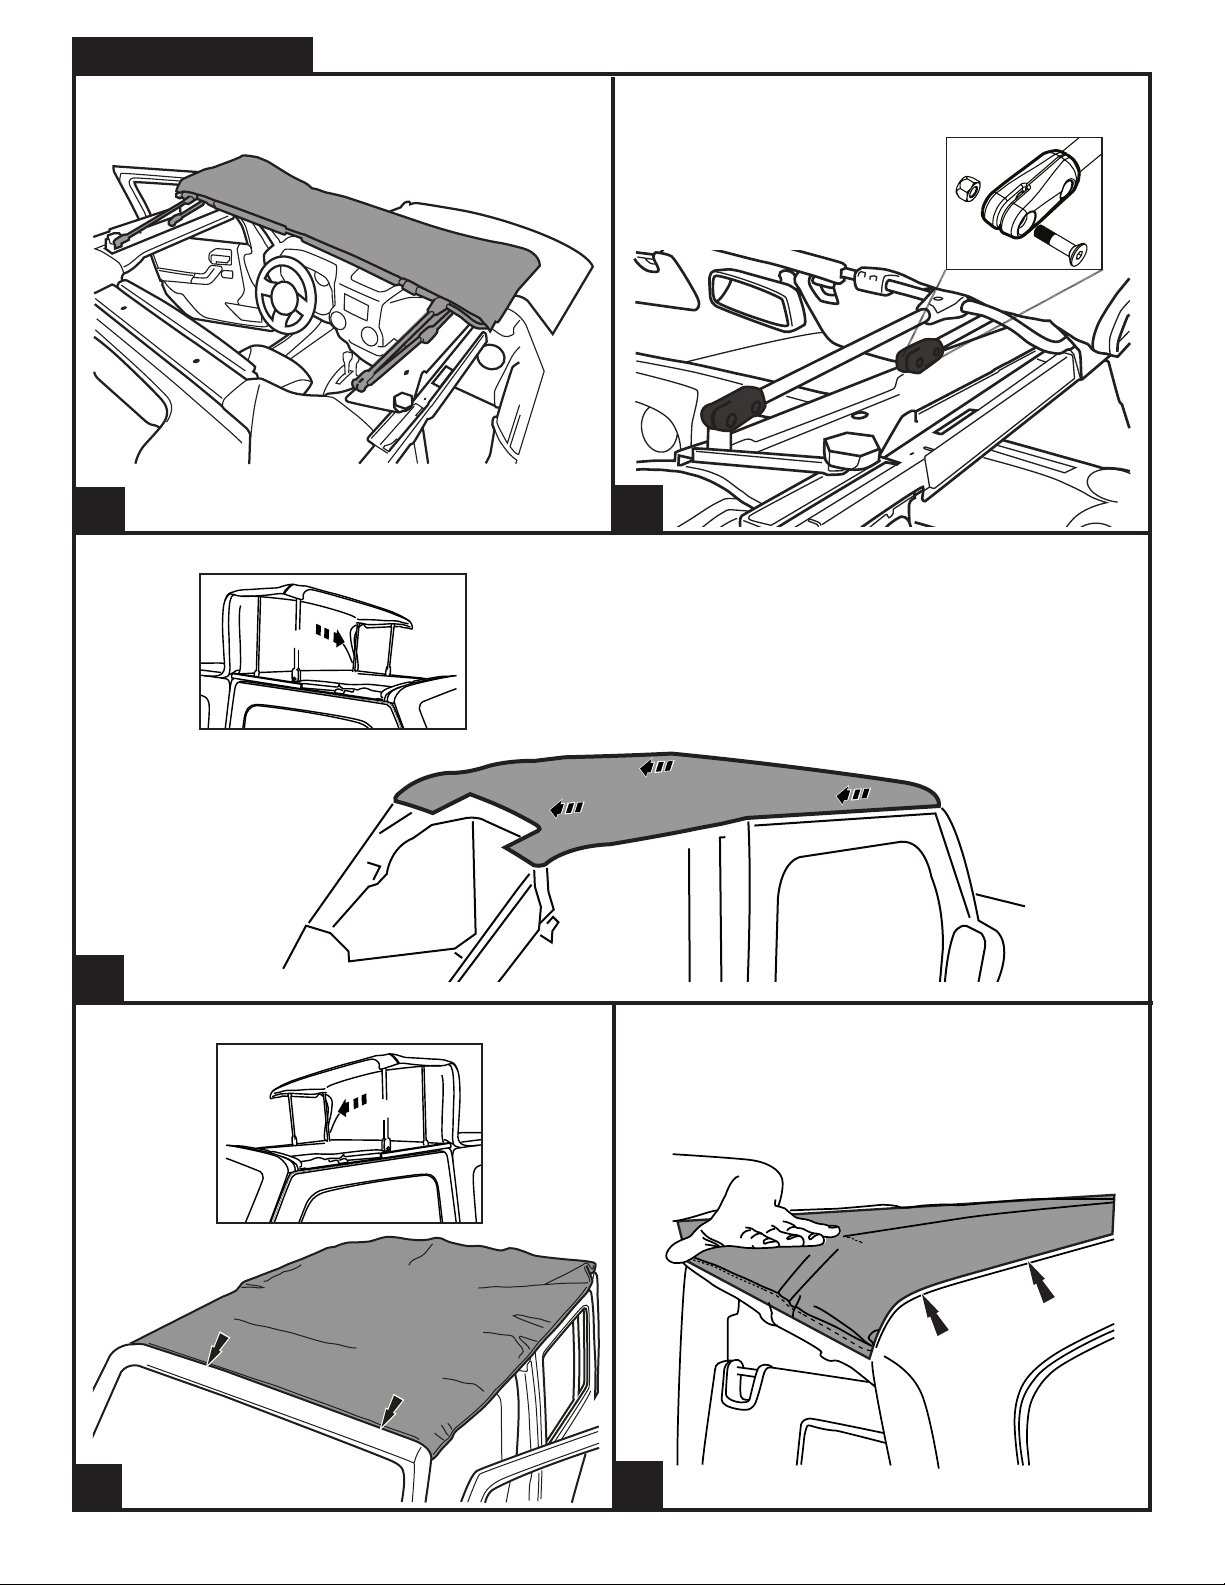
Lift the Trail view soft top and header channel assembly onto the windshield
gasket. 2 person help makes this easier.
Place pivot tubes over the mount hing plate. Install shoulder bolt and nut
using allen key wrench. Nut goes to inside of vehicle and fits into plastic.
26
Un-Fold the Trail view Tonneau main deck fabric over the top of the roll cage and in place.
28
Close the top toward the windshield.
27
29
Check the front edge to windshield edge lines up to windshield seal
29
30
7
Installation Steps
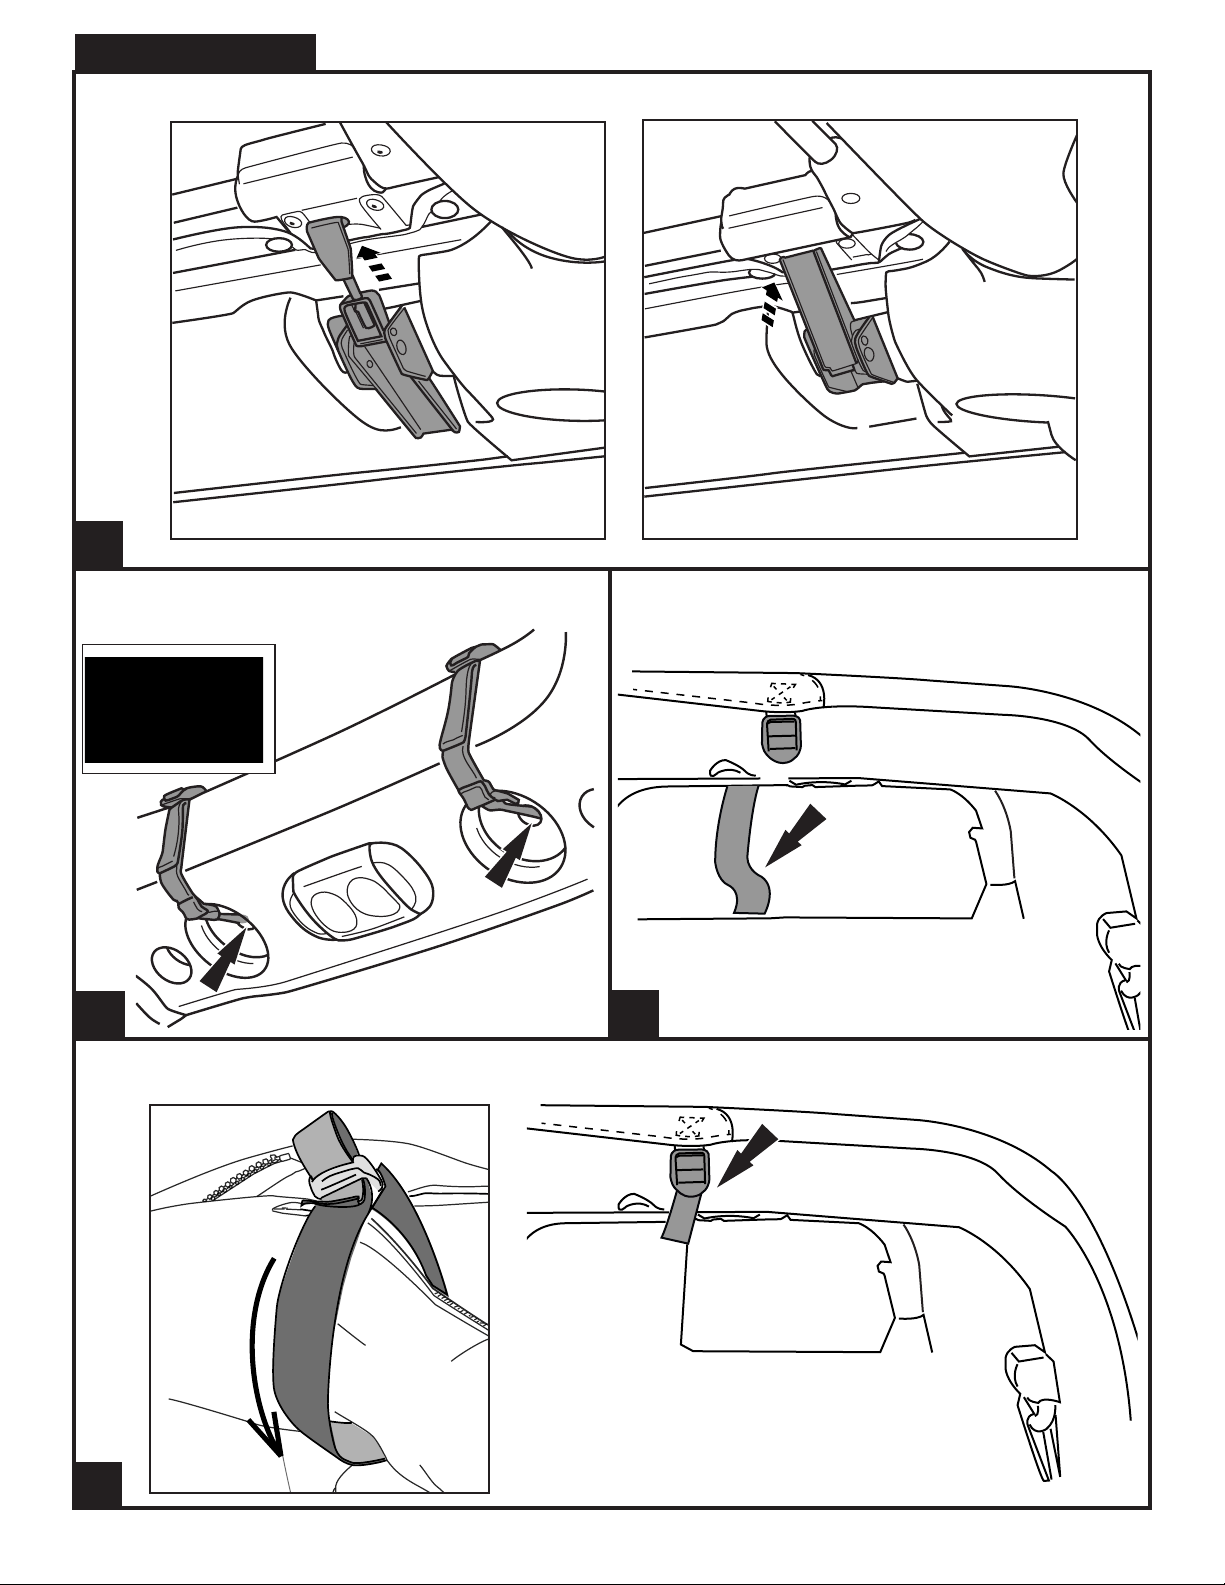
Attach the latch to the metal flange. Adjust the hook to fit with slight tension when latch is closed. Tip: Turn screw for tighter latch.
31
Wrap the 2 straps attached to the main section of fabric around the rearmiddle of the sound bar. Insert plastic hooks into the holes on the undeside
of the sound bar. Tighten the strap until snug.
32
Wrap the straps around the roll bar oward the inside of the Jeep, then back up to the strap adjustment buckle. Tighten and repeat for the passenger side.
Adjust each side to position the top evenly.
Locate the ceiling adjustment straps at the corners of the ceiling panel. Wrap
the straps around the roll bar oward the inside of the Jeep, then back up to
the strap adjustment buckle.
33
34
8
Installation Steps
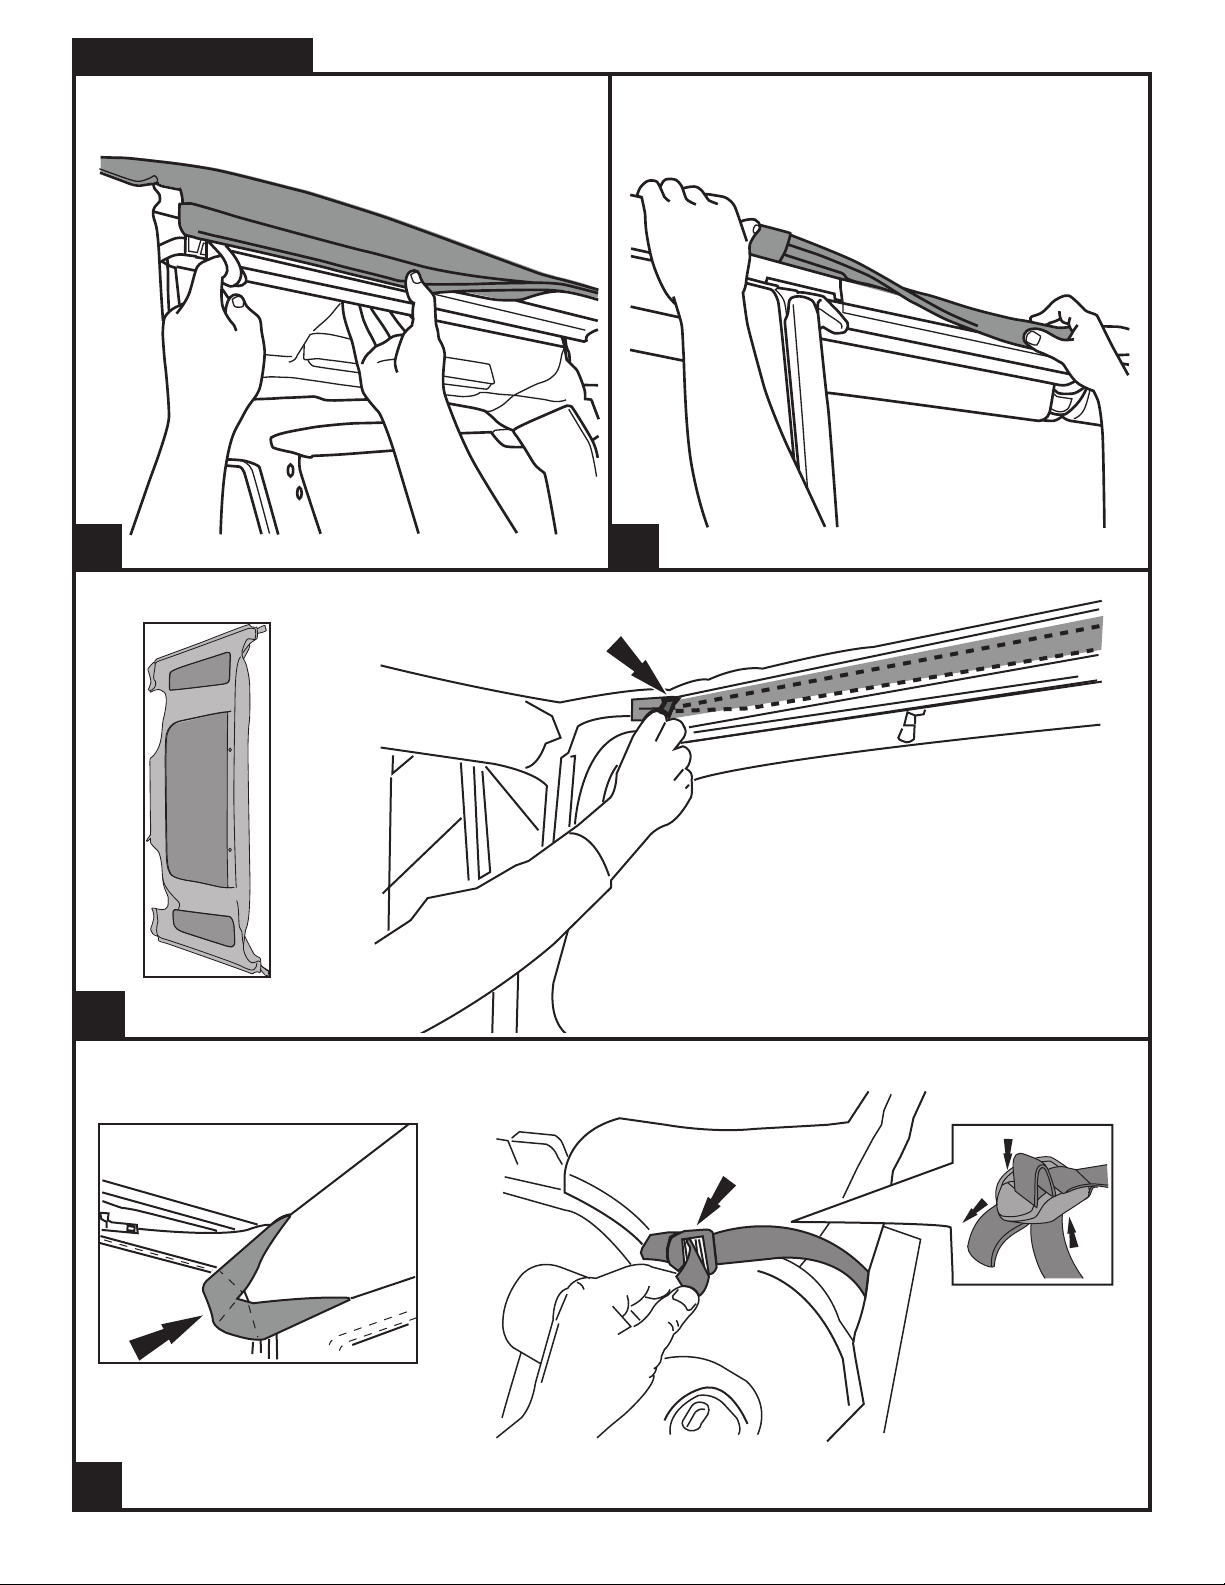
Attach the main deck belt rail plastic into the upper door surround sides
from front to back. Start at the windshield header.
Continue fastening the upper side tuck strips of the main deck until the
top is fully attached all around the door surrounds.
35
Attach zippers from the back window to the main cover fabric by zipping into place. Access from the inside to start zipper.
36
37
Locate the side straps at the upper corners of the back window. Connect and tighten the straps around the sport bar, thread the end through the buckle as
shown.
Note: Straps should be snug and can be tighten later to properly mount.
38
9
Installation Steps
Tuck rear window sides into the door surround sides by sliding the plastic
backing into the door surround as shown. Repeat on other side.
Tip: Start at the top and work your way down. Then tuck in small tab at
bottom.
Lay the Tonneau cover upside down to access support bow sleeve.
39
Insert Tonneau cover support bow into pocket sleeve.
41
Start on the passenger side at the bottom of the back window and zip the
tonneau cover to the back window.
40
Lay the Tonneau cover loosely over the rear of the vehicle tub. Locate the
zipper start on the passenger side at the bottom of the back window and zip
the tonneau cover to the back window.
42
Connect the hook and loop collar flaps around the sport bar. Be sure to pull
the seat belt inside here as well.
43
44
10
Installation Steps
Assemble the brackets by sliding the plastic backing onto the metal
extrusion.
45
Install the Tailgate Bar brackets by hooking the front edge over the belt
rail sheet metal. Close the clamp with downward pressure while pulling
the backing tight. The and lock onto the underside of the tube edge.
clamp will pop and lock onto the underside of the tube edge.
Secure with two screws in each bracket using pre-drilled holes.
46
Slide the tailgate bar onto the rear of the tonneau cover, using the built-in
C-channel to guide it over the flap and small tube.
47
Fit the rubber gasket onto the top of the tailgate. Push the gasket down
over the top edge of the tailgate to seal tightly. See below for proper
orientation:
49
48
Insert the Tailgate Bar into the brackets by pushing the bar against the
brackets and rotating it towards your body.
50
11

Tuck plastic strip into belt rail of vehicle body. It works best to start from the
area and work your way back towards the rear.
Tuck the plastic strip into the belt rail of the tub at the rear corners taillight
area.
51
52
12
 Loading...